

Drawing a fish is a very creative activity. There is a wide variety of fish to choose from.
They come in all sizes, shapes and colors. Some things most fish have in common, though, can be fins and especially scales, which could be labeled as their main characteristics.
To solve the seemingly complex task of scale composition, you can use some of the tools Illustrator has to offer to make your life more simple.
In this tutorial, you’ll learn how to get this done step by step.
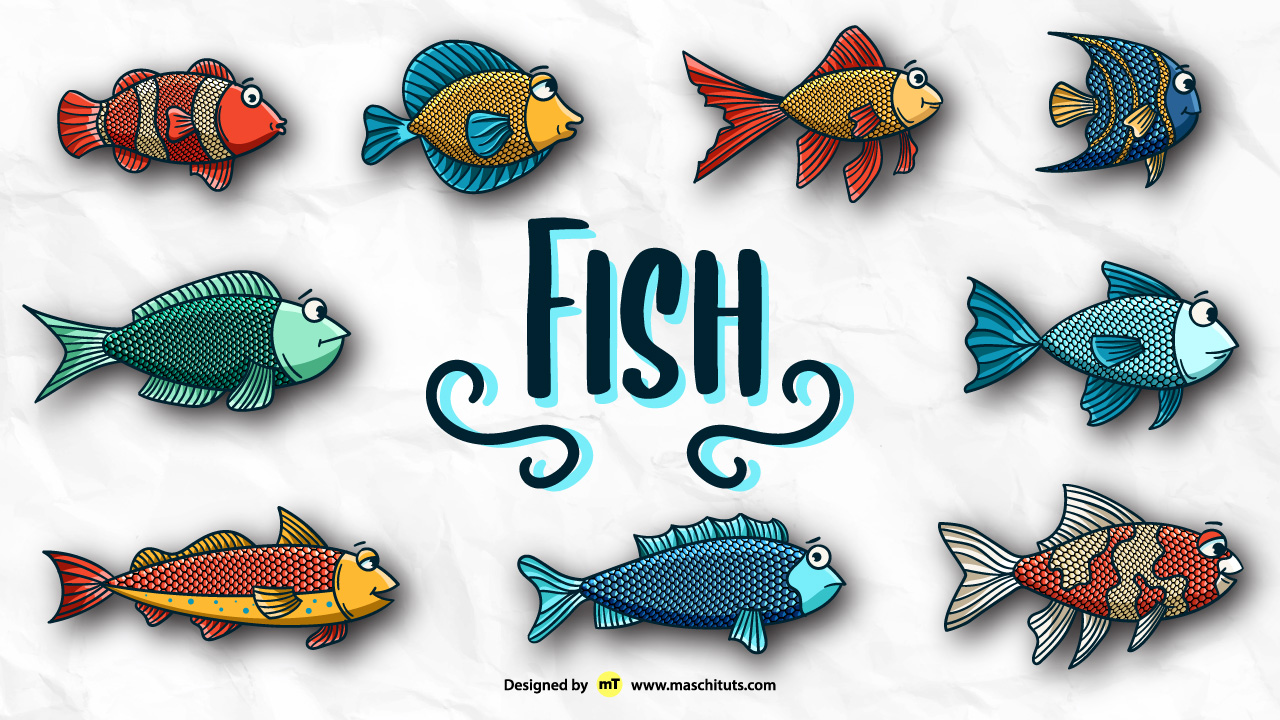
Even better, you’ll also get a free downloadable pack of fish illustrations at the end of this article.
Let’s dive into it!
How to Draw a Fish in Illustrator
To draw a fish in Illustrator, use the Paintbrush tool to draw a fish sketch. Lock the layer and create a new one. Draw the line art and then expand it. Use the Live Paint Bucket tool to paint it. Expand again and draw a scale. Convert it to a pattern and apply it to the fish. Add shadows/lights.
Step 1: Set the Document Color Mode

When creating a new document, select the proper “Color Mode.”
Select “RGB” color mode if your work will be shown only on screens.
Select “CMYK” color mode if your work will be printed or both shown on screens and printed.
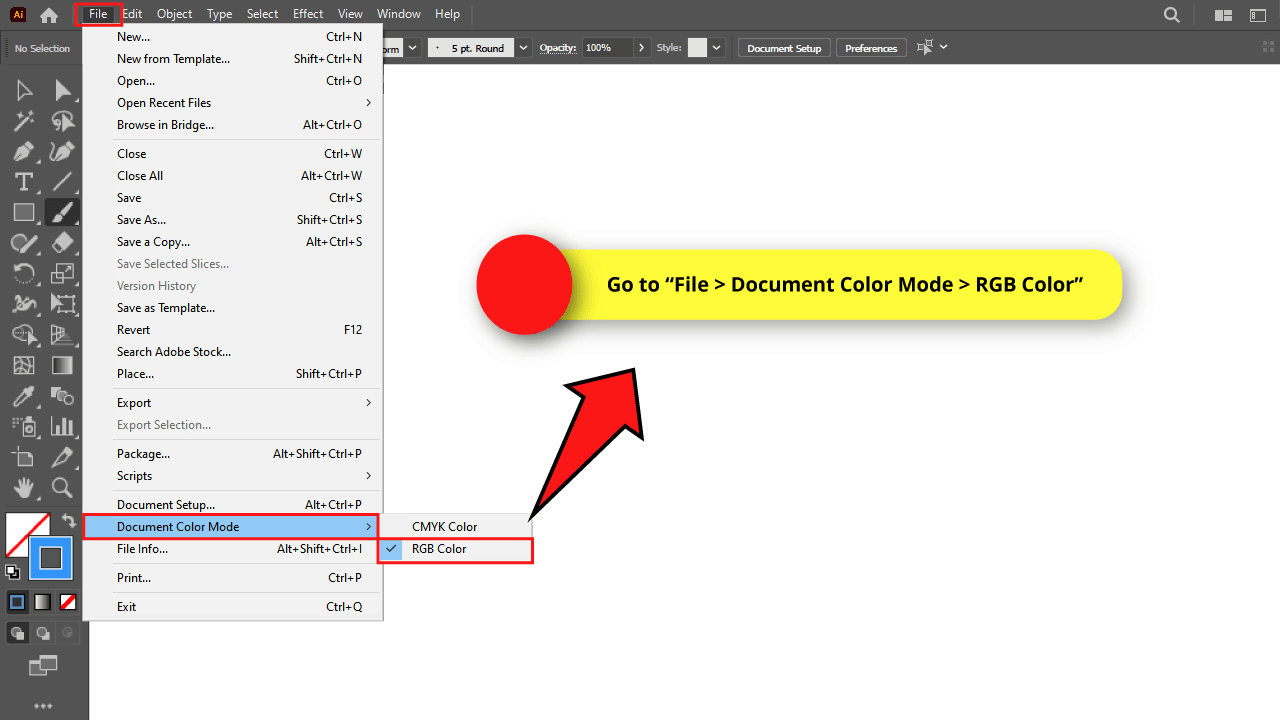
If you already started working on a document but you want to change the color mode in the middle of the process, you can do it by going to “File > Document Color Mode” on the menu at the top of the screen.
I’ll set the RGB color mode for my drawing.
Step 2: Adjust the “Paintbrush Tool” Options
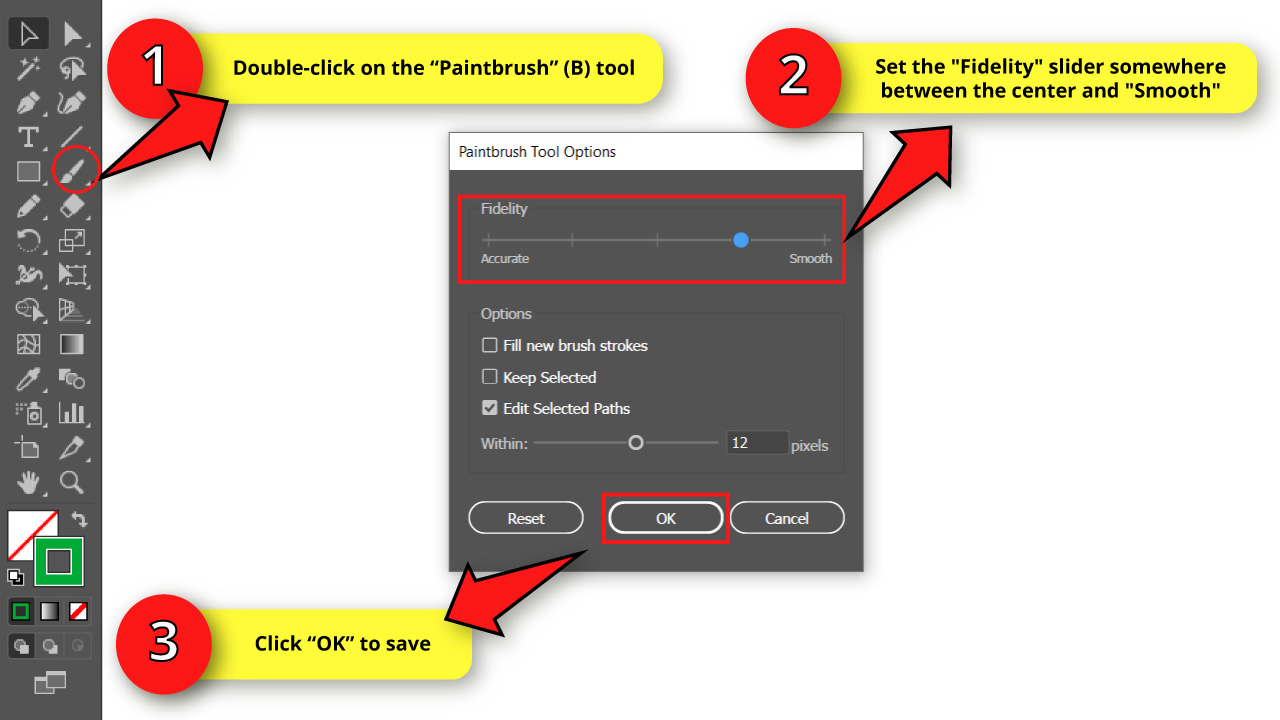

Double-click on the “Paintbrush” (B) tool on the left side toolbar to open the options window.
Set the “Fidelity” slider somewhere between the center and “Smooth.”
Then, click “OK” to save.
Step 3: Customize a Brush
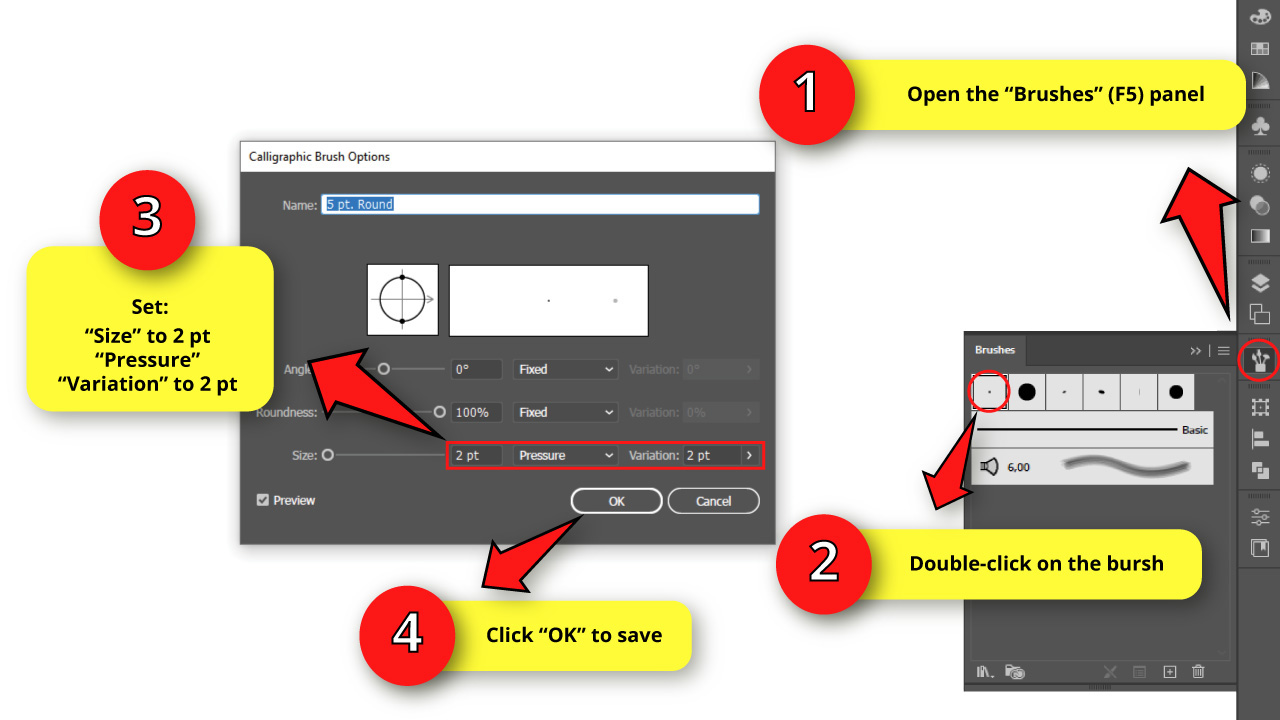


To make a brush in Illustrator, open the “Brushes” (F5) panel on the toolbar located on the right side of the screen.
If you can’t find it, you may have to enable it by going to “Window > Brushes” on the menu at the top of the screen.
Double-click on the tiny round brush to open the “Calligraphic Brush Options” window.
Set the “Size” to 2 pt. Change the box setting to “Pressure,” and select 2 pt. for the “Variation” field.
This last adjustment allows us to make paths sensitive to the tablet pen pressure.
Once you’re done, click “OK” to save.
Keep in mind that you can change the brush size in Illustrator at any time during the drawing process.
Step 4: Draw a Circle
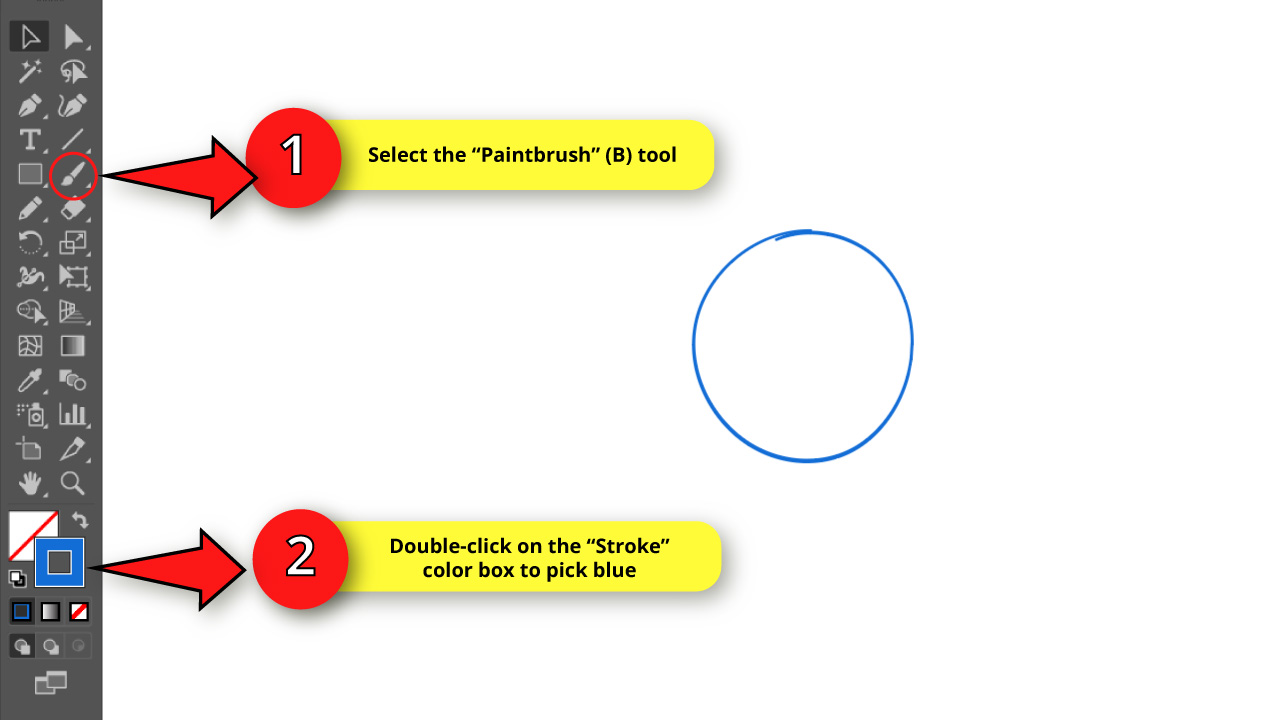

Select the “Paintbrush” (B) tool on the left side toolbar.
Then, double-click on the “Stroke” color box to select a color for the sketch. Pick a color like blue, red, or green.
I picked blue for this example.
Step 5: Draw the Fish Main Shape

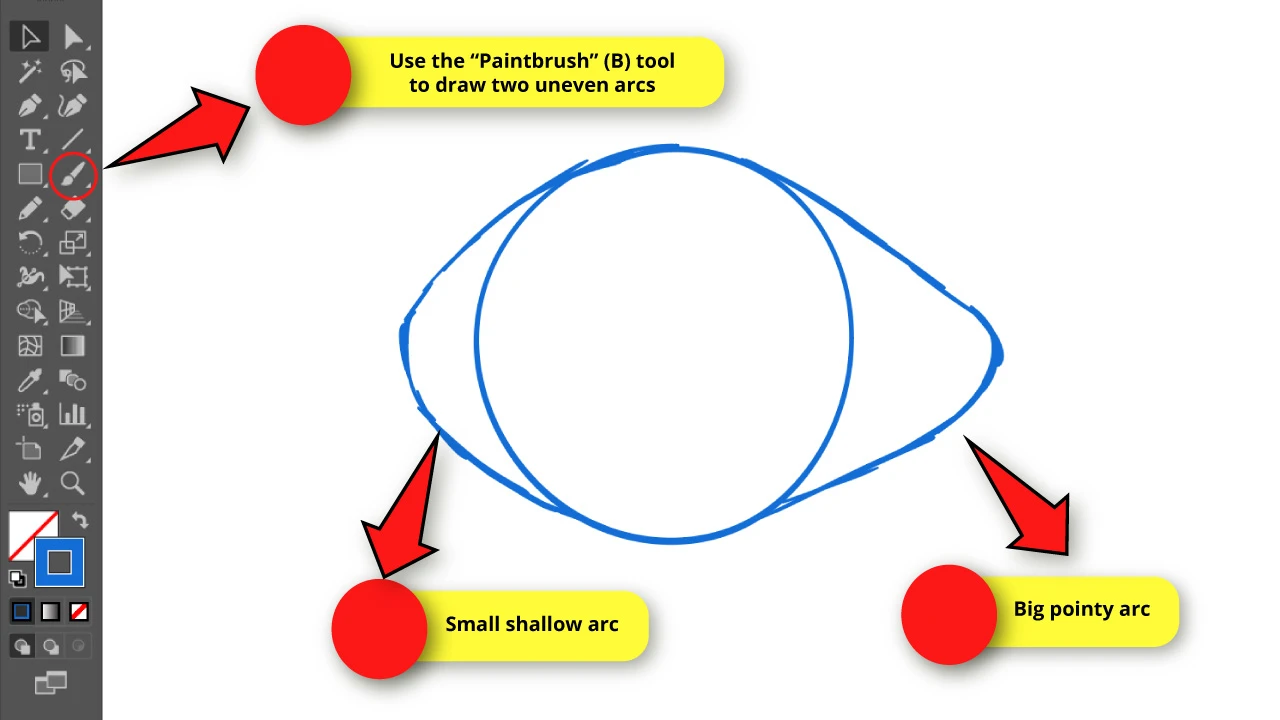
Use the circle as the base, and draw two uneven arcs.
The left side arc must be a small and shallow arc. This will be the front part of the fish.
The right side arc needs to be big and pointy, similar to a round triangle. This will be the back of the fish.
Step 6: Draw the Fish Tail

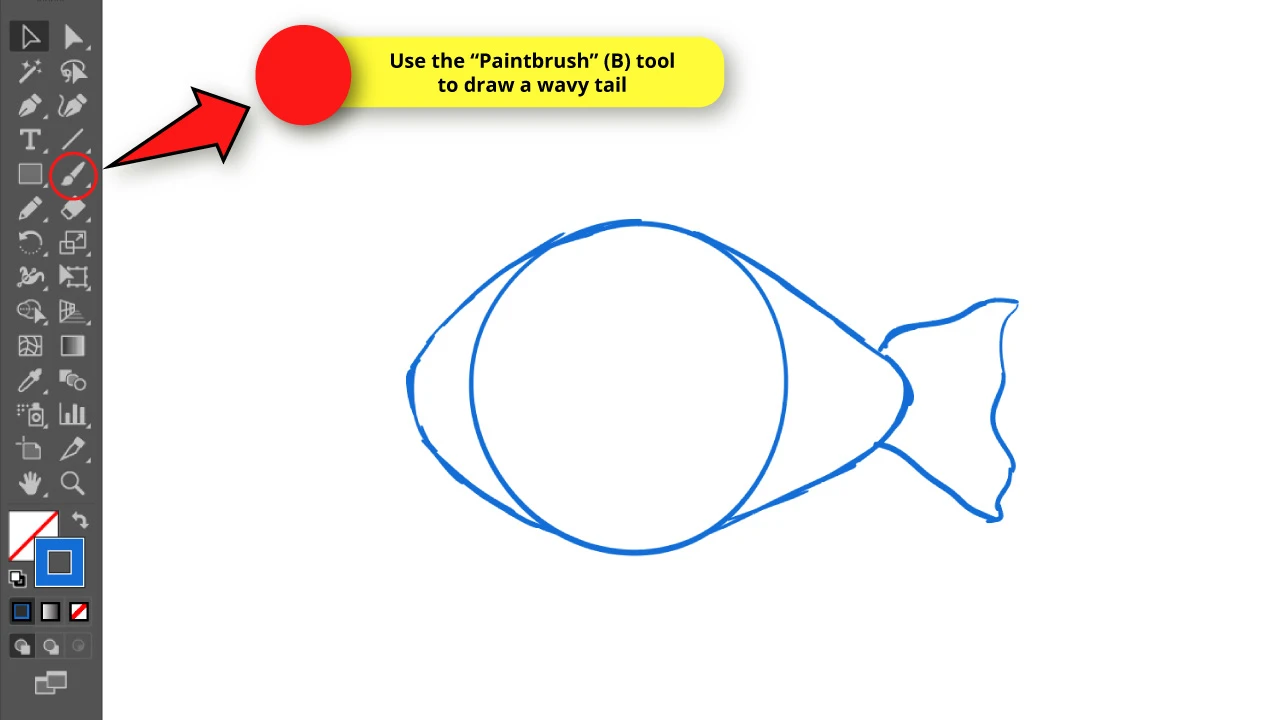
Use the “Paintbrush” (B) tool to draw the fishtail.
Fishes have several different types of tails. You can, of course, draw any type of tail you want. But for this example, we’ll use a triangle-shaped tail with a wavy end.
Step 7: Draw the Fish Fins
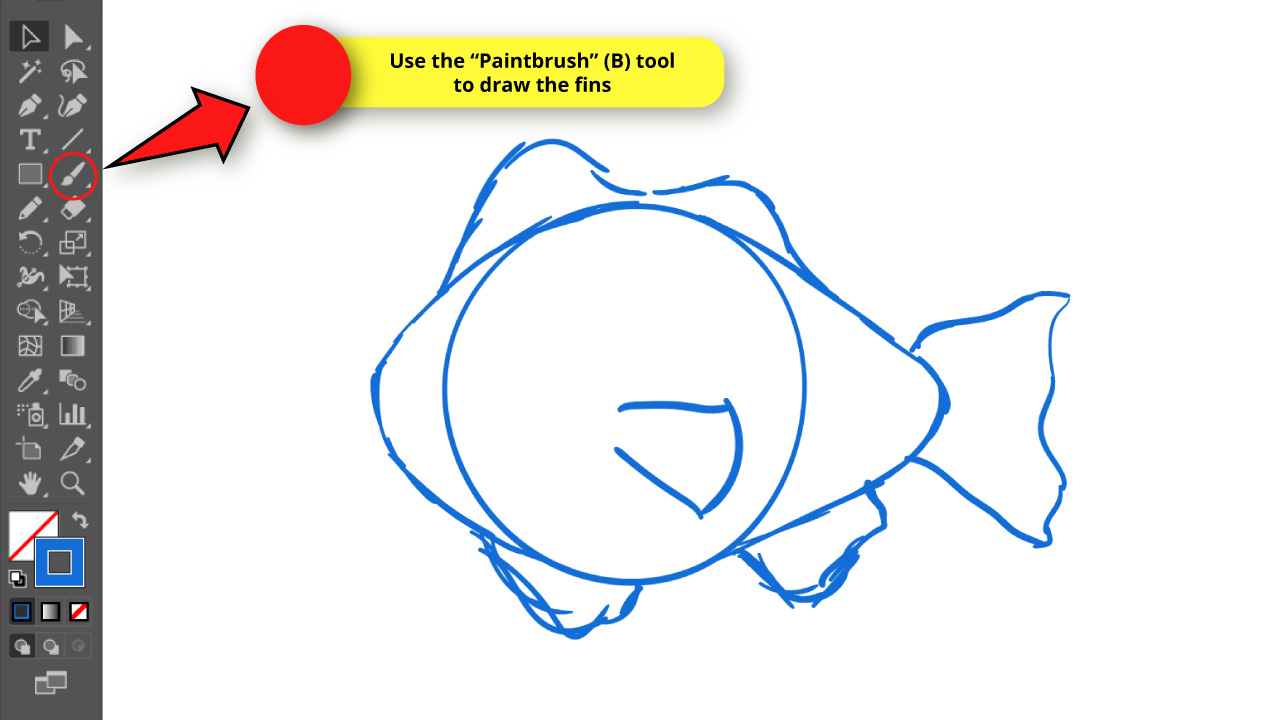

Draw an object that looks like two linked rounded mountains for the top fins. The front fin should be bigger than the back one.
For the bottom fins, draw two separate objects.
Draw one of them close to the fish’s face and the other one close to the tail.
Finally, draw the pectoral fin (the “arm”). It looks like an open triangle with a rounded bottom.
Step 8: Draw the Fish Face

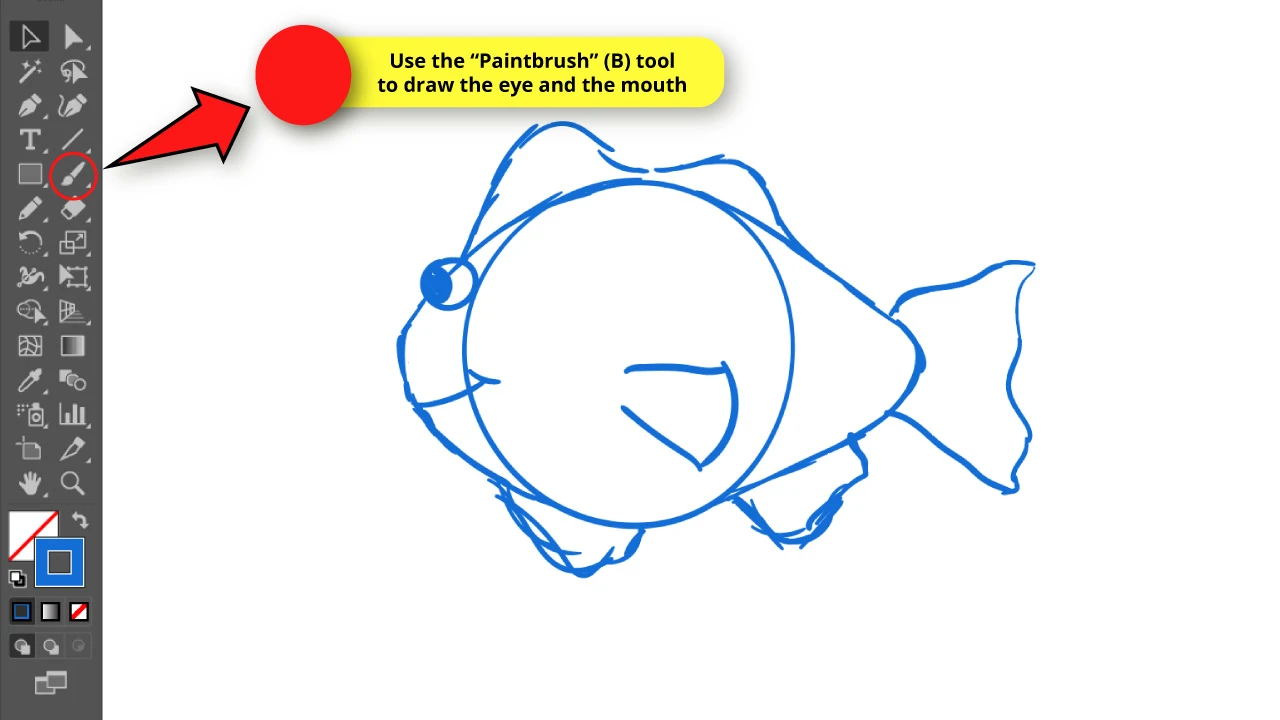
Continue using the “Paintbrush” (B) tool to draw the fish face.
Usually, the face of the fish defines the style of the illustration. It could be more realistic or more cartoony.
I’ll make it more cartoony. So, I’ll draw the eye and the mouth in a more exaggerated fashion.
For the eye, draw a blank circle and then a filled oval on the inside for the pupil.
Regarding the mouth, draw a mild smile to simplify the drawing a little bit. Simply draw a concave arc with a small line for the end.
Step 9: Draw the Fish’s Body Areas
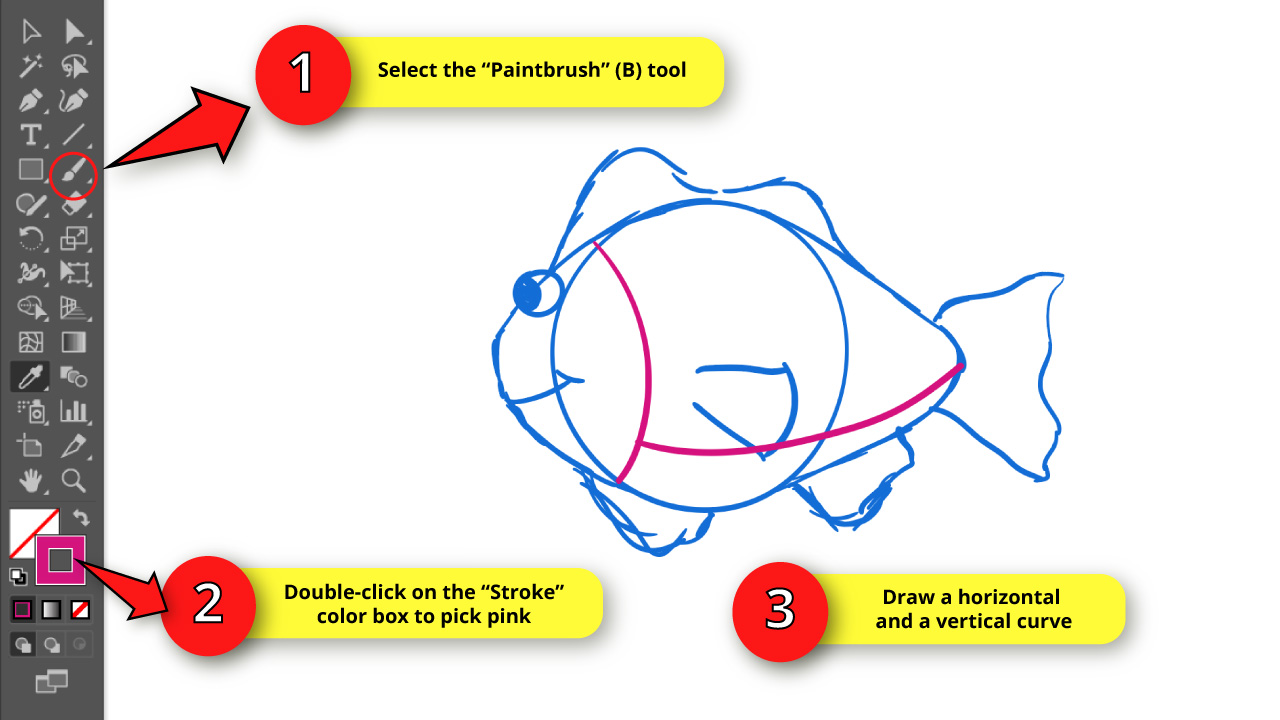

Now, double-click on the “Stroke” color box to pick another color to highlight the fish body lines that we’ll draw next.
Draw a vertical curve as the gill delimitations, and then draw a large horizontal curved line to separate the bottom part of the fish.
Step 10: Make the Sketch Transparent and Create a New Layer
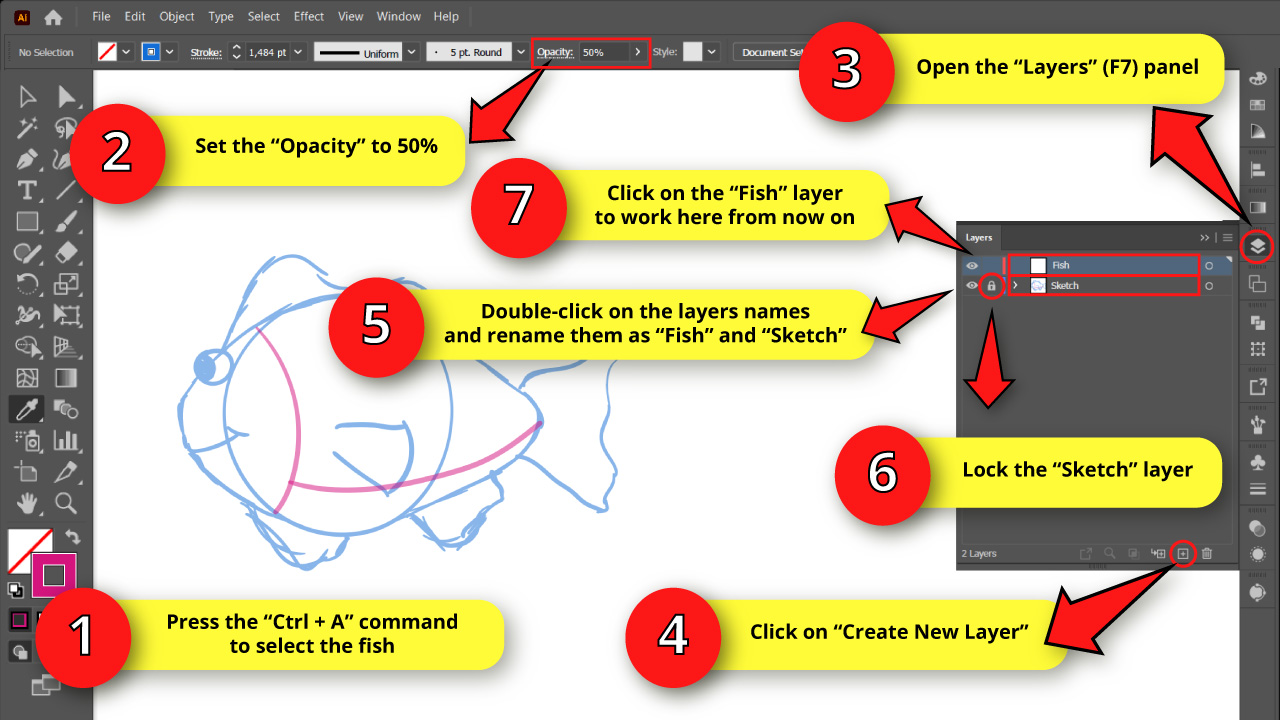
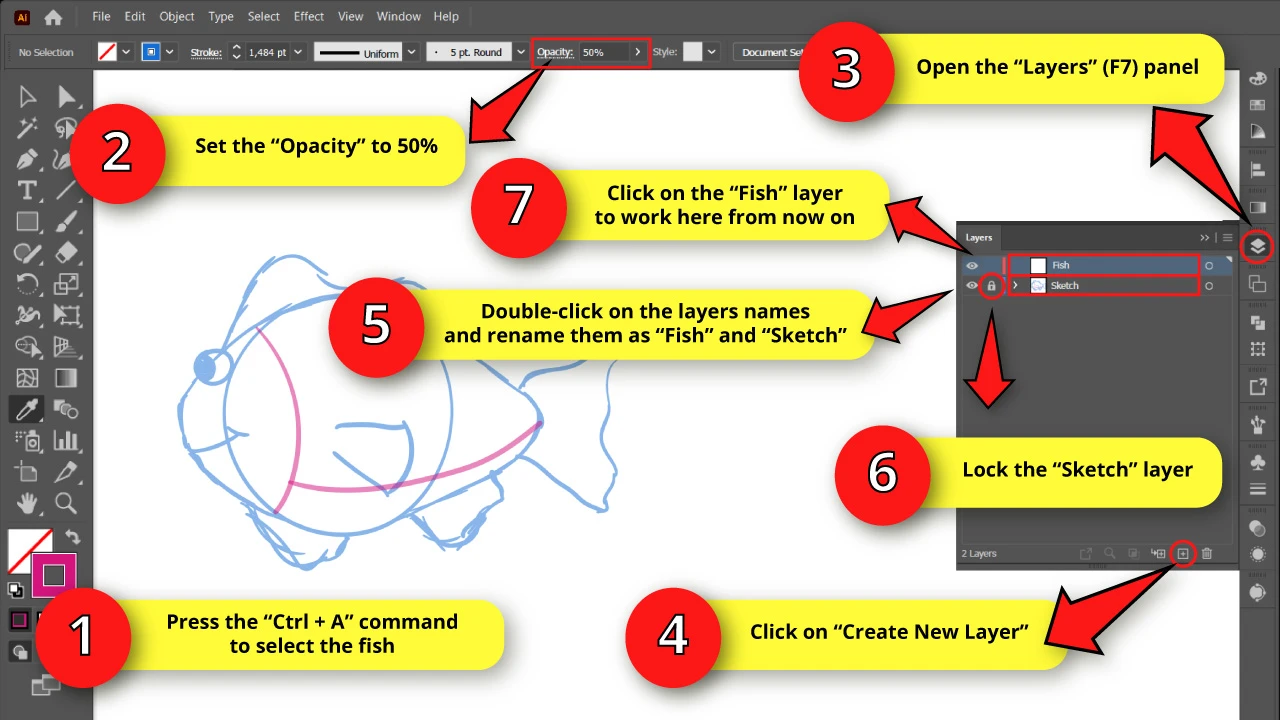
Select all the lines using the “Ctrl + A” command or by using the “Selection” (V) tool located on the left side toolbar.
Then, go to the “Opacity” field on the toolbar at the top of the screen and set it to 50%.
Next, go to the “Layers” (F7) panel on the right side toolbar.
If you can’t find it, you may have to enable it first by going to “Window > Layers” on the menu at the top of the screen.
On the “Layers” (F7) panel, click on the “Create New Layer” button at the bottom of the panel to create a new layer.
Double-click on the “Layer 1” and “Layer 2” layers names and rename them to “Sketch” and “Fish”, respectively.
You can also change the layers color in Illustrator if it makes your work any easier.
Lock the “Sketch” layer by clicking on its empty box. Once the box displays a lock icon, that means the layer is now locked, and is no longer possible to select it or modify it.
Select the “Fish” layer to continue working here from now on.
Step 11: Draw the Fish Line Art


Select the “Paintbrush” (B) tool and then double-click on the “Stroke” color box to pick black.
Draw the fish’s final lines using the sketch as your reference guide.
Step 12: Draw the Fins Details
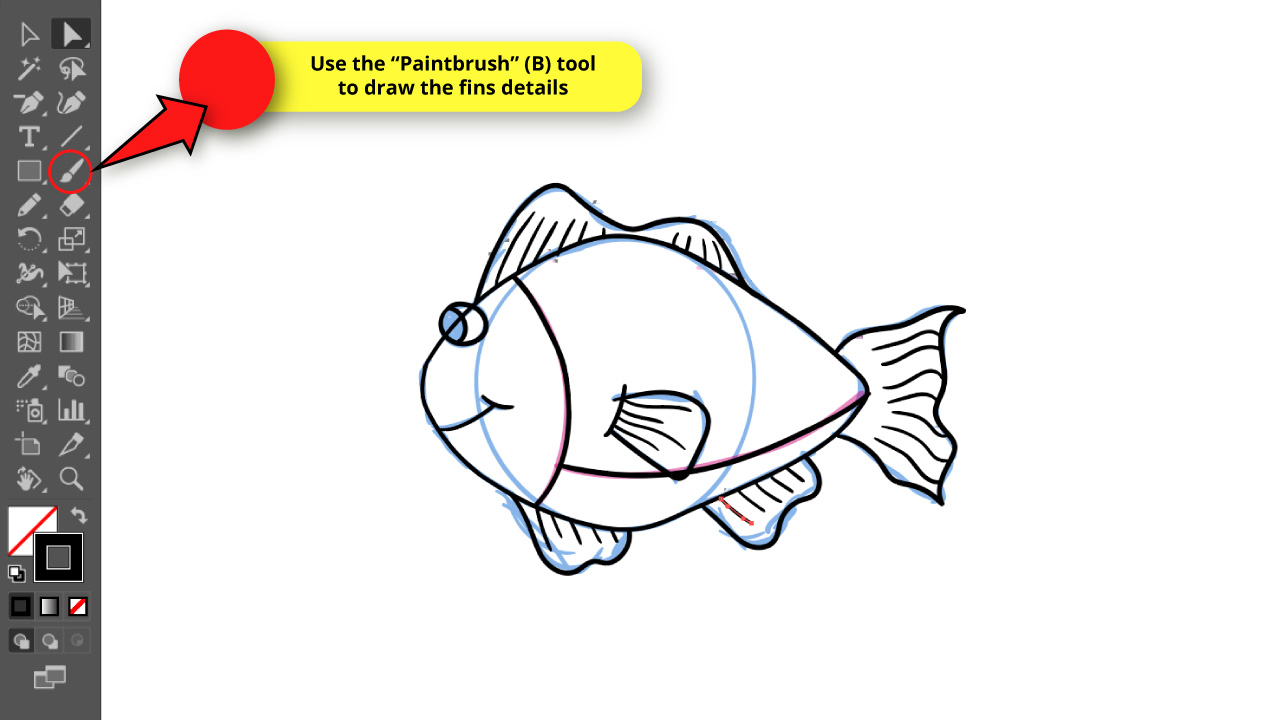
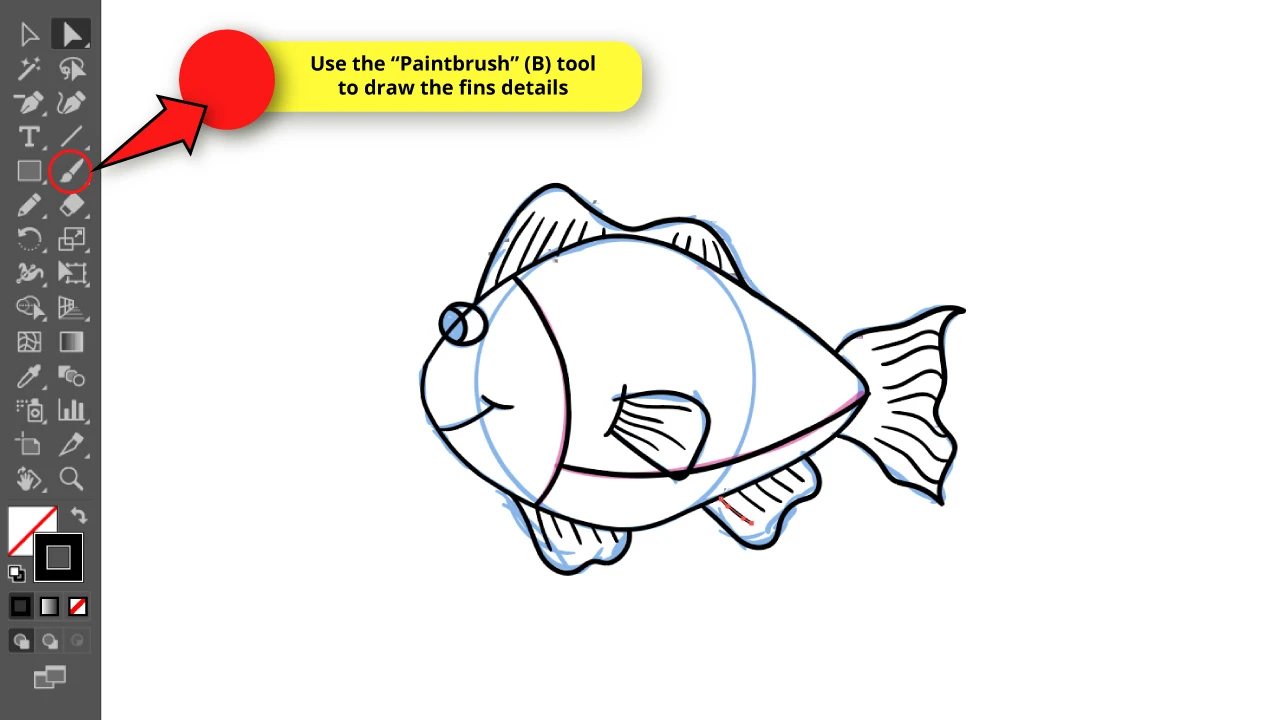
Keep using the “Paintbrush” (B) tool to draw the fins details.
For the top and bottom fins, draw some parallel lines starting from the body of the fish.
For the tail, make wavy lines in Illustrator starting from the edge.
Finally, for the pectoral fin, first make a curve to close the fin, and then draw its detailed lines starting from the line you’ve just drawn.
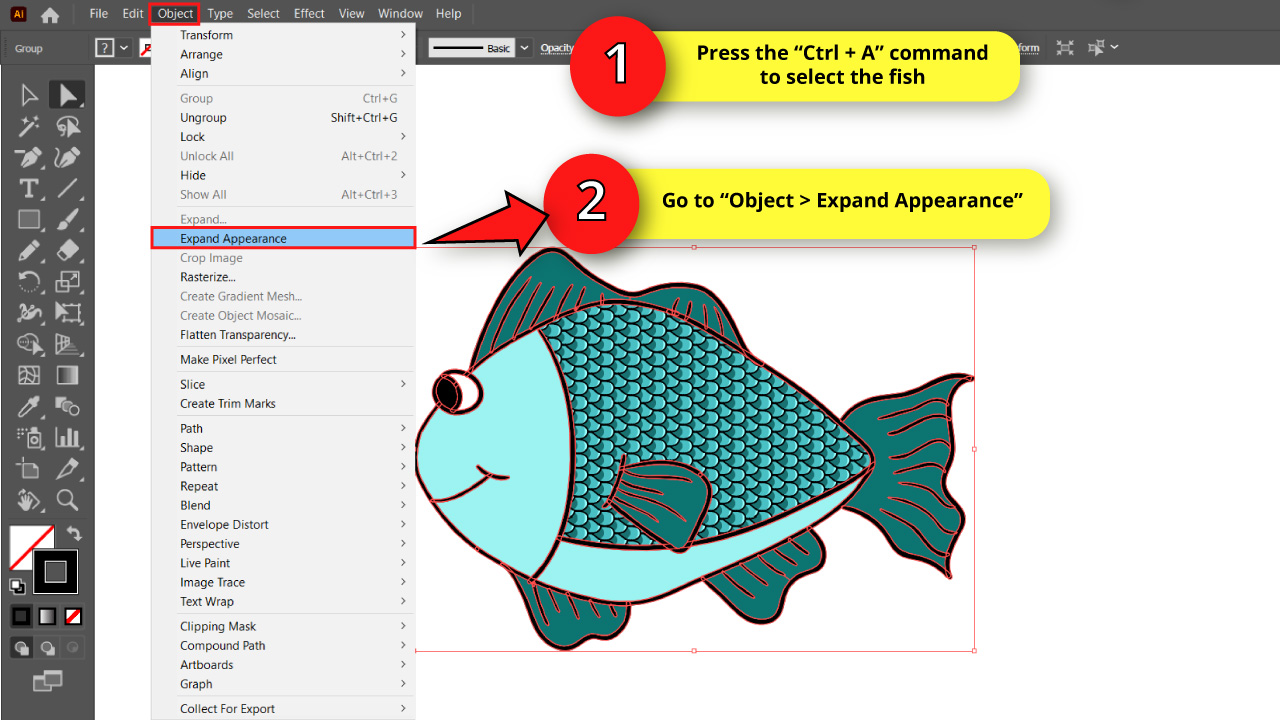
Step 13: Expand Appearance
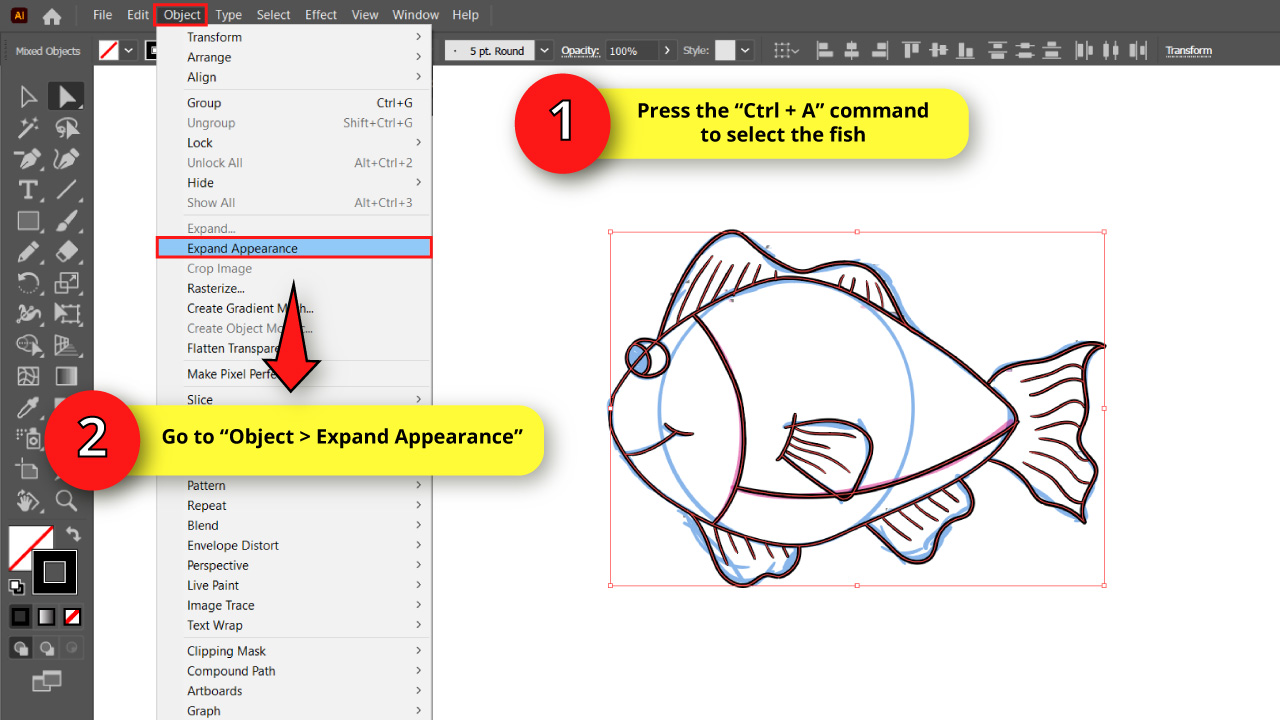

Now, we need to convert paths to objects so we can paint them using the “Live Paint Bucket” (K) tool and still keep the line style.
To get this done, first select all the lines using the “Ctrl + A” command or by using the “Selection” (V) tool.
Then go to “Object > Expand Appearance” on the menu at the top of the screen.
Step 14: Get Rid of the Extra Lines
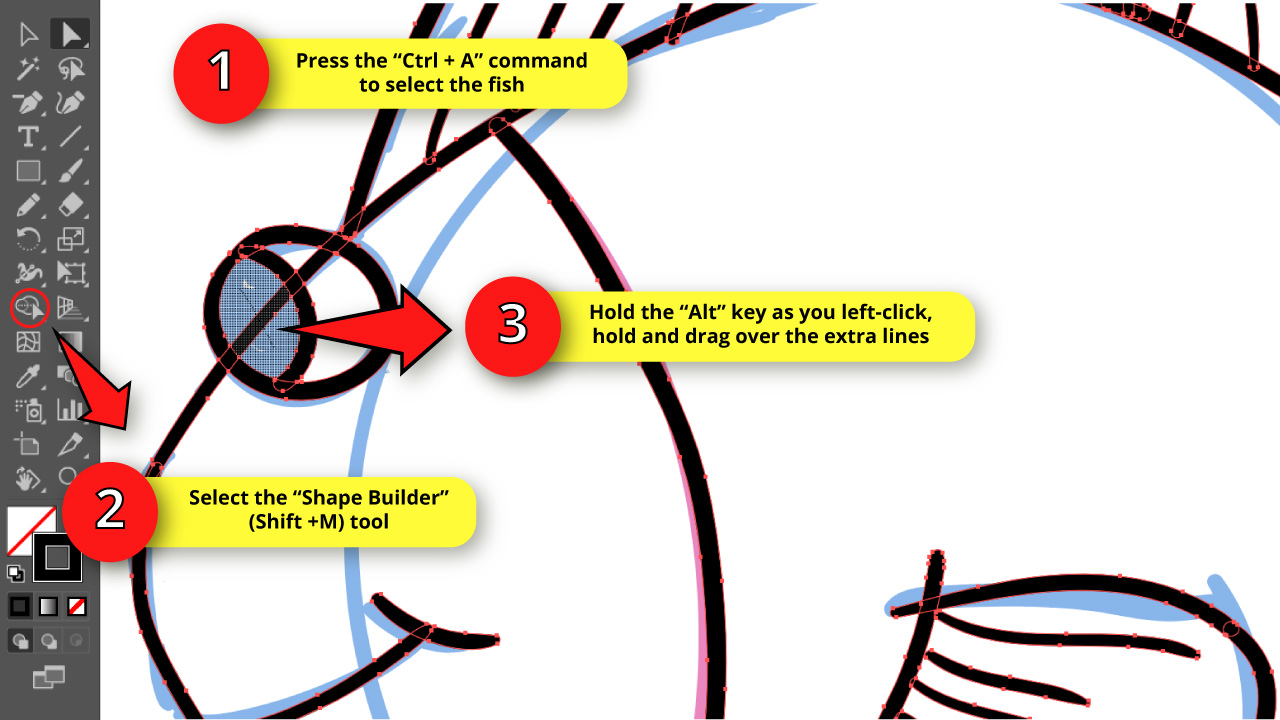

Now, we need to trim the extra lines. To trim lines in Illustrator, first make sure that all the lines are still selected, or use the “Ctrl + A” command.
Then click on the “Shape Builder” (Shift + M) tool on the left side toolbar.
Once the “Shape Builder” (Shift + M) tool is selected, hold the “Alt” key as you left-click, hold, and drag over the extra lines to get rid of them.
Repeat this process with all the extra lines.
As you can appreciate in the reference image, I removed the extra line for the eye.
Step 15: Paint the Fish
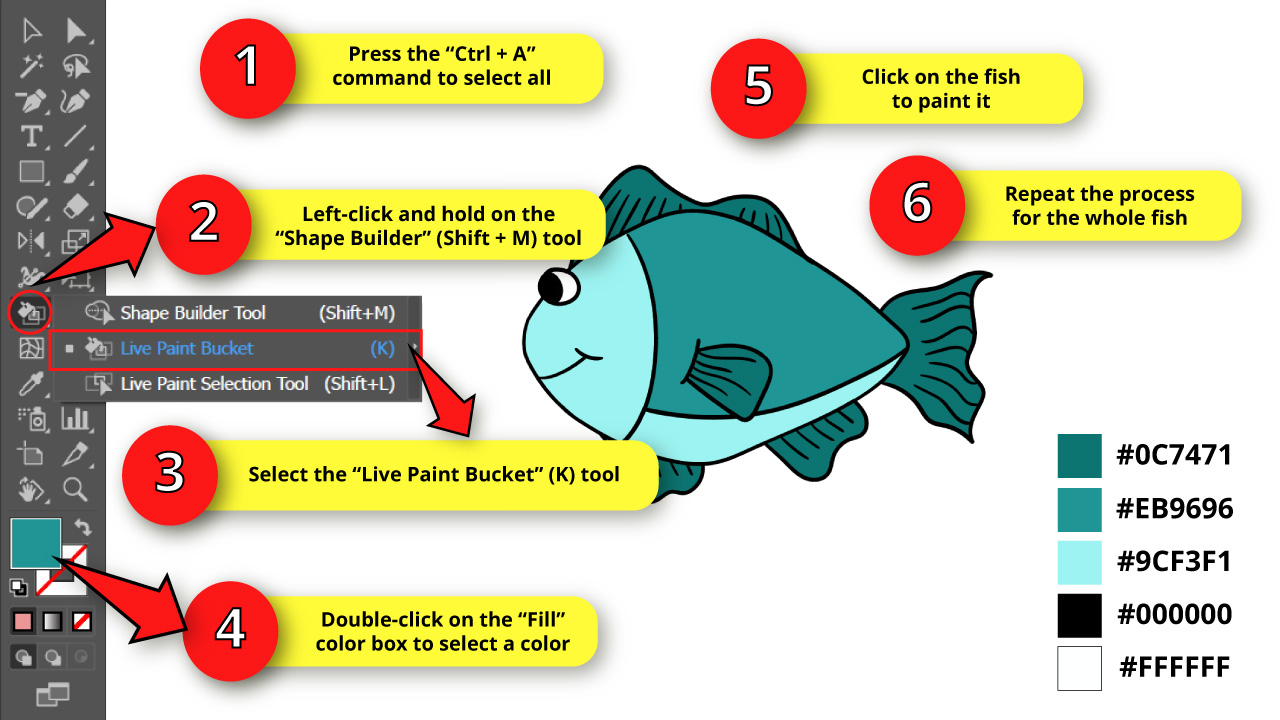
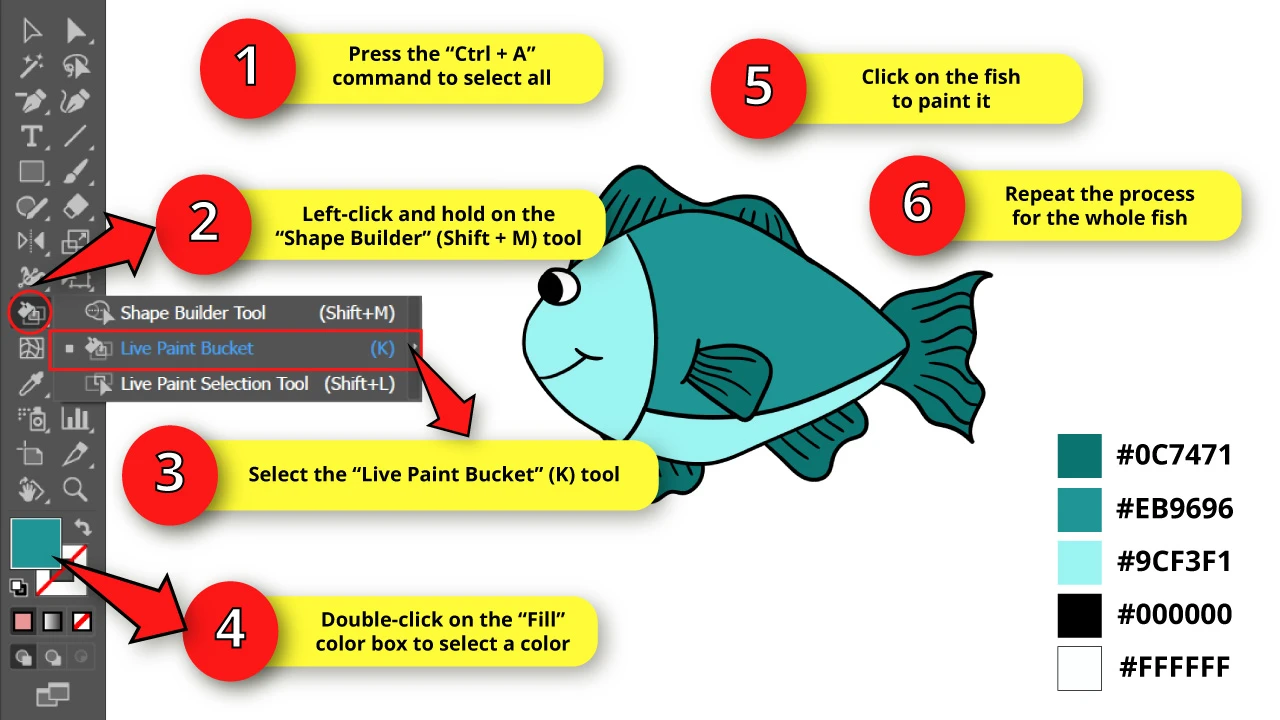
To fill color in Illustrator, make sure that the fish is still selected by pressing the “Ctrl + A” command, and then left-click and hold on the “Shape Builder” (Shift + M) tool to unfold the hidden tools.
On the unfolded menu, select the “Live Paint Bucket” (K) tool or press the “K” key to shortcut it.
To use the “Live Paint Bucket” (K) tool in Illustrator, double-click on the “Fill” color box and pick a color for the fish. Then, click on the fish areas to paint them.
I’m painting the fish in three different shades of teal, besides black and white, which I’ll use for the eye.
I’m using:
The #9CF3F1 shade of aquamarine for the face and the belly of the fish.
The #1F9595 shade of teal for the central part of the fish.
The #0C7471 darker shade of teal for the fins and the tail.
Step 16: Expand the Fish
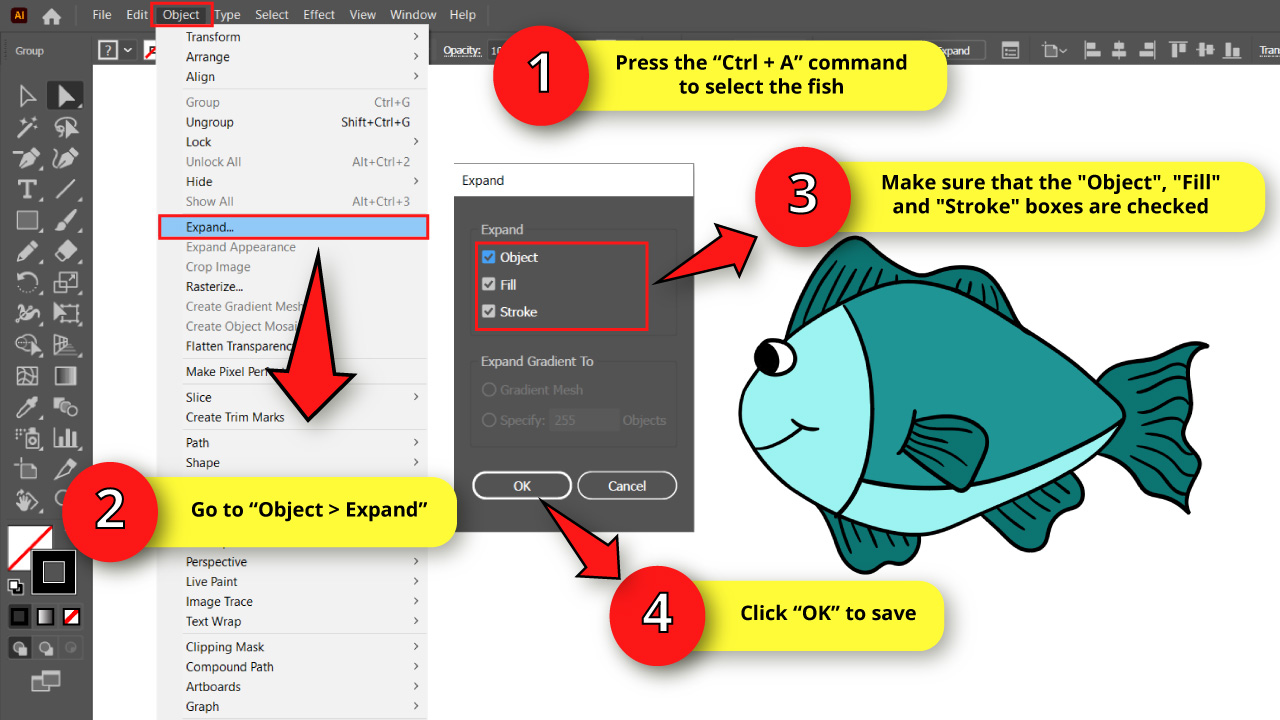

First, select the fish using the “Ctrl + A” command, and then go to “Object > Expand” on the menu at the top of the screen.
Once the “Expand” options menu opens, make sure to have the “Object,” “Fill,” and “Stroke” boxes selected, and then click “OK” to save.
Step 17: Draw a Fish Scale

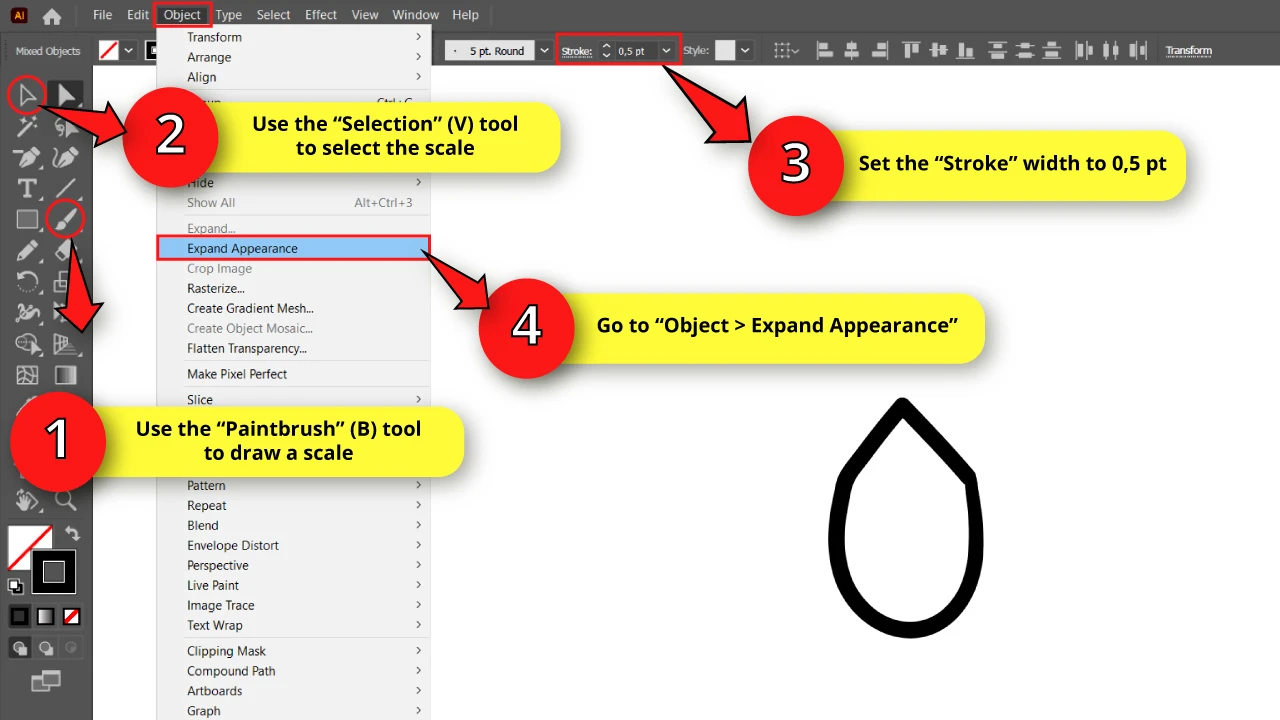
Now, we have to focus on the fish scales.
We actually need to draw just a single scale, and then we’ll use a tool to create a repeating pattern.
Use the “Paintbrush (B) tool to draw a “U” shape with a pointy tip.
We need the scale lines to be thinner than the fish lines to get the visual effect we’re looking for. So, select the scale using the “Selection” (V) tool and then go to the “Stroke” field located on the toolbar at the top of the screen. Set it to 0.5 pt.
Then go to “Object > Expand Appearance” on the menu at the top of the screen to convert the path to object.
Step 18: Paint and Expand the Scale

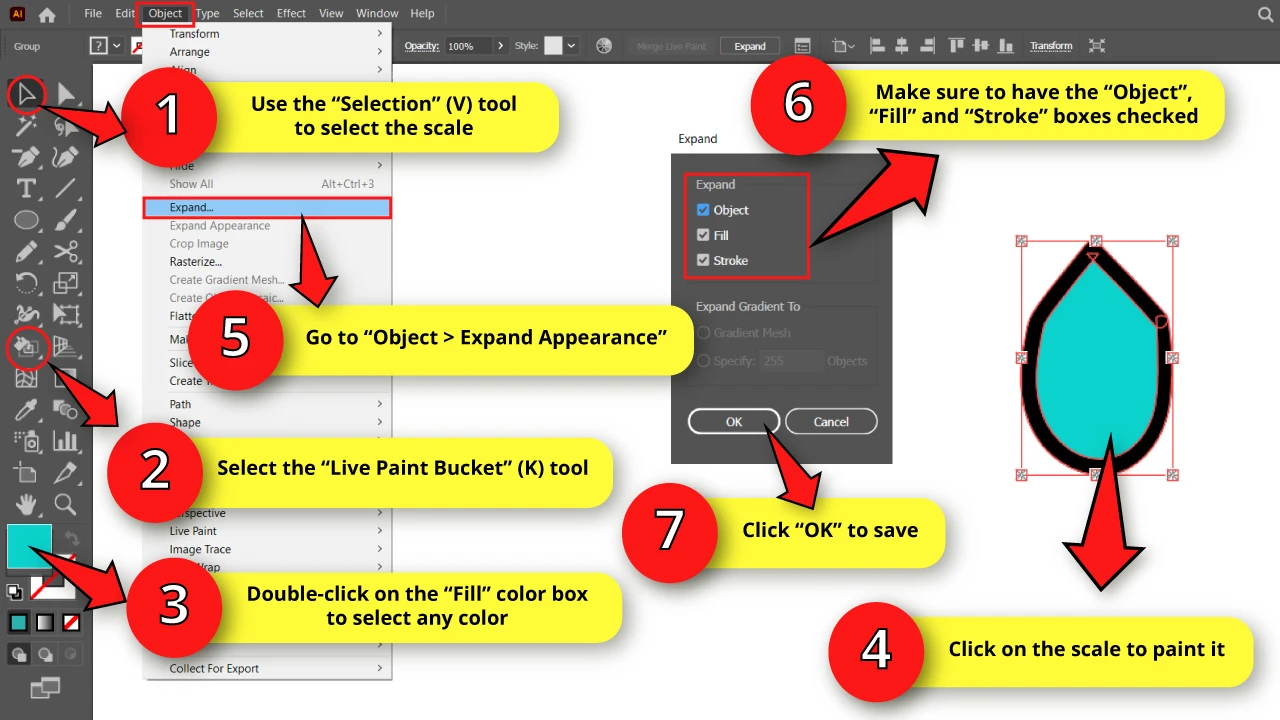
Select the scale with the “Selection” (V) tool, and then use the “Live Paint Bucket” (K) tool to paint it.
You can paint it in any color because we’ll change it in the next step.
To finish with this step, select the whole scale with the “Selection” (V) tool and go to “Object > Expand” on the menu at the top of the screen.
The “Expand” options window will pop up. Make sure that the “Object,” “Fill,” and “Stroke” boxes are checked, and then click “OK” to save.
Step 19: Divide the Scale Into Three Parts


Use the “Direct Selection” (A) tool on the left side toolbar to select the scale fill color.
It’s important that you only select the fill color and not the black lines, so the trim tool only applies to the fill color.
Then, left-click and hold on to the “Eraser” (Shift + E) tool to unfold the hidden tools.
On the unfolded menu, select the “Knife” tool.
Use this tool to trim the scale into three parts.
To get this done, make two horizontal curved lines, and as a result, you should end up with the bottom area of the scale as the smallest.
Step 20: Paint the Areas of the Scale, and Rotate it
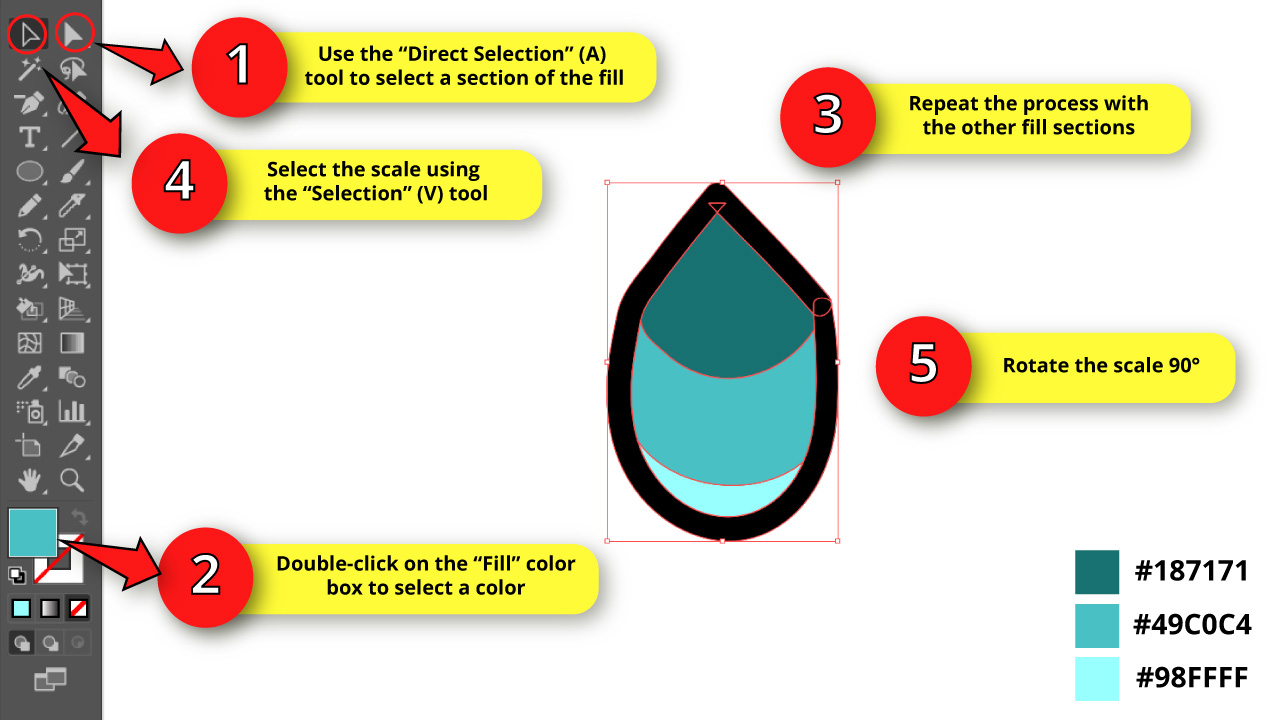
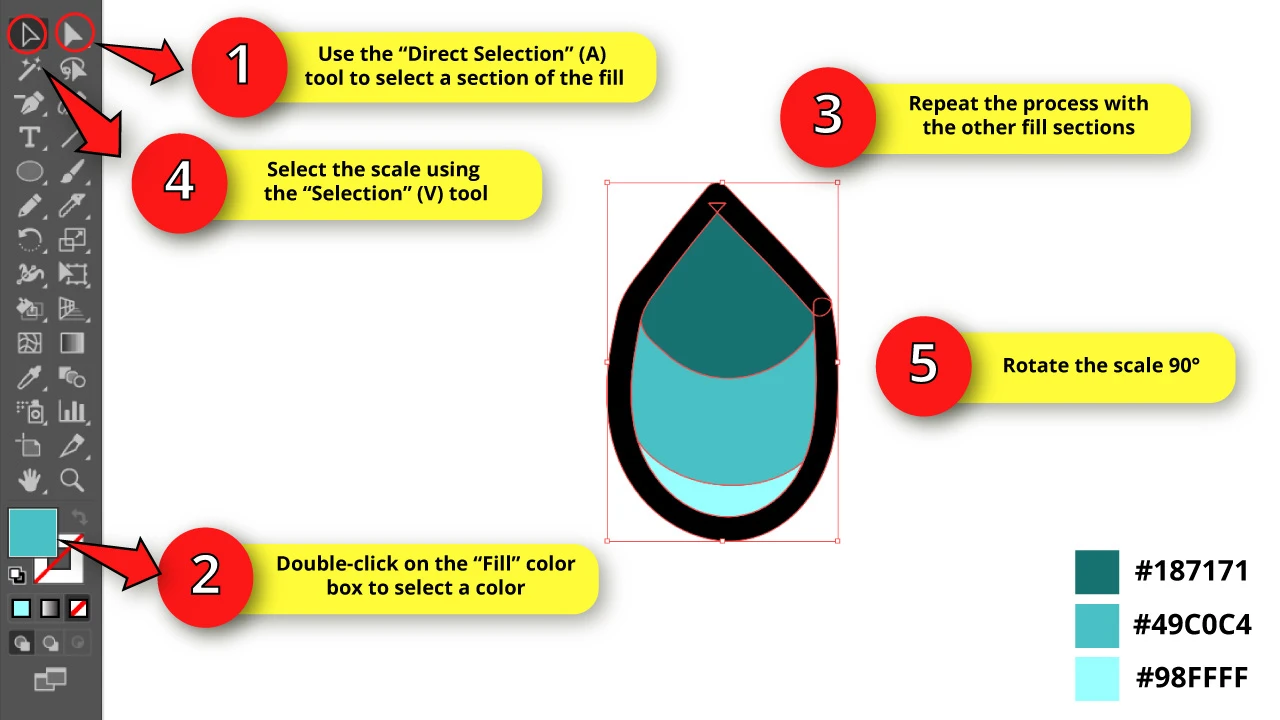
Select the different scale areas with the “Direct Selection” (A) tool and then double-click on the “Fill” color box to paint them. Make sure that darker shade goes at the top and the lighter shade goes at the bottom
I’m using the following shades of teal, from darker to lighter:
#187171
#49C0C4
#98FFFF
Once you’re done with the fill color, select the whole scale with the “Selection” (V) tool, and use the bounding box handles to rotate the scale 90°.
You can also get this done by using the right-click to open the options menu, going to “Transform > Rotate,” and setting the “Angle” to 90°.
Then click “OK” to save.
Step 21: Convert the Scale Into a Pattern
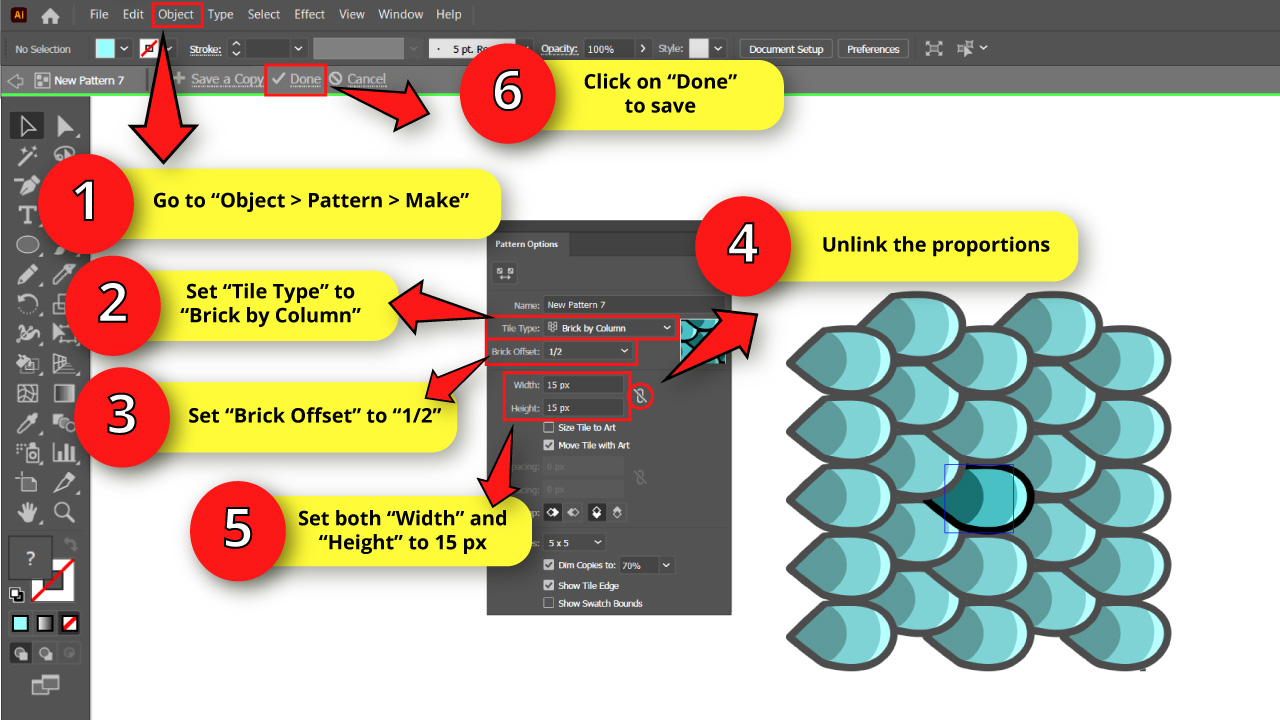

Make sure that the scale is still selected, and then go to “Object > Pattern > Make” on the menu at the top of the screen.
The “Pattern” options window will pop up. On this window, set “Tile Type” to “Brick By Column”, and set “Brick Offset” to “1/2″.
We need both the “Width” and “Height” proportions to be unlinked, so if necessary, click on the “Maintain Width and Height Proportions” button until the “Unlinked” icon shows.
Then, set the “Width” and “Height” values to a distance that makes your pattern look similar to mine. The number that works better on my pattern is 15 px for both fields.
This number may vary if you draw your scale on a different size.
Once the scale pattern fits, click on “Done” at the left top side of the canvas.
Step 22: Add the Scale Pattern to the Fish
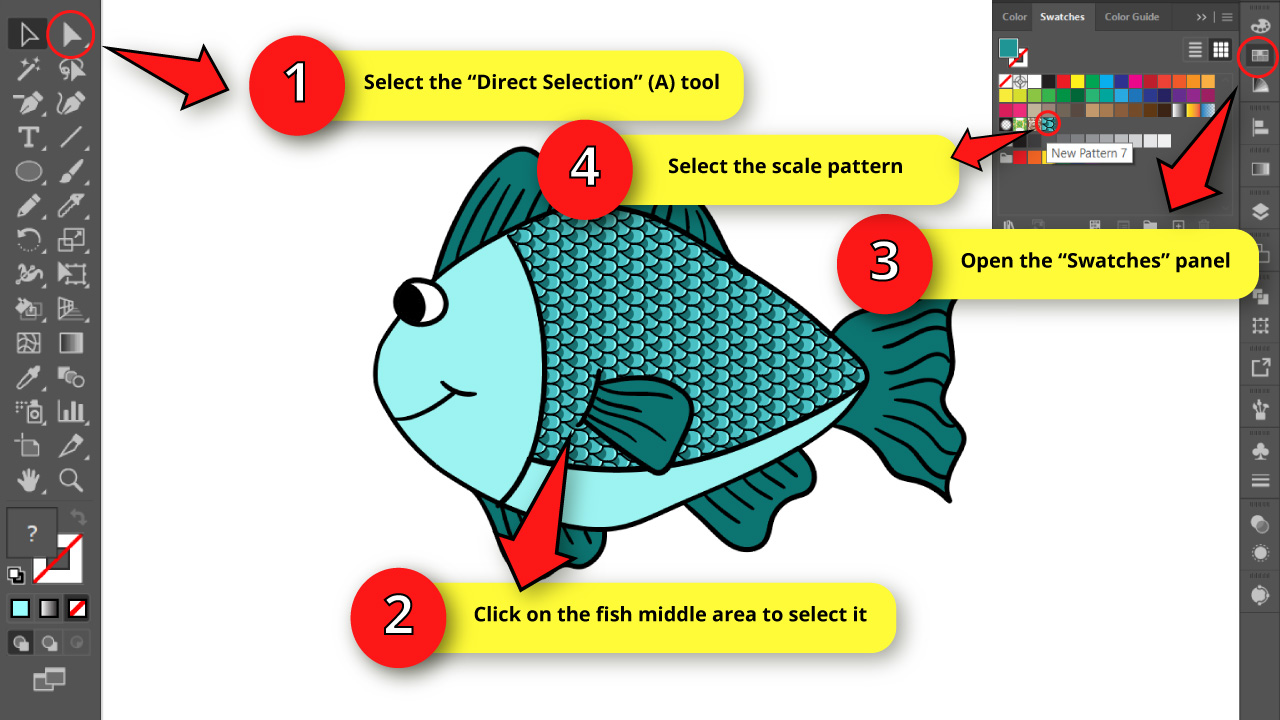

Select the fish central area with the “Direct Selection” (A) tool, and then go to the “Swatches” panel on the right side toolbar.
If you can’t find it, you may have to enable it first by going to “Window > Swatches” on the menu at the top of the screen.
Once you are on the “Swatches” panel, go to the very end of the default color samples and select the pattern you have just created.
Now, our fish has the scale pattern on his body!
Step 23: Expand the Fish’s Appearance

Now select the fish by using the “Ctrl + A” command, and then go to “Object > Expand Appearance”.
We are doing this to move the black lines to a new layer.
Step 24: Create New Layers
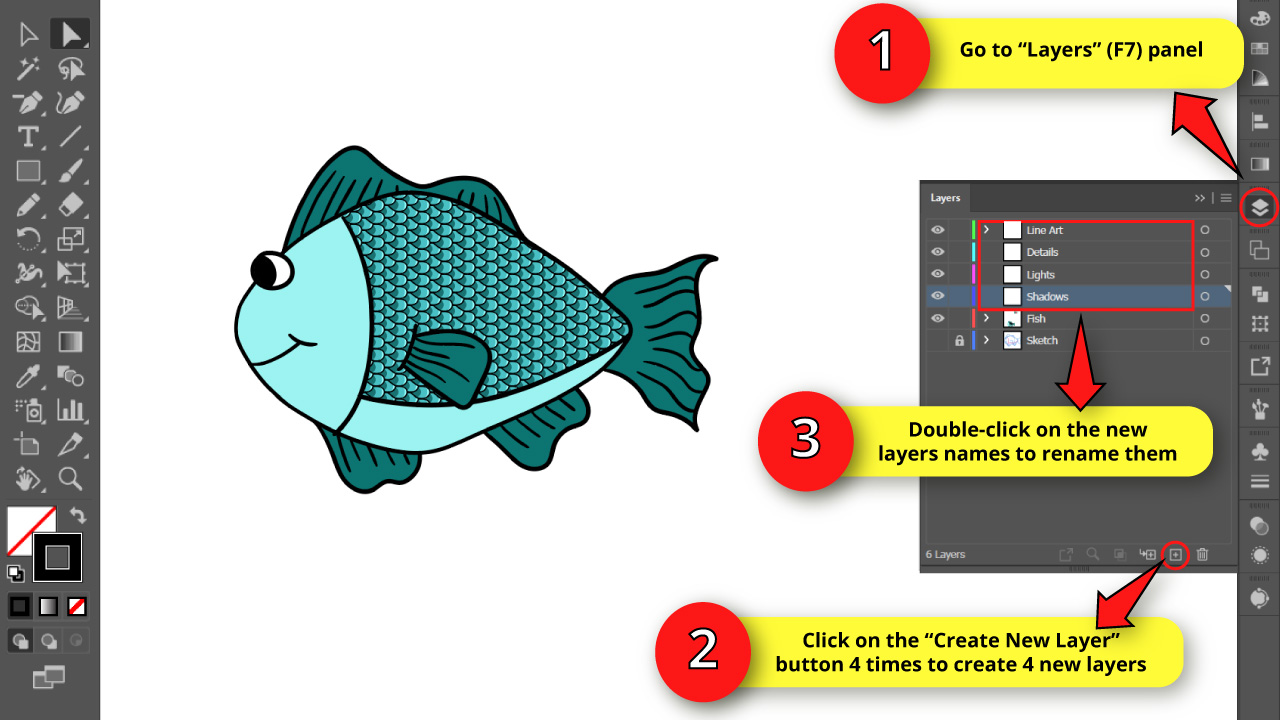

Go to the “Layers” (F7) panel and create four new layers by clicking four times on the “Create New Layer” button.
Double-click on the new layers names and rename them to: “Line Art,” “Details,” “Lights,” and “Shadows” in that order.
Step 25: Move the Fish’s Black Lines to a New Layer

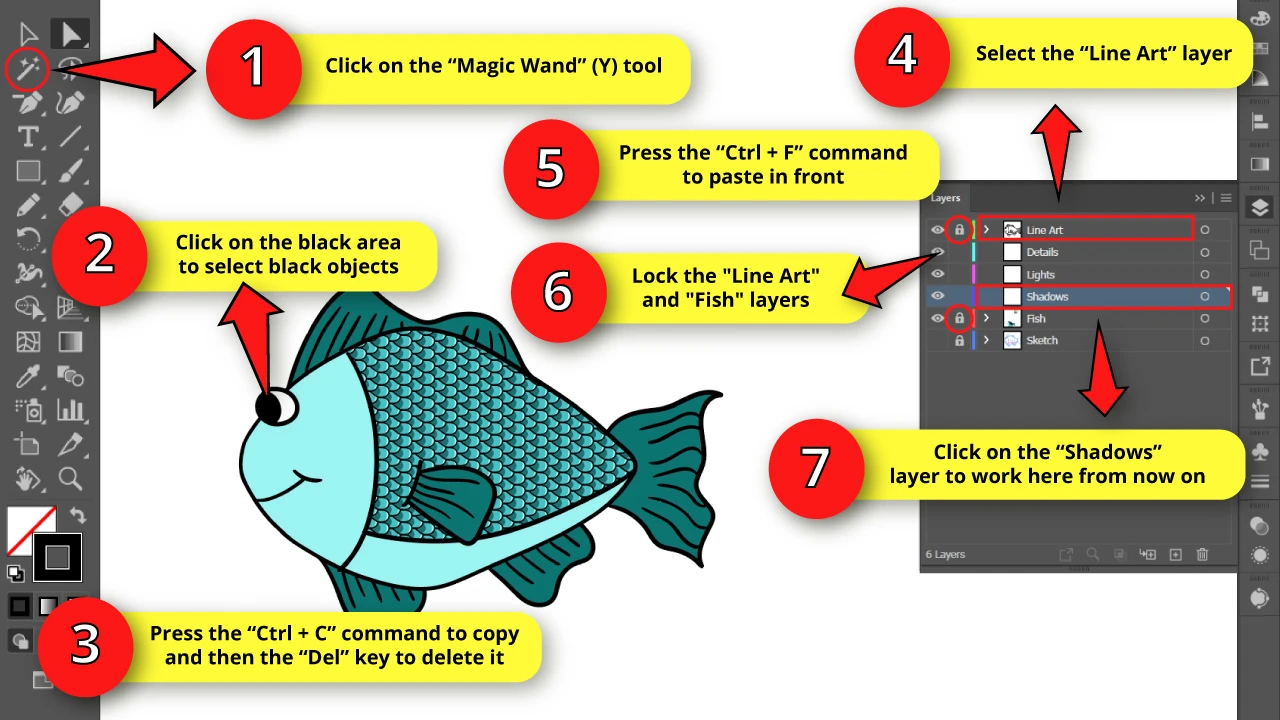
Now, we need to exclusively select the black lines.
For this, we’ll use the “Magic Wand” (Y) tool on the left side toolbar.
Select this tool and then click on the black lines to select them.
Then, press the “Ctrl + C” command to copy them, followed by the “Del” key to delete them.
Next, click on the “Line Art” layer to select it, and press the “Ctrl + F” command to paste in front.
Now the fish’s black lines are on its own layer.
Lock the “Line Art” and “Fish” layers so we can now draw the shadows, lights, and details in the next steps with more ease.
To finish this step, click on the “Shadows” layer to work here from now on.
Step 26: Adjust the “Pencil” (N) Settings

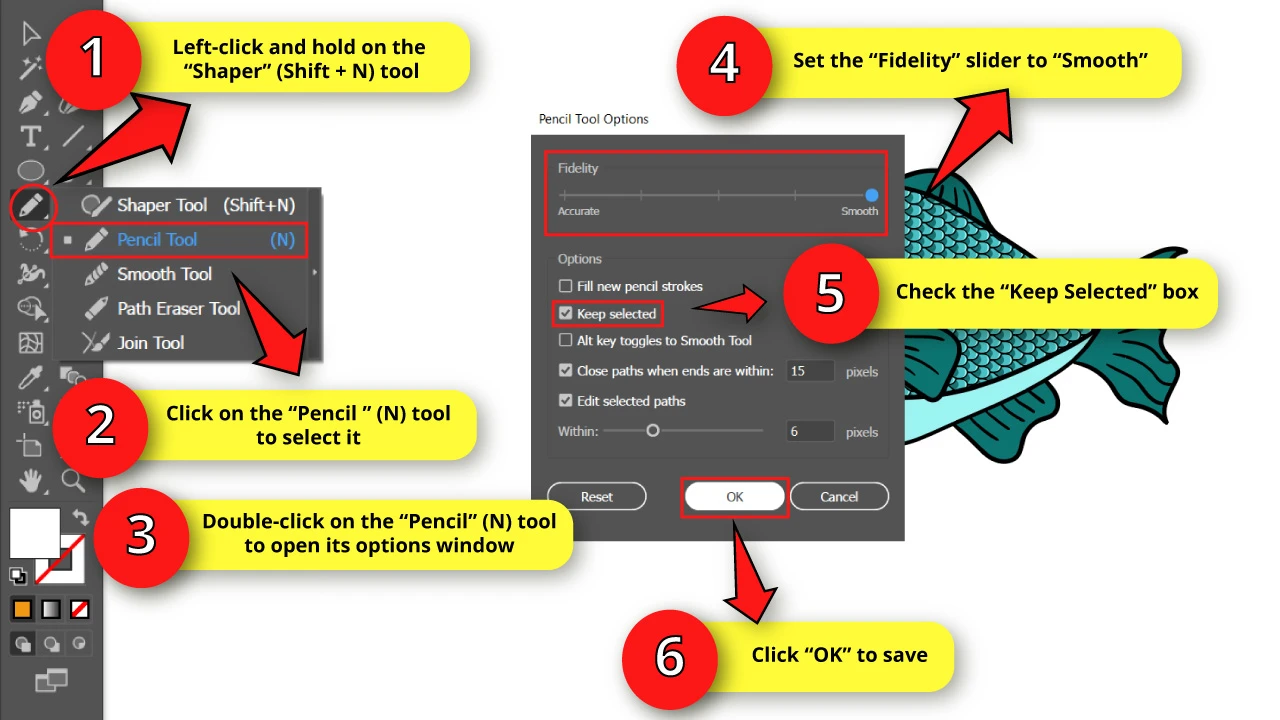
We need to use the “Pencil” (N) tool to draw in Illustrator. We’ll now work on shadows and lights.
To select the “Pencil” tool, left-click and hold on the “Shaper” (Shift + N) tool on the left side toolbar to unfold the hidden tools. On the unfolded menu, select the “Pencil” (N) tool or press the “N” key from your keyboard to shortcut it.
Once the “Pencil” (N) tool displays on the left side toolbar, double-click on it to open its options window.
On the options window, set the “Fidelity” slider to “Smooth”.
Finally, check the “Keep Selected” box and click on “OK” to save.
Step 27: Draw the Shadows

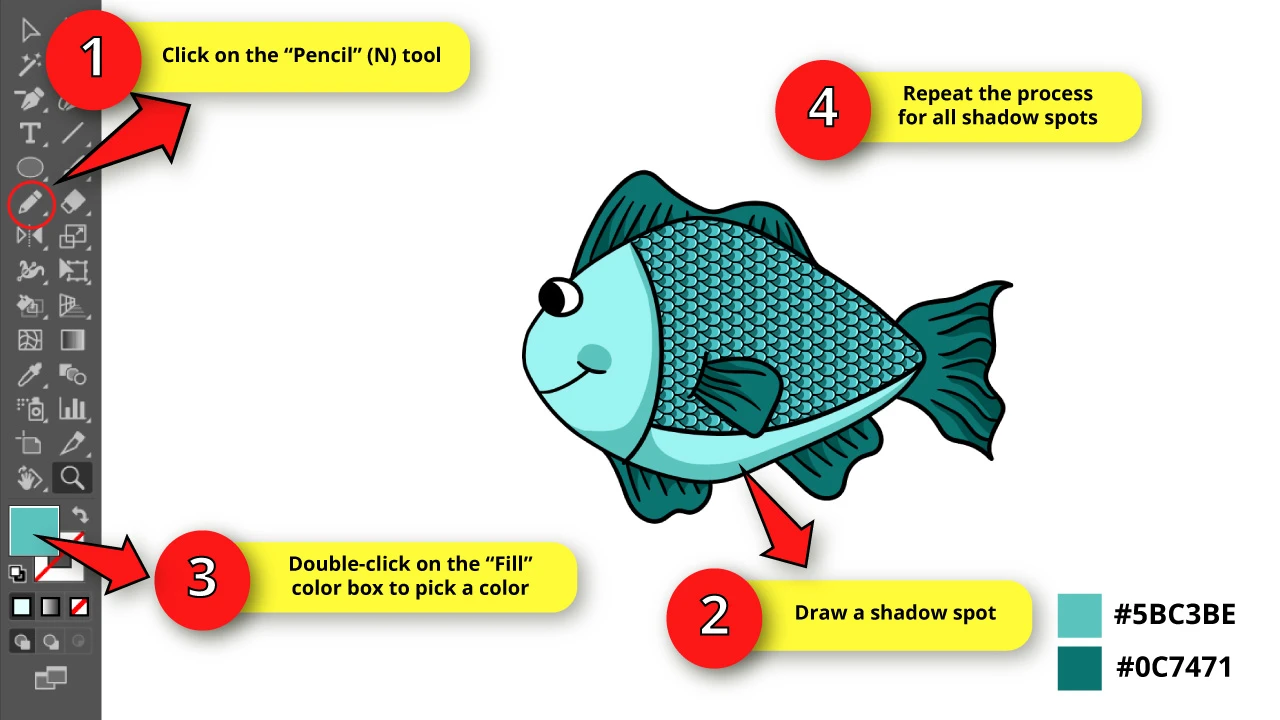
Use the “Pencil” (N) tool to draw the fish’s shadow spots.
Then, double-click on the “Fill” color box to pick a color.
The shadow’s color will depend on the base color of the area you are drawing the shadows on.
For the lighter areas, I’m using the #5BC3BE shade of teal.
For the darker areas, I’m using the #0C7471 shade of teal.
Try to make the shadow areas thicker at the bottom and thinner at the top.
For the lighter areas, I gave the shadows a curved form, following the fish shape, covering the whole belly and a portion of the sides.
For the darker areas, which are the fins and the tail, I drew something like curved triangle shapes for each detail line of the fins.
Then, I made an oval-shaped shadow for the cheek.
Step 28: Draw the Lights
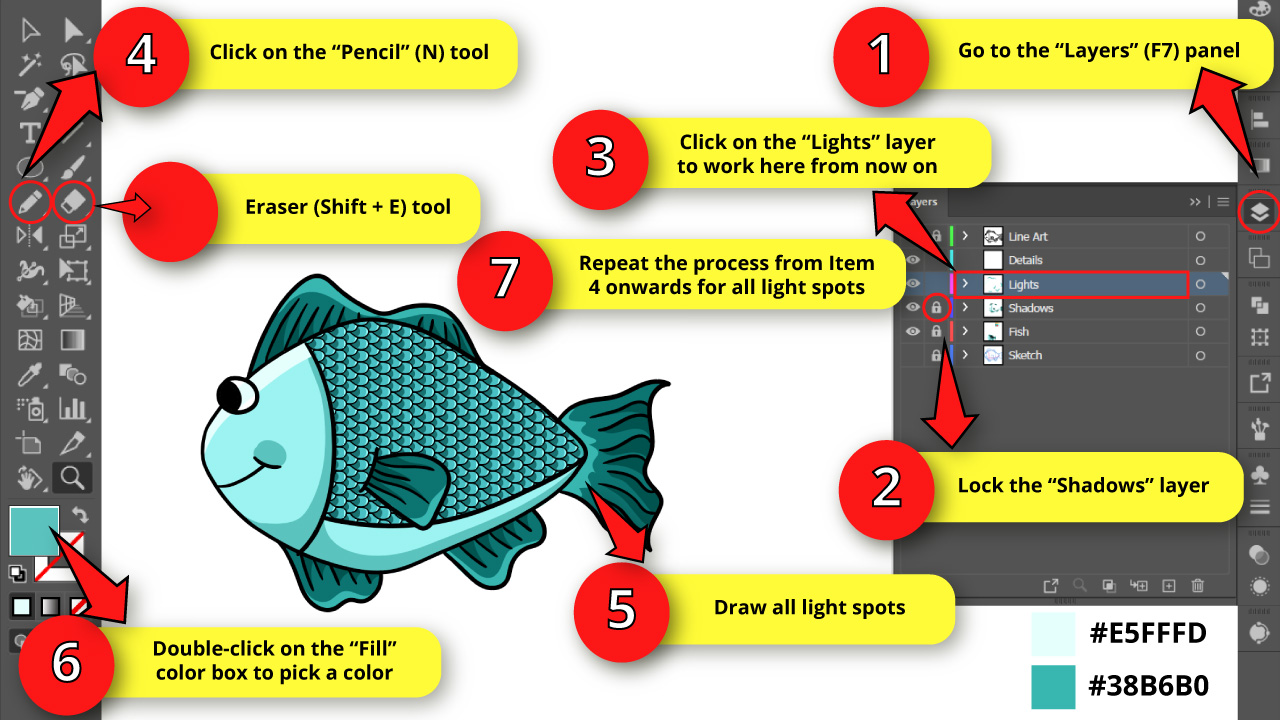

Go to the “Layers” (F7) panel, lock the “Shadows” layer and select the “Lights” layer to work here from now on.
Then, select the “Pencil” (N) tool and draw a large thick curve at the top of the fish head. Next, double-click the “Fill” color box and pick a color for it. I picked the very light #E5FFFD shade of turquoise for these lights.
As you can see, the lights also cover part of the fish eye.
This means we must remove the overlapping areas using the “Eraser” (Shift + E) tool.
To use the Eraser tool in Illustrator, first use the “Direct Selection” (A) tool to select the light area you’ve just drawn, restricting the Eraser actions to the selected object. And then, select the “Eraser” (Shift + E) tool to erase the overlapping section.
You can also make the size of the eraser bigger in Illustratrator if you need.
Repeat the same process for the fins and tail. I made some thick curves at the edges of the fins and a wavy light area starting from the body for the tail.
I selected the #38B6B0 shade of teal for the fins and tail.
Step 29: Draw the Details

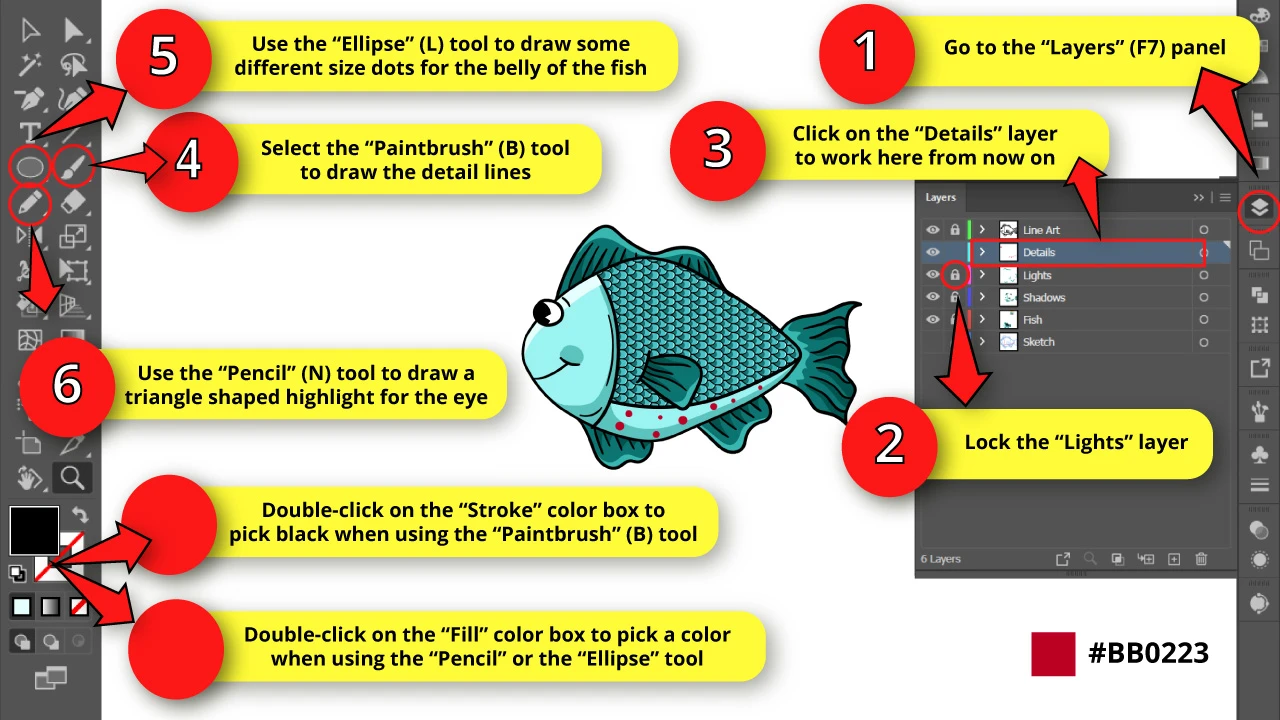
Go to the “Layers” (F7) panel and lock the “Lights” layers. Then click on the “Details” layer to work here from now on.
Use the “Ellipse” (L) tool, hidden in the “Rectangle” (M) tool nest.
Left-click and hold to unfold the hidden tools. Then, select the “Ellipse” (L) tool or press the “L” key to shortcut it.
Once you have selected the “Ellipse ” tool, draw a circle as you hold the “Shift” key to maintain the proportions and get a perfect circle.
Now, double-click on the “Fill” color box to select red.
Draw some dots of different sizes on the belly of the fish.
Next, use the “Pencil” (N) tool to draw a triangle-shaped highlight for the eye.
Once you finish this, double-click on the “Fill” color box and pick white for the highlight.
Finally, click on the “Paintbrush” (B) tool to draw the eyebrow and some detail lines for the head and the face to complete the illustration. Then, double-click on the “Stroke” color box and select black.
Step 30: Group the Fish Layers
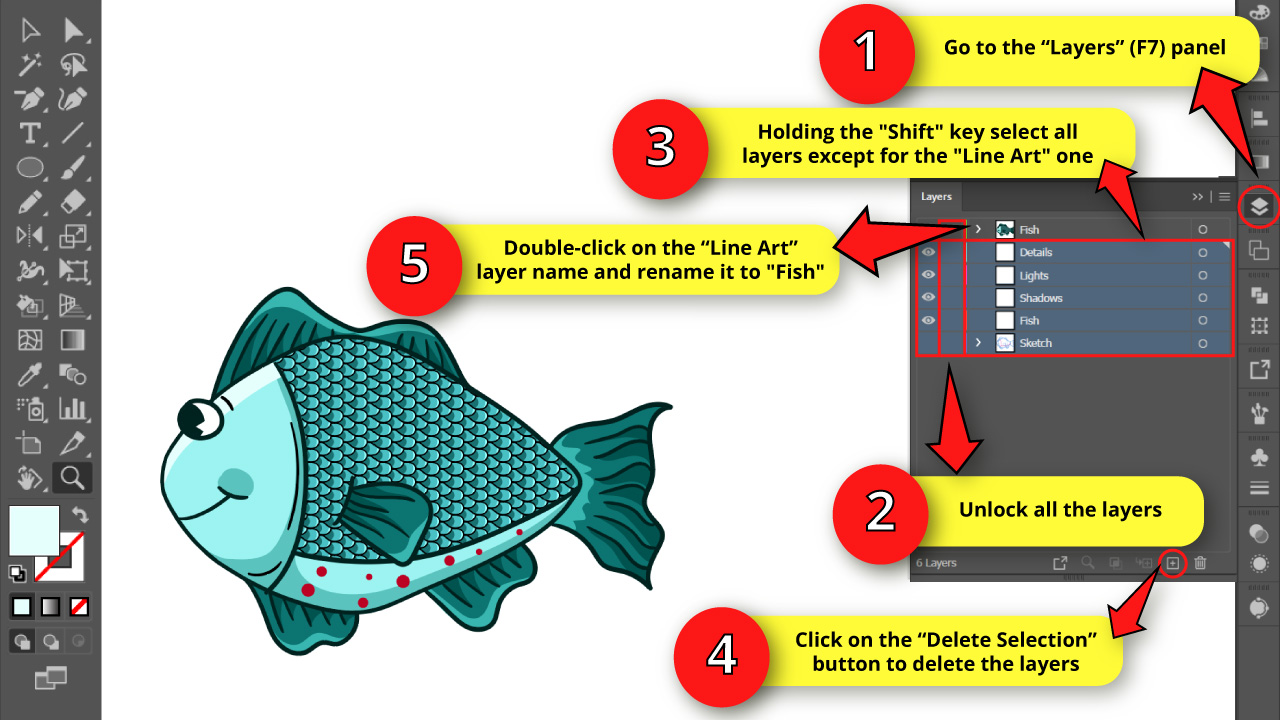
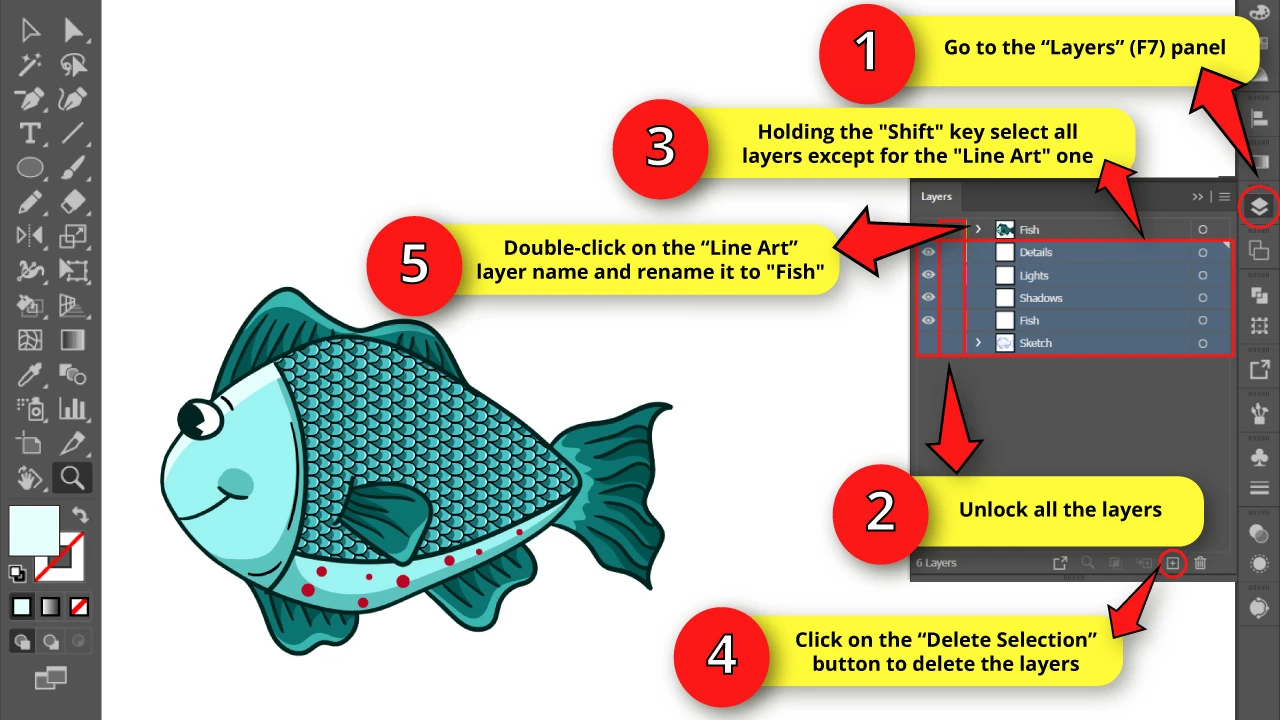
To group objects in Illustrator, first go to the “Layers” (F7) panel and unlock all the layers.
Next, press the “Ctrl + A” command to select the whole fish, followed by the “Ctrl + G” command to group the objects. Now the fish is grouped on the “Line Art” layer.
Holding the “Shift” key, select all layers except for the “Line Art” one. Then click on the “Delete Selection” button to delete them.
Finally, double-click on the remaining layer name and rename it to “Fish”.
The Result
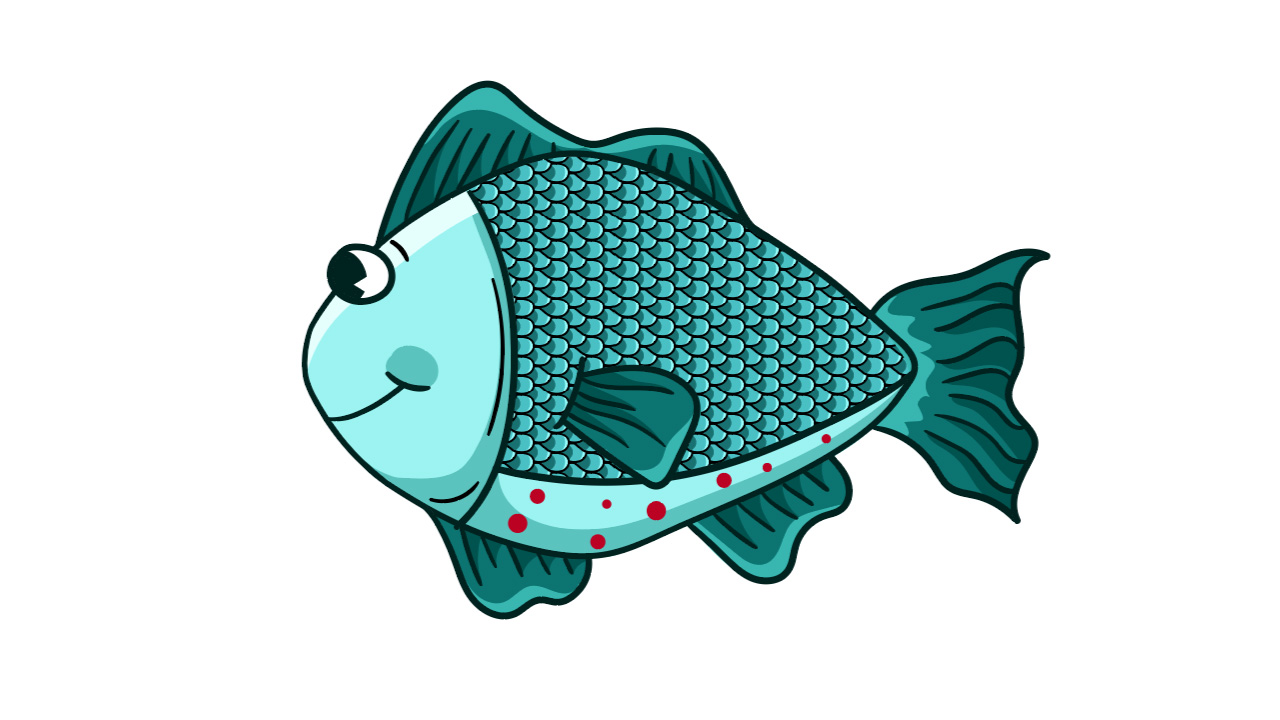
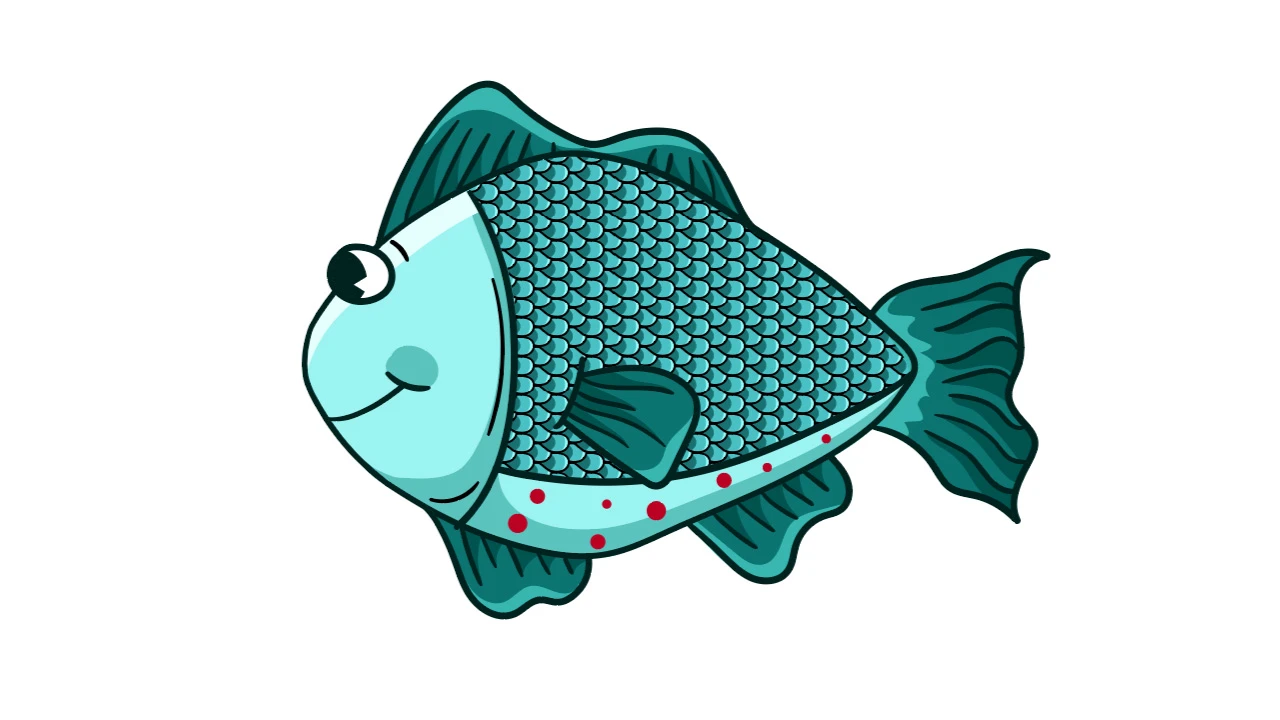
And this is how our cute fish looks!
Download our Free Fish Vector Pack
Frequently Asked Questions on “How to Draw a Fish in Illustrator”
How to change the tile size of the scale pattern?
Go to the “Swatches” panel and double-click on the pattern sample to open the “Pattern” options. Click on the scale and then use the bounding box handles to resize it. Now you need to readjust the “Width” and “Height” values again. Then click on “Done” to save.
How can I add shadows and lights to the fish?
First separate the line art and the flat colors into two different layers. Lock them and create two new layers in the middle. Click on one of them for the shadows and use the “Pencil” (N) tool to draw shadows. Then pick a color for it. Repeat the process for the lights on the remaining layer.


Hey guys! It’s me, Marcel, aka Maschi. On MaschiTuts, it’s all about tutorials! No matter the topic of the article, the goal always remains the same: Providing you guys with the most in-depth and helpful tutorials!

