
When drawing an illustration or simply creating some custom shapes, you have different methods to add color.
But there is a way that can save you a lot of headaches.
The “Live Paint Bucket” tool isn’t just a tool that helps you add color in a very tidy and clean way, it also works with shapes with gaps or with anchor points not properly closed.
Let’s see how it works!
How to Use the Live Paint Bucket Tool in Illustrator
Select your shapes and double-click on “Live Paint Bucket” (K) on the left side toolbar. Check the “Paint Fill” or “Paint Strokes” box depending on what you want to paint. Click “OK” to save. Pick a color from the box on the left side toolbar and click your shapes to paint them.
How to Use the “Live Paint Bucket” Tool to Paint the Fill Color in Illustrator
Select your shapes and click on the “Live Paint Bucket” tool (K) on the left side toolbar. Pick the color you want to use from the color swatch panel or by just double-clicking on the color box on the left side toolbar. Finally click on your shapes and it’s all set! Your drawing has been painted.
Imagine you just finished drawing an illustration or you made some shapes and you want to paint them. As you read before there are several ways to do this. But there is definitely a way to do it like a pro.
Let’s use the following cupcake as an example. It has only the stroke lines so far.
Step 1: Draw your Illustration

First you must have your illustration or your shapes ready to paint.
If you have doubts about how to draw in Illustrator please check this useful article about “How to Draw in Illustrator in 5 Simple Steps” and also this other one about “How to Change the Brush Sizes in Illustrator in 4 Easy Steps”.
It’s important to clarify that drawing can be done by using the “Pen”, “Brush”, “Pencil”, “Line” tools, basic shape makers, etc.
And these can have stroke lines or not. You can add, delete or change stroke width at any moment of the process.
Step 2: Select the Drawing

Select your drawing with the “Selection” tool (V) you can find on the toolbar on the left side of the screen, or just press “Ctrl + A” to select all of it.
Step 3: Find “Live Paint Bucket”
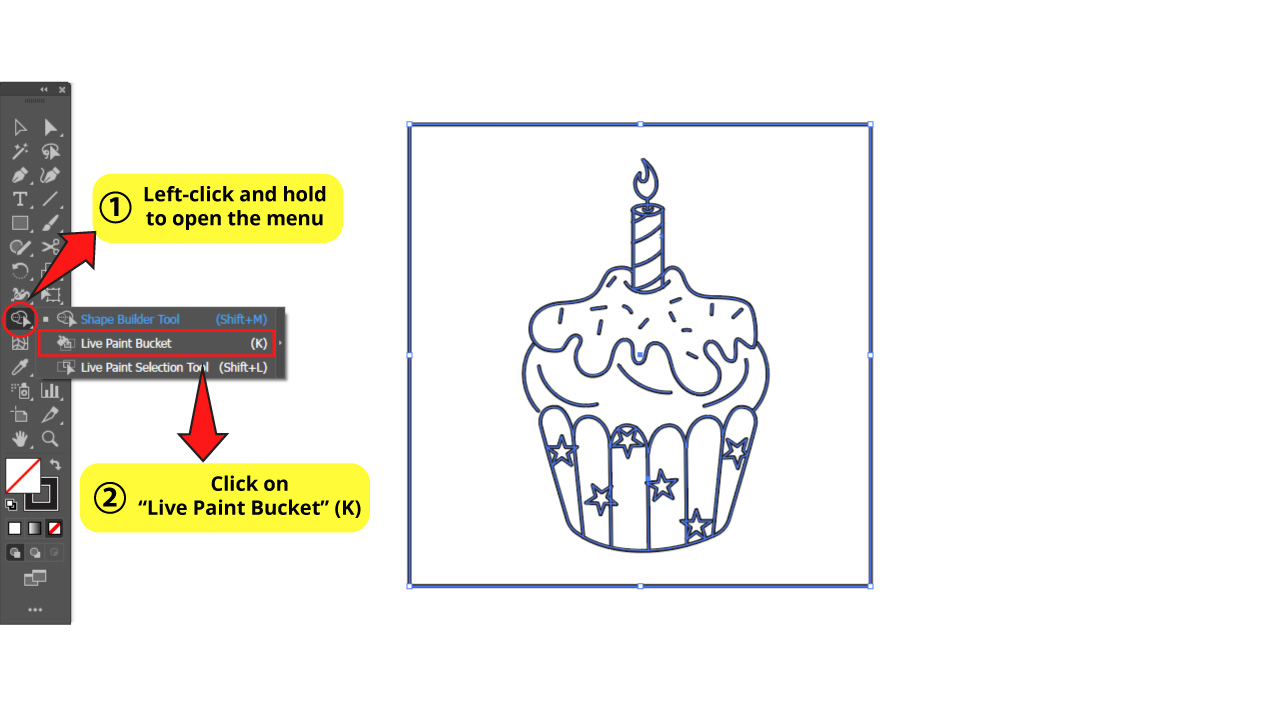
Then you have to click on the “Live Paint Bucket” tool (K). You can find it on the “Shape Builder” tool nest on the left side toolbar.
To open it, just left-click and hold on the “Shape Builder” tool and a small menu will open up displaying the hidden tools: “Live Paint Bucket” and “Live Paint Selection”.
Click on the “Live Paint Bucket ” tool or just use the “K” shortcut.
If you are interested in the many things the “Shape Builder” tool can actually do, we strongly recommend you to take a look at this complete guide about “How to Combine Shapes in Illustrator”.
Step 4: Get to Understand the “Live Paint Bucket” Tool
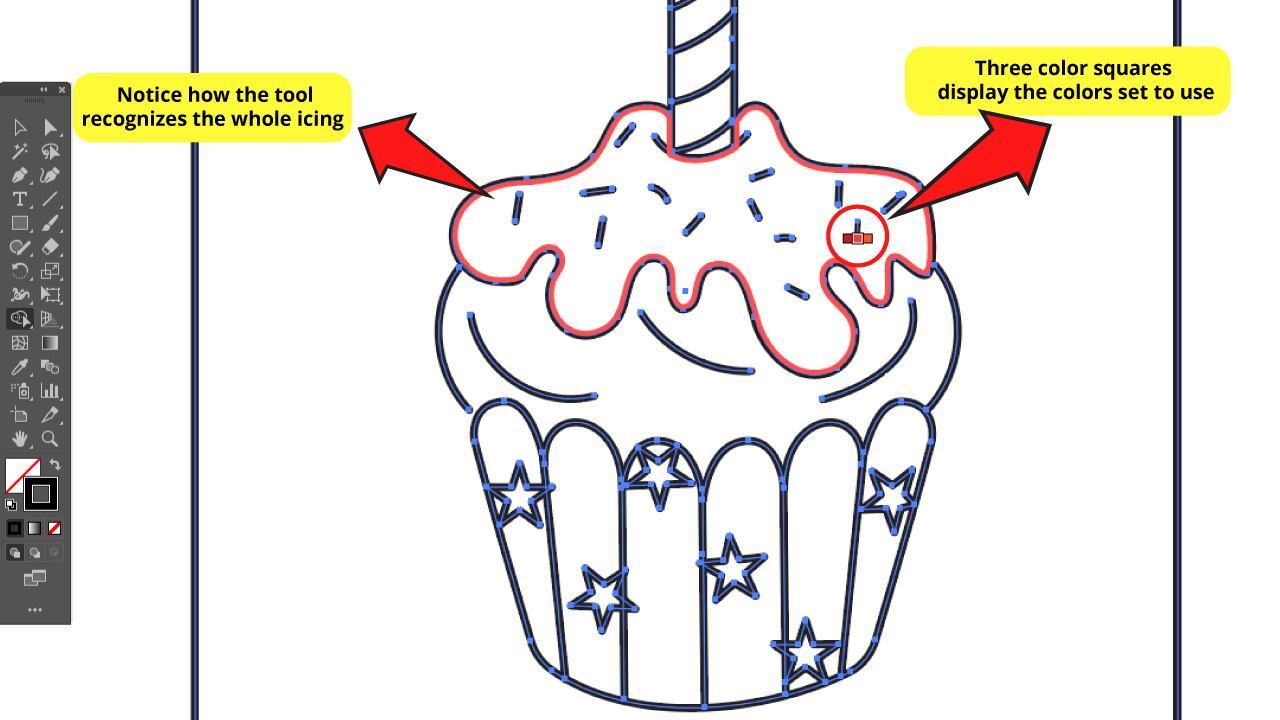
If you have selected the “Live Paint Bucket” tool correctly, then as you move the mouse pointer over the drawing it will automatically recognize closed shapes that you can paint as a whole solid path.
Notice how Illustrator recognizes the cupcake icing as a single path.
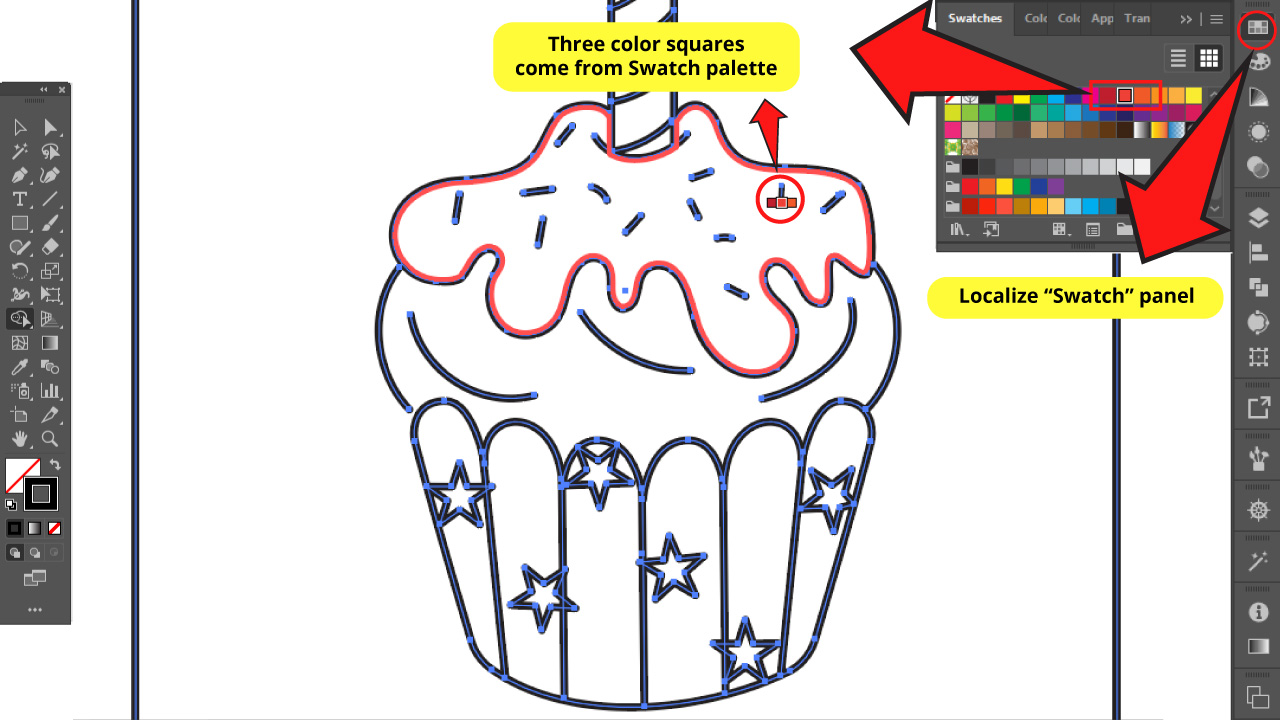
Step 5: Find the “Swatch” Panel
If you want to color your drawing with random colors just doble-click on the box color on the left side toolbar and continue directly to Step 8.
But if you want to organize the colors that you are going to use, please continue reading here next.
When you move the mouse pointer over the shapes you can also notice that there are three small color squares. Those colors are from the default “Swatch” generated by Illustrator.
You can find the color “Swatch” panel on the right side toolbar. If you can’t find it, you might have to enable it first by going to the top side menu clicking on “Windows” > “Swatch”.
So, notice that these three color squares are coming from the “Swatch” panel. You can choose the next or previous square color by just pressing “Left” and “Right” arrow keys from your keyboard.
Step 6: Select Colors for Your Artwork
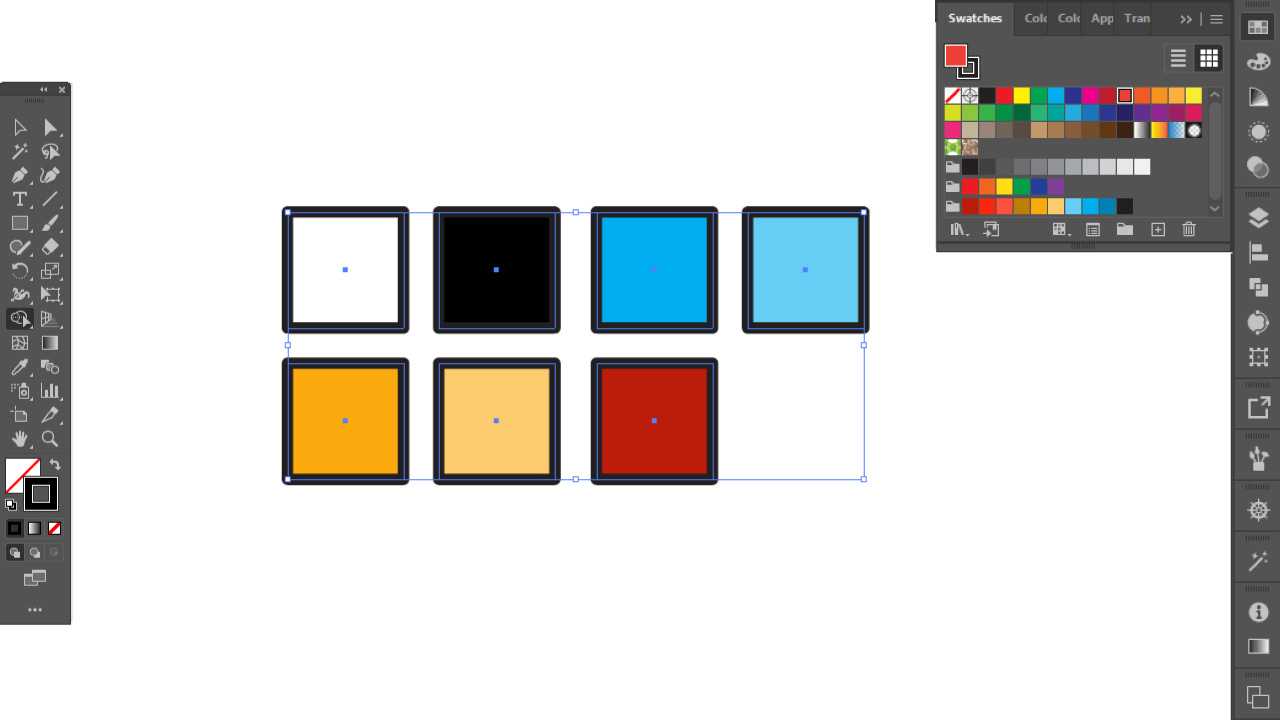
When you are coloring a complex drawing with a lot of paths it is highly recommended that you first set your color palette. This way you can work in a more organized way.
In order to get this, you just have to draw shapes with the colors that you are going to use. For this example I’m using squares with stroke lines, but it also works with different shapes with or without stroke lines. I used stroke lines just to visualize the white color better.
Step 7: Create Your Customized Color Palette
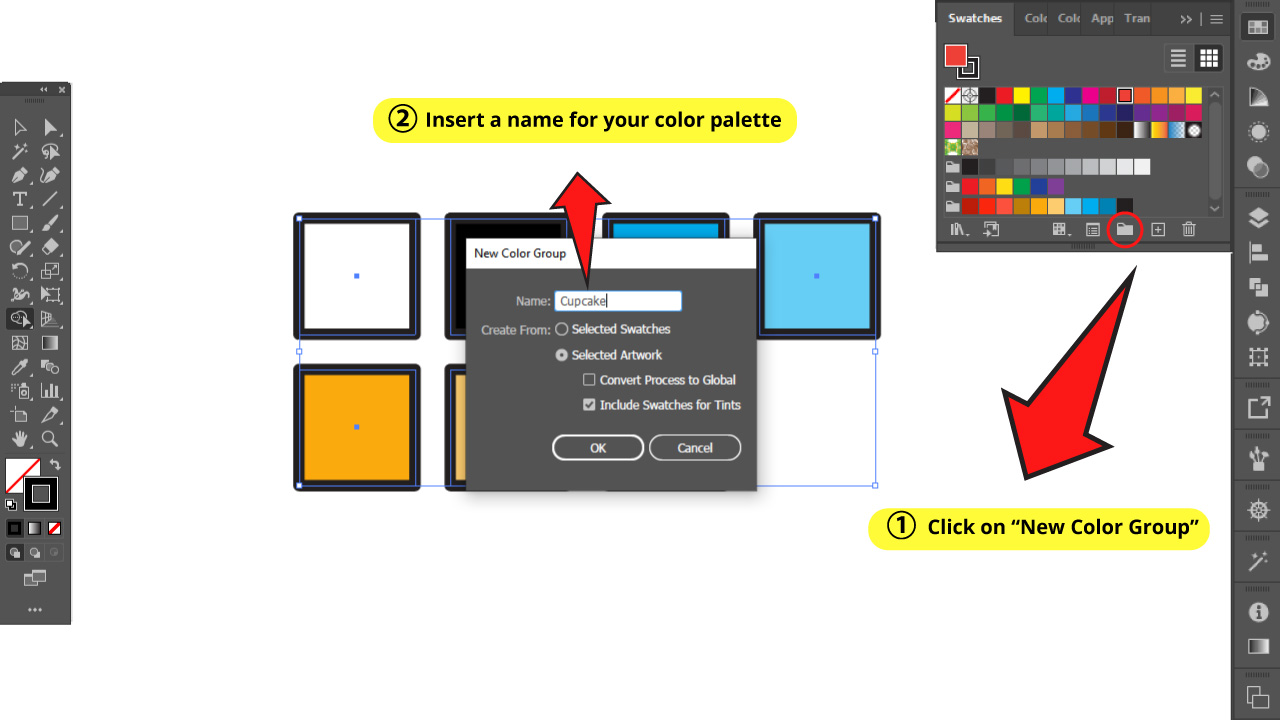
Once you have your colors, select them with the “Selection” tool (V) and then click on “New Color Group” (the folder icon) in the “Swatch” panel. A window called “New Color Group” will open.
Insert a name for your new color palette. Then click on “Selected Artwork” and make sure that the “Include Swatches for Tints” checkbox is selected, while “Convert Process to Global” is not.
Click OK and you’ll have your customized color palette ready to use.
If you want to go deeper about Illustrator Swatches, we suggest you take a look at this guide about “How to use and create Swatches in Illustrator”.
Step 8: Paint Section by Section
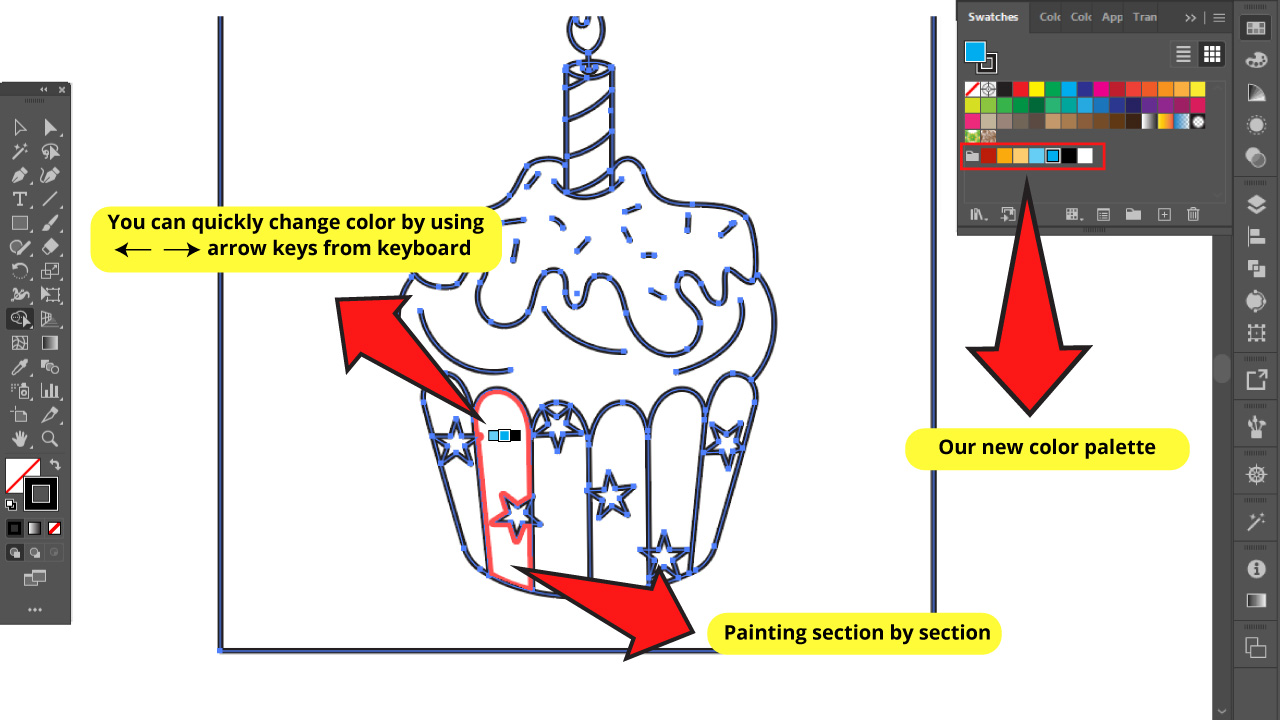
Again, select your drawing and go to “Live Paint Bucket” or press “K”, and then select the color you want to use (from the Swatch palette or just picking directly from the color box).
Then click on the path you want to color. This method is for coloring section by section.
Step 9: Paint Several Sections at the Same Time
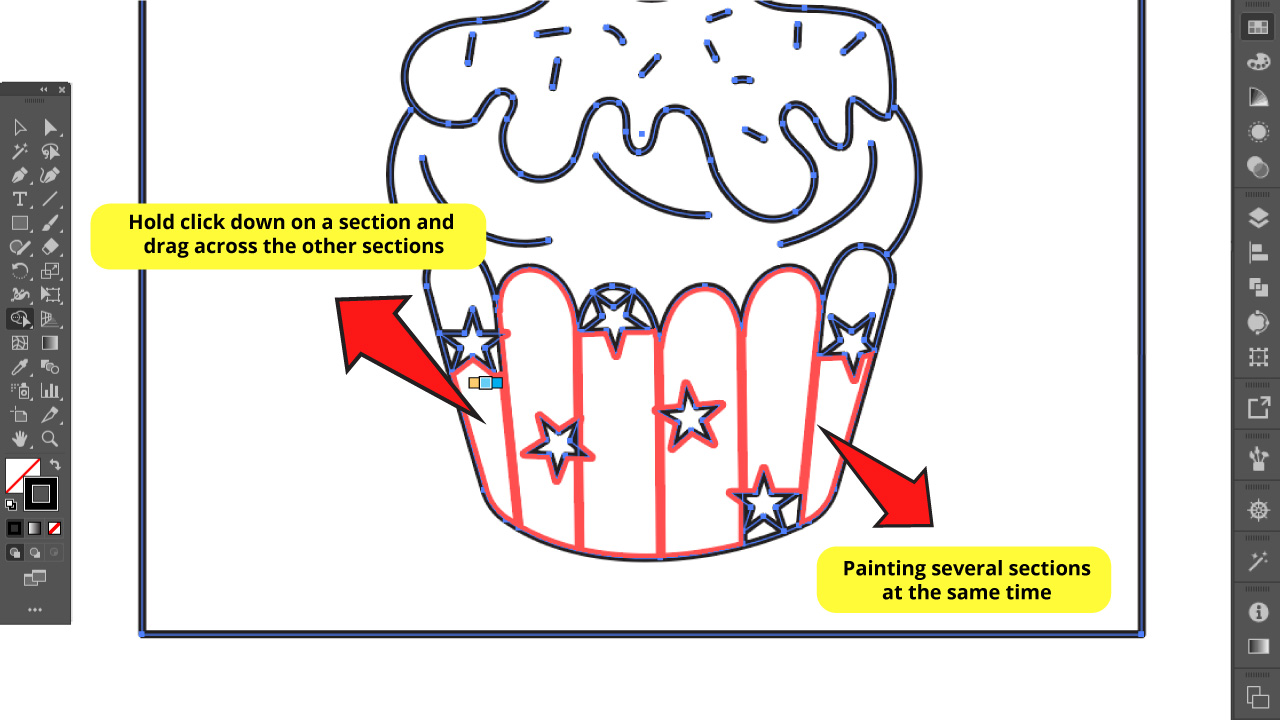
But if you want to color several paths at the same time with the same color, you have to left-click and hold in a shape and drag to the other shapes.Then release the click and there you go. Several paths colored at the same time.
Step 10: Detect Gap Issues
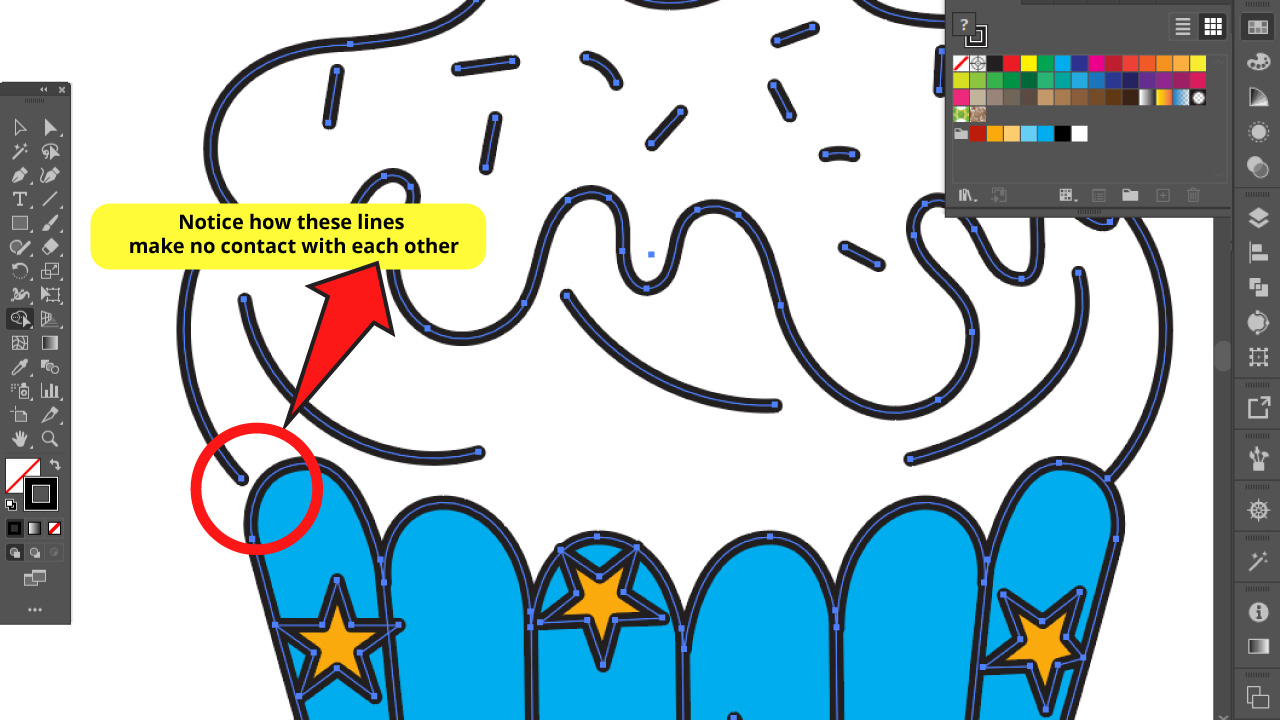
It’s very common to find small gaps in drawings or customized shapes.
Gaps appear when anchor points aren’t properly joined or when the drawing lines make no contact with each other.
Notice how in this example lines make no contact. As a result, the “Live Paint Bucket” tool can’t recognize the cake section as a path and won’t let us paint it.
So we have to make a small adjustment first.
Step 11: Get to Know How to Solve Gap Issues
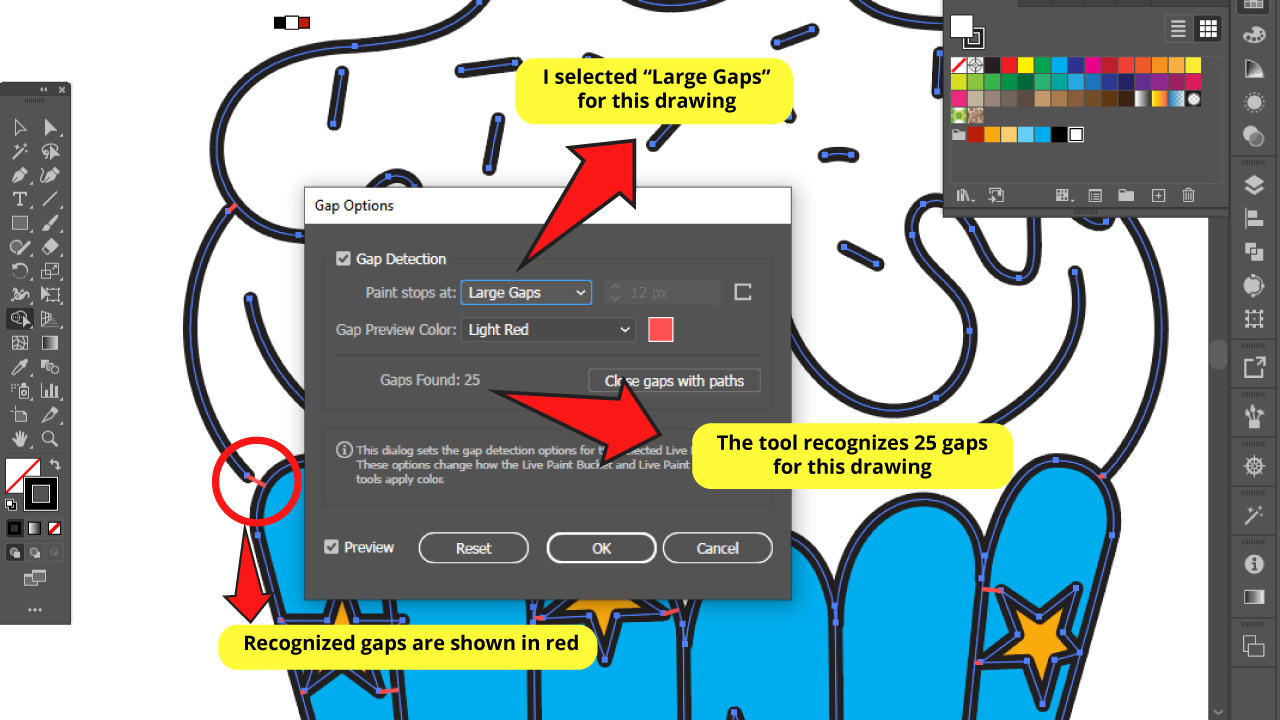
For this we have to select the whole drawing and go to the top menu “Object” > “Live Paint” > “Gap Option”.
A window will pop up. For this example I’ll select “Large Gaps” but you can choose whatever works better for your drawing. Meaning that if you only want to fix very small gaps, you should select “Small Gaps”.
For this example the tool found 25 gaps in my illustration.
Click OK to solve gap issues.
Step 12: Solve Gap Issues
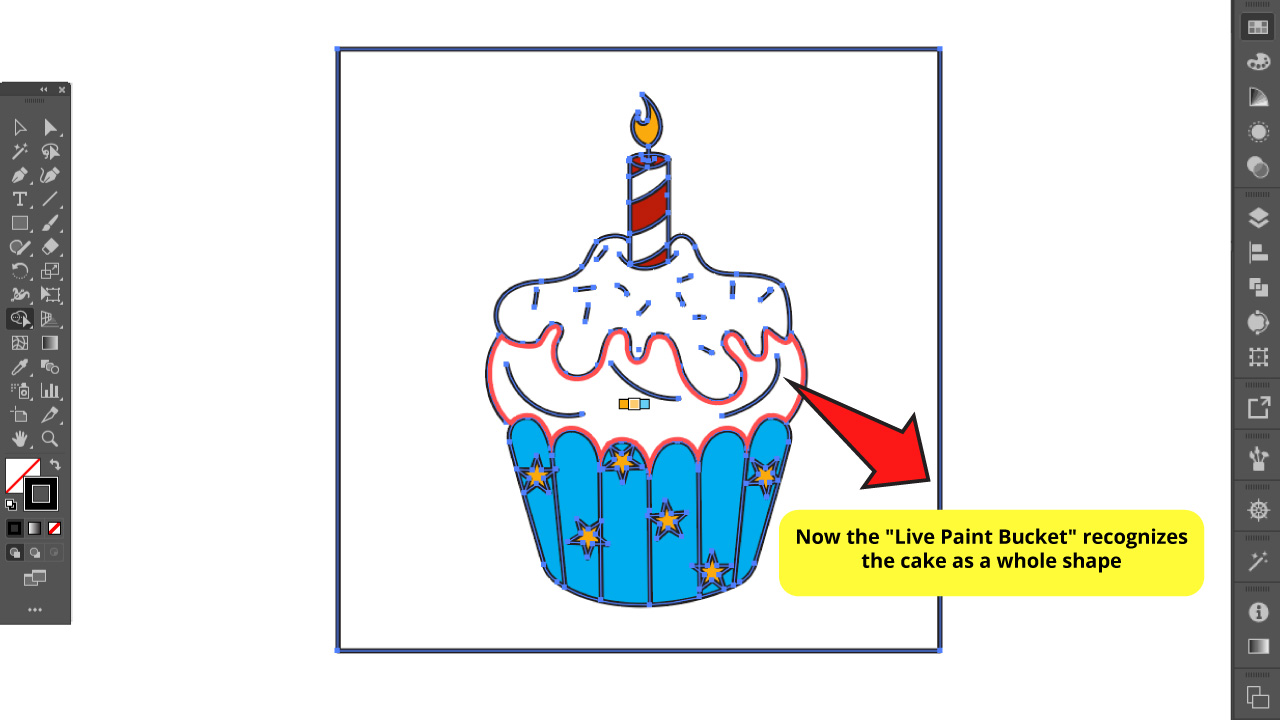
Notice how the tool recognizes the cake section now and allows us to paint it, even if the lines still make no contact.
Anyway, if you want to join or move those anchor points you can check this article about “How to Move Anchor Points in Illustrator in 4 Easy Steps”.
Step 13: Complete the Color Fill
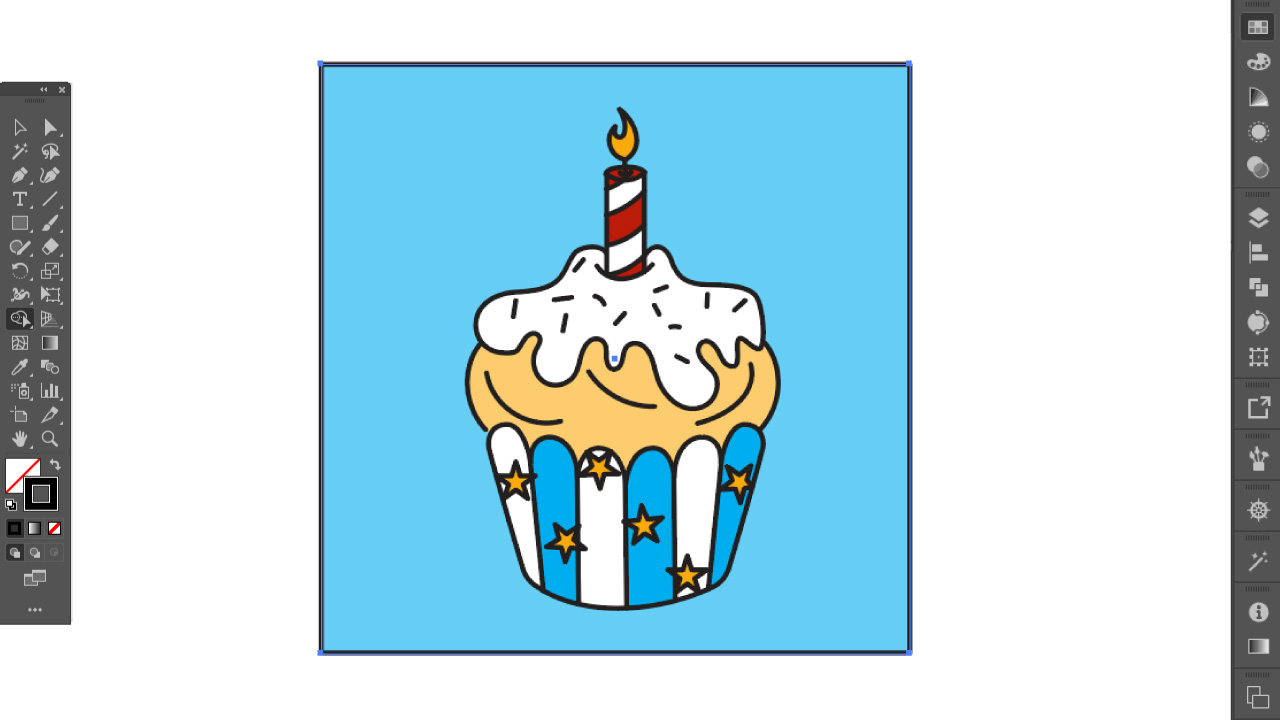
Here it is! The whole drawing was painted.
Step 14: Delete Strokes
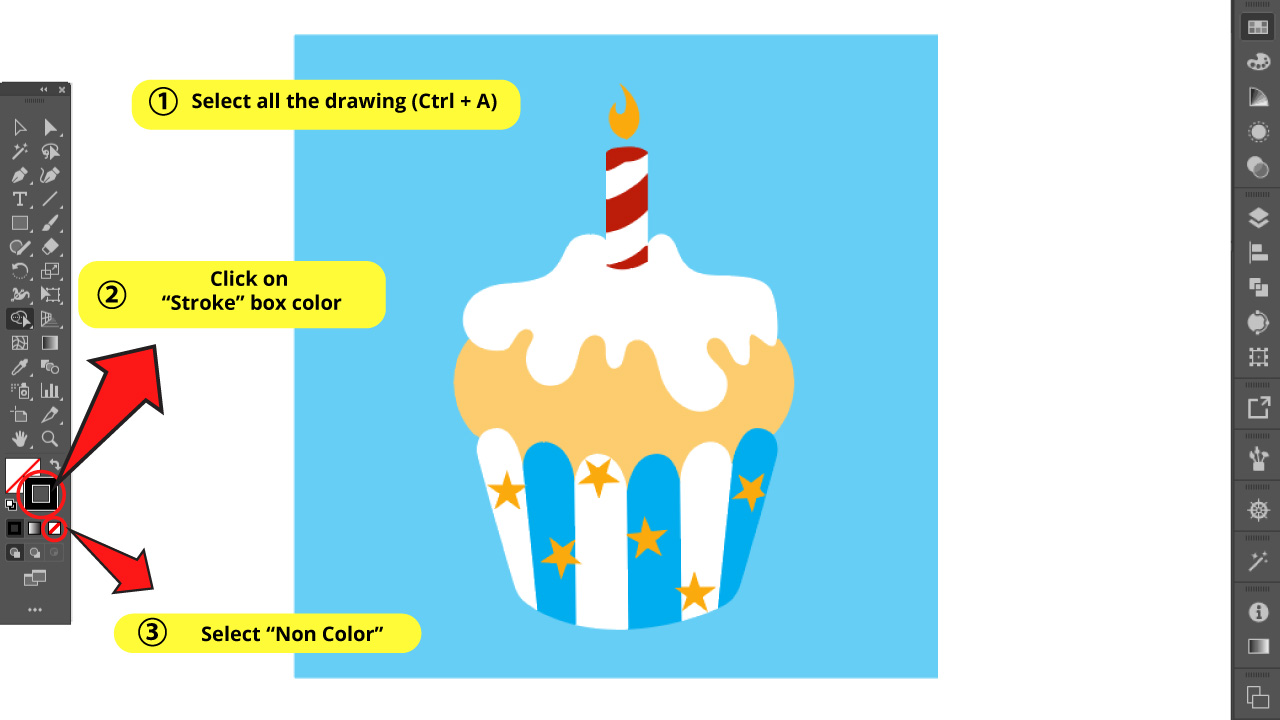
As stated at the beginning, the great thing about this tool is that the process is not destructive. I mean, you can add, delete or modify the stroke lines as you wish at any moment, and the color shapes will look fine anyways.
For example we can delete the stroke lines. For this you have to select the whole drawing. Next, click on the stroke box color on the left side toolbar and finally click on the “non color” box which is just below the stroke box selector.
Notice how the color paths merge perfectly even without lines!
If you’d like to see more examples of the “Live Paint Bucket” put in practice, take a look at this awesome guide about “How to Make Pixel Art in Illustrator”.
How to use the “Live Paint Bucket” tool to color the Stroke Lines in Illustrator
First select your stroke line shapes and then double-click on “Live Paint Bucket” (K). Check the “Paint Strokes” box, uncheck the “Paint Fill” box and click OK. Next, pick a color and click on the strokes you want to modify.
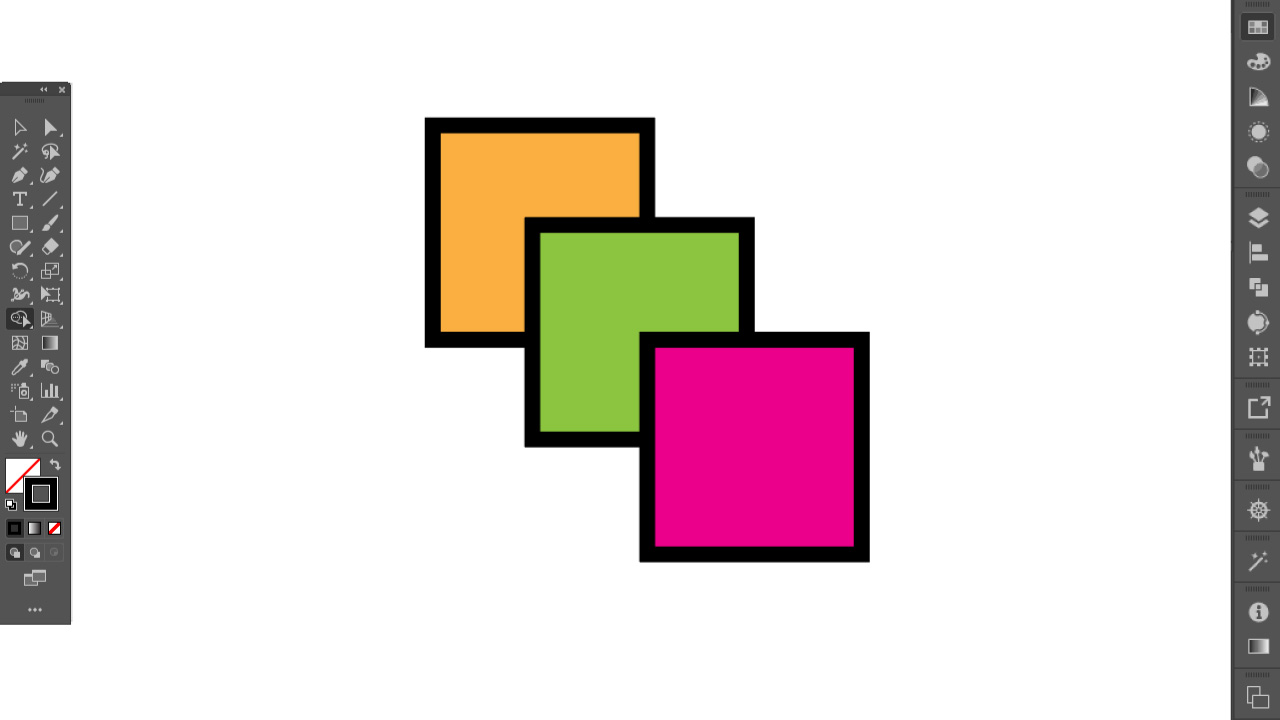
For this step-by-step guide we are going to use just three overlaid squares to explain the next utility of this magnificent tool.
Step 1: Draw your Shapes
First get your shapes ready and select all of them (Ctrl + A).
You can read more about creating shapes in this quick tutorial about “How to Use the Polygon Tool in Illustrator in 5 Easy Steps”.
Step 2: Set “Live Paint Bucket” Options
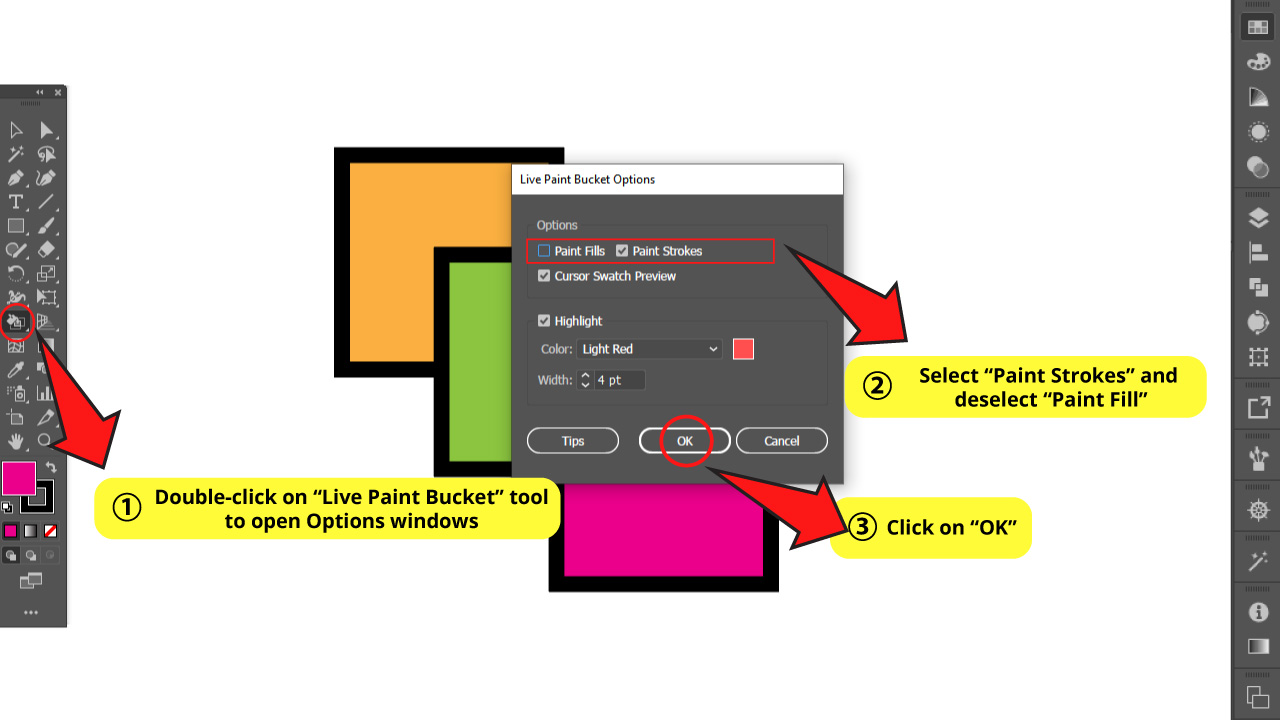
Double-click on the “Live Paint Bucket” tool that you can find on the left side toolbar.
An option menu will open up.
Check “Paint Strokes” and uncheck ”Paint Fills” boxes. Then click OK.
You had now set the tool to paint only the stroke lines.
Step 3: Color it!
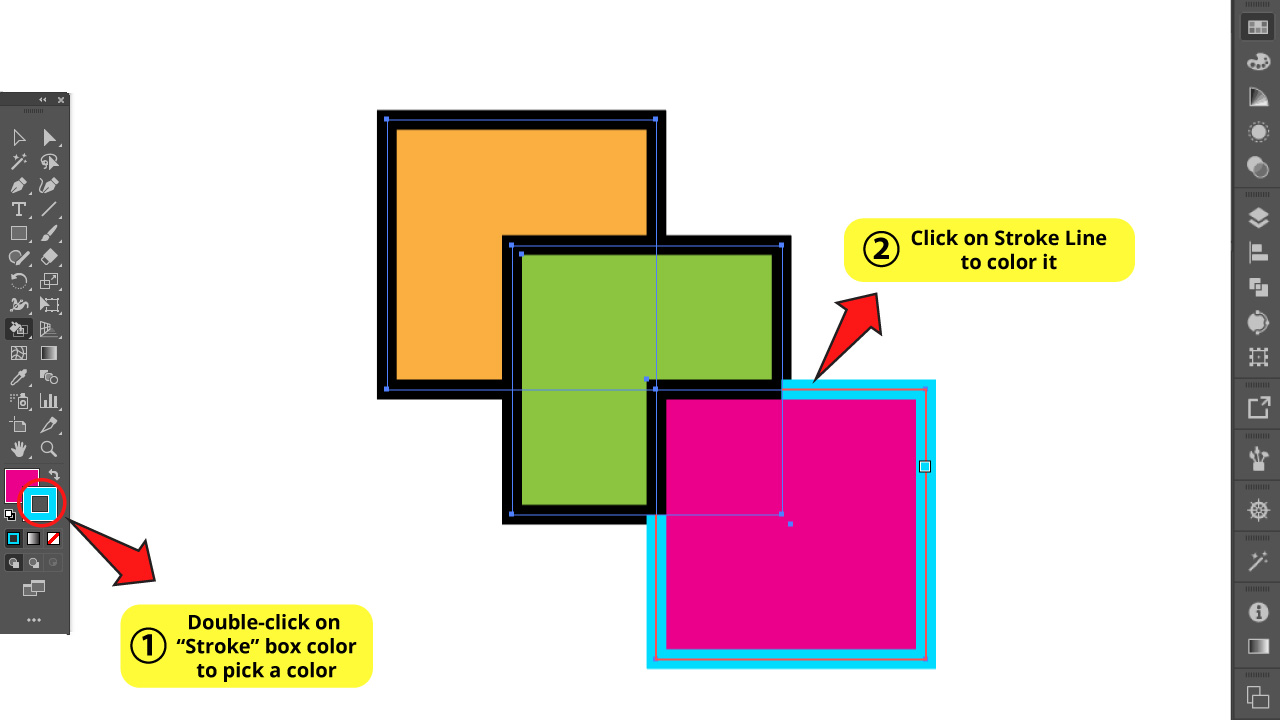
Pick a color for the stroke lines.
For this you can double-click on the stroke color box which is next to the fill color box. You can find those boxes on the left side toolbar.
Double clicking on this box will let you pick your color directly. You can also single click on it and then select a color from your swatch color palette.
Only remaining step is to color the sections you want to.
So as we did with fill color, just click the stroke line sections you want to modify.
Notice how the stroke line changes color only until the unlaid square lines because the tool recognizes separated sections.
Step 4: Finish it Off!
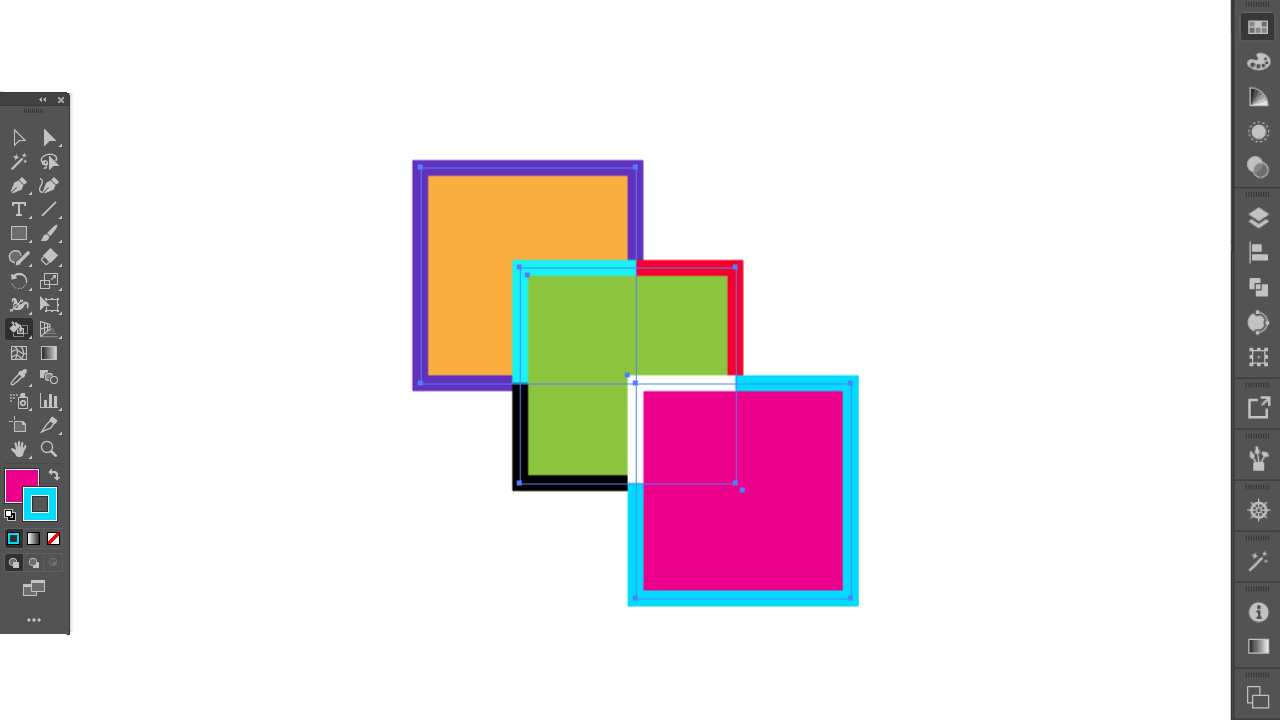
Finally you can get your stroke lines color customized as you want. For this example I used random colors, but you can make real masterpieces with this single tool.
Frequently Asked Questions on “How to Use the Live Paint Bucket Tool in Illustrator”
Is it necessary that the shapes have stroke lines to use the “Live Paint Bucket” tool?
You can use this tool on paths without lines or even without any fill. If you are looking forward to painting shapes with a modern aesthetic without bold lines, this tool will also work fine for you.
Can I add stroke lines at the end of the process of using the paint bucket tool?
You can do this any time because the best aspect of this tool is that the process is not destructive. That means that changes made will never permanently affect the drawing. So you can go back, change colors, strokes, and so on, with no permanent consequences whatsoever.