

There are three types of gradients that you can create in Illustrator: Linear, Radial, and Freeform.
Linear type is used to blend colors from one point to another in a straight line.
Radial type is used to blend colors from one point to another point in a circular pattern.
Freeform type is used to blend color stops within a shape in an ordered or random sequence such that the blending appears smooth and natural.
Now, without further ado, let’s get straight into it. After completing the below tutorial, you will surely be a gradient master!
How to Use Linear Gradients in Illustrator
How to use Radial Gradients in Illustrator
How to use Freeform Gradients in Illustrator
How to Use Linear Gradients in Illustrator
To use linear gradients in Illustrator, Choose the Rectangle Tool and create a rectangle. Select the rectangle, and open the Gradient Panel from Window > Gradient. Click on the Gradient box to apply it to the rectangle. Under “Types,” choose “Linear.” Use the sliders to adjust the gradient.
Linear gradients go from one end to another. They are used to blend colors from one point to another in a straight line.
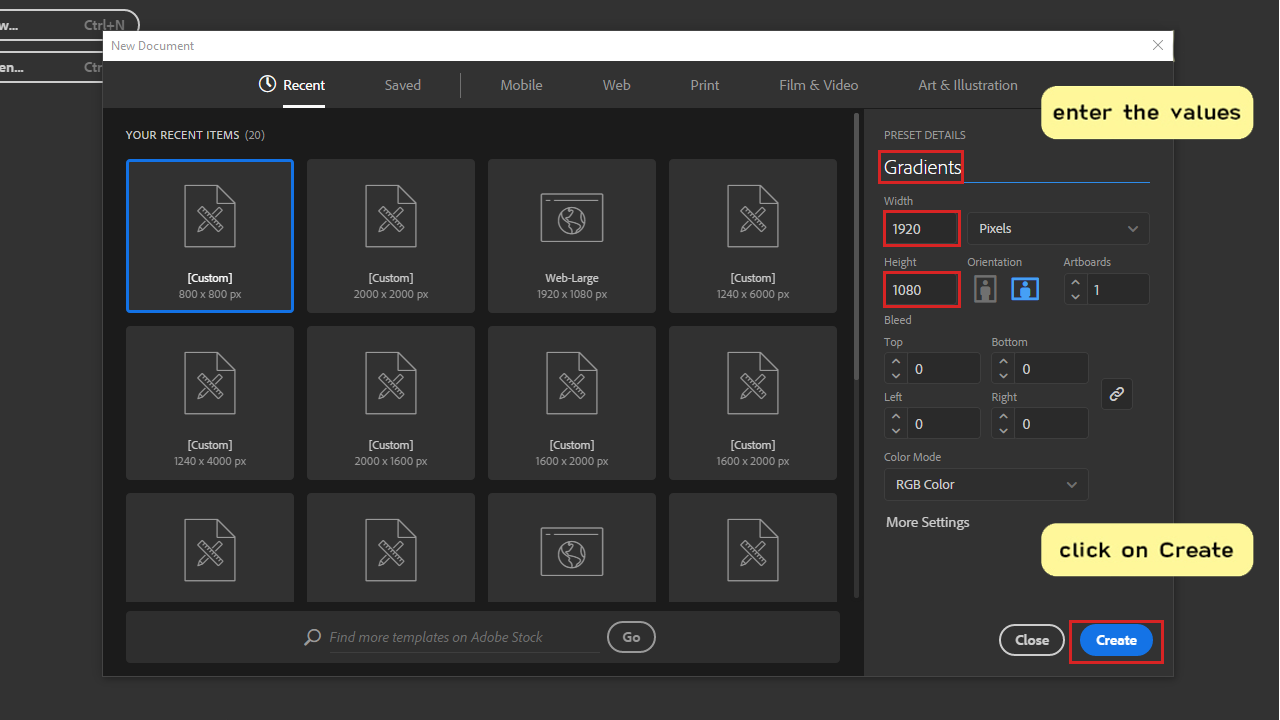
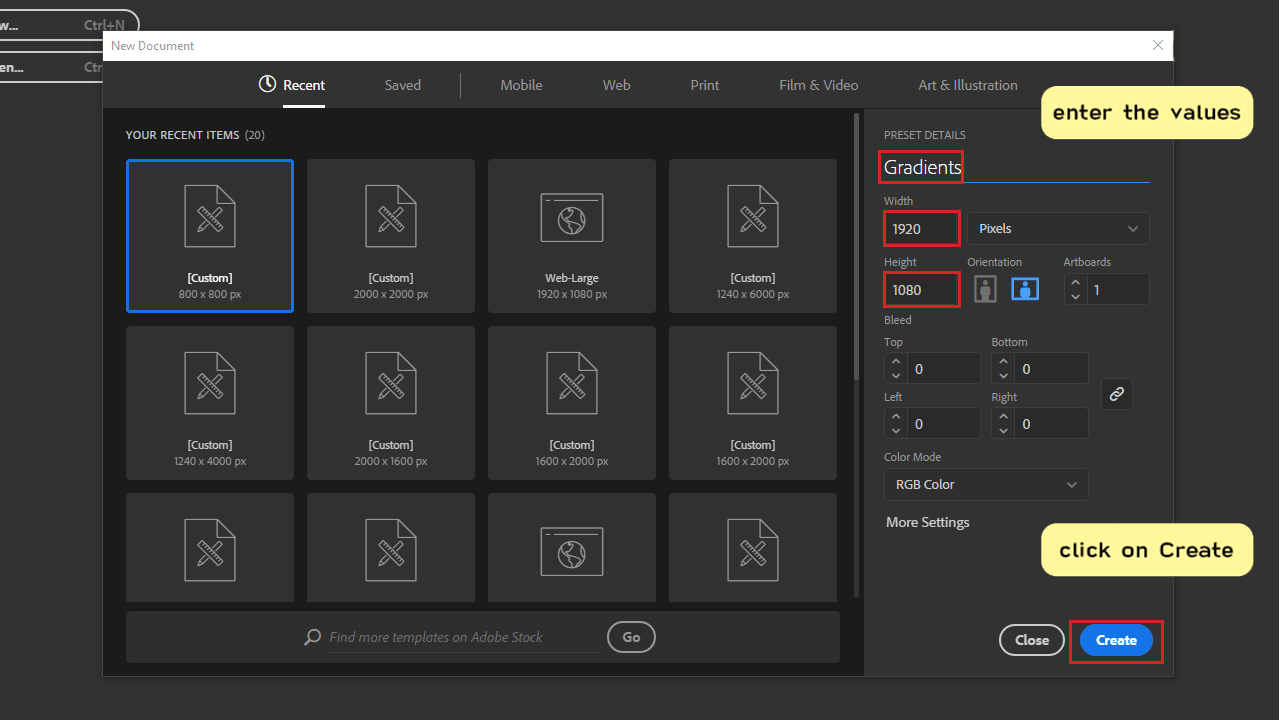
Step 1: Create a New File in Adobe Illustrator
To start, create a new document by clicking the “Create New” button on the top left side of your screen. The window “New Document” will pop up; feel free to choose any size of the canvas. In this tutorial, the dimensions are set to 1920x 1080px. One handy shortcut for creating a new file is CTR+N (Windows) or Command + N (MAC). Set your document name, set chosen “Width,” and do the same for “Height”. Click on “Create”, and let’s begin.
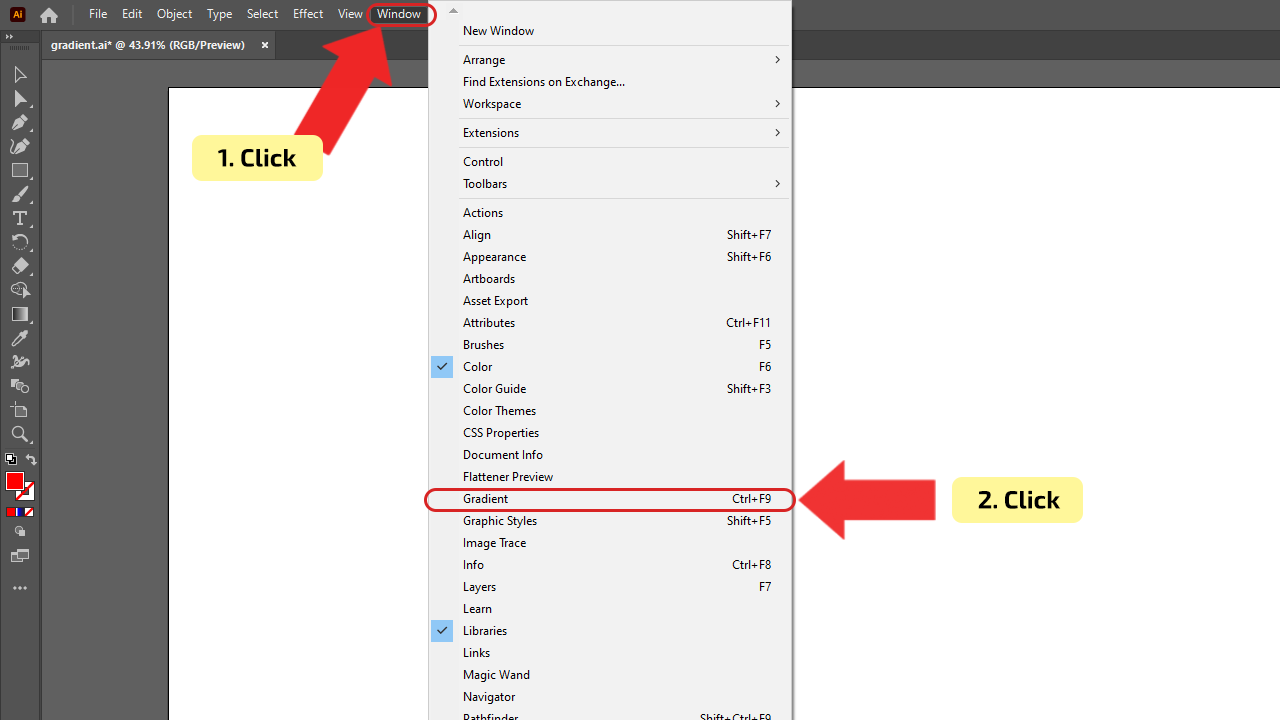
Step 2: Access the Gradient panel
The Gradient panel is located on the right side of the screen, and if it’s not there, you can access it by choosing “Window” > “Gradient.” Also, you can use the shortcut “Ctrl+F9” or Command + F9 (MAC). By default, the gradient will be displayed in black and white in the gradient bar.

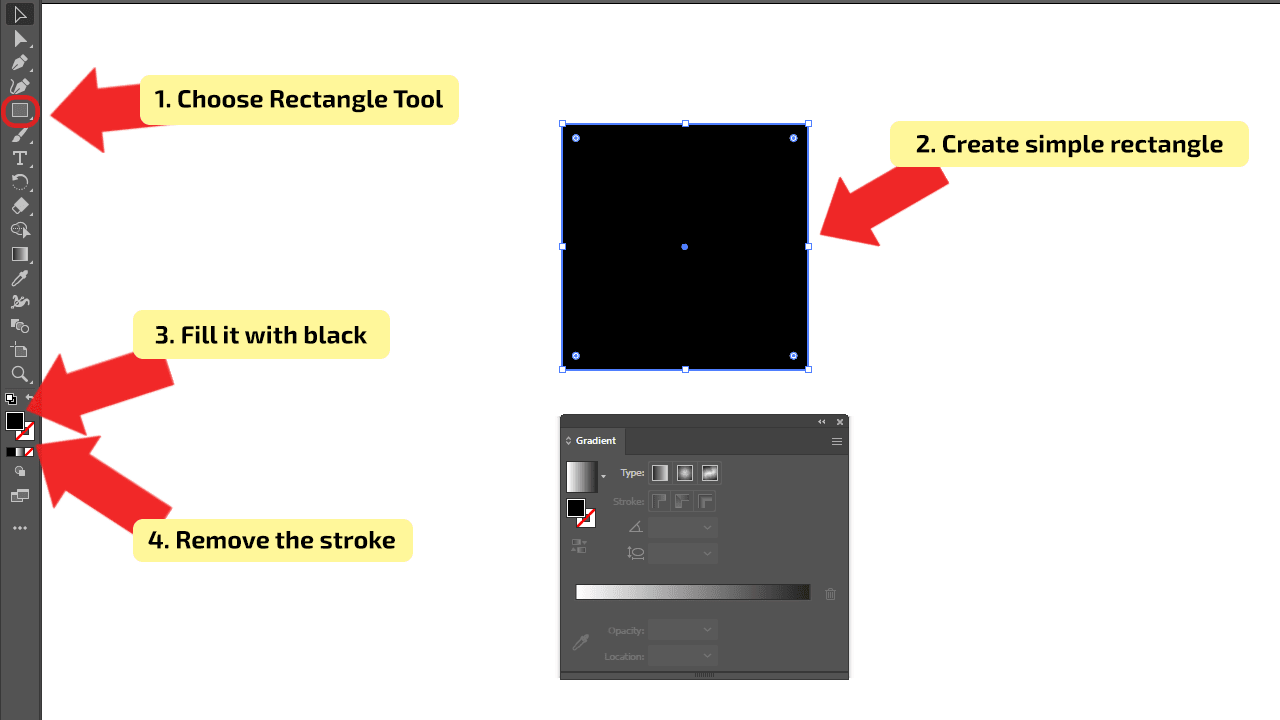
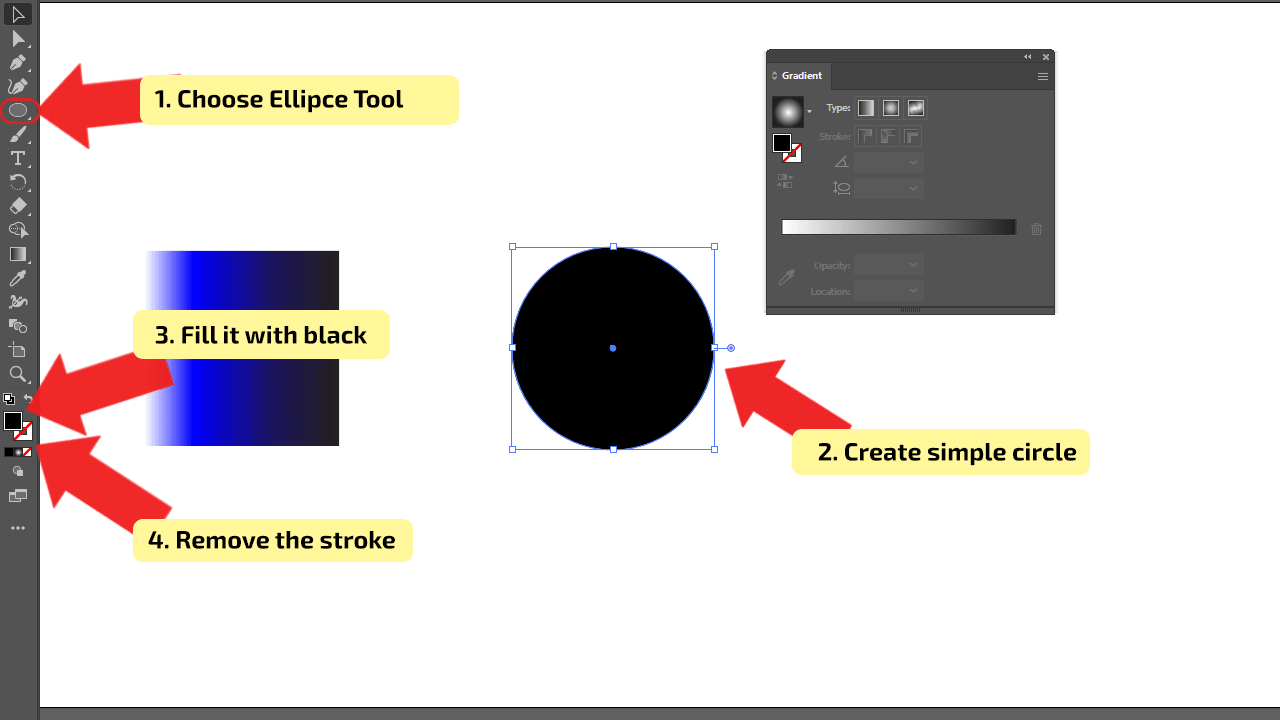
Step 3: Create an object
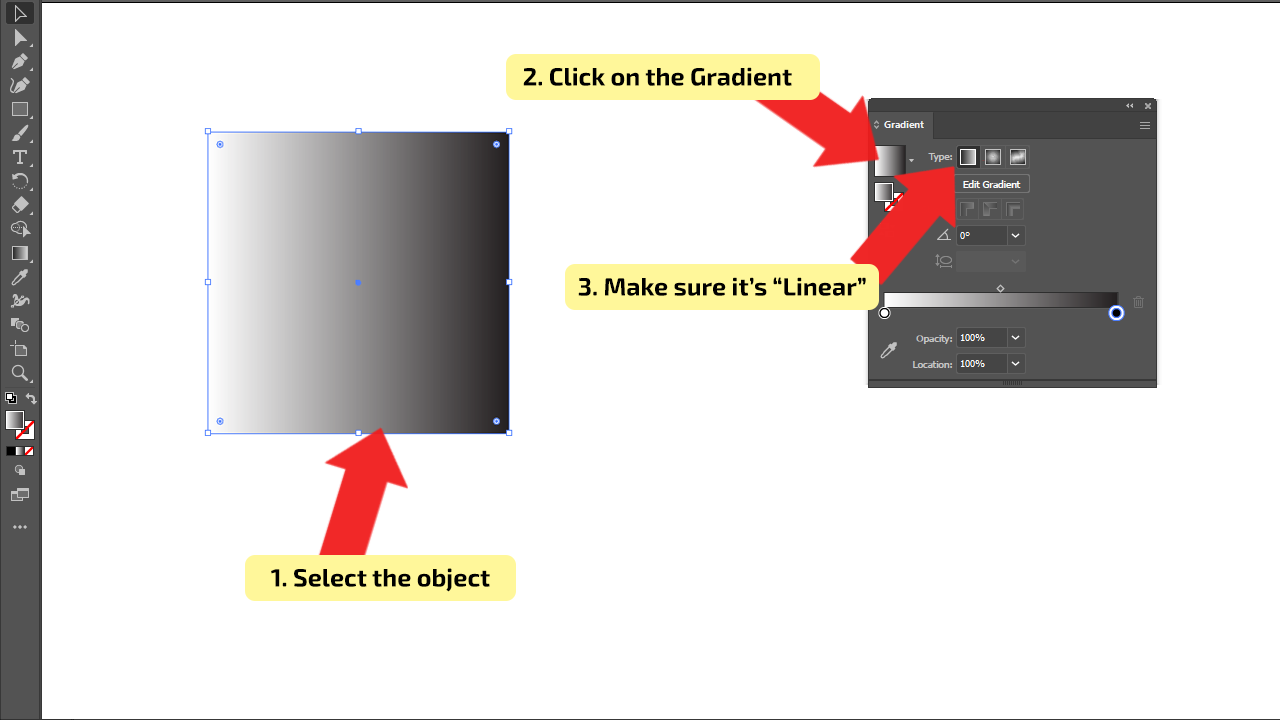
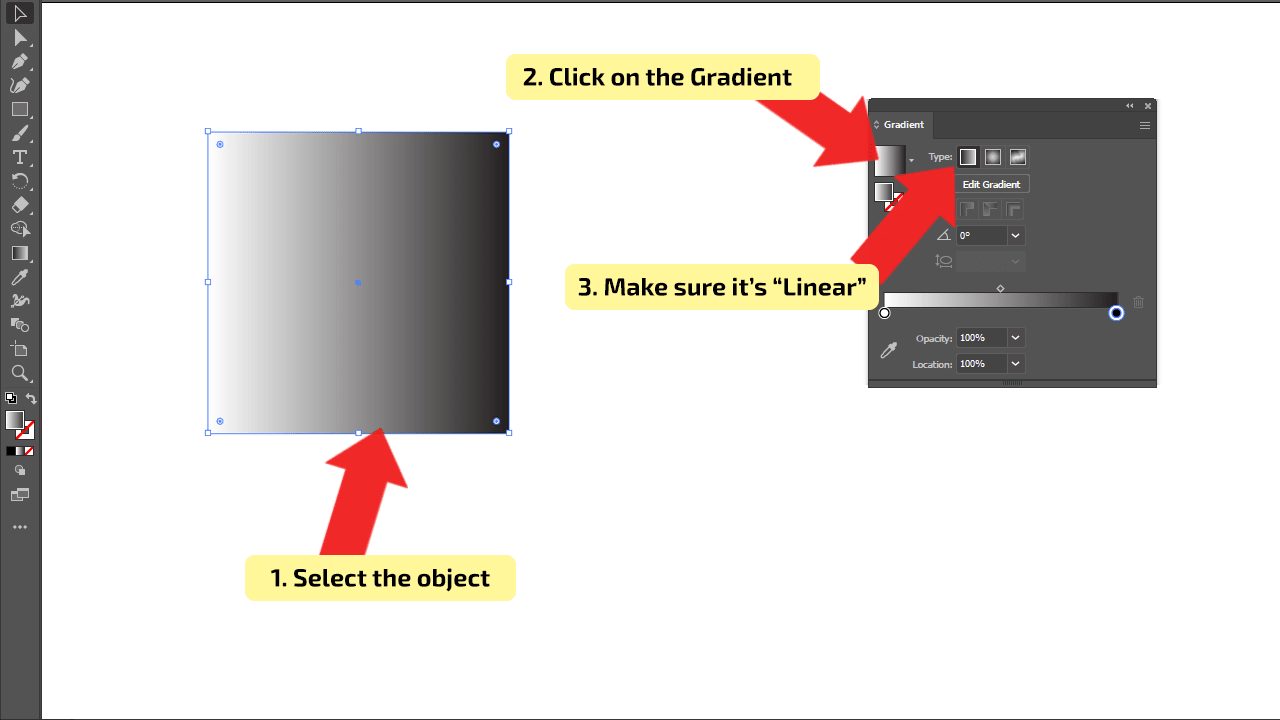
To use this tool, an object needs to be created. Choose the “Rectangle Tool” on the right tool palette, and create a simple square; it should be a basic color. Make it black and remove the stroke. Now, when an object is created, the focus can be shifted to the main tool of the tutorial, “Gradient Tool.”

Step 4: Apply the Gradient to the Object
Before using this tool, make sure that the chosen object is selected. To apply a gradient on the object, click the Gradient or Gradient slider on the Gradient bar. It will be applied automatically, and you can see the gradient on the object. Make sure that the “Linear” Gradient is selected. After working with default gradients, it is time to check the rest of the options.


Step 5: Adjust the Look of the Gradient
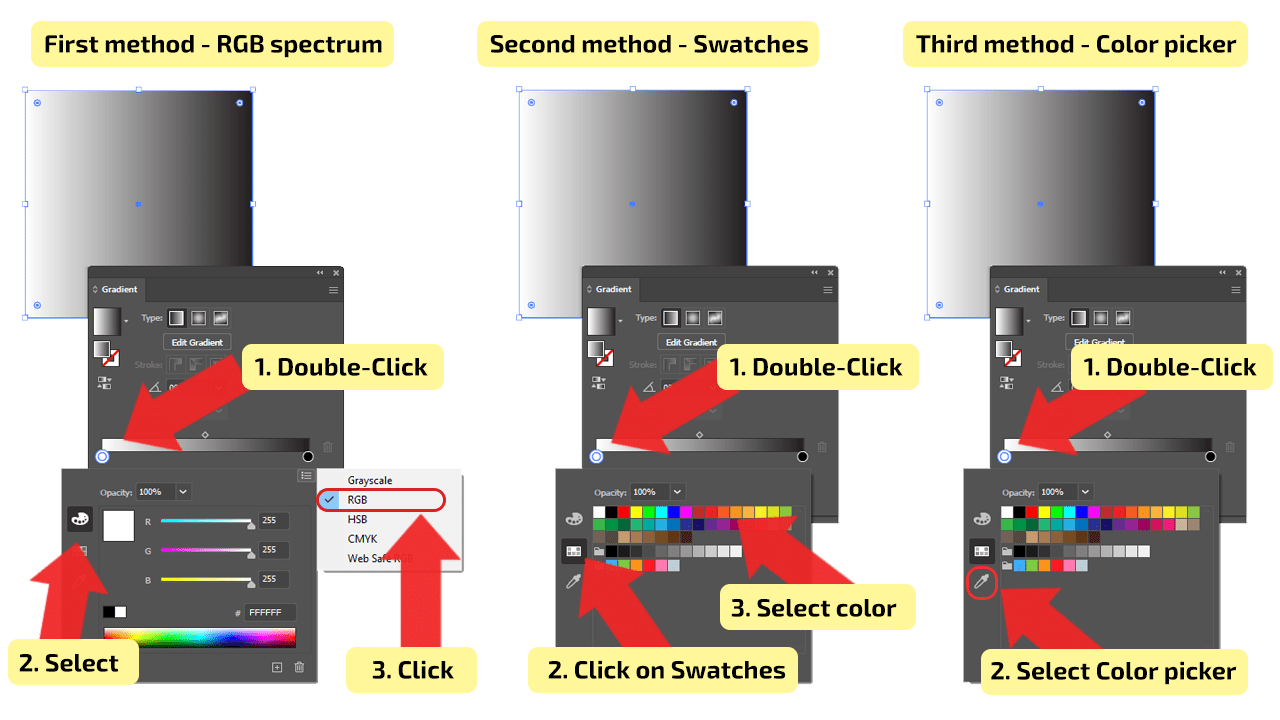
The first and easiest thing that needs to be changed is color. You need to return to the “Gradient Bar” for this. On the slider, you can find the small circles on both ends of the slider; they are called Color stops. These are points on the gradient where the color is defined and where you can change the color by double-clicking on the color stop at the bottom of the sliding bar.
A small window will pop up, and you will see the two options for choosing the color. The first option is the most flexible because you can use the RGB spectrum.
The second option is the Swatches.
The third option is a Color Picker, which can pick out any color within the document. Choose the color for each Color stop.
By clicking and dragging the color stop left and right, adjust the starting and the ending points to change the look and smoothness of the gradient.
Also, you can adjust the midpoint on top of the sliding bar, it is represented as a diamond icon.

Step 6: Add or Delete Color Stops on the Gradient
By clicking below the Gradient slider bar, you will be able to add Color stops and change the color as in previous steps. In this way, you can add as many colors as you need and it will be automatically shown on the object.
If you are not satisfied with the color or think that there are too many colors, you can always delete the color points. To delete, select the color point that you want to remove and simply click on the “Delete Stop” button, it is represented as a trash can. The second way to remove the Color stop is to click on the stop and drag it downwards until it disappears.

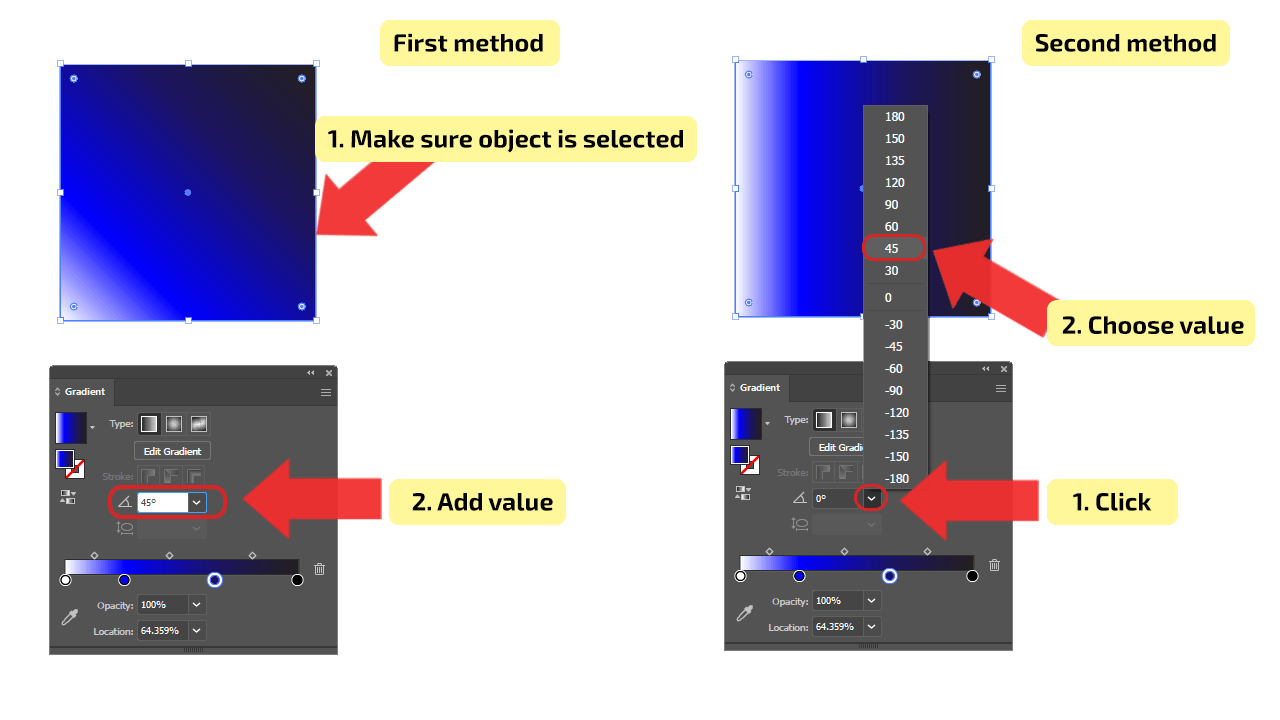
Step 7: Adjust the angle of the Gradient
There are two ways to adjust the angles of the gradient on your object. The first one is by choosing a value in the Angle box, for example, an angle of 45° will be automatically applied and visible on your object.
The second way of adjusting the gradient is to use the drop-down menu. Next to the Angle box, you will find an arrow, by clicking on it, the drop-down menu will appear. Predefined values will be shown, and you just need to choose the preferred one. It is as simple as that.

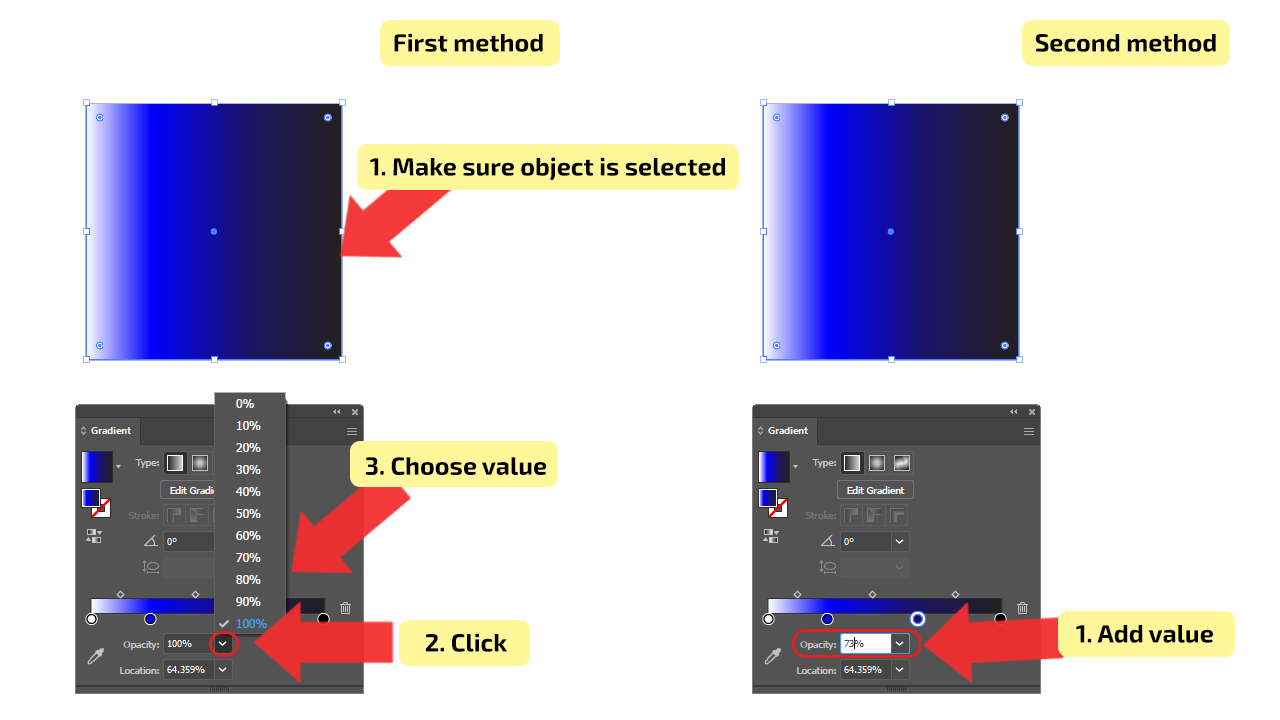
Step 8: Adjust the Opacity of Color Stops
For adjusting, the color stop has to be selected. The Opacity box is located below the Gradient Slider. By clicking on the arrow next to the opacity box, the drop-down menu will be shown; choose the predefined value, and the gradient opacity will be automatically applied to the object.
If you are not satisfied with the defined opacity value, you can enter the number into the box, for example, to 73%. Use the same method to change the opacity of the remaining color stops.

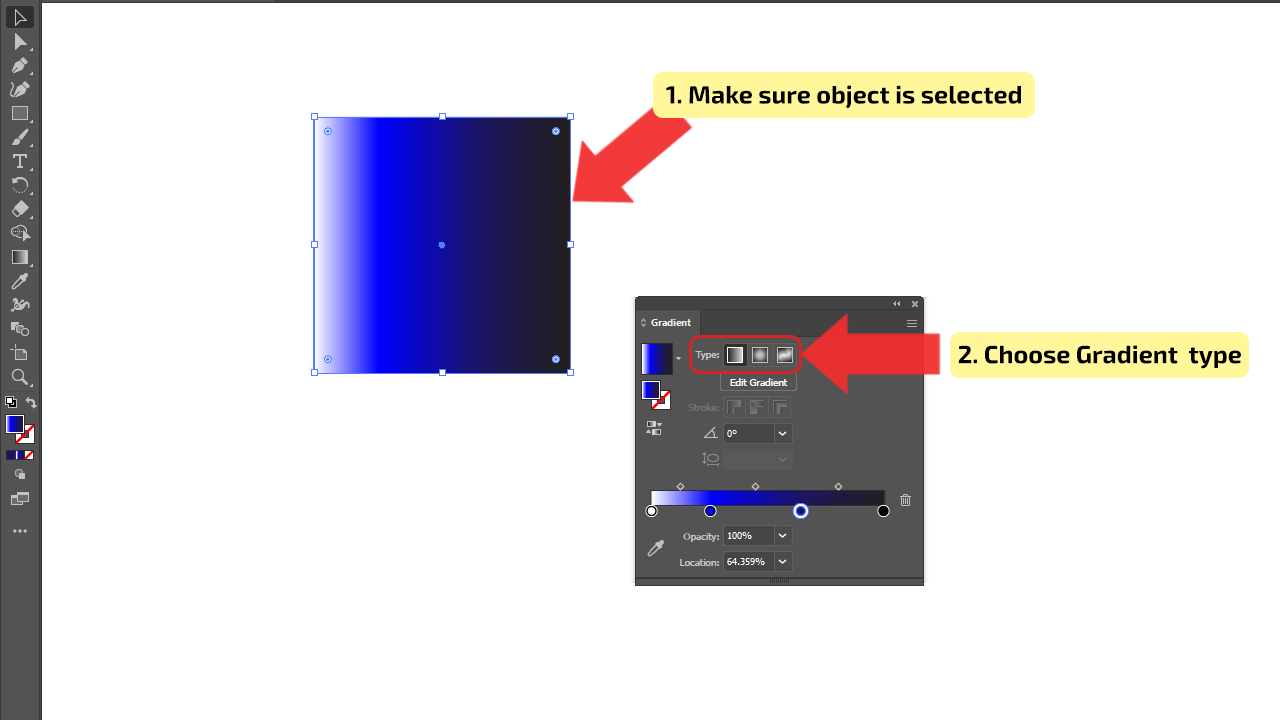
Step 9: Change the Gradient Type
You can change the gradient type for any gradient you apply. At the top of the Gradient bar, you can choose the gradient type, from linear to radial or freeform. Find the “Type” box and the arrow for the drop-down menu is placed next to it. By clicking on the arrow, the menu will be shown, and you will be able to choose the Gradient type.

How to use Radial Gradients in Illustrator
To use radial gradients in Illustrator, choose the Ellipse Tool and create a circle. With the circle selected, open the Gradient Panel from Window > Gradient. Click on the Gradient box to apply it to the circle and choose “Radial” for the type. Use the slider to adjust the look of the gradient.
Radial gradients are used to blend colors from one point to another point in a circular pattern.
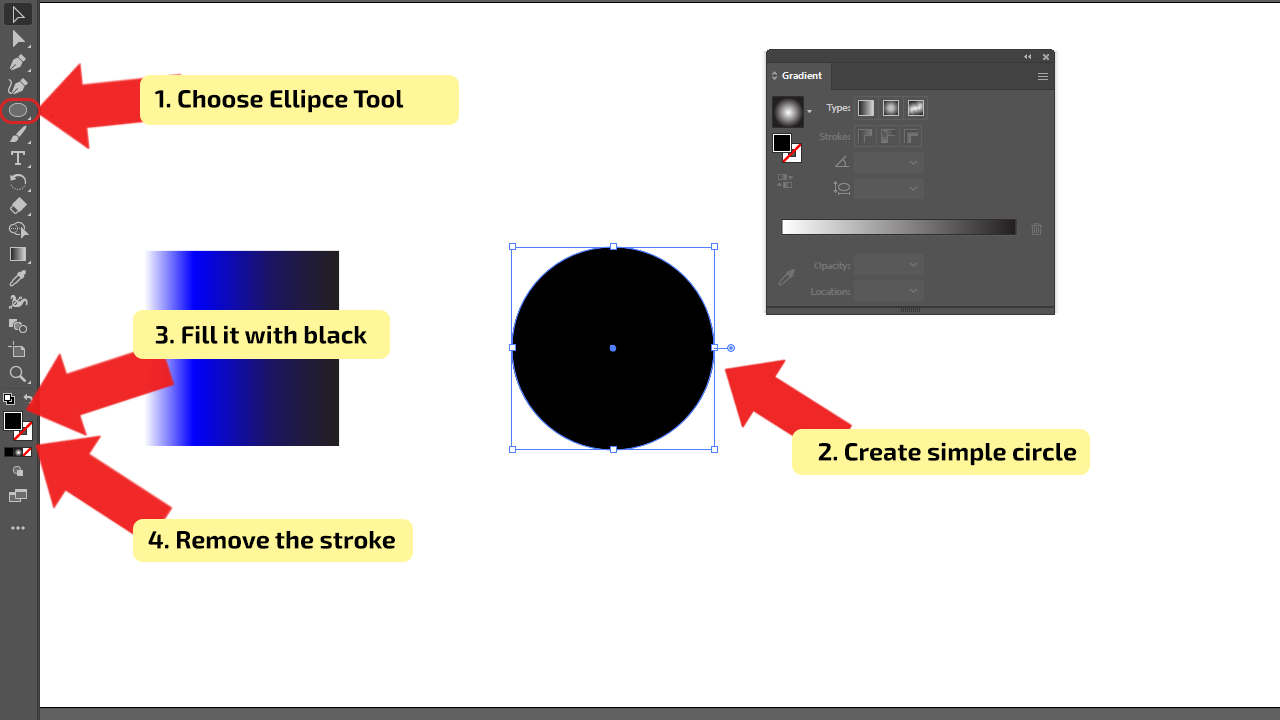
Step 1: Create an Object
The first thing that should be done is to create a new object. To compare all gradients, create the second object next to the rectangle. Choose the “Ellipse tool” on the right tool palette, and create a simple circle; it should be a basic color. Make it black and remove the stroke.
Step 2: Add or Delete Color Stops on the Gradient
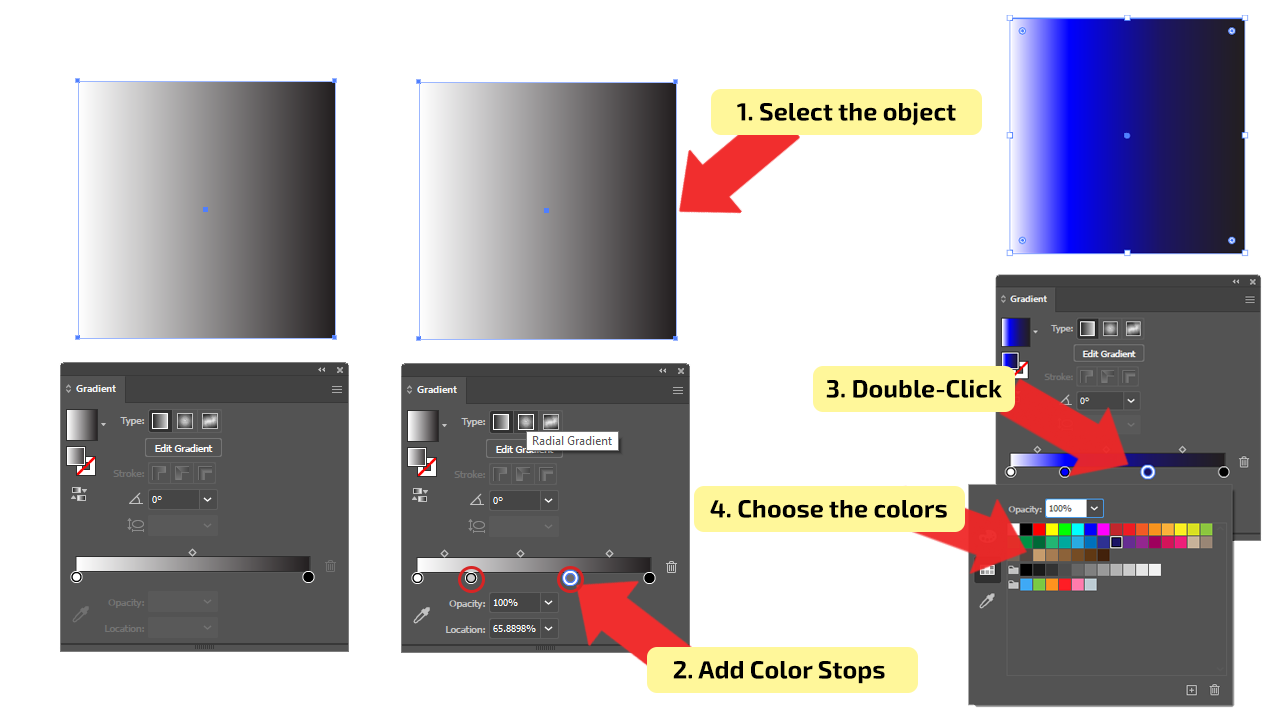
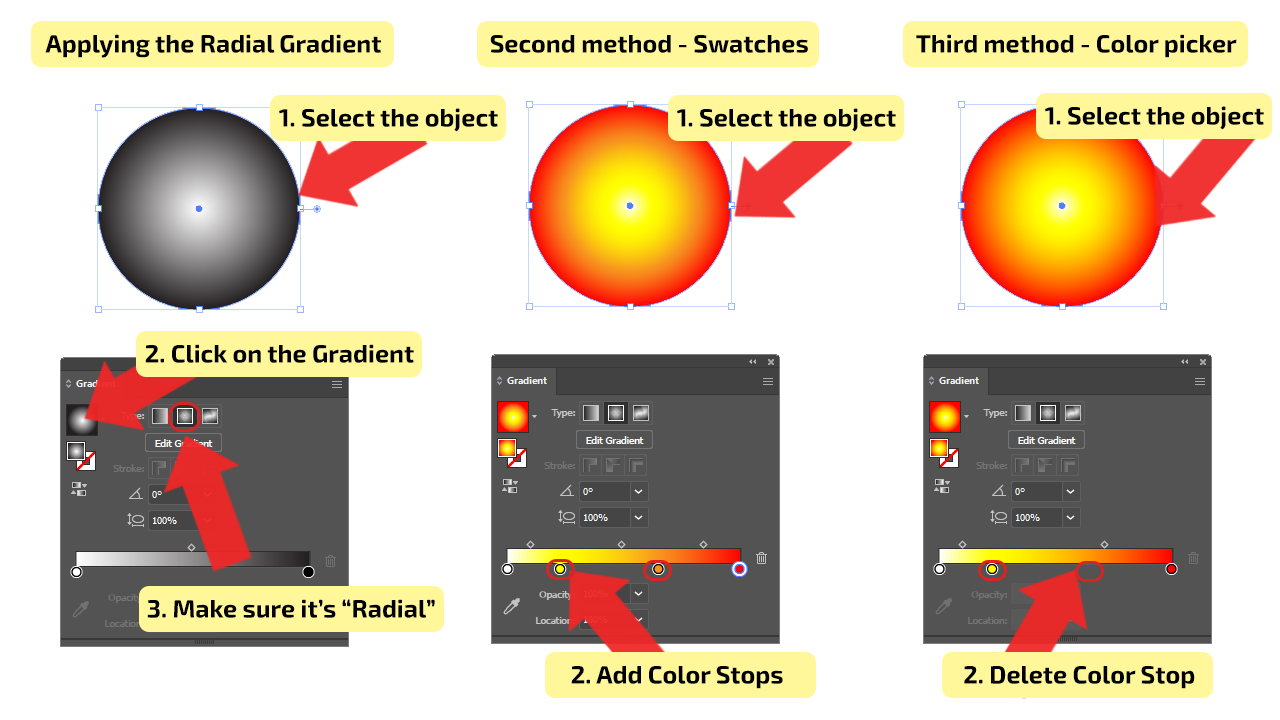
Select the object, and on the “Gradient bar,” choose the “Radial Gradient” or press “L” on your keyboard.
It will be applied automatically, and you can see the radial gradient on the object. This step is the same as it is for Linear Gradient.
Add stops by clicking below the Gradient slider and changing the color. The number of color stops isn’t limited and will be automatically shown on the object.
Deleting the color points, select unwanted ones, and simply click the “Delete Stop” button or drag it downwards until it disappears.

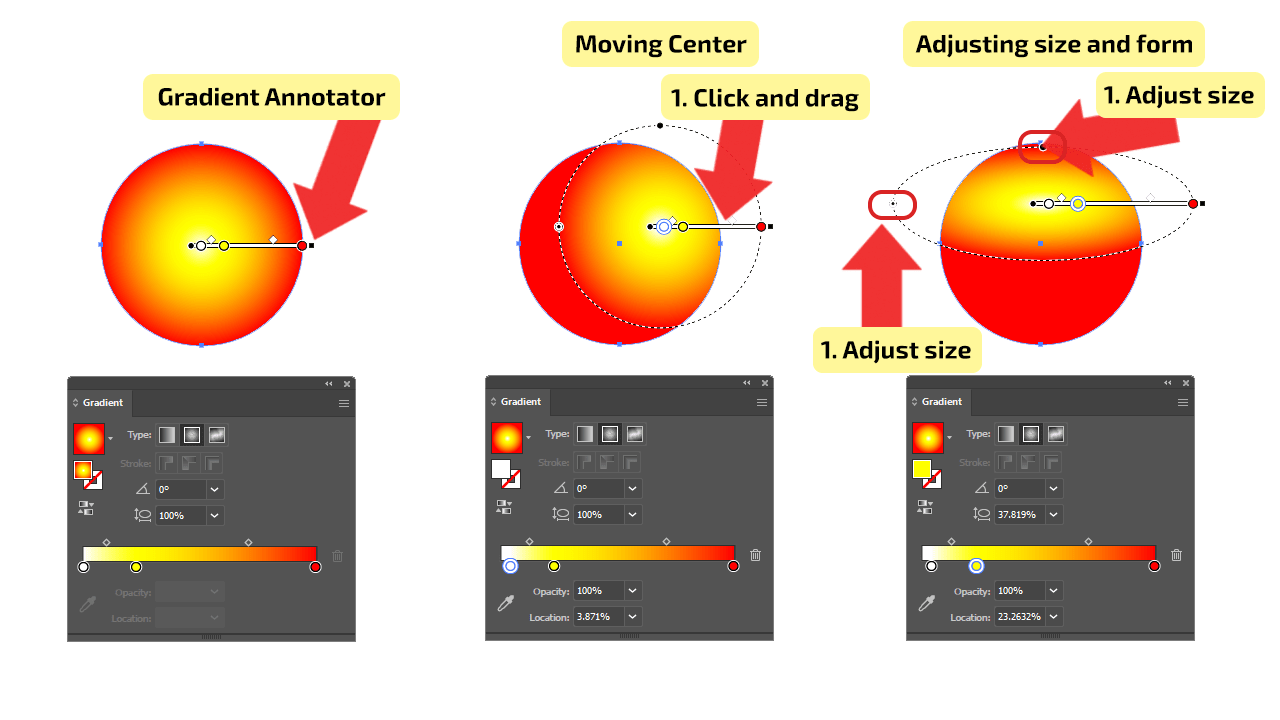
Step 3: Move and Adjust the Radial Gradient
In this type of Gradient, the most interesting thing happens when you use the Gradient Annotator; it will appear by clicking on “Edit Gradient” on the “Gradient Bar.” With this, you can change the size or form of the gradient and move the center around.
On the left side of the Gradient Annotator, you can change the size of the gradient or just click and drag. Changing the form is similar to changing the size, and also, there is a drop-down menu for changing the form.

How to use Freeform Gradients in Illustrator
To use freeform gradients in Illustrator, first create an object. With the object selected, go to Window > Gradient. Click on the Gradient box to apply it to the object. In the drop-down menu, choose the “Freeform” type of gradient. Use sliders and stops to adjust the look of the gradient.
Freeform gradients are used to blend color stops within a shape in an ordered or random sequence such that the blending appears smooth and natural. It can be applied in two modes: Lines and Points.
In the Lines mode, you will select if you want to create color stops over a line segment in the object and shade the area around a line.
When this type of gradient is used, after clicking the Freeform button on the Gradient bar, a series of color stops will appear in the selected object.
The number and color of those color stops depend on the artwork in your document. For each stop, you can change color and place, or if there are too many stops, you can always delete them. If there is a lack of color stops, you can add new ones.
In the Points mode, you will select if you want to create color stops as independent points in the object and shade the area around a color stop.
How to use Freeform Gradients in Illustrator
To use freeform gradients in lines mode in Illustrator, follow these steps:
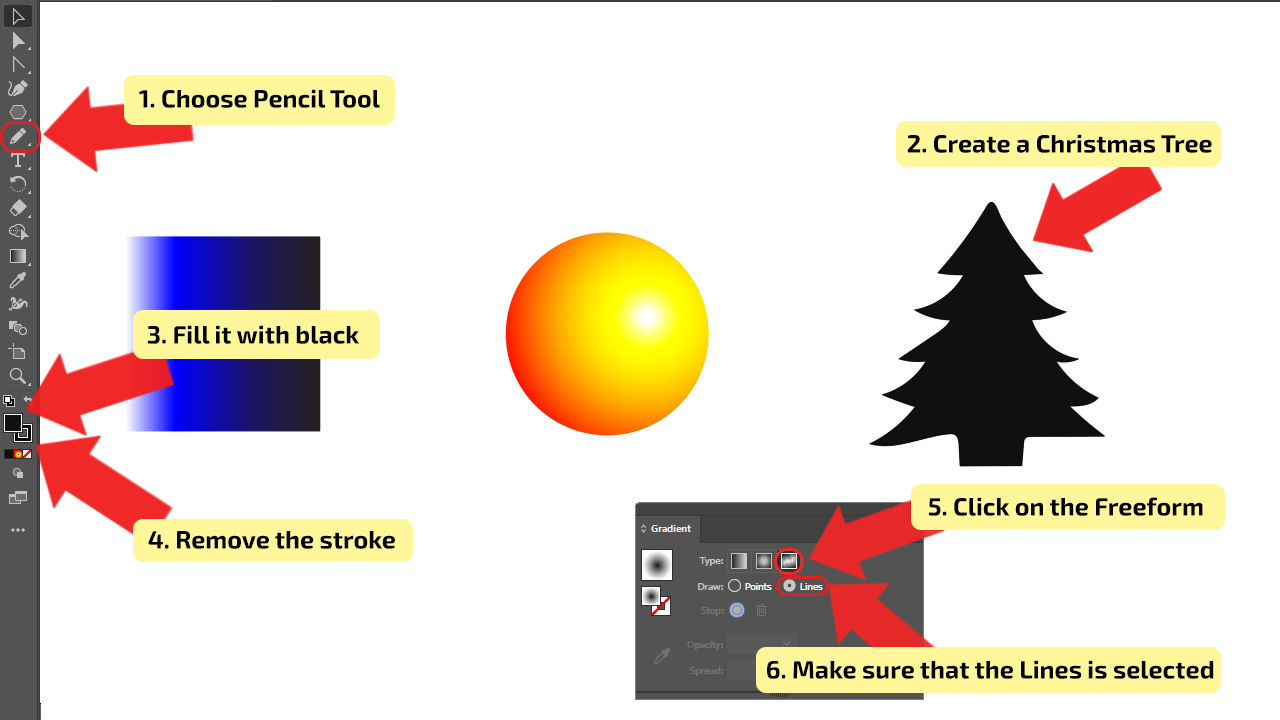
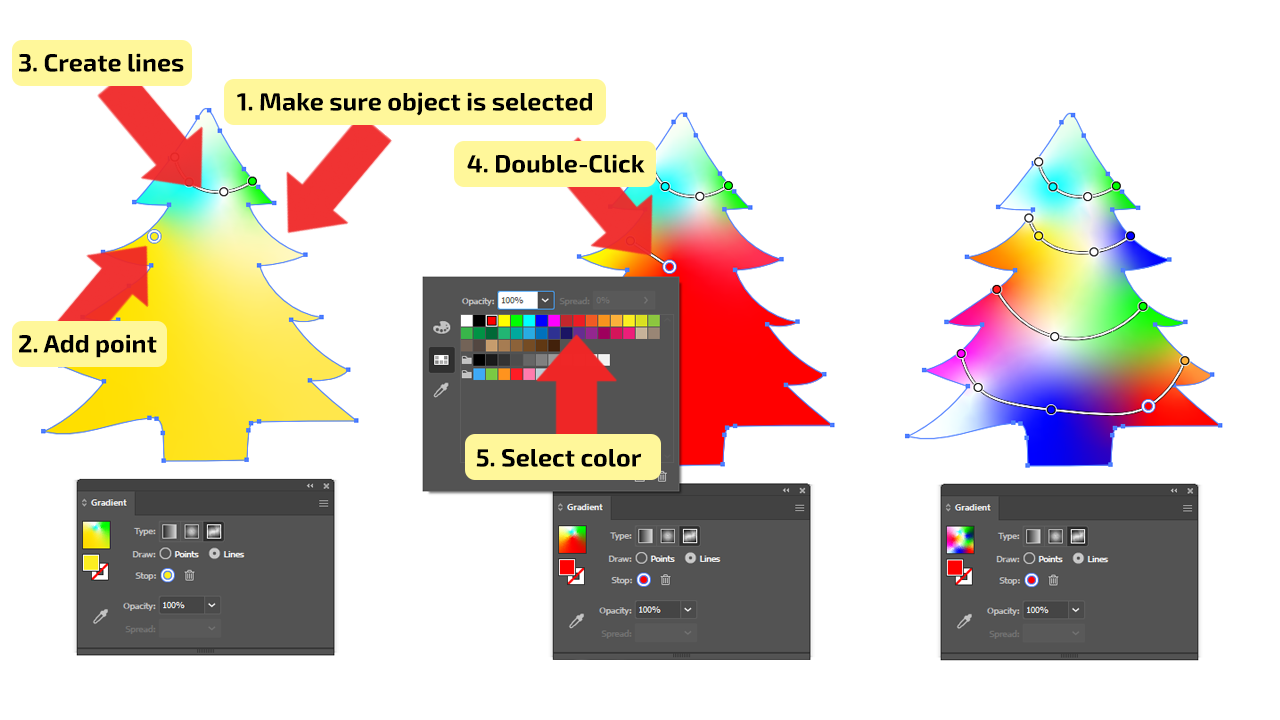
Step 1: Add Stops in Lines Mode
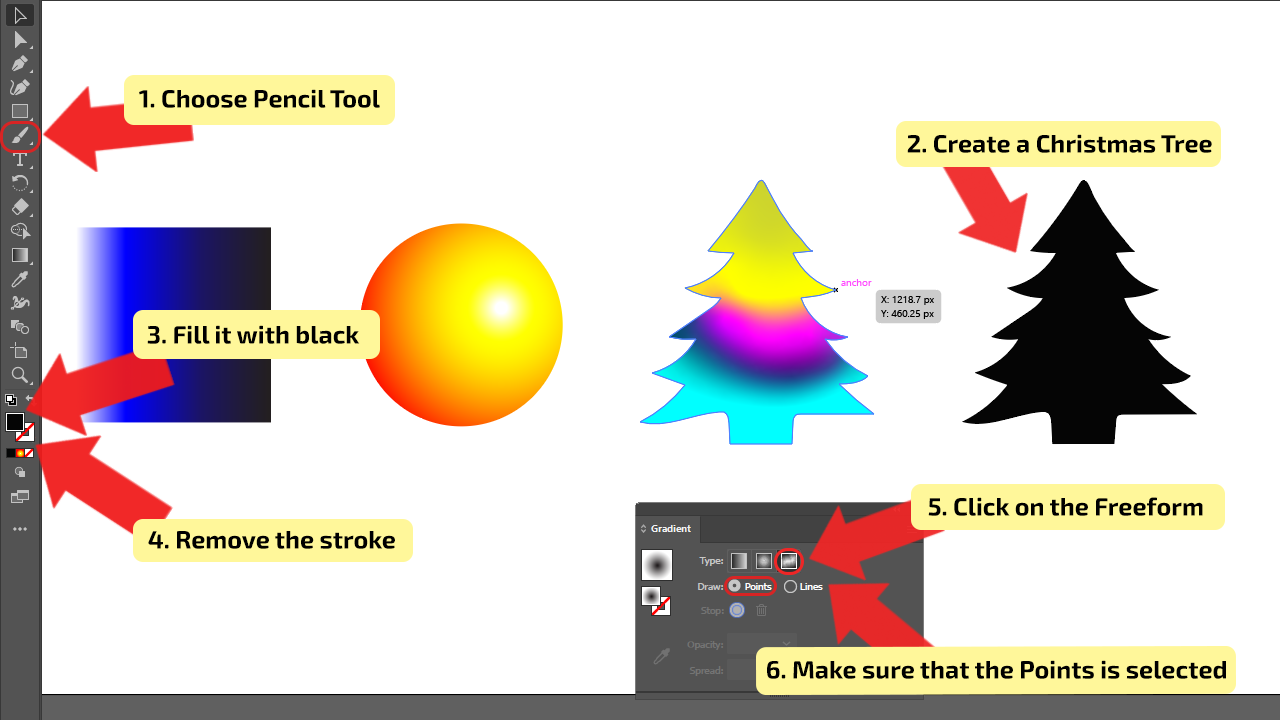
We will apply this mode on a Christmas tree (you can obviously also apply this to another object in Illustrator). Choose the “Pencil Tool” or the “Paintbrush Tool” on the right tool palette, and create a Christmas tool; it should be a basic color. Make it black and remove the stroke. In the Properties panel, select the “Lines Option.”

Step 2: Draw Lines, Create Points, and Adjust the Color
Click on the selected object to set a point and draw the line.
You need to create the starting point for the line segment; therefore, click anywhere in the object to create the first color stop. The next step is to create the next color stop.
After creating the second stop, a straight line will connect the first and the second color stops. To create further color stops, click again.
The straight line will change into a curved line. Continue clicking to finish the path. To stop drawing, press Esc on your keyboard.
You can create multiple individual line segments in an object. To edit the color of points, double-click on any of the stops on the path, and a panel with several color options will appear. Choose the color, and it will automatically be applied to the object.

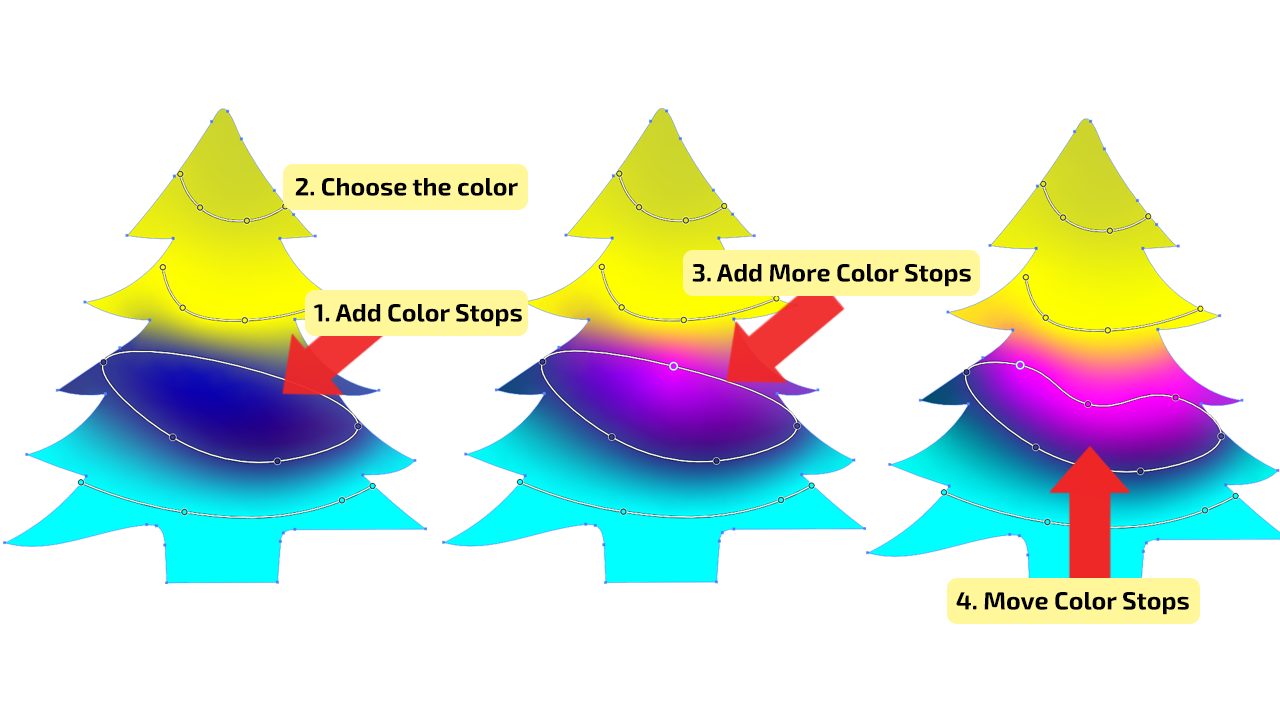
Step 3: Add, Delete, or Move Color Stops
You can add color stops on existing line gradients by clicking on the line. You can delete color points in a few ways.
Selecting the point that needs to be removed, press Delete or Backspace on the keyboard, and the point will be automatically removed from the line.
Another way is to drag the color point outside the object area or click “Delete Stop” in the “Gradient Bar.” To change the position of a point, just drag and place it at the desired location.
The line segment also shrinks or expands when you change the position of a color stop. The position of other color stops remains unchanged.

How to Use Freeform Gradients in Points Mode in Illustrator
To use freeform gradients in points mode in Illustrator, follow these steps:
Step 1: Create an object.
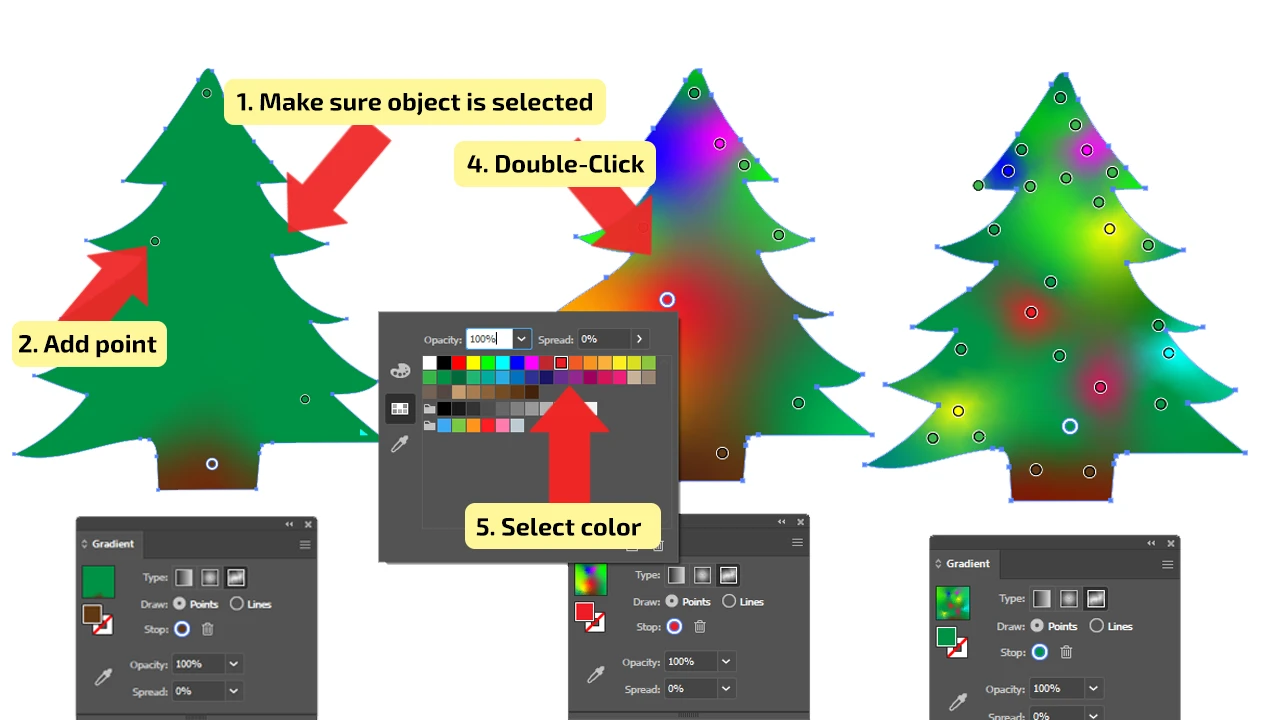
Create the third object, for example, a Christmas tree. Make it black and remove the stroke. Select the Christmas tree and choose the “Freeform Gradient” on the “Gradient bar.” In the selected object, a series of color stops will appear.

Step 2: Change the color of the color stop(s).
It is easy and simple. Choose the color stop, double-click on it, and several color options will appear in a panel.
Click on the preferred color, and it will automatically be applied to the object.
There is another way to change the color, as mentioned in previous steps, and that is to select the color stop and click the Fill color in the Properties panel and choose the color.
You can change the color of more than one color stop at a time. Shift-click the color stops you wish to edit, then click the Fill color in the Properties panel and adjust the color for all of them.
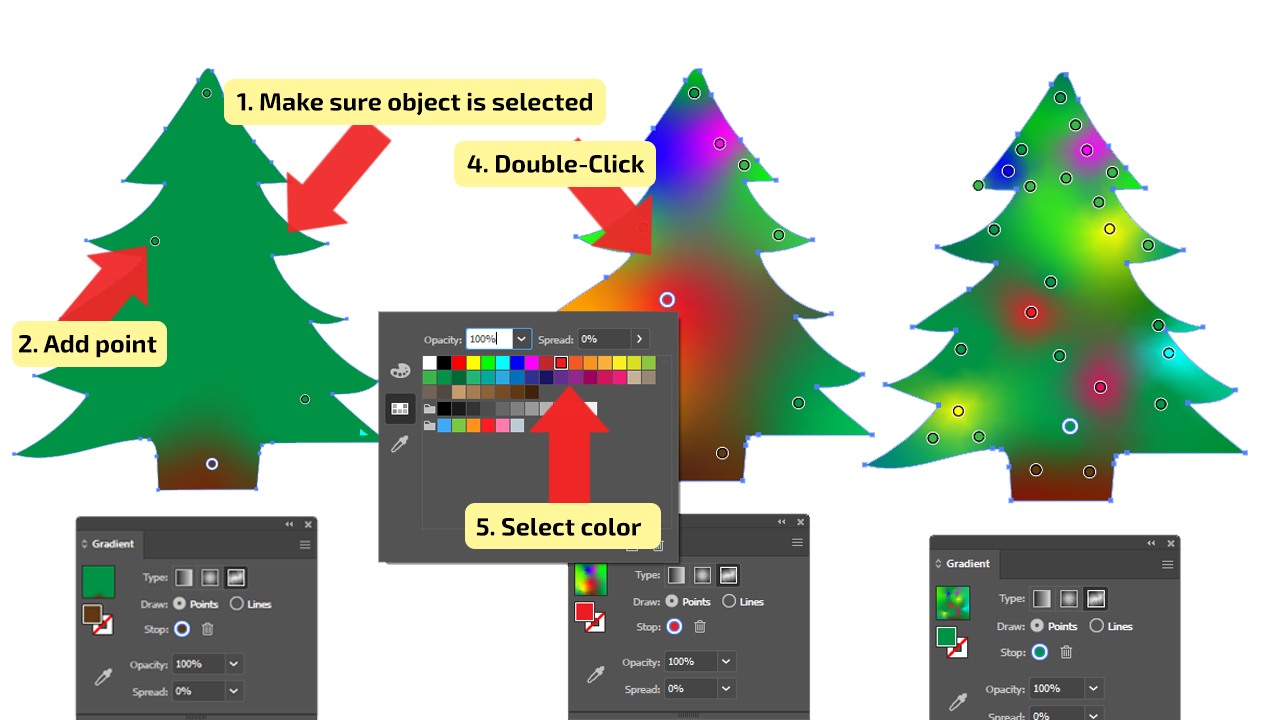
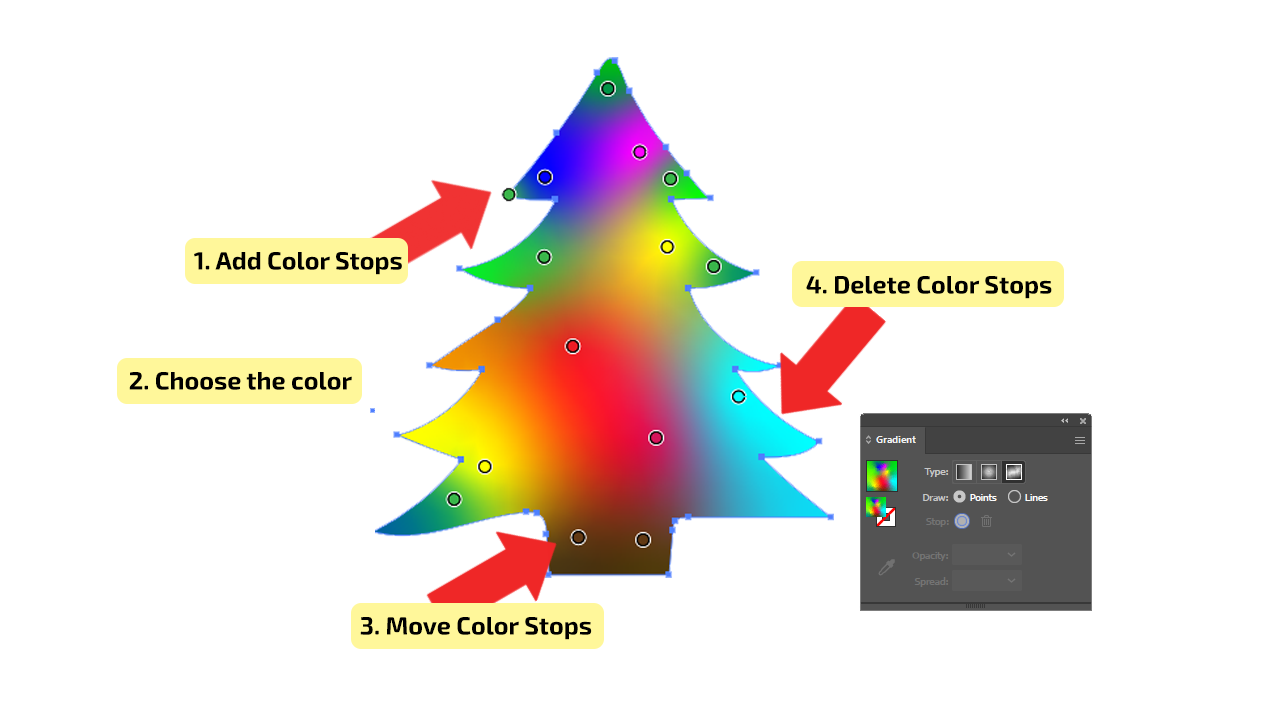
Step 3: Add, Delete, or Move Color Stops
You can add more stops by clicking within the bounds of the selected artwork or by clicking below the Gradient slider bar, and you will be able to add Color stops and change the color.
You can add as many colors as you need, and it will be automatically shown on the object. If you are not satisfied with color stops, you are able to remove them. Select the color point and either press Backspace or Delete on your keyboard.
Also, you can click on the “Delete Stop” button in the “Gradient bar,” which is represented as a trash can.
The simplest way to remove the Color stop is to select the stop and drag it downwards until it disappears.
After adding all the stops, and you think that one of them isn’t in the right place, you can move it.
Changing the position of the color stop can’t be easier. Press and drag the chosen color stop to the desired place in the object.


Hey guys! It’s me, Marcel, aka Maschi. On MaschiTuts, it’s all about tutorials! No matter the topic of the article, the goal always remains the same: Providing you guys with the most in-depth and helpful tutorials!

