

In this article, you will find two complete tutorials. One covers how to draw a nose in front view, and the other in side view. Both use Adobe Illustrator software.
So you can learn how to draw a nose step by step and put it into practice in your own projects.
At the end of this article, you will also find a 100% free pack of vectors containing several nose shapes that you can use for your own artwork.
How to Draw a Nose in Illustrator
To draw a nose in Illustrator, use the “Paintbrush” (B) tool to draw the nose sketch. Lock that layer and create 4 new ones. Draw the final lines. Close the nose lineart with temporary lines, and use the “Live Paint Bucket” (K) tool to paint. Use the “Pencil” (N) tool to add shadows and lights. Group it.
How to Draw a Nose in Front View in Illustrator
In this part, you will learn how to draw a nose in front view in Illustrator.
You’ll find how to make a sketch to simplify the nose into very basic shapes. Then, we’ll draw the final lines and make some temporary curves to close the nose, so we can use the “Live Paint Bucket” (K) tool to paint.
Next, we’ll use the “Pencil” (N) tool to add lights, reflected lights, and two shades of shadows.
Finally, we’ll group the nose and delete the unnecessary layers.
Step 1: Set the Document Color Mode
When creating a new document, make sure you select the proper “Color Mode”.
Select “RGB” color mode if your work will be shown only on screens.
Select “CMYK” color mode if your work will be printed, or both shown on screens and printed.
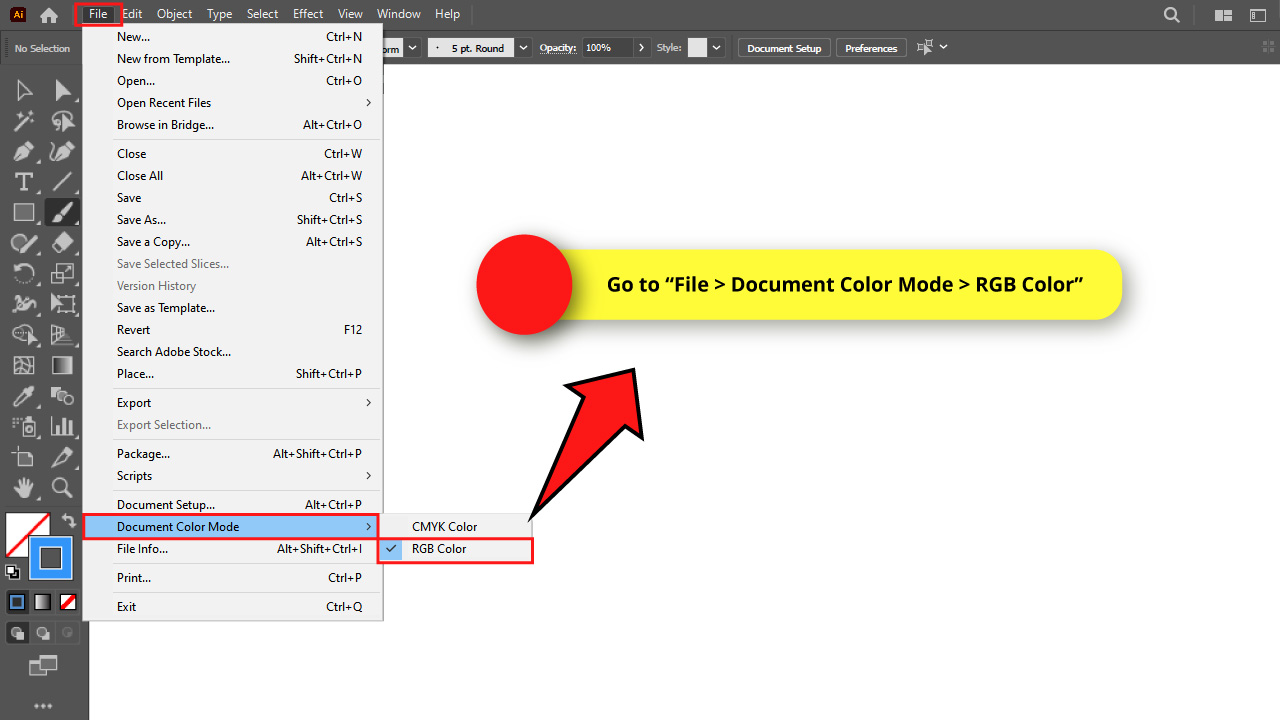
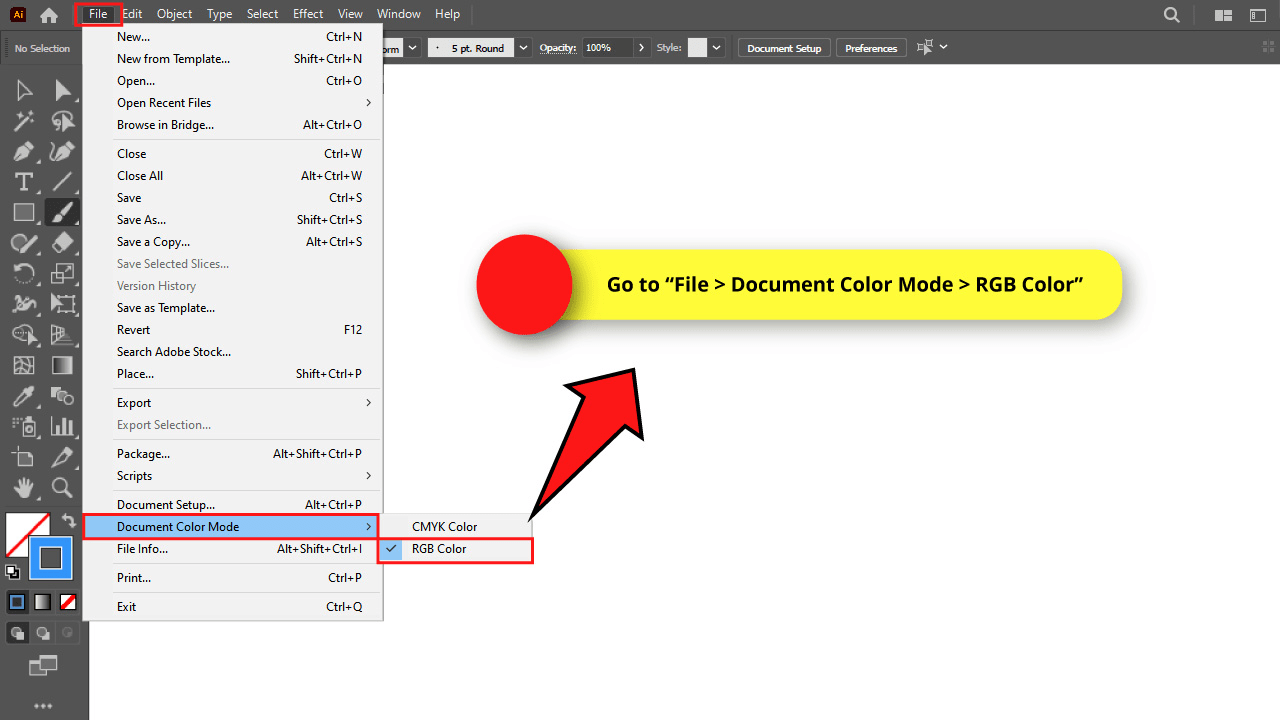
If you already started working on a document, but you want to change the color mode in the middle of the process, you can do it by going to “File > Document Color Mode” on the menu at the top of the screen.
I’ll set the RGB color mode for my drawing.
Step 2: Adjust the “Paintbrush” Tool Options

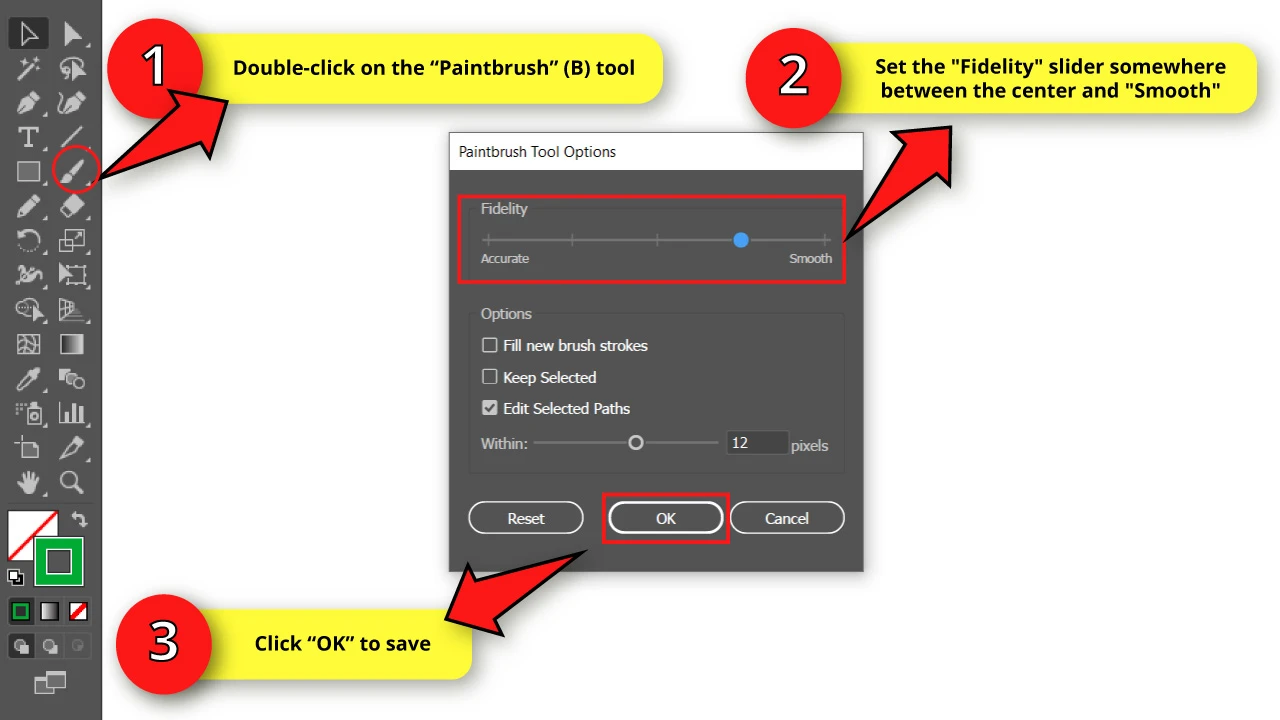
Double-click on the “Paintbrush” (B) tool on the left side toolbar to open the options window.


Set the “Fidelity” slider somewhere between the center and “Smooth”.
Then, click “OK” to save.
Step 3: Customize a Brush

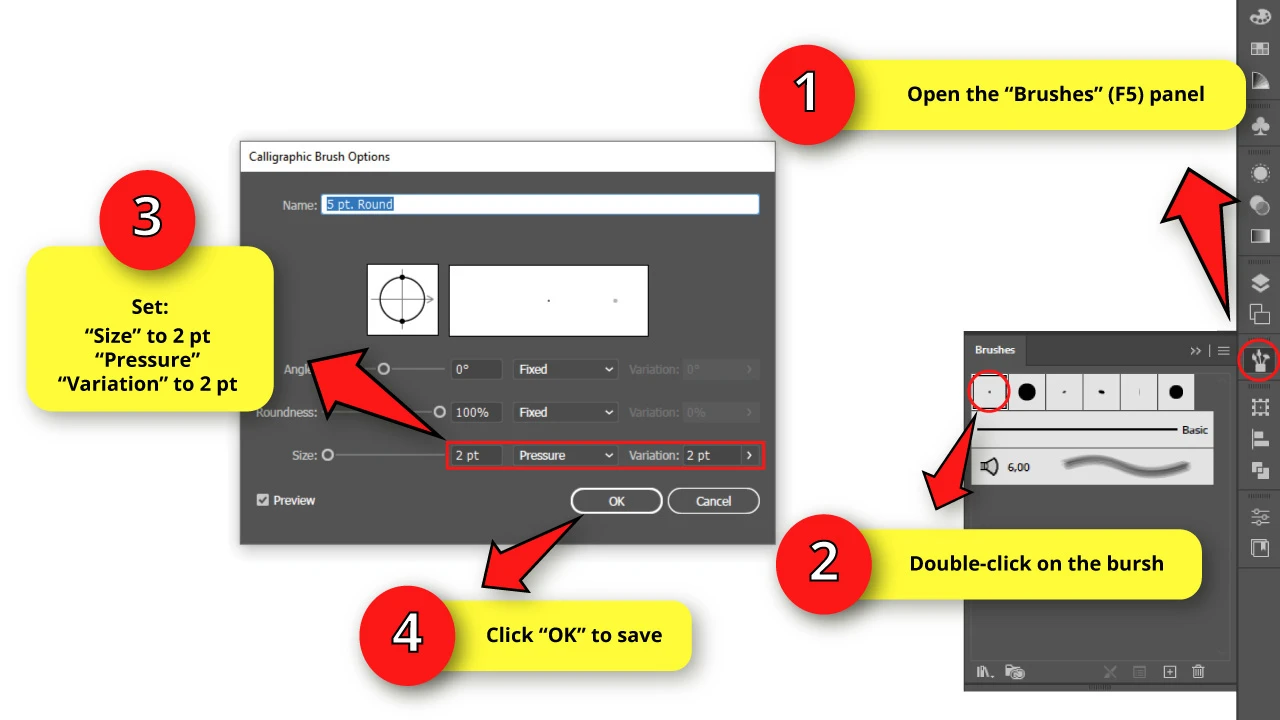
To make a brush in Illustrator, open the “Brushes” (F5) panel on the toolbar located on the right side of the screen.
If you can’t find it, you may have to enable it first by going to “Window > Brushes” on the menu at the top of the screen.
Double-click on the tiny round brush to open the “Calligraphic Brush Options” window.
Set the “Size” to 2 pt. Change the box setting to “Pressure”, and select 2 pt. for the “Variation” field.
This last adjustment allows us to make paths sensitive to the tablet pen pressure.
Once you’re done, click “OK” to save.
Keep in mind that you can change the brush size in Illustrator at any time during the drawing process.
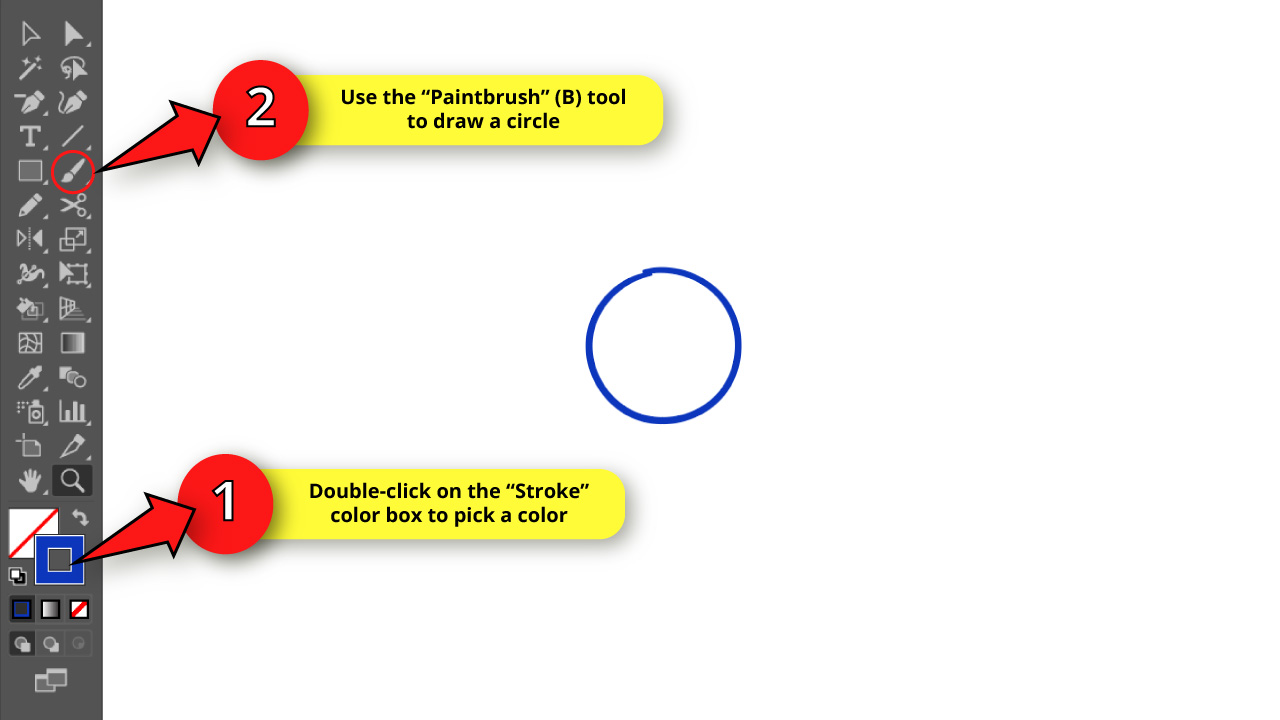
Step 4: Draw a Circle

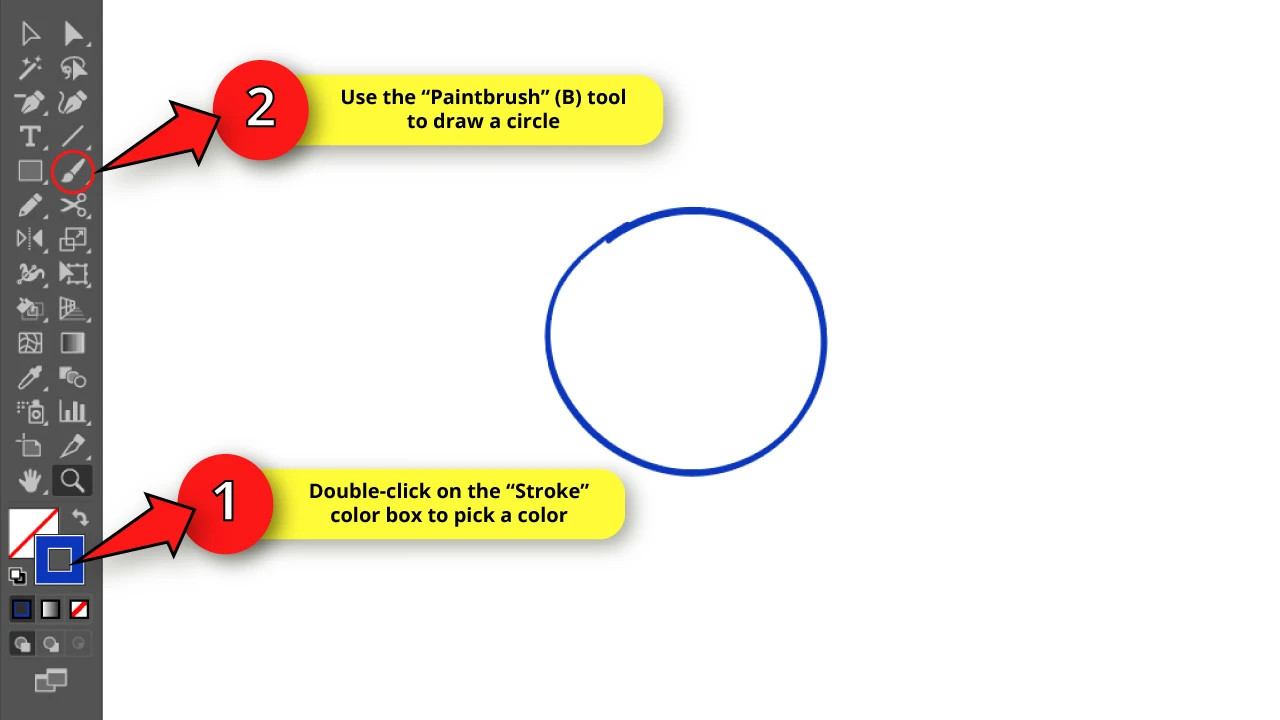
First, we’ll start sketching a front view of a nose.
So, double-click on the “Stroke” color box on the left side toolbar to pick a color for it.
Select a color like blue, red, or green. I picked blue for this example.
Then use the “Paintbrush” (B) tool to draw a circle for the nose tip.
Step 5: Draw Two Half Circles

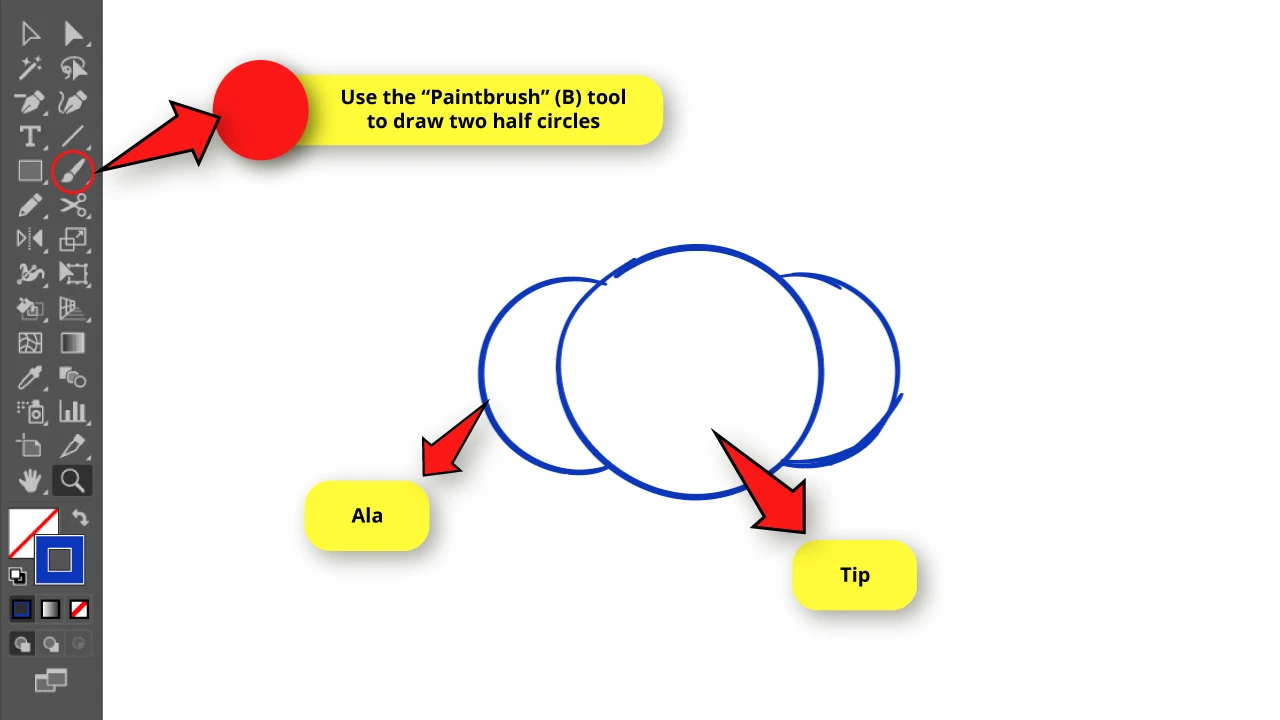
Now we need to make half circles in Illustrator.
We’ll use the “Paintbrush” (B) tool to draw two half circles attached to each side of the circle to sketch the nose alas.
The tighter you place the half circles, the smaller the nose will end up being.
Step 6: Draw Two Arcs
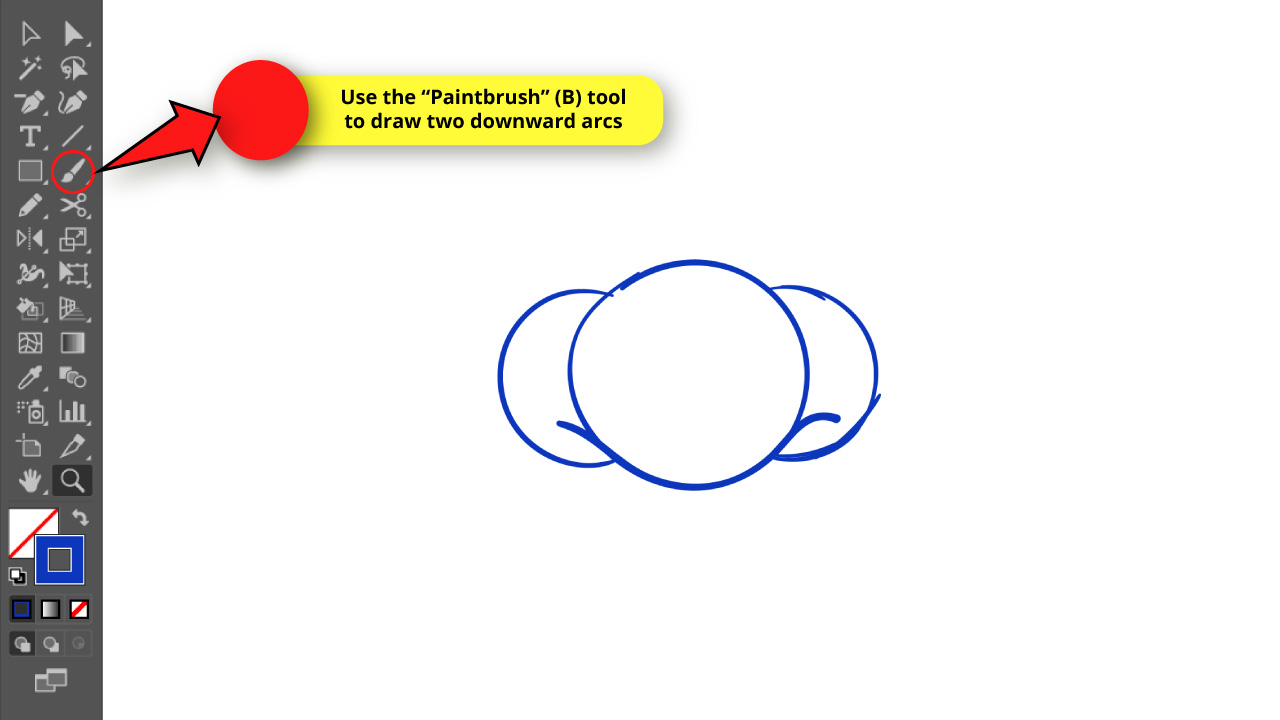

Use the “Paintbrush” (B) tool to draw two downward arcs suggesting the nostrils.
Draw the arcs starting as an extension of the base of the circle. Take a look at the reference image to understand this better.
Leave enough space between the arcs and the half-circle lines since we still need to draw the nostrils.
Step 7: Draw The Nostrils
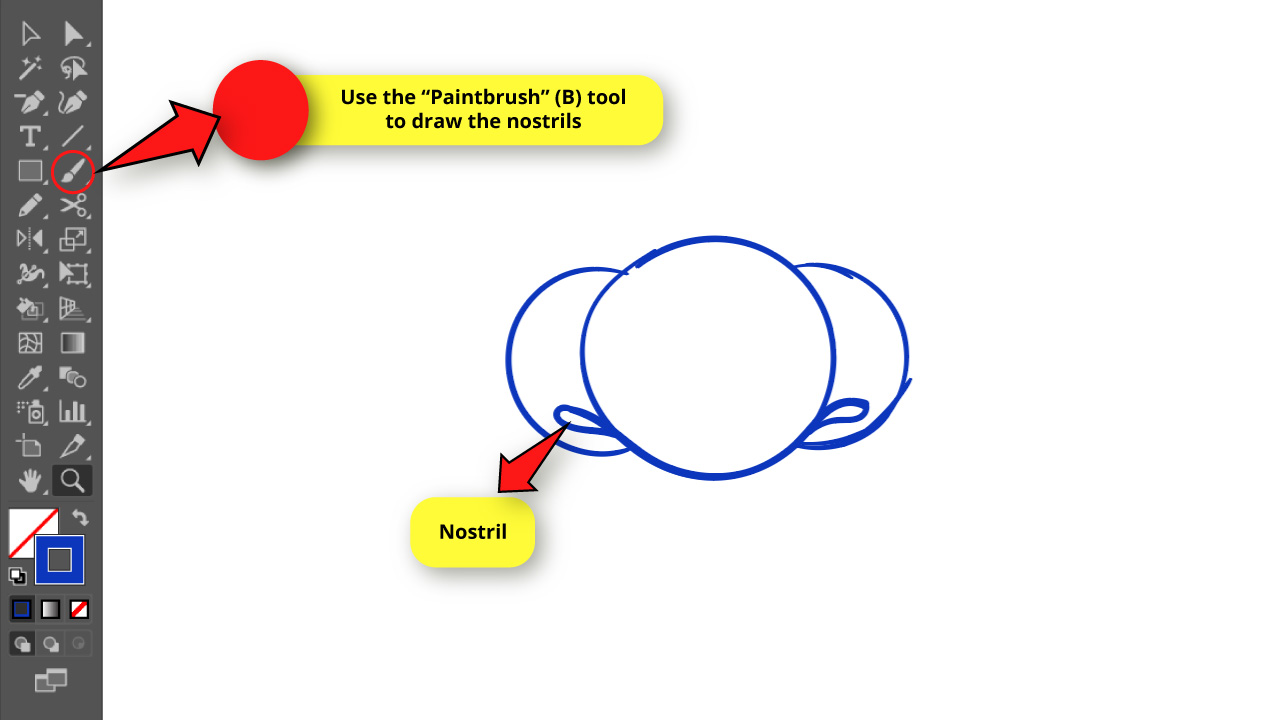

Keep using the “Paintbrush” (B) tool and draw two small water drop shapes as the nostrils.
Draw the nostrils using the lines we sketched in the previous step as a guide.
Step 8: Draw Two Vertical Curves

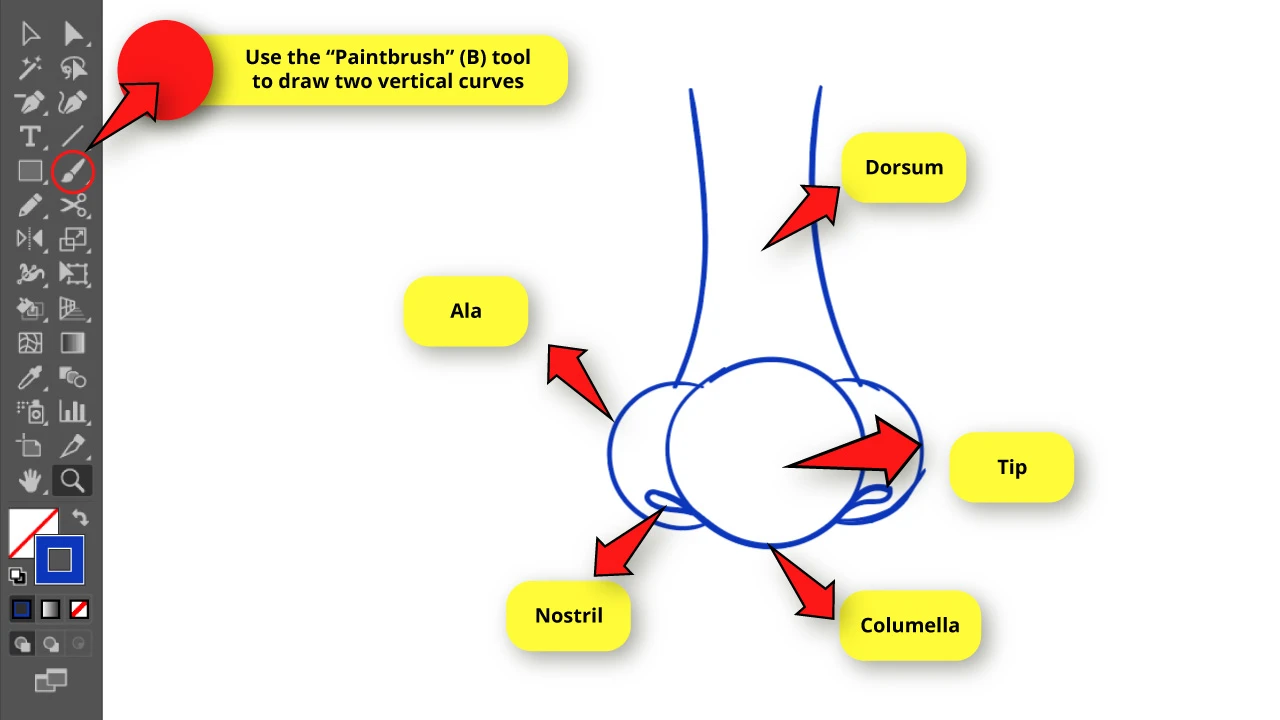
To finish the front view sketch of the nose, draw two horizontal, slightly concave curves as the nose dorsum.
Both lines should end on each side in half circle.
Once again, the nearer you place the curves, the thinner the nose will end up being.
Step 9: Make the Sketch Transparent and Create New Layers
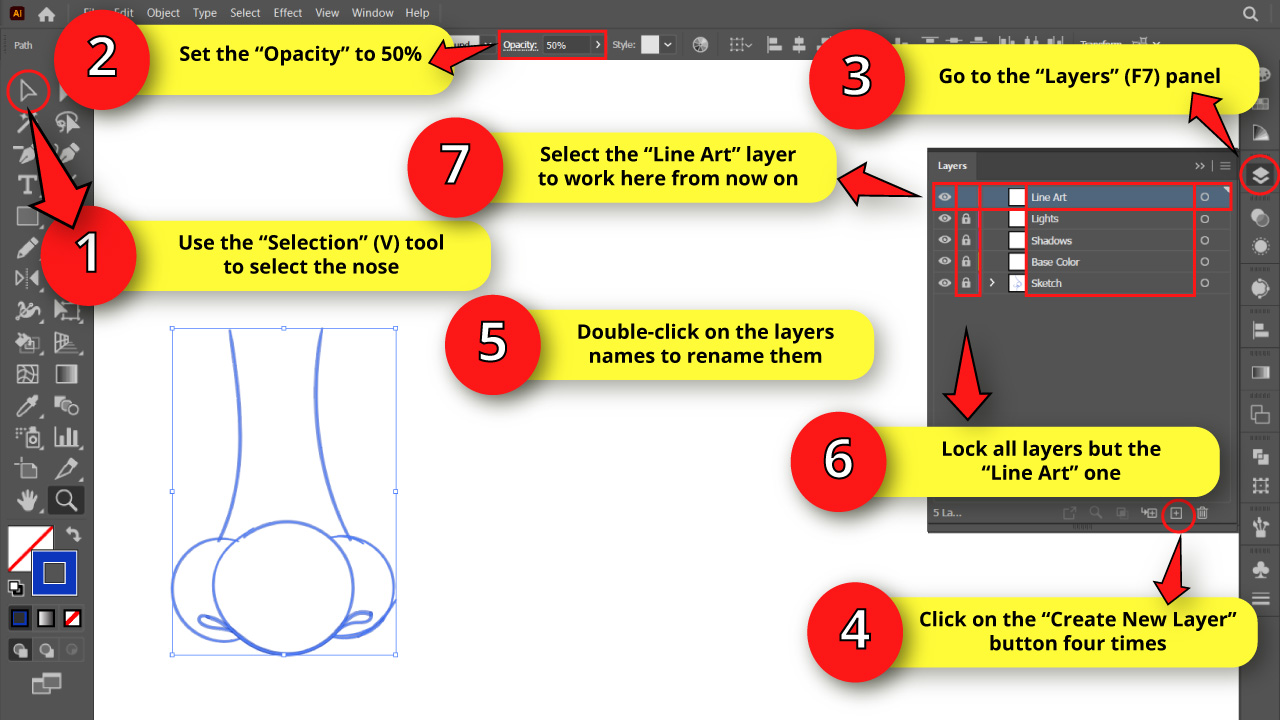
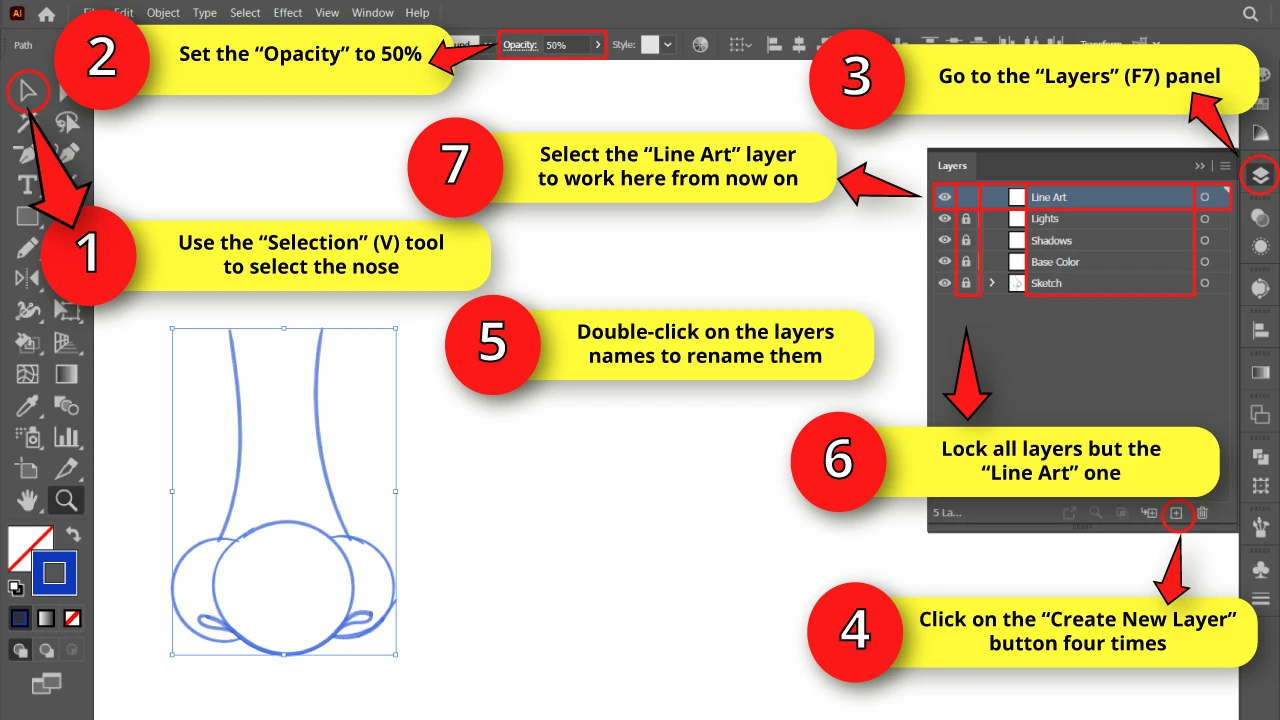
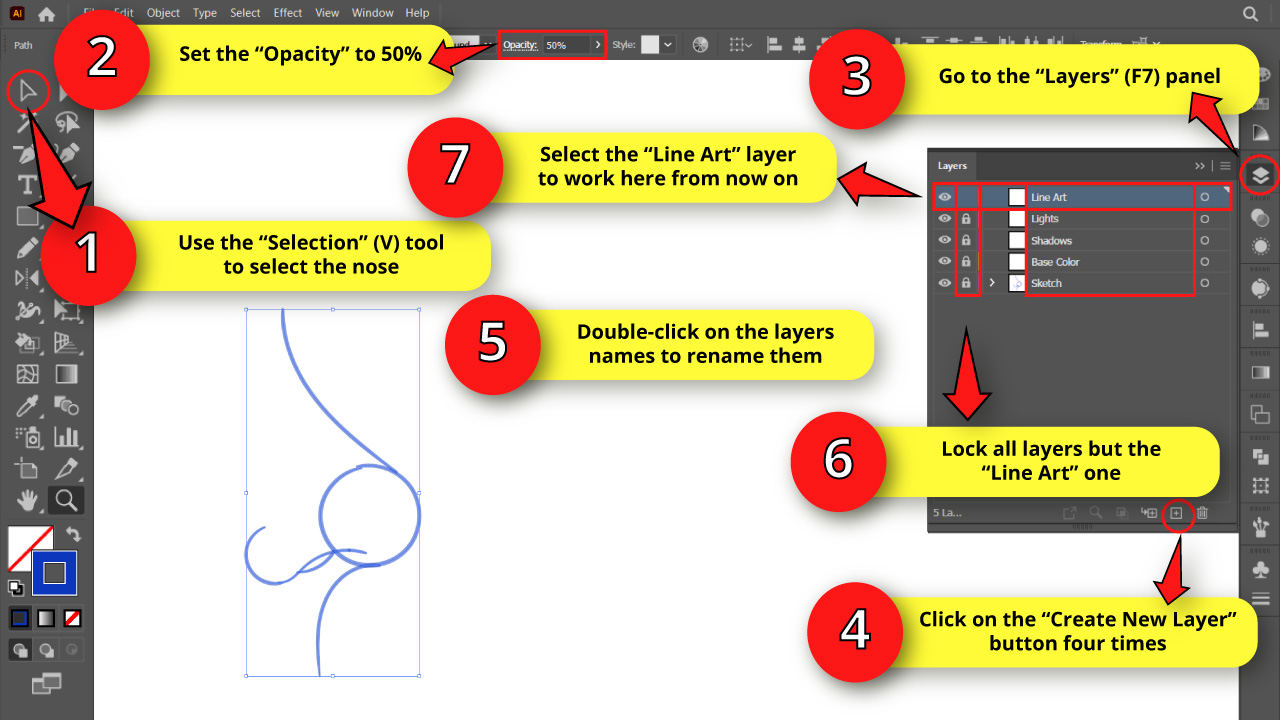
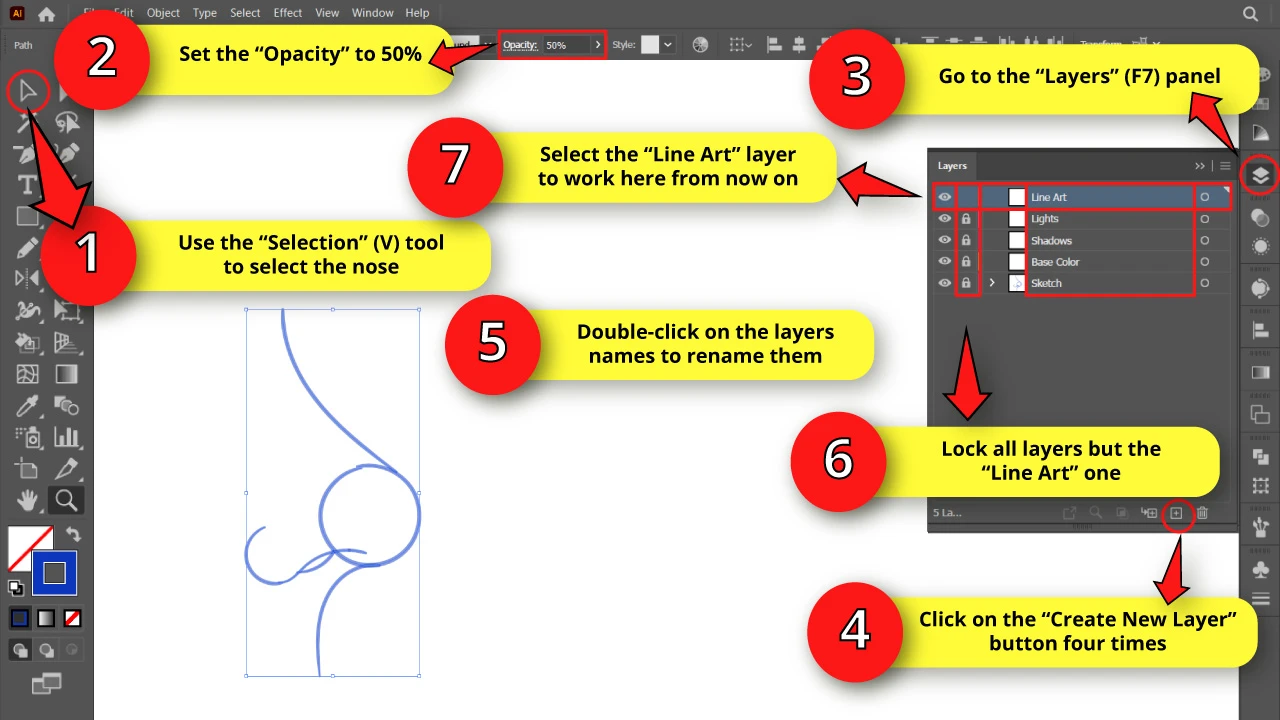
Select all sketch lines using the “Selection” (V) tool located on the left side toolbar, or pressing the “Ctrl + A” command.
Then, go to the “Opacity” field on the toolbar at the top of the screen, and set it to 50%.
Next, go to the “Layers” (F7) panel on the right side toolbar.
If you can’t find it, you may have to enable it first by going to “Window > Layers” on the menu at the top of the screen. Or press the “F7” key to shortcut it.
On the “Layers” (F7) panel, you’ll find a layer called “Layer 1”, which will contain the lines we’ve drawn so far.
Click four times on the “Create New Layer” button at the bottom of the panel to create four new layers.
Now double-click on each of the layers names to rename them as:
“Line Art”
“Lights”
“Shadows”
“Base Color”
“Sketch”
Maintain this layer order, and make sure that the “Sketch” layer is the one that contains the drawn lines.
You can also change the layer color in Illustrator if it makes your work easier.
Now, lock all layers but the “Line Art” one, by clicking on their empty boxes next to the eye icons. Once the box displays a lock icon, that means the layer is now locked and is no longer possible to select it or modify it.
Select the “Line Art” layer to continue working here from now on.
Step 10: Draw the Nose Final Lines

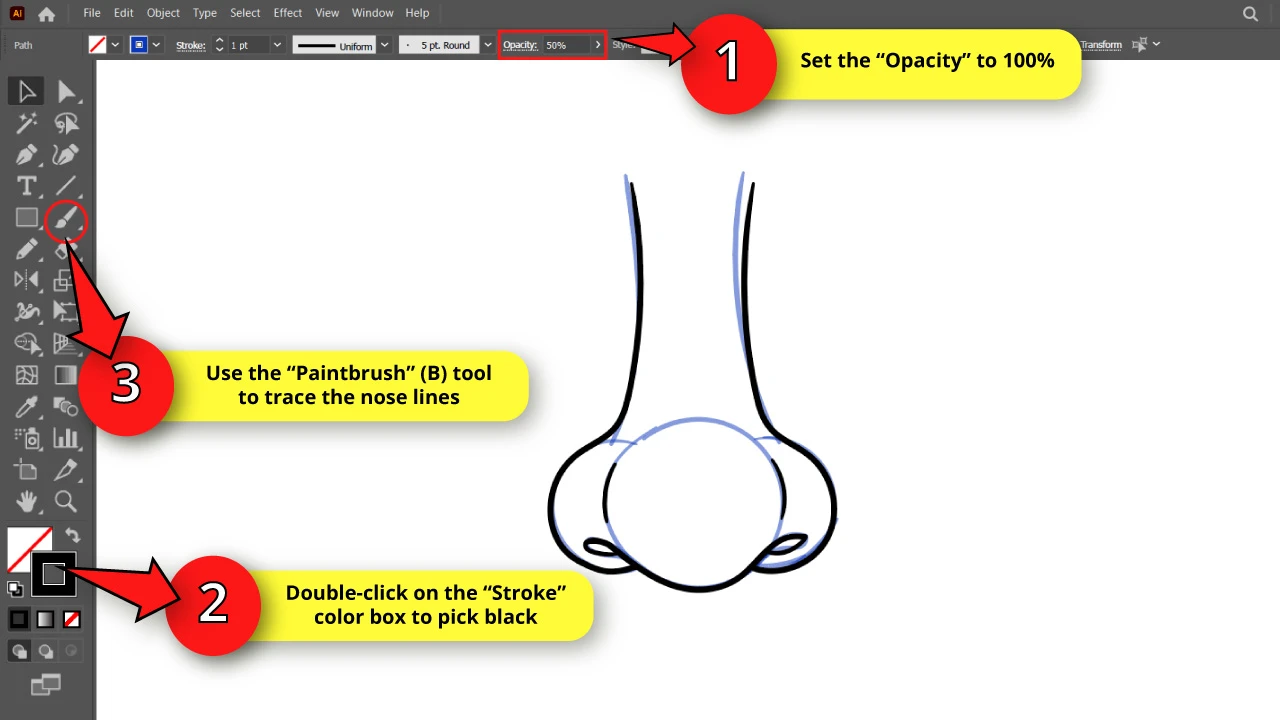
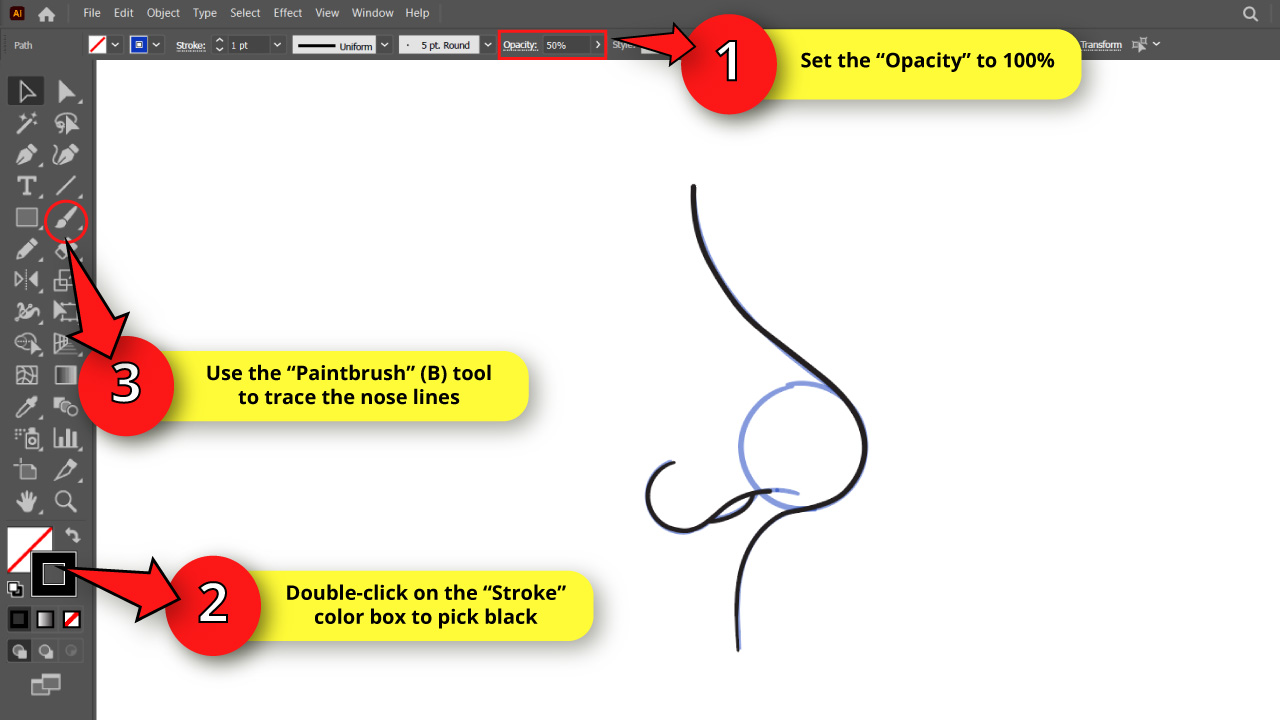
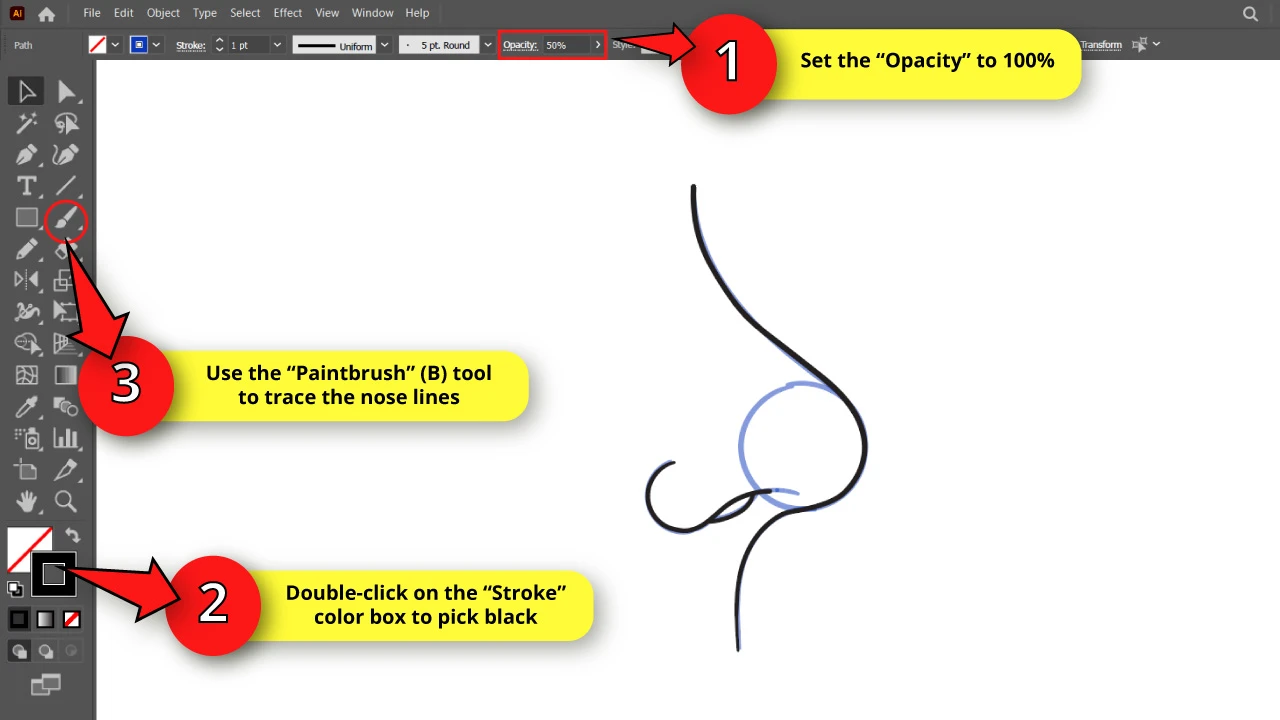
Go to the “Opacity” field and set it back to 100%.
Next, select the “Paintbrush” (B) tool, and then double-click on the “Stroke” color box to pick black.
Now, draw the nose final lines using the sketch as a guide.
First, draw the nose outline and nostrils. Then draw two small curves suggesting the nose tip outlines.
Avoid drawing the whole circle for the nose tip.
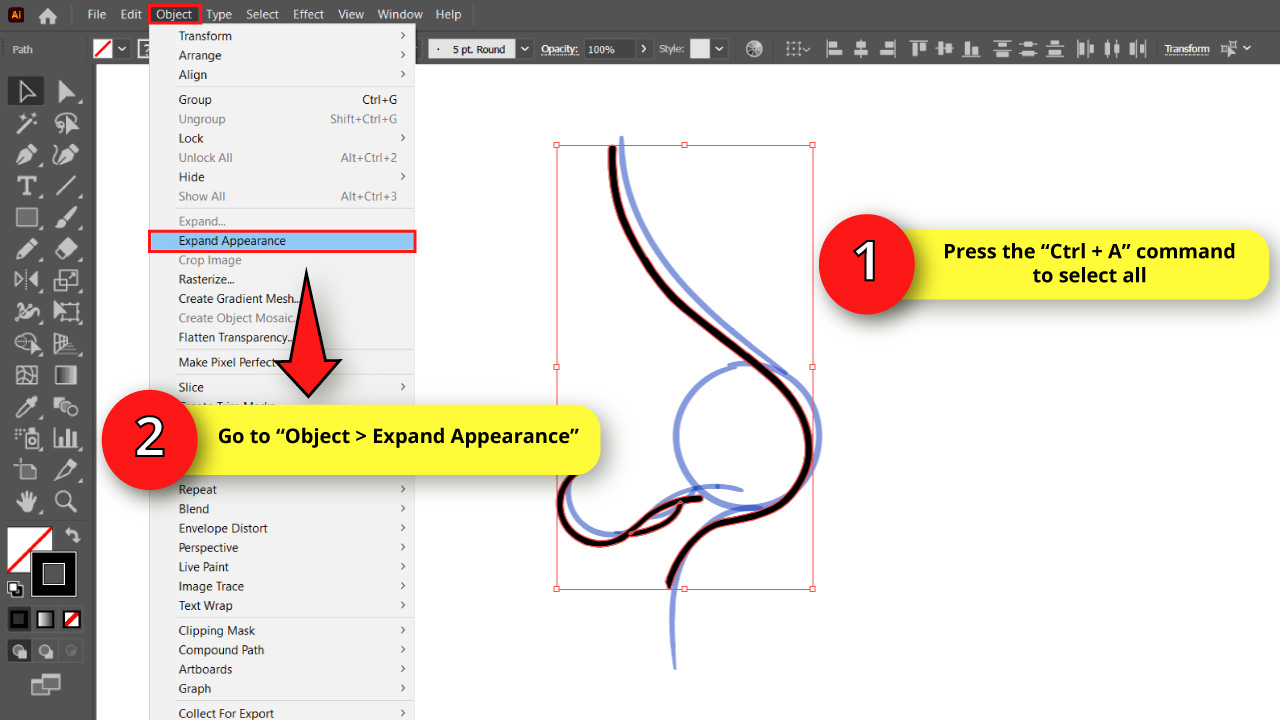
Step 11: Expand Appearance

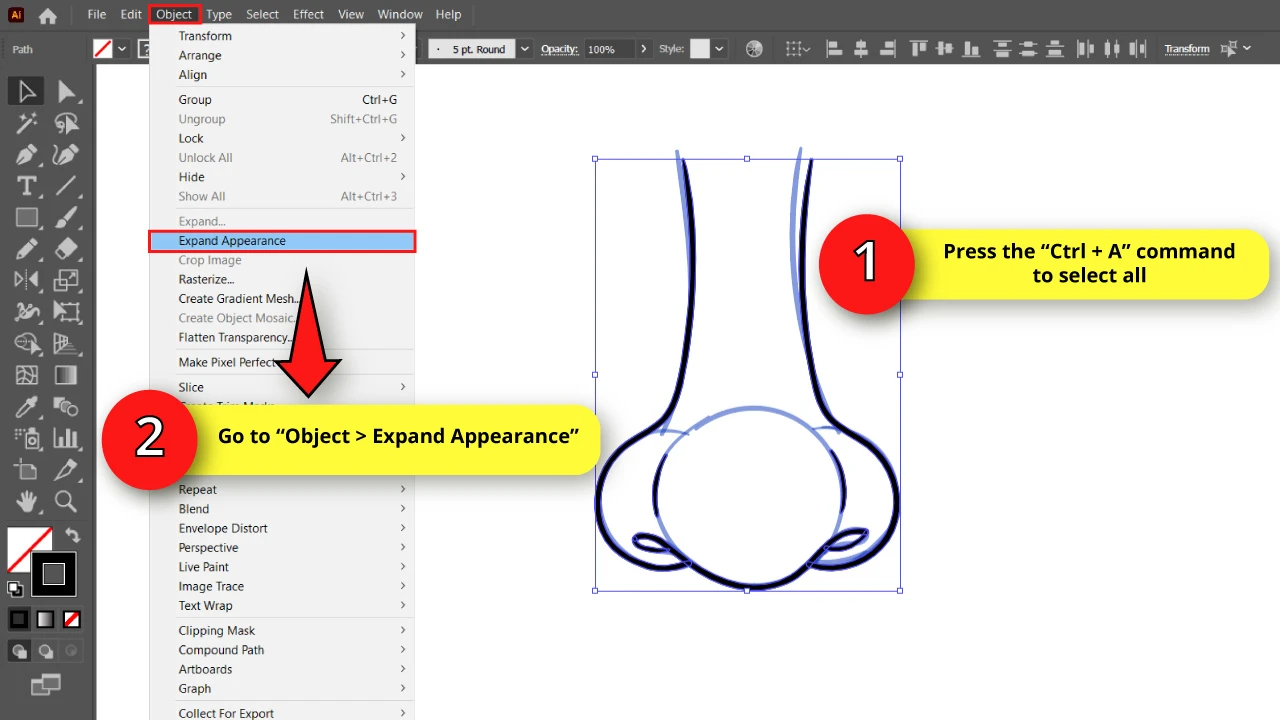
Select all the lines using the “Ctrl + A” command.
Then go to “Object > Expand Appearance” on the menu at the top of the screen to convert paths to objects.
We are doing this so we can continue working without worrying about modifying the black lines by mistake.
Step 12: Draw A Temporary Curve

Now we need to close the nose shape to be able to paint it using the “Live Paint Bucket” (K) tool.
Hence, we need to draw some temporary lines which we’ll get rid of later on.
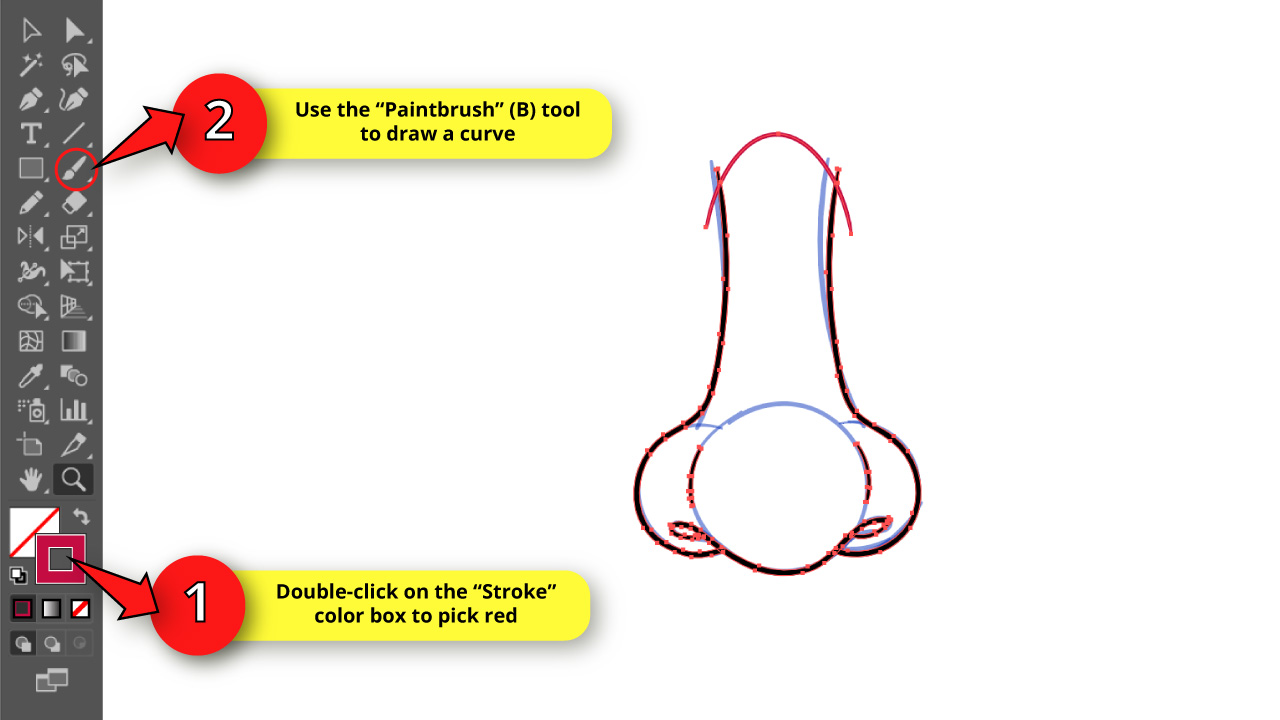
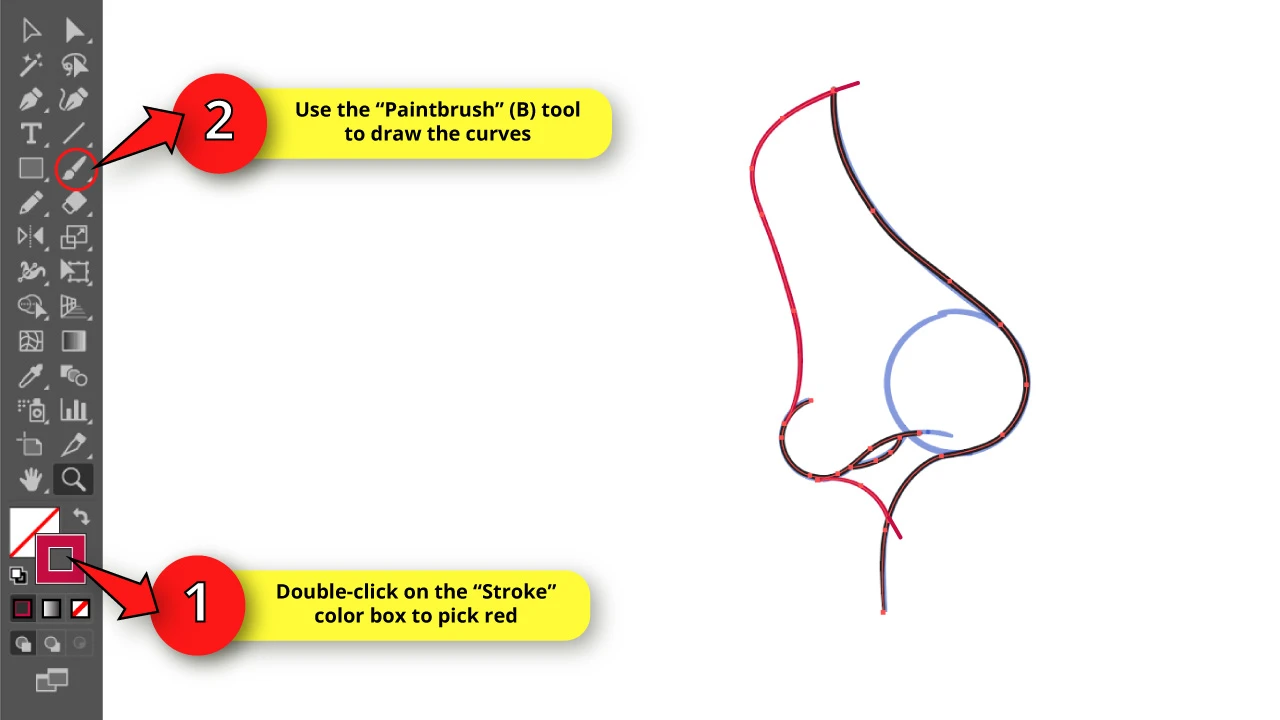
To get this done, select the “Paintbrush” (B) tool once again, and then double-click on the “Stroke” color box to pick a color, so it stands out from the others.
I’ll use red for this example.
Finally, draw a pointy curve at the top of the dorsum to close the shape.
Just make sure that this curve surpasses the nose black lines, so we can trim the black lines leftover tips, and get a cleaner illustration.
Step 13: Paint the Nose
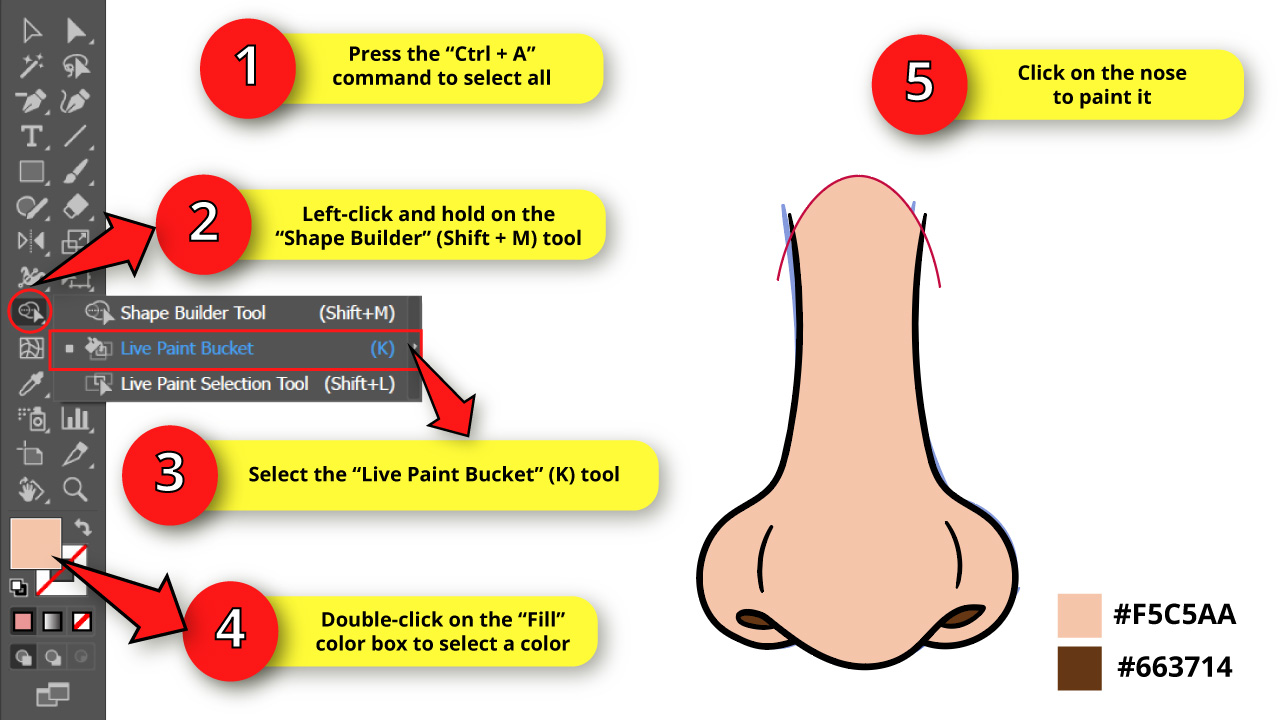
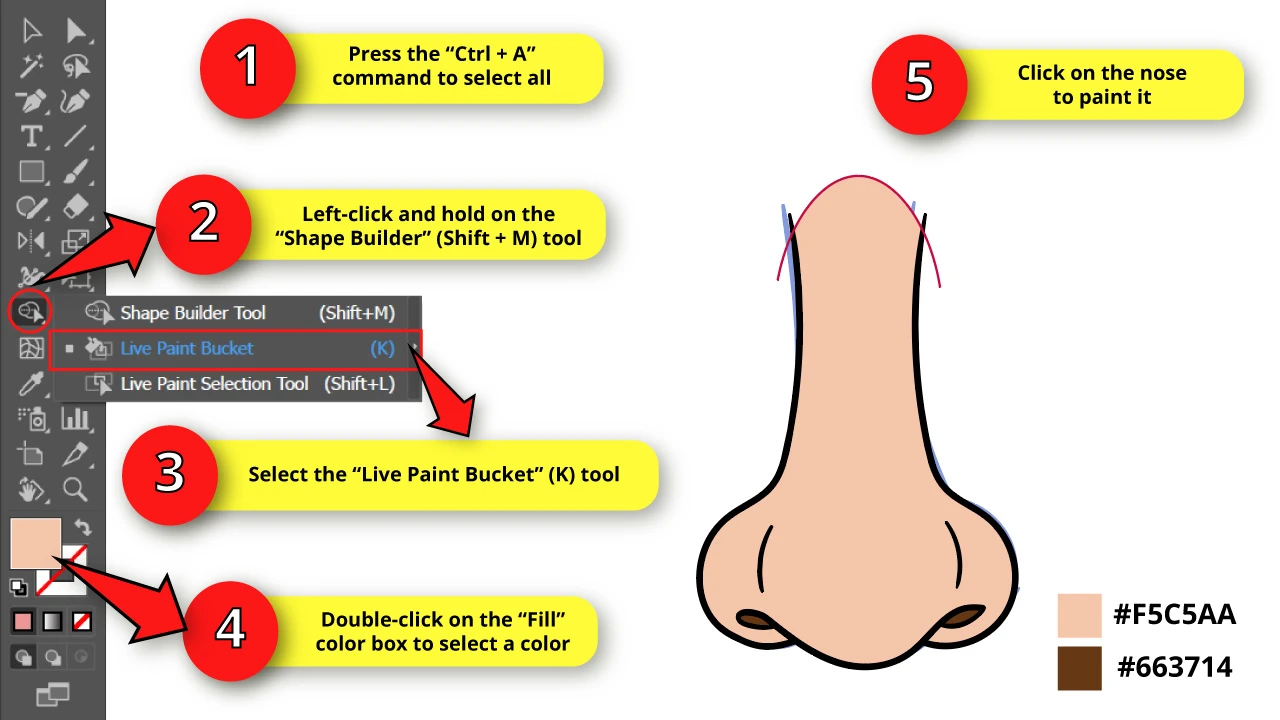
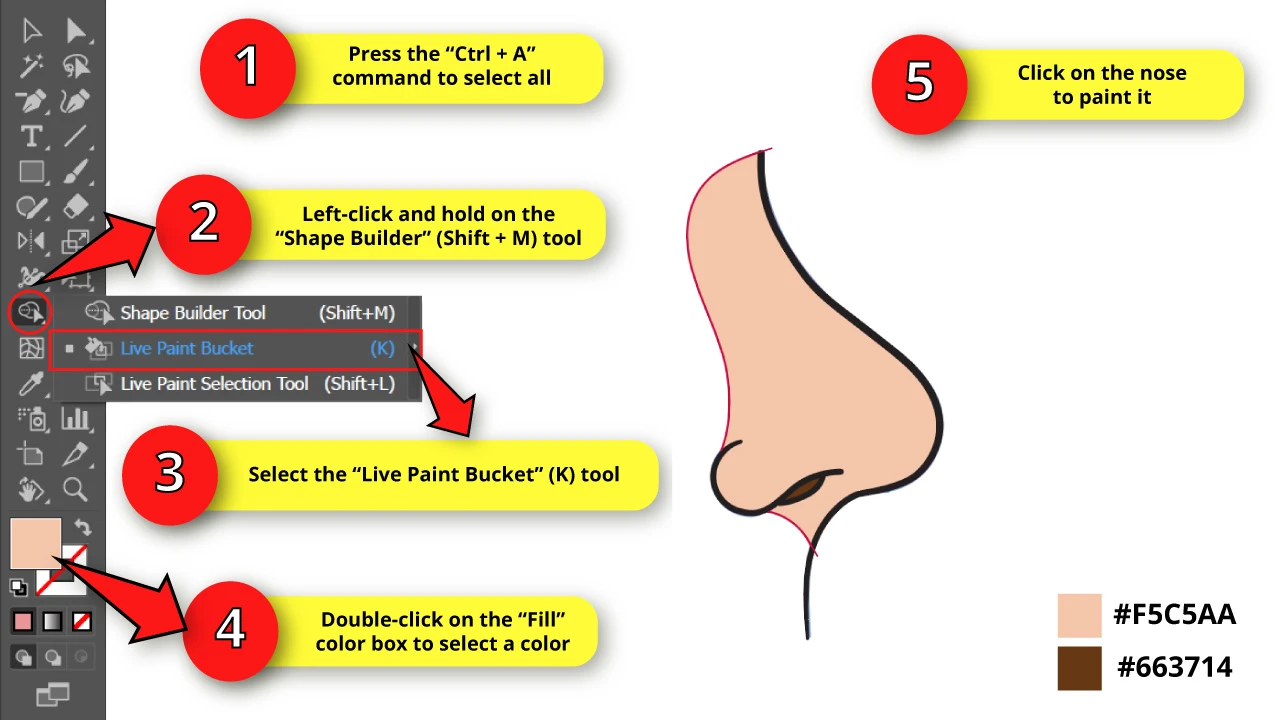
To fill color in Illustrator, make sure that the nose is still selected by pressing the “Ctrl + A” command, and then left-click and hold on the “Shape Builder” (Shift + M) tool to unfold the hidden tools nest.
On the unfolded menu, select the “Live Paint Bucket” (K) tool, or press the “K” key to shortcut it.
To use the “Live Paint Bucket” (K) tool in Illustrator, double-click on the “Fill” color box on the left side toolbar, and pick a skin color for the nose. Then, click on the nose areas to paint them.
I’m painting the nose in two different skin tones. I’m using:
The #F5C5AA color for the nose.
The #663714 color for the nostrils.
Step 14: Expand the Nose
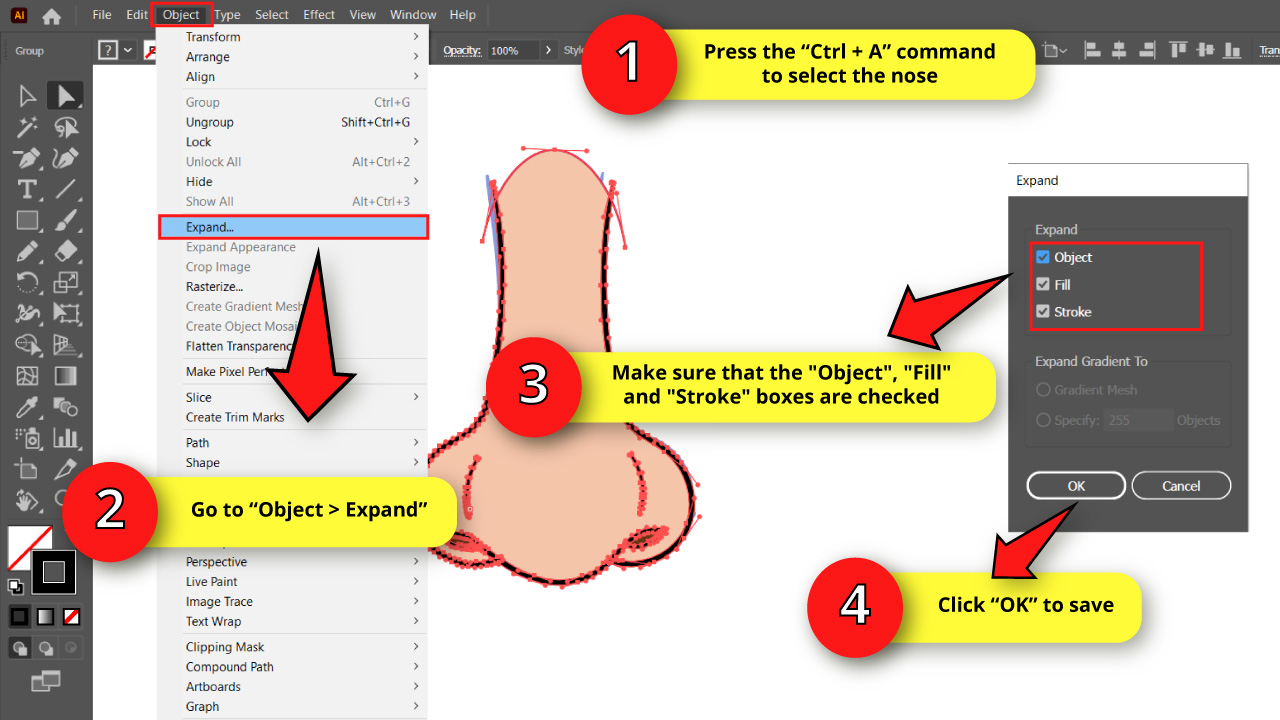

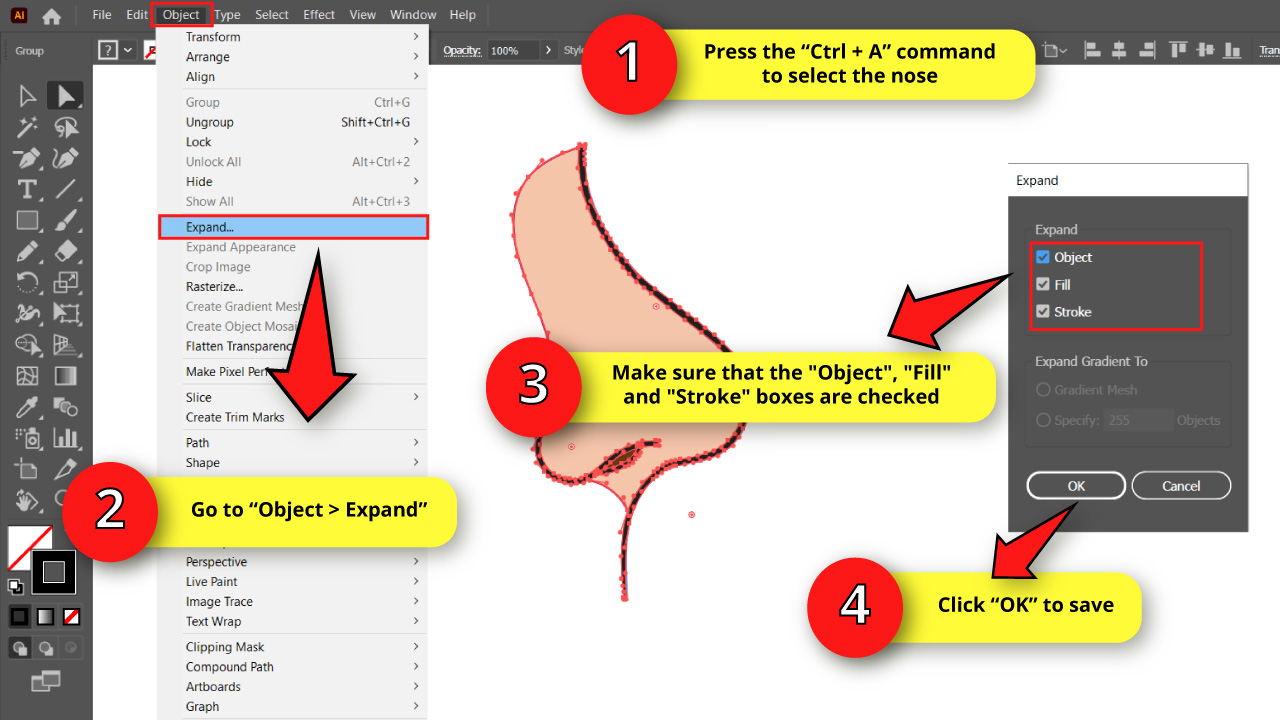
Select the nose using the “Ctrl + A” command, and then go to “Object > Expand” on the menu at the top of the screen.
Once the “Expand” options menu opens, make sure to have the “Object”, “Fill” and “Stroke” boxes selected, and then click “OK” to save.
We are doing this to unlink the fill color from the lineart.
Step 15: Get Rid of the Extra Curve and Hide the Sketch Layer
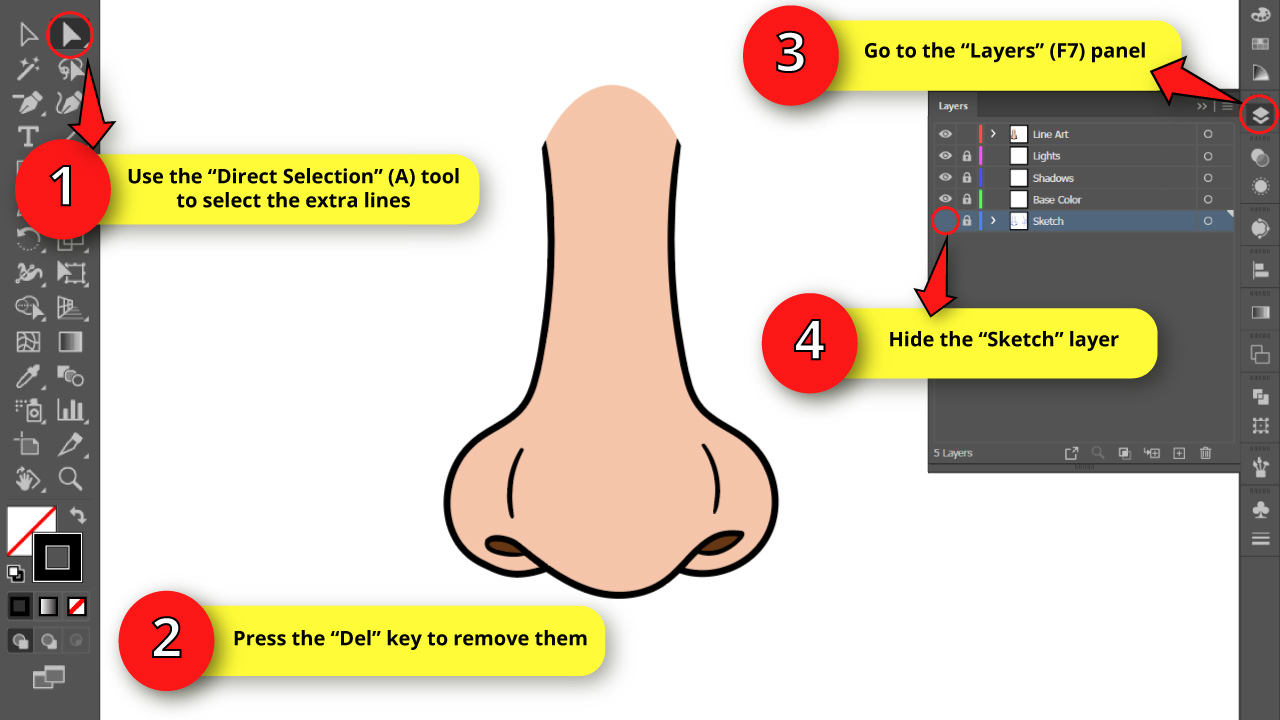
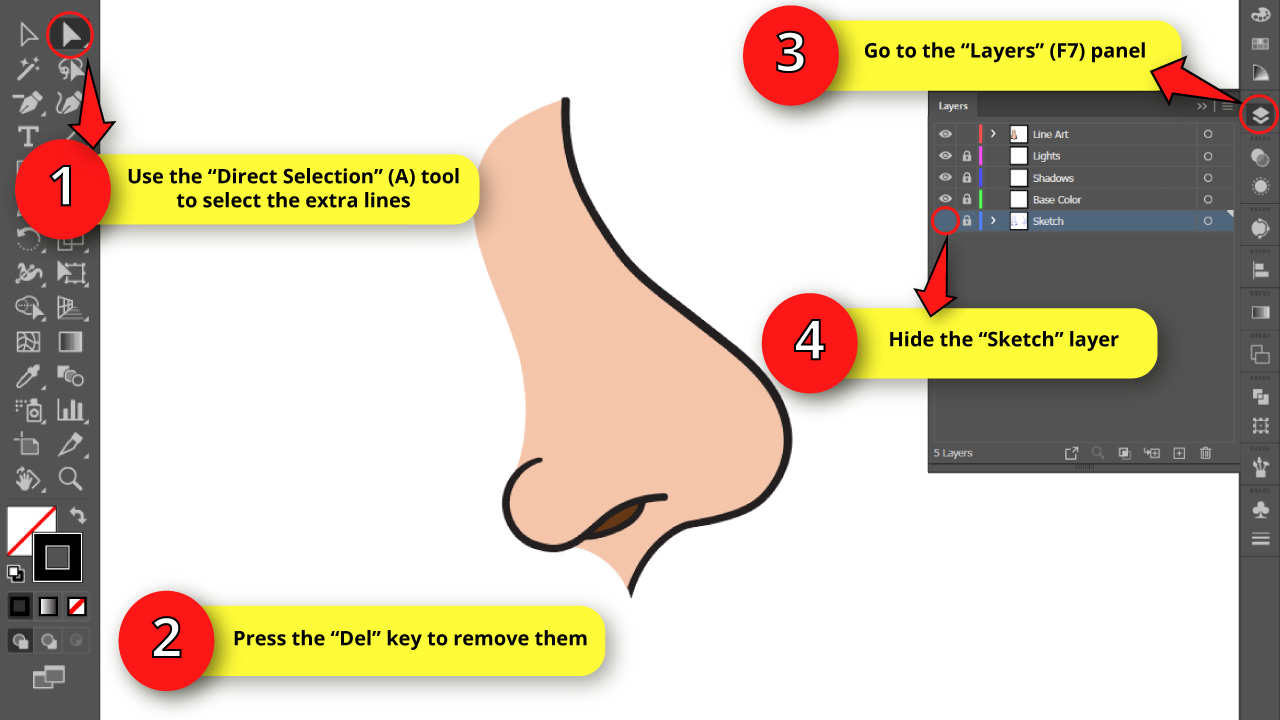
 Use the “Direct Selection” (A) tool located on the left side toolbar to select the curves you have drawn on “Step 12”, and then press the “Del” key as many times as necessary to remove the curve.
Repeat the same process selecting the nose dorsum top tips and removing them.
Then, go to the “Layers” (F7) panel and click on the “Sketch” eye icon to hide it.
Step 16: Isolate the Nose Fill Color

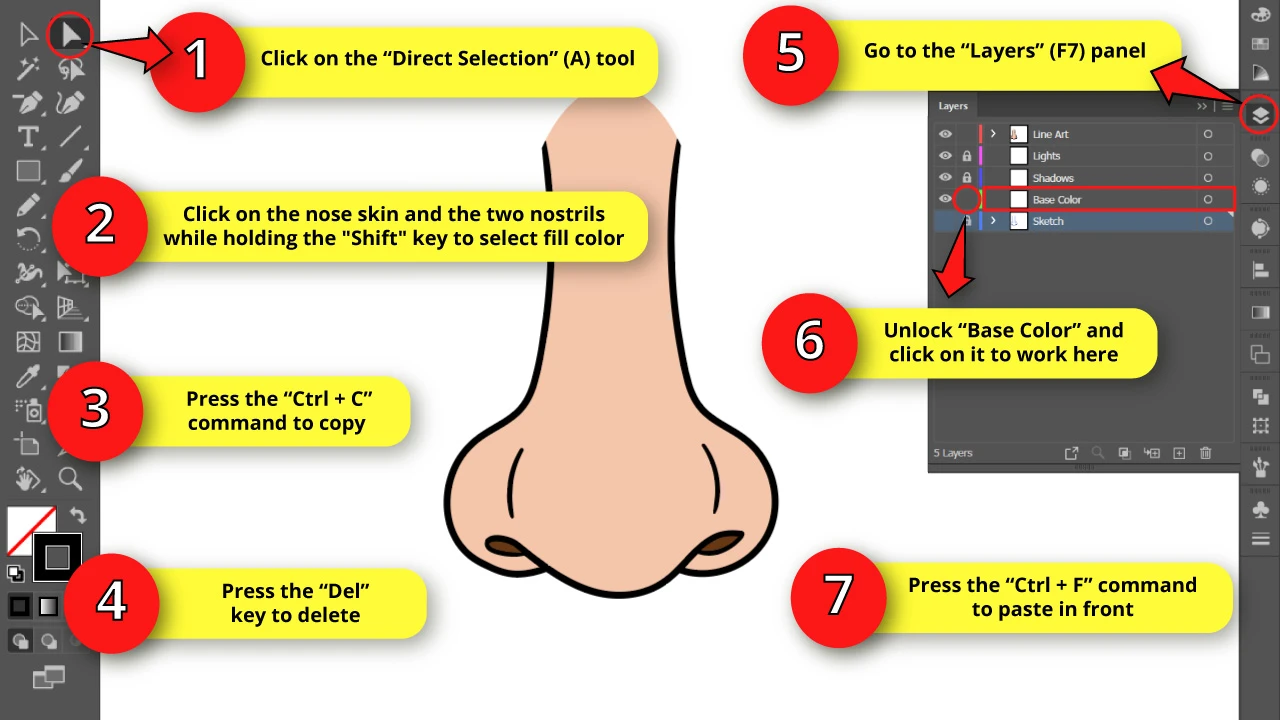
In this step, we will isolate the fill color from the black lines. This way we will be able to draw shadows and lights in the mid layers.
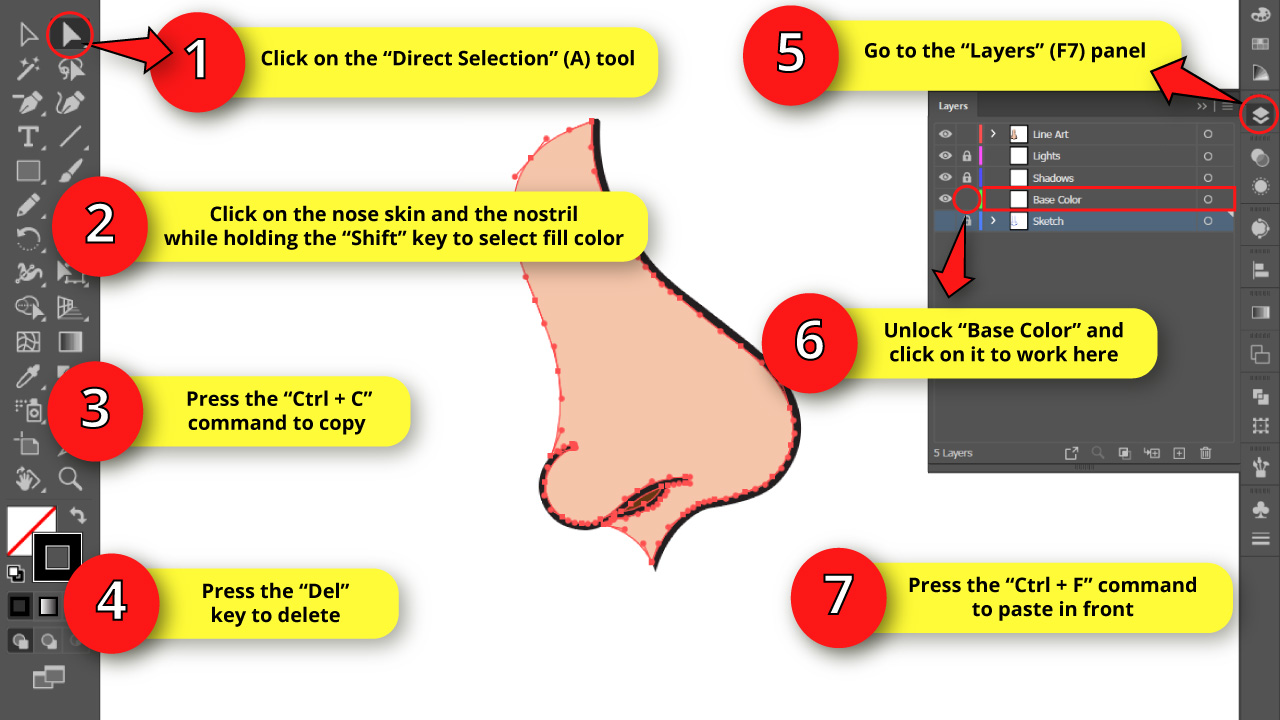
To isolate the black lines from the fill color, first select the “Direct Selection” (A) tool on the left side toolbar.
Use this tool to select the three fill color objects (the nose skin, and the two nostrils) while holding the “Shift” key, to select several objects at the same time.
Make sure to click far from the edges when you select the fill colors, so you can indeed select the whole objects, and not just a part of them.
Next, copy them by pressing the “Ctrl + C” command, and then delete them using the “Del” key.
Go to the “Layers” (F7) panel, unlock the “Base Color” layer and click on it to work there.
Finally, press the “Ctrl + F” command to paste in front. Now the fill colors are on their own layer.
Step 17: Set the “Pencil” (N) Tool Options

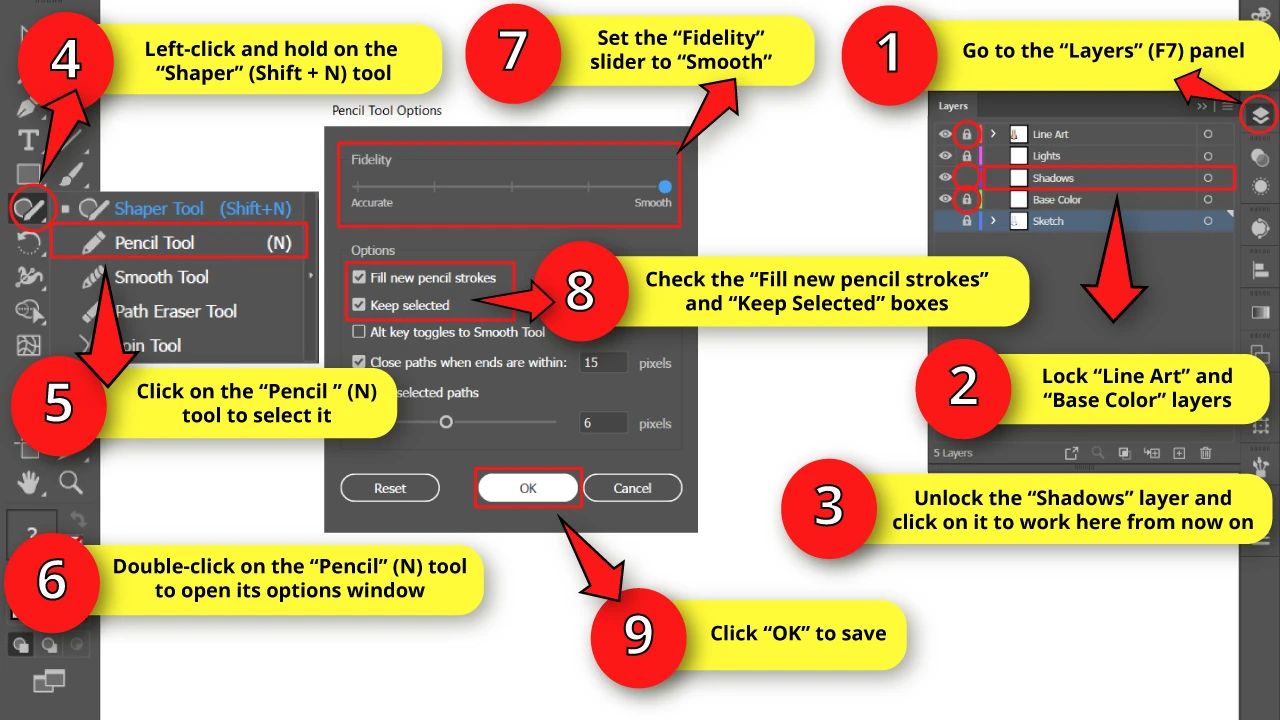
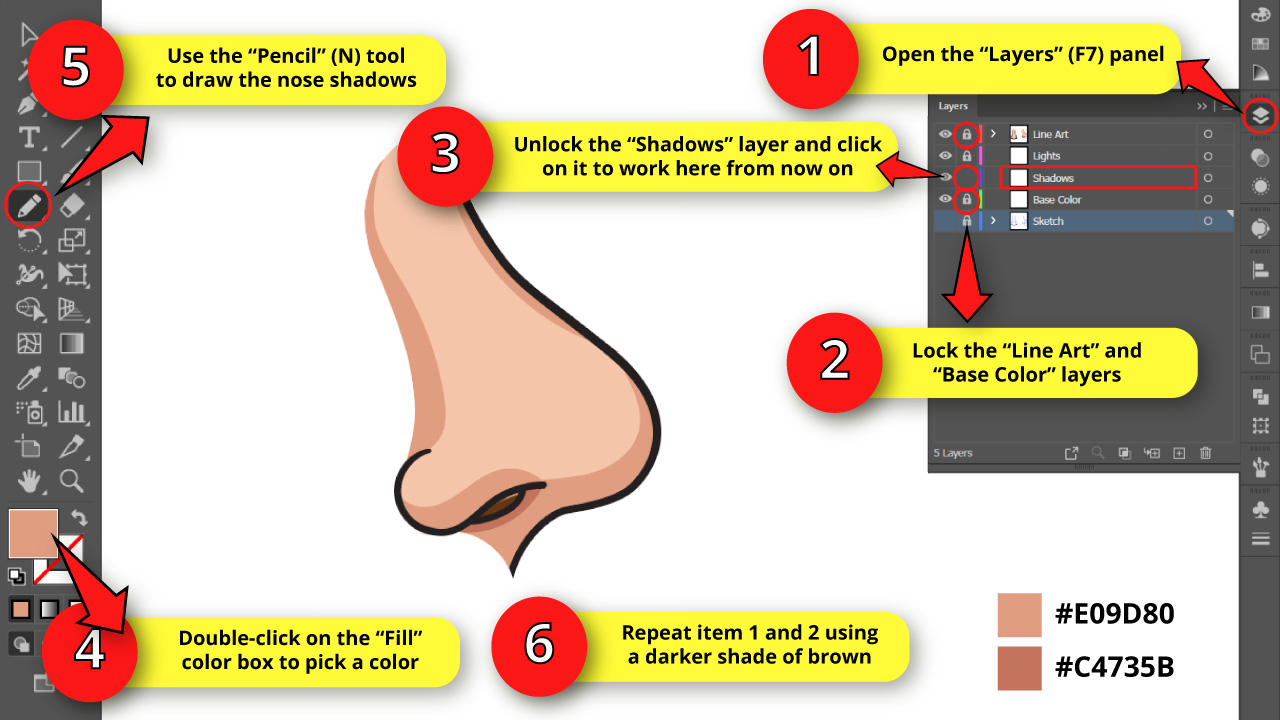
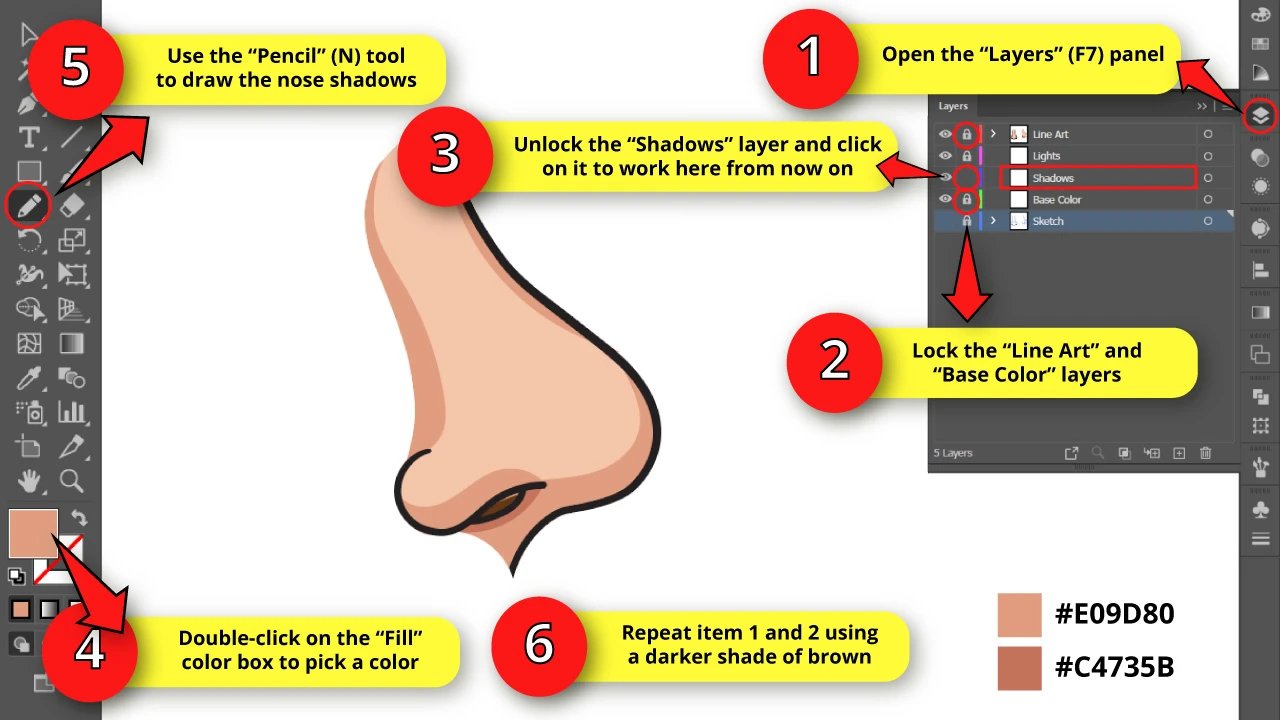
On the “Layers” (F7) panel, lock the “Line Art” and “Base Color” layers, so we can work on shadows without selecting objects accidentally.
Then, unlock the “Shadows” layer and click on it to work here from now on.
We now need to use the “Pencil” (N) tool to draw in Illustrator. We’ll work on shadows.
To select the “Pencil” tool, left-click and hold on to the “Shaper” (Shift + N) tool, located on the left side toolbar, to unfold the hidden tools.
On the unfolded menu, select the “Pencil” (N) tool, or press the “N” key from your keyboard to shortcut it.
Once the “Pencil” (N) tool appears on the left side toolbar, double-click on it to open its options window.
On the “Pencil Tool Options” window, make sure that the “Fidelity” slider is set all the way to “Smooth”.
Then, check both “Fill new pencil strokes” and “Keep selected” boxes, and click “OK” to save.
Step 18: Draw the Nose Shadows

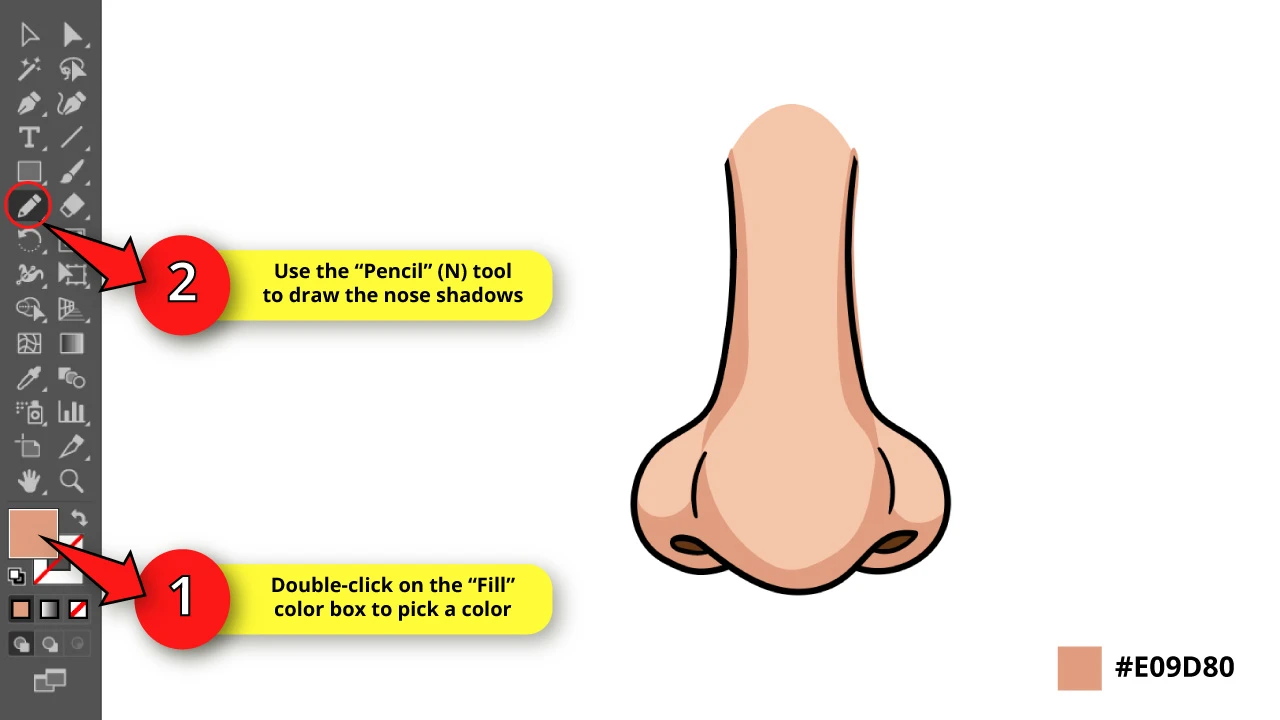
Noses are voluminous with several levels of deepness. Considering this, this time we’ll use two different shades for the shadows, so we depict our nose illustration better.
First, we’ll trace wider and lighter shadow areas, to trace thinner and darker ones later. Following this method we’ll get a nice and more realistic depth effect.
Double-click on the “Fill” color box and pick the shadow color.
I’ll use the #E09D80 shade of brown.
Use the “Pencil” (N) tool and draw three “U” shaped areas at the bottom of the nose.
Then, draw the shadow of the dorsum. Draw a vertical thin area, with a curvy, pointy ending at the bottom. You need to do this on both sides of the nose.
Don’t worry if your shadow areas surpass the nose lines. We’ll learn how to erase the surplus lines later.
Step 19: Draw the Nose Darker Shadows
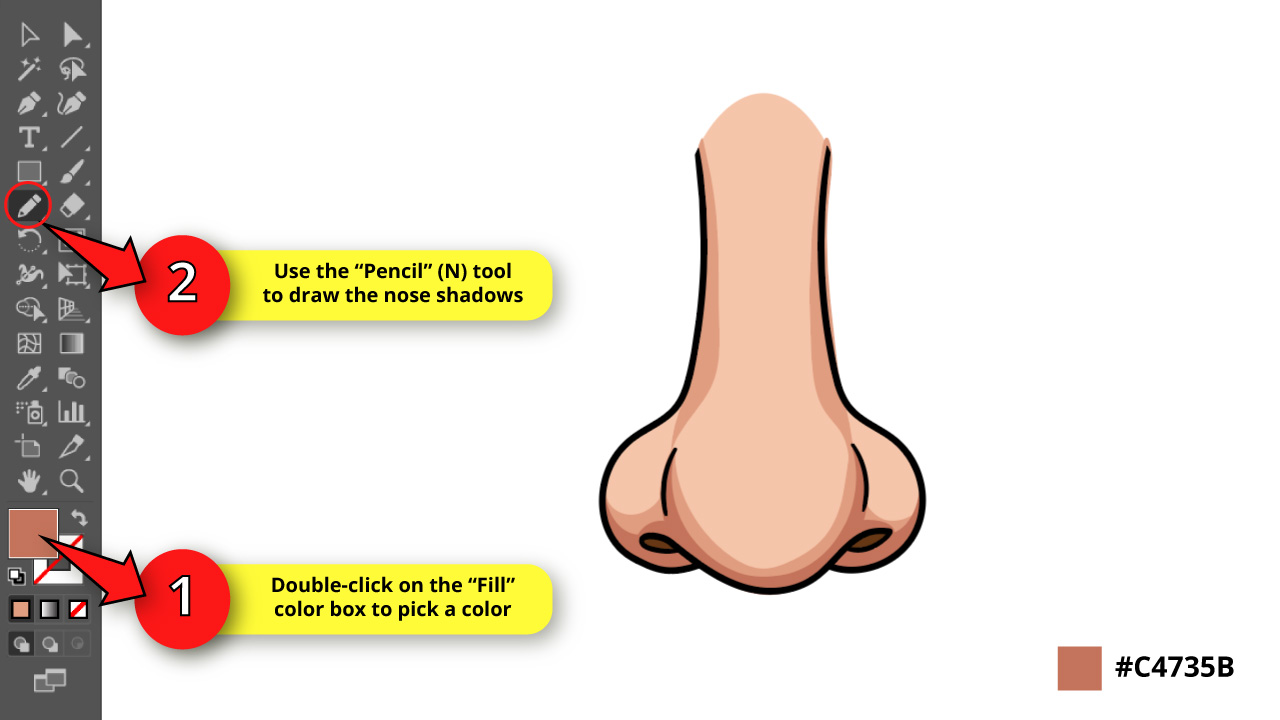

Now we’ll draw the darker shadow areas at the bottom of the nose.
Double-click on the “Fill” color box and pick a darker shadow tone. I’ll use #C4735B.
Use the “Pencil” (N) tool to draw and emphasize the deeper areas of the nose.
Basically, you have to repeat the same areas of the lighter shadows, but now you have to draw them thinner and locate them at the very bottom to get that deeper and heavier effect.
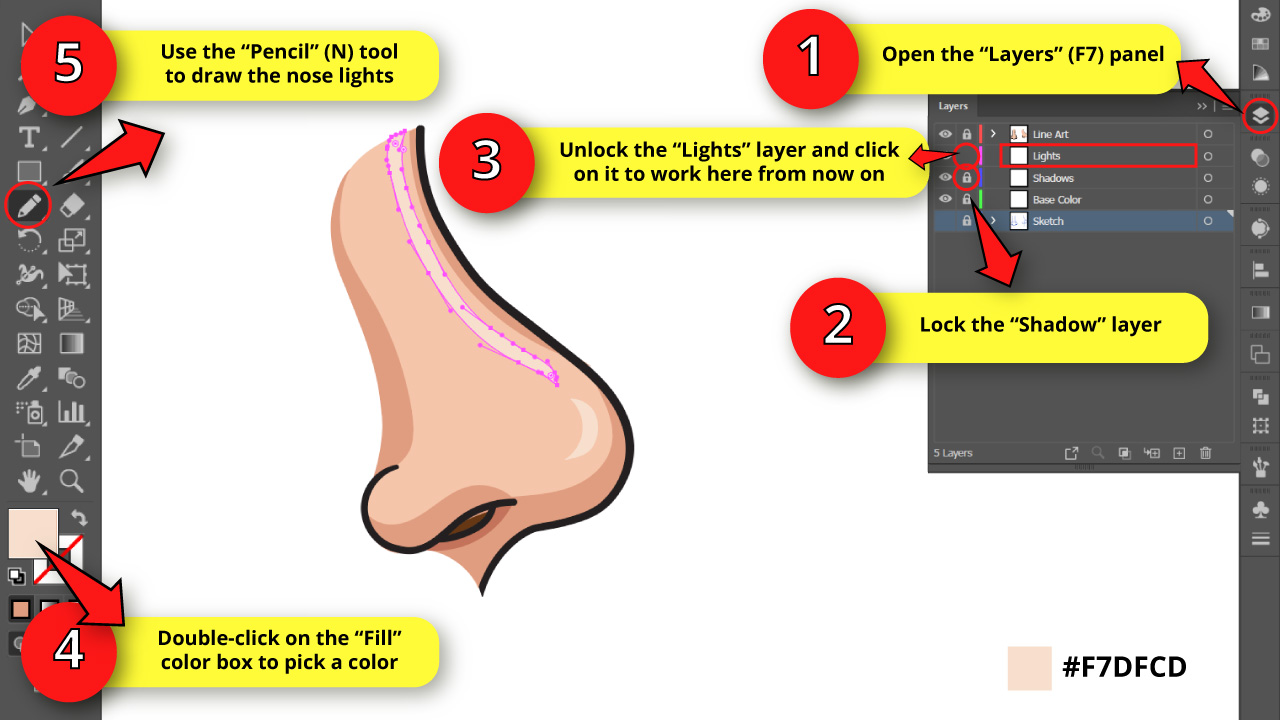
Step 20: Draw the Nose Lights
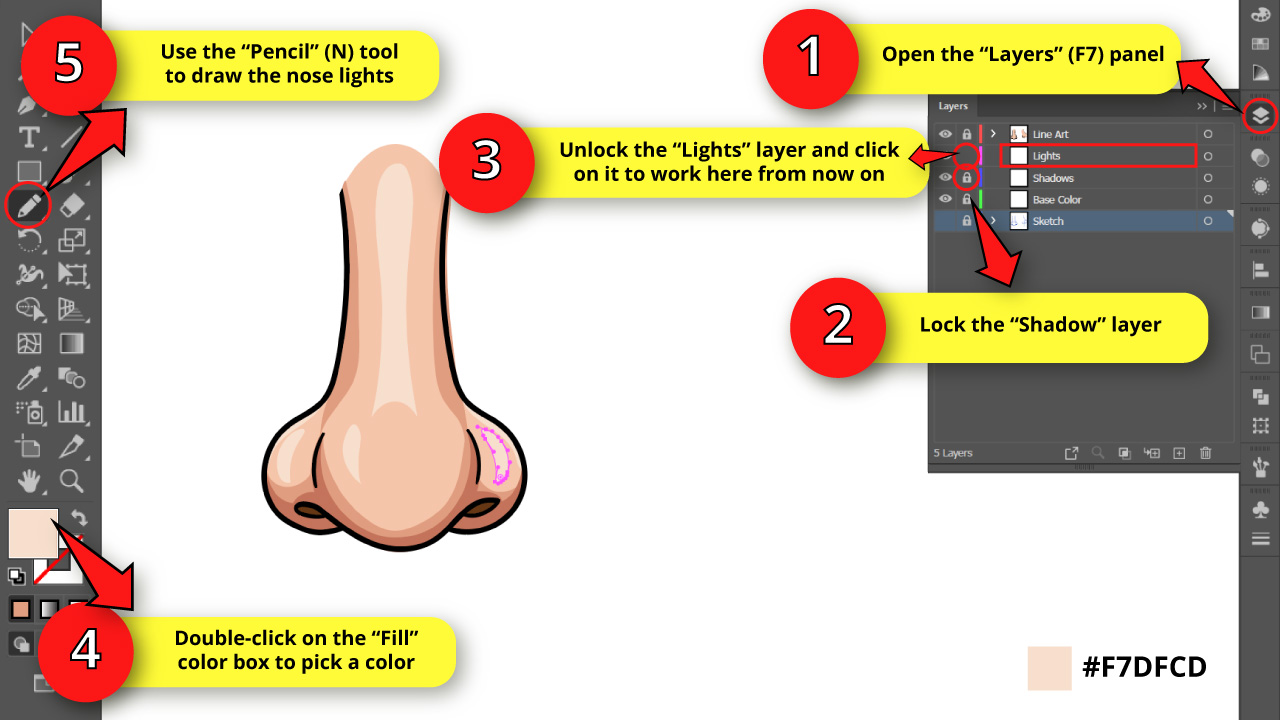
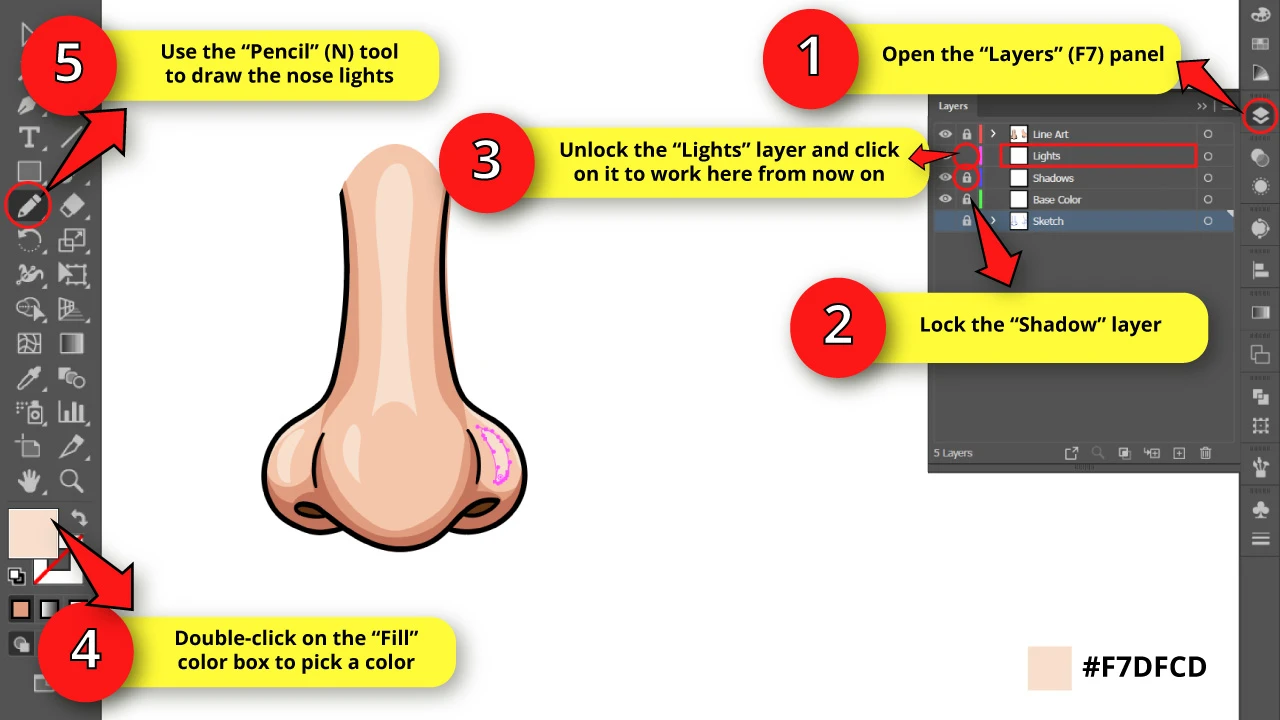
Go to the “Layers” (F7) panel and lock the “Shadows” layer.
Then unlock the “Lights” layer, and click on it to work here from now on.
Since nose skin is usually more moist or oily compared to other skin areas, when it comes to illustrating them, it’s a good idea to exaggerate the lights a little bit to get better results.
Double-click on the “Fill” color box to pick a color for the skin lights. I’ll use #F7DFCD.
Now, use the “Pencil” (N) tool to draw a large vertical thin area as the dorsum light. The top side has to have a round tip, and the bottom side has to have an upward curve.
Then, draw a water drop shape for the nose tip light. Draw this shape on one of the sides of the nose tip. I’ll place it on the left side for this example.
Finally, draw a half-moon shape with round tips for each side of the nose alas.
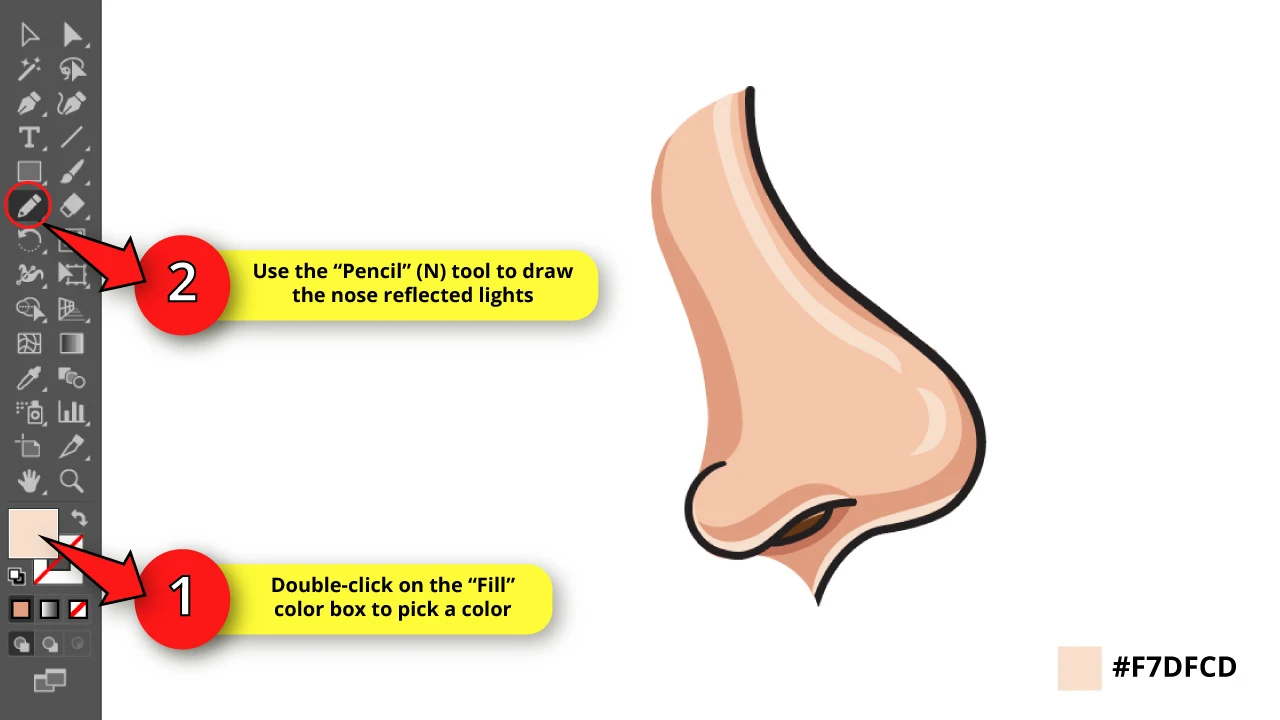
Step 21: Draw the Reflected Lights
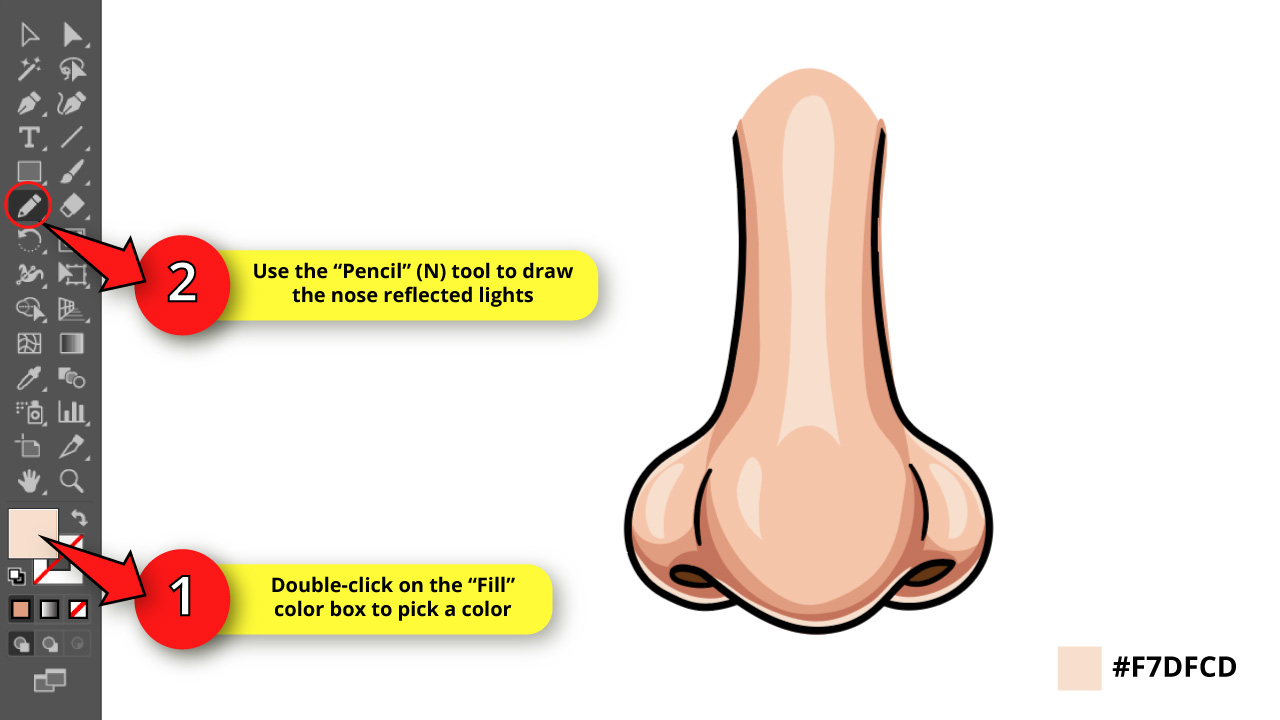

To get a top-notch illustration, we’ll draw the reflected lights as well.
These reflected lights appear at the very bottom of the nose since this has a round shape.
Adding the reflected lights to our nose artwork will take our illustration to the next level.
For the reflected lights, we’ll use the same color we’re using for the common lights (#F7DFCD). We don’t need to change anything.
Simply select the “Pencil” (N) tool, and draw a very thin area at the bottom of the nose.
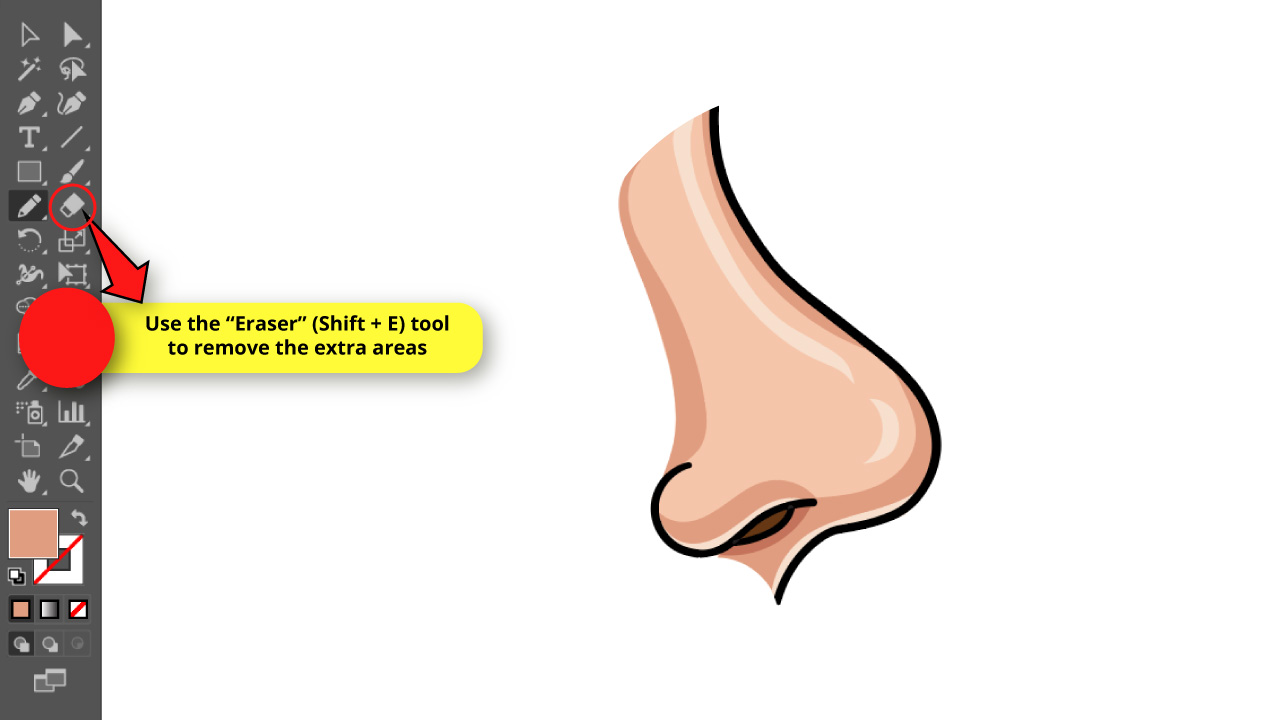
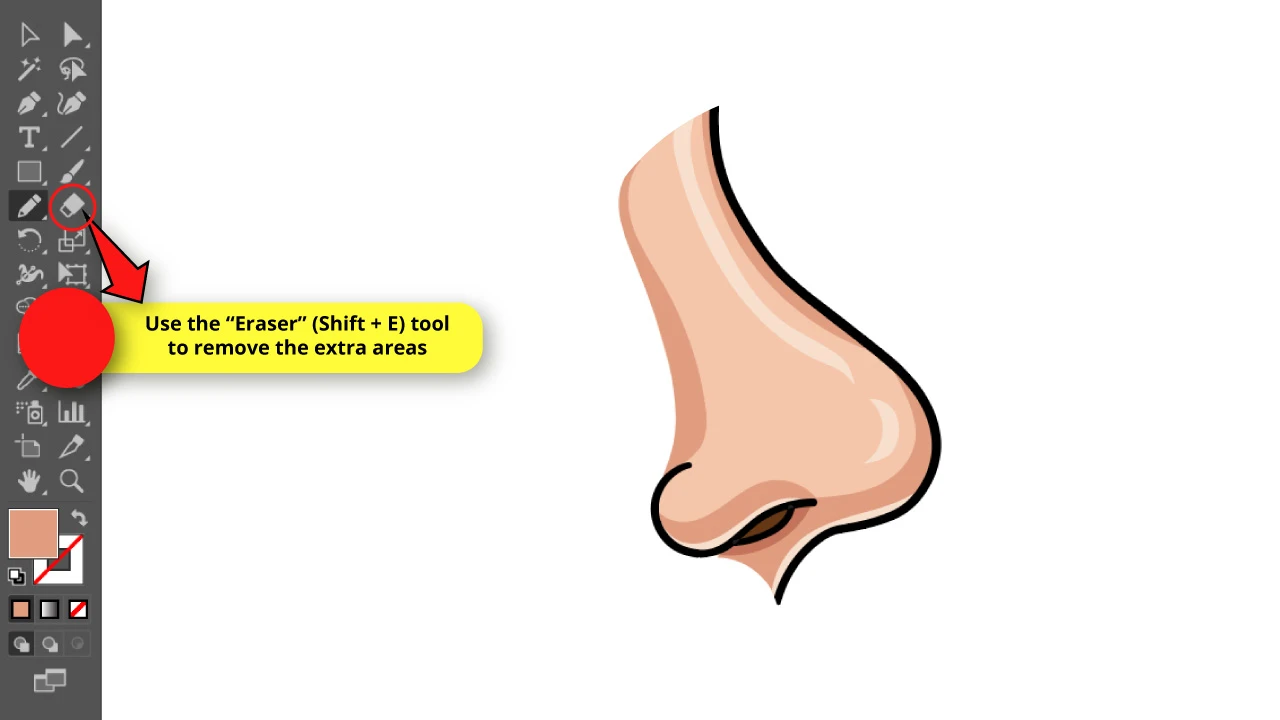
Step 22: Erase the Extra Areas

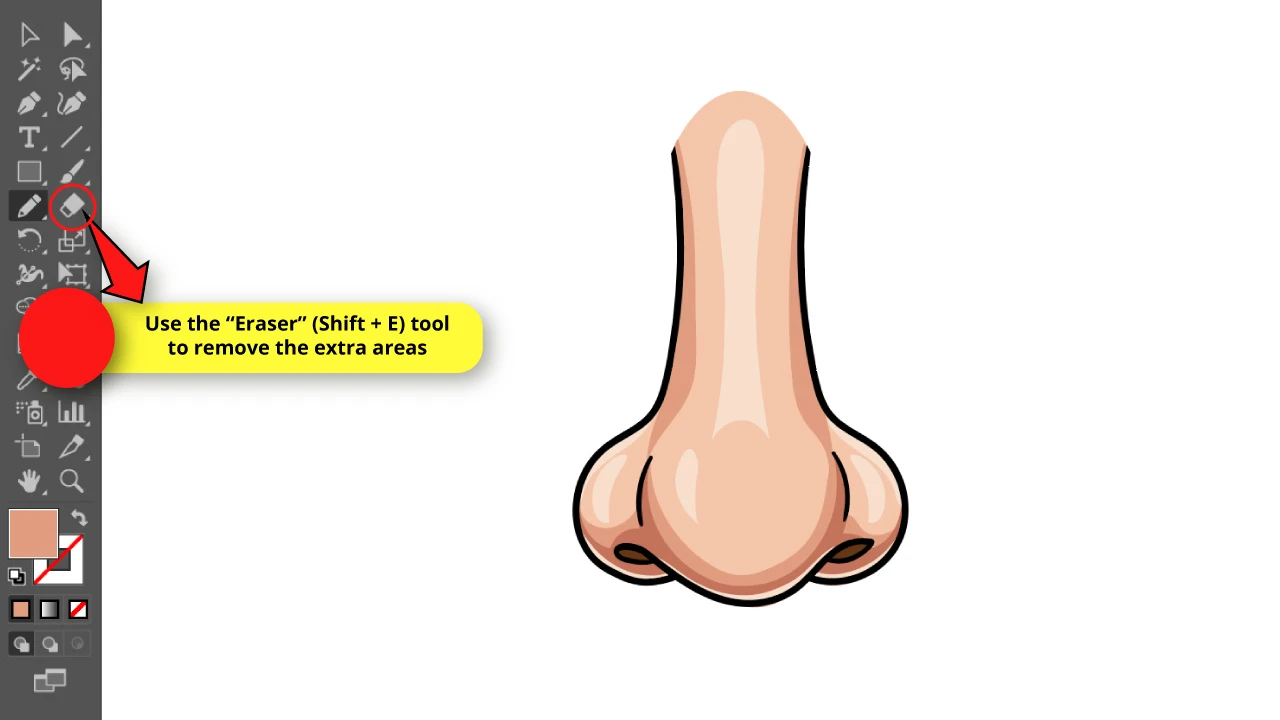
Go to the “Layers” (F7) panel and unlock the “Shadows” layer.
Now we’ll use the eraser tool in Illustrator to get rid of the unnecessary fill areas.
For that, select the “Eraser” (Shift + E) tool, located on the left side toolbar, and erase all surplus areas that we drew when we were adding shadows and lights.
You can also make the size of the eraser bigger in Illustrator if you need to.
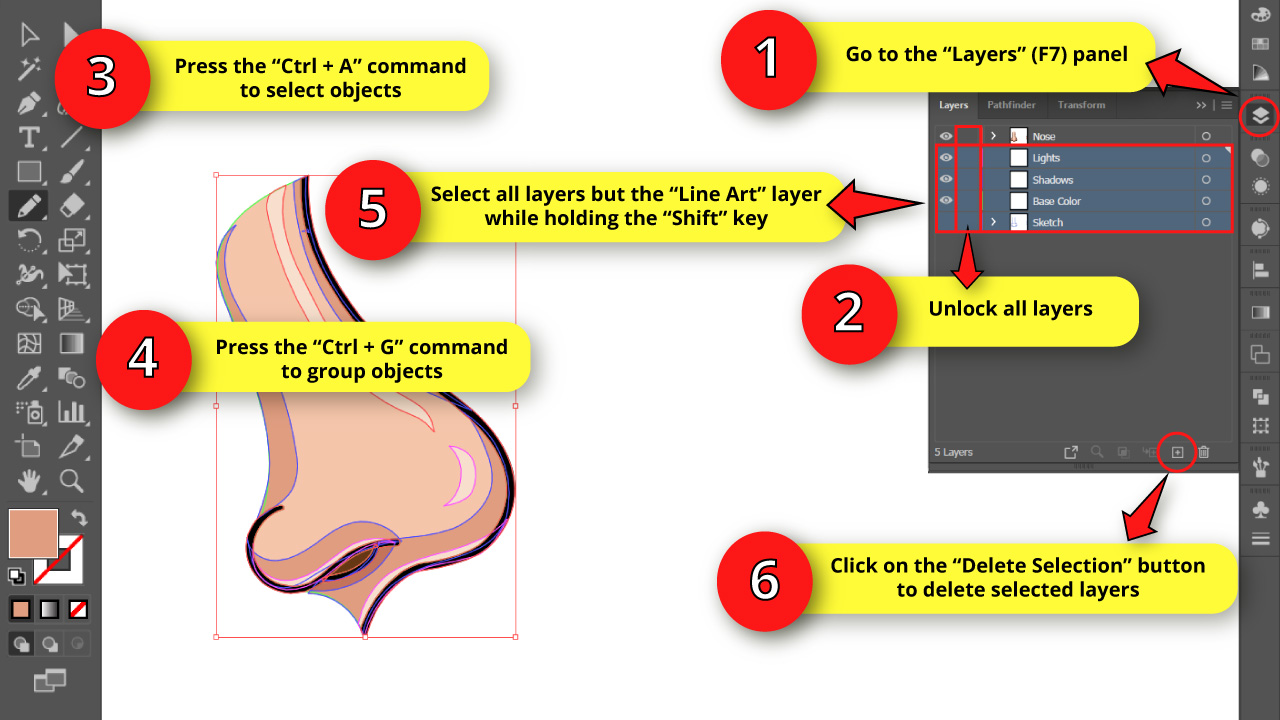
Step 23: Group the Nose and Delete Leftover Layers
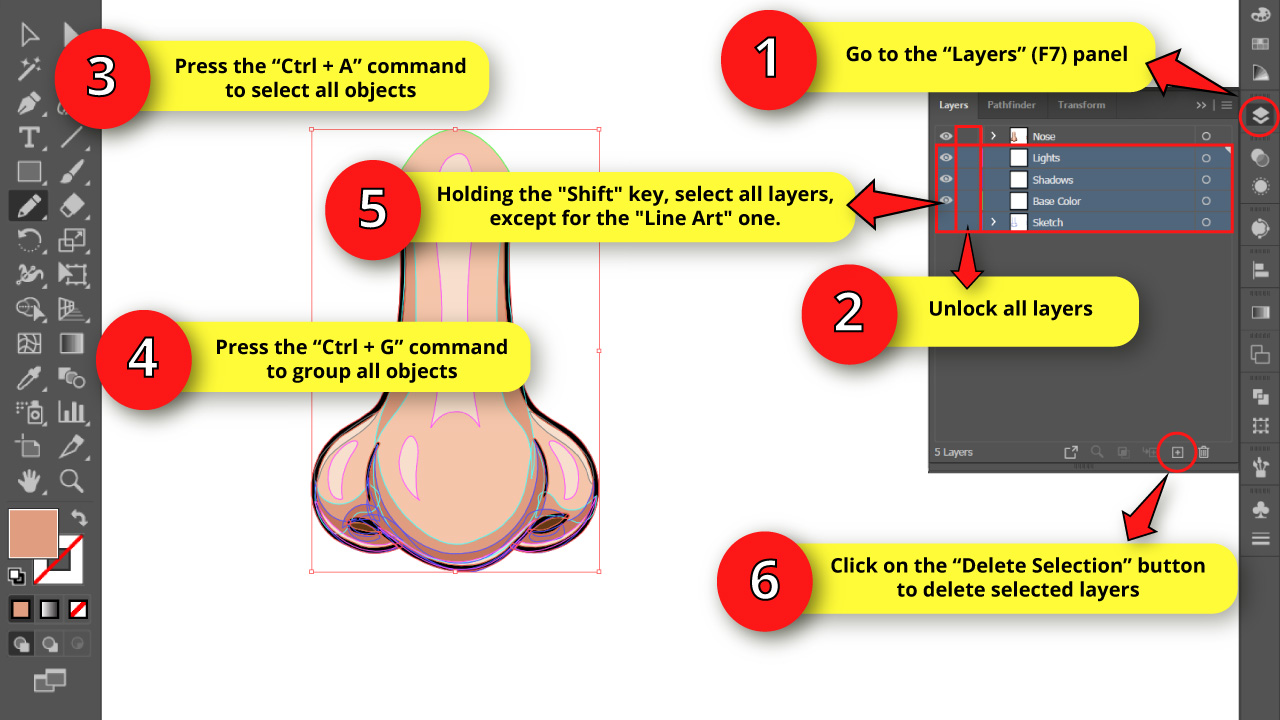

Go to the “Layers” (F7) panel and unlock all layers by clicking on the lock icons.
Press the “Ctrl + A” command to select all, followed by the “Ctrl + G” command to group objects in Illustrator.
You can also group selected objects by right-clicking anywhere on the canva to open the options menu, and clicking on “Group”.
Once you’ve done this, the objects will be grouped on the “Line Art” layer. This means that the rest of the visible layers will be empty.
Now we need to delete these unnecessary empty layers.
In order to do this, holding the “Shift” key (to be able to select several objects at the same time) select all layers, except for the “Line Art” one.
Then, click on the “Delete Selection” button at the bottom of the panel to delete the selected layers.
Finally, double-click on the “Line Art” layer name to rename it to “Nose”, and that’d be it.
The Result
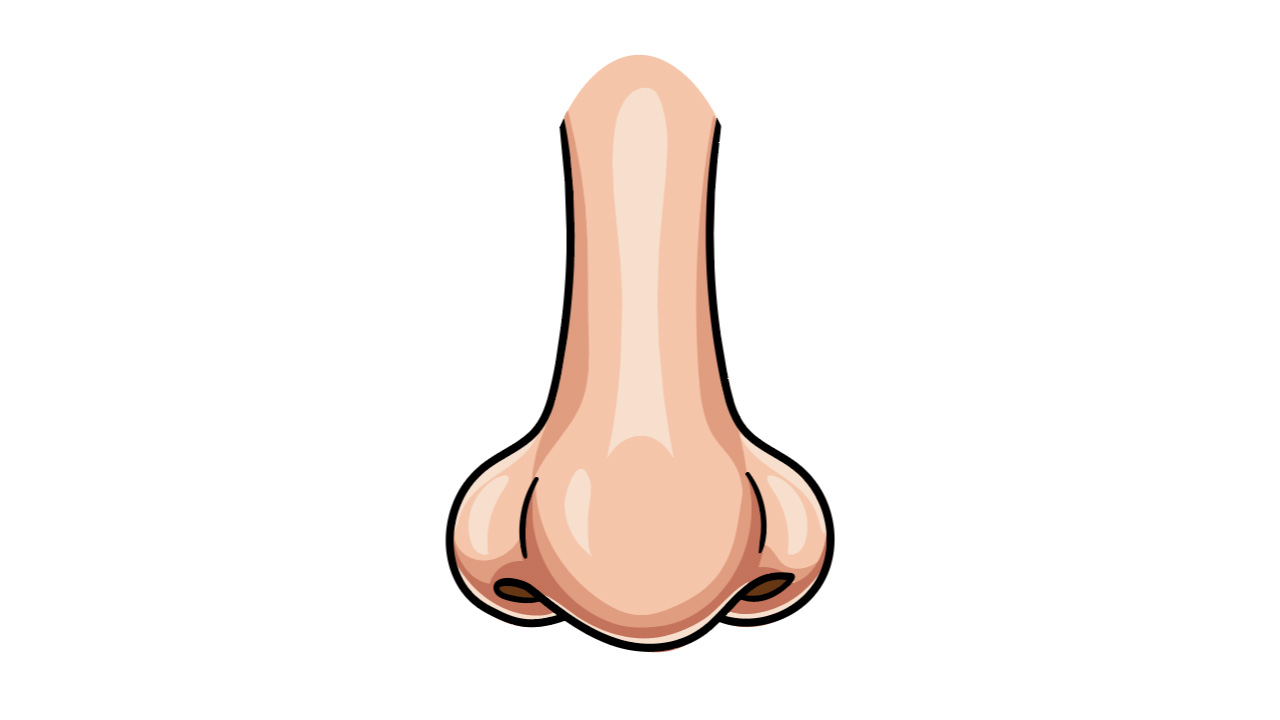
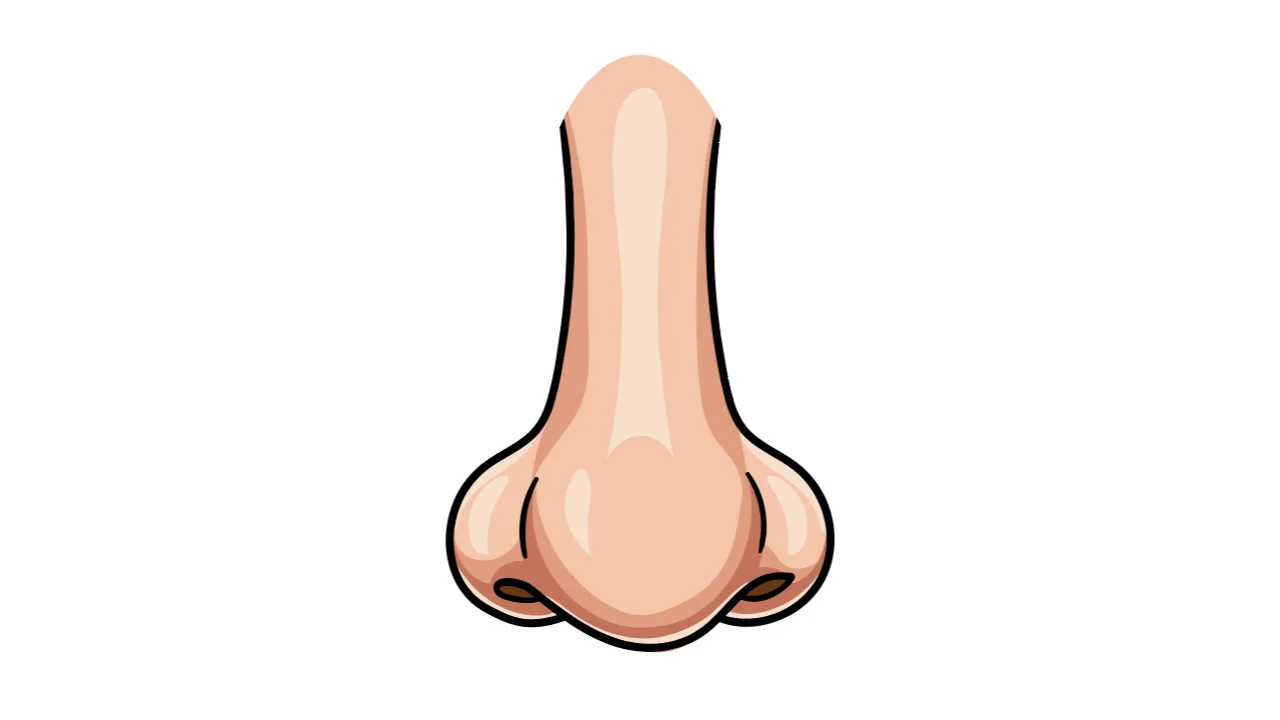
This is how we get our nose in front view, with two shades of shadows, lights and reflected lights.
How to Draw a Nose in Side View in Illustrator
To draw a nose in side view in Illustrator, use the “Paintbrush” (B) tool to draw the nose sketch making a circle with two curves. Draw the nostril and then the ala. Lock the layer and create a new one. Next, draw the final lines and use the “Live Paint Bucket” (K) tool to paint. Use the “Pencil” (N) tool to add shadows and lights. Group it.
In this part, you will learn how to draw a nose in side view in Illustrator.
The drawing process is quite different, but several steps are the same as the front view illustration.
For this reason, you’ll find some references to the previous section, where you will find an extended explanation for some steps.
Step 1: Draw a Circle

First make sure to have the right color mode and the same brush settings we used in the first three steps of the previous tutorial (How to Draw a Nose in a Front View in Illustrator).
Read steps 1, 2 and 3 of the previous tutorial if necessary.
To draw a nose in side view, first select the “Paintbrush” (B) tool on the left side toolbar.
Then, double-click on the “Stroke” color box, also located on the left side toolbar, and pick a color.
I’ll use blue just like I did in the first example.
Use the “Paintbrush” (B) tool to draw a circle as the nose tip.
Step 2: Draw Two Curves
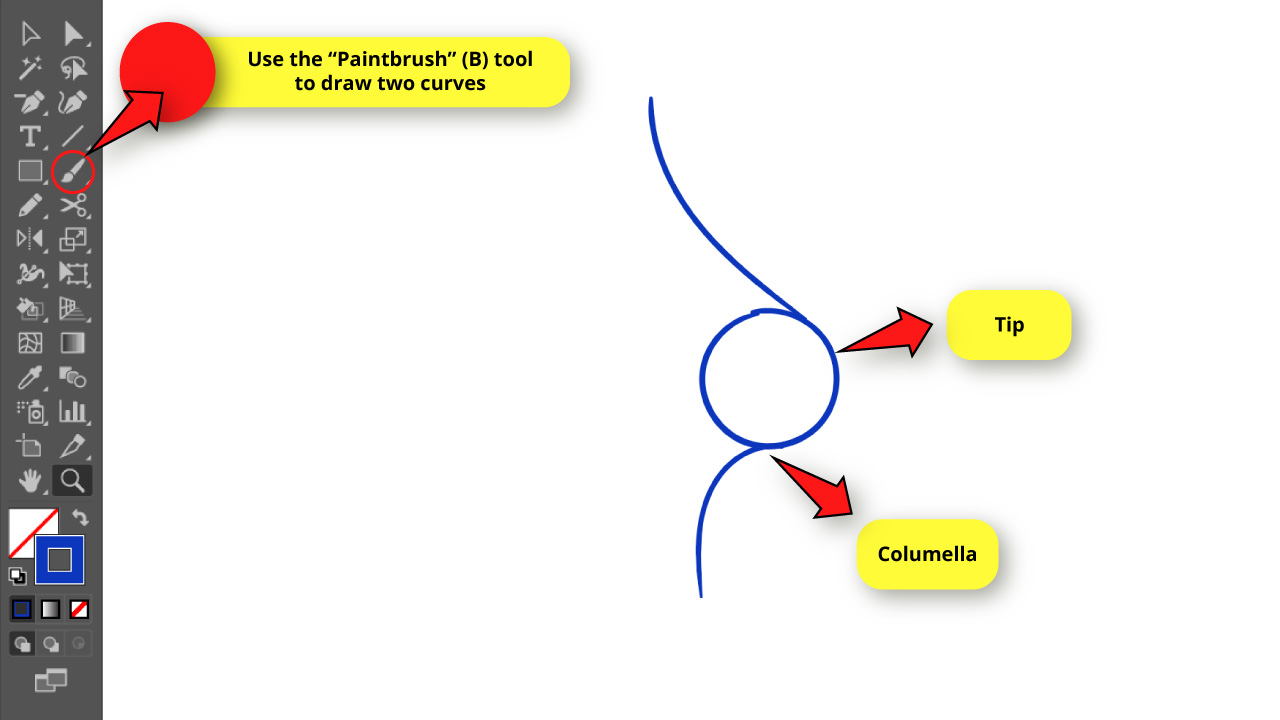

Use the “Paintbrush” (B) tool to draw a diagonal curve coming off the circle as the nose dorsum.
Then, draw a vertical line with a curved tip coming off the circle as the columella.
Step 3: Draw a Wavy Line

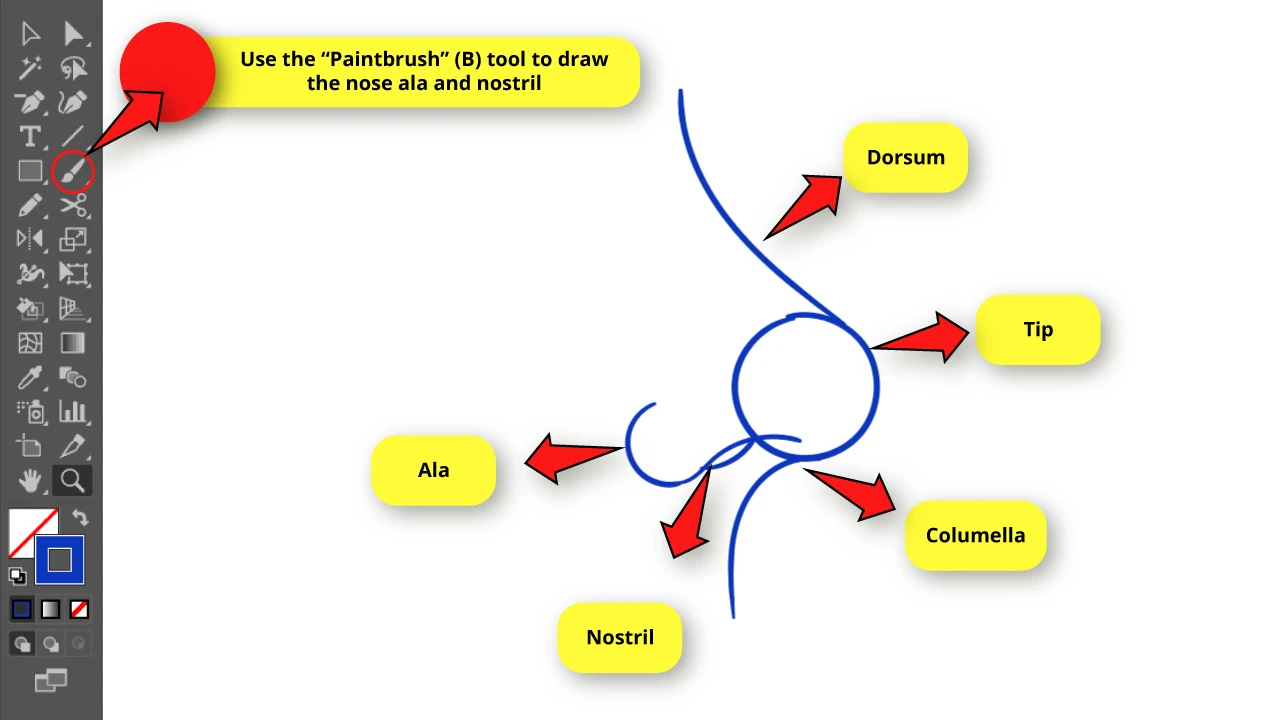
To make a wavy line in Illustrator, continue using the “Paintbrush” (B) tool, now to draw a half circle shaped line, and then draw a downward curve finishing at the bottom of the circle.
The whole curve has to be drawn at an angle close to 20°.
Finally, draw a small upward curve to make the nostril.
Step 4: Make the Sketch Transparent and Create New Layers
Select all sketch lines using the “Selection” (V) tool located on the left side toolbar, or by pressing the “Ctrl + A” command.
Then, go to the “Opacity” field on the toolbar at the top of the screen, and set it to 50%.
Next, go to the “Layers” (F7) panel on the right side toolbar, or press the “F7” key from your keyboard to shortcut it.
Once you are on the “Layers” (F7) panel, click four times on the “Create New Layer” button at the bottom of the panel to create four new layers.
Now double-click on each of the layers names to rename them as:
“Line Art”
“Lights”
“Shadows”
“Base Color”
“Sketch”
Maintain this layer order, and make sure that the “Sketch” layer is the one that contains the drawn lines.
Now, lock all layers but the “Line Art” one, by clicking on their empty boxes next to the eye icons
Once the box displays a lock icon, that means the layer is now locked and is no longer possible to select it, or modify it.
Select the “Line Art” layer to continue working here from now on.
Step 5: Draw the Nose Final Lines
Go to the “Opacity” field and set it back to 100%.
Next, select the “Paintbrush” (B) tool, and then double-click on the “Stroke” color box to pick black.
Now, draw the nose final lines using the sketch as a guide.
Draw the nose outline and nostril. Avoid drawing the whole circle. Just use it as a guide to draw the nose tip.
Step 6: Expand Appearance

Select all the lines using the “Ctrl + A” command.
Then go to “Object > Expand Appearance” on the menu at the top of the screen to convert paths to objects.
We are doing this so we can continue working without worrying about modifying the black lines by mistake.
Step 7: Draw Temporary Curves

As we did in the previous tutorial, we now need to close the nose shape to be able to add fill color.
Therefore, we need to draw some temporary lines which we’ll get rid of later on.
In order to do this, select the “Paintbrush” (B) tool yet again, and then double-click on the “Stroke” color box to pick a different color to stand out from the others. I’ll use red just like I did in the previous tutorial.
Finally, draw two curves. The first one has to be a flattened “S” curve starting from the nose bridge and finishing on the nose ala.
The other curve has to be a diagonal downward curve, starting from the ala and finishing on the philtrum (upper lip area).
Just make sure that your red lines reach or surpass the black lines, so the lineart is closed.
Step 8: Paint the Nose

Select the “Live Paint Bucket” (K) tool, or press the “K” key to shortcut it.
This tool is hidden in the “Shape Builder” (Shift + M) tool nest.
If you need to know how to find this tool, take a look at “Step 13” from the previous tutorial (How to draw a nose in front view in Illustrator).
Double-click on the “Fill” color box on the left side toolbar, and pick a color for the nose. Then, click on the nose areas to paint them.
I’m using the same skin tones I used in the previous tutorial:
The #F5C5AA color for the nose.
The #663714 color for the nostrils.
Step 9: Expand the Nose

Select the nose using the “Ctrl + A” command, and then go to “Object > Expand” on the menu at the top of the screen.
Once the “Expand” options menu opens, make sure that the “Object”, “Fill” and “Stroke” boxes are selected, and then click “OK” to save.
Now, since the lines have been expanded, the red lines trimmed the black ones on the overlapped sections.
Step 10: Get Rid of the Extra Curve and Hide the Sketch Layer

Use the “Direct Selection” (A) tool located on the left side toolbar to select the curves you have drawn on “Step 7”, and then press the “Del” key as many times as necessary to remove the curve.
Repeat the same process selecting the remaining long vertical black line under the nose, and delete it using the “Del” key.
Then, go to the “Layers” (F7) panel and click on the “Sketch” eye icon to hide it.
Step 11: Isolate Nose Fill Color

Now we need to isolate the fill color from the black lines. This way we will be able to draw shadows and lights in the mid layers.
To isolate the black lines from the fill color, first select the “Direct Selection” (A) tool on the left side toolbar.
Use this tool to select the three fill color objects (the nose skin, and the nostril) while holding the “Shift” key, to select several objects at the same time.
Make sure to click far from the edges when you select the fill colors, so you can indeed select the whole objects, and not just a part of them.
Next, copy them by pressing the “Ctrl + C” command, and then delete them using the “Del” key.
Go to the “Layers” (F7) panel, unlock the “Base Color” layer, and click on it to work there.
Finally, press the “Ctrl + F” command to paste in front. Now the fill colors are on their own layer.
Step 12: Draw the Nose Bottom Shadows
On the “Layers” (F7) panel, lock the “Line Art” and “Base Color” layers.
Then unlock the “Shadows” layer, and click on it to work here from now on.
We need to use the “Pencil” (N) tool to draw shadows. This tool is hidden in the “Shaper” (Shift + N) tool nest, located on the left side toolbar.
You can check how to find this tool on “Step 17” from the previous tutorial (How to draw a nose in front view in Illustrator).
You can also press the “N” key to shortcut it.
Use the “Pencil” (N) tool to draw a shadow area, covering the bottom of the nose to the nose tip.
Repeat this action adding shadows for the bottom of the nose ala, a large area for the dorsum and a thin area for the dorsum edge.
Now, we’ll add an even darker shadow area under the nostrils.
For this one, double-click on the “Fill” color box to pick the #C4735B color.
Continue using the “Pencil” (N) tool to draw an upward curve area.
Don’t worry if when you’re drawing the shadows you surpass the black lines. We’ll get rid of the surplus lines later on.
Step 13: Draw the Nose Lights

Go to the “Layers” (F7) panel and lock the “Shadows” layer.
Then unlock the “Lights” layer, and click on it to work here from now on.
Double-click on the “Fill” color box to pick a color for the lights. I’ll use #F7DFCD.
Use the “Pencil” (N) tool to draw a large thin diagonal area following the dorsum curve, right before reaching the nose tip.
Then, draw a half-moon-shaped area for the nose tip light.
Step 14: Draw the Reflected Lights

Now we’ll add some reflected lights at the very bottom of the nose.
We’ll use the same light color for the reflected lights. You don’t need to change the fill color. We’ll still use #F7DFCD.
Select the “Pencil” (N) tool to draw a very thin area at the bottom of the nose.
Step 15: Erase the Extra Areas
Go to the “Layers” (F7) panel and unlock the “Shadows” layer.
Select the “Eraser” (Shift + E) tool, located on the left side toolbar, and erase all surplus areas that we drew when we were adding shadows and lights.
Step 16: Group the Nose and Delete Leftover Layers
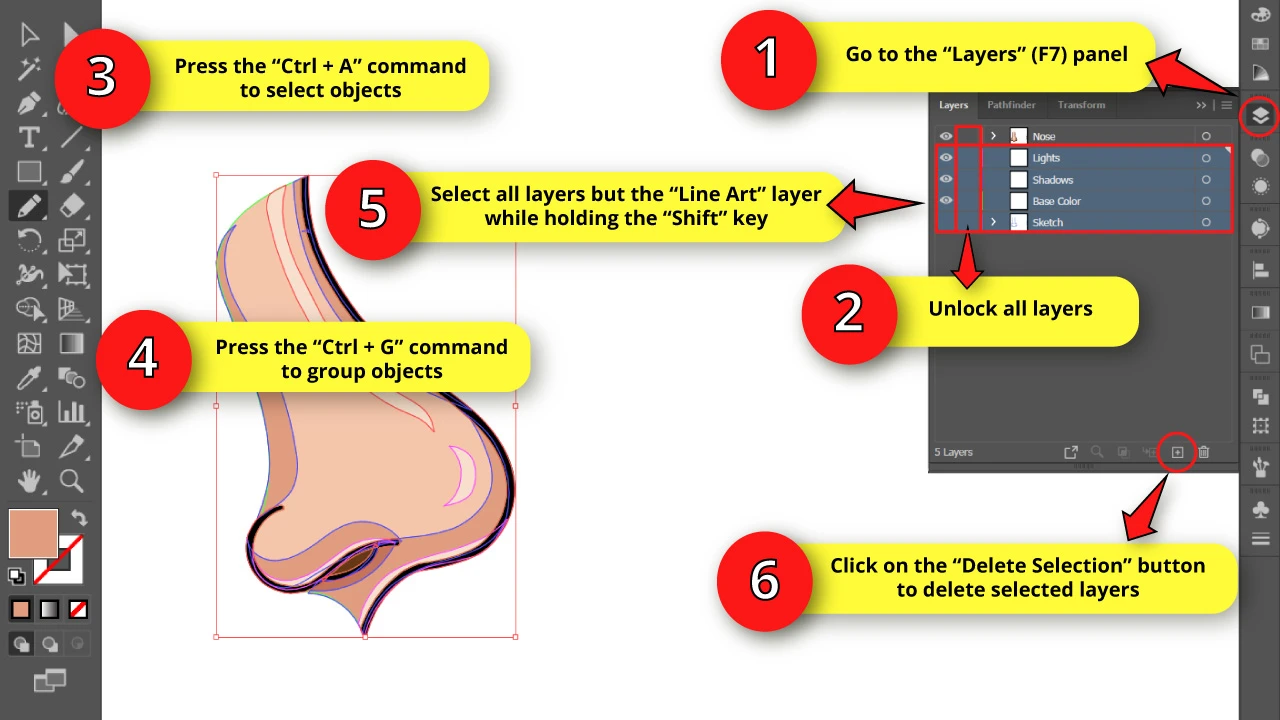
Go to the “Layers” (F7) panel and unlock all layers by clicking on the lock icons.
Press the “Ctrl + A” command to select all, followed by the “Ctrl + G” command to group all objects.
Once you’ve done this, the objects will be grouped on the “Line Art” layer. This means that the rest of the visible layers will be empty.
Holding the “Shift” key (to be able to select several objects at the same time) select all layers, except for the “Line Art” one.
Then, click on the “Delete Selection” button at the bottom of the panel to delete the selected layers.
Finally, double-click on the “Line Art” layer name to rename it to “Nose”.
The Result
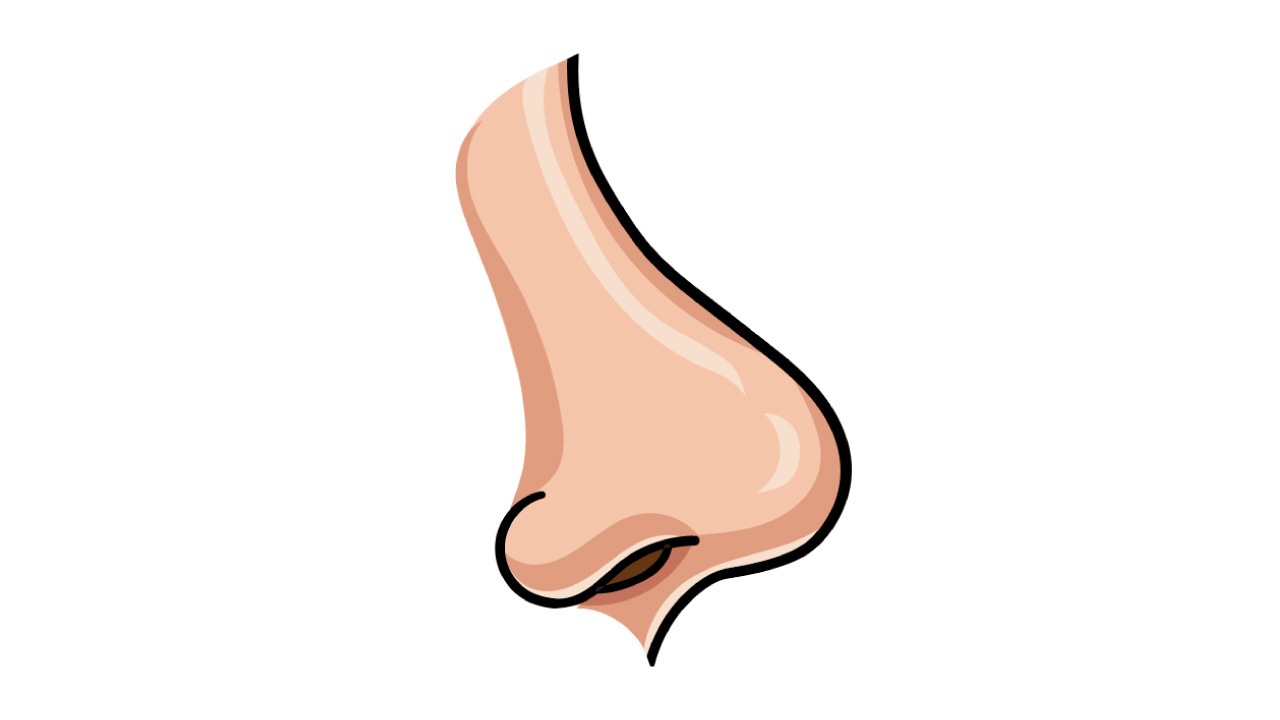

We’re done! This is the result of drawing a nose in side view in Illustrator.
Frequently Asked Questions on “How to Draw a Nose in Illustrator”
Why should I draw the shadows and lights between the “Line Art” and “Base Color” layers, and not on top?
We do this because when we use the “Pencil” tool we draw freehand strokes and it’s very hard to get perfect shapes. Since the first layer is the “Line Art” one, the irregular edges get hidden behind it. This is why it’s important to lock both layers when it comes to drawing shadows and lights.
What is a reflected light?
Reflected light comes as a result of another surface being illuminated. In the nose example, the bottom has a thin reflected light as a result of the skin or cheeks brightness. The reflected light has the color of the origin surface, but dimmed.
How to set the “Pencil” (N) tool to fill each new stroke automatically in Illustrator?
Press the “N” key to display the “Pencil” (N) tool on the left side toolbar. Next, double-click on it to open its options window. On that window, make sure to check the “Fill new pencil strokes” box, and press “OK” to save.
How to use the “Direct Selection” (A) tool in Illustrator to select a whole object?
The trick to use the “Direct Selection” (A) tool to select an object, is clicking anywhere on the object far enough from the edges (anchor points). If you by mistake click on an anchor point, you will only select a part of the object. So simply avoid clicking close to the edges.


Hey guys! It’s me, Marcel, aka Maschi. On MaschiTuts, it’s all about tutorials! No matter the topic of the article, the goal always remains the same: Providing you guys with the most in-depth and helpful tutorials!

