

There are several methods to fill color in Illustrator, but doubts begin to arise when you have to deal with complex artworks.
There is not really any intuitive way to do this. Unless, of course, you are familiar with some tools and procedures that can help us to get this done.
Let’s go through the best two ways to do this!
Filling Color in Illustrator
To fill color in Illustrator, select all (CTRL +A) and then use the Live Paint Bucket tool to color the sections of the artwork. Or, select your artwork, then expand the lines and use “Unite paths.” Set a rectangle on the background to cover the artwork. Trim it. Then select a section and pick a color.
How to Fill Color Using the “Live Paint Bucket” Tool in Illustrator
Select your artwork by pressing “Ctrl + A” to select all. Double-click on the “Live Paint Bucket” (K) tool to open options windows. Check “Paint Fills” and uncheck “Paint Strokes”. Click OK to save. Pick a color and click on your artwork sections to fill color.
The “Live Paint Bucket” tool is Illustrator’s specific tool to fill color (or even stroke color).
The good thing about this tool is that the process is not destructive. That means you don’t have to convert your drawing lines to paths to use it. Even more, you can make adjustments at any moment of the process. Like moving the anchor points, changing the width size or completely deleting the stroke lines to get a different style of drawing.
Learn how to move anchor points in Illustrator in this complete tutorial about “How to Move Anchor Points in Illustrator in 4 Easy Steps”.
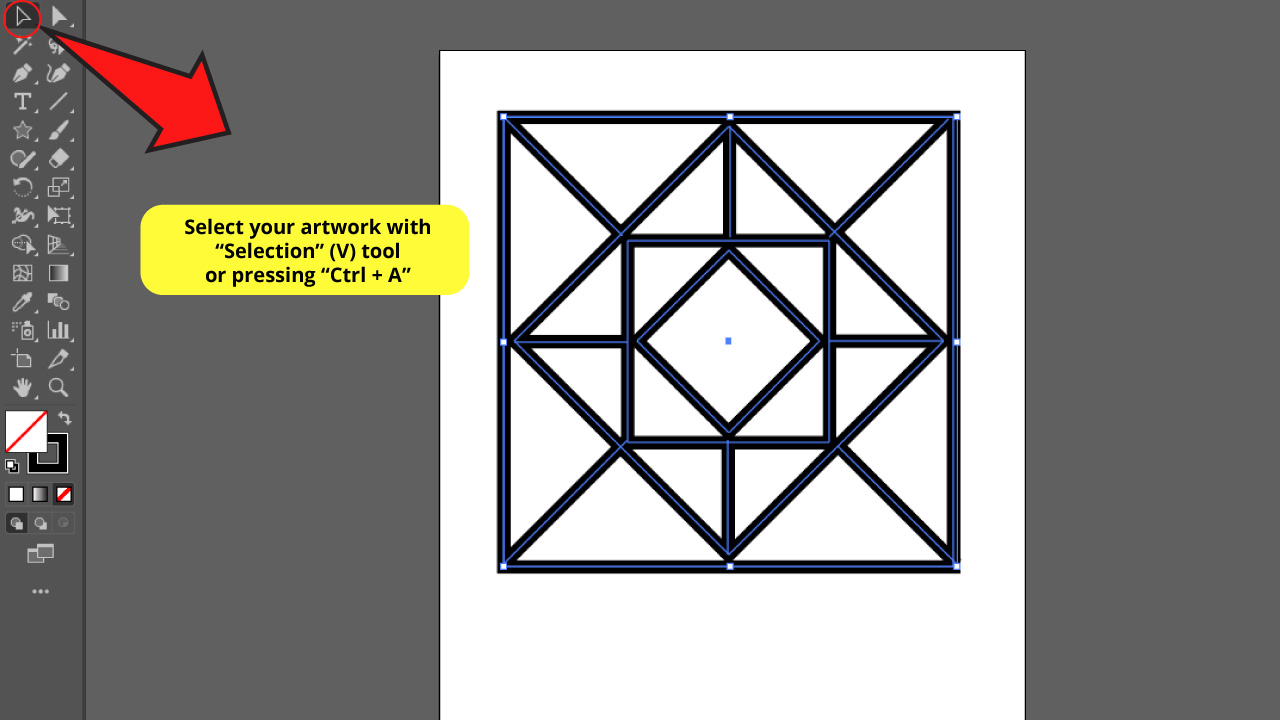
Step 1: Select your Artwork
First select your artwork using the “Selection” (V) tool you can find on the left side toolbar, or using “Ctrl + A” to select all.
If you need some information about drawing in Illustrator, you can take a look at these two articles: “How to Draw in Illustrator in 5 Simple Steps“ and “Change the Brush Size in Illustrator”.
Step 2: Find the “Live Paint Bucket” Tool

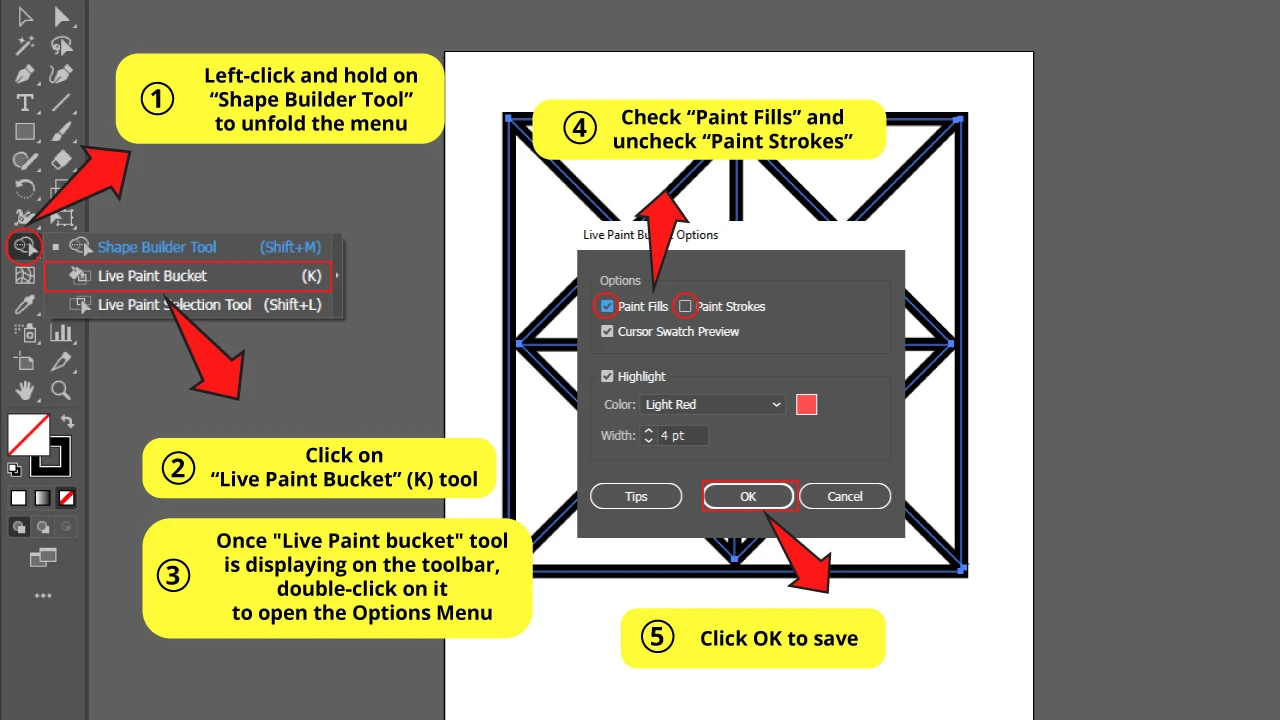
Left-click and hold on the “Shape Builder” tool to unfold a menu with hidden tools.
Select “Live Paint Bucket” (K) from this menu.


Now the “Live Paint Bucket” (K) tool is displayed on the left side toolbar. Double-click on the “Live Paint Bucket” tool to open the Options Menu.
Check “Paint Fills” and uncheck “Paint Strokes” boxes.
Then click on OK to save.
Would you like to know what the “Shape Builder” tool is used for? You can find this out in this article about “Illustrator: How to Use the Shape Builder Tool”.
Step 3: Color your Artwork
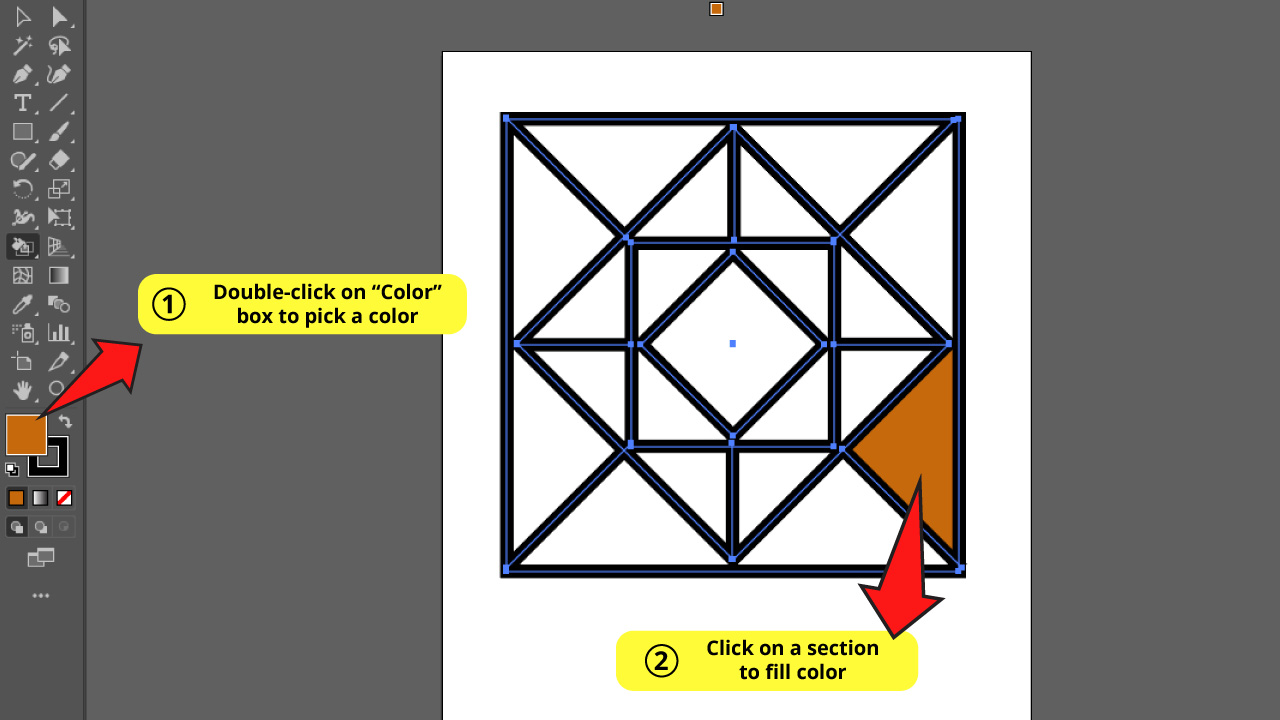
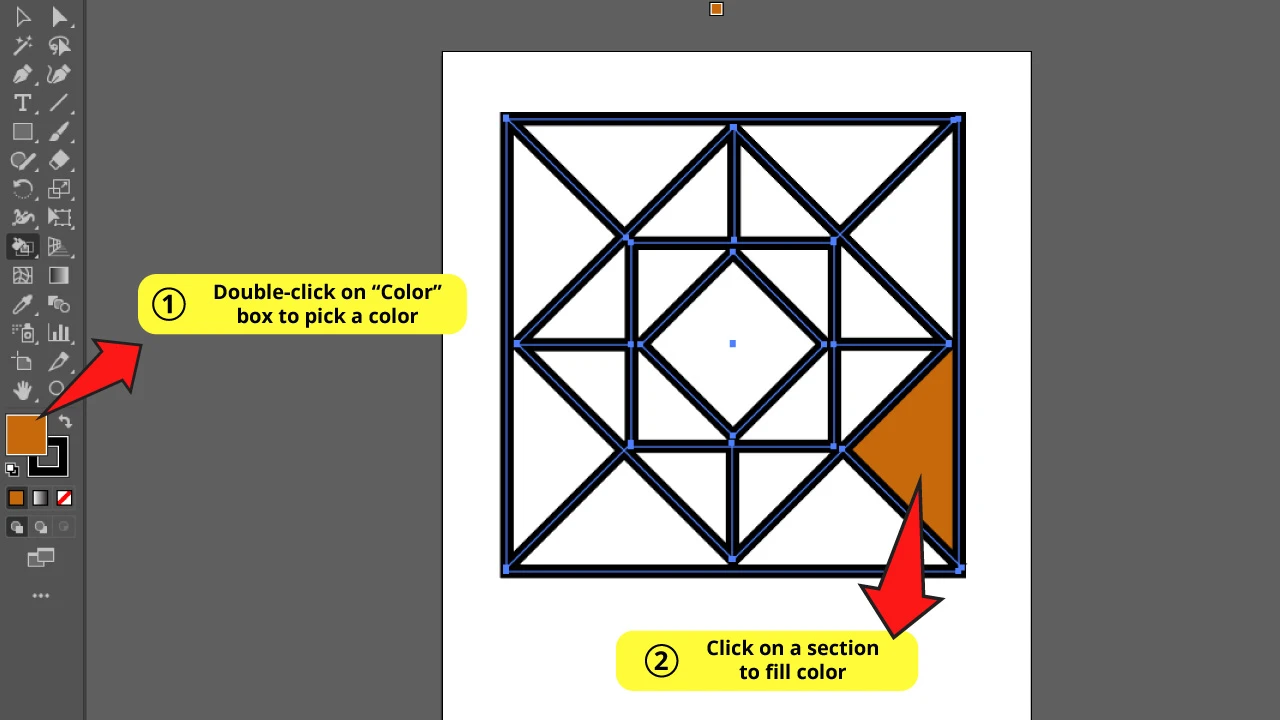
Now pick a color by double-clicking on the “Color” box on the left side toolbar.
Make sure that the “Live Paint Bucket” tool is selected and place your mouse above your artwork. Click on a section of your drawing and it will be filled with your selected color.
Repeat this step to color the whole drawing.
Step 4: Disable the Stroke Lines if Needed
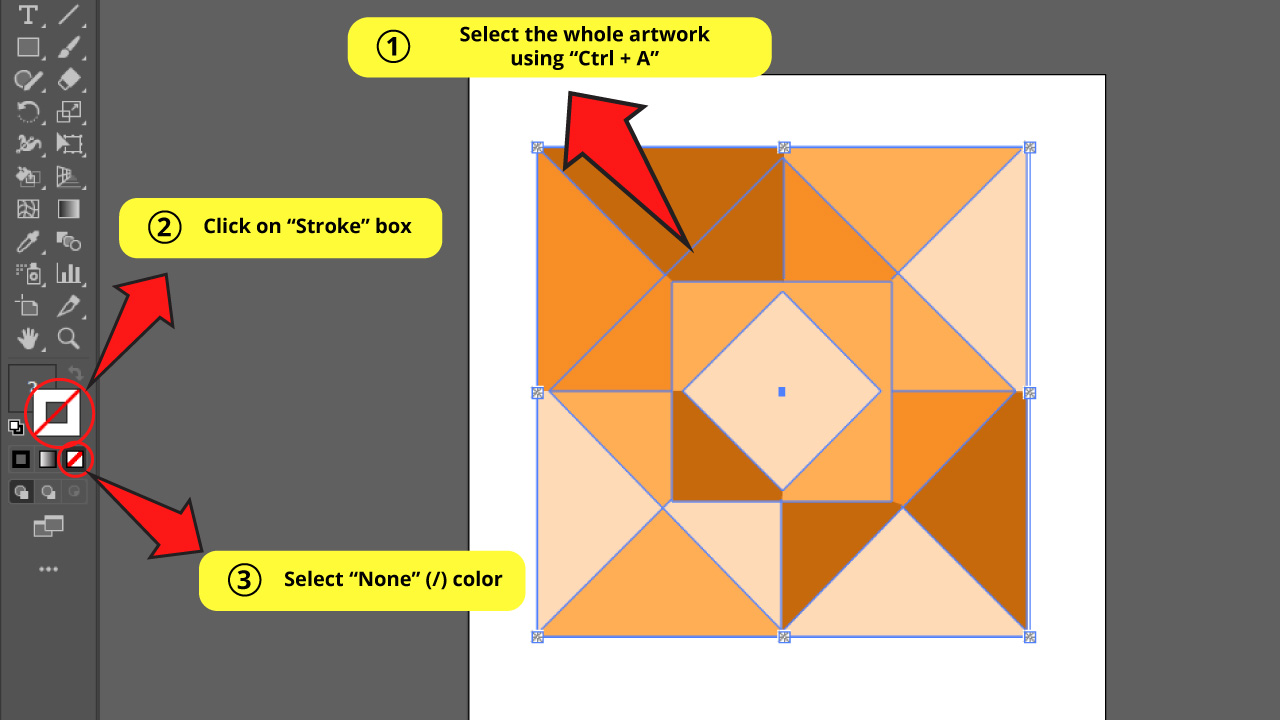

This method allows you to make some adjustments like moving anchor points, changing the width size of your stroke lines, or even deleting them.
For my example, I’m going to delete the stroke lines to show you how it could look. And it could look pretty good, indeed.
To get this done, just select the whole drawing using the “Ctrl + A” command. Next, click on the “Stroke” box, and then click on the “None” (/) color. Both are located at the bottom of the left side toolbar.
If you want to go deeper on how to use the “Live Paint Bucket” tool, we suggest you check this article about “How to Use the Live Paint Bucket Tool in Illustrator”.
Filling Color Using the “Pathfinder” Panel in Illustrator
Select your artwork. “Expand” the lines. “Unite” the paths. Make a rectangle to cover all the artwork. Send it back. Select all. “Trim” the artwork. Use “Direct Selection” (A) tool to delete the extra edges. Use this tool to select a section of the artwork and then pick a desired color.
This is the other method to fill color. Keep in mind that you will have to necessarily convert your lines into paths to go by this method. So chances are the decision of using one or the other method will depend on your needs and on what tools you feel more comfortable with.
Step 1: Select your Artwork
First select your artwork using the “Selection” (V) tool you can find on the left side toolbar, or using “Ctrl + A” to select all.

Step 2: Expand your Artwork Lines
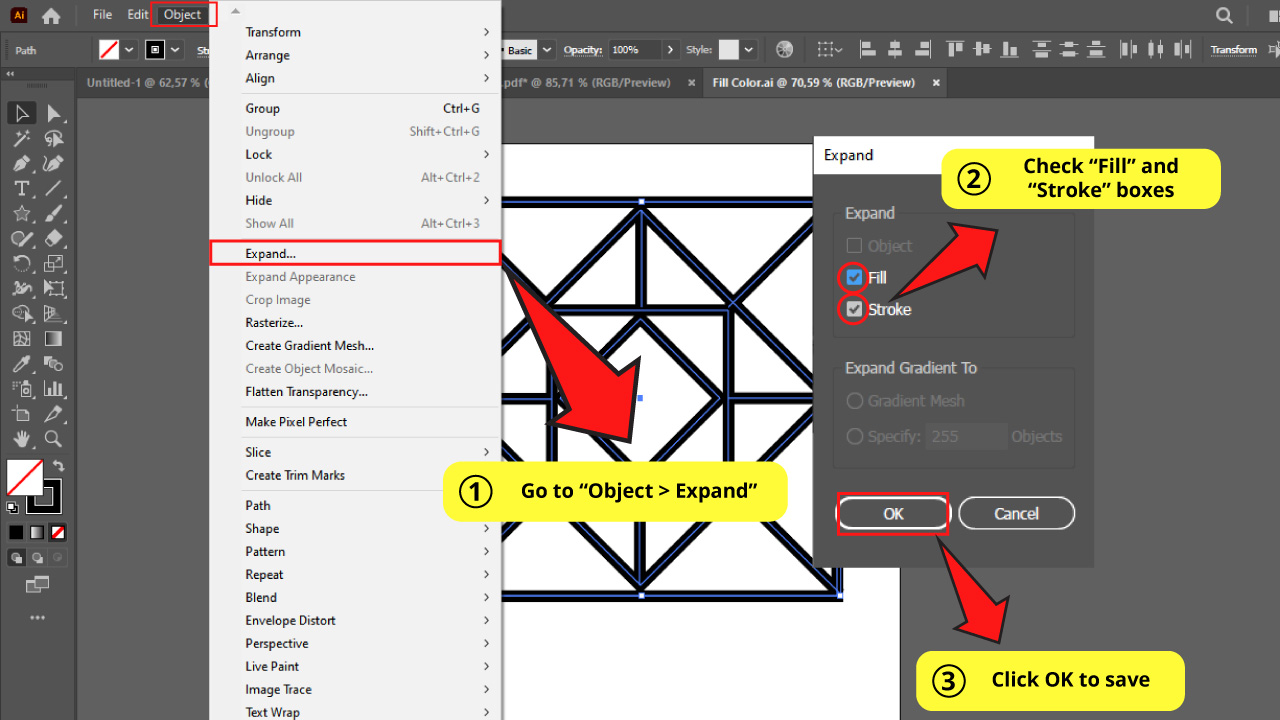
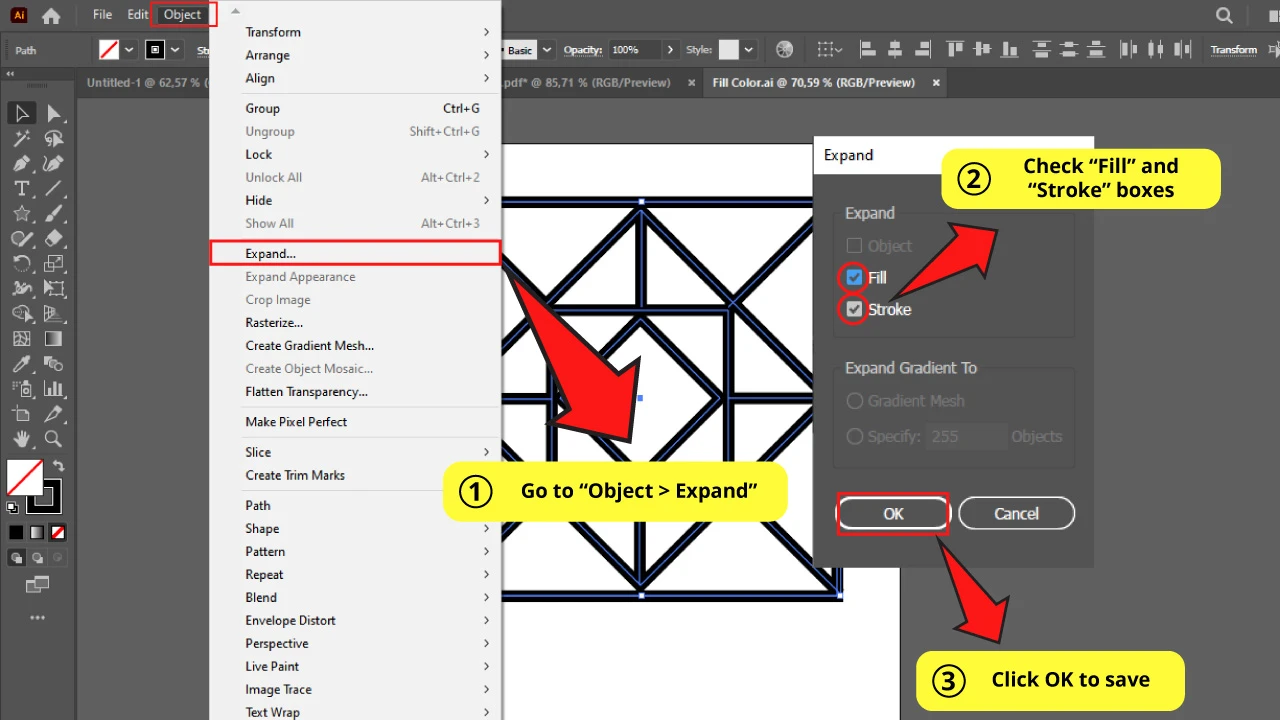
This step will convert your stroke lines into paths. This process is destructive. This means you won’t be able to turn your paths back into stroke lines again. Keep this in mind.
To get this done, go to “Object > Expand” on the top side menu.
Make sure that the “Fill” and “Stroke” boxes are checked on the “Expand” options menu.
Then click OK to save.
Step 3: Use the “Unite” Function from the “Pathfinder” Panel
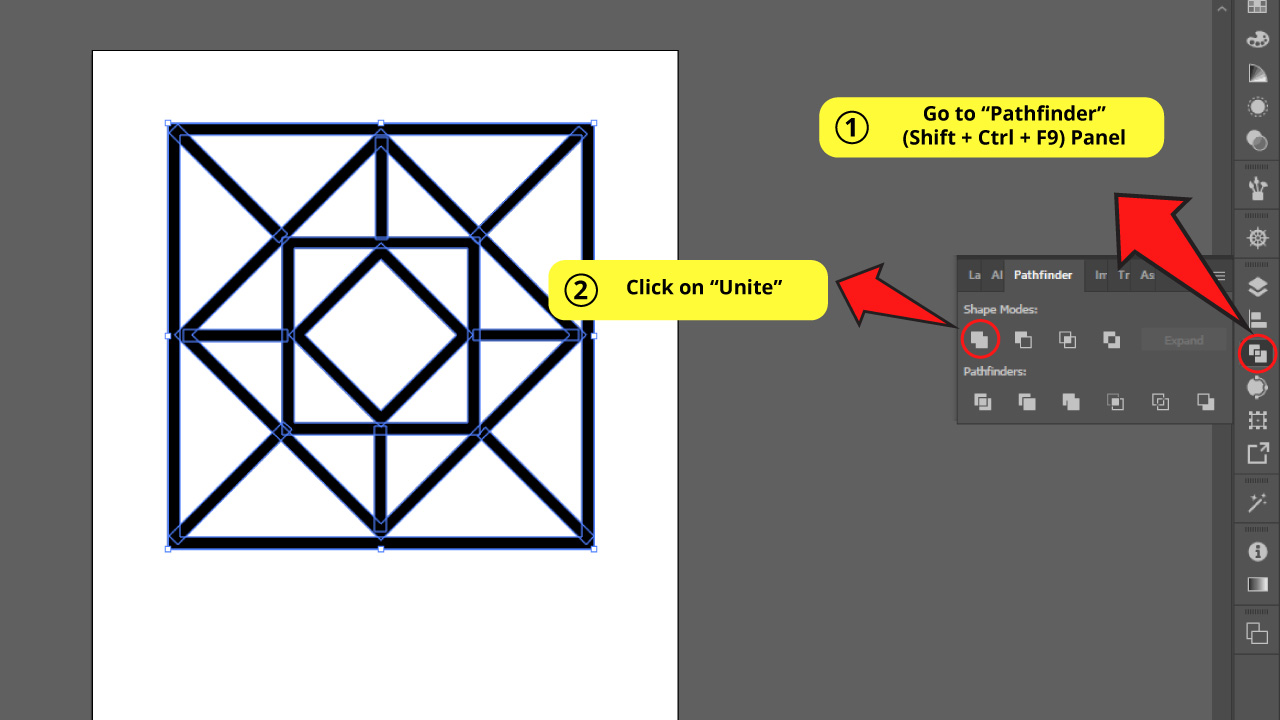
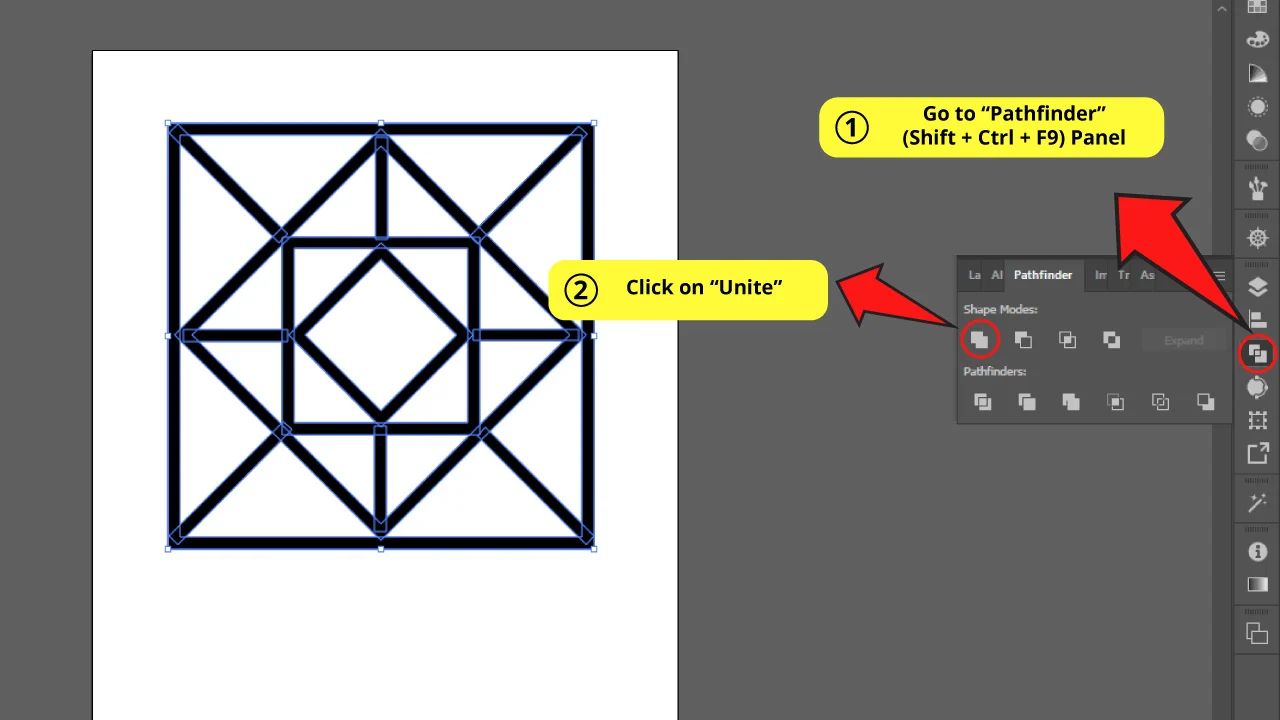
Open the “Pathfinder” (Shift + Ctrl + F9) panel. You can find it on the right side toolbar. If you can’t find it, you may have to enable it first by going to “Window > Pathfinder” or by using the “Shift + Ctrl + F9” command.
Once you have opened this panel, with your artwork selected, click on the “Unite” function.
This function will unite the separated paths of your artwork into a single path.
Step 4: Make a Rectangle

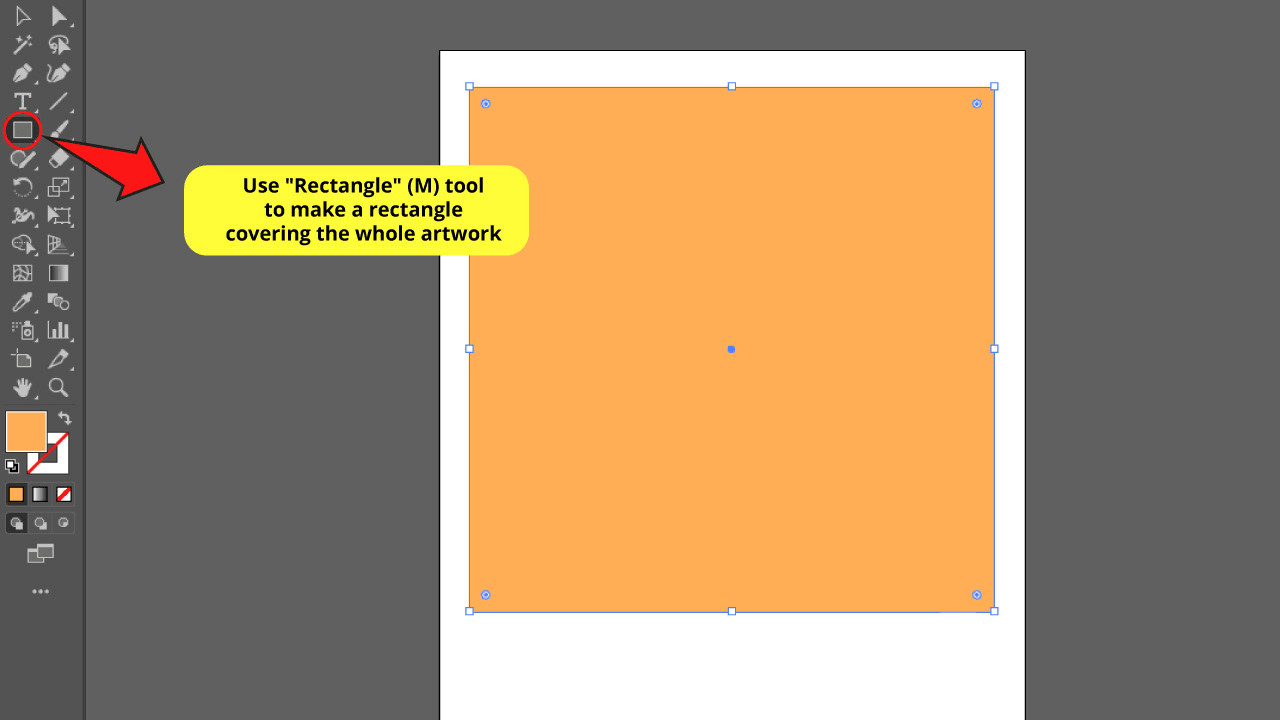
Use the “Rectangle” (M) tool on the left side toolbar to create a rectangle or square covering your whole artwork.
If you’re finding this article interesting so far, you may also be interested in this article about “How to Use the Polygon Tool in Illustrator”.
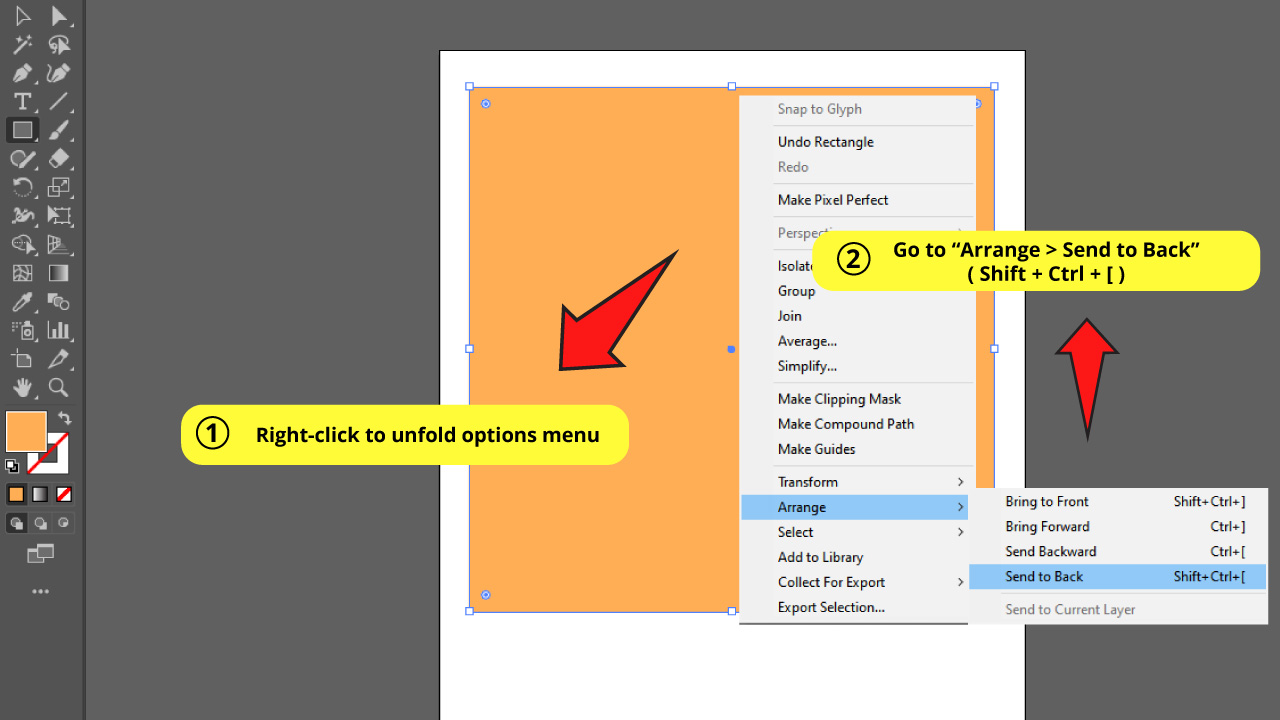
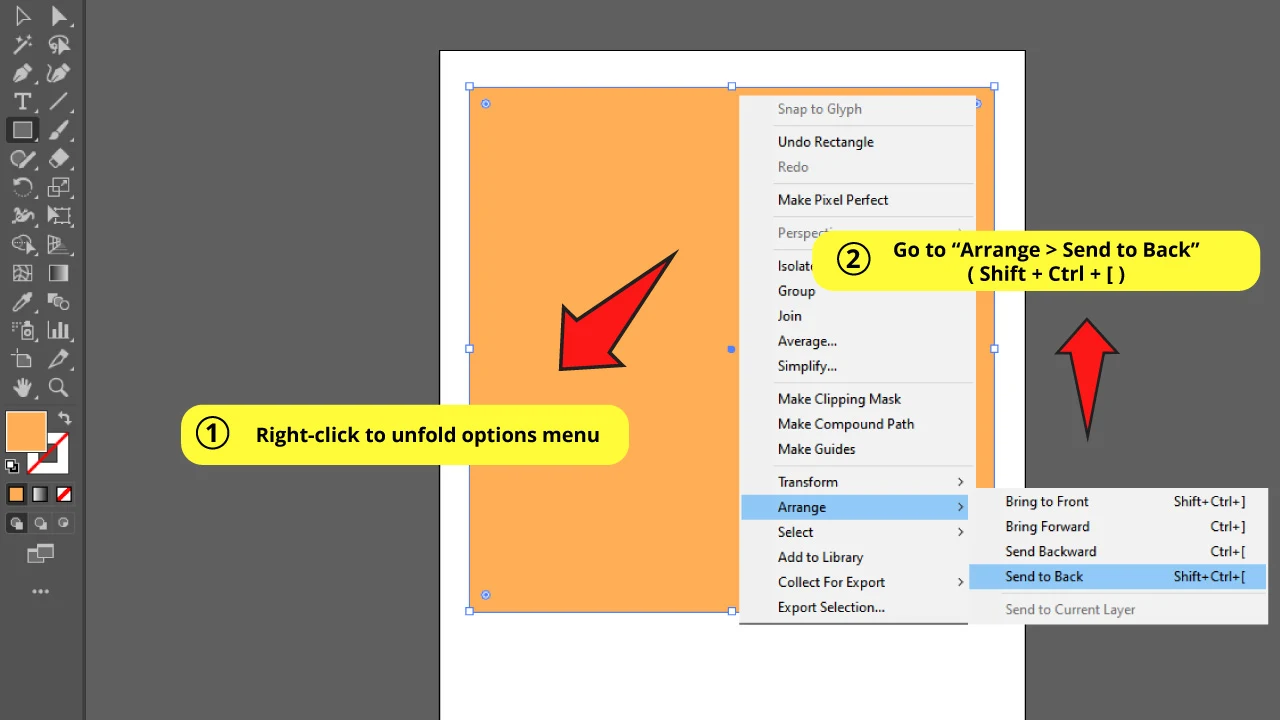
Step 5: Set the Rectangle to the Back
Click in the rectangle with the “Selection” (V) tool to select it and then right-click to unfold the options menu.
In this menu select “Arrange > Send To Back” or use the “Shift + Ctrl + [“ command to send the rectangle to the back of your artwork.
Step 6: Use the “Trim” Function from the “Pathfinder” Panel
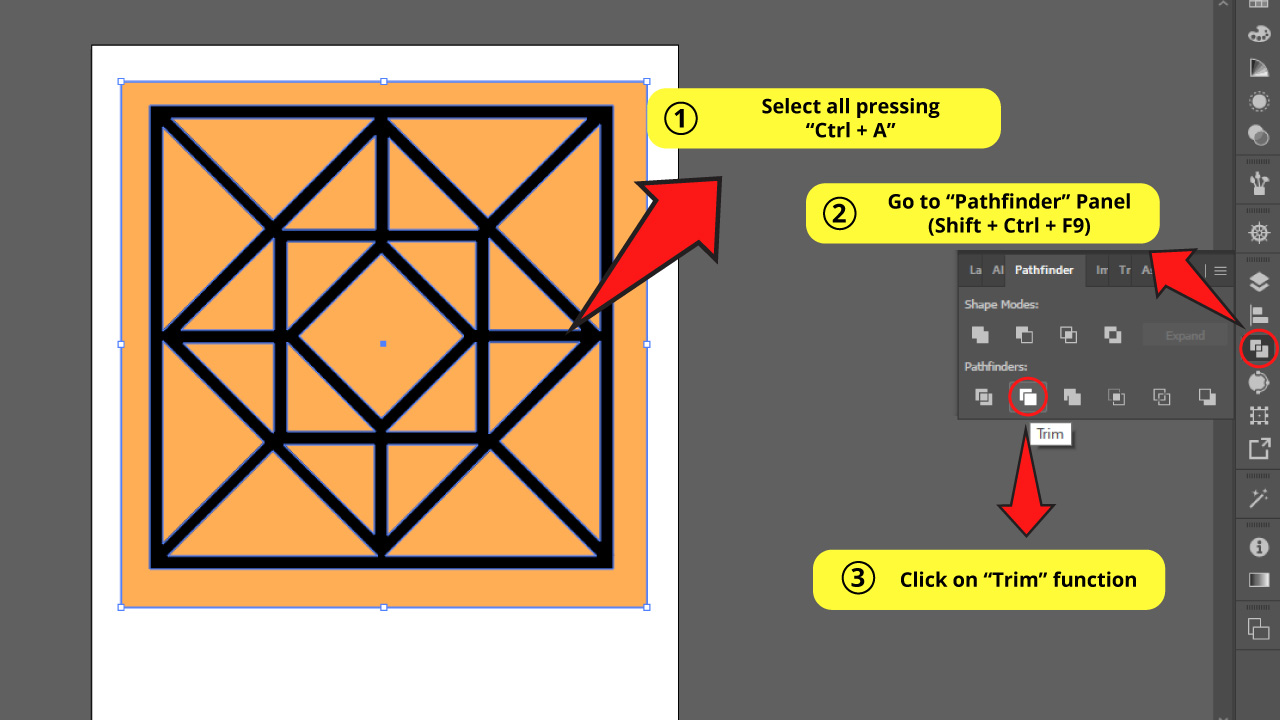
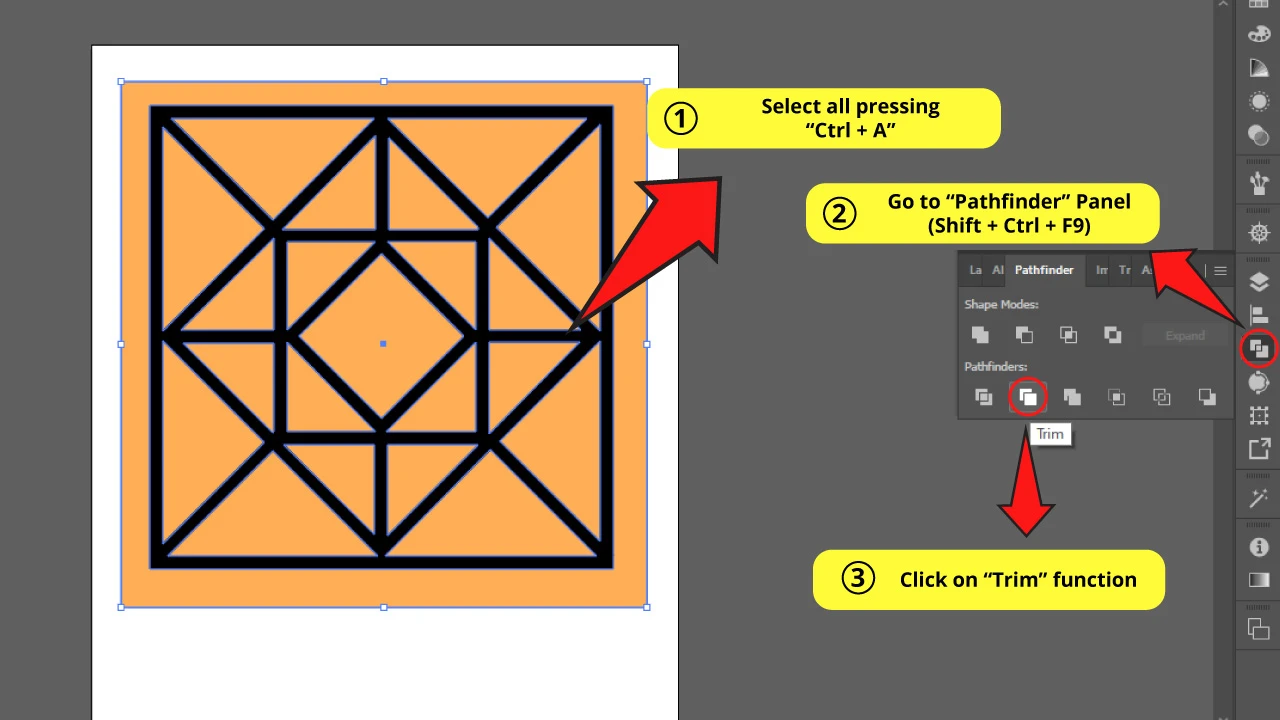
Now you have to select all using “Ctrl + A” and then go to the “Pathfinder” (Shift + Ctrl + F9) panel again.
This time click on the “Trim” function.
This function will trim the rectangle using your drawn artwork as a guide.
If you want to know more about the “Pathfinder” panel functions, you can learn all you need about it in this article: “How to Combine Shapes in Illustrator”.
Step 7: Get Rid of the Extra Edges

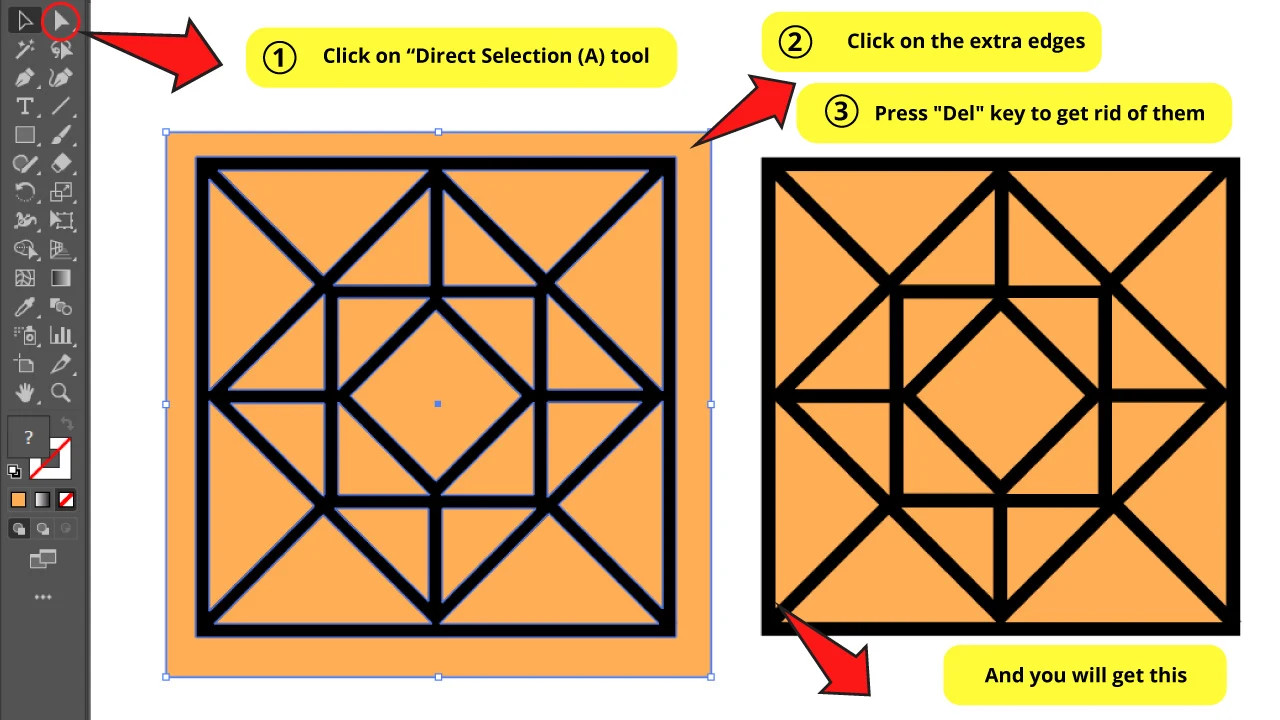
Click on the “Direct Selection” (A) tool on the left side toolbar, and then click on the extra edges of the rectangle to select them.
Now press the “Del” key to delete them.
Step 8: Color your Artwork
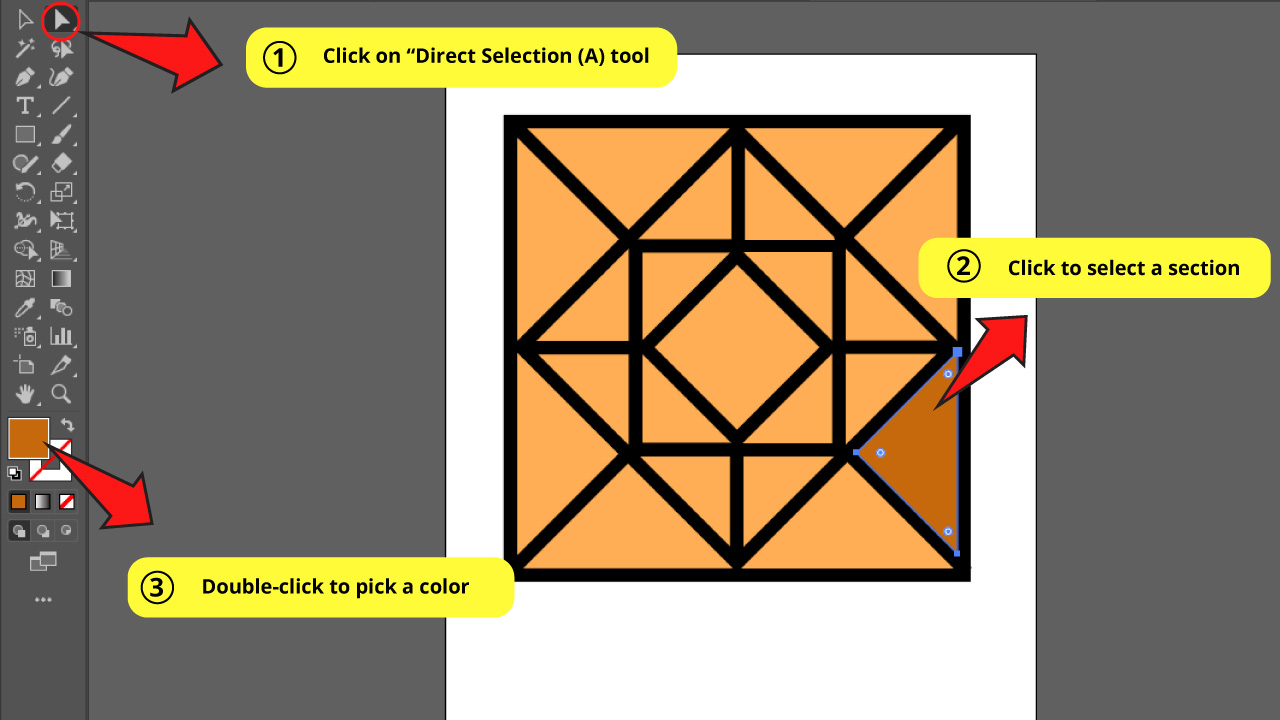
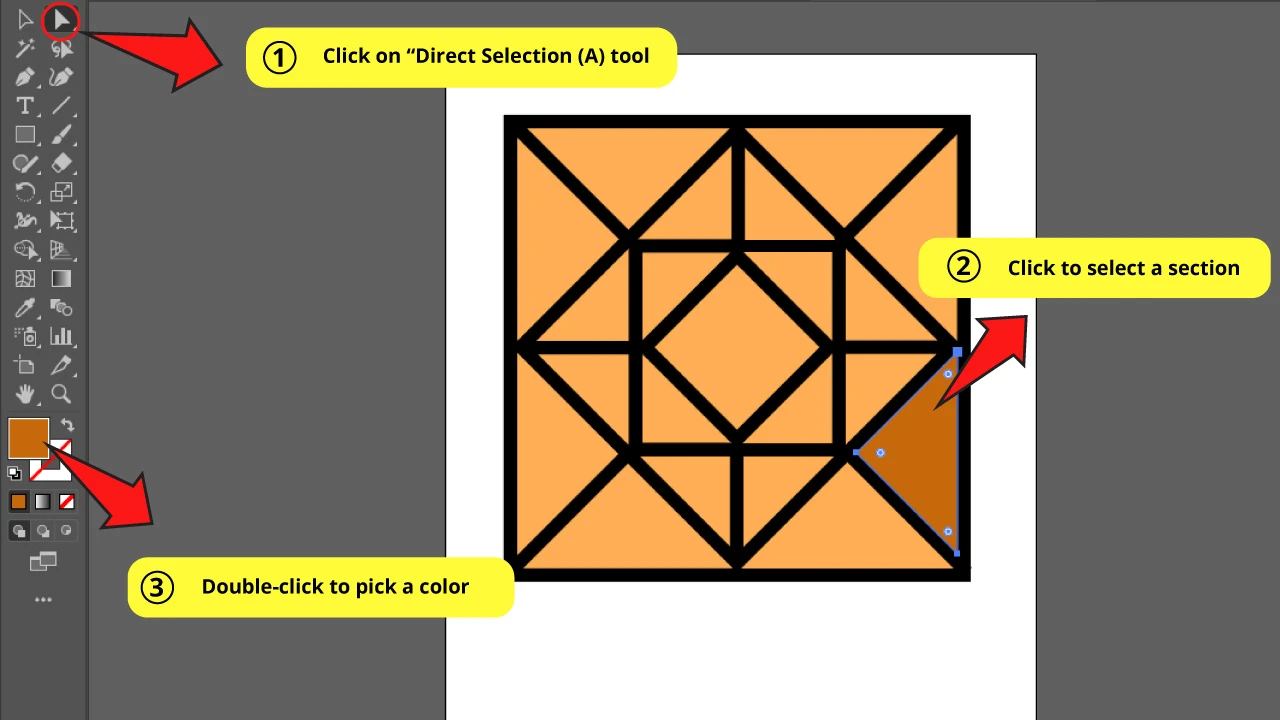
You’re now ready to fill color.
Use the “Direct Selection” (A) tool and select a section from your artwork to fill color.
Then pick a color by double-clicking on the color box on the left side toolbar.
Repeat this step as many times as you need until you’re done coloring your artwork.
Frequently Asked Questions on “How to Fill Color in Illustrator”
What’s the difference between using the “Live Paint Bucket” tool or the “Pathfinder” panel methods to fill color in Illustrator?
The main difference is that the “Live Paint Bucket” tool method uses a specific tool designed to fill color. Also, this method isn’t destructive. So you can make adjustments on the stroke lines at any moment. On the other hand, with the “Pathfinder” panel method you need to turn the lines into paths.
Is the “Live Paint Bucket” tool method better than the “Pathfinder” panel method?
You can’t really say it’s better. It mainly depends on what method fits better your preferences and specific needs, and on the tools that you feel more comfortable working with.


Hey guys! It’s me, Marcel, aka Maschi. On MaschiTuts, it’s all about tutorials! No matter the topic of the article, the goal always remains the same: Providing you guys with the most in-depth and helpful tutorials!

