
If I had to mention one of the most versatile and powerful tools in Illustrator, the first thing that comes to my mind is the “Blend” tool with no doubt.
The “Blend” tool has as many utilities as you can imagine. You can get all sorts of amazing visual effects.
Let’s dig into it and talk about this great tool.
How to Use the Blend Tool in Illustrator
To use the blend tool in Illustrator, draw different colored shapes, lines, or text. Select all and go to “Object > Blend > Make” to blend them. Then adjust the settings in the “Blend Options” window to get the desired result.
The “Blend” (W) tool works by multiplying objects to blend them a specific amount of times. The copies slightly vary from each other to reach a visual blending effect.
This means that the “Blend” (W) tool blends features such as shapes, colors, distance, size, and path curves.
Let’s work with four different examples to appreciate what this extraordinary tool can do.
How to Use the Blend Tool to Blend Shapes in Illustrator
Draw two stars of different sizes and a circle. Pick different colors for each item. Select the Blend (W) tool and click on the bigger star, then on the smaller one, and finally on the circle. Double-click on the Blend tool to open Blend Options. Select Specified Distance to 1 pt value and save.
For this example we’ll see how the “Blend” (W) tool works on basic shapes, such as a circle and two stars of different sizes, colored in different shades.
The “Blend” (W) tool will blend both shapes and colors.
To blend shapes in Illustrator, follow these steps:
Step 1: Draw Some Shapes
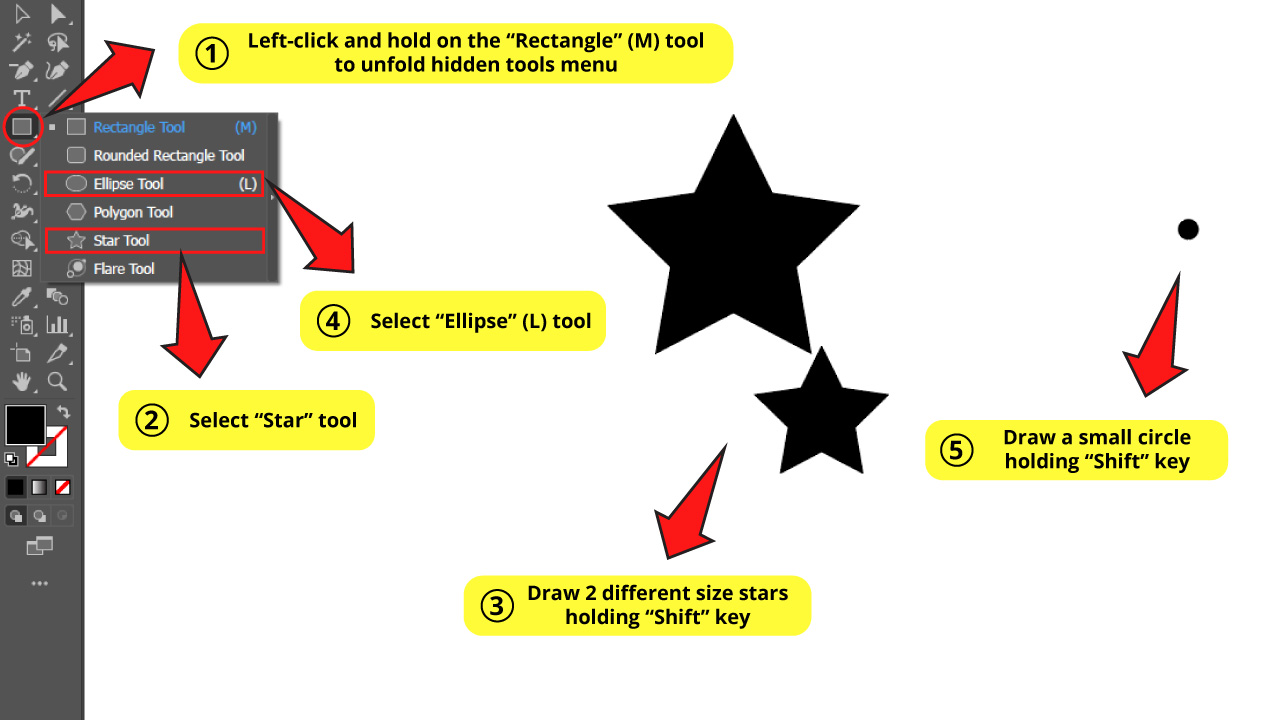
Make stars and a circle.
Both the “Star” and the “Ellipse” (L) tools are hidden in the “Rectangle” (M) tool nest on the left side toolbar.
Left-click and hold on the “Rectangle” (M) tool to unfold the hidden tools menu.
Then select the “Star” tool to make two stars of different sizes, and next the “Ellipse” (L) tool to draw a small circle.
Remember to hold the “Shift” key when you are using the “Ellipse” (L) and the “Star” tools.
The “Shift” key will allow you to create a symmetrical ellipse (a circle).
And if you hold the “Shift” key as you’re drawing the stars, you will be able to draw stars in a straight position (non-rotated).
Step 2: Select Fill Colors
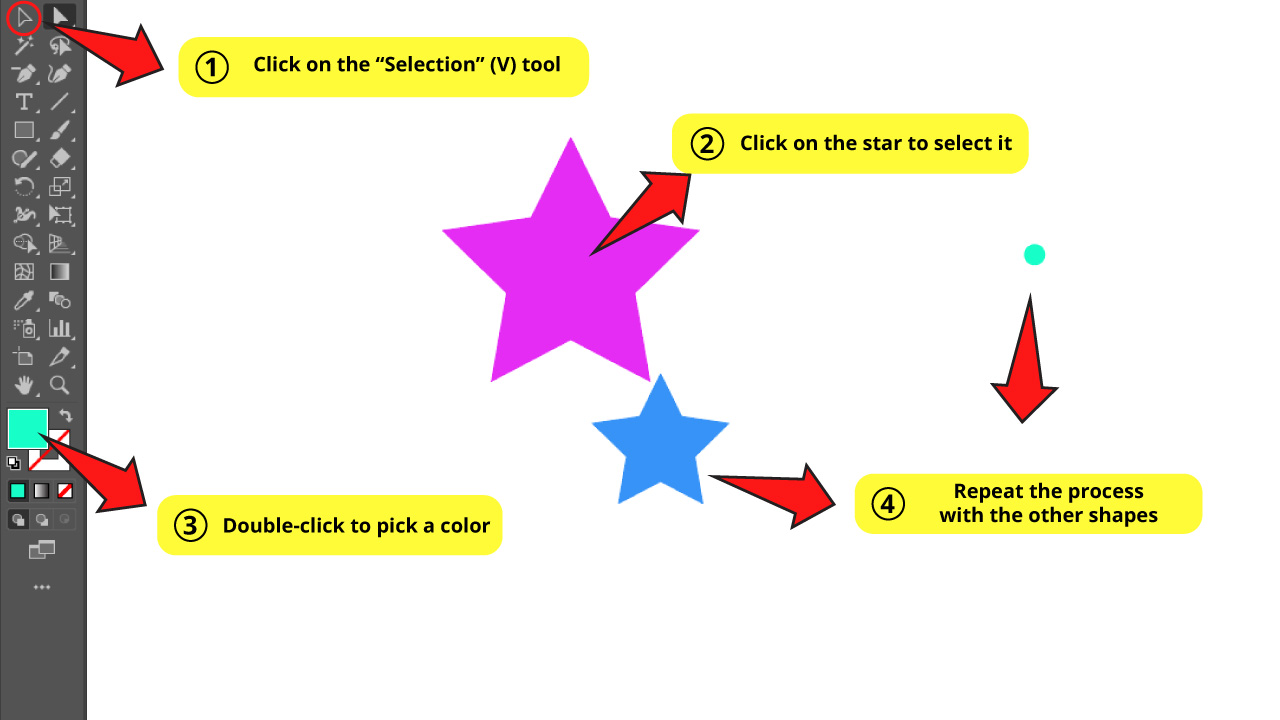
Use the “Selection” (V) tool on the left side toolbar to select one of the items. Then double-click on the “Fill” box color to pick a color.
Repeat the process on the remaining objects. Select a different color for each one.
Step 3: Make Blend
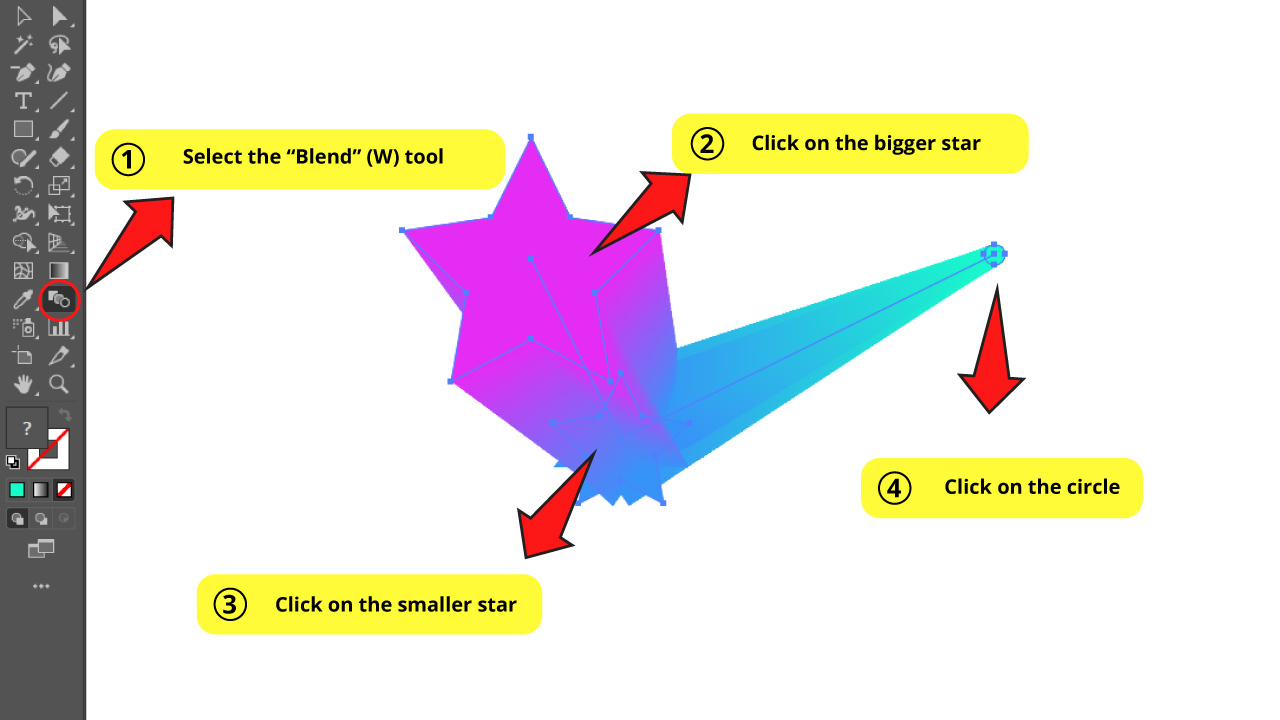
We are going to use the “Blend” (W) tool on the left side toolbar to blend the objects.
So, select the “Blend” (W) tool and click on the bigger star, then on the smaller one, and finally click on the circle to make a blend.
If we had only two shapes to blend, we could directly use the blending option available on “Object > Blend > Make” (Alt + Ctrl + B) on the menu at the top of the screen.
But since we’re working with three objects we need to specify the blending order. Otherwise, in case we applied “Blend” from the menu at the top of the screen, the blending would be applied in a random order.
Regarding the settings, either default values or your last used settings will be applied to the selected shapes. That means that if this won’t fit your current artwork, you will have to adjust the “Blend” (W) tool settings first.
Step 4: Set Blend Options
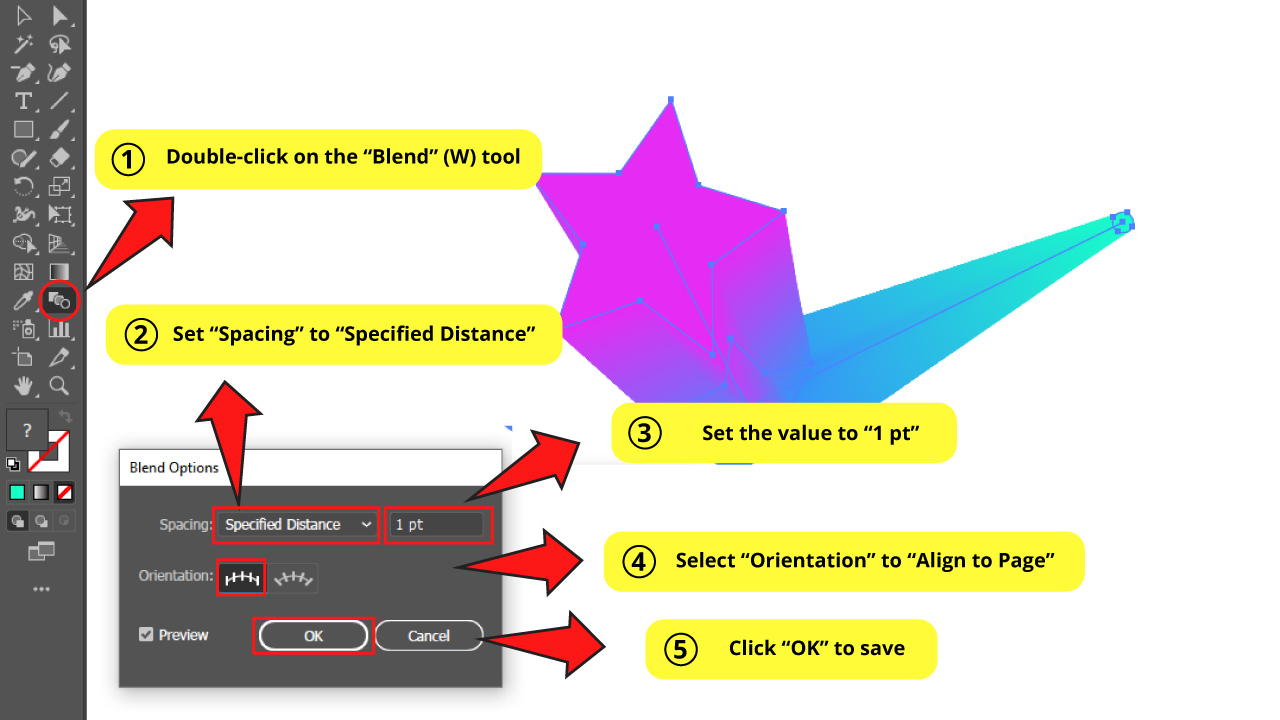
Double-click on the “Blend” (W) tool on the left side toolbar to open the “Blend Options” window.
For the “Spacing” value we have three available options: “Smooth Color”, “Specified Steps” and “Specified Distance”.
For this example, I’ll select “Specified Distance.”
For the “Orientation” settings we have two available options: “Align to Page” and “Align to Path”.
For this example, I’ll use “Align to Page.”
Then click “OK” to save.
Check the F.A.Q. If you want to know more about the different settings available for “Spacing” and “Orientation.”
Step 5: Reverse Spine
Sometimes even if you set the “Blend Options” correctly, it still can look weird (like twisted), and that could happen because of the order the shapes were made.
If that’s your case, continue with this step. Otherwise, simply skip to “Step 6”.
My particular example looks alright, but I’ll do it anyway to show you how it works.
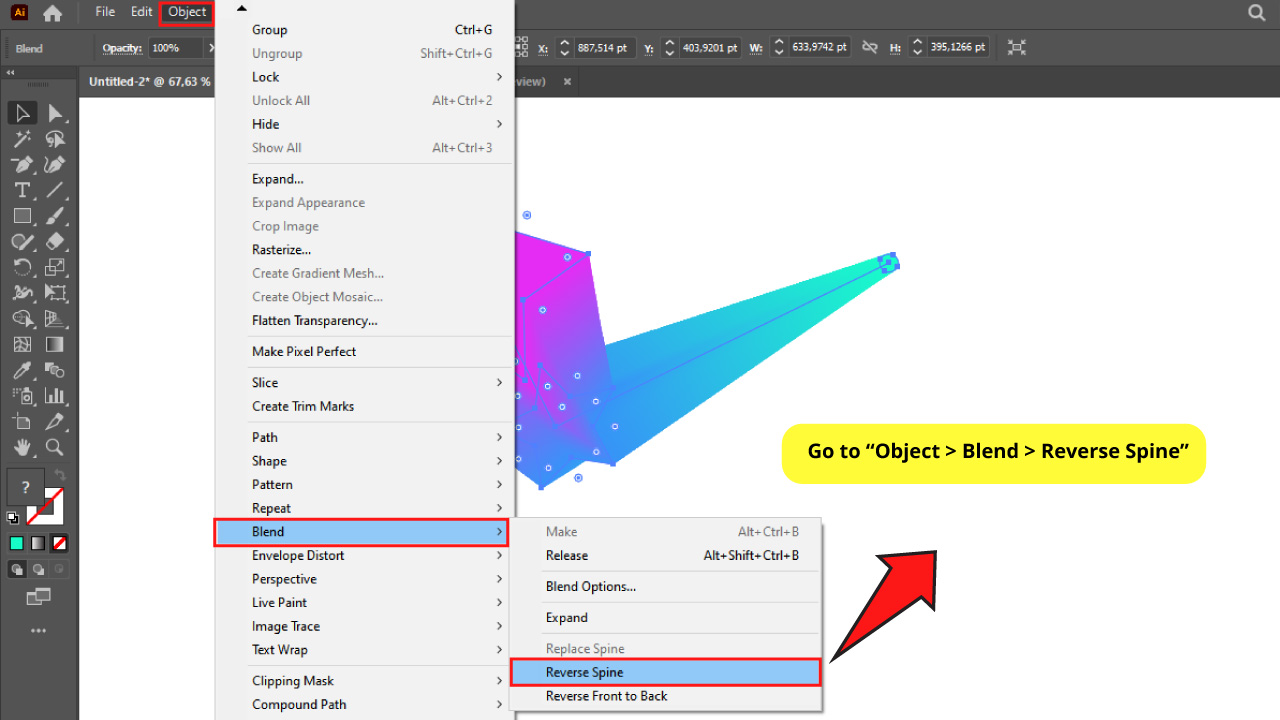
So, if your blending isn’t looking good, go to “Object > Blend > Reverse Spine” available on the menu at the top of the screen.
This feature will change the direction of the blended path but will also reflect your artwork like a mirror. It’s not a big deal, though. You can change the orientation by right-clicking to unfold the options menu.
Then go to “Transform > Reflect” and in the “Reflect Options” window select “Vertical”, and click “OK” to save.
You can check an example of how the reflections work in Illustrator in this article about “How to Make Symmetrical Shapes in Illustrator”.
Step 6: Expand it!

This step is important because when you use the “Blend” tool, the objects get linked somehow.
When you’re done with the blending procedure, and you want to manipulate the objects as usual, you have to expand them.
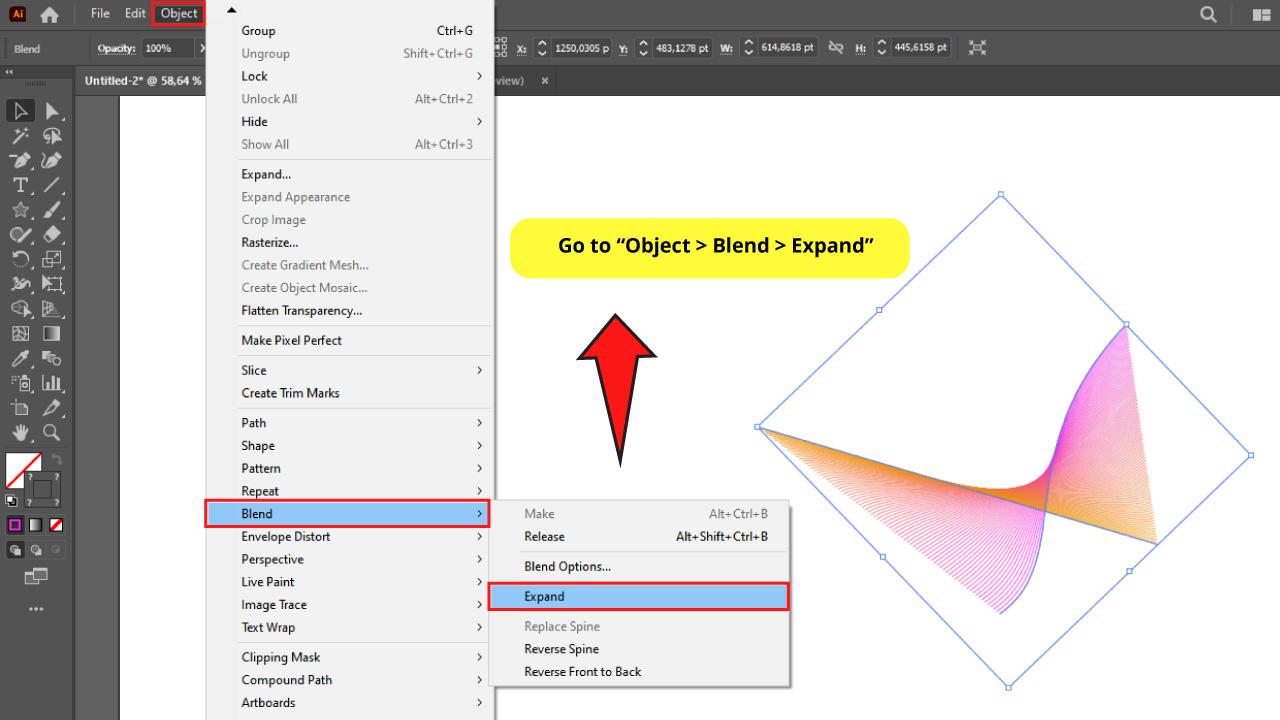
To get this done go to “Object > Blend > Expand” on the menu at the top of the screen.
The Result

This is how the effect of using the “Blend” (W) tool to blend basic shapes should look.
How to Use the Blend Tool to Make Abstract Decorative Lines in Illustrator
Draw two parallel color lines. Select the Blend (W) tool and click on the lines. Double-click the “Blend” tool to open the “Blend Options” window. Select Specified Steps around 80. Select the right line and cross it to the left. Add handles to that line’s anchor point and make it a smooth curve.
In this example, we’ll learn how to make abstract decorative lines. For this, we are going to blend both color and curvature.
Step 1: Draw Two Lines
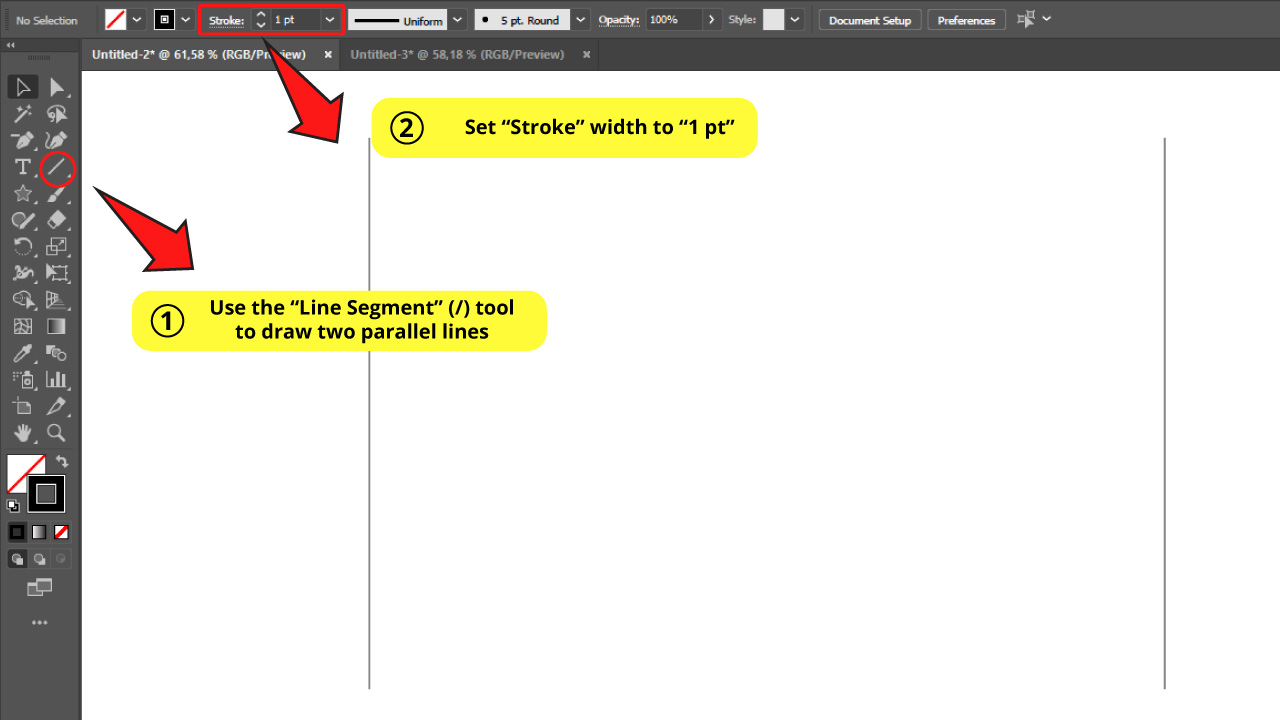
Use the “Line Segment” (/) tool to draw two parallel lines with a certain distance between them.
Set the “Stroke” width to “1 pt” on the toolbar at the top of the screen.
Step 2: Pick Stroke Color
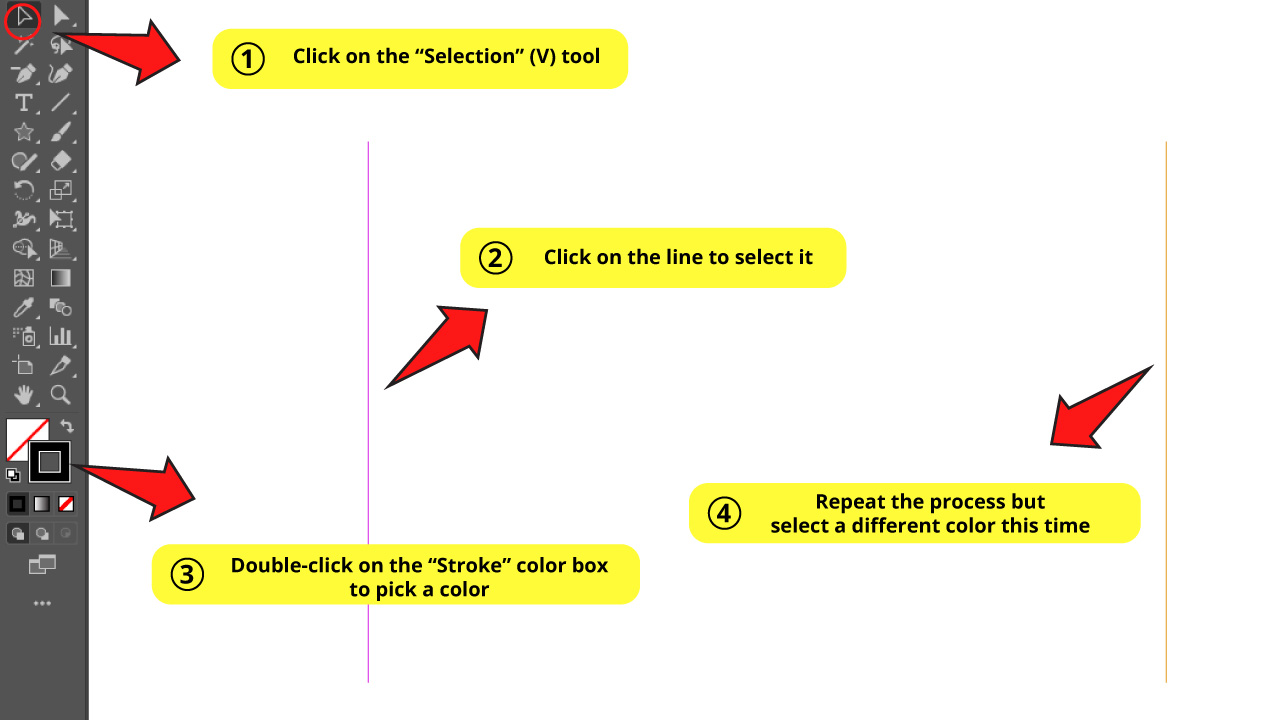
Use the “Selection” (V) tool to select one of the lines and then double-click on the “Stroke” box color to pick a color.
Repeat the process for the other line, but pick a different color this time.
Step 3: Make Blend
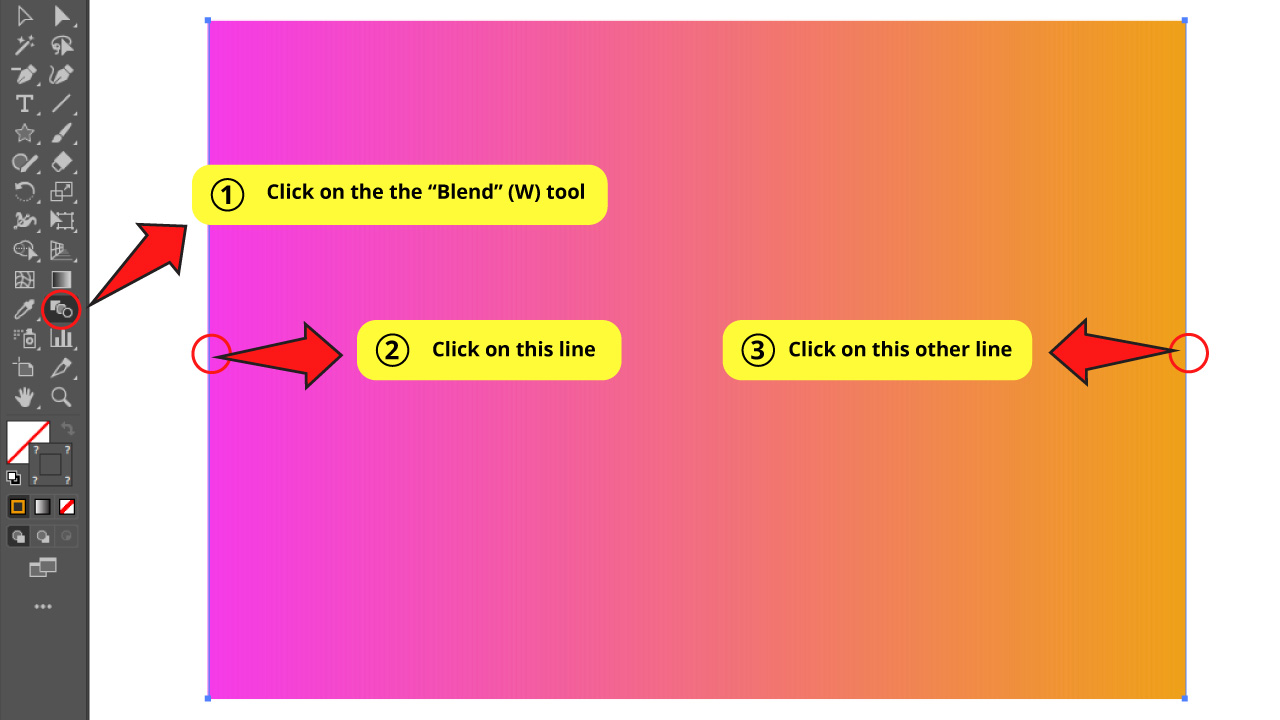
Select the “Blend” (W) tool on the left side toolbar.
Next, click on one of the lines and then on the other one to blend them.
Step 4: Set Blend Options

Double-click on the “Blend” (W) tool on the left side toolbar to open the “Blend Options” window.
Set the “Spacing” to “Specified Steps” at “80”, or the value that works better for the distance you placed your lines from each other.
Step 5: Cross the Lines
The next thing is crossing the lines. For this, we will have to move the anchor points.
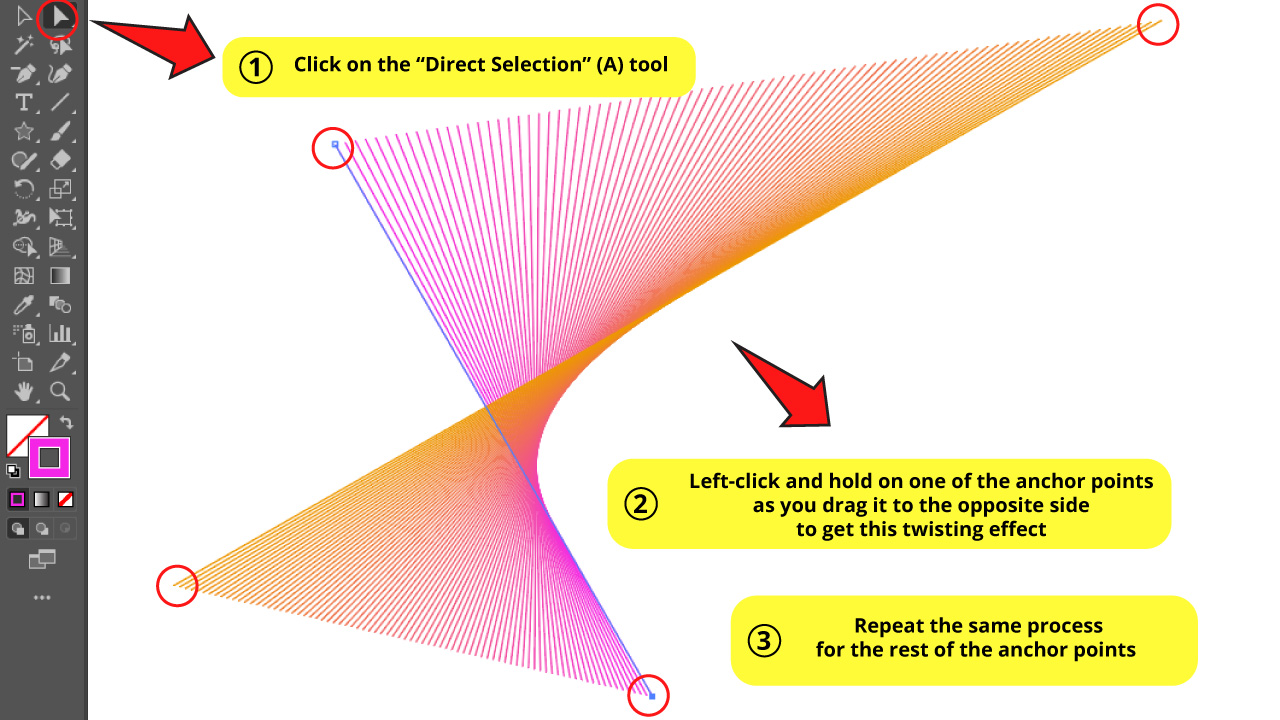
So, first click on the “Direct Selection” (A) tool on the left side toolbar.
Then click on the right line’s bottom anchor point to select it.
Now, left-click and hold on the selected anchor point as you drag it to the left, crossing it.
Then, repeat the process for the line on the left, dragging the bottom anchor point to the right.
Try to reach the same twisting effect you can see in the reference image.
Step 6: Curve the Line
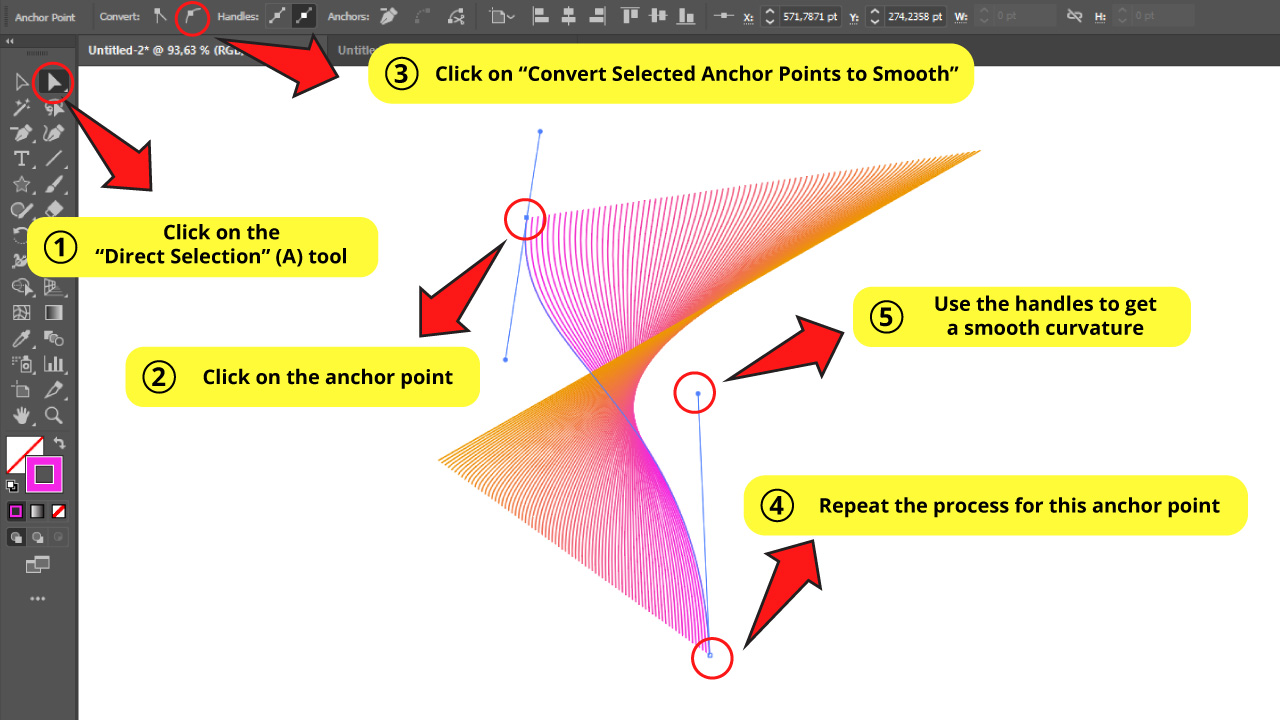
We need to curve the line, so we have to add handles to the anchor points.
Next, with the “Direct Selection” (A) tool, click on the bottom anchor point and then click on the “Convert Selected Anchor Points to Smooth” button.
Repeat the process on the top anchor point.
Now, both anchor points have handles. Use those handles to get a smooth curve.
Left-click and hold on one of the handles of the bottom anchor point, and then drag it until you get the desired curve.
Repeat the process on the other anchor point
Step 7: Rotate the Lines
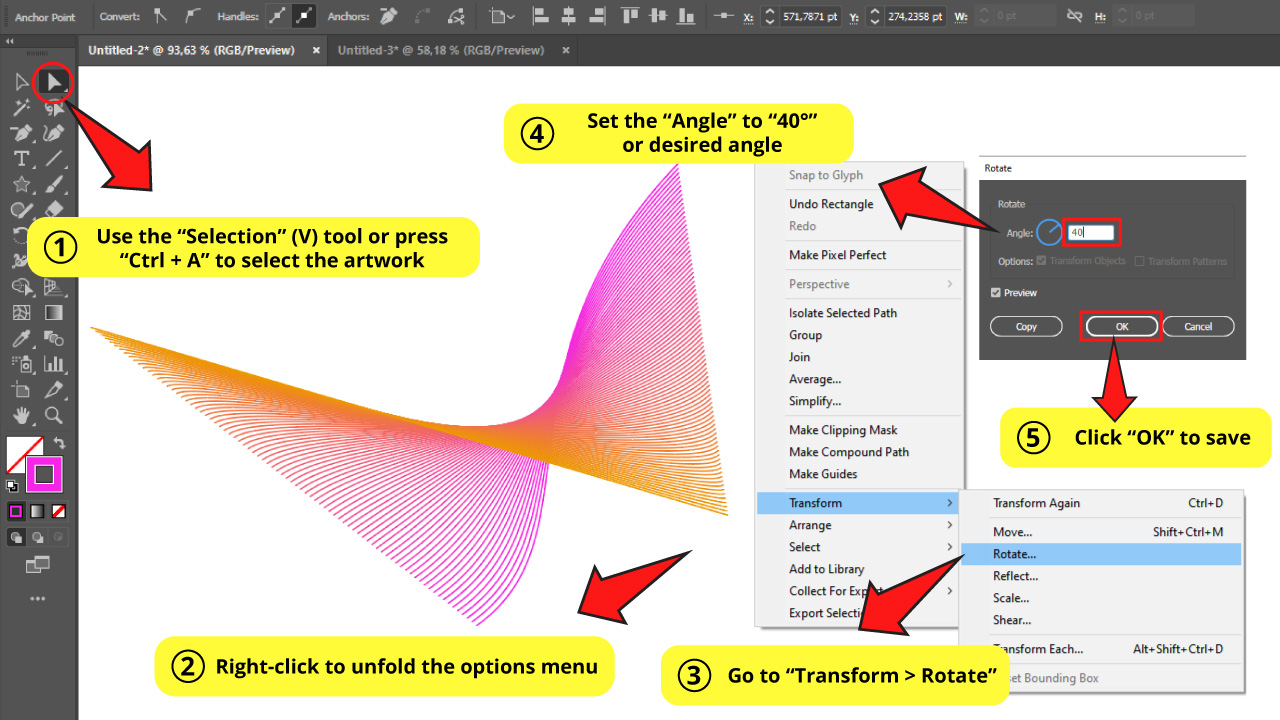
Use the “Selection” (V) tool or press the “Ctrl + A” command to select all.
Right-click to unfold the options menu and go to “Arrange > Rotate”.
On the “Rotate” options window, set the “Angle” to your desired rotation.
I’ll set mine to “40°”.
Then click “OK” to save.
Step 8: Expand it!
With the object still selected, go to “Object > Blend > Expand” to expand the lines, and it’s all set.
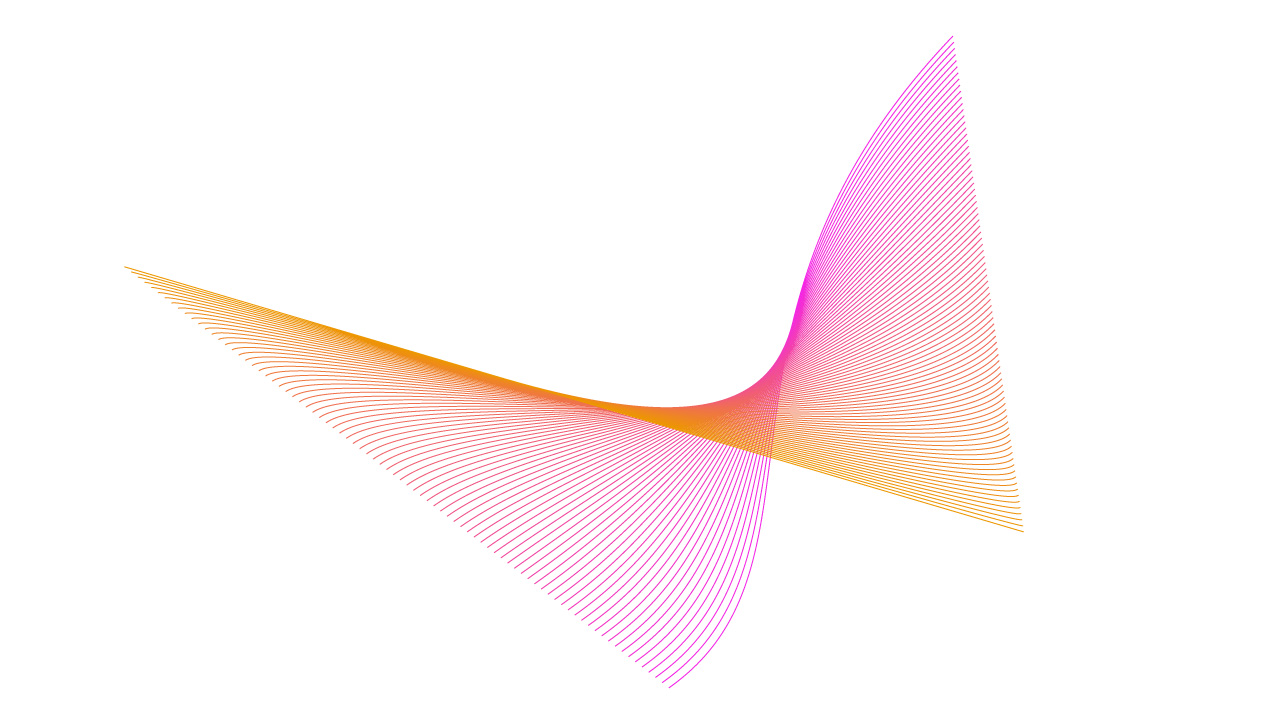
The Result
And here is how it should look like.
How to Use the Blend Tool to Get a 3D Text Effect in Illustrator
Type a colored text. Make a copy of the text, make it bigger, and pick another color. Center both. Select all and press “Alt + Ctrl + B” to make a blend. On the “Blend Options” window select “Specified Distance” around 1 pt value. Select the front text and drag it down to get a deep 3D effect.
For this example we’ll learn how to make 3D text letters using the “Blend” (W) tool.
In order to get this, we’ll be blending both text colors and sizes.
Step 1: Type a Text

Use the “Type” (T) tool on the left side toolbar to type a text.
It’s highly recommended to use a bold font. I went with the “A Big Deal” font for this example.
Then double-click on the “Fill” color box, also located on the left side toolbar, to pick a color.
Step 2: Copy the Text
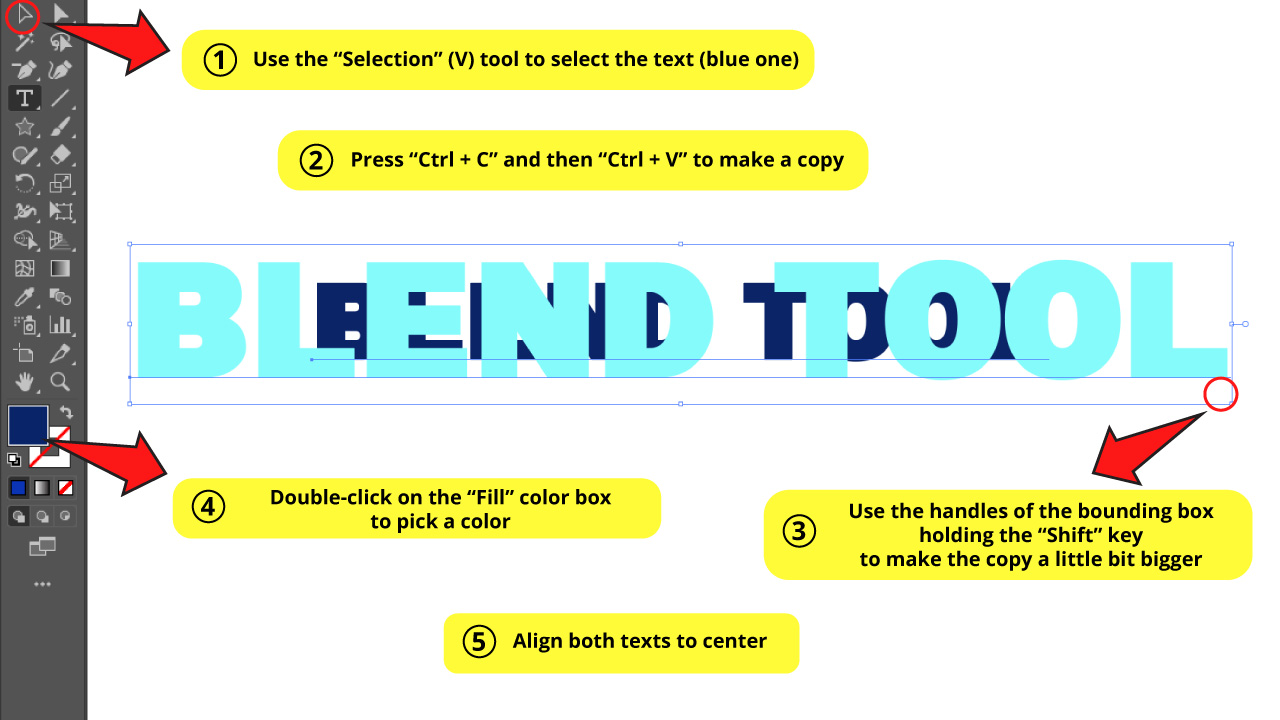
Select the text with the “Selection” (V) tool. Then press the “Ctrl + C” and the “Ctrl + V” command to make a copy.
Now we need to make the text bigger. To achieve this, select the copy of the text and use the handles of the bounding box to make it a little bit bigger.
Remember to hold the “Shift” key to maintain proportions.
Choose a different color for the copy by double-clicking the “Fill” color box.
Finally we have to center the texts. If you want to know how to get this done, check this article about centering objects in Illustrator.
Step 3: Make Blend
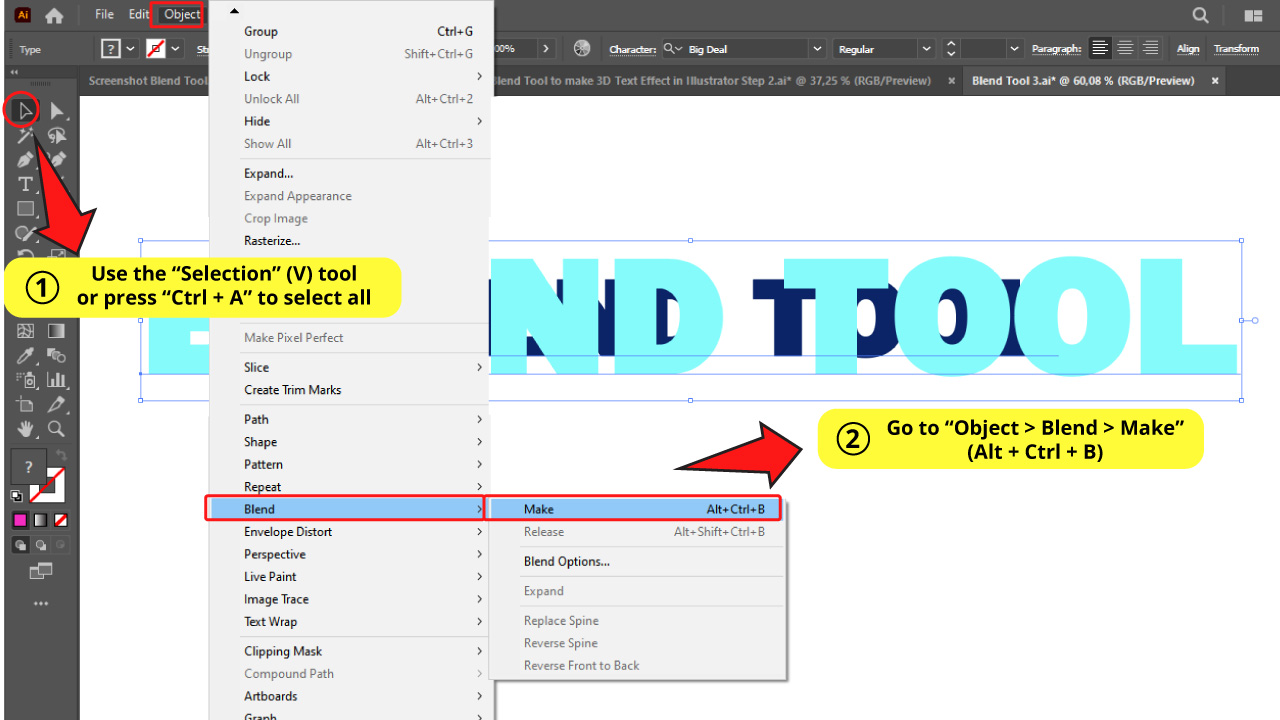
Select both texts using the “Selection” (V) tool, or use the “Ctrl + A” command to select all.
Next, go to “Object > Blend > Make” (Alt + Ctrl + B).
Step 4: Set Blend Options
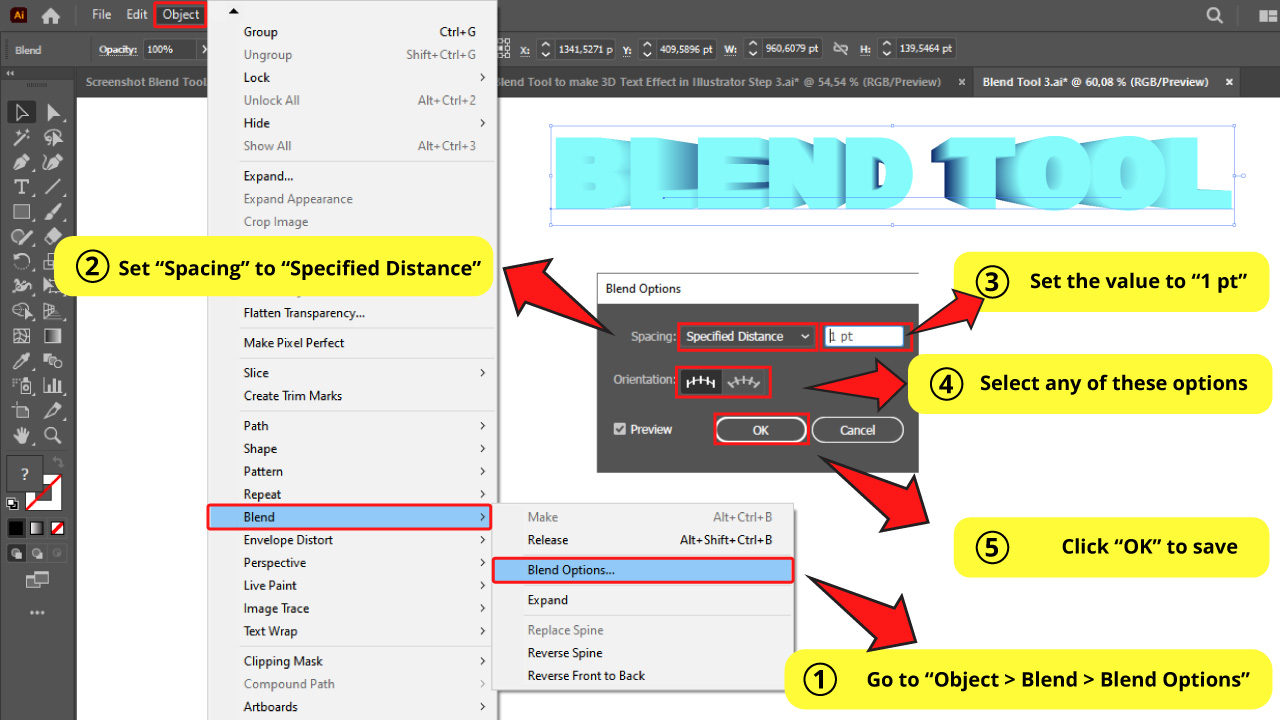
With the blended text selected, go to “Object > Blend > Blend Options” on the menu at the top of the screen.
In the “Blend Options” window, select “Specified Distance” for “Orientation”. And set the value to somewhere close to “1 pt”.
Step 5: Drag the Text
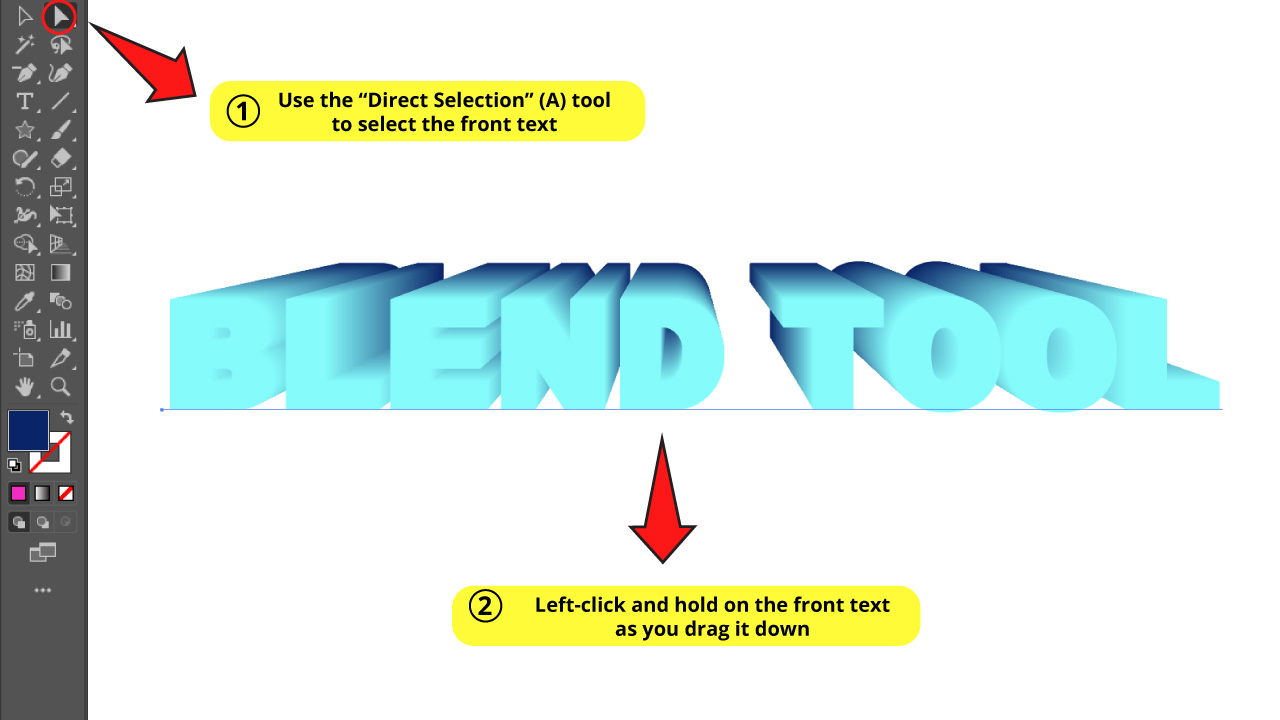
Select the “Direct Selection” (A) tool on the left side toolbar.
Left-click and hold on the front text as you drag it down to get a deeper 3D text effect.
Step 6: Expand it!
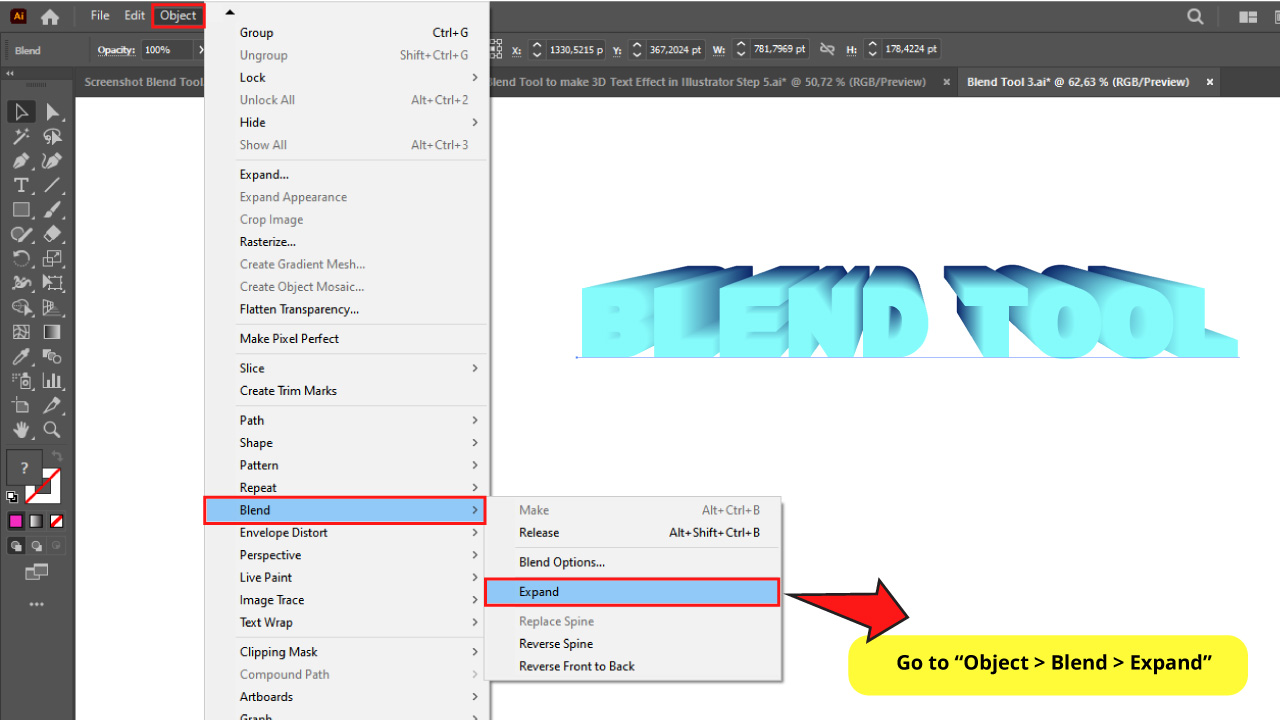
Select the whole text using “Ctrl + A” and go to “Object > Blend > Expand” to expand the lines.
The Result on “How to Use the Blend Tool to Get a 3D Text Effect in Illustrator”
This is yet another thing you can get using the “Blend” (W) tool.

How to Use the Blend Tool to Get a 3D Lettering Effect in Illustrator
Draw around 15 circles and add Gradient. Select all and press Alt + Ctrl + B to make a blend. In Blend Options set Specified Step to around 15. Make a copy of the blend. Draw a text using the Paintbrush (B) tool. Select both the text and the blend copy and go to Object > Blend > Replace Spine.
To add one more ingredient to the blending formula we’ll use gradient colors to reach a fabulous blended color effect. This is probably our favorite “Blend” (W) tool function.
To get the 3D lettering effect we’ll ONLY blend colors. And even then the outcome will be amazing.
Step 1: Draw a Circle
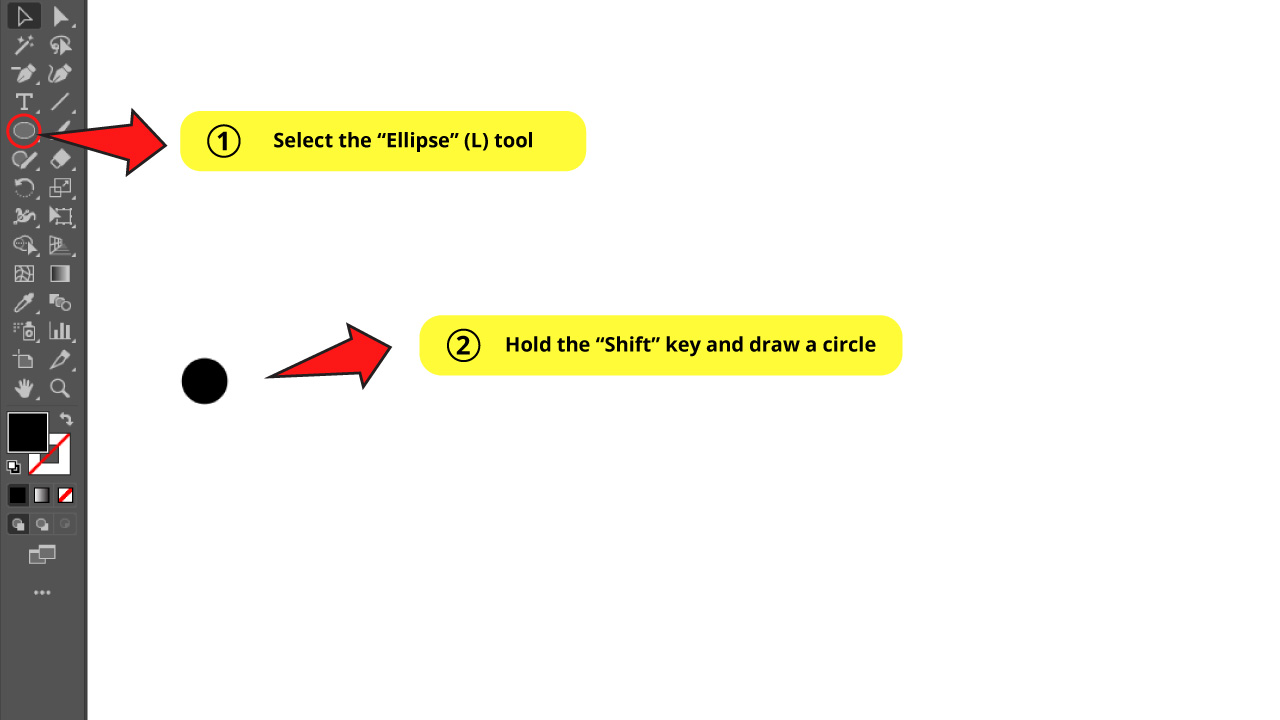
Press the “L” key to select the “Ellipse” (L) tool and draw a circle.
Make sure to hold the “Shift” key as you draw the ellipse to get a symmetrical circle.
Step 2: Add Gradient
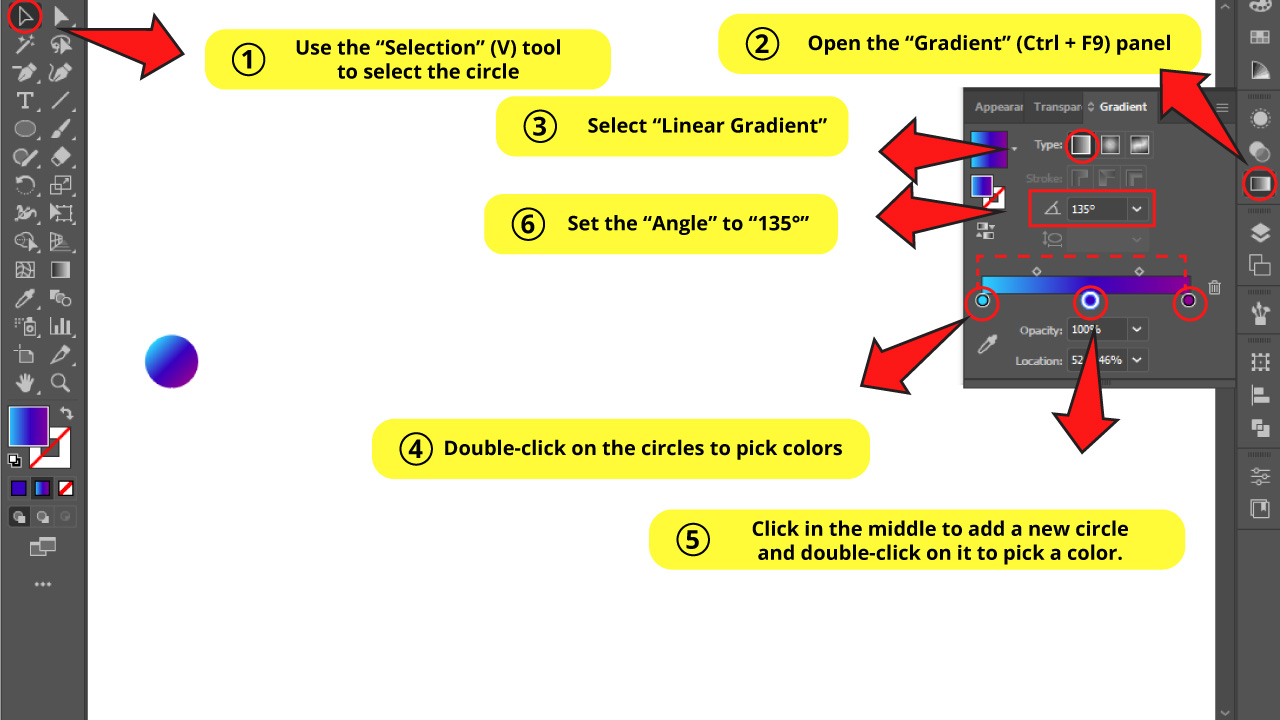
Select the circle using the “Selection” (V) tool and open the “Gradient” (Ctrl + F9) panel, usually located on the right side toolbar.
If you can’t find it, use the “Ctrl + F9” command to open it, or go to “Window > Gradient” on the menu available at the top of the screen.
Once in the “Gradient” panel, select “Linear Gradient” and double-click on the color circles to change them to the desired colors.
Now click in the middle between the two circles to add a new circle.
Double-click on the recently created circle and change its color.
I selected light blue, blue and purple for my gradient tones.
Then set the “Angle” to “135°”.
Step 3: Make Copies of the Circle
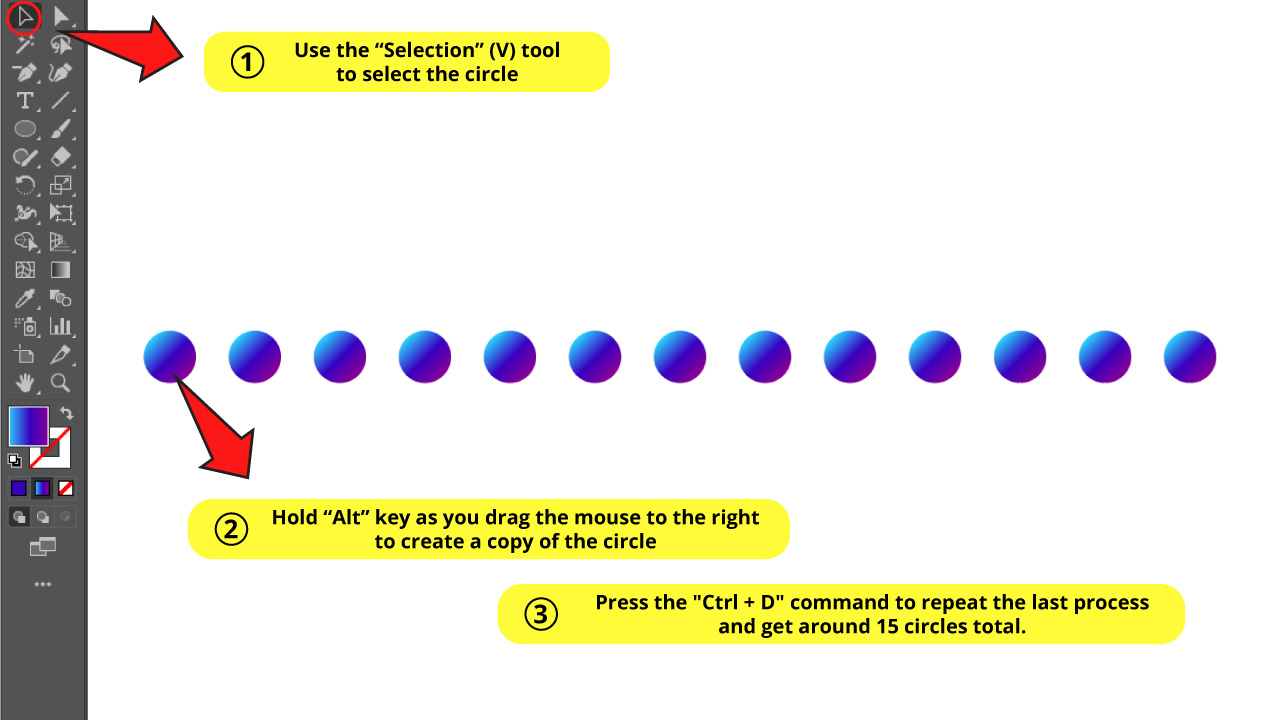
Select the circle using the “Selection” (V) tool.
Hold both left-click and “Alt” key as you drag the mouse to the right to create a copy of the circle.
Now, press the “Ctrl + D” to repeat the last process. Continue until you get around 15 circles.
Step 4: Make Blend
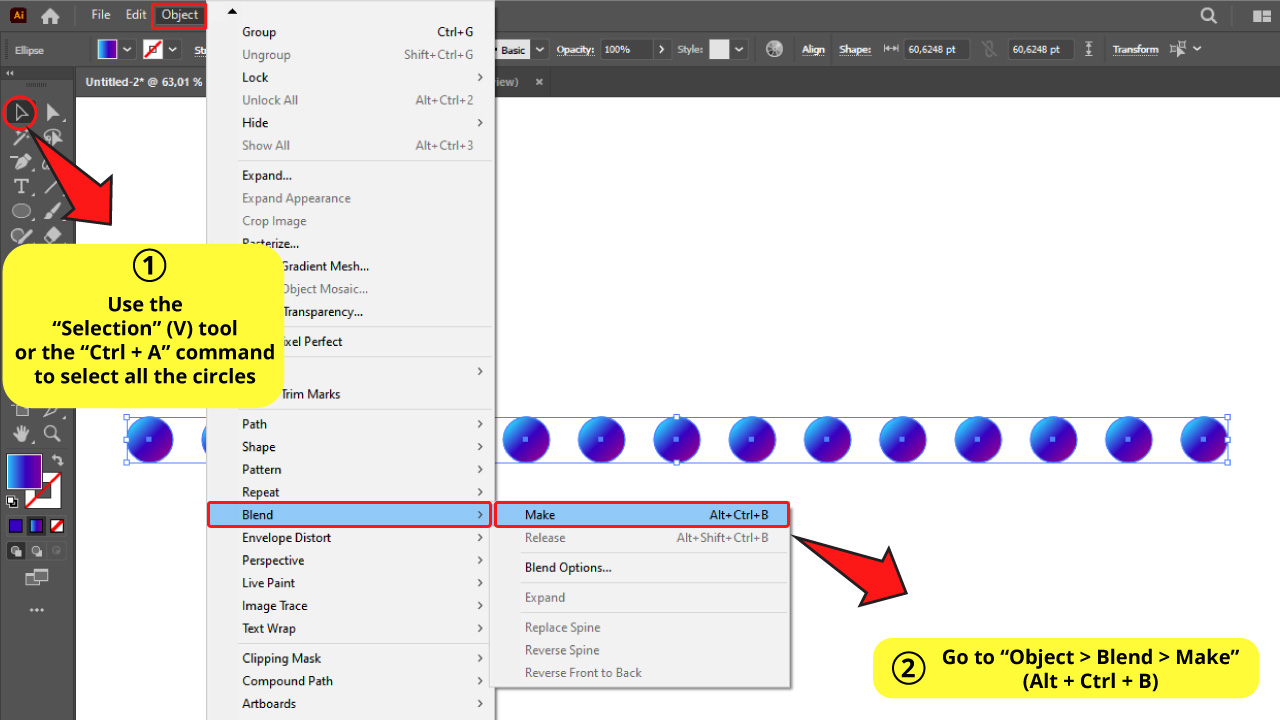
Select all the circles using the “Selection” (V) tool or the “Ctrl + A” command to select all.
Then go to “Object > Blend > Make” (Alt + Ctrl + B) on the menu at the top of the screen to blend the circles.
The applied effect will be the last one used or the default one. So we’re most likely having to make some adjustments.
Step 5: Set Blend Options
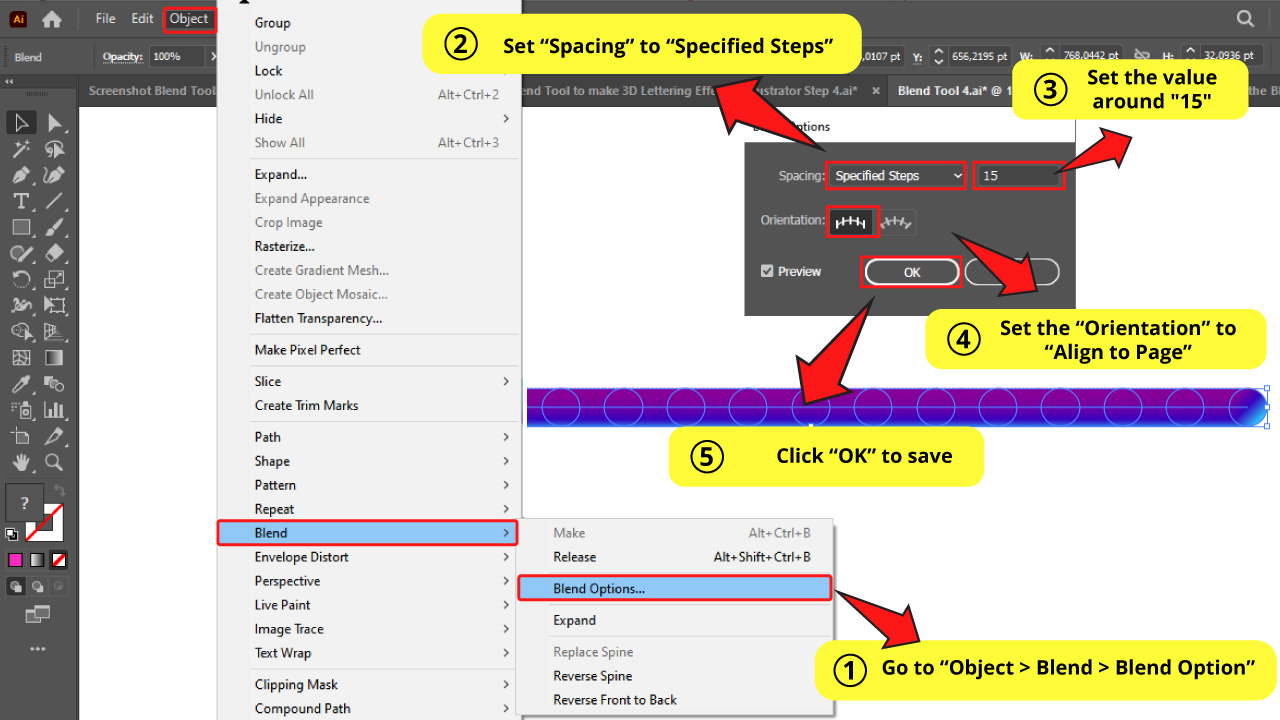
To adjust the blending effect, go to “Object > Blend > Blend Options”
In the “Blend Option” window, select “Specified Steps” and set the value to somewhere around “15”.
Take in mind that the bigger the number, the smoother the blending will be. Now, this also means that your computer will use more resources. If your computer’s performance isn’t the best, the system could freeze or even crash. Be aware.
There is a trick to avoid this complication, though. We’ll set the “Specified Steps” closer to “15”, and then we’ll polish the smoothness once the blending has already been applied to the drawn lines. This will be explained in detail in the next step.
Finally, set the “Orientation” to “Align to Page”.
Click “OK” to save.
Step 6: Write a Handwritten Text
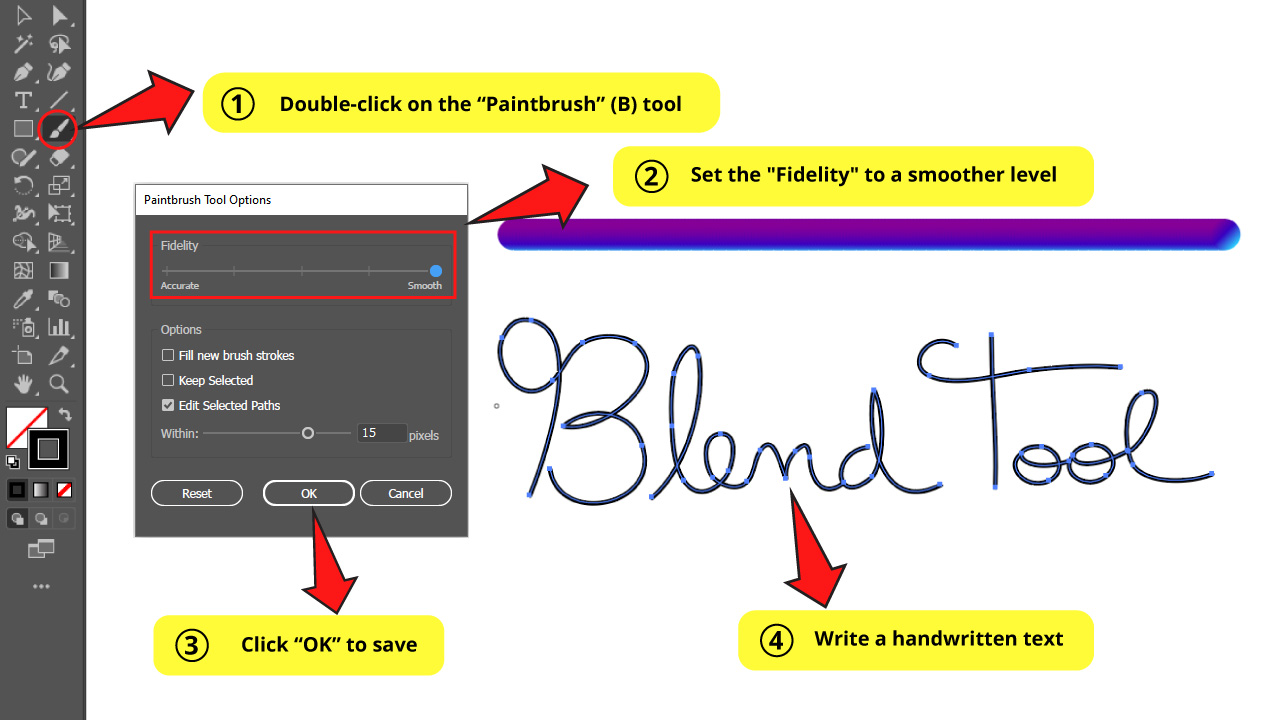
Click on the “Paintbrush” (B) tool on the left side toolbar and write a text on the artboard.
Make sure to draw your paths in sections. This means making a separate path for every one or two letters max.
You can change the brush size if that makes you feel more comfortable.
There are other adjustments you can make to improve your drawing, and that includes making the curves smoother.
To get this done, double-click on the “Paintbrush” (B) tool to open “Paintbrush Tool Options”.
On the popup window set the “Fidelity” to a smoother level. This is usually one of the most common features when you make a brush.
Then click “OK” to save.
Step 7: Add Blend to Text Section
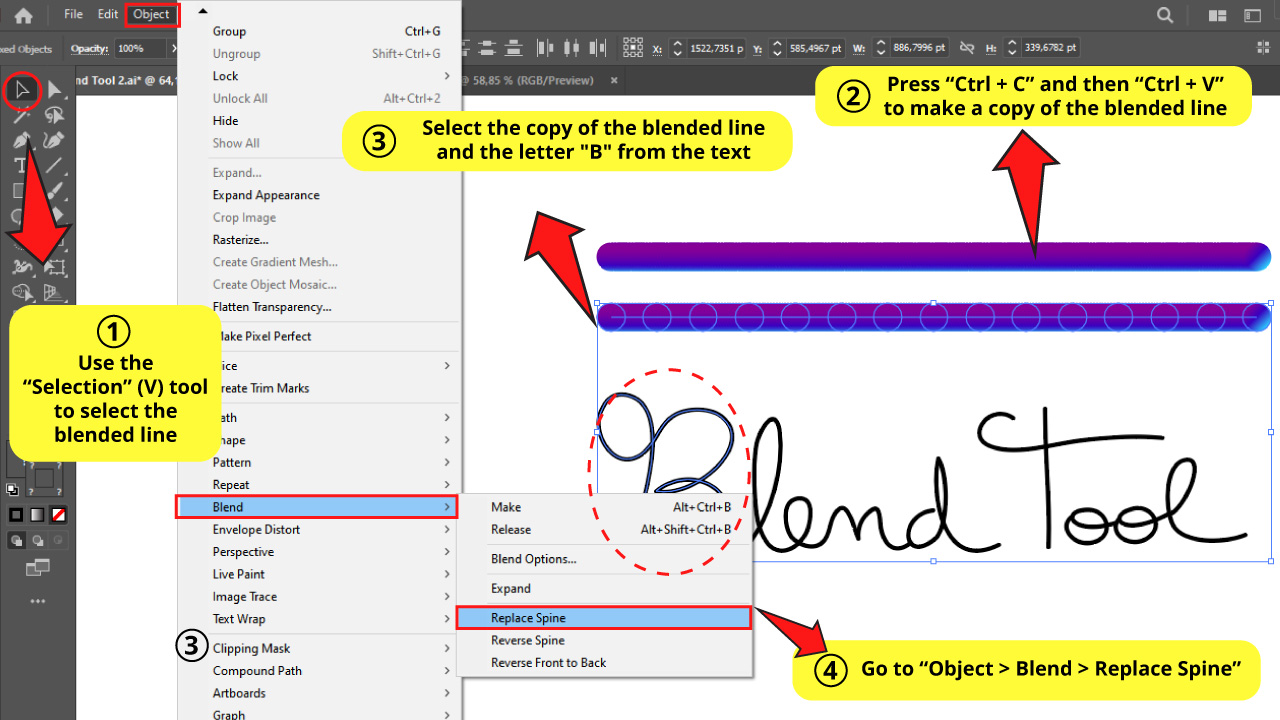
Now we need to create a copy of the blending line. So select it using the “Selection” (V) tool and press “Ctrl +C” to copy it and then “Ctrl + V” to paste it.
Hold the “Shift” key and select one of the blended lines. Then select the first letter of your drawing. Holding the “Shift” key allows us to select several objects at the same time.
Then go to “Object > Blend > Replace Spine” on the menu at the top of the screen to apply the blend effect to the text.
Every time you use the “Replace Spine” feature, the selected blended line will become part of the path we are applying this effect to.
That’s the reason why we should always keep a copy of the original line. To be able to follow this technique, it’s necessary you have at least two lines before applying the “Replace Spine” function. Never do it if you have only one blended line left.
Step 8: Repeat the Previous Step
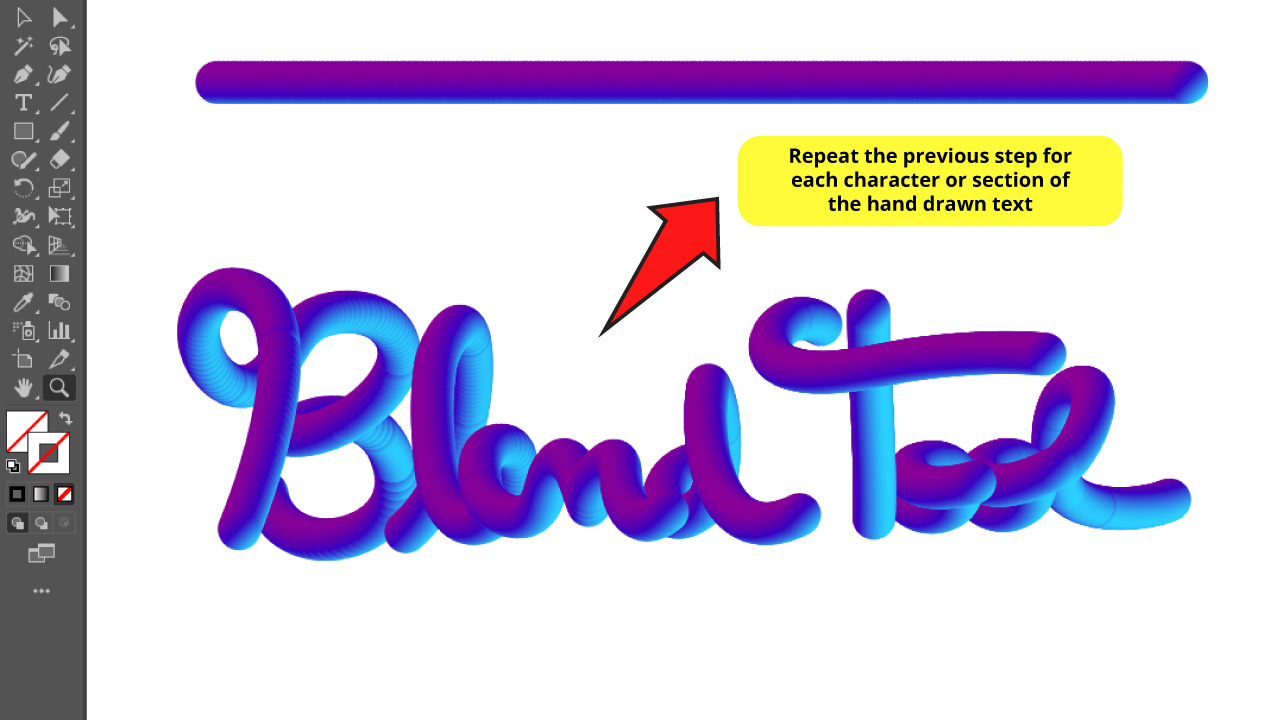
Repeat the previous step for each section of your text.
Step 9: Reverse Spine
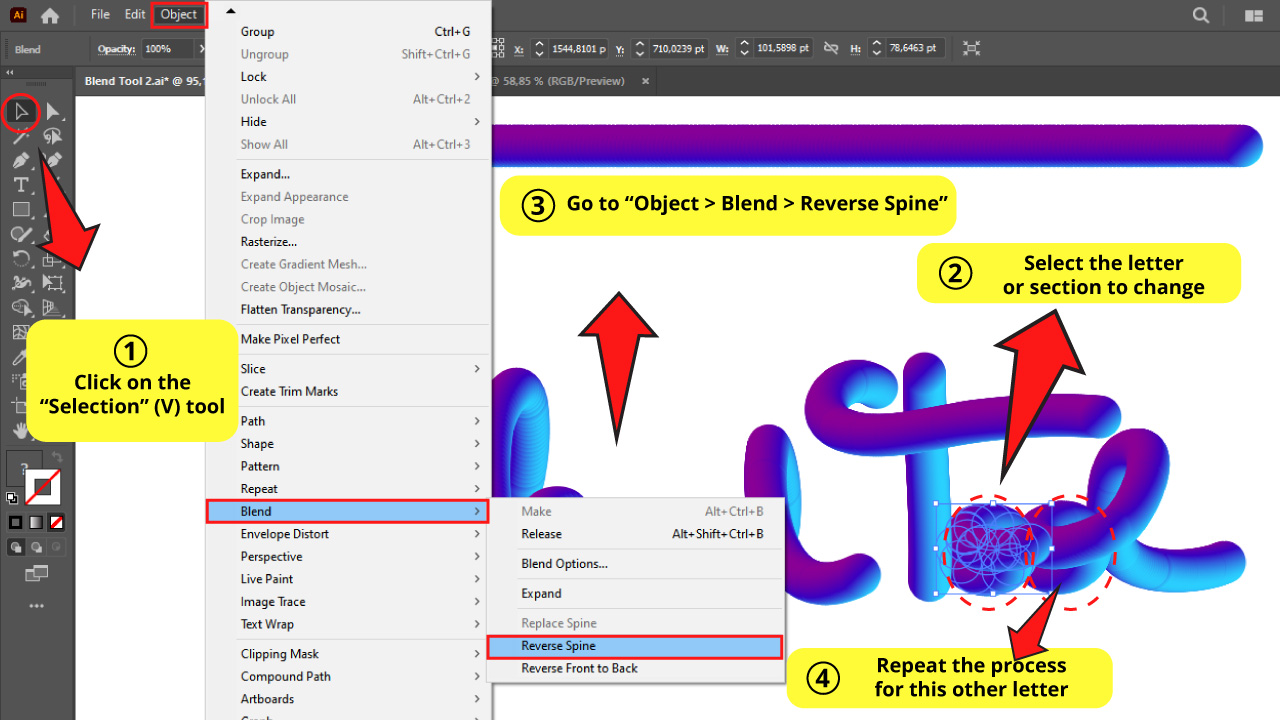
In case you notice that some letters have a wrong path direction, you have to use the “Reverse Spine” feature to change it.
For this example, I needed to apply the “Reverse Spine” on the O’s.
To get this done, click on that specific path and go to “Object > Blend > Reverse Spine”.
Repeat this process on all those paths you need to correct.
Step 10: Readjust Blend Options
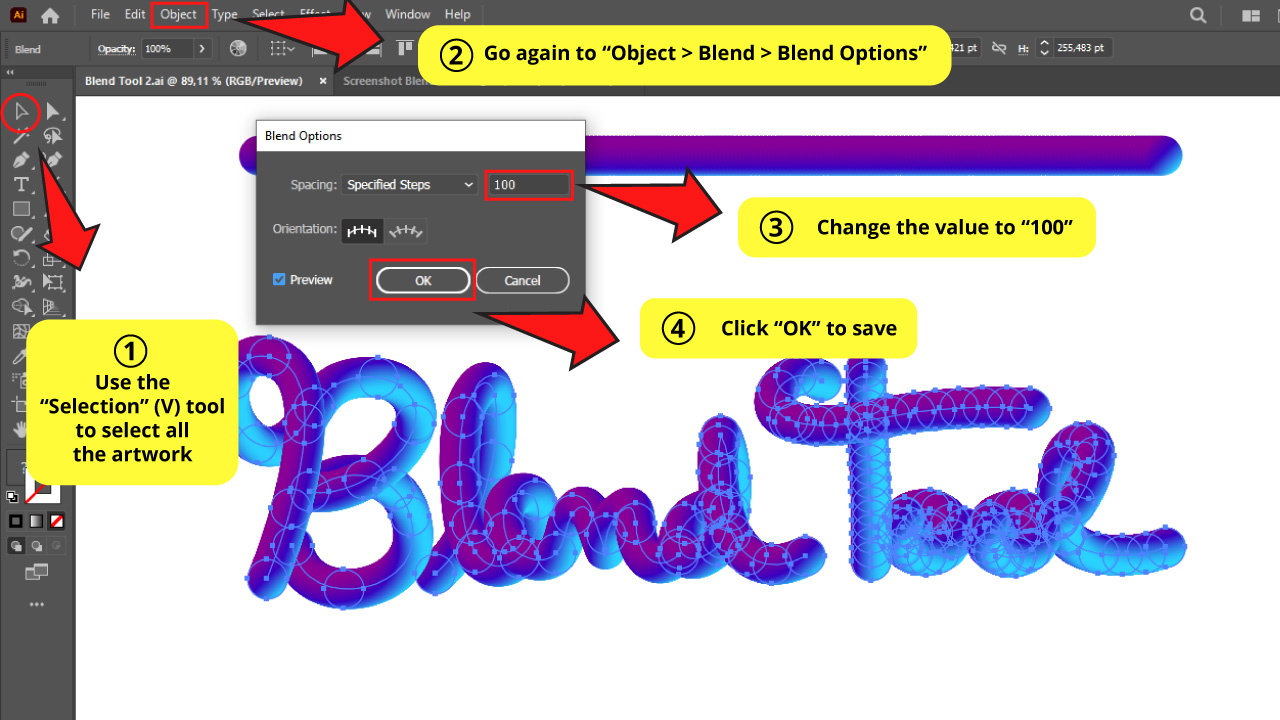
Select the artwork and go again to “Object > Blend > Blend Options”, and now set the “Specified Steps” value to a higher number, close to 100 or so.
Then click “OK” to save.
Step 11: Delete Misplaced Circles

Some drawn lines can end up having some out of place gradient circles, so we will have to get rid of them.
To delete them, select the “Direct Selection” (A) tool on the left side toolbar.
Then click on the misplaced circles and finally press the “Del” key.
Repeat this process until all those annoying circles are gone.
You can now finally delete the original blended line. We won’t need it anymore.
Step 12: Expand it!
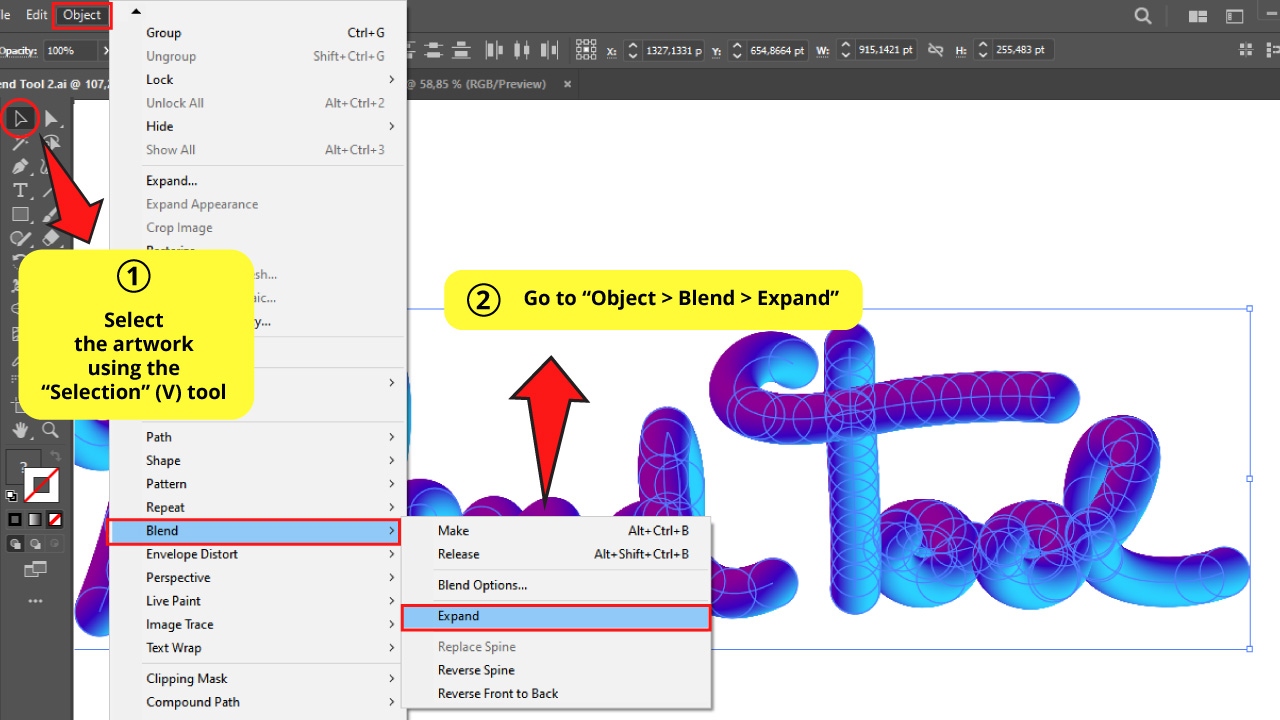
Once you have finished with the blending, you now have to expand it.
To expand it, first select the whole artwork and then go to “Object > Blend > Expand”.
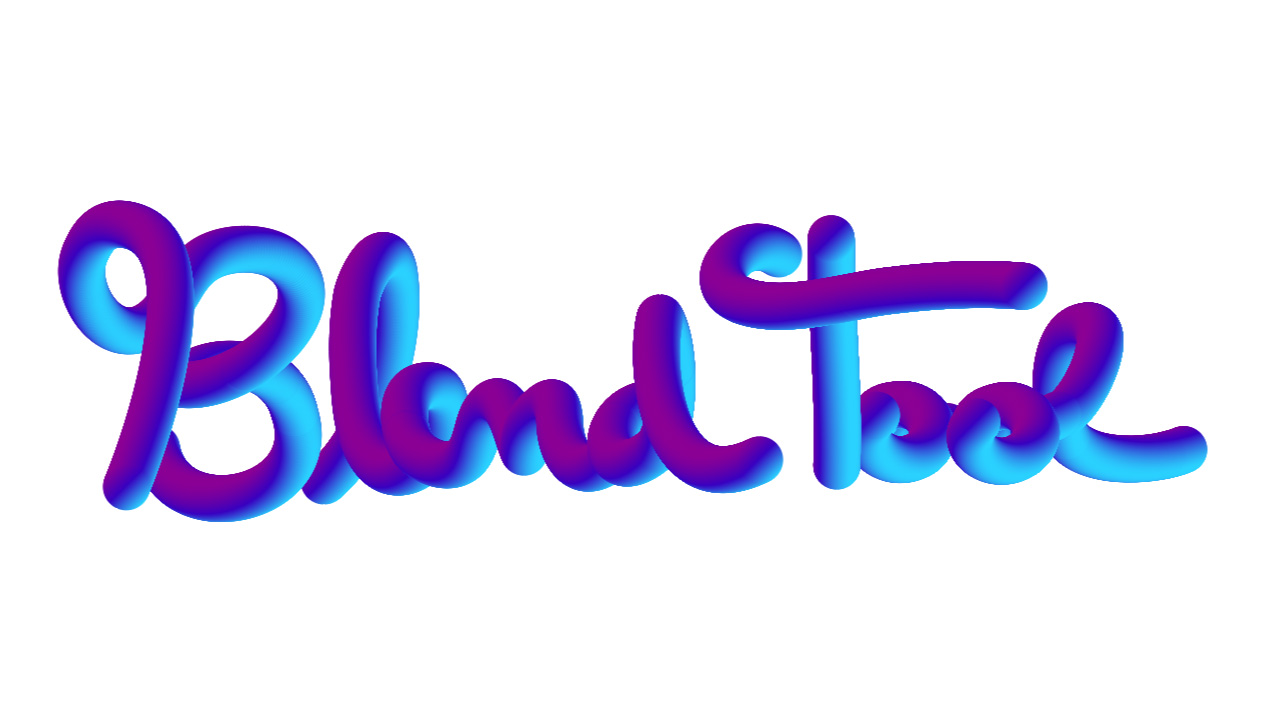
The Result on “How to Use the Blend Tool to Get a 3D Lettering Effect in Illustrator”
Check the result of this amazing 3D lettering effect!
Frequently Asked Questions on “How to Use the Blend Tool in Illustrator”
What’s the difference between “Smooth Color”, “Specified Steps” and “Specified Distance” on the “Spacing” setting in the “Blend Options” window?
The “Smooth Color” blending is the smoothest way without any trace of repeating shapes. With the “Specified Steps” you can blend specifying how many shapes should be repeated in the middle. And with the “Specified Distance” you can specify the distance between each repeating shape.
What’s the difference between “Align to Page” and “Align to Path” on the “Orientation” setting in the “Blend Options” window?
The difference between these two settings lies in that “Align to Path” varies the alignment following the path, while “Align to Page” stays fixed to the page orientation.