
Neon text in Illustrator is a very eye-catching effect that you can use to highlight titles, phrases, names, and logos, just to name a few.
This prominent visual effect can be the best choice when working on banners, posters, and templates set in night city aesthetics, like big sales, promoting nightclubs, stand-up shows or venues, music festivals, bars, arcade games, etc.
In this article, you will learn all you need to know about how to get a realistic neon text effect, including background lighting and some other secrets.
Let’s start!
How to make neon text in Illustrator
To make neon text in Illustrator, follow these steps:
- Start by adding a black rectangle as the background.
- Type your text and select a neon color.
- Change the text fill color to a 1px stroke.
- Duplicate the text layer five times.
- Set “Layer 1” to a whitish color.
- Choose a mid-color neon shade for “Layer 2.”
- Adjust “Layer 2” to have a stroke width of approximately 3.5 pixels.
- Set “Layers 3-6” to have a stroke width of 6 pixels each.
- Apply the “Gaussian Blur” effect to “Layer 2” and increase blurring for “Layers 3-6.”
Below, we are going to show you how to make neon text in Illustrator, step-by-step.
Please note that the steps are slightly different than above because we are showing everything in more detail below.
Step 1: Make a rectangle
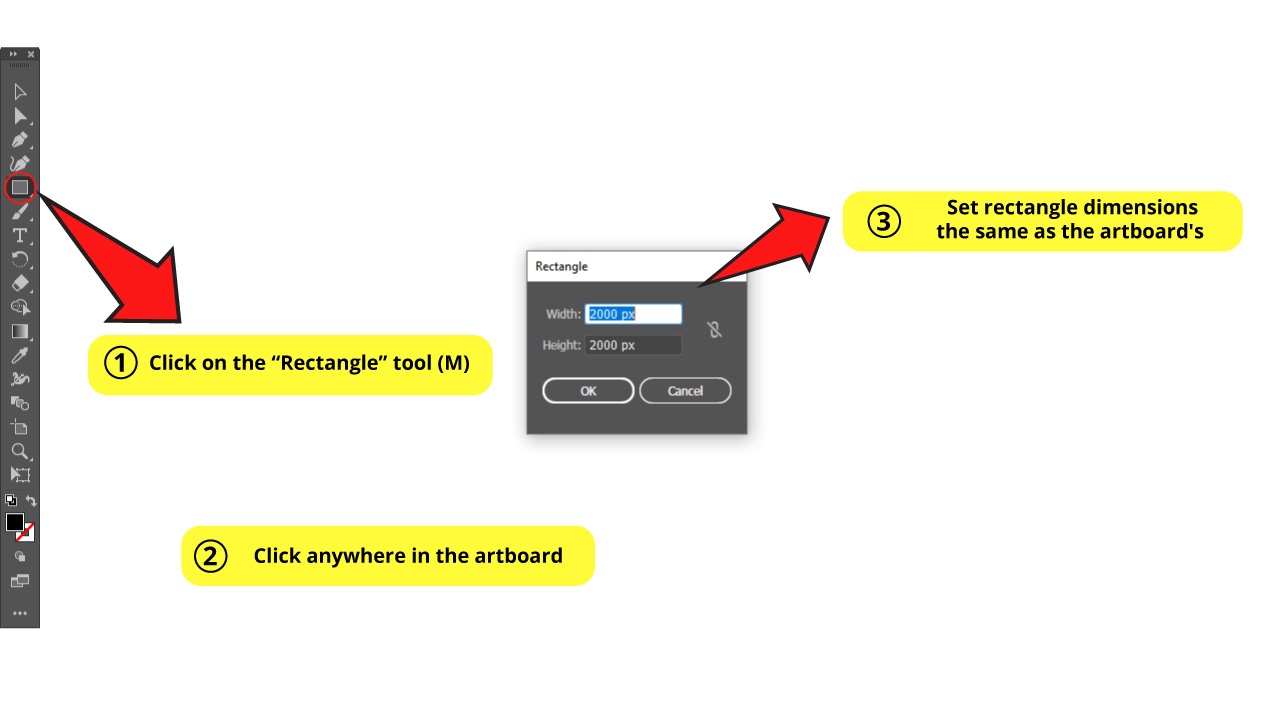
Click on the “Rectangle” tool (M) that you can find on the left side toolbar and click on the artboard. A window to set the rectangle dimensions will pop up.
I’m setting my artboard dimensions as a perfect square of 2000 x 2000 px. When you’re done setting yours, click OK.
Align your rectangle on the center of the board so both are perfectly centered.
If you have doubts or questions about how to align or center objects, you can check this article on “How to Center Objects in Illustrator”.
Then double-click on the color box that you can find on the left side menu, and pick black color. This will be our background for the moment.
Step 2: Type your text in
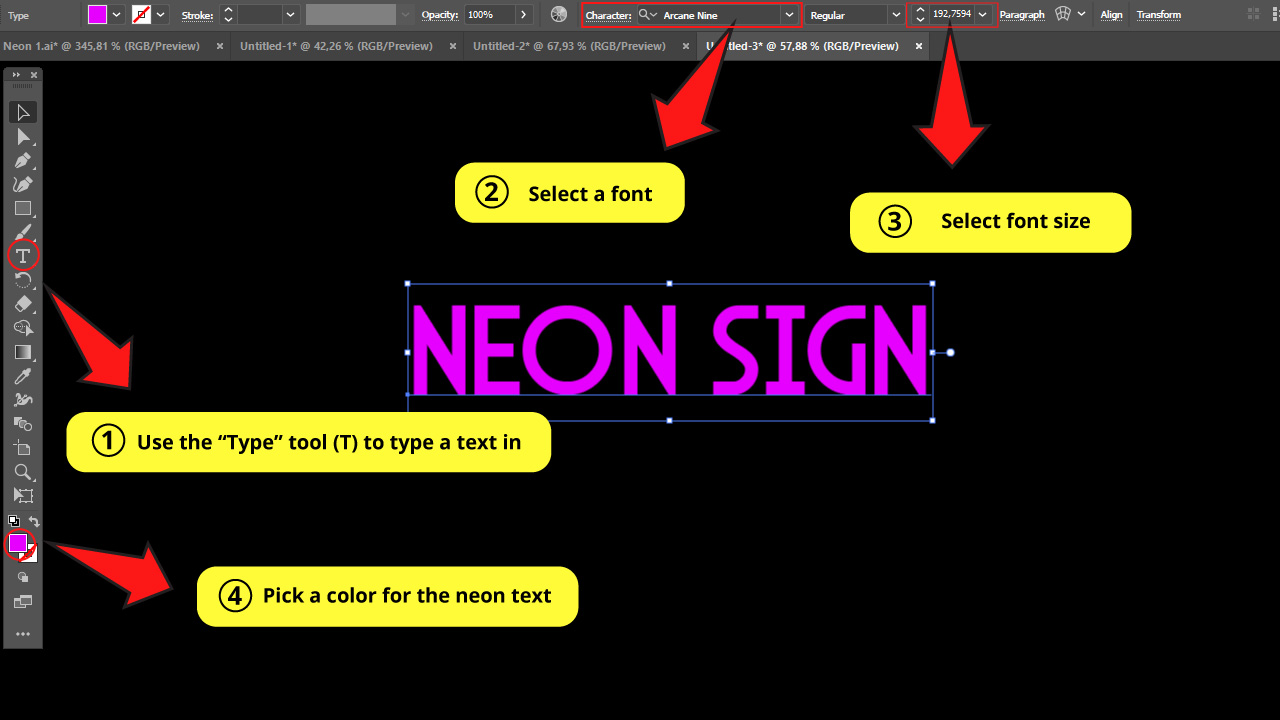
Use the “Type” tool (T) on the left side toolbar and type your text in.
I will use the “Arcane Nine” font (all caps in this case). It has a cool retro look. Try to always choose bold fonts because those will definitely work better for neon texts.
Then set your font size on the “Character” panel on the top toolbar.
Pick a color from the color box which is located on the left side toolbar.
Learn other useful ways to resize text in Illustration in this guide about “How to Make Text Bigger in Illustrator”.
Step 3: Add a stroke to your text
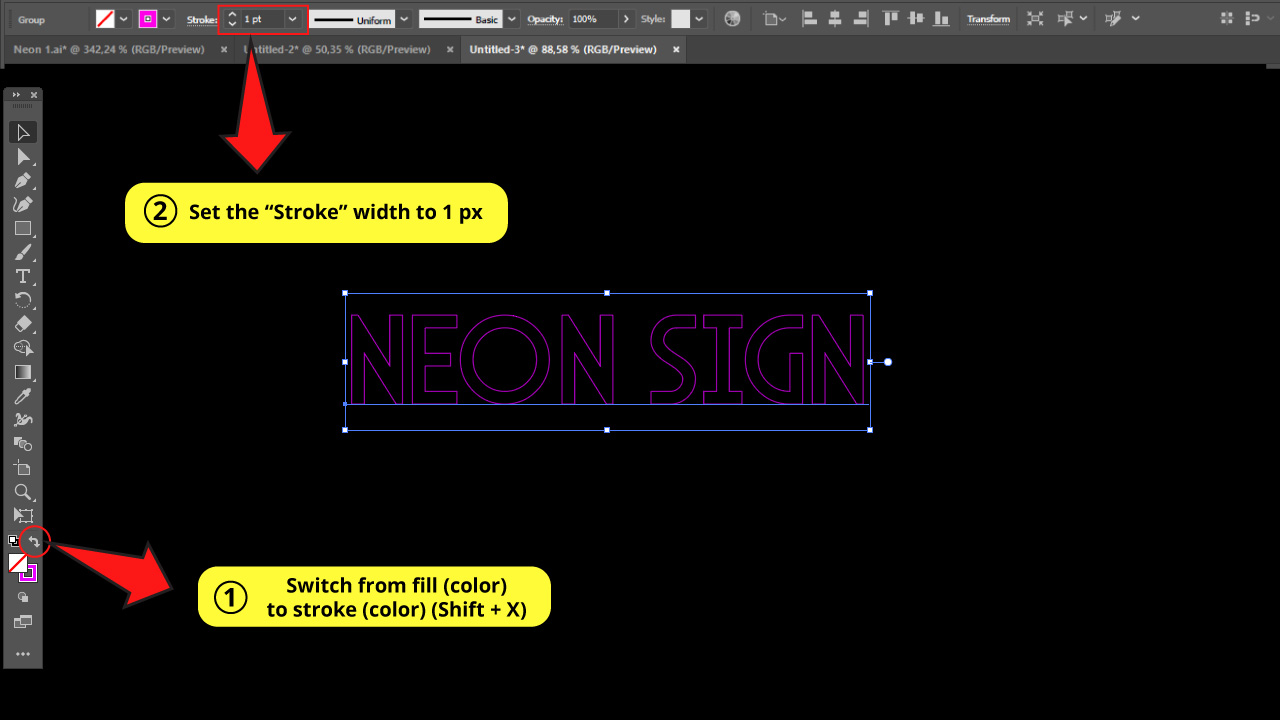
Now we have to switch from “Fill Color” to “Stroke”. You can do this by clicking the arrows icon right above the color boxes, or by using the command “Shift + X”.
Make sure that the stroke width is set to 1 px. This is important because as we advance we will set other widths based on this one.
It’s not necessary to specifically use 1 px for this stroke line, but please make sure to maintain proportions through the process explained in this guide.
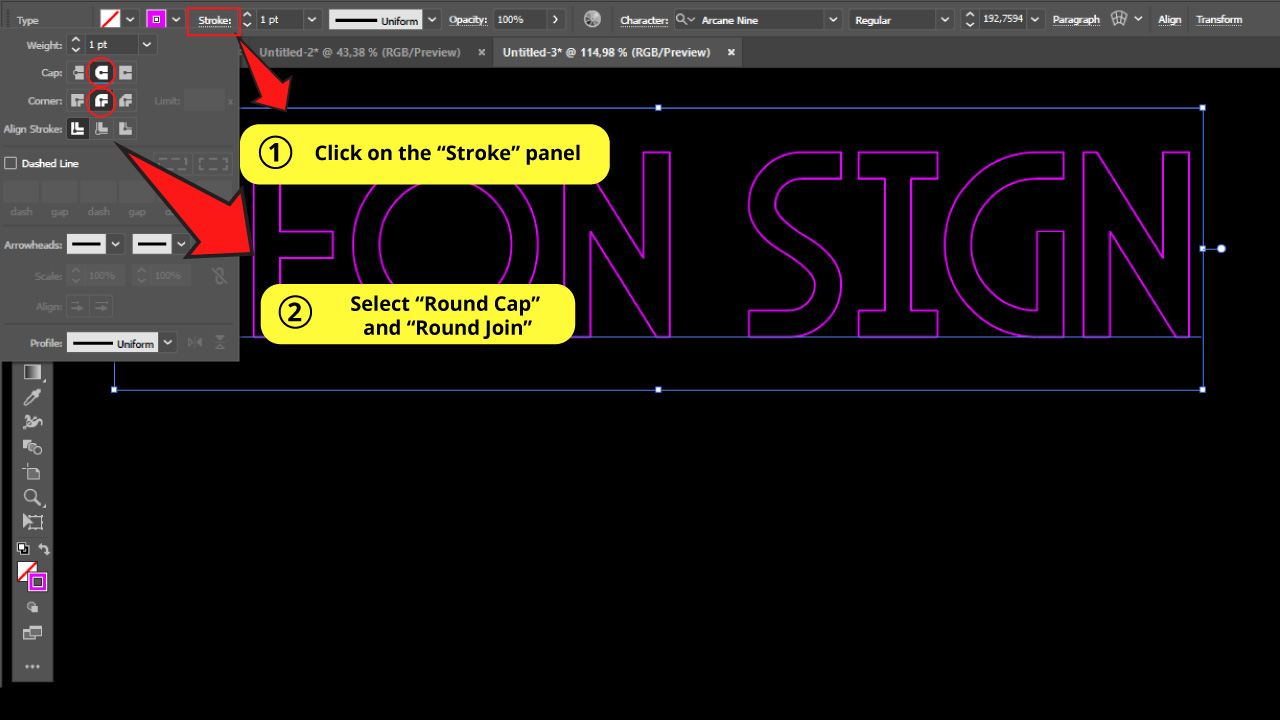
To get a more realistic effect, we recommend rounding the text lines. For this, we need to click on the “Stroke” panel on the top toolbar and select “Round Cap” and “Round Join” settings.
Step 5: Make five copies
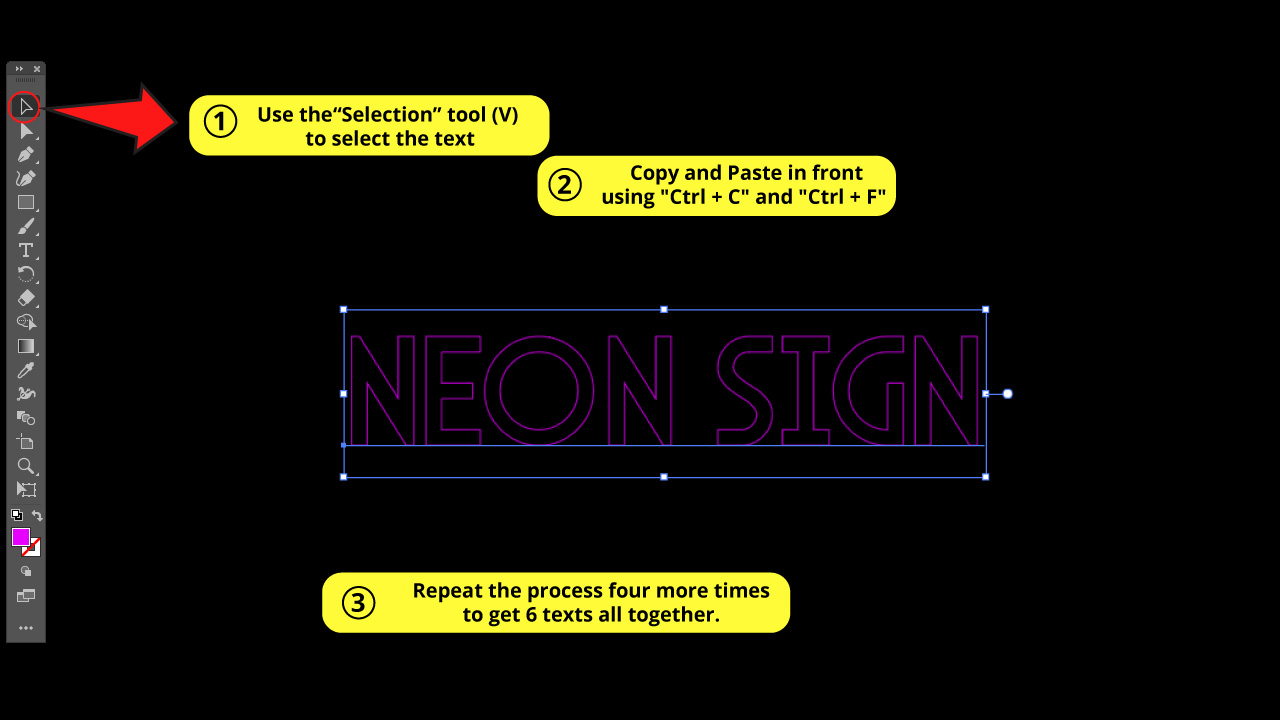
Now we have to select our text with the “Selection” tool (V) on the left side toolbar and then press “Ctrl + C” and then “Ctrl + F” to paste it in front
Repeat this action four more times to get a total of 6 Layers of the same text altogether.
Step 6: “Layers” Panel
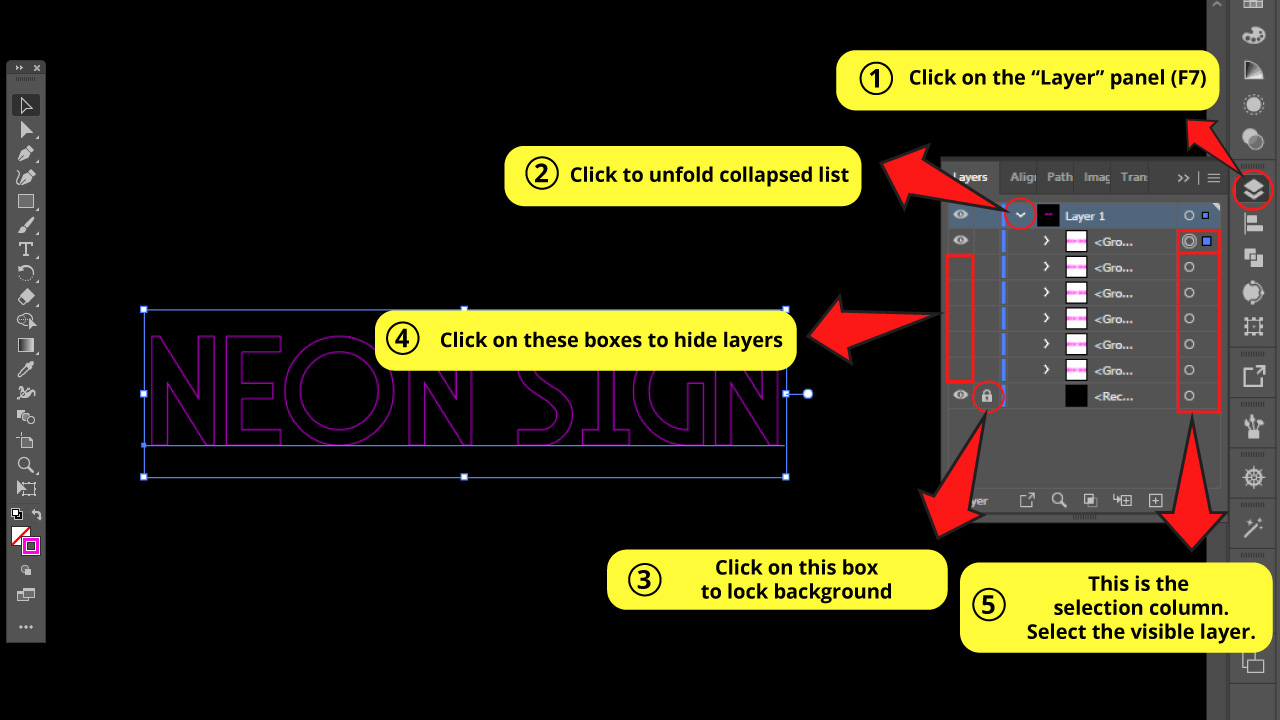
Next, we have to locate the “Layers” panel. It’s usually on the right side toolbar, but if you can’t find it, you can enable it first by going to “Window > Layers” on the top side menu. Or press “F7” to shortcut it.
Once you have located the “Layers” panel, notice a layer for each copy and one more for the background rectangle. We will be able to manage them from this panel.
If there’s only a single layer displayed, it is because the menu is collapsed. To unfold the collapsed menu just click on the arrow next to the layer’s name, as you can see in the image.
The first thing we should do on this panel is lock the background to be able to work with more ease.
This allows us to lock the black rectangle, so we won’t select it when working with the text layers.
For this, we need to click on the right empty box (next to the “eye” box), and a lock will display, letting us know that the layer is locked.
Next, we need to hide the copies, leaving only Layer 1 visible for now. We are doing this in order to be able to work layer by layer, so we can appreciate the changes we are going to make.
To hide a particular layer, we need to click on the “eye” box next to it, and the eye icon will disappear.
When the eye is shown, it means that the layer is visible. If there is no eye, that means it’s not visible.
If it makes things easier for you, you can rename each layer to save some time and confusion. You can do this by double-clicking the layer’s name.
One more thing you should know about this panel is that if you want to select a layer from this panel, you have to click on the right-side circle.
If it is selected correctly, a small color square will display. In this case, the square color is blue because the whole layer group is set to that color.
You can change the default color. Here is a quick guide about “How to Change Layer Color in Illustrator” that might help you.
If you want to learn more about the “Layers” panel, we recommend you take a look at “How to Merge Layers in Illustrator in 4 Simple Steps” .
Step 7: Setting “Layer 1”
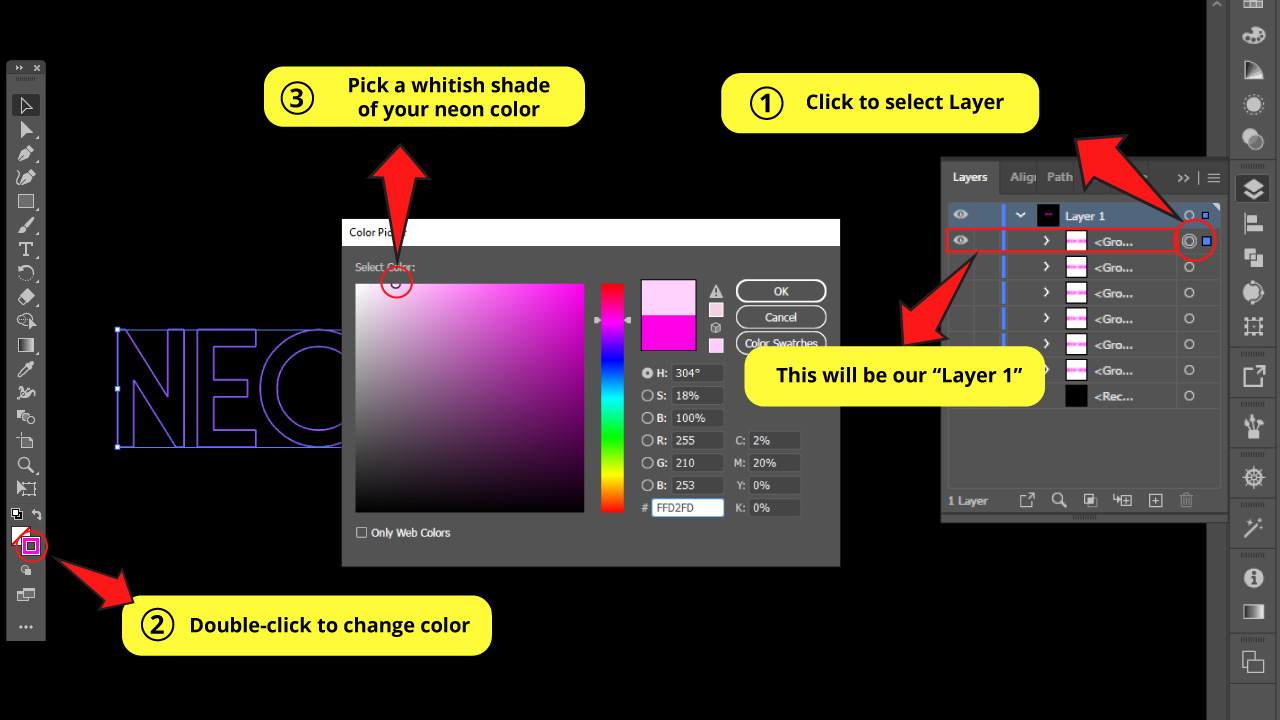
Select “Layer 1” by clicking on the circle on the “Layer” panel as previously stated.
Select a lighter color, closer to white but keeping the original tint, that’d be light pink for my text. Click OK to save.
Step 8: Setting “Layer 2”
Make “Layer 2” visible by clicking on the left side box on the “Layer” panel, enabling the “eye” icon. Then, select it with the right side circle.
For this layer, we are going to set stroke lines at 3,5 px width. Remember to change this on the top side toolbar on the “Stroke” box.
Then we have to change the color. For this one, we’re using a mid-pink. Something in between the original neon color we picked and the whitish-pink color from “Layer 1”.
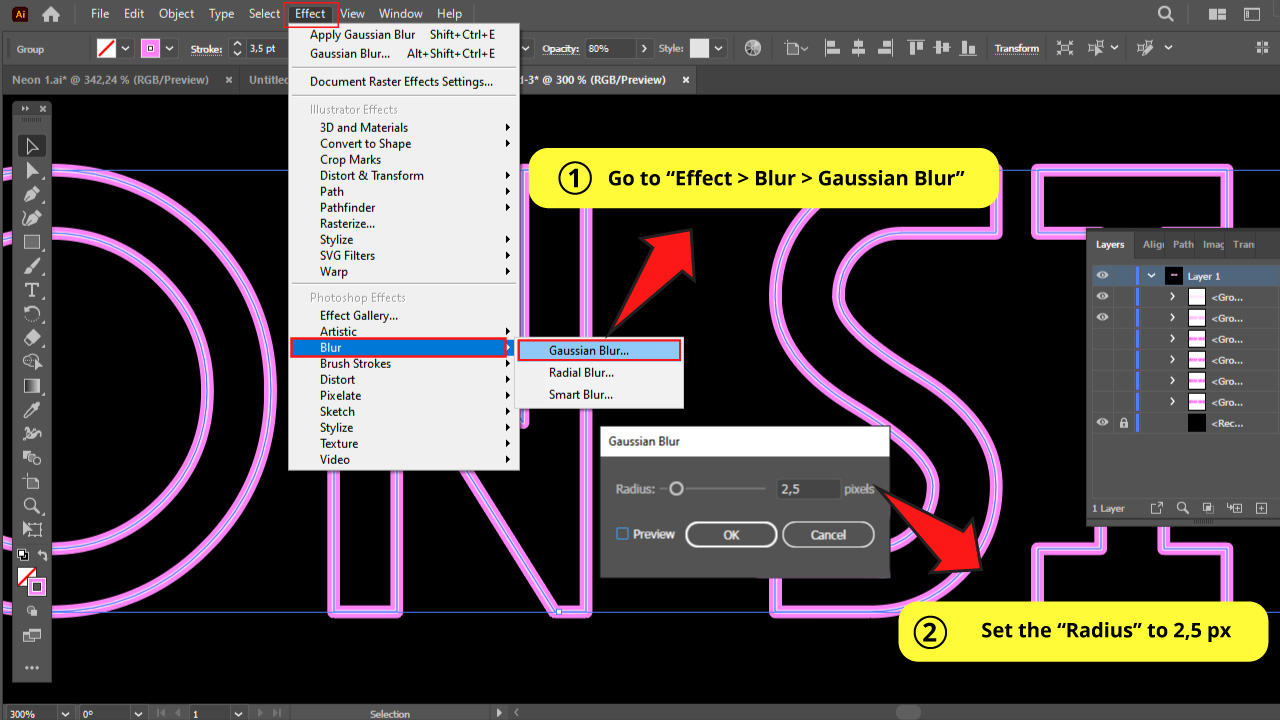
Set the “Opacity” to 80% on the box you can find on the toolbar at the top of the screen.
Next, we need to add some blur. Go to “Effect > Blur > Gaussian Blur” on the top side menu.
A window with settings will pop up. Set the “Radius” to 2,5 px.
Step 9: Setting “Layer 3”
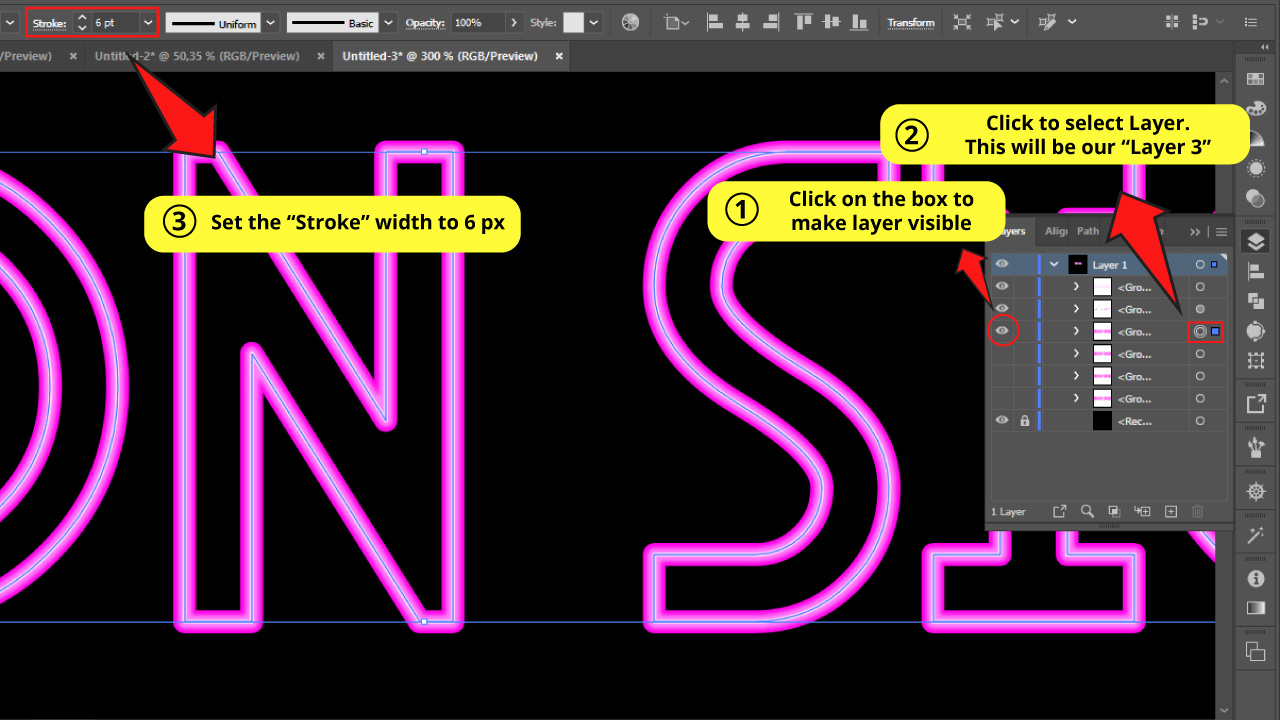
Again, make this layer visible so we can work on it and select it.
The only thing we have to do for this layer is set the stroke width to 6 px.
It won’t be necessary to change color or add blur.
Step 10: Setting “Layer 4”
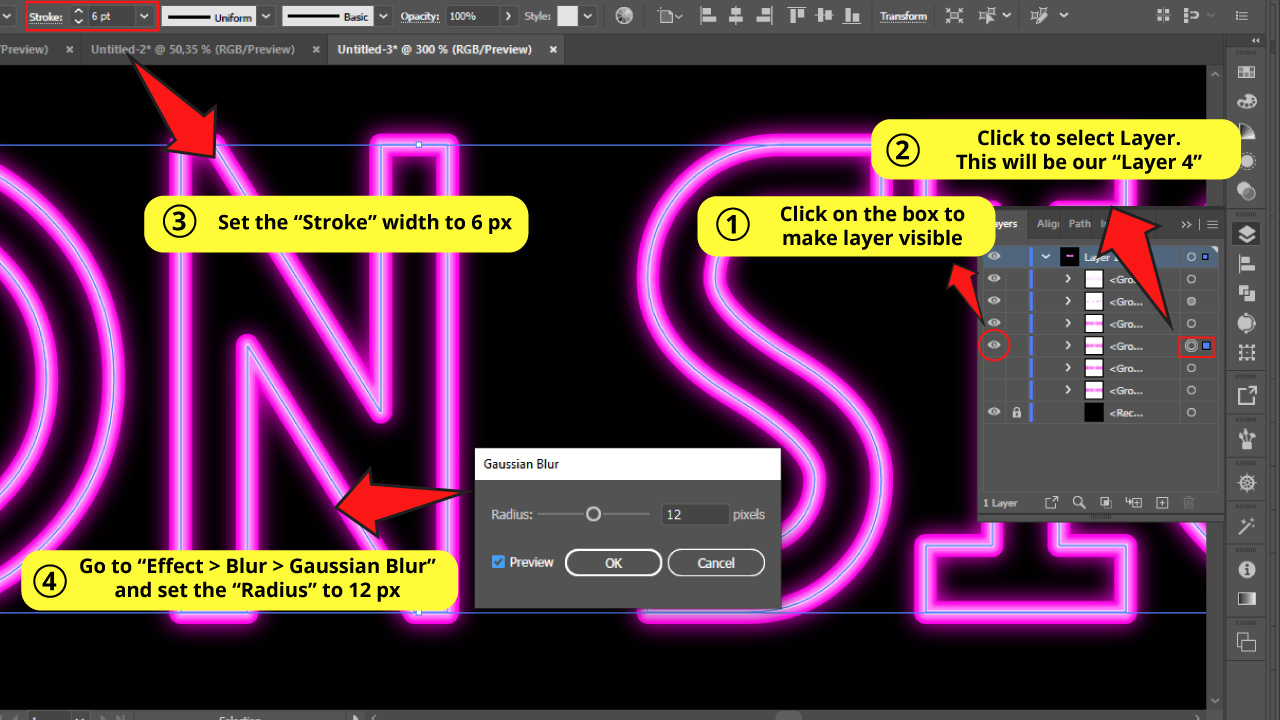
Make the copy visible and select it.
Set the stroke width to 6 px.
Add “Gaussian Blur” on a 12 px. radius.
Leave the color as it is.
Step 11: Setting “Layer 5”
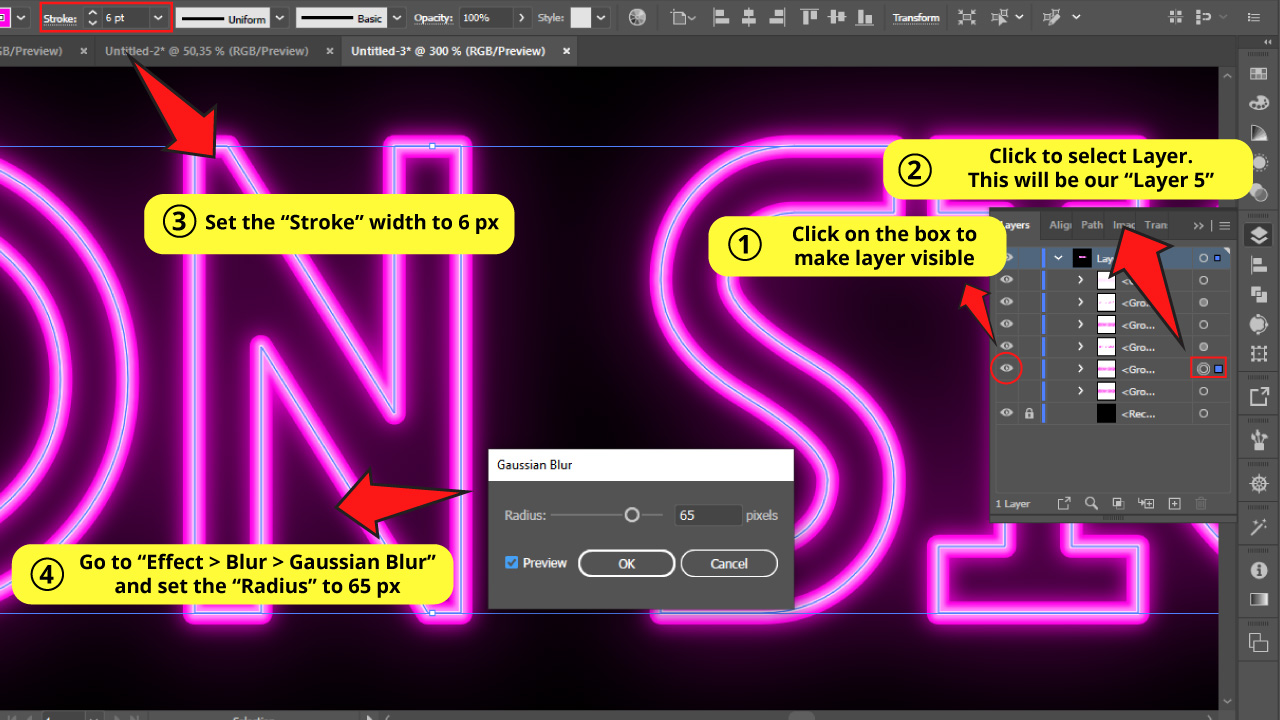
Make the copy visible and select it.
Set the stroke width to 6 px.
Add “Gaussian Blur” on a 65 px radius.
Leave the color as it is.
Step 12: Setting “Layer 6”
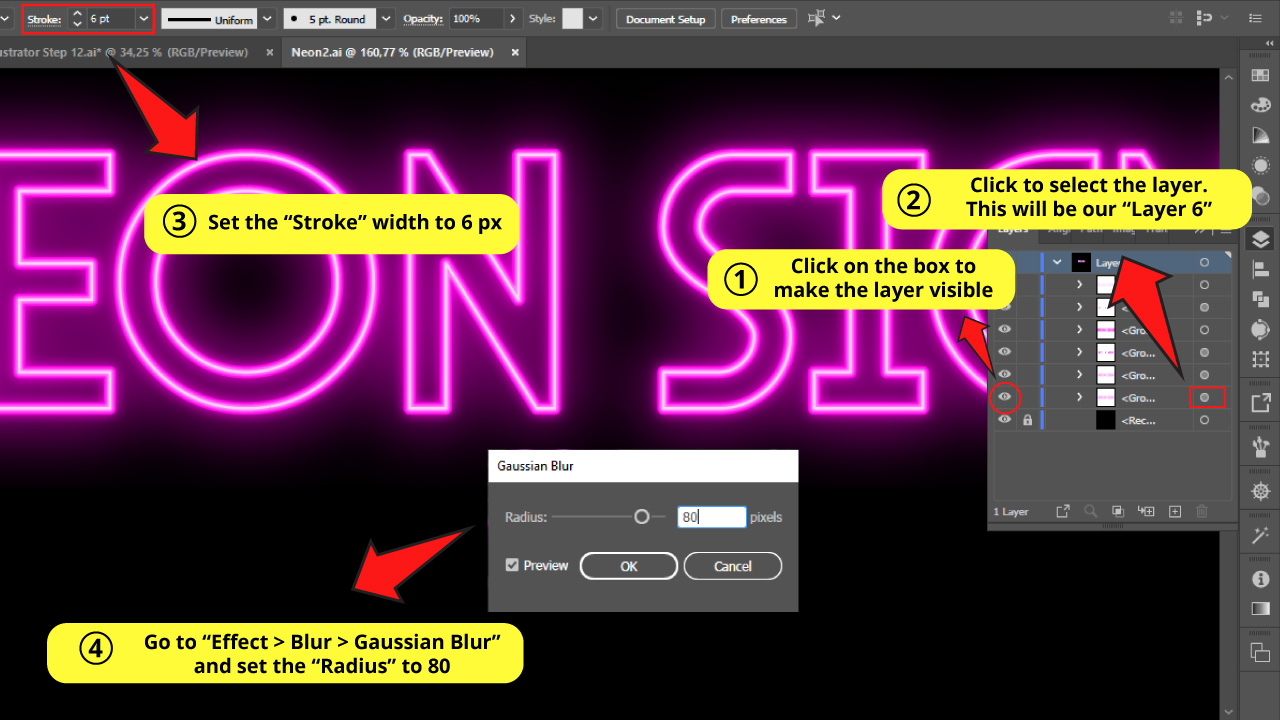
Make the copy visible and select it.
Set the stroke width to 6 px.
Add “Gaussian Blur” on a 80 px radius.
Leave the color as it is.
Step 13: Neon Text
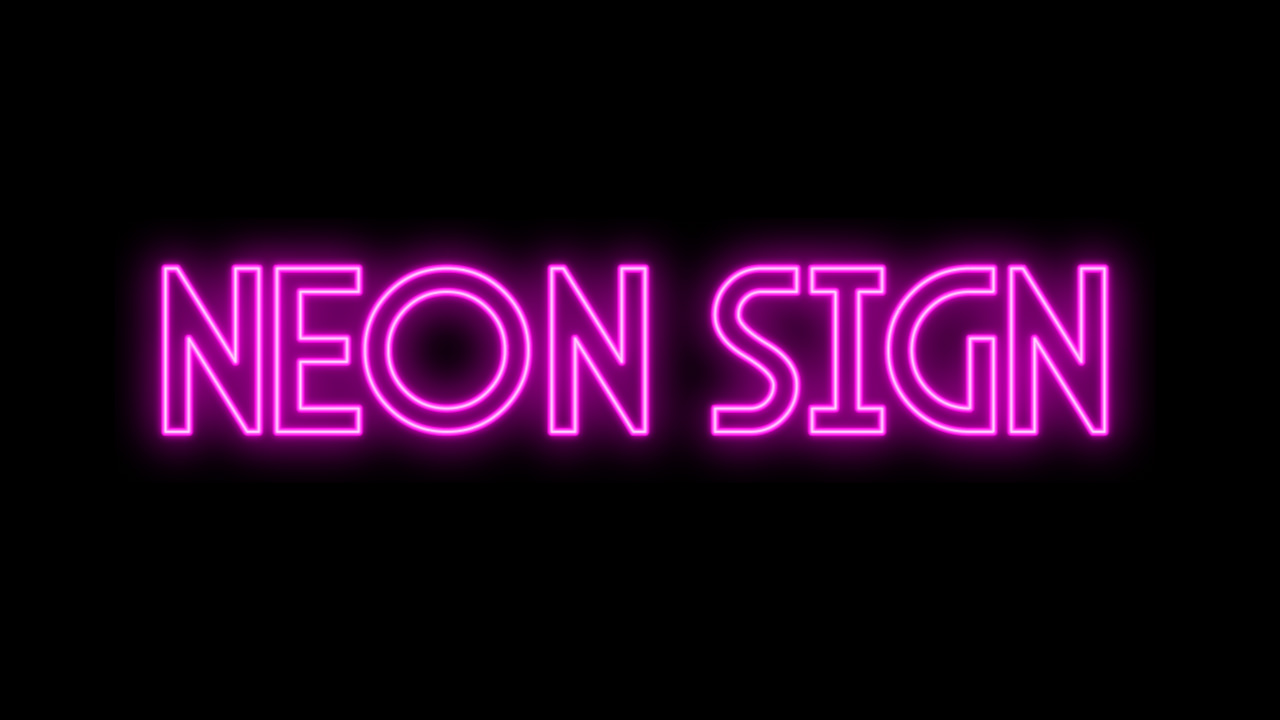
There you go, magnificent neon lights!
How to make a background for neon text in Illustrator: Step-by-step guide
The difference between getting regular and outstanding neon text is the atmosphere that you can get by setting a proper background.
You see if you place your neon text in any given background without any adjustments, it will look very flat and lifeless.
The eye-catching effect will also be sharply reduced. That’s the reason why the background is so important.
To make a background for neon text in Illustrator, follow these steps:
Step 1: Place a texture
For this example, I’m going to use a brick wall texture. As you can notice, this texture is a simple red brick wall. It isn’t set at night, but we are going to get it with a few adjustments.
Open a new document file by going to “File > New” or pressing “Ctrl + N”.
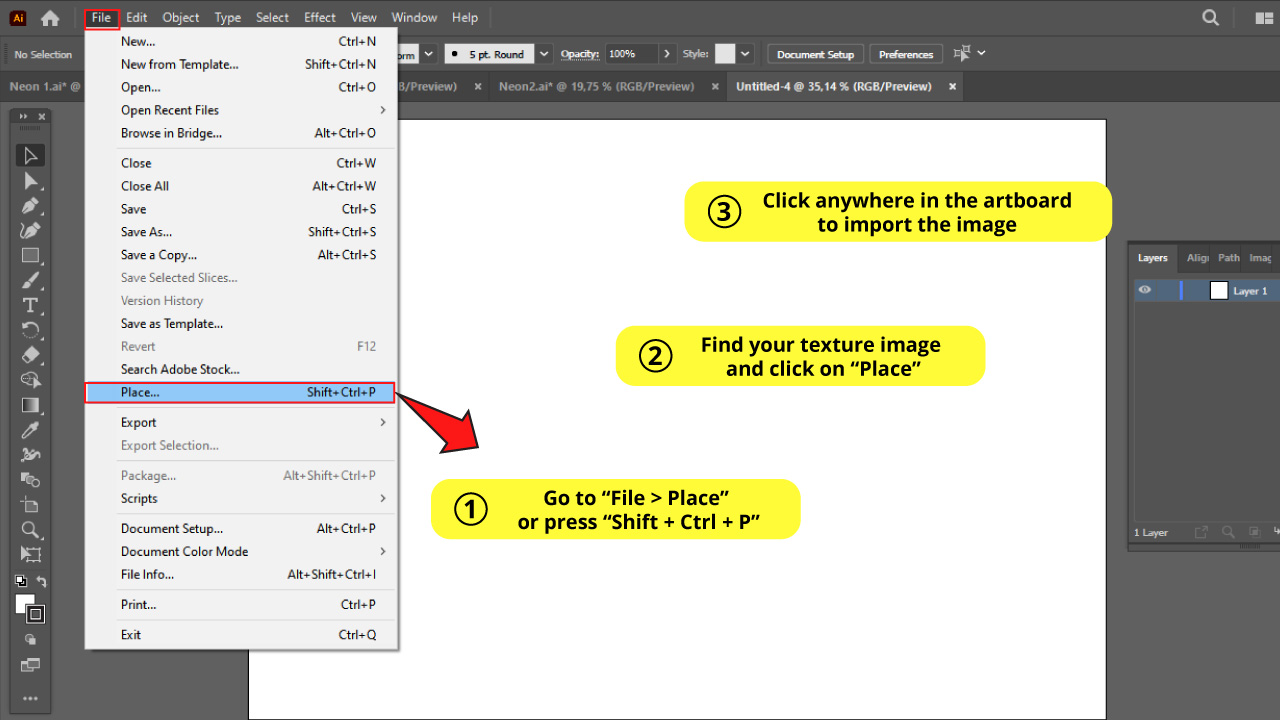
Then click on “File > Place” on the top side menu or by simply using the “Shift + Ctrl + P” command. A window will pop up. Search for the texture image that you are going to use, select it, and click on “Place.”
Then just click anywhere in the Illustrator artboard to import the image.
Step 2: Resize the Texture
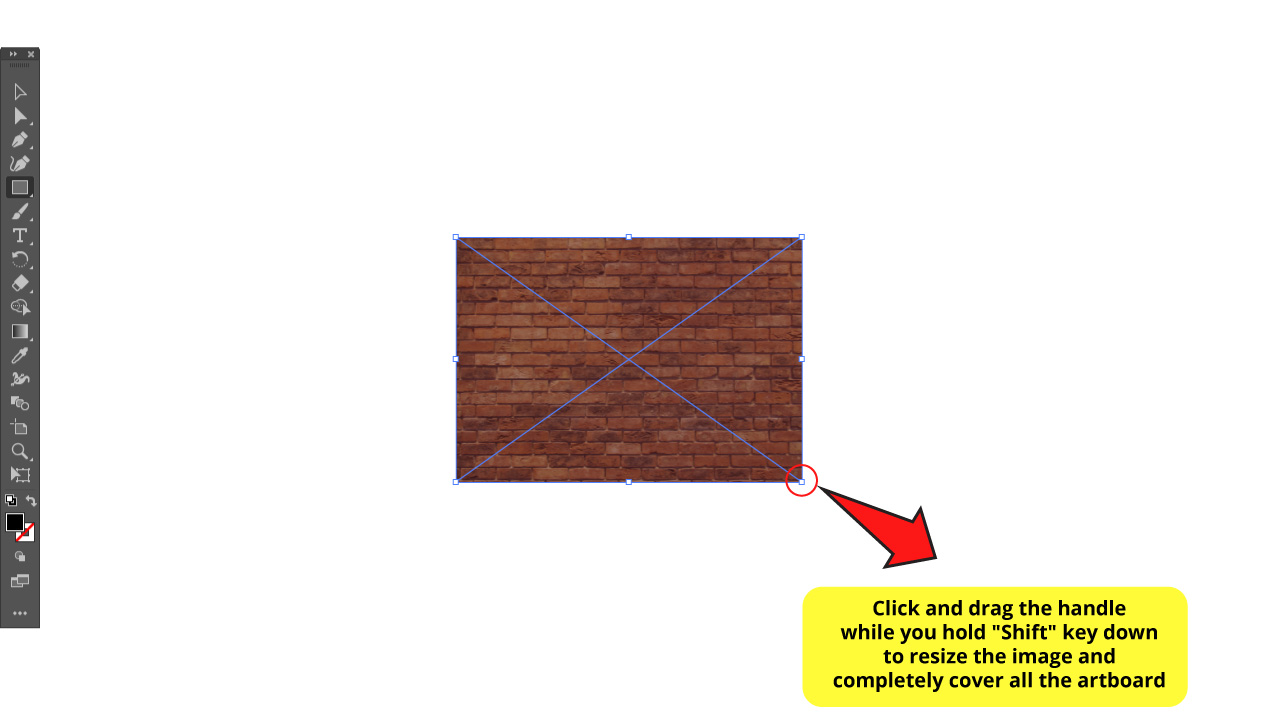
Use the handles on the corner of the bounding box to resize the texture image to cover the whole artboard. Remember to hold the “Shift” key down while you are doing this to maintain proportions.
Step 3: Create a Rectangle
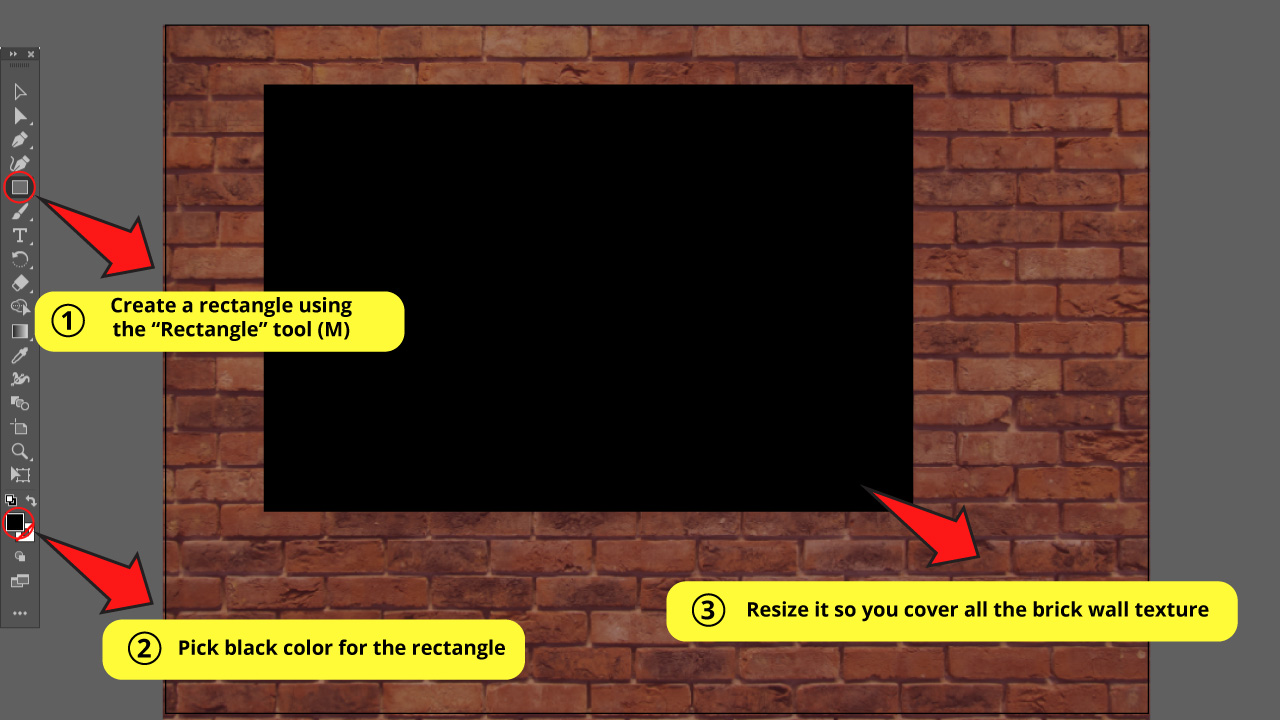
Create a rectangle using the “Rectangle” tool (M).
Select a black color for this rectangle.
Then, resize the rectangle to cover all the brick wall texture.
Step 4: Change the Blend Mode of Rectangle 1 to “Color”
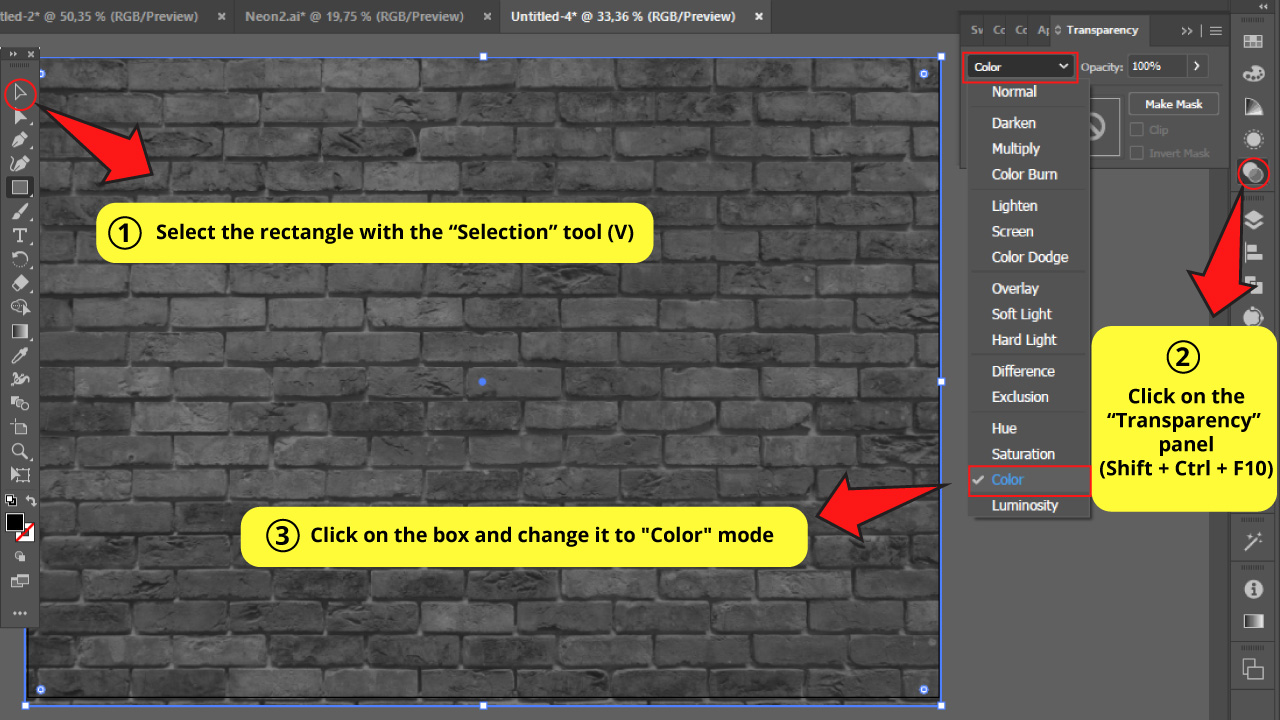
Now, you have to find the “Transparency” panel on the right side toolbar.
If you can’t find it, go to “Window > Transparency” on the top side menu. Or just use the “Shift + Ctrl + F10” command.
Once you have opened the “Transparency” panel, select the rectangle with the “Selection” tool (V) and click on the box set by default as “Normal.” Change it to “Color” mode.
Step 5: Change the Blend Mode of Rectangle 2 to “Soft Light”
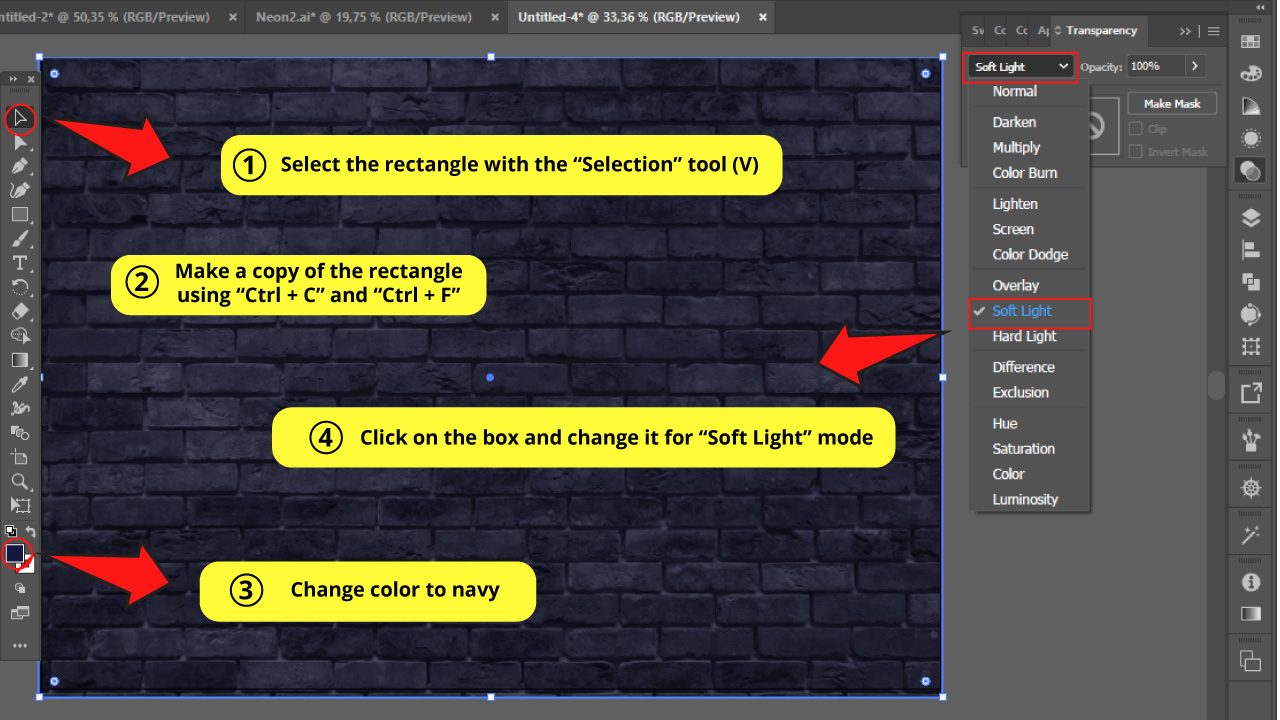
Select the rectangle you have created and make a copy using “Ctrl + C” and then “Ctrl + F” to paste it in front.
Select a navy blue color for this rectangle.
Set the “Transparency” panel to “Soft Light.”
Step 6: Change the Blend Mode of Rectangle 3 to “Overlay”
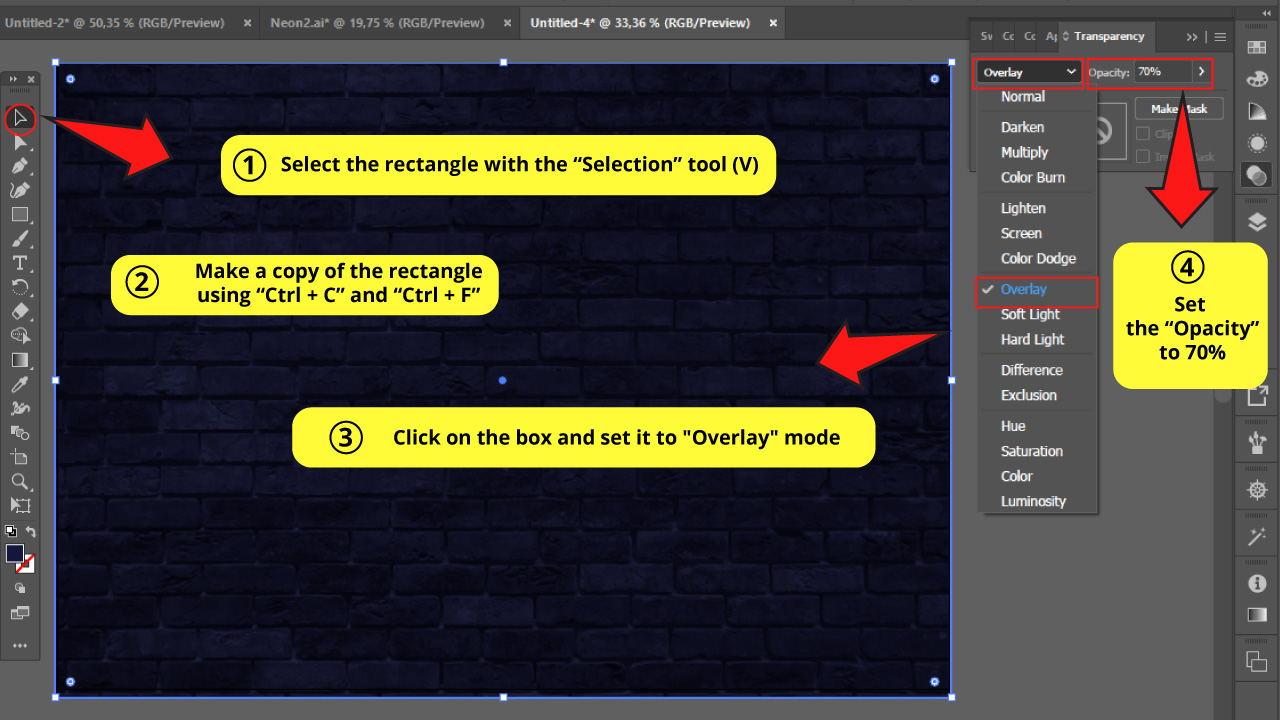
Select the recently created rectangle and make yet another copy-pasting it in front of the other ones. This will be the 3rd rectangle.
Keep the same navy color.
Set the “Transparency” panel to “Overlay.”
Step 7: Adjust the Gradient Color and Opacity for “Rectangle 3”

Find the “Gradient” panel on the right side menu. If you can’t find it, maybe you have to enable it first by going to “Window > Gradient” or by simply using the “Ctrl + F9” shortcut.
Once you have opened the “Gradient” panel, select the Rectangle 3 and click “Radial Gradient”.
Notice that there is a “black and white” gradient by default.
Double-click on the white color to change it. Go to the “Swatch” tab inside the “Gradient” panel and select the closest color to your neon text (pink in this case).
Set opacity to 30%.
Then click anywhere outside the “Swatch” window to close it.
Leave the black color as it is.
Step 8: Draw an Oval Gradient Shape for Rectangle 3

Make sure that the rectangle is still selected, and then select the “Gradient” tool (G) that you can find this time on the left side toolbar.
Notice that the “Gradient” tool and the “Gradient” panel aren’t the same. They are used to adjust different settings.
If you have clicked correctly on the “Gradient” tool (G), then a dotted circle will be displayed when you drag the mouse pointer over the rectangle.
This will allow us to adjust the gradient circle shape and the gradient radius.
So, hold the click down on the top handle of the circle and drag it down to make it a tad bit flatter. You will get an oval.
Step 9: Create an Oval with the “Ellipse” Tool
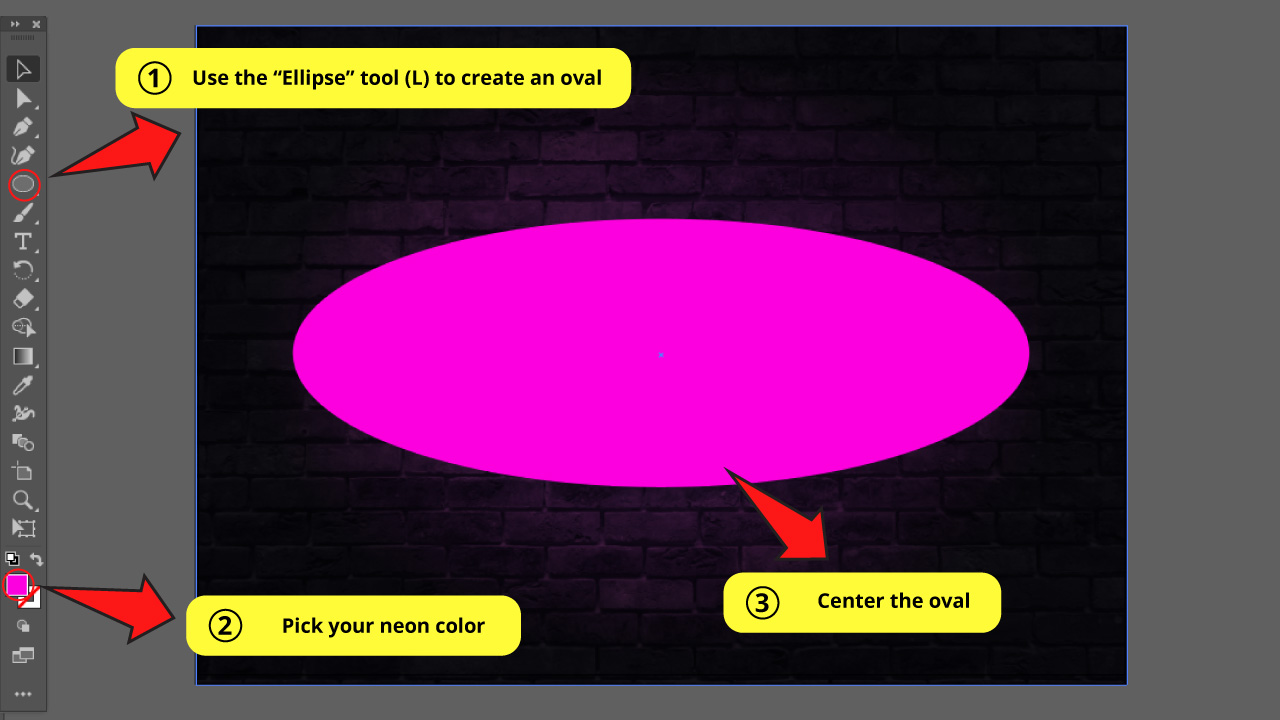
Use the “Ellipse” tool (L) on the left side toolbar to create an oval.
Then, select a color for your oval. I’m going to use pink because my neon text is pink as well.
Align it on the center by dragging the oval.
Step 10: Add Radial Blur to the Oval
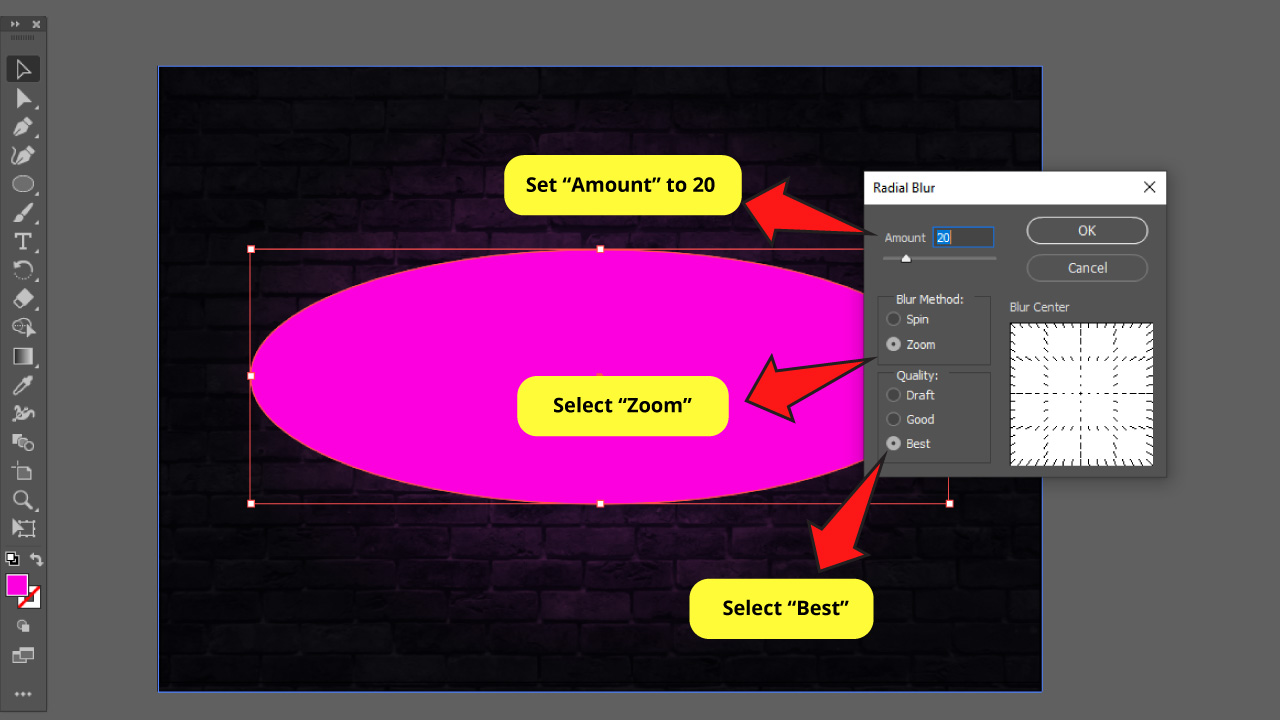
While the oval is selected, go to “Effect > Blur > Radial Blur ” on the top side menu.
A window will open. Set the “Amount” to 20, the “Blur Method” on “Zoom,” and the “Quality” to “Best.”
Click OK to save it.
Step 11: Add Gaussian Blur to the Oval
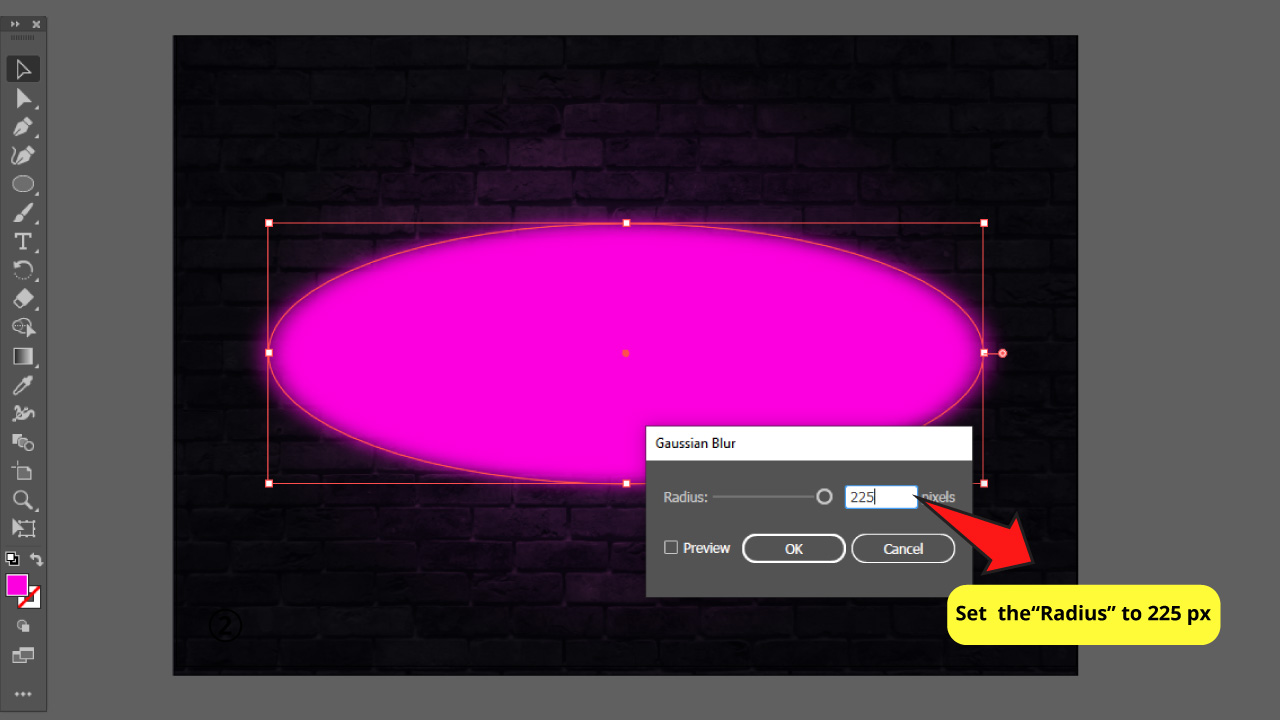
Now, we have to add blur again. But this time, it will be “Gaussian Blur”.
So go to “Effect > Blur > Gaussian Blur” on the top side menu.
A window will open. Set the “Radius” to about 225 px.
Then click OK.
Step 12: Add Transparency to the Oval
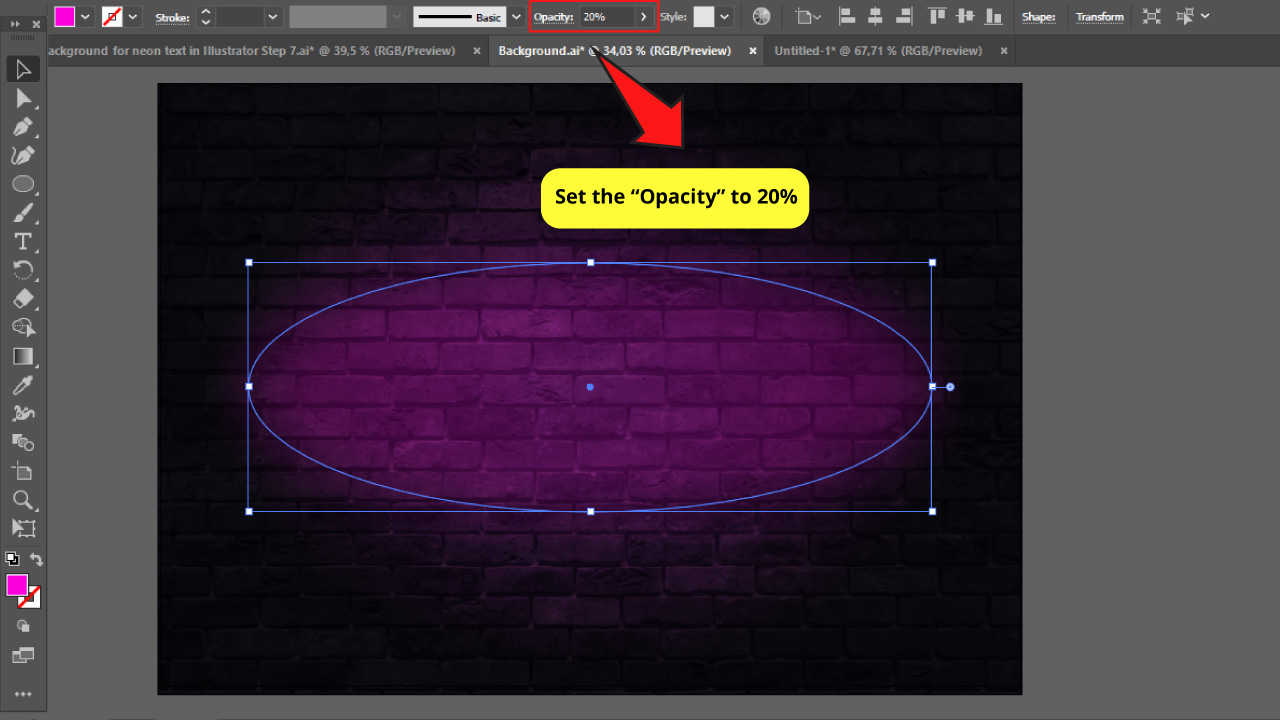
Select the oval and then set the “Opacity” to 20%. You can find the “Opacity” panel on the top side toolbar.
Step 13: Add the Neon Text

Go to the window you have been working with the neon text in on the first step-by-step guide.
Select the text using “Ctrl + A” to select all of it, and then copy it with the “Ctrl + C” command.
Then go to our recently created background window and press “Ctrl + V” to paste it.
Once you have pasted it in front of the background, you can group the text to make your life a bit easier. While the text is selected, press “Ctrl + G” to group it. Or right-click to open the dropdown menu and select “Group.”
Go to the “Transform” panel that you can find on the top side toolbar. You can also enable that panel by going to “Window > Transform” or by using the “Shift + F8” shortcut.
Then click on the “Scale Strokes & Effects” checkbox to maintain the stroke lines scale when we resize the text.
Step 14: Resize and Center the Neon Text
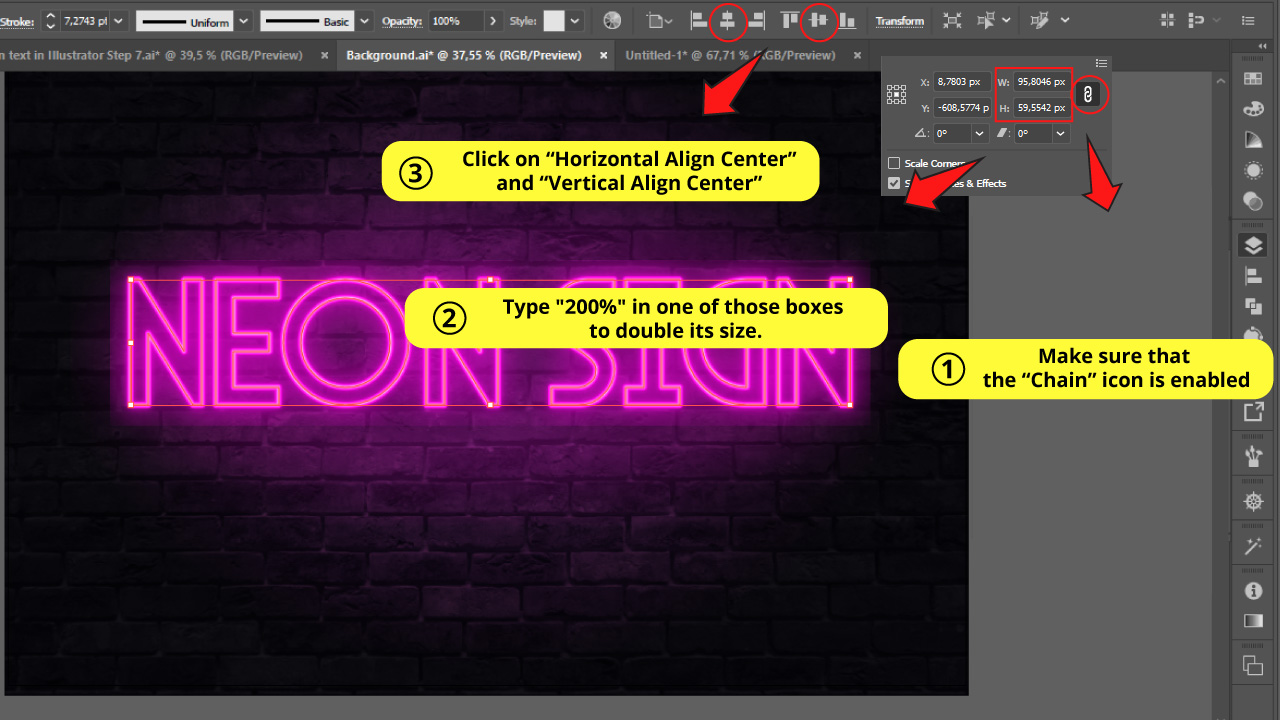
Make sure that the chain icon on the “Transform” panel is enabled, and in the “Height” or “Weight” box, let’s set it to “200%” to make the text twice as big.
Open the “Align” panel on the top side toolbar. If you can’t find it, you can enable it by going to “Window > Align” or by pressing “Shift + F7”.
Click on “Horizontal Align Center” and “Vertical Align Center” to align the image to “center.”
The Result
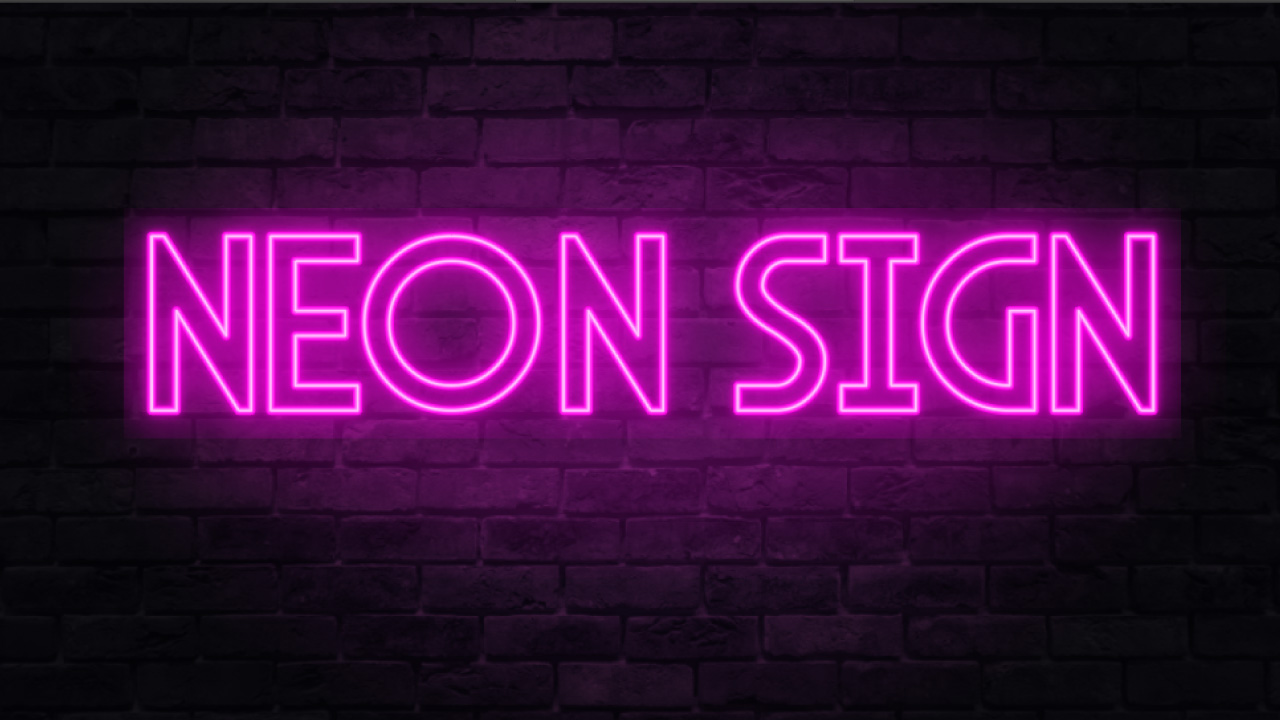
And here it is!
Look how better it looks now with the atmosphere we got by adjusting the background.
How to take neon text to another level in Illustrator: Step-by-step guide
If you want to take your neon text to another level and make it even more realistic, you have to adjust some more details.
Real neon lights don’t have homogeneous lighting. They have lighter and darker sections through the tubes.
On the other hand, the same neon light structure drops shadows on the background.
So, if you add these two details, you can get an outstanding neon text look.
Step 1: Select the Whitish Line
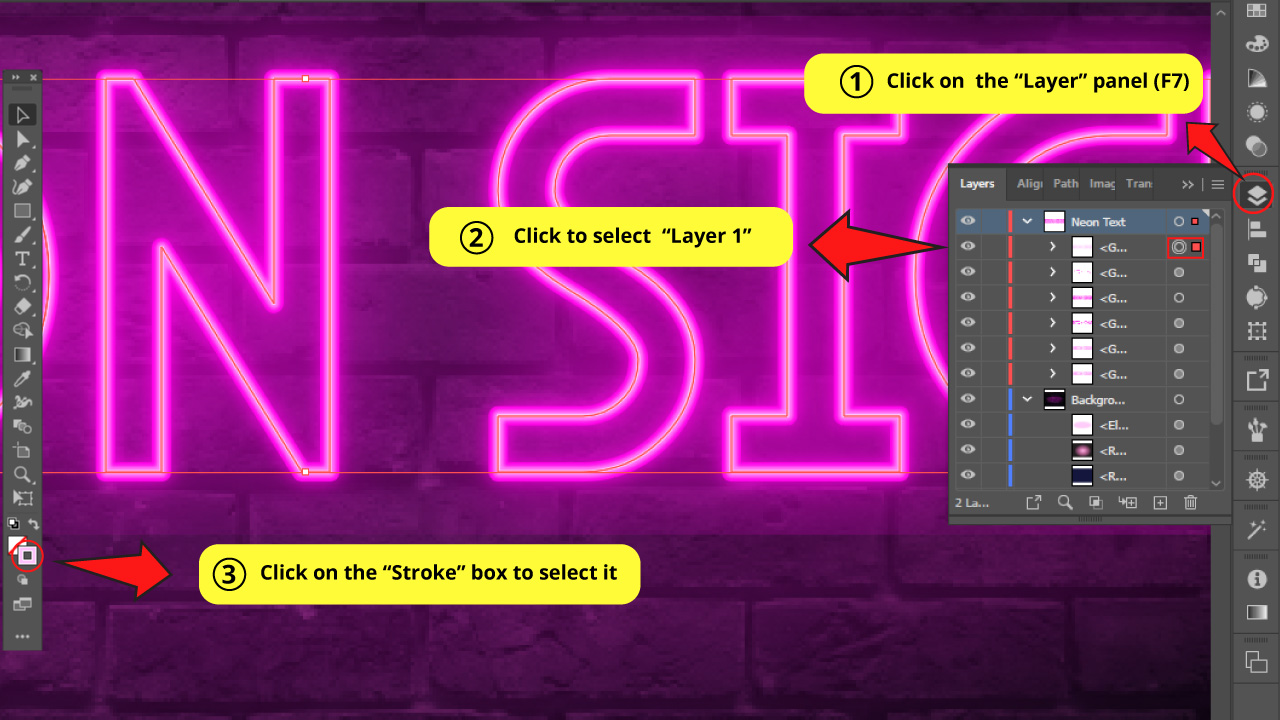
Select the whitish stroke line on the “Layer” panel. We previously named it “Layer 1”.
Then click on the stroke box on the left side toolbar.
Step 2: Gradient Color
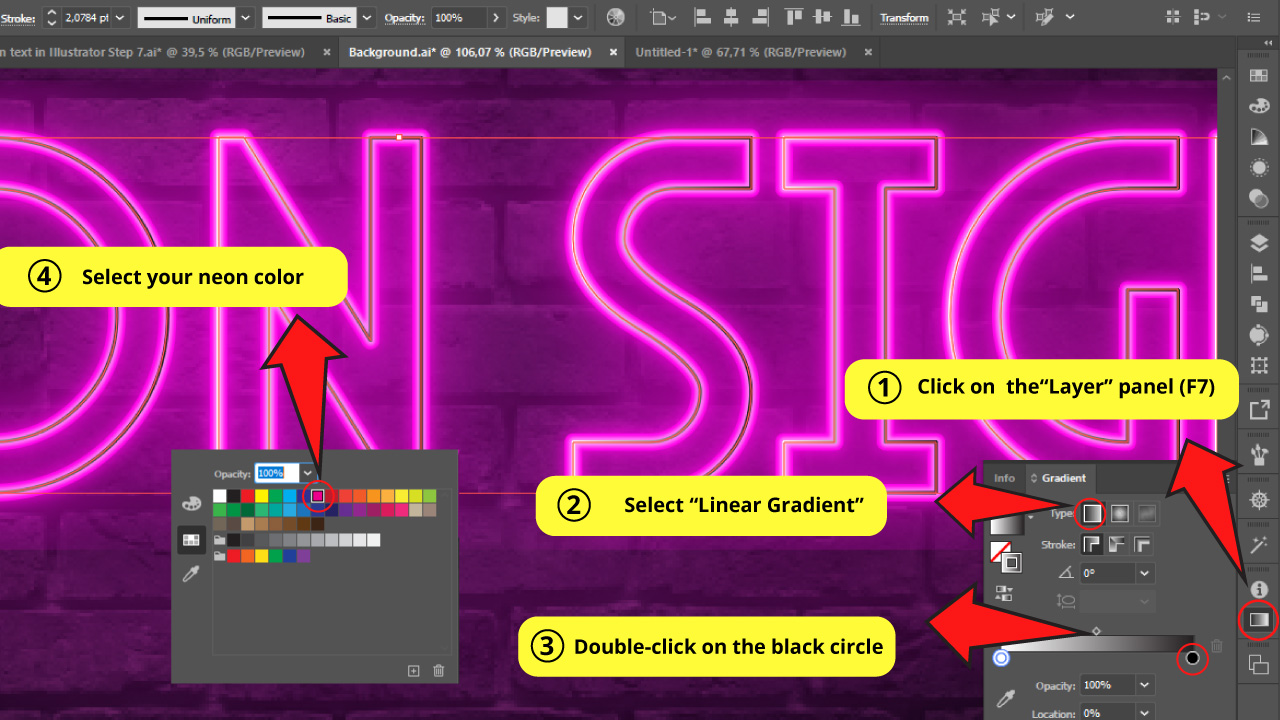
Go to the “Gradient” panel (Ctrl + F9) on the right side toolbar.
Select “Linear Gradient”.
Double-click on the default black color and change it to your neon color (pink in this specific case)
Step 3: Adding Color
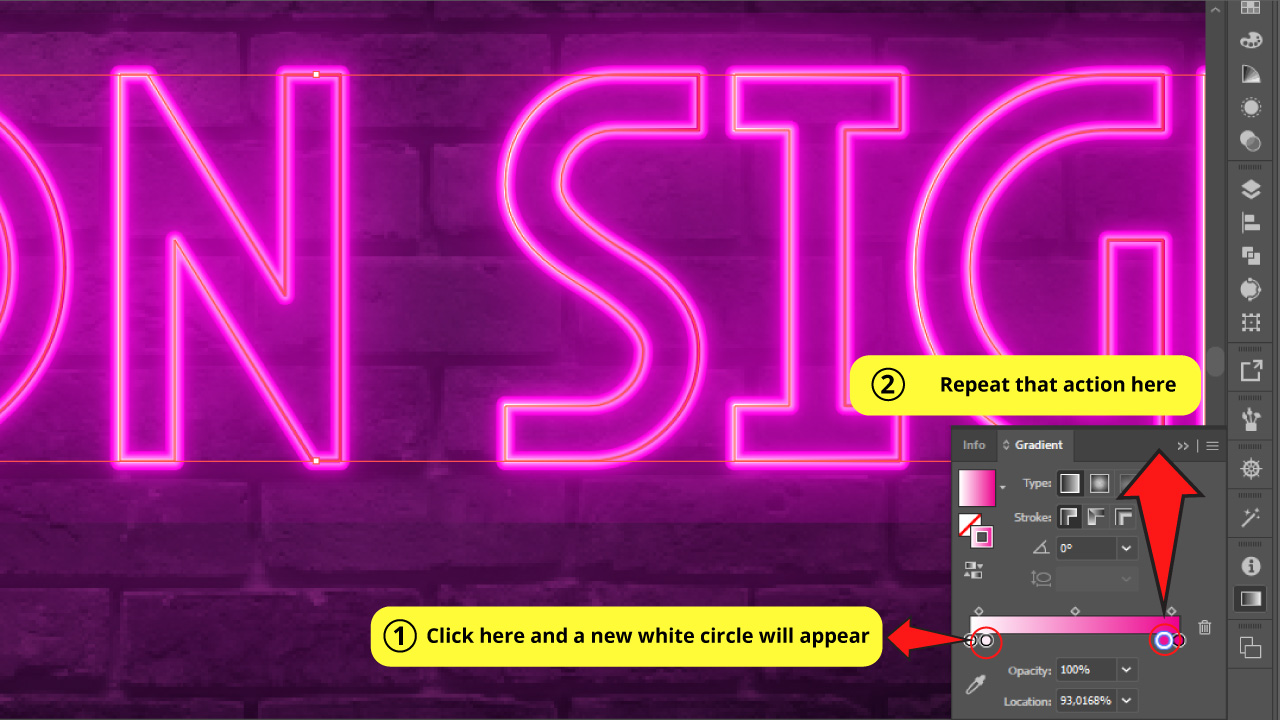
Click right next to the white circle and a new color circle will be displayed. This way you can add more colors to your gradient.
Do the same with a pink circle.
Now we have 4 color circles.
Step 4: Interleaved Colors
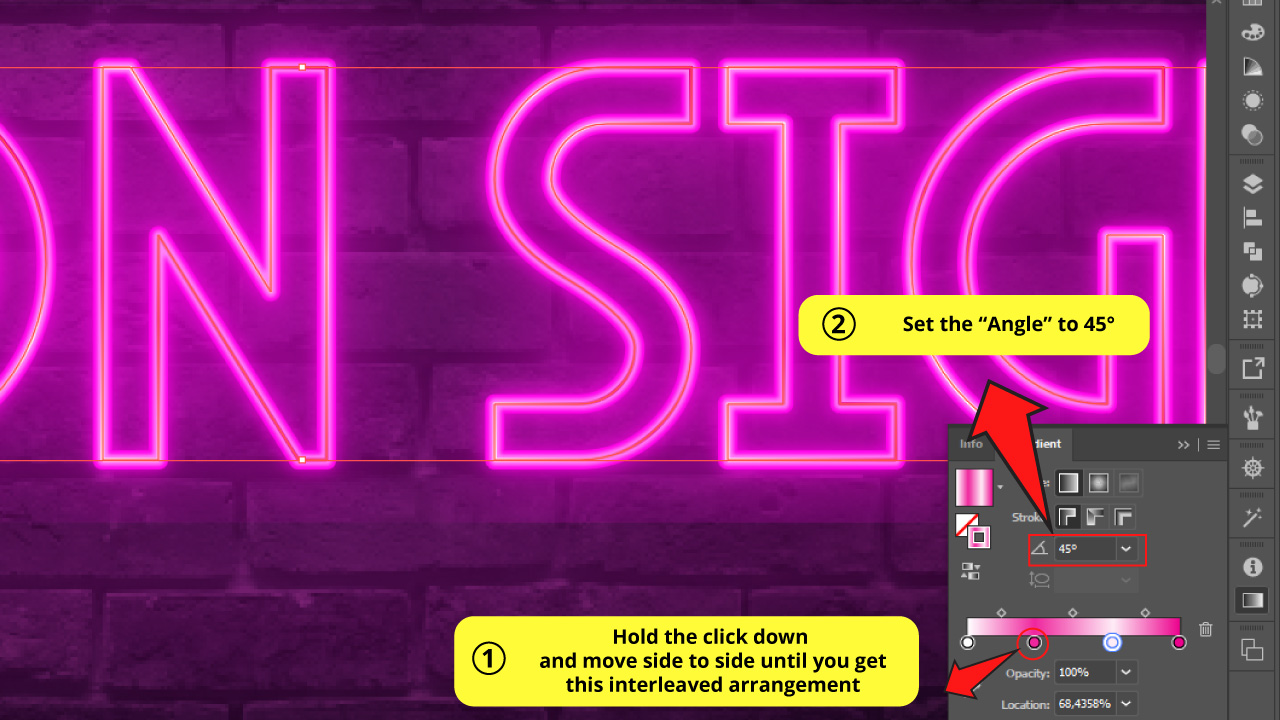
If you click & hold one of those circles, you can move it side to side. When you want to leave the circle in a specific place, release the click button to place it.
Use this technique to set the colors to be interleaved as white – color – white – color.
Then, set the “Angle” to 45°
Notice how the whitish light stops being homogeneous, and now it looks more realistic.
Step 5: Copy Layer

Go to the “Layers” panel that you can find on the right side menu or by simply pressing the “F7” shortcut.
Find the layer that we have called “Layer 4” at the beginning of this tutorial.
The “Layer 4” is the first layer with an outer glow. It has the most reduced radius of outer glow.
Once you have found it, select it by clicking on the right circle next to the layer’s name as we did before in “How to make neon text in Illustrator: Step-by-step guide” “Step 6: “Layers Panel.”
Select the layer and press “Ctrl + C” then “Ctrl + F” to copy and paste in front.
Step 6: Drag to Back
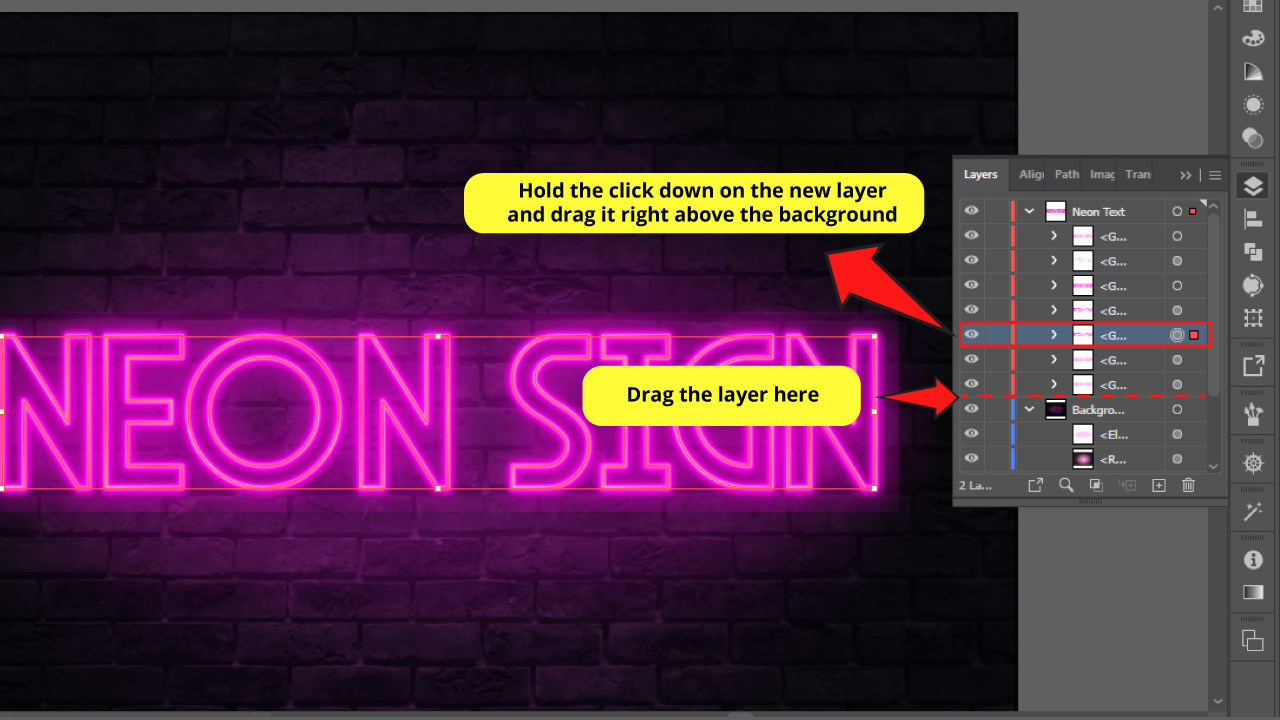
Select this new copy on the “Layers” panel and hold the click down as you drag it to the end of the layers list.
You need to place it in between “Layer 6” and the blurry oval that we created in the background guide. That means between the neon text and the background.
Step 7: Make a Drop Shadow

While the layer that we have just moved to the back is selected, change the color to black.
Then, while you hold the “Shift” key down, use the “Down” arrow key from your keyboard to move it slightly down and then “Right” to create a dropping shadow effect.
Step 8: The Final Result
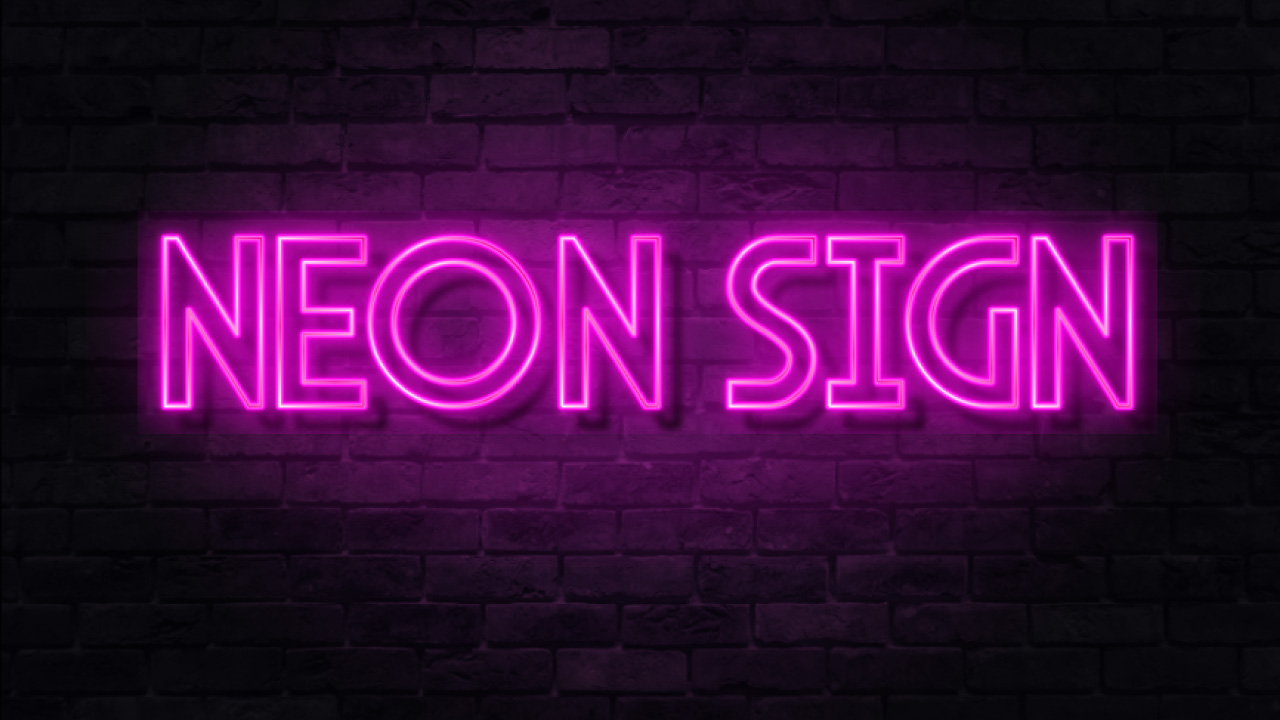
And here it is! You finally got your realistic neon text placed in the night atmosphere background.