When it comes to drawing a moon, there’s a wide range of styles to choose from, going from very minimalistic to very detailed ones.
In this tutorial we’ll be covering a generous portion of that range, and you will learn how to draw and master the three main features of the moon: the texture, the shadow and the glow.
We will also take some time to create a starry night background from scratch to build a special atmosphere according to the style of our moon, improving the general quality of our artwork considerably.
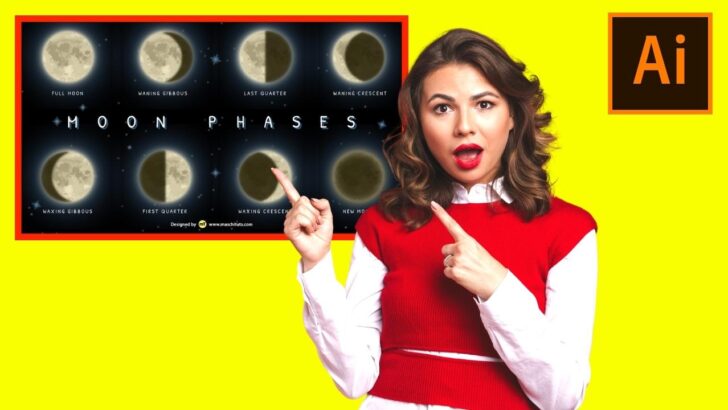
And as a special gift! At the end of this tutorial, you’ll find a moon phases vector pack completely free for you to download.
Now let’s get to work!
How to Draw a Moon in Illustrator
Draw a rectangle and add black and blue gradients. Draw a light yellow circle. Import a texture and vectorize it in black an white. Paint it to dark yellow and place it over the moon. Make a dark half moon shape as its shadow. Then make the moon glow with a transparent gradient from behind.
Step 1: Set the Document Color Mode
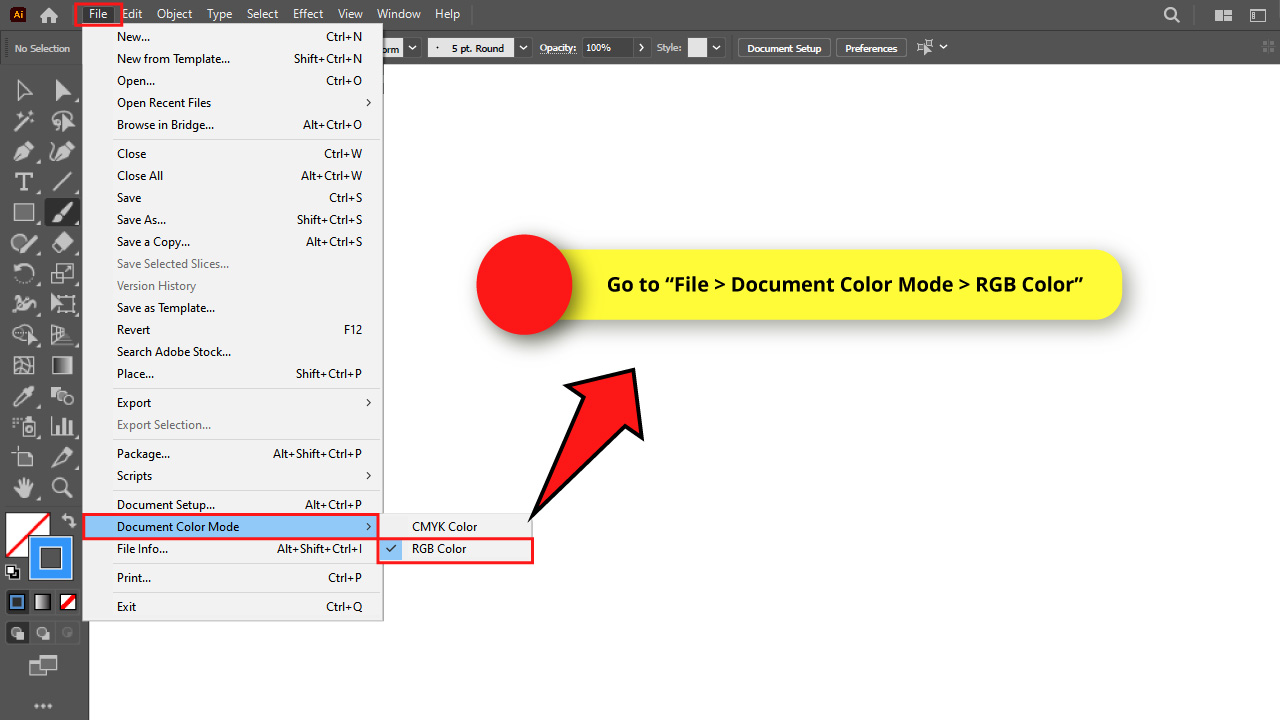
When creating a new document, make sure you select the proper “Color Mode”.
Select “RGB” color mode if your work will be shown only on screens.
Select “CMYK” color mode if your work will be printed, or both shown on screens and printed.
If you already started working on a document, but you want to change the color mode in the middle of the process, you can do it by going to “File > Document Color Mode” on the menu at the top of the screen.
I’ll set the RGB color mode for my drawing.
Step 2: Adjust the “Paintbrush Tool” Options
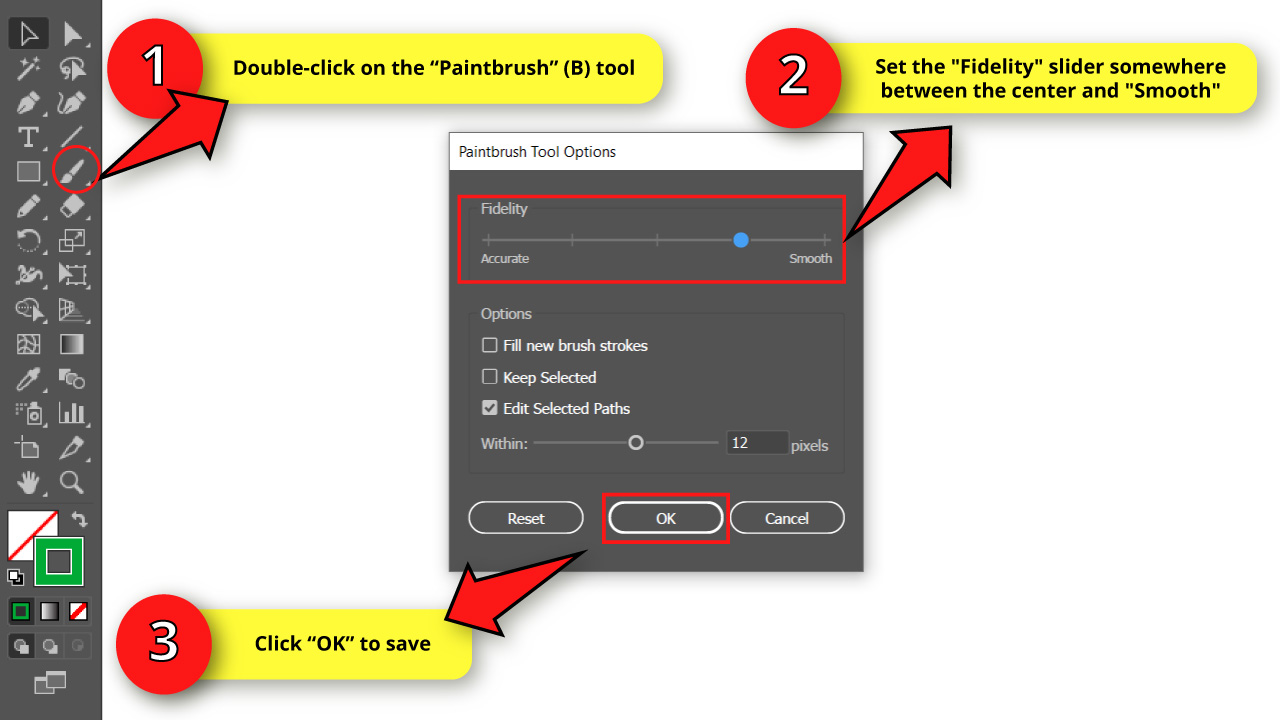
Double-click on the “Paintbrush” (B) tool on the left side toolbar to open the options window.
Set the “Fidelity” slider somewhere between the center and “Smooth”.
Then, click “OK” to save.
Step 3: Customize a Brush
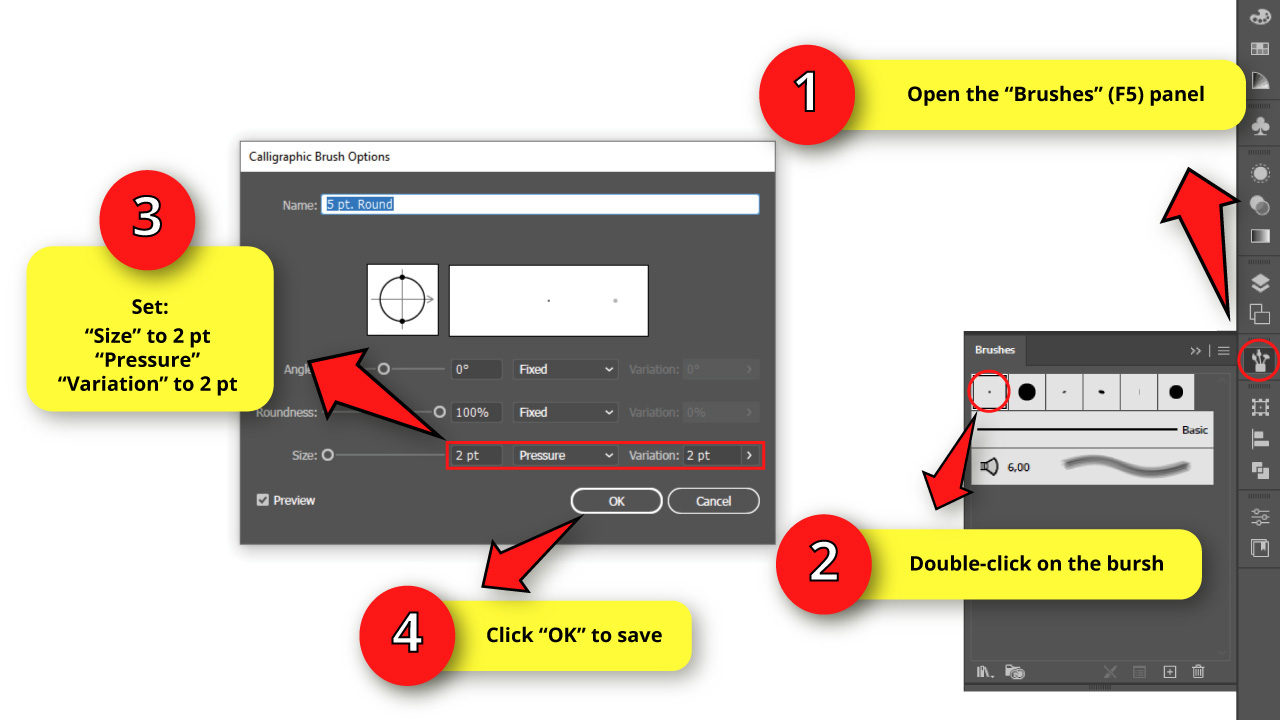
To make a brush in Illustrator, open the “Brushes” (F5) panel on the toolbar located on the right side of the screen.
If you can’t find it, you may have to enable it first by going to “Window > Brushes” on the menu at the top of the screen.
Double-click on the tiny round brush to open the “Calligraphic Brush Options” window.
Set the “Size” to 2 pt. Change the box setting to “Pressure”, and select 2 pt. for the “Variation” field.
This last adjustment allows us to make paths sensitive to the tablet pen pressure.
Once you’re done, click “OK” to save.
Keep in mind that you can change the brush size in Illustrator at any time during the drawing process.
Step 4: Make a Rectangle
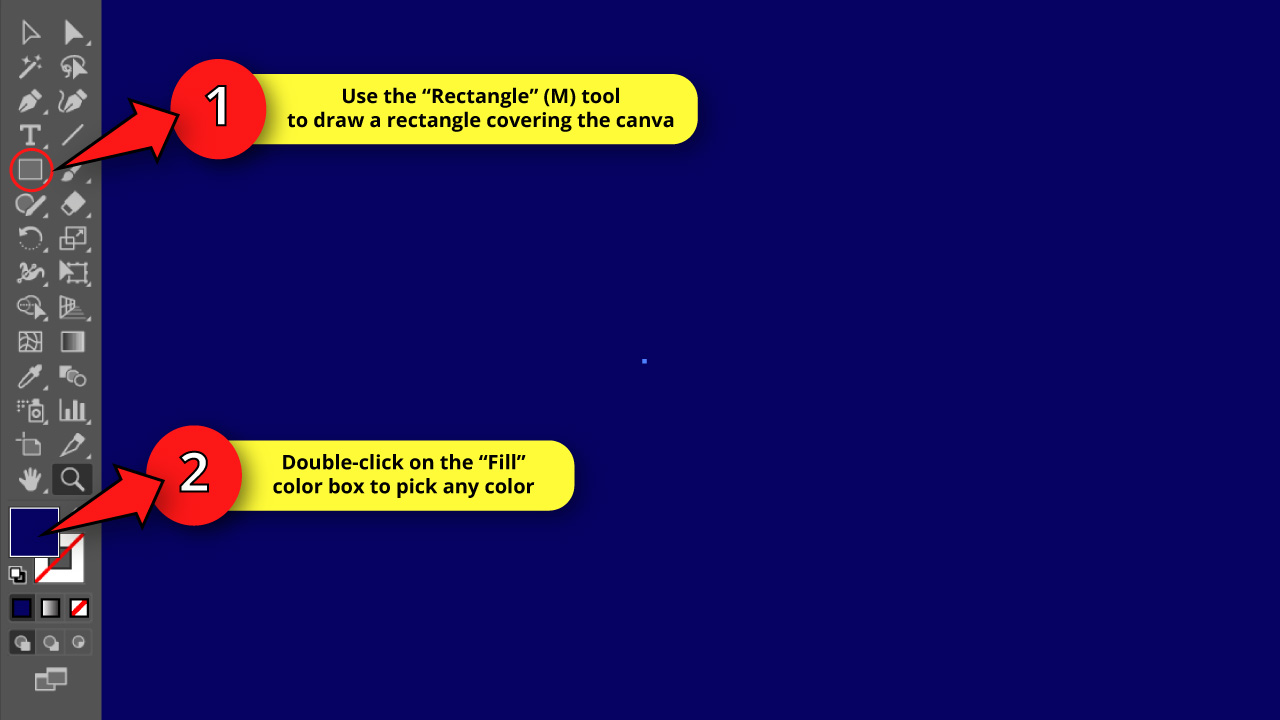
Select the “Rectangle” (M) tool to draw a rectangle covering the whole canva.
Then, double-click on the “Fill” color box, and pick any color.
Step 5: Add Gradient to the Rectangle
Now we need to use gradients in Illustrator. To use gradients, first select the rectangle with the “Selection” (V) tool, and then go to the “Gradient” (Ctrl + F9) panel, usually located on the right side toolbar.
If you can’t find it, you may have to enable it first by going to “Window > Gradient” on the menu at the top of the screen.
Or just press the “Ctrl + F9” command to shortcut it.
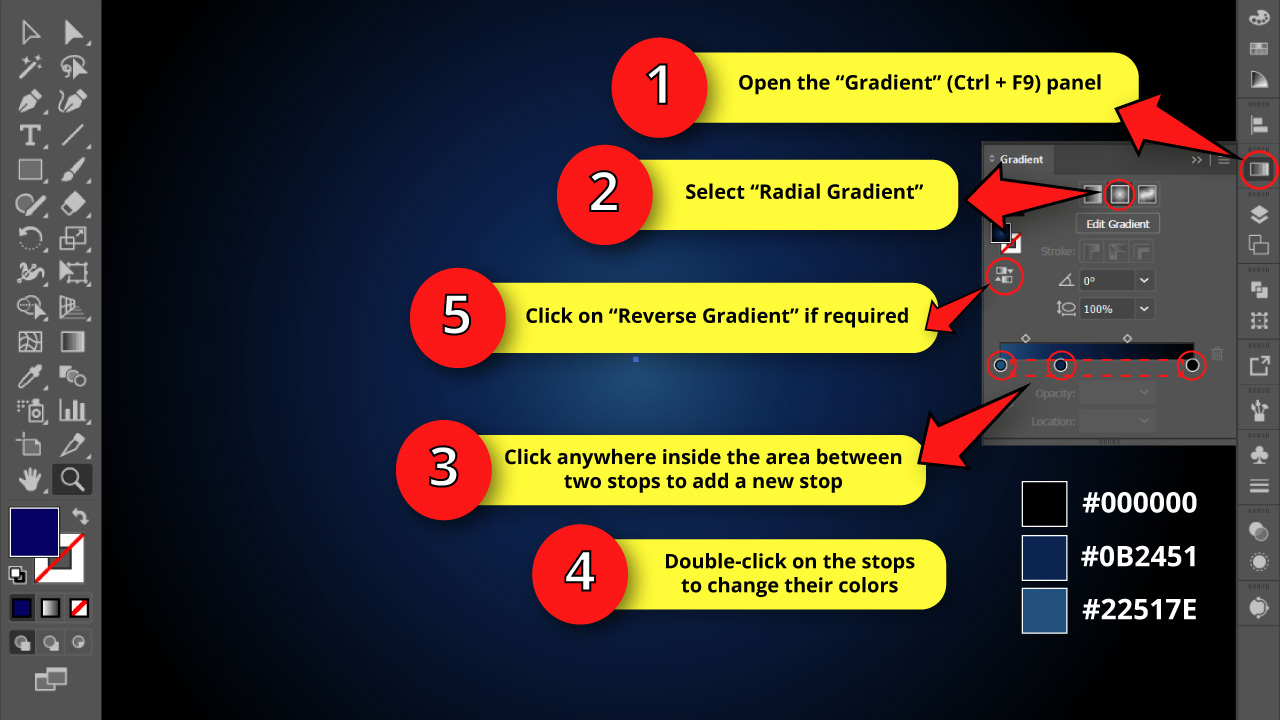
Once you’re on the “Gradient” (Ctrl + F9) panel, select “Radial Gradient”. We require an extra gradient shade, so we’ll add a new stop (the color circles) in the middle of the other two.
To add a new gradient stop, simply click anywhere inside the area between two stops.
Now we need to change their colors. Double-click on any stop to pick a color. For this example we’ll use a gradient varying from total black (#000000), passing through dark blue (#0B2451), and finishing on a lighter shade of blue (#22517E).
Make sure that the gradient is covering the edges of the canva with the total black color, and the center with the lighter shade of blue.
If your gradient is covering the canva the opposite way, click on the “Reverse Gradient” button, located on the left side of the “Gradient” (Ctrl + F9) panel.
It’s also very important that the distance between the lighter blue and the darker blue stops is shorter than the distance between the darker blue and the total black stops. That way we’ll reach the desired visual effect.
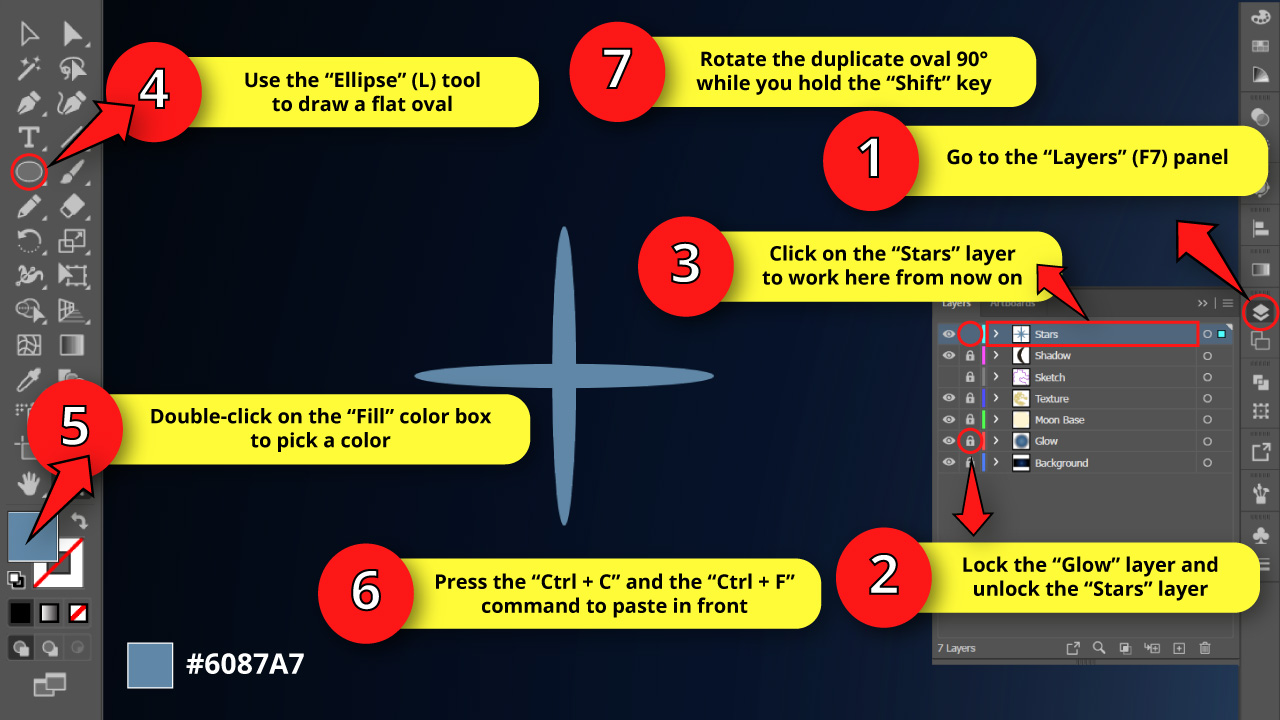
Step 6: Create New Layers
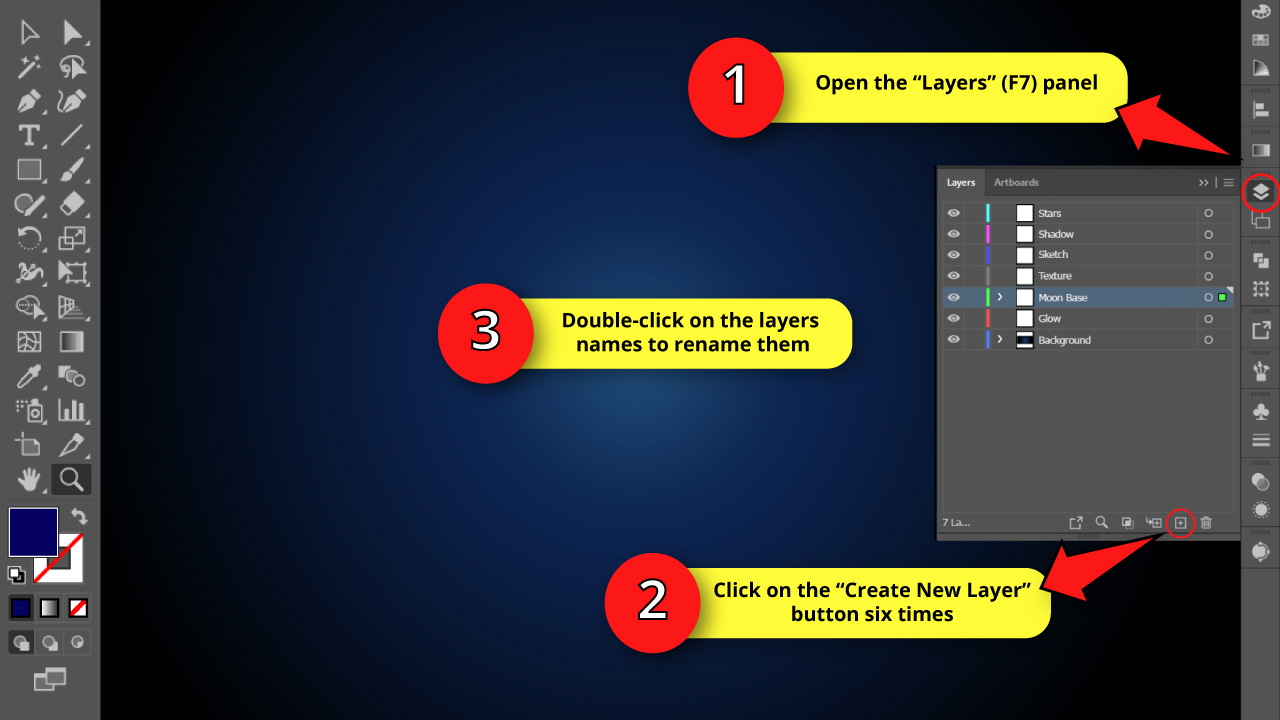
Go to the “Layers” (F7) panel located on the right side toolbar. If you can’t find it, you may have to enable it first by going to “Window > Layers” on the menu at the top of the screen.
Or press the “F7” command to shortcut it.
Once in the “Layers” (F7) panel, create six new layers by clicking six times on the “Create New Layer” button located at the bottom of the panel.
Now we need to rename the new layers by double-clicking on each layer name. Rename these new layers the same way you can appreciate in the reference image. This would be, in descending order:
“Stars”
“Shadow”
“Sketch”
“Texture”
“Moon Base”
“Glow”
Now, rename the original layer where we’ve been working on the previous steps to “Background”.
You can also change the layers color in Illustrator if it makes your work any easier.
Step 7: Draw a Circle
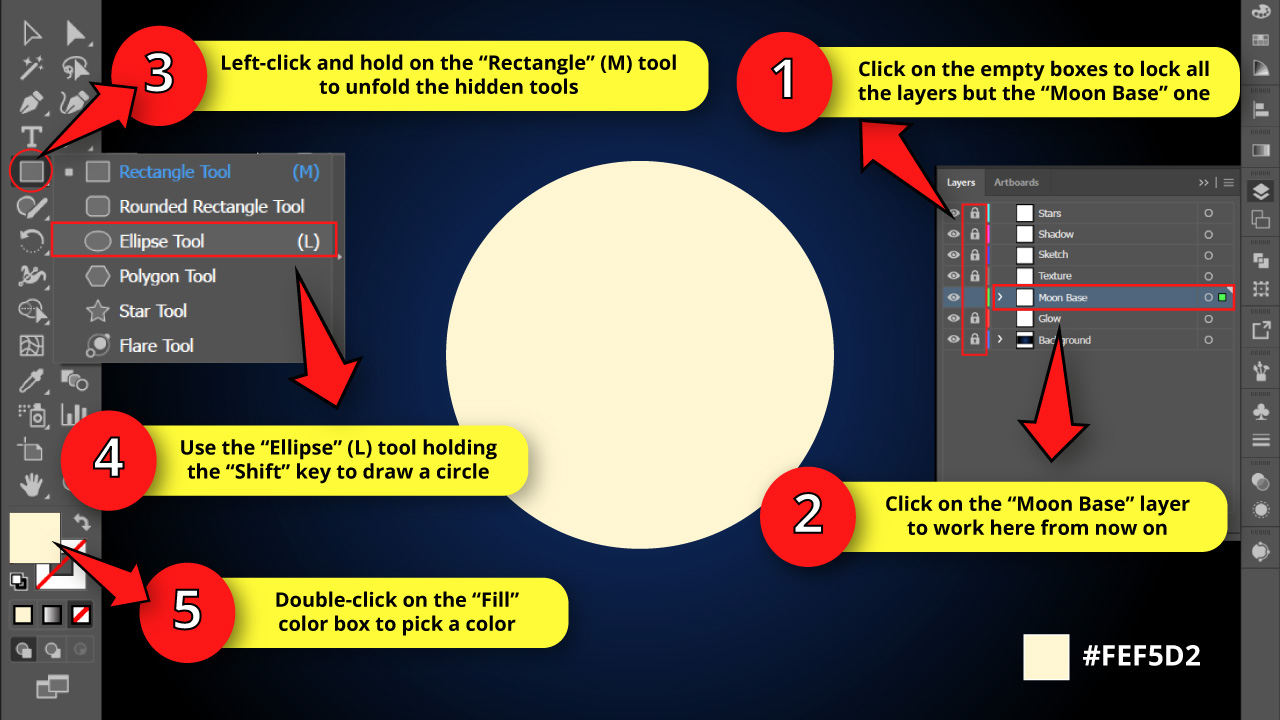
Now we need to lock layers. To lock a layer, you need to click on its empty box, next to the eye icon, on the “Layers” (F7) panel.
Once the box displays a lock icon, that means the layer is now locked and is no longer possible to select it, or modify it.
Lock all layers but the “Moon Base” one, and click on it to start working here from now on.
Next, select the “Ellipse” (L) tool hidden in the “Rectangle” (M) tool nest, on the left side toolbar.
To unfold the hidden tools, just left-click and hold on the “Rectangle” (M) tool, and then select the “Ellipse” (L) tool.
Once you select the “Ellipse” (L) tool, draw a circle holding the “Shift” key while you draw so you can maintain proportions and get a perfect circle.
Now, double-click on the “Fill” color box on the left side toolbar to pick a light yellow color as your moon base color.
I’m using the #FEF5D2 shade of yellow.
Step 8: Start with the Sketch
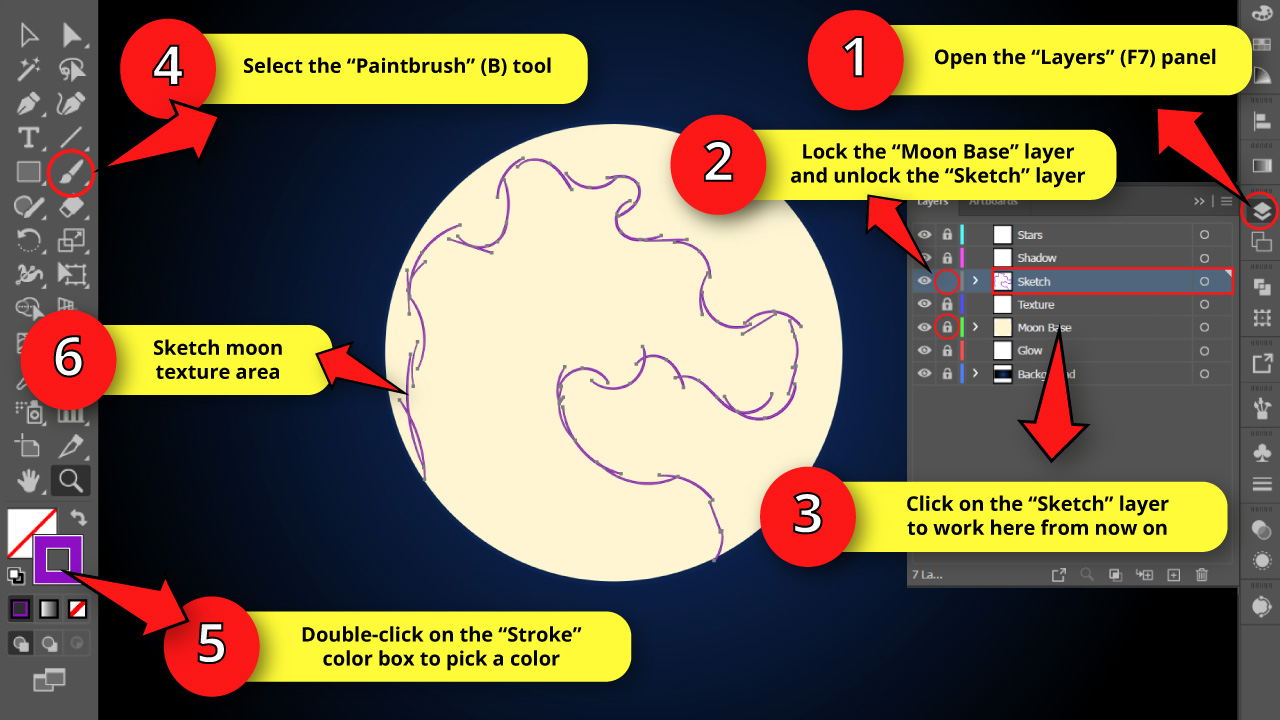
Go to the “Layers” (F7) panel. Lock the “Moon Base” layer. Unlock the “Sketch” layer and click on it to start working here from now on.
Next, select the “Paintbrush” (B) tool and double-click on the “Stroke” color box on the left side toolbar, and pick any color for the sketch. I’m using purple.
We’ll be tracing the area where the moon texture will be applied.
Now, for this sketch we need to be creative and try to focus most strokes on one of the sides of the moon. You can check some moon pictures and use them as reference.
I decided to use the left side as the main drawing area, and just worked on some minor details on the right side. Try your best to avoid being symmetrical. Give your moon some personality.
Step 9: Import a Texture
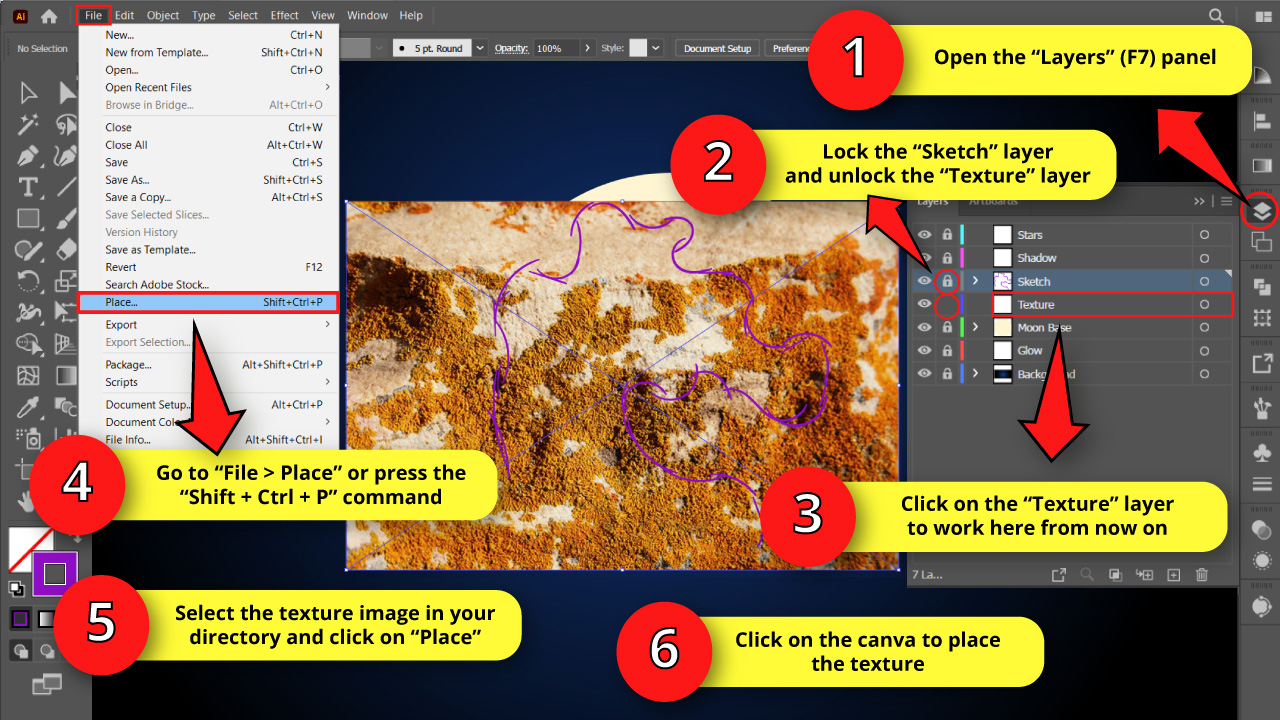
Go once again to the “Layers” (F7) panel and lock the “Sketch” layer.
Unlock the “Texture” layer, and click on it to work here from now on.
We need an image with a specific texture to import and make our moon look more realistic.
Textures that may work are irregular surfaces with big areas like watercolor, grunge, rust textures.
I’m using a picture of a rock half covered in moss as my texture.
Once you have your texture you need to import it.
To import your texture, go to “File > Place”, or press the “Shift + Ctrl + P” command to shortcut it.
Next, search for the image in your local files. Select it and click on the “Place” button.
Finally, click anywhere on the canva to complete the action.
Step 10: Vectorize your Texture

In this step we need to vectorize an image in Illustrator. To get it done, first select your texture with the “Selection” (V) tool, and then click on the “Image Trace” button on the toolbar at the top of the screen.
Your texture will be vectorized in black and white by default. However, we still need to customize it.
So, go to the “Image Trace” panel, usually located on the right side toolbar.
If you can’t find it, you may have to enable it first by going to “Window > Image Trace” on the menu at the top of the screen.
On the “Image Trace” panel, you need to drag the “Threshold” slider to the point the texture looks good enough for you.
The higher the value of the “Threshold” field, the more surface the black part of the texture will cover.
I need the white part of the texture to have a certain presence, so I’ll set my Threshold value to 173. Make sure you check this cautiously for your texture.
For the “Noise” field, drag the slider a little bit to the right side to get rid of unnecessary detail. The more to the right, the less detail you’ll get. I’ll set mine to 41 px.
The rest of the fields are not that important. You can leave all their values by default.
Step 11: Expand and Delete the Black Area
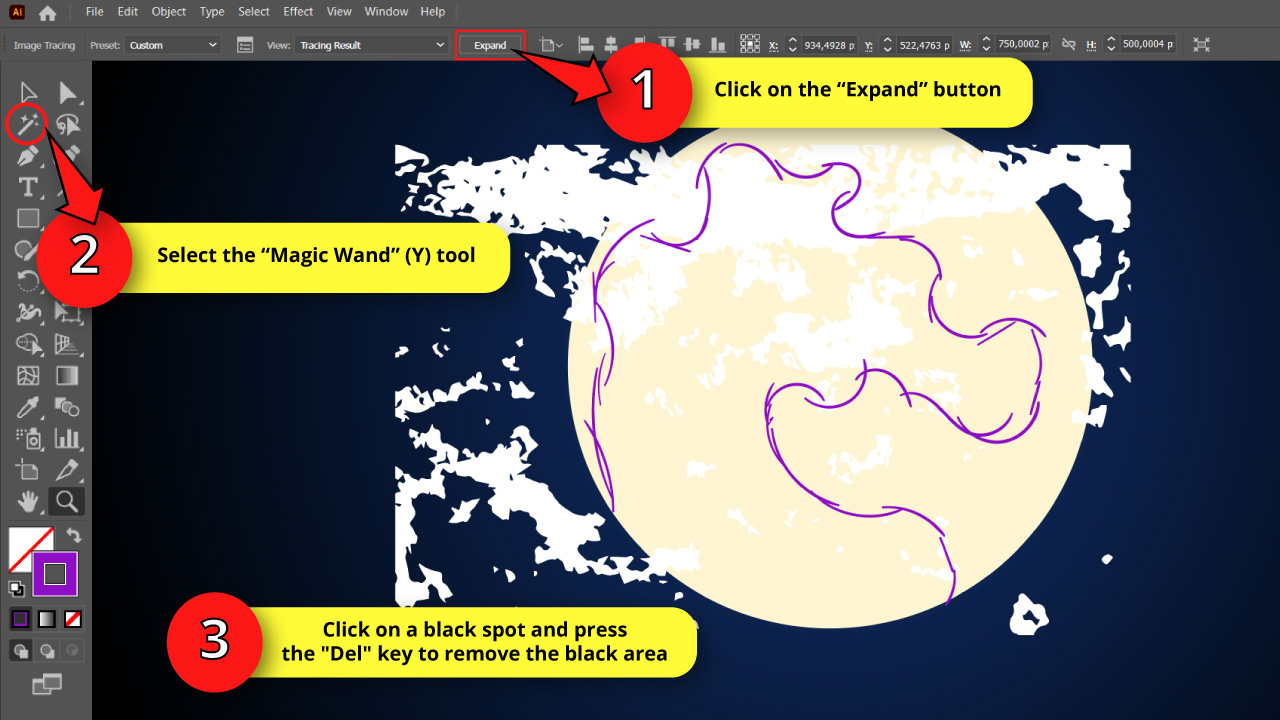
Select your texture with the “Selection” (V) tool, and then click on the “Expand” button on the menu at the top of the screen to convert the vectorized texture to an object, so we can manage and modify it.
Now, select the “Magic Wand” (Y) tool, located on the right side toolbar.
Click on a black spot to select all black areas, and press the “Del” key from your keyboard to remove them.
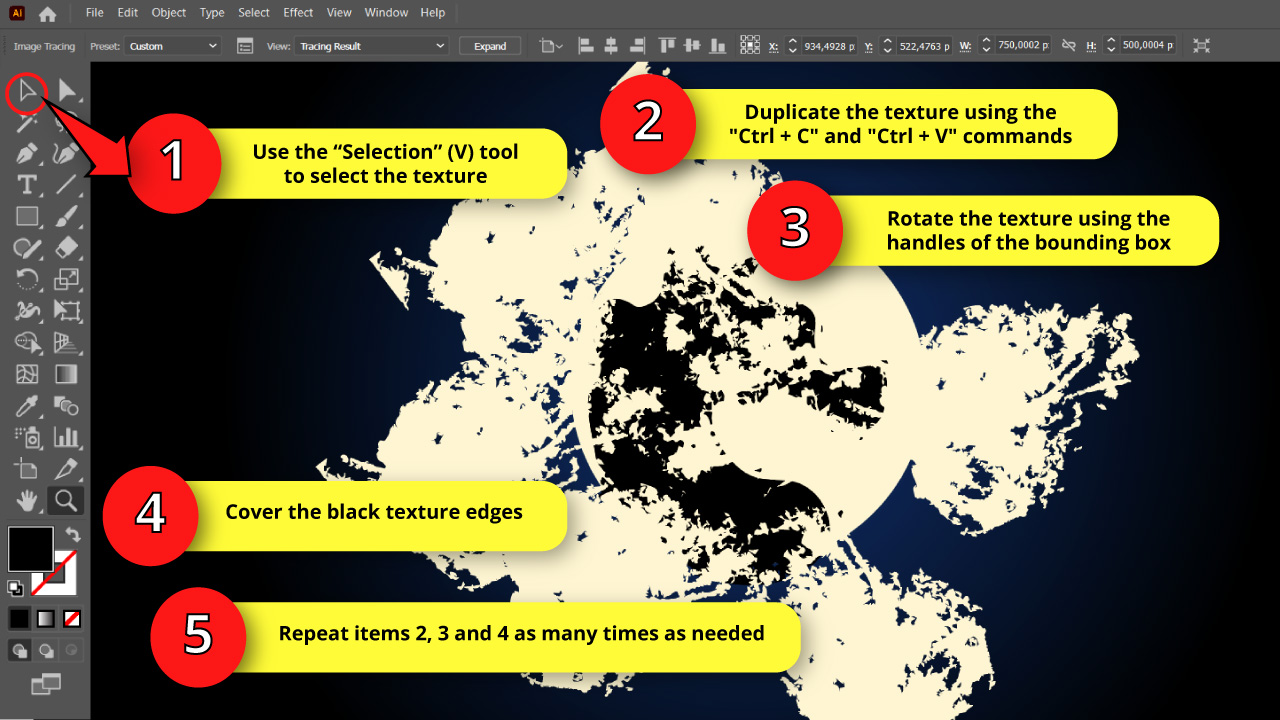
Step 12: Duplicate and Place your Texture
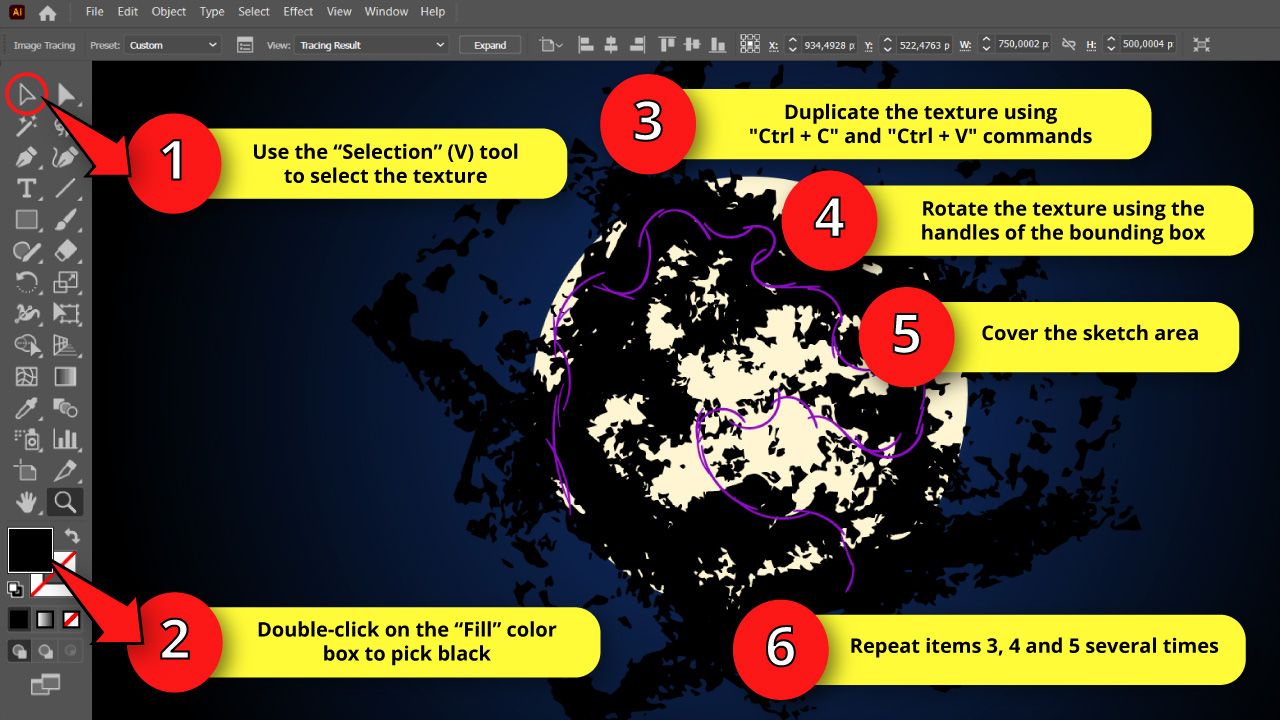
Select your texture with the “Selection” (V) tool, and then double-click on the “Fill” color box to change white color to black.
We’re doing this so we can get a better contrast with our moon, to understand and visualize better how our texture looks.
Copy and paste your texture several times using the “Ctrl + C” and “Ctrl + V” commands.
Then, rotate each copy covering the remaining areas of the sketch.
To rotate an object, you need to select it with the “Selection” (V) tool, and then use the bounding box handles.
Repeat this process as many times as you need until the covering is done. It took me three repetitions, getting four copies total.
Step 13 Get Rid of the Surplus Texture Areas
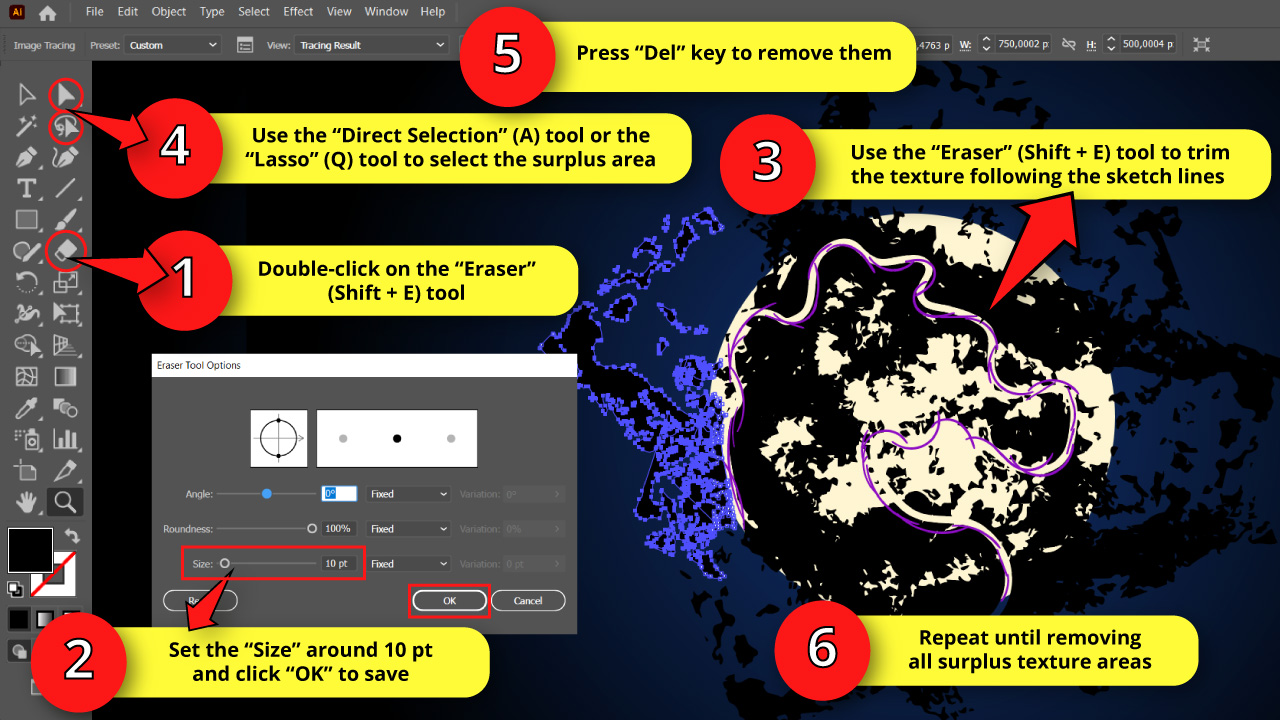
Double-click on the “Eraser” (Shift + E) tool, located on the left side toolbar, to open its options window.
On the “Eraser Tool Options” window, set the “Size” value to 10 pt or similar to make the size of the eraser bigger in Illustrator.
Then click on “OK” to save.
Next, use the “Eraser” (Shift + E) tool to trim the texture following the sketch lines, so we can divide the texture between the area we need to keep and the one we need to get rid of.
Once you have done this, use either the “Direct Selection” (A) tool, or the “Lasso” (Q) tool, both located on the left side toolbar, to select the surplus texture areas and delete them using the “Del” key from your keyboard.
Repeat this last process until you’re done.
You don’t need to be too precise in this step, you can leave some leftover texture spots surpassing the sketch lines. As a matter of fact, this could actually make your moon texture look more natural.
Step 14: Import Another Texture
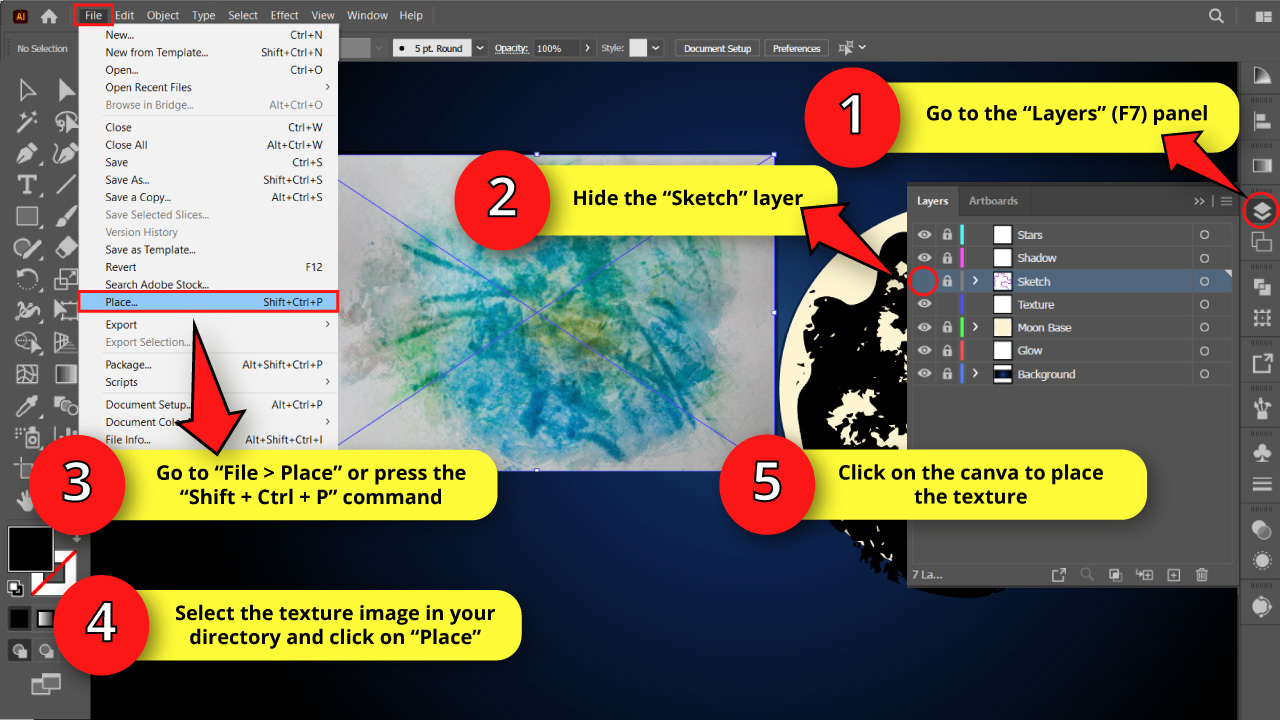
Go to the “Layers” (F7) panel and hide the “Sketch” layer by clicking on its eye icon.
We already have the moon texture, but it still looks kind of artificial even if we trimmed the texture edges with the “Eraser” (Shift + E) tool. We now need the texture edges to look more messy.
So, we have to import another texture. You could use the same texture again, but it’s highly recommendable to use a different one to get better results.
For this occasion, you can use a stain or watercolor texture. I’ll use a watercolor texture.
To import the new texture, repeat the same procedure from “Step 9”. Go to “File > Place” or press the “Shift + Ctrl + P” command to shortcut it.
Next, search for the image in your local files. Select it and click on the “Place” button.
Finally, click anywhere on the canva to complete the action.
Step 15: Vectorize the Texture
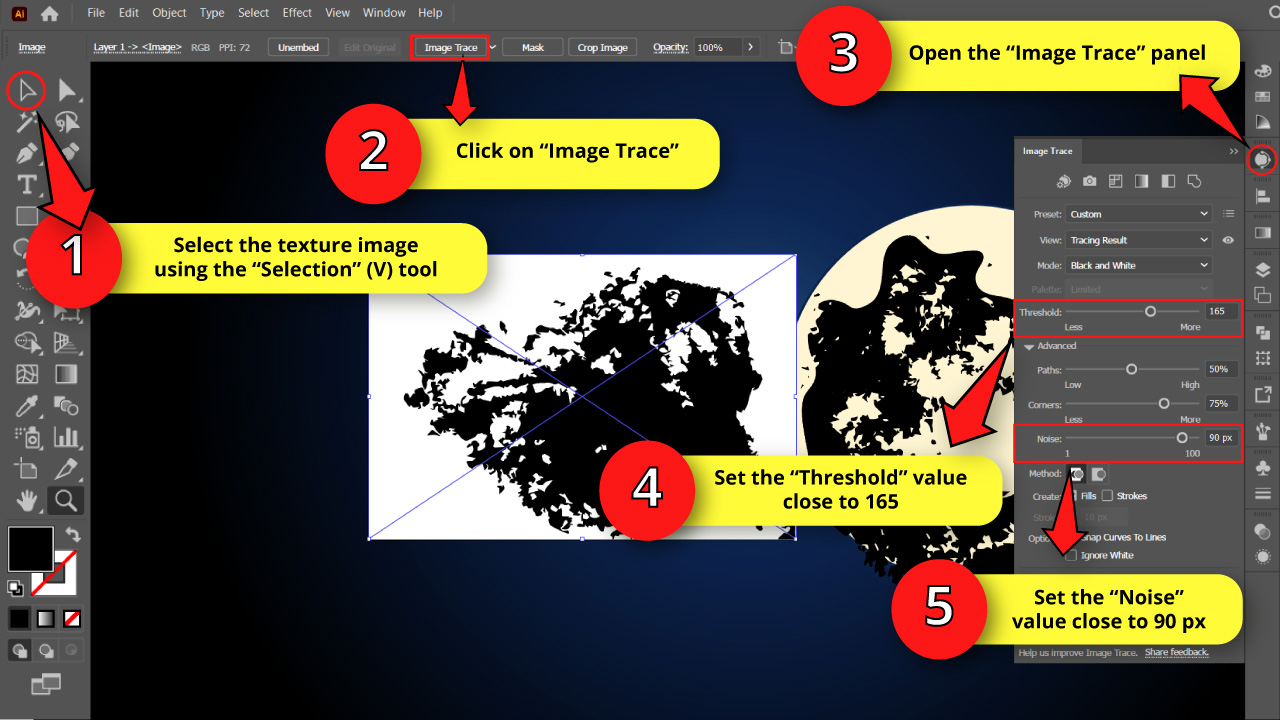
We need to vectorize the texture, the same way we did with the previous one.
Select the imported texture with the “Selection” (V) tool, and then use image trace in Illustrator by clicking on the “Image Trace” button on the toolbar at the top of the screen.
Next, go to the “Image Trace” panel on the right side toolbar and set the “Threshold” field to a value that makes your texture look good for you. I’ll set mine to 165 this time.
For the “Noise” field, we don’t need too many details this time, so I’ll set mine to 90 px.
The settings could obviously vary according to your texture image. Run as many tests as necessary.
Step 16: Expand and Change Texture Color
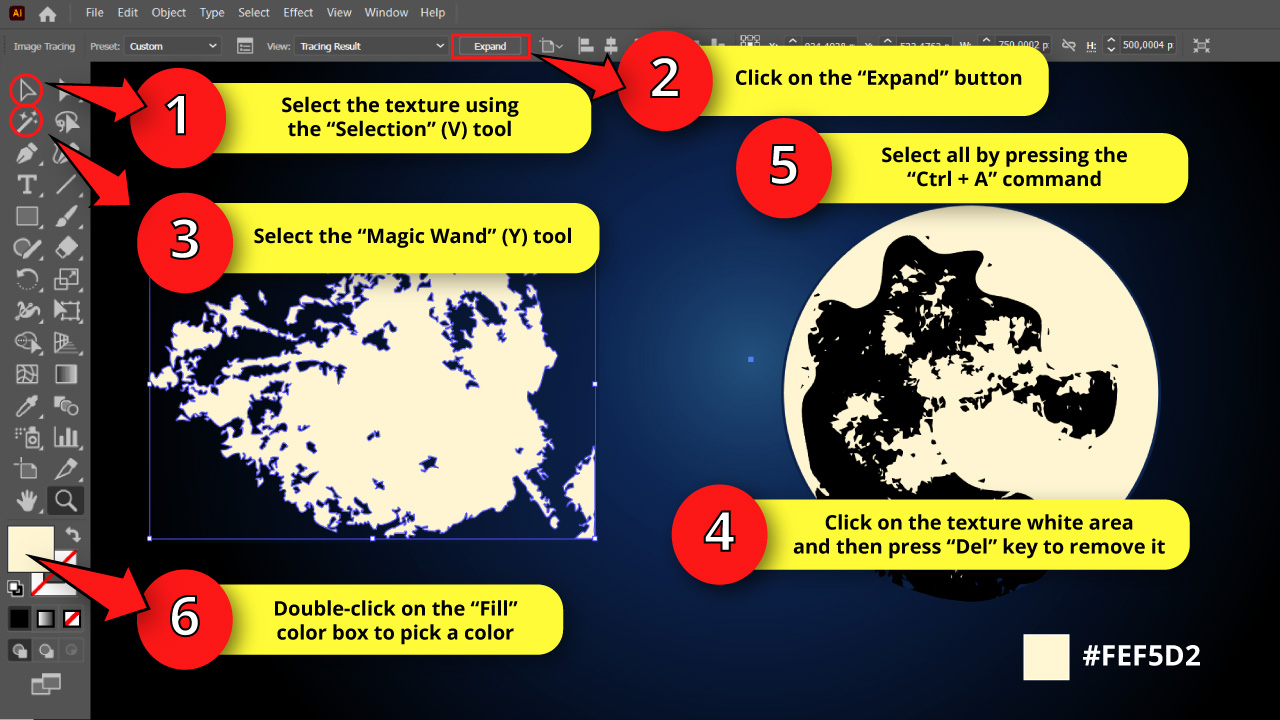
With the new texture selected with the “Selection” (V) tool, click on the “Expand” button on the menu at the top of the screen.
Then select the “Magic Wand” (Y) tool, and click on the texture white area to select all white objects.
Click on the “Del” key from your keyboard to delete them.
Next, select the vectorized texture with the “Selection” (V) tool again, and then double-click on the “Fill” color box to pick the same color of the moon (#FEF5D2).
We are doing this to preview how it would look when we overlap both textures, since the new texture will crop the black one.
Step 17: Duplicate and Rotate the Texture
Select the texture with the “Selection” (V) tool.
Duplicate the texture several times using the “Ctrl + C” and” Ctrl + V” commands.
Then, rotate the copies using their bounding box handles to avoid repetitive patterns.
Finally, place them around the black texture to get a more messy, better looking edge.
Step 18: Get Rid of the Surplus Texture Areas
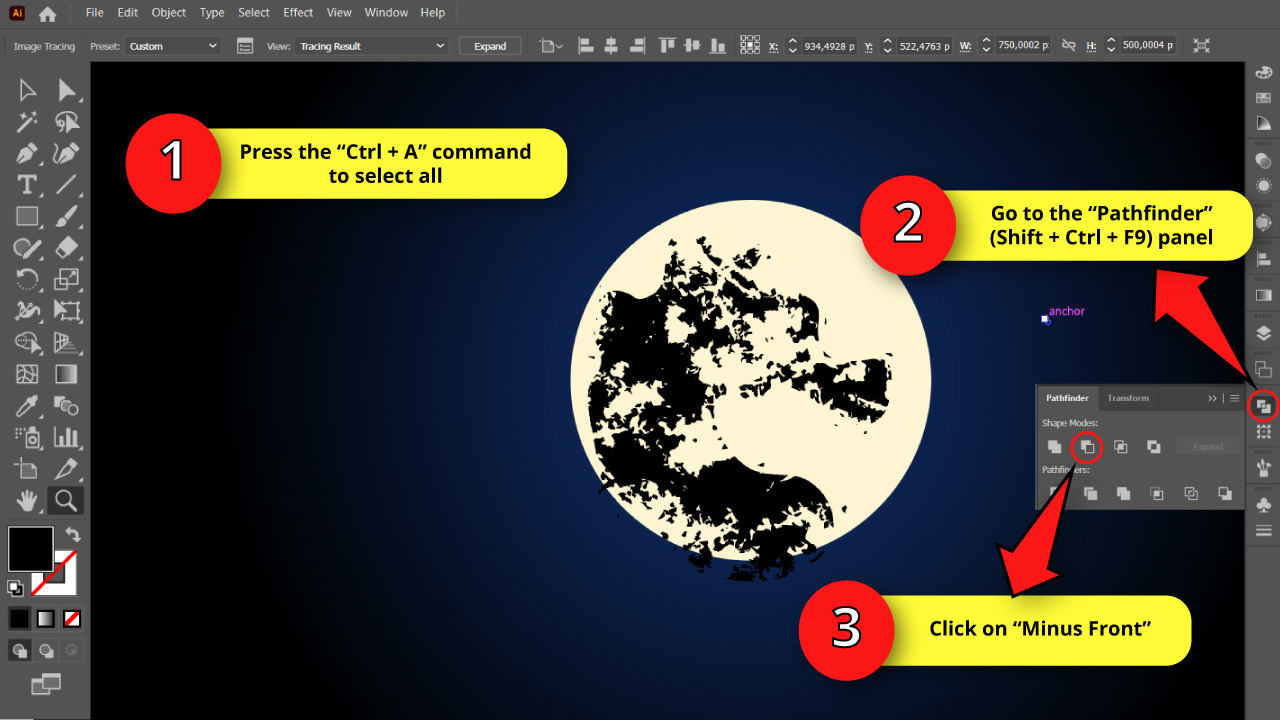
Now we need to combine shapes in Illustrator, to get this done, first select all the textures using the “Ctrl + A” command.
Then go to the “Pathfinder” (Shift + Ctrl + F9) panel, usually located on the right side toolbar.
If you can’t find it, you may have to enable it first by going to “Windows > Pathfinder” on the menu at the top of the screen.
Or you can just press the “Shift + Ctrl + F9” command to shortcut it.
Once you are on the “Pathfinder” (Shift + Ctrl + F9) panel, click on the “Minus Front” button to crop the textures in such a way that the objects below remain, while the ones above get deleted.
Step 19: Duplicate the Moon Circle
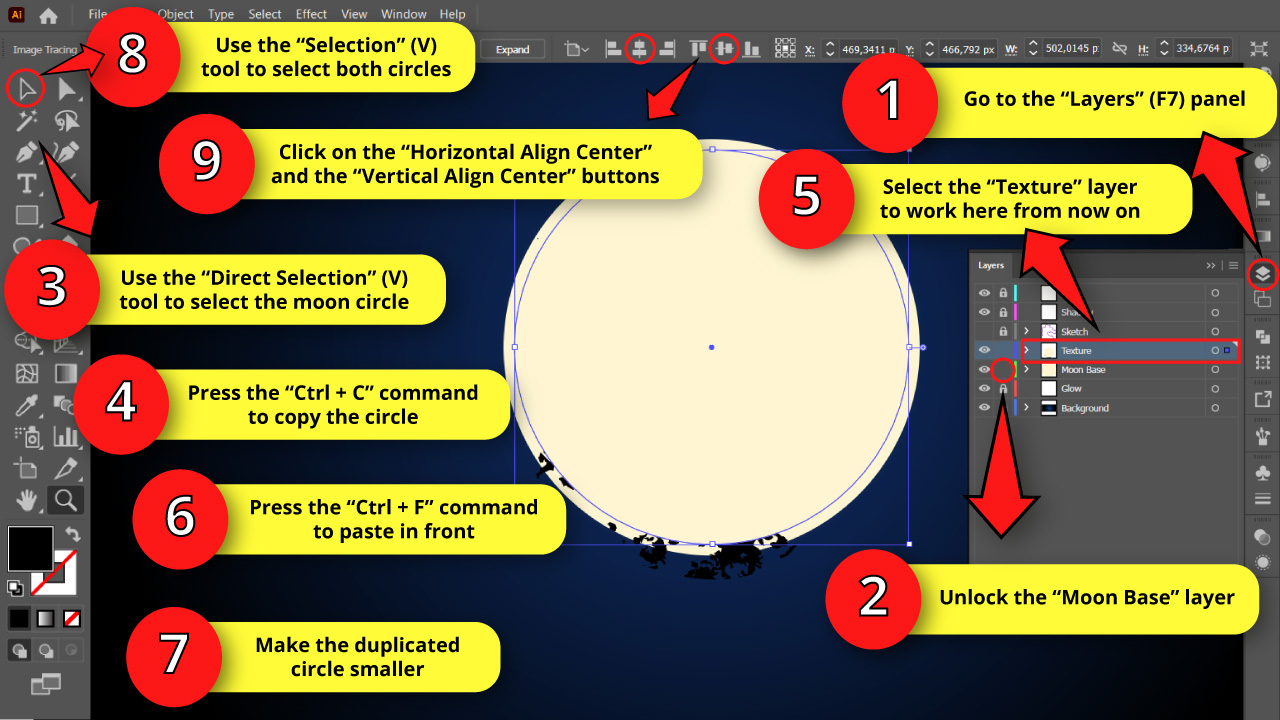
Go back to the “Layers” (F7) panel and unlock the “Moon Base” layer.
Then use the “Selection” (V) tool to select the moon circle, and press the “Ctrl + C” command to copy it.
Next, click on the “Texture” layer to work there, and press the “Ctrl + F” command to paste in front.
A duplicated moon will be placed right over the texture.
Now, resize the duplicated circle making it slightly smaller by using the handles of the bounding box while you hold the “Shift” key to maintain proportions.
Finally, we need to center both circles, first select them using the “Selection” (V) tool, or using the “Ctrl + A” command.
Then go to the “Align” (Shift + F7) panel, which automatically appears on the toolbar at the top of the screen when you select two or more objects.
If the panel is not showing up, you can press the “Shift + F7” command, or search the panel on “Window > Align” on the menu at the top of the screen.
Once you are on the “Align” (Shift + F7) panel, click on “Horizontal Align Center” and “Vertical Align Center” buttons to center objects in Illustrator.
Step 20: Apply Clipping Mask to the Texture
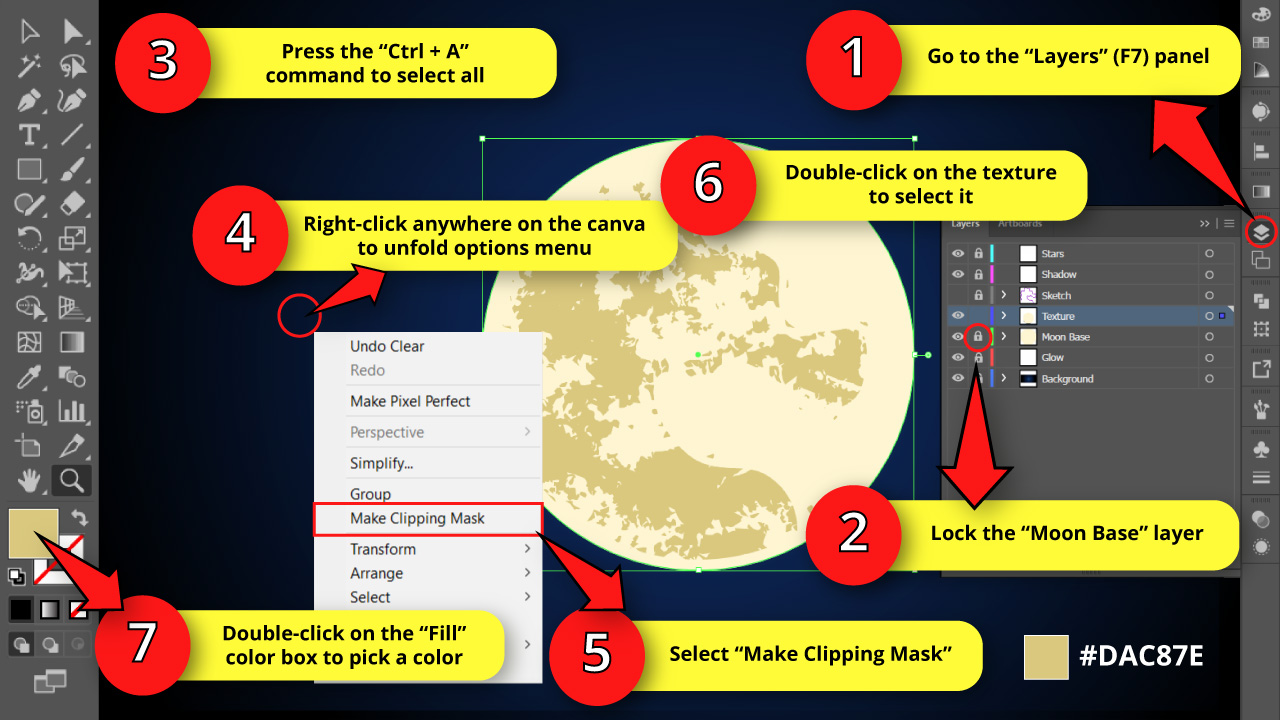
Go to the “Layers” (F7) panel once again, and lock the “Moon Base” layer.
We need to make a Clipping Mask in Illustrator. To get this done, press the “Ctrl + A” command to select all the objects. Right-click anywhere on the canva to open the “Options Menu”, and then select the “Clipping Mask” option.
We are doing this in order to mask the texture area in a smaller circle to avoid the texture reaching the edges. This way the texture looks neater and better.
Finally, double-click on the texture to select it (we need to double-click now, and not only a single click, since we just made a clipping mask).
Then double-click on the “Fill” color box to pick a darker shade of the same color of the moon.
I’m using #DAC87E.
Step 21: Draw a Half Moon Shape
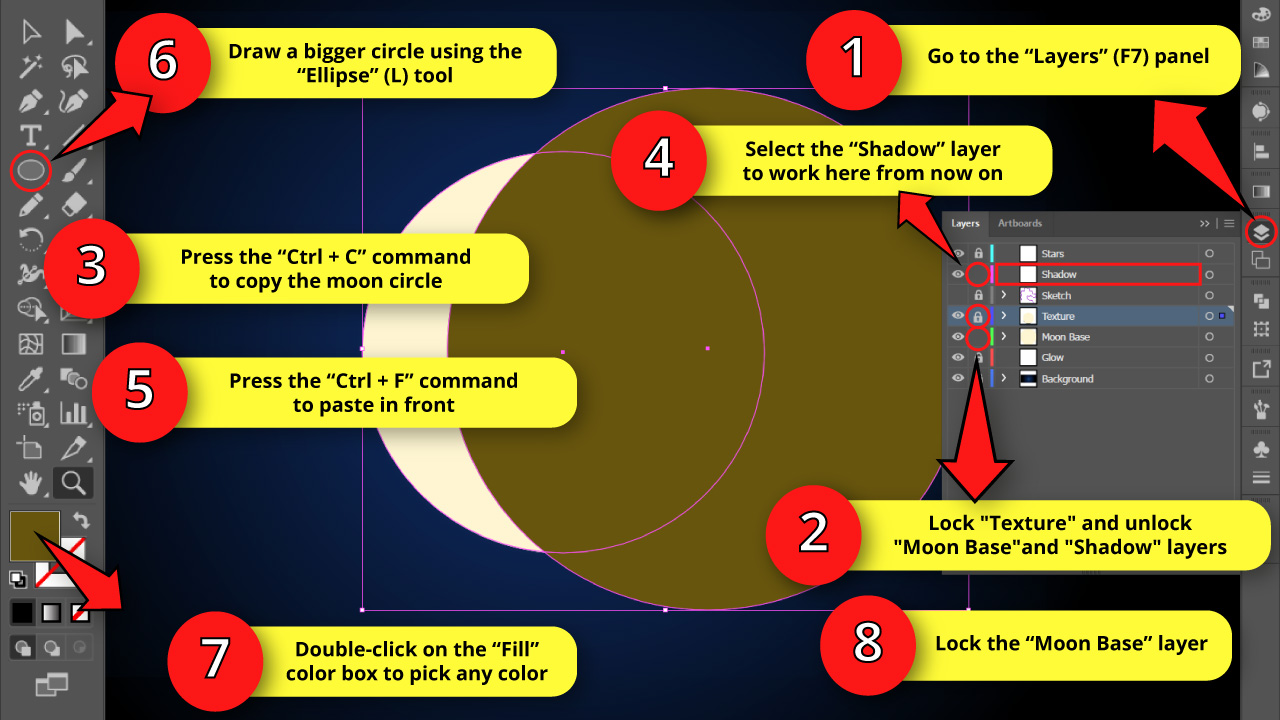
Go to the “Layers” (F7) panel to lock the “Texture” layer and unlock the “Moon Base” and “Shadow” layers.
Next, use the “Selection” (V) tool to select the moon circle. Then make a copy of it using the “Ctrl + C” command.
Go to the “Layers” (F7) panel again, and click on the “Shadow” layer to work there, and press the “Ctrl + F” command to paste in front. Now the duplicated circle is on the “Shadow” layer.
Now use the “Ellipse” (L) tool to draw a bigger circle, and then double-click on the “Fill” color box to pick any other color than the one we’re using for the moon.
Place the bigger circle over the moon leaving an uncovered area to get a half moon shape.
Finally, lock the “Moon Base” layer again.
Step 22: Make the Moon Shadow
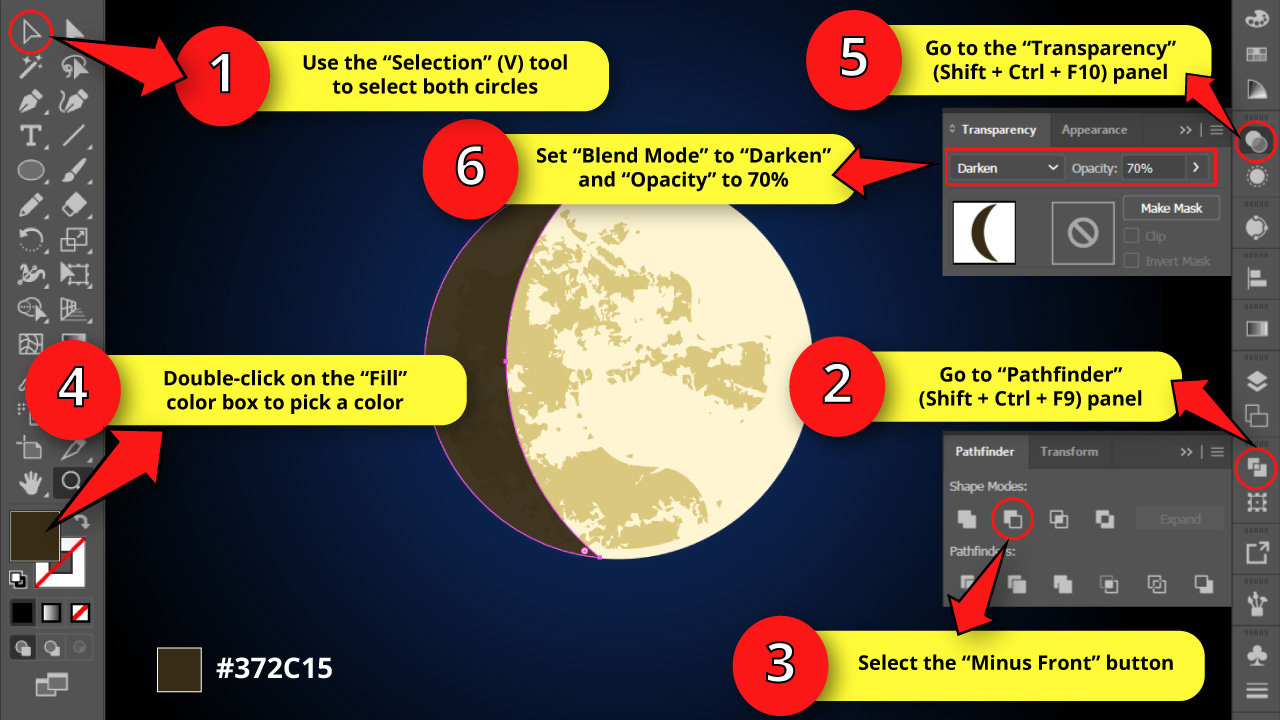
Use the “Selection” (V) tool to select both circles.
Then go to the “Pathfinder” (Shift + Ctrl + F9) panel and select the “Minus Front” button. Once you are done, the half moon shape will be cropped.
Now, we need to paint the moon shadow. So double-click on the “Fill” color box to pick a dark brown. I’ll use the #372C15 shade of brown.
Next, go to the “Transparency” (Shift + Ctrl + F10) panel, usually located on the right side toolbar.
If you can’t find it, you may have to enable it first by going to “Window > Transparency” on the menu at the top of the screen. Or pressing the “Shift + Ctrl + F10” command.
Once you are on the “Transparency” (Shift + Ctrl + F10) panel, set the “Blending Mode” field to “Darken”, and the “Transparency” to 70%.
Step 23: Draw a Big Circle
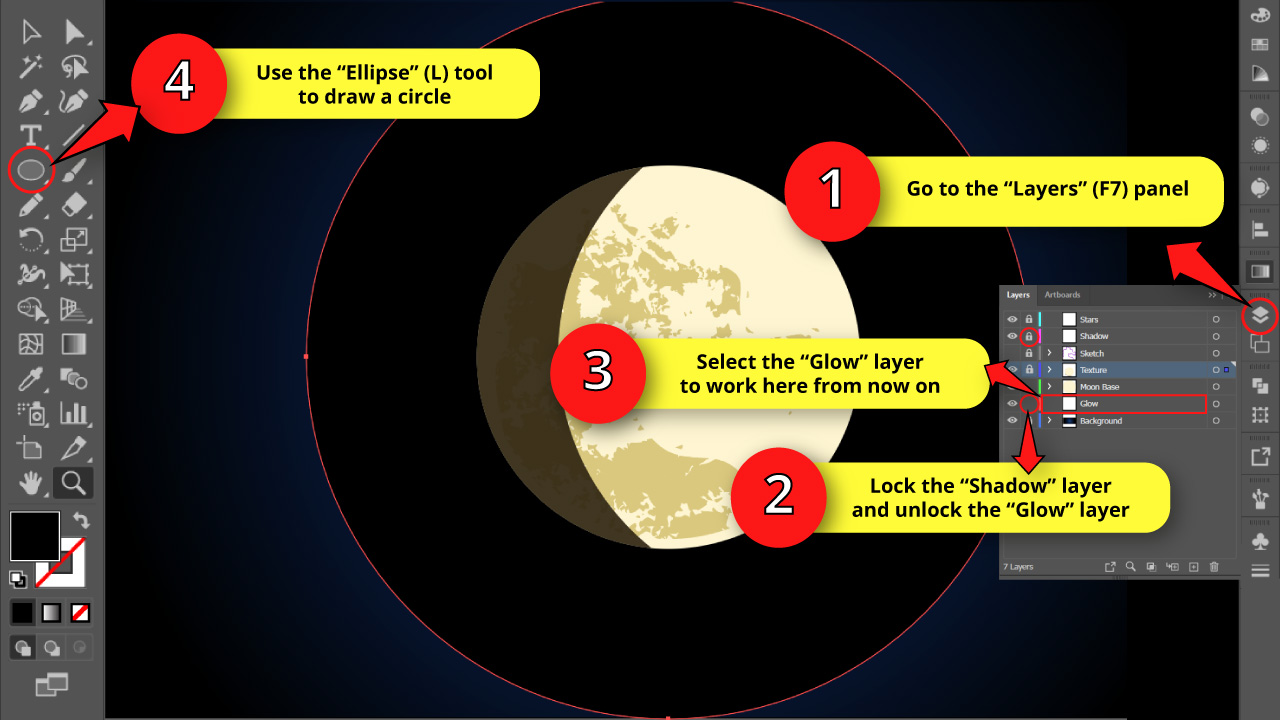
Go to the “Layers” (F7) panel and lock the “Shadow” layer.
Then unlock the “Glow” layer, and click on it to work here from now on.
Draw a big circle using the “Ellipse” (L) tool. Remember to hold the “Shift” key while you use the “Ellipse” (L) tool to get a perfect circle.
Step 24: Add a Gradient to the Circle

Make sure that the circle is still selected with the “Selection” (V) tool, and then go to the “Gradient” (Ctrl + F9) panel. Once there, click on the “Radial Gradient” button.
The applied gradient should be the same you used last time. That would be the background gradient, which has 3 gradient stops (color circles).
If this is not the case, make sure your gradient has 3 stops.
To add a new stop, click on the area between the stops. To delete a stop, click on it and then click on the “Delete Stop” button.
Double-click on the stops to change its colors. Set a very light shade of blue for the first circle (the one on the left), and a little darker blue for the second one (the one in the middle).
I’ll use the #5E89A7 and #375D85 shades of light blue.
For the third circle, just click on it and set the “Opacity” to 0%. The color doesn’t matter since it will be transparent.
Now, we need that the gradient goes from light blue at the center of the circle, to transparent at the edges.
If your gradient displays the opposite way, click on the “Reverse Gradient” button to invert it.
Finally, set the distance between the two light blue stops to be considerably longer than the distance between the middle and the transparent stop.
Step 25: Duplicate Moon Glow and Change its Color
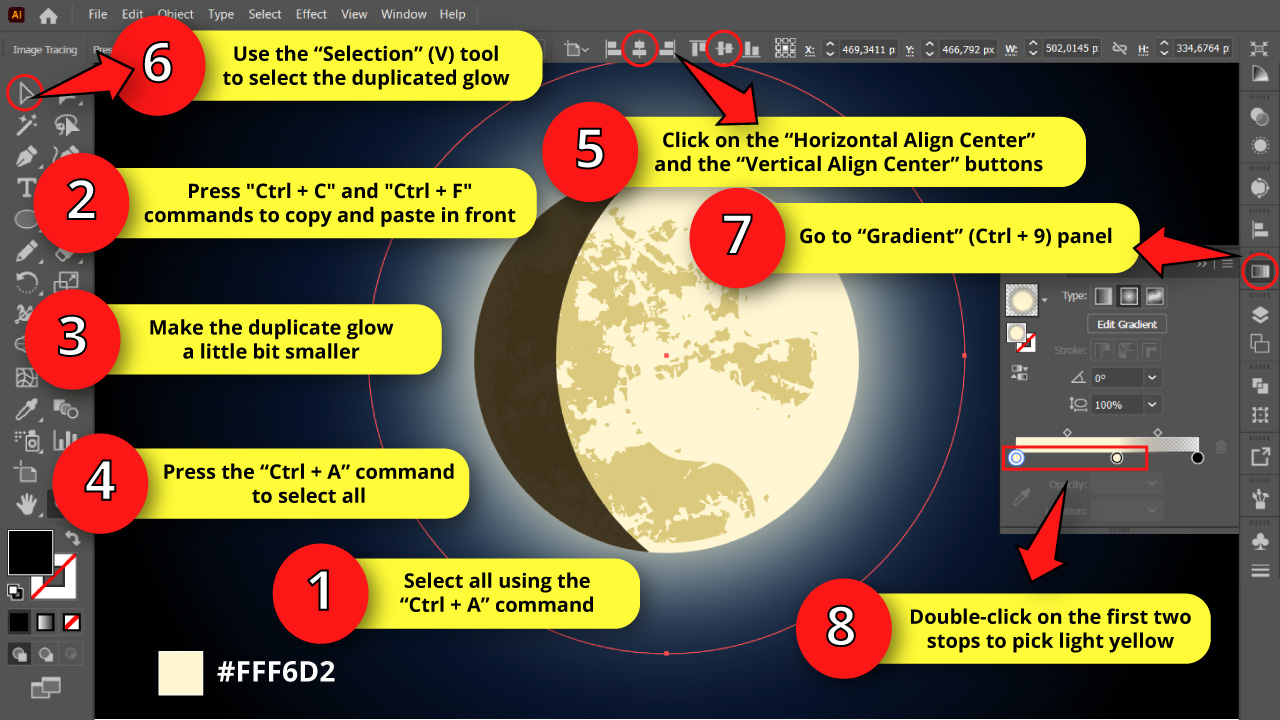
Using the “Ctrl + A” command, select the gradient circle you just made in the previous step, and then press “Ctrl + C” and “Ctrl + F” commands to copy and paste in front.
Resize the duplicated gradient circle making it a little smaller than the original.
To resize it, use the handles of the bounding box while you hold the “Shift” key to keep the proportions.
Then center both gradient circles.
To center objects, first select them using the “Selection” (V) tool, or using the “Ctrl + A” command.
Then go to the “Align” (Shift + F7) and click on “Horizontal Align Center” and “Vertical Align Center” to center both circles.
Now, select the duplicated gradient with the “Selection” (V) tool, and then go to the “Gradient” (Ctrl + F9) panel.
On the “Gradient” (Ctrl + F9) panel, double-click on the light blue stops to change both colors to a whitish yellow. I’ll use the #FFF6D2 shade.
Step 26: Draw a Cross with Flatten Ovals
In this step, we’ll learn how to make stars to improve our atmosphere.
The following four steps (until “Step 29”) are completely optional.
To make a star in Illustrator, first go to the “Layers” (F7) panel and lock the “Glow” layer.
Then unlock the “Stars” layer and click on it to work there from now on.
Draw a very flatten vertical oval using the “Ellipse” (L) tool, and then double-click on the “Fill” color box to pick a light blue color. I’ll use the #6087A7 shade of blue.
Next, select your flatten oval and duplicate it by using the “Ctrl + C” and “Ctrl + F” commands to copy and paste in front.
Finally, rotate the copy 90° to take it to a horizontal position.
To get this done, use the handles of the bounding box while you press the “Shift” key so you can constrain the rotation cycles to 45° each. This way you can easily get a perfect horizontal angle by rotating it manually.
Step 27: Duplicate the Cross
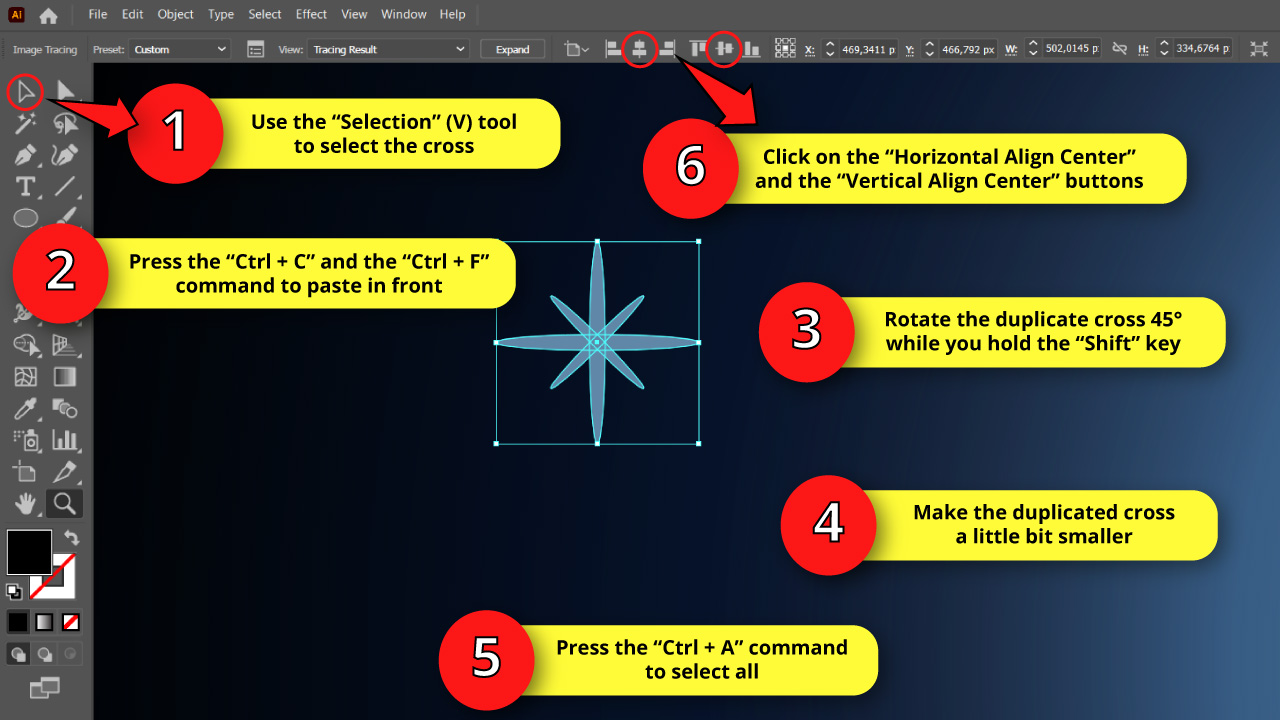
Select both ovals using the “Selection” (V) tool, and duplicate them using the “Ctrl + C” and “Ctrl + F” commands to copy and paste in front once again.
With the duplicated cross still selected, rotate it 45° using the handles of the bounding box while you hold the “Shift” key.
Now you need to resize the duplicated cross using the handles of the bounding box while you hold the “Shift” key to maintain the proportions.
Finally, center both crosses manually, or using the “Align” (Shift + F7) panel tools as we did on “Step 19”.
Step 28: Add Gaussian Blur Effect to the Stars
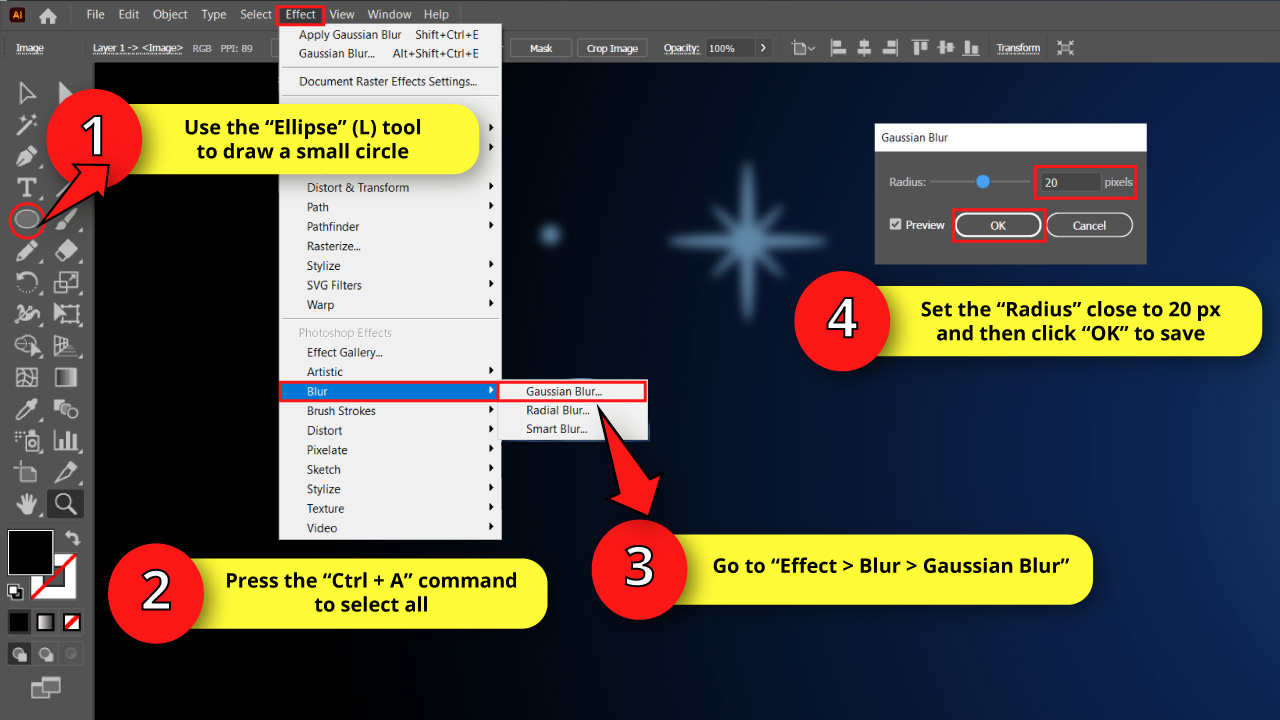
Draw a small circle using the “Ellipse” (L) tool while you hold the “Shift” key to maintain the proportions. This circle will work as a very distant star.
Then select all using the “Ctrl + A” command, and go to “Effect > Blur > Gaussian Blur” on the menu at the top of the screen.
On the “Gaussian Blur Options” window, set the “Radius” to a value close to 20 px, and then click “OK” to save.
Step 29: Duplicate Stars
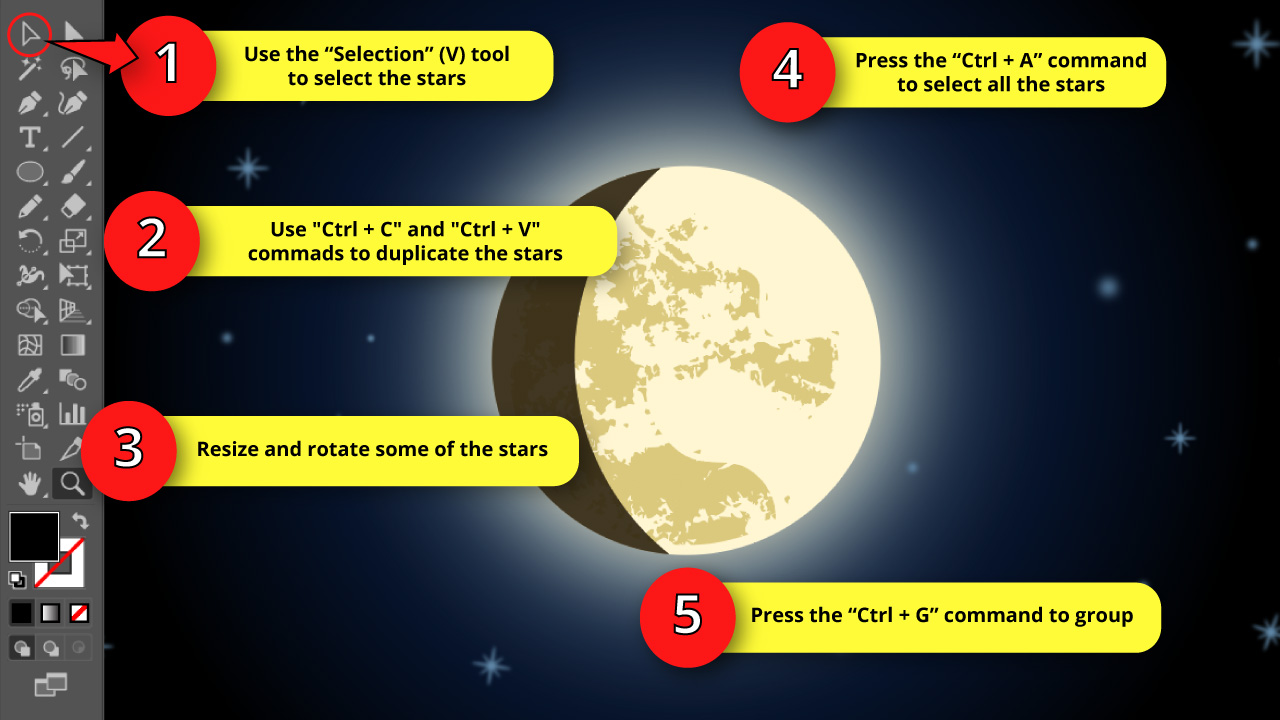
Select the stars we just drew with the “Selection” (V) tool and then duplicate them several times using the “Ctrl + C” and “Ctrl + V” commands.
Resize some of the stars making them a little bigger or smaller using the handles of the bounding box. Remember to hold the “Shift” key while you do this to keep the proportions.
Place the stars all over the artwork and rotate some of them to get a more natural appearance.
Finally, press the “Ctrl + A” command to select all the stars, following with the “Ctrl +G” command to group them.
Step 30: Group the Moon Objects
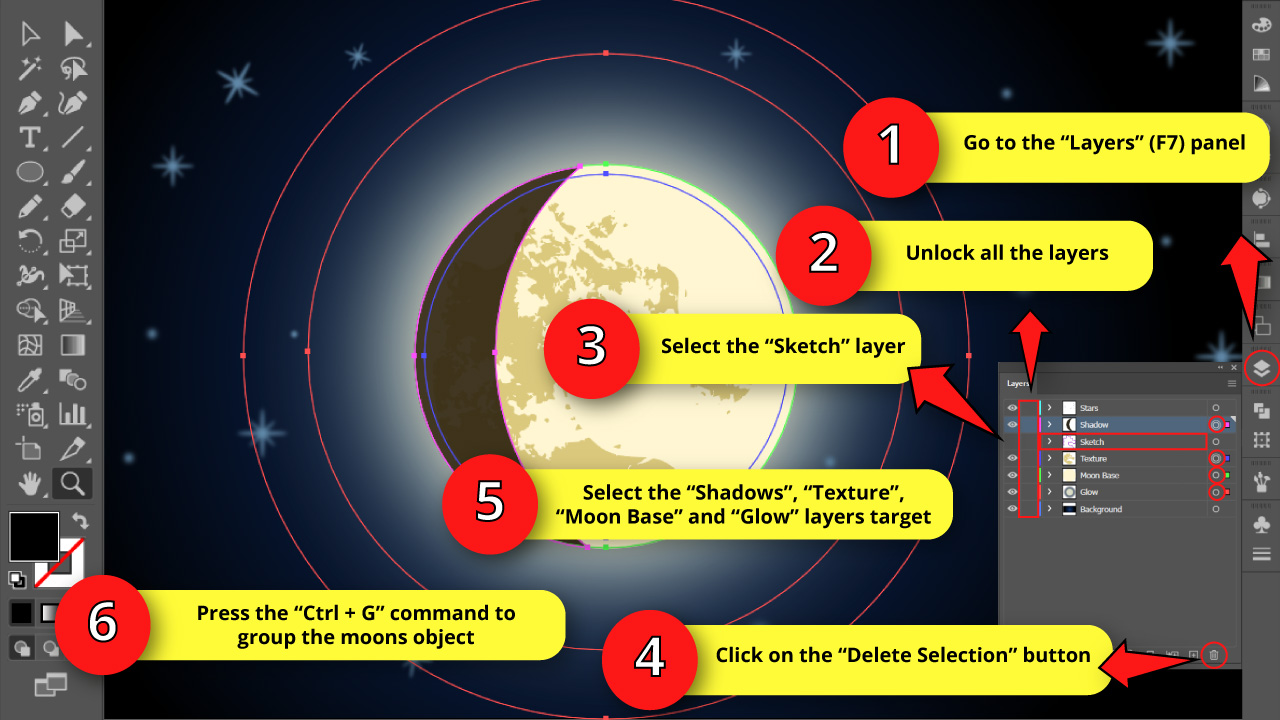
Go to the “Layers” (F7) panel one more time, and unlock all layers.
Select the “Sketch” layer and click on the “Delete Selection” button located at the bottom of the panel.
Next, hold the “Shift” key while clicking on the “Shadow”, “Texture”, “Moon Base” and “Glow” layers targets (the circles next to each layer) to select all the objects on these layers.
You need to hold the “Shift” key to be able to select several targets at the same time.
Once all the moon objects are selected, press the “Ctrl + G” command to group objects in Illustrator.
The Result
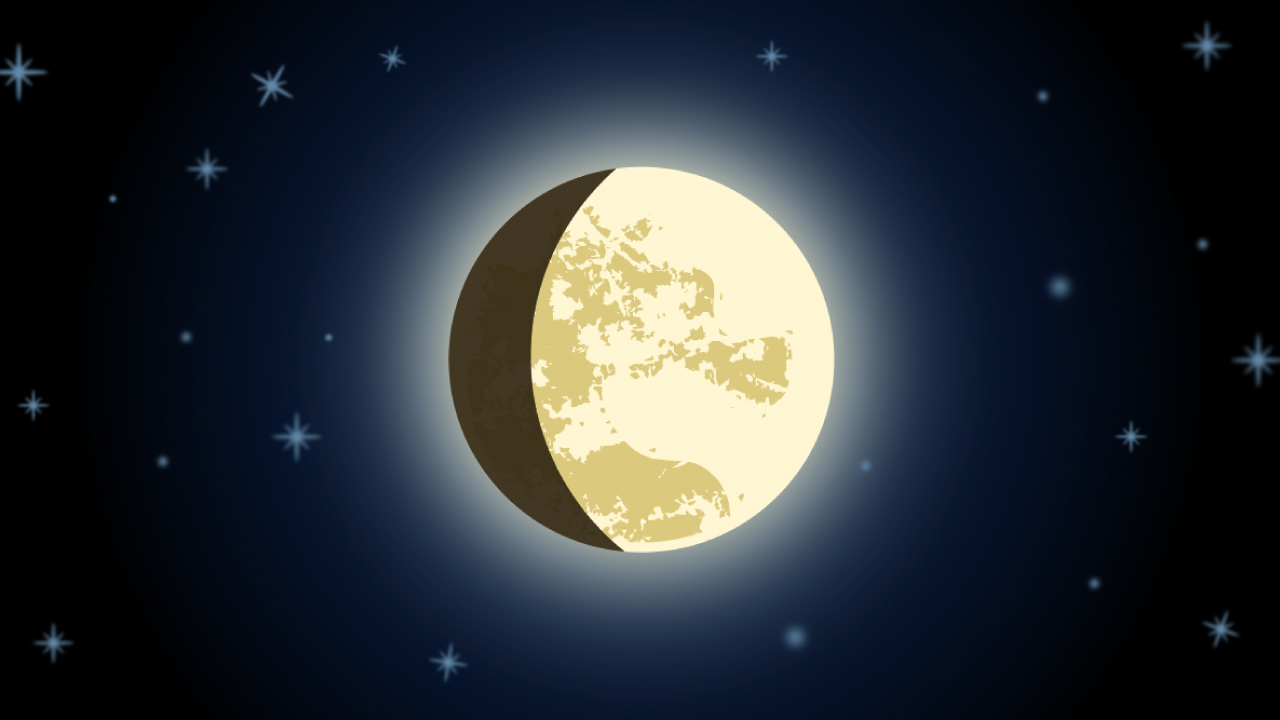
With our illustration finished, we can now appreciate the beauty of the moon in a sky full of stars.
Frequently Asked Questions on “How to Draw a Moon in Illustrator”
When I try to pick a color for the texture using the “Fill” color box in Illustrator, the applied color appears in grayscales. How can I fix this?
After vectorizing the texture the color mode can be constrained into grayscales. To fix this, select the texture and pick any color from the “Swatches” panel on the right side toolbar. This action will break the color limitation. Then you can pick your desired color using the “Fill” color box.
Where can I find the field to change the hex color codes on the “Gradient” panel in Illustrator?
On the “Gradient” (Ctrl + F9) panel, double-click on the gradient stops to change their colors. Then go straight to the “Swatches” tab, and pick any color from this palette. Once you have done this, go back to the “Color” tab, and the hex color code field will be enabled.