

Have you ever wanted to draw a palm tree on Illustrator, but you didn’t even know where to start? Well, in this tutorial you will learn step-by-step how to draw a realistic palm tree.
Drawing a palm tree consists of two main subjects to attend to: the crown (consisting of the leaves) and the trunk.
We’ll first focus on the leaves to the point where we’ll create a custom brush to draw them, since they’re the main feature of the tree.
On the other hand, we’ll try to make the trunk’s drawing process as simple as possible.
The drawing process will require several steps, locking and unlocking layers to avoid mess. But despite these repetitive actions, drawing a palm tree is actually a very easy thing to do.
Also, if you would just like to download our free palm tree vector files, you can easily do so by subscribing to our newsletter (you will then be able to download these vectors for FREE and right away!)
How to Draw a Palm Tree in Illustrator
Draw a basic palm tree sketch. Lock the sketch layer and create a new one. Create a brush for the leaves and use it to draw them. Add a greenish gradient. Draw a fill colored trunk shape. Trace some horizontal lines and then add shadows and lights. Delete the sketch and group the tree layers.
Step 1: Set the Document Color Mode
When you are creating a new document, make sure you select the proper “Color Mode”.
Select “RGB” color mode if your work will be shown only on screens.
Select “CMYK” color mode if your work will be printed, or both shown on screens and printed.
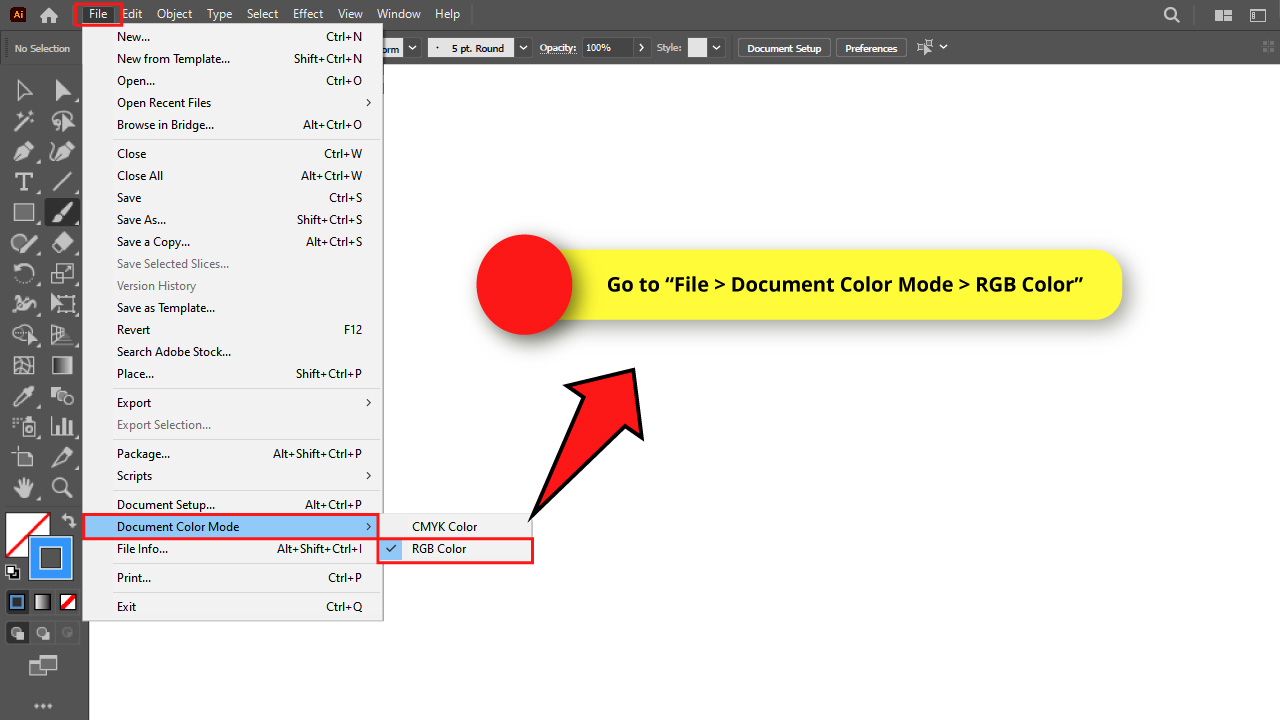
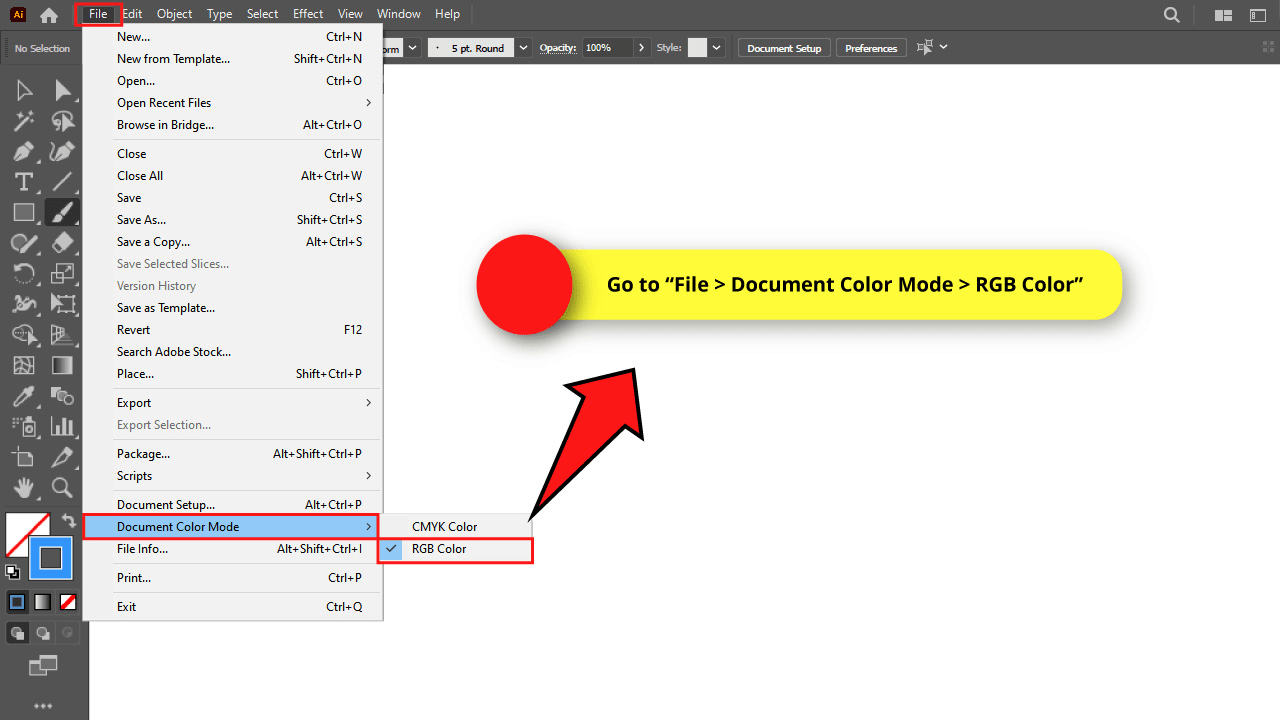
If you already started working on a document and you want to change the color mode, you can do it by going to “File > Document Color Mode” on the menu at the top of the screen.
I’ll use RGB color mode for my drawing.
Step 2: Adjust the “Paintbrush Tool” Options
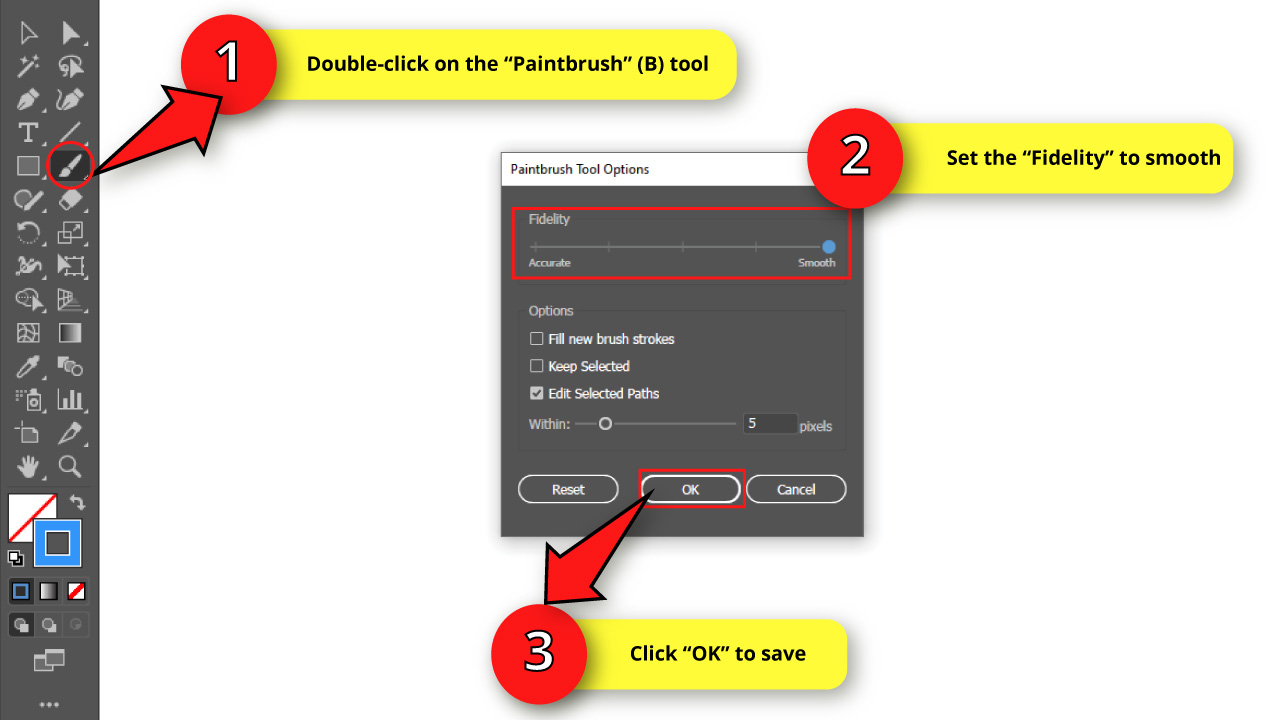

Double-click on the “Paintbrush” (B) tool on the left side toolbar to open the options window.
Set the “Fidelity” slider somewhere between the center and “Smooth”.


Then click “OK” to save.
Step 3: Customize a Brush
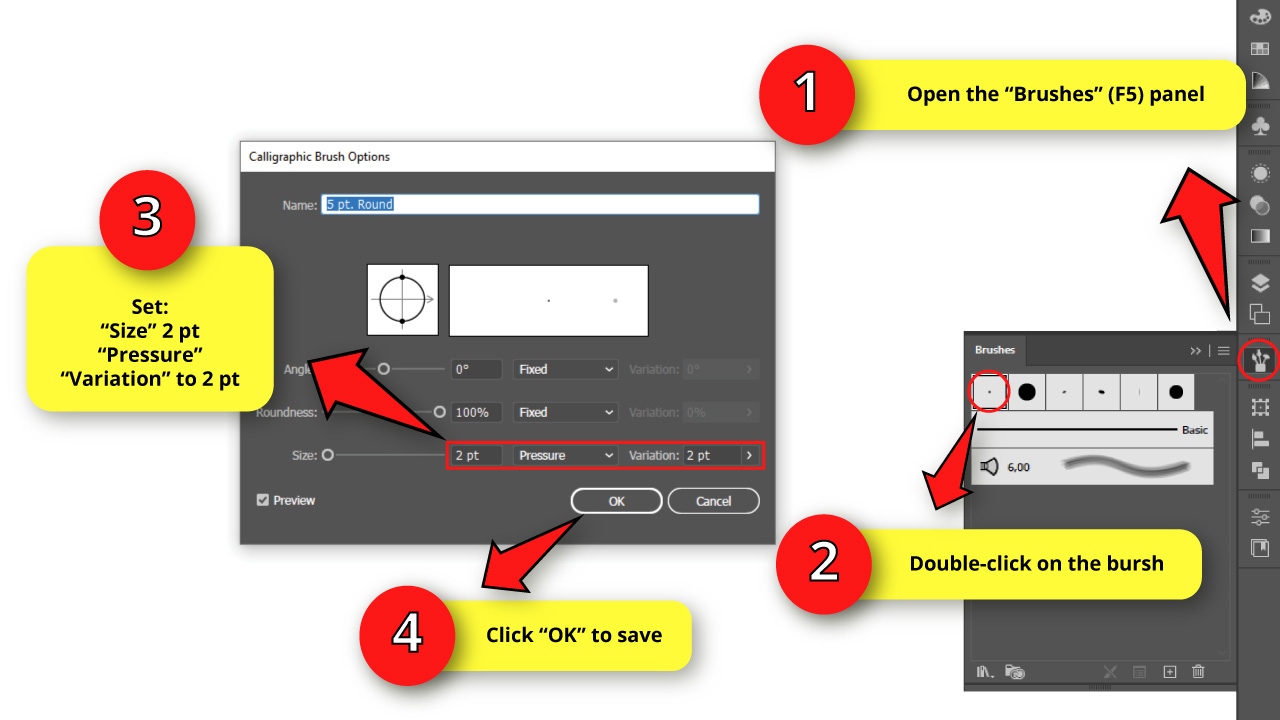
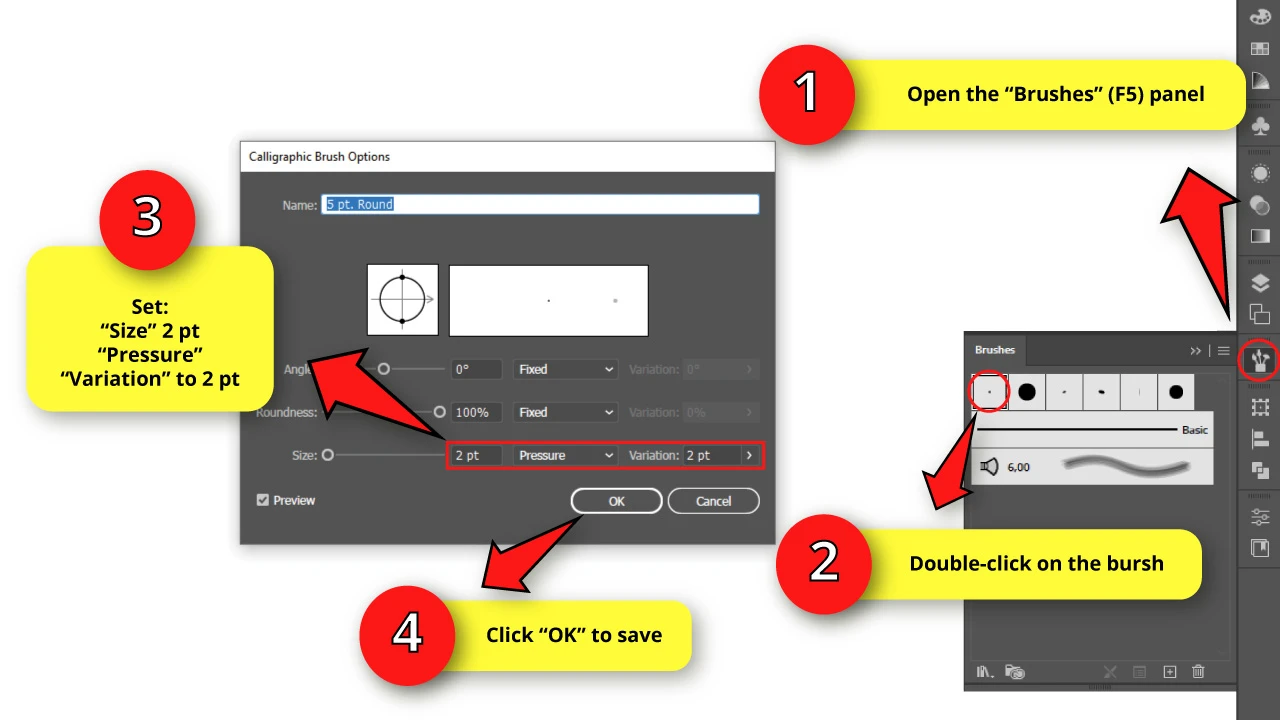
To make a brush, open the “Brushes” (F5) panel located on the right side of the screen.
If you can’t find it, you may have to enable it first by going to “Window > Brushes” on the menu at the top of the screen.
Double-click on the tiny round brush to open the “Calligraphic Brush Options” window.
Set the “Size” to 2 pt. Change the box setting to “Pressure” and select 2 pt. for the “Variation” field.
This last adjustment allows us to make paths sensitive to the tablet’s pen pressure.
Then click “OK” to save.
Keep in mind that you can change the brush size anytime during the drawing process.
Step 4: Draw the First Sketch Line

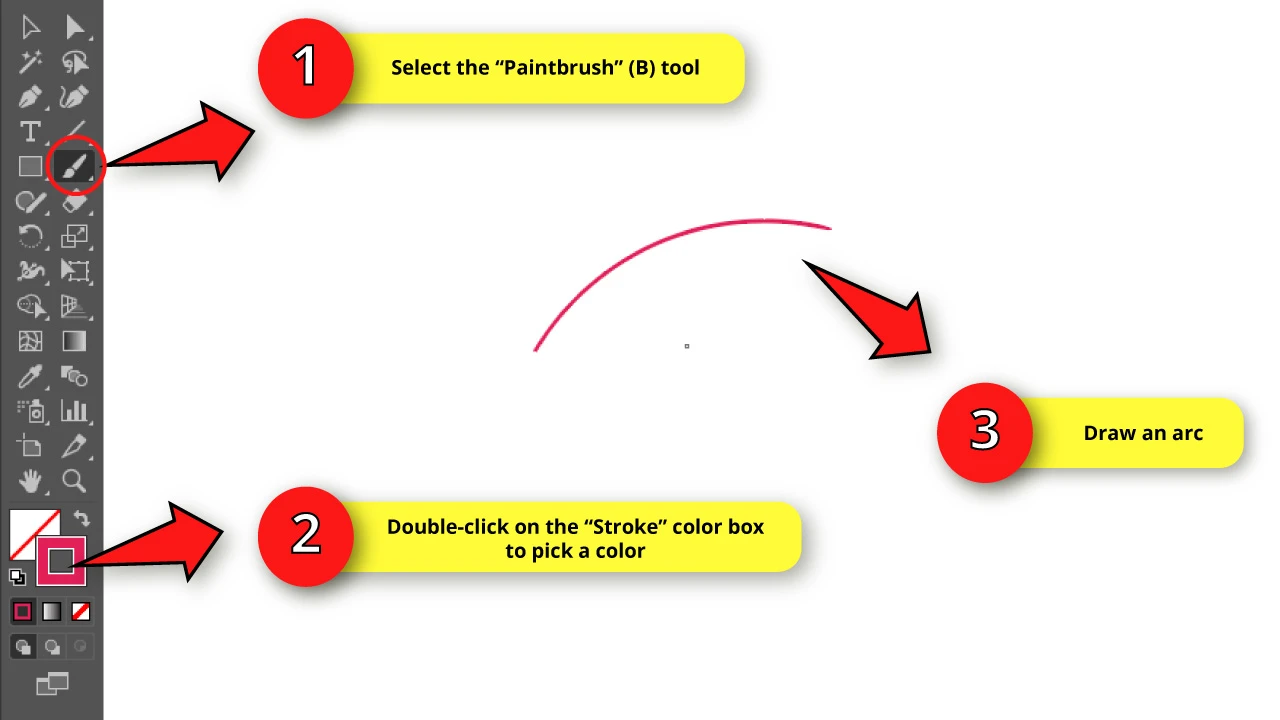
Select the “Paintbrush” (B) tool and then double-click on the “Stroke” color box on the left side toolbar to select a color for the sketch.
Pick any color other than black, like red, blue or green.
I’ll pick red this time.
Then draw an arc shaped line as a palm tree leaf. You can also do it by using the “Arc” tool.
Step 5: Draw the Leaves Sketch
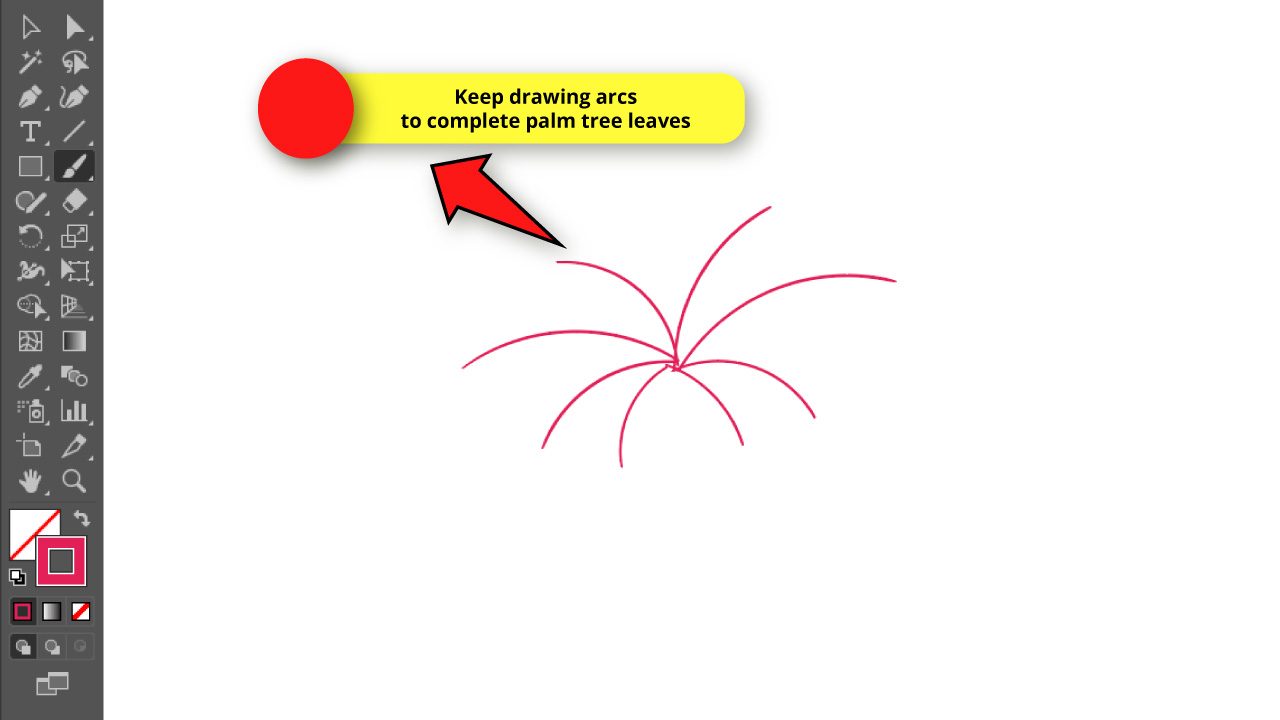

Keep drawing these arcs until you get something like this.
Make sure you draw a single stroke for each leaf.
Step 6: Draw the Trunk Sketch

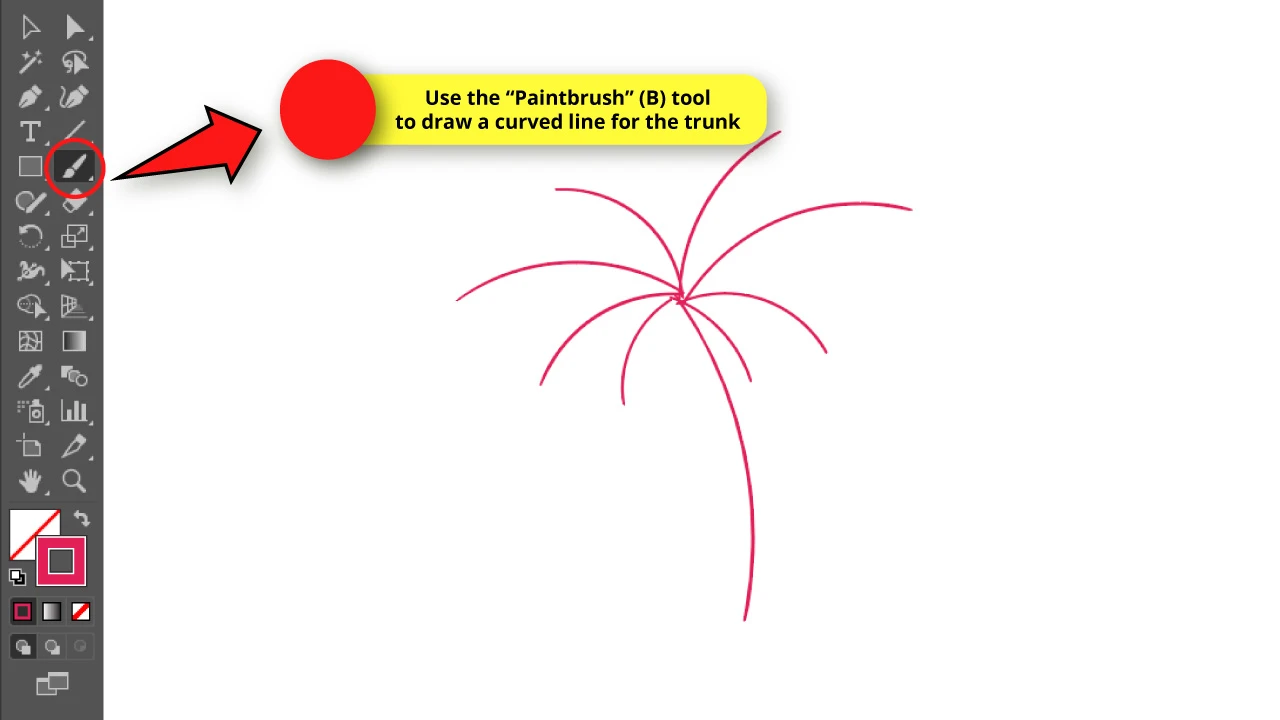
Draw a curved line as the palm tree’s trunk.
Step 7: Make a Width Profile Line
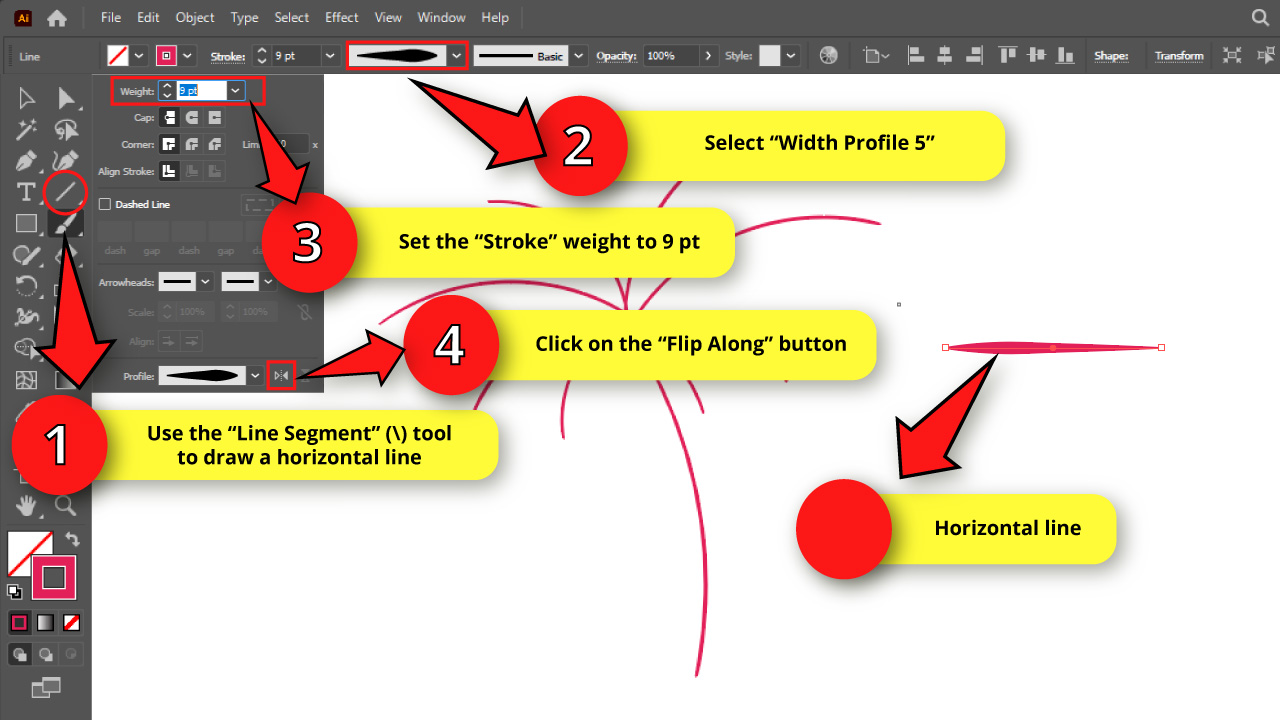

Click on the “Segment Line” (\) tool on the left side toolbar to draw a horizontal line.
Then go to the “Variable Width Profile” on the menu at the top of the screen, and set it to “Width Profile 5”.
Next, click on the “Stroke” setting, also on the menu at the top of the screen.
Set the weight to 9 pt, and then click on “Flip Along” to invert the “Variable Width Profile” that is set by default.
We need the line’s thick part to be on the left end.
Step 8: Create an Art Brush for the Leaves
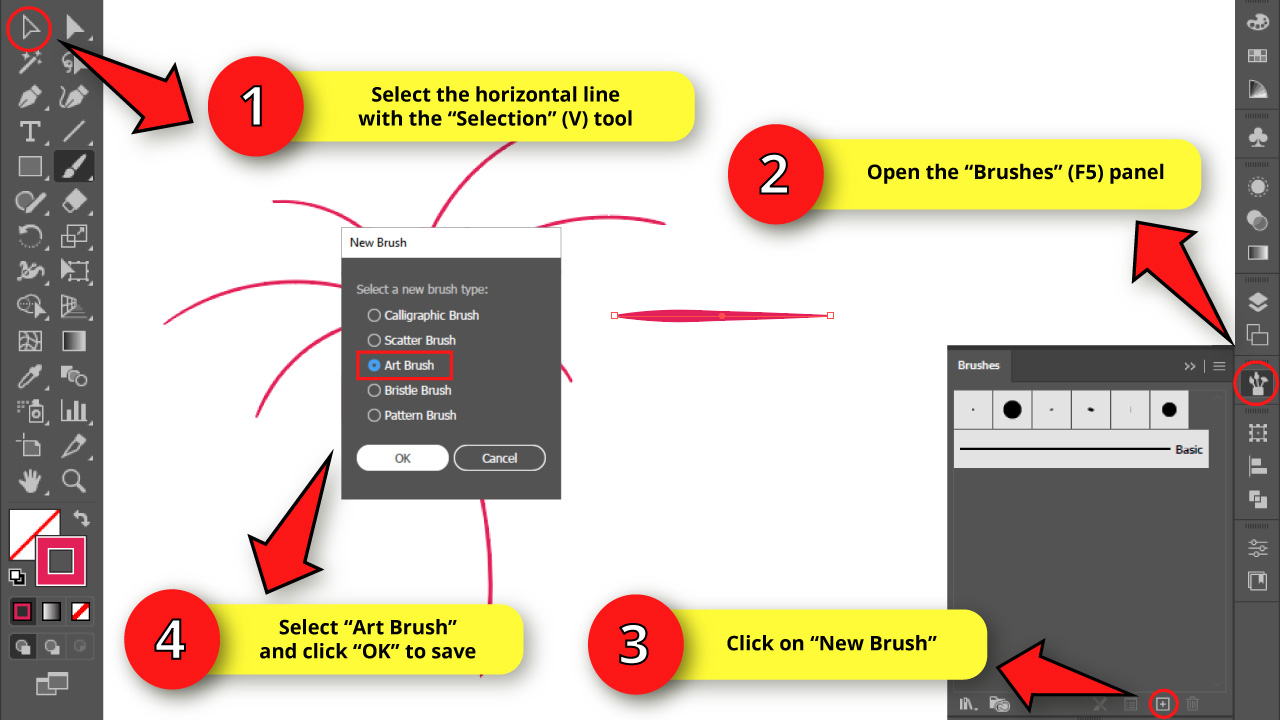

Select the line we have created on the previous step with the “Selection” (V) tool.
Then go to the “Brushes” (F5) panel and click on the “New Brush” button at the bottom of the panel.
On the pop up window, select “Art Brush” and then click “OK” to save.
Step 9: Adjust the Art Brush


Once you have done this, the “Art Brush Options” window will open.
On this new window, set the “Width” to “Pressure” and change the “Colorization Method” to “Hue Shift”.
Finally, click “OK” to save.
Step 10: Make the Sketch Transparent

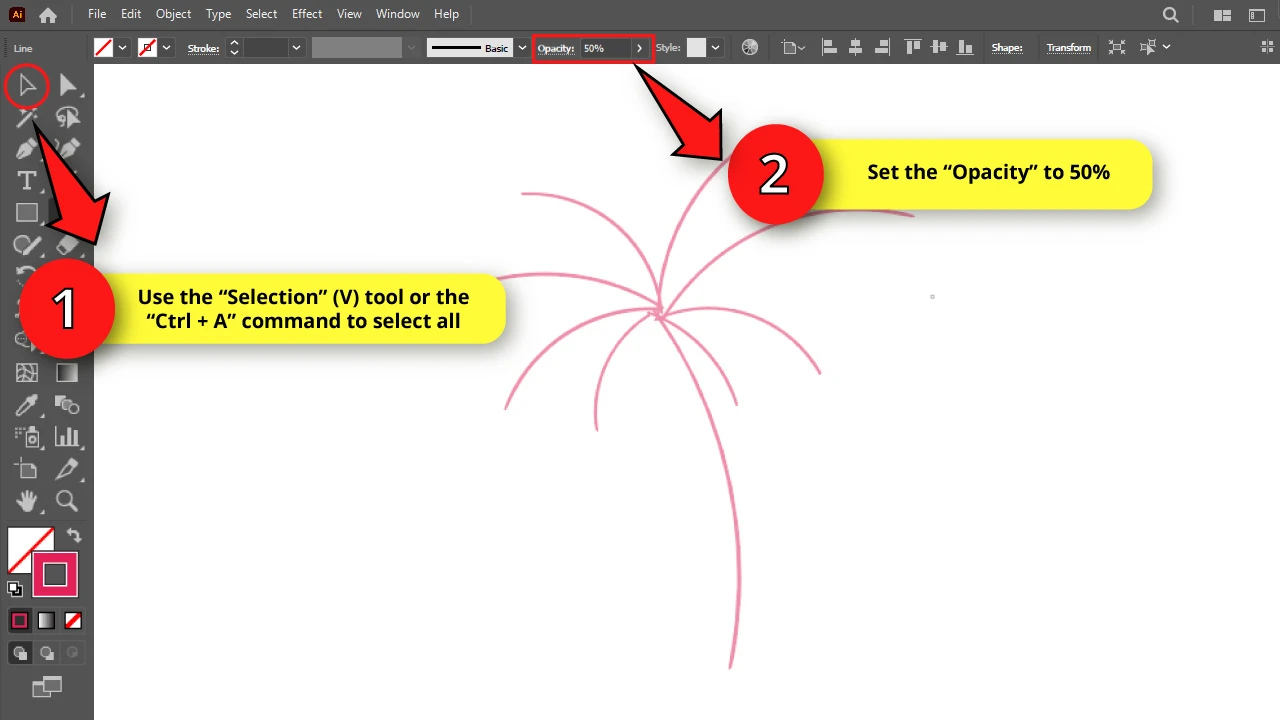
Select the whole sketch using the “Ctrl + A” command, or by using the “Selection” (V) tool.
Then go to the “Opacity” setting located on the toolbar at the top of the screen, and
change the value to 50%.
Step 11: Lock the Sketch Layer
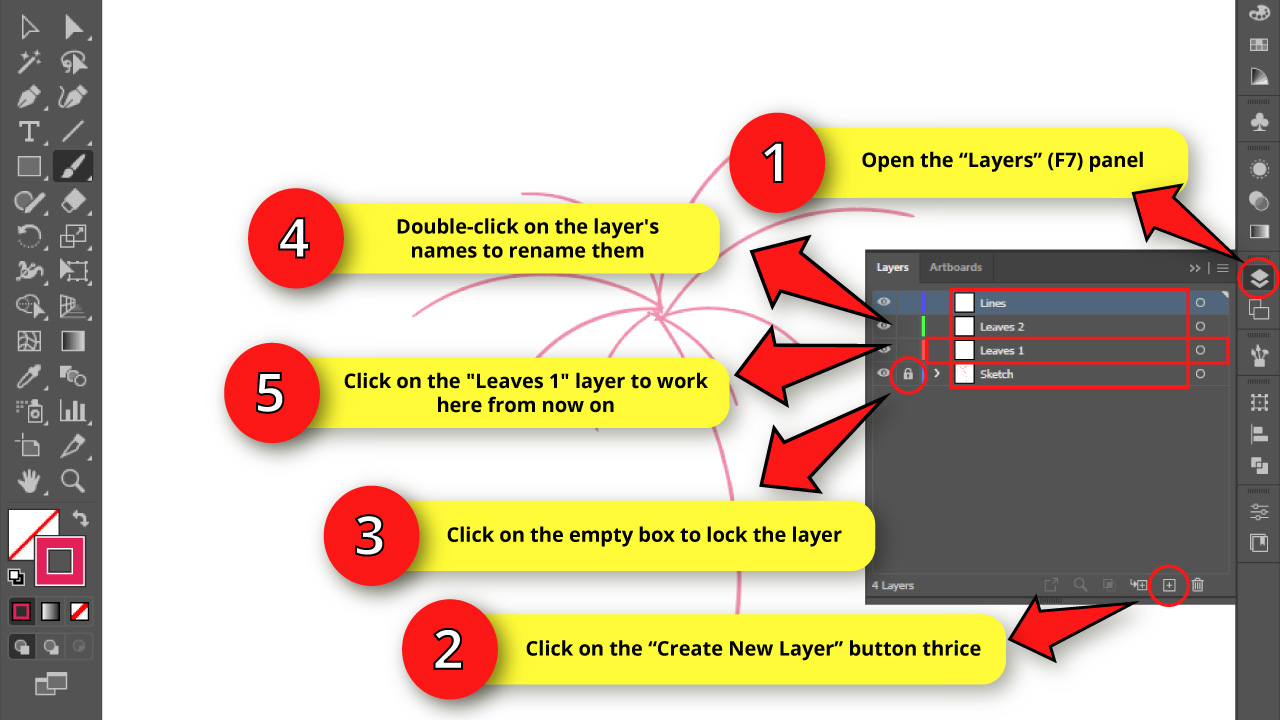
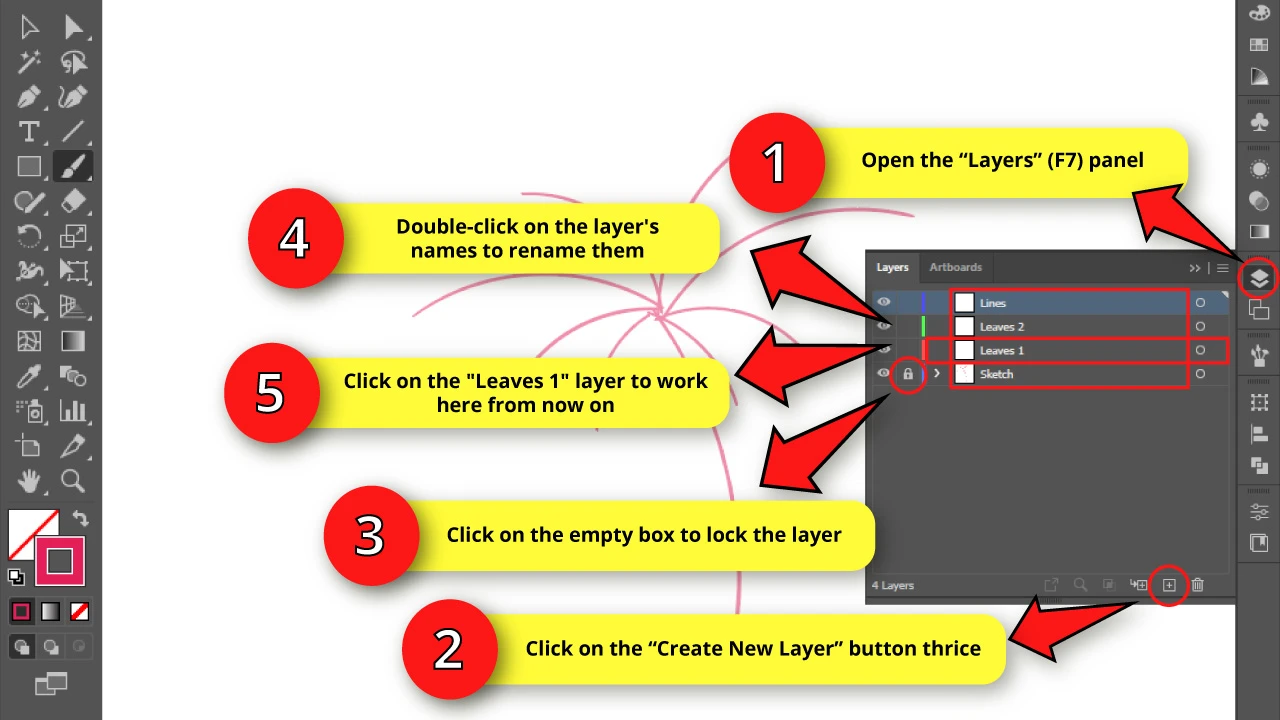
Go to the “Layers” (F7) panel, usually located on the right side toolbar. If you can’t find it, you may have to enable it by going to “Windows > Layers” on the menu at the top of the screen.
On the “Layers” (F7) panel, click thrice on the “Create New Layer” button at the bottom of the panel to create three new layers.
Then click on the empty box next to the eye on the “Layer 1” row, to enable the lock.
Once the lock icon displays, that means the layer is locked and can’t be selected or modified.
This step is important because now we can draw the final lines over the sketch without making a mess.
Then, double-click on the new layer’s names to rename them. Since we will use multiple layers, we need to keep our work as tidy as possible to avoid making mistakes, and so we can save some time.
I’ll rename layers as:
“Lines”
“Leaves 2”
“Leaves 1”
“Sketch”
Step 12: Draw the Leaves
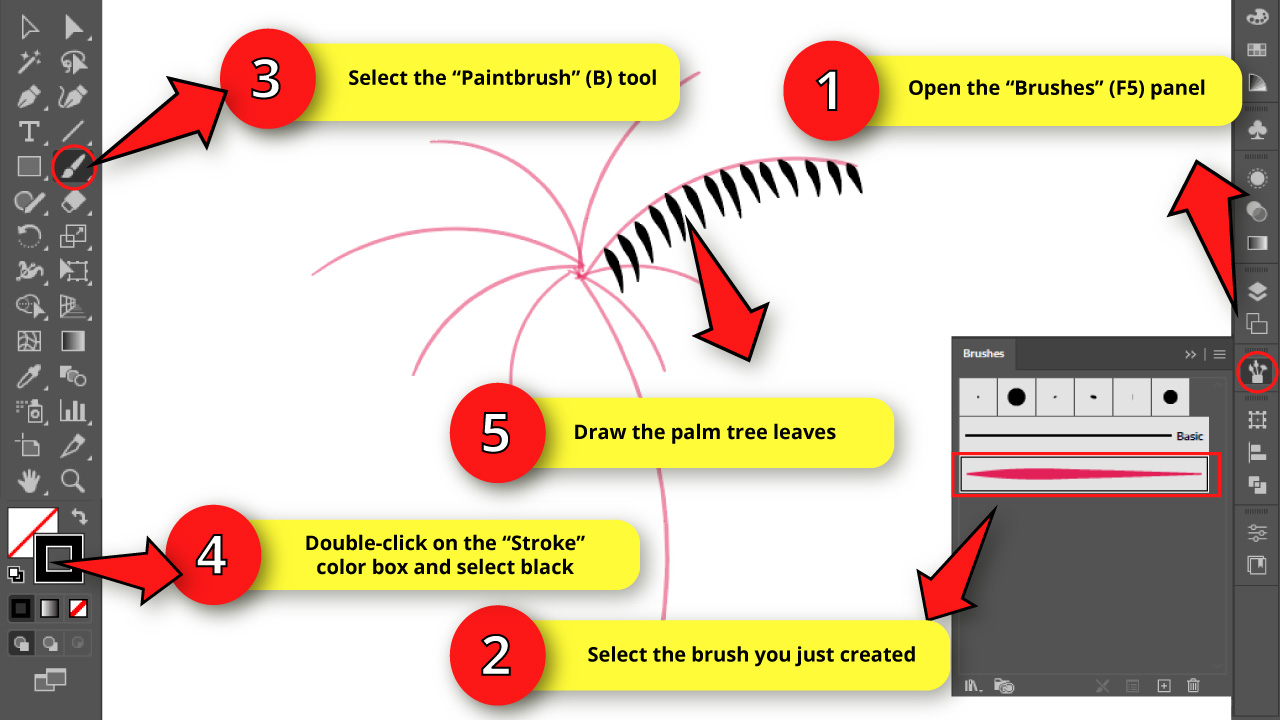

Open the “Brushes” (F5) panel and select the brand new brush we just created on the “Step 8”.
Select the “Paintbrush” (B) tool and then double-click on the “Stroke” color box and pick black.
Next, draw some short lines as leaves using the sketch lines as a guide. Keep in mind that the leaves’ angles will be influenced by gravity. So draw these accordingly.
Leave some space between each stroke, and leave some additional extra space before starting every new row of leaves.
We are aiming to keep the center of the palm tree crown empty.
Step 13: Finish Drawing One Side of the Leaves
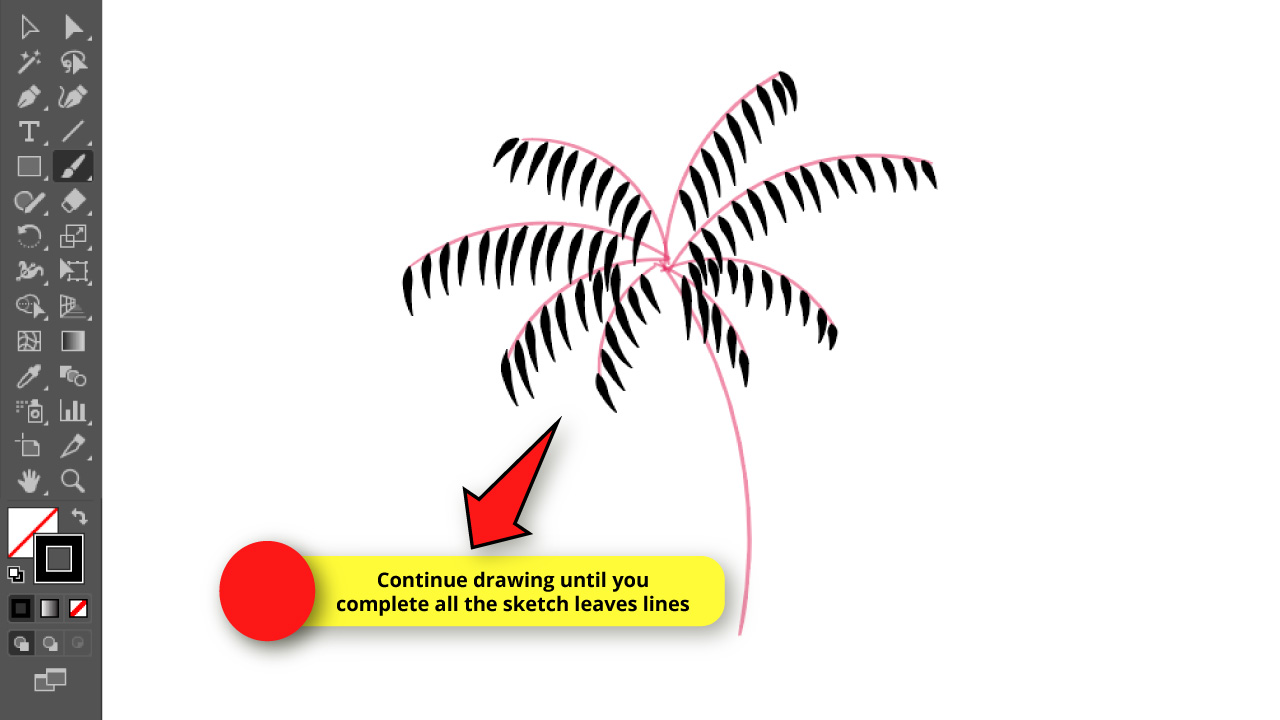

Keep drawing the leaves only on one side of each sketch line until you complete all rows.
Step 14: Group the Leaves by Rows

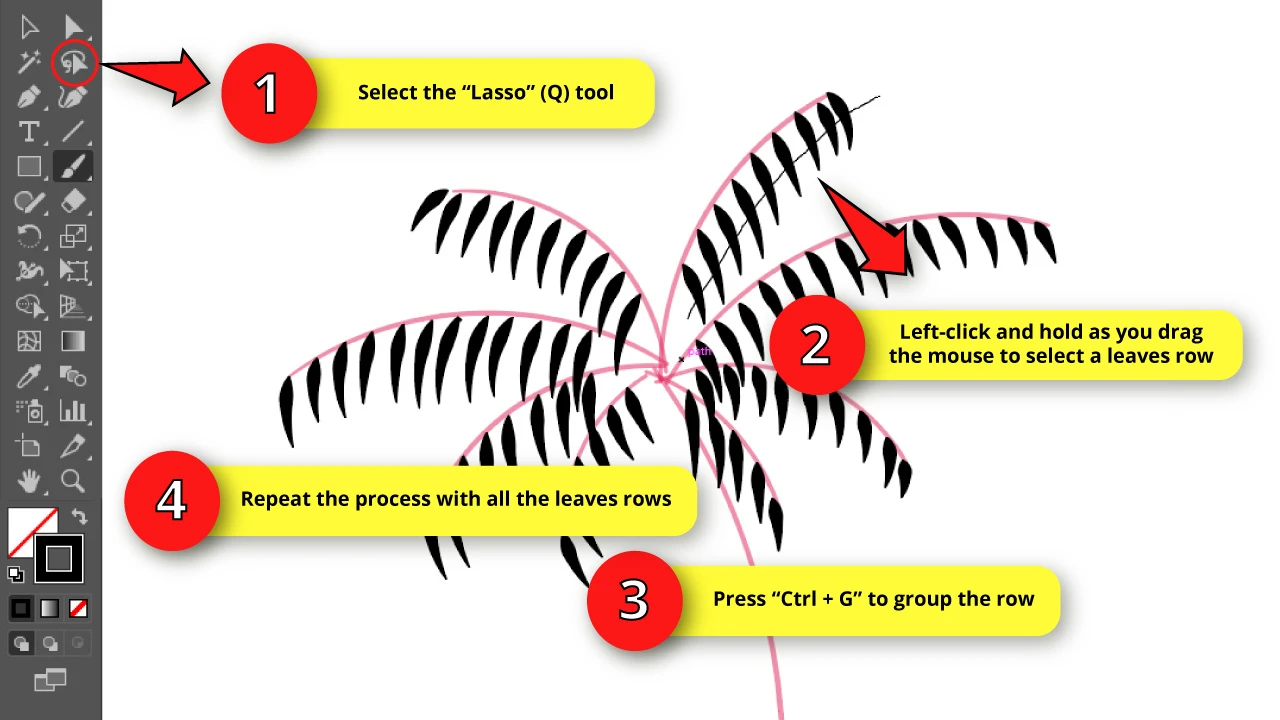
Select the “Lasso” (Q) tool. This tool will help us to select the leaves and group them by rows.
So, once you have selected the “Lasso” (Q) tool, left-click and hold as you drag the mouse over the leaves to select them.
You don’t need to enclose the leaves on the “Lasso” (Q) tool trace. Simply tracing one single time over each leaf will be enough.
Then press the “Ctrl + G” command to group them. This feature is also available by right-clicking anywhere on the artboard to unfold the options menu and selecting “Group”.
Repeat this process to group all leaves by rows.
Step 15: Draw a New Row of Leaves

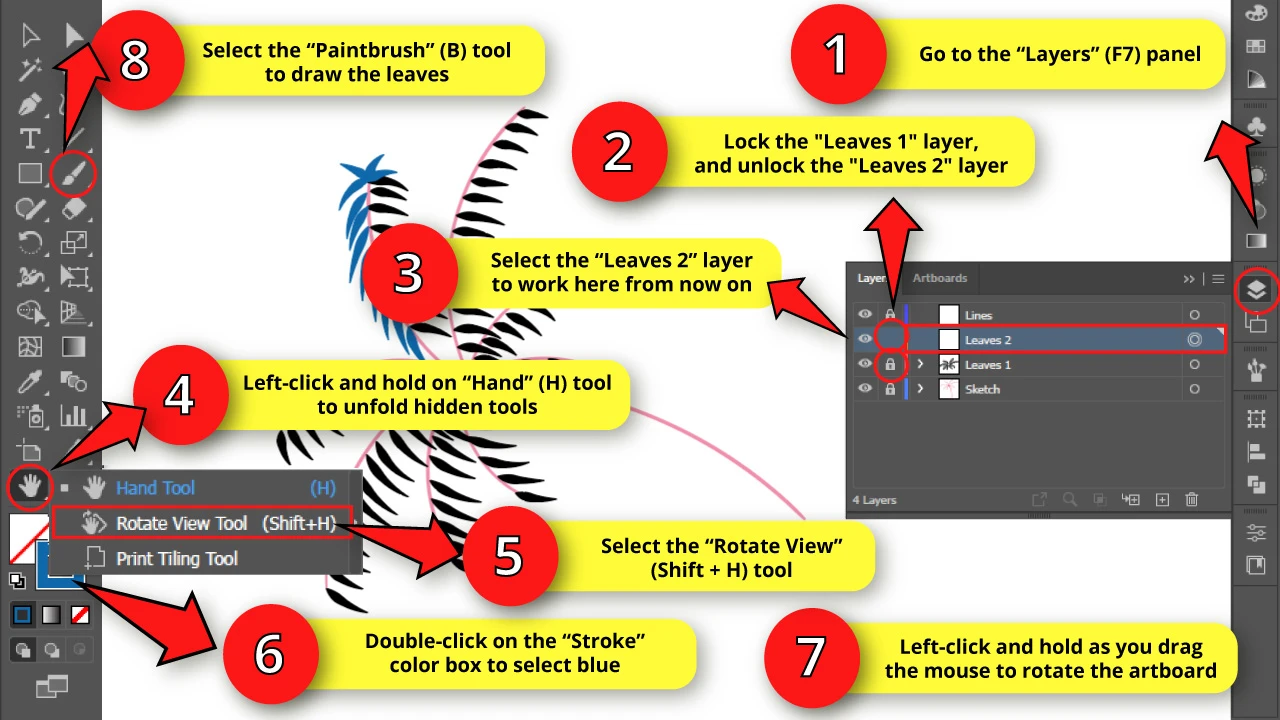
Go to the “Layers” (F7) panel and lock the “Leaves 1” layer while you unlock the “Leaves 2” layer.
Select the “Paintbrush” (B) tool and then double-click on the “Stroke” color box to pick another color, like blue.
Now draw a new row of leaves to complete both sides of the leaves sketch lines.
When drawing these new leaves, it’s not necessary that inclination is influenced by gravity, since this is just an artistic interpretation of reality. But please keep in mind that gravity is always acting on each object.
There is a feature in Illustrator that allows you to rotate the artboard to make your drawing process easier.
To rotate the canva, left-click and hold on the “Hand” (H) tool to unfold the hidden tools.
Now select the “Rotate View” (Shift + H) tool, or press the “Shift + H” shortcut.
Then left-click and hold on the artboard as you drag the mouse to rotate the canva to your desired position.
If you want to exit the “Rotation View” (Shift + H) tool, press the “Esc” key from your keyboard.
Step 16: Finish the Leaves Drawing

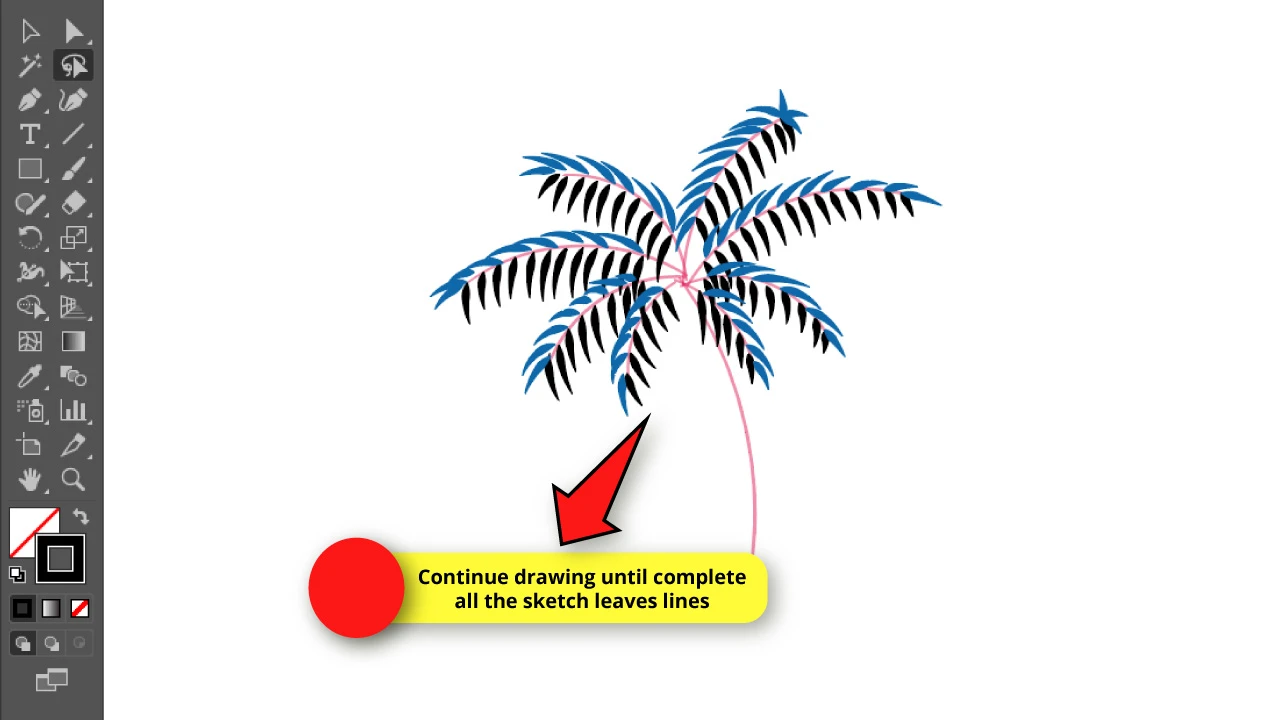
Continue drawing and complete all the rows until you get something like this.
Step 17: Group the Leaves by Rows
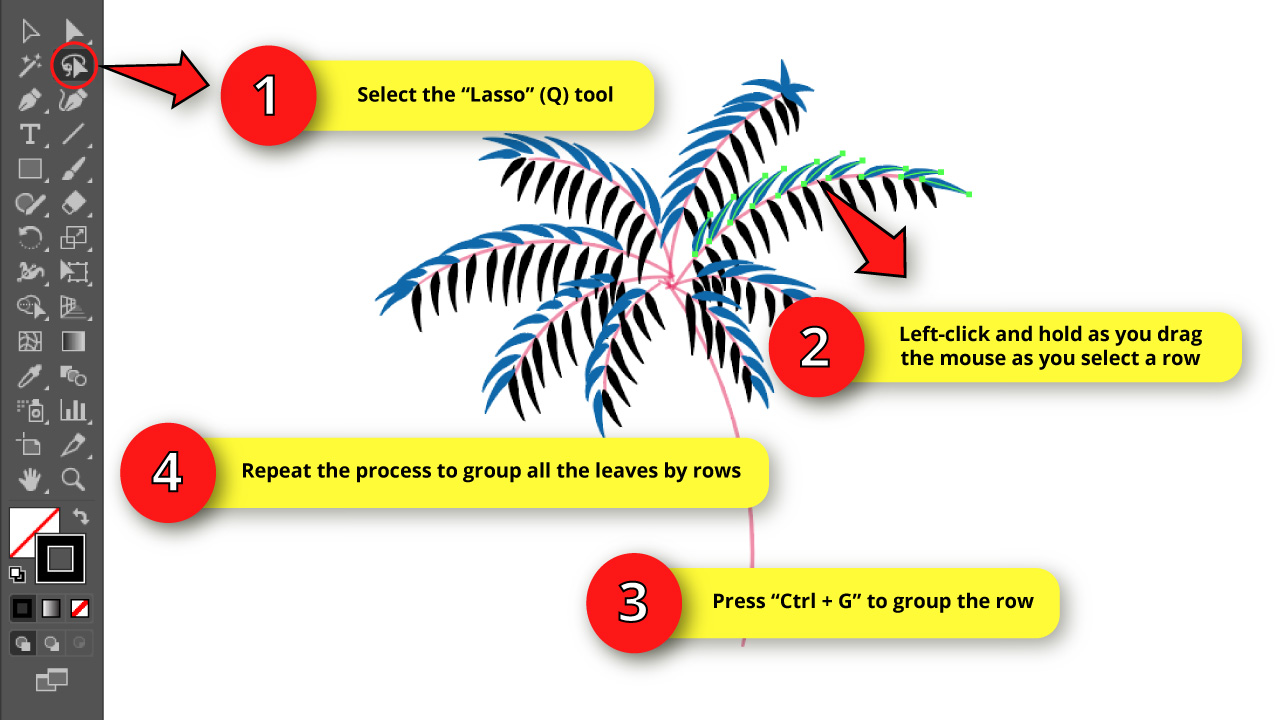

Use the “Lasso” (Q) tool to select the new leaves rows and then press the “Ctrl + G” command to group them.
Repeat this process until you group all the leaves by rows.
Step 18: Duplicate the Blue Leaves

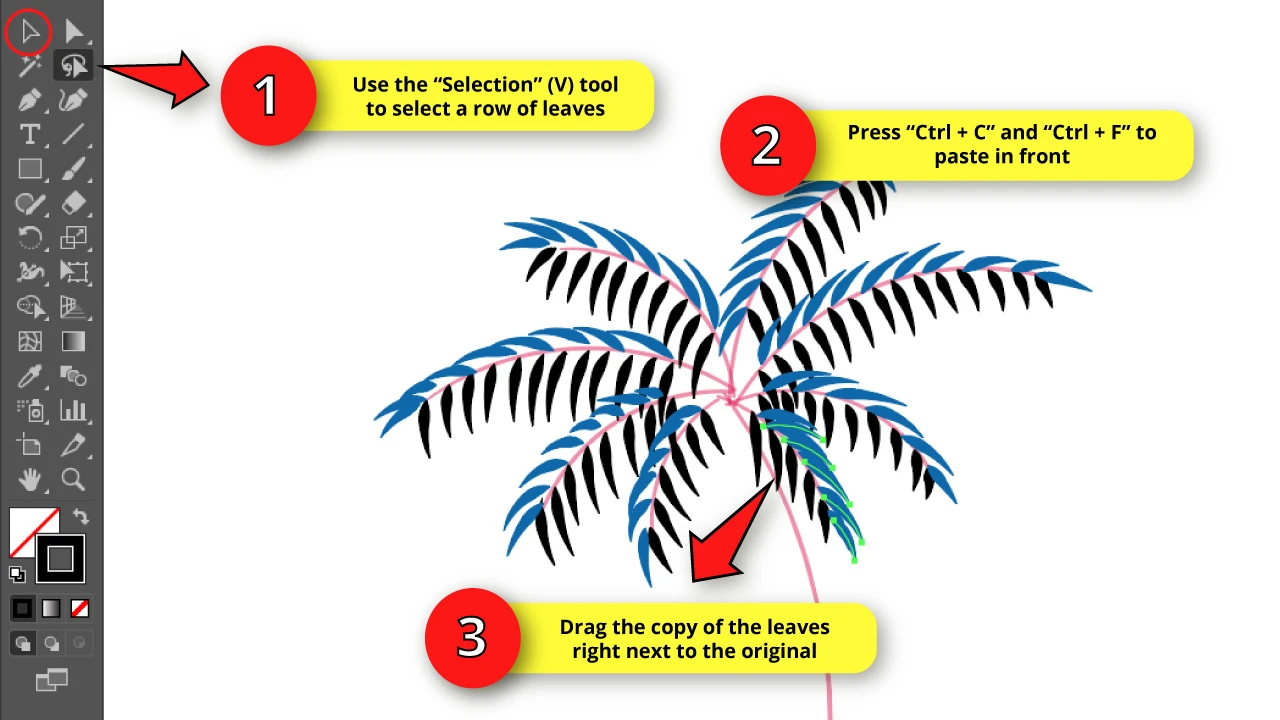
Now, select a group of leaves using the “Selection” (V) tool.
Then press “Ctrl + C” and “Ctrl + F” commands to paste the copy in front.
Then, drag the copy right next to the original, slightly moving it to duplicate the amount of leaves.
Step 19: Finish Leaves Duplication
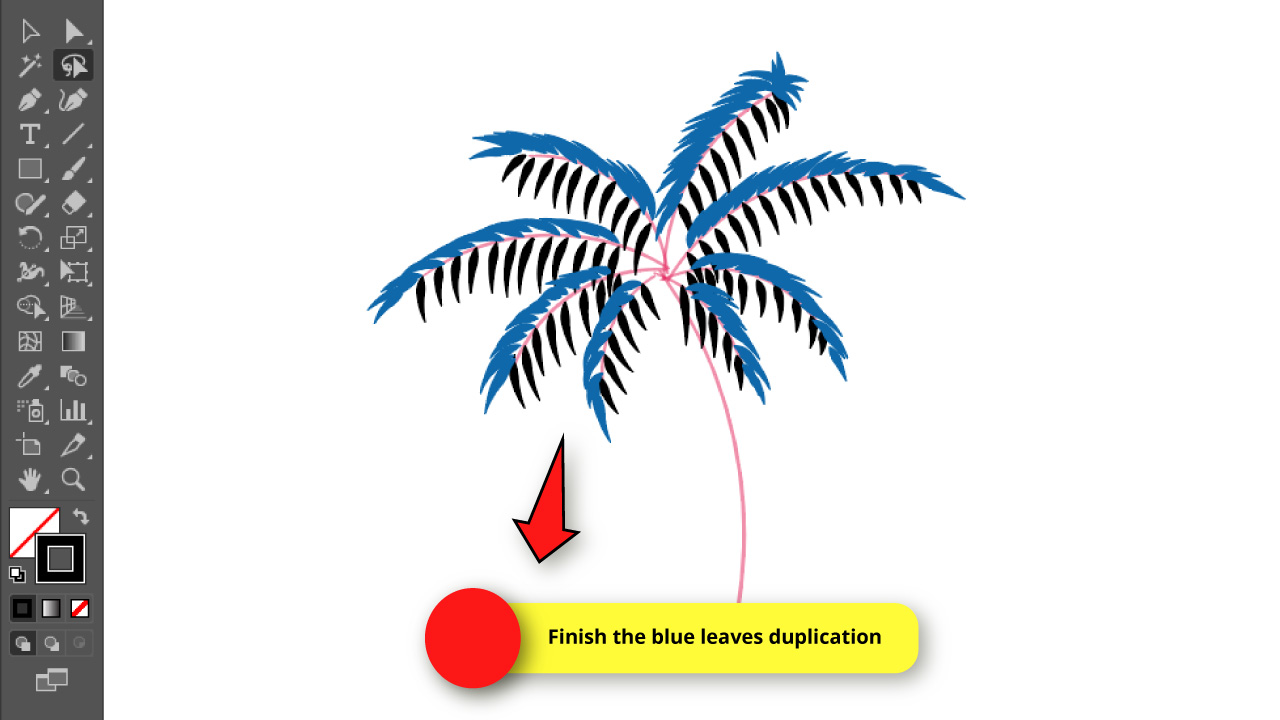

Repeat the previous step with all the rows until you get something like this.
Step 20: Unlock the “Leaves 1” Layer

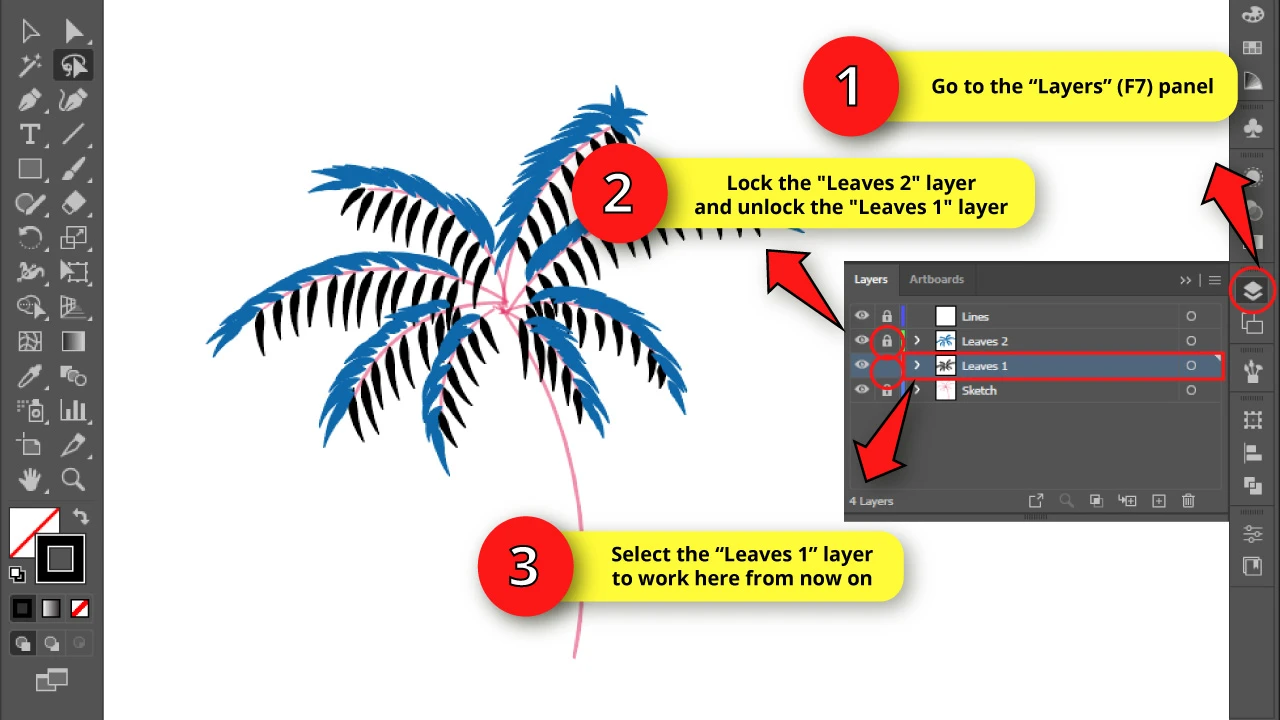
Go to the “Layers” (F7) panel again, and unlock the “Leaves 1” layer by clicking on its lock.
Then, click on the empty box to lock the “Leaves 2” layer.
Step 21: Duplicate the Black Leaves
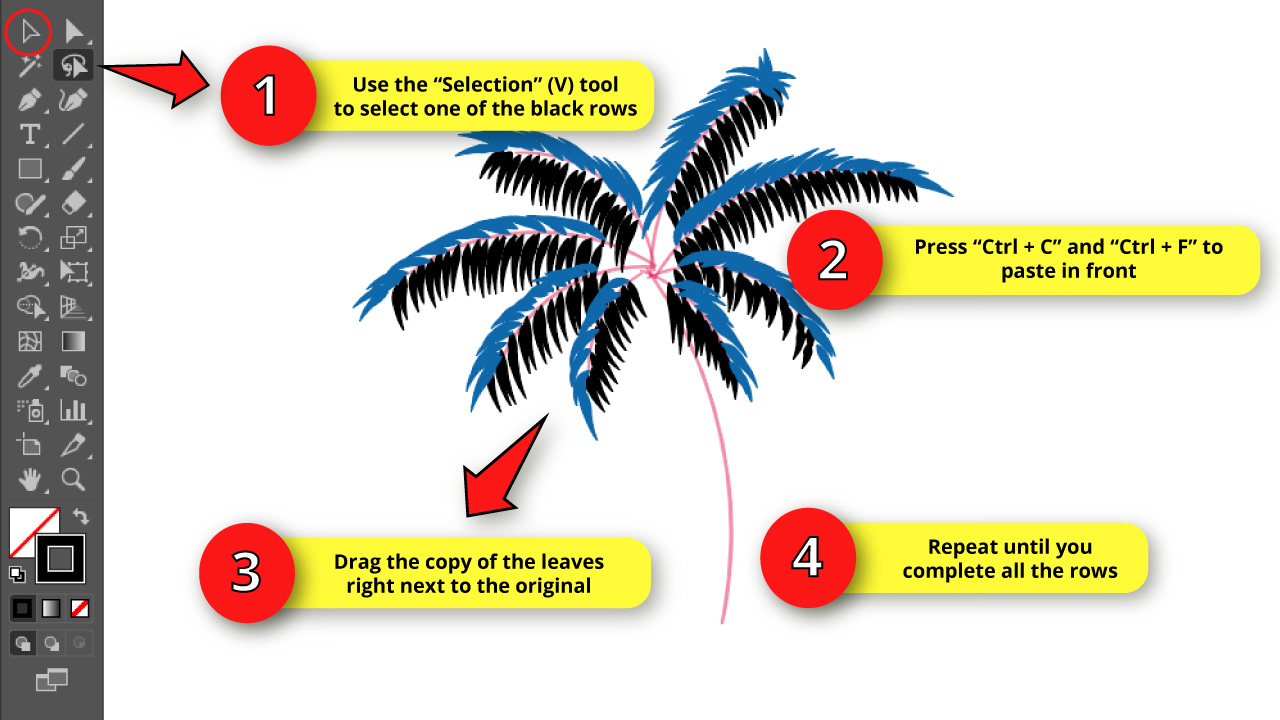

Now, duplicate the black leaves as you just did in “Step 19”.
Select a row using the “Selection” (V) tool, and then press “Ctrl + C” and “Ctrl + F” to paste in front. Next, drag the copy next to the original, slightly moving it to duplicate the amount of leaves.
Step 22: Unlock the “Lines” Layer

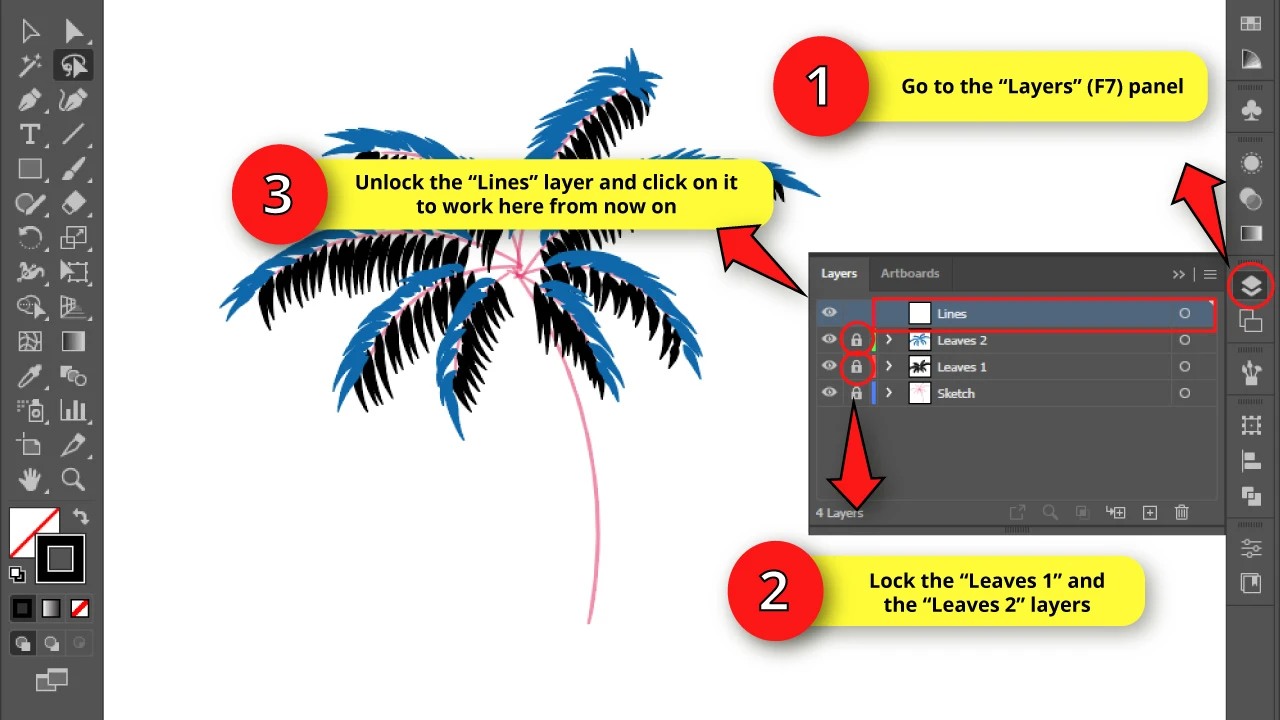
Go to the “Layers” (F7) panel and lock all layers but the “Lines” one.
Select the “Lines” layer to work here from now on.
Step 23: Draw a Leaf Midrib
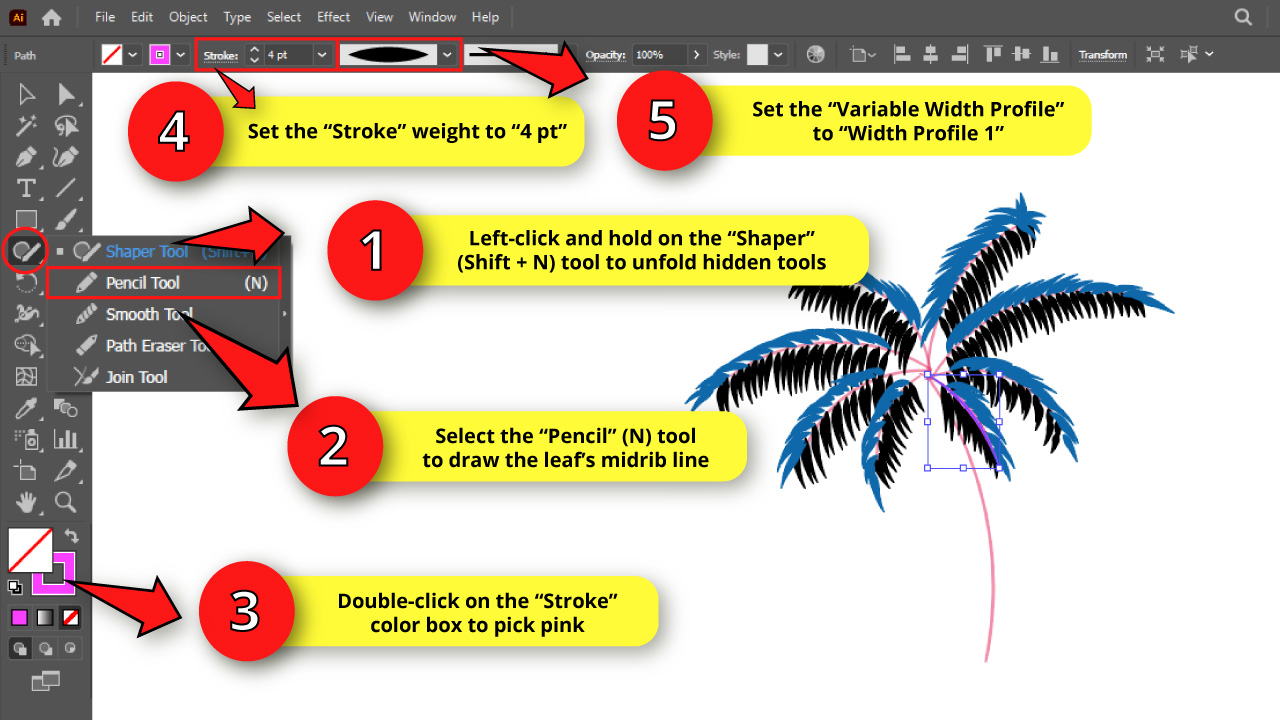

Now we need to use the “Pencil” (N) tool.
To select this tool, left-click and hold on the “Shaper” (Shift + N) tool to unfold the hidden tools.
Then click on the “Pencil” (N) tool to select it, or press the “N” key to shortcut it.
Draw a line as the leaf midrib (the middle stem of the leaf) using the sketch lines as a guide.
Double-click on the “Stroke” color box to select a color. I’ll use pink this time.
Then set the “Stroke” weight to “4 pt”, and select “Width Profile1” in “Variable Width Profile”.
Step 24: Finish Drawing the Leaves Midribs
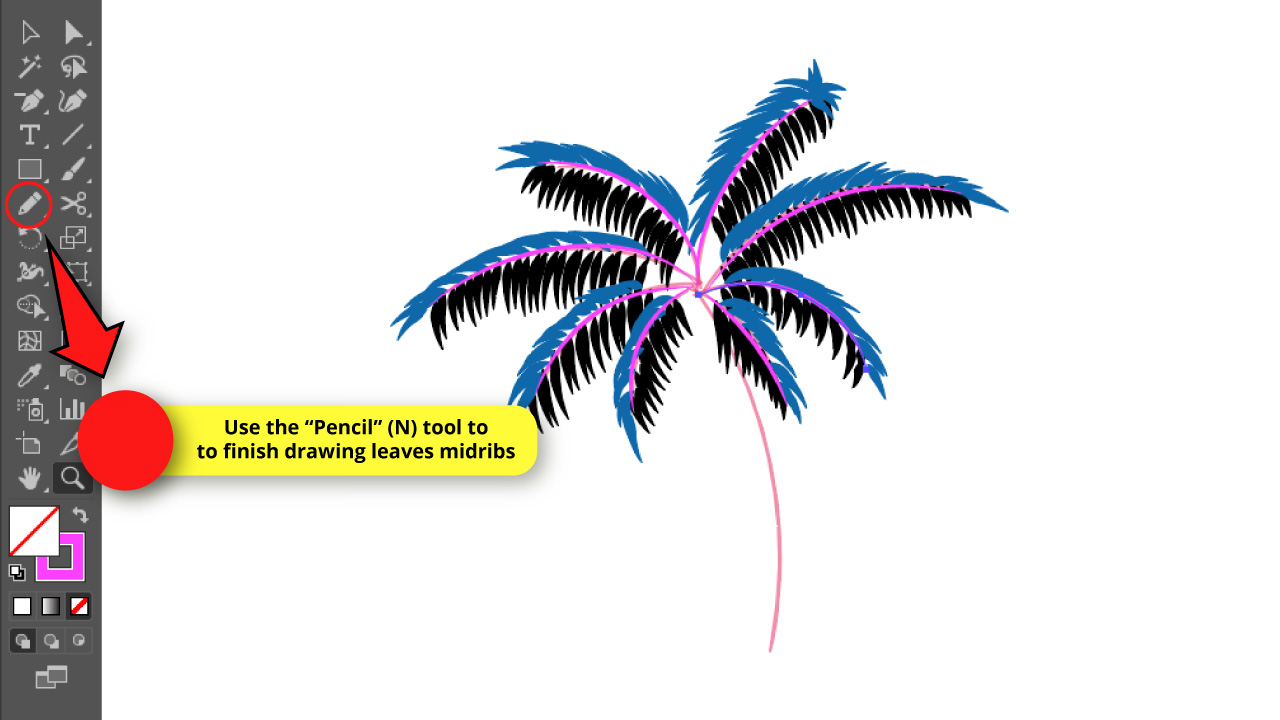

Repeat the previous step until you complete all the leaves midribs.
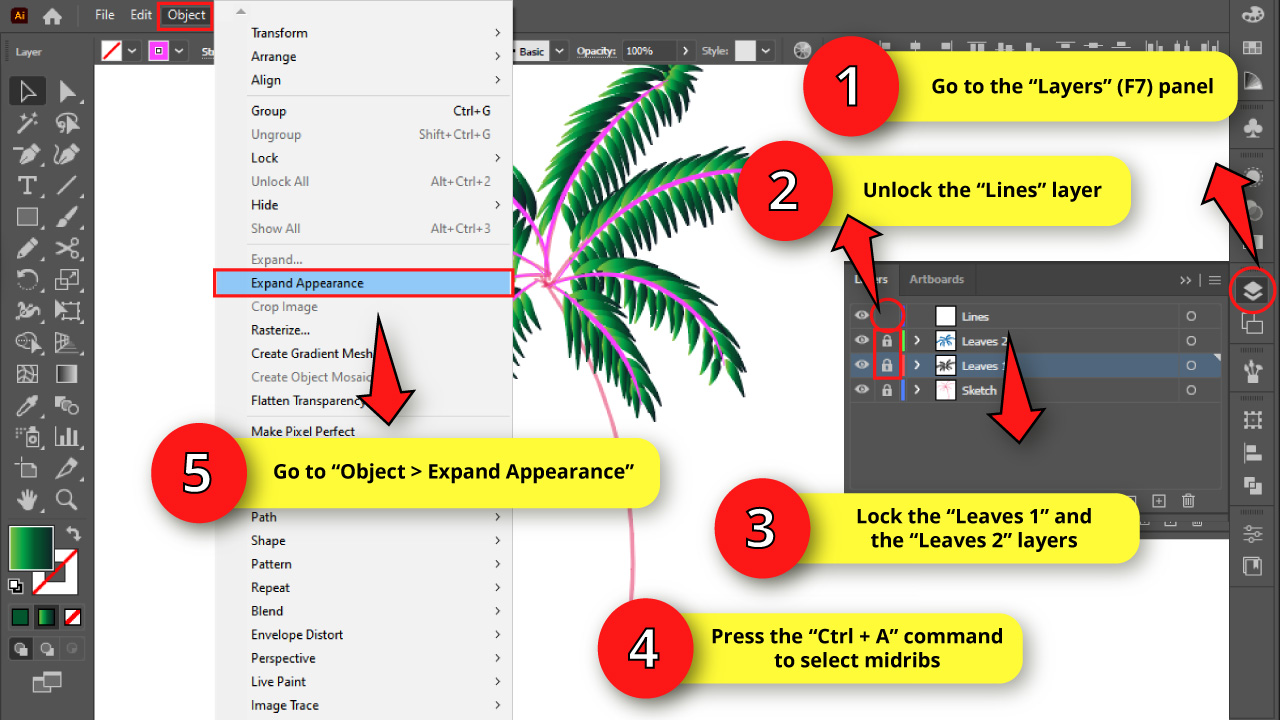
Step 25: Unlock “Leaves 1” and “Leaves 2” Layers
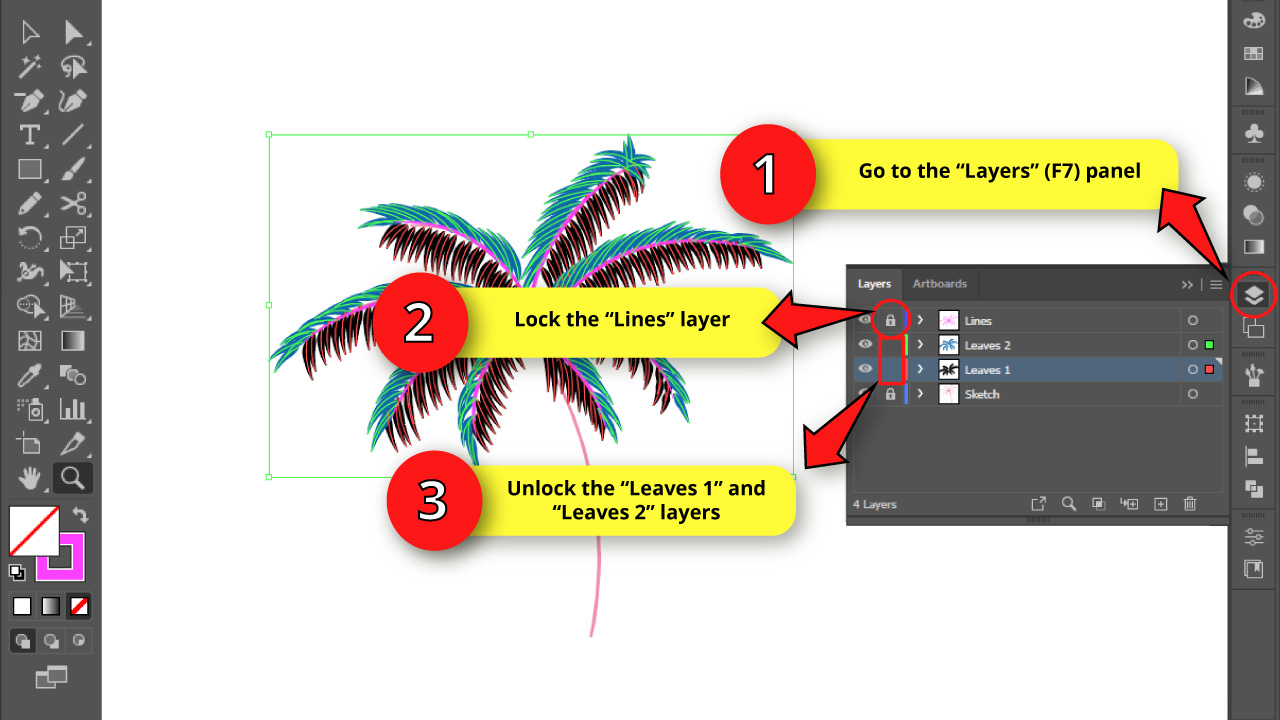

Go to the “Layers” (F7) panel and unlock the “Leaves 1” and “Leaves 2” layers, while you lock the “Lines” layer.
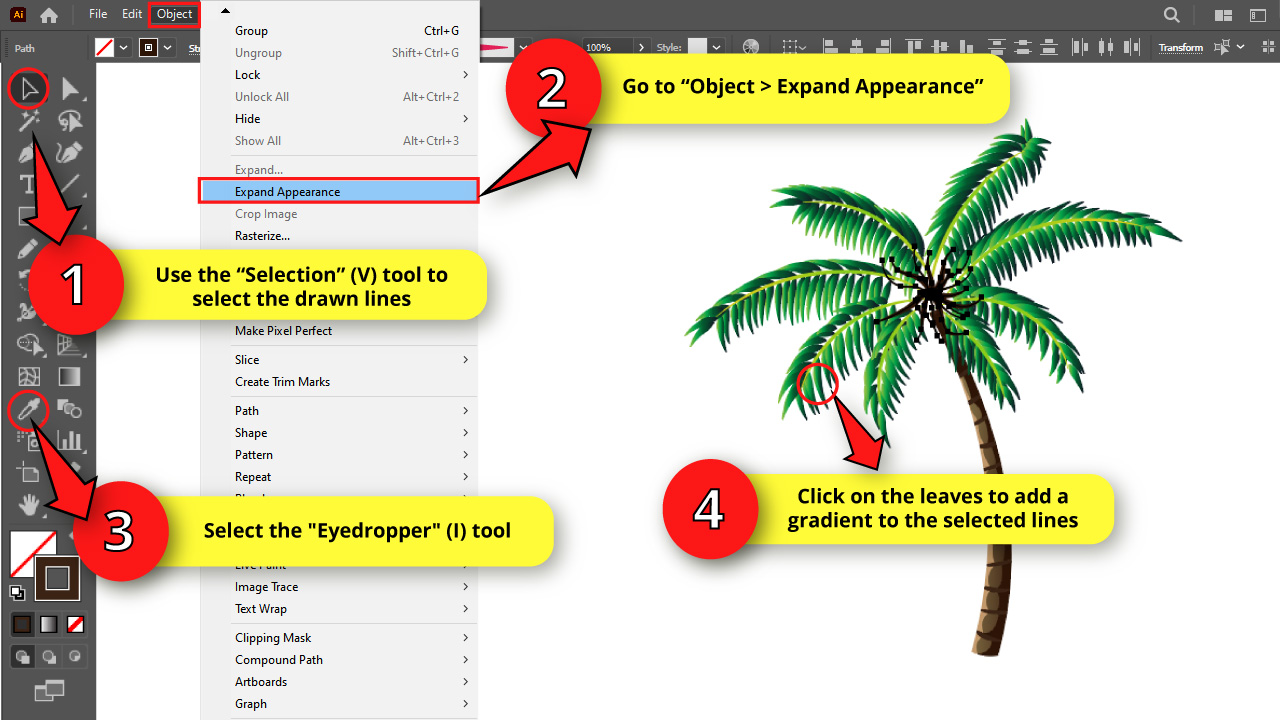
Step 26: Expand Leaves
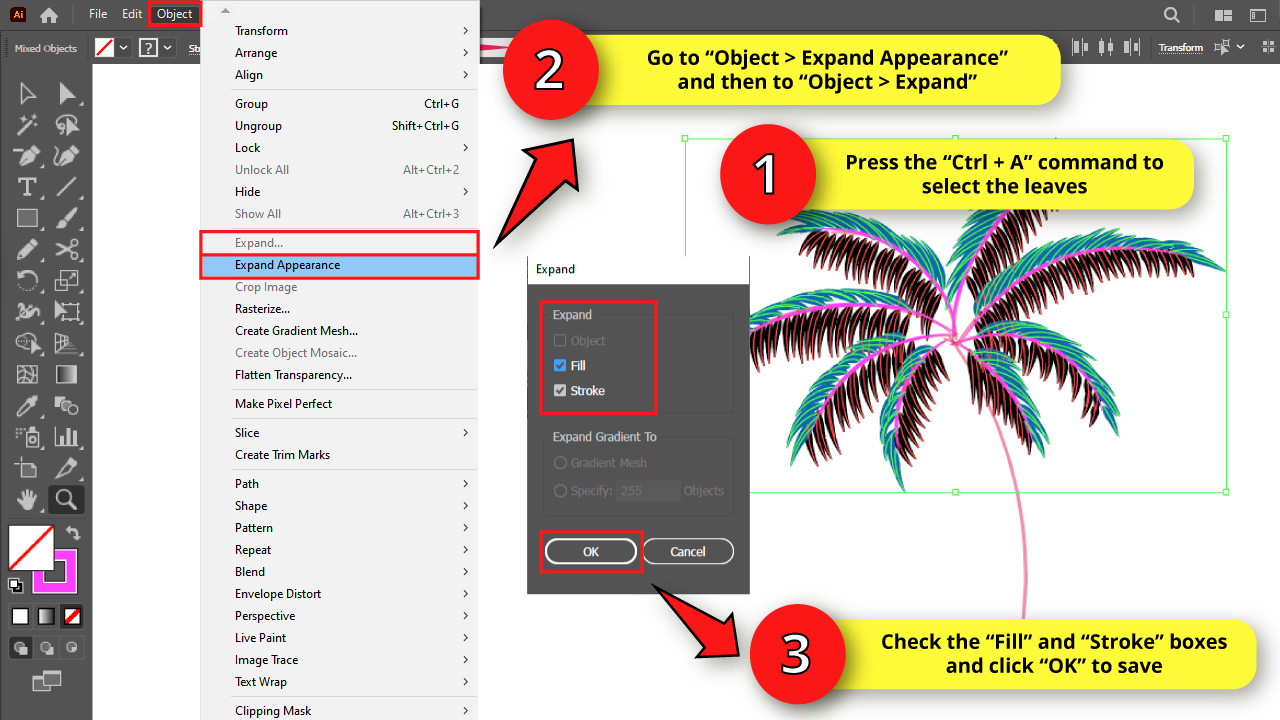

Select all the leaf traces using the “Selection” (V) tool or by pressing the “Ctrl + A” command to select all.
Now go to “Object > Expand Appearance” on the menu at the top of the screen.
Then go to “Object > Expand”. Once you have done this last action, the “Expand” options window will open.Make sure that both “Fill” and “Stroke” boxes are selected, and then click “OK” to save.
This is to convert the paths to objects.
Step 27: Add Gradient for Leaves
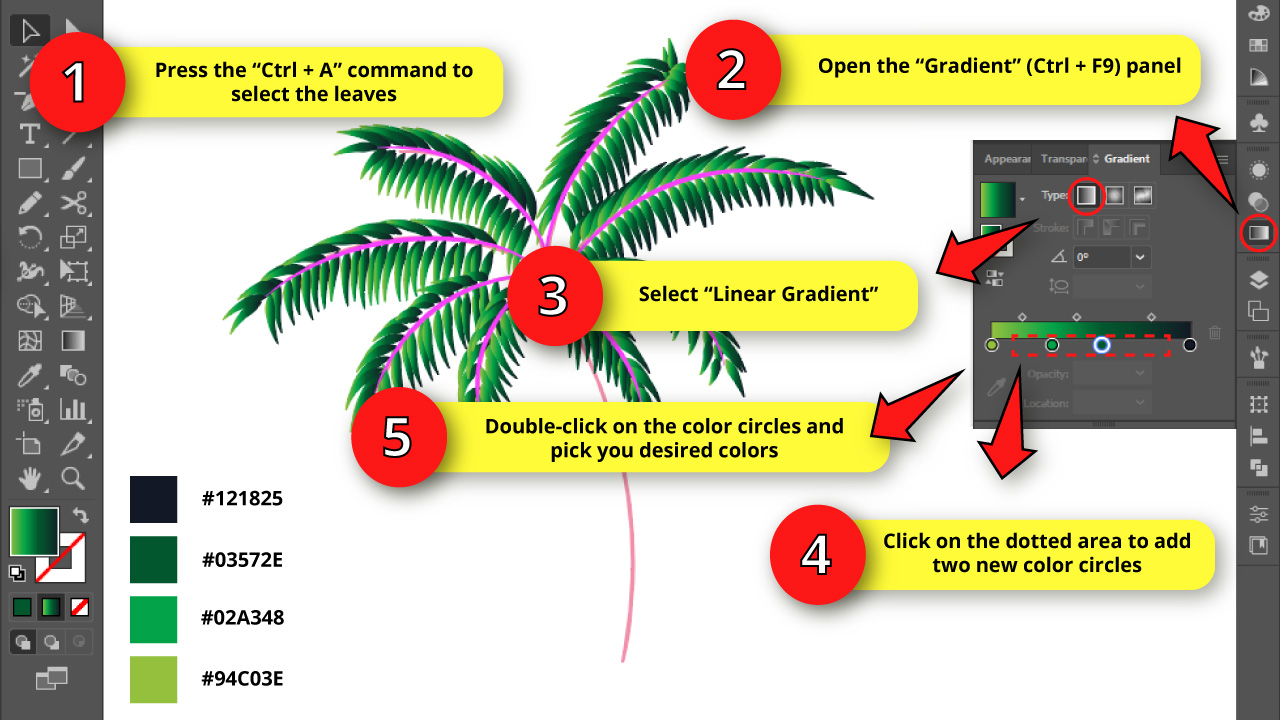

Select all the leaves again by pressing “Ctrl + A” command to select all.
Now, we need to use gradients. To use them, go to the “Gradient” (Ctrl + F9) panel. This panel is usually located on the right side toolbar.
If you can’t find it, you may have to enable it first by going to “Window > Gradient” on the menu at the top of the screen.
Once you are on the “Gradient” (Ctrl + F9) panel, select “Linear Gradient”. A black and white linear gradient will apply on our leaves.
To adjust the colors, click twice between the color circles to add two new circles.
Left-click and hold on the new circles as you drag them along to the gradient line to place them in almost equidistant spots.
To change the gradient color, double-click on the color circles and select your desired color.
I’ll use the following green shades, ordered from darkest to lightest:
#121825
#03572E
#02A348
#94C03E
Once you apply the colors, then you can rearrange the circles to get your desired gradient.
Step 28: Expand Midrib Lines

Go to the “Layers” (F7) panel and unlock the “Lines” layer, while you lock the “Leaves 1” and “Leaves 2” layers.
Then select all midribs by pressing the “Ctrl + A” command.
Then go to “Object > Expand Appearance” followed by “Object > Expand”, both located on the menu at the top of the screen.
Step 29: Make Compound Path for Midribs
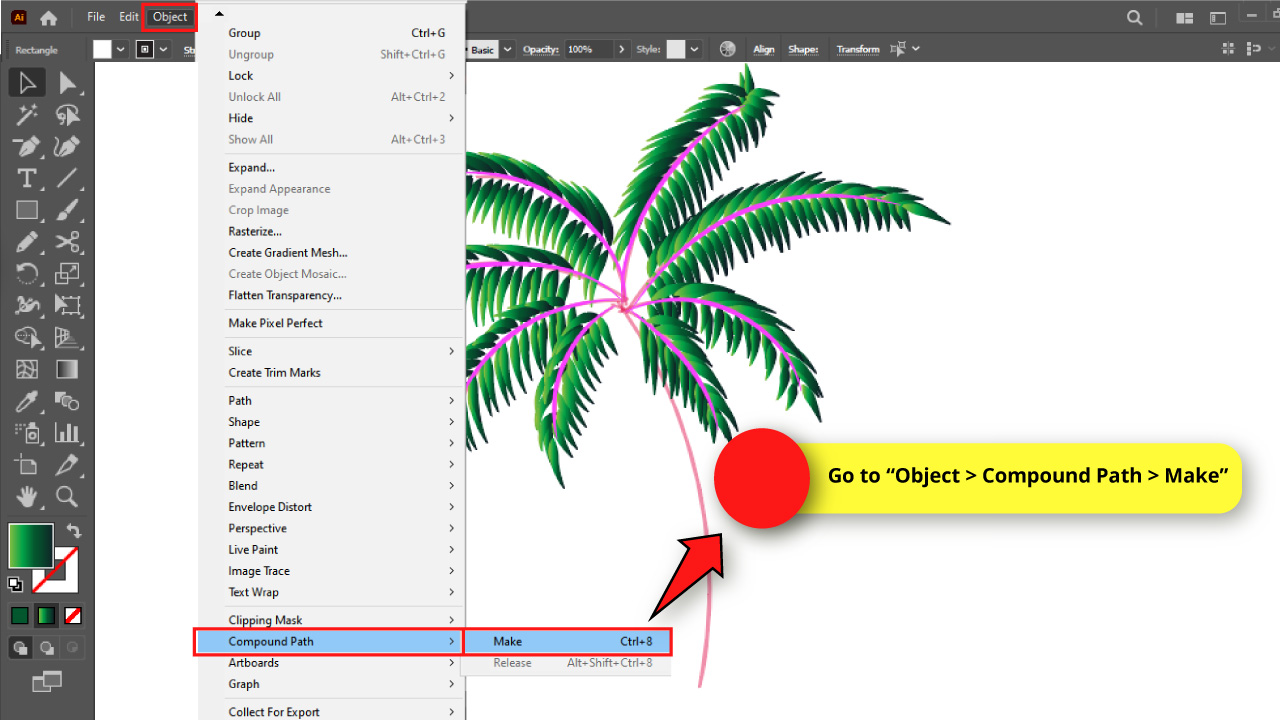

With the midribs selected, go to “Object > Compound Path > Make” on the menu at the top of the screen, or press the “Ctrl + 8” command to shortcut it.
Step 30: Add Gradient for Midribs
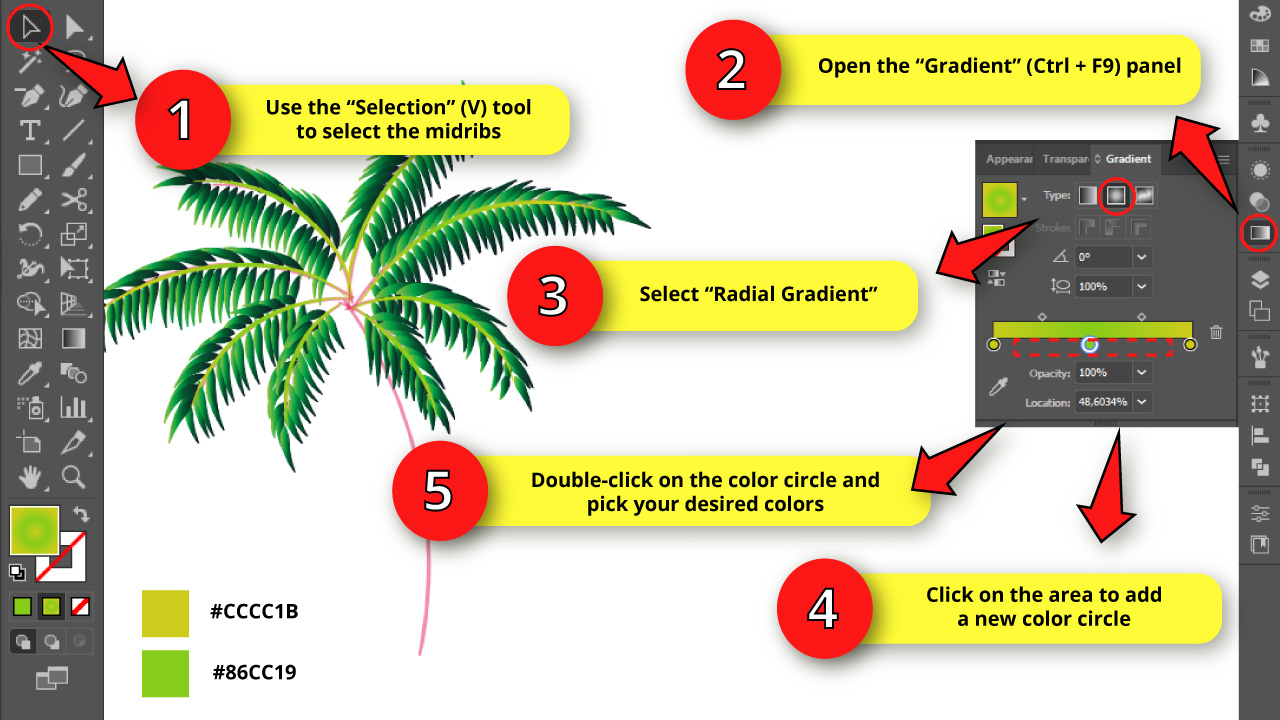

Select all the midribs using the “Selection” (V) tool, or by pressing the “Ctrl + A” command.
Then go to the “Gradient” (Ctrl + F9) panel and select “Radial Gradient”. A white and black radial gradient will apply on the midribs.
Click somewhere between the color circles to add a new circle. Then double-click on the circles to pick a color.
Set the color gradient as the following yellowish green shades:
#CCCC1B
#86CC19
#CCCC1B
Notice that both edges’ color is the same.
Step 31: Make New Layers for the Trunk

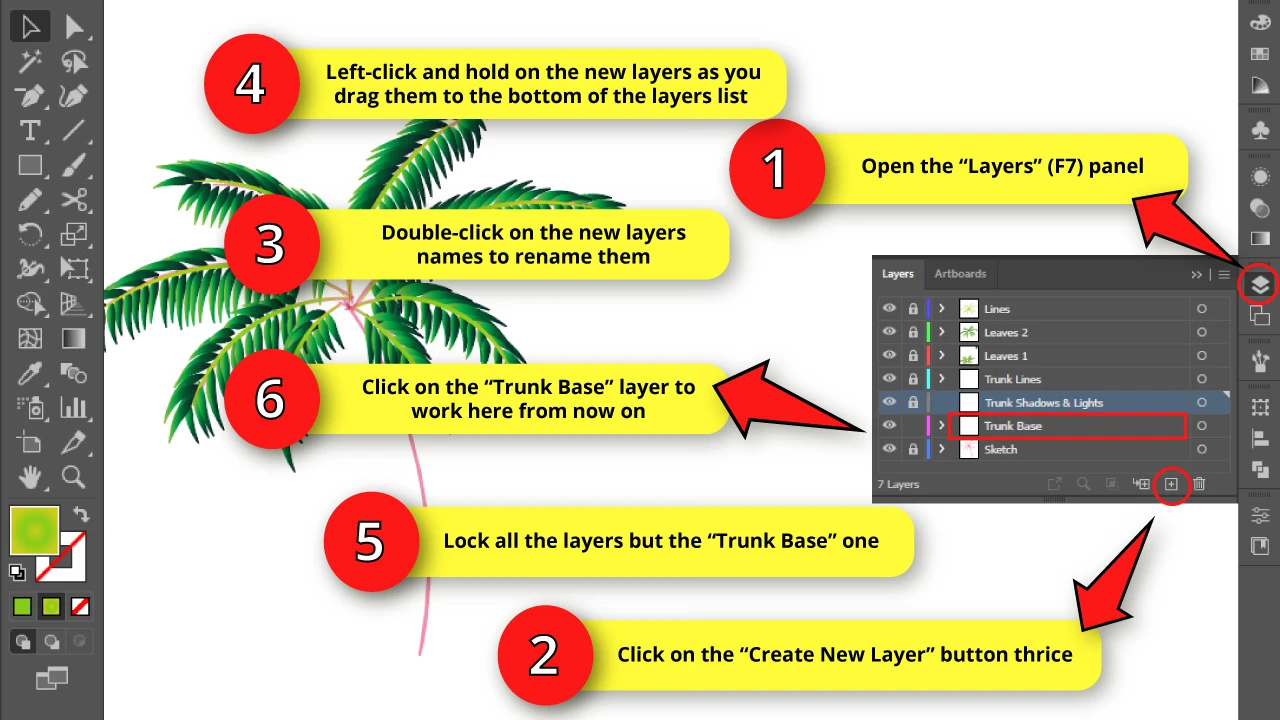
Go to the “Layers” (F7) panel.
Click three times on the “Create New Layer” button to create three new layers.
Double-click on each of the new layers’ names and rename them as “Trunk Lines”, “Trunk Shadows & Lights” and “Trunk Base”, following this order.
Move these three new layers to the bottom of the list, maintaining the stated order.
To move the layers, left-click and hold as you drag them to the bottom of the list.
To select several layers at the same time, hold the “Shift” key while you are selecting the layers.
Lock all layers but the “Trunk Base” one, by clicking on the empty box until the lock icon displays.
Finally, click on the “Trunk Base” layer to work here from now on.
Step 32: Make a Curved Line for the Trunk

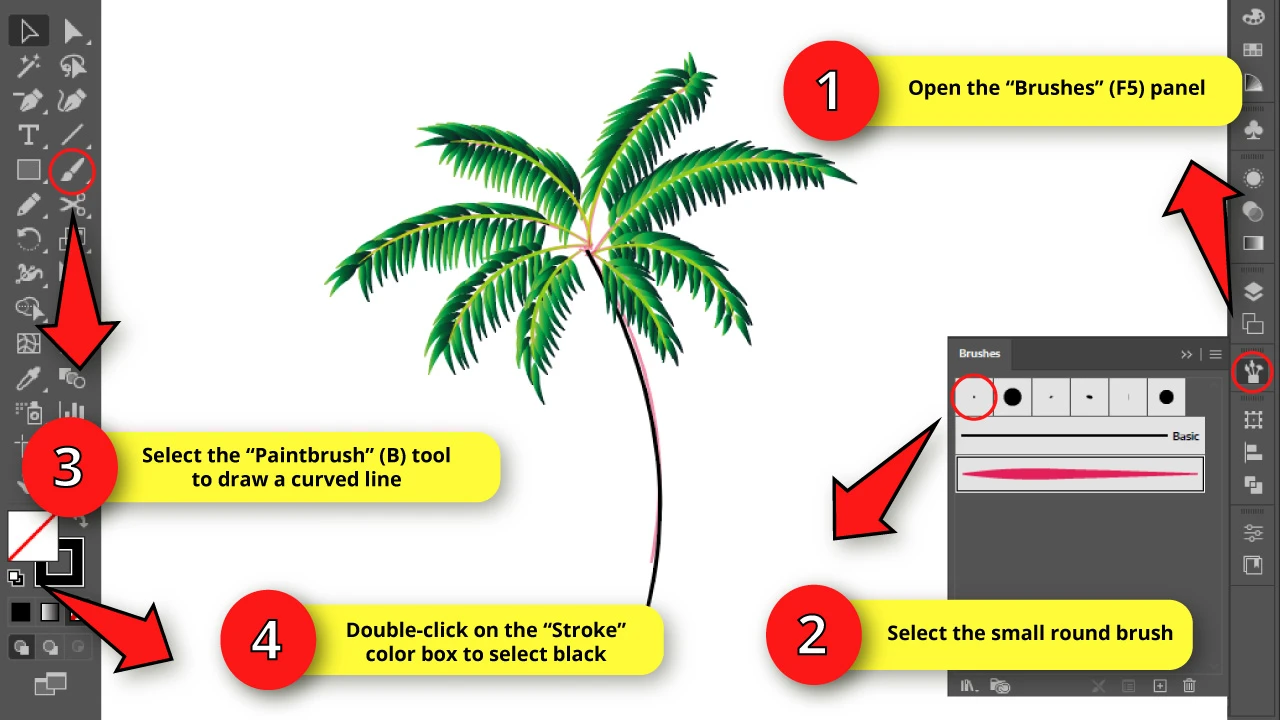
Go to the “Brushes” (F5) panel, and select the same small round brush we modified on “Strep 3”.
Select the “Paintbrush” (B) tool, and then double-click on the “Stroke” color box to select black.
Next, use the “Paintbrush” (B) tool to draw a curved line based on the sketch line as a guide.
Step 33: Make a Copy of the Curved Line

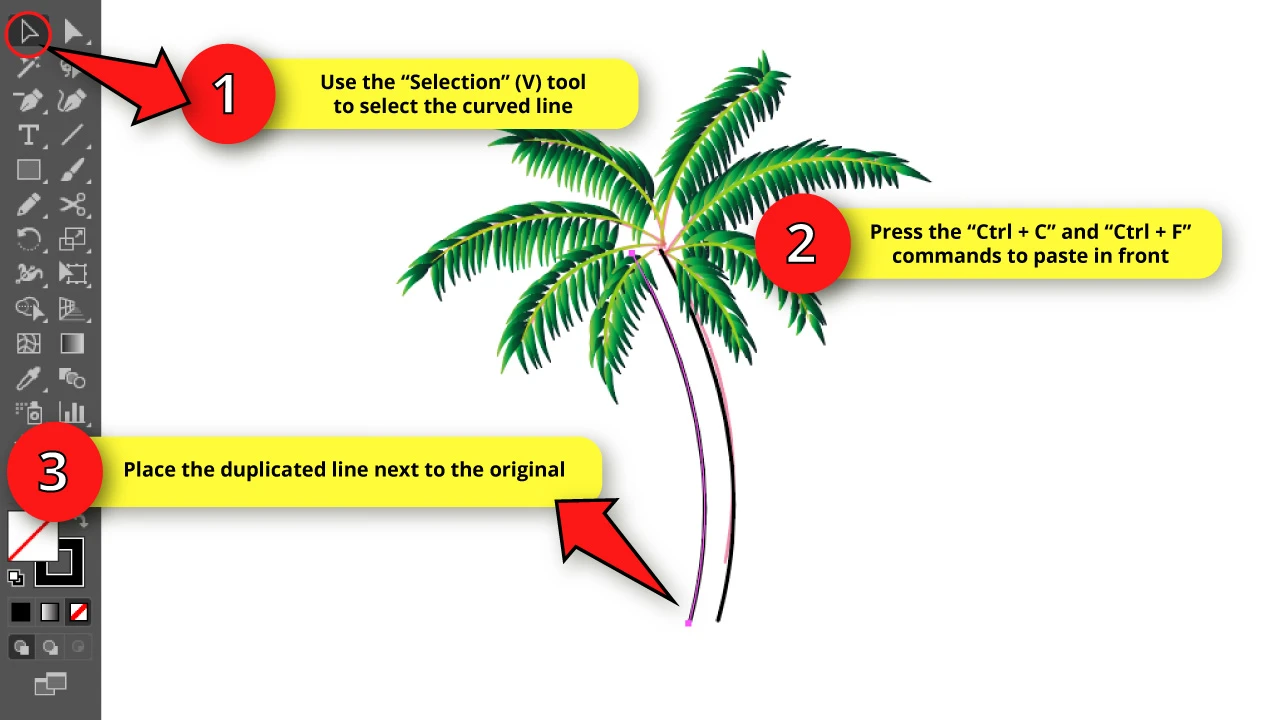
In this step will make a copy of the curved line.
For this, select the recently created line with the “Selection” (V) tool, and then press the “Ctrl + C” and “Ctrl + F” commands to paste in front.
Move the duplicated line right next to the original, slightly dragging it to its side.
Step 34: Move the Anchor Point of the Curved Line


Now, we need to move the line’s anchor point.
To move anchor points, use the “Direct Selection” (A) tool located on the left side toolbar.
Left-click and hold on the duplicated line’s top anchor point as you drag it to make the top end of the trunk narrower than the bottom one.
Step 35: Close the Trunk Shape
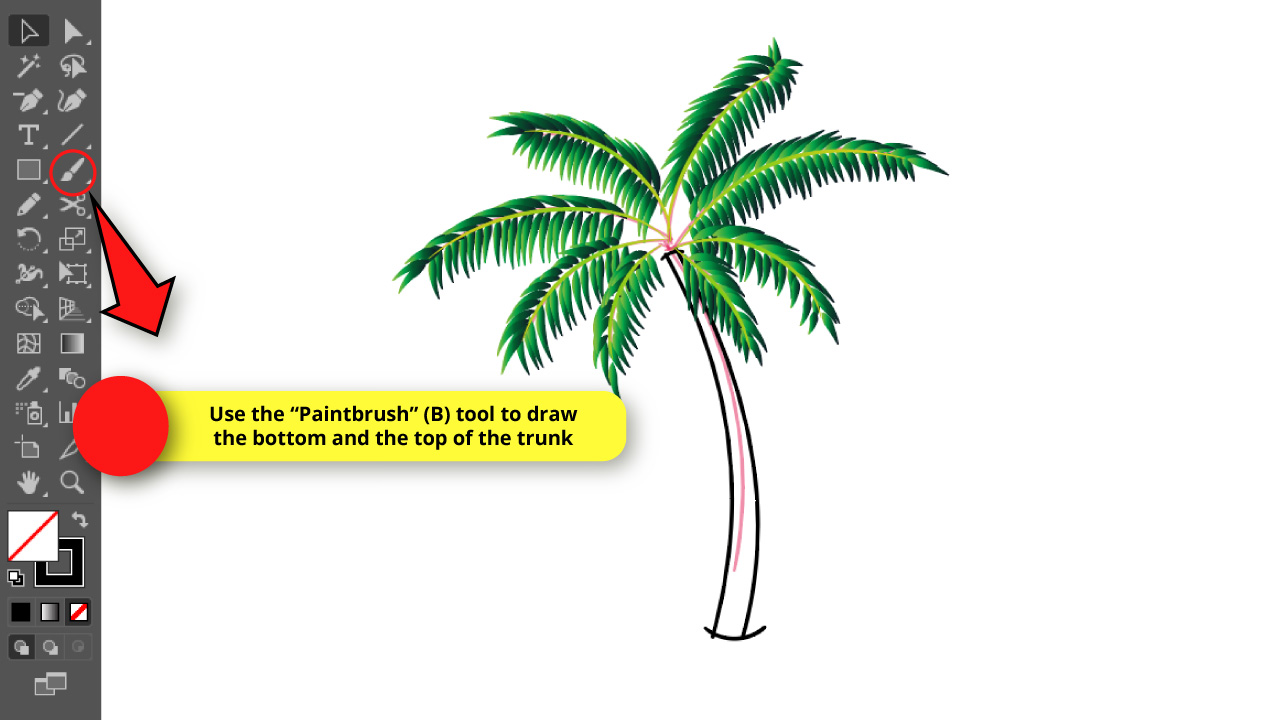
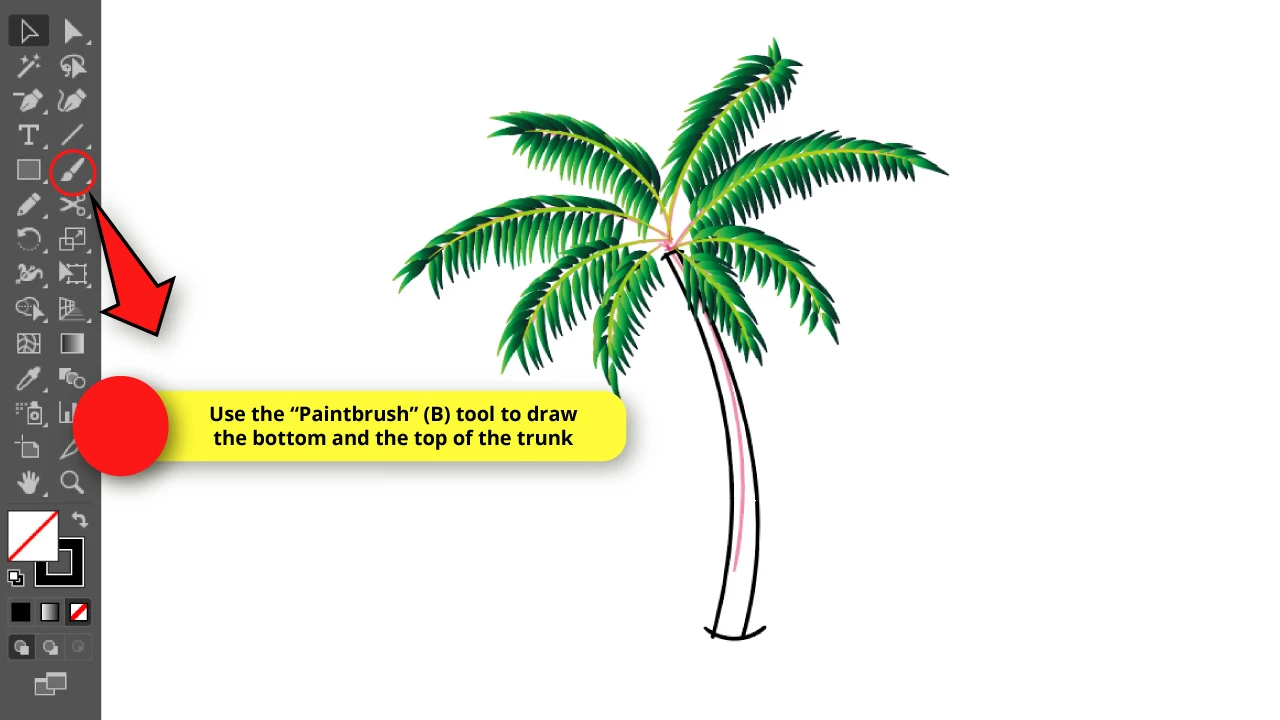
Use the “Paintbrush” (B) tool to draw a concave arc for the bottom of the trunk, and a convex arc for the top to enclose the trunk shape.
The lines don’t need to be perfect starting and finishing in the correct place.
Step 36: Paint the Trunk

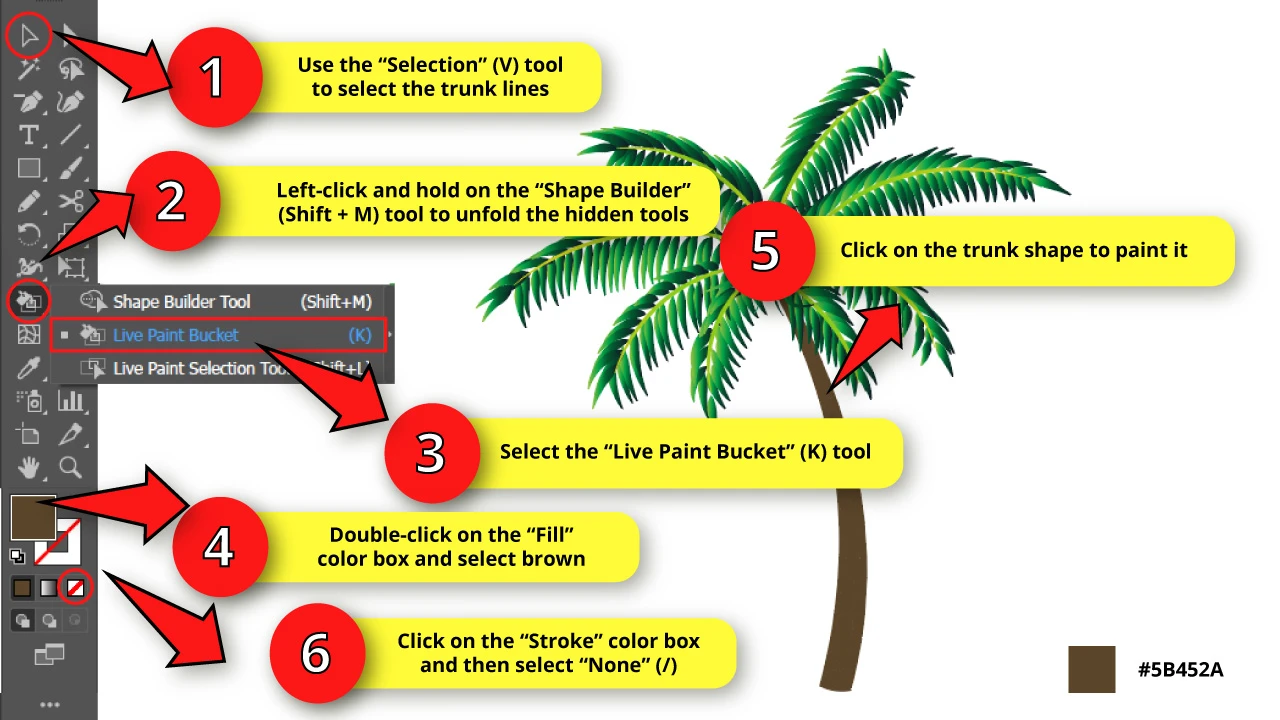
Select all the trunk lines with the “Selection” (V) tool, or by pressing the “Ctrl + A” command.
Now we need to fill color, so we will use the “Live Paint Bucket” (K) tool.
To do so, left-click and hold on the “Shape Builder” (Shift + M) tool to unfold the hidden tools.
Select the “Live Paint Bucket” (K) tool from the unfolded menu. Or you can press the “K” key from your keyboard to shortcut it.
Double-click on the “Fill” color box to pick a mid brown color. I’ll use the #5B452A.
Then click on the trunk to paint it.
Finally, click on the “Stroke” color box and select the “None” (/) color, to remove the stroke lines.
Step 37: Expand the Trunk

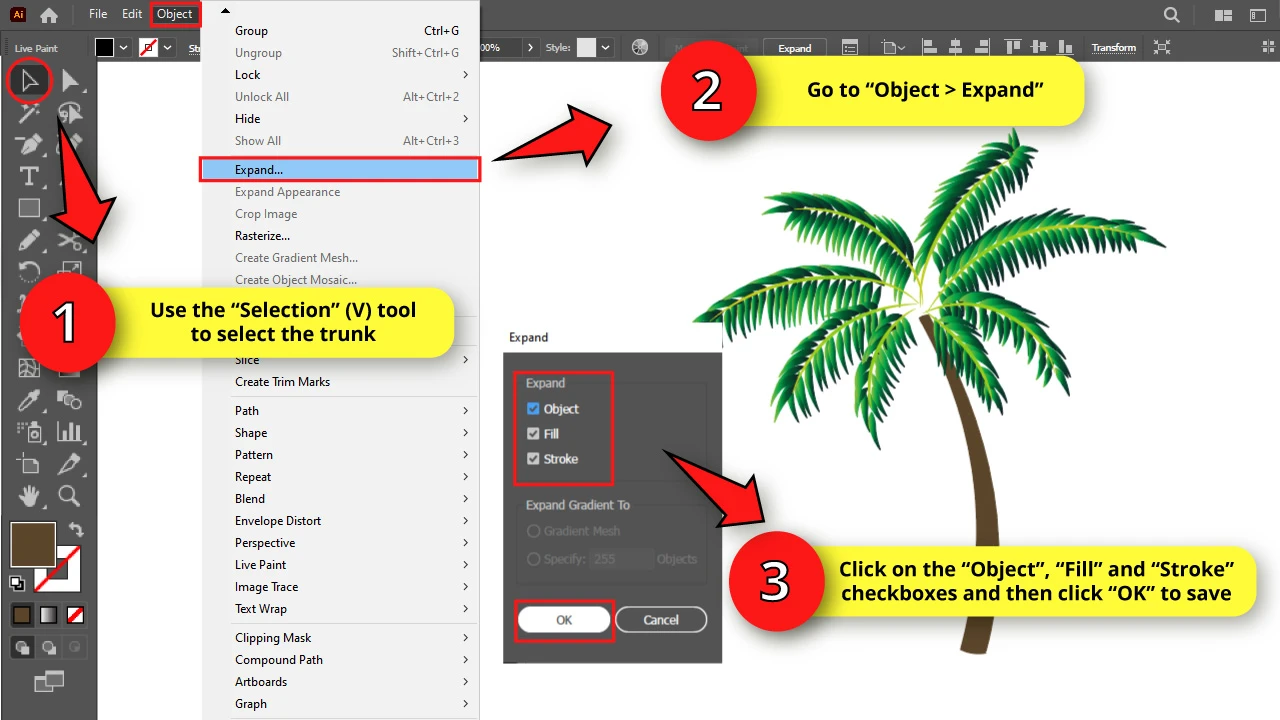
With the trunk selected, go to “Window > Expand”.
In the pop up window make sure to check “Object”, “Fill” and “Stroke” boxes, and click “OK” to save.
Step 38: Draw Some Horizontal Lines
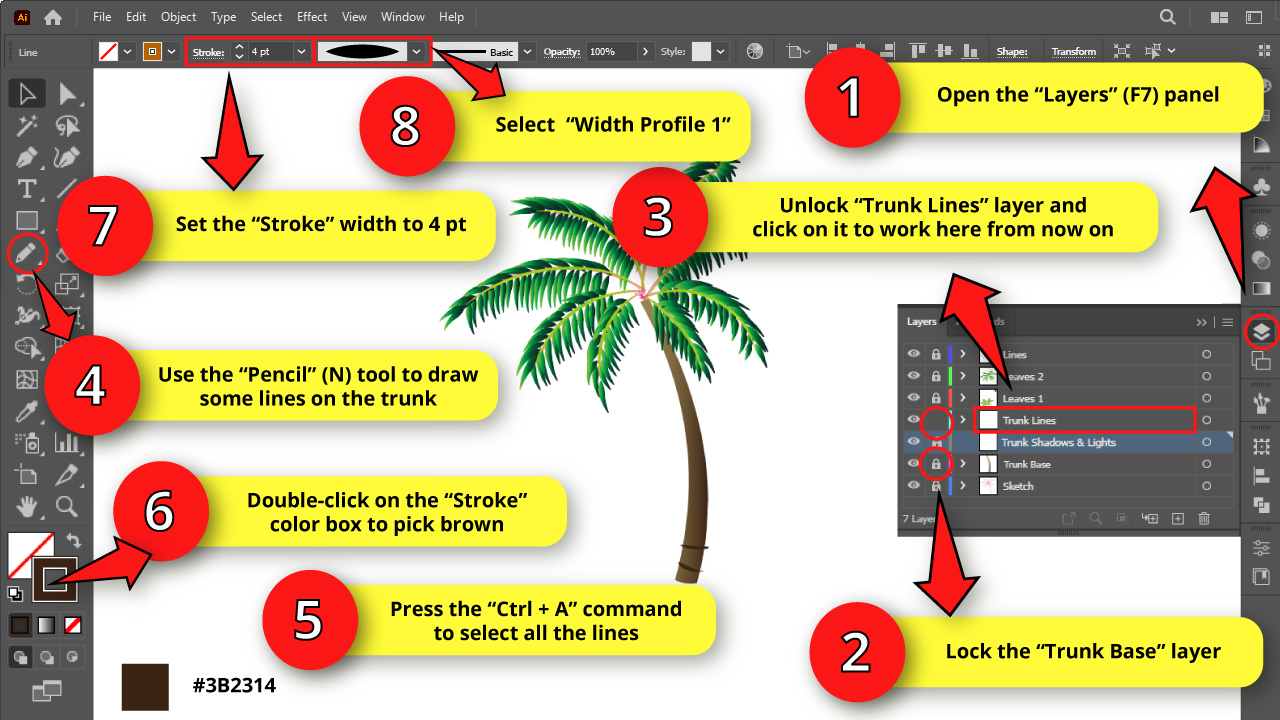

Go to the “Layers” (F7) panel and lock the “Trunk Base” layer, while you unlock the “Trunk Lines” layer.
Select the “Pencil” (N) tool and draw some horizontal lines across the palm tree trunk.
Using the “Selection” (V) tool, select the lines you have drawn, and double-click on the “Stroke” color box to select a dark brown color. I’ll use #3B2314.
Next, set the “Stroke” weight to “4 pt” and the “Variable Width Profile” to “Width Profile 1”.
Step 39: Duplicate the Horizontal Lines
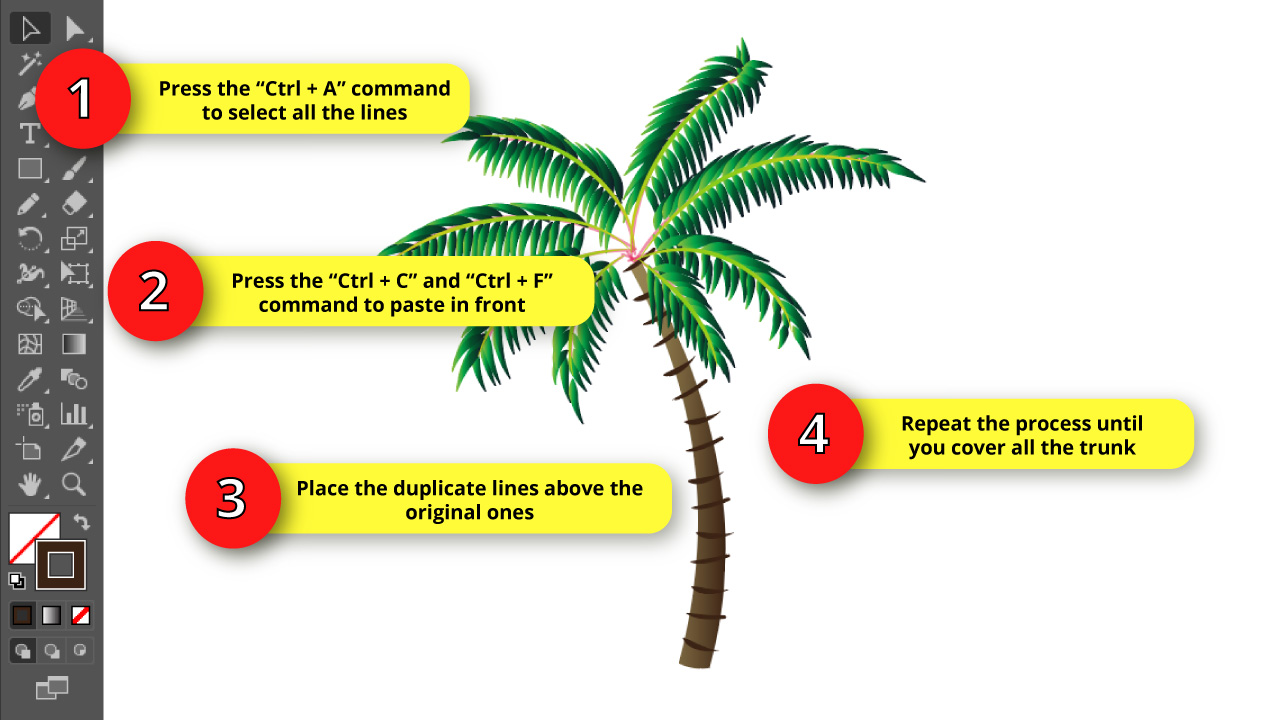
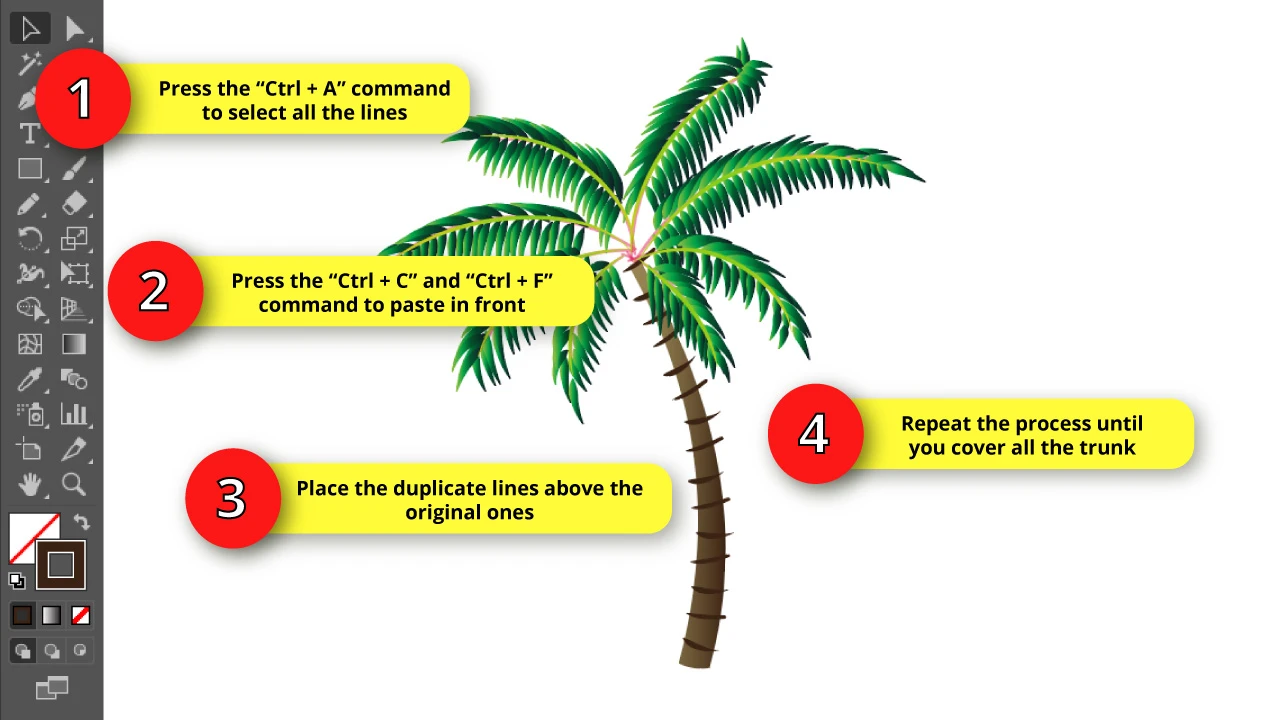
With the horizontal lines selected, press the “Ctrl + C” and then the “Ctrl + F” commands to paste in front.
Then drag and place the copies above to the original ones.
Repeat the process until you cover all the trunk.
Step 40: Adjust the Pencil Setting for the Trunk Shadows

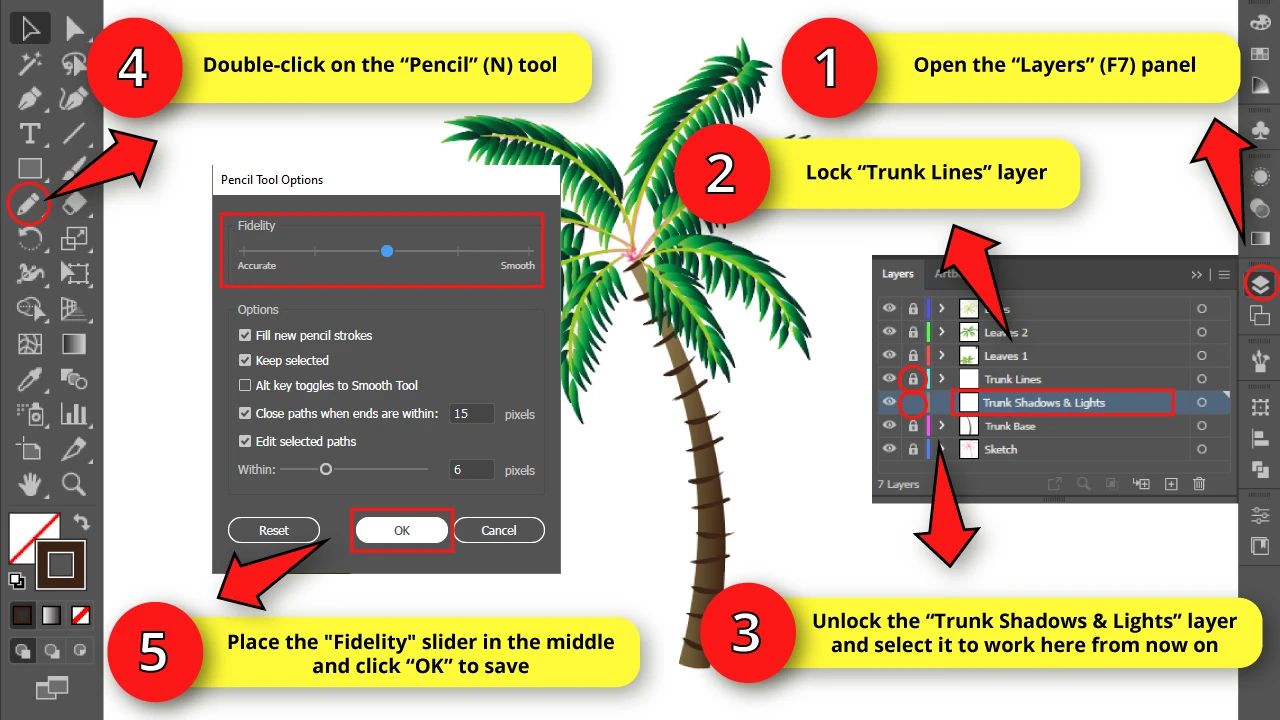
Go to the “Layers” (F7) panel and lock the “Trunk Lines” layer, while you unlock the “Trunk Shadows & Lights” layer.
Then click on the “Trunk Shadows & Lights” layer to work here from now on.
Double-click on the “Pencil” (N) tool to open the “Pencil Tool Options” window.
Place the “Fidelity” slider in the middle. Finally, click “OK” to save.
We need the “Fidelity” to be more accurate in comparison to what we’d usually use, because we will work on smaller details.
Step 41: Draw the Trunk Shadows

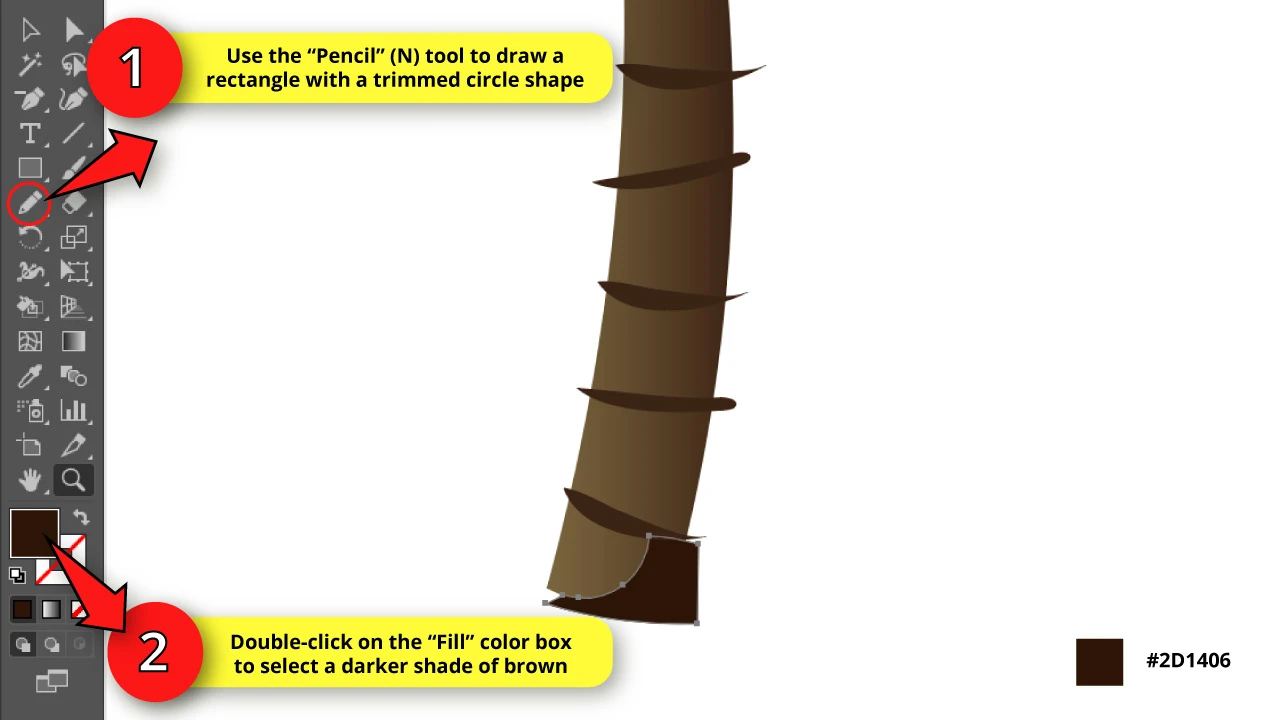
Select the “Pencil” (N) tool and then double-click on the “Fill” color box to select a darker brown. I’ll use the #2D1406 shade of brown.
Use the “Pencil” (N) tool to draw a shape in the form of a rectangle with a trimmed circle at the trunk’s bottom.
You don’t need to be extremely accurate. You can surpass the trunk limits. We’ll get rid of the surplus later.
Step 42: Finish Drawing the Trunk Shadows
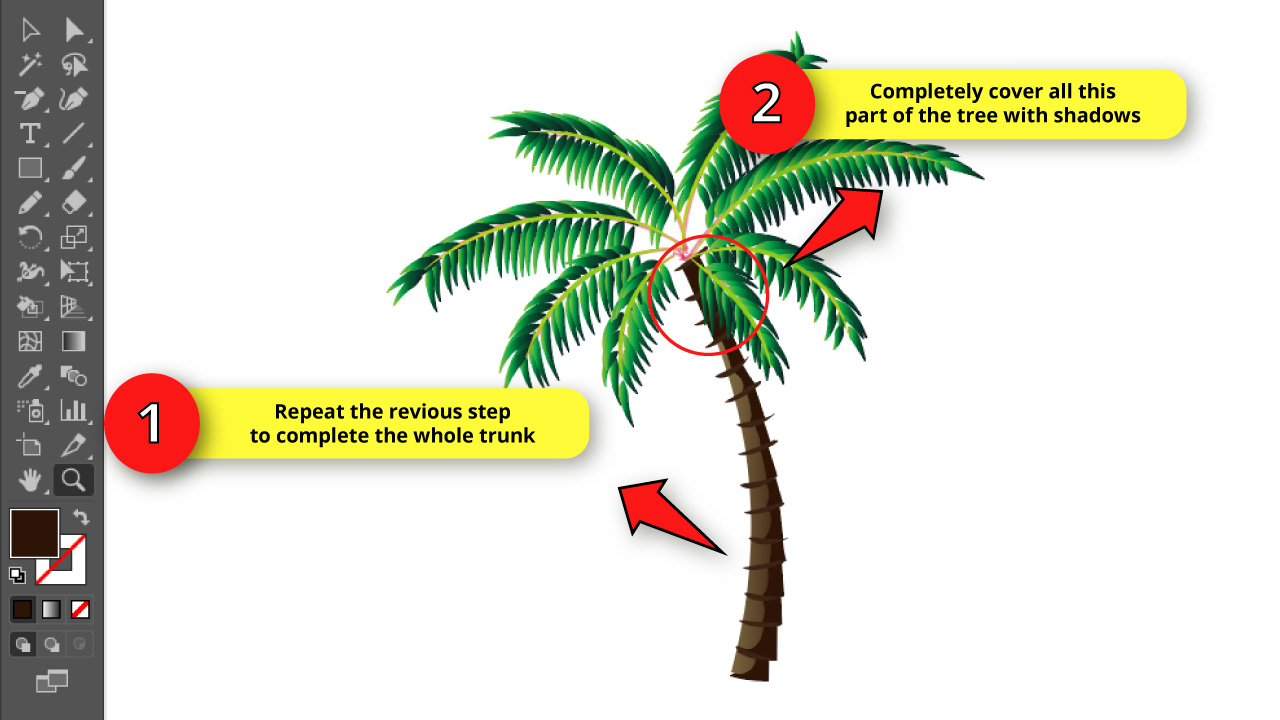
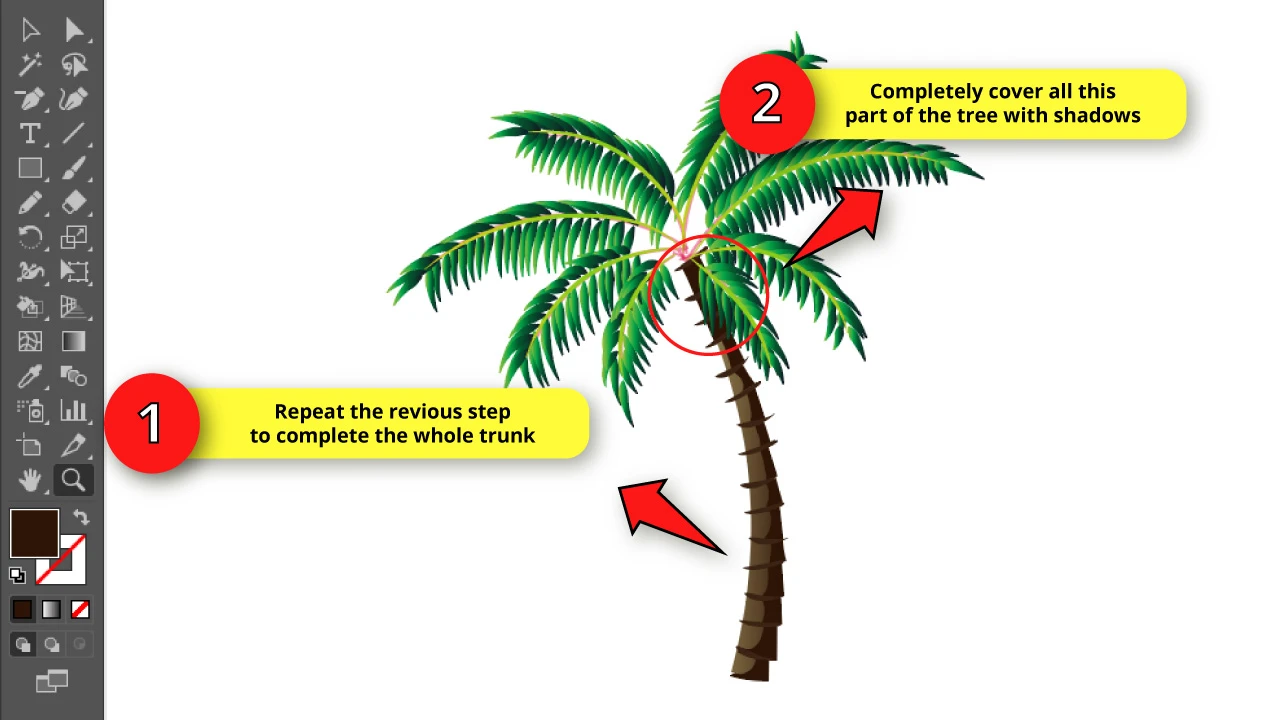
Repeat the previous step to complete the whole trunk.
For the trunk’s top area, just make a simple rectangle to cover all of it with shadows.
This is because the palm tree leaves wouldn’t allow any light in for that part of the trunk.
Step 43: Draw the Trunks Lights

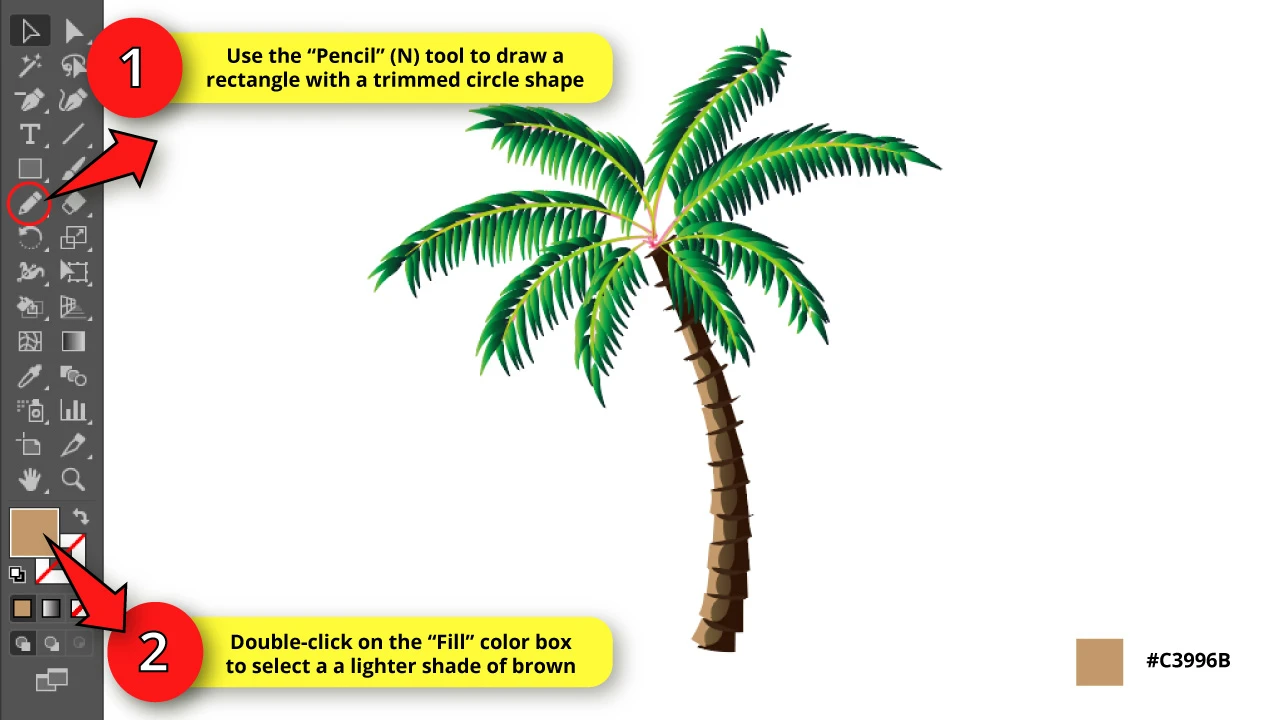
Select the “Pencil” (N) tool and then double-click on the “Fill” color box to select a lighter brown. I’ll use the #C3996B shade of brown.
Use the “Pencil” (N) tool to draw a slightly different shape than the one we used for the shadows, but reflected like a mirror now. We’ll use this one for the lights.
Keep drawing until you reach the area completely filled with shadows.
Step 44: Unlock All Trunk Related Layers

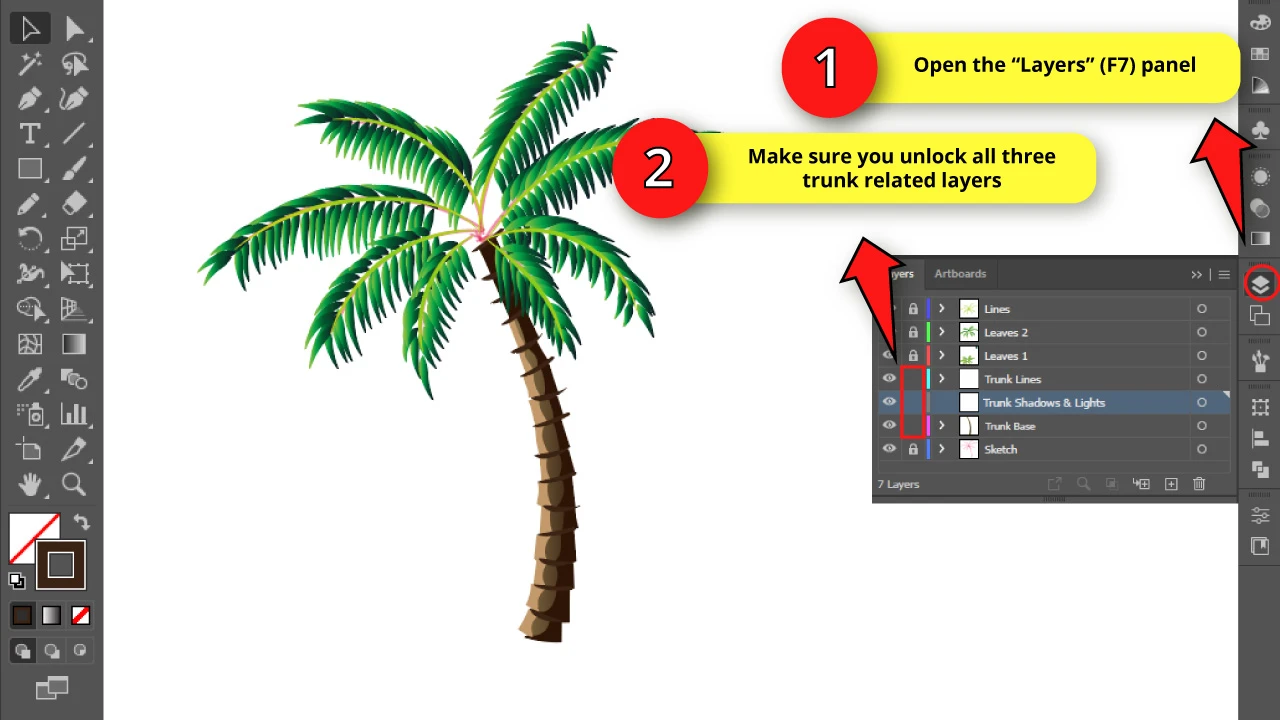
Go to the “Layers” (F7) panel and unlock all three layers related to the trunk: “Trunk Lines”, “Trunk Shadows & Lights” and “Trunk Base”.
Step 45: Trim the Trunk Objects


Now, we need to combine all palm tree trunk parts.
To combine shapes, go to the “Pathfinder” (Shift + Ctrl + F9) panel located on the right side toolbar.
If you can’t find it, you may have to enable it first by going to “Window > Pathfinder” on the menu at the top of the screen.
Once you are on the “Pathfinder” (Shift + Ctrl + F9) panel, select all the trunk parts by pressing the “Ctrl + A” command.
Then, click on the “Divide” button located at the bottom of the left side of the panel.
Step 46: Get Rid Of the Surplus Areas
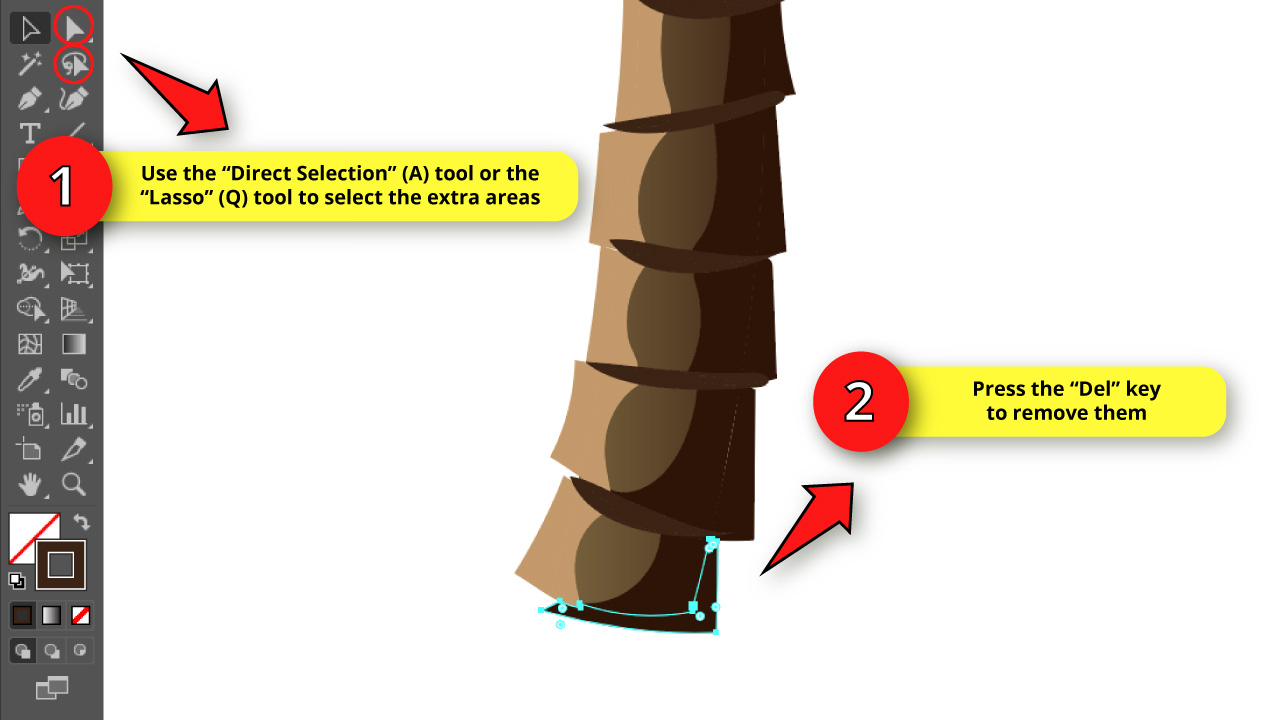

Now all of the trunk areas are divided, so we will be able to get rid of the surplus areas with ease.
Use the “Direct Selection” (A) tool to select the extra areas, and then press the “Del” key from your keyboard to delete them.
You can also use the “Lasso” (Q) tool to select several objects at the same time.
Step 47: Removing the Trunk Surplus Areas Hidden Behind the Leaves

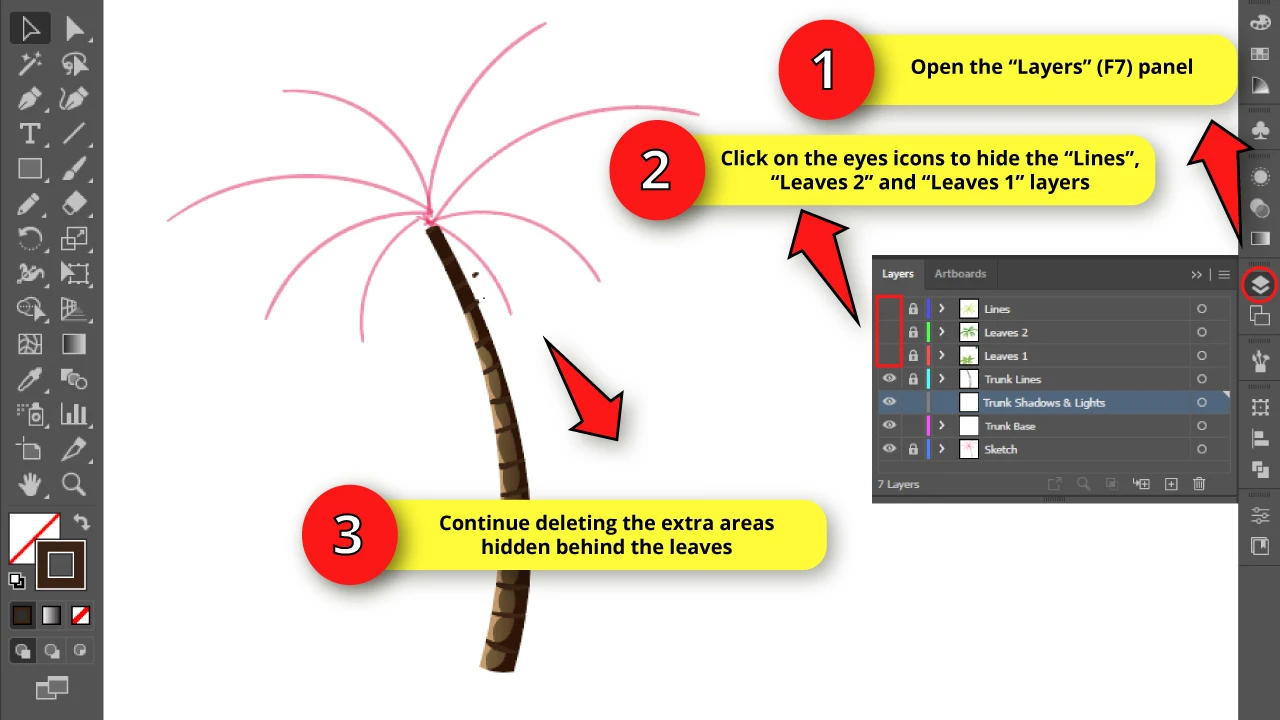
In the trunk area hidden behind the leaves, the best thing you can do is to hide the leaves layers so you can work better there.
To get this done, go again to the “Layers” (F7) panel, and click on the eye icon for the “Leaves 1”, “Leaves 2” and “Lines” layers to hide them.
Now you can continue deleting the extra areas.
Step 48: Create One Last Layer
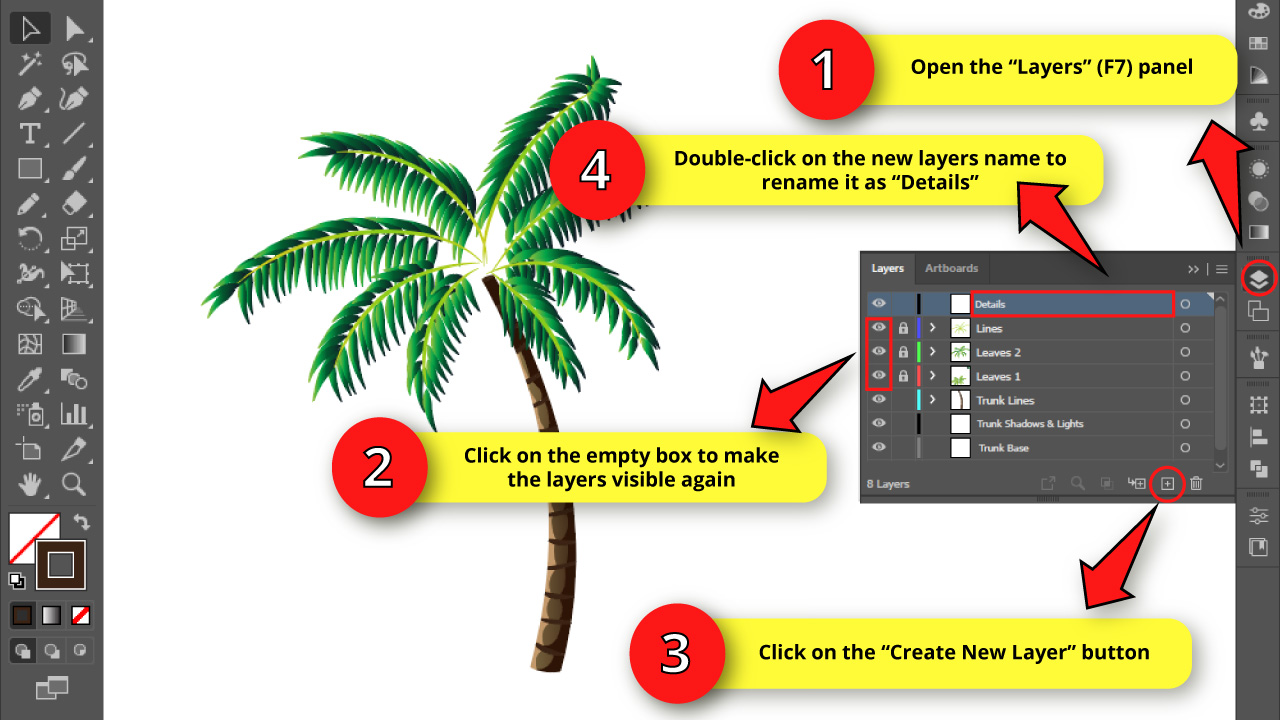

Go to the “Layers” (F7) panel and click on the empty boxes to enable visibility for the “Leaves 1”, “Leaves 2” and “Lines” layers again.
Then click on the “Create New Layer” button. Double-click on the new layer’s name, and rename it as “Details”.
Step 49: Draw the Details

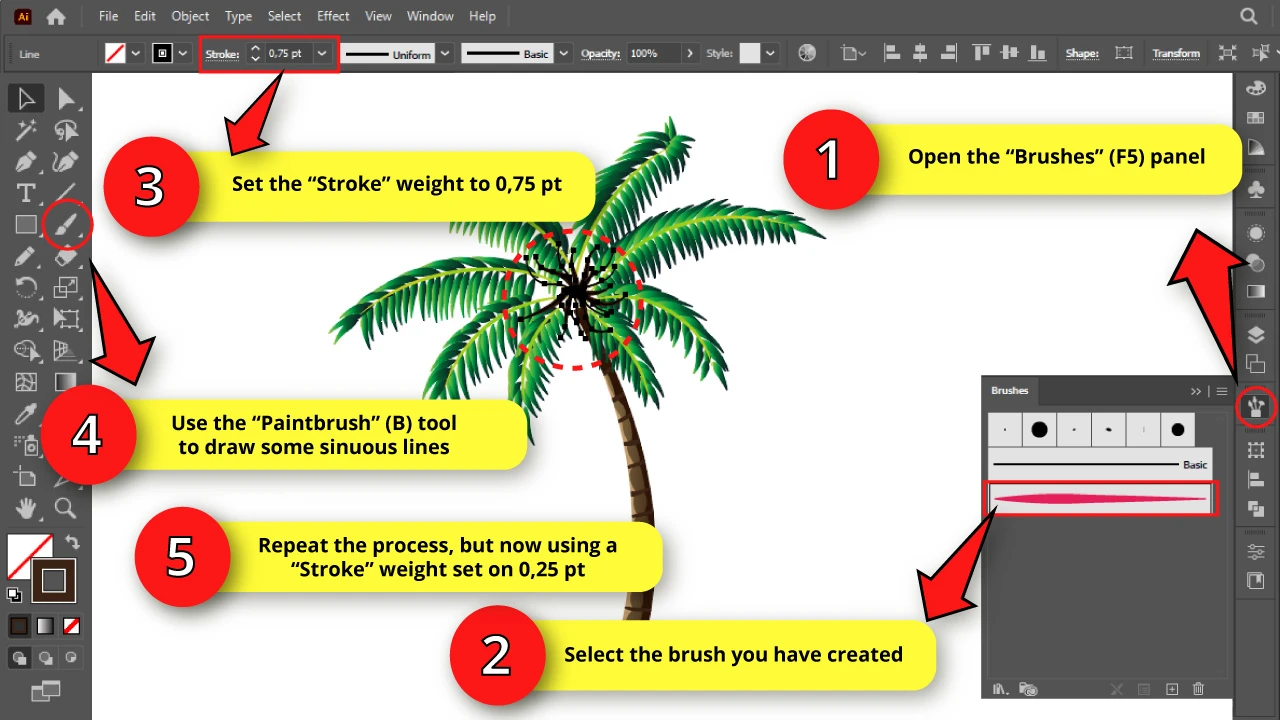
Go to the “Brushes” (F5) panel and select the brush we have created.
Set the “Stroke” weight to “0,75 pt”.
Then select the “Paintbrush” (B) tool and draw three or four sinuous lines, starting from the center to the outside of the leaves.
Next, change the “Stroke” weight to “0,25 pt” and continue drawing some more sinuous lines with the “Paintbrush” (B) tool.
Step 50: Expand and Paint the Details

Use the “Selection” (V) tool to select all the lines you have drawn on the previous step.
Then expand them by going to “Object > Expand Appearance”.
Make sure that these lines are still selected before you proceed.
Finally, select the “Eyedropper” (I) tool located on the left side toolbar, and then click on the leaves to pick their color.
Now the lines we have drawn are colored with the same gradient we used for the leaves.
Step 51: Delete Empty Layers and Group the Tree


Go to the “Layers” (F7) panel yet again and unlock all locked layers by clicking on their locks.
Select the “Sketch” layer, and delete it by clicking on the “Delete Selection” button.
Press “Ctrl + A” to select the whole tree and then press “Ctrl + G” to group all the objects. Now you’ll be able to handle it better.
Select the new empty layers and click on “Delete Selection” to delete them all.
These layers were emptied when we grouped the objects.
Finally, double-click on the remaining layer’s name (this is the layer where all the palm tree objects are grouped now) and rename it to “Palm Tree”.
The Result


Congratulations, you are done! You finally got your realistic palm tree.
Download our Palm Tree Vectors for FREE


On top of all of that, we would also like to gift you our completely free Palm Tree Vectors!
There is NO COPYRIGHT on these, as we created these palm trees from scratch.
To get the, all you need to do is to subscribe to our newsletter here and you will then immediately get a download link to download our FREE Palm Trees Vector Pack (Click on the image after you subscribed!)
Frequently Asked Questions on “How to Draw a Palm Tree in Illustrator”
How can I draw the sketch without a tablet?
You can sketch using a pencil and paper. Then take a photo or scan your drawing. Open the photo of your sketch in Illustrator. Set the “Opacity” to 50% and lock the layer. Create a new layer and work using the sketch as a reference.
How can I rotate the canvas view in Illustrator?
There is a feature in newer Illustration versions that allows users to rotate the artboard or canva temporarily, just as we would do if we were drawing on a piece of paper. This tool is the “Rotate View” (Shift + H) tool, and it’s hidden inside the “Hand” (H) tool nest.


Hey guys! It’s me, Marcel, aka Maschi. On MaschiTuts, it’s all about tutorials! No matter the topic of the article, the goal always remains the same: Providing you guys with the most in-depth and helpful tutorials!

