

In this tutorial you will learn how to draw a mountain from scratch in Illustrator.
First you will learn how to set the document file color mode.
Next, we’ll make a very basic sketch, and then another one that, among other things, will help us figure out where to place shadows and lights. We’ll use these sketches as a guide to come up with the final version. Next, we’ll color the mountain and its respective lights and shadows.
This tutorial is designed to draw using either just the mouse or a drawing tablet.
If you are going to use the mouse, please check the FAQ where you’ll find some useful tips when it comes to sketching.
Also, if you would just like to download our free mountain vector files, you can easily do so by subscribing to our newsletter (you will then be able to download these vectors for FREE and right away!)
How to Draw a Mountain in Illustrator
Use the “Paintbrush” (B) tool to draw the mountain sketch. Figure out where shadows and lights should be and draw their areas. Use the “Pen” (P) tool to draw the final lines. Use the “Live Paint Bucket” (K) tool to paint the mountain. Remove the stroke lines, and that’s it.
Step 1: Set the Document Color Mode
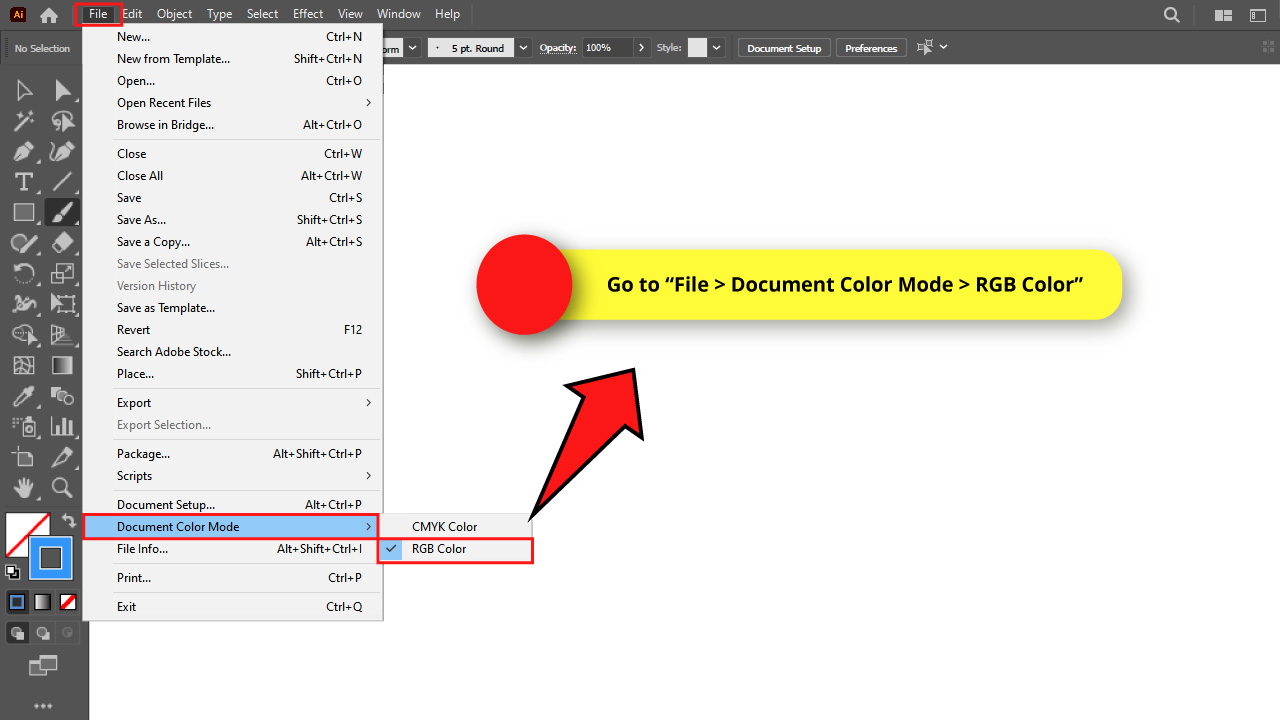
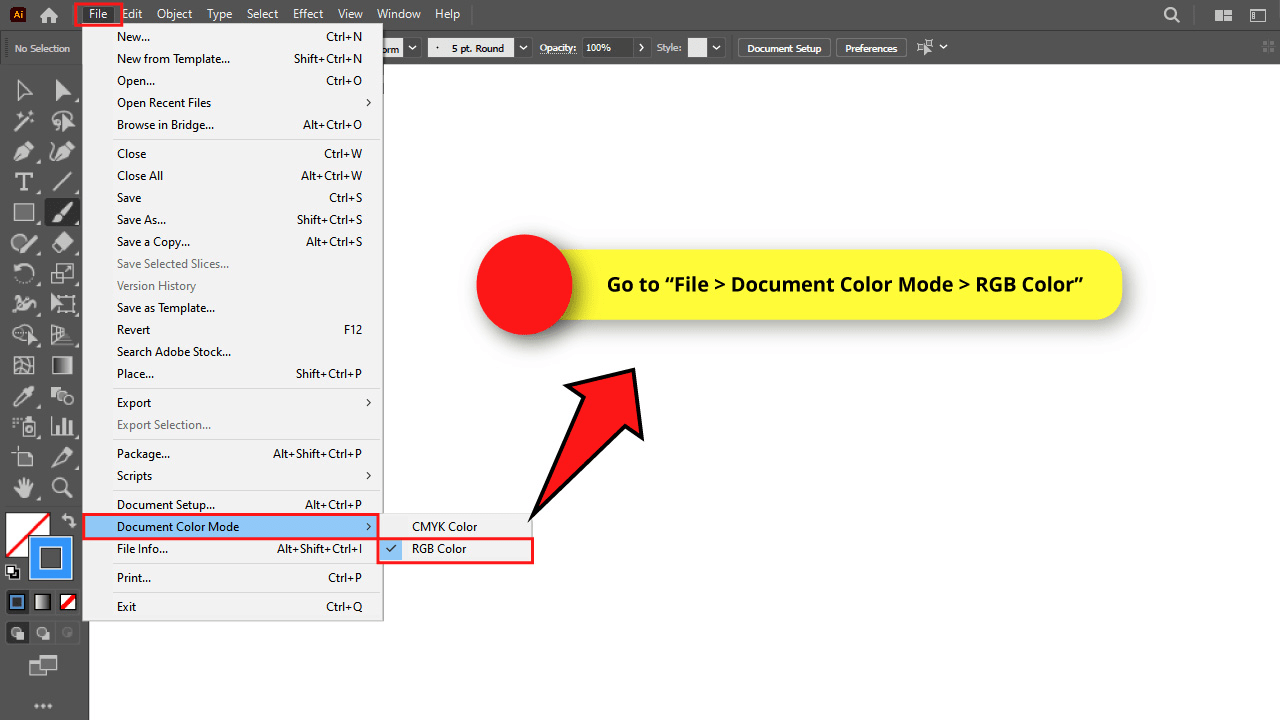
When you are creating a new document, make sure you select the proper “Color Mode”.
Select “RGB” color mode if your work will be shown only on screens.
Select “CMYK” color mode if your work will be printed, or both shown on screens and printed.
If you already started working on a document and you want to change the color mode, you can do it by going to “File > Document Color Mode” on the menu at the top of the screen.
I’ll use RGB color mode for my drawing.
Step 2: Adjust the “Paintbrush Tool” Options
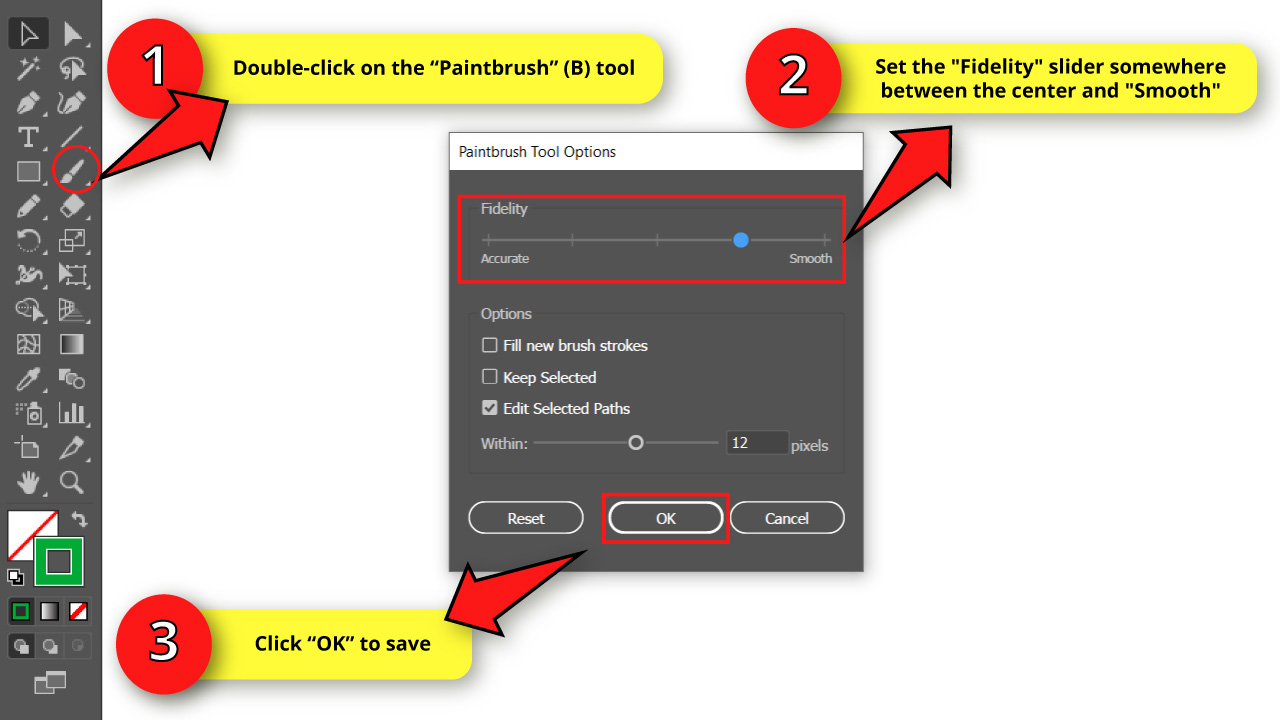


Double-click on the “Paintbrush” (B) tool on the left side toolbar to open the options window.
Set the “Fidelity” slider somewhere between the center and “Smooth”.
Then click “OK” to save.
Step 3: Customize the Brush

If you are going to draw your sketch using a pencil and paper, skip straight to the next step.
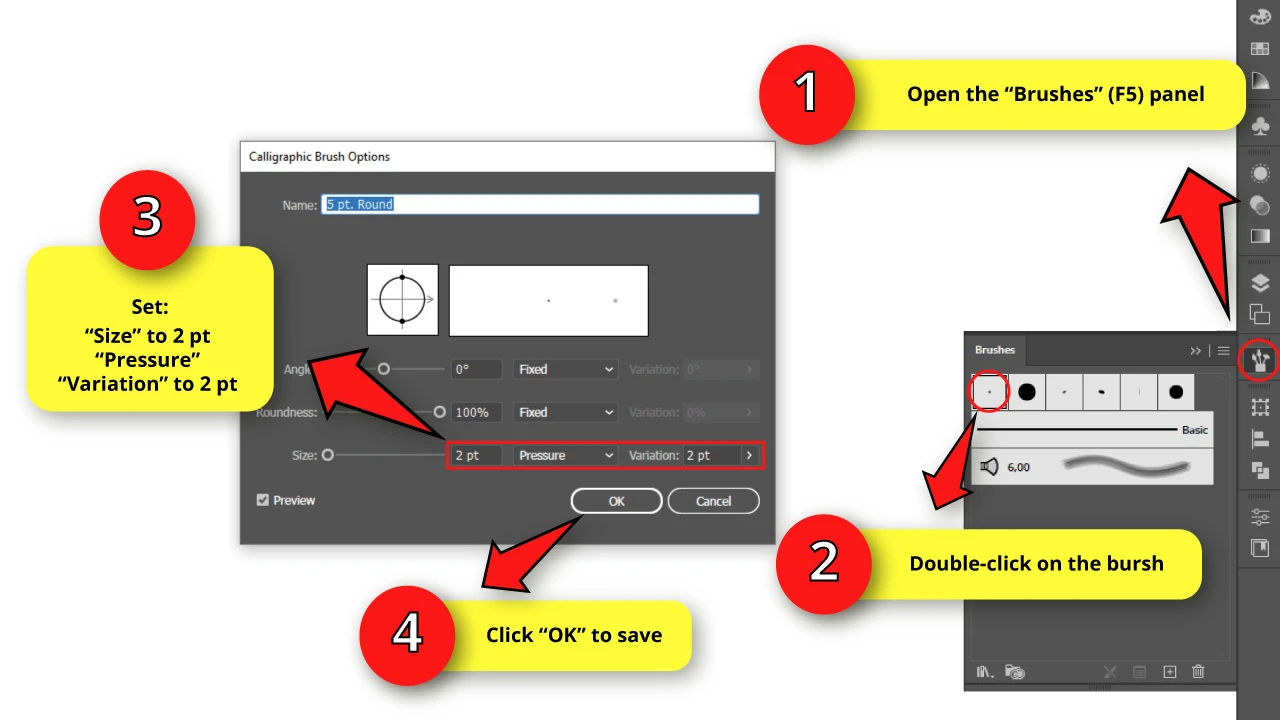
To make a brush in Illustrator, open the “Brushes” (F5) panel located on the right side of the screen.
If you can’t find it, you may have to enable it first by going to “Window > Brushes” on the menu at the top of the screen.
Double-click on the tiny round brush to open the “Calligraphic Brush Options” window.
Set the “Size” to 2 pt. Change the box setting to “Pressure” and select 2 pt. for the “Variation” field.
This adjustment allows us to make paths sensitive to the tablet’s pen pressure.
Then click “OK” to save.
Keep in mind that you can change the brush size in Illustrator anytime during the drawing process.
Step 4: Draw the Main Mountain Shapes

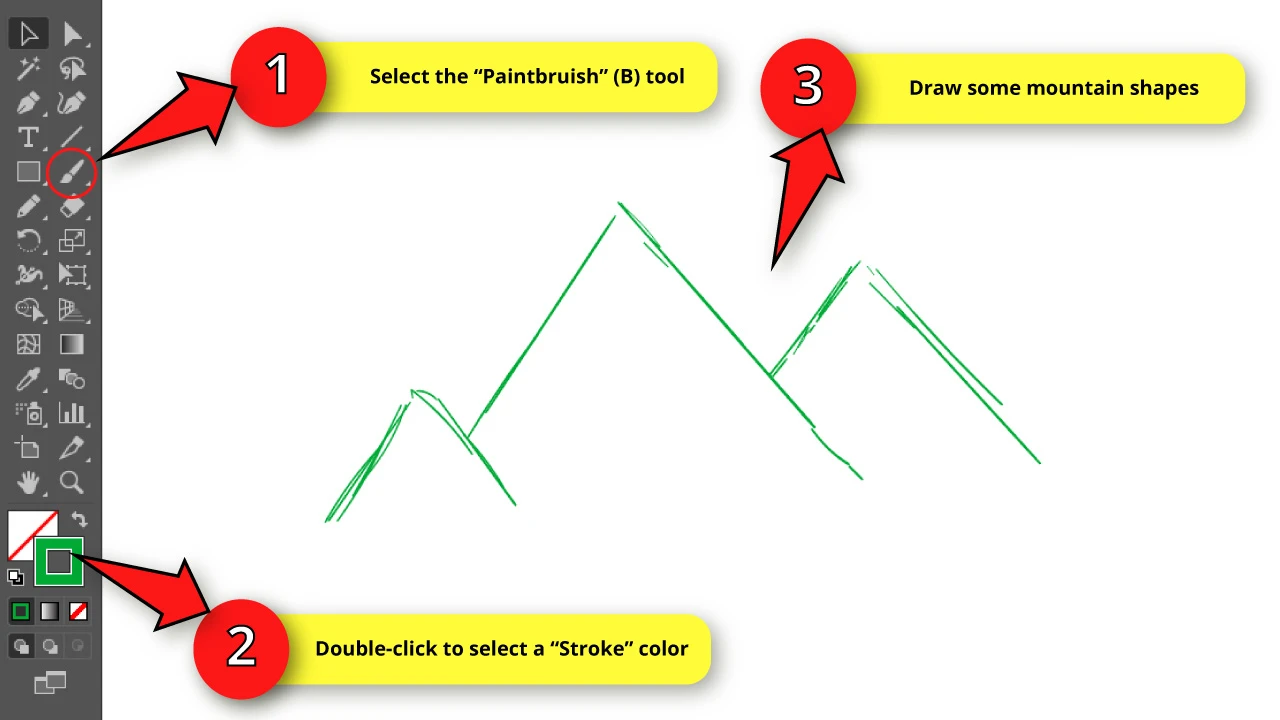
Select the “Paintbrush” (B) tool and then double-click on the “Stroke” color box located on the left side toolbar to select a color for the sketch.
Put your tablet to work to draw some triangles as mountains. Make sure to make their heights uneven. If possible, also make their widths uneven.
I’ll draw 3 mountains.
Step 5: Make them Transparent
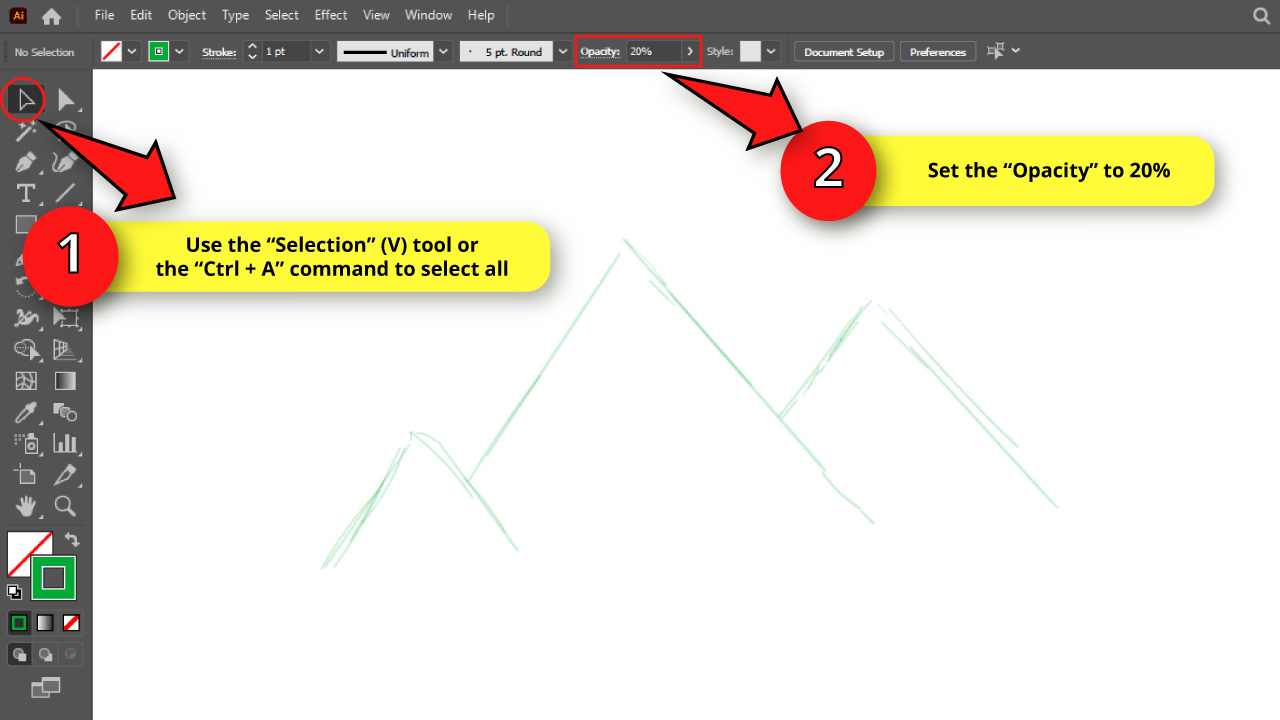

Select all the lines using the “Selection” (V) tool on the left side toolbar, or by pressing the “Ctrl + A” command to select all.
Then set the “Opacity” to 20% on the toolbar at the top of the screen.
Step 6: Draw the Mountain Slope Sketch

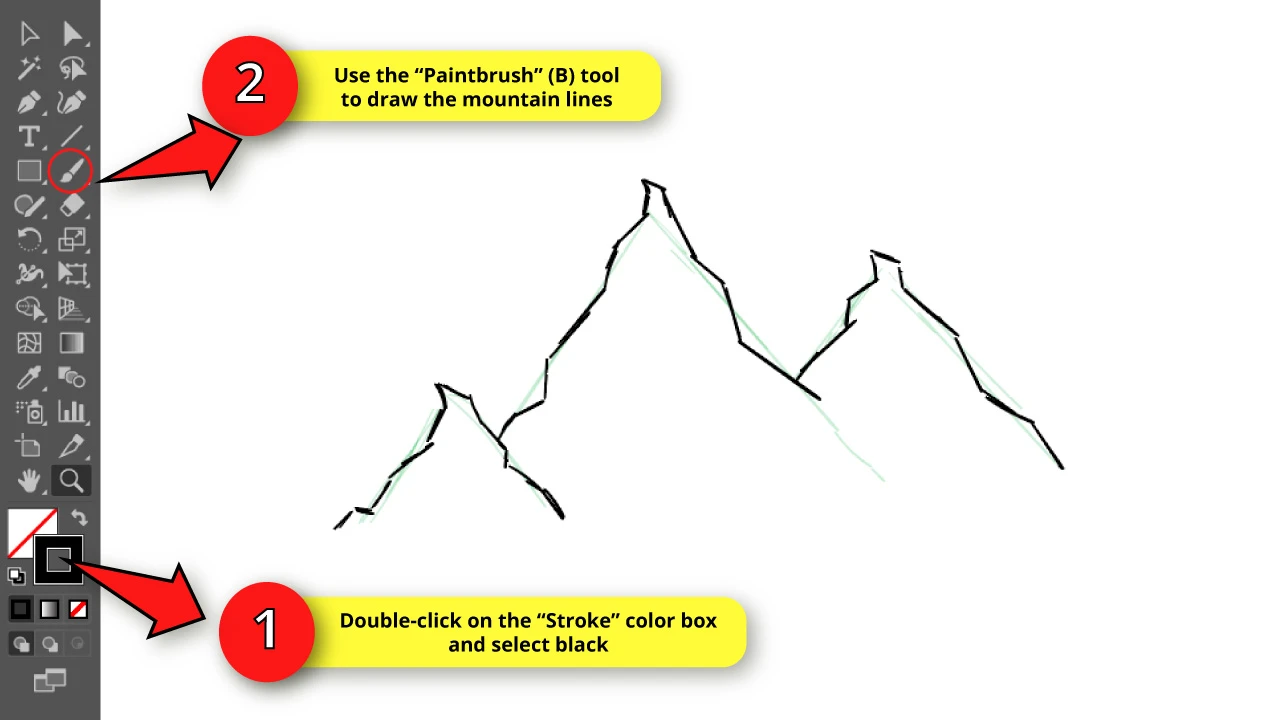
Notice that mountains never have a perfect triangle shape. They actually have a very irregular surface.
To make the mountain more realistic, select the “Paintbrush” (B) tool again, and double-click on the “Stroke” color box to select black.
We are going to draw some medium length straight lines, slightly varying the angle of each one, but always following the main mountain slope (represented by the green lines).
Step 7: Draw the Mountain Ground Sketch
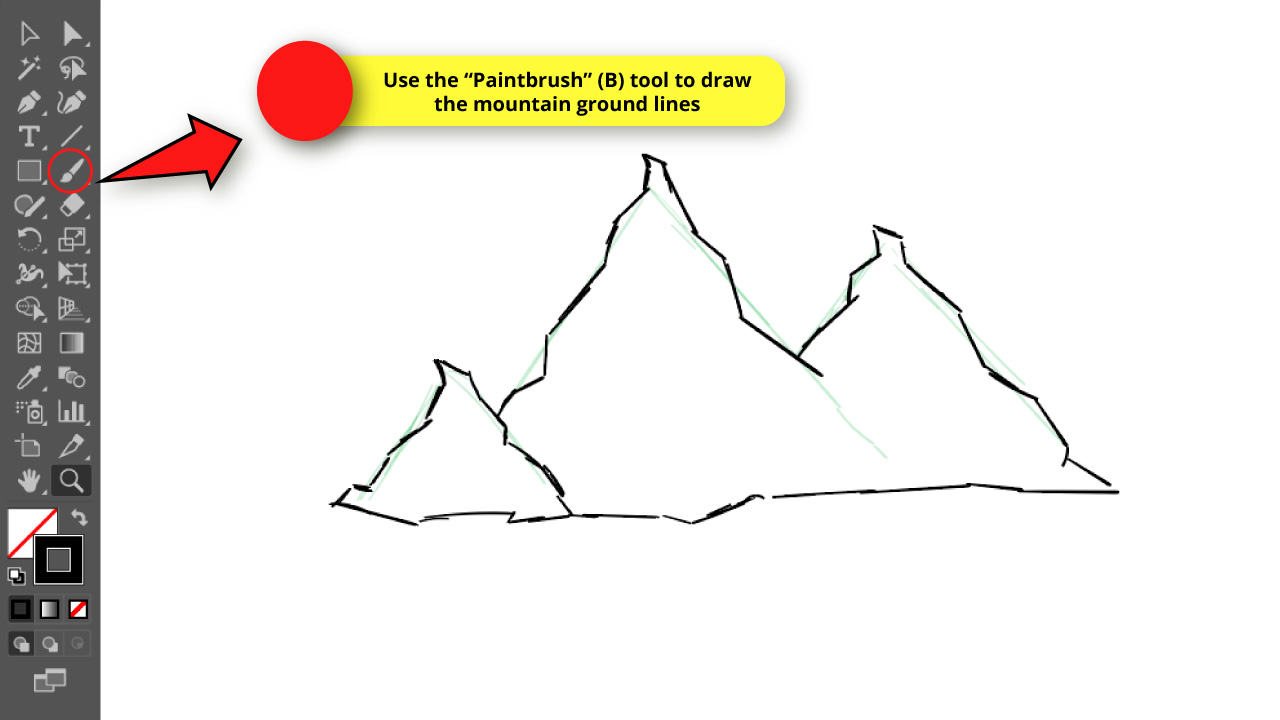

Now it’s time to work on the ground.
We’ll follow the same concept for the previous step, but drawing a horizontal line for the ground.
It doesn’t need to be perfect. Actually, the more irregular the better.
Step 8: Get Rid of the Extra Lines

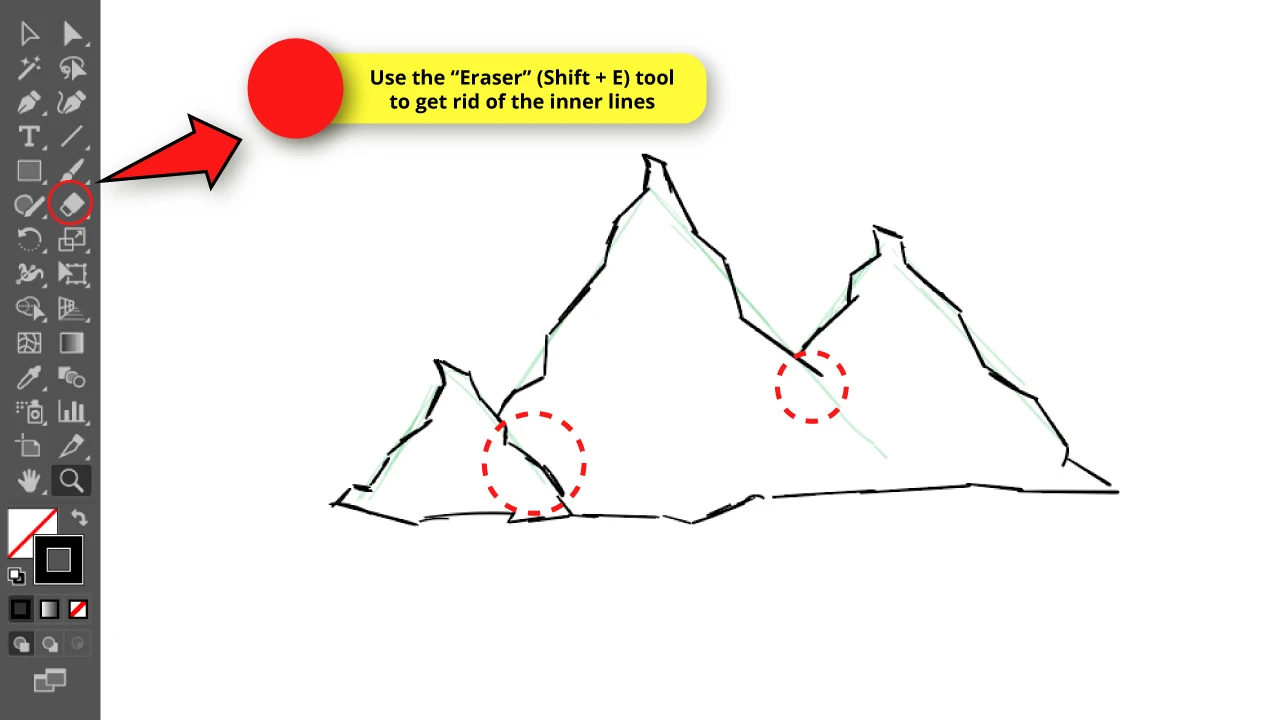
We need to delete the inner lines, since we’ll continue working with the mountain outlines for now.
Use the “Eraser” (Shift + E) tool on the left side toolbar to remove mountain inner lines.
If it makes your work easier, you can make the eraser size bigger in Illustrator.
Step 9: Draw the Mountain’s Backside Lines
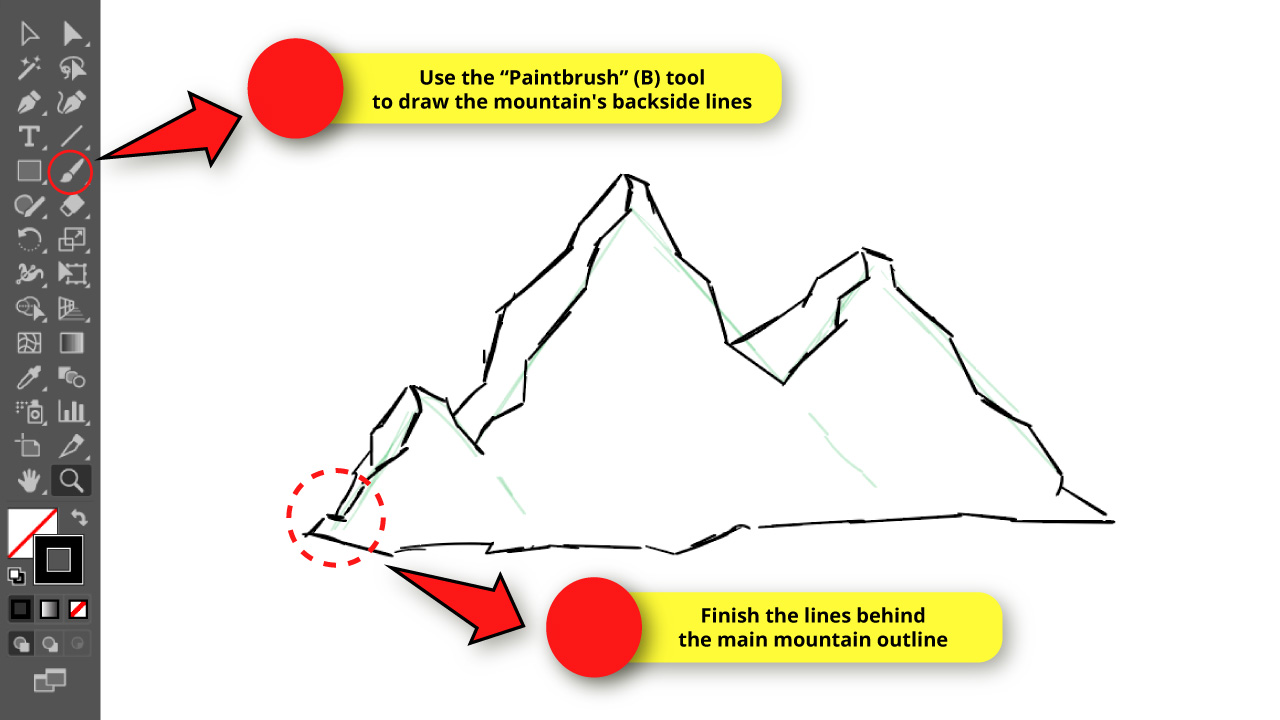

Now draw the mountain’s backside lines using the “Paintbrush” (B) tool to get a 3D effect.
Repeat the same “Step 4” concept, drawing medium length straight lines.
When it comes to drawing the smallest mountain backside lines, make sure you finish the lines behind the main mountain outline.
Step 10: Create a New Layer

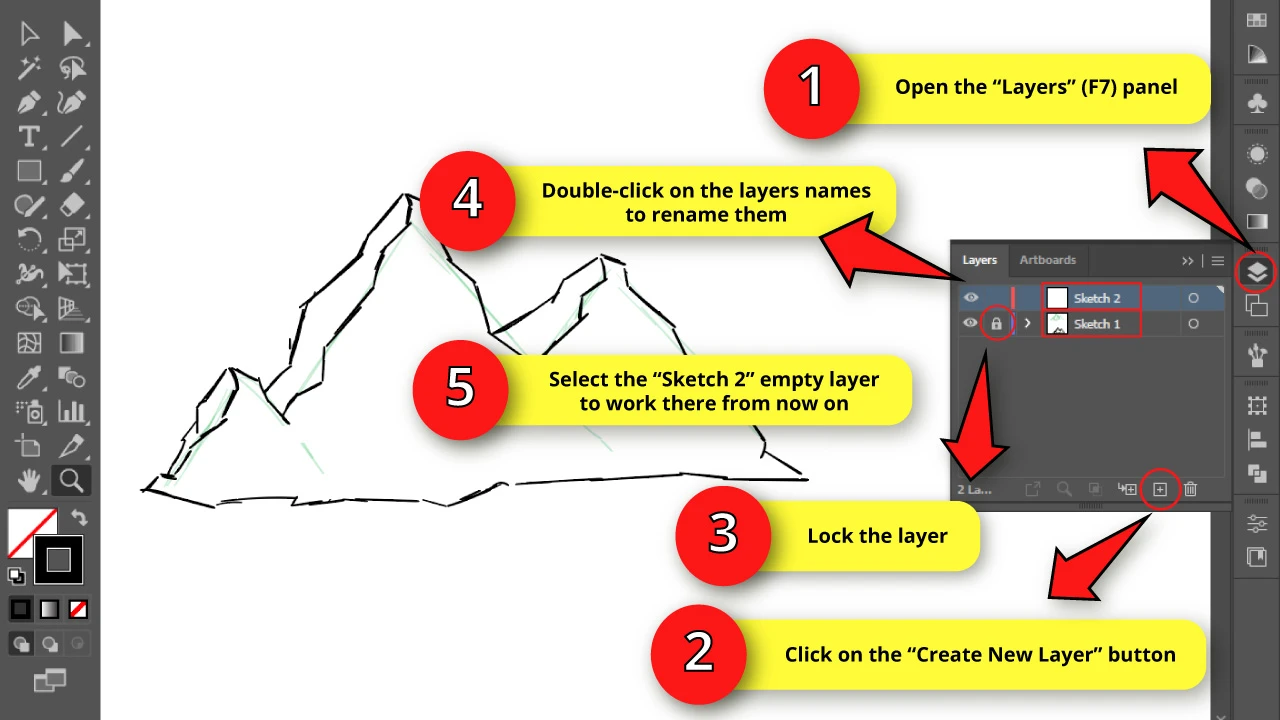
Then, open the “Layers” (F7) panel on the right side toolbar.
If you can’t find it, you may have to enable it first by pressing the “F7” key from your keyboard, or going to “Window > Layers” on the menu at the top of the screen.
On the “Layers” panel, click on “Create New Layer” at the bottom of the panel.
Then double-click on the layers name, and rename them as “Sketch 1” and “Sketch 2”.
“Sketch 1” contains the lines we’ve drawn so far.
“Sketch 2” for the empty layer where we’ll draw the shadows and lights sketch in the next two steps.
If you prefer, you can also change the layer’s color in Illustrator. I’ll leave mine by default.
Select the “Sketch 2” to work there from now on.
Step 11: Draw Mountain Shadow Areas
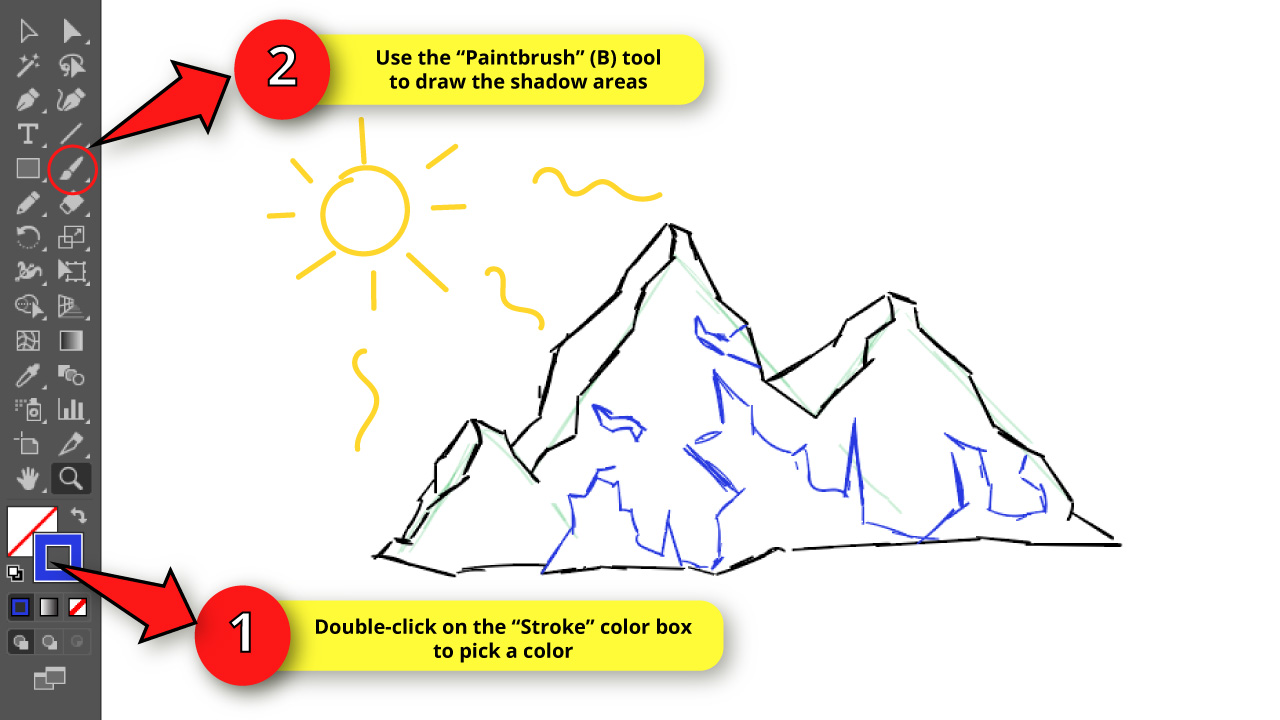

It’s time to decide where the shadows should be in our mountain.
There are no specific rules for this, so there is no right or wrong way to get this done.
Just keep in mind our light source, which is the sun in this illustration.
Therefore, the light source for this illustration comes from the top left side.
So, shadows would usually be located at bottom right.
Select the “Brush” (B) tool and then double-click on the “Stroke” color box to select any color other than black. The idea is you can visualize these new lines you are drawing better.
Draw wide bottom and narrow top (mountain like) shapes using medium length straight lines.
I made 3 main shapes.
Then, you can add some small irregular shapes in higher spots of the mountain.
Step 12: Draw Mountain Light Areas
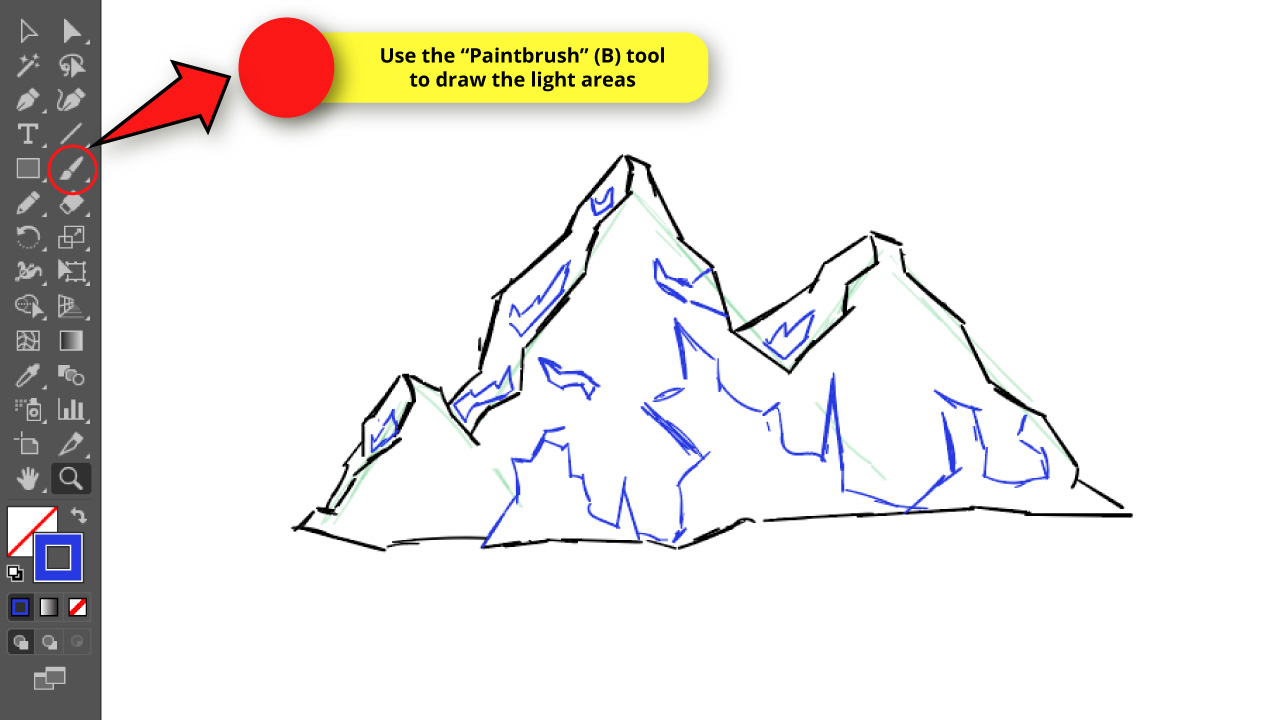

Based on the sun position that we defined in the previous step, we need to visualize where the lights would be.
For lights, draw some irregular shapes on the visible lateral side of the mountain.
Try to draw the biggest shapes at the bottom and the smallest at the top.
Step 13: Lock the Sketches Layers
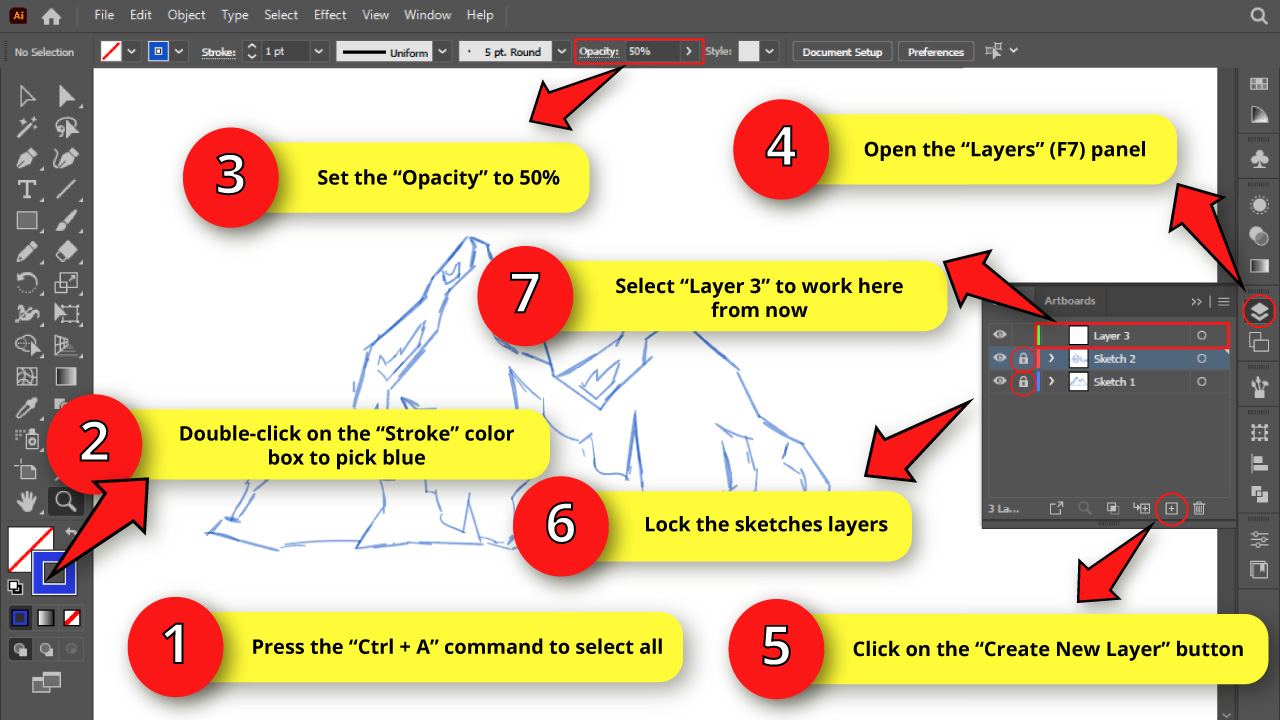
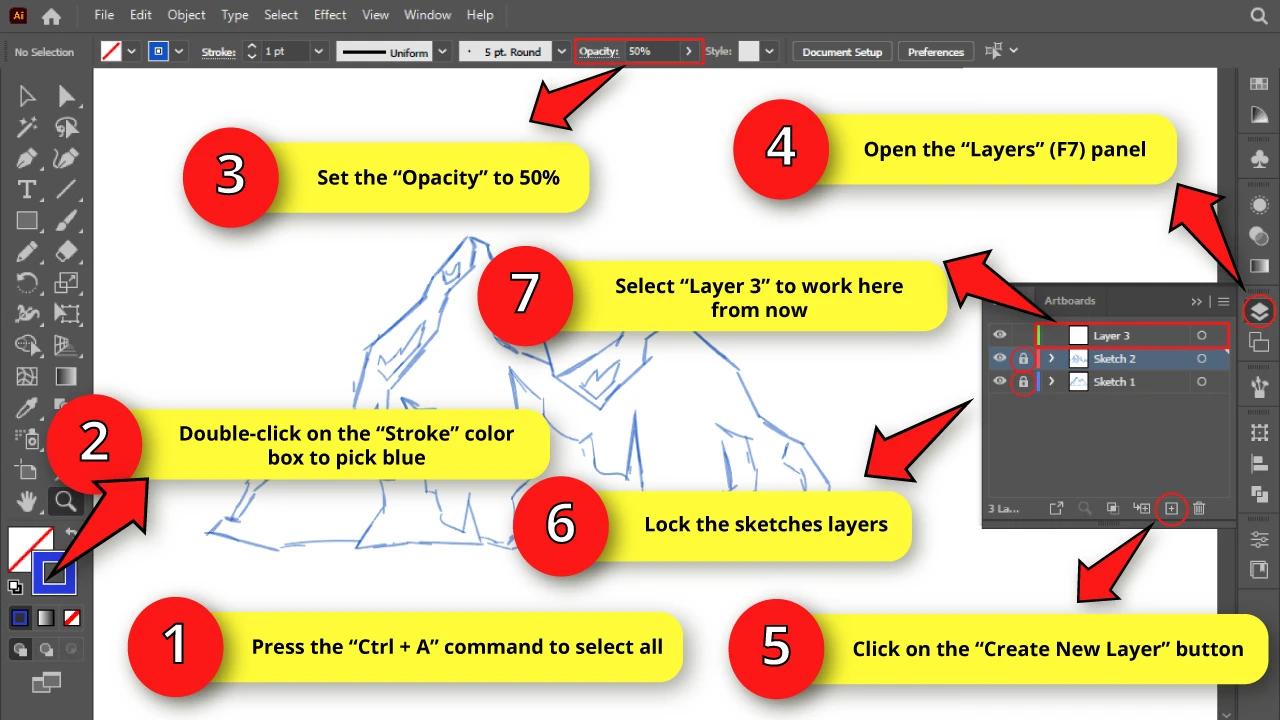
We need to lock all sketches layers and decrease the opacity to be able to make the final lines over them.
To get this done, select all the lines by pressing the “Ctrl + A” command to select all.
Then double-click on the “Stroke” color box, and select blue (or any color other than black).
Then set the “Opacity” to 50%.
Next, open the “Layers” (F7) panel and click on the empty box next to the eye to lock the layers. Once you click on that box, a lock will display. That means the layer is locked.
Then click again on the “Create New Layer” button to create the third layer.
Select this third layer to work there from now on.
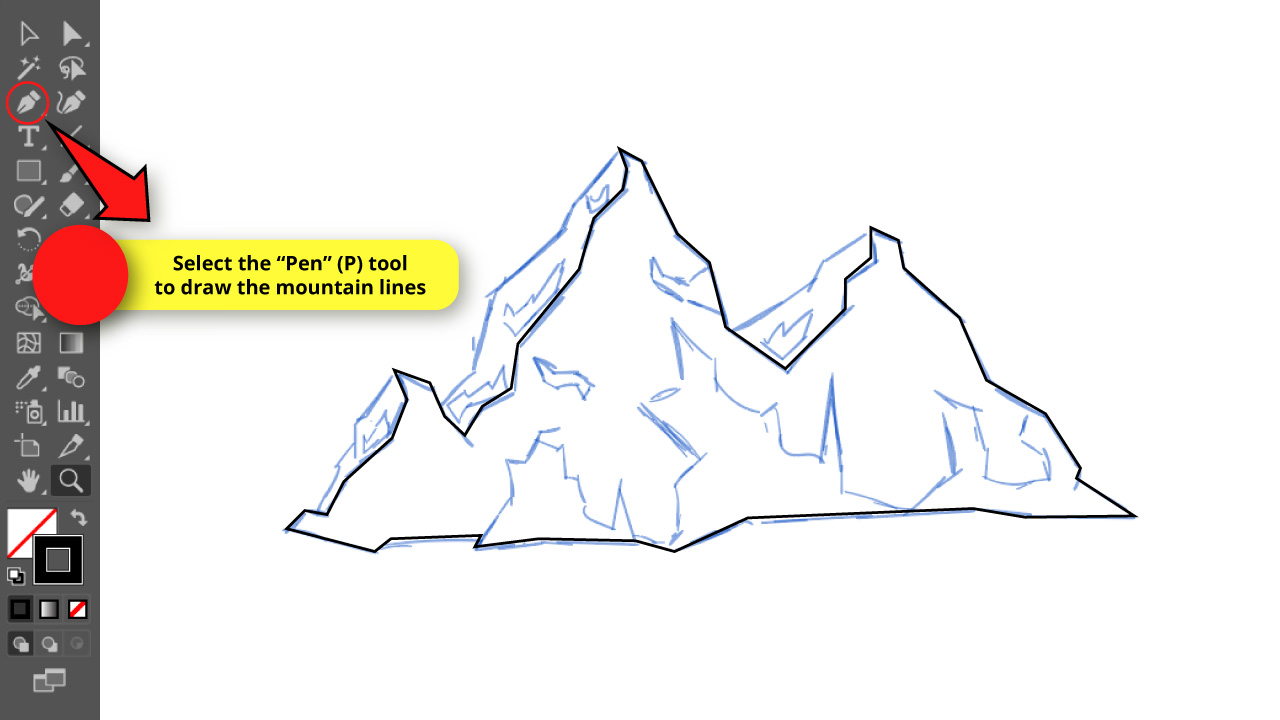
Step 14: Trace with the Pen (P) Tool

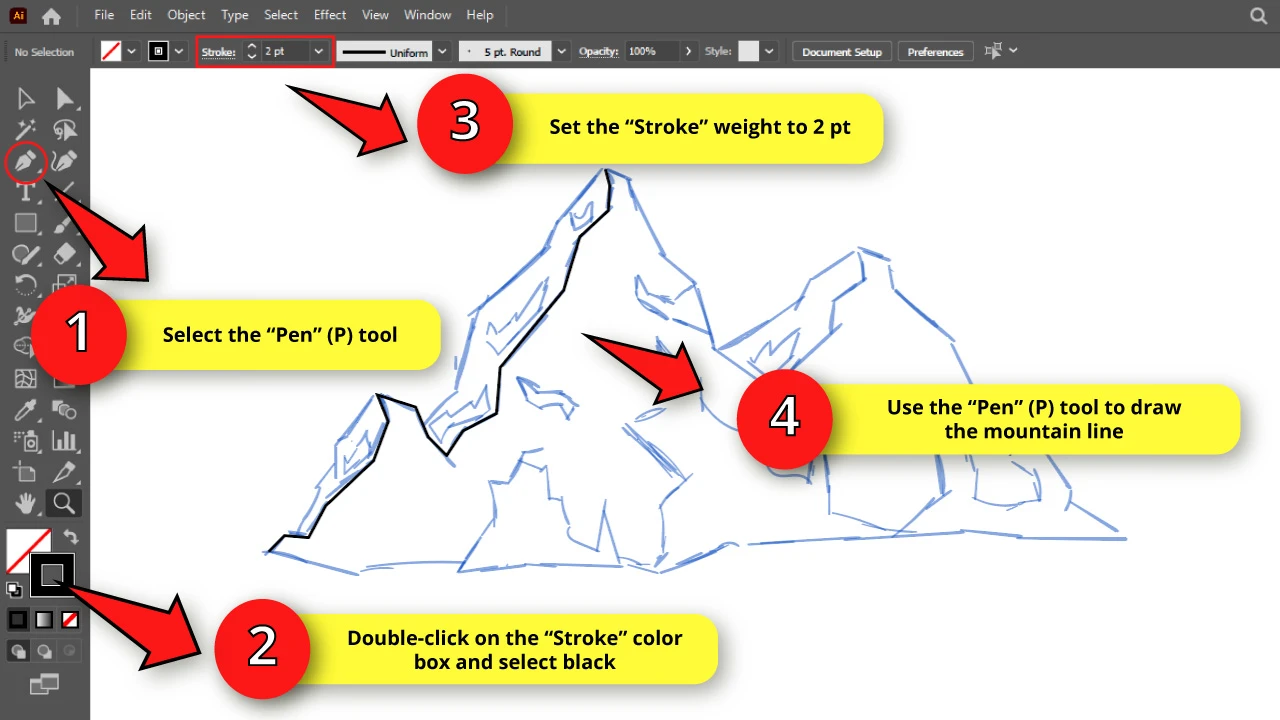
The tool we are going to next is the “Pen” (P) tool located on the left side toolbar.
Select the “Pen” (P) tool and then set the “Stroke” weight to 2 pt.
Then double-click on the “Stroke” color box and select black.
We are setting the “Stroke” weight this thick temporarily, just so we can visualize the lines better. We will change this later.
Use the “Pen” (P) tool to trace the mountain lines based on the sketch.
To use this tool, just click on the beginning of each line segment to place the anchor points. A line will be drawn according to where you place the anchor points.
When you wish to stop drawing the line, just press the “Esc” key from your keyboard.
Step 15: Trace the Mountain Outline

Use the “Pen” (P) tool to draw the mountain outline.
Step 16: Finish Tracing the Mountain

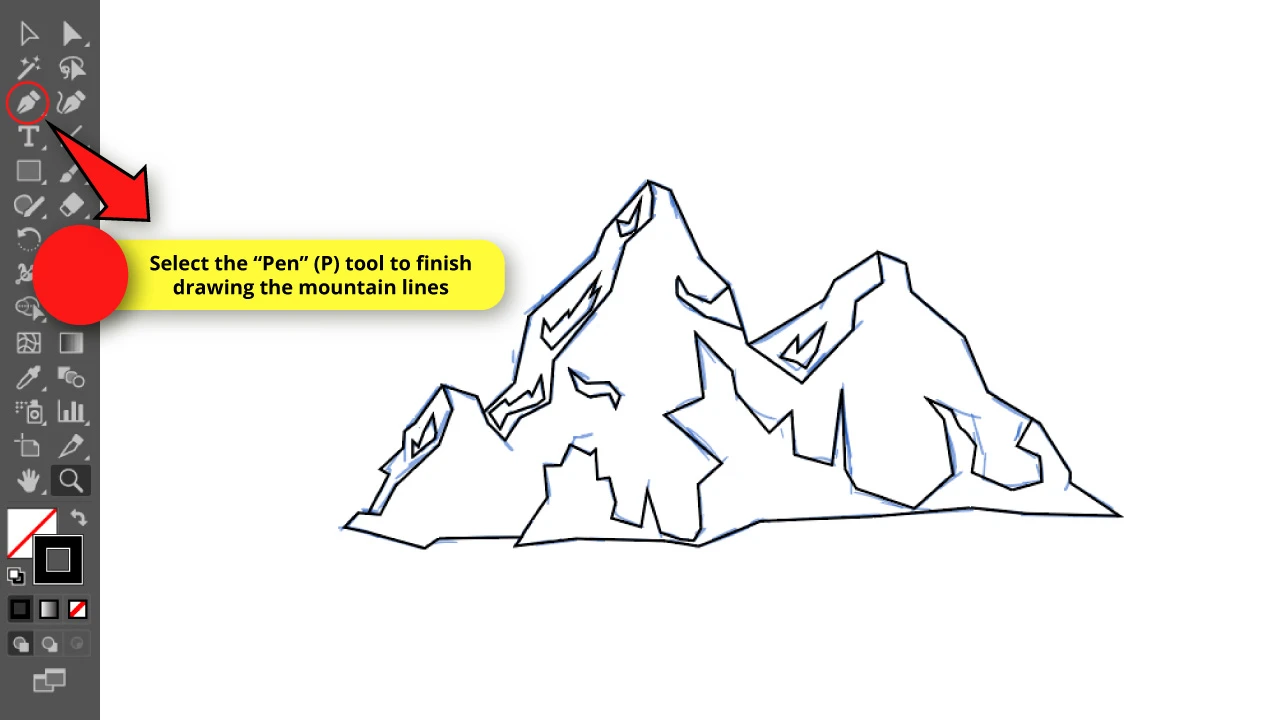
Use the “Pen” (P) tool to finish tracing the rest of the mountain lines.
Step 17: Hide Sketches Layers

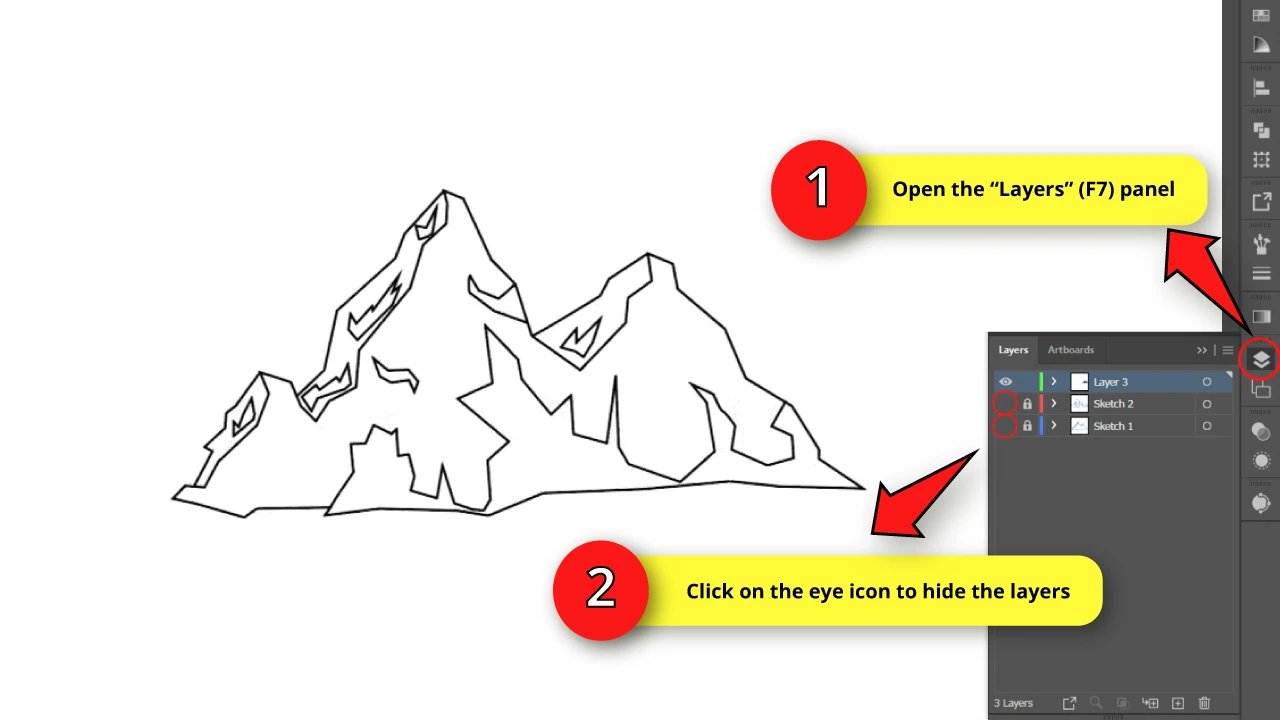
Open the “Layers” (F7) panel and click on “Sketch 1” and “Sketch 2” layers’ eyes to hide the sketches.
Step 18: Paint the Mountain Base Color
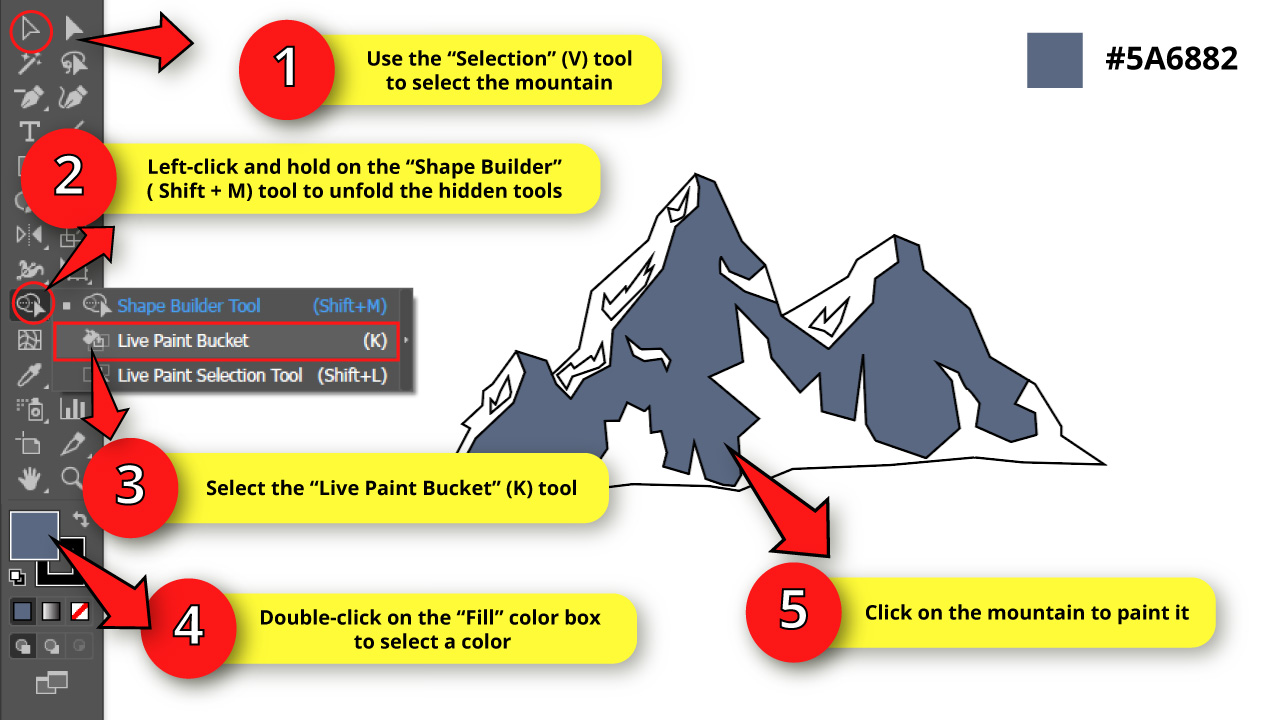

To fill color in Illustrator we will use the “Live Paint Bucket” (K) tool.
Select the graphic by pressing the “Ctrl + A” command or using the “Selection” (V) tool.
Then, left-click and hold on the “Shape Builder” (Shift + M) tool on the left side toolbar to unfold the hidden tools menu.
Select the “Live Paint Bucket” (K) tool from the unfolded menu. Or press the “K” key from your keyboard.
Then, double-click on the “Fill” color box to select a blue gray color. I’m using the #5A6882 color.
Next, click on the mountain front side to color it. Leave the shadow spots blank to color them in the next step.
Step 19: Paint the Mountain Shadow

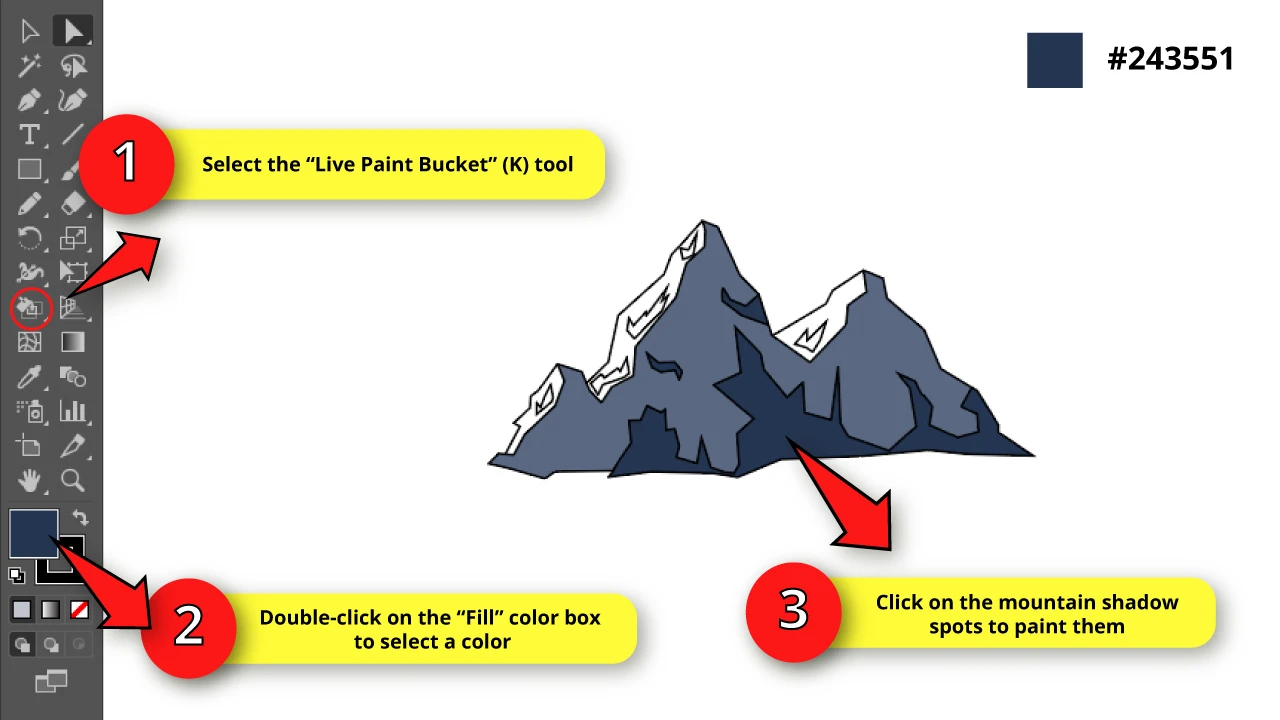
With the “Live Paint Bucket” (K) tool selected, double-click on the “Fill” color box to select a darker color for the shadows.
I’ll use the #243551 color.
Click on the shadow spots to color them.
Step 20: Paint the Mountain Lateral Side


Again, with the “Live Paint Bucket” (K) tool selected, double-click on the “Fill” color box to select a light gray color.
I’ll use the #C0C5CE color.
Click on the mountain lateral side areas to color them. Leave the light spots for the next step.
Step 21: Paint the Mountain Lights
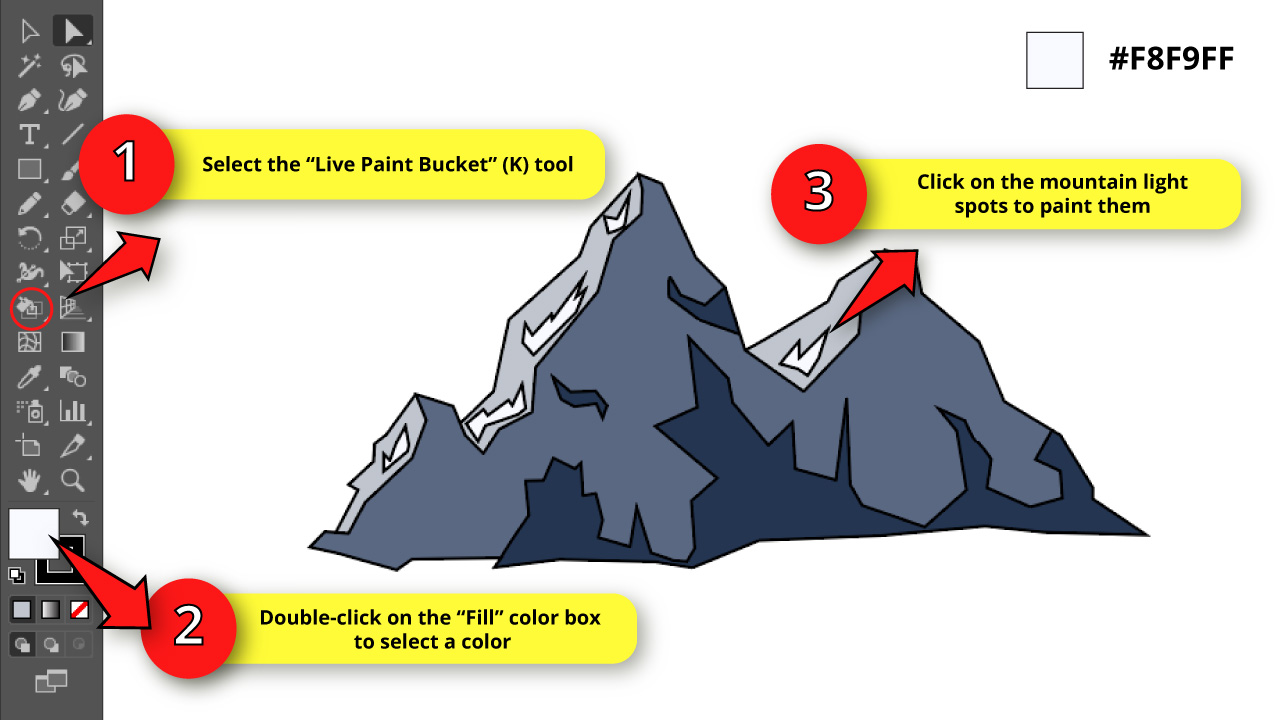

Once again, with the “Live Paint Bucket” (K) tool selected, double-click on the “Fill” color box to select a very light gray (almost white) color.
I’ll use the #F8F9FF color.
Click on the mountain light areas to color them.
Step 22: Remove the Stroke Lines
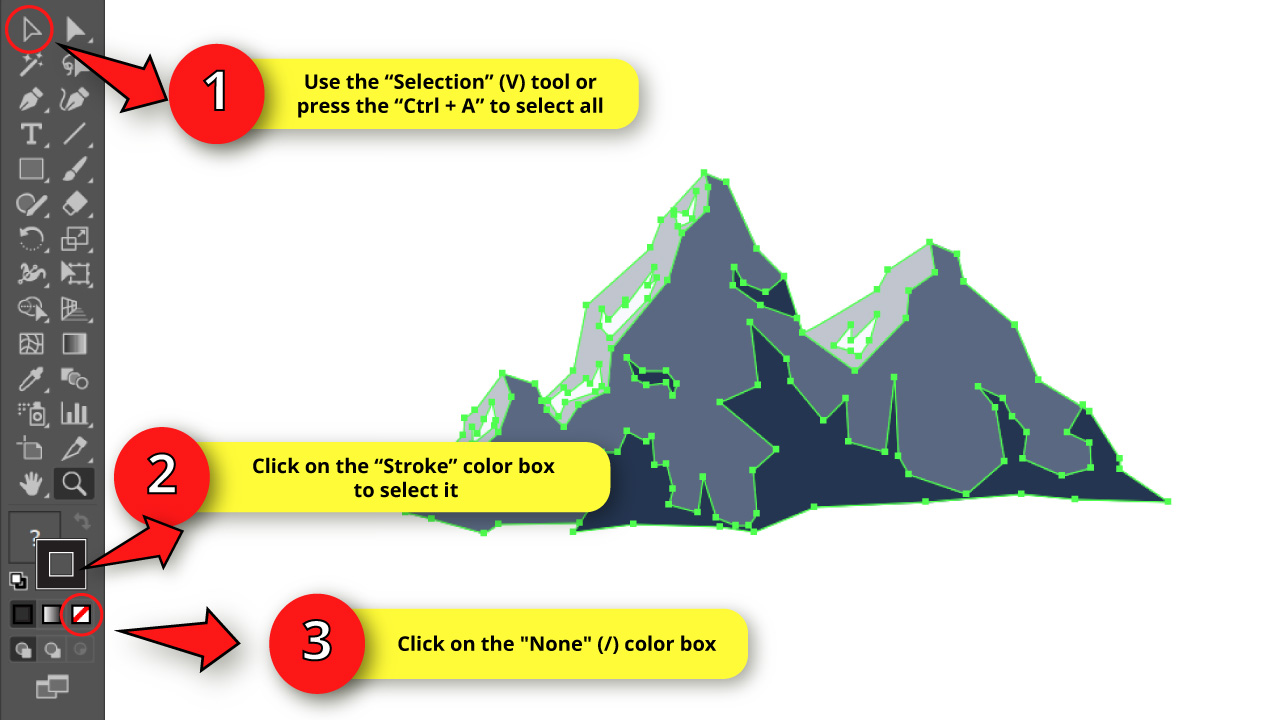

Select the graphic by pressing the “Ctrl + A” command to select all or use the “Selection” (V) tool.
Then click on the “Stroke” color box. Next, click on the “None” (/) color box to remove the stroke lines.
Step 23: Expand it!

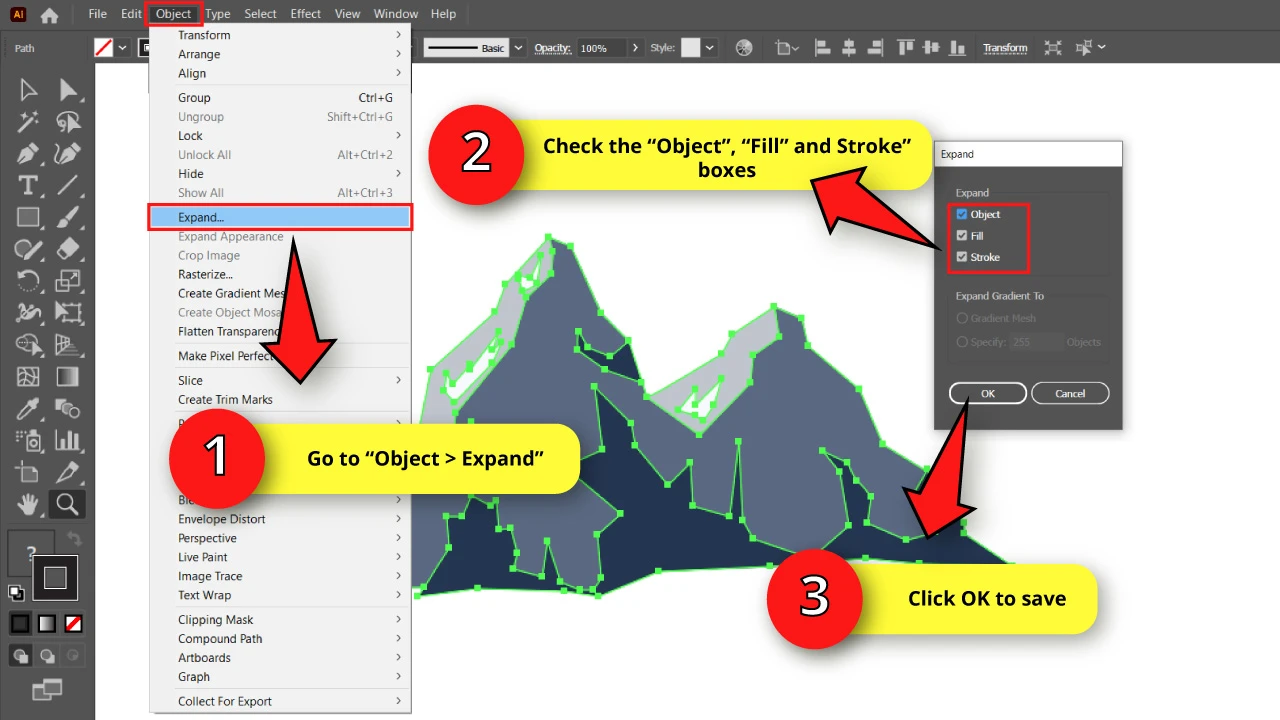
When we use the “Live Paint Bucket” (K) tool, the graphic stays linked and you can’t manage it as a regular object.
So to unlink it, go to “Object > Expand” on the menu at the top of the screen.
On the “Expand” options window, make sure the “Object”, “Fill” and “Stroke” boxes are checked. Press “OK” to save.
Step 24: Delete Sketches Layers
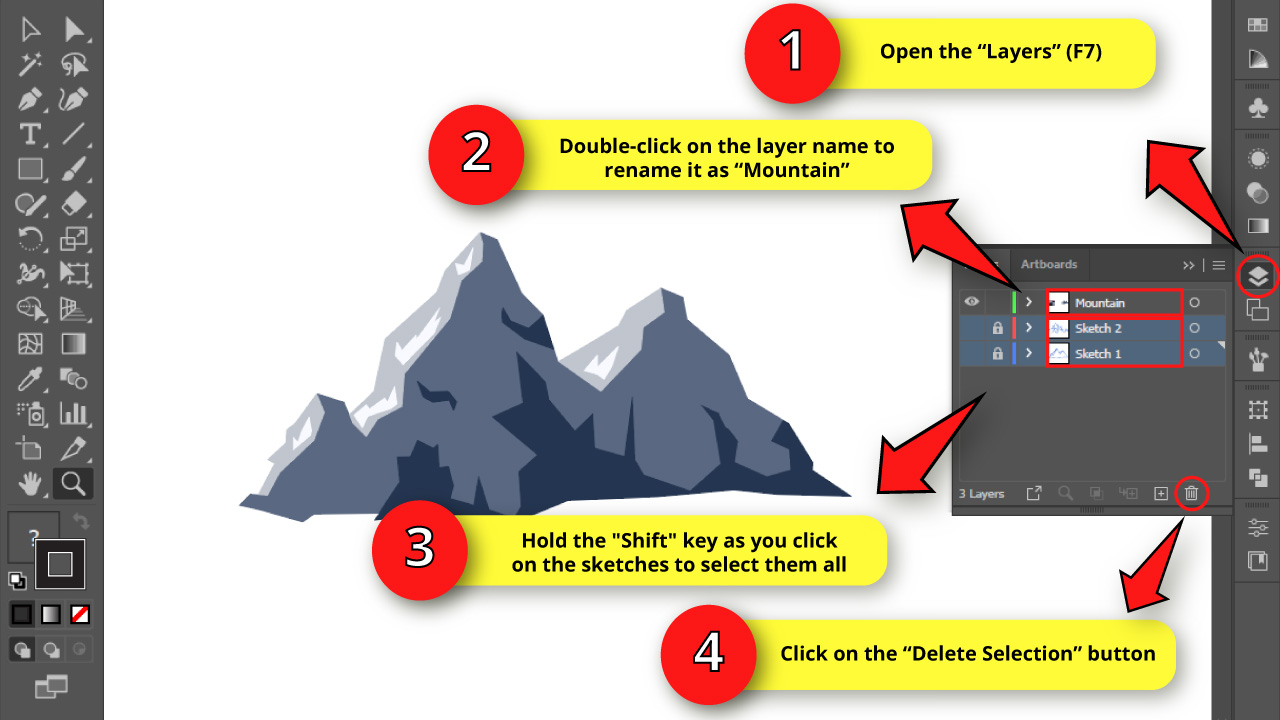

Once we’re done with the drawing, we can delete the sketches.
For this, go to the “Layers” (F7) panel.
Then select the sketches layers by holding the “Shift” key and clicking on them, to select several layers at the same time.
Then click on the “Delete Selection” button at the bottom of the panel to delete the layers.
The Result
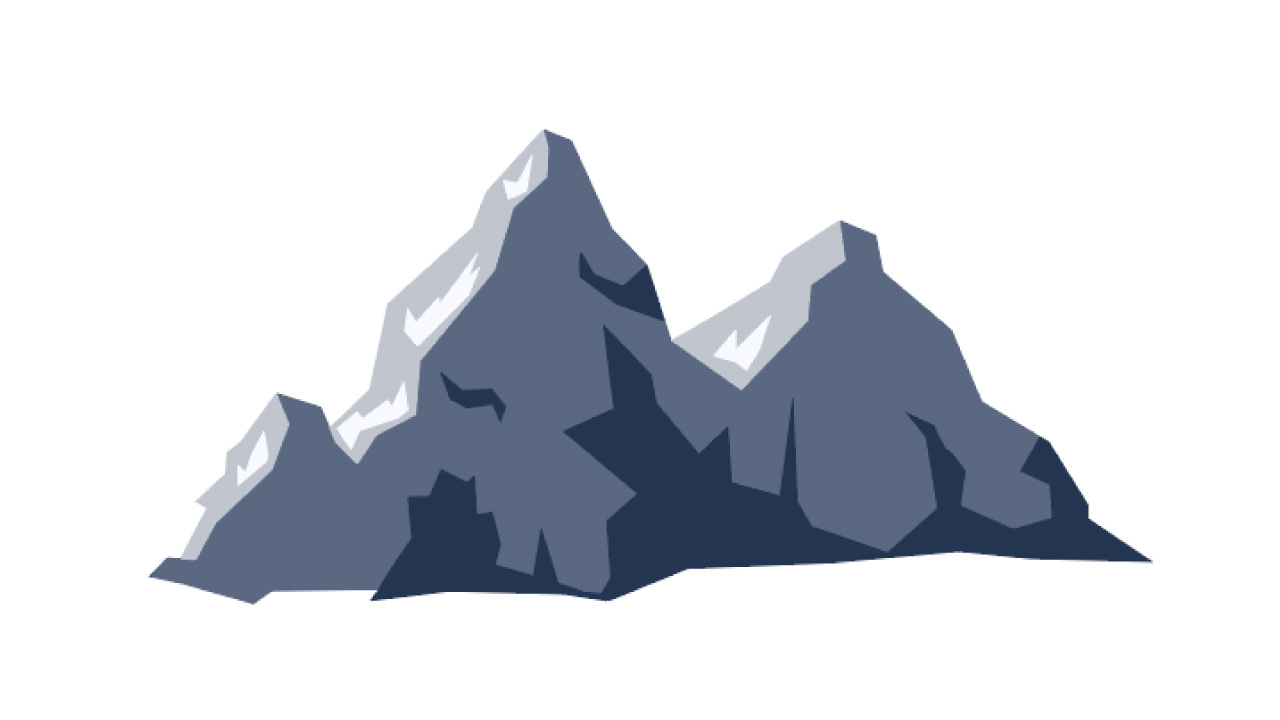

And here is our mountain finished!
Download our Free Mountain Vector Pack


On top of all of that, we would also like to gift you our completely free Mountain Vector Pack!
There is NO COPYRIGHT on these, as we created these mountains from scratch.
To get it, all you need to do is to subscribe to our newsletter here and you will then immediately get a download link to download our Mountain Vector Pack (Click on the image after you subscribed!)
Frequently Asked Questions on “How to Draw a Mountain in Illustrator”
How can I draw the mountain sketch without a tablet?
You can sketch a mountain using a pencil and paper. Then take a photo or scan of your drawing. Open the photo of your sketch in Illustrator. Set the “Opacity” to 50% and lock the layer. Create a new layer and work using the sketch as a reference.


Hey guys! It’s me, Marcel, aka Maschi. On MaschiTuts, it’s all about tutorials! No matter the topic of the article, the goal always remains the same: Providing you guys with the most in-depth and helpful tutorials!

