

When we try to insert a text over a background, sometimes we find that our text fades out in the image. And if we’re working over a busy background, the situation becomes worse.
As a result, even if we edit our text in tons of ways, we still fail to succeed.
Designers have been facing this problem for a long time, but some of them came up with quite a few solutions that we’ll review in this article.
Spoiling the answer a little bit, the point isn’t just editing the text, but also the background.
Selecting the correct “Font”, “Style”, “Size”, “Color” and considering the hierarchy rule for the text is half the solution.
The rest consists of applying filters to the background.
Stay with me to learn all you need about this!
How to Make Text Pop in Photoshop
Use bold fonts and all caps. Use the hierarchy rule if you are adding more than one type of text. Pick a text color that harmonizes with the picture. Add a filter layer to the background, like: dark overlay, transparent or solid color frames, gaussian blur, black & white, or color lookup.
How to Make Text Pop Adjusting Text Style and Color in Photoshop
Import an image and type a text in all caps. Set the “Font”, “Style” and “Size” using bold fonts as the first option. Type another text using regular style and increase the character tracking. Pick a color for the text and place it where it stands out better. Resize the text if necessary.
Step 1: Import an Image
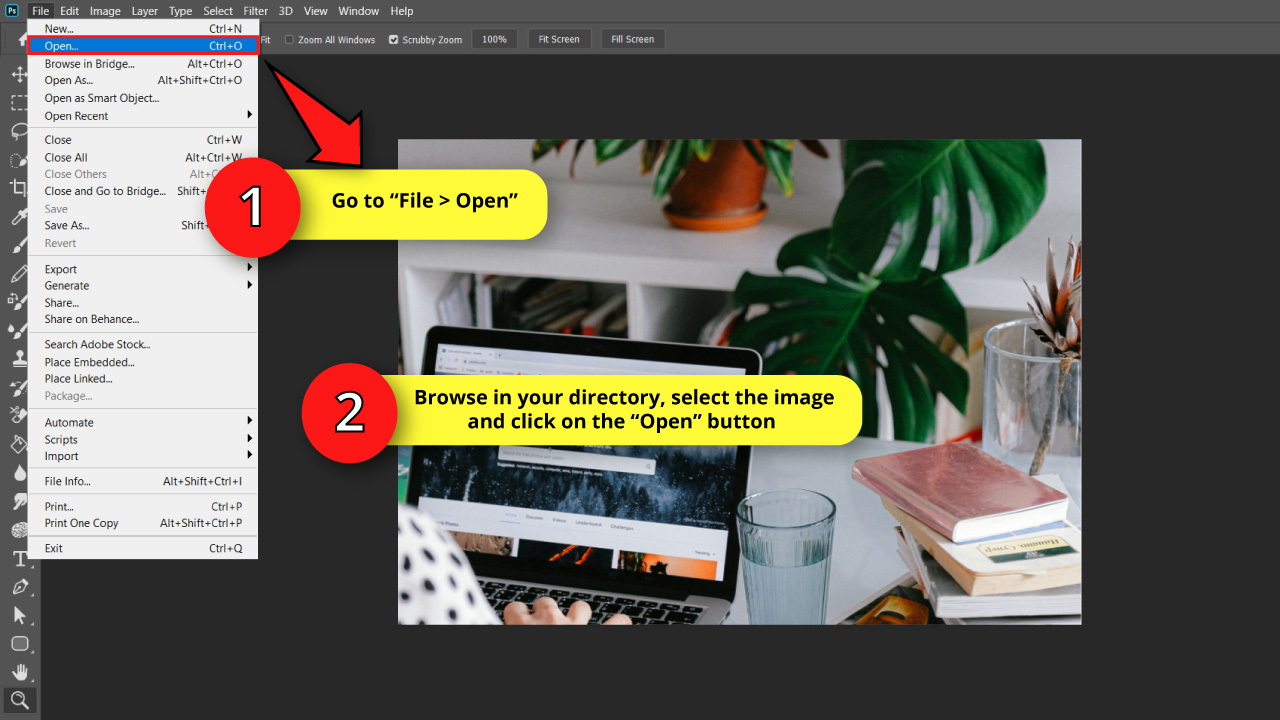
To import an image, go to “File > Open” on the menu at the top of the screen.
Or press the “Ctrl + O” command to shortcut it.
On the pop up window, browse in your directory and locate the photo you want to work on.
Select the image and then click on the “Open” button.


Step 2: Type a Text and Set the Style
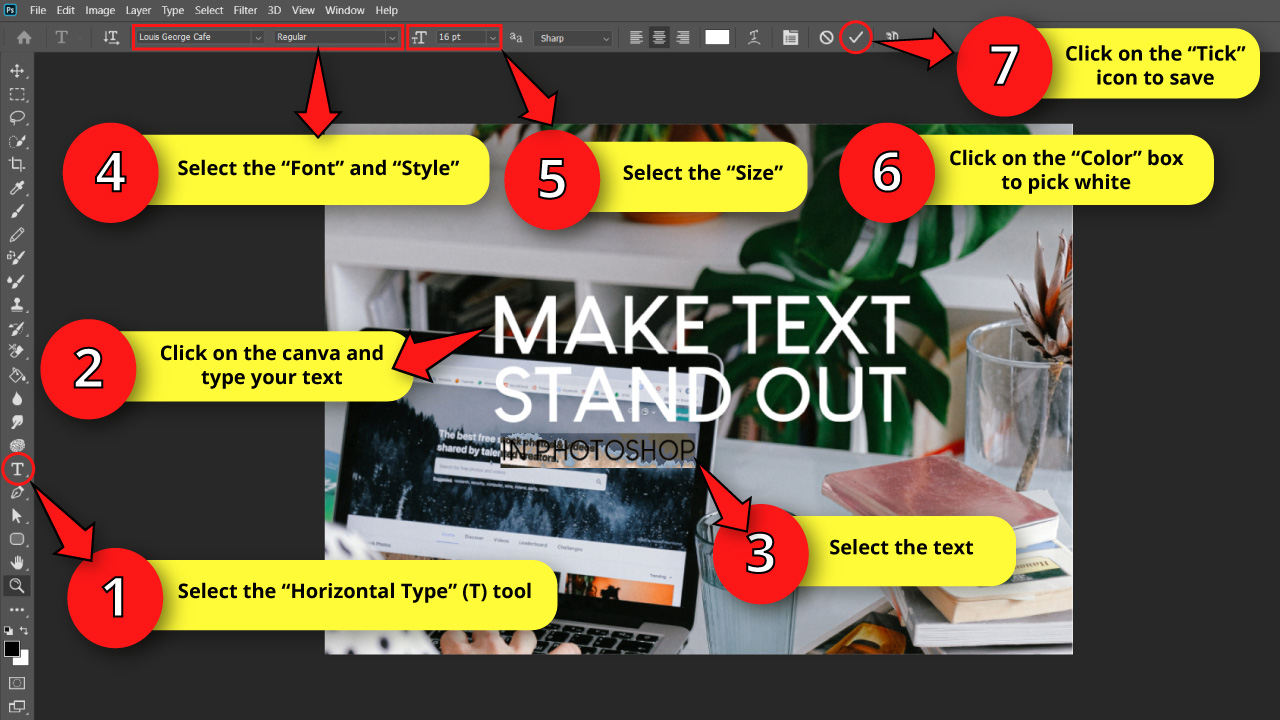
To type a text, click on the “Horizontal Type” (T) tool located on the left side toolbar.
Then click on the canva to type your text.
As a rule of thumb, to make a text stand out, try to pick a bold font and use all caps.
However, abusing bold fonts or all caps may end up being overwhelming. So limit their use only for titles or for a few words.
If you need to type more texts, like headings or paragraphs, use other styles of texts to get a more harmonious appearance.
Always apply the hierarchy principle for texts, so the reader’s eyes have a clear path of the order it should be read.
The title should be the first thing to be caught by the reader’s eyes, followed by the heading and then the paragraph.
That’s why it is necessary to vary the “Font”, “Style” and “Size” between each type of text.
For my example I’ll type a title and a heading.
Select the text and then set the “Font”, “Style” and “Size” fields located on the toolbar at the top of the screen.
For the title, I’ll use the “Louis George Cafe” font on all caps in “Bold” style.
Then I’ll set the “Size” around 45 px. Finally click on the “Color” box and pick white color.
For the heading, I’ll also use the “Louis George Cafe” font on all caps, but in “Regular” style.
Then I’ll set the “Size” around 16 px.
Once you are done with the text, click on the “Tick” icon to save changes.
Step 3: Set the Heading Character Separation and Resize It
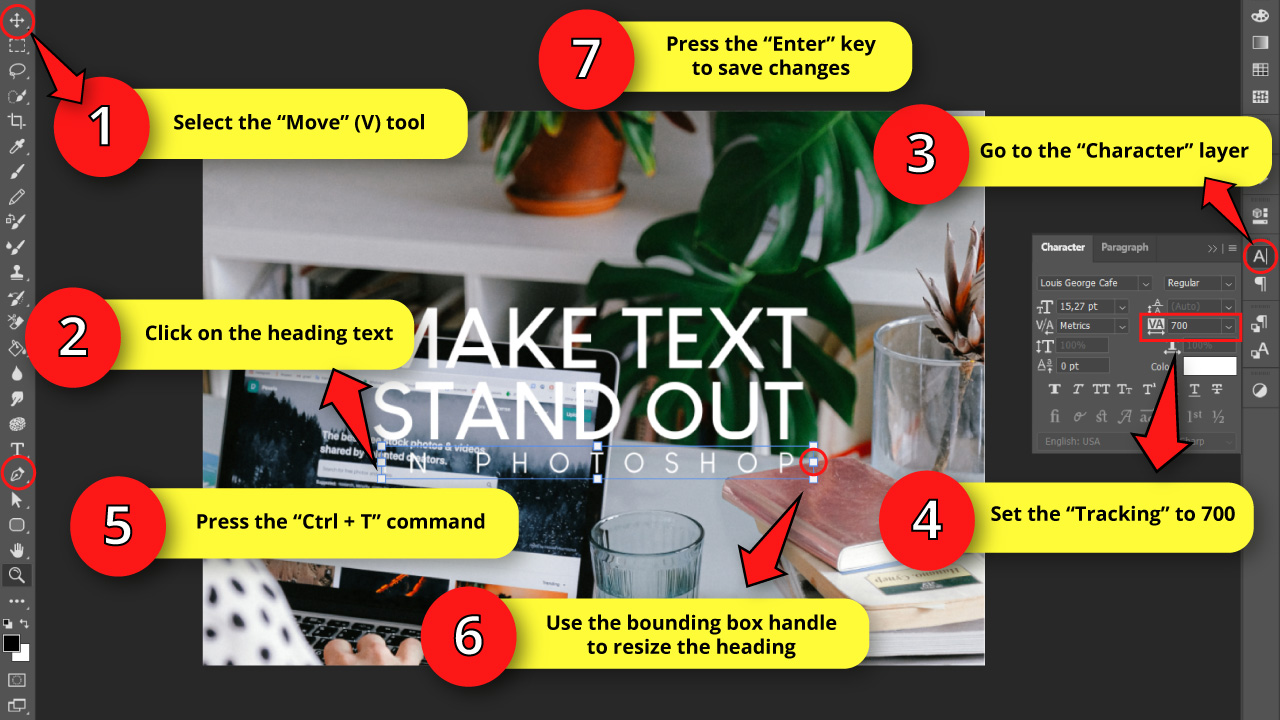
Since the heading size is smaller and the style is thinner than the title, we need to make some adjustments to make it more catchy.
We’ll modify the tracking to increase separation..
Select the “Move” (V) tool first, and then click on the heading text to select it.
Next, go to the “Character” panel usually located on the right side toolbar.
If you can’t find it, you may have to enable it first by going to “Window > Character” on the menu at the top of the screen
Once you are on the “Character” panel, set the “Tracking” value. I’ll set mine to 700.
To get a neater result, resize the heading, so both the title and the heading match in the same line from beginning to end.
You can resize the text by changing the “Size” value, or by pressing the “Ctrl + T” command, enabling the “Free Transform” tool.
Then left-click and hold on the bounding box handles resizing the text to make the heading length fit the title.
Finally, press the “Enter” key to save changes.
Step 4: Select the Text Color to Match the Background
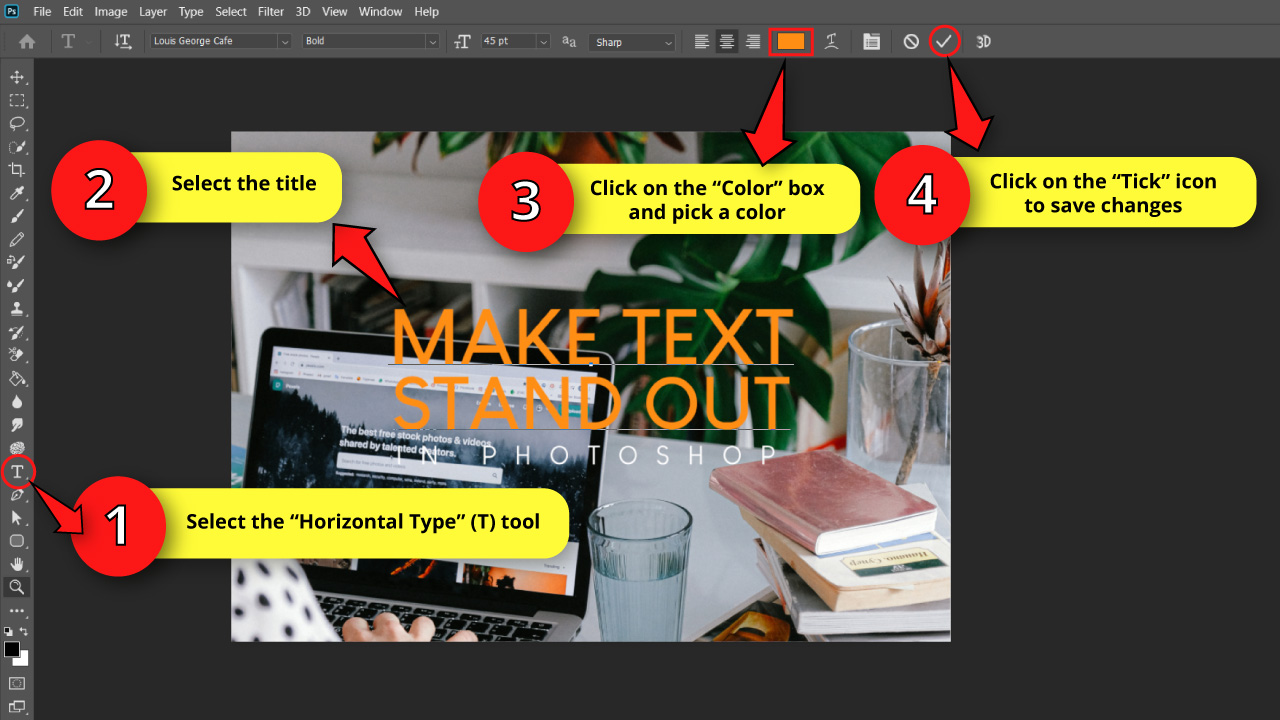
Now it’s time to pick the right color for our text.
You need to select a color that both contrasts with the background and harmonizes with most of the colors of the picture.
My background has shades of green, blue and orange as main colors. So I’ll use one of these colors.
Look for the predominant colors in your image, and use one of them.
Since black and white match with all colors, you might use them as well.
To change the text color, select the “Horizontal Type” (T) tool and then click on the text to enable the editing mode.
Then select the text you want to change the color to, by left-clicking, holding and dragging the mouse over the text.
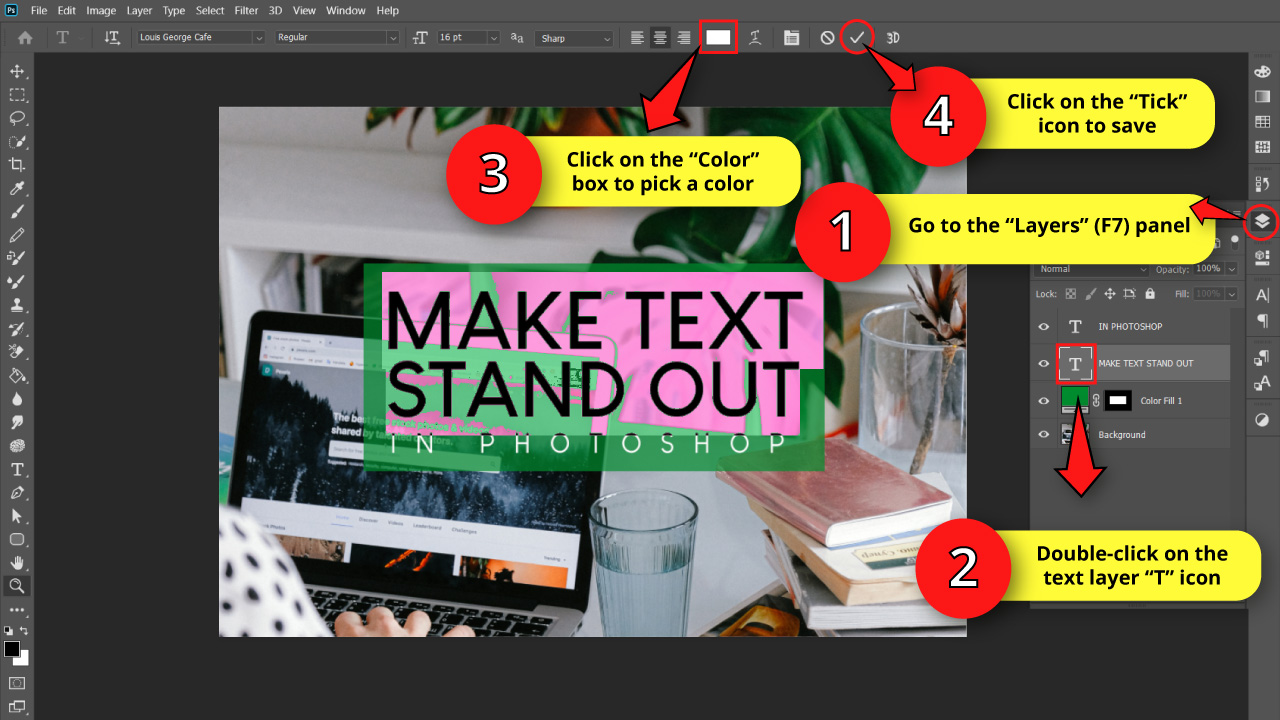
Next, click on the “Color” box on the menu at the top of the screen and pick your desired color.
For my example I’ll use orange for the title, and white for the heading.
Click on the “Tick” icon to save changes when you’re done.
Step 5: Find a Spot to Place your Text
Busy backgrounds tend to fade out texts.
Because of this, whenever possible, try to find a spot with enough clear space to place your text or where your text contrasts better with the background colors.
The place where my text stands out better is over the plant, since green and orange contrast pretty well.
However, I’ll need to resize the text to fit better.
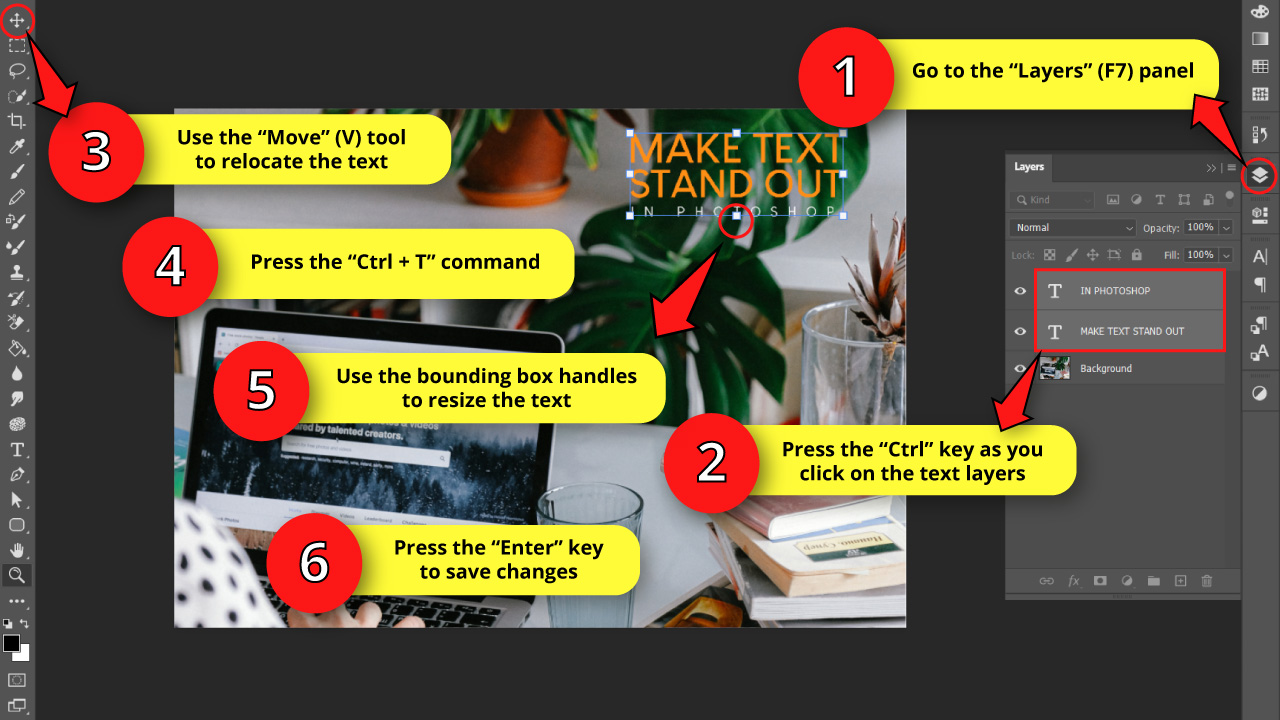
To move several texts at the same time, go to the “Layers” (F7) panel usually located on the right side toolbar.
If you can’t find it, you may have to enable it first by going to “Window > Layer” on the menu at the top of the screen. Or press the “F7” key shortcut.
Once you are on the “Layers” (F7) panel, hold the “Ctrl” key as you click over the text layers to select several layers at the same time.
Next, use the “Move” (V) tool to move your text to the spot it stands out better.
To resize the different text sizes, press the “Ctrl + T” command to use the “Free Transform” tool.
Then left-click and drag on one of the bounding box handles as you drag it to resize your texts.
When you are happy with the edition, press the “Enter” key to save changes.
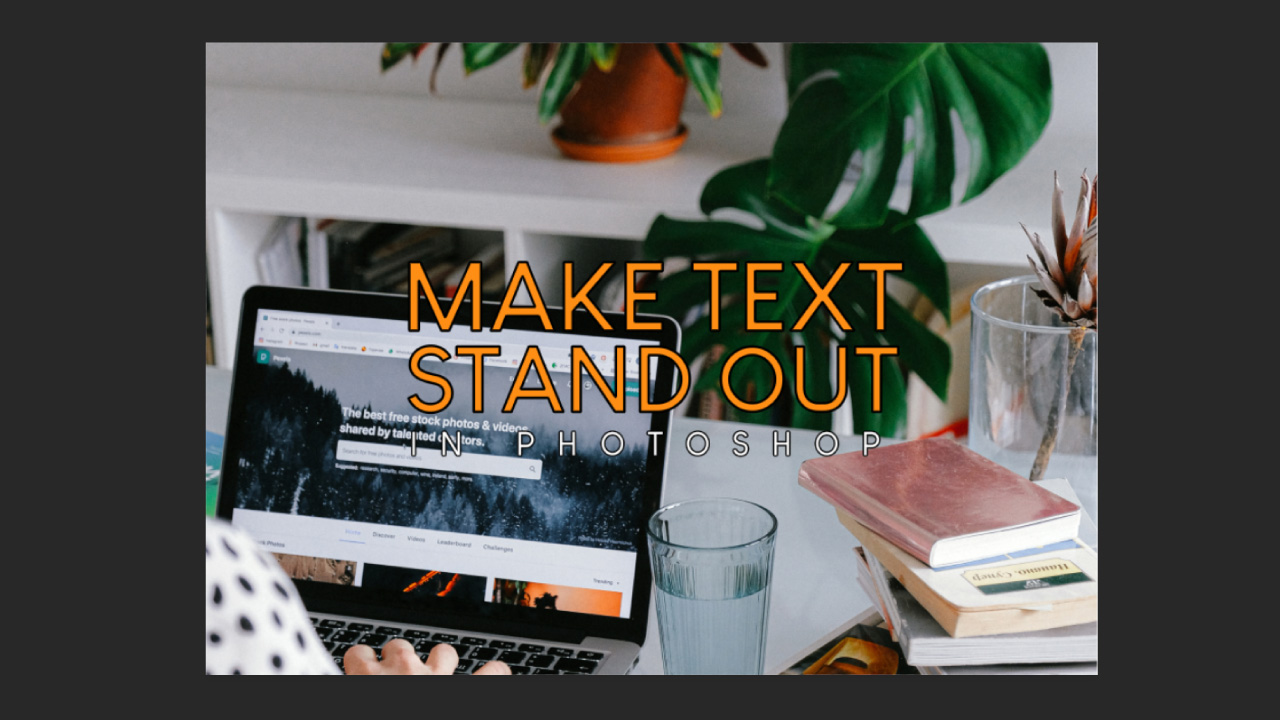
The Result

Here is the result of making a text pop by simply adjusting the text style and color.
Make use of these basic concepts when it comes to make a text pop, in combination with one of the following methods covered in this article.
How to Make Text Pop Using Drop Shadows in Photoshop
Go to the “Layers” (F7) panel and select a text layer. Then click on the “Add a Layer Style” button and select the “Drop Shadows” option. Adjust the “Drop Shadow” settings. Once you are done, click on “OK” to save. Repeat the process on the rest of the text layers.
First you need a background and a text. So check “Step 1” and “Step 2” from the previous section if you need to.
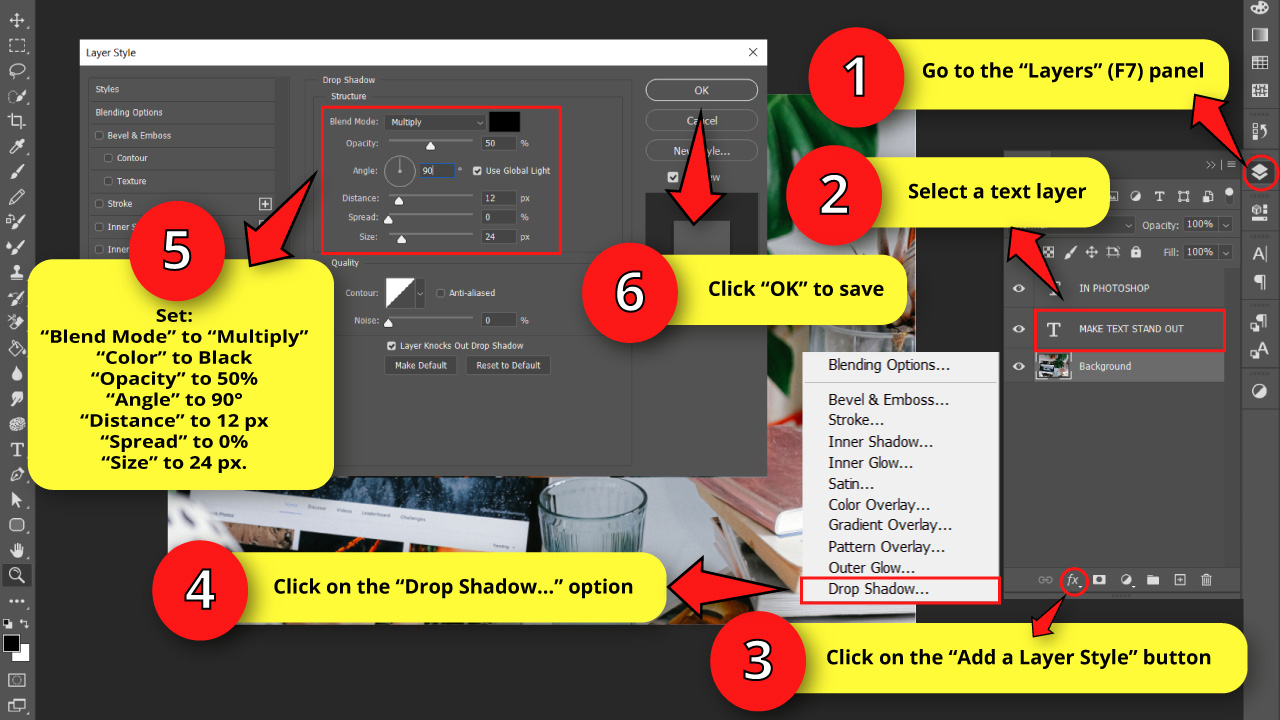
Go to the “Layers” (F7) panel and select a text layer.
Then click on the “Add a Layer Style” button at the bottom of the panel.
On the unfolded menu, select the “Drop Shadow…” option.
Once the “Layer Style” window pops up, set the following adjustments:
“Blend Mode” to “Multiply”
“Color” to Black
“Opacity” to 50%
“Angle” to 90°
“Distance” to 12 px
“Spread” to 0%
“Size” to 24 px.
Click on “OK” to save changes.
Repeat the process on the rest of the text layers.
The Result
Here is the result of making a text pop by adding a subtle drop shadow.

How to Make Text Pop Using Stroke in Photoshop
Go to the “Layers” (F7) panel and select a text layer. Then click on the “Add a Layer Style” button, and select the “Stroke” option. Adjust the “Stroke” settings. Once you are done, click on “OK” to save. Repeat the process on the rest of the text layers.

First you need a background and a text. So check “Step 1” and “Step 2” from the “How to Make Text Pop Adjusting Text Style and Color in Photoshop” section if you need to.
Go to the “Layers” (F7) panel and select a text layer.
Then click on the “Add a Layer Style” button at the bottom of the panel.
On the unfolded menu, select the “Stroke…” option.
Once the “Layer Style” window pops up, set the following adjustments on the “Stroke” tab:
“Size” to 5 px
“Position” to “Center”
“Blend Mode” to “Normal”
“Opacity” to 100%
“Spread” to 0%
“Color” to Black (or a very dark shade of your text color)
Click on “OK” to save changes.
Repeat the same process on the rest of the text layers, except for the “Position” and “Size” values.
For thin fonts, as happens with the heading, set the “Position” value to “Outside” and the “Size” around 3 px.
The Result
Here is the result of making a text pop by adding a stroke.
How to Make Text Pop Using an Overlay Layer in Photoshop
Go to the “Layers” (F7) panel and select the background layer. Click on the “Create New Fill or Adjustment Layer” button, and select the “Solid Color” option. On the “Color Picker” window, select black and click on “OK” to save. Finally, set the “Opacity” to 50% on the “Layers” panel.
Step 1: Add a Solid Color Layer
First you need a background and a text. So check “Step 1” and “Step 2” from the “How to Make Text Pop Adjusting Text Style and Color in Photoshop” section if you need to.
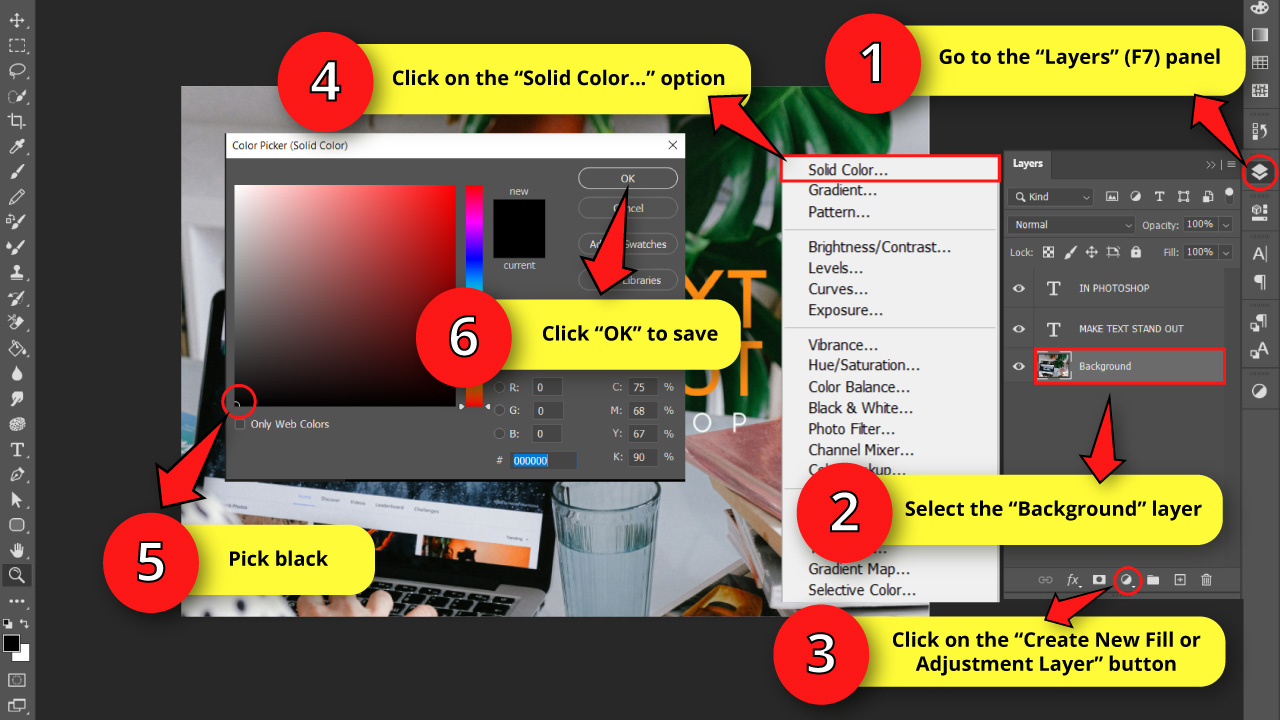
Go to the “Layers” (F7) panel and select the “Background” layer.
We are doing this so the new layer that we’ll create will be added just above the background.
Then click on the “Create New Fill or Adjustment Layer” button located at the bottom of the “Layers” (F7) panel.
Once the menu pops up, select the “Solid Color…” option. Then select a color from the “Color Picker” window. Next, click “OK” to save.
Select total black, white, or another color.
I’ll pick black for this example.
Step 2: Set the Opacity
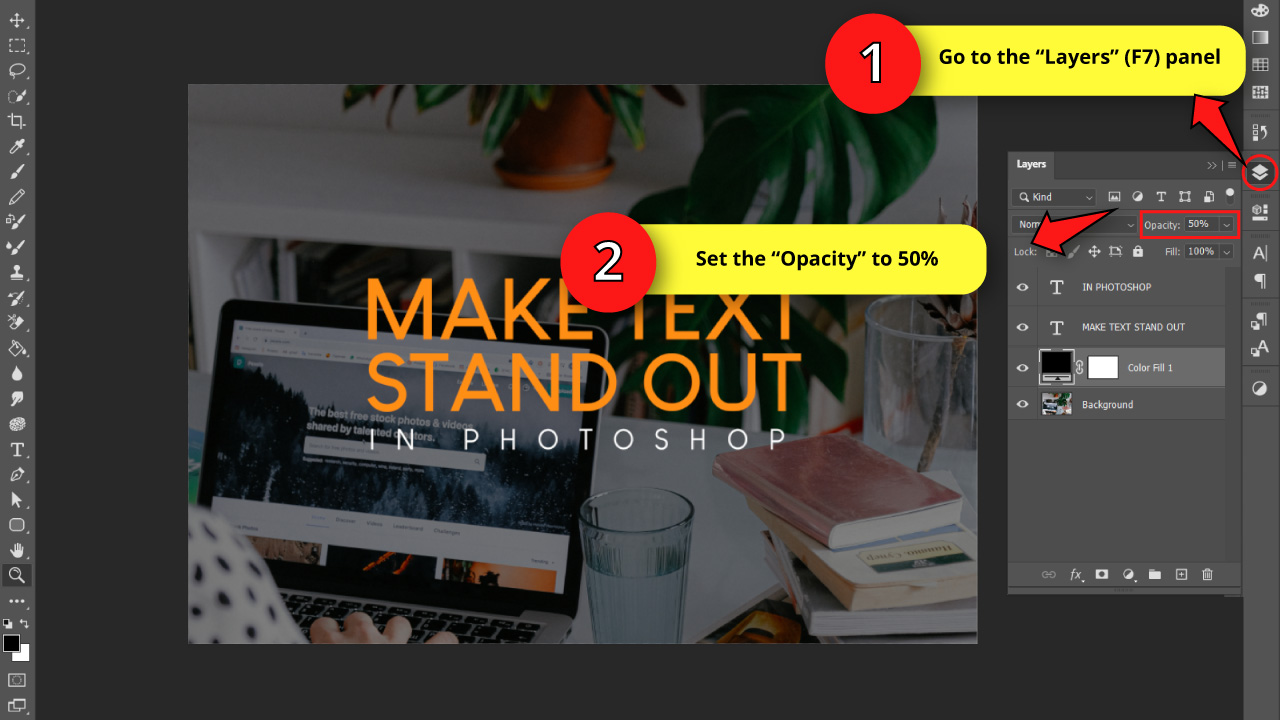
Go back to the “Layers” (F7) panel, and set the “Opacity” value to 50%.
This value may vary depending on your background, so run different tests until you find the best value for your image.
The Result

Here is the result of making a text pop by adding a dark overlay layer.
How to Make Text Pop Using Frames in Photoshop
Use the “Rectangular Marquee” tool to make a selection rectangle enclosing the text. Go to the “Layers” panel and select the background layer. Click on the “Create New Fill or Adjustment Layer” button and select the “Solid Color” option to pick a color. Reduce the “Opacity” value if necessary.
Step 1: Select the Text Area
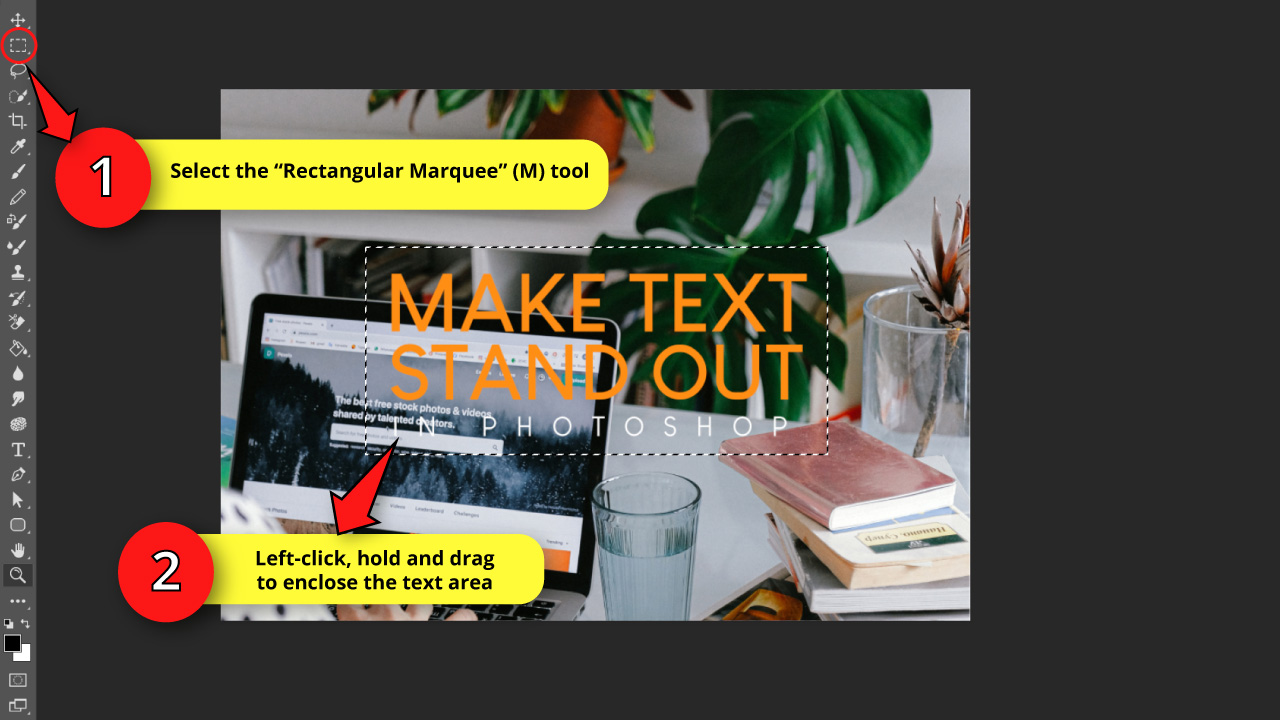
First you need a background and a text. So check “Step 1” and “Step 2” from the “How to Make Text Pop Adjusting Text Style and Color in Photoshop” section if you need to.
Select the “Rectangular Marquee” (M) tool located on the left side toolbar.
You can also use the “Elliptical Marquee” (M) tool, which is hidden on the “Rectangular Marquee” (M) tool nest.
Use the tool that fits your text shape better. Since my text has a rectangular shape, I’ll go with the “Rectangular Marquee” (M) tool.
So use the tool of your choice to draw a selection area by left-clicking, holding and dragging to enclose the text area.
Step 2: Add Fill Color
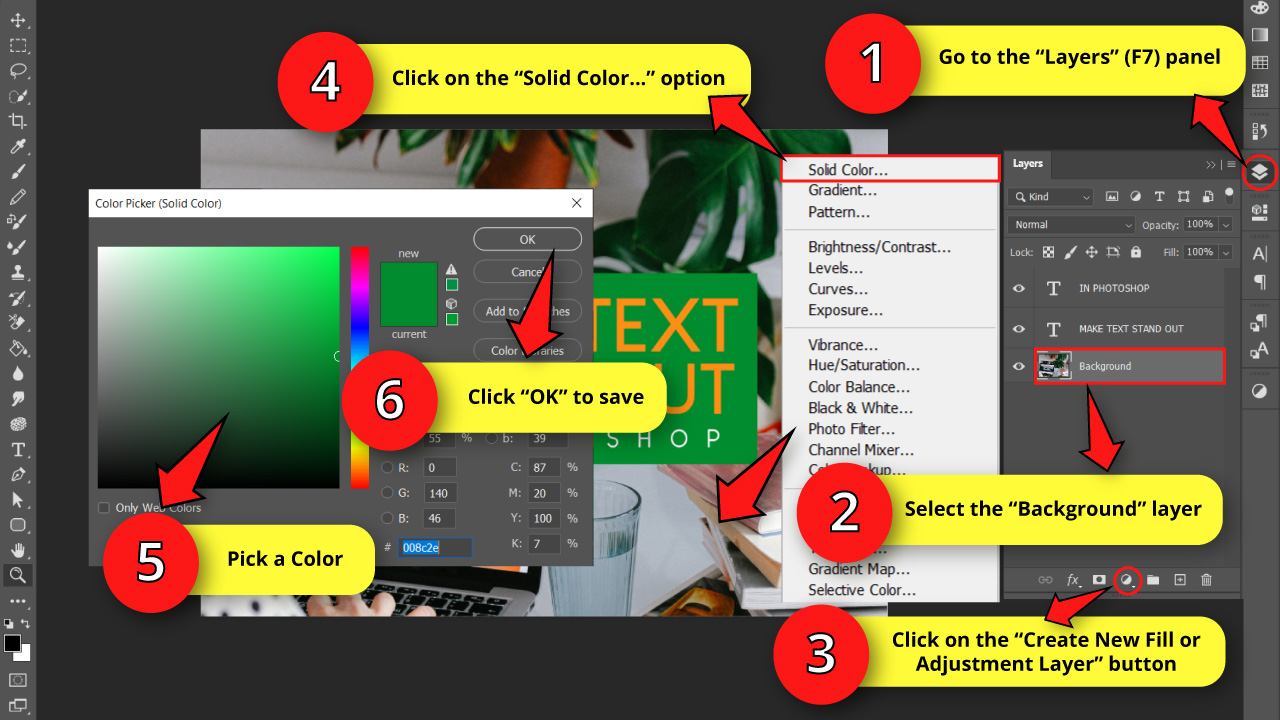
Go to the “Layers” (F7) panel and select the background layer.
Next, click on the “Create New Fill or Adjustment Layer” button located at the bottom of the panel.
Once the menu pops up, select the “Fill Color…” option.
On the “Color Picker” window, select a color and then click on “OK” to save.
Pick black, white or a color that matches your image.
For example, my background has shades of green, blue and orange, so these are the colors that harmonize better with my frame.
I’ll use green this time.
Step 3: Add Transparency to the Frame
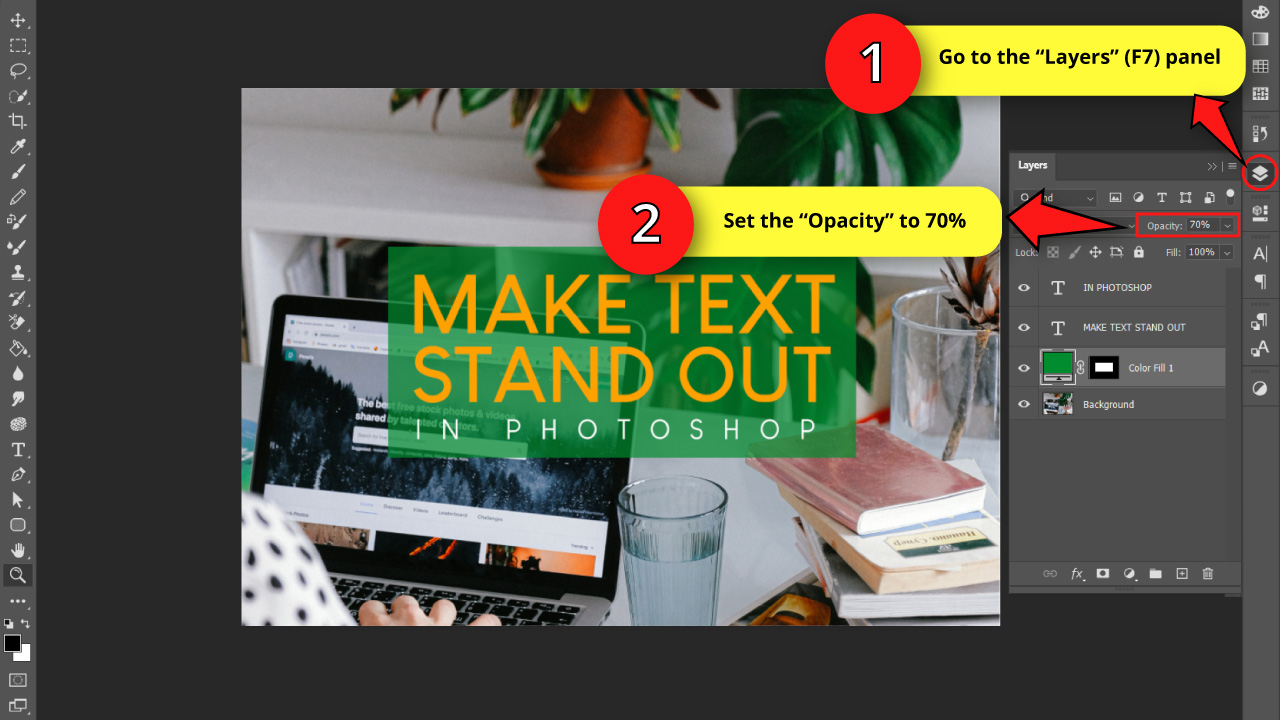
This step is optional. You can leave the frame in a solid color.
If you don’t want to make it transparent, skip to the next step.
To make it transparent, on the “Layers” (F7) panel set the “Transparency” value to 70%, or the value that fits your background better.
Step 4: Change Text Color
This step is also optional.
If you want to change the text color to match the text and the frame colors better, follow this last step.
Go to the “Layers” (F7) panel, and then double-click on the text layer “T” icon.
Next, click on the “Color” box on the menu at the top of the screen and pick your desired color.
I’ll pick white this time.
If you want to make your text stand out even more, try to use the opposite color of your frame.
If you are familiar with the color wheel, you should pick the complementary color.
If you are not familiar with it, use this mini guide of complementary colors:
Black – White
Yellow – Purple
Red – Green
Blue – Orange
Keep in mind that contrast colors probably work better with solid color frames, and not necessarily with transparencies.
The Result
Here is the result of making a text pop adding a solid or transparent color frame.

How to Make Text Pop Using Transparent Gradients in Photoshop
Select black on the “Foreground” color box. Go to the “Layers” panel and select the background layer. Click on the “Create New Fill or Adjustment Layer” button and select the “Gradient” option. Set the “Gradient” field to “Foreground to Transparent”, “Style” to “Linear”, and “Angle” to 90°.
Step 1: Add Transparent Gradient
First you need a background and a text. So check “Step 1” and “Step 2” from the “How to Make Text Pop Adjusting Text Style and Color in Photoshop” section if you need to.
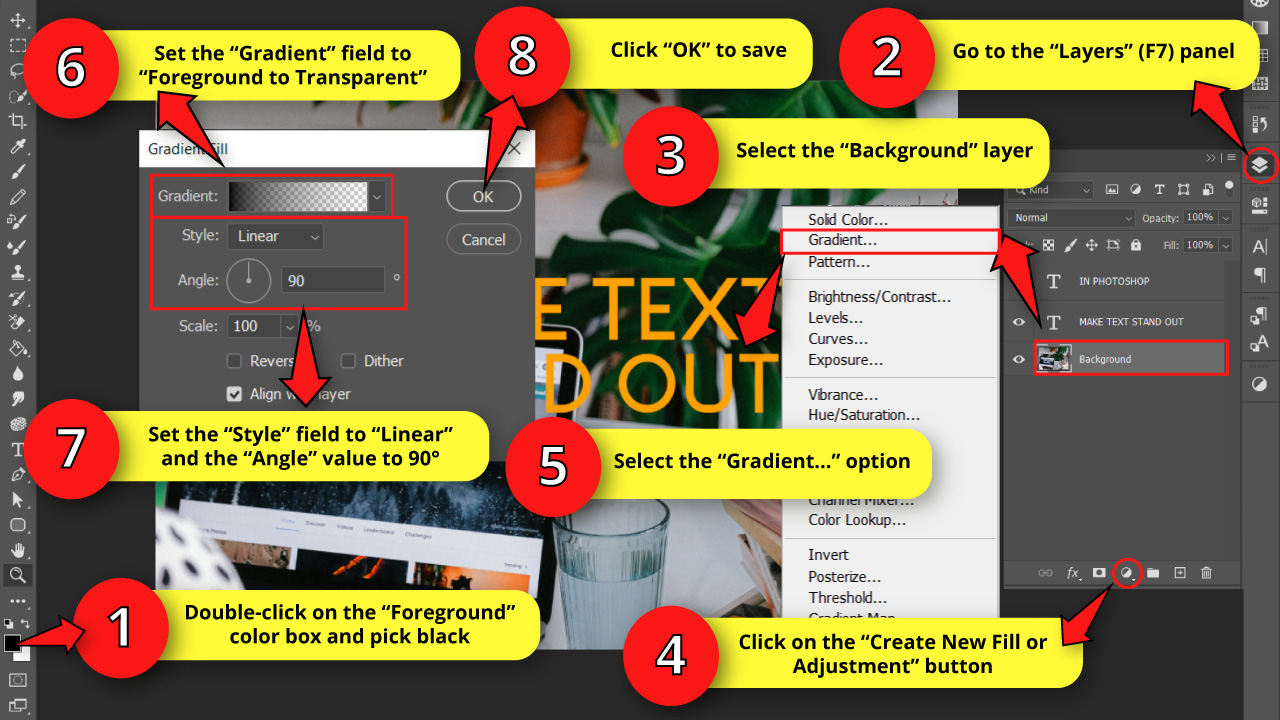
Double-click on the “Foreground” color box to pick a color. I’ll pick black for this example. This color will be the one we’ll use for the gradient.
Go to the “Layers” (F7) panel and select the “Background” layer.
Then, click on the “Create New Fill or Adjustment” button located at the bottom of the panel, and select the “Gradient…” option.
Once the “Gradient Fill” options window pops up, you will notice that the “Gradient” field has several presets grouped in folders.
In the “Basic” folder, select the “Foreground to Transparent” gradient.
Next, set the “Style” value to “Linear”, and the “Angle” to 90°.
If the applied gradients are inverted, you can fix this by marking the “Reverse” checkbox.
Finally click “OK” to save.
Step 2: Make the Gradient Effect Softer
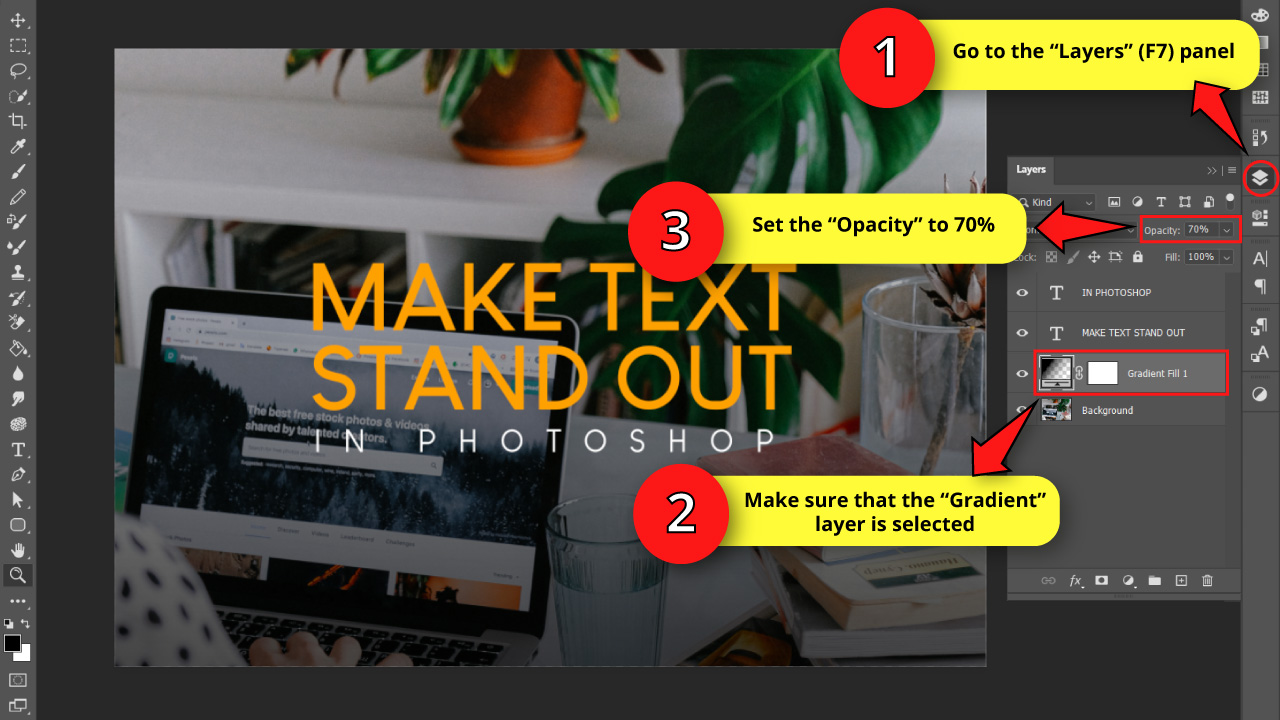
This step is optional.
If you consider that the gradient filter is too strong, you can make it softer by going to the “Layers” (F7) panel and setting the “Opacity” field around 70%, or even lower.
The Result

Here is the result of making a text pop by adding a transparent to dark gradient filter.
How to Make Text Pop Using Color Gradients in Photoshop
Go to the “Layers” panel and select the background layer. Click on the “Create New Fill or Adjustment Layer” button, and select the “Gradient” option. Select your desired preset on the “Gradient” field. On the “Layers” (F7) panel, set “Blend Mode” to Multiply, and “Opacity” to 80%.
Step 1: Add a Color Gradient
First you need a background and a text. So check “Step 1” and “Step 2” from the “How to Make Text Pop Adjusting Text Style and Color in Photoshop” section if you need to.
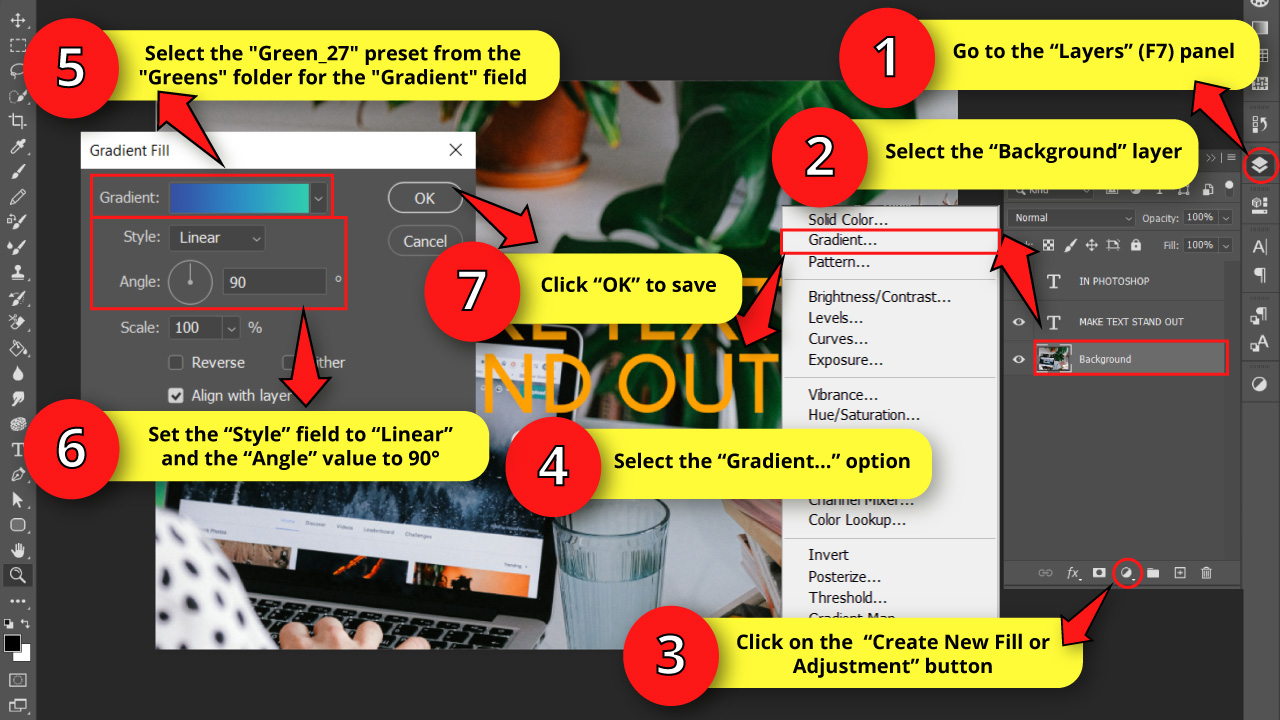
Go to the “Layers” (F7) panel and select the “Background” layer.
Then click on the “Create New Fill or Adjustment” button located at the bottom of the panel, and select the “Gradient…” option.
On the “Gradient Fill” window, select your desired gradient preset.
For this example I’ll pick the “Green_27” gradient from the “Greens” folder.
Then select “Linear” in the “Style” field, and set the “Angle” to 90°.
If the applied gradients are inverted, you can fix this by marking the “Reverse” checkbox.
Then click “OK” to save.
Step 2: Adjust the Blending Mode and Transparency
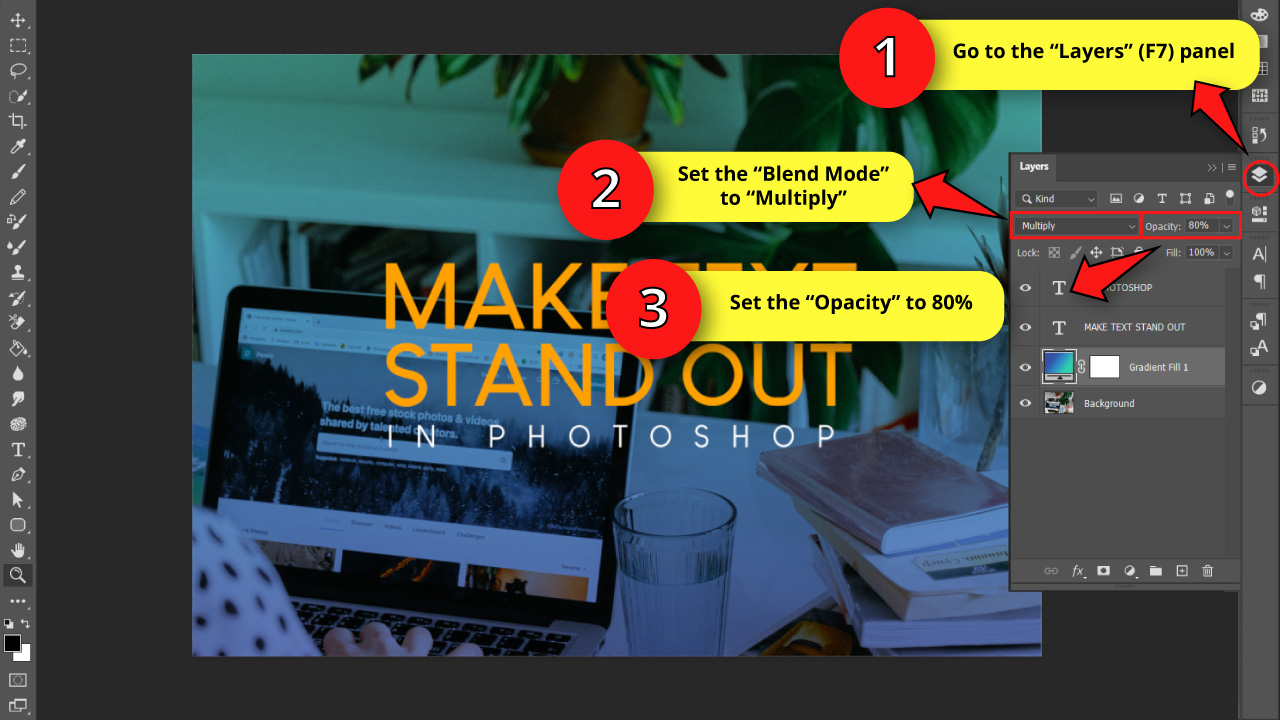
Go back to the “Layers” (F7) panel and select “Multiply” or “Hard Light” in the “Blending Mode” field. I’ll use “Multiply”, but you can check around for different blending modes.
If you think that the gradient filter is too intense, you can make it softer by lowering the “Opacity” to around 80%.
Finally keep in mind that you can also change the text color to match your gradient better.
If you want to change it but you need help with it, check the “Step 4” of the “How to Make Text Pop Using Frames in Photoshop” section from this same article.
The Result
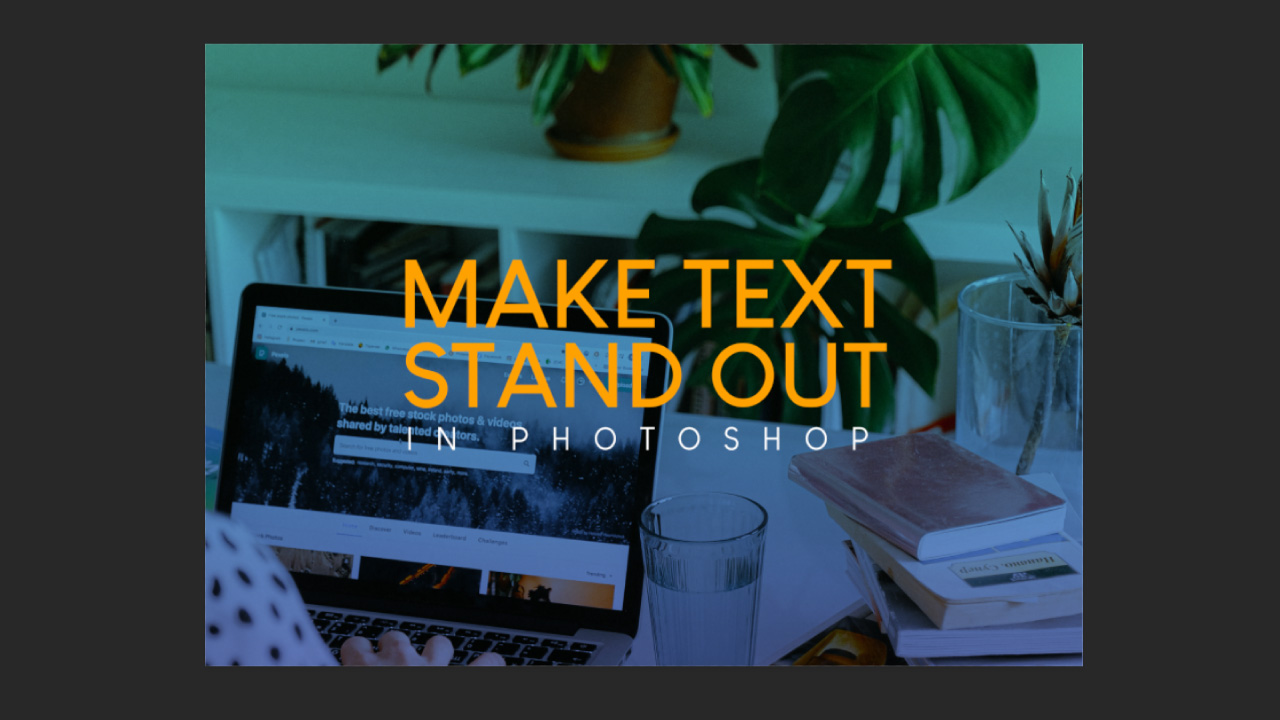
Here is the result of making a text pop by adding a color gradient filter.
How to Make Text Pop Using Blur Filter in Photoshop
Go to the “Layers” panel and duplicate the background. Go to “Filter > Blur > Gaussian Blur” and set the “Radius” around 11 px. To make a blur frame, use the “Rectangle Marquee” tool, and enclose the text. Then, click on the “Add Layer Mask” button on the “Layers” panel.
Step 1: Duplicate the Layer
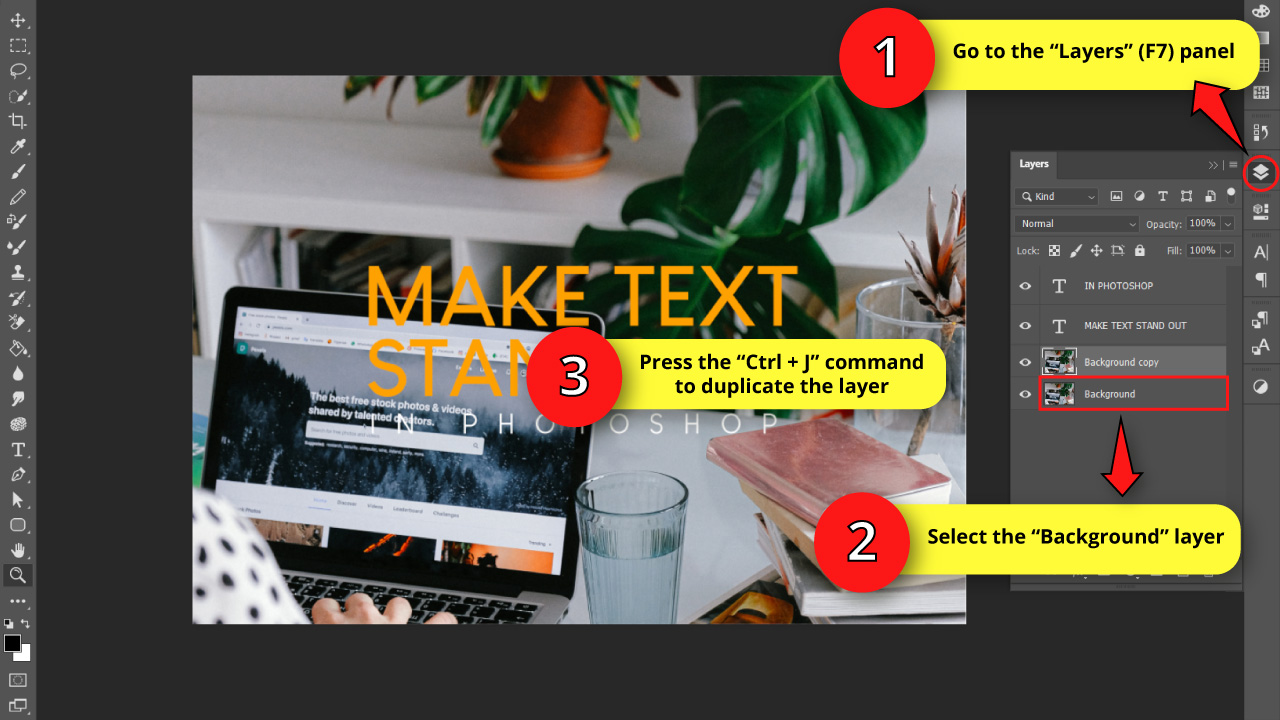
First you need a background and a text. So check “Step 1” and “Step 2” from the “How to Make Text Pop Adjusting Text Style and Color in Photoshop” section if you need to.
Go to the “Layers” (F7) panel and select the “Background” layer.
Next, press the “Ctrl + J” command to duplicate the layer.
You can also duplicate layers by clicking on the menu icon (the three horizontal lines) at the top right side of the panel.
We are duplicating the layer because we need a backup of the “Background” layer, since we’ll use a filter that works as a destructive edition.
Check the F.A.Q. if you want to know more about destructive and non-destructive editing in Photoshop.
Step 2: Add Gaussian Blur Filter
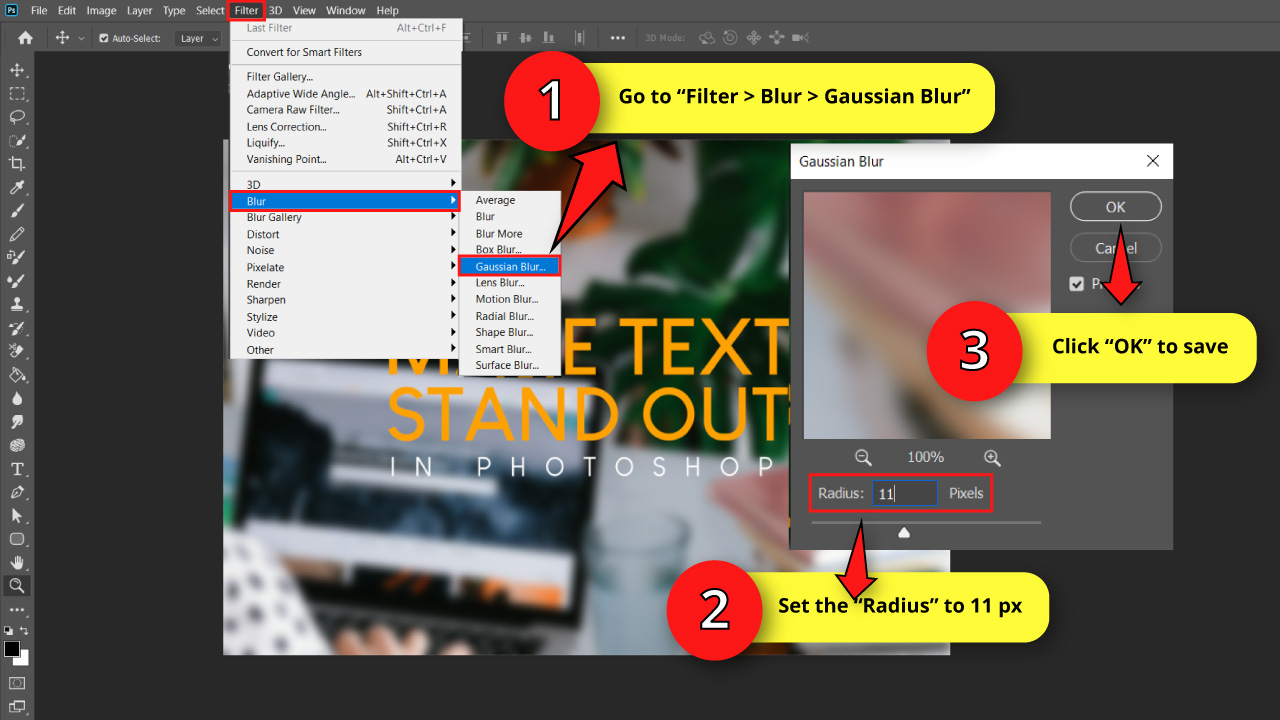
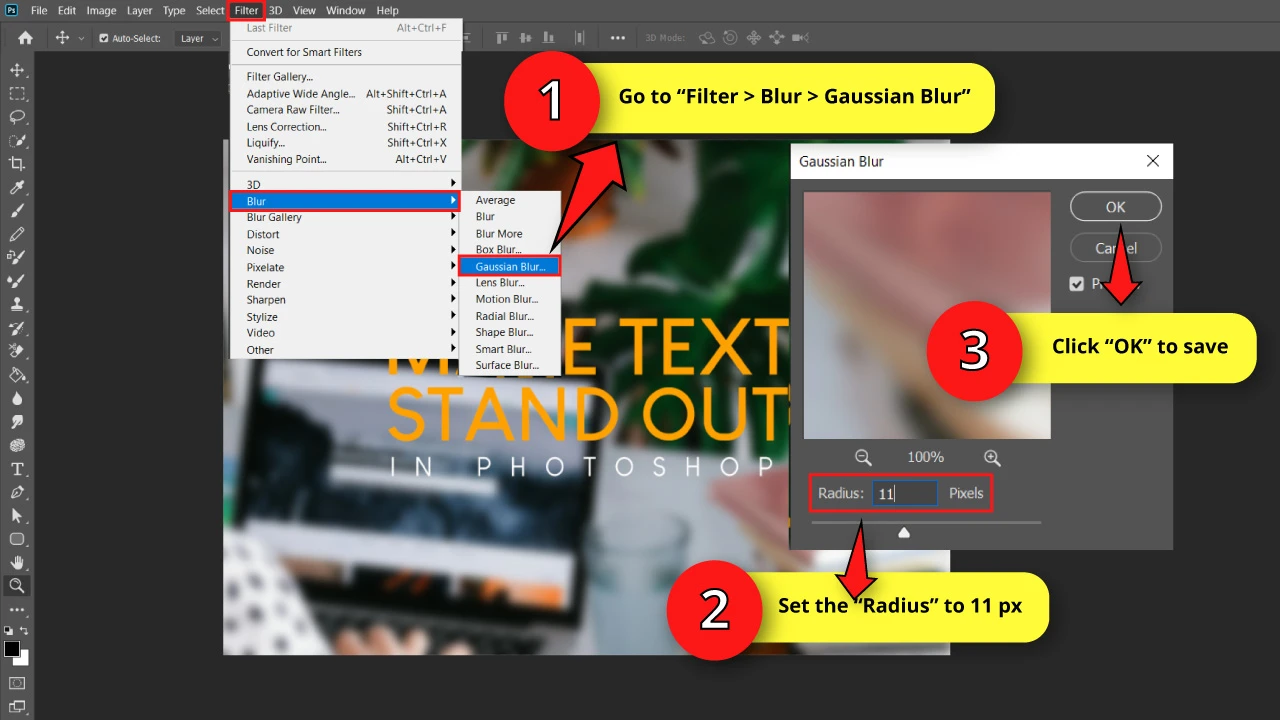
Go to “Filters > Blur > Gaussian Blur” on the menu at the top of the screen.
Once the “Gaussian Blur” window pops up, set the “Radius” value around “11 px”.
This value may vary depending on the resolution of your background. Try with different “Radius” values until you reach the desired effect.
Finally click on “OK” to save changes.
If you want to add just a frame of the “Gaussian Blur” filter, continue with the next step.
Step 3: Limit the Gaussian Blur Filter to a Frame

Use the “Rectangular Marquee” (M) tool to draw a rectangular selection by left-clicking, holding and dragging to enclose the text area.
Next, go to the “Layers” (F7) panel once again, and make sure to have selected the “Background copy” layer.
Finally, click on the “Add Layer Mask” button located at the bottom of the panel to mask the blurred layer.
The Result

Here is the result of making a text pop by adding a blur filter to the whole layer, or simply to a frame.
How to Make Text Pop Using Black & White Filter in Photoshop
Go to the “Layers” (F7) panel and select the background layer. Click on the “Create New Fill or Adjustment” button and select “Black & White” option. On the “Properties” panel adjust the filter settings. Finally use the “Move” (V) tool to relocate the text if necessary.
Step 1: Add Black & White Filter
First you need a background and a text. So check “Step 1” and “Step 2” from the “How to Make Text Pop Adjusting Text Style and Color in Photoshop” section if you need to.
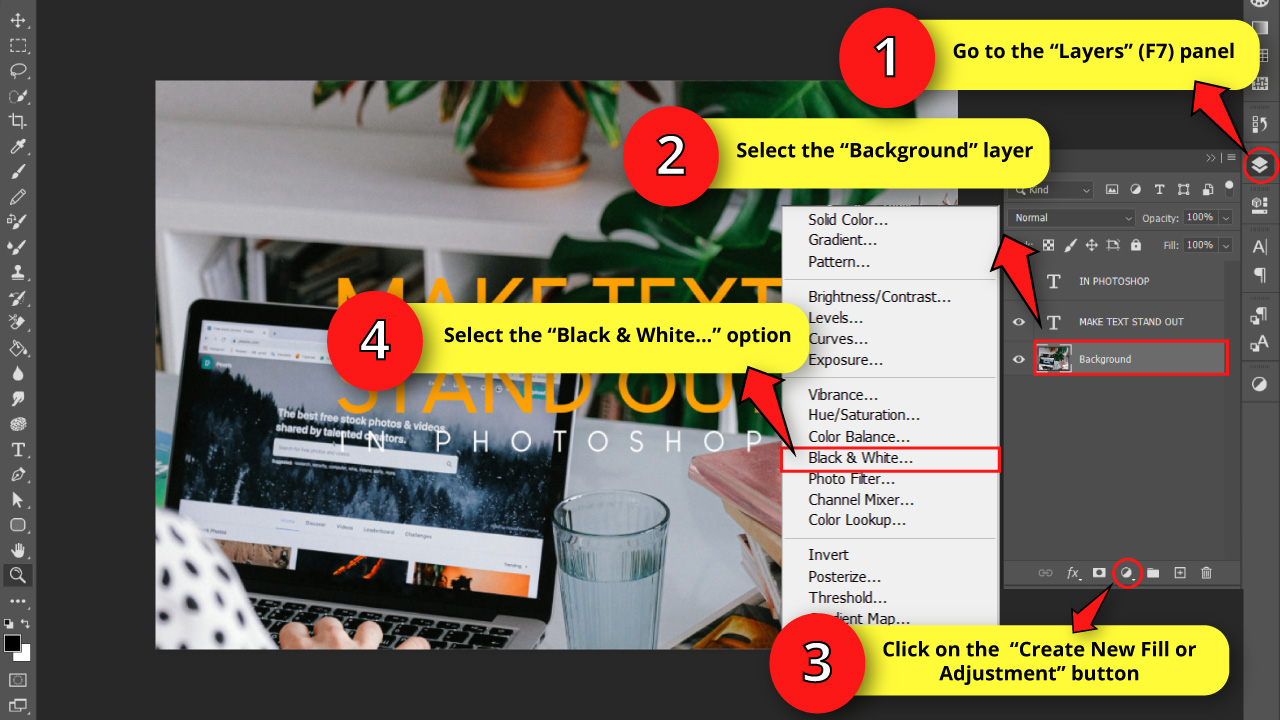
Go to the “Layers” (F7) panel and select the “Background” layer.
Next, click on the “Create New Fill or Adjustment Layer” button located at the bottom of the panel to unfold the options menu.
Finally, select the “Black & White…” option to open its “Properties” panel.
Step 2: Adjust the Black & White Filter
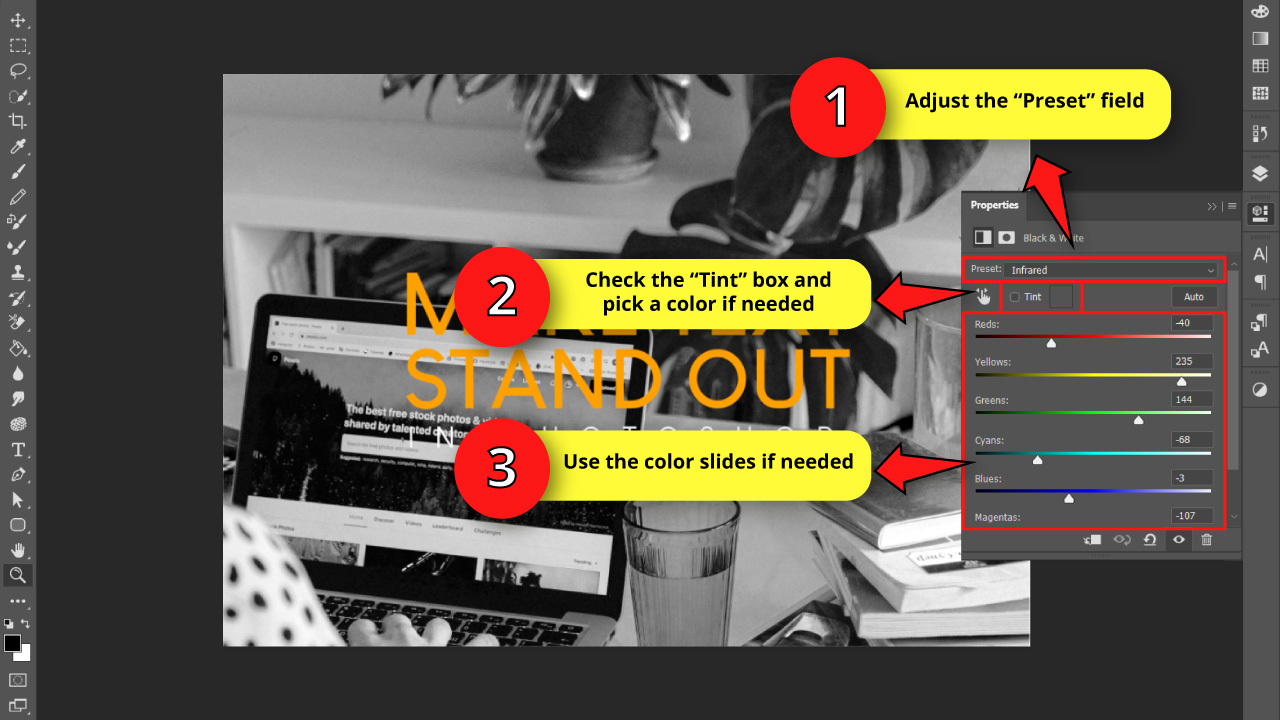
On the “Properties” panel, you can leave settings by default, or you can set the “Preset”, where you can find several black & white filter types.
You can adjust the filter using the color sliders (reds, yellows, greens, cyans, blues and magentas) as well.
Drag them to the right if you want to make that color brighter in black & white version.
Drag them to the left if you want to make that color darker in black & white version.
You also have an option to add a “Tint”.
Check the “Tint” box if you want your black & white filter to have a color tint.
Once you check the “Tint” box, you can double-click on the color box to pick your desired tint.
The only adjustment I’ll make is selecting “Infrared” in the “Preset” field.
Step 3: Add a Brightness/Contrast Filter

This step is optional.
Since my background isn’t dark enough, and the text kind of fades a little bit, I need to add a “Brightness/Contrast” filter.
If this is also your case, go to the “Layers” (F7) panel again, and click on the “Create New Fill or Adjustment Layer” button, located at the bottom of the panel.
On the unfolded menu, select the “Brightness/Contrast…” option to open its “Properties” panel.
If you feel it can make your work any easier, you can also quickly rename layers in Photoshop to make things more organized.
Step 4: Adjust the Brightness / Contrast Filter
Once the “Properties” panel opens, set the “Brightness” value around -94 and the “Contrast” to 29.
The Result
Here is the result of making a text pop by adding a black & white filter.


How to Make Text Pop Using Color Lookup Filter in Photoshop
Go to the “Layers” (F7) panel and select the background layer. Click on the “Create New Fill or Adjustment” button, and select the “Color Lookup” option. On the “Properties” panel, select the “Moonlight.3DL” or your desired filter in the “3DLUT File” field.
Step 1: Add a Color Lookup Filter
First you need a background and a text. So check “Step 1” and “Step 2” from the “How to Make Text Pop Adjusting Text Style and Color in Photoshop” section if you need to.
Go to the “Layers” (F7) panel and select the “Background” layer.
Next, click on the “Create New Fill or Adjustment Layer” button located at the bottom of the panel to unfold the options menu.
Select the “Color Lookup…” option to open its “Properties” panel.
Step 2: Adjust the Color Lookup Filter
You can select different photo filters on the “Properties” panel. You can use these to darken your background, so the text instantly stands out.
I’ll select the “Moonlight.3DL” option in the “3DLUT File” field just for this example.
You can try with different presets until you find the one you like the most.
Once you’ve picked your “3DLUT File” preset, you can change the text color to match your filter better.
If you want to change it but you need help with it, check the “Step 4” of the “How to Make Text Pop Using Frames in Photoshop” section from this same article.
The Result
Here is the result of making a text pop by adding a Color Lookup filter.
Frequently Asked Questions on “How to Make Text Pop in Photoshop”
Are there any main tips to make a text pop in Photoshop?
There are a few. Type a text based on the hierarchy rule, making titles bolder and catchier than the headings, and follow the same idea regarding the paragraphs. Use colors that harmonize with the background. If possible, place the text in a clear spot. Add a filter to the background.
What’s the difference between destructive and non-destructive processing in Photoshop?
A destructive process involves editing the original image. This means the edition becomes permanent when you reach the limit of “Ctrl + Z” commands, or the ”Undo” button. Non-destructive editions don’t modify the original image, so you can always go back and recover it in its original state.
What is a color wheel?
The color wheel or color circle is the scheme of colors organized around a circle where you can appreciate the relations between them. This wheel is used in the Color Theory to study the complementary, analogous, triads, tetradic, cool, warm, hues, tints, tones and shades of the colors.


Hey guys! It’s me, Marcel, aka Maschi. On MaschiTuts, it’s all about tutorials! No matter the topic of the article, the goal always remains the same: Providing you guys with the most in-depth and helpful tutorials!

