Entering the world of custom brushes represents a game changer. Learning how to make your own brushes and how to adjust them simply takes you to another level.
Possibilities are almost infinite when it comes to brushes. In this tutorial we are going to learn the basics of each type of brush.
Making a Brush in Illustrator
To make a Calligraphic or Bristle brush, go to the Brush (F5) panel and click on Create Brush. Select your desired type of brush and configure settings. To make a Scatter, Art or Pattern brush first select your artwork and then go to the Brush panel. Finally use the “Paintbrush” (B) tool to draw.
Making a Calligraphic Brush in Illustrator
Open the “Brush” (F5) panel. Click on “New Brush” and select “Calligraphic Brush”. Set the “Angle” to 45°, “Roundness” to 20% and “Size” to 20 pt. Select “Fixed” variation for all, but if you have a Graphic Tablet, set “Size” variation to “Pressure” on 20 pt. Select the “Paintbrush” (B) and draw.
Use or make a “Calligraphic Brush” if you want to create a brush for lettering. Also you can use it for some drawings.
There are a lot of different brush setting combinations you can set, so we’ll learn the basics and some examples.
It’s highly recommended that you take some time and run trials with different setting values to understand better how brushes work and how to get what you’re looking for.
Step 1: Create a New Brush
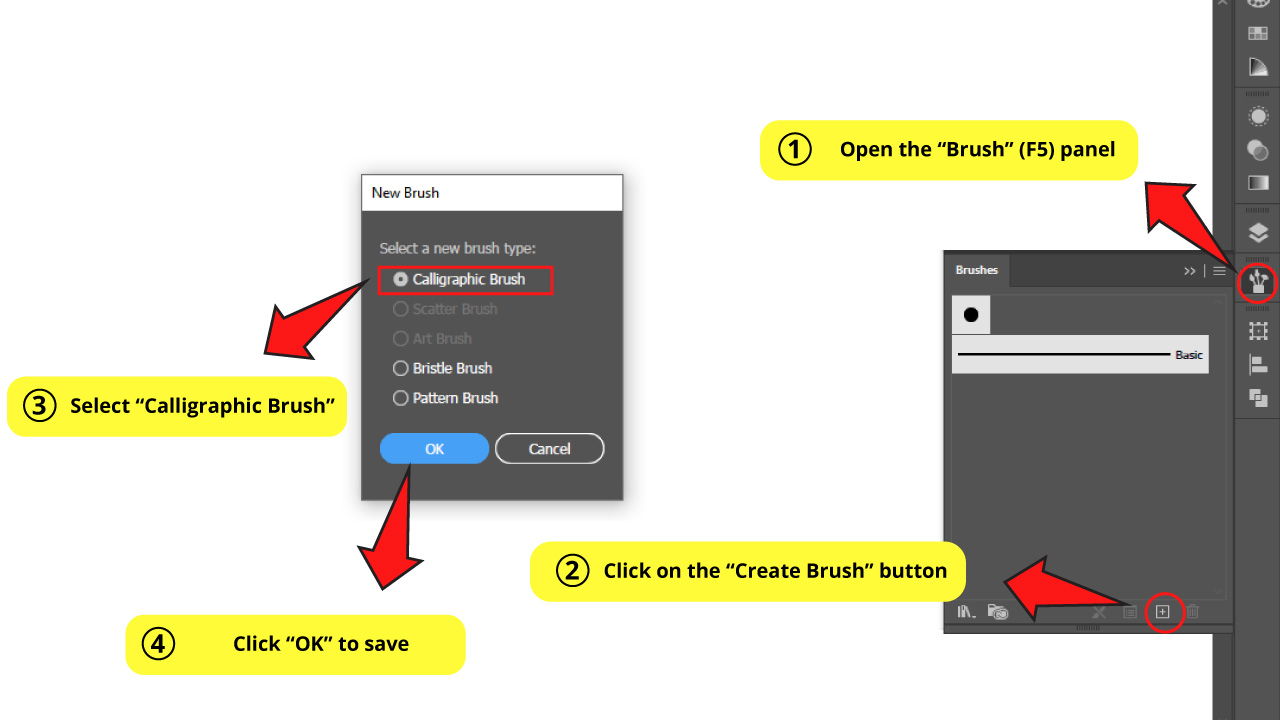
First open the “Brush” panel located on the right side toolbar. If you can’t find it, you may have to enable it first by going to “Windows > Brush” or pressing the “F5” key shortcut.
Then click on the “New Brush” button at the bottom of the panel.
Select “Calligraphic Brush” on the popup window, and then click “OK” to save.
Step 2: Set the Calligraphic Brush Options
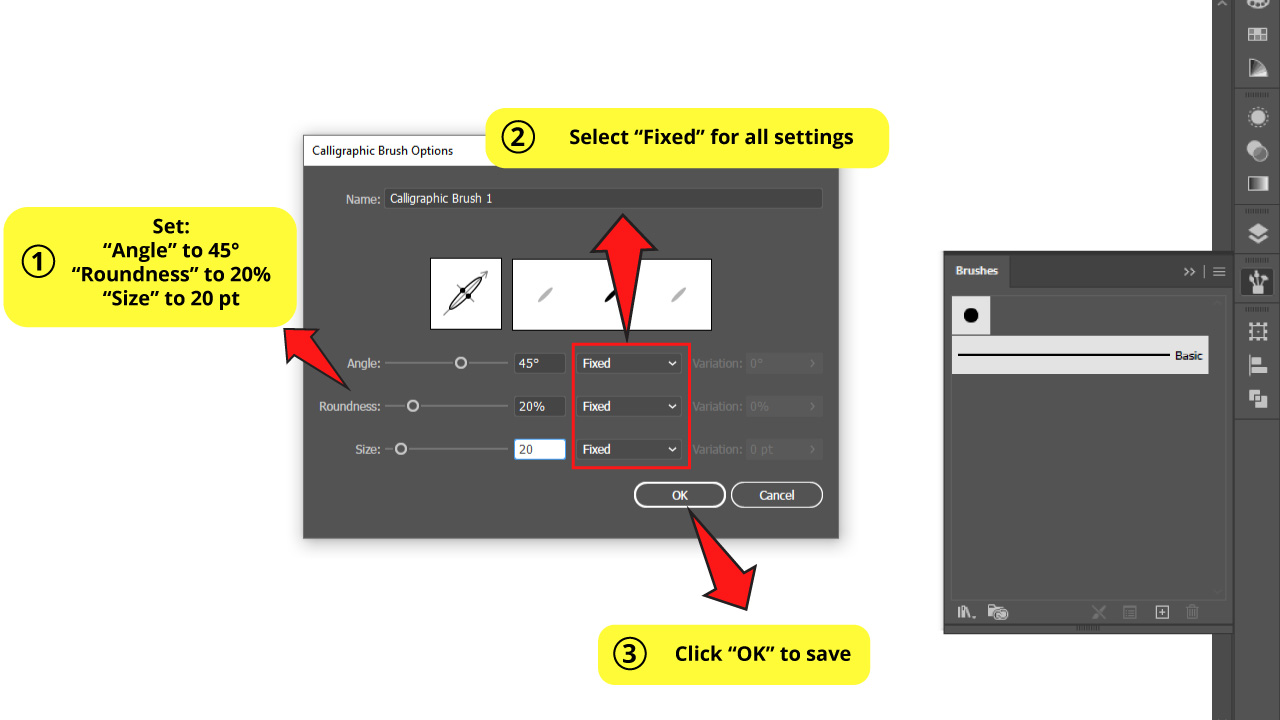
You can adjust “Angle”, “Roundness” and “Size” settings, as well as the “Variation” option in this “Calligraphic Brush Options” window.
Of course, these settings will depend on your specific needs. But we are going to set these values for this example.
Set “Angle” to 45° to make the orientation to 45°.
Set “Roundness” to 20% to make the brush flatter.
Set “Size” to 20 pt.
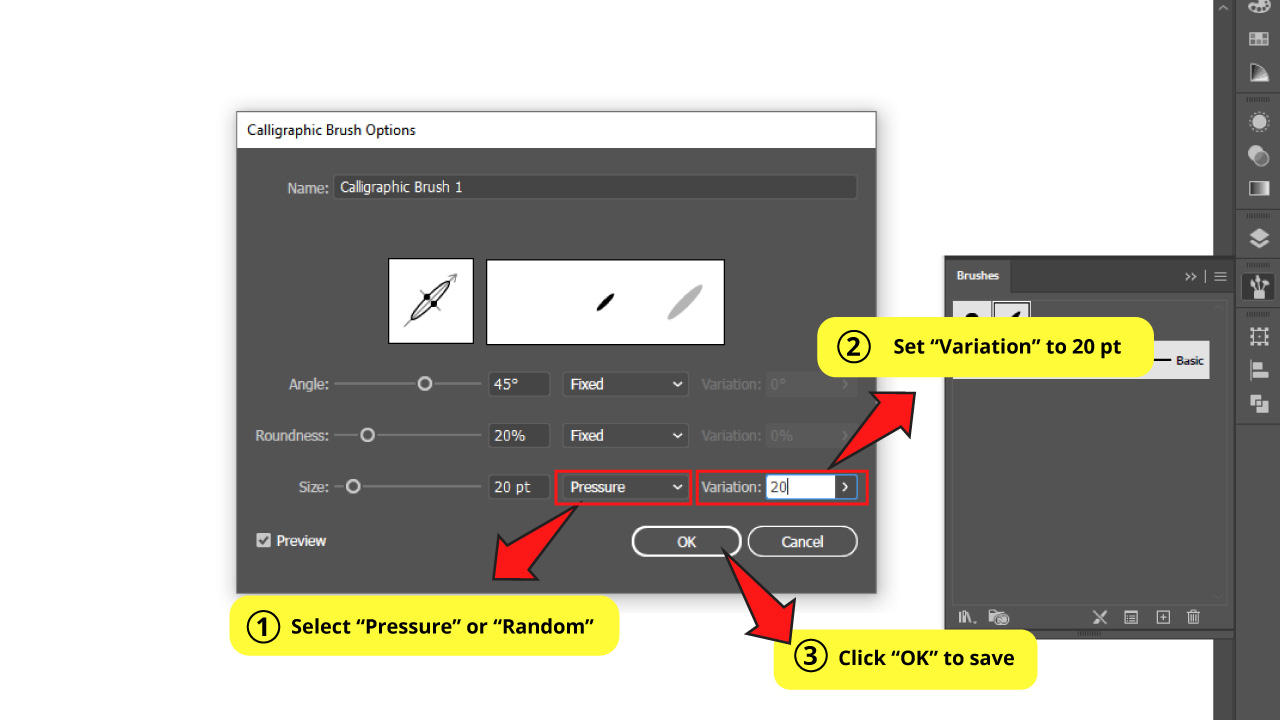
You can also set the “Variation”. There are several options for this value, but we are going to learn the main ones: “Fixed”, “Random”, “Pressure”.
Leave “Fixed” if you don’t want any variation of the set values.
Use “Random” if you want to randomly vary the values.
Use “Pressure” if you’re working with a graphic tablet capable of recognizing pressure, so the variation will depend on the pressure you put on the pen.
We are going to leave all values set to “Fixed” for now.
Step 3: Set the Brush Fidelity
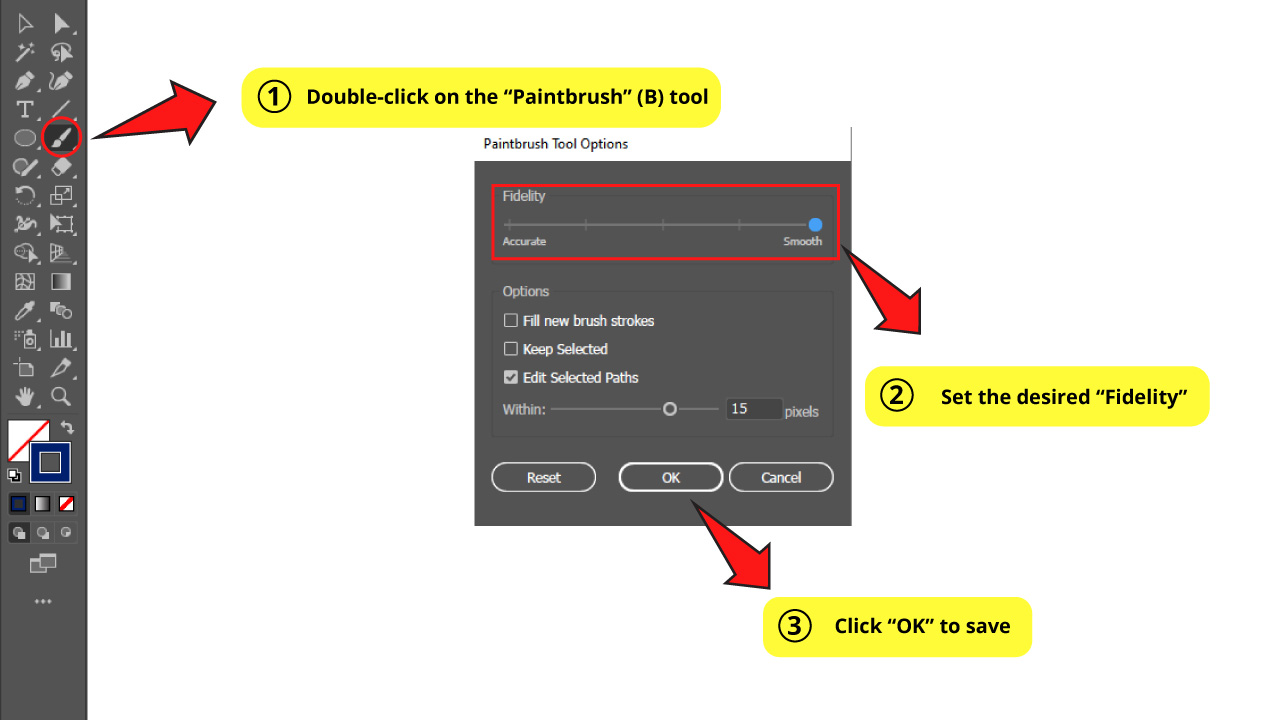
You can also set the “Fidelity” of the brush. This feature allows us to adjust the brush making it more accurate and precise or making it more smoother.
To set “Fidelity”, double-click on the “Paintbrush” (B) tool on the left side toolbar to access brush options.
As a rule of thumb, it’s recommended to set the brush to a smoother value if you aren’t working with a graphic tablet, if you have a trembling hand, or if your traces are going to be straight or wide curved lines.
I’m going to set “Fidelity” to max smoothness.
Step 4: Use the Fixed Brush
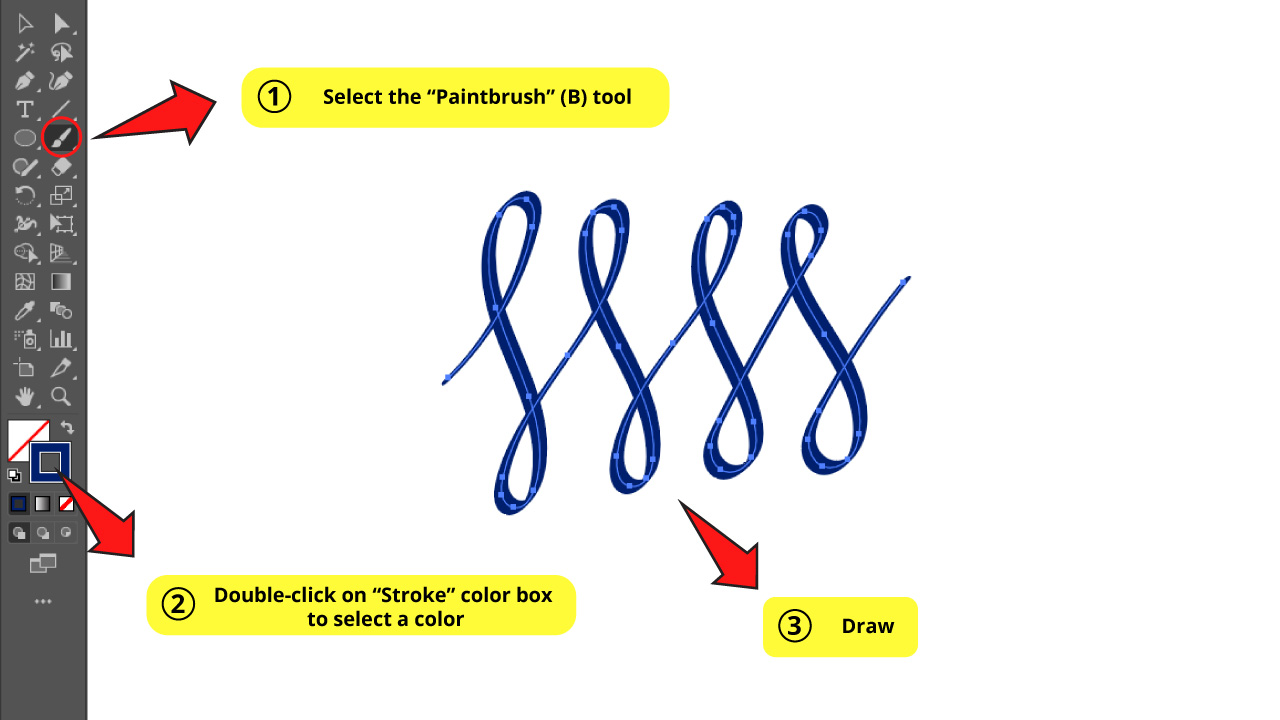
Select the “Paintbrush” (B) tool.
Double-click on the “Stroke” box color on the left side toolbar to select a color.
Then draw on the artboard.
Step 5: Modify Brush Settings
If you want to readjust the brush settings you can do it by going to the “Brush” panel and double-clicking on the brush thumbnail. The “Calligraphic Brush Options” will open.
To finish the “Calligraphic” brush tutorial, we will go through two more possibilities, but there are a lot of different combinations you can try. Just have some fun playing with the settings and you’ll get real cool brushes.
For one of the examples I’m going to set the “Size” variation as “Pressure” at 20 pt. That’d be the max value for this range.
And for the other example I’m going to set the “Size” variation as “Random”, also at 20 pt.
Step 6: Use Pressure and Random Brushes

Use the “Paintbrush” (B) tool to draw the new lines.
For the brush set to “Pressure”, as you can notice, the brush varies its size as you trace depending on if your pressure is harder or softer. Remember that the “Pressure” feature will properly work only with a graphic tablet.
For the brush set to “Random”, you can notice that every time you draw a trace, it randomly changes the brush size.
Would you like to know about other ways to change brush sizes? Check this tutorial about how to “Change the Brush Size in Illustrator In 4 Easy Steps”.
Make a Scatter Brush in Illustrator
Select your artwork. Open the “Brush” (F5) panel. Click on “New Brush” and select “Scatter Brush”. Set “Variation” to “Random” and select your desired values for “Size”, “Spacing”, “Scatter” and “Rotation”. Set “Colorization” to “Hue Shift”. Then draw using the “Paintbrush” (B) tool.
Use the “Scatter Brush” when you want to come up with a decorative, or even a shadowing brush.
You can pick from a very basic shape (like a circle) to a very complex artwork (like an entire drawing with a lot of details) as a “Scatter Brush”.
For this example I’ll be using a snowflake.
Are you already an avid drawing artist in Illustrator? Take a look at this article about “How to Draw in Illustrator in 5 Simple Steps”.
Step 1: Select your Artwork
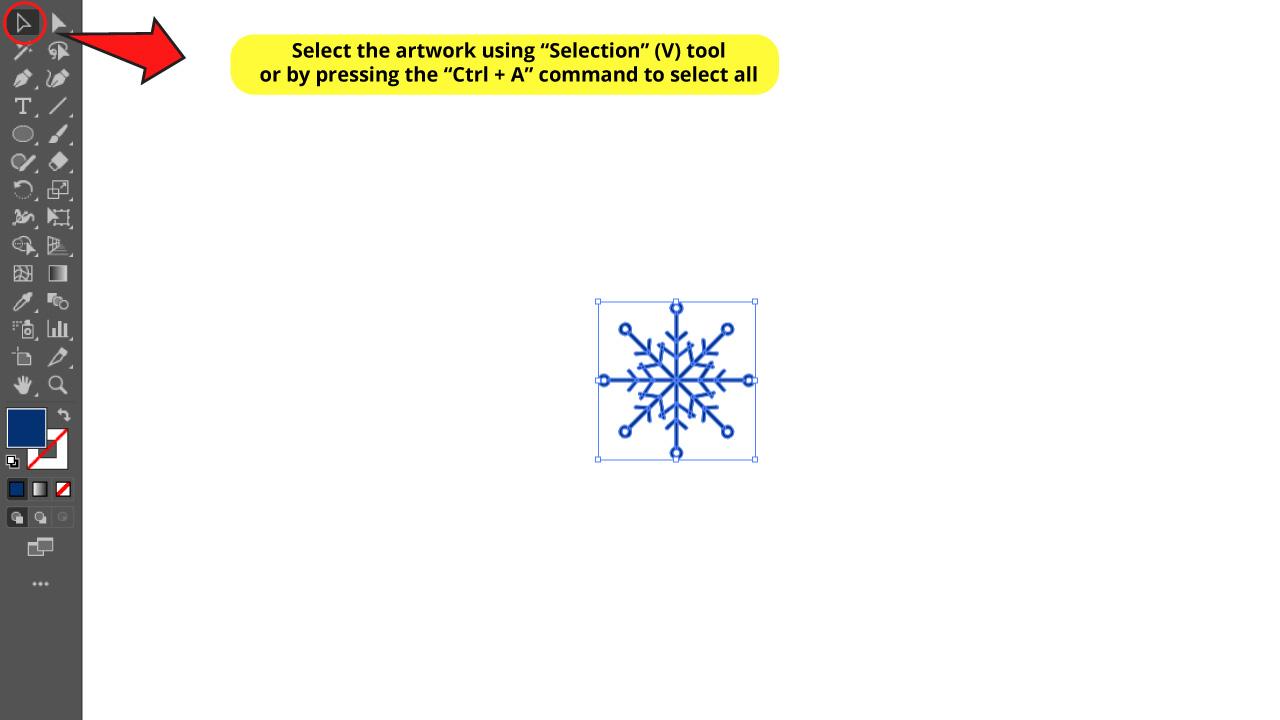
First select your artwork.
You can do this with the “Selection” (V) tool or by pressing the “Ctrl + A” command to select all.
Step 2: Create a New Brush
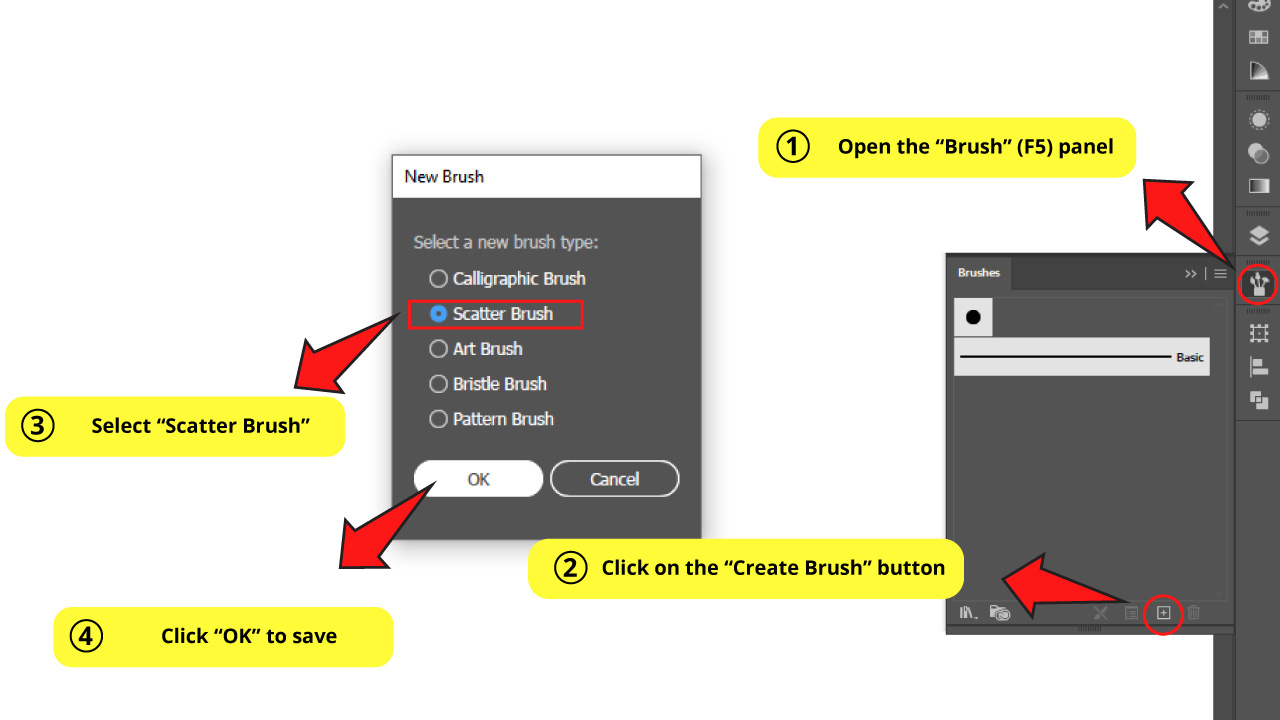
Go to the “Brush” (F5) panel and click on “New Brush”.
Select “Scatter Brush” and then click “OK” to save.
Step 3: Set the Scatter Brush Options
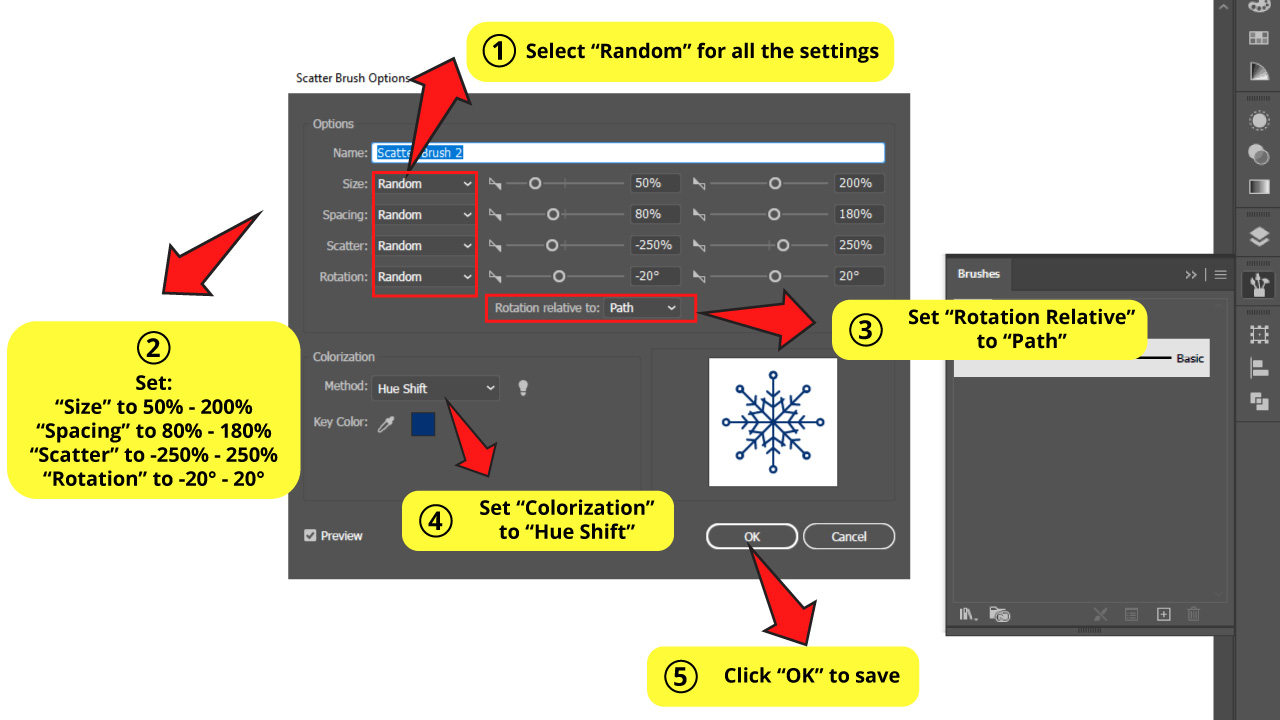
You can adjust “Size”, “Spacing”, “Scatter” and “Rotation” settings, as well as “Colorization” and “Rotation Relative” options in this “Scatter Brush Options” window.
As we previously mentioned in the “Calligraphic Brush” tutorial, we can set these values to vary by “Pressure”, “Random”, or to stay “Fixed”.
For this example we will set all to “Random”. If you select “Random” or “Pressure”, a third column of settings will be available to set the range.
So let’s make the following adjustments:
For “Size” set 50% to 200%
For “Spacing” set 80% to 180%
For “Scatter” set -250% to 250%
For “Rotation” set -20° to 20°
For “Rotation Relative to” you can set it to “Path”.
For “Colorization” select “Hue Shift” to be able to change its color later.
Step 4: Use the Brush
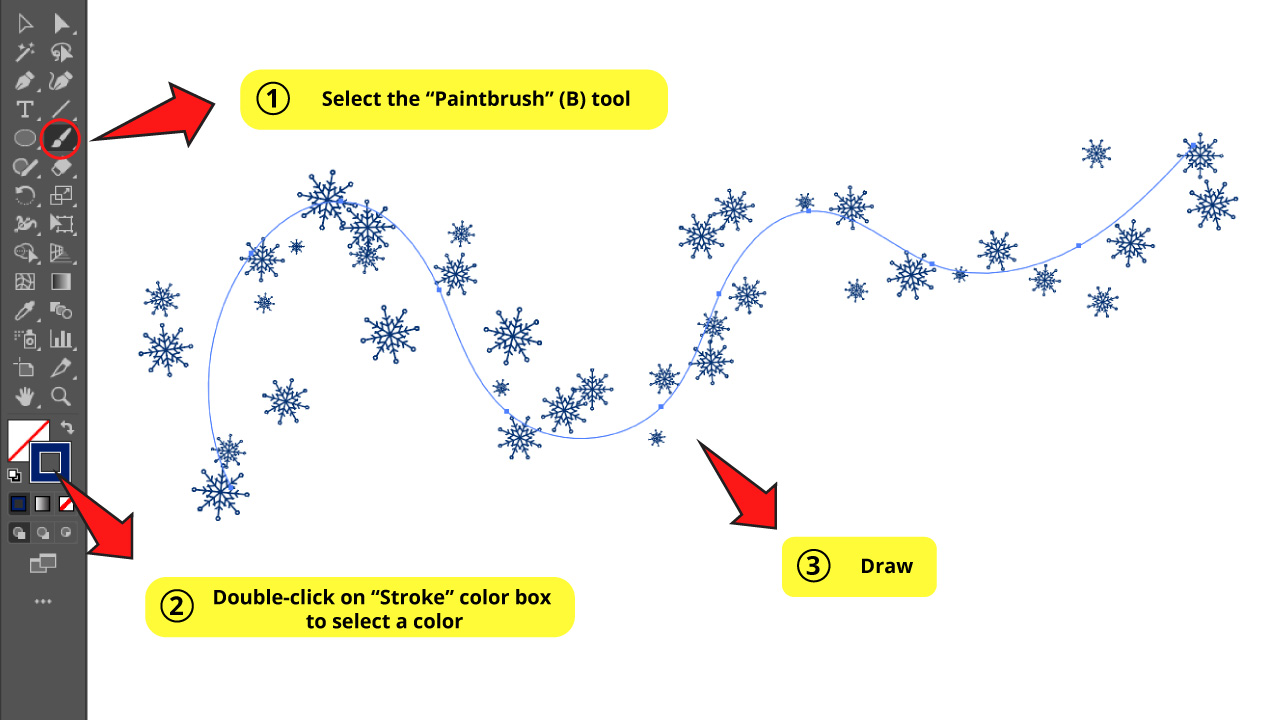
Click on the “Paintbrush” (B) tool.
Then double-click on the “Stroke” color box to select a color.
Then draw on the artboard.
Making an Art Brush in Illustrator
Draw a circle using “Ellipse” (L) tool. Use the “Direct Selection” (A) tool to stretch both sides’ anchor points to flatten the circle. Open “Brush” (F5) panel. Click “New Brush” and select “Art Brush”. Set “Colorization” to “Hue Shift” and click “OK” to save. Select the “Paintbrush” (B) and draw.
The “Art Brush” was mainly designed for drawing.
The difference between “Art Brush” and “Calligraphic Brush” brushes is that “Art” ones have more customizable options and that with “Art” ones you can turn any shape into a brush.
For the next example, I’m going to use a shape to create a brush with thinner ends and a thicker midsection.
Step 1: Make a Circle
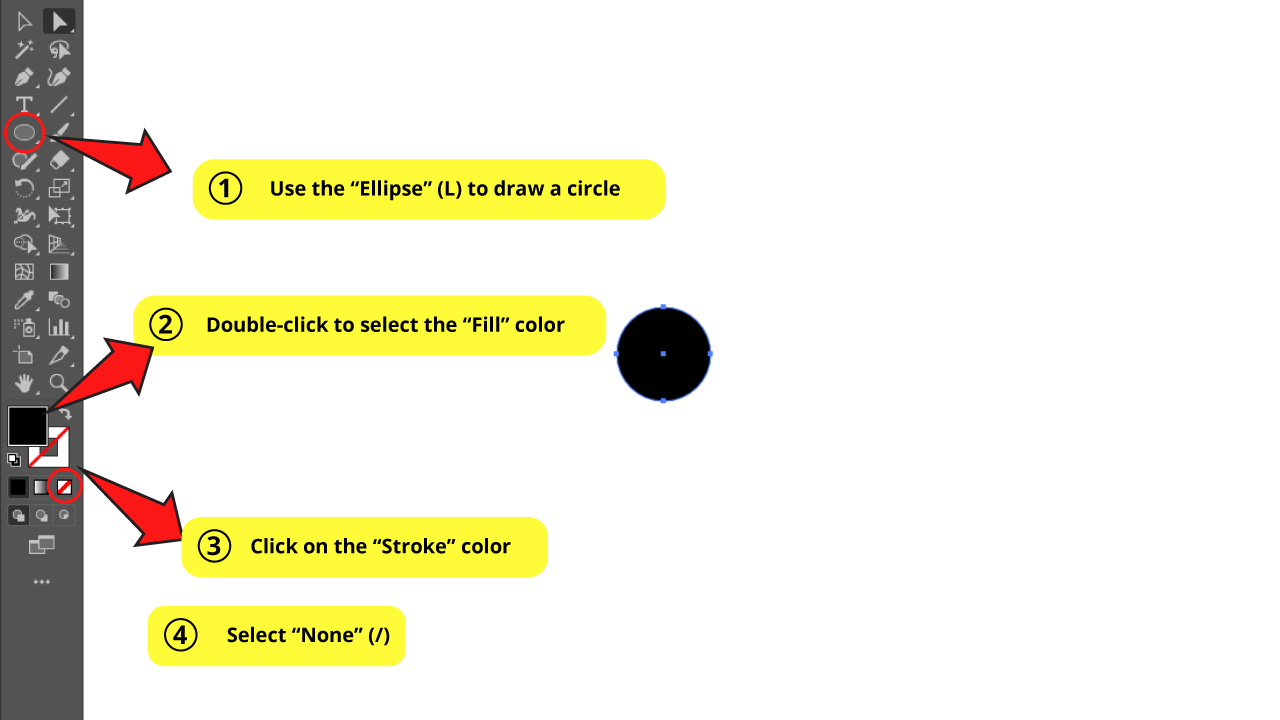
First make a circle using the “Ellipse” (L) tool hidden in the “Rectangle” tool nest on the left side toolbar.
To get a circle (and not an oval) remember to hold the “Shift” key as you draw.
Make sure “Fill” color is enabled in the color box, and not “Stroke”.
To get this done, double-click on the “Fill” color box and select a color.
Then click on the “Stroke” color box and select “None” (/).
Step 2: Stretch Both Circle Ends
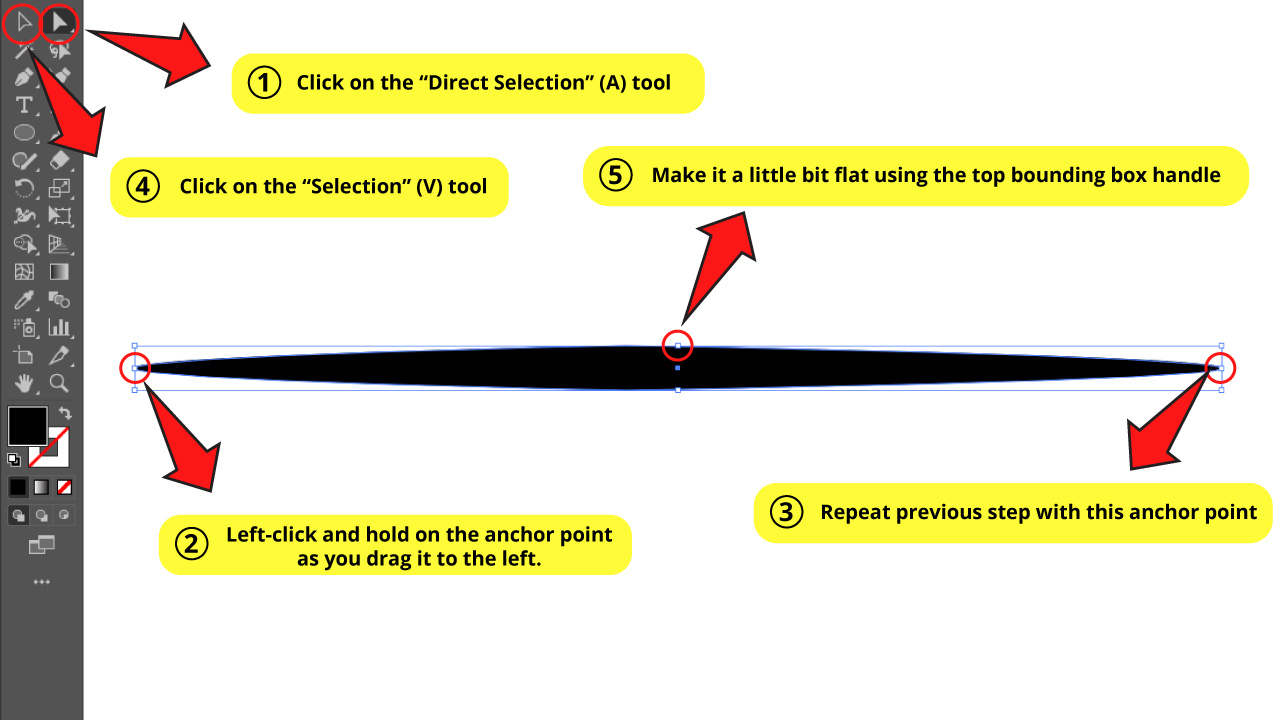
Select the “Direct Selection” (A) tool on the left side toolbar.
Left-click and hold on the circle’s left side anchor point as you drag it to the left.
Repeat the process with the right circle’s anchor point, and drag it to the right.
Then select the whole shape with the “Selection” (V) tool and make it a little bit flat using the top bounding box handle.
Step 3: Create your New Brush
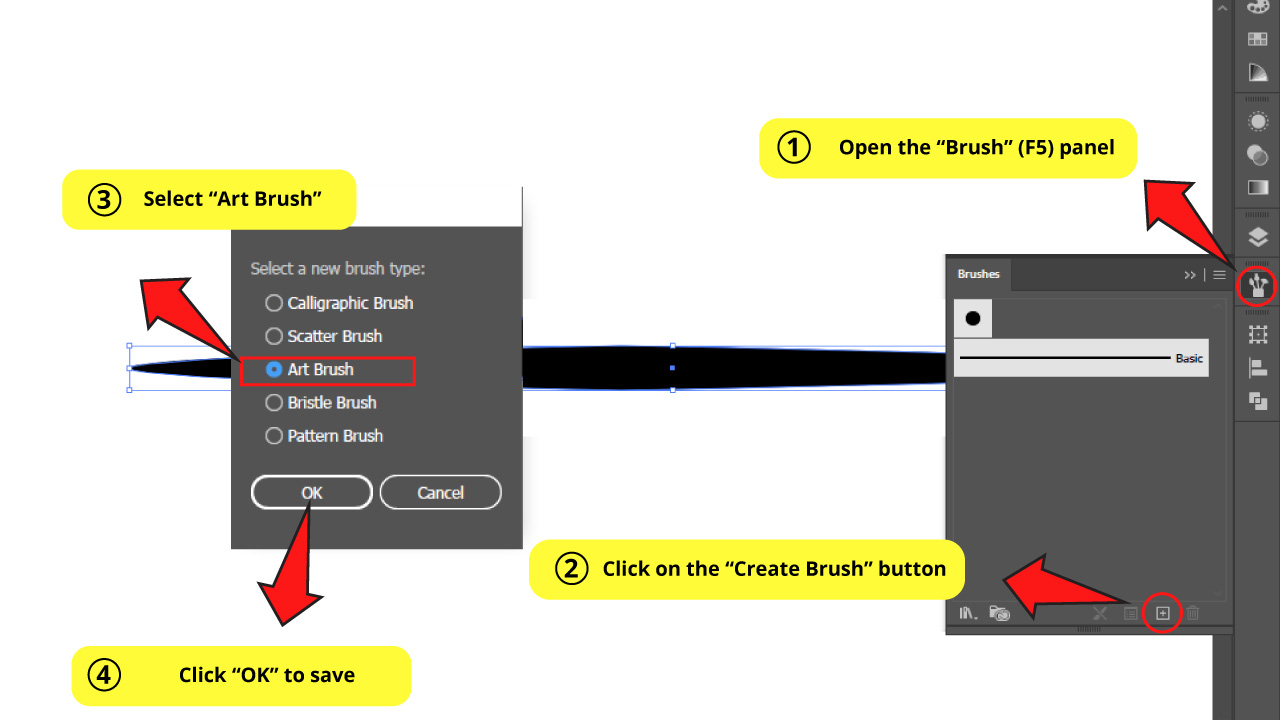
Go to the “Brush” (F5) panel.
Then click on the “New Brush” button.
Select “Art Brush” in the options window.
Then click “OK” to save.
Step 4: Set the Art Brush Options
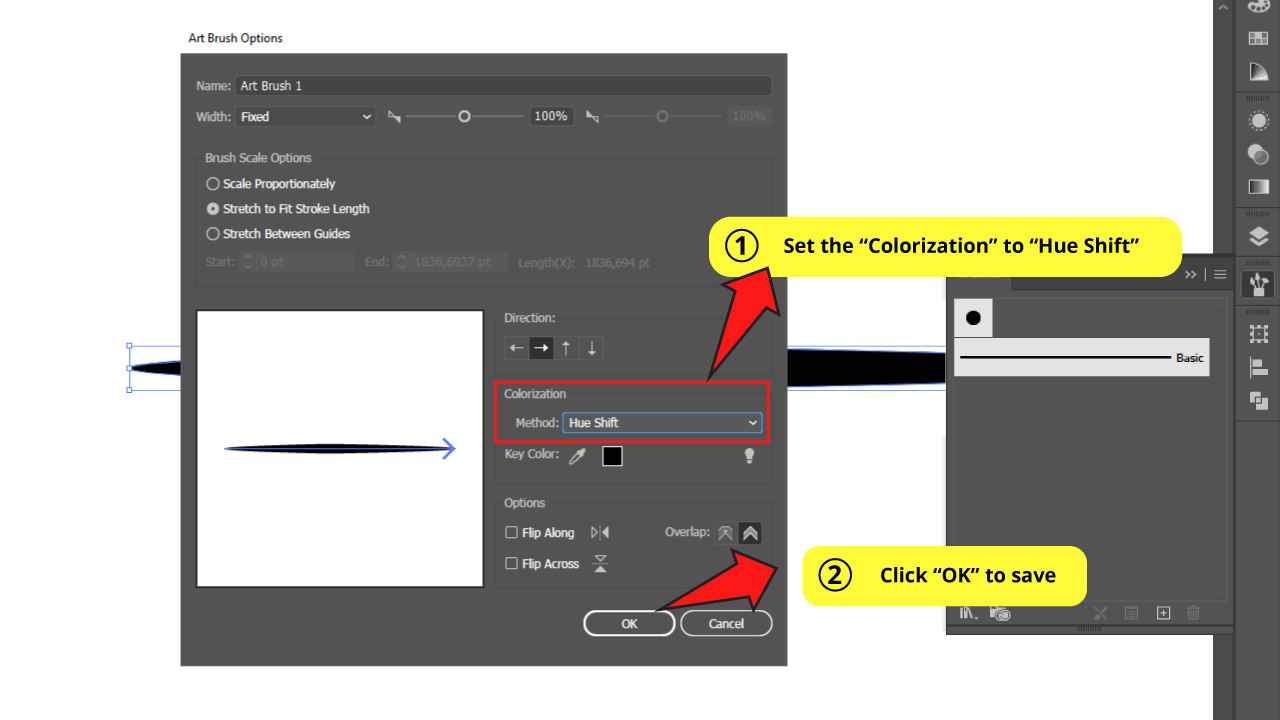
Leave all settings by default except for “Colorizing”, selecting “Hue Shift” to be able to change the brush color later.
Click “OK” to save.
Step 5: Use the Brush
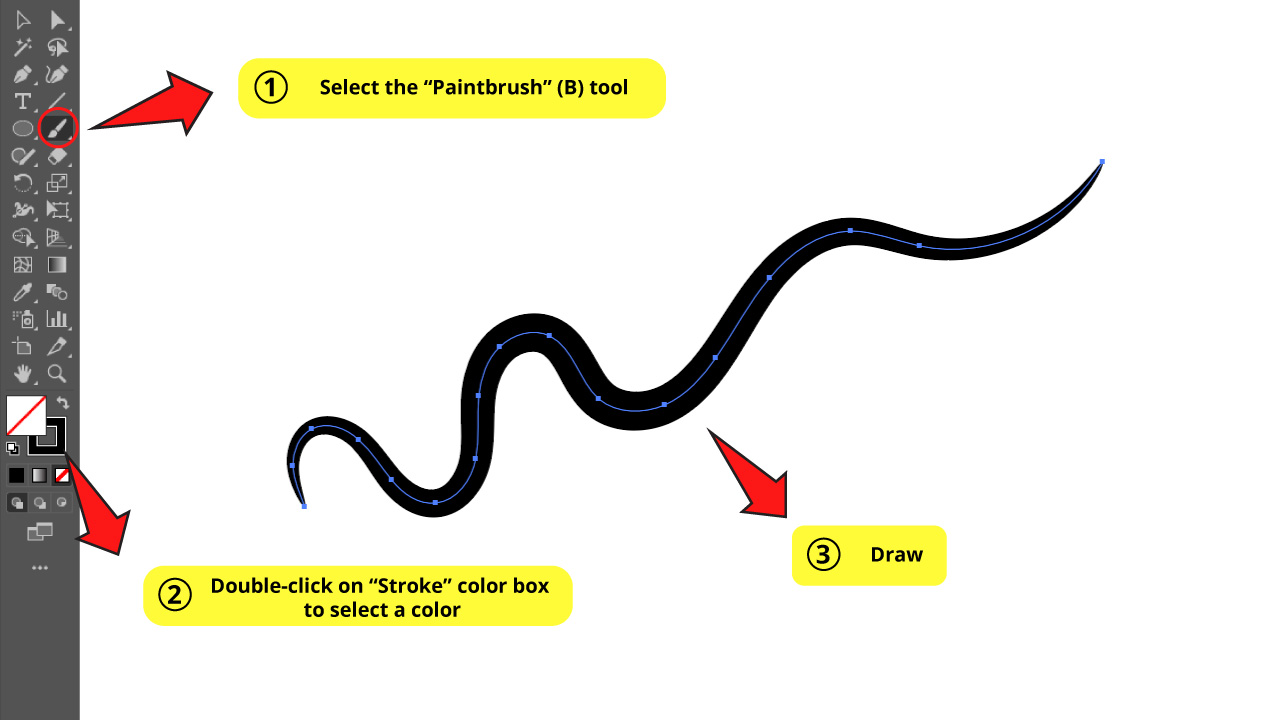
Click on the “Paintbrush” (B) tool.
Then double-click on the “Stroke” color box to select a color.
Now draw on the artboard.
Making a Bristle Brush in Illustrator
Open the “Brush” (F5) panel. Click on “New Brush” and select “Bristle Brush”. Select your desired brush “Shape”. Set “Size”, “Bristle Length”, “Bristle Density”, “Bristle Thickness”, “Paint Opacity” and “Stiffness” to desired values. Select the “Paintbrush” (B) tool and draw.
The “Bristle Brush” is designed to simulate a “real” painting brush. You have several brush shape options and you can also set other interesting features such as “Density”, “Length” or “Opacity”, to name a few.
I’ll design my brush to get something similar to a watercolor effect.
Step 1: Make a Brush
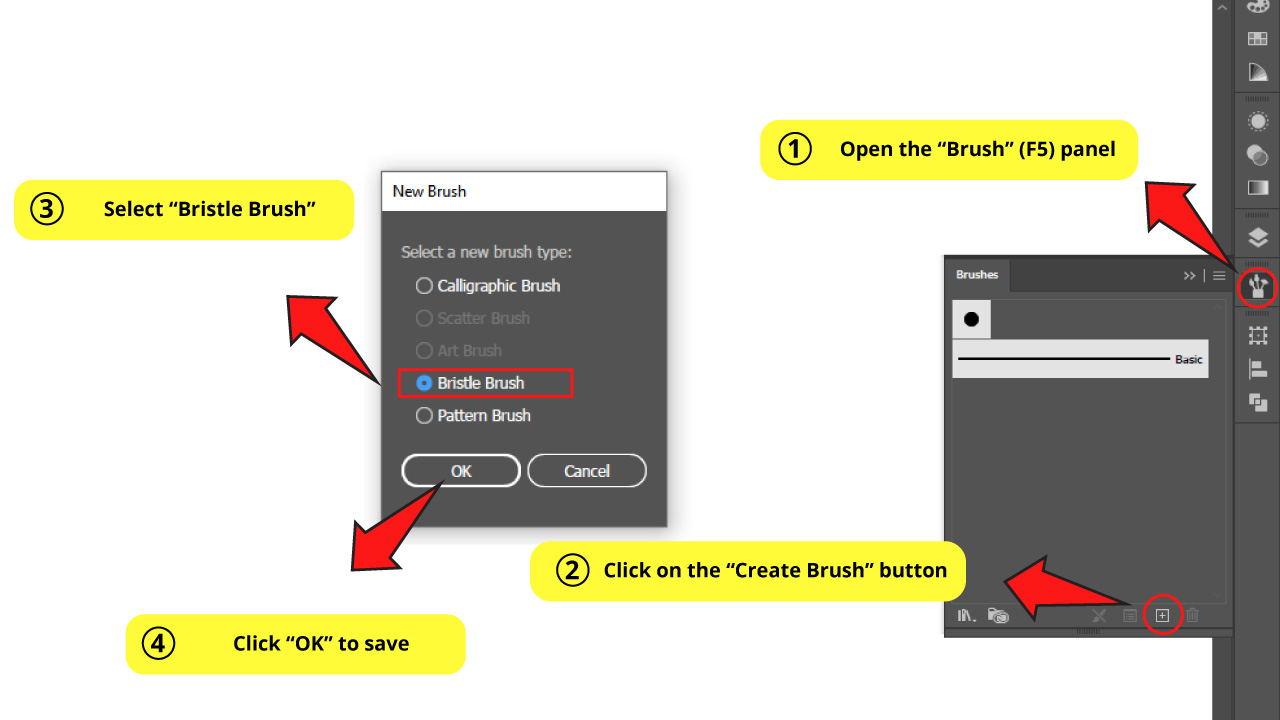
Go to the “Brush” (F5) panel.
Click on the “New Brush” button at the bottom of the panel.
Select “Bristle Brush” in the options window, and then click “OK” to save.
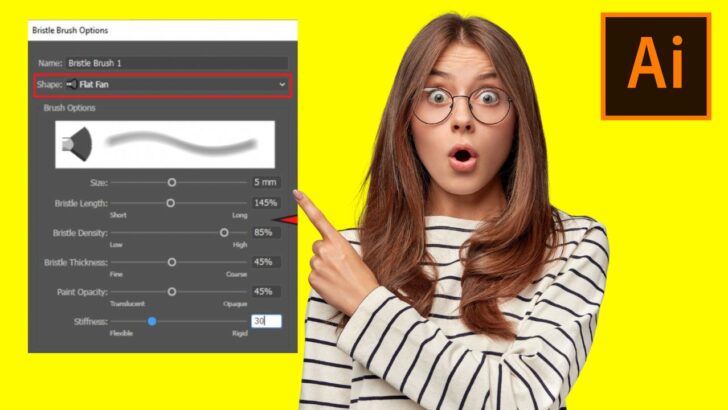
Step 2: Set the Bristle Brush Options
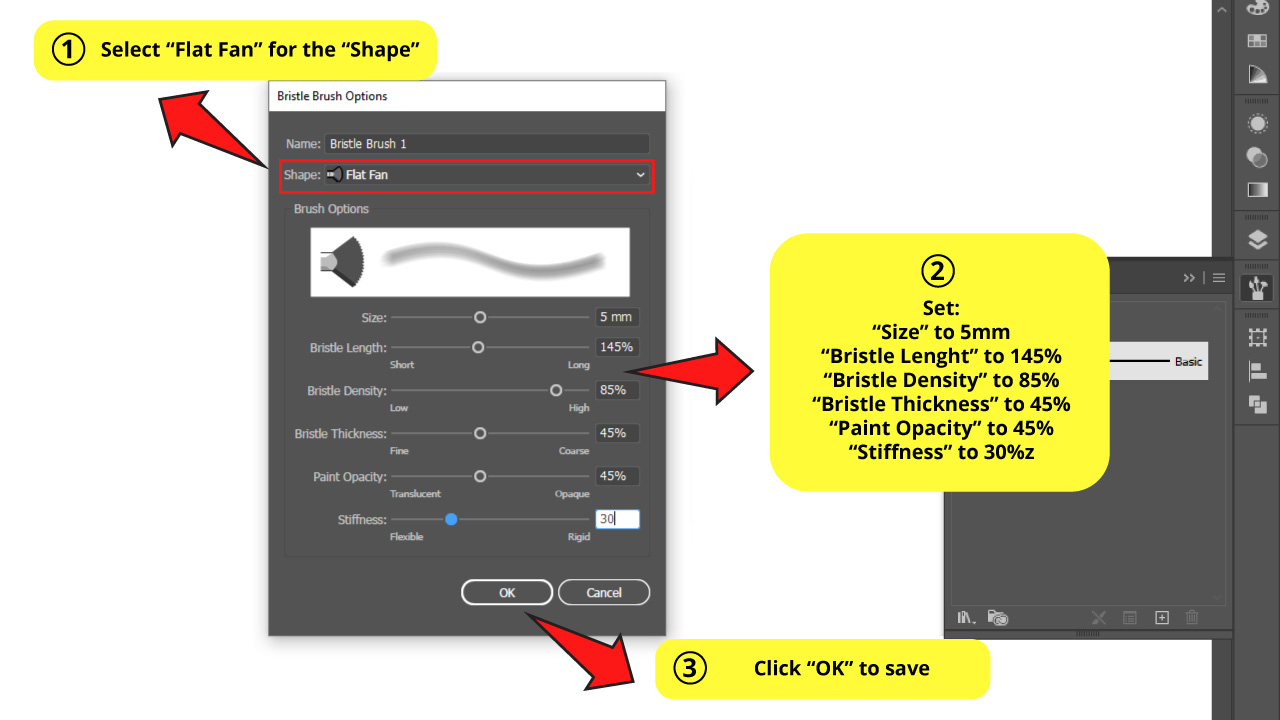
You can select the brush “Shape” in this “Bristle Brush Options” window.
You can also adjust settings as “Size”, “Bristle Length”, “Bristle Density”, “Bristle Thickness”, “Paint Opacity” and “Stiffness”.
For this example I’ll be using the following settings:
“Shape” to “Flat Fan”
“Size” to 5 mm
“Bristle Length” to 145%
“Bristle Density” to 85%
“Bristle Thickness” to 45 %
“Paint Opacity” to 45%
“Stiffness” to 30%
Click “OK” to save when you’re done.
Step 3: Use the Brush
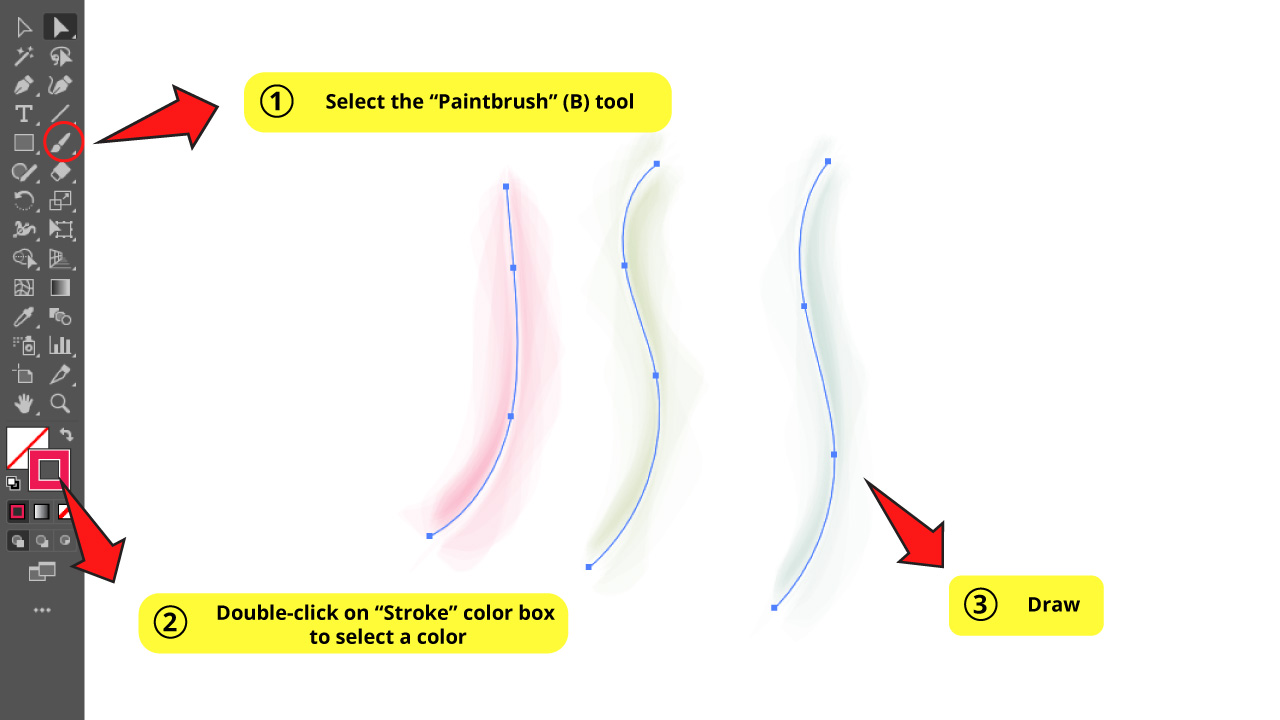
Select the “Paintbrush” (B) tool.
Then double-click on the “Stroke” color box to pick a color.
Finally, draw on the artboard.
Making a Pattern Brush in Illustrator
Draw or download a repeating tile. Select it. Open the “Brush” (F5) panel. Click on “New Brush” and select “Pattern Brush”. Set the “Scale” to “Fixed” and “Colorization” to “Hue Shift”. Select a different setting for each section if necessary. Select the “Paintbrush” (B) tool, and draw.
The “Pattern Brush” is simply amazing! It works as a charm and allows you to customize the behavior of the brush in different situations.
For instance, if you are working on a floral decoration, you can use different flowers for the corners, for the middle, for the ends, etc.
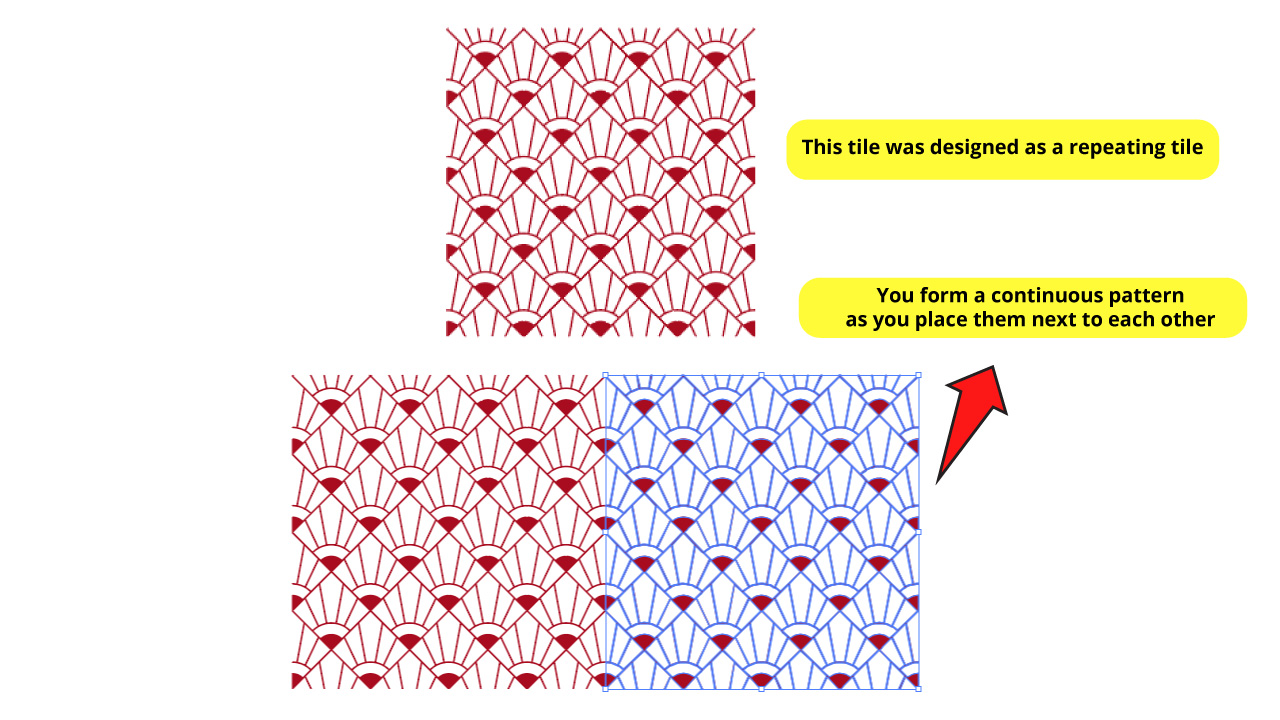
However, using a repeating tile for the “Pattern Brush” is a must, because if your tile doesn’t meet the requirements, this just won’t work as supposed to.
Step 1: Draw or Download a Repeating Tile
First we have to draw or download a repeating tile.
I’m using the downloaded tile you can see in the image.
It’s important that the tile you draw or download meets the repeating tile format. This means that if you make a copy and paste it next to the original tile, it will be embedded in the form of a continuous pattern.
Step 2: Select the Tile
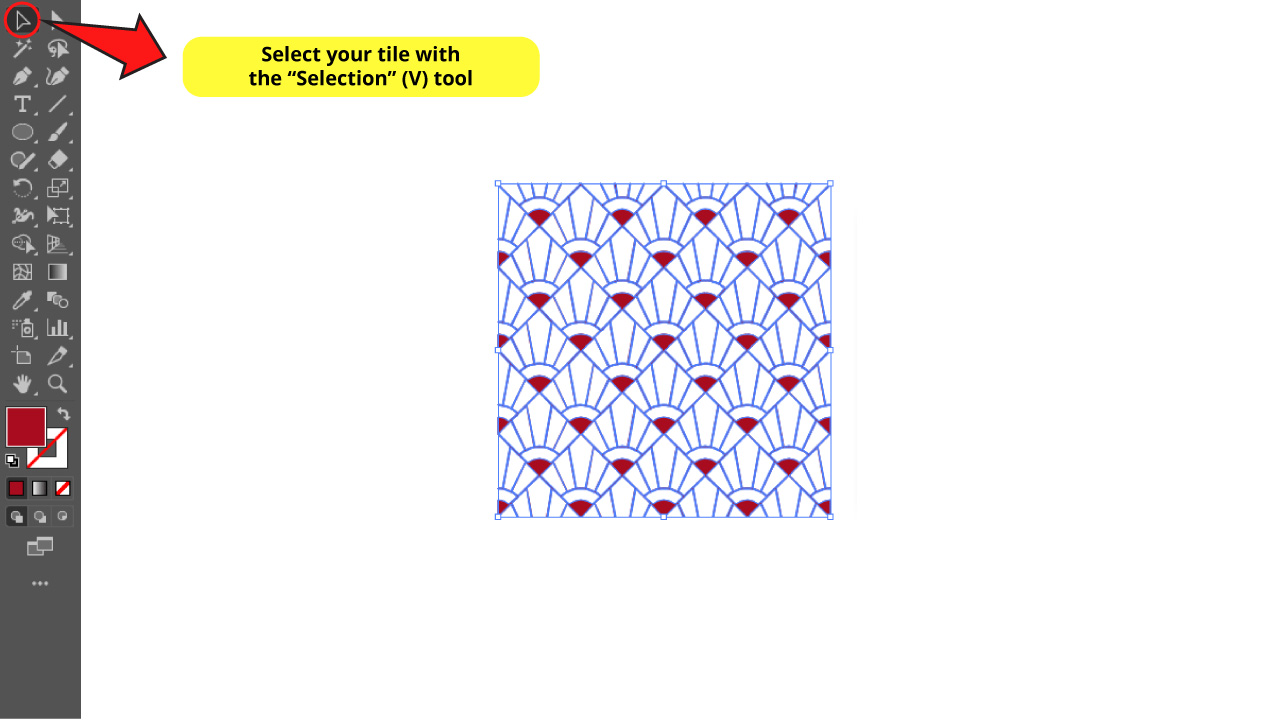
Select the tile using the “Selection” (V) tool on the left side toolbar.
Step 3: Create a Brush
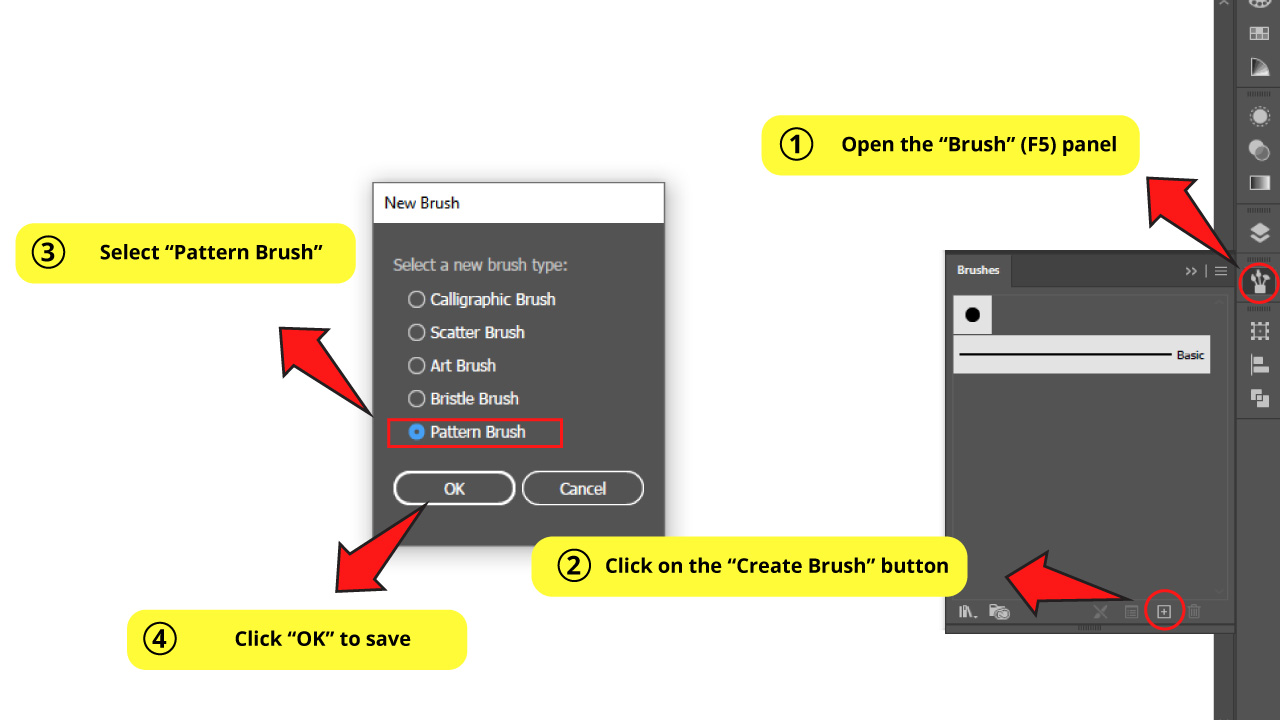
Go to the “Brush” (F5) panel.
Click on the “New Brush” button at the bottom of the panel.
Select “Pattern Brush” in the options window and then click “OK” to save.
Step 4: Set the Pattern Brush Options
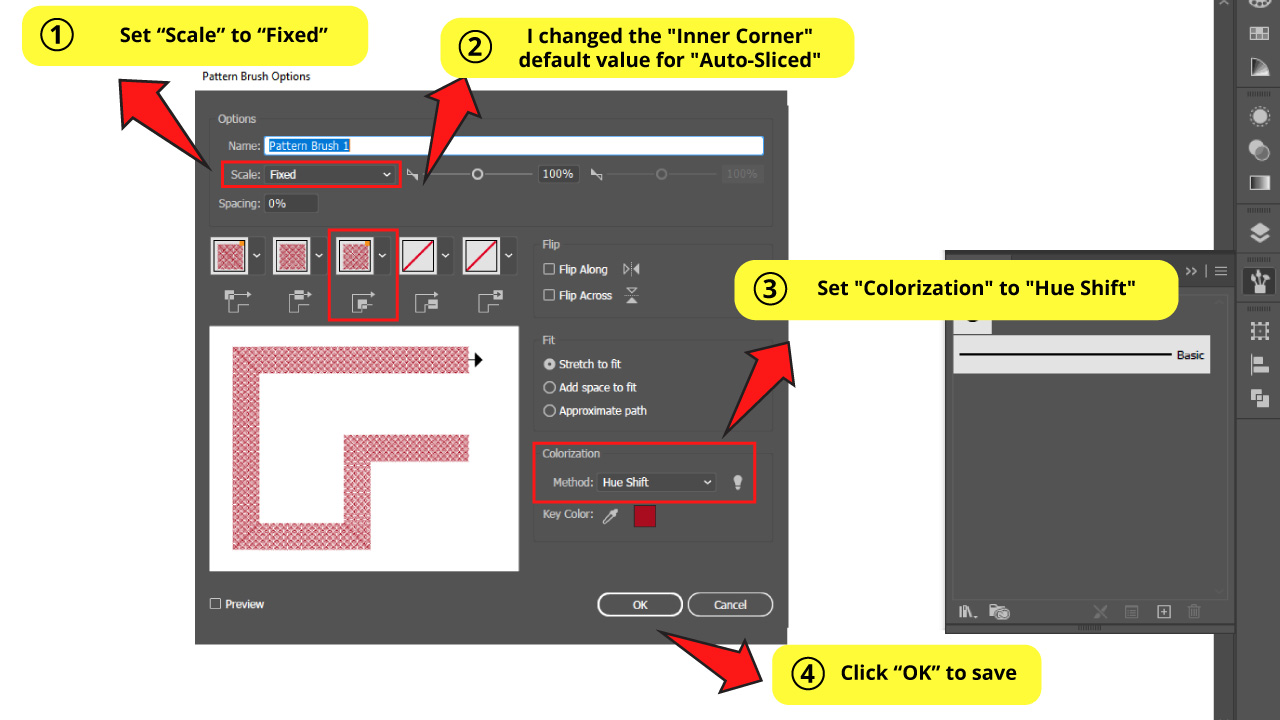
In the “Pattern Brush Options” leave “Scale” set to its default value, “Fixed”.
Set “Colorization” to “Hue Shift”.
There is a feature to adjust the pattern behavior on different sections of the line: “Outer Corner”, “Side”, “Inner Corner”, “Start” and “End” tiles.
The cool thing about these features is that you can import different tiles for each section. This way you can create really cool brushes.
For this example, I’ll leave everything set by default except for the “Inner Corner” value, which I decided to change to “Auto-Sliced” because it fits my pattern way better.
You can visualize a preview of the brush in each display situation, so you can try with different settings until you get something you like.
Click “OK” to save when you’re done.
Step 5: Use the Brush
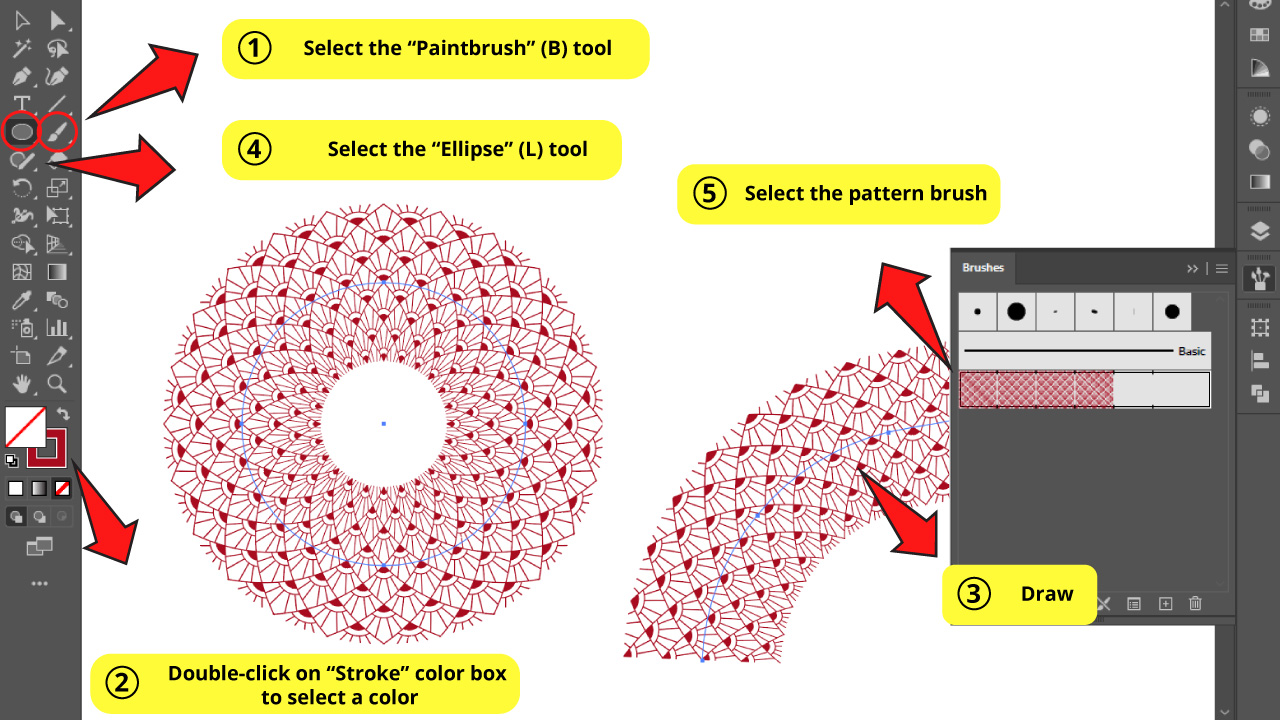
Click on the “Paintbrush” (B) tool.
Then double-click on the “Stroke” color box to select a color.
You can also apply any of the brushes we worked with in this tutorial to a stroke line for drawings made with other drawing tools (“Ellipse”, “Rectangle”, “Line Segment”, “Polygon”, “Star”, etc).
I’m applying my pattern brush to a circle.
To apply the brush to a circle, first draw the circle using the “Ellipse” (L) tool.
Then click on the desired brush on the “Brush” (F5) panel to get it done.
Would you like to know how to apply a brush to a polygon shape? Learn how to use the “Polygon” tool in this quick tutorial about “How to Use the Polygon Tool in Illustrator in 5 Easy Steps”.
If you want to know more about Pattern Brushes, take a look at this “Create a Pattern Brush” video tutorial.
Frequently Asked Questions on “How to Make a Brush in Illustrator”
How can I make the brush traces smoother in Illustrator?
To make the brush traces smoother, double-click on the “Paintbrush” (B) tool on the left side toolbar to open the options window. Set the “Fidelity” to a smoother level and then click “OK” to save.
How can I enable the pressure sensitivity for brushes in Illustrator?
To enable the brush pressure sensitivity, go to the “Brush” (F5) panel and double-click on the brush you want to set. On the “Variation” settings select “Pressure”. You can set the “Pressure” variation not only for the brush size, but also for other aspects such as “Rotation”, “Angle”, etc.
How can I add a brush style to a drawn path in Illustrator?
To add a brush style to a path, first select the path using the “Selection” (V) tool. Then open the “Brush” (F5) panel and click on your desired brush to apply it.
Can I change the brush width without changing the brush settings in Illustrator?
You can change the brush width without modifying brush settings using the “Stroke” width. To get this done, select your traces with the “Selection” (V) tool and then change the “Stroke” width values on the top side toolbar.