

In this tutorial you will learn how to draw a leaf from scratch.
You will learn how to set the document file and customize a brush.
Then we’ll make the sketch to use as a guide to draw the line art. Next we’ll color the leaf and finally add lights and shadows.
This tutorial is designed to ideally draw using a drawing tablet.
But if you don’t have one, don’t worry.
You can still follow the steps. Just make sure to check the FAQ where you’ll find some tips to get it done without a tablet.
In this article you’ll also find a pack of leaves to download and use for free.
Let’s begin!
How to Draw a Leaf in Illustrator
Make the leaf sketch using the “Paintbrush” (B) tool. Use it as a guide to draw the line art. Expand the lines and use the “Live Paint Bucket” (K) tool to paint the basic colors. Expand again and draw the shadows and the lights using the “Pencil” (N) tool. Group all of it and it’s done.
Step 1: Set Document Color Mode
When we create a brand new document file in Illustrator, we don’t usually pay the proper attention to set the adjustments of the document file. After all, we can change the “Document Setup” later if necessary.
But there is a very important adjustment we need to make first in order to not mess up our work. And that is the “Document Color Mode”. There are two options for this: “CMYK” or “RGB”.
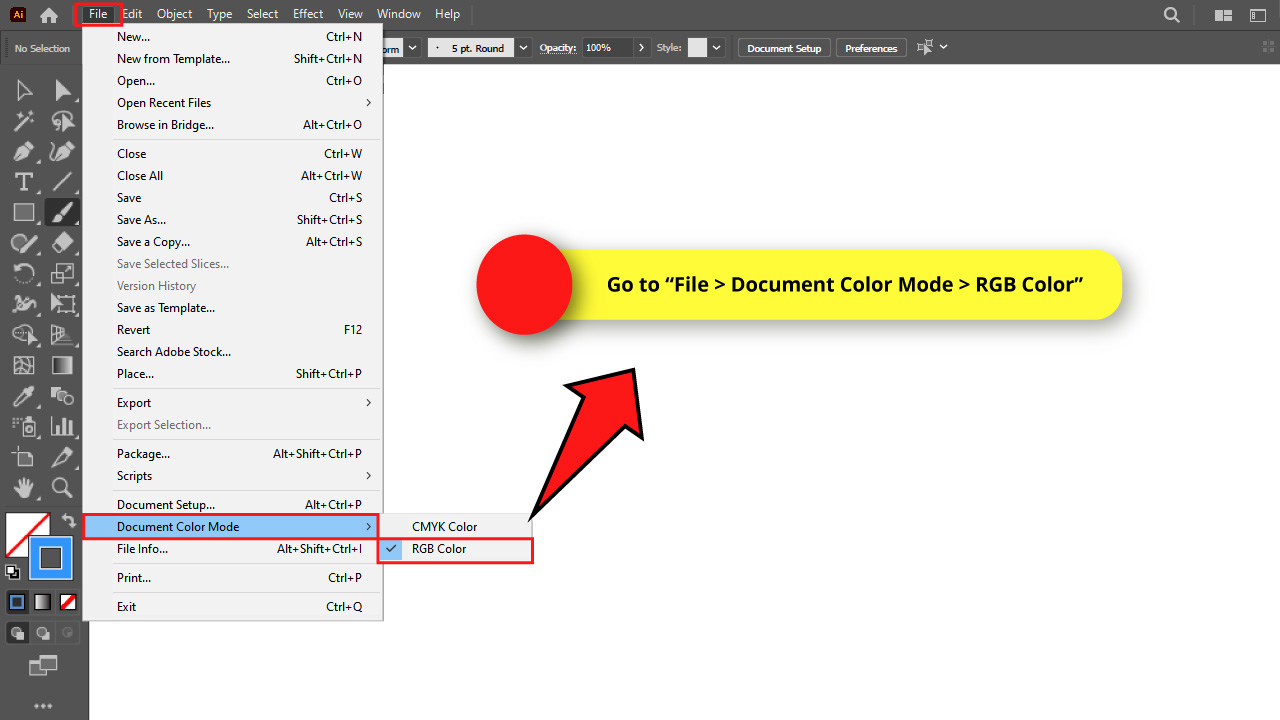
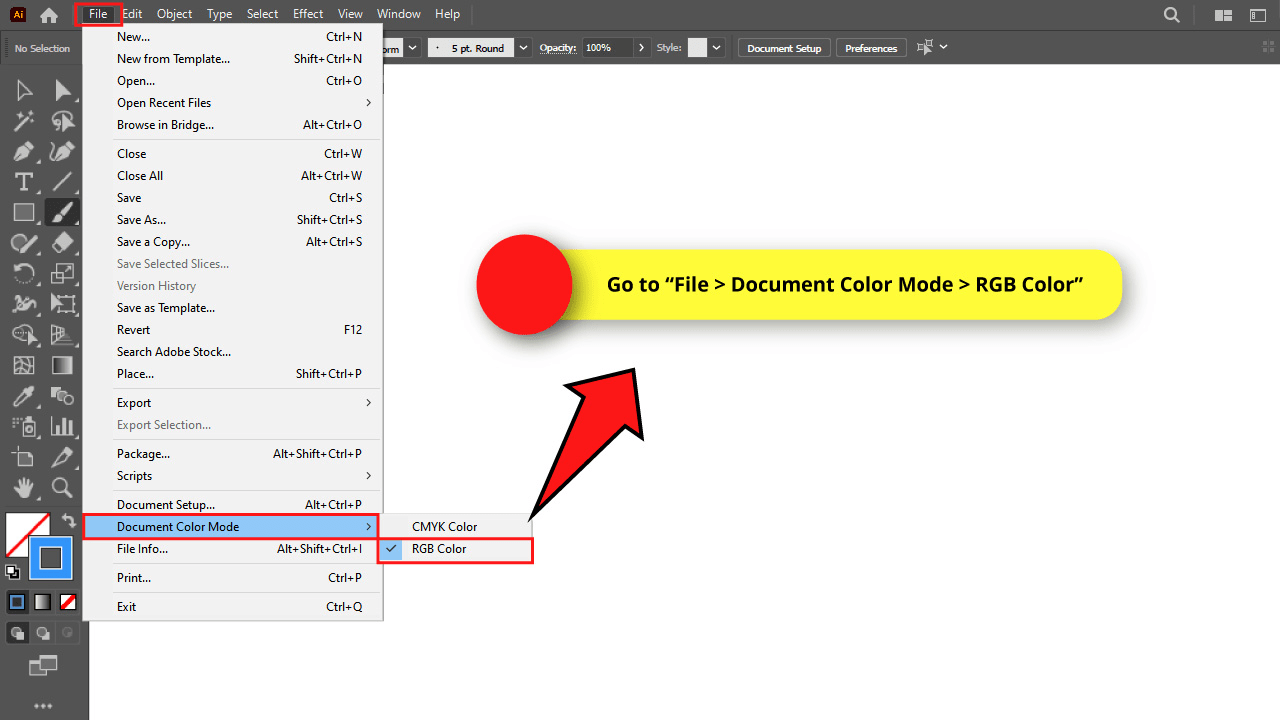
If you didn’t select the correct color mode when you were creating a new document file, you can change it by going to “File > Document Color Mode > RGB color” on the menu at the top of the screen.
Select “RGB” color mode if your work will be shown only on screens.
Select “CMYK” color mode if your work will be printed, or both shown on screens and printed.


Step 2: Adjust the “Paintbrush Tool” Options

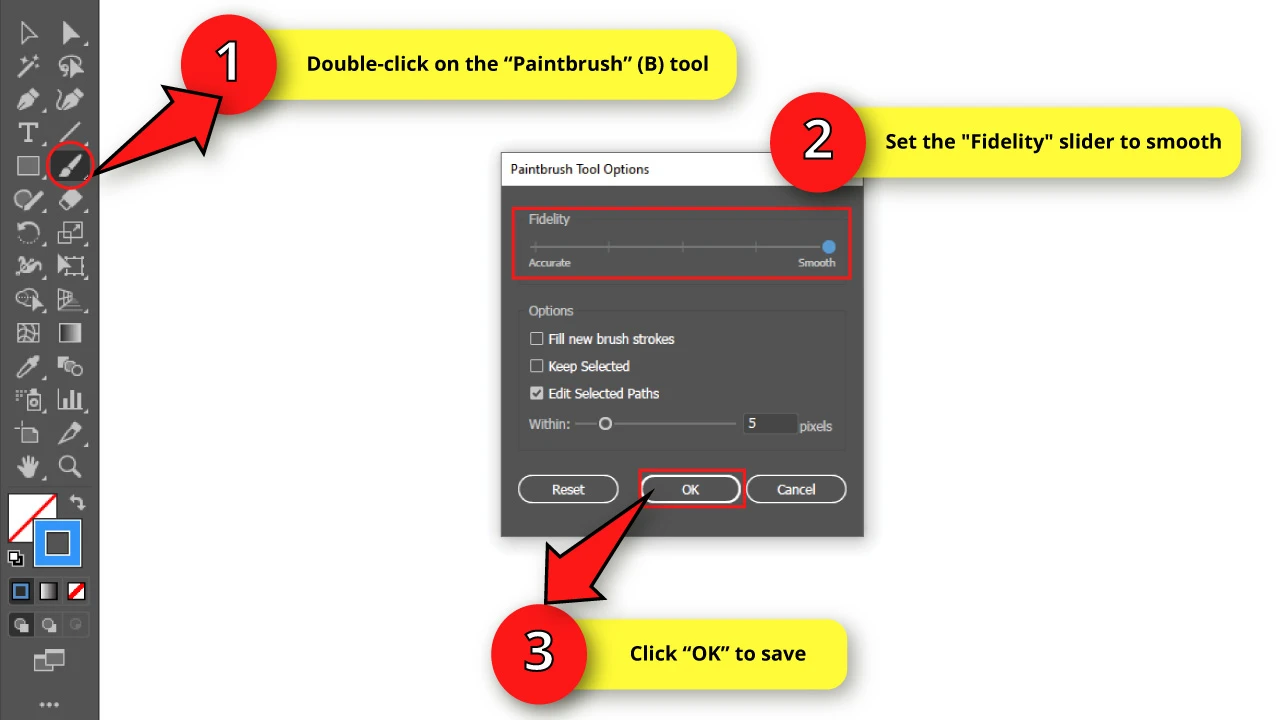
Double-click on the “Paintbrush” (B) tool on the left toolbar to open the options window.
Set the “Fidelity” slider to “Smooth”.
Then click “OK” to save.
Step 3: Customize the Brush
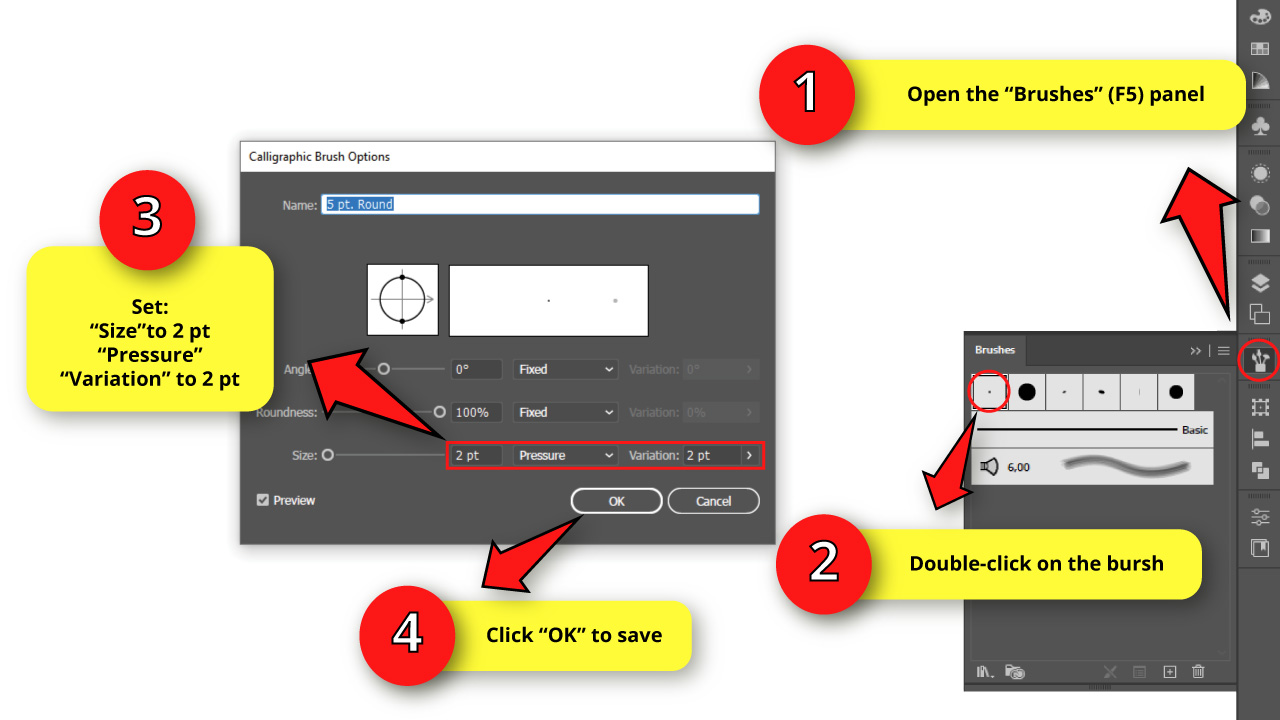
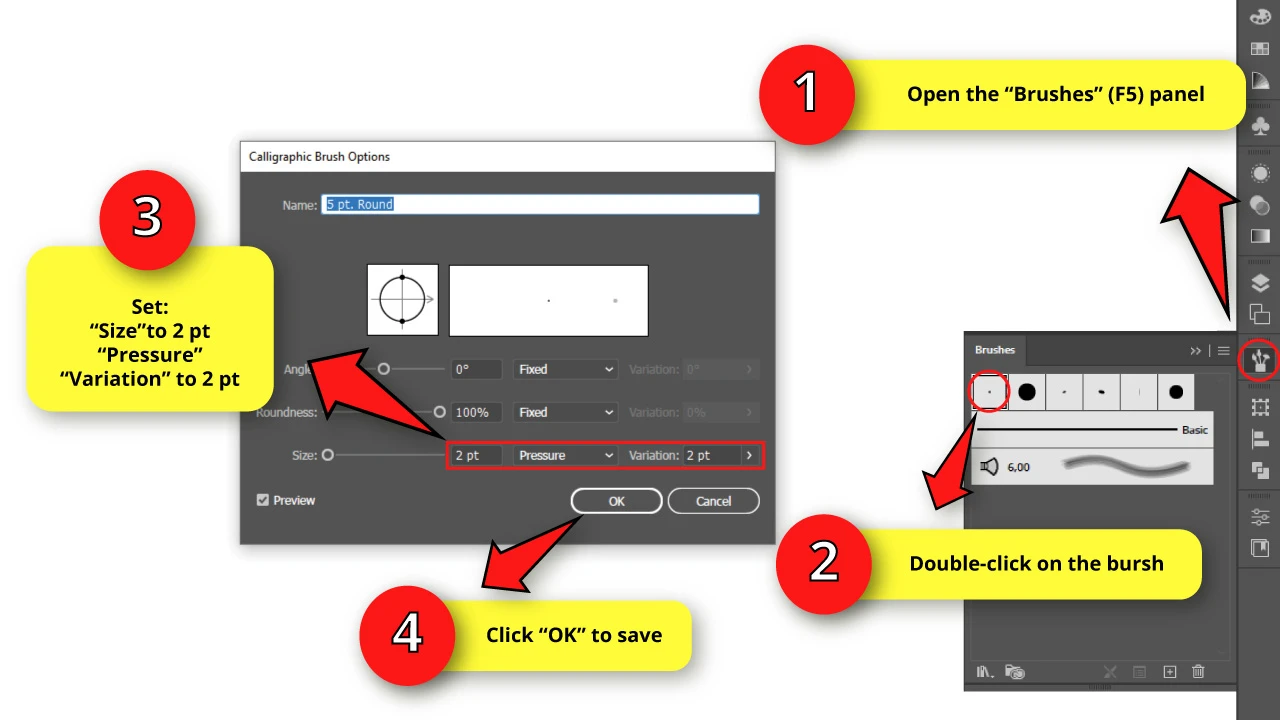
To make a brush, open the “Brushes” (F5) panel located on the right side of the screen.
If you can’t find it, you may have to enable it first by going to “Window > Brushes” on the menu at the top of the screen.
Double-click on the tiny round brush to open the “Calligraphic Brush Options” window.
Set the “Size” to 2 pt. Change the box setting to “Pressure” and select 2 pt. for the “Variation” field.
This adjustment will allow us to make paths sensitive to the tablet’s pen pressure.
Then click “OK” to save.
Take note that you can change the brush size during the drawing process.
Step 4: Draw an Inverse Heart Shape
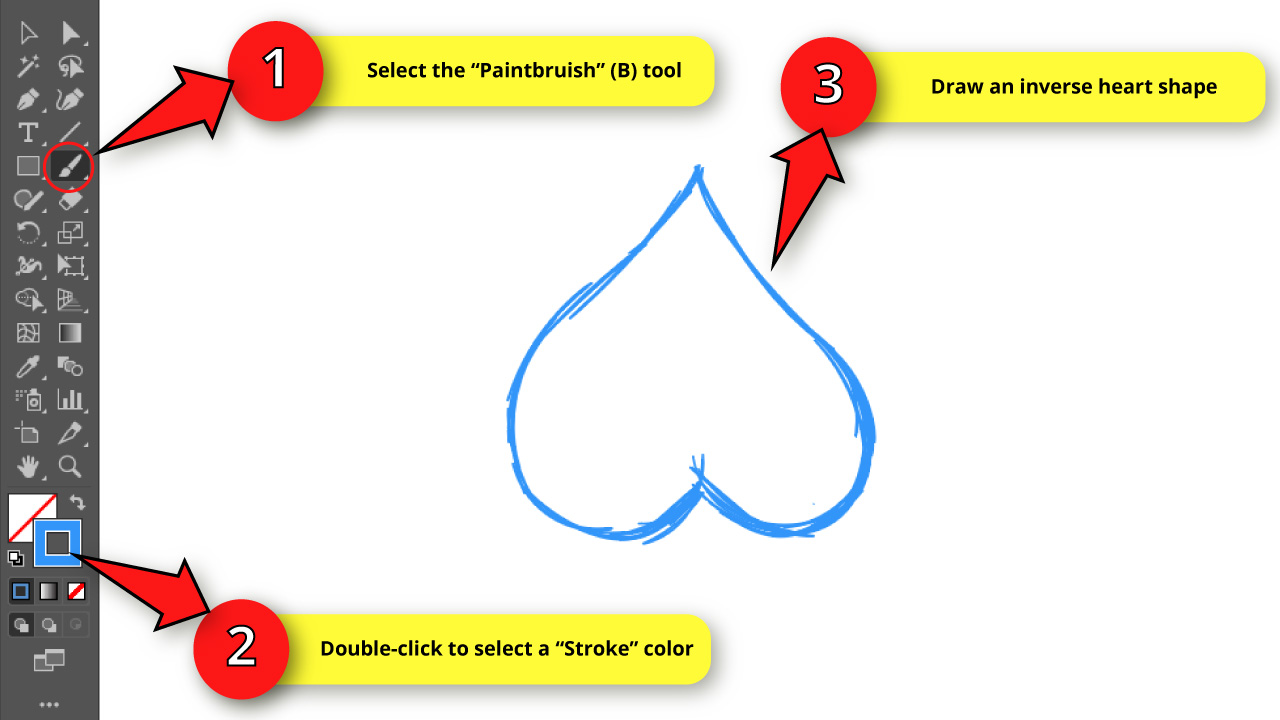

Select the “Paintbrush” (B) tool and then double-click on the “Stroke” box color located on the left side toolbar to select a color for the sketch.
Select a color other than black. It could be blue, red, or green. We’ll need to use black in further steps.
Now, it’s time to put our tablet to work.
Draw an inverted heart shape. It doesn’t have to be perfect. Make all the lines you need to do.
You can also make a heart in a normal position. Then select all the paths with the “Selection” (V) tool, or by pressing the “ Ctrl + A” command to select all, and then rotate them using the bounding box handles.
Step 5: Make a Vertical Line

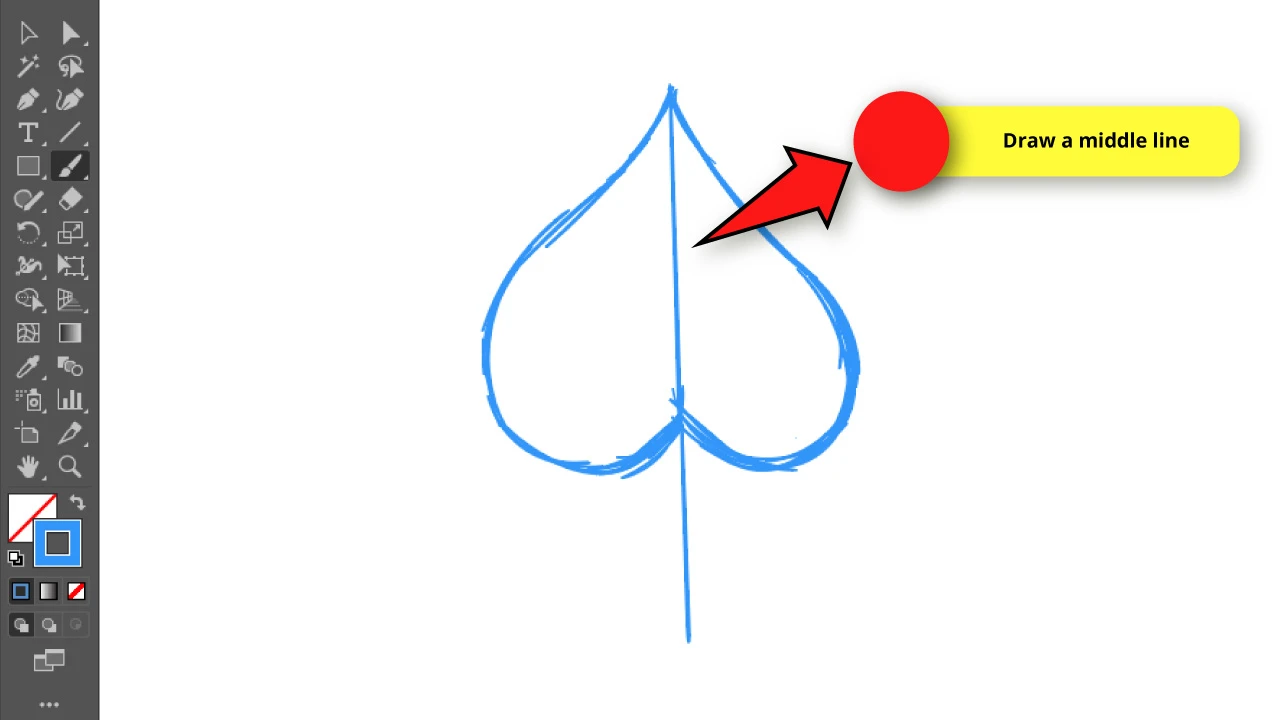
Make a vertical line dividing the inverted heart shape in two halves.
The line has to have a section coming out from the bottom.
Step 6: Make Some Lines for the Veins
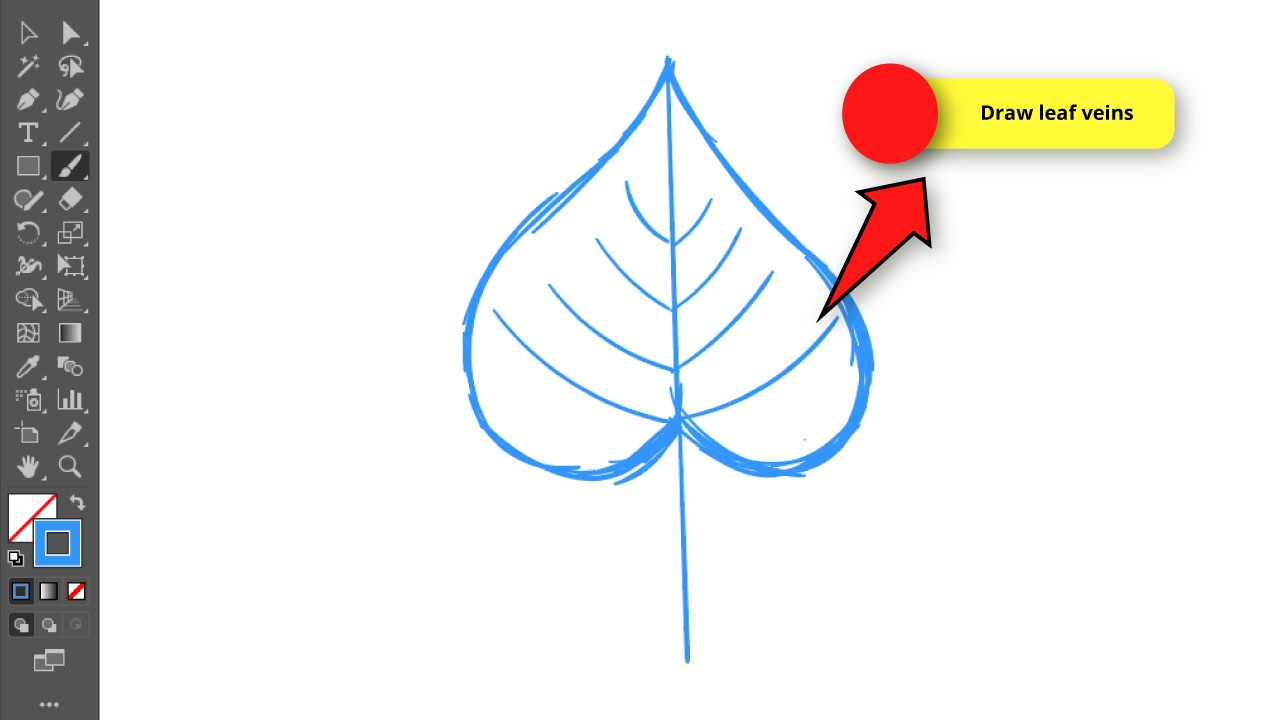

Now make some lines for the leaf veins.
Make between 3 or 4 lines for each side.
You can make them symmetrically, but also uneven to get a more organic effect.
Step 7: Draw the Petiole
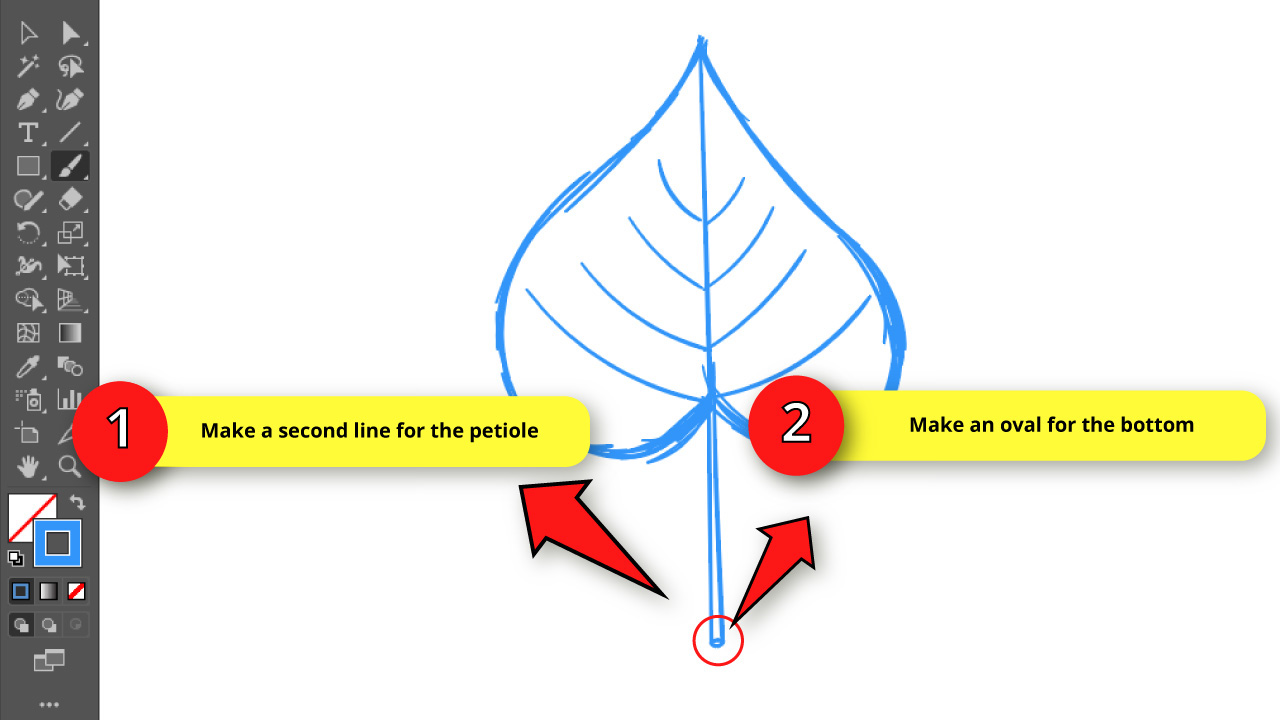

To draw the leaf “stem”, also known as petiole, make a second line next to the original vertical line.
Make it a little bit lean to get a wide bottom and narrow top.
Finally, draw a small oval at the bottom to finish the sketch.
Step 8: Lock the Sketch

Now we need to lock the sketch to use it as a reference, and draw the definitive lines in front.
To get this done, first select all the paths using the “Selection” (V) tool or pressing the “Ctrl + A” command to select all.
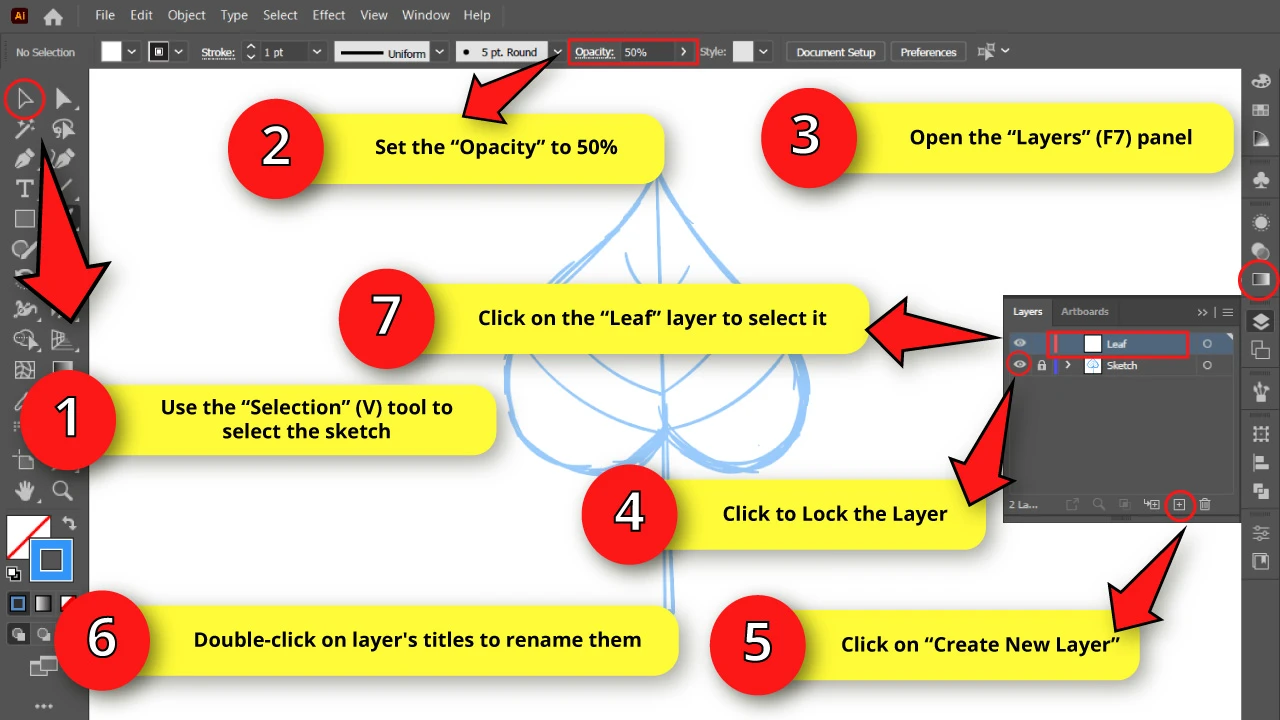
Go to the toolbar at the top of the screen and set the “Opacity” to 50%.
We are doing this to decrease the intensity of the lines and avoid messing up when we start tracing the definitive lines.
Then open the “Layers” (F7) panel on the right side toolbar.
If you can’t find it, you may have to enable it first by pressing the “F7” key from your keyboard, or going to “Window > Layers” on the menu at the top of the screen.
On the “Layers” panel, lock the current layer by clicking on the empty box next to the eye.
And then click on “Create New Layer” at the bottom of the panel to create a new layer where we’ll be working from now on.
Since we are going to work with multiple layers, we strongly recommend working as tidy as possible. Make sure to label the layers to recognize the content of each layer.
Double-click on layer’s titles to rename them.
I labeled mines to “Sketch” for the rough lines, and “Leaf” for the definitive lines we are going to make now.
Click on the “Leaf” layer to work on it from now on.
You can also change the layer color if you prefer. I’ll leave mine by default.
Step 9: Make the Leaf’s First Lines

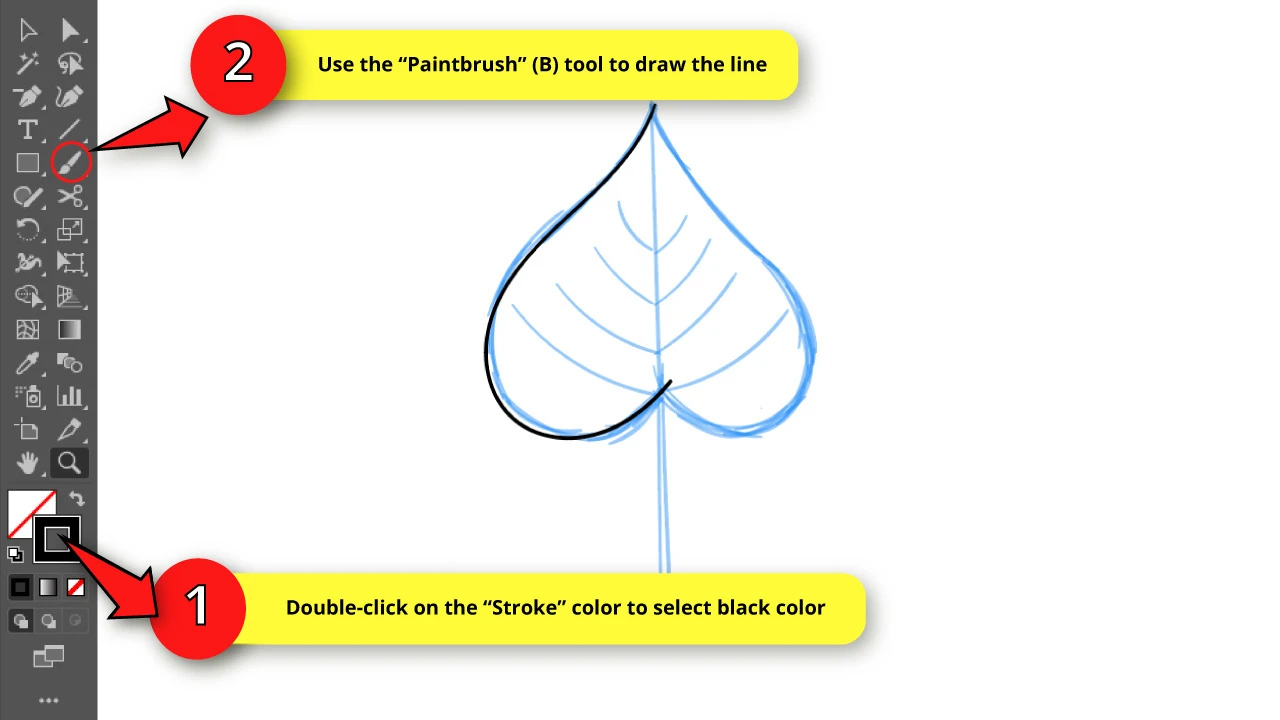
First double-click on the “Stroke” color box and select black.
Then use the “Brushpaint” (B) tool to draw the definitive lines for the line art, based on the transparent background sketch.
The definitive lines don’t need to be exactly the same as what you originally sketched. Use the sketch as a reference.
You have basically two options to get the illustration done.
Since leaves are symmetrical (if you divide it in half), you can draw just one half of the leaf and then duplicate and reflect it to get the other half.
If you go this way, you will get a clean leaf in a very short time, but you will lack that natural organic appearance.
The other option is to draw everything by hand. Of course this will require more time, but as previously said, you can reach a more natural appearance.
For this illustration I will use the first method, drawing only half of the leaf.
When drawing the first line of the leaf, it’s important to do it in one single stroke to get a nice looking line.
If you can get it on your first try, you can go back and try again as many times as necessary by pressing the “Ctrl + Z” command until you get it.
You can also help yourself moving the anchor points and using its handles to fix curve details.
Step 10: Copy, Paste and Reflect the Leaf Line
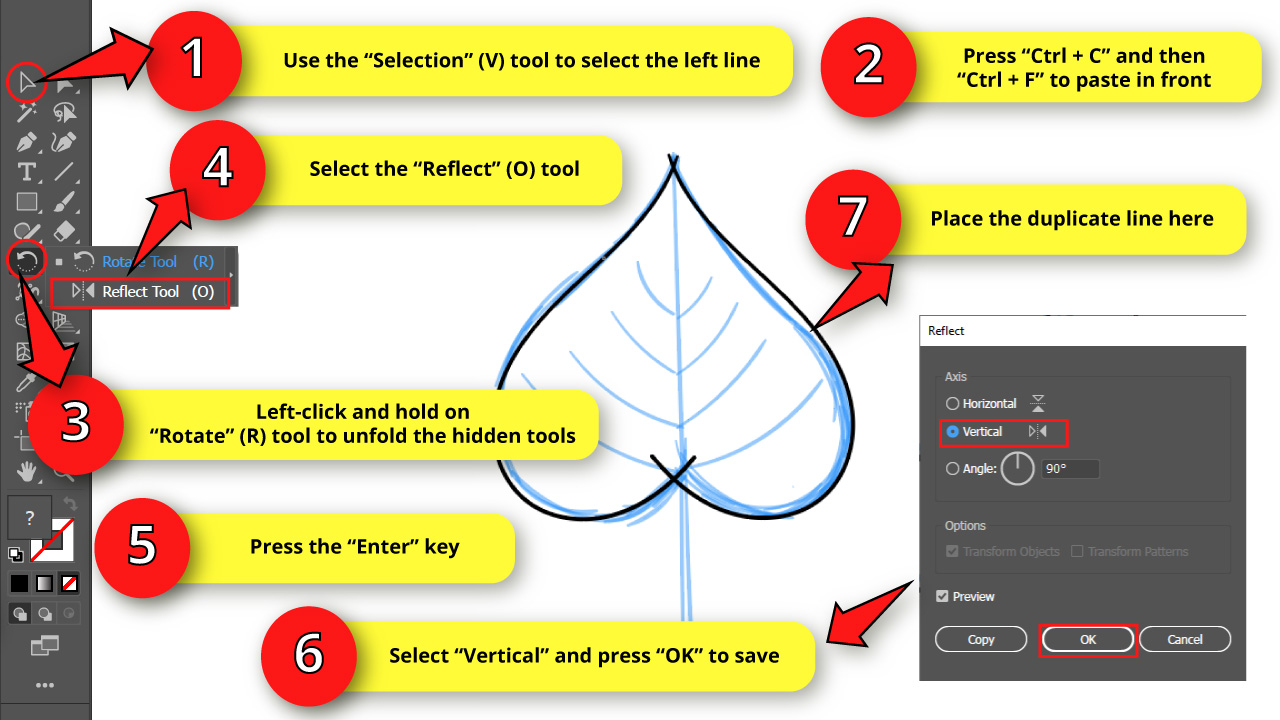
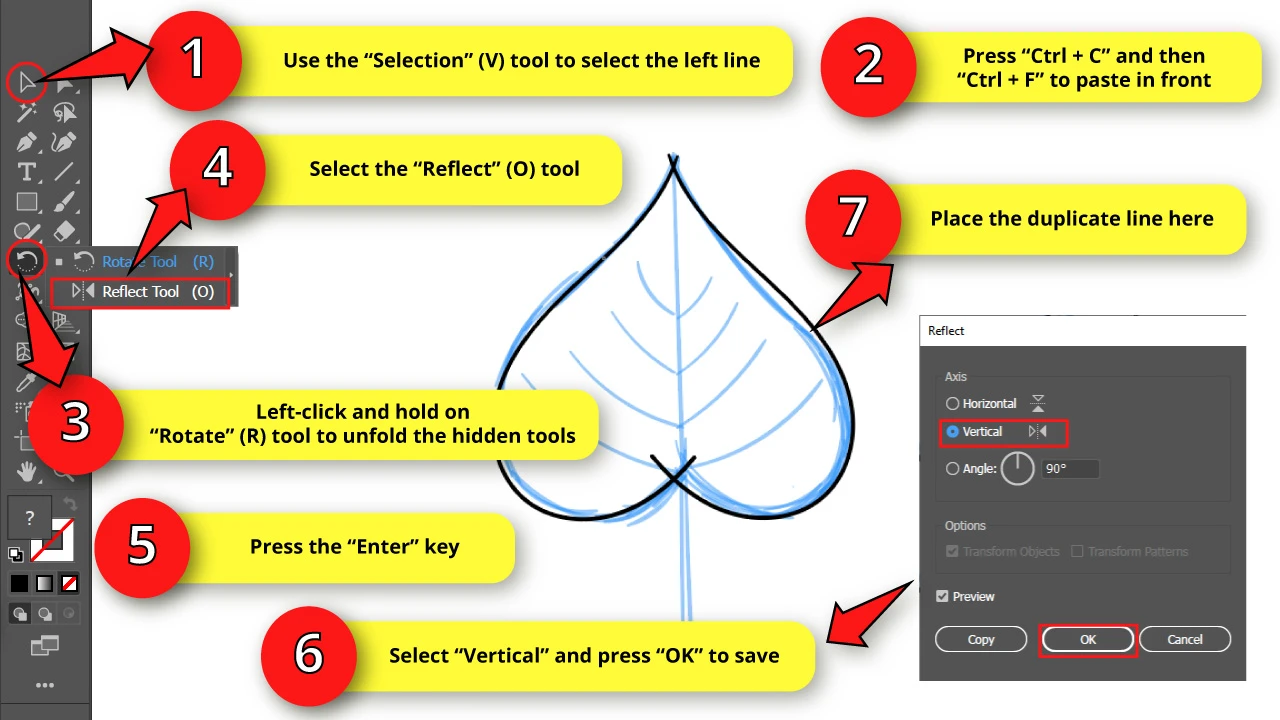
Now, select the line using the “Selection” (V) tool and press “Ctrl + C” and then “Ctrl + F” to copy and paste in front.
Then move the copy to a side to be able to tell the copy apart from the original path.
Next, we need to use the “Reflect” (O) tool. This one is hidden in the “Rotate” (Shift + H) tool nest.
To unfold the hidden tools nest, left-click and hold on the “Rotate” (Shift + H) tool. Then select the “Reflect” (O) tool. Or you can shortcut it by pressing the “O” key.
Once you have selected the “Reflect” (O) tool, press the “Enter” key from your keyboard.
In the “Reflect” options window, select “Vertical” and then press “OK” to save.
Now you have a reflected copy of the leaf path.
Simply place it next to the original curve to get the basic leaf shape (or heart inverted shape).
Step 11: Get Rid of the Extra Lines

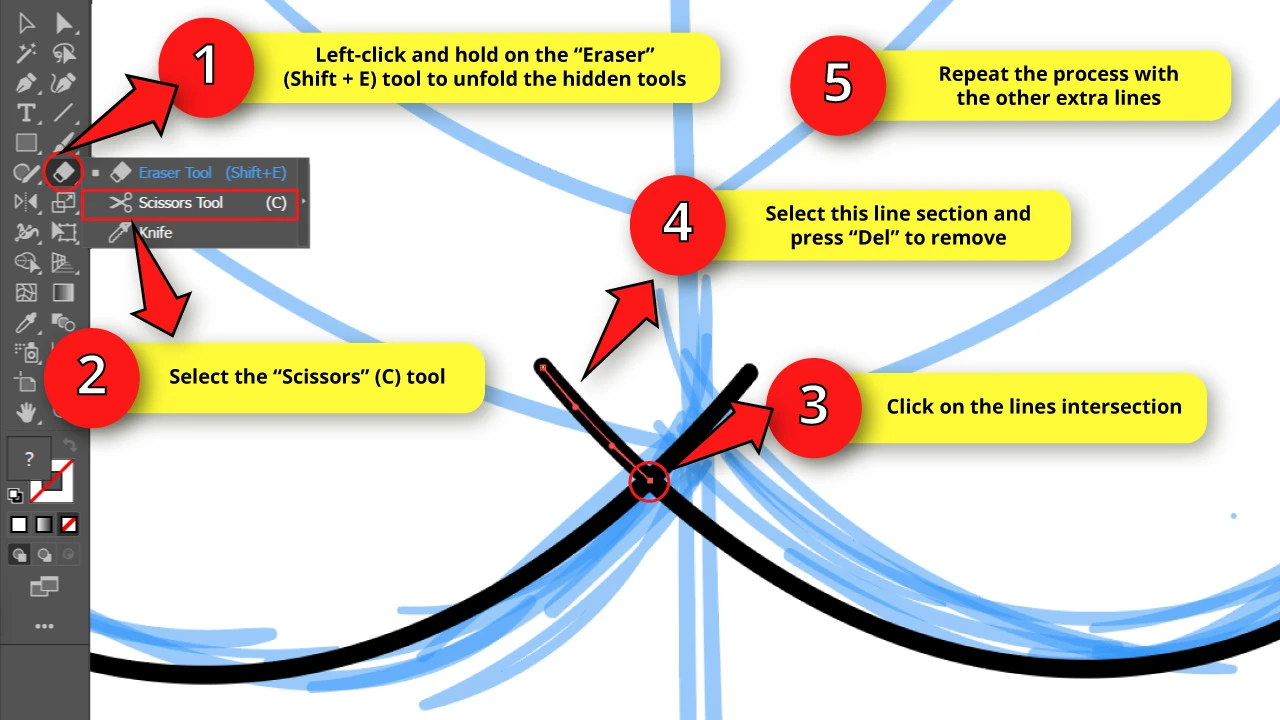
We are going to use the “Scissors” (C) tool to get rid of the extra lines.
This tool is hidden in the “Eraser” (Shift + E) tool nest.
To unfold the hidden tools nest, just left-click and hold on the “Eraser” (Shift + E) tool, and then select the “Scissors” (C) tool. Or press the “C” key to shortcut it.
With the “Scissors” (C) tool selected, click on the extra lines intersection to divide it in two sections.
Then select the extra lines section with the “Selection” (V) tool and press “Del” to remove them.
Repeat this step for the other 3 line intersections.
You can also use the “Shape Builder” (Shift + M) tool to trim the lines.
Step 12: Draw a Line for the Middle

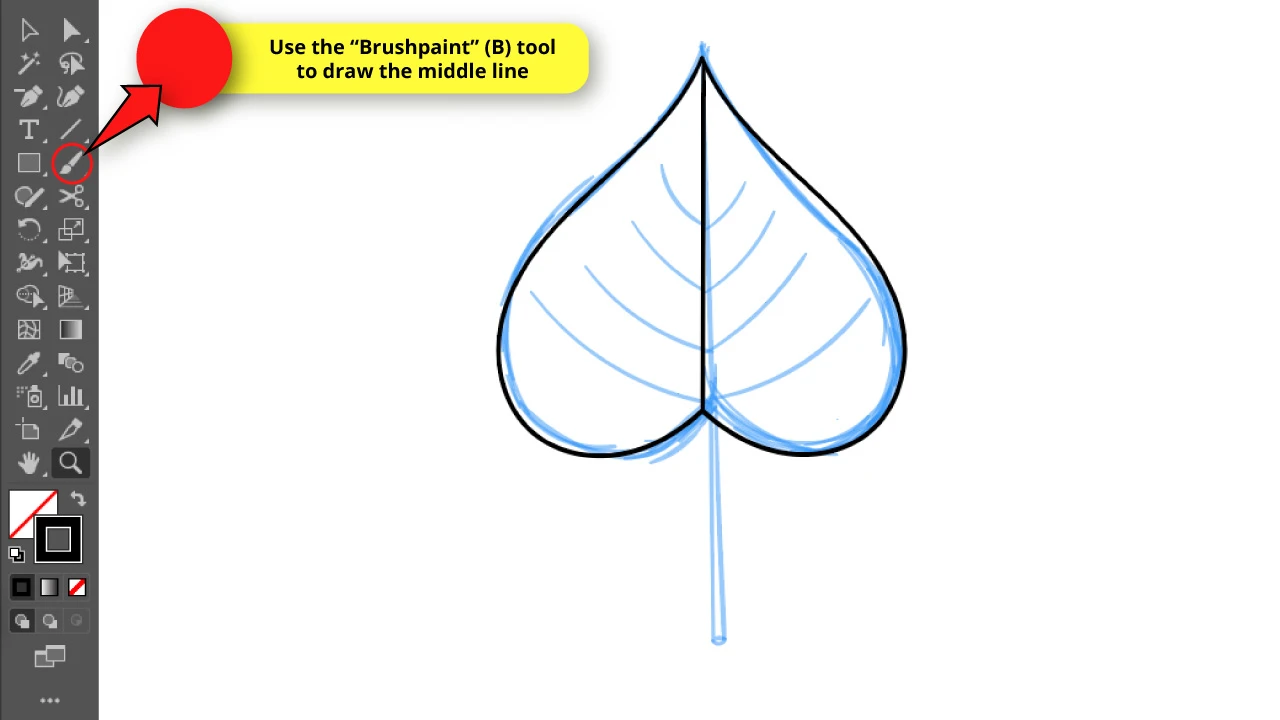
Use the “Paintbrush” (B) tool to draw the leaf’s middle line. It doesn’t have to be perfect.
Step 13: Draw the Leaf’s Petiole

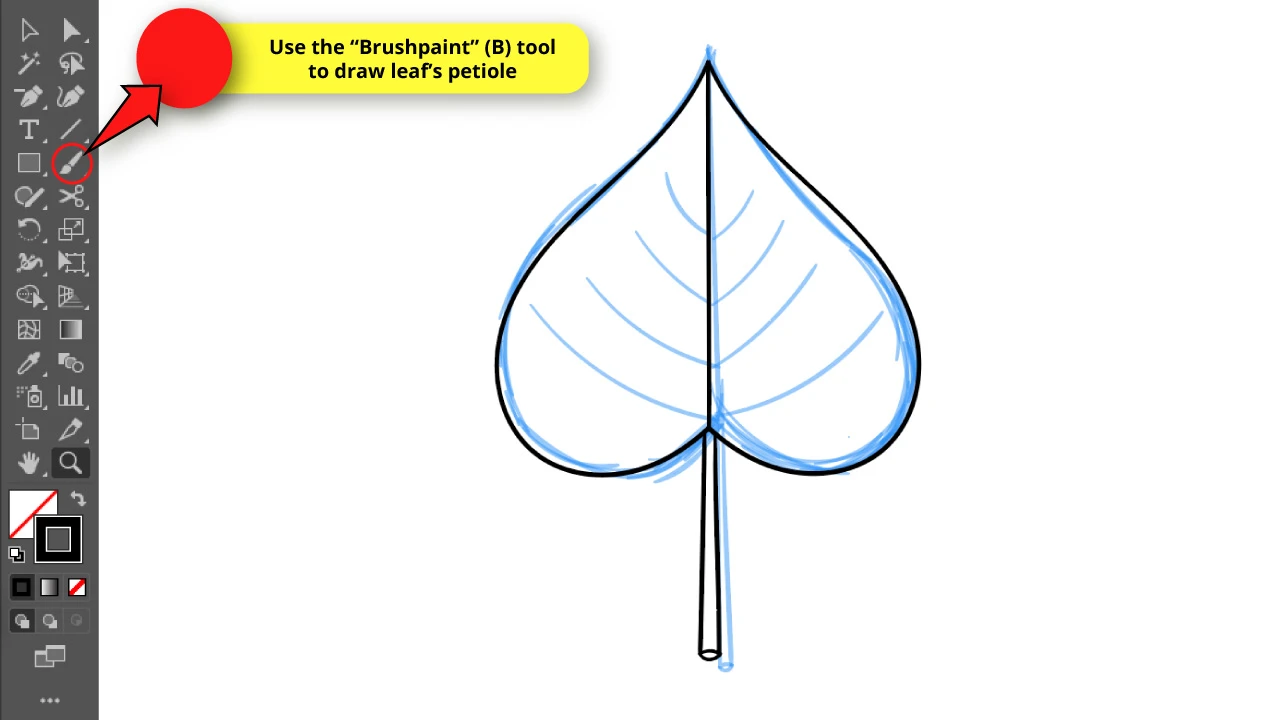
Use the “Paintbrush” (B) tool to draw to make two lines for the petiole.
Then make the small oval by making a convex arc for the top side, and then a concave arc for the bottom.
Step 14: Draw the Leaf’s Veins


Make some lines for one half of the leaf veins.
Try to make it uneven, and focus on making larger lines for the lower veins, and shorter lines for the upper veins.
Step 15: Duplicate Leaf’s Veins

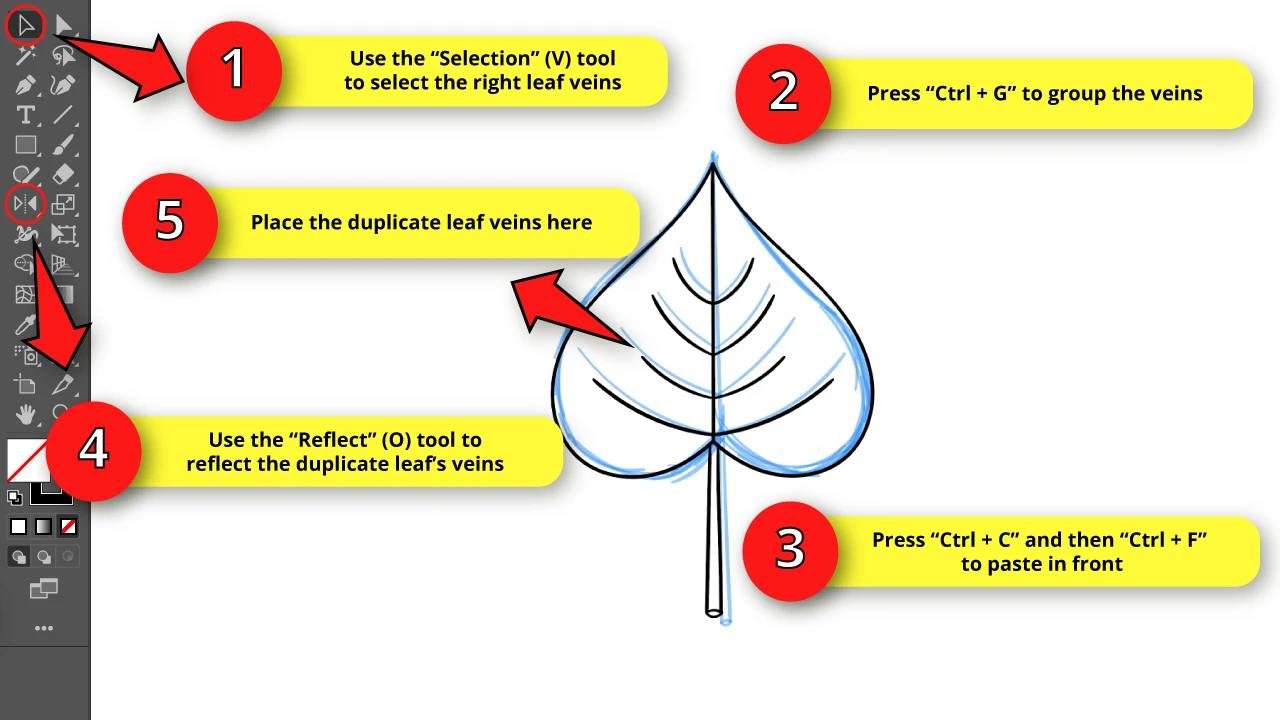
To group objects, first select all the veins using the “Selection” (V) tool and then press the “Ctrl + G” command
Next, press “Ctrl + C” and then “Ctrl + F” to copy and paste in front.
Then press the “O” key to select the “Reflect” tool. And press the “Enter” key to open the “Reflect” options window.
Make sure to have selected the “Vertical” option and then click “OK” to save.
Finally place the duplicated veins where they belong.
Step 16: Set the Path “Strokes”
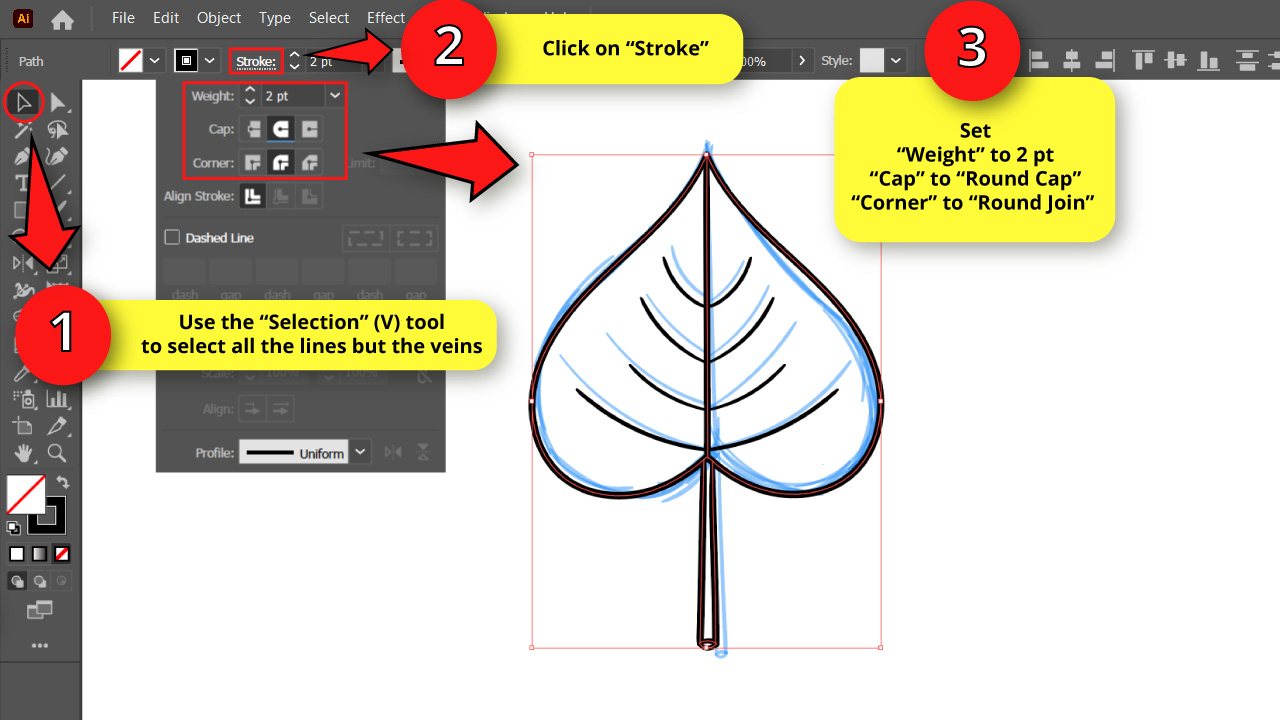

Select all the lines but the veins, then click on “Stroke” to open its options window.
Set the “Stroke” width to 2 pt . Select “Round Caps” for “Caps” and “Round Join” for “Corner”.
Step 17: Expand Appearance and Unite Shapes
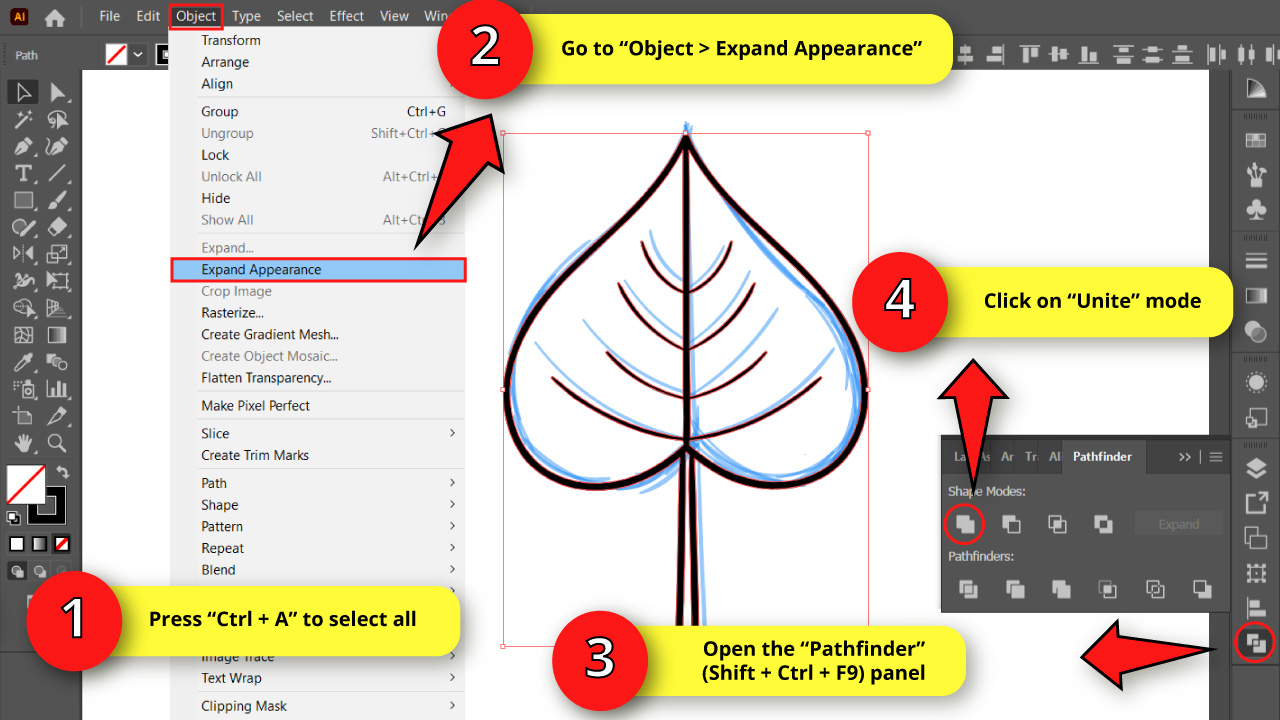

To convert paths into objects, select all the lines by pressing the “Ctrl + A” command and then go to “Object > Expand Appearance” on the menu at the top of the screen.
Then we need to combine the shapes. So open the “Pathfinder” (Shift + Ctrl + F9) panel on the right side toolbar.
If you can’t find it, you may have to enable it first by going to “Window > Pathfinder” on the menu at the top of the screen. Or using the “Shift + Ctrl + F9” shortcut.
Once you have opened the “Pathfinder” (Shift + Ctrl + F9) panel, click on “Unite” mode to unite all the objects.
Step 18: Hide the Sketch Layer
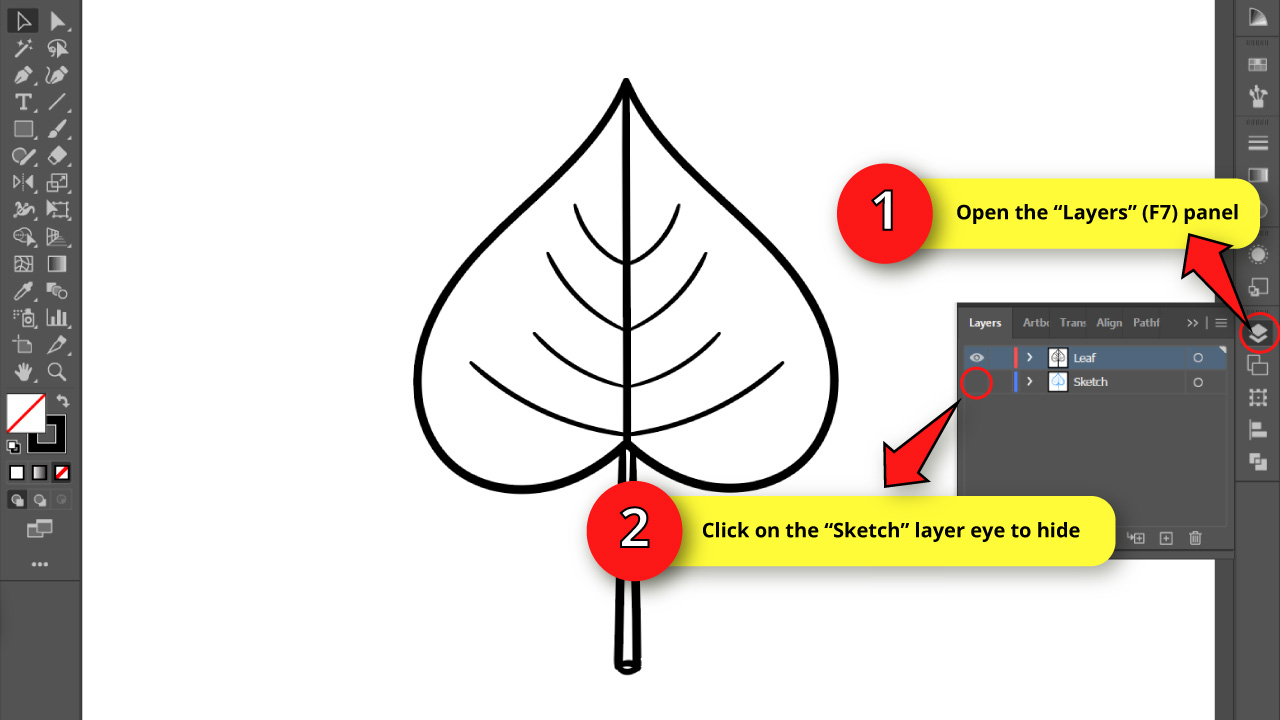
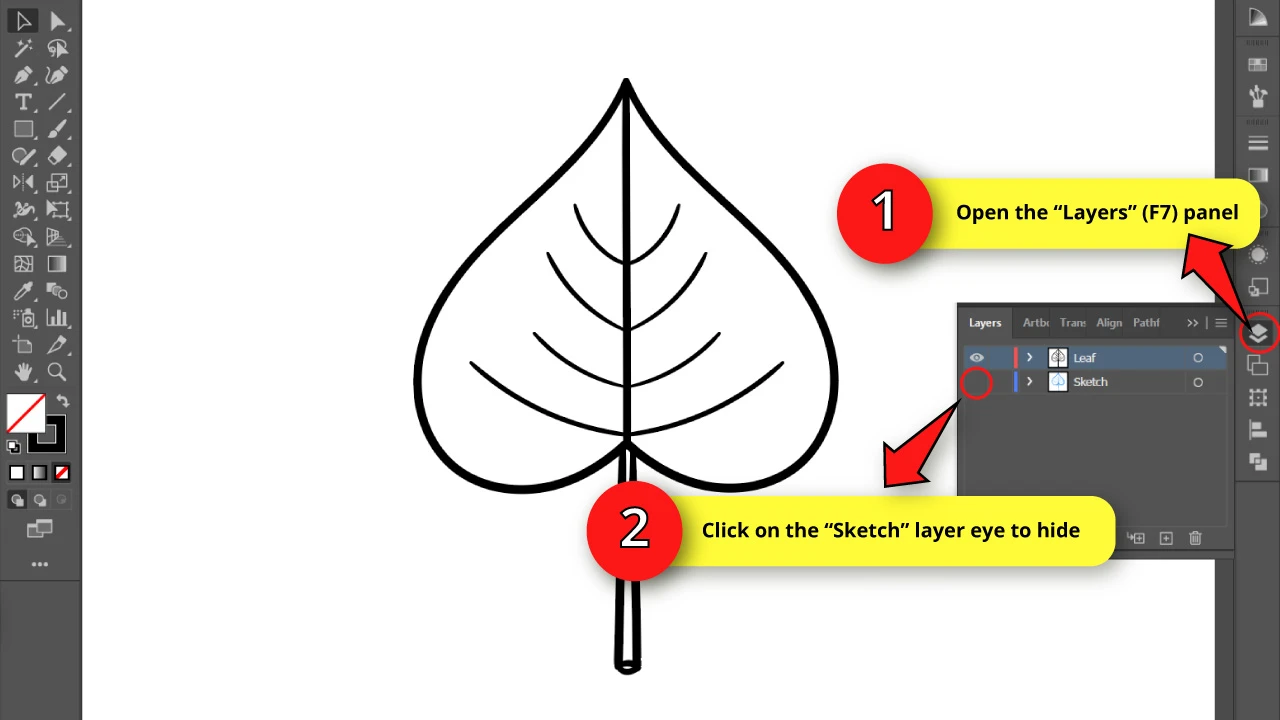
Go to the “Layers” (F7) panel and click on the “Sketch” layers eye icon to hide this layer.
Step 19: Color it Using the “Live Paint Bucket” Tool
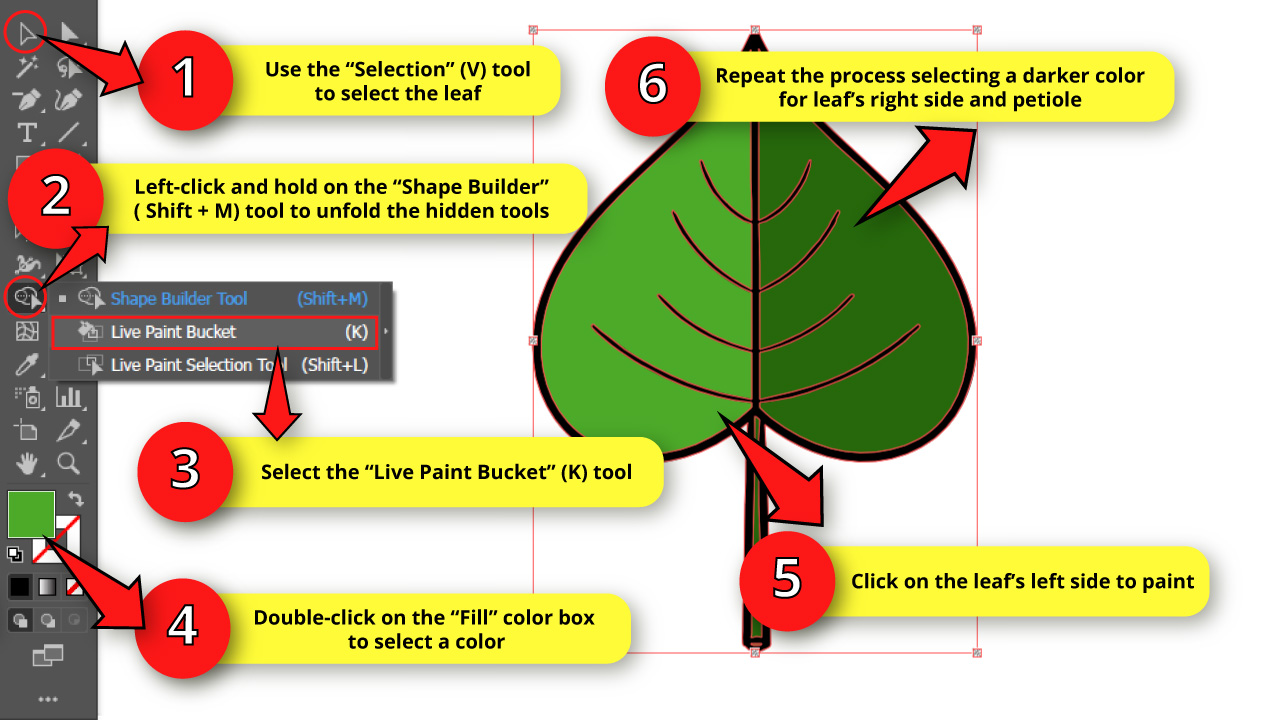
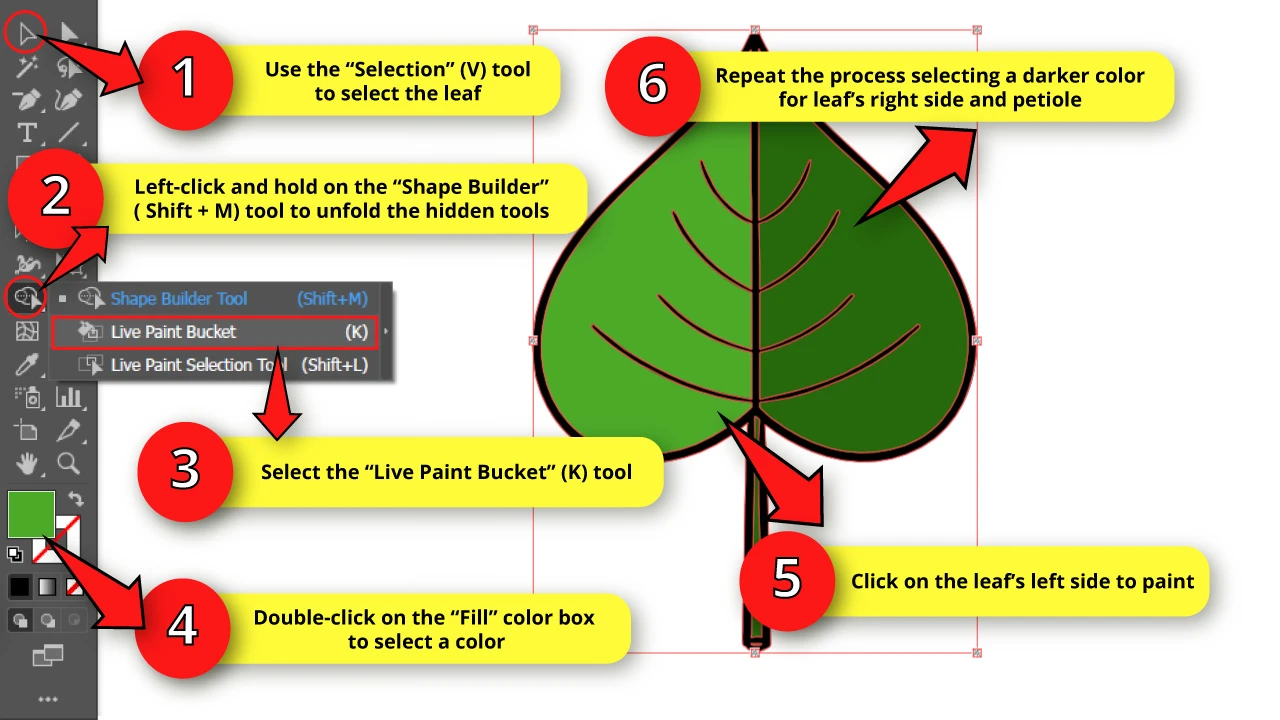
To fill color we’ll use the “Live Paint Bucket” (K) tool.
So first select the graphic using the “Ctrl + A” command to select all.
Then left-click and hold on the “Shape Builder” (Shift + M) tool on the left side toolbar to unfold the hidden tools.
Select the “Live Paint Bucket” (K) tool from the unfolded menu. Or press the “K” key from your keyboard.
To use the “Live Paint Bucket” (K) tool, double-click on the “Fill” color box to select a mid green color. Then click on the left side of the leaf to color it.
Repeat this process to complete the leaf coloring. Select a darker green for the right side and the petiole.
Step 20: Expand it

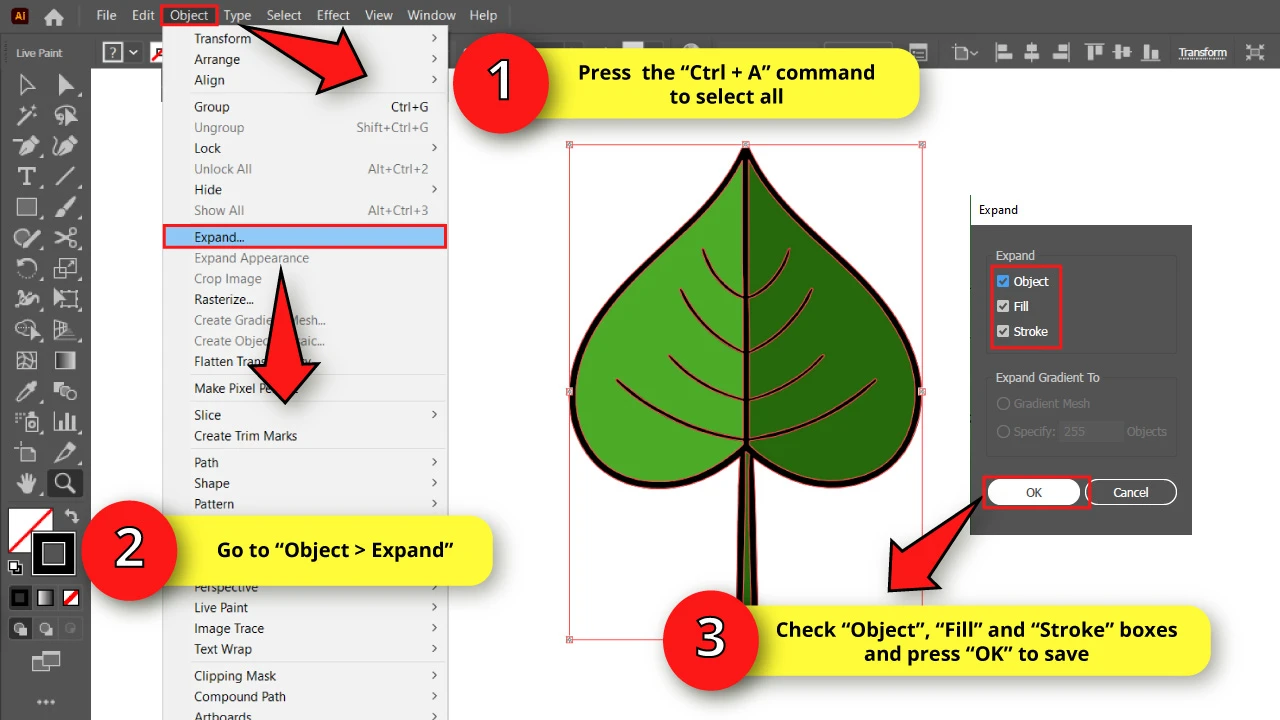
Select the whole graphic again by pressing the “Ctrl + A” command to select all and then go to “Object > Expand” on the menu at the top of the screen.
On the “Expand” options window, make sure the “Object”, “Fill” and “Stroke” boxes are checked. Press “OK” to save.
We have to do this to unlink the whole graphic and to be able to work with the different parts separately.
Step 21: Create New Layers for Coloring
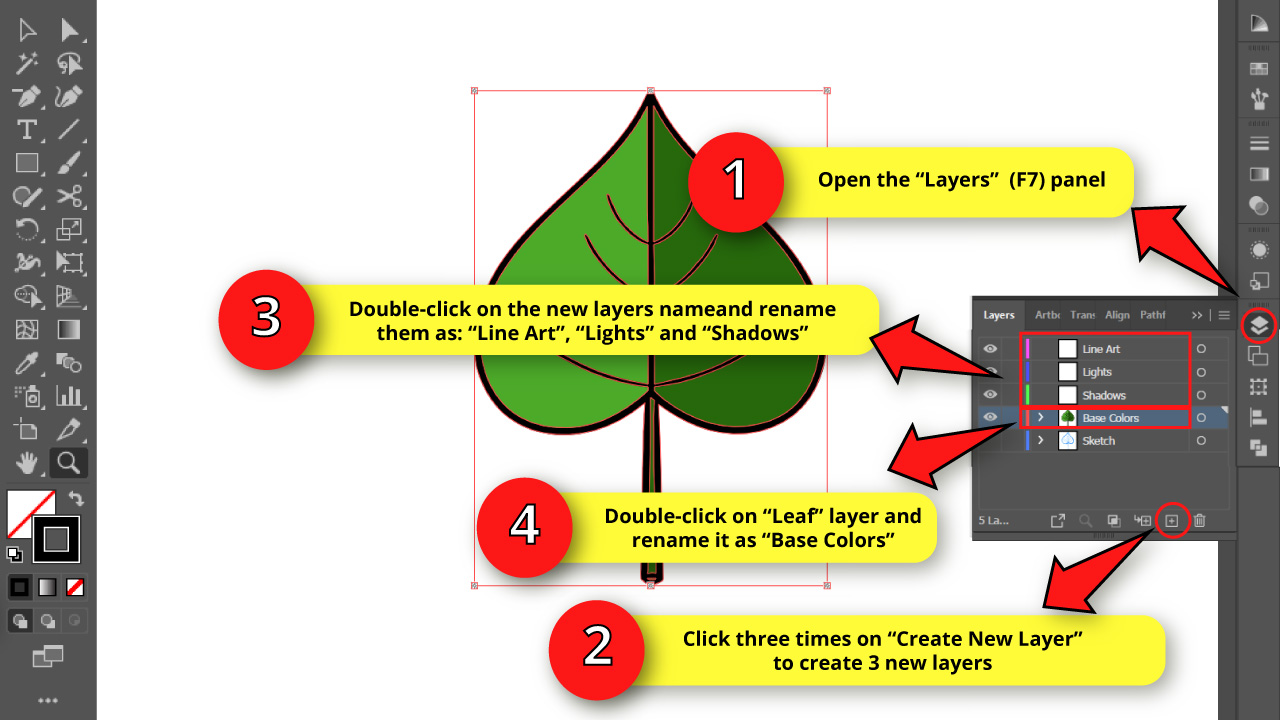
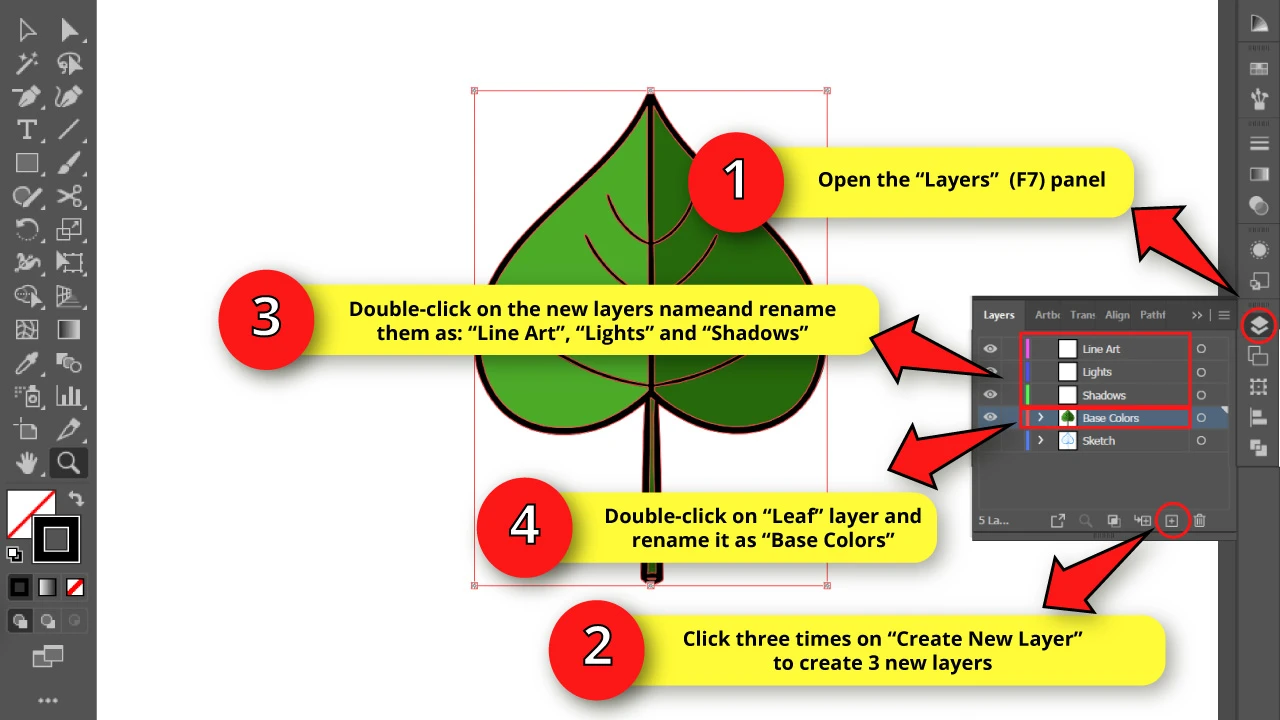
Go to the “Layers” (F7) panel and create three new layers by clicking on the “Create New Layer” button thrice.
Name these new layers as: “Shadows”, “Lights” and “Line Art”. Rename the “Leaf” layer to “Base Colors”.
Step 22: Separate the Line Art from the Base Colors

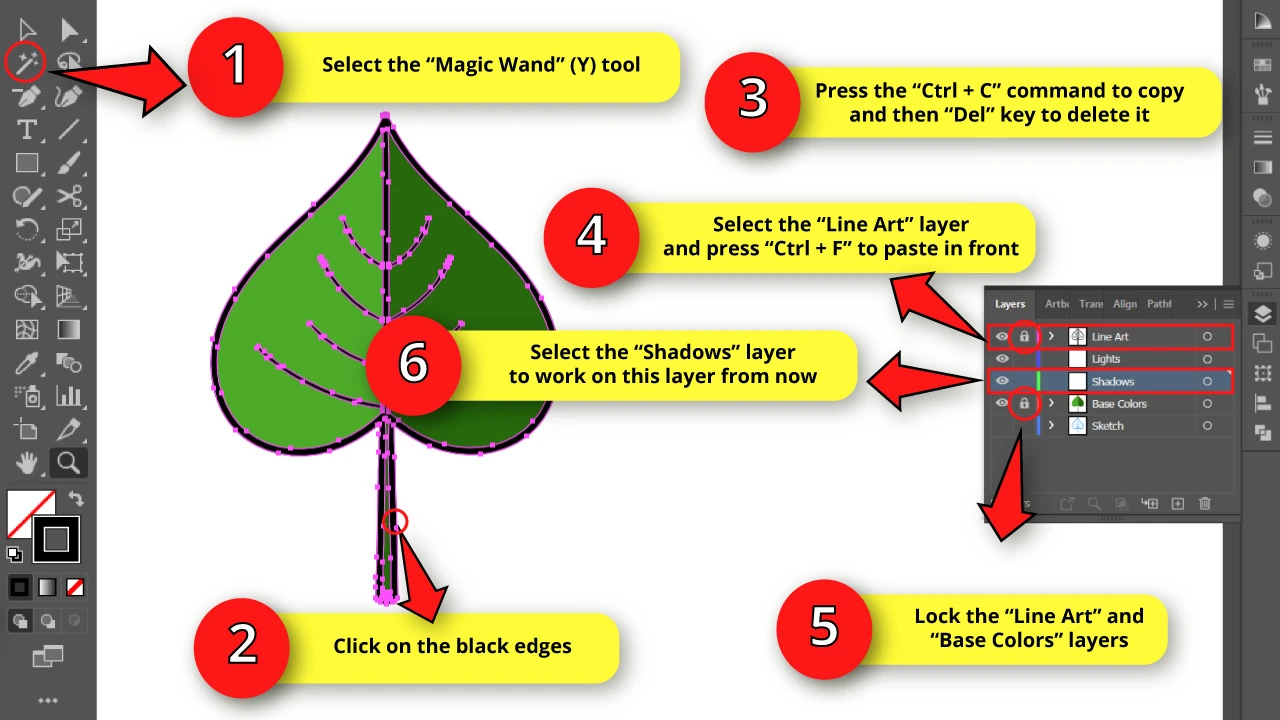
Click on the “Magic Wand” (Y) tool on the left side toolbar.
Then click on the leaf’s black edges to select all the black objects.
Next, press “Ctrl + C” to copy and then press the “Del” key to delete it.
Now select the “Line Art” layer and press “Ctrl + F” command to paste it in front.
The leaf’s black lines are now in the “Line Art” layer.
Finally, lock both “Line Art” and “Base Color” layers to avoid messing up when drawing shadows and lights in the following steps.
To lock layers, click on the empty box next to the eye. When the lock icon appears, that means the layer is locked.
Click on the “Shadows” layer to work here from now on.
Step 23: Pick the Shadow Color
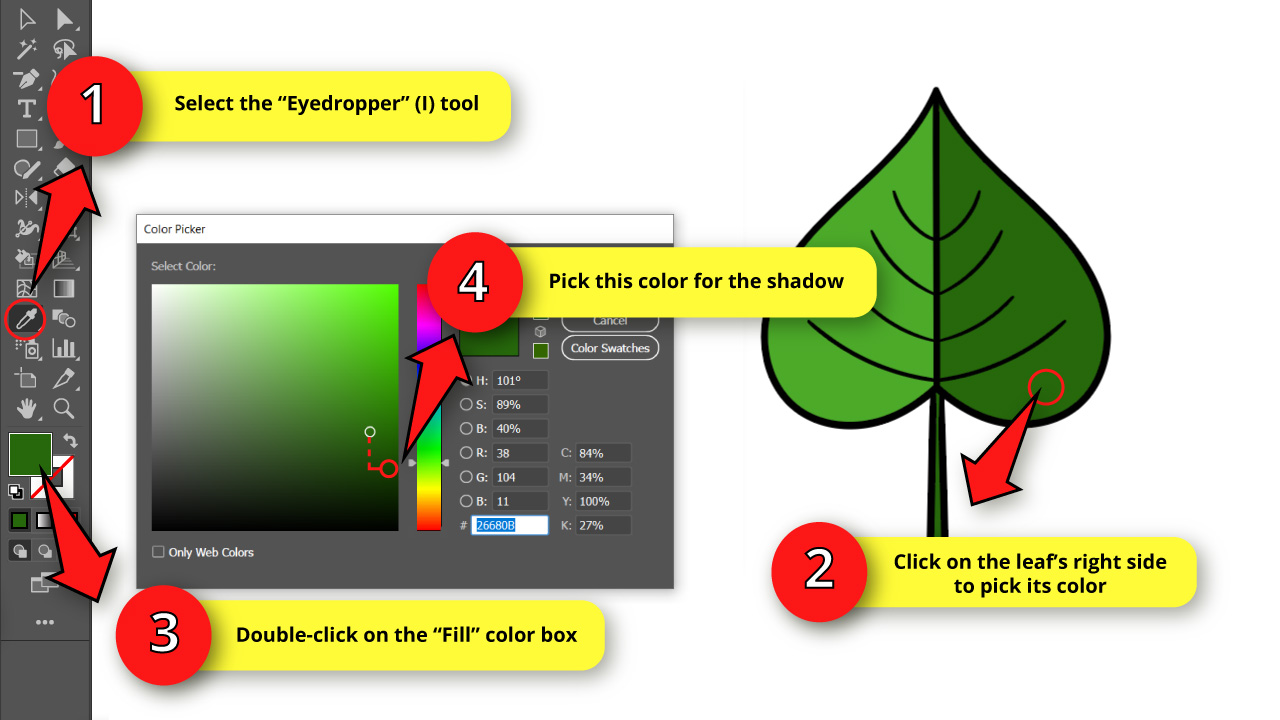

To know what color we should select for the shadows, we need to use the base colors as reference.
Click on the “Eyedropper” (I) tool on the left side toolbar. Then click on the right side of the leaf to pick that green.
Next, double-click on the “Fill” color box and slightly move the color picker to the right and down to pick a darker shade of green.
This will be our shadow green for this part of the leaf.
When you move the color picker down you get a darker color.
When you move it to the right you get a more saturated color.
So the correct combination for a shadow is selecting a darker and more saturated color, based on the “Base Color”.
Step 24: Draw the Bottom Shadow

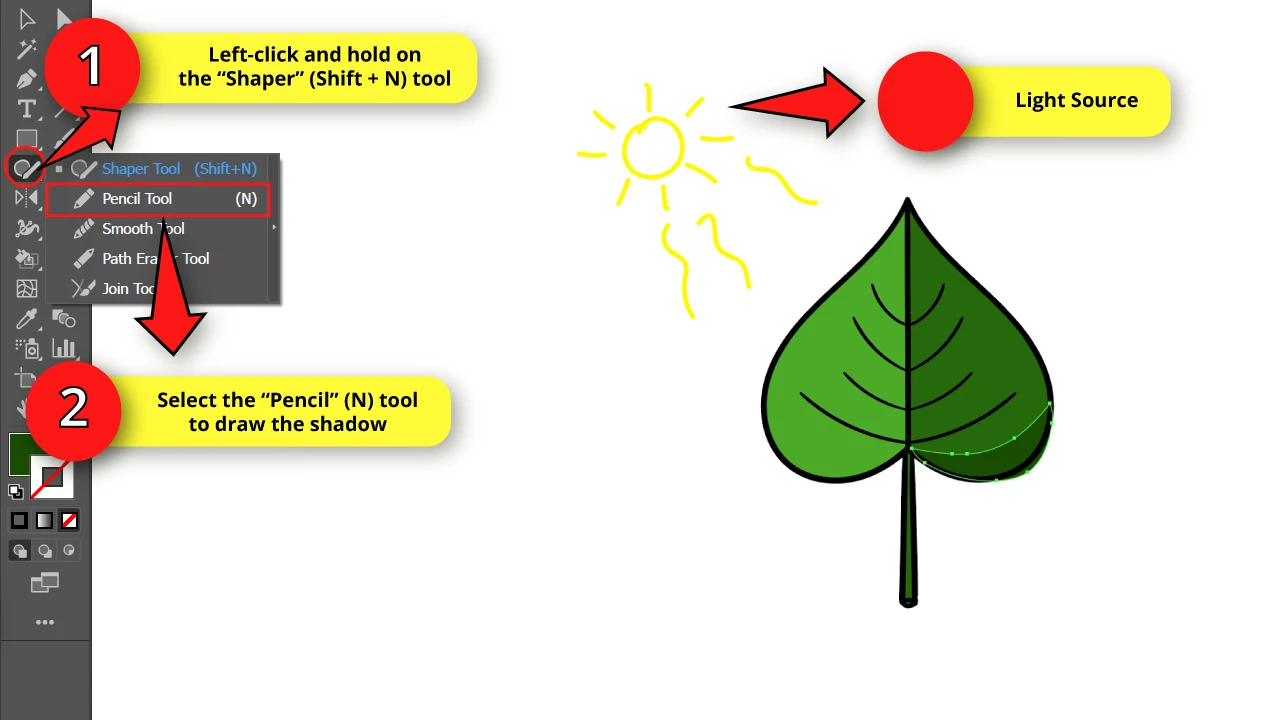
To understand where the shadows and the lights should be on an illustration, you need to imagine where the light source would be coming from.
Imagine that our light source is coming from the left top side. In that case we will draw shadows on the right bottom side and for the veins.
The tool we will use for this is the “Pencil” (N) tool. This tool is hidden in the “Shaper” (Shift + N) tool nest.
To unfold the hidden tools nest, left-click and hold. Then select the “Pencil” (N) tool.
Or just press the “N” key to shortcut it.
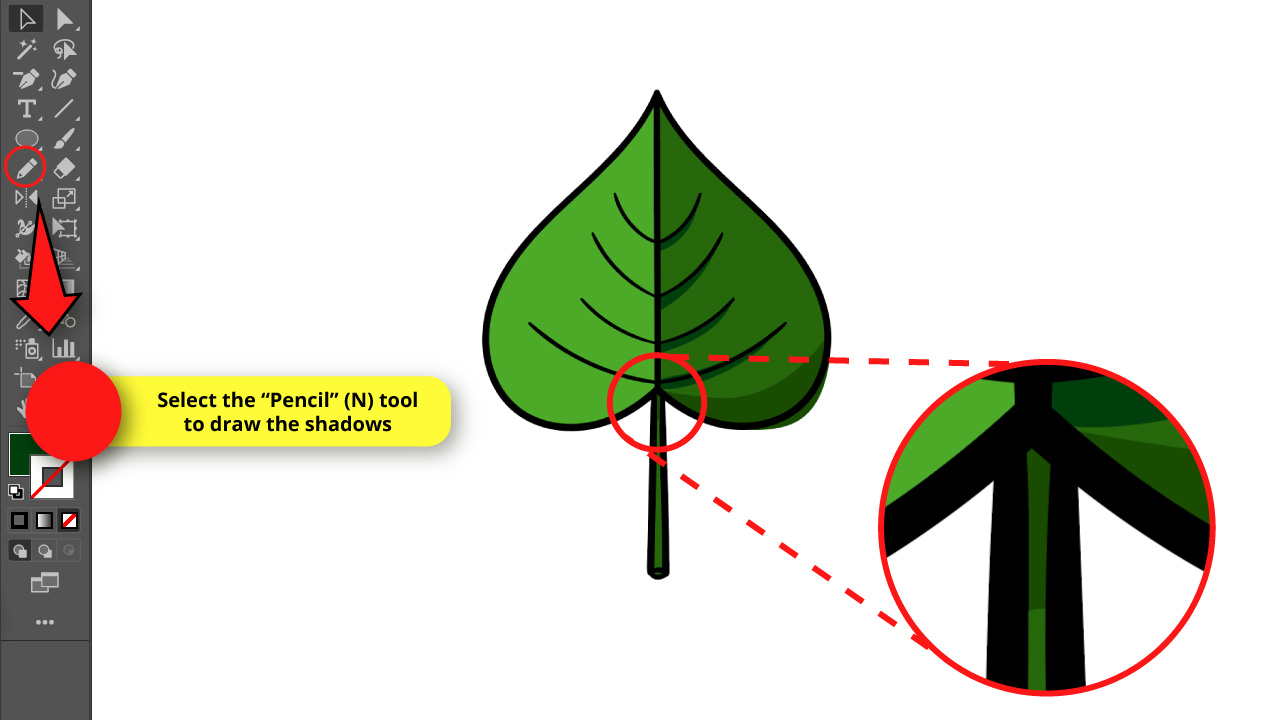
This tool lets us draw colored areas. Exactly what we need to draw shadows and lights.
So once you have selected the green for shadowing this section of the leaf, draw a half-moon shape at the bottom of the leaf.
It doesn’t have to be perfect, and it doesn’t really matter if you get off the black lines when you draw. You can get rid of the excess later.
Notice how these shapes are drawn behind the black lines because of the arrangement we made on the “Layers” panel on “Step 22”.
Step 25: Draw Shadows for the Leaf Veins and the Petiole

Continue using the “Pencil” (N) tool to draw shadows for the leaf veins.
The shape of these shadows is something similar to a curved triangle.
Then add a small shadow at the top of the petiole.
Step 26: Pick the Light Color

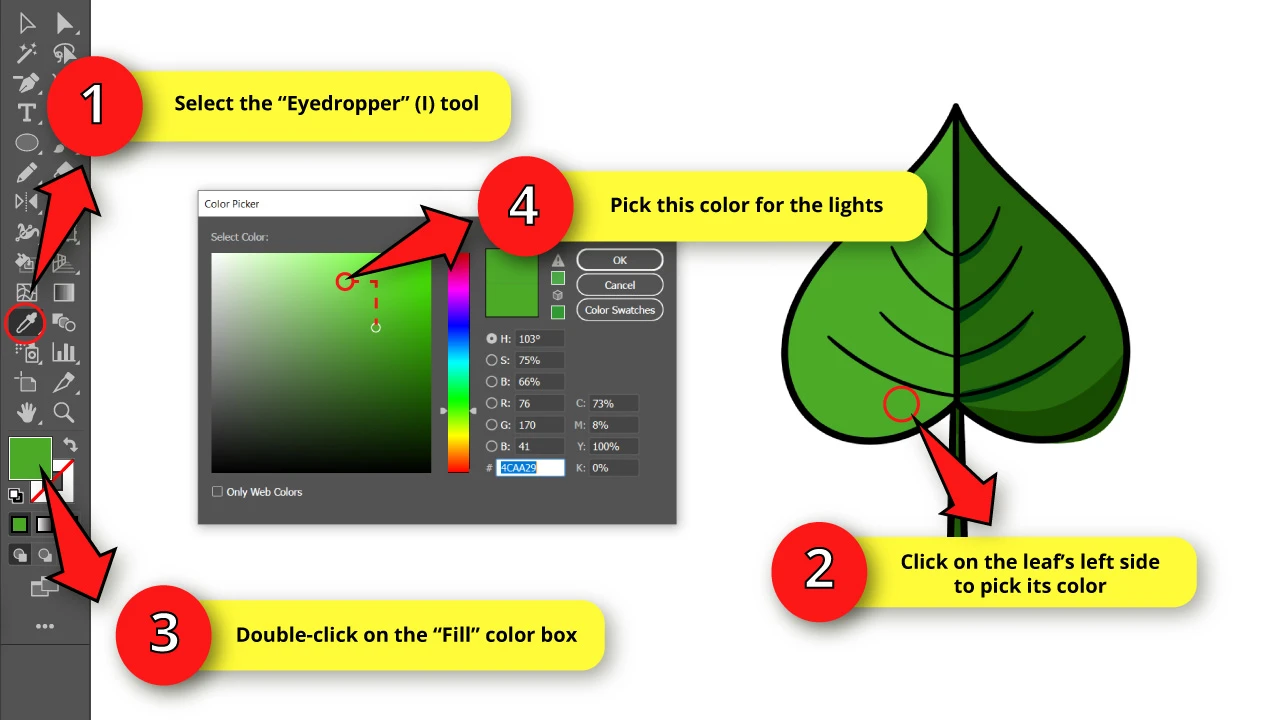
To pick a correct light color, use the “Eyedropper” (I) tool to pick the base color of the left side of the leaf.
Then double-click on the “Fill” color box and slightly move the color picker to the left and up to pick a brighter shade of green.
Unlike the shadow picking color method, when you move the color picker up you get a brighter color. When you move it to the left you get a less saturated color.
So the correct combination for a light is selecting a brighter and less saturated color, based on the “Base Color”.
Step 27: Draw the Lights

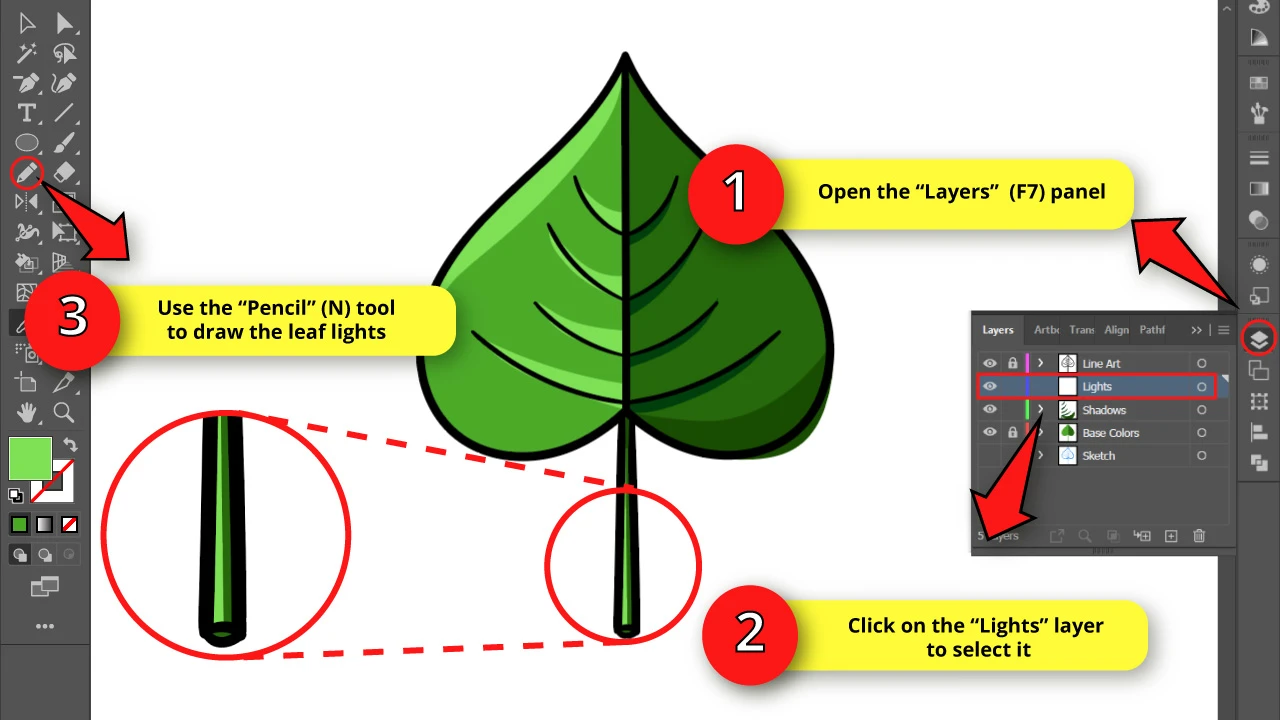
To draw the lights, first open the “Layers” (F7) panel and select the “Lights” layer.
Use the same “Pencil” (N) tool and draw the light areas.
Draw a light bordering the inner side of the edge for the left top side of the leaf.
Then draw some shapes similar to round concave triangles right above the veins of the left side.
Step 28: Get Rid of the Extra Areas

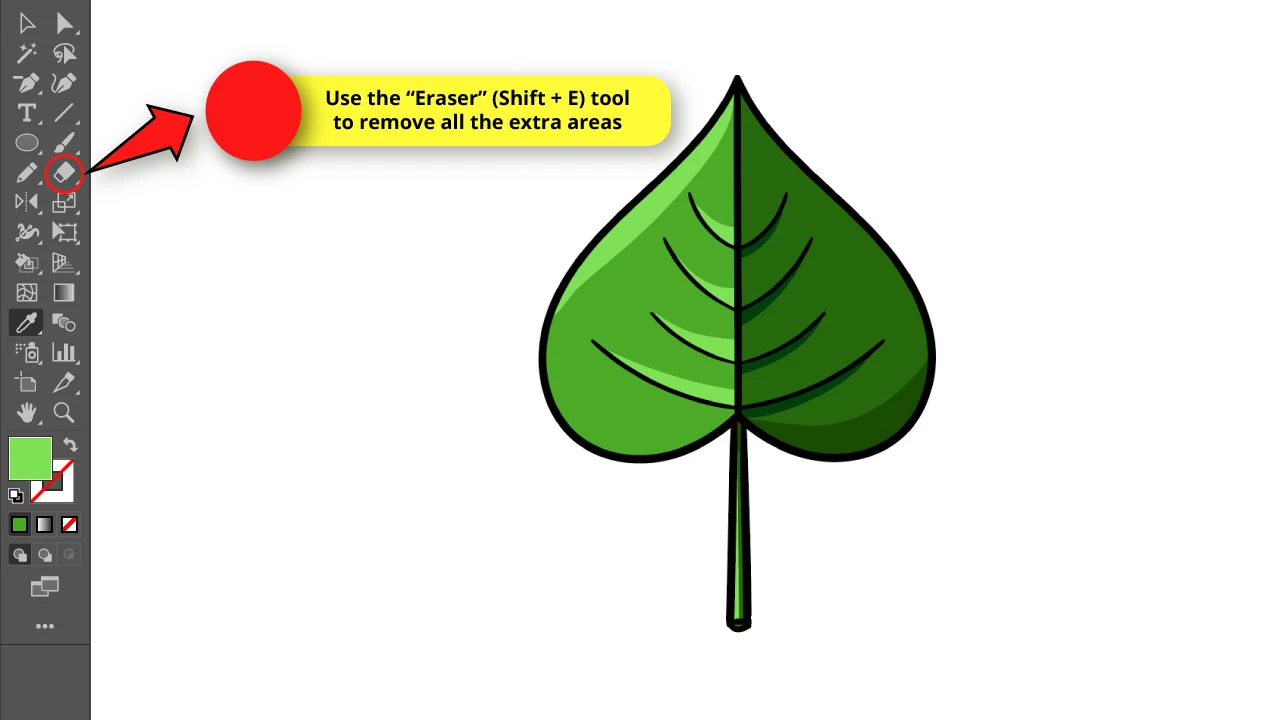
Select the “Eraser” (Shift + E) tool located on the left side toolbar.
Use the “Eraser” (Shift + E) tool to delete the extra areas of lights and shadows.
Step 29: Change the Line Art Color
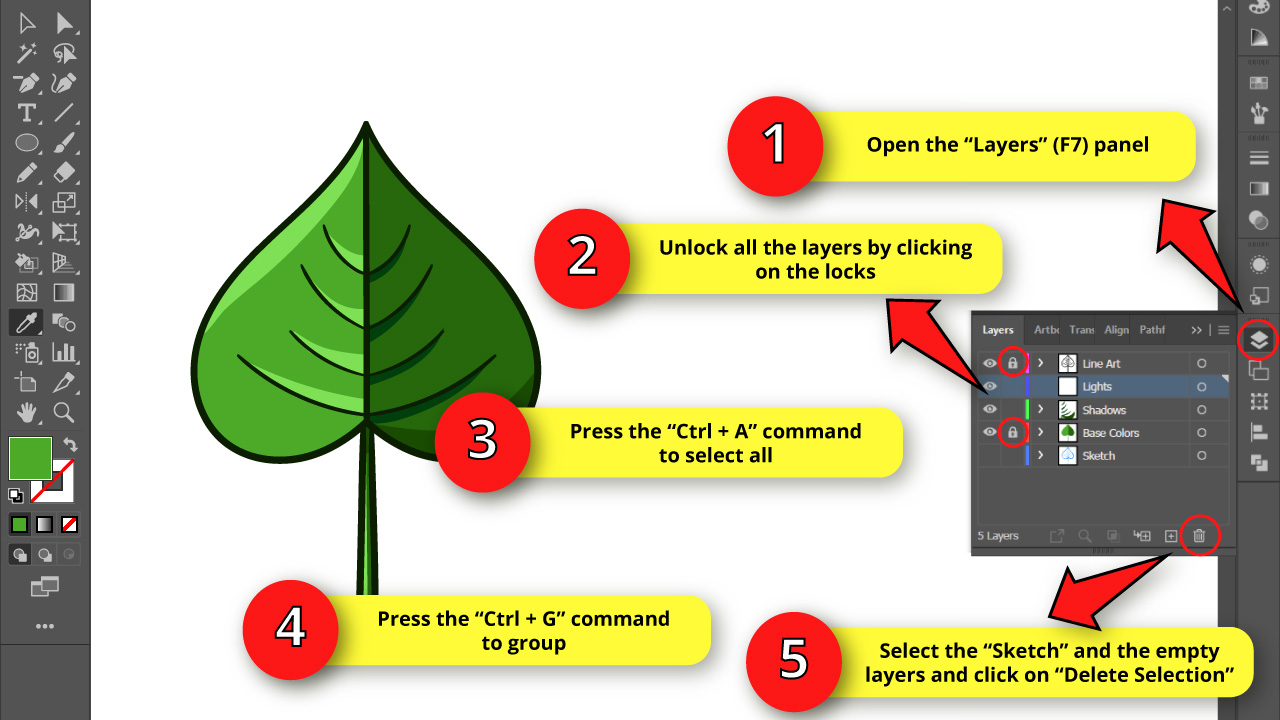

On the “Layers” (F7) panel unlock the “Line Art” and “Base Colors” layer by clicking on the lock.
Then press “Ctrl + A” to select all, following the “Ctrl + G” command to group.
Now you can handle the leaf illustration as a single object.
Select the “Sketch” and the empty layers, and then click on “Delete Selection”.
Step 30: Join the Layers

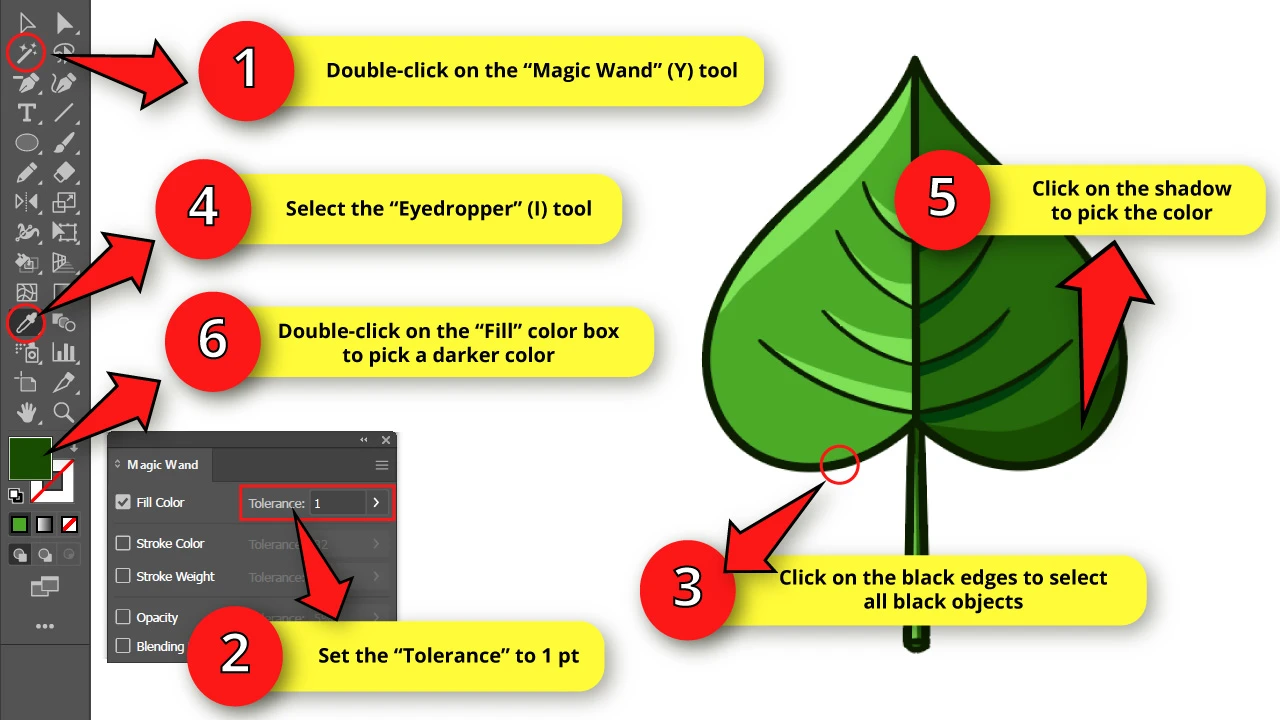
If you don’t really like the bold black edges that much, you can attenuate the black impact by picking another color.
Then double-click on the “Magic Wand” (Y) tool to open its options window and set the “Tolerance” to 1 pt.
Then click on the black edges to select all the black objects.
Next, use the “Eyedropper” (I) tool to select the green shadow color.
Finally, double-click on the “Fill” color box and pick a darker color for the edges. To get the desired effect, it has to be a very dark green. Quite close to, but not black.
The Result on “How to Draw a Leaf in Illustrator”


And here is our leaf finished!
Download our Leaf Pack for FREE


We have already created some awesome-looking leaves for you.
All of these are not copyrighted and you can use them in whatever way you want!
Frequently Asked Questions on “How to Draw a Leaf in Illustrator”
How can I draw the sketch without a tablet?
You can sketch using a pencil and paper. Then take a photo or scan your drawing. Open the photo of your sketch in Illustrator. Set the “Opacity” to 50% and lock the layer. Create a new layer and work using the sketch as a reference.
How can I stroke brush and pencil lines without a tablet?
You have to use the Illustration drawing tools whenever possible, or use the “Pen” (P) tool to stroke the lines. To emulate the pen pressure sensitivity, you can use the “Width” (Shift + W) tool to make customized path widths. Or make a custom brush and then apply it to the drawn paths.
What is the difference between “RGB” and “CMYK” color mode?
“RGB” mode covers all visible colors spectrum. This means you can visualize saturated and vivid colors. “CMYK” mode is based on ink colors. This means its color spectrum is narrower. The colors are less saturated, just like the colors you would get when you print something.
When should I select the “RGB”, and when the “CMYK” color mode in Illustrator?
Select “RGB” if your illustration is going to be strictly used as content for social media, webpages, digital graphics, or any other kind of display on screens. Select “CMYK” if you are planning to print your artwork, or if you will both print and use your artwork digitally.
What are Hue Colors?
“Hue” colors are the different colors of the chromatic wheel (or the rainbow colors if you prefer). These are: Red, Orange, Yellow, Green, Blue, Purple, and all intermediate colors between these.
What is Saturation Color?
“Saturation” changes the pureness of the color. If you set it to 100%, you’ll get a pure vivid color (like the rainbow colors). If you set it to 0%, you’ll get grayscale colors.
What is Brightness Color?
“Brightness”, also known as “Value”, changes the color brightness/darkness. It goes from a light color at 100% of brightness, to a total black at 0% of brightness.


Hey guys! It’s me, Marcel, aka Maschi. On MaschiTuts, it’s all about tutorials! No matter the topic of the article, the goal always remains the same: Providing you guys with the most in-depth and helpful tutorials!

