

Drawing a flame could be challenging because it lacks a static shape, but it does have transparencies, different shades of yellow, orange and red, and some glow/blur effects.
Of course when it comes to drawing a flame, it depends on how simple you want it to be.
You can draw a very basic flame, colored with a single shade, or you can make it more realistic and complex.
In this tutorial you will learn how to draw a balanced flame in a few steps.
It will have a minimalist shape, but it will feature gradients and glow effects which will make the flame more interesting and eye-catching.
And even more, at the end of this tutorial you will find a free downloadable pack of flames for you to use on your own projects.
Let’s get into it!
Also, if you would just like to download our free flames vector files, you can easily do so by subscribing to our newsletter (you will then be able to download these vectors for FREE and right away!)
How to Draw a Flame in Illustrator
Use the Paintbrush (B) tool to draw the flame sketch. Lock the layer and create a new one. Use the Pencil (N) tool to draw the flame final lines. Add a dark background. Paint the flame with yellow, orange and red gradients. Duplicate the flame and add the Gaussian Blur effect at the background.
Step 1: Set the Document Color Mode
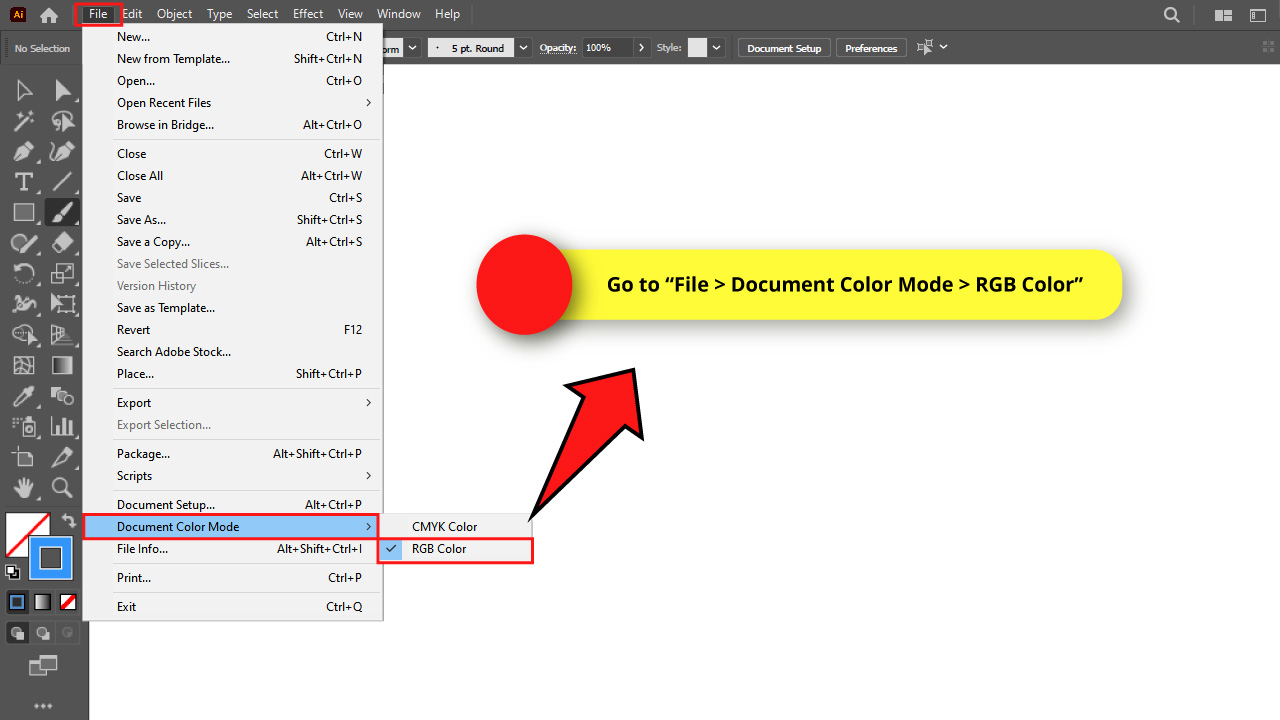

When creating a new document, make sure you select the proper “Color Mode”.
Select “RGB” color mode if your work will be shown only on screens.
Select “CMYK” color mode if your work will be printed, or both shown on screens and printed.
If you already started working on a document, but you want to change the color mode in the middle of the process, you can do it by going to “File > Document Color Mode” on the menu at the top of the screen.
I’ll set the RGB color mode for my drawing.
Step 2: Adjust the “Paintbrush Tool” Options

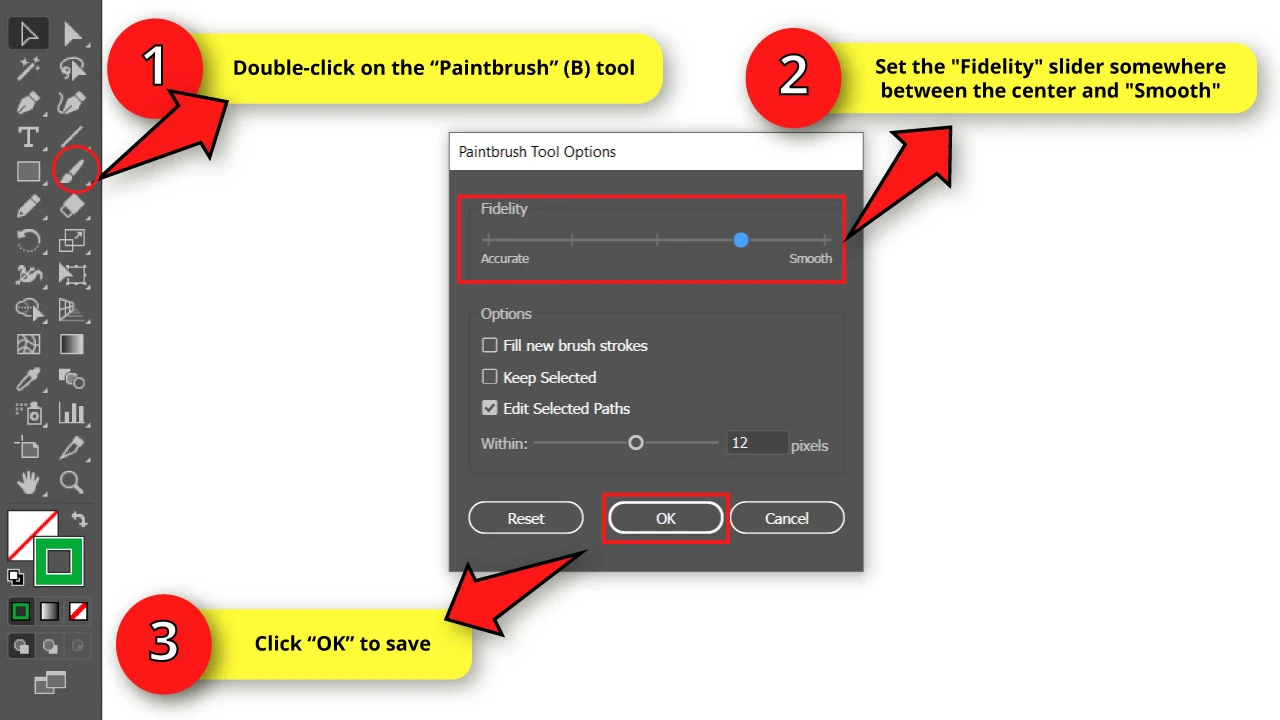
Double-click on the “Paintbrush” (B) tool on the left side toolbar to open the options window.


Set the “Fidelity” slider somewhere between the center and “Smooth”.
Then, click “OK” to save.
Step 3: Customize a Brush

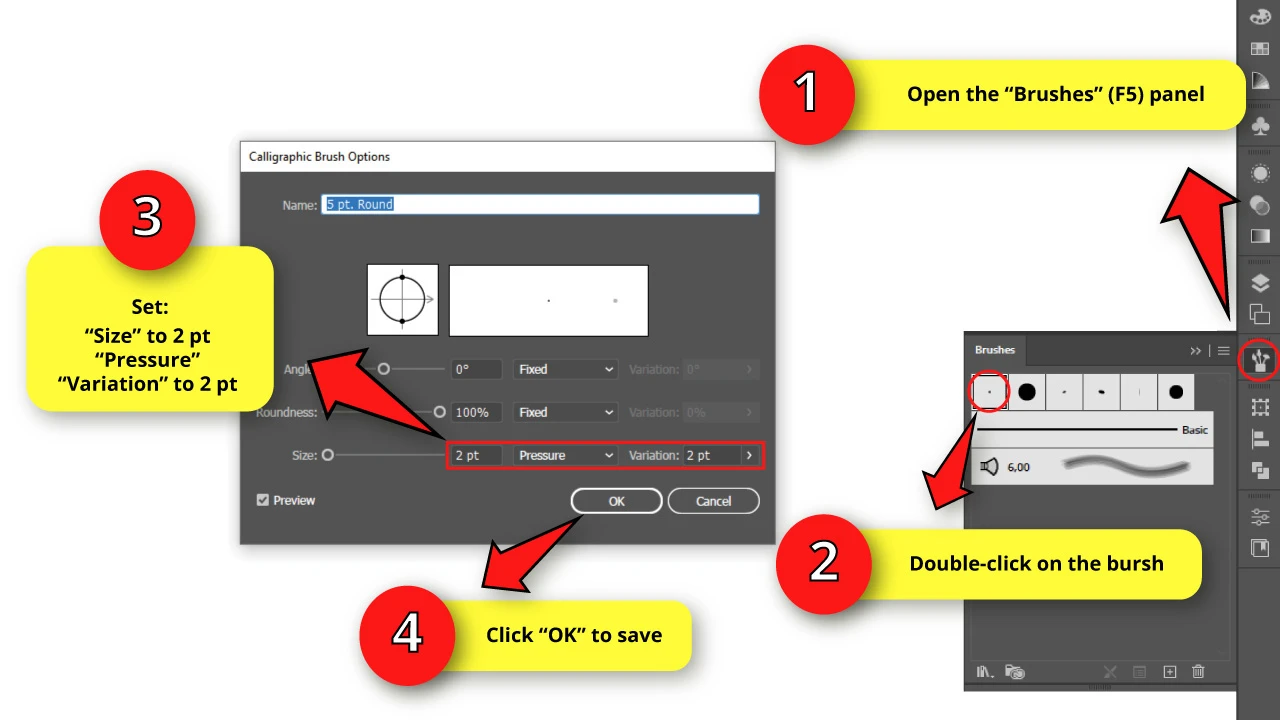
To make a brush in Illustrator, open the “Brushes” (F5) panel on the toolbar located on the right side of the screen.
If you can’t find it, you may have to enable it first by going to “Window > Brushes” on the menu at the top of the screen.
Double-click on the tiny round brush to open the “Calligraphic Brush Options” window.
Set the “Size” to 2 pt. Change the box setting to “Pressure”, and select 2 pt. for the “Variation” field.
This last adjustment allows us to make paths sensitive to the tablet pen pressure.
Once you’re done, click “OK” to save.
Keep in mind that you can change the brush size in Illustrator at any time during the drawing process.
Step 4: Draw a Circle Using the “Ellipse” (L) Tool

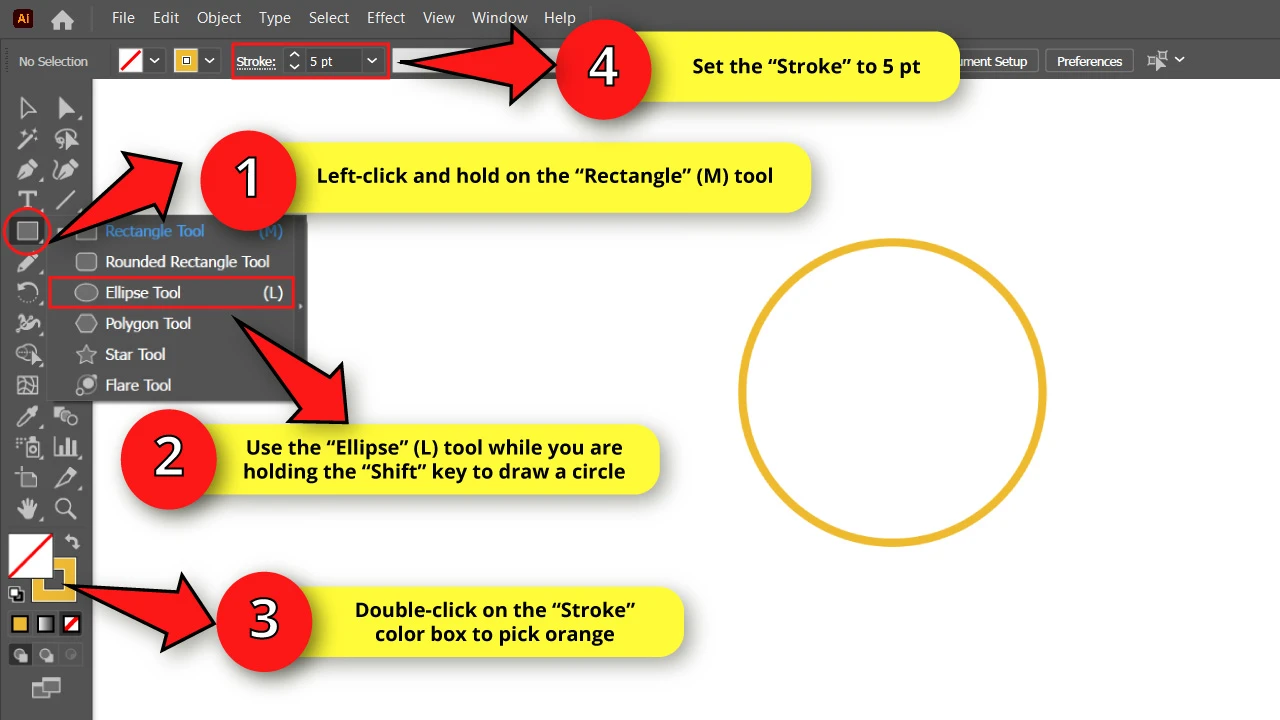
Left-click and hold on the “Rectangle” (M) tool on the left side toolbar to unfold the hidden tools.
On the unfolded menu select the “Ellipse” (L) tool, or click on the “L” key to shortcut it.
Use the “Ellipse” (L) tool to draw a circle. Remember to hold the “Shift” key while drawing the circle, so you can maintain the proportions and get a perfect circle.
Double-click on the “Stroke” color box located on the left side toolbar to pick a color. I’ll use orange.
Then set the “Stroke” weight to 5 pt on the toolbar at the top of the screen.
Step 5: Draw the Flame Main Shape
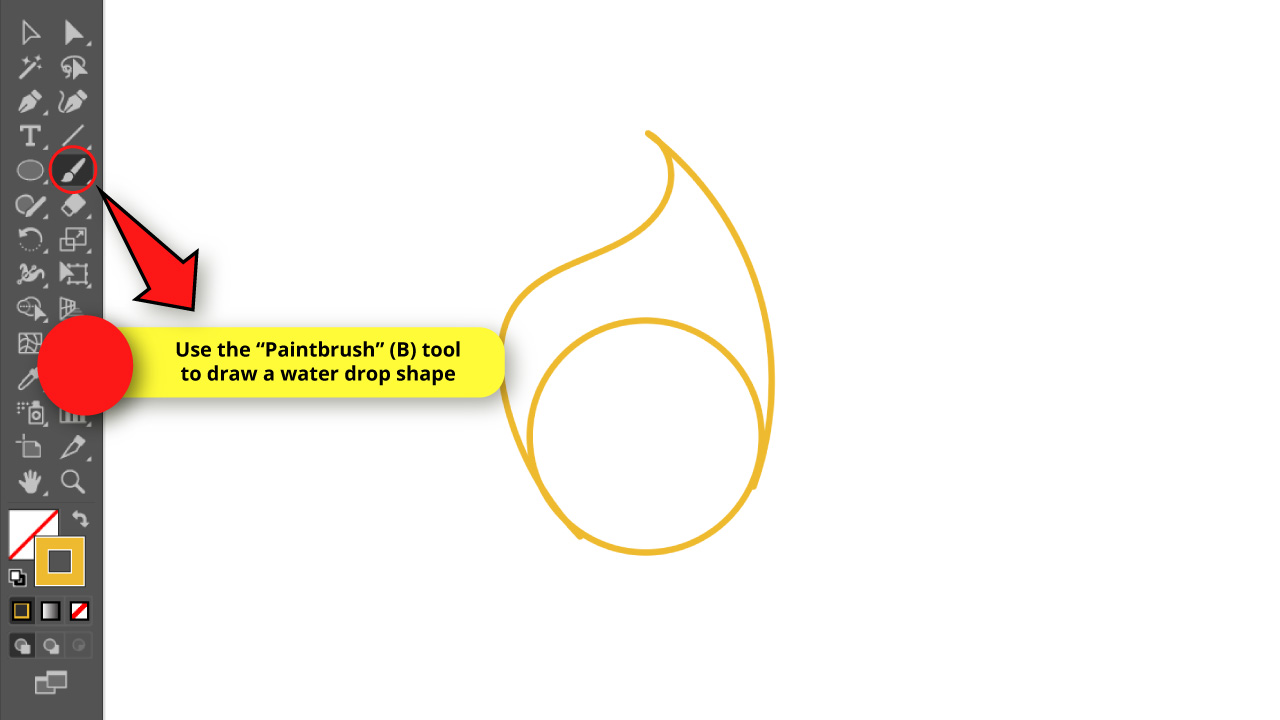

We need to draw the flame main shape first, in order to be able to draw the rest of the lines later.
Use the “Paintbrush” (B) tool to draw an object similar to a water drop shape, using the circle as the base.
Step 6: Draw the First Flame Lines
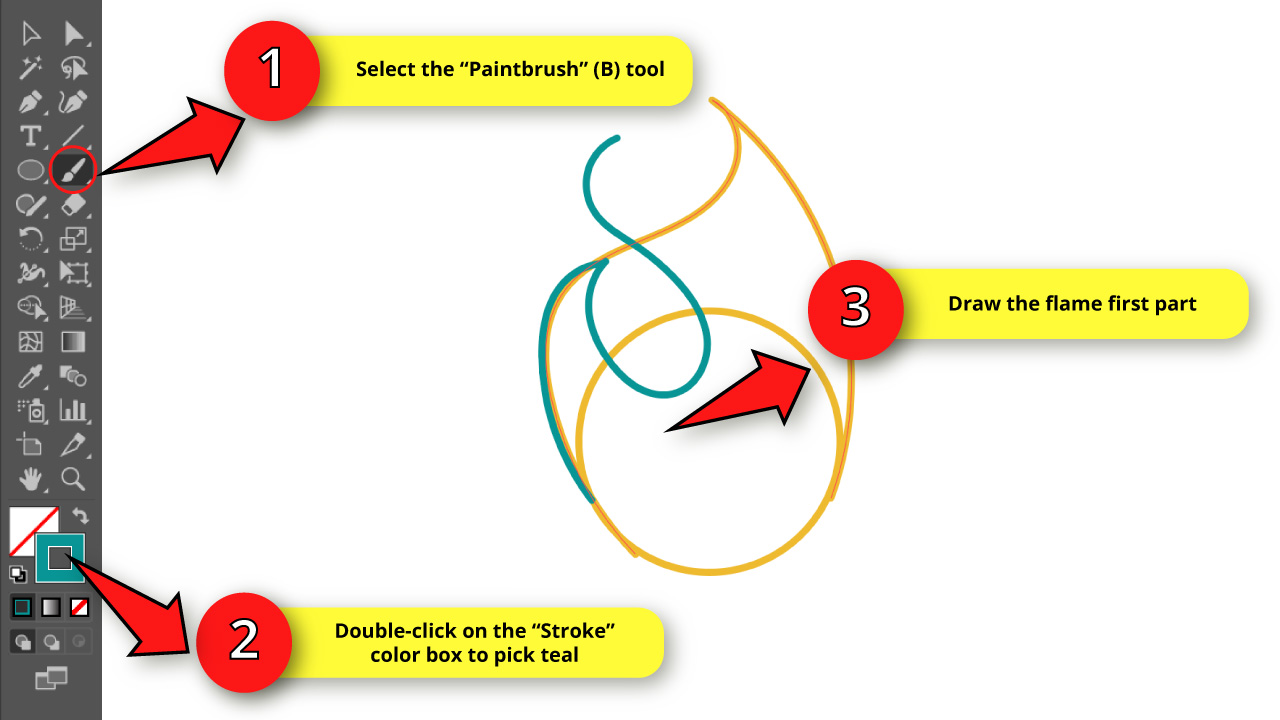

Double-click on the “Stroke” color box to pick another color. I’ll use teal this time.
Then use the “Paintbrush” (B) tool to start drawing the flame shape in a more detailed form.
First make a line following the water drop shape, and then draw an “S” shape to make our first flame.
Step 7: Continue Drawing the Flame Lines for the Sketch

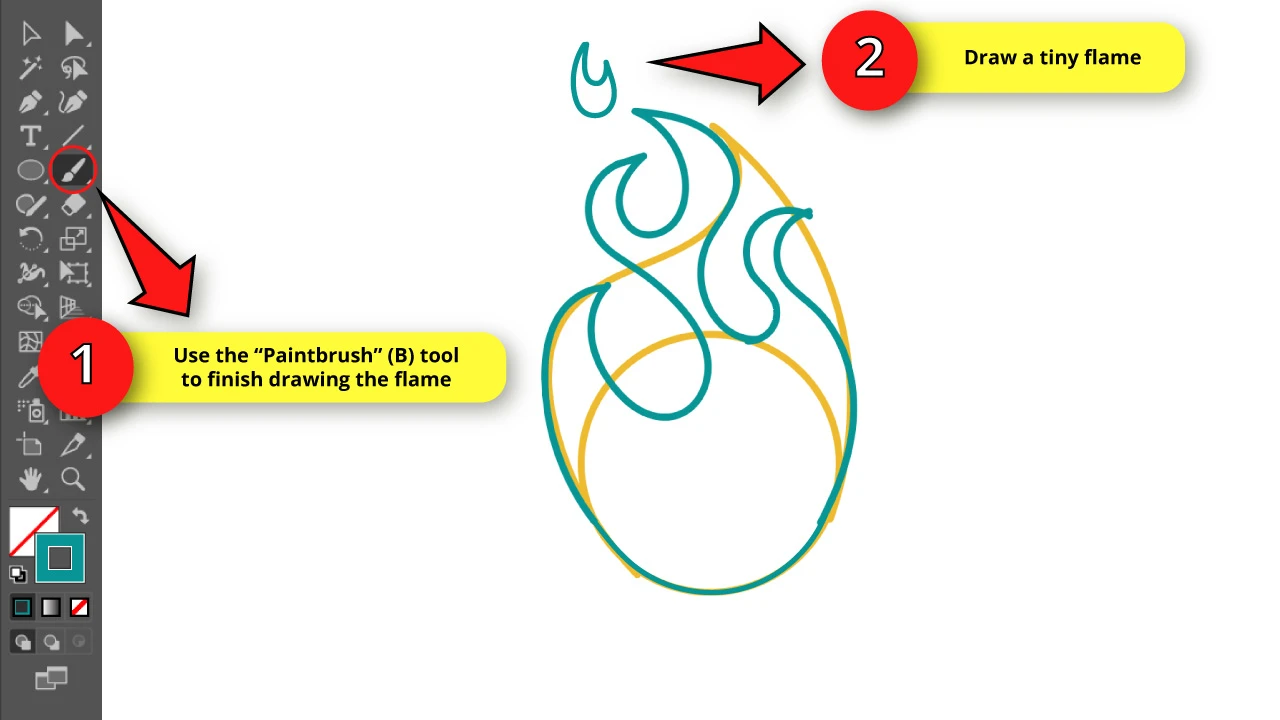
Next, draw something similar to an “U” followed by an inverted “S” to make the second part of the flame.
Then make the third part of the flame drawing another “S” shape.
Follow the circle lines that we made on “Step 4” to close the flame lines.
Finally, draw a tiny “U” shaped flame at the top.
Keep in mind that we’re simply following just one of several different ways to draw a flame. Since flames don’t actually have a specific shape, you can pretty much freely draw the flame shape any way you prefer, as long as it indeed looks like a flame.
Step 8: Draw a Small Flame

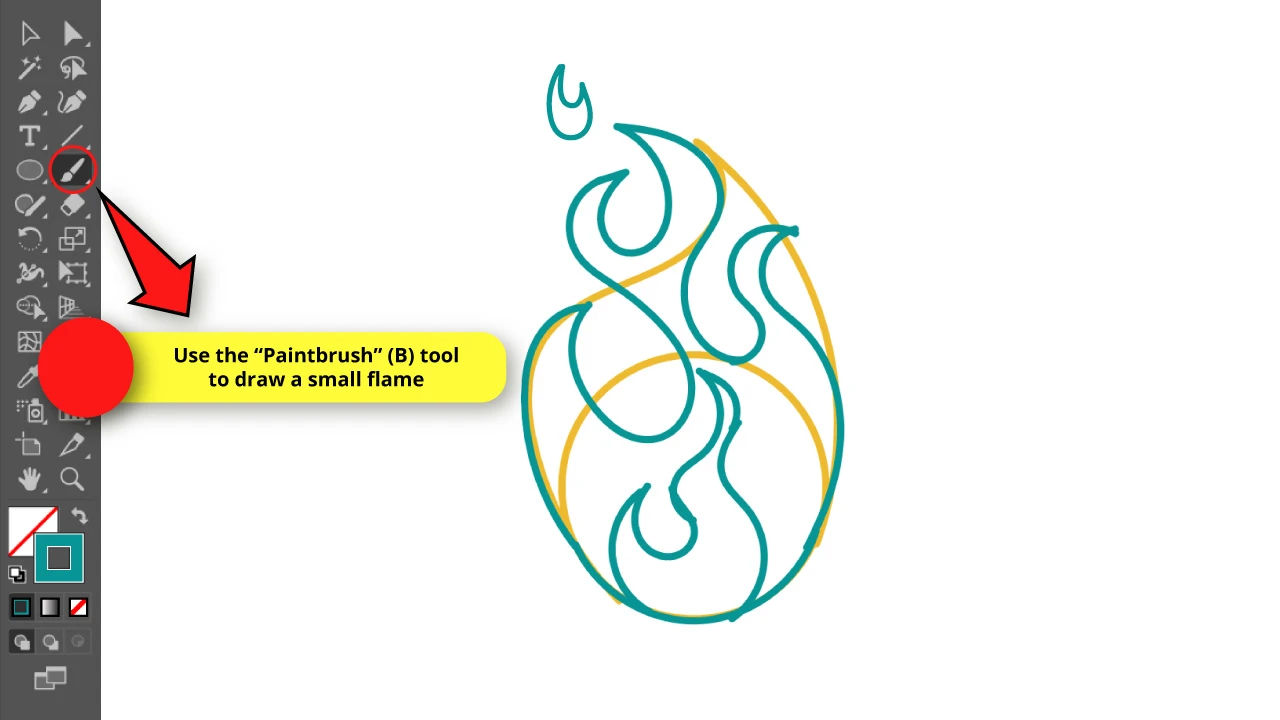
Now use the “Paintbrush” (B) tool to draw a small flame on the inside of the big one.
Make sure that this small flame shares the bottom with the big flame.
Step 9: Lock the Sketch Layer and Make it Transparent
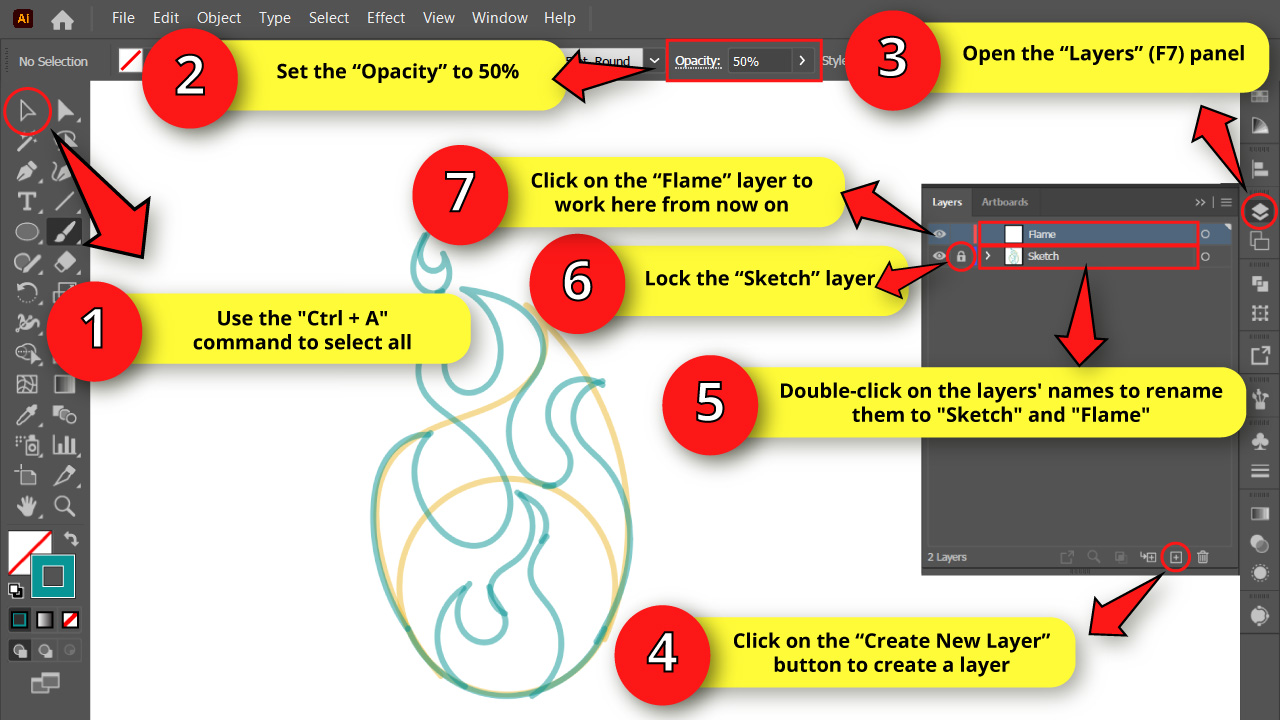

Select all the sketch lines using the “Selection” (V) tool located on the left side toolbar, or by pressing the “Ctrl + A” command.
Then, on the toolbar located at the top of the screen, set the “Opacity” to 50%.
Next, go to the “Layers” (F7) panel on the right side toolbar.
If you can’t find it, you may have to enable it first by going to “Window > Layers” on the menu at the top of the screen.
On the “Layers” (F7) panel, lock the “Layer 1” layer by clicking on the empty box. Once the box displays a lock icon, that means the layer is now locked and is no longer possible to select it, or modify it.
Then, double-click on the “Layers 1” layer’s name to rename it to “Sketch”.
Finally, click on the “Create New Layer” button on the bottom of the panel to create a new layer. Double-click on the new layer’s name and rename it to “Flame”.
Select the “Flame” layer to continue working here from now on.
Step 10: Adjust the “Pencil” (N) Tool Settings

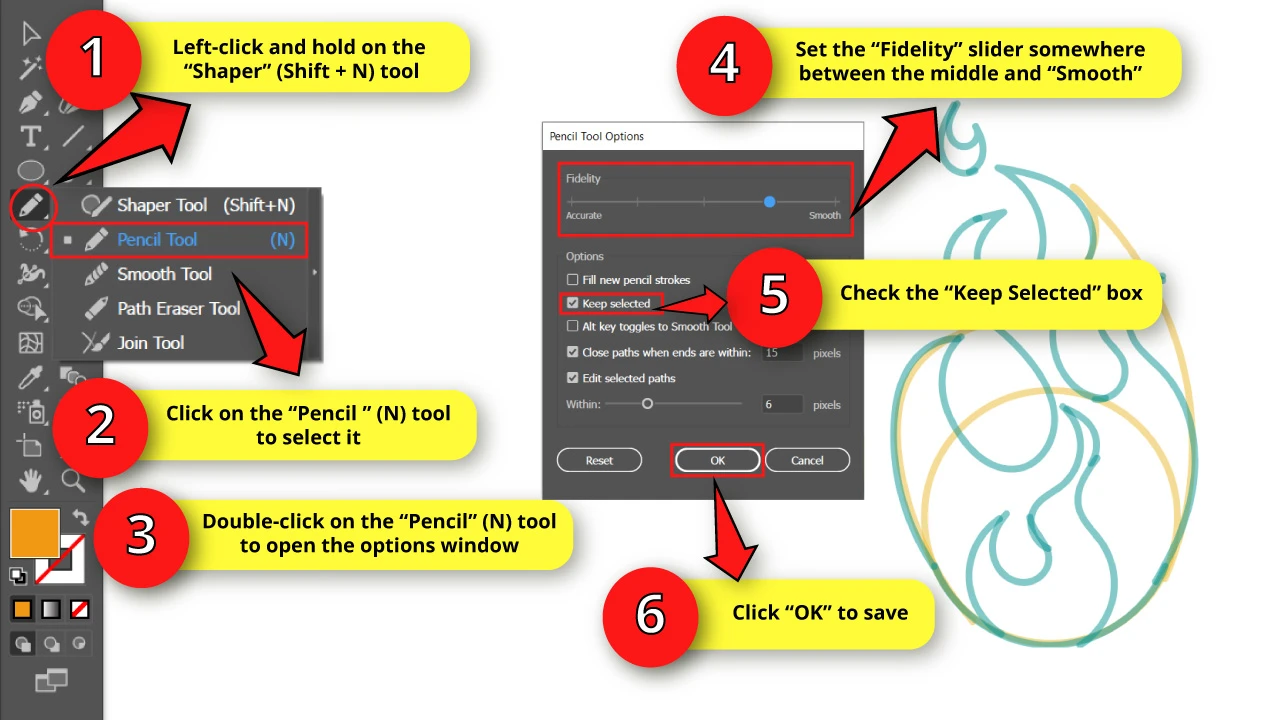
Now we have to draw the final lines. For this, we will draw in Illustrator using the “Pencil” (N) tool.
To select this tool, left-click and hold on the “Shaper” (Shift + N) tool on the left side toolbar to unfold the hidden tools. On the unfolded menu, select the “Pencil” (N) tool, or press the “N” key from your keyboard to shortcut it.
Once the “Pencil” (N) tool displays on the left side toolbar, double-click on it to open its options window.
On the options window, set the “Fidelity” slider somewhere between the middle and “Smooth”.
Make sure that the “Keep Selected” box is checked, and click on “OK” to save.
Step 11: Draw the Big Flame
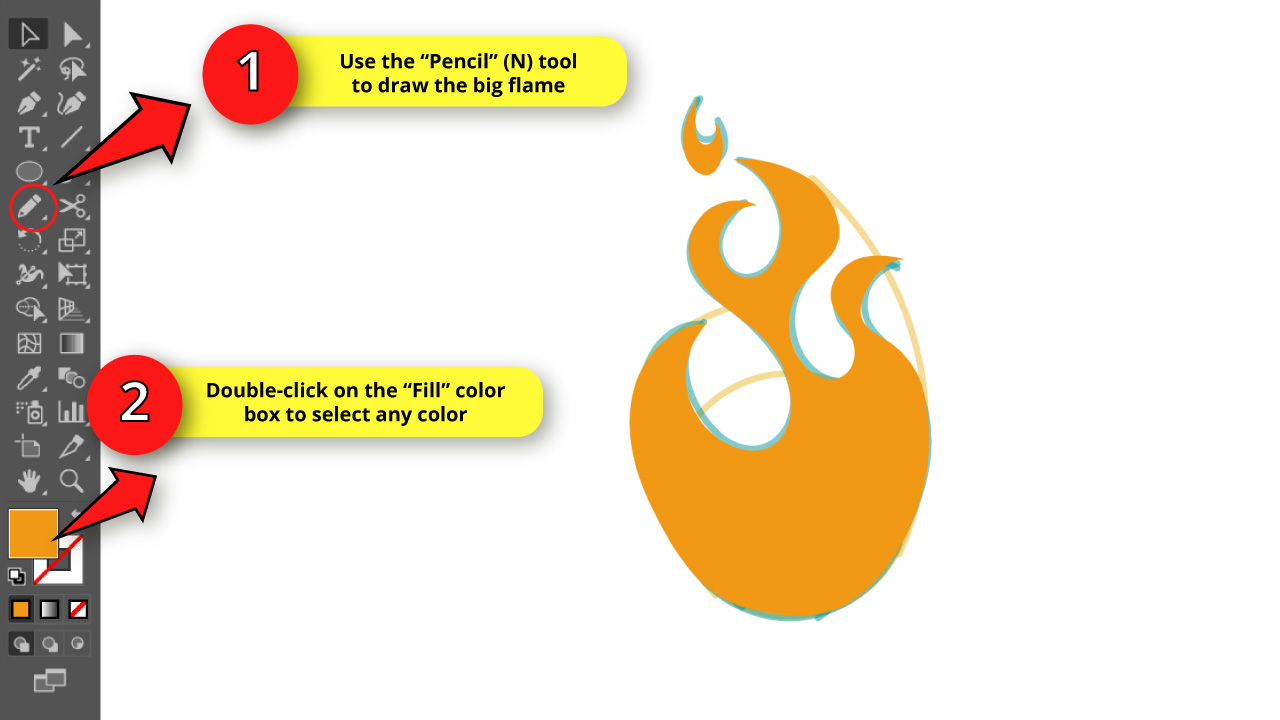

Use the “Pencil” (N) tool to draw the big flame first.
Don’t worry if you can’t draw the whole flame shape on your first try.
Thanks to the “Pencil” (N) tool configuration we set in the previous step, we are now able to release the click, but still continue working on the same stroke.
Just make sure to make clean and smooth strokes. Remember you can always go back and draw the line again using the “Ctrl + Z” command.
You can also help yourself using the eraser tool in Illustrator or you can move the anchor points in Illustrator to adjust the angle and get exactly what you want.
Once you’re done drawing the flame, double-click on the “Fill” color box to pick a color. It doesn’t really matter which color, because we’ll change it later.
Step 12: Draw the Small Flame
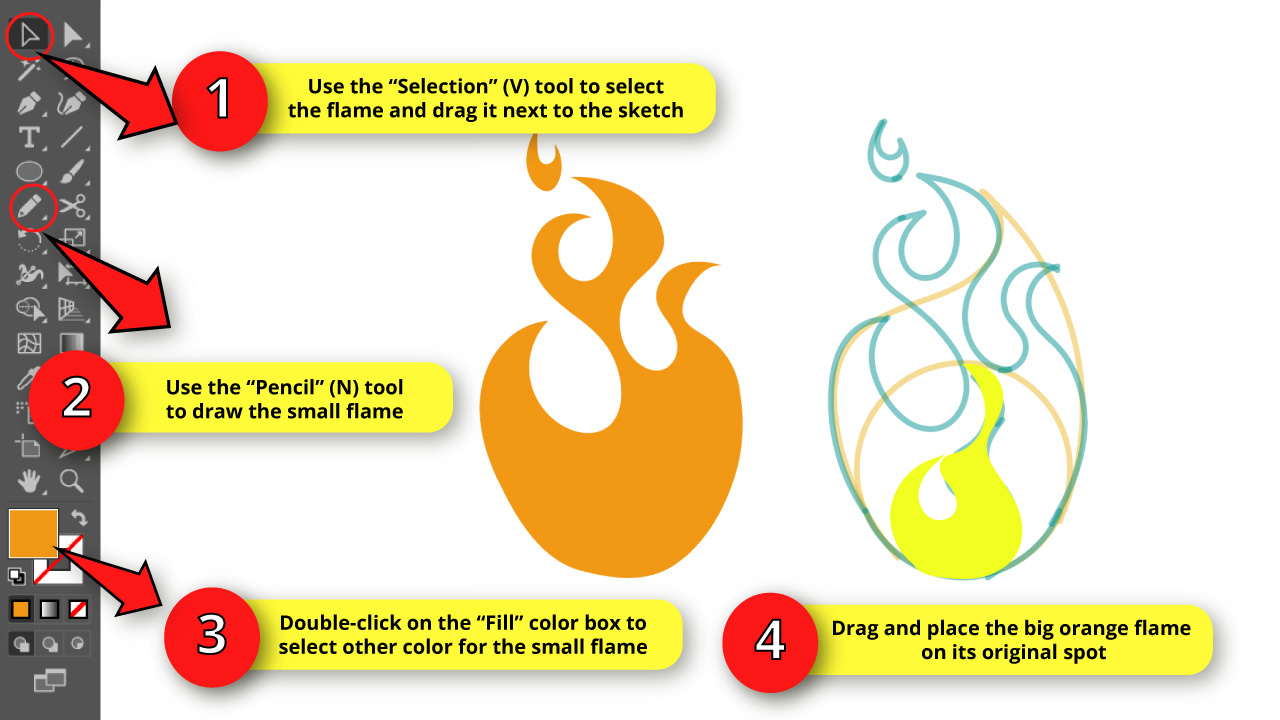

Select the flame using the “Selection” (V) tool, and drag it next to the sketch. We now can work on the small flame.
Use the “Pencil” (N) tool to draw the small flame, and then double-click on the “Fill” color box to select another color.
Next, drag and place the big flame on its original spot.
Step 13: Create a Black Background

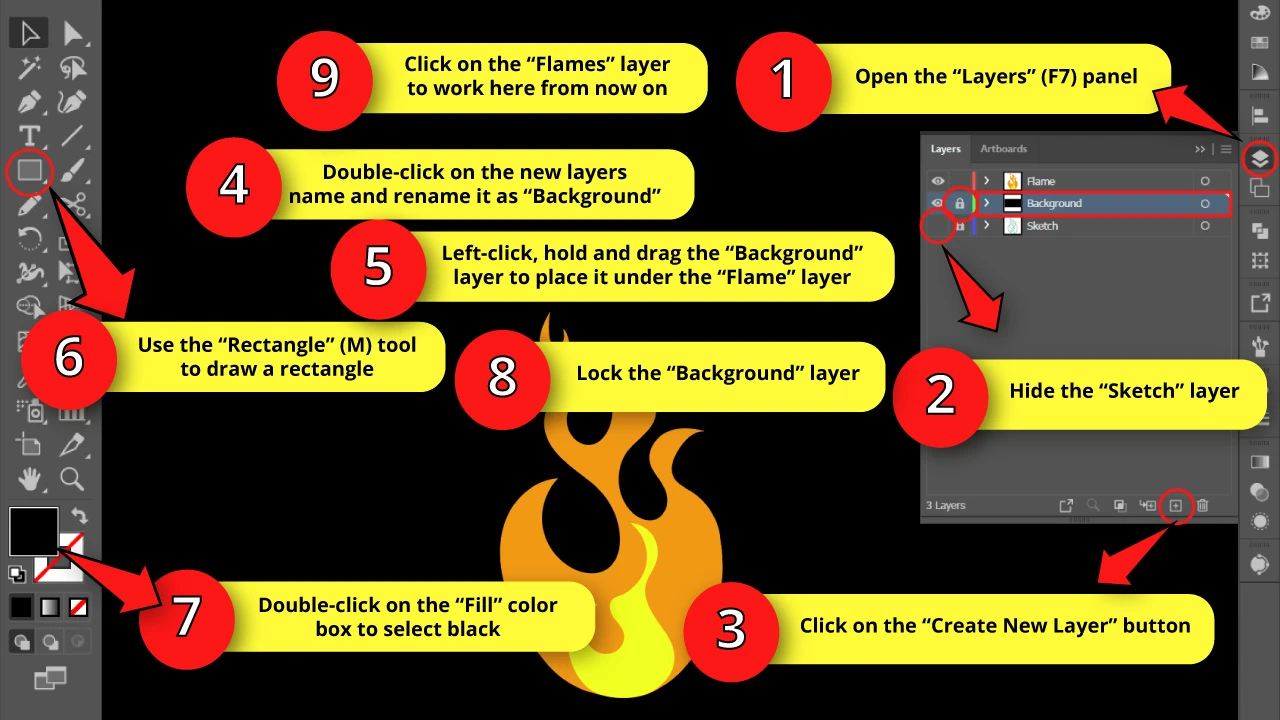
In this step we’ll create a black background to be able appreciate the visual effects we’ll add next. It’s not mandatory for the background to be black, but it’s recommended to use a very dark color
The darker the color of the background, the better you will appreciate the visual effects on the artwork.
Go to the “Layers” (F7) panel and click on the “Sketch” layer eye icon to hide it.
Then create a new layer by clicking on the “Create New Layer” button.
You can also change the layers colors in Illustrator if you want.
Double-click on the new layer’s name and rename it to “Background”.
Left-click, hold and drag the “Background” layer under the “Flame” layer.
Use the “Rectangle” (M) tool to draw a rectangle covering the whole canva. Next, double-click on the “Fill” color box and pick black.
Then, go to the “Layers” (F7) panel again, lock the “Background” layer, and select the “Flame” layer to work here from now on.
Step 14: Apply Compound Path on the Flame
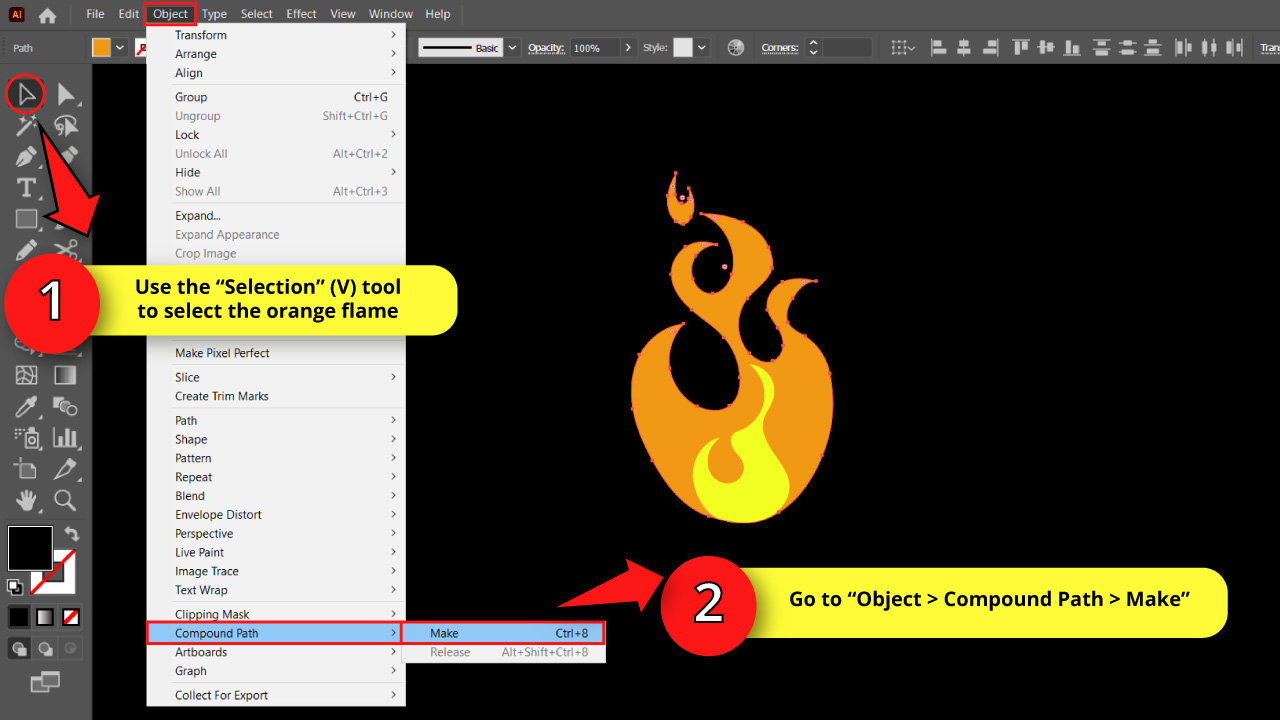
Select the orange flame areas (the big flame and the tiny “U” shape flame) using the “Selection” (V) tool.
To select several areas at the same time, hold the “Shift” key while you are selecting the objects.
Then, on the menu located at the top of the screen, go to “Object > Compound Path > Make”, or simply press the “Ctrl + 8” command to shortcut it.
This step links the tiny and the big flames together, and allows us to add gradients evenly on both objects.
Step 15: Add Linear Gradient

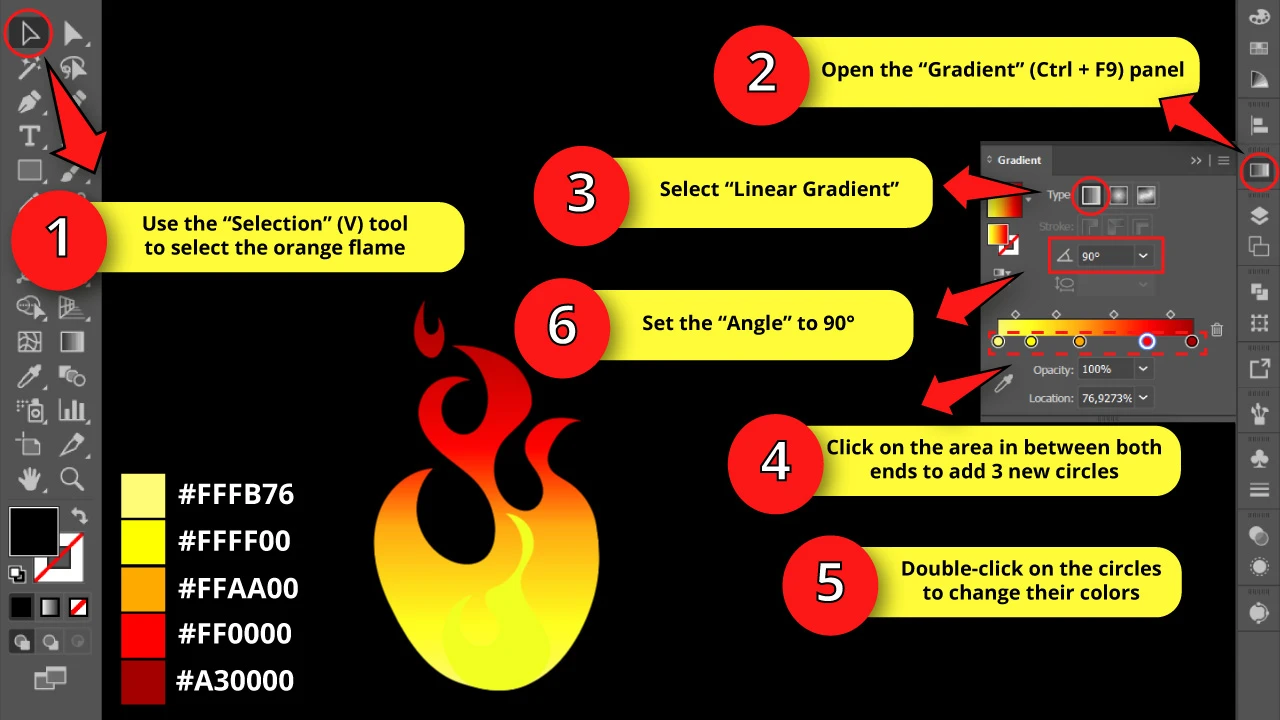
To use gradients in Illustrator, first select the orange flame, and then go to the “Gradient” (Ctrl + F9) panel on the right side toolbar.
If you can’t find the Gradient (Ctrl + F9) panel, you may have to enable it first by going to “Window > Gradient” on the menu at the top of the screen. Or you can press the “Ctrl + F9” command to shortcut it.
Once you are on the “Gradient” (Ctrl + F9) panel, click on “Linear Gradient”. A black and white gradient will apply on the flame.
Double-click on the color circles to pick another color. To add a new color, just click on the area between both color circles.
I’ll use 5 color gradients going from light yellow to dark red, passing through orange in the middle.
The colors I’ll use are the following:
#FFFB76
#FFFF00
#FFAA00
#FF0000
#A30000
You can try different combinations of longer and shorter gaps between stops (the color circles) so the color distribution looks better on your flame. But this is optional, of course.
Keep in mind that the gradient we are applying also includes the tiny “U” shape flame, so if we strain the red color to a small area, the red gradient will only be visible at the top of the artwork on the tiny flame.
Now set the “Angle” to 90°, so the gradient will display from top to bottom.
If the gradient happens to show inverted, click on the “Reverse Gradient” button, so the gradient goes from red at the top, to yellow at the bottom.
Step 16: Paint the Small Flame with a Light Yellow

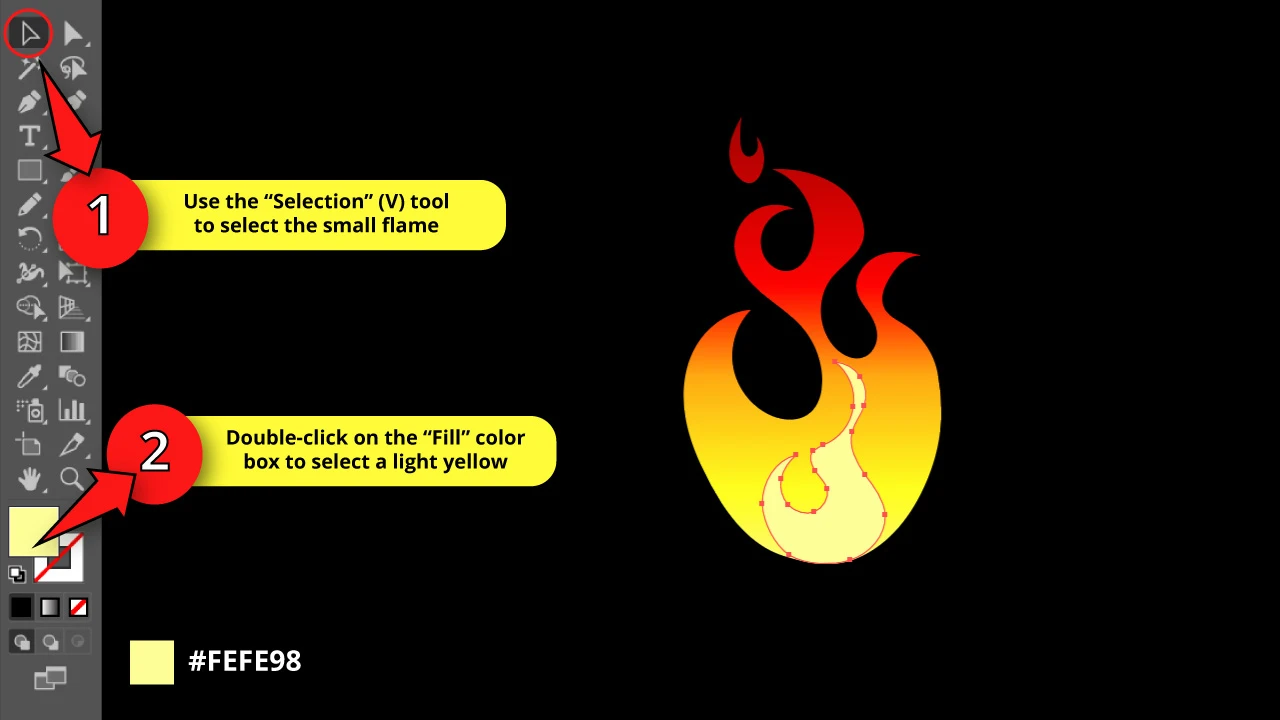
Select the small yellow flame using the “Selection” (V) tool, and then double-click on the “Fill” color box to pick a very light yellow.
I’ll use the #FEFE98 shade of yellow.
Step 17: Duplicate and Create a New Layer
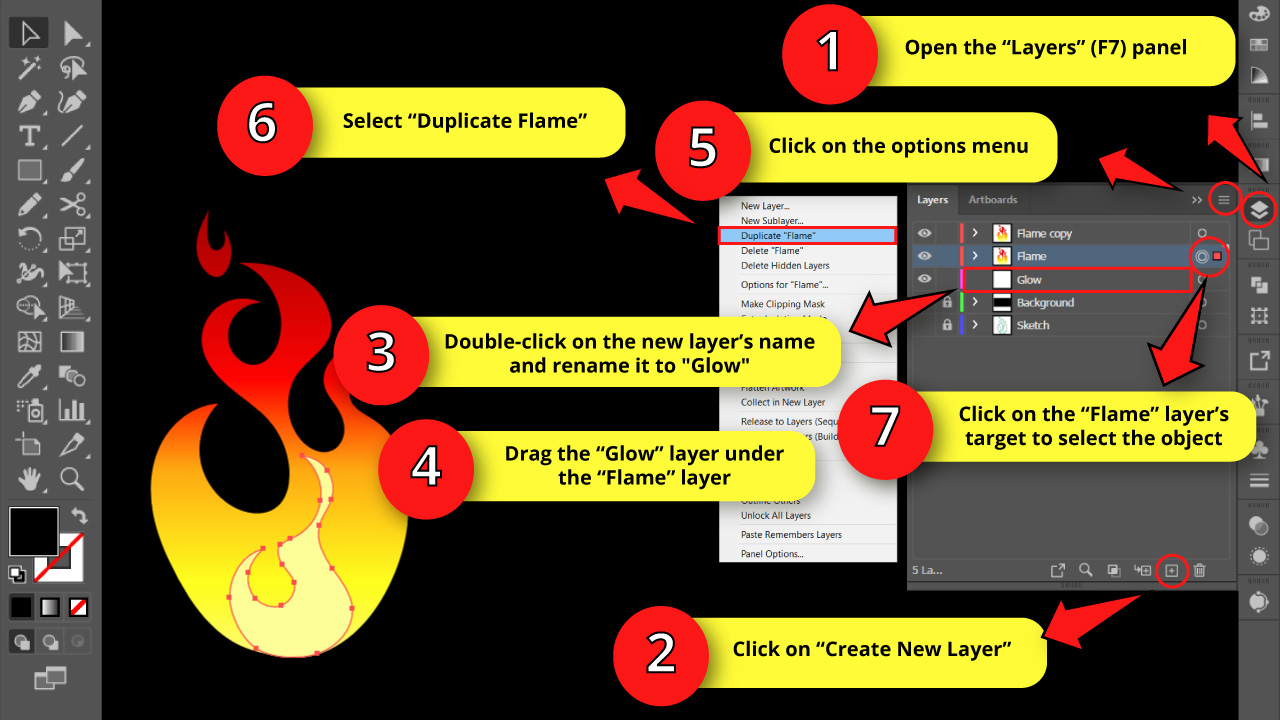
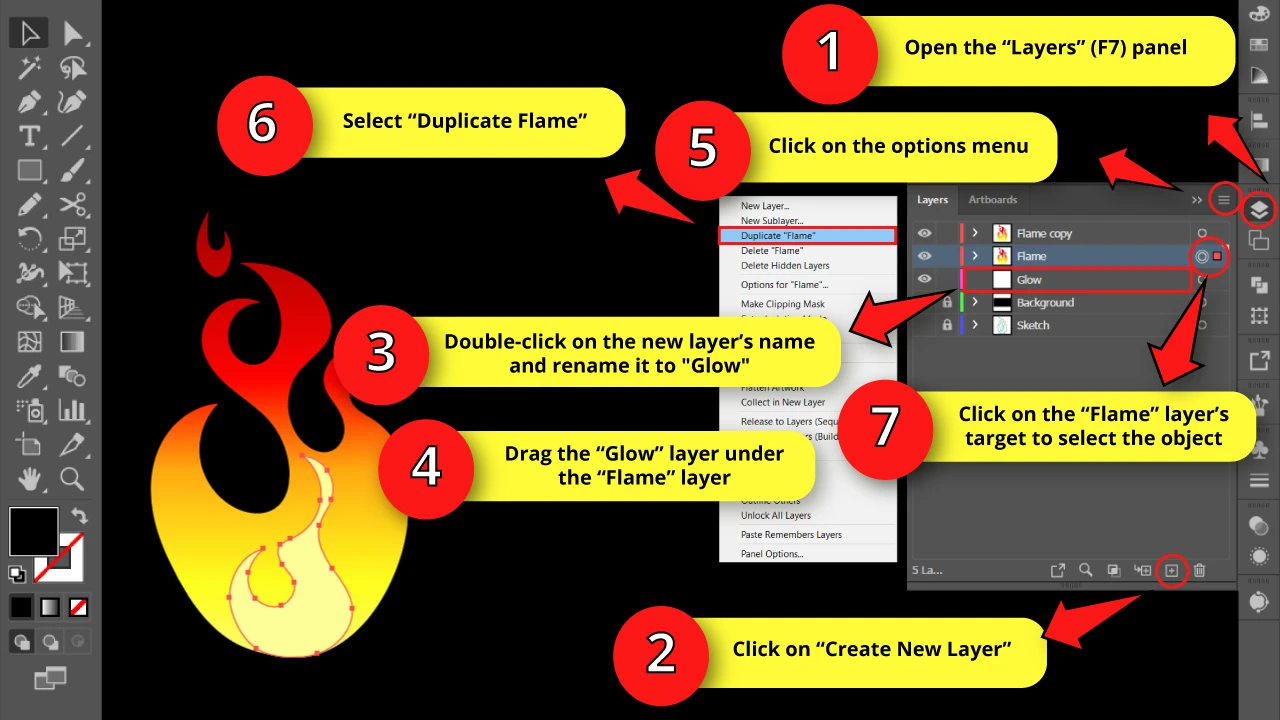
Go to the “Layers” (F7) panel and create a new layer using the “Create New Layer” button.
Double-click on the new layer’s name and rename it to “Glow”.
Then left-click, hold and drag the “Glow” layer under the “Flame” one.
Next, select the “Flame” layer and go to the options menu at the right top side of the panel, and click on “Duplicate Flame”. A copy of the “Flame” layer will be created at the top of the layers list.
Click on the second “Flame” layer’s target (this is the flame located below the copy) so we can apply the blur effect on the next step.
Step 18: Add Gaussian Blur Effect on the Flame


Remember that we need to have the back flame selected to move on, just as we did in the previous step.
With the back flame selected, go to “Effect > Blur > Gaussian Blur”.
When the “Gaussian Blur Options” window pops up, set the “Radius” to somewhere close to 82 px.
It’s a good idea to check the “Preview” box, so you can preview the blur intensity at the same time you are setting the “Radius” properties.
When you’re done, click “OK” to save.
Step 19: Draw a Transparent Circle

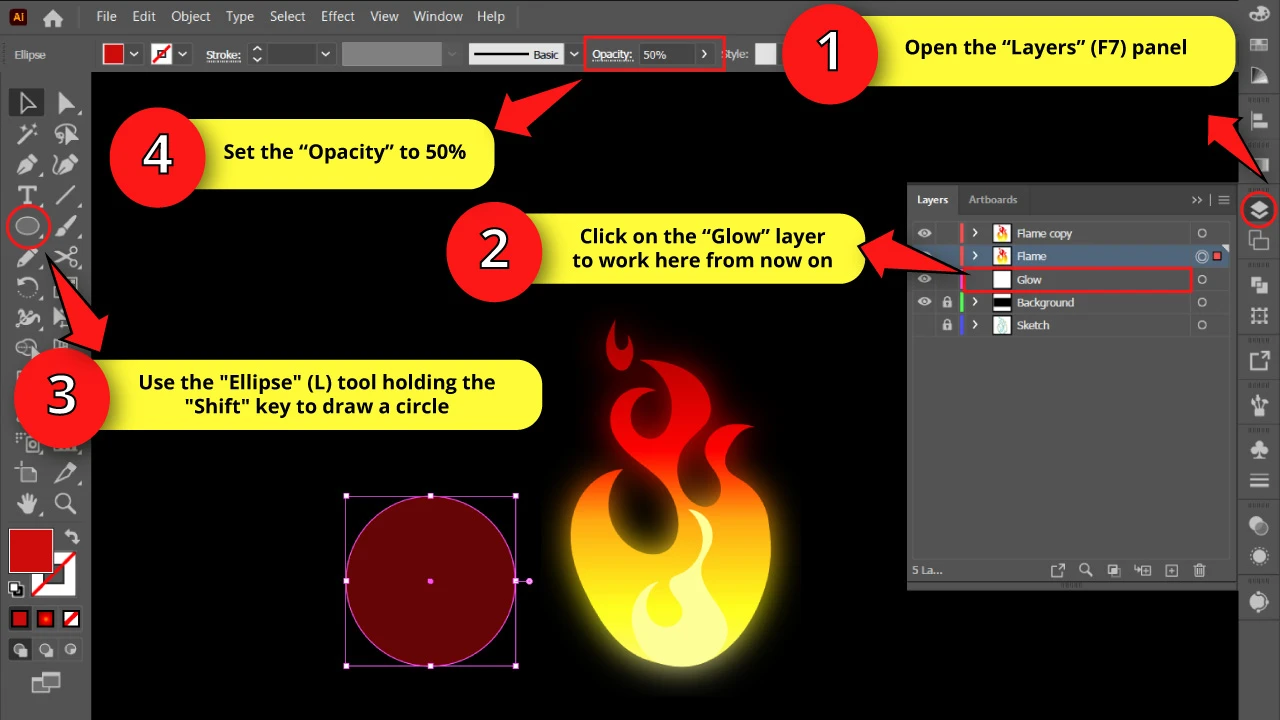
Go to the “Layers” (F7) panel and click on the “Glow” layer to work here from now on.
Use the “Ellipse” (L) tool to draw a perfect circle next to the flame. Remember to hold the “Shift” key as you draw the circle so you can maintain the proportions.
It doesn’t matter what color you pick for the circle because we’ll change it later. What matters is that the circle is transparent.
For this, make sure that the circle is selected (use the “Selection” (V) tool if it’s not) and then go to the “Opacity” field on the toolbar at the top of the screen to set it to 50%.
Step 20: Add Gradients to the Circle

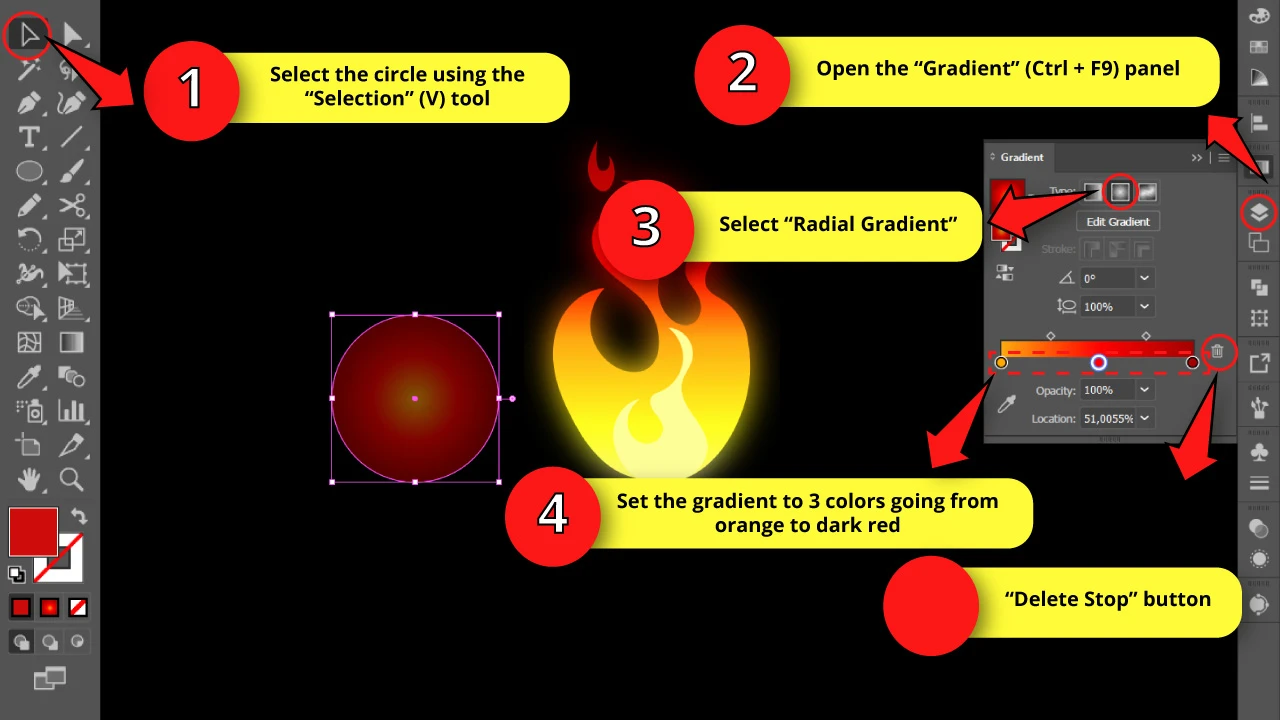
Select the circle with the “Selection” (V) tool, and then go to the “Gradient” (Ctrl + F9) panel.
Click on “Radial Gradient”. The same gradient you used for the flames will be applied on the circle, but in radial display.
For this circle we’ll need to apply only the three darker colors of the flame.
So you can select the two shades of yellow and delete them by clicking on the “Delete Stop” button.
Once you do this, relocate the color circles evenly. Just make sure that the gradient goes from the lighter color in the center of the circle, to the darkest color on the edges.
Step 21: Add Gaussian Blur Effect to the Circle


Select the circle with the “Selection” (V) tool and then go to “Effect > Blur > Gaussian Blur”.
When the “Gaussian Blur Options” window pops up, set the “Radius” to somewhere close to 82 px.
Just like in Step 18, it’s a good idea to check the “Preview” box.
When you’re done, click “OK” to save.
Next, drag the circle and place it behind the flame.
Finally, use the circle bounding box handles to stretch the circle a tad bit to fit better with the flame shape.
Step 22: Delete Unnecessary Layers
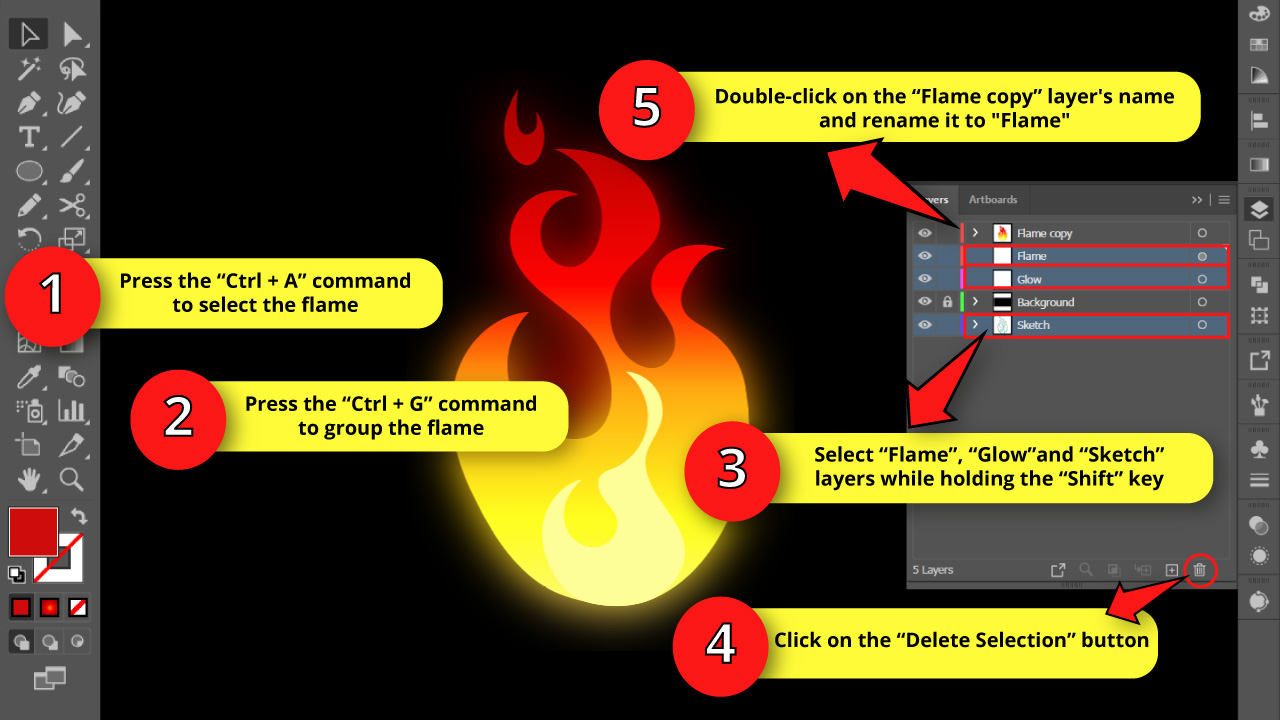

Press the “Ctrl + A” command to select the whole flame.
Then, press the “Ctrl + G” command to group the flame.
Then, go to the “Layers” (F7) panel and select the “Flame”, “Glow” and “Sketch” layers while holding the “Shift” key to select several layers at the same time.
Next, click on the “Delete Selection” button to delete these unnecessary layers.
Finally, double-click on the “Flame copy” layer’s name, and rename it to “Flame”.
The Result
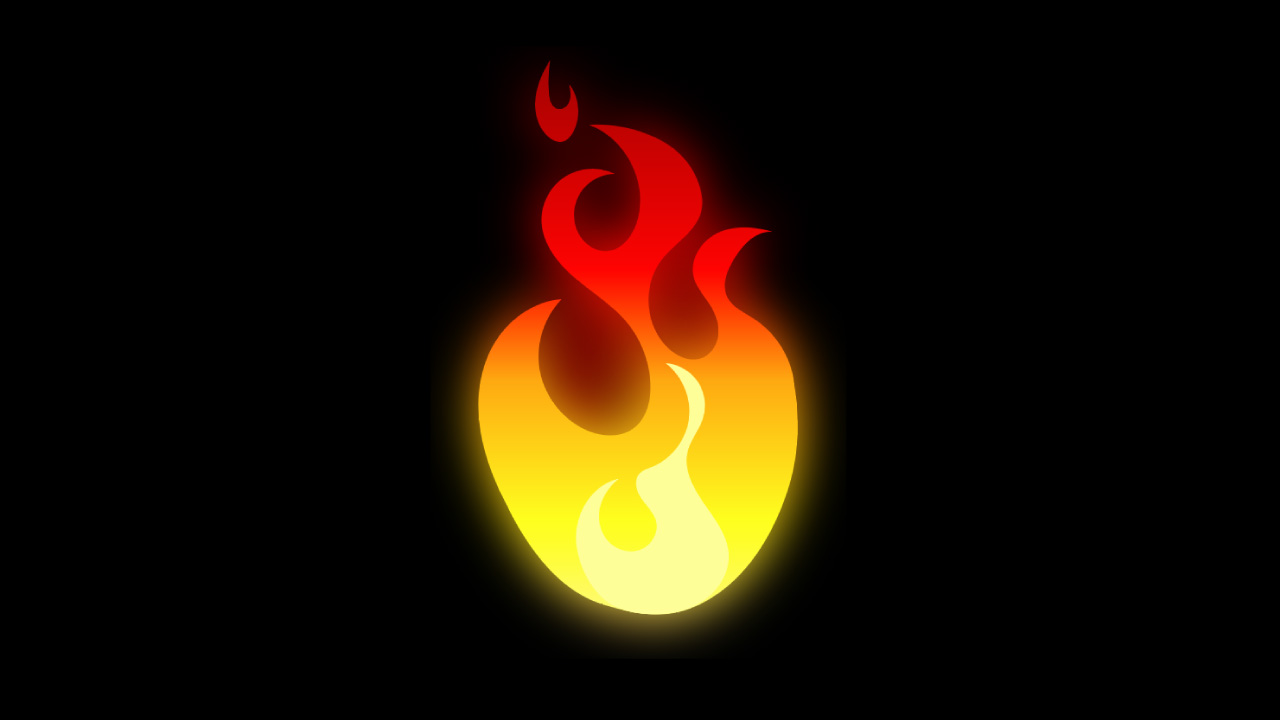

And here is our flame finished!
Try to always use the flame on a dark background, so the blur effect can be appreciated better.
Download our Flames Vector Pack for Free

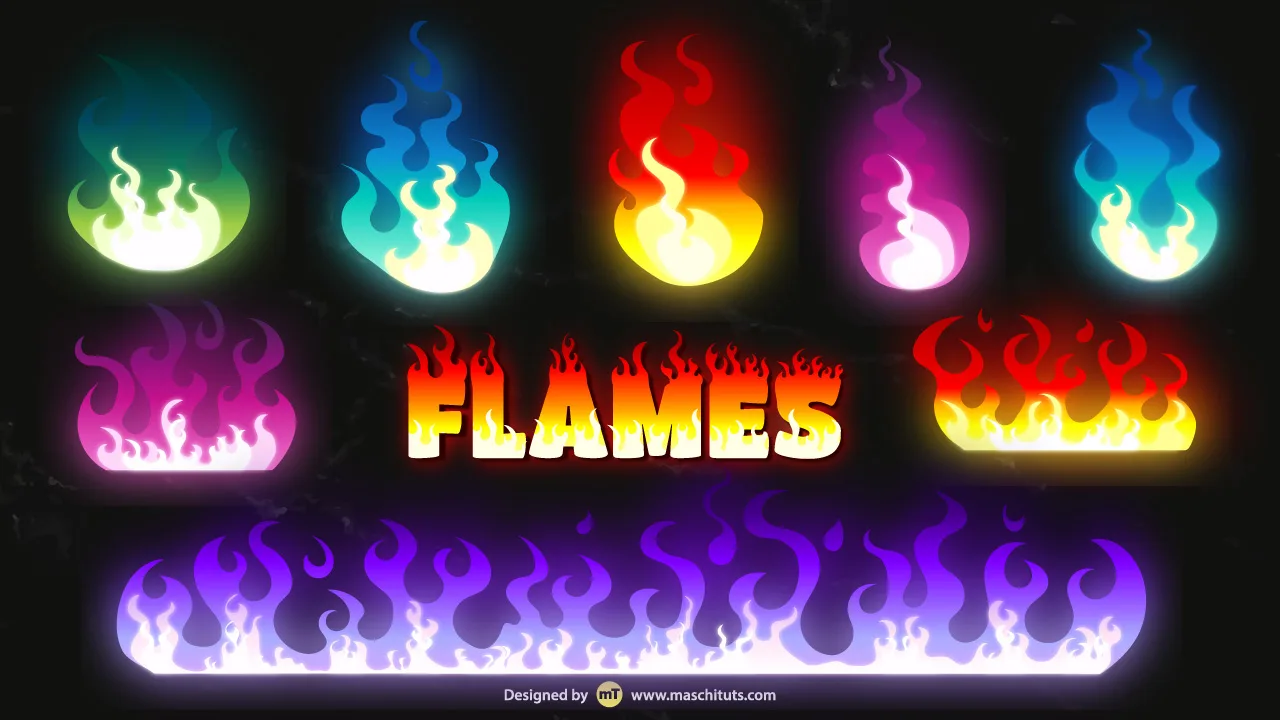
On top of all of that, we would also like to gift you our completely free Flames Vector Pack.
You are free to use these flames in whichever way you want.
To get them, all you need to do is to subscribe to our newsletter here and you will then immediately get a download link to download our Mountain Vector Pack (Click on the image after you subscribed!)
Frequently Asked Questions on “How to Draw a Flame in Illustrator”
When I group the flame, the blurry flame effect disappears. What can I do?
Go to the “Layers” (F7) panel and unfold the collapsed layer containing the flame objects. Click on the bottom “Compound Path” layer’s circle to select the object and add the blur effect again by going to “Effect > Blur > Gaussian Blur”. Then set the “Radius” to 82 px and click “OK” to save.
How to add a new color for the flame gradient?
To add a new color for the gradient, open the “Gradient” (Ctrl + F9) panel and click on any area in between the color circles. Illustrator calls these color circles “Stops”. Once you do this, a new color circle will be added. To change its color, double-click on it and select a new color.
How can I select the back flame if it’s hidden behind the front flame?
Go to the “Layers” (F7) panel and locate the back flame. Click on the back flame’s target. The target is the small circle displayed on the very right end of the layers row. If the target is properly selected, a small colored square will display next to the circle.


Hey guys! It’s me, Marcel, aka Maschi. On MaschiTuts, it’s all about tutorials! No matter the topic of the article, the goal always remains the same: Providing you guys with the most in-depth and helpful tutorials!

