

Sometimes you need to work with curved lines in a project, but it can quickly become a headache if you can’t get the exact curved line that you need.
This is most likely happening because you aren’t using the ideal tool for that.
In this article you will learn the best four ways to get a curved line, so you can follow the method that fits your project better.
Curving Lines in Illustrator
To curve lines, draw a line, press Shift + C, place mouse on line, left-click and hold, and then drag to curve. You can also use the Pen or Curvature tools, making 2 anchor points, holding left-click on the second one to curve it. Finally you can use the Arc tool holding left-click and dragging.
Curving Lines Using the “Anchor Point” Tool in Illustrator
Draw a line using the “Line Segment” tool (\). Press the “Shift + C” command to select the “Anchor Point” tool. Place the mouse above the line. Then left-click and hold as you drag the mouse down to get the desired curvature. Release the left-click to finish it.
This method is pretty customizable and the “Pen” (P) tool is not required for it. This can be an advantage for those who don’t like to mess with anchor points.
Step 1: Draw a Line
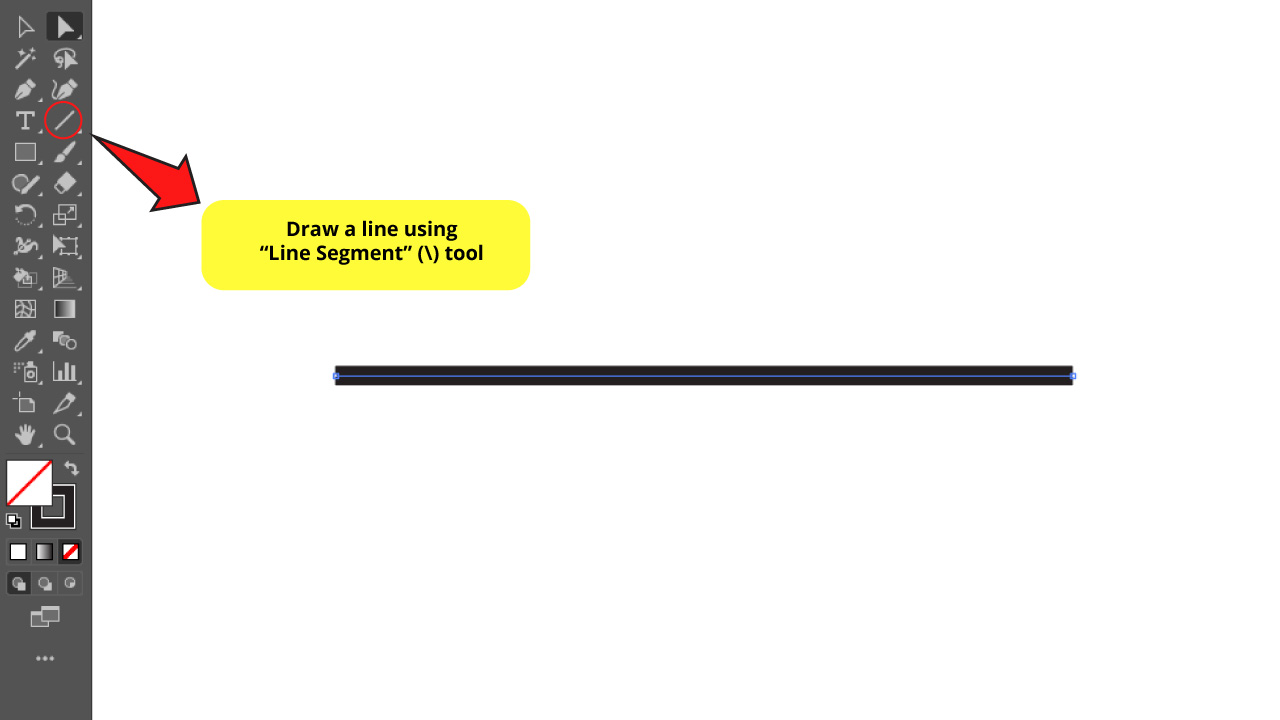

Draw a line using the “Line Segment” tool (\).
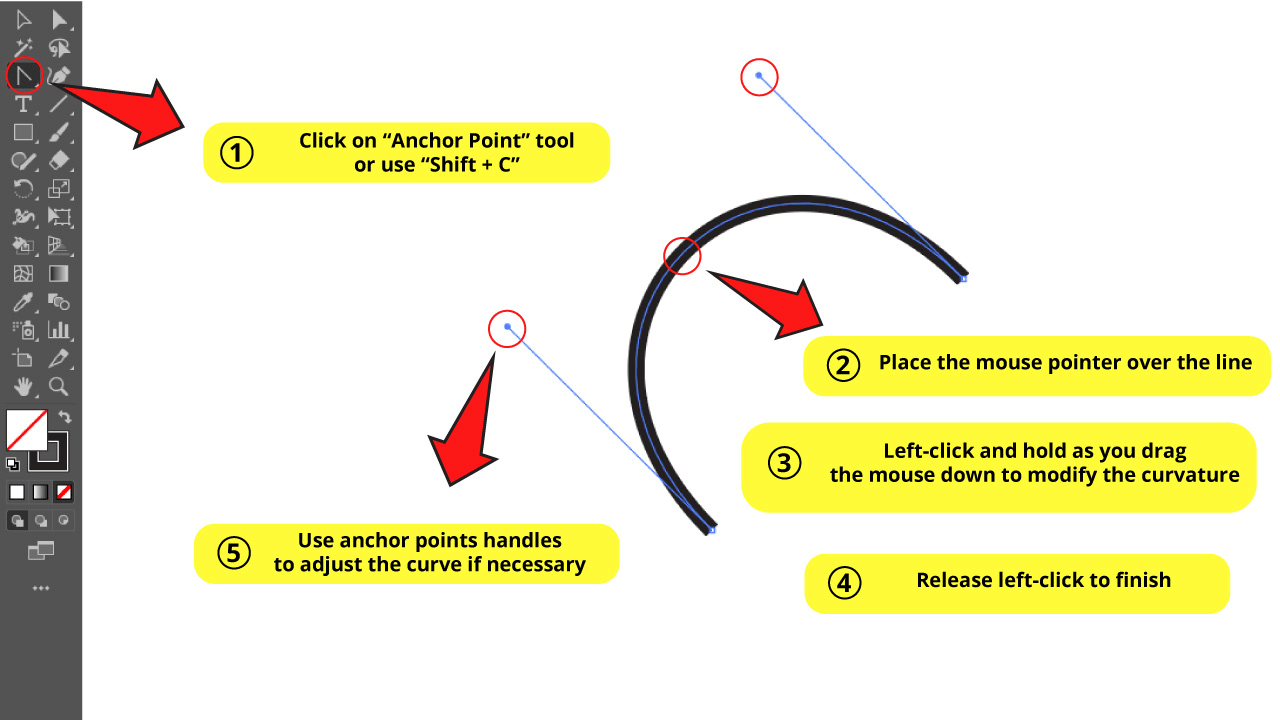
Step 2: Find the “Anchor Point” Tool

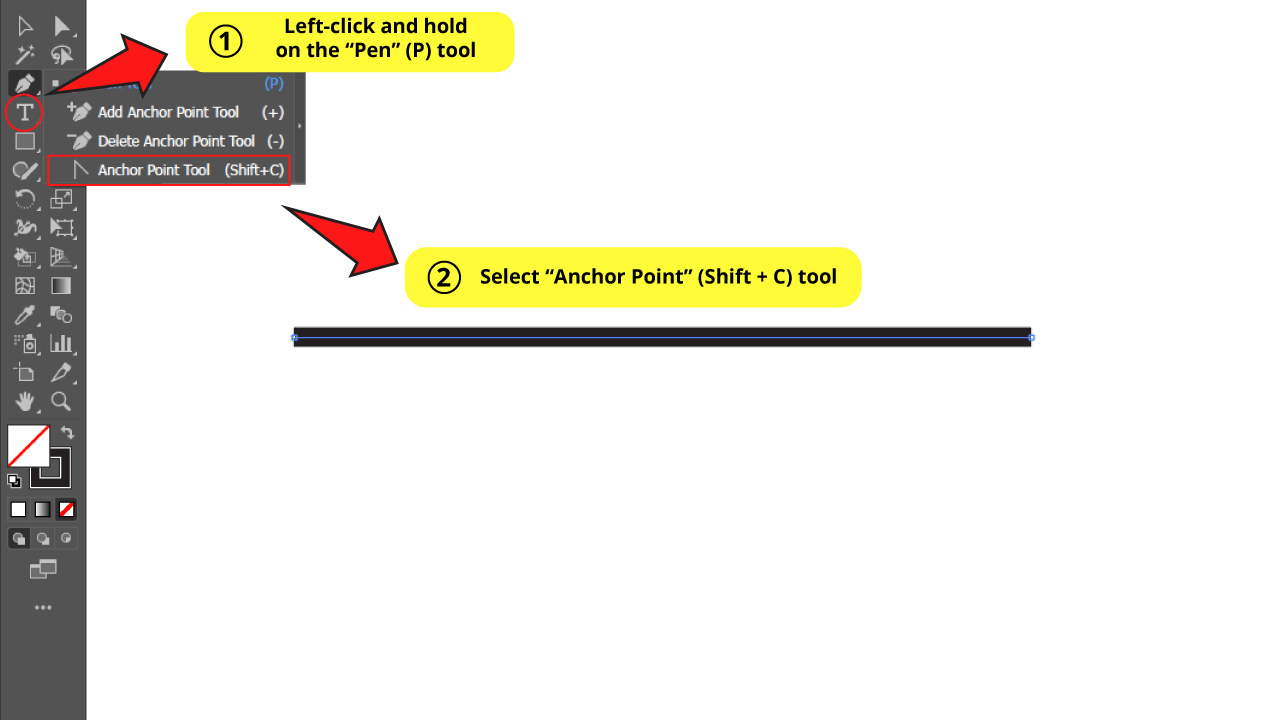
Left-click and hold on the “Pen” (P) tool to unfold the hidden tools on the left side toolbar.
Select the “Anchor Point” tool or use the “Shift + C” command.
Step 3: Curve the Line
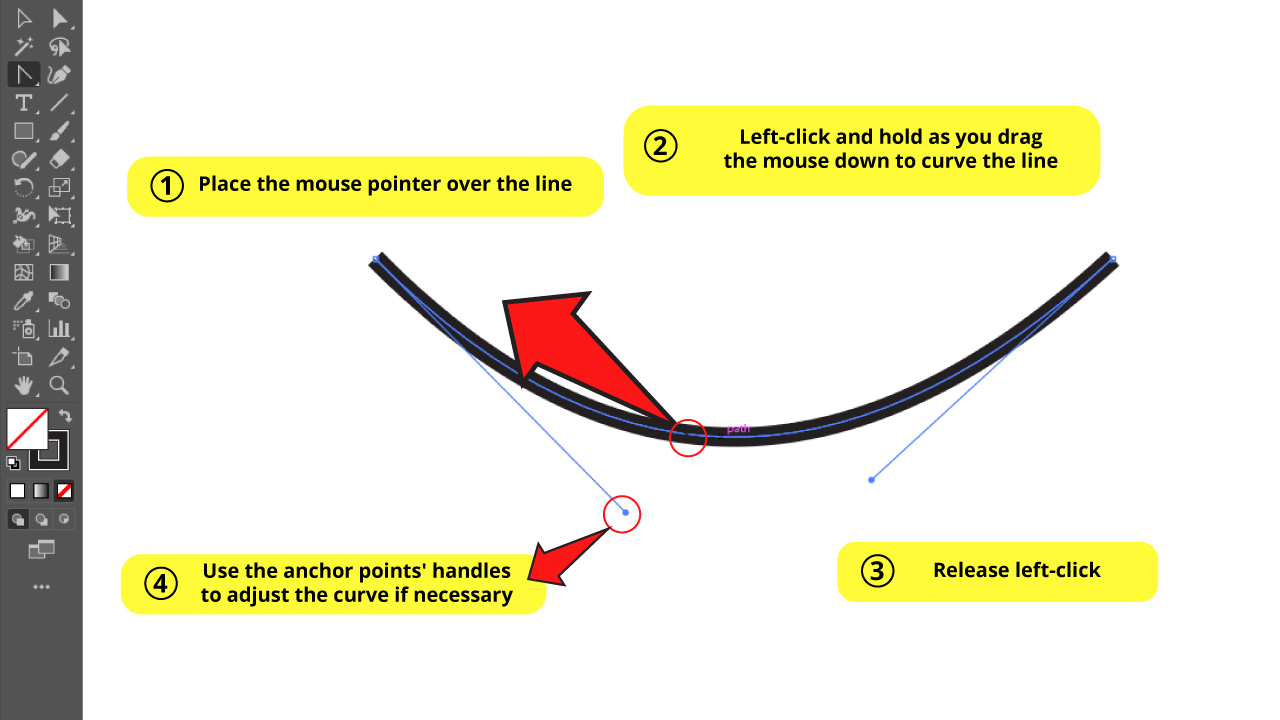

Place the mouse pointer over the line until the mouse icon changes to a “curved arrow” icon. Left-click and hold as you drag the mouse down to curve the line.
Release the left-click to finish the step.


If you need to retouch your curve, you can repeat “Step 3”, or you can also work with the anchor points’ handles as shown in the image.
If you are enjoying this topic so far, we suggest you also check this other article about “The 3 Best Ways to Make a Wavy Line in Illustrator”.
Curving Lines Using the “Pen” (P) Tool in Illustrator
Select “Pen” (P). Click on the artboard to draw an anchor point. Draw a second anchor point but this time left-click and hold. Drag the mouse to increase or decrease the convexity of the curve. Release the click to draw the curve. Press “Esc” to finish the process.
This is the classic method used by designers to create customized curves. “Pen” (P) allows you to get the exact curve you need for your line. It does require a certain skill, though. That’s if you expect to get a neat and smooth result.
Step 1: Draw Using the “Pen” (P) Tool
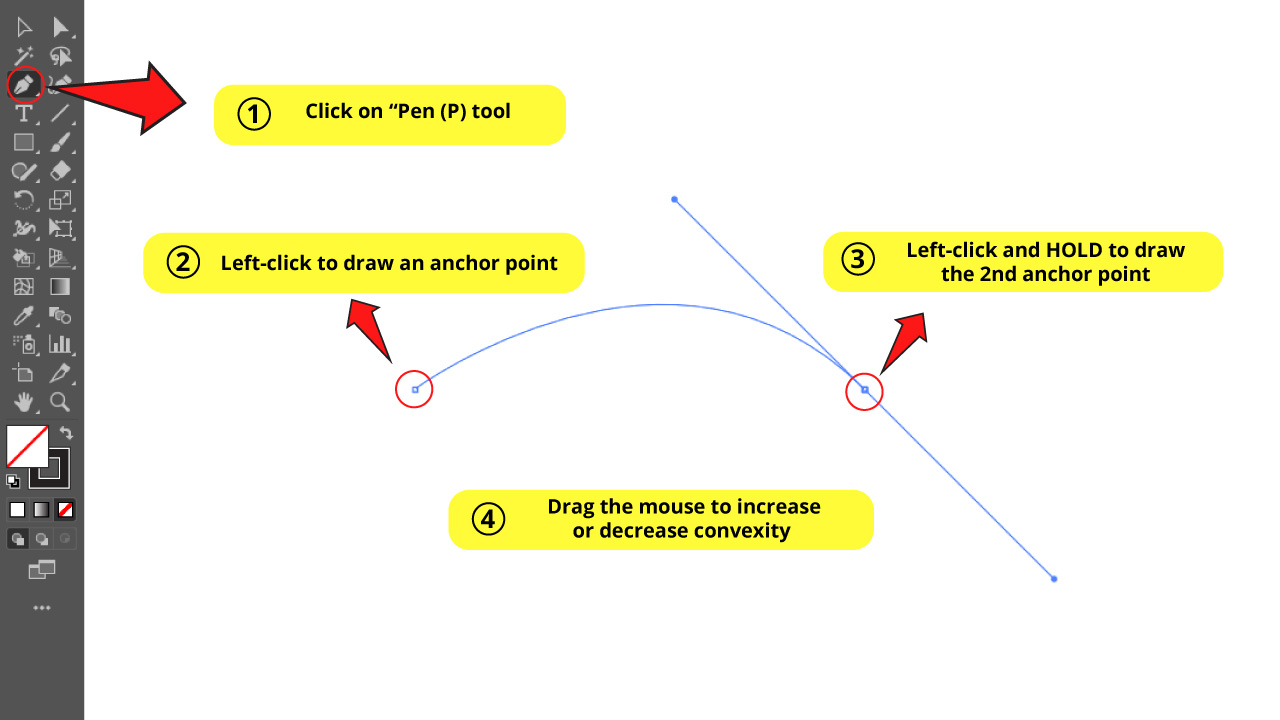
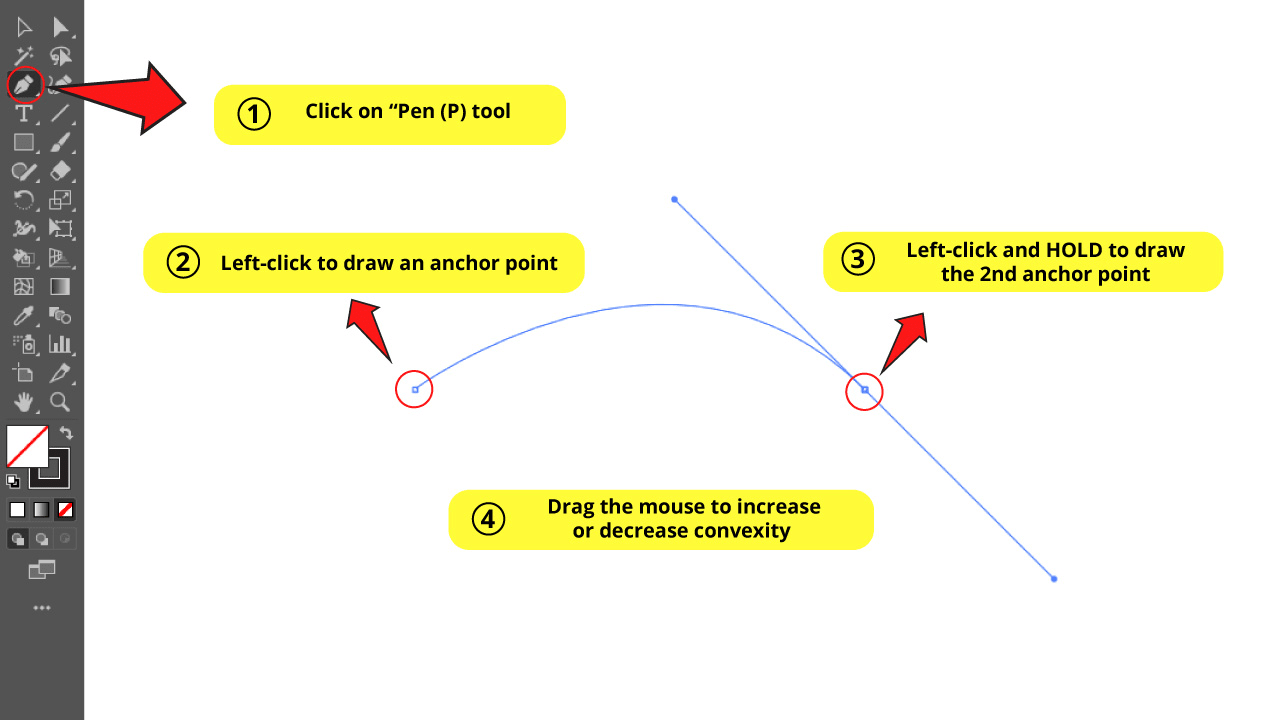
Click on the “Pen” (P) tool on the left side toolbar.
Click on the artboard to draw an anchor point.
Then, draw a second anchor point but this time hold the left-click.
Drag the mouse to increase or decrease the convexity of the curve.
When you think it’s done, release the click.
Step 2: Finish the Drawing
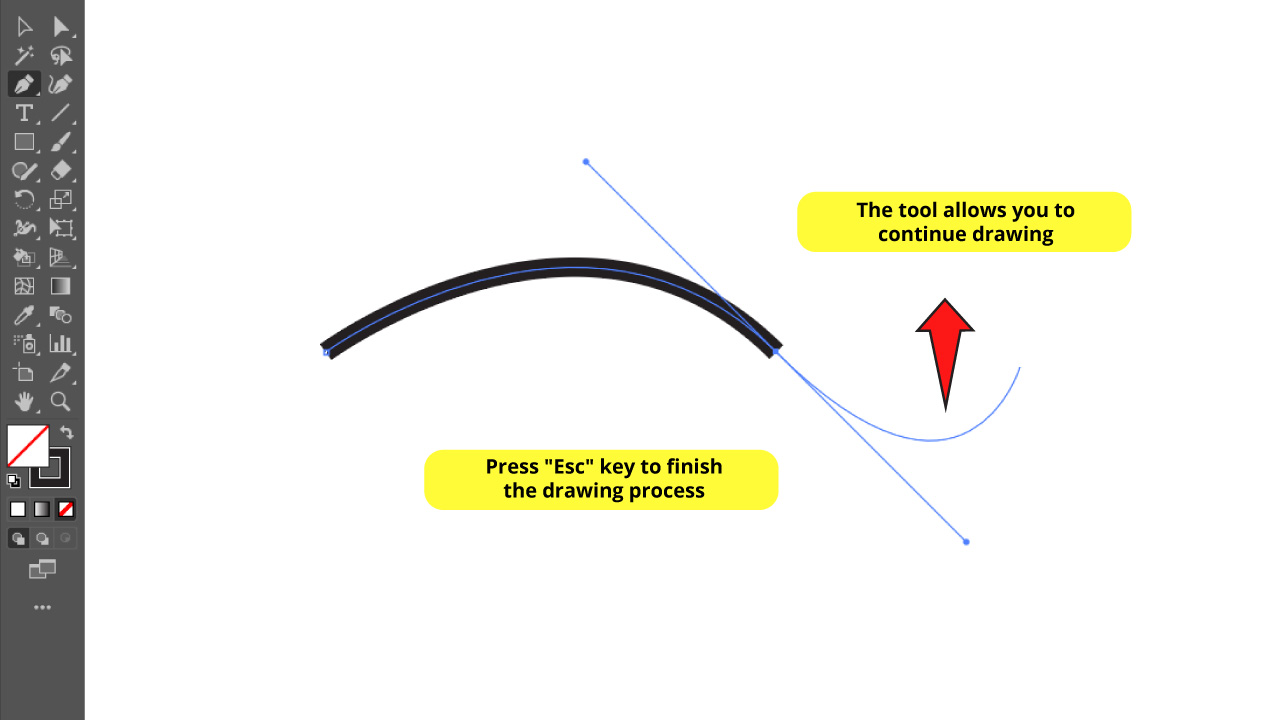
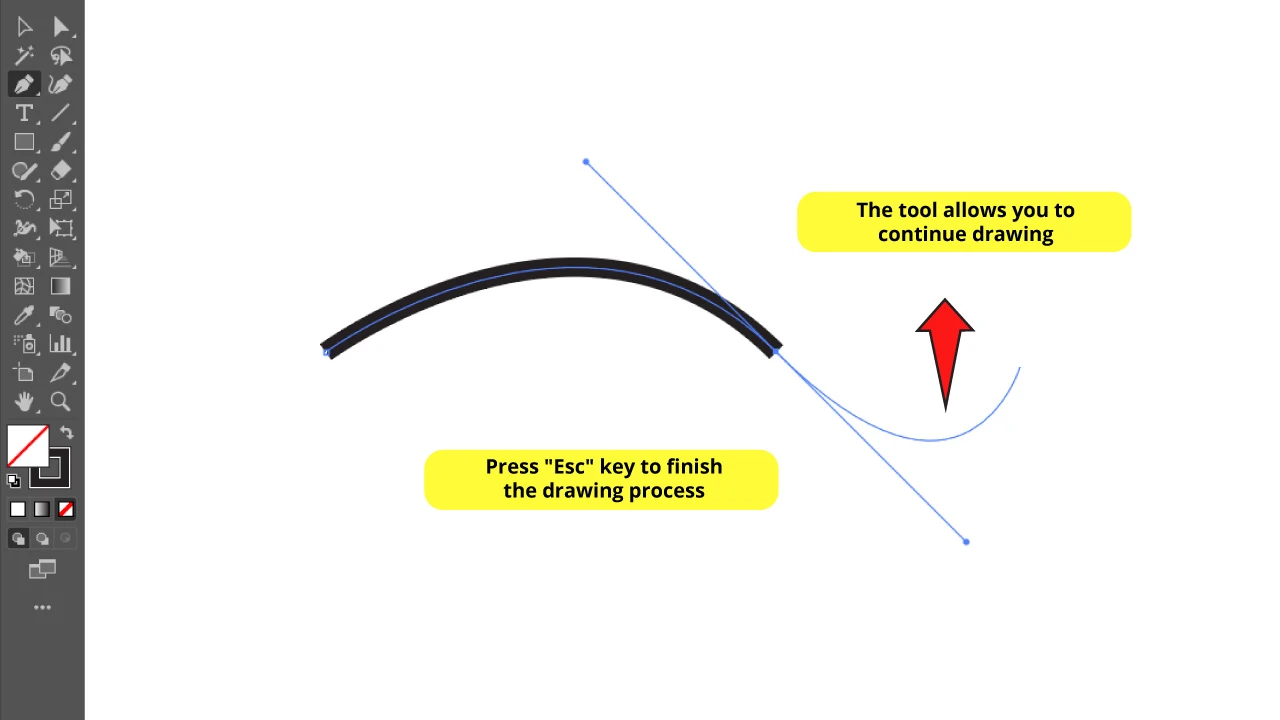
This tool allows you to continue drawing both straight and curved lines.
If you don’t want to continue, just press the “Esc” key to finish the drawing.
If you still need to make some adjustments you can work with the anchor points’ handles.
If you’d like to know more about the “Pen” tool, you can take a look at this article about “How to Move Anchor Points in Illustrator in 4 Easy Steps”.
Curving Lines Using the “Arc” Tool in Illustrator
Select the “Arc” tool hidden in the “Line Segment” tool nest. Pick the desired “Slope”. Hold both the “Shift” key and the left-click. Then drag the mouse pointer to draw the arc on the artboard. Release both click and “Shift” to draw the arc.
The “Arc” tool doesn’t count with many customized features itself, but it works really fine for some specific projects that need arcs.
Like a quarter circle. Anyway, you can adjust the arc using the “Anchor Point” (Shift + C) tool or handling the anchor points to modify the convexity.
If you need some tips on how to make a half circle, you can take a look at this tutorial titled “The 3 Best Methods to Make a Half Circle in Illustrator”.
Step 1: Find the “Arc” Tool
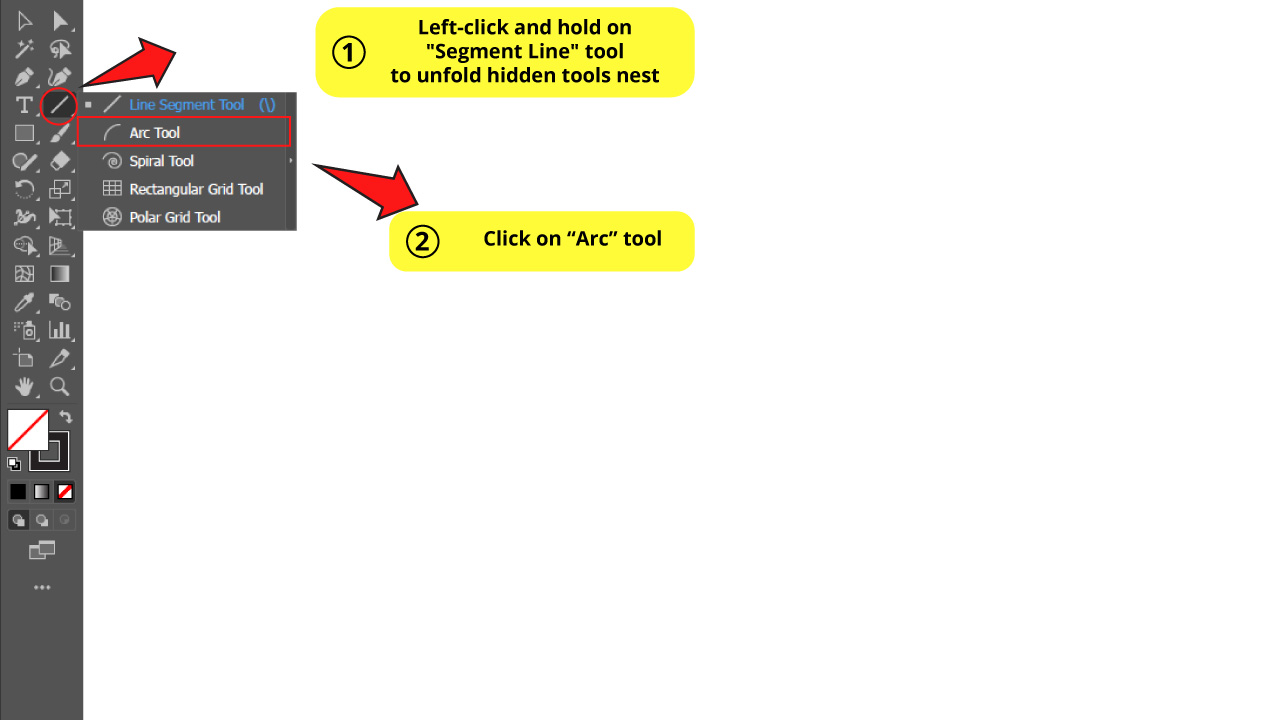

The “Arc” tool is hidden in the “Line Segment” nest. To open it, just left-click and hold to unfold the hidden tools nest. Then select “Arc Tool”.
Step 2: Set the “Arc” Tool Options
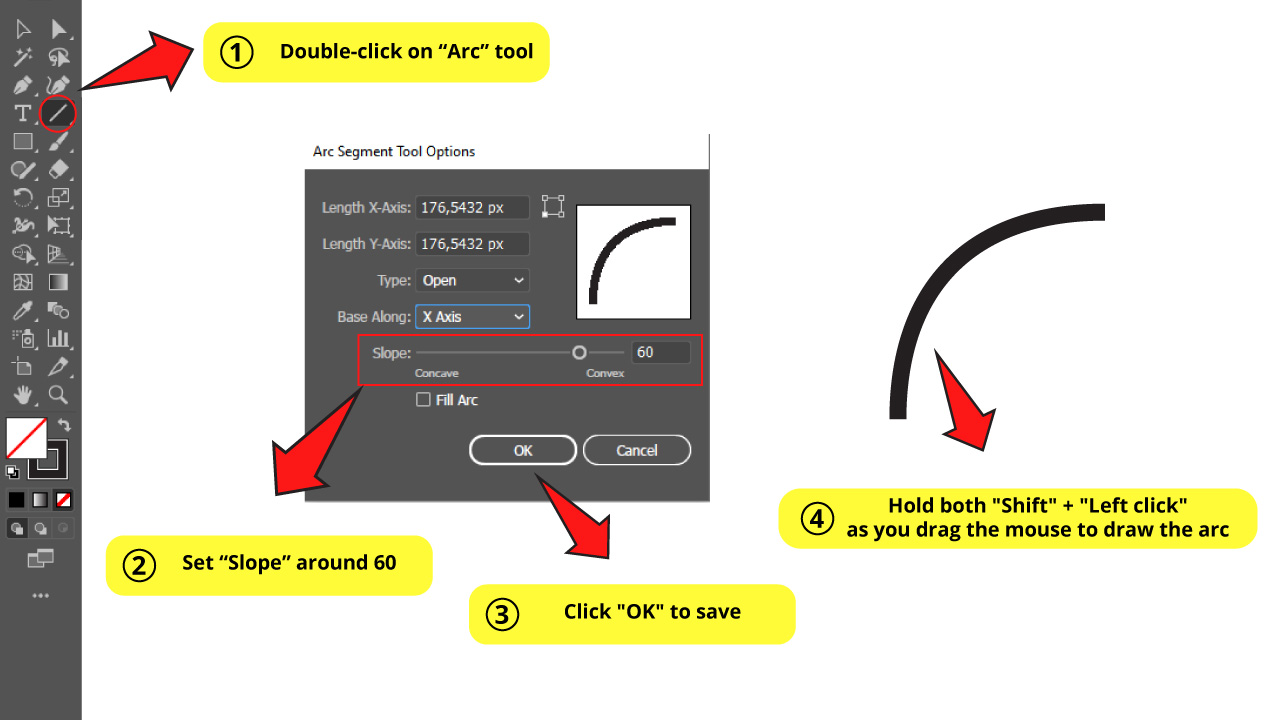

Now the “Arc” tool is displayed on the left side toolbar. So, double-click on it to open the “Arc Segment Tool Options”.
Here in the Options window you can modify the “Slope”, going from concave to convex.
To get an harmonic arc set the “Slope” around 60. Click “OK” to save.
Now left-click and hold, and drag the mouse pointer to draw the arc. If you want to get a symmetrical arc you also need to hold the “Shift” key.
Step 3: Retouch the Arc

If you need to retouch your arc, do the following:
Select the “Anchor Point” (Shift + C) tool hidden in the “Pen” tool nest, or just use the “Shift + C” command.
Place the mouse pointer over the arc until the mouse icon changes to a “curved arrow” icon. Left-click and hold as you drag the mouse down to modify the curvature.
Release left-click to finish.
Remember you can also modify the arc working with the anchor points’ handles.
Would you like to know more about the “Arc” tool? Check this quick article about “How to Use the Arc Tool in Illustrator”.
Curving Lines Using the “Curvature” Tool in Illustrator
Select the “Curvature” (Shift + ~) tool on the left side toolbar. Make the first anchor point by clicking on the artboard. Make the second anchor point and drag your mouse across the artboard to get the desired curvature. Left-click to draw the suggested curve. Press the “Esc” key to finish.
This tool is only available on the latest versions of Adobe Illustrator. It works similar to the “Pen” (P) tool. The difference is that the “Curvature” tool was specifically designed to draw curved lines, so expect to get better results with this one.
Step 1: Use the “Curvature” Tool

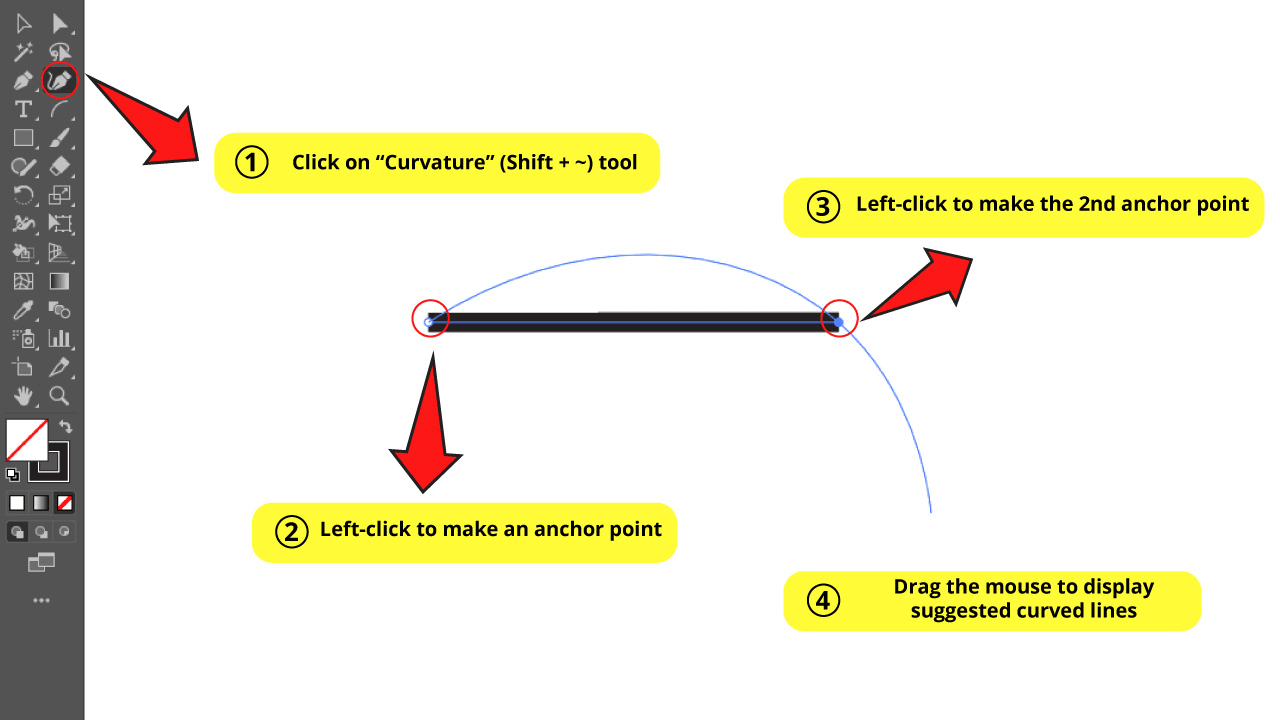
Go to the left side toolbar and select the “Curvature” (Shift + ~) tool.
Once you have selected the “Curvature” tool, click on your artboard to make an anchor point. Next, make another click to create the second anchor point.
If you drag your mouse across your artboard, you will notice that a suggested curved line will display, based on the angle and the distance of your anchor points.
Step 2: Make Curved Lines

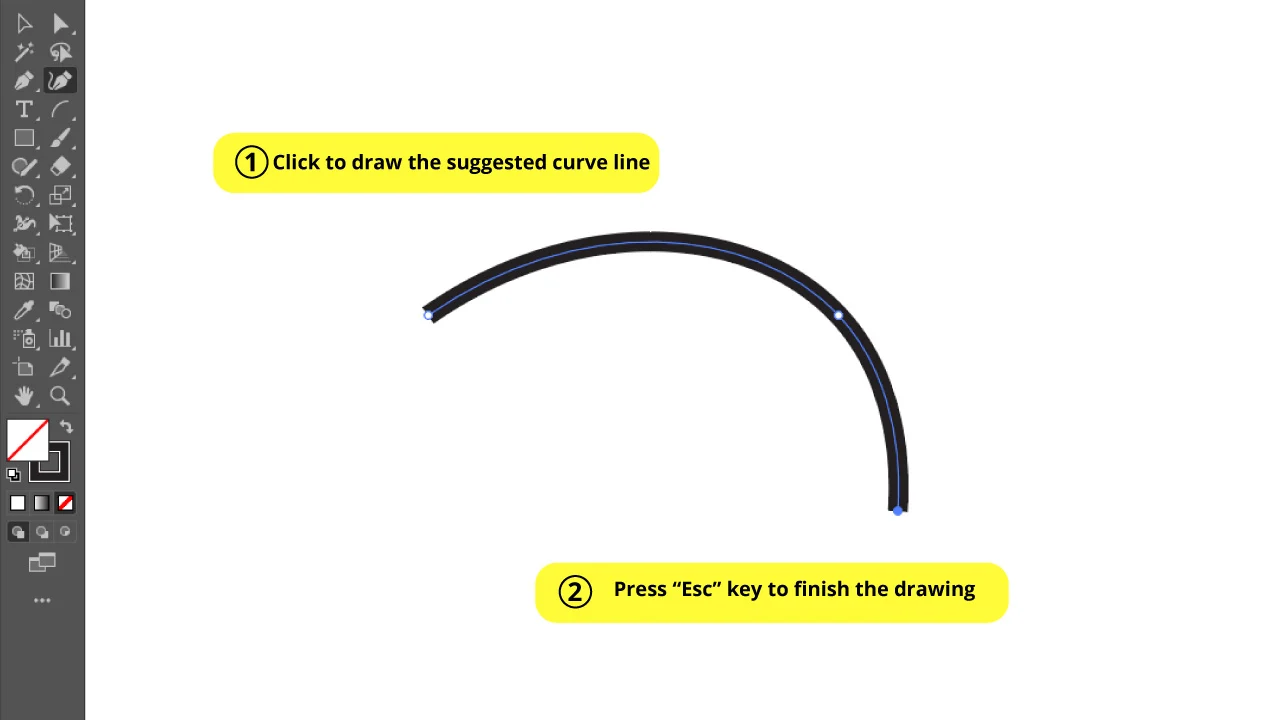
When you’re satisfied with the suggested curved line, just click to get it drawn.
This tool allows you to continue drawing curved lines.
If you want to continue drawing, just drag your mouse to get another desired curve and click to confirm as many times as you need.
If you’re done drawing, press the “Esc” key.
Frequently Asked Questions on “How to Curve Lines in Illustrator”
Where is the “Curvature” tool located in Illustrator?
The “Curvature” tool was released on the “Illustrator CC” (2014) version. If you’re using an older version, this tool won’t be available. But if your version is 2014 or subsequent, you can find it on the left side toolbar, or you can select it with the “Shift + ~” command.
How can I curve lines without using the “Pen” (P) tool?
If you want to curve a line without messing with the anchor points, your best choice is drawing a line and then curve it with the “Anchor Point“ (Shift + C) tool. Left-click and hold over the line, and then drag the mouse pointer. You can also use this technique to modify a drawn arc.


Hey guys! It’s me, Marcel, aka Maschi. On MaschiTuts, it’s all about tutorials! No matter the topic of the article, the goal always remains the same: Providing you guys with the most in-depth and helpful tutorials!

