
As you start working with the “Pen” (P) tool and getting involved with anchor points, you will most likely have to manipulate the anchor point’s handles to get nice and smooth curves.
Adding handles is very easy to do, it’s pretty much just a click away.
However, there are some variations when it comes to adding handles, and maybe you didn’t even know that these functions were available.
In this tutorial you will learn all you need about adding and manipulating anchor points’ handles, so you can make your line tracing process much easier.
Adding Handles to Anchor Points in Illustrator
Select the anchor point with the “Direct Selection” (A) tool and click on the “Convert Selected Anchor Points to Smooth” button to add handles. Press “Shift + C” to select the “Anchor Point” tool, and left-click and hold on the handle as you drag the mouse to unlock it from the other handle.
Adding Locked Handles to Anchor Points in Illustrator
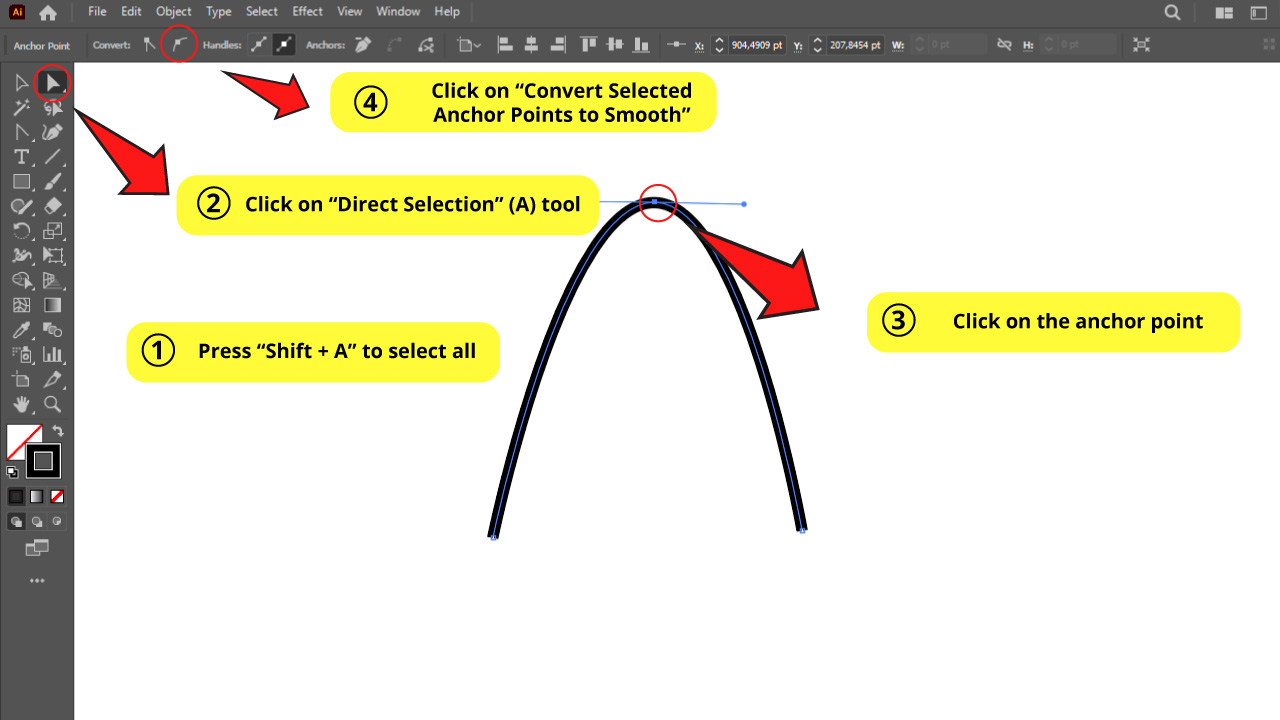
Select the drawing using the “Selection” (V) tool. Then click on the “Direct Selection” (A) tool to display the anchor points. Next, click on the anchor point to select it. Finally, click on the “Convert Selected Anchor Points to Smooth” button on the top side toolbar to add the handles.
When you add handles to an anchor point, you get locked handles by default.
Locked means that when you manipulate one of the handles, the other one will also move in the opposite direction. Always proportionally. These handles are constrained and will always work and move as a single unit. Simultaneously.
Step 1: Click on Selection Tool

Select your drawing using the “Selection” (V) tool on the left side toolbar, or pressing “Ctrl + A” command to select all.
Next, click on the “Direct Selection” (A) tool, also located on the left side toolbar.
Now you should be able to see the anchor points.
Step 2: Add Handles
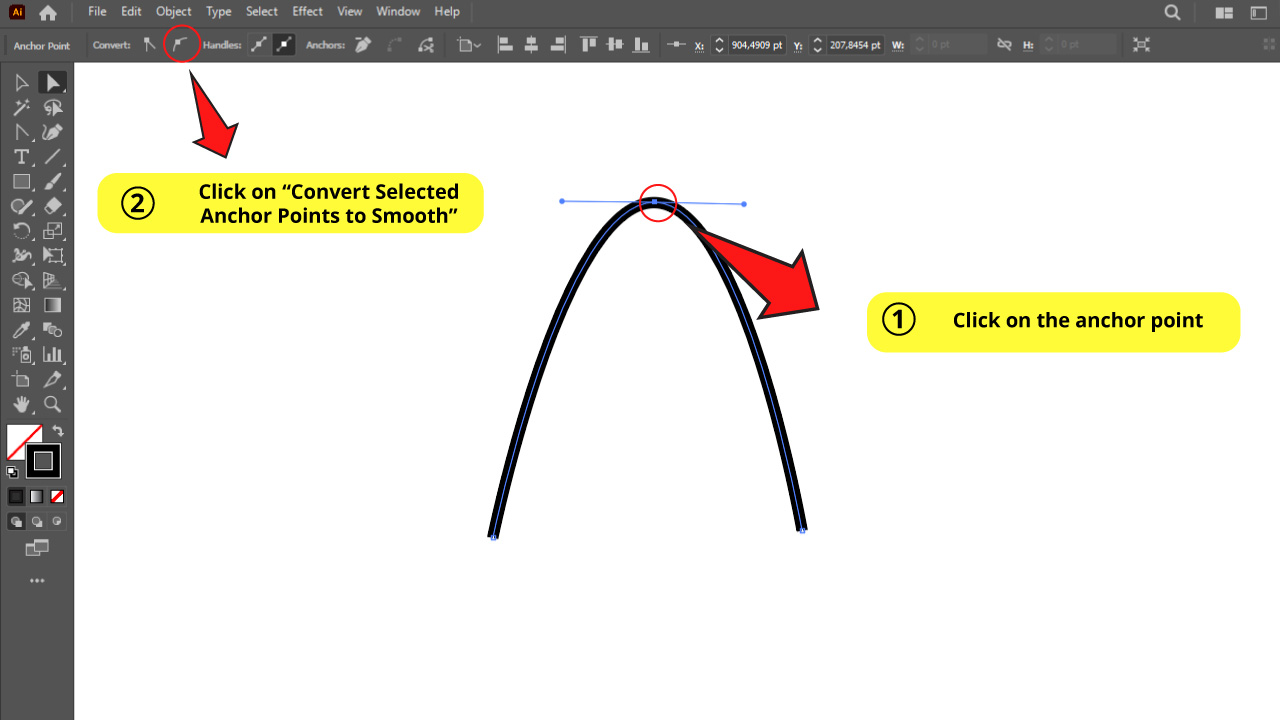

With the “Direct Selection” (A) tool selected, click on the anchor point you want to add handles to.
Then click on the “Convert Selected Anchor Points to Smooth” button located on the top side toolbar to add the handles.
If you want to add handles to several anchor points, hold the “Shift” key as you click on the anchor points to keep them all selected. Then click on the “Convert Selected Anchor Points to Smooth” button.


If you are finding this topic interesting so far, make sure you check this article about “How to Curve Lines in Illustrator” to learn how to get those smooth curves you’re aiming for.
Step 3: Manage Handles
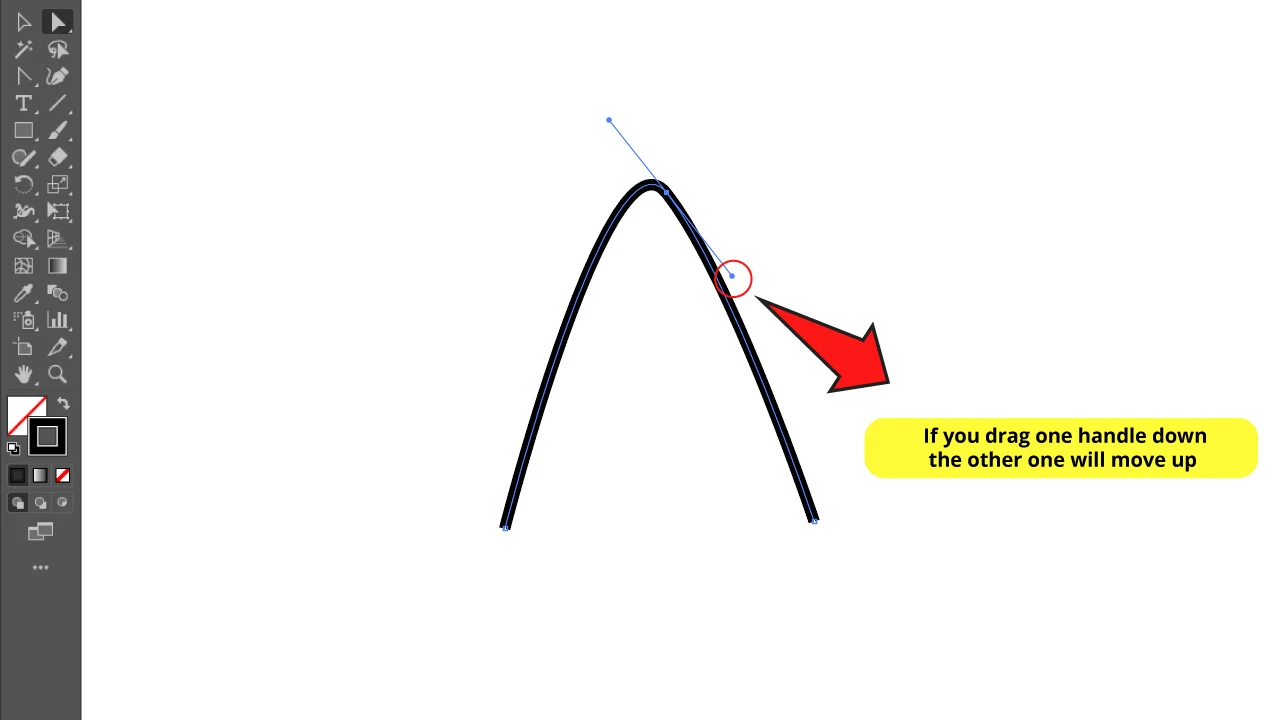
Notice that, as previously stated, the anchor points’ handles are constrained to work together. They’re locked. This means if you, for instance, drag one of the handles down, the other one will move up.
Adding Unlocked Handles to Anchor Points in Illustrator
Select the anchor point using “Direct Selection” (A) tool. Click on the “Convert Selected Anchor Points to Smooth” button to add the handles. Press “Shift + C” to select the “Anchor Point” tool, and left-click and hold on the handle as you drag the mouse to unlock it.
If you want to freely manipulate your handles in different directions, you need to unlock them first. Let’s see how we can get this done.
Step 1: Add Handles

To add unlocked handles, you need to first add the handles as usual, and then you have to unlock them.
First, press the “Ctrl + A” command to select the whole drawing. Then click on “Direct Selection” (A) tool, and click on the anchor point to select it.
Next, click on the “Convert Selected Anchor Points to Smooth” button to add handles.
Learn other ways to smooth edges in this tutorial about “How to Smooth Edges in Illustrator”.
Step 2: Select “Anchor Point” Tool
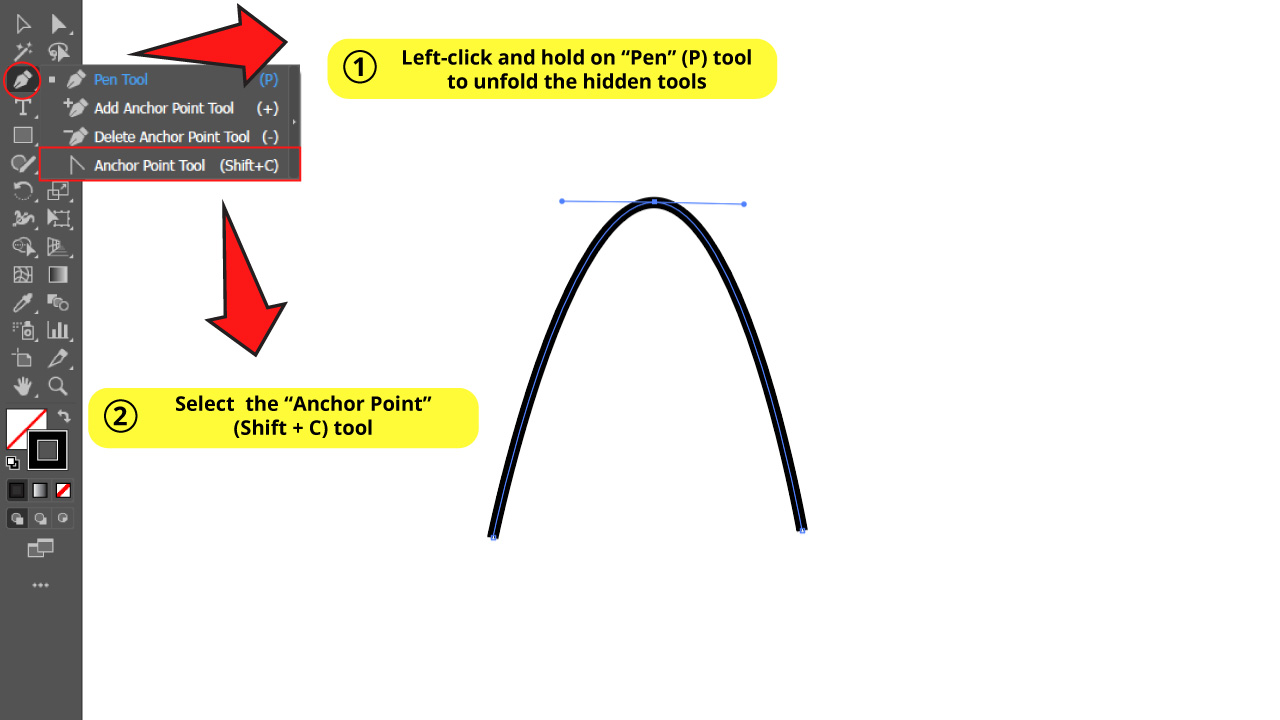

Left-click and hold on the “Pen” (P) tool on the left side toolbar to unfold the hidden tools.
Select the “Anchor Point” (Shift + C) tool or press the “Shift + C” shortcut.
Step 3: Manage the Handles Separately


Left-click and hold on the handle as you drag the mouse to manage it separately from the other.
How to Simultaneously Manage Unlocked Anchor Points’ Handles in Illustrator
Select the anchor point using the “Direct Selection” (A) tool. Click on the “Scale” (S) tool on the left side toolbar. Now, left-click and hold on the handle as you drag the mouse to move both simultaneously.
You already know how to manipulate handles separately, but what if you need to move these unlocked handles simuntanley to get smooth curves?
Imagine you want to trace a heart shaped figure.
How would you manipulate the handles of the anchor point located on the vertex spot where the half circles converge?
You can’t do this if the handles are locked because they are aligned on the same line.
Hence, you would probably think it isn’t possible to do it with unlocked handles. But you actually can! This is what the “Scale” (S) tool is for.
If you want to know how to draw a heart shaped figure without having to deal with anchor points, check this tutorial about “How to Make a Heart in Illustrator”.
Step 1: Select the Anchor Point
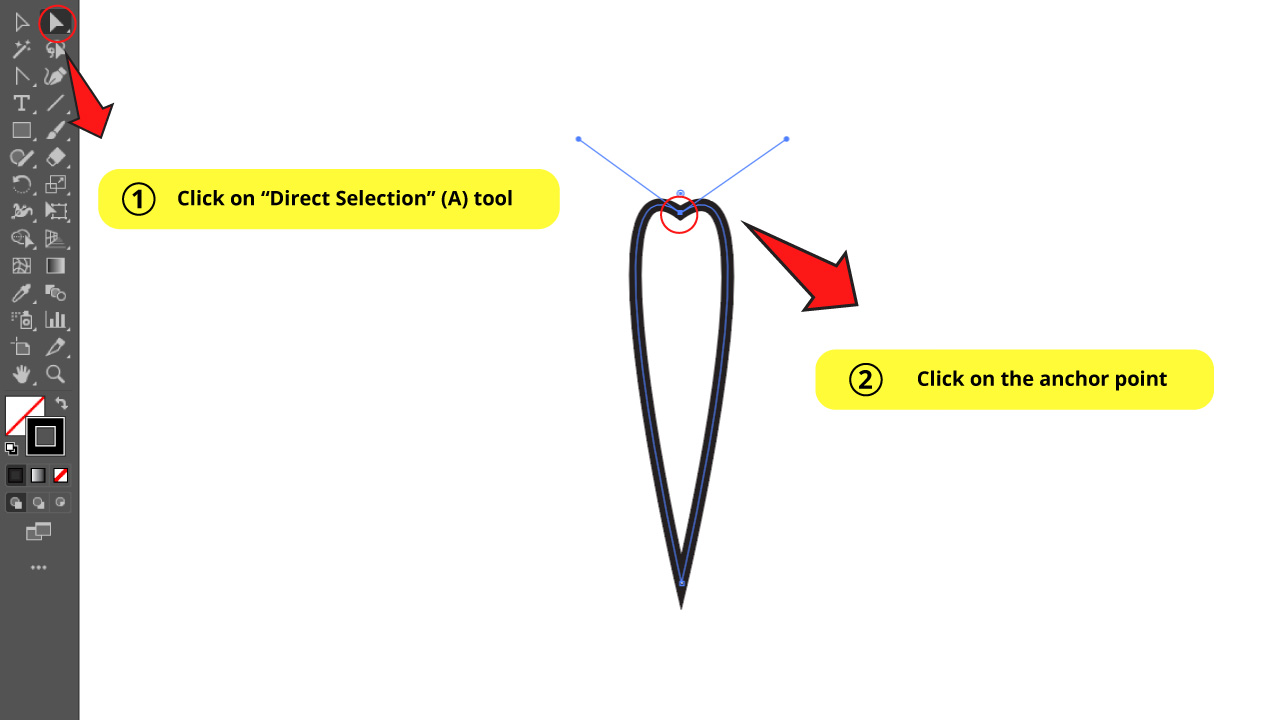
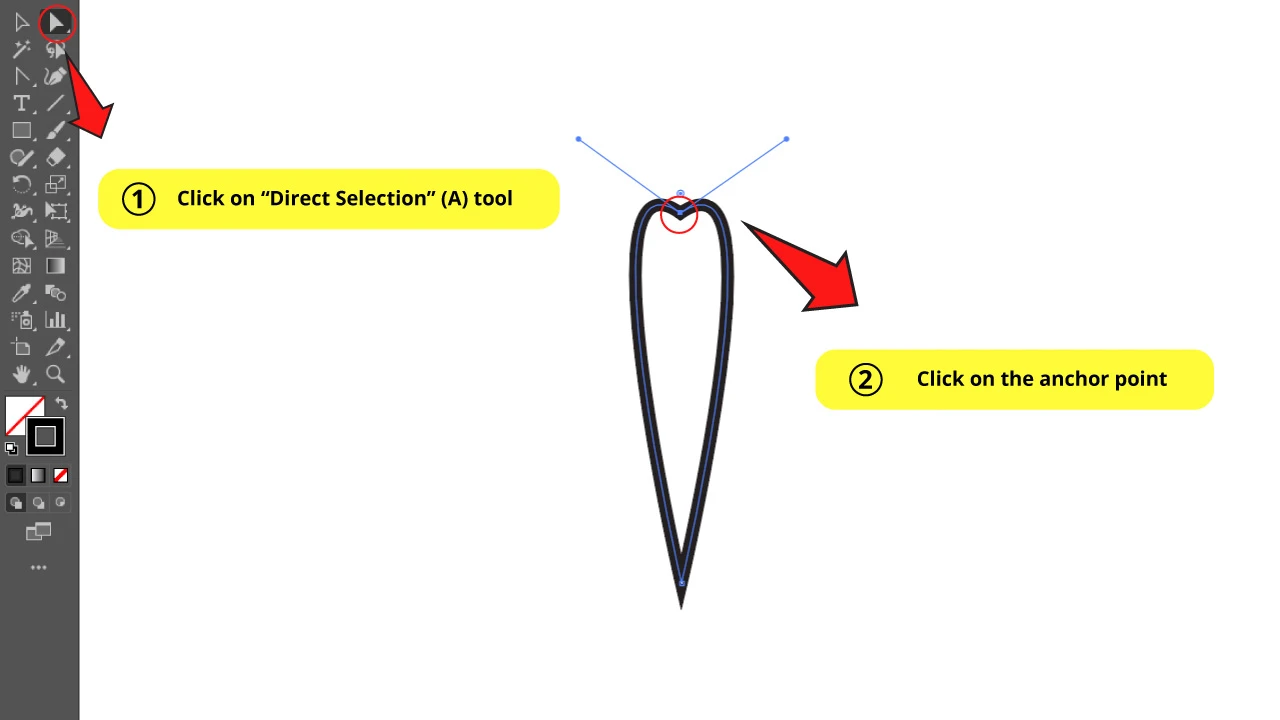
Select the anchor point you want to work with with the “Direct Selection” (A) tool.
Step 2: Use the “Scale” (S) Tool

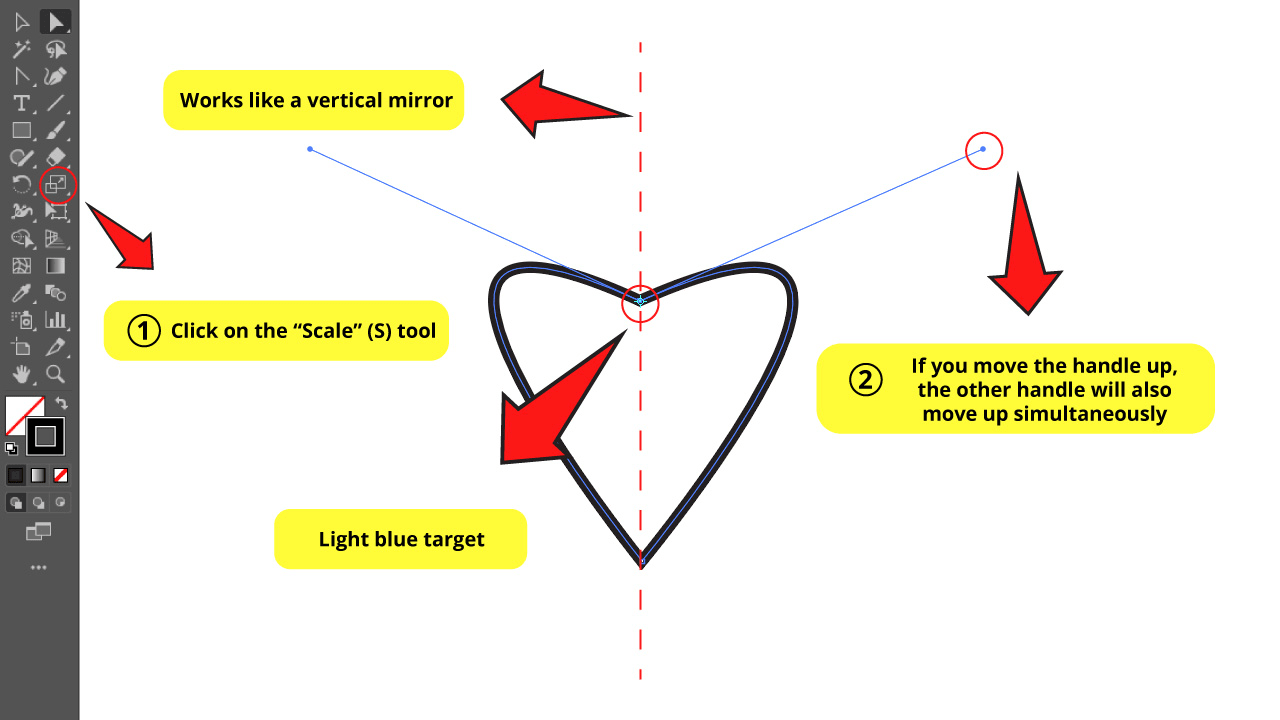
Then click on the “Scale” (S) tool located on the left side toolbar.
Notice that a light blue target will be displayed right over the anchor point we’re working with.
Now try to move one of the handles. You’ll notice that the other one will simultaneously move in the same direction even if the handles aren’t locked. It works just like a mirror.
Adding One Single Handle to an Anchor Point in Illustrator
Select the anchor point using “Direct Selection” (A) tool. Click on the “Convert Selected Anchor Points to Smooth” button on the top side toolbar to add the handles. Press “Shift + C” to the select “Anchor Point” tool. Left-click on the handle to select it and then press the “Del” key to delete it.
Step 1: Add Handles
To get one single handle, you have to first add the handles as usual, and then simply delete one of them.
You’ll have to first press the “Ctrl + A” command to select the whole drawing. Then click on the “Direct Selection” (A) tool, and click on the anchor point to select it.
Next, click on the “Convert Selected Anchor Points to Smooth” button to add handles.
Step 2: Delete One of the Handles
Click on the “Anchor Point” (Shift + C) tool hidden on the “Pen” tool nest, or just use the “Shift + C” shortcut.
Click on the handle you want to delete.
Press the “Del” key to delete it.
If you want to know more about this topic, we suggest you check this article about “How to Move Anchor Points in Illustrator in 4 Easy Steps”.
Illustrator Handles Are Not Showing – What’s Wrong?
If you can’t see the handles in Illustrator, there are a couple of things you can check to make them visible again.
If both the handles and anchor points are not visible, then you should proceed directly to the “Check 1” section.
On the other hand, if the anchor points are visible but the handles are not, then you should jump to the “Check 2” section.
By following these steps, you can quickly troubleshoot the issue and regain control of your design.
Check 1: Make Edges Visible
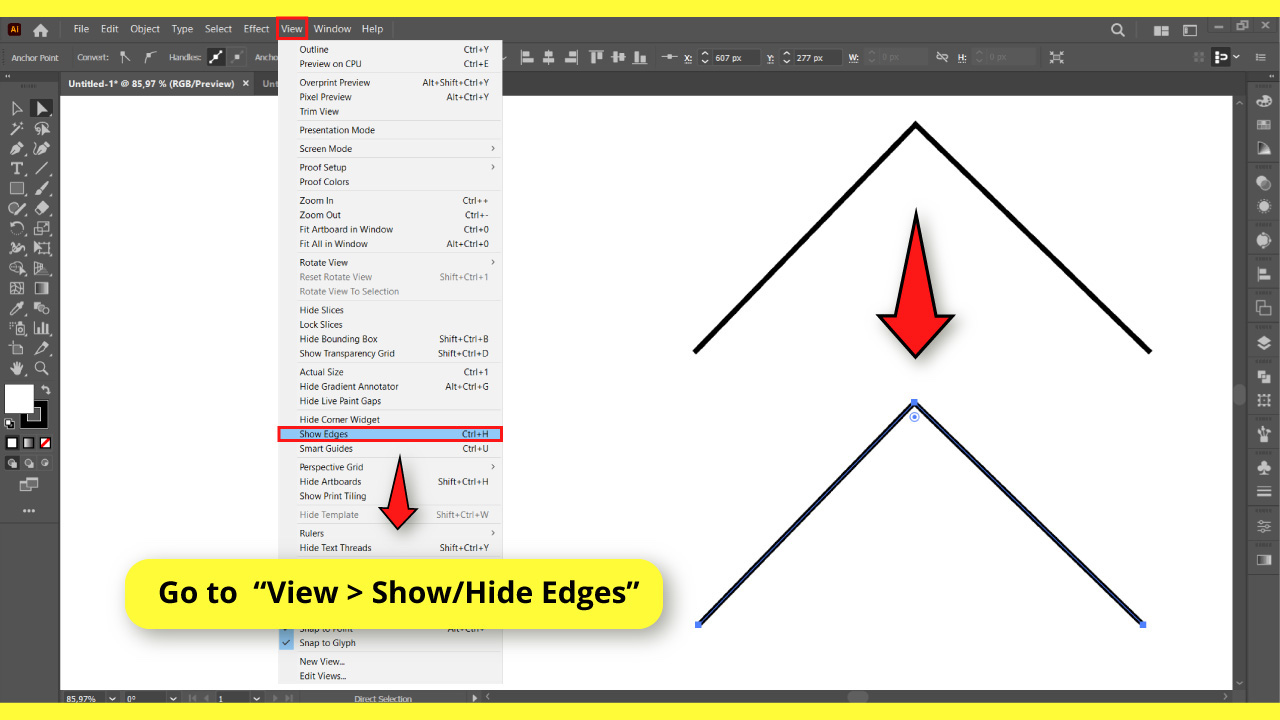

If neither anchor points nor their handles are showing, you can make them visible by going to “View > Show/Hide Edges” in the menu at the top of the screen.
Alternatively, you can press the “Ctrl + H” or “Cmd + H” command on your keyboard to toggle the Show/Hide Edges mode.
Check 2: Add Handles to Anchor Points


Not all anchor points have handles. Handles make anchor points have smoother edges. Therefore, most of the anchor points do not have handles to get straight edges like corners.
If you want to add handles to an anchor point, first select the anchor point using the “Direct Selection” (A) tool located on the right side toolbar.
Once the anchor point is selected, some option tools will display on the toolbar at the top of the screen.
Click on the “Convert Selected Anchor Point to Smooth” button located on that toolbar to add handles to the anchor point.
You can also do this by right-clicking on the “Pen” (P) tool located on the left-side toolbar.
On the unfolded hidden tools menu, click on the “Anchor Points” (Shift + C) tool.
Alternatively, you can use the “Shift + C” command to shortcut it.
After selecting the “Anchor Points” (Shift + C) tool, click, hold, and drag on the anchor point to add the handle and manage it.
Now that you have recovered the handles of the anchor points you can curve lines in Illustrator and make wavy lines in Illustrator as well.
Frequently Asked Questions on “How to Add Handles to Anchor Points in Illustrator”
How can I delete the handles of an anchor point in Illustrator?
If you want to delete handles, click on the “Direct Selection” (A) tool, and then click on the anchor point to select it. Finally, click on the “Convert Selected Anchor Points to Corner” button located on the left side of the top side menu, to get rid of those handles.
Why is the “Scale” (S) tool not working correctly with my handles in Illustrator?
This is probably because your handles aren’t properly aligned with each other. You will have to briefly rotate your drawing to the point the handles are perfectly aligned on the same horizontal line, as if there was a mirror in the middle. The “Scale” tool should work then.
How to Add Anchor Points in Illustrator?
To add brand new anchor points, use the “Pen” (P) tool located on the left-side toolbar. However, if you want to add anchor points to an object that already exists, you have to use the “Add Anchor Point” (+) tool hidden in the “Pen” (P) tool nest.
I can’t see the Anchor Points in Illustrator. What’s wrong?
If you can’t see the anchor points, you have probably disabled them by mistake. To make them visible again, hit the “Ctrl + H” or “Cmd + H” command on your keyboard to enable them again. Alternatively, you can go to “View” followed by “Show/Hide Edges” in the menu at the top of the screen.


Hey guys! It’s me, Marcel, aka Maschi. On MaschiTuts, it’s all about tutorials! No matter the topic of the article, the goal always remains the same: Providing you guys with the most in-depth and helpful tutorials!

