

The interesting thing about blending colors in Illustrator is that there are a few methods to get it done.
However, each method should be used according to your needs and specifications.
Let’s learn how and when to use each one of these methods.
Blending Colors in Illustrator
First select colors for both first and last shapes and then select all. Go to “Edi”t > “Edit Colors” and choose Blend Vertically or Horizontally. Or you can go to “Object” > “Blend” > “Make” and then “Object” > “Blend” > “Blend Options” and select “Specified Steps.” Or use the “Gradient” (Ctrl + F9) panel.
Depending on the kind of artwork you want to blend colors in, you need to use a specific method.
If you want to blend colors in a solid shape, your only option is using the “Gradient” tool.
On the other hand, you can use both the “Color Edition” or the “Gradient” tool if you’re working with several shapes.
However, the result you’ll get from different methods won’t be the same.
With the “Color Edition” method you’ll get a specific color for each shape, while with the “Gradient” one you will get different shades of the selected colors for every different shape.
Now, if you haven’t finished your artwork yet, it’s a good idea to use the “Blend” tool.
Blending Colors Using the “Color Edition” Tool in Illustrator
Select the first and last shapes using “Direct Selection” (A) tool and pick colors for them. Press “Ctrl + A” to select all and then go to “Edit” > “Edit Colors” > “Blend Horizontally” or “Edit” > “Edit Colors”> “Blend Vertically” depending on the alignment of your shapes.
This method works when you need to blend colors for different objects whose shapes have been already assigned.
The final result will be a single color for each object with a blending general illusion effect in the whole artwork.
Step 1: Select Colors for the First and Last Circles


The first thing you have to do is select the blending colors.
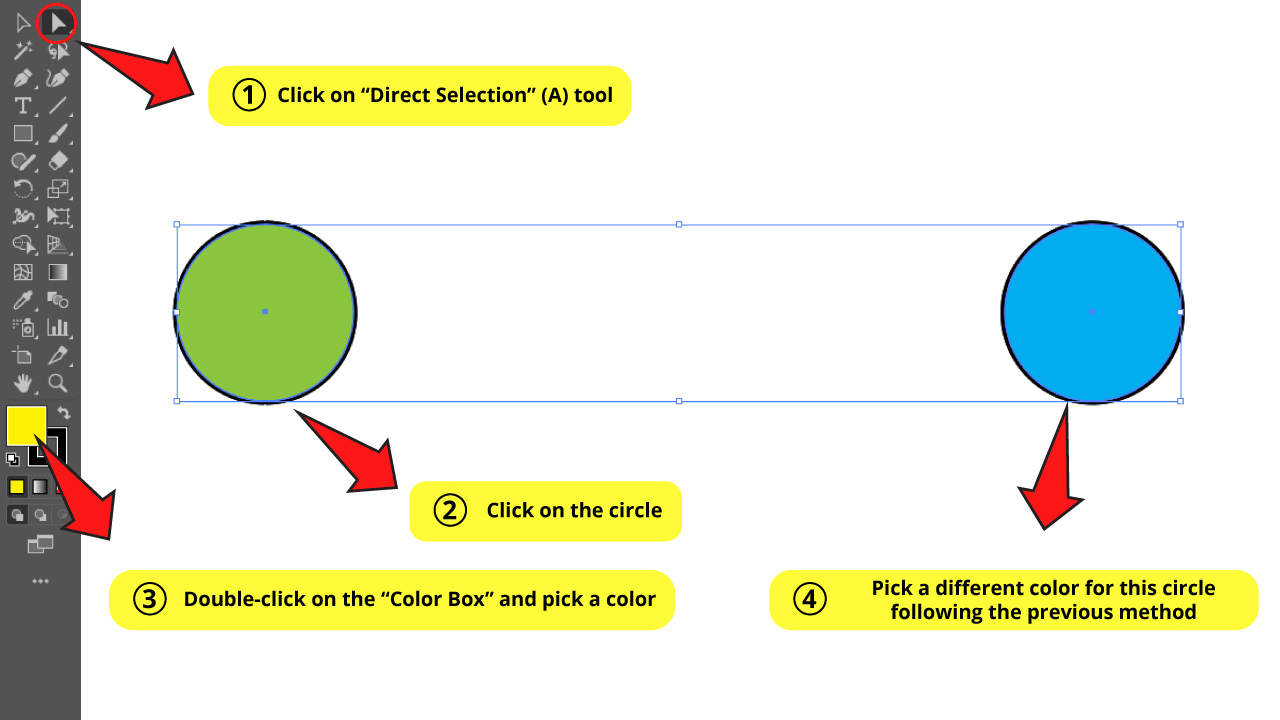
For this, click on the “Direct Selection” (A) tool on the left side toolbar and then click on one first circle.
Then double-click on the “Color Box” located at the bottom of the left side toolbar to select a color.


Next, pick a different color for the last circle following the same method.
The color of the circles in between will make no difference.
Step 2: Select your Shapes
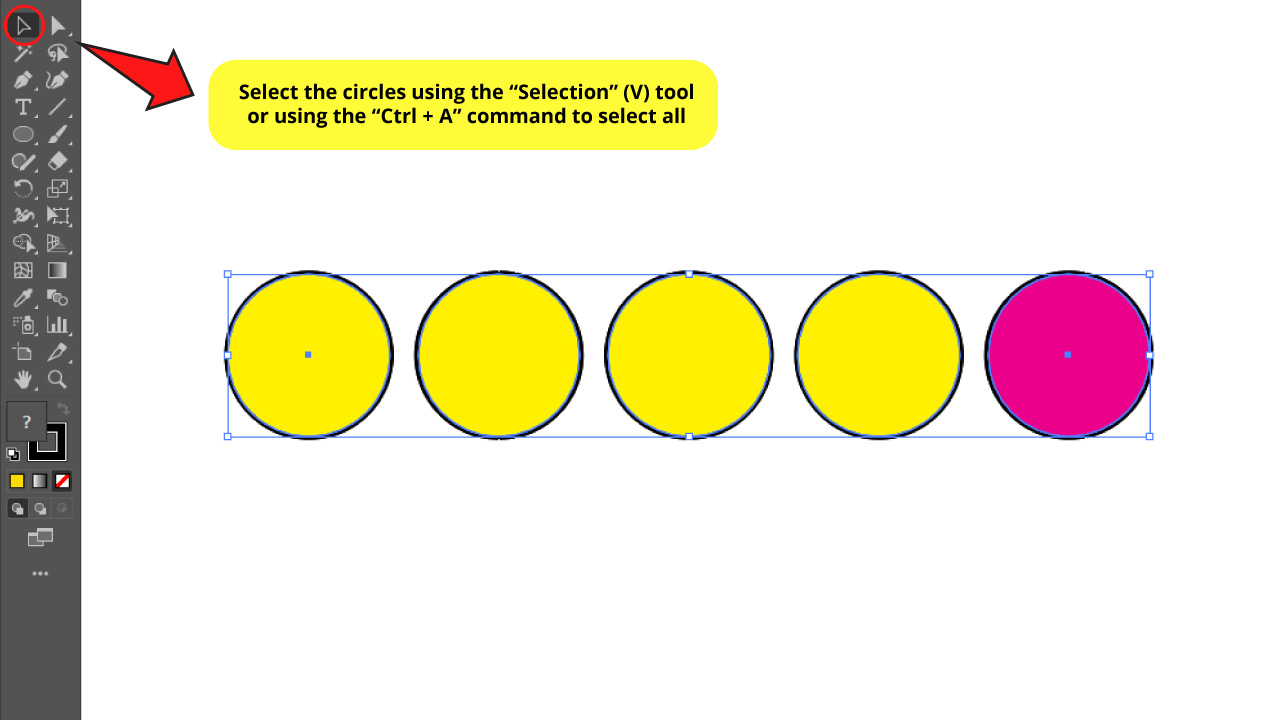

Select all the shapes using the “Selection” (V) tool on the left side menu. Or press “Ctrl + A” to select all.
Step 3: Blend Colors

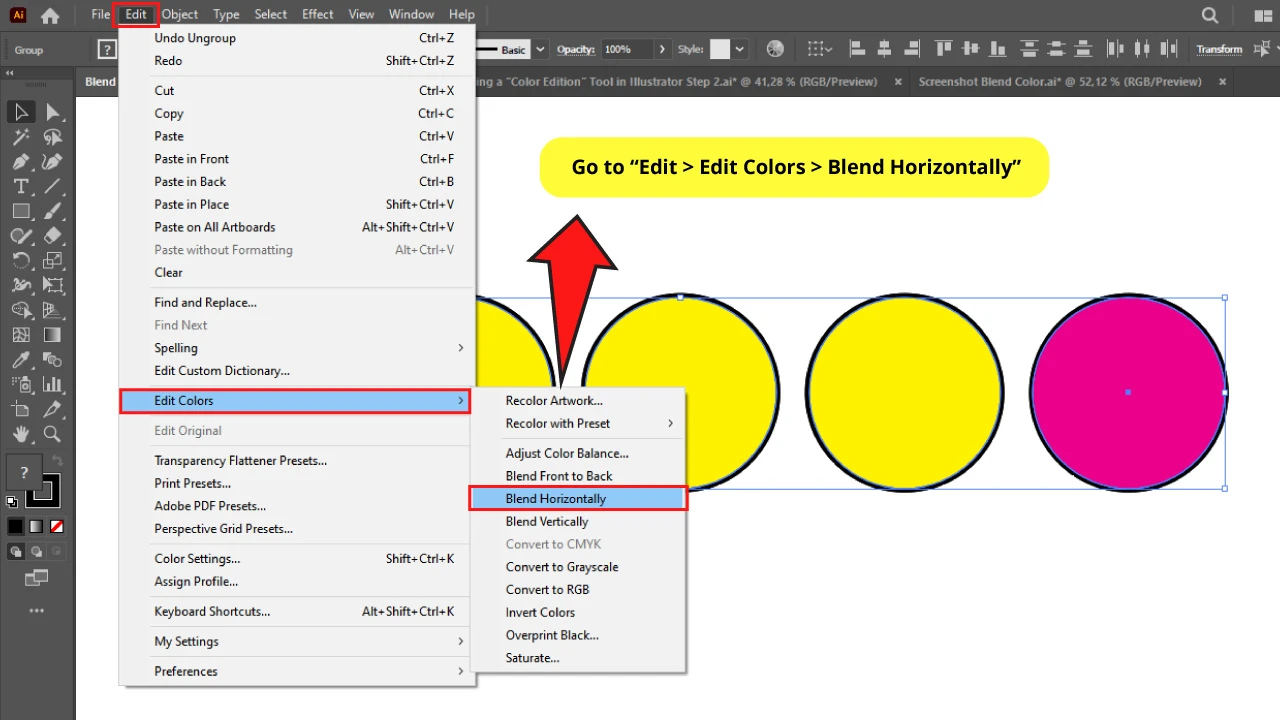
My shapes are aligned horizontally. If yours too, go to “Edit > Edit Colors > Blend Horizontally” on the top side menu.
But if your shapes are aligned vertically, go to “Edit > Edit Colors > Blend Vertically”
The Result on “How to Blend Colors Using the “Color Edition” Tool in Illustrator”

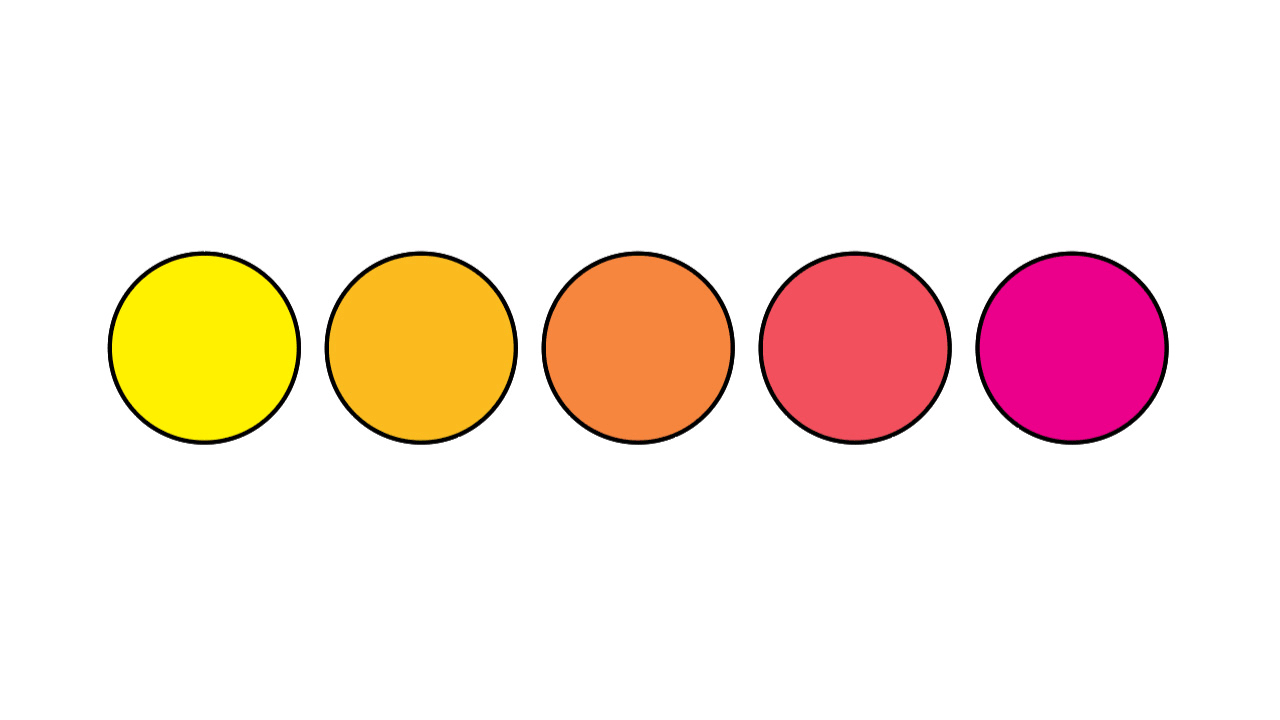
And this is how blending colors with the “Color Edition” tool looks like.
Blending Colors Using the “Blend” Tool in Illustrator
Select the first and last shapes and pick colors for them. Press “Ctrl + A” to select all. Go to “Object” > “Blend” > “Make.” Then click on “Object” > “Blend” > “Blend Options” and set Spacing to “Specified Steps” and the necessary quantity. Finally expand it by going to “Object” > “Blend” > “Expand.”
This method is about using a powerful tool that allows us to make different types of adjustments. This tool not only blends colors, but also blends shapes and other aspects of the objects.
We will be publishing an article reviewing this tool in depth very soon. So stay alert!
In the meantime, you can check this article about “How to Blend Objects” to learn more about this tool.
You can use this tool for saving time at early stages of your artwork. This tool will create the missing shapes in between to blend them all, both color and object shapes.
Step 1: Select Colors for the First and Last Circles

Click on the “Direct Selection” (A) tool on the left side toolbar and then click on the first circle.
Then double-click on the “Color Box” (also located on the left side toolbar) to select a color.
Now pick a different color for the last circle following the same method.
Step 2: Select your Shapes
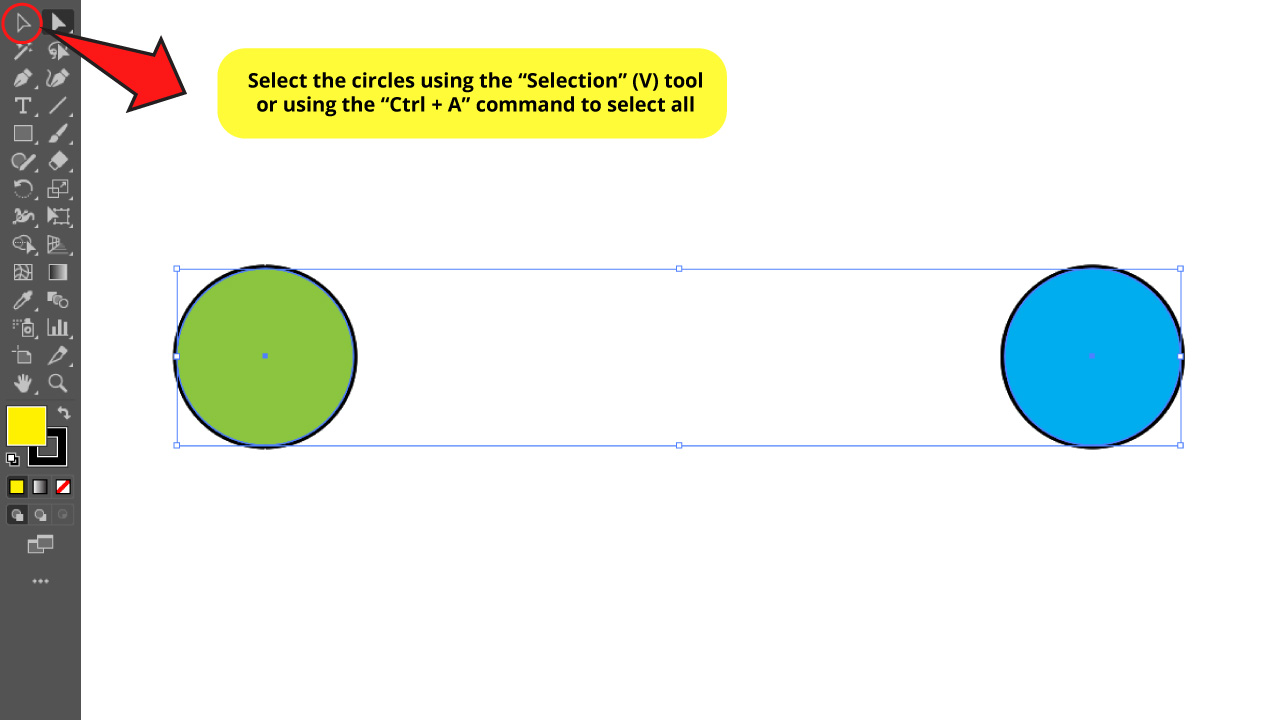

Select the shapes using the “Selection” (V) tool on the left side menu. Or press “Ctrl + A” to select all.
Step 3: Blend Colors

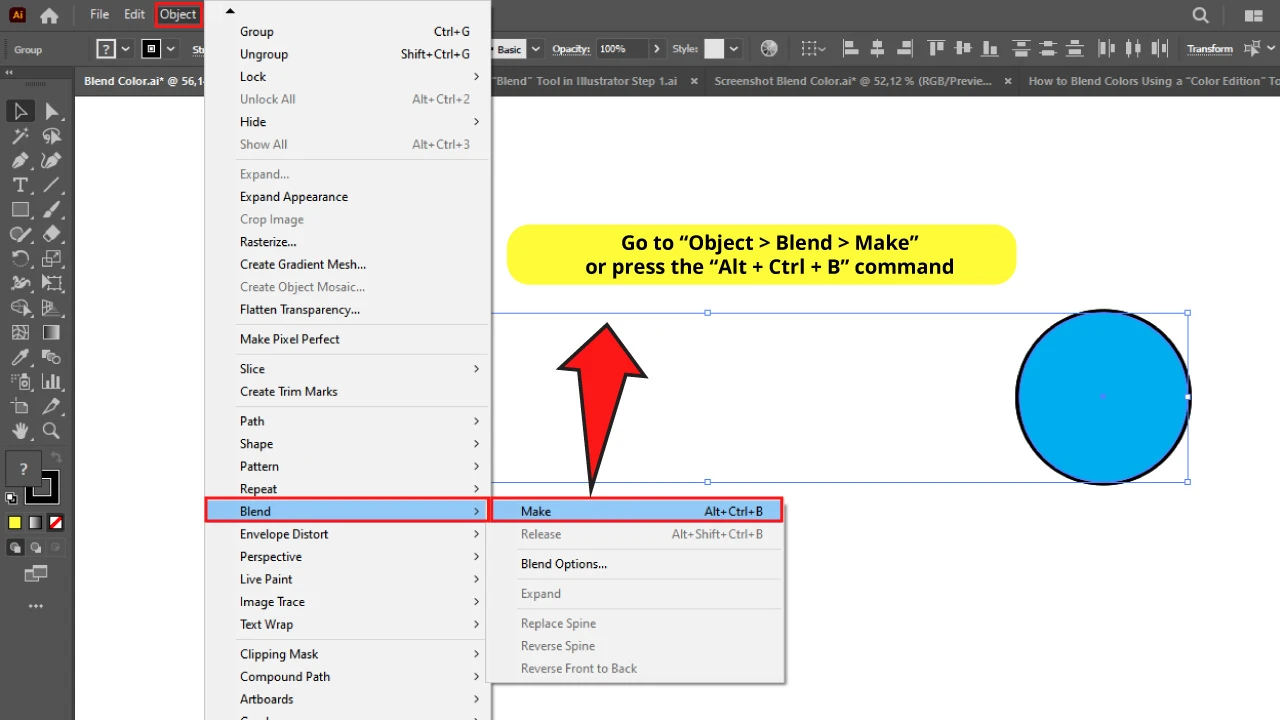
Go to “Object” > “Blend” > “Make” (Alt + Ctrl + B) on the top side menu.
Or press the “W” key to select the “Blend” tool. Next, click on one of the circles and then click on the other one to blend them.
Don’t worry if at this stage the result of the blending looks weird. This is because the number of the circles was multiplied. We just need to make some adjustments. Let’s move on to the next step.
If you are interested in how two circles can be blended so it looks like a single shape with a gradient color effect, check this article about “How to Blend Objects in Illustrator.
Step 4: Adjust Blend Options

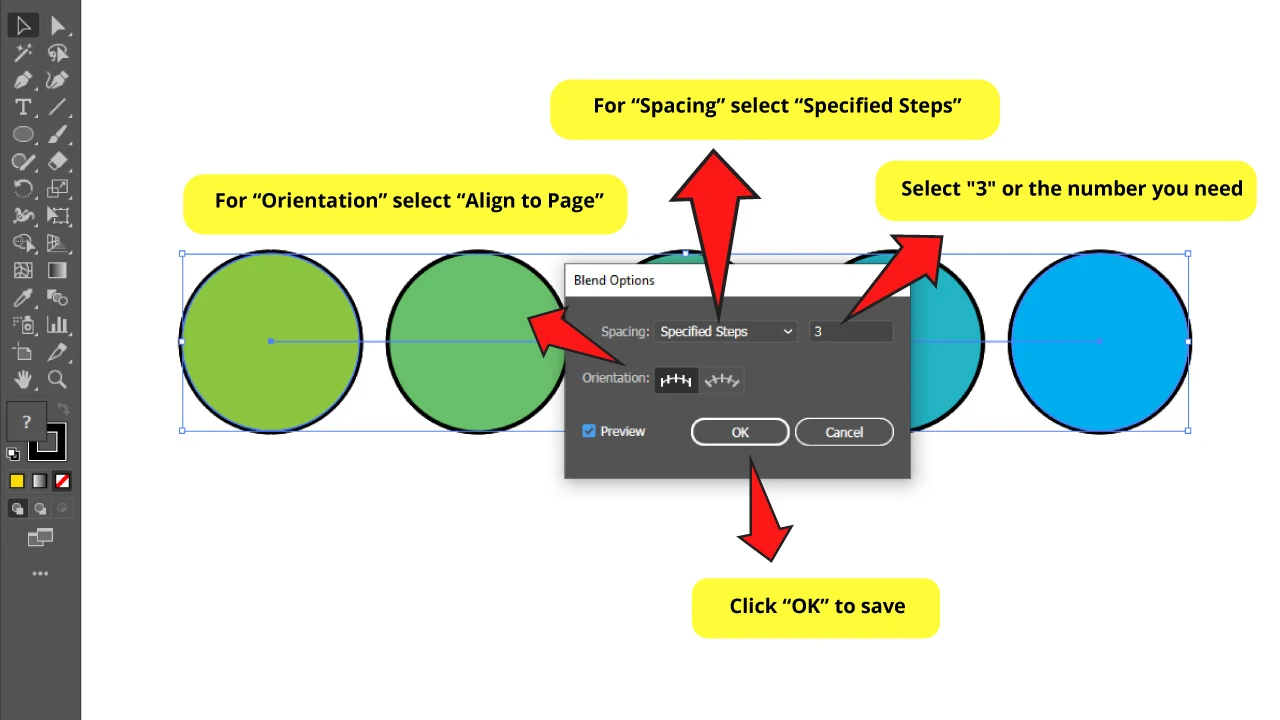
Go to “Object” > “Blend” > “Blend Options” on the top side menu.
In the pop up window set “Spacing” on “Specified Steps” and set it to 3 or the number you need.
This number equals the quantity of middle objects. So if I set it to 3, it would be 5 circles total including the first and the last ones.
For the “Orientations” select “Align to Page”.
Then click “OK” to save.
Step 5: Expand Object

We are only one step away from our goal.
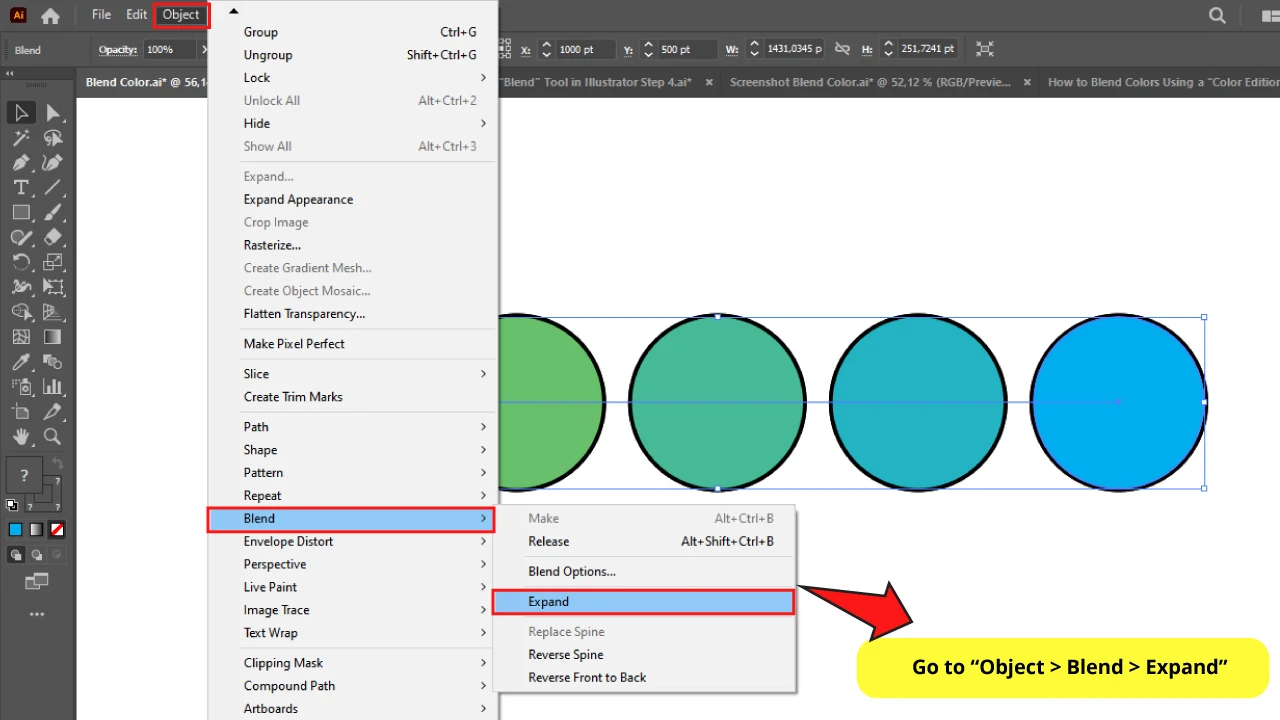
When you blend objects, the shapes are getting linked under the blend effect.
So if you want to manage these shapes as separate items, you need to expand them.
For this, first select all the artwork pressing “Ctrl + A” or using the “Selection” (V) tool.
Then go to “Object > Blend > Expand”.
The Result on “How to Blend Colors Using the “Blend” Tool in Illustrator”

And there you go. Your colors blended using the “Blend” tool.
Blending Colors Using the “Gradient” Tool in Illustrator
Select your shapes using the “Ctrl + A” command. Go to “Object” > “Compound Path” > “Make.” Open the “Gradient” (Ctrl + F9) panel. Select “Linear Gradient” and double-click on the color circles to pick the gradient colors.
The “Gradient” tool function is the most common to blend colors.
With this tool you can create a gradient between two or more colors, not restricted to a single object but including several separated ones.
The feature to add gradients in several separated objects is not an option that the “Gradient” tool has itself, but you can get it by following a procedure before adding gradients.
Step 1: Select your Shapes
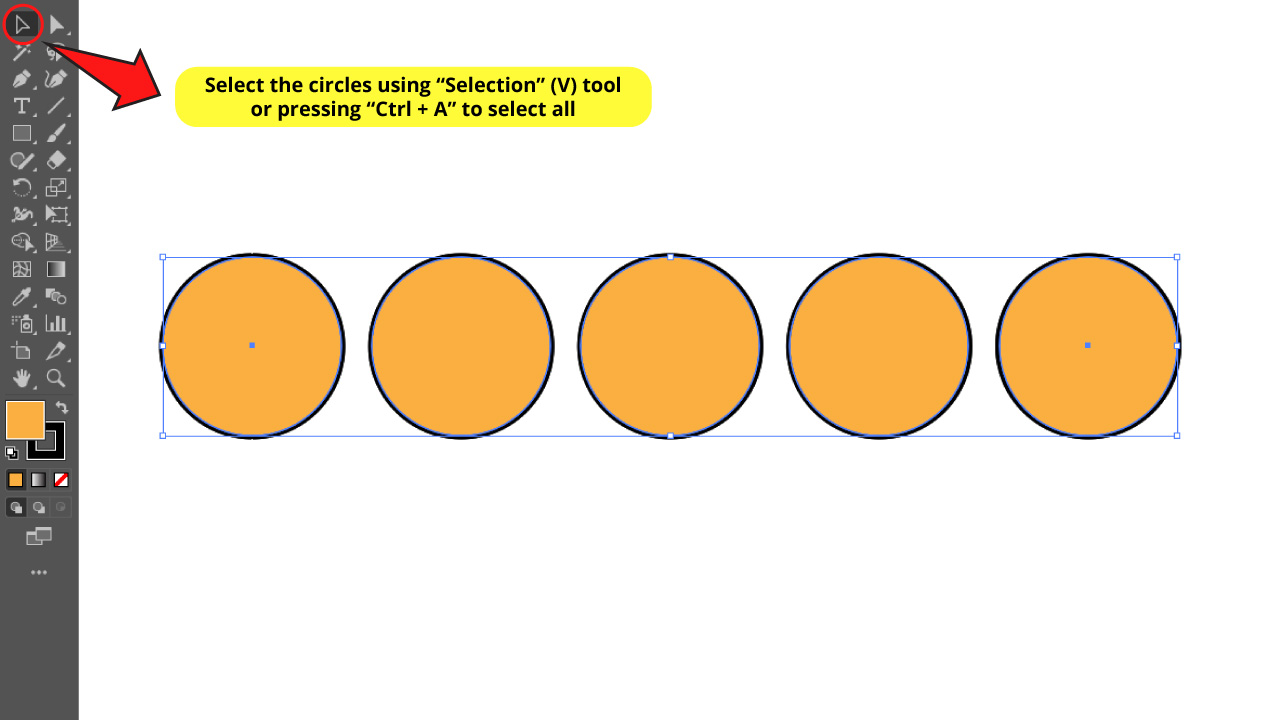
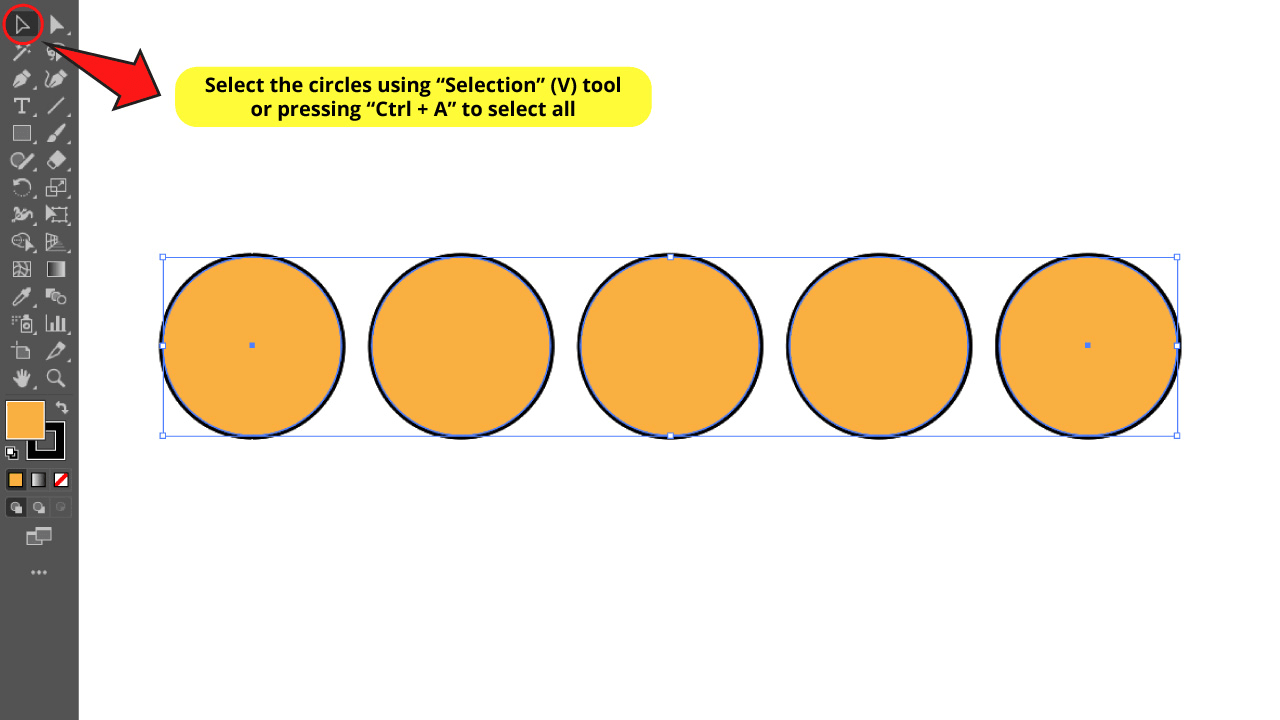
Select the shapes using the “Selection” (V) tool on the left side menu. Or press “Ctrl + A” to select all.
Step 2: Make Compound Path
If you need to blend colors for a single shape, just skip this step.
But if you need to blend colors for several shapes, you will have to compose them. So when we use the gradient tool the blending will be applied to the whole artwork as if it was a single shape.
For this, go to “Object > Compound Path > Make” on the left side menu, or press “Ctrl + 8” to shortcut it.
Step 3: Add Gradient
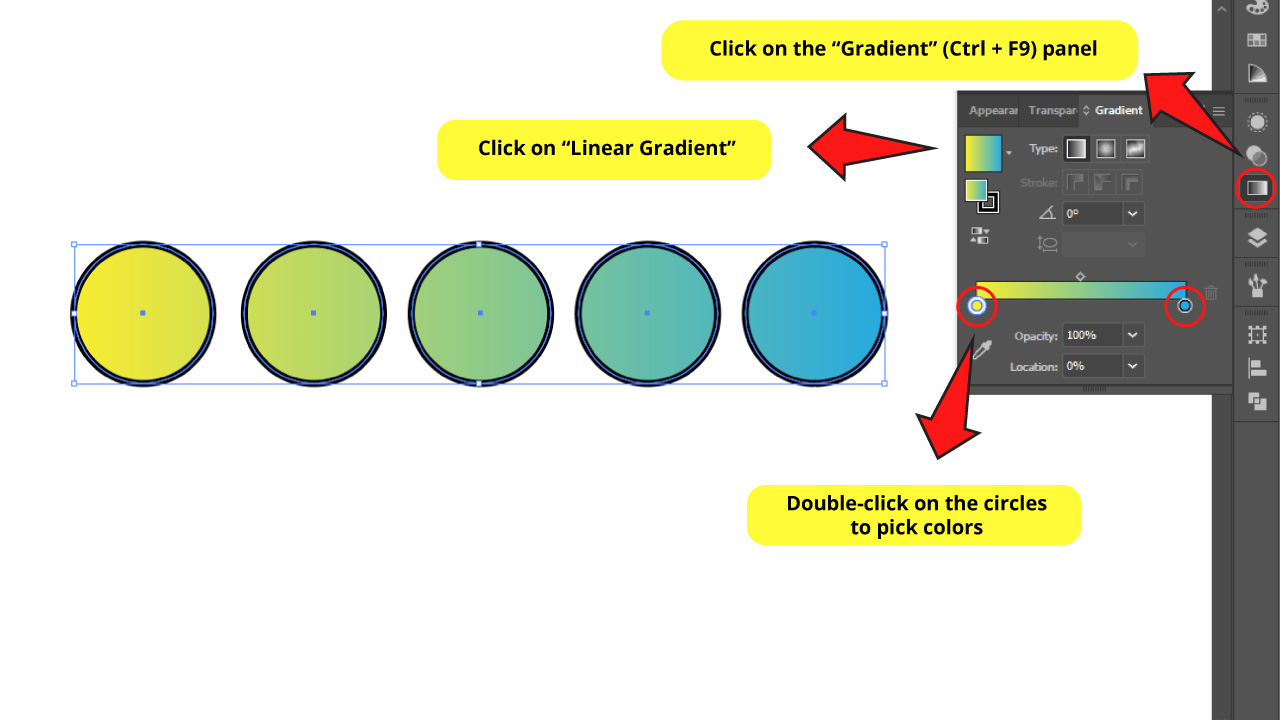

Go to the “Gradient” panel usually located on the right side toolbar. If you can’t find it, you may have to enable it first by going to “Window > Gradient” or pressing the “Ctrl + F9” command.
Once you have opened the panel, click on “Linear Gradient”. Remember that the shapes must have been selected first in order to apply the gradient.
Then, double-click on both color circles to pick the desired colors.
The “Gradient” panel has many customizable options, like “Radial Gradient”, or “Freeform Gradient” for the style.
If you want to learn all about gradients in depth, check this article about “How to Use Gradients in Illustrator”.
The Result of “How to Blend Colors Using the “Gradient” Tool in Illustrator”


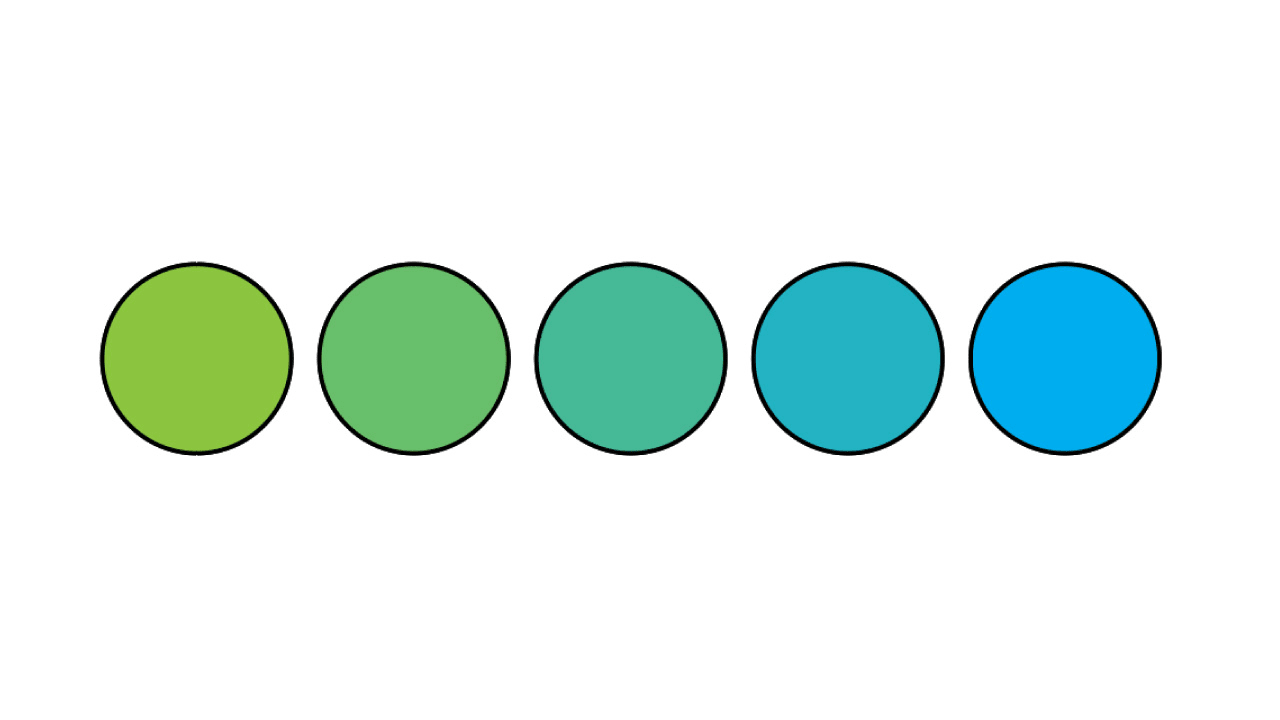
And here is the result!
Notice that unlike the “Color Edition” tool method, this “Gradient” tool method blends colors smoothly, getting different shades of the gradient for each object.
Would you like to see another example of blending colors using the “Gradient” tool? Take a look at this article about “How to Gradient Text in Adobe Illustrator”,
Frequently Asked Questions on “How to Blend Colors in Illustrator”
Can I use the “Color Edition” tool to blend colors even if my shapes aren’t aligned in a single line?
This tool can be used even if your shapes are scattered all over the artboard. The only thing you have to take into consideration is to select vertical or horizontal blending orientation according to your needs.
What is the difference between blending colors with the “Color Edition” or the “Gradient” tool?
The difference is that the Color Edition tool works only for several shapes. And after blending, each object will have a single color. On the other hand, Gradient tool works for both single and multiple objects. The blending effect is always gradual. Each shape will have different color shades.


Hey guys! It’s me, Marcel, aka Maschi. On MaschiTuts, it’s all about tutorials! No matter the topic of the article, the goal always remains the same: Providing you guys with the most in-depth and helpful tutorials!

