
Combining shapes is one of the most useful features in Illustrator.
Knowing which tool is the most suitable in each situation will allow you not only to create incredible vector shapes, but also to save a lot of time.
You can combine your shapes the way you want just using these two powerful tools: “Shape Builder” and “Pathfinder”.
Let’s see how and when to use each of them.
How to combine shapes in Illustrator using the “Shape Builder Tool”
First select the shapes you want to combine, then click on the “Shape Builder Tool” (Shift + M). You can find it on the left side toolbar. Next, hold the click down on one of the shapes and pass through all the rest. Release click and it will be done.
How to combine shapes in Illustrator using the “Shape Builder Tool”: Step-by-step Guide
To show you how to use the Shape Builder Tool to combine shapes, we are going to create a cloud out of several circles.
In order to create this awesome cloud, simply follow our step-by-step guide below.
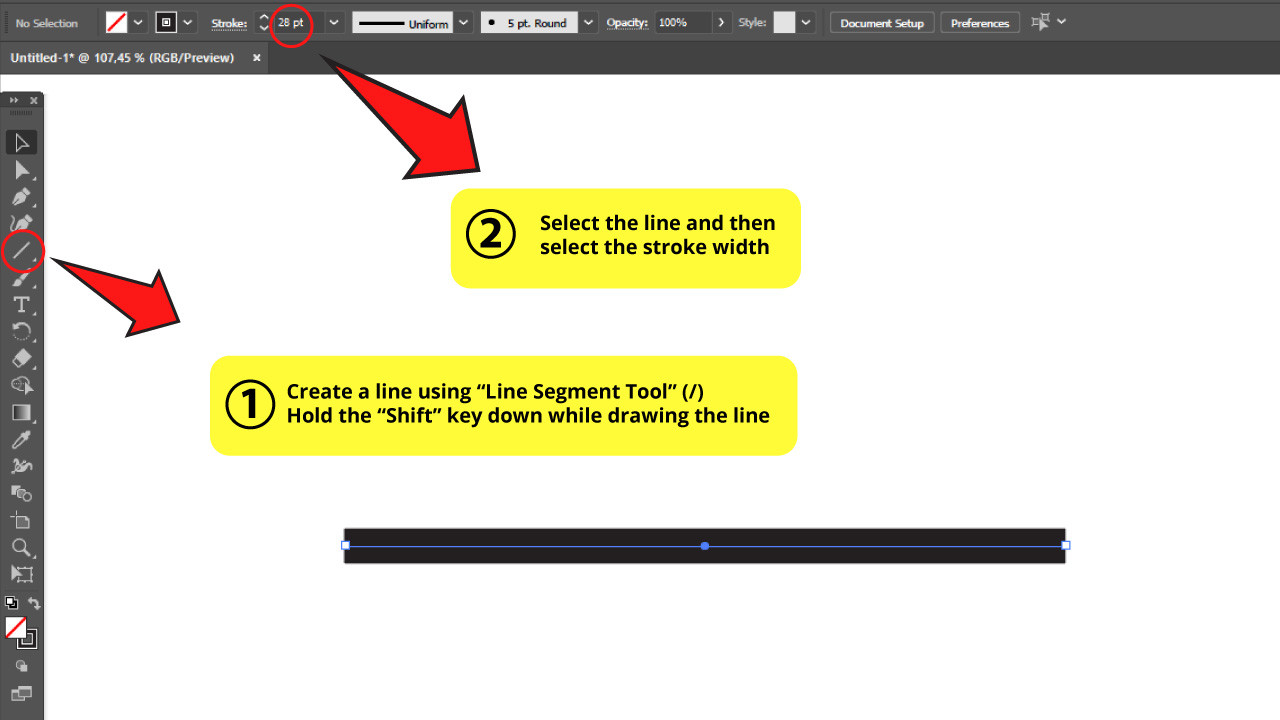
Step 1: Make a line
Let’s make a cloud to better understand this tool.
Create a horizontal line using “Line Segment Tool” (/). Make sure to hold the “Shift” key down while you are drawing the line so you can get a straight line in 180°. While the line is selected, select your line width on the Stroke Box that you can find on the toolbar on the top of the screen.
For this cloud I selected 28 pt. width.
Step 2: Make a circle
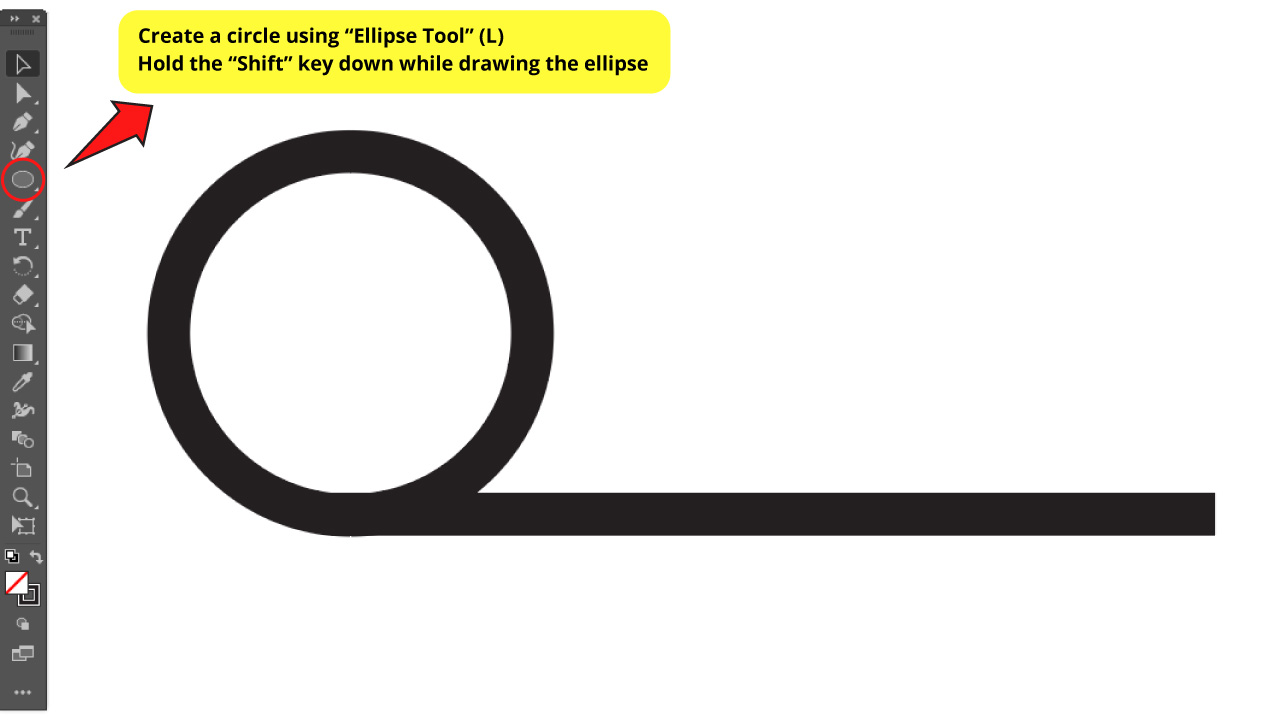
Create a circle using “Ellipse Tool” (L). Make sure to hold the “Shift” key down while you are creating the ellipse, so you can get a symmetric ellipse, that is a circle.
Step 3: Copy the circle
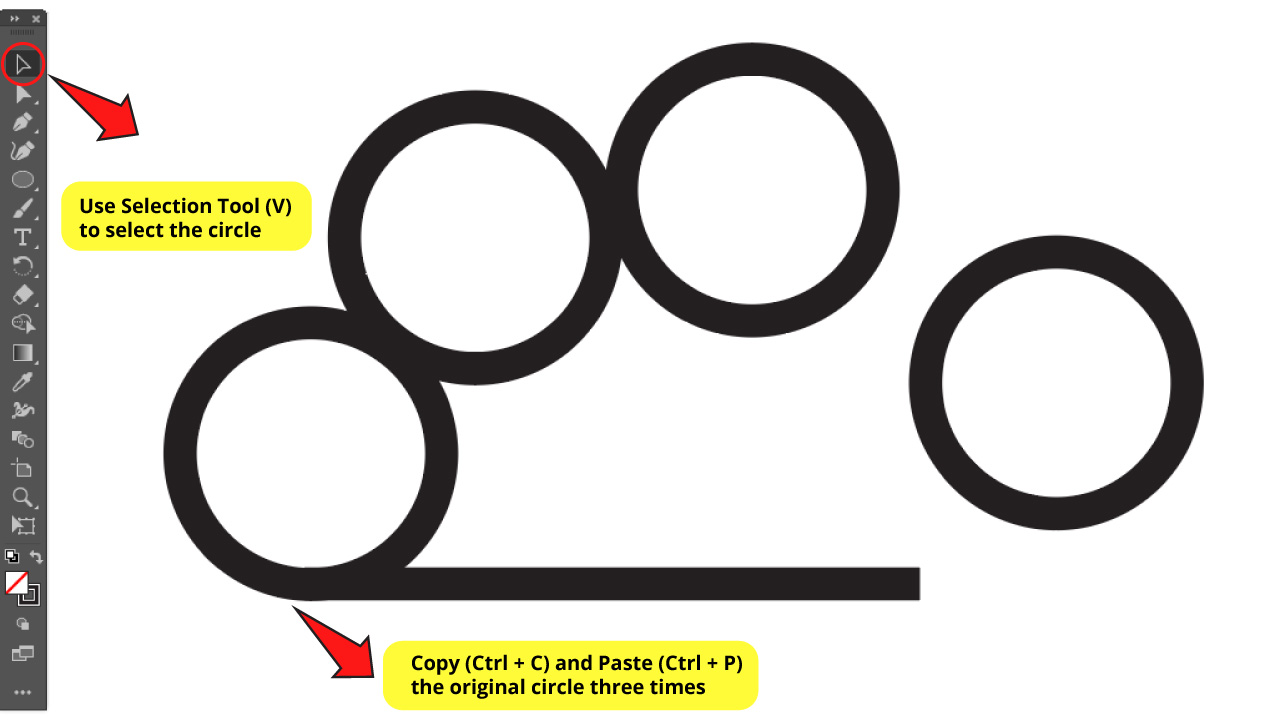
To make copies of the circle first select the circle. To select the circle use the “Selection Tool” (V) you can find on the toolbar on the left side of the screen.
Then you have to press “Ctrl + C” (copy) and then “Ctrl + P” (paste). You can also do this by going to “Edit > Copy” and then “Edit > Paste”. You can find the “Edit” menu on the top of the screen.
Repeat this action to create 3 more circles.
Step 4: Resize the circles and align
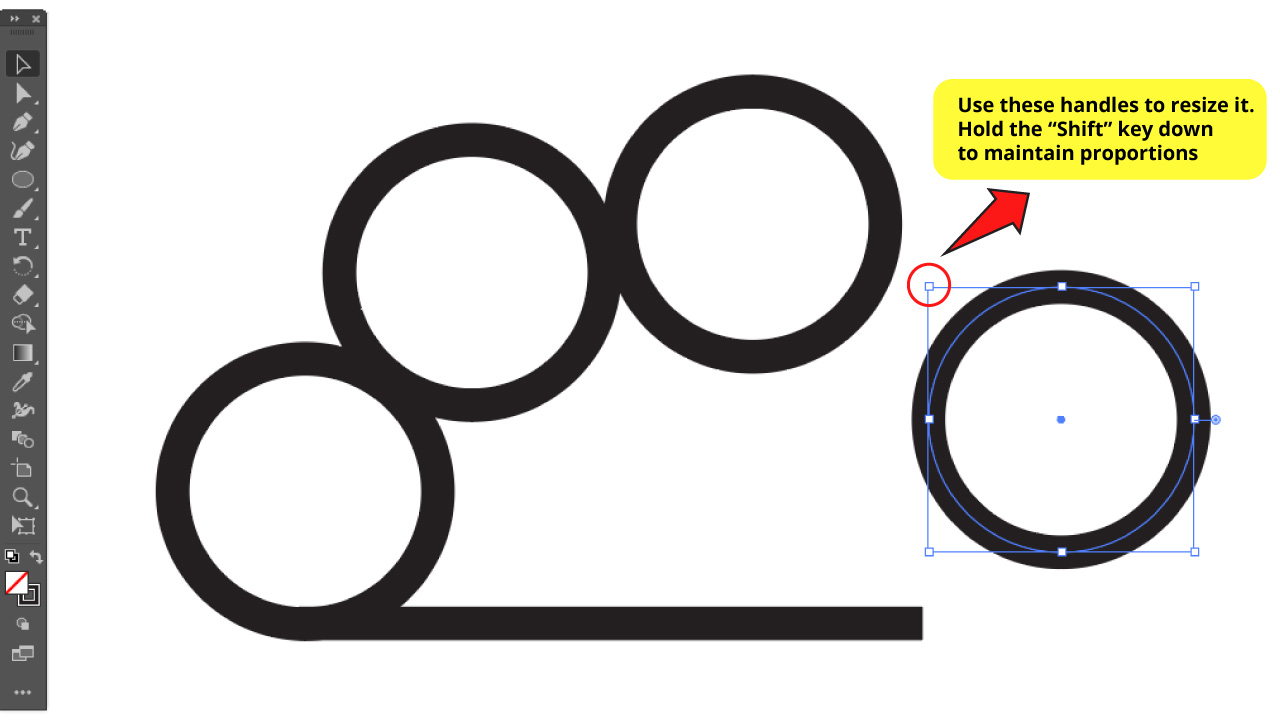
You can resize some of the circles to get a more organic and realistic cloud shape. You can resize it by selecting the circle you want to modify and manipulating the handles on the corners of the bounding box. Remember to hold the “Shift” key down while you are doing this to maintain proportions. Once you’re done with this, align the circles on the top of the line.
Step 5: Understanding the “Shape Builder” tool
Once you have aligned all your shapes, select all using the “Ctrl + A” command or select everything manually using the “Selection Tool” (V).
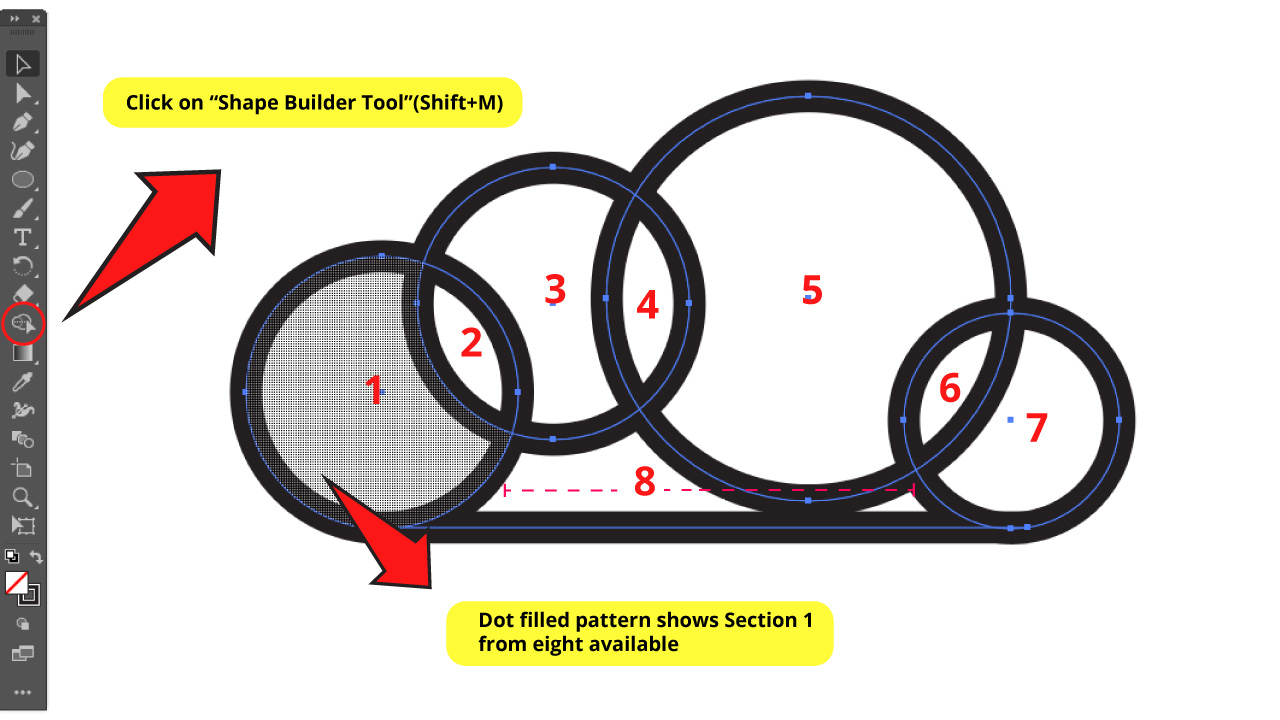
Then click on the “Shape Builder Tool” (Shift + M) that you can find on the left side toolbar.
If you successfully selected the “Shape Builder Tool”, when dragging the mouse pointer over the shapes it will be filled with a dotted pattern showing one single section of your whole draw. For this example we have eight different sections.
Just to clarify, section 8 is the whole bottom shape. It’s not two separated shapes.
This is because the circle and the horizontal line that we had created at the beginning aren’t crossing or reaching each other. Meaning the blue lines, not the black stroke lines.
Step 6: Using the “Shape Builder” tool
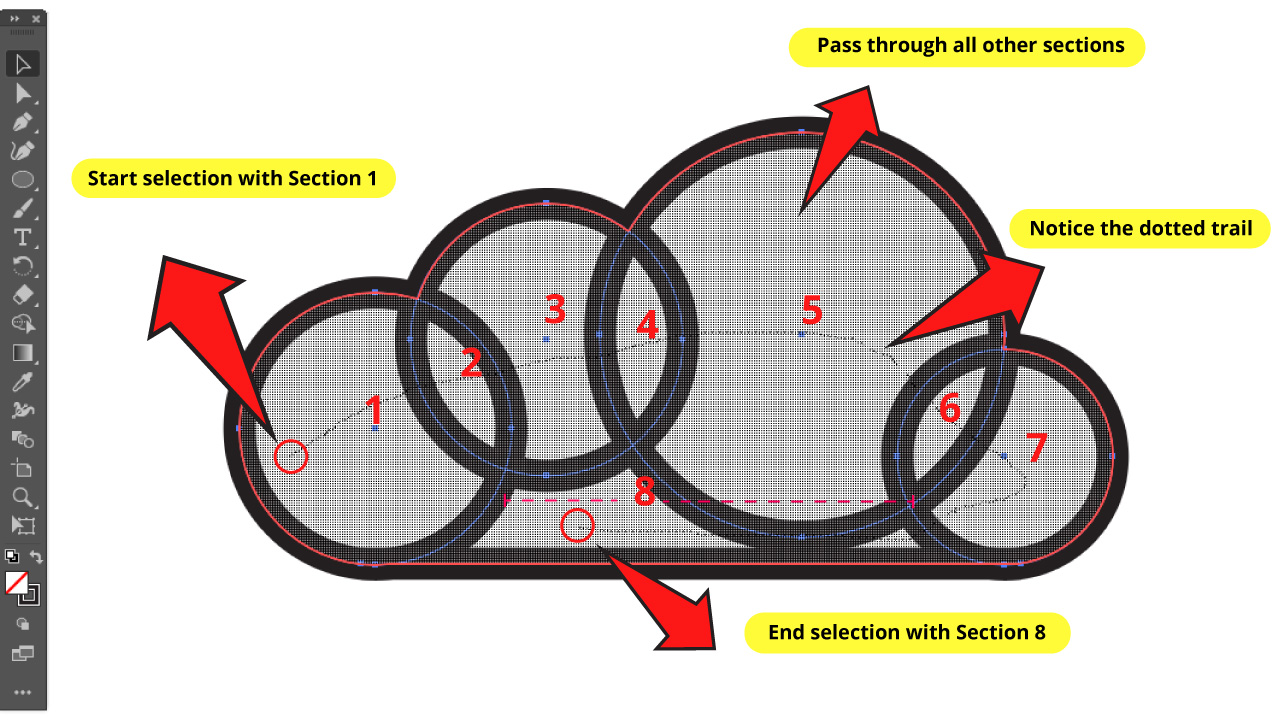
To create the cloud we have to unite all sections to get a single unified shape.
For this we have to hold click down on section 1 and pass across all the sections through section 8.
While you do this you will notice a dotted line trail.
Once you have reached section 8, release the click and you will get your cloud.

Step 7: Fill the cloud
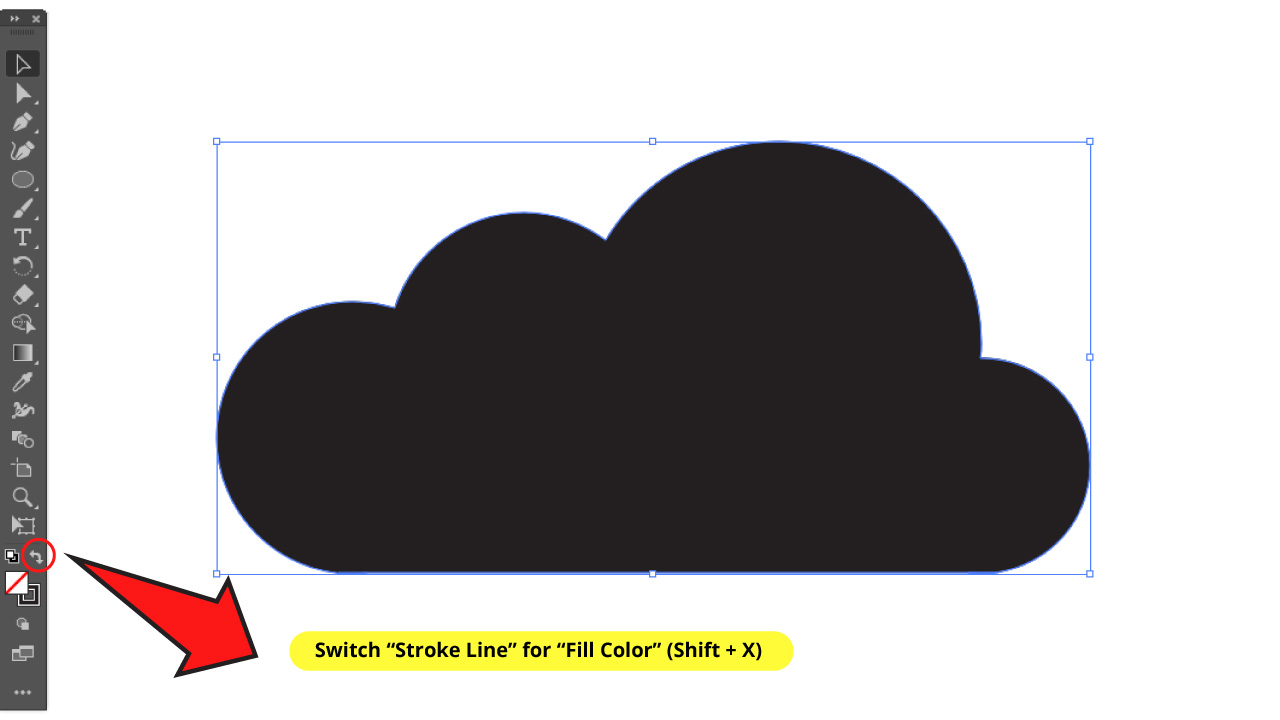
You could leave the cloud like this. But if you want to get a filled cloud shape, you can switch “stroke color” for “fill color”.
You can do this by going to the color box on the left side toolbar and clicking on the arrow. Or you can shortcut it with “Shift + X”.
Finally, you can pick the color you want by just double-clicking on the color box.

If you’d like to know about a different method to create clouds you can check this article: How to Make Clouds in Illustrator – Step-by-step Guide
How to combine complex shapes in Illustrator using “Shape Builder Tool”
Select the shapes you want to combine, then click on “Shape Builder Tool” (Shift + M). Visualize the shapes you want to unify and hold the click down on one of those shapes. Pass through all the other shapes to join them. Release click and it will be done.
How to combine complex shapes in Illustrator using the Shape Builder Tool: Step-by-step Guide
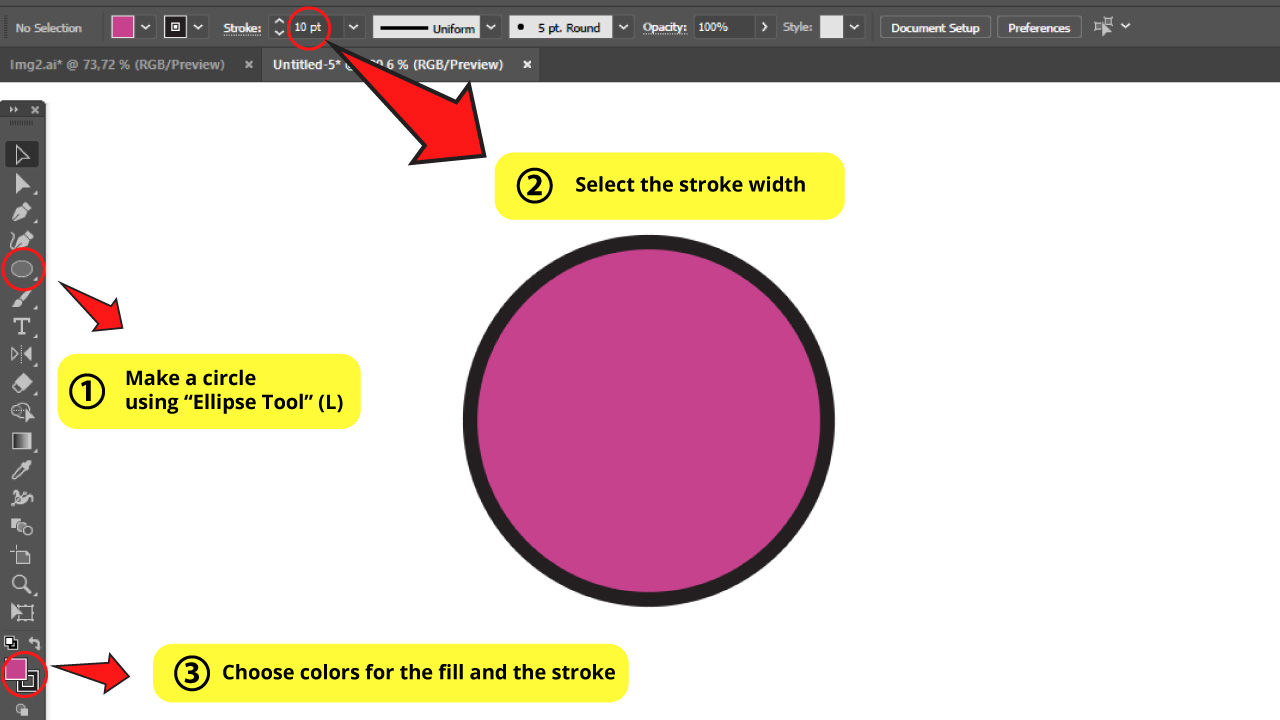
Step 1: Make a circle with stroke line
Let’s make Linked Rings to better understand this tool.
Create a circle using the “Ellipse Tool” (L). Remember to hold the “Shift” key down while you are making the ellipse so you can get a perfect circle.
We need a stroke line for the circle, so you can add it by simply setting the width from the stroke box that you can find on the toolbar on the top of the screen.
Then you can choose the color of both the fill and the stroke by double-clicking on the color boxes on the left side toolbar.
Step 2: Make a ring
To make a ring you need to copy and paste your circle. For this you have to select the circle and press “Ctrl + C” and then “Ctrl + F” (or “Ctrl +Shift + V”). The last command is for pasting the new circle exactly on top of the original circle.
Then you have to resize the new circle to get a smaller one. Use the selection handles as explained in the “Step 4: Resize the circles and align” tutorial.
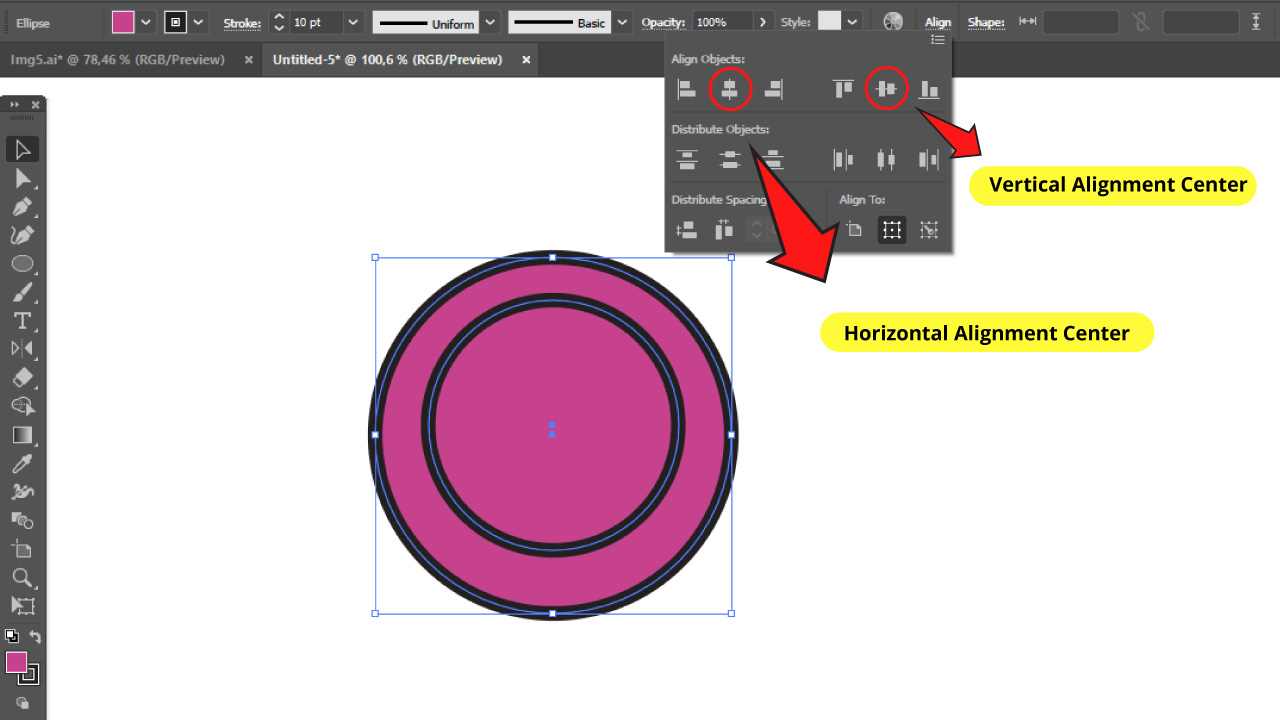
If you want to get a perfect ring, you have to center both circles. So we are going to use the “Align Tool” for this action.
The “Align Tool” can usually be found on the top of the screen or on the right side toolbar. If you can’t find it, you have to enable it by going to “Windows > Align” or pressing the “Shift + F7” command.
Once you have found it, select “Horizontal Align Center” and “Vertical Align Center” to align both circles exactly in the middle.
If you want to read more about this topic you can check our tutorial on How to center objects in Illustrator.
Step 3: Group them
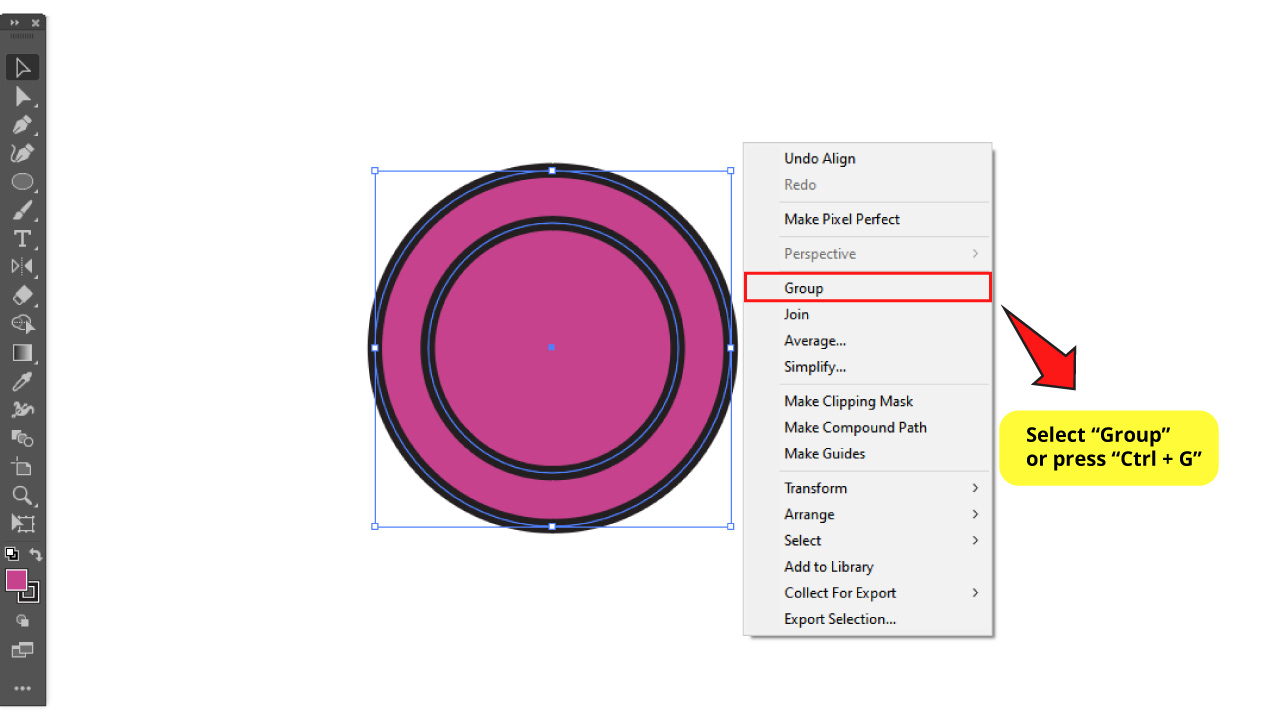
So you have a ring, but both circles are separated items. We need to group them to be able to handle the ring as an individual unit. Select both circles and then press “Ctrl + G” or right-click to open the options menu and select “Group”.
Step 4: Make copies

As you can see, since both circles were grouped you can now move both as a single object.
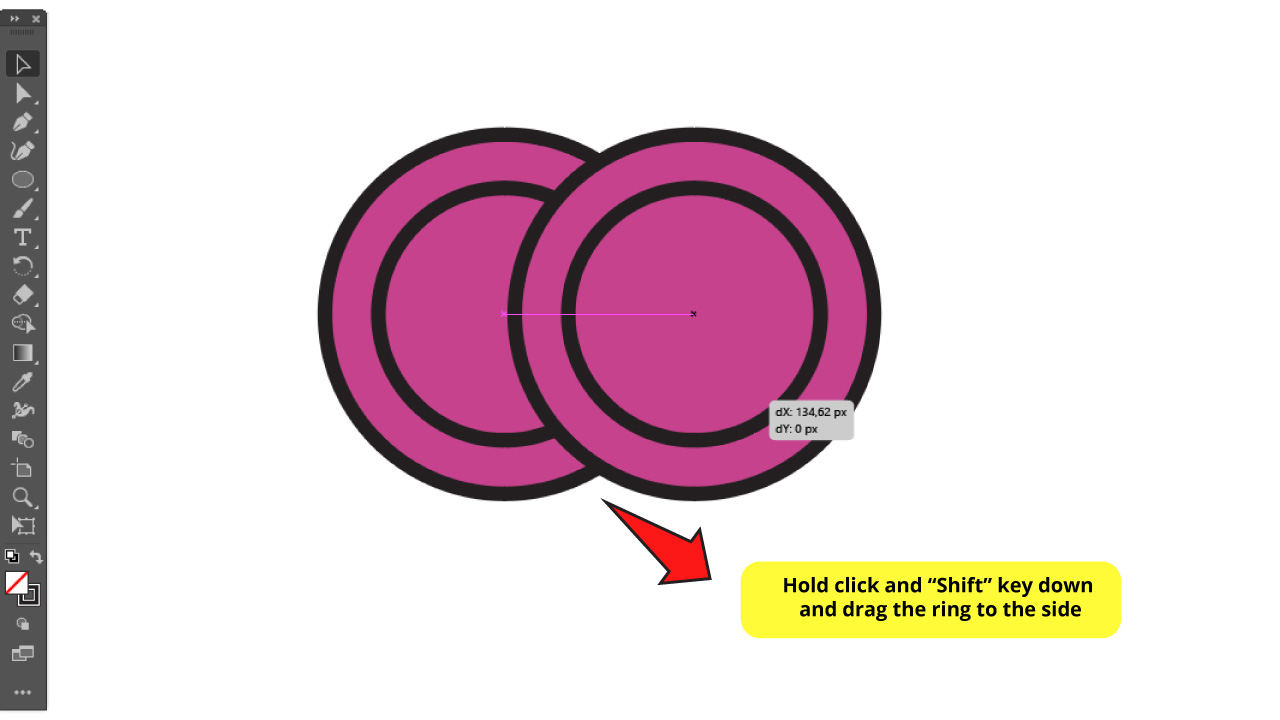
Next we have to make two more copies of the ring. Select the ring and press “Ctrl + C” and then “Ctrl + F”.
Select the new ring which will appear just atop of the original ring. Then while you hold the “Shift” key and the click down at the same time, drag the ring to one side. The “Shift” key will let you move the new ring in the same horizontal axis so both circles will remain horizontally aligned.
Next, let’s make yet another copy of one of those rings. You can place this new ring below the other two.
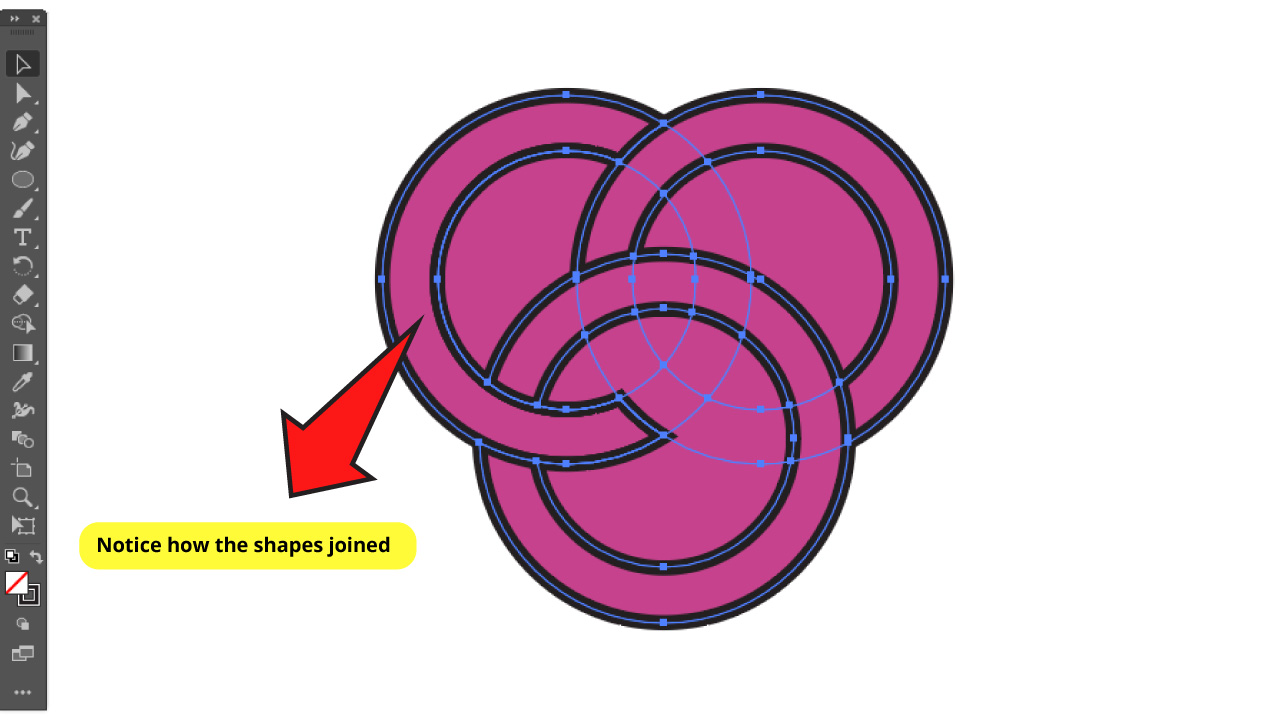
Step 5: Linking rings
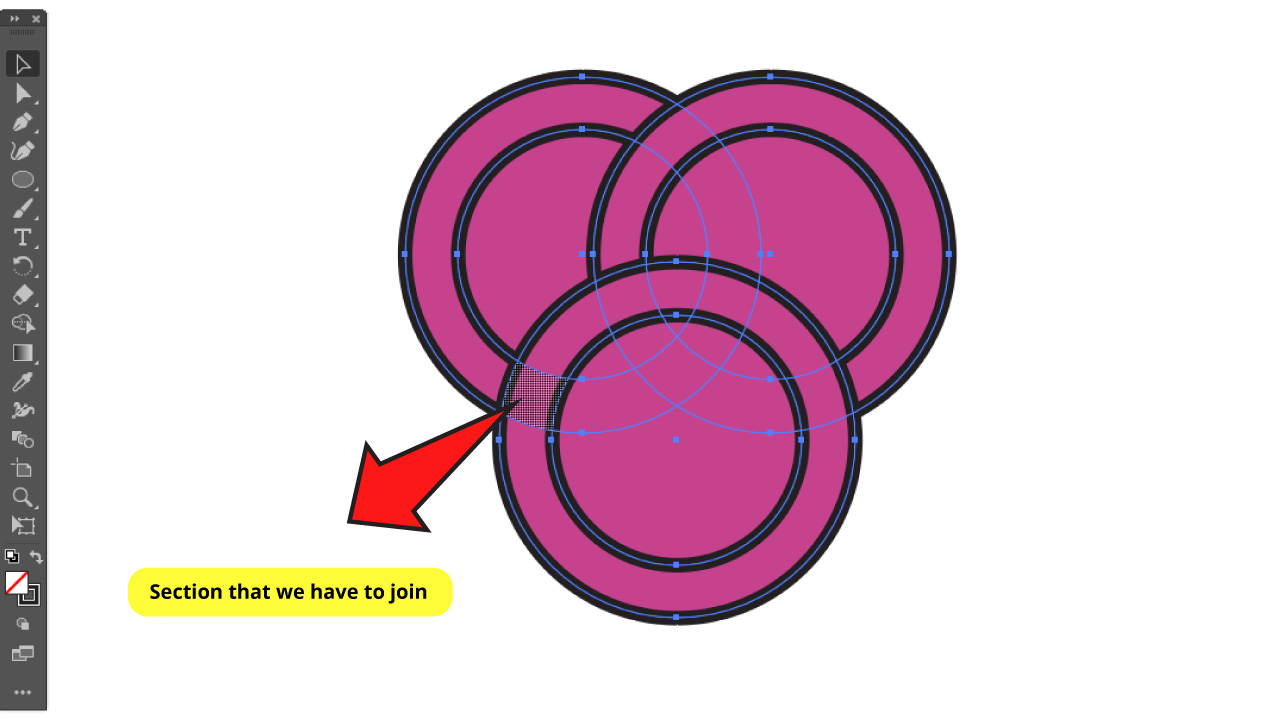
To get the rings properly linked we need every ring to pass below and above each other, so we need to keep this in mind when uniting shapes.
First select the 3 rings and click on the “Shape Builder Tool” (Shift + M).
You can visualize a selected section of the ring. If we want this section to be on the top, we need to also work on both the previous and the next sections in order to join them.
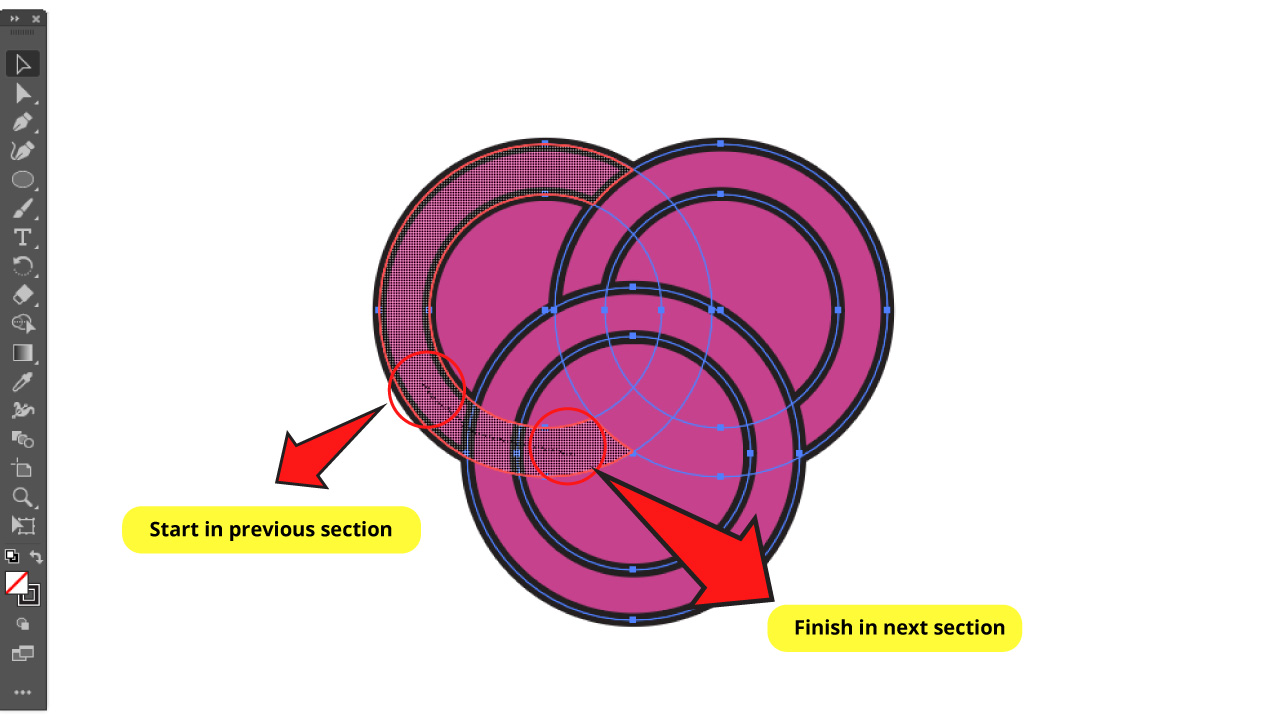
Hold the click button down on the previous section and drag it all the way across the next two sections to unite them all. You will get this.
Continue joining paths remembering that the rings need to pass above and below each other. If you do it right, you will get this.
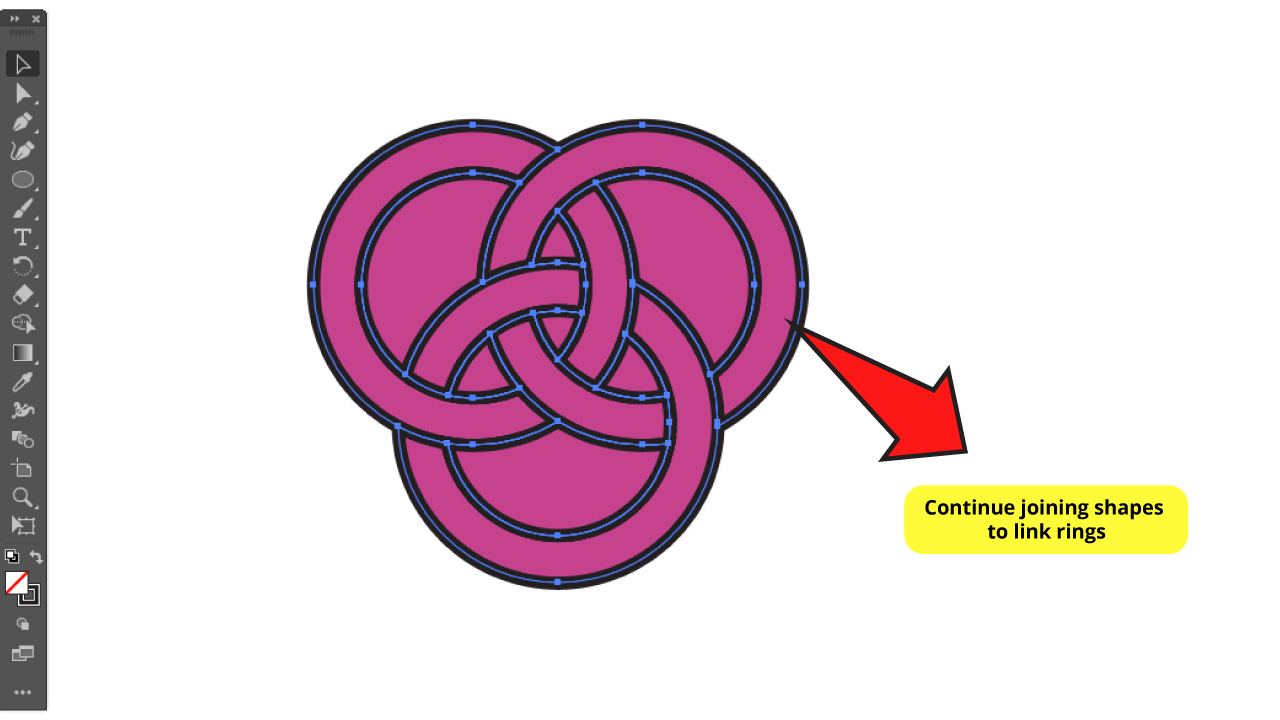
You can read more about “Shape Builder Tool” in this tutorial: Illustrator: How to use the Shape Builder Tool
Step 6: Deleting background
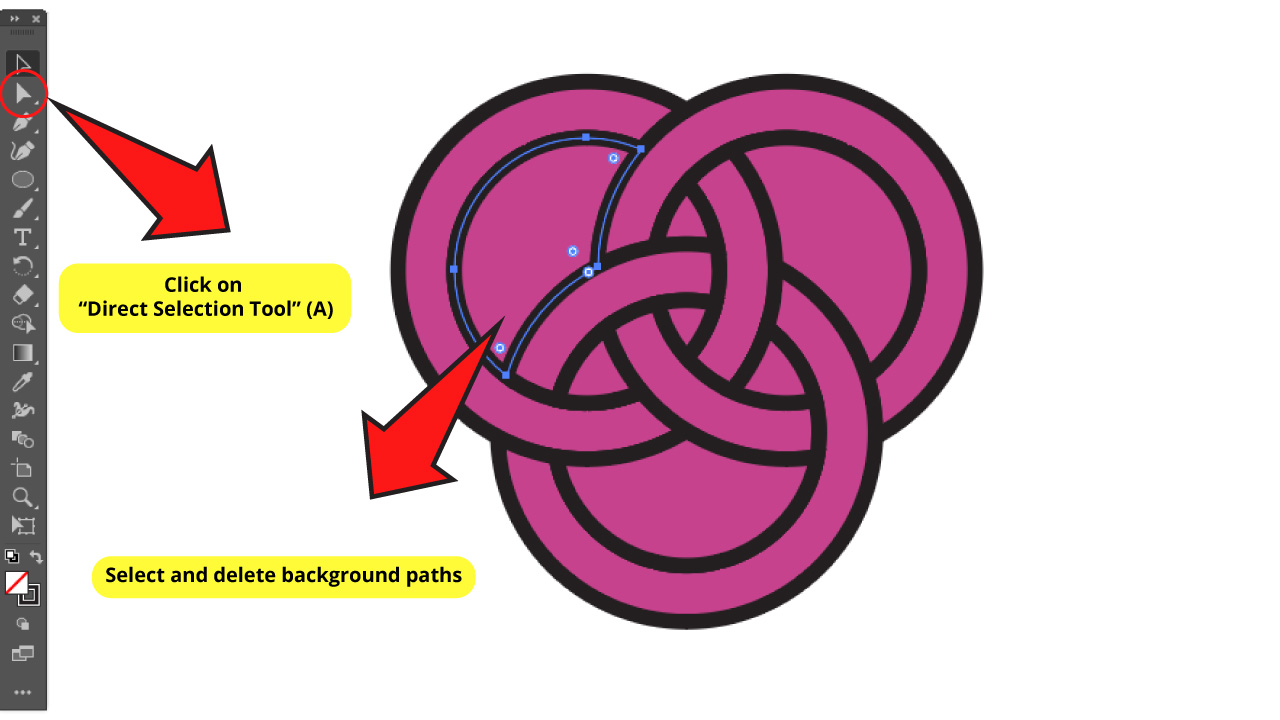
Now the only thing left is to delete the background paths. First select “Direct Selection Tool” (A) from the left side toolbar.
Then select the background paths and press the “Del” key to delete them one by one. Maybe you have to delete the same section more than once to get it completely deleted.
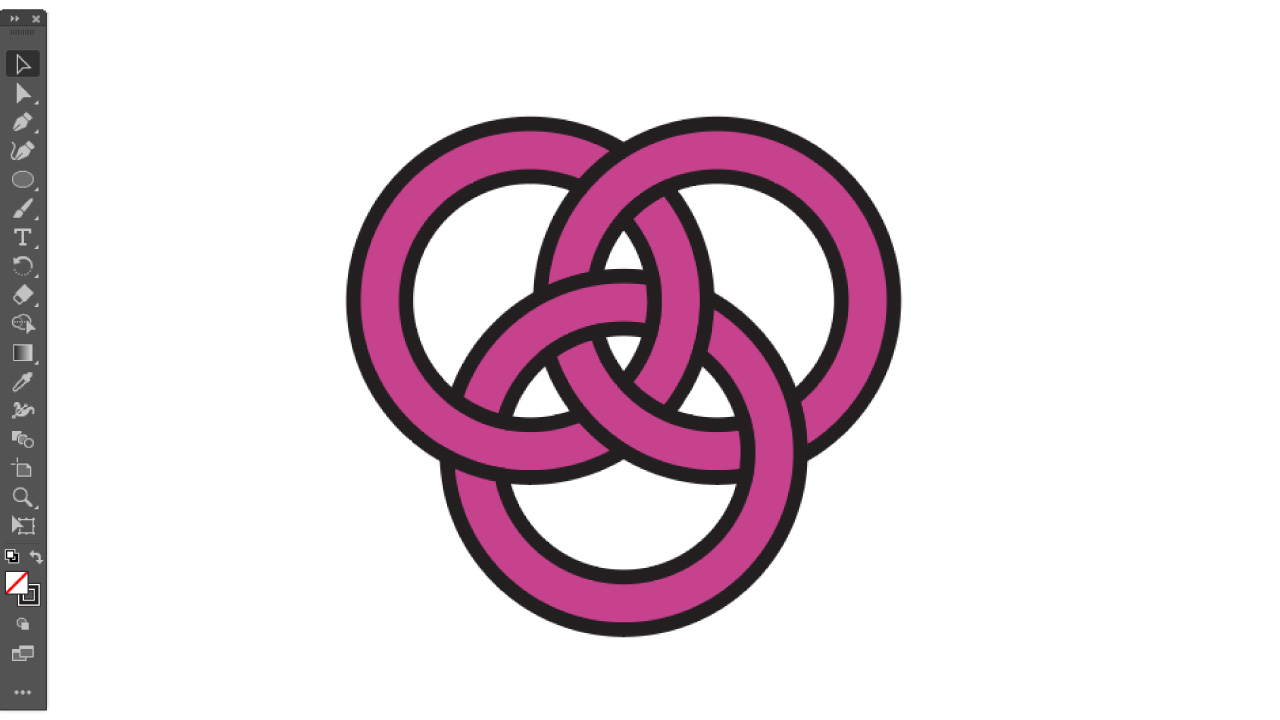
Once you have done this you finally obtained your linked rings.
You can apply the technique explained in this basic tutorial for different shape combinations.
How to combine shapes in Illustrator using the “Pathfinder Tool”
Select the shapes you want to combine. Go to “Pathfinder Tool” (Shift + Ctrl + F9) and select the tool that best suits your needs. For instance, select “Unite” if you want to unify your shapes as a one solid shape, or select “Divide” if you want to trim your paths through the shape lines.
Method 1: Unite Tool
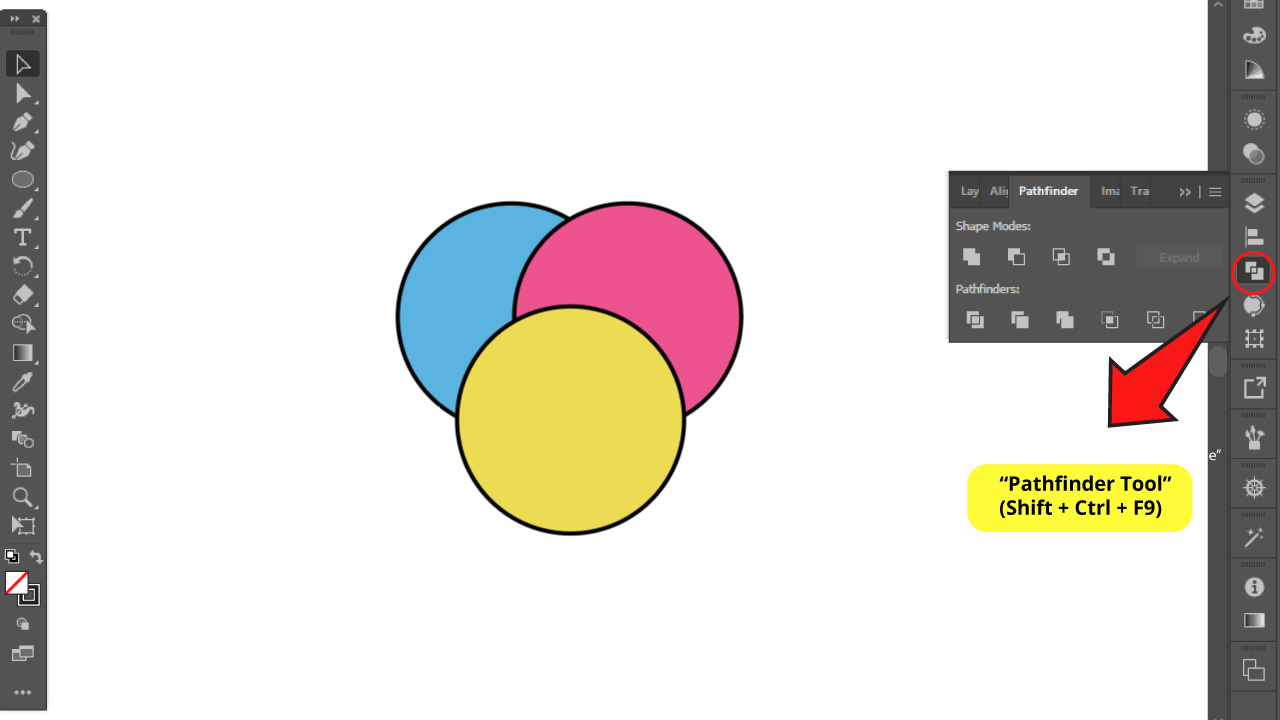
To understand better how shapes combine with the “Pathfinder Tool” we are going to use tree circles with fill color and stroke line.
First of all we need to locate the “Pathfinder Tool”. It’s usually located on the toolbar on the right side of the screen. If you can’t find it, you can enable it by selecting “Windows > Pathfinder” on the menu on the top of the screen. Or you can just use the “Shift + Ctrl + F9” command.
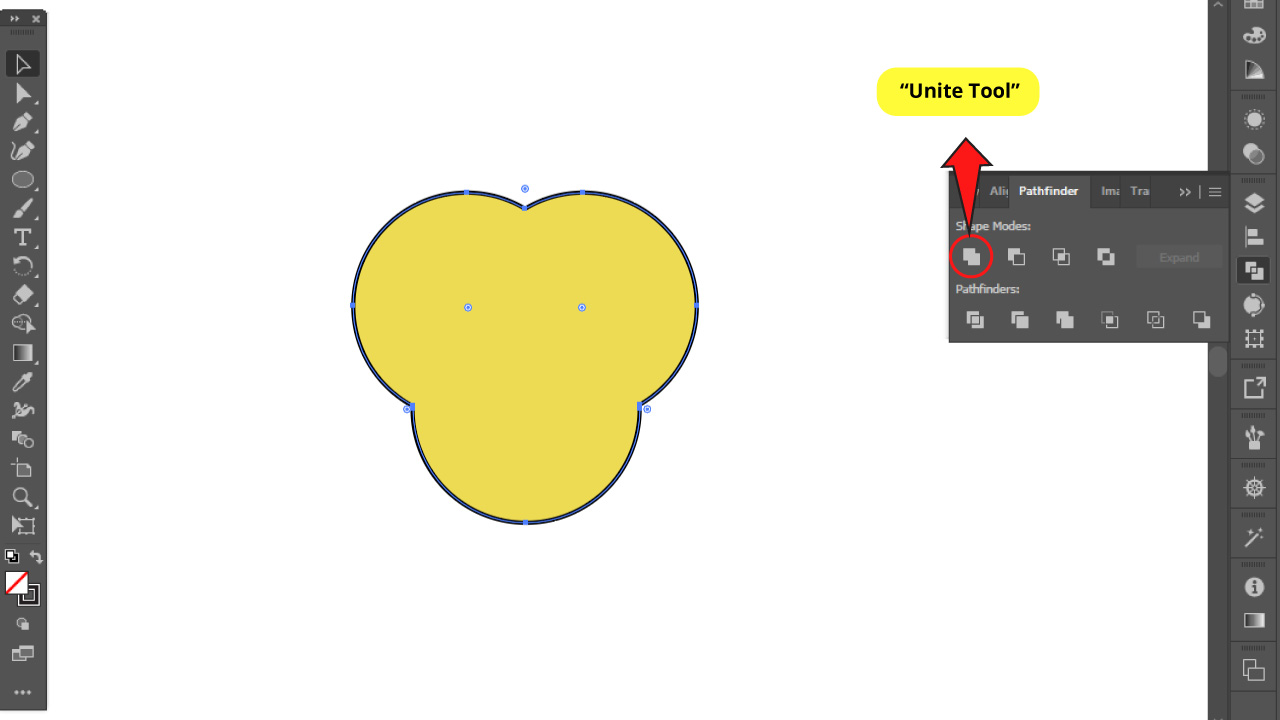
Select the shapes and click on “Unite Tool” so you get a whole unified shape with stroke lines.
This is the best and quickest way to unify fill color shapes.
Just to clarify, we couldn’t have done the cloud shape example with this tool because there was a line shape between the circles, so that wouldn’t have worked.
If the cloud was only made of circles, “Unite Tool” would be the best and quickest route.
Method 2: Minus Front Tool
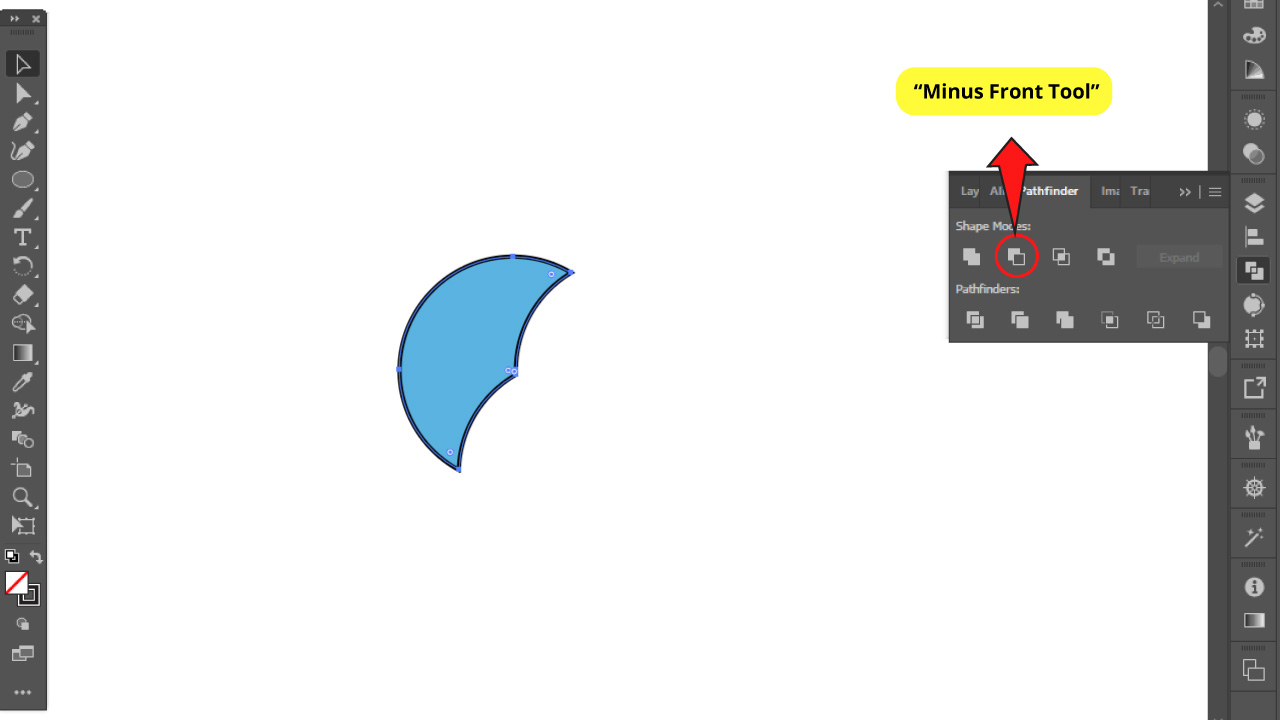
“Minus Front Tool” crops the shapes in such a way that the path below stays, while the other shapes are deleted.
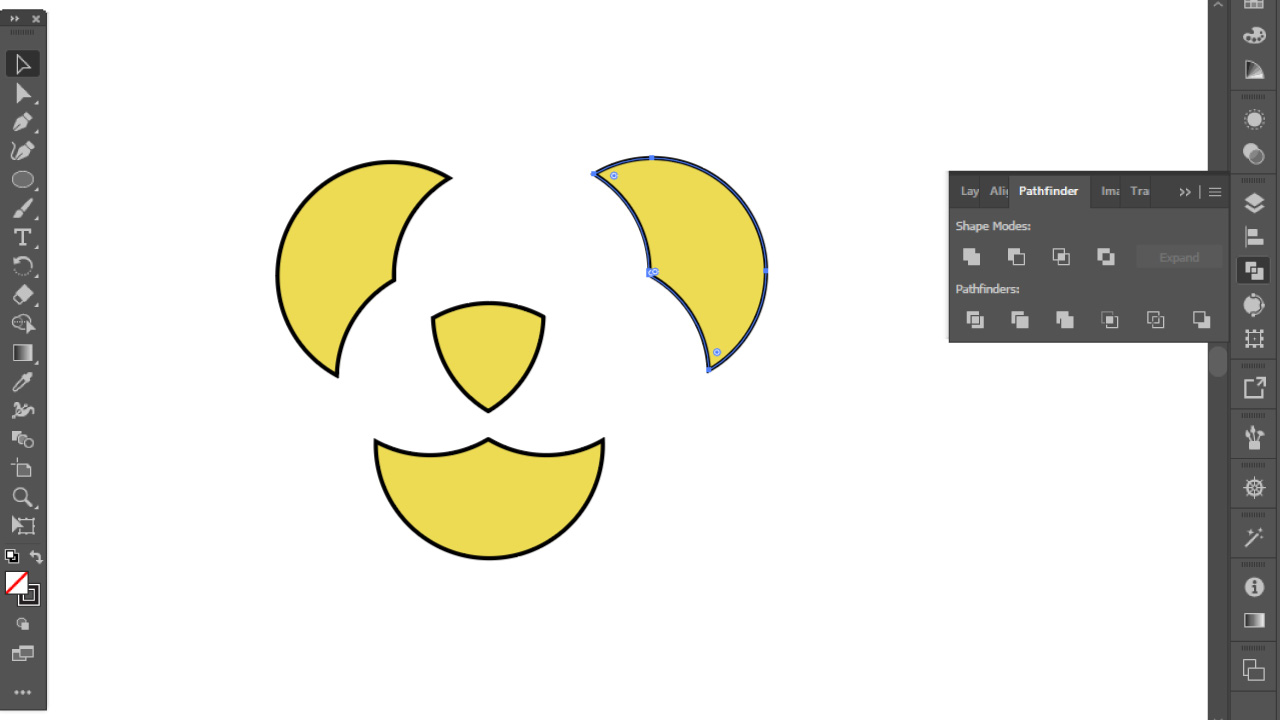
Method 3: Intersect Tool
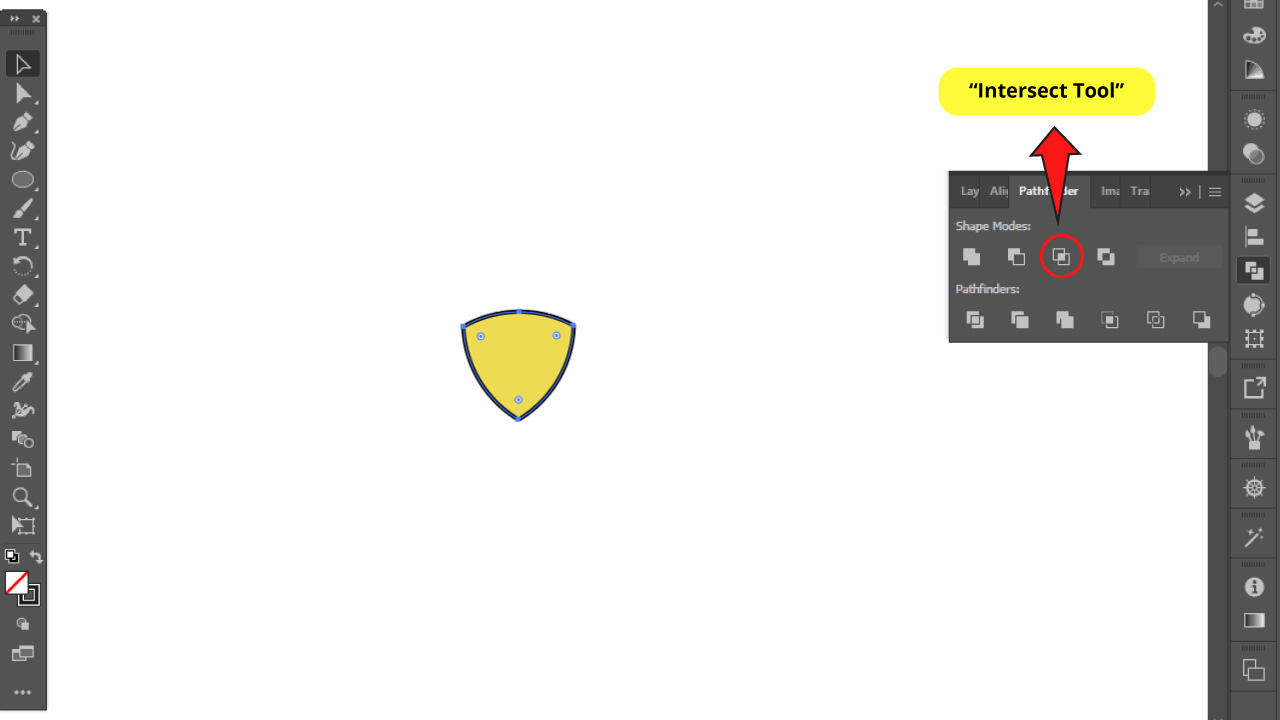
“Intersect Tool” only leaves the intersection of all the shapes. In this case, the intersection of the three circles.
Method 4: Exclude Tool
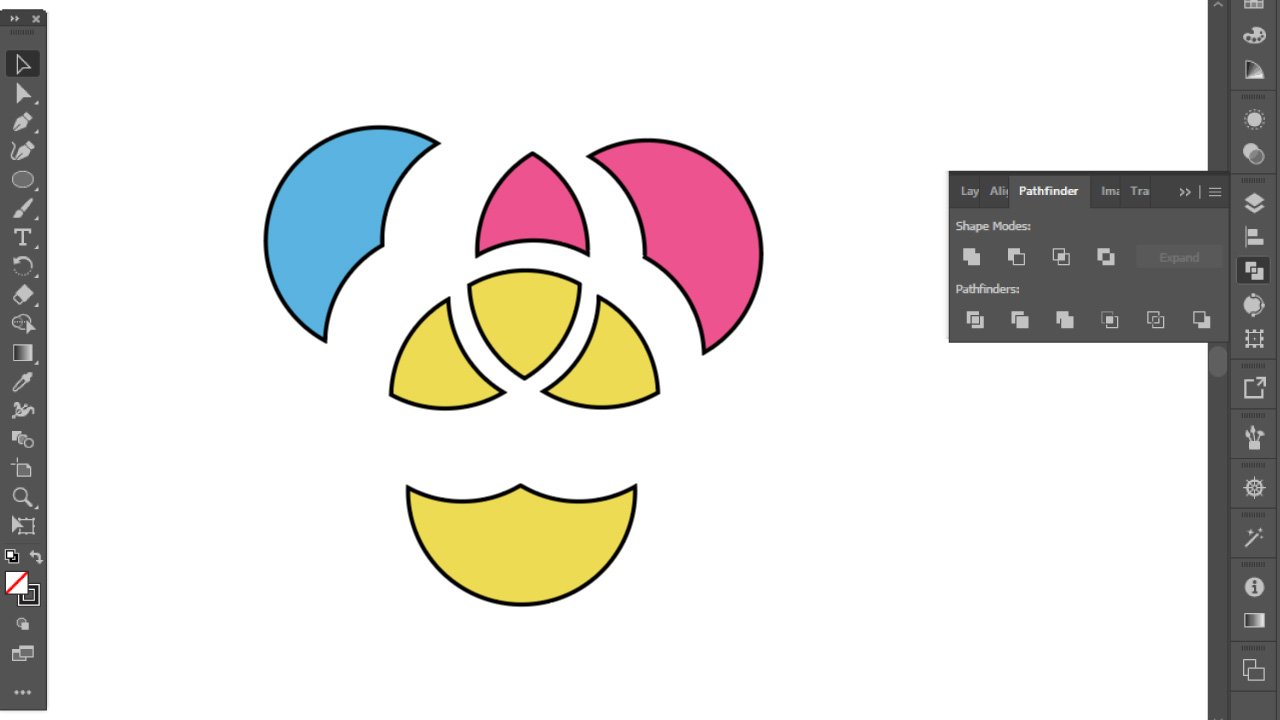
“Exclude Tool” deletes the even intersections and keeps the odd intersections. In this case, it deletes the intersections between 2 circles, but leaves the central intersection because there are three intersections there.
The result after this process is a grouped path which contains separated shapes, so you can drag them individually if you use “Direct Selection Tool” (A). Or if you prefer, you can first “Ungroup” (Shift + Ctrl + G) them, or right-click on them and select “Ungroup” from the dropdown menu.
Method 5: Divide Tool
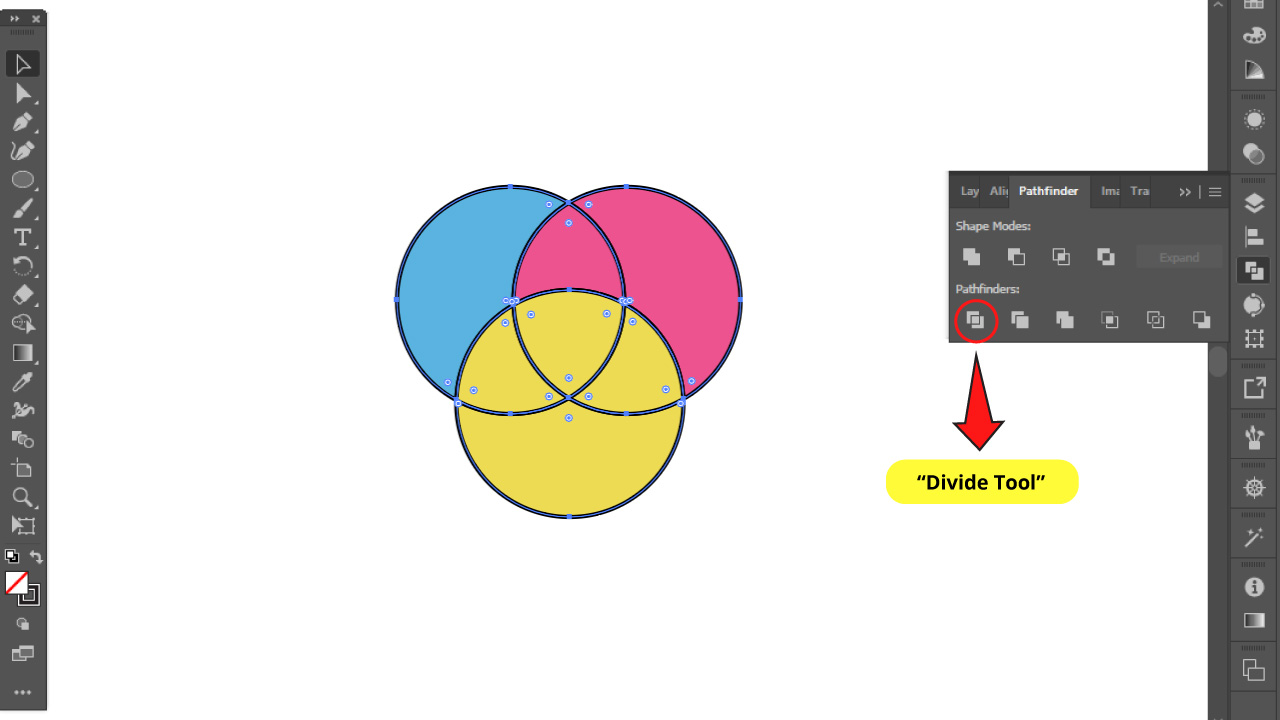
“Divide Tool” crops the shapes through the crossing lines and keeps the stroke lines.
This way you can separate the items the same way shown in the method previously executed.
Method 6: Trim Tool
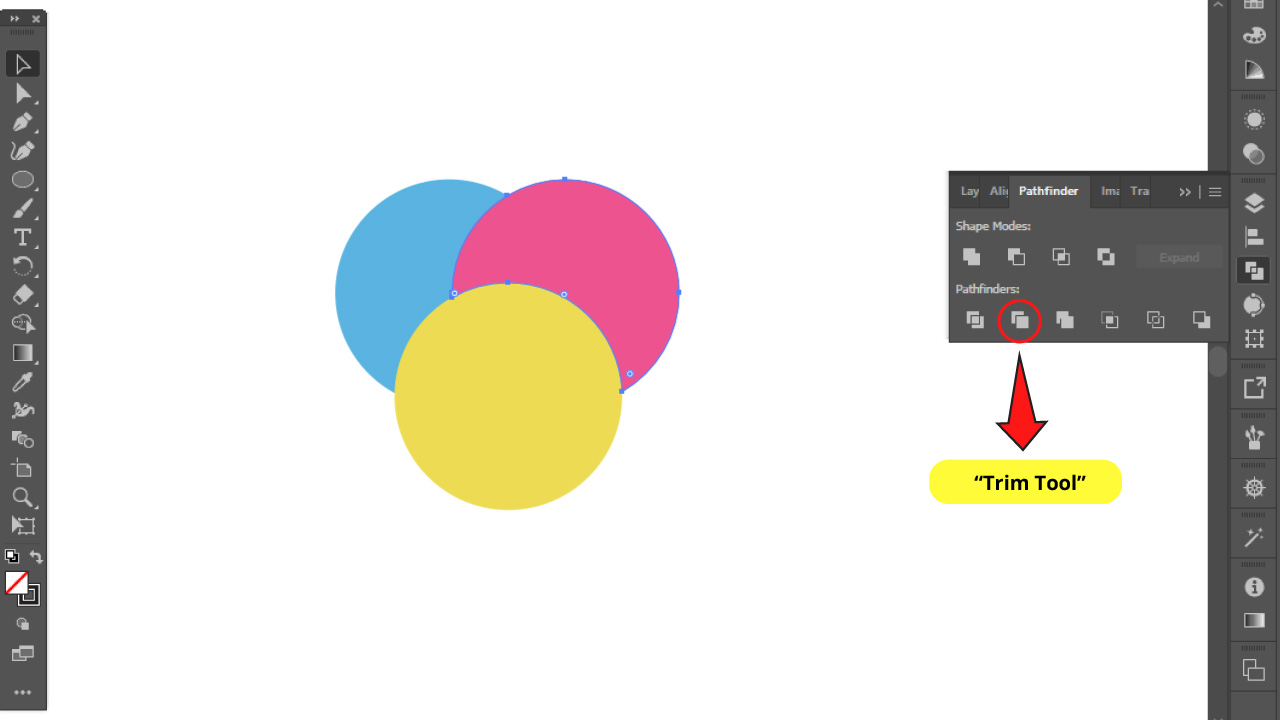
“Trim Tool” exclusively trims the shapes of the visible lines and deletes the stroke lines.
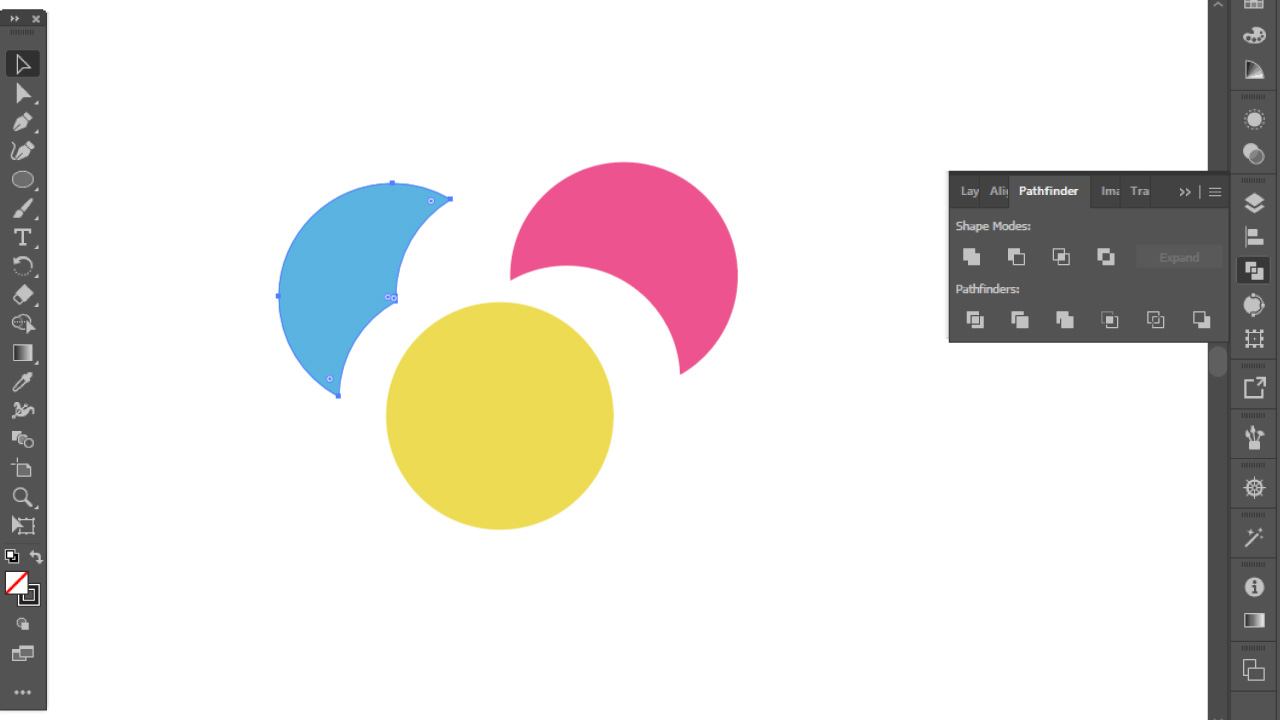
If you separate the paths you obtain these shapes.
Method 7: Merge Tool
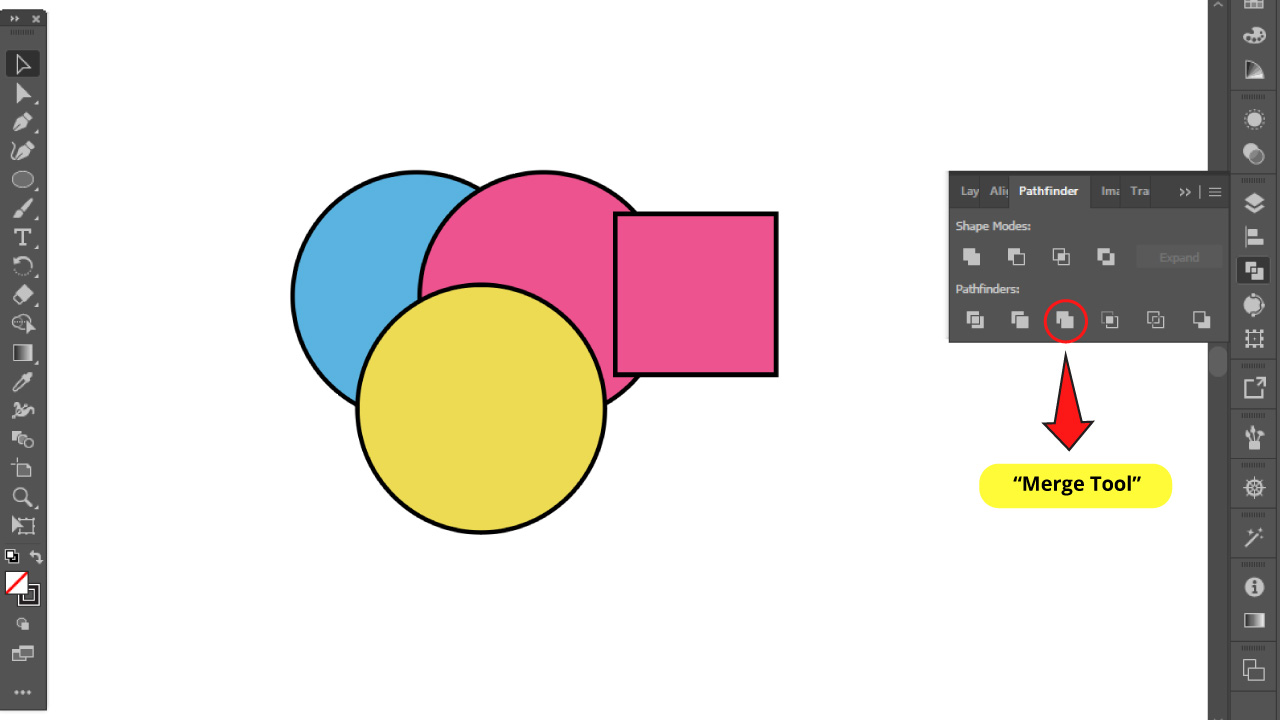
For this example I included a square so we can properly appreciate what this tool does.
“Merge Tool” trims the shapes of the visible lines and deletes the stroke lines just as the “Trim Tool” but it also unites shapes of the same color.
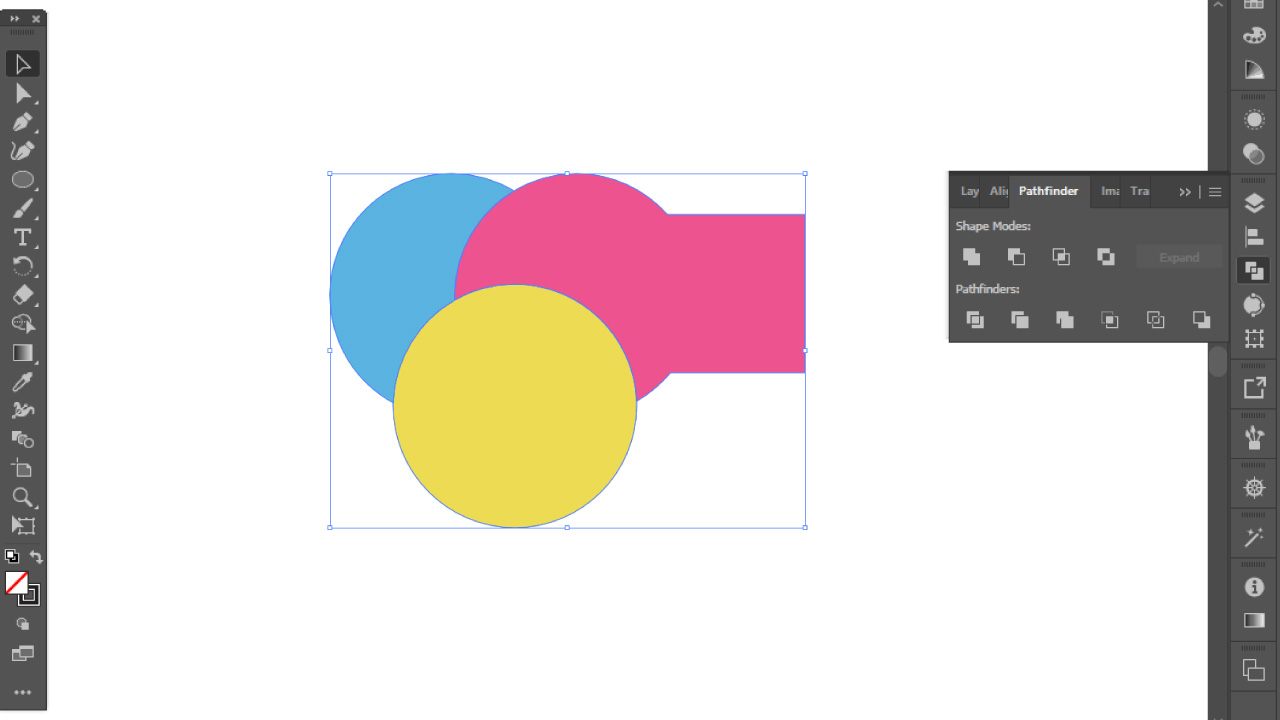
Again, if you separate the paths you obtain these other shapes.
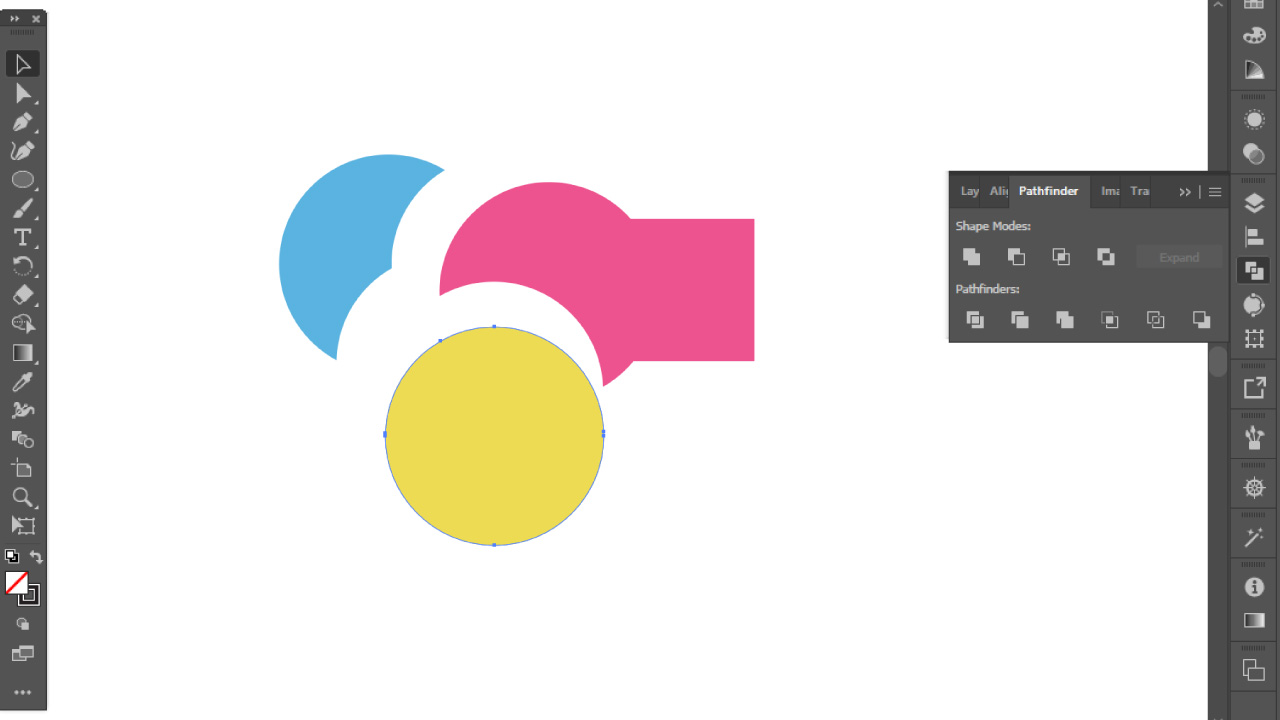
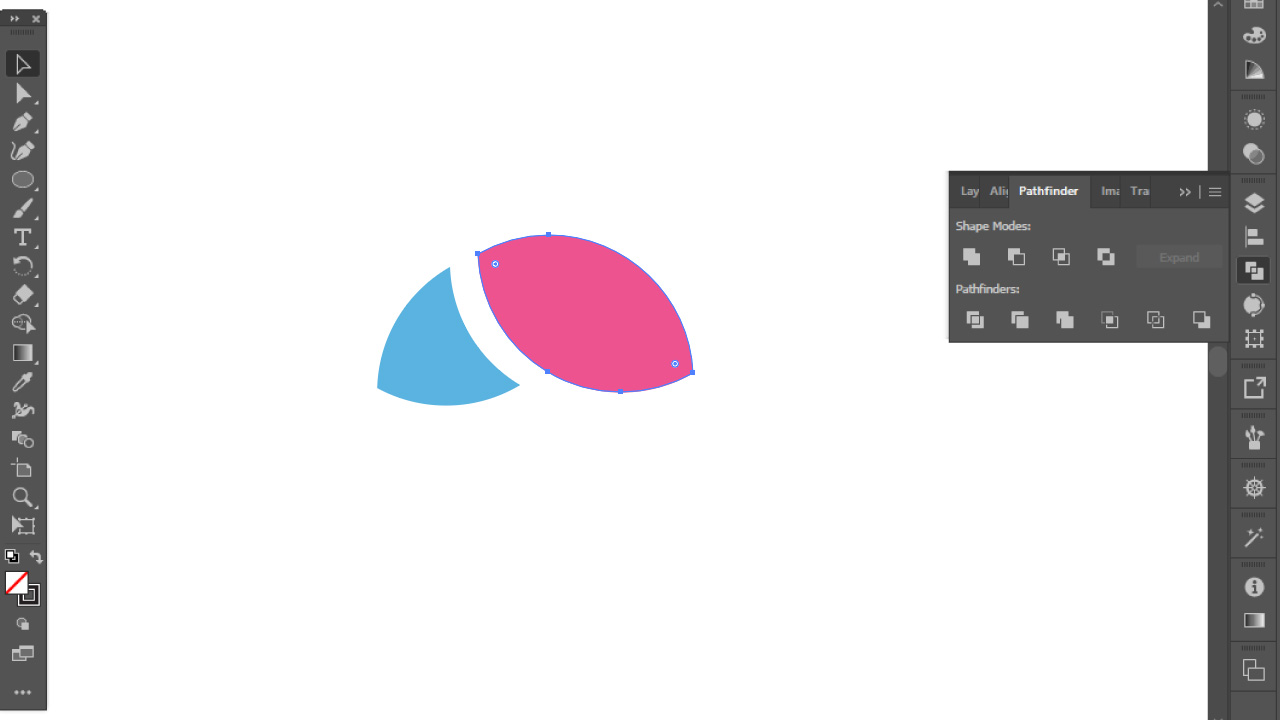
Method 8: Crop Tool
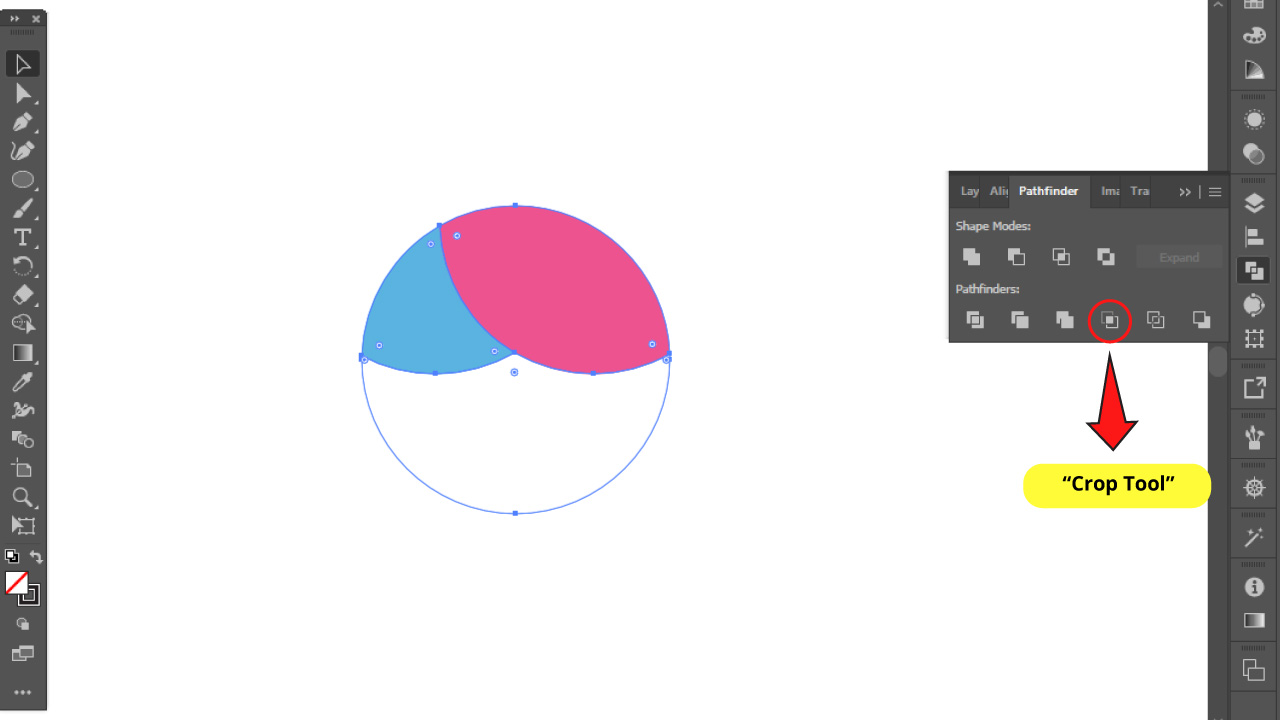
The “Crop Tool” is like a masking option. It uses the path that is above (yellow circle in this case) to mask the shapes below.
The rest of the shapes are deleted, as well as the stroke lines.
You can separate the paths if you want by selecting the “Direct Selection Tool” (A) or “Ungrouping” them first.
Method 9: Minus Back Tool
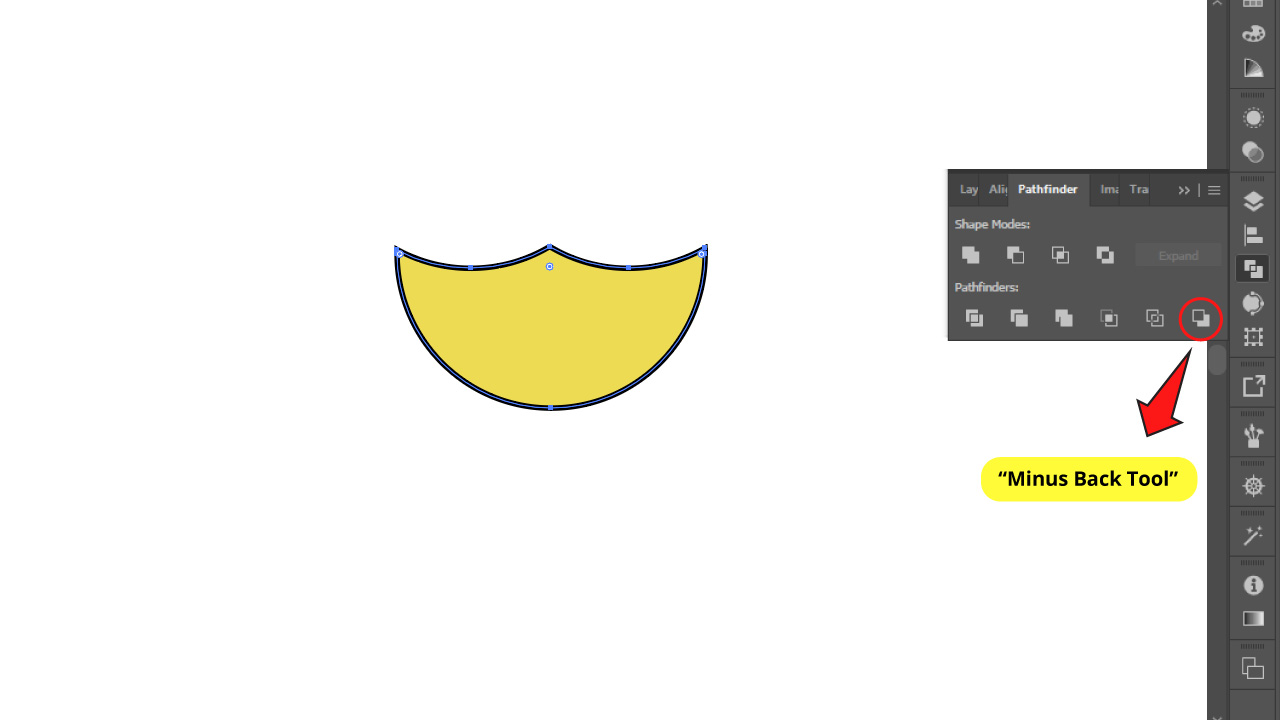
The “Minus Back Tool” works similar to “Minus Front Tool” but in a negative way. It keeps the shape on top but only the section with no intersections. The rest of the shapes are deleted.
You can read more about how combine shapes in this quick tutorial: The 3 Best Ways to Merge Paths in Illustrator – Revealed
Frequently asked questions on “How to combine shapes in Illustrator”
Are “Shape Builder” and “Pathfinder”interchangeable tools?
In some cases they are interchangeable, but for some specific shape combinations they aren’t. As a rule of thumb you can get all “Pathfinder” actions with “Shape Builder” but not vice versa.
What is the best tool, the “Shape Builder” or the “Pathfinder” tool?
It actually depends on what you need. “Shape Builder” is more of a manual tool so it means you’ll have to work more, but it also means more versatility. Anyway, if you just need to unite some shapes, the easiest and quickest option is probably “Unite Tool” from “Pathfinder”.