
When it comes to illustration, the technique of perspective proficiency becomes fundamental. Fortunately, Adobe Illustration counts with a tool to make our work much easier.
The first impression using the perspective tool may seem overwhelming, because of the huge number of handles and overlapping grids. But it’s actually pretty simple to use.
Once you get acquainted with the Perspective Tool, the drawing process becomes smooth. The steps are mostly repetitive until you build the whole graphic.
In this tutorial we will learn how and when to use this tool in its three modes: One, Two or Three Point Perspective.
How to Use the Perspective Tool in Illustrator
Open the “Perspective Grid” (Shift + P) tool. Go to “View > Perspective Grid” and select a number for Point Perspective. Select one of the sides of the cube in the “Plane Switching” widget. Use the “Rectangle” (M) tool to draw a rectangle. Repeat the process until you have built all your artwork.
Using the Perspective Tool in One Point Perspective in Illustrator
Open the “Perspective Grid” (Shift + P) tool. Go to “View > Perspective Grid > One Point Perspective > 1P-Normal View”. Select one of the sides of the cube in the “Plane Switching” widget. Use the “Rectangle” (M) tool to draw a rectangle. Repeat the process until you have built all your artwork.
The “One Point Perspective” is used to draw hallways, highways, city streets, aerial views of cities, railway lines, room interiors, just to mention a few.
The thing these have in common is that all have real and imaginary lines which vanish in one single point. And that’s why it’s called “One Point Perspective”.
Next, we will learn how to use the “Perspective Grid” (Shift + P) and “Perspective Selection” (Shift + V) tools in Illustrator for “One Point Perspective”. To understand this better, we will cover the drawing process of a room interior as an example.
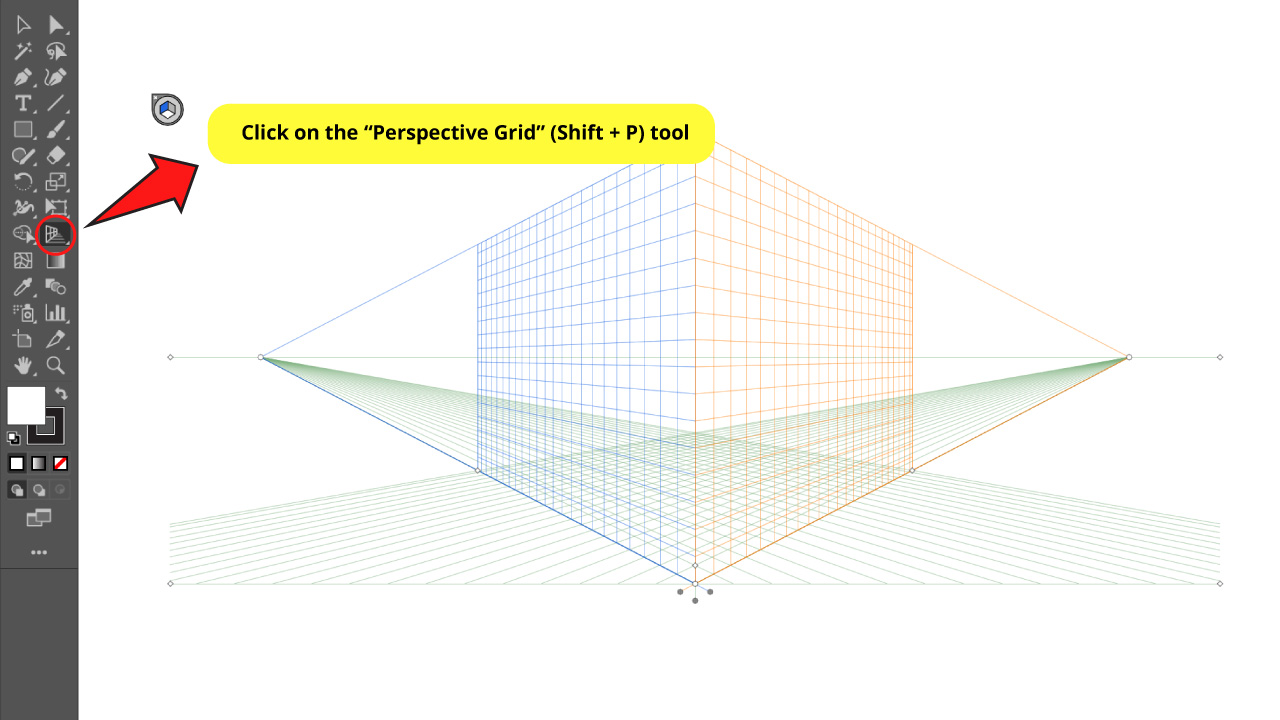
Step 1: Enable the “Perspective Grid” Tool


Click on the “Perspective Grid” (Shift + P) tool on the left side toolbar.
A Two Point Perspective grid will be set on the artboard by default.
Step 2: Set it to One Point Perspective
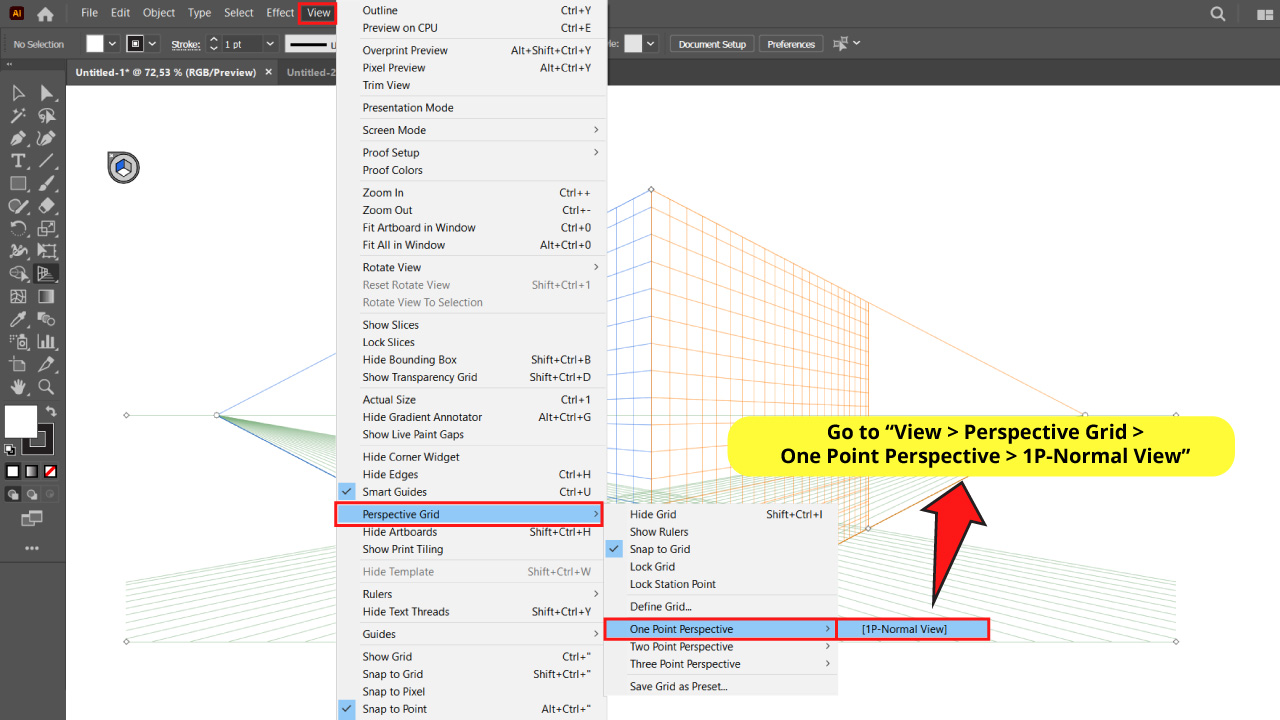

To set it to One Point Perspective go to “View > Perspective Grid > One Point Perspective > 1P-Normal View” on the menu at the top of the screen.


Step 3: Manage the Perspective Grid

To adjust the perspective grid to your desired position, you have to use the perspective grid handles.
To use these handles you have to left-click and hold as you drag the mouse to the allowed direction which depends on the handle and its function.
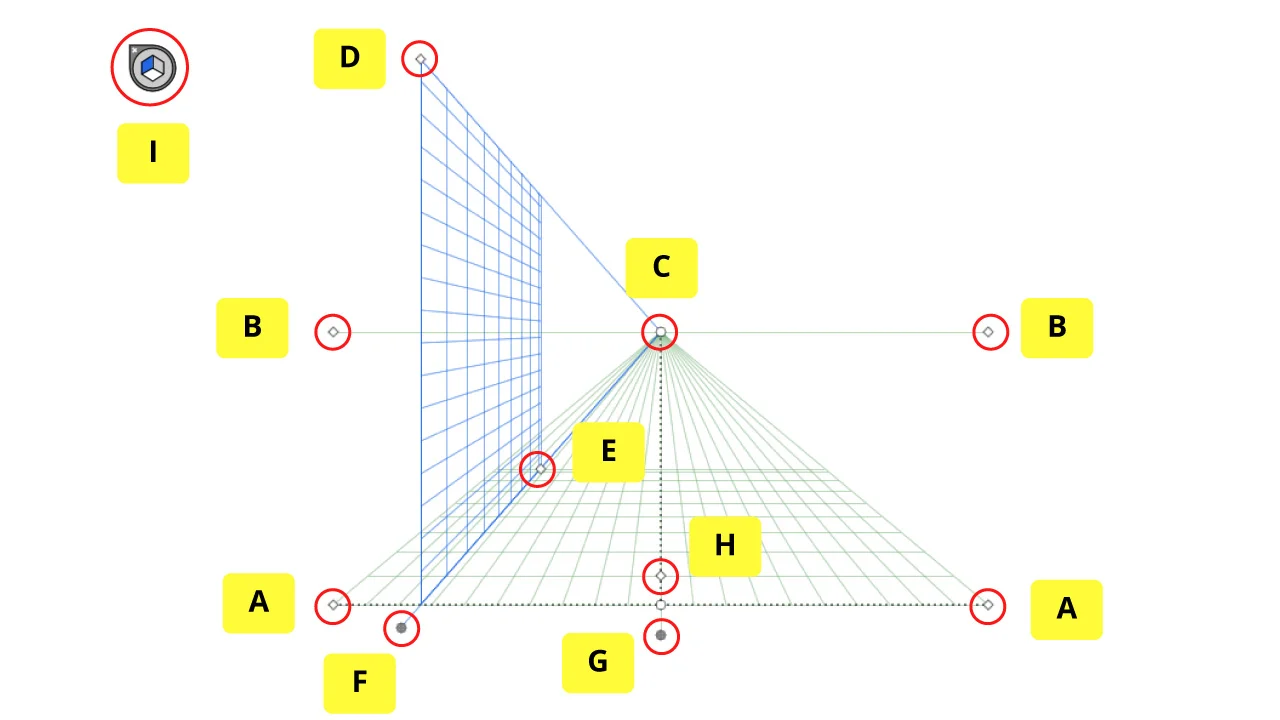
Next you have a list of handles’ functions:
A. Handles to move the perspective grid all over the artboard.
B. Handles to set the horizon line level.
C. Handle to position the vanishing point.
D. Handle to extend the vertical grid.
E. Handle to extend the depth grid.
F. Handle to control the side plane.
G. Handle to control the ground plane.
H. Handle to change the grid size.
I. “Plane Switching” widget.
Use these handles to adjust the planes and grids to fit your work.
Step 4: Manage the “Plane Switching” Widget
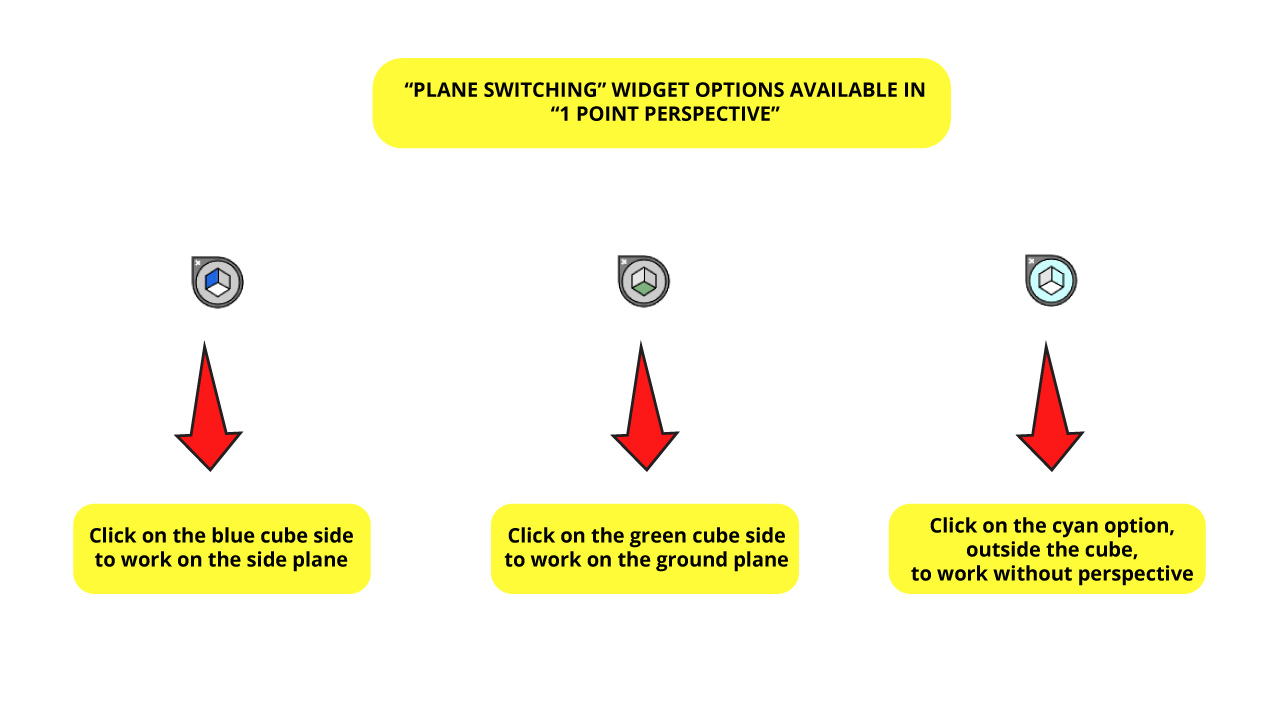

There are 3 available options for the “Plane Switching” widget in “One Point Perspective”.
To be able to manage this widget, make sure to have the “Perspective Grid” (Shift + P) or the “Perspective Selection” (Shift + V) tool selected. We will learn how to use this last tool in “Step 8”.
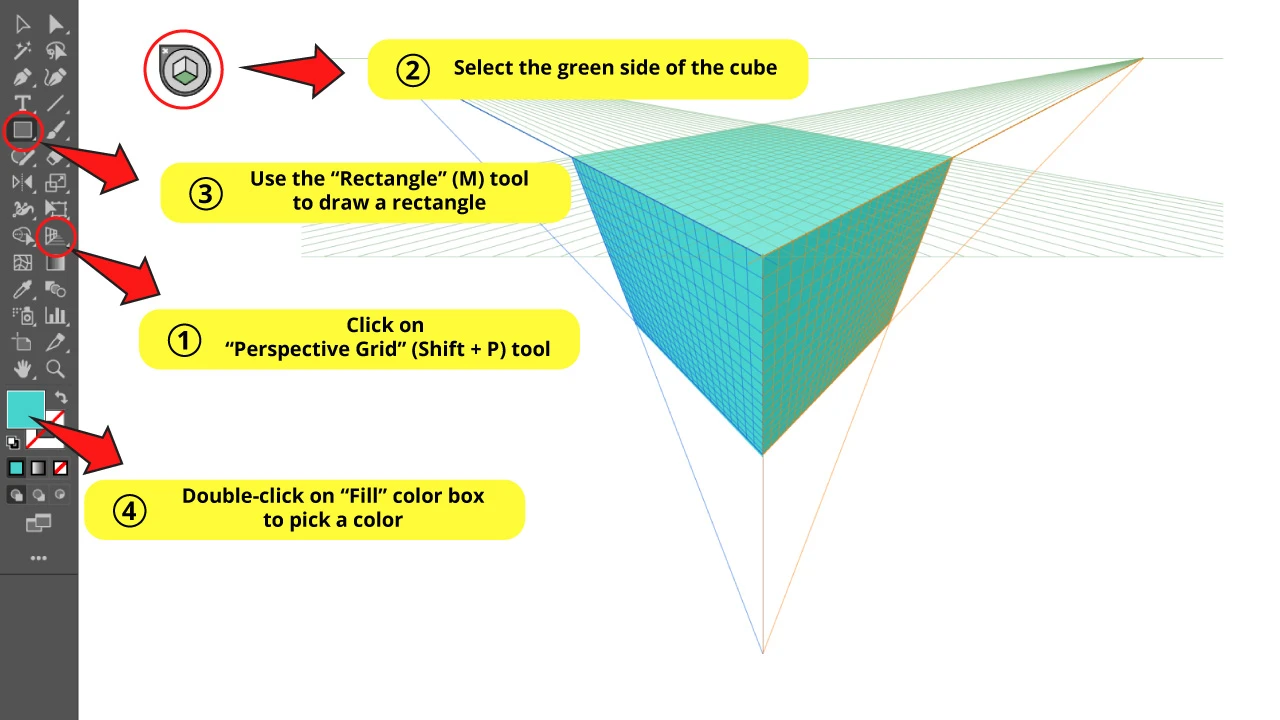
Notice that the “Plane Switching” widget and the grids have the same colors.
If you wish to work on the side grid plane, which is blue, you have to select the blue side of the cube.
If you want to work on the ground grid, which is green, you have to select the green side of the cube.
The third side of the cube is disabled. You can’t select it. The third option consists of the outside of the cube. This allows you to work out of the perspective grids. This option is represented by cyan color.
This option is also known as “No Active Grid”.
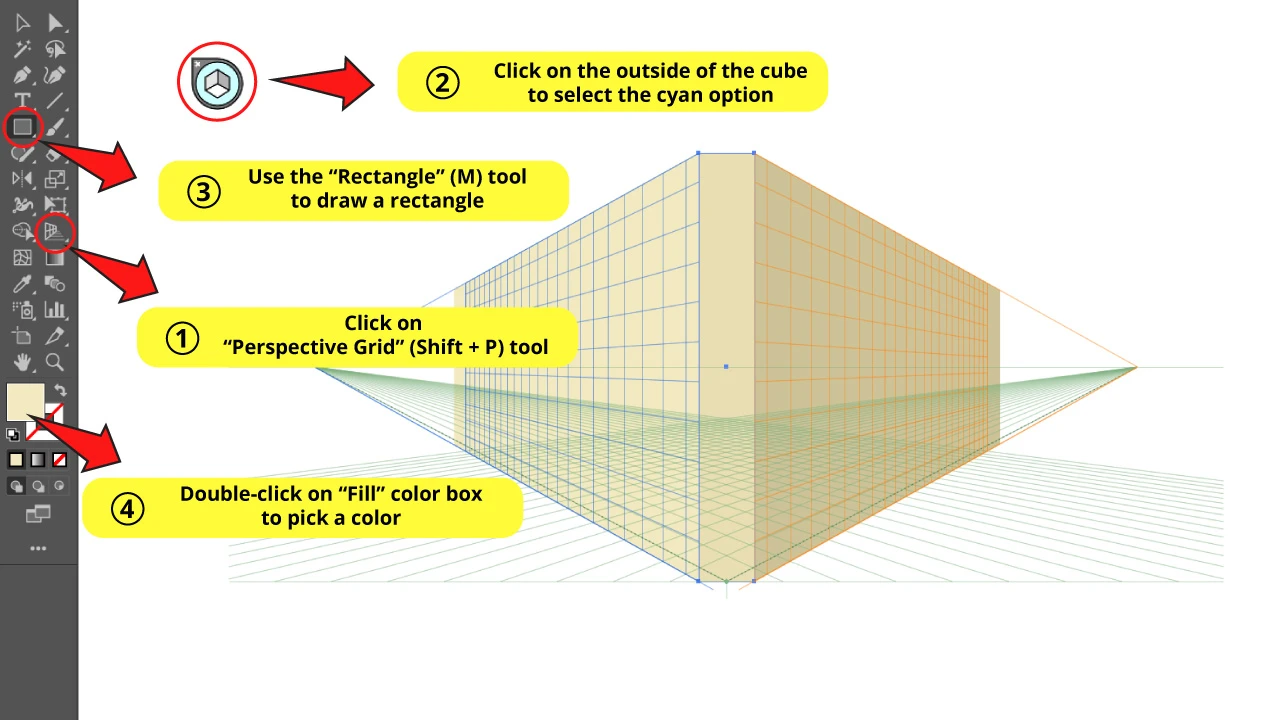
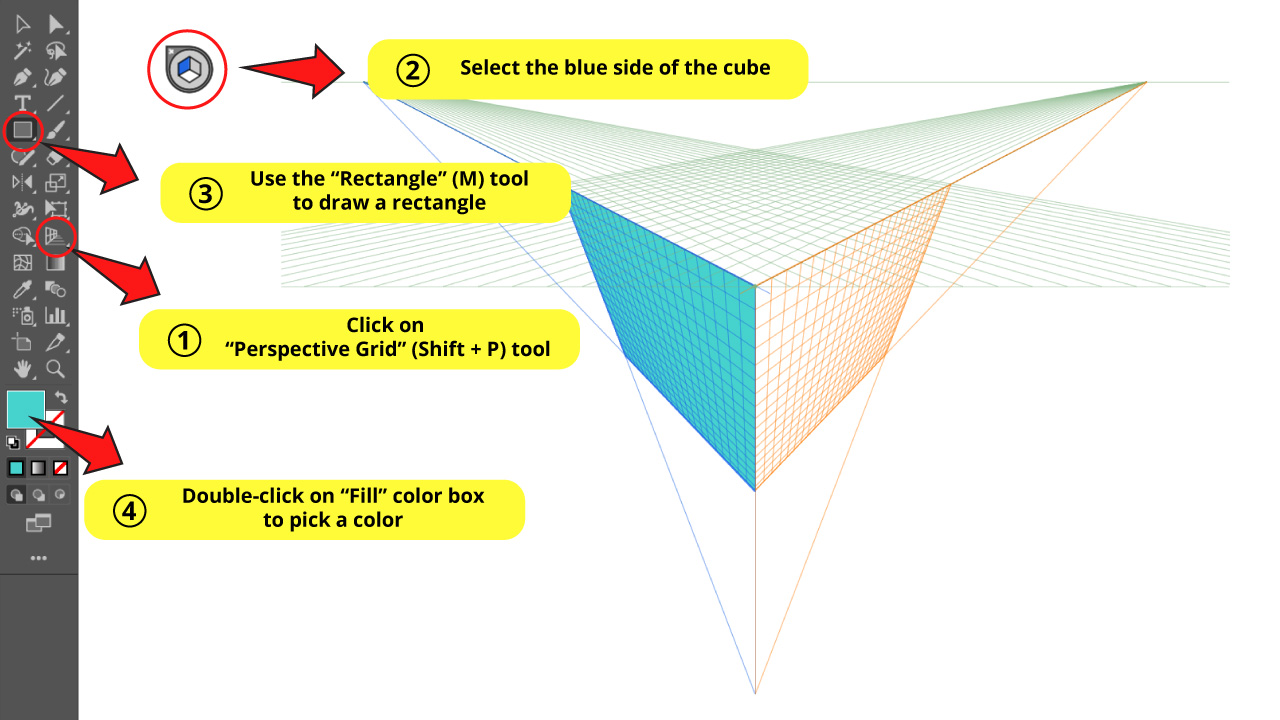
Step 5: Make Rectangles to the Side Plane


To work on the side plane, with the “Perspective Grid” (Shift + P) tool selected, click on the blue side of the cube in the “Plane Switching” widget.
Now click on the “Rectangle” (M) tool on the left side toolbar.
Draw a rectangle. It will be part of the side plane perspective.
Then double-click on the “Fill” color box to select a color.
If you want to draw a rectangle on the right side, just make sure that the rectangle crosses the dashed middle line, so the perspective applies to the right side.
This is how you draw rectangles in perspective for the sides.
If you need to resize a rectangle, use the “Perspective Selection” (Shift + V) tool hidden in the “Perspective Grid” (Shift + P) tool nest. We will learn how to manage this tool in “Step 8”.
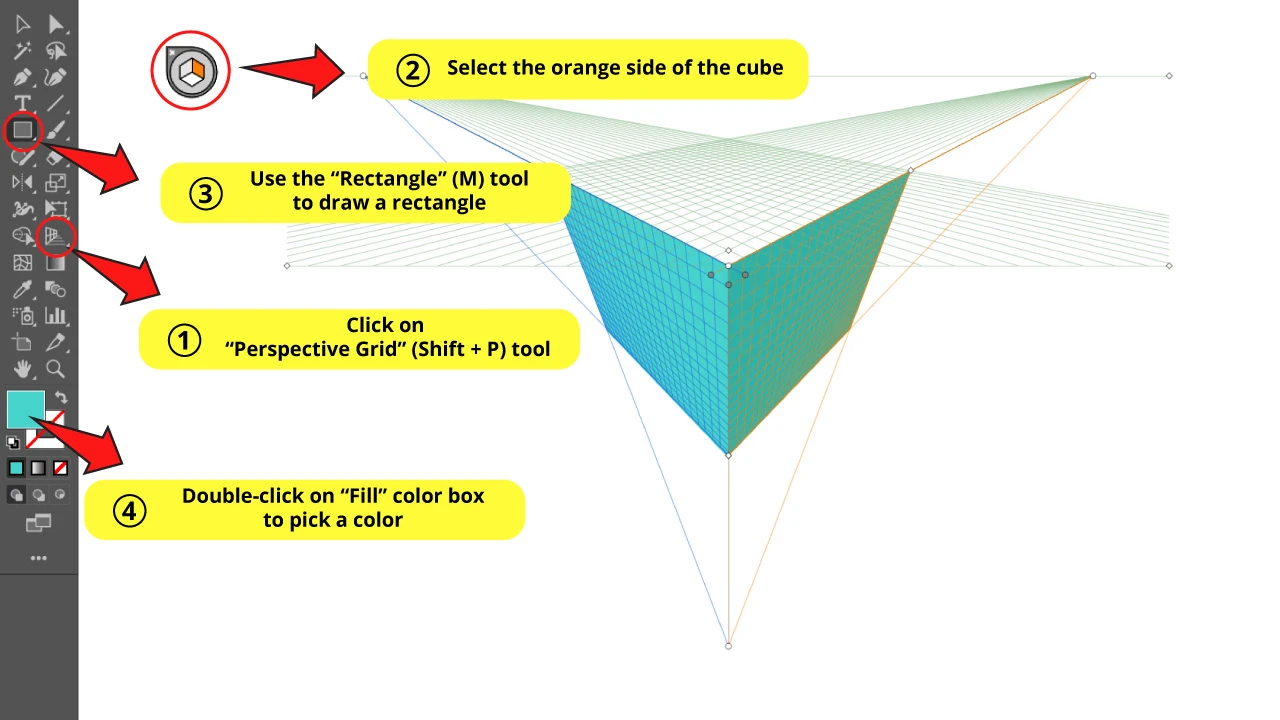
Step 6: Make Rectangles to the Ground Plane
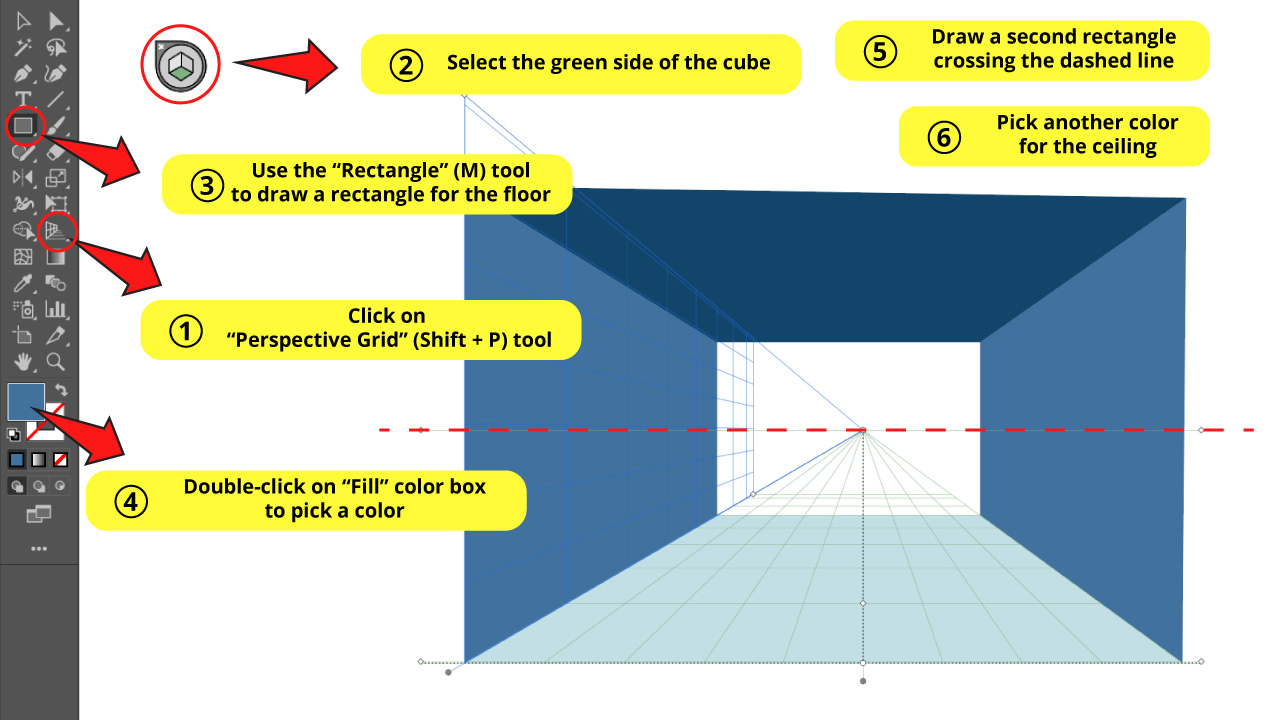
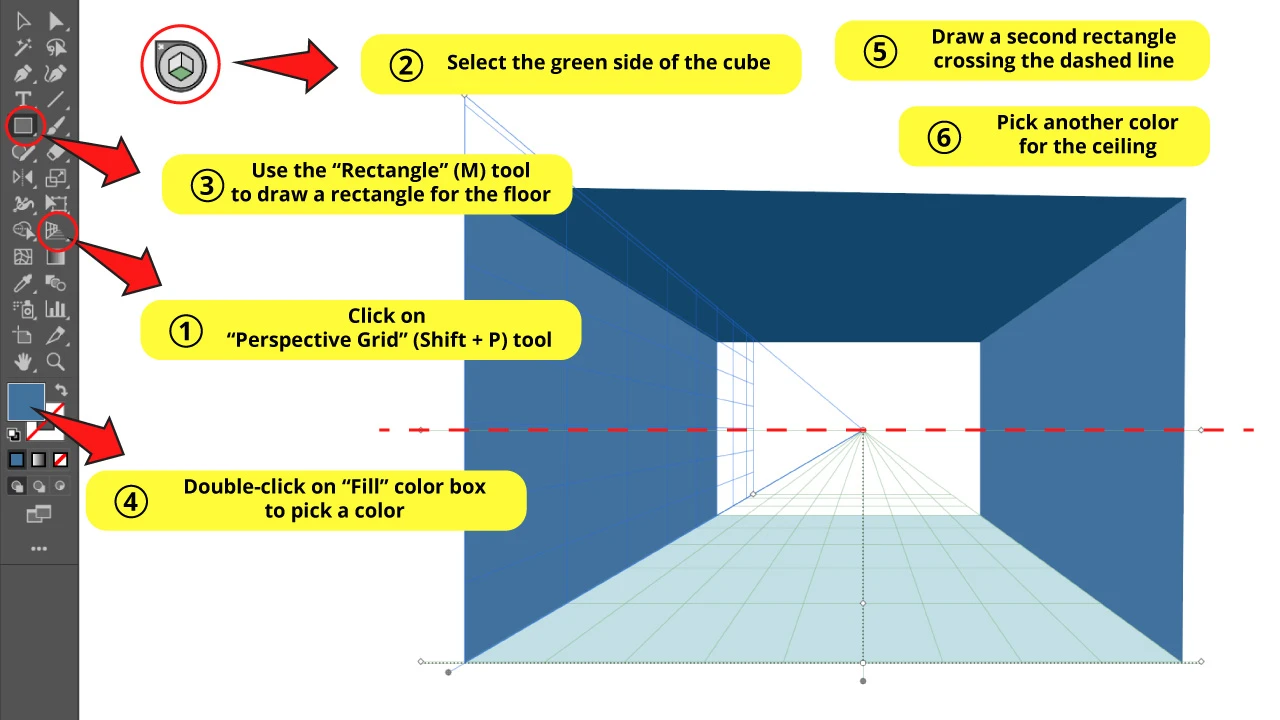
To work on the ground plane, with the “Perspective Grid” (Shift + P) tool selected, click on the green side of the cube in the “Plane Switching” widget.
Repeat the previous step. Select the “Rectangle” (M) tool to draw a rectangle and then double click on the “Fill” color box to pick a color.
The rectangle will be drawn according to the ground grid perspective.
If you also want to draw the ceiling rectangle, just make sure to draw the rectangle above the horizon line so the perspective applies to the ceiling.
Step 7: Make a Rectangle to the Background

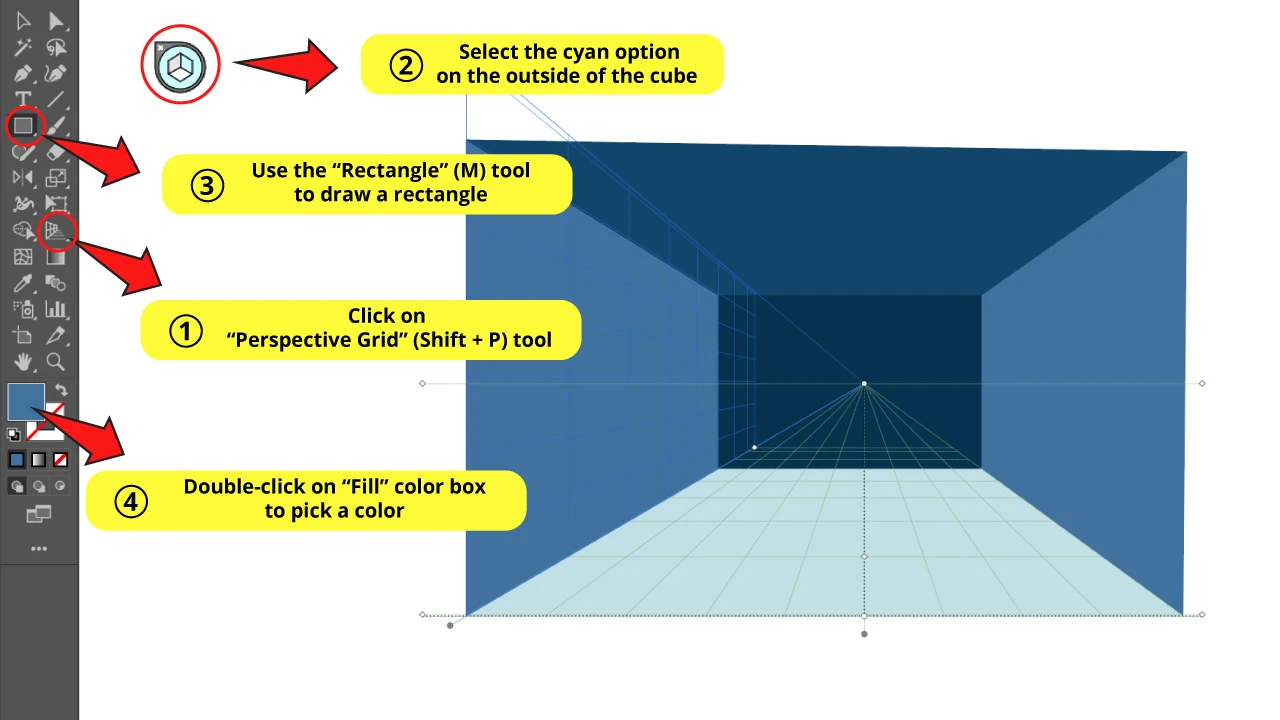
To work out of the perspective grids, with the “Perspective Grid” (Shift + P) tool selected, click on the cyan option on the outside of the cube in the “Plane Switching” widget.
Select the “Rectangle” (M) tool to draw a rectangle, and then double click on the “Fill” color box to pick a color.
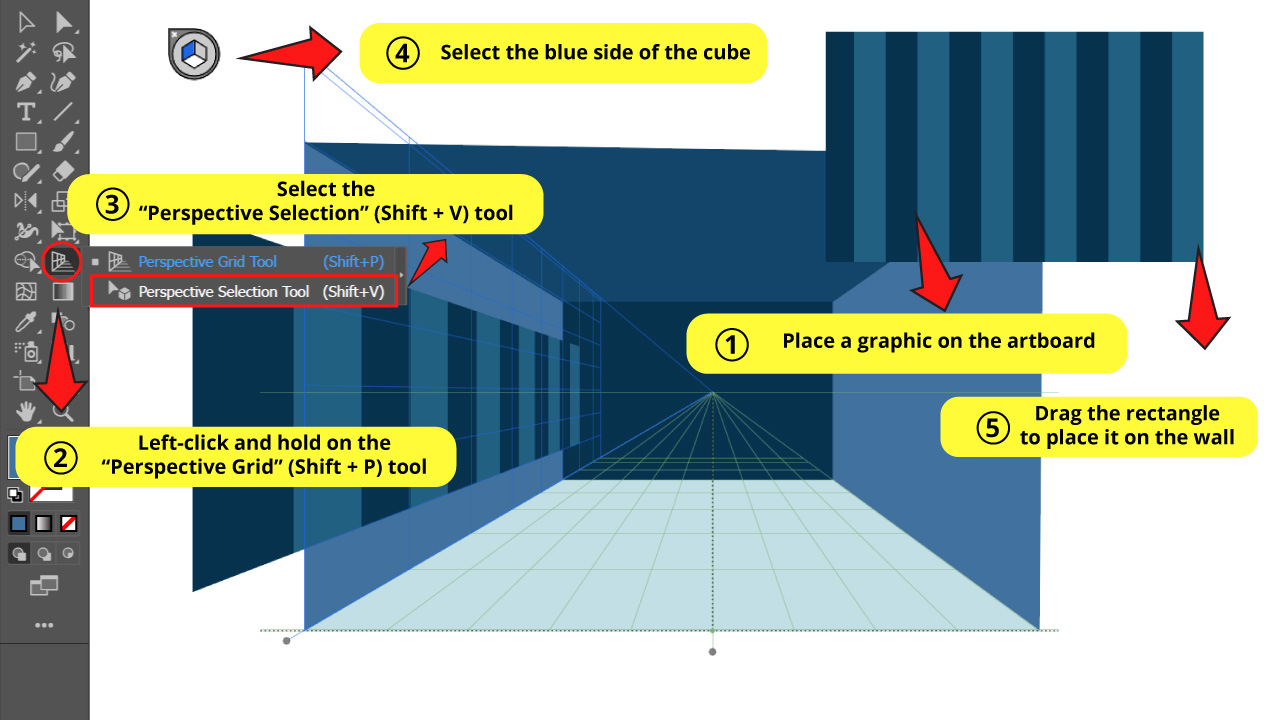
Step 8: Add Graphics to the Planes
We already know how to draw shapes on each perspective plane.
Now we will add some graphics to the planes to make it look like a wallpaper.
First we need a graphic. You can make it yourself, or you can download it.
I’ll draw some basic straight lines to use as a graphic.
It’s important to point out that you can’t apply just any kind of graphics to the perspective grid. You can’t use rasterized images (bitmap images) or graphics which have been converted to patterns.
The tool simply doesn’t work with rasterized images.
But when it comes to patterns, even though the tool allows you to apply them to the perspective grid, the appearance will not warp to fit the perspective. It would continue looking as flat as it is.
So to properly apply graphics to the “Perspective Grid” (Shift + P) tool, you have to use vectorized images. Avoid graphics converted to patterns.
If you want to apply a pattern, don’t convert the graphic to pattern. Make the pattern repeating process manually. Then group it by pressing “Ctrl + G” to handle it better when you apply it to the perspective grid.
Once you have your graphic on the artboard, select the plane you want to apply it to in the “Plane Switching” widget.
Then left-click and hold on the “Perspective Grid” (Shift + P) on the left side toolbar to unfold the hidden tools nest. Then select the “Perspective Selection” (Shift + V) tool, or press the “Shift + V” command to shortcut it.
With the “Perspective Selection” (Shift + V) tool selected, left-click and hold as you drag the mouse across the artboard.
The graphic will display in perspective according to the plane you have previously selected.
Use the “Perspective Selection” (Shift + V) tool to resize the graphic to fit the wall.
I added the stripes wallpaper for both sides of the walls. Then I made a darker version of the graphic for the background. Finally, I drew squares as tiles for the floor, and added this graphic to the ground.
Step 9: Draw Objects

Now we have the four sides of the room. But the room is empty.
Using the previous methods, we can also draw objects for the room.
We will draw a box now.
First click on the outside of the cube (the cyan option) in the “Plane Switching” widget.
Then use the “Rectangle” (M) tool to draw a rectangle. Double-click on the “Fill” color box to pick a color.
Next, select the ground side of the cube (green option) in the “Plane Switching” widget.
Finally, draw a rectangle and pick another color for it.
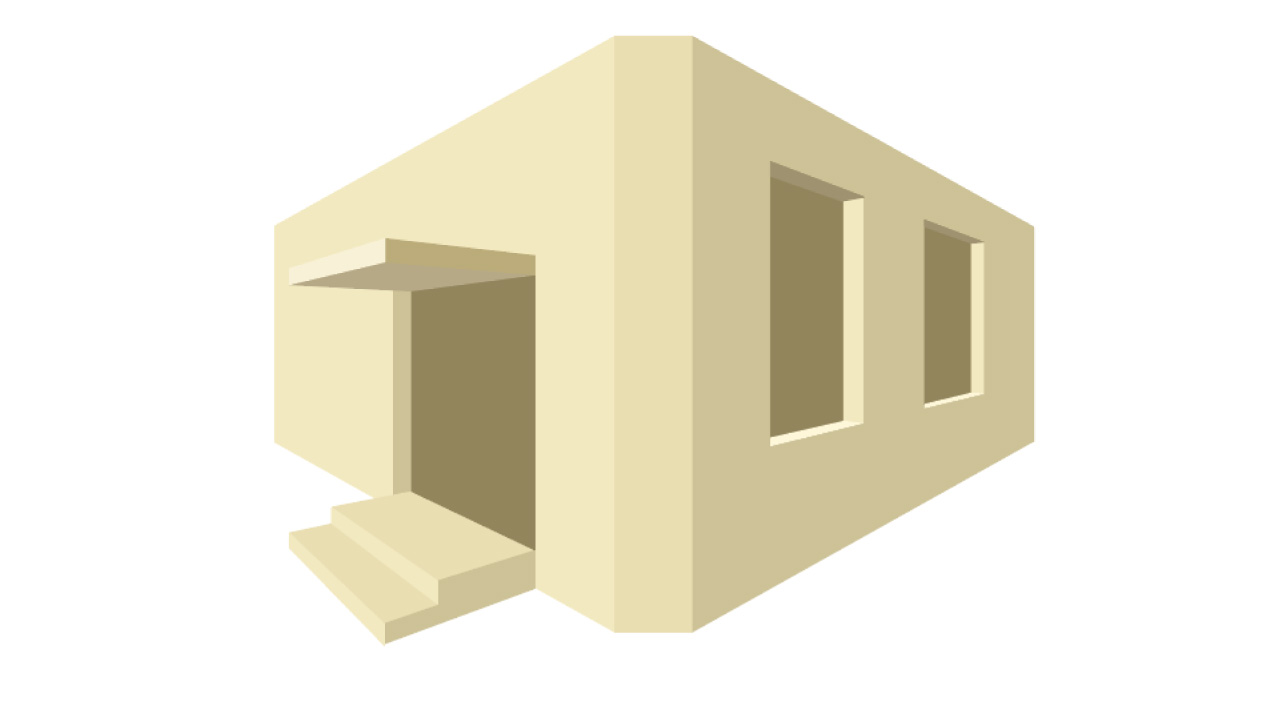
The Result
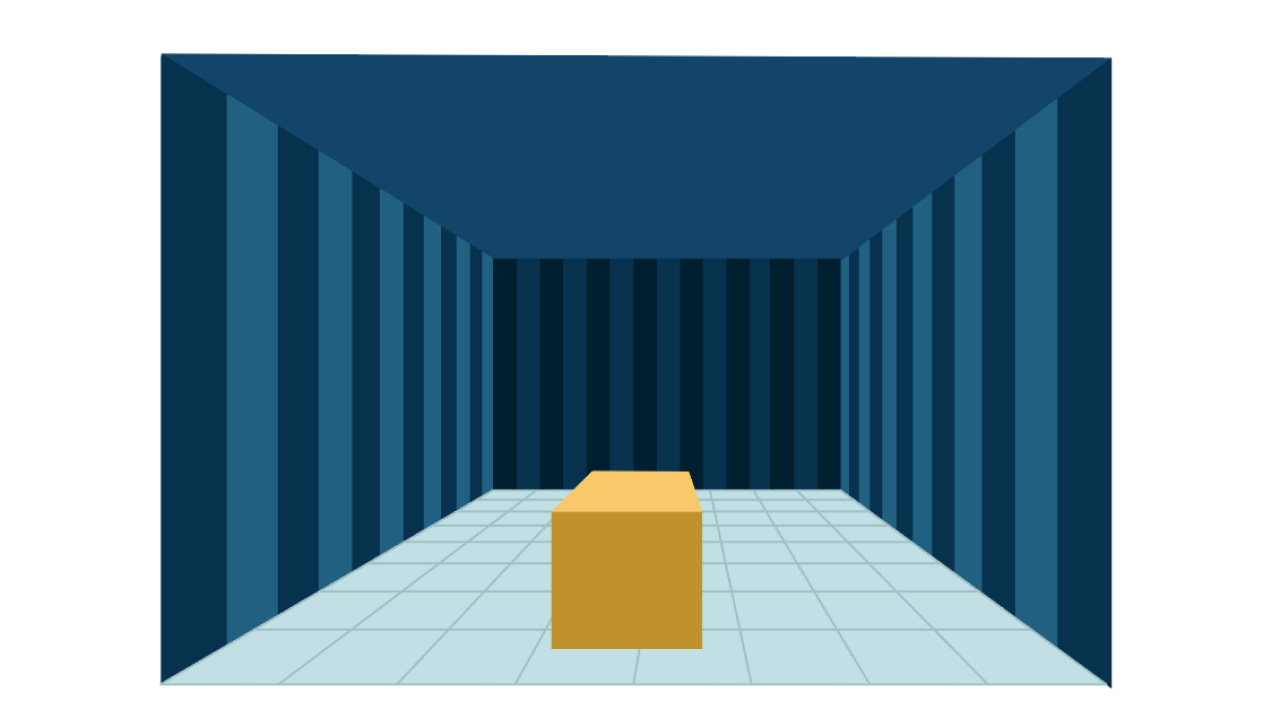
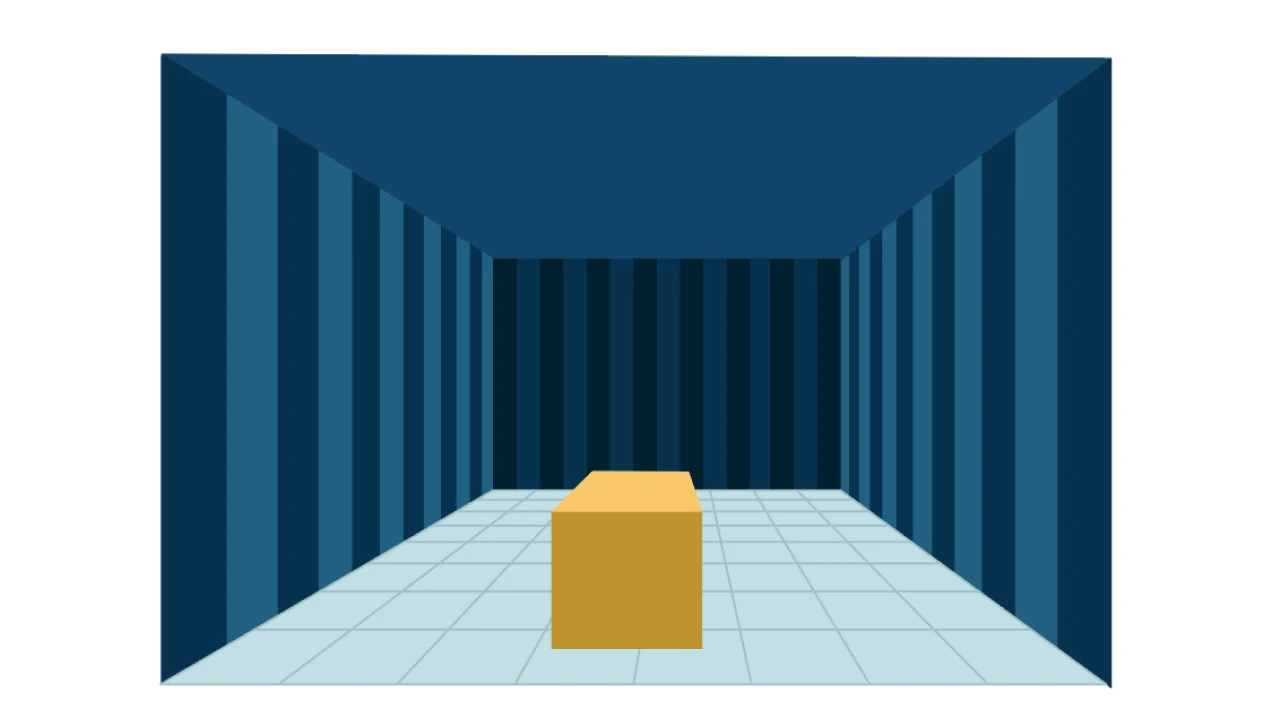
And this is how a room made with the “Perspective Grid” (Shift + P) tool in One Point Perspective looks.
Using the Perspective Tool in Two Point Perspective in Illustrator
Open the “Perspective Grid” (Shift + P) tool. Select one of the sides of the cube in the “Plane Switching” widget. Use the “Rectangle” (M) tool or any drawing tool to draw shapes. Repeat the process until you have built all your artwork.
The “Two Point Perspective” is used to draw corners of cities, buildings, houses, rooms. It is also used to draw the intersection of two streets.
The thing these have in common is that all have real and imaginary lines which vanish in two points. And that’s why it’s called “Two Point Perspective”.
Now we will learn how to use the “Perspective Grid” (Shift + P) tool in Illustrator for “Two Point Perspective”, which is set by default. To understand this better, we will cover the drawing process of a corner building as an example.
Step 1: Enable the “Perspective Grid” Tool

Click on the “Perspective Grid” (Shift + P) tool on the left side toolbar.
A Two Point Perspective grid will be set on the artboard by default.
Step 2: Manage the Perspective Grid
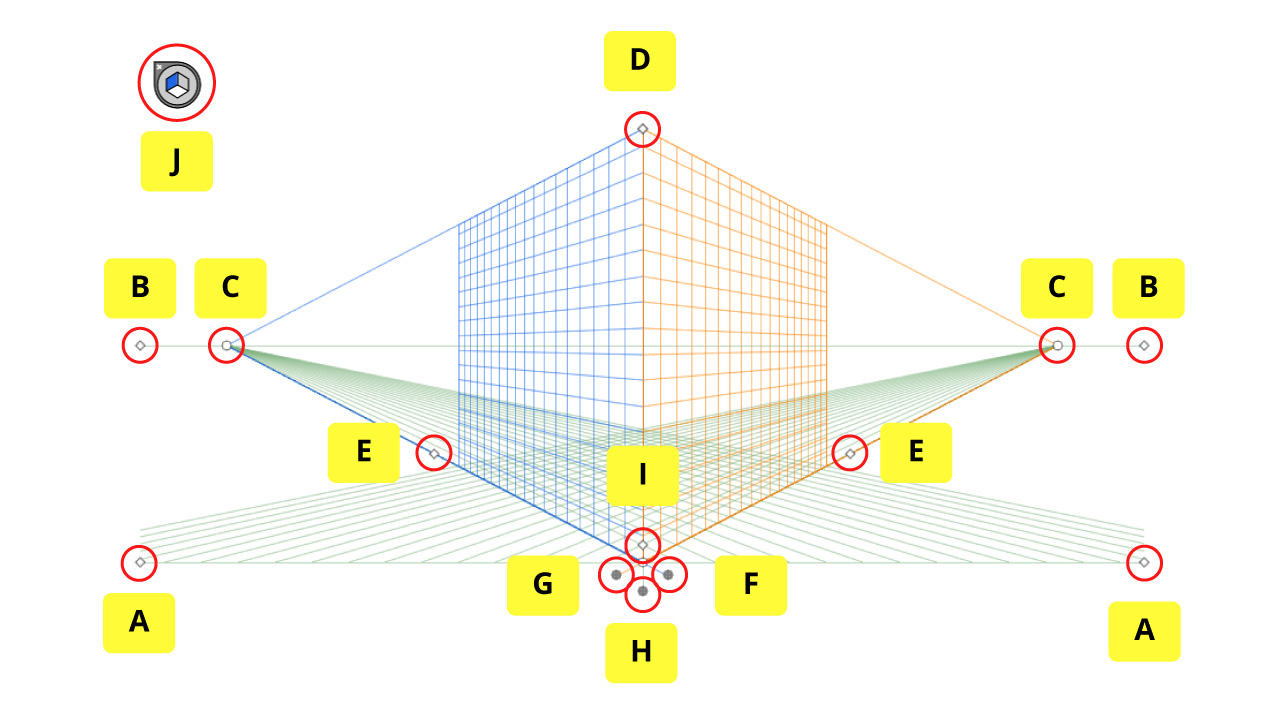
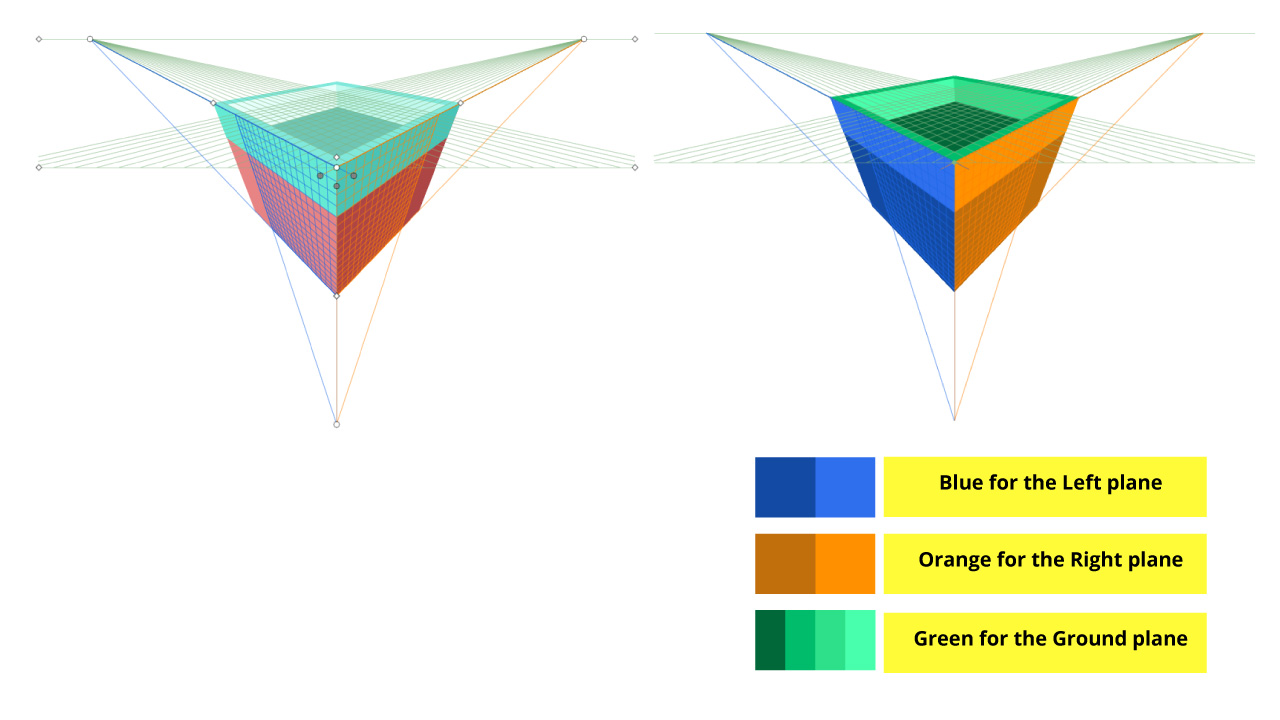
Notice that for Two Point Perspective we have 3 grids:
Blue for the Left Side
Orange for the Right Side
Green for the Ground Side
Use the following handles to adjust the planes and grids to fit your work.
To use them, left-click and hold as you drag the mouse to the allowed direction, which depends on the handle and its function.
A. Handles to move the perspective grid all over the artboard.
B. Handles to set the horizon line level.
C. Handles to move the vanishing points.
D. Handle to extend the vertical grid.
E. Handles to extend the ground grid.
F. Handle to control the left plane.
G. Handle to control the right plane.
H. Handle to control the ground plane.
I. Handle to change the grids size.
J. “Plane Switching” widget.
Step 3: Manage the “Plane Switching” Widget
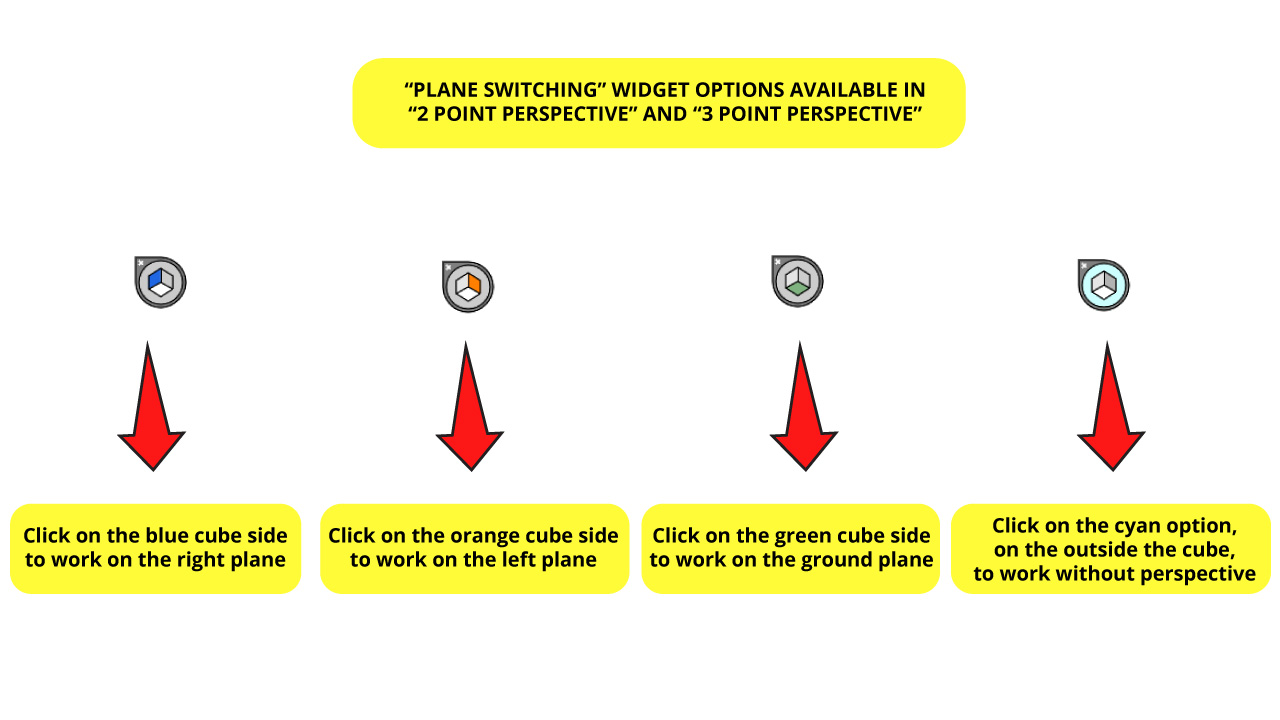

There are 4 available options in the “Plane Switching” widget for both “Two Point Perspective” and “Three Point Perspective”.
To be able to manage this widget make sure to have either the “Perspective Grid” (Shift + P) or the “Perspective Selection” (Shift + V) tool selected.
Notice that the “Plane Switching” widget’s cube shares the same colors with the plane’s grids.
If you want to work on the left side grid plane, which is blue, you have to select the blue side of the cube.
If you want to work on the right side grid plane, which is orange, you have to select the orange side of the cube.
If you want to work on the ground grid plane, which is green, you have to select the green side of the cube.
If you want to work without perspective, click on the outside of the cube, which would be the cyan option.
Step 4: Move the Sides Planes
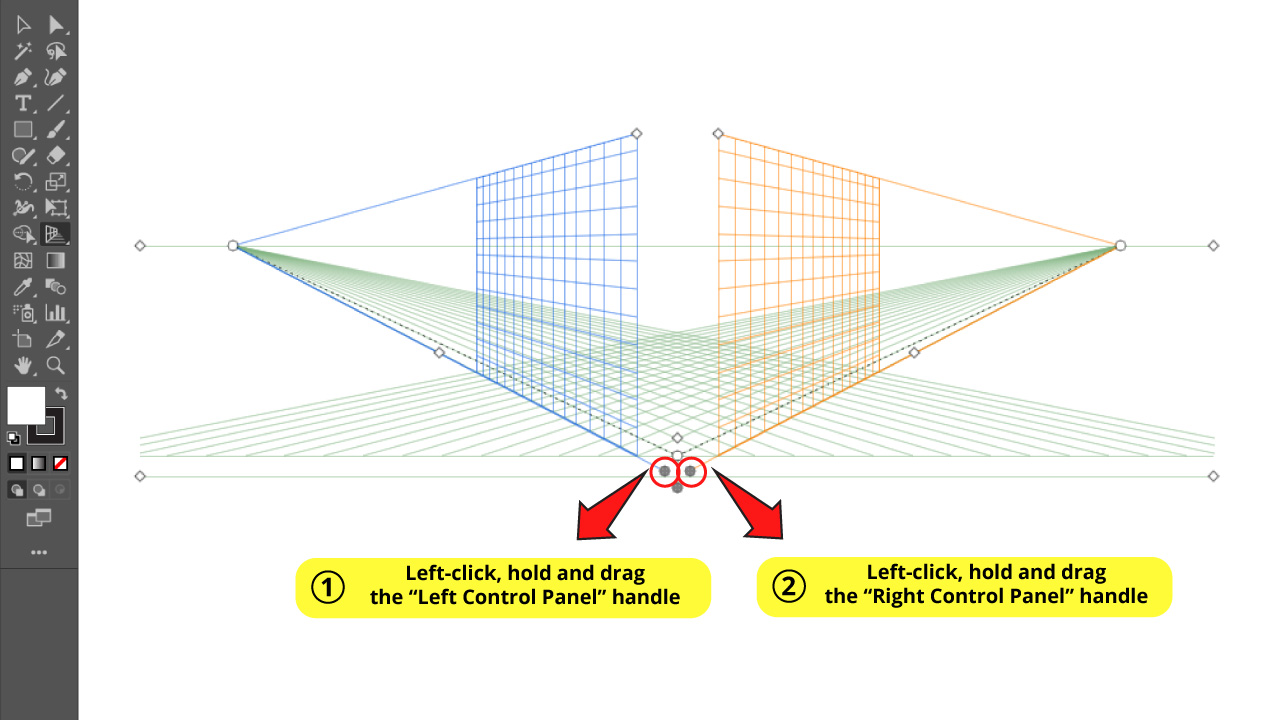

For this drawing, we’ll need to customize the default grid just a tad bit.
We want a beveled corner to get a more interesting building shape.
To get this done, left-click, hold and drag the “Left Control” handle. Then repeat the process with the “Right Control” handle.
Remember to use the handles to make all the adjustments you need to fit the planes according to your project.
Step 5: Make a Rectangle for the Left Side Plane
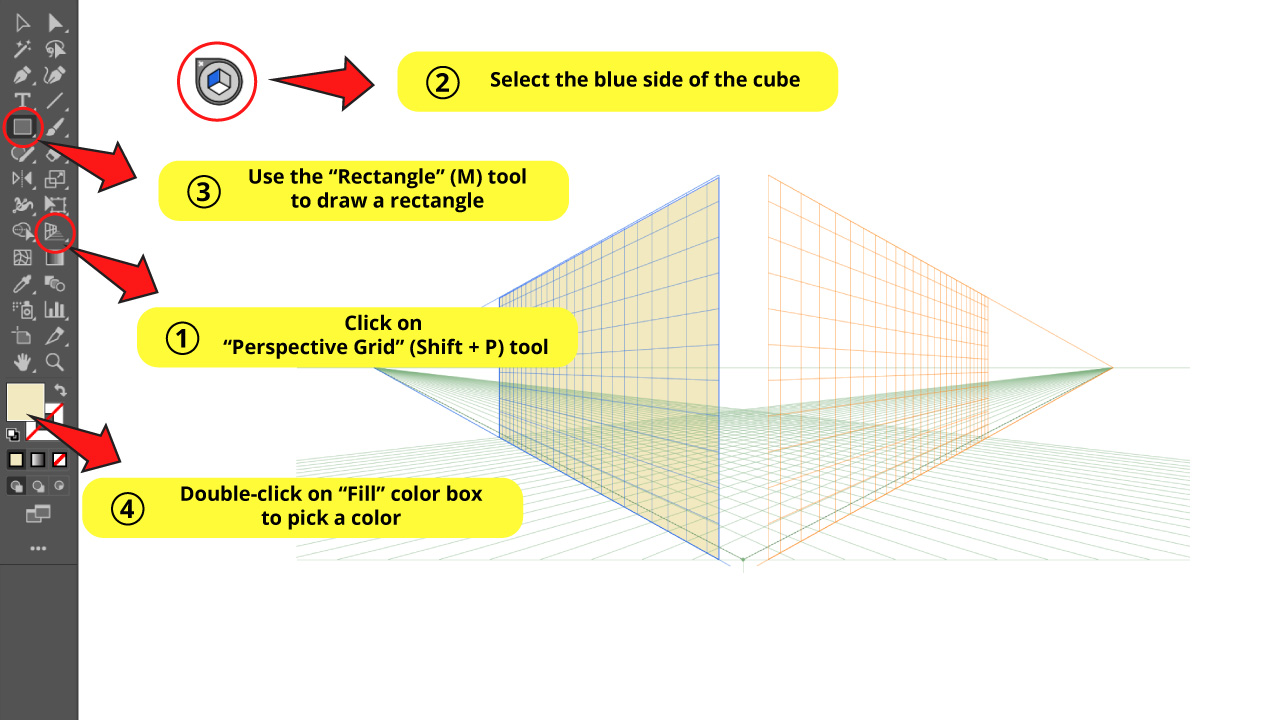
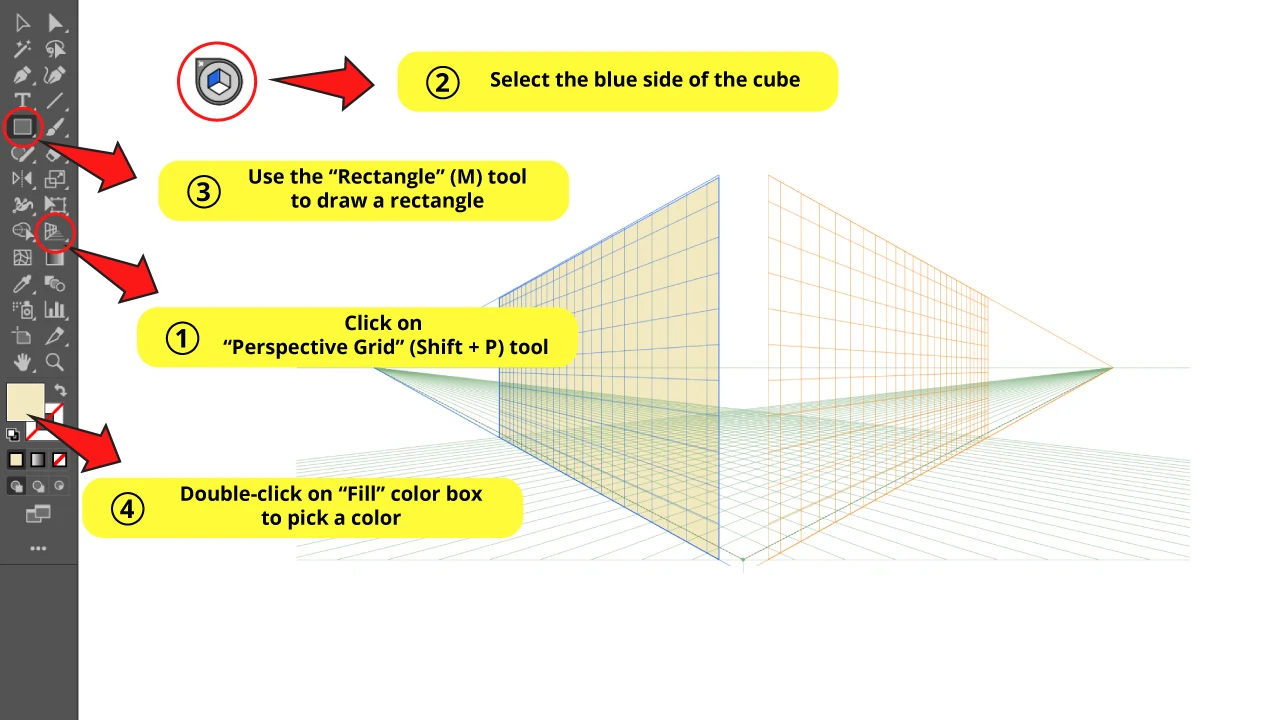
To build the left side wall, with the “Perspective Grid” (Shift + P) tool selected, click on the blue side of the cube in the “Plane Switching” widget.
Then use the “Rectangle” (M) tool to draw a rectangle. The shape will be drawn in perspective according to the left grid position.
Then double-click on the “Fill” color box to select a color.
Step 6: Make a Rectangle for the Right Side Plane

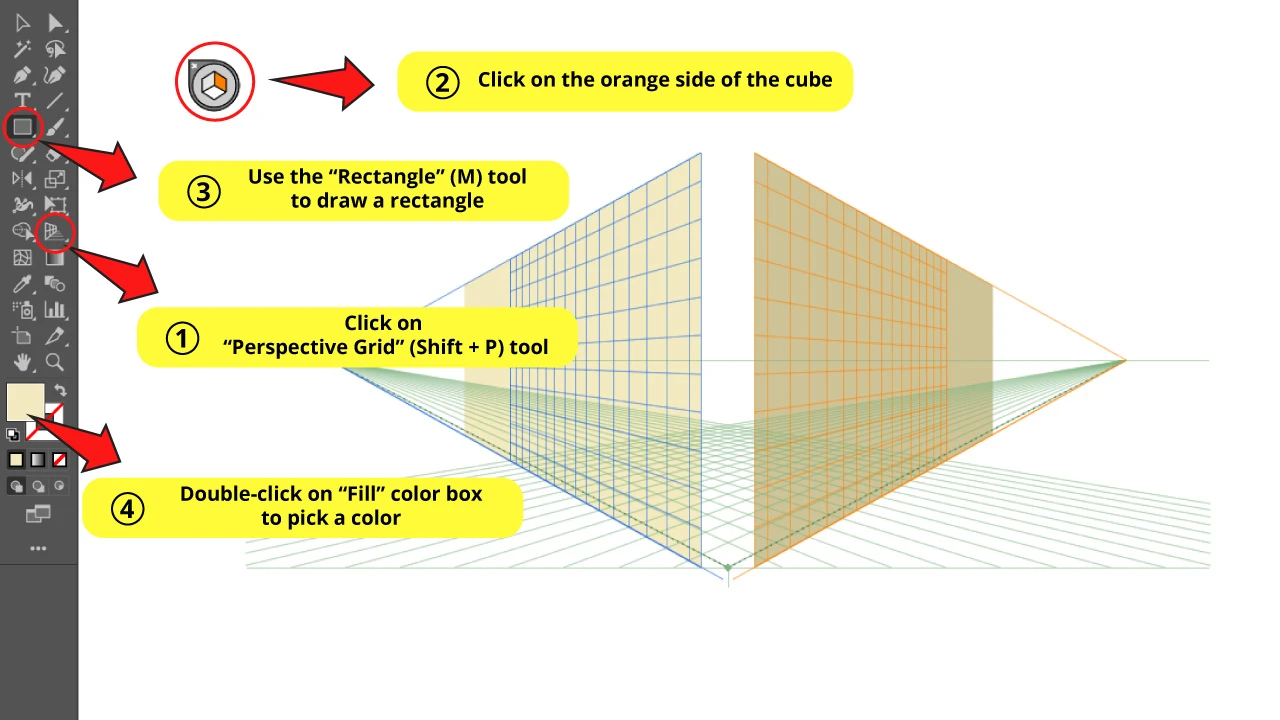
To build the right side wall, with the “Perspective Grid” (Shift + P) tool selected, click on the orange side of the cube in the “Plane Switching” widget.
Then repeat the previous step. Use the “Rectangle” (M) tool to draw a rectangle. The shape will be drawn in perspective according to the right grid position.
Finally select a different color for this rectangle by double-clicking on the “Fill” color box.
Step 7: Make a Rectangle for the Front Side Plane

Now we have to make a rectangle for the beveled corner to complete the main shape of the building.
Click on the “Perspective Grid” (Shift + P) tool.
Then click on the outside of the cube (cyan option) in the “Plane Switching” widget, to work out of the perspective grids.
Then use the “Rectangle” (M) tool to make the corner wall. Finally pick a color for this wall.
Step 8: Draw the Building Features
We already have the main building shape done.
Now we have to focus on details. We’ll work on an entrance including a couple steps, and a few windows.
This process is very similar to previous steps. Just select a side from the cube in the “Plane Switching” widget and then draw a rectangle using the “Rectangle” (M) tool. Then double-click on the “Fill” color box to select a color.
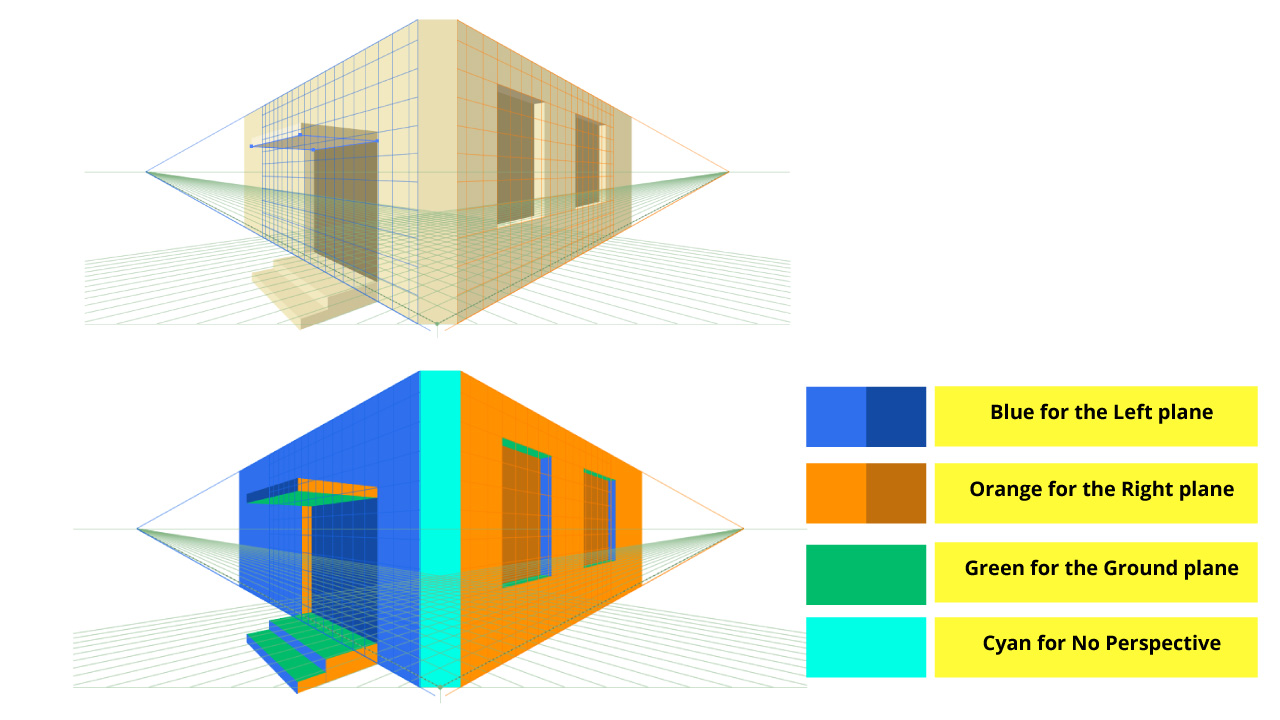
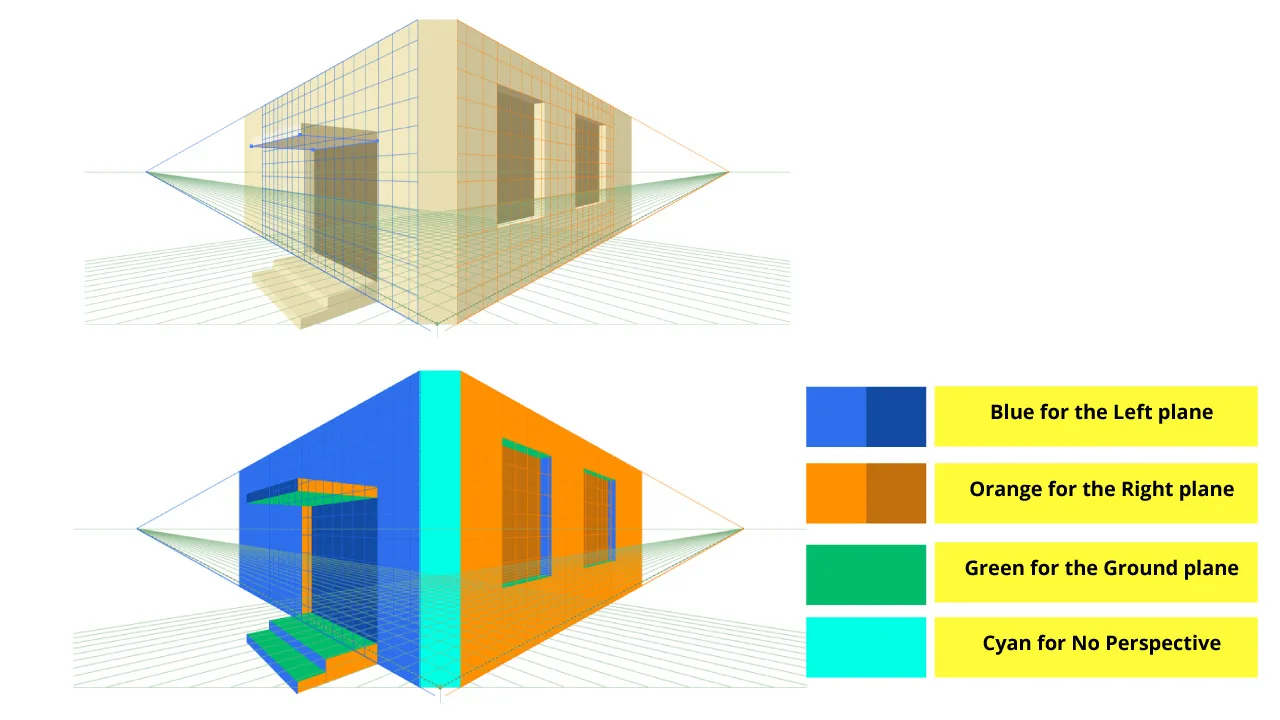
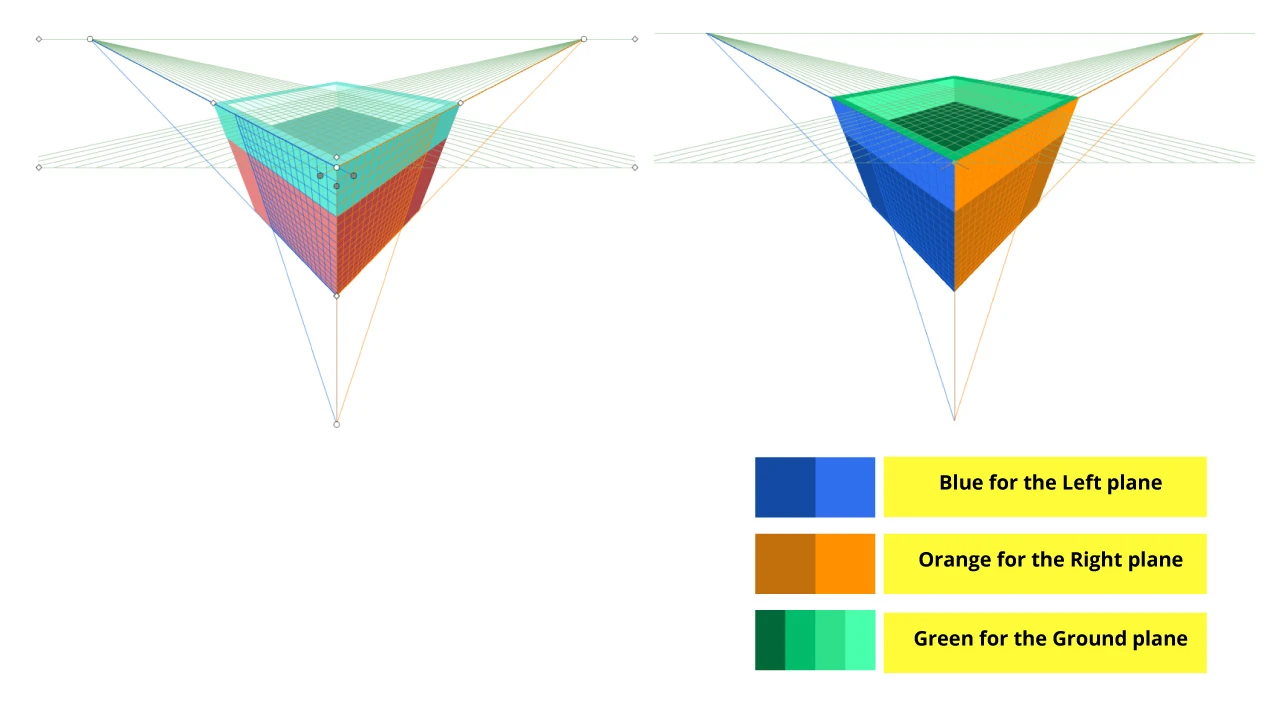
In the top image you can see how the different parts of the building look in their original color.
In the bottom one, the building parts have been colored according to the grid plane, so you can understand better which plane I selected to draw each rectangle.
For Blue rectangles I selected the Left plane.
For Orange rectangles I selected the Right plane.
For Green rectangles I selected the Ground plane.
For the Cyan rectangle I selected the outside of the cube to work without the perspective grids.
Step 9: Make the Shapes Fit your Graphic
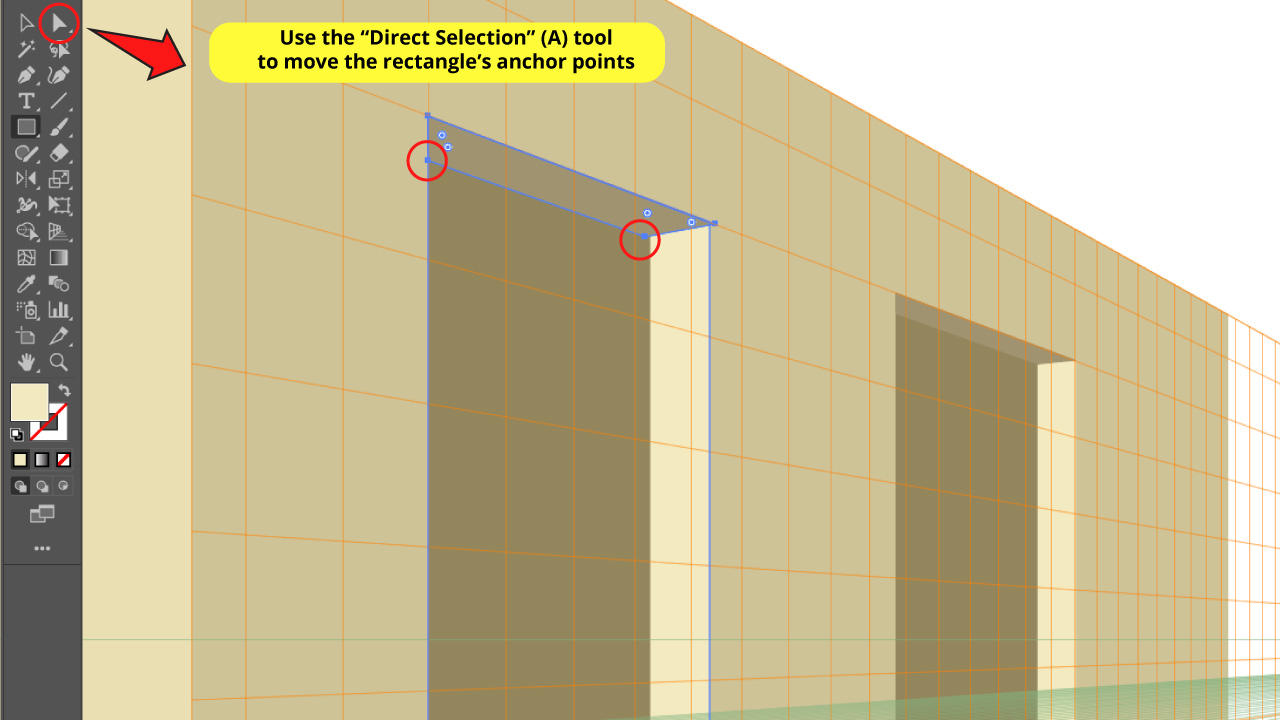

I made some little adjustments for the windows’ edges. If you look carefully, you will notice that these aren’t rectangles but trapezoids.
To make trapezoids, I started with a rectangle and then I used the “Direct Selection” (A) tool on the left side toolbar to move the anchor points to fit the window’s shape.
The Result

And this is how a building made with the “Perspective Grid” (Shift + P) tool in Two Point Perspective looks.
Using the Perspective Tool in Three Point Perspective in Illustrator
Open the “Perspective Grid” (Shift + P) tool. Go to “View > Perspective Grid > Two Point Perspective > 2P-Normal View”. Select a side of the cube in the “Plane Switching” widget. Use the “Rectangle” (M) tool to draw a rectangle. Repeat the process until you have built all your artwork.
The “Three Point Perspective ” is used mainly in tall buildings with a very dramatic perspective. These drawings give you some sort of sensation similar to vertigo. Our point of view usually is from the ground, or aerial, appreciating an endlessly tall building.
The thing these have in common is that they have real and imaginary lines which vanish in three points. And that’s why it’s called “Three Point Perspective”.
Next, we will learn how to use the “Perspective Grid” (Shift + P) for “Three Point Perspective”. To understand this better, we will cover the drawing process of a flower pot as an example, just to make something different to the classic building this time.
Step 1: Enable “Perspective Grid” Tool


Click on the “Perspective Grid” (Shift + P) tool on the left side toolbar.
A Two Point Perspective grid will be set on the artboard by default.
Step 2: Set it to Three Point Perspective


To set it to Three Point Perspective go to “View > Perspective Grid > Three Point Perspective > 3P-Normal View” on the menu available at the top of the screen.
Then you can use the grid handles to adjust the planes to fit your work.
Step 3: Make a Rectangle for the Left Side Plane

Select the blue side of the cube in the “Plane Switching” widget.
Then use the “Rectangle” (M) tool on the left side toolbar to draw a rectangle.
The shape will be drawn in perspective based on the left side grid.
Next, double-click on the “Fill” color box to pick a color.
Step 4: Make a Rectangle for the Right Side Plane

Select the orange side of the cube in the “Plane Switching” widget.
Then use the “Rectangle” (M) tool on the left side toolbar to draw a rectangle.
The shape will be drawn in perspective based on the right side grid.
Next, double-click on the “Fill” color box to pick another color.
Step 5: Make a Rectangle for the Ground Side Plane

Select the green side of the cube in the “Plane Switching” widget.
Then use the “Rectangle” (M) tool on the left side toolbar to draw a rectangle.
The shape will be drawn in perspective based on the ground side grid.
Next, double-click on the “Fill” color box to pick another color.
Step 6: Draw the Flower Pot Details
Once you have drawn the basic shape for the flower pot, you can continue using the “Plane Switching” widget to work on the details.
Just select a plane to work on, and draw the rectangles or shapes you want. Of course, this is not constrained to rectangles.
Finally, pick your desired colors. You can play with different color shades to create visual effects.
I drew a smaller rectangle on the ground, keeping a margin, to give it some depth visual effect.
Then I drew a rectangle as grass. This one is even smaller than the previous one.
On the left side you can see the flower pot in its original colors.
On the right side the graphic is colored according to the grid planes, so you can better understand which plane I selected to draw each rectangle.
For Blue rectangles I selected the Left plane.
For Orange rectangles I selected the Right plane.
For Green rectangles I selected the Ground plane.
I also drew two red rectangles for each one of the sides of the pot, as decoration.
If you need to retouch some shapes, you can always do it using the “Perspective Selection” (Shift + V) tool, hidden in the “Perspective Grid” (Shift + P) tool.
To unfold the hidden tools nest, left-click and hold on the “Perspective Grid” (Shift + P) tool.
You can also use the “Direct Selection” (A) tool to move the shapes’ anchor points to fit your work.
Step 7: Draw Some Circles for the Plant
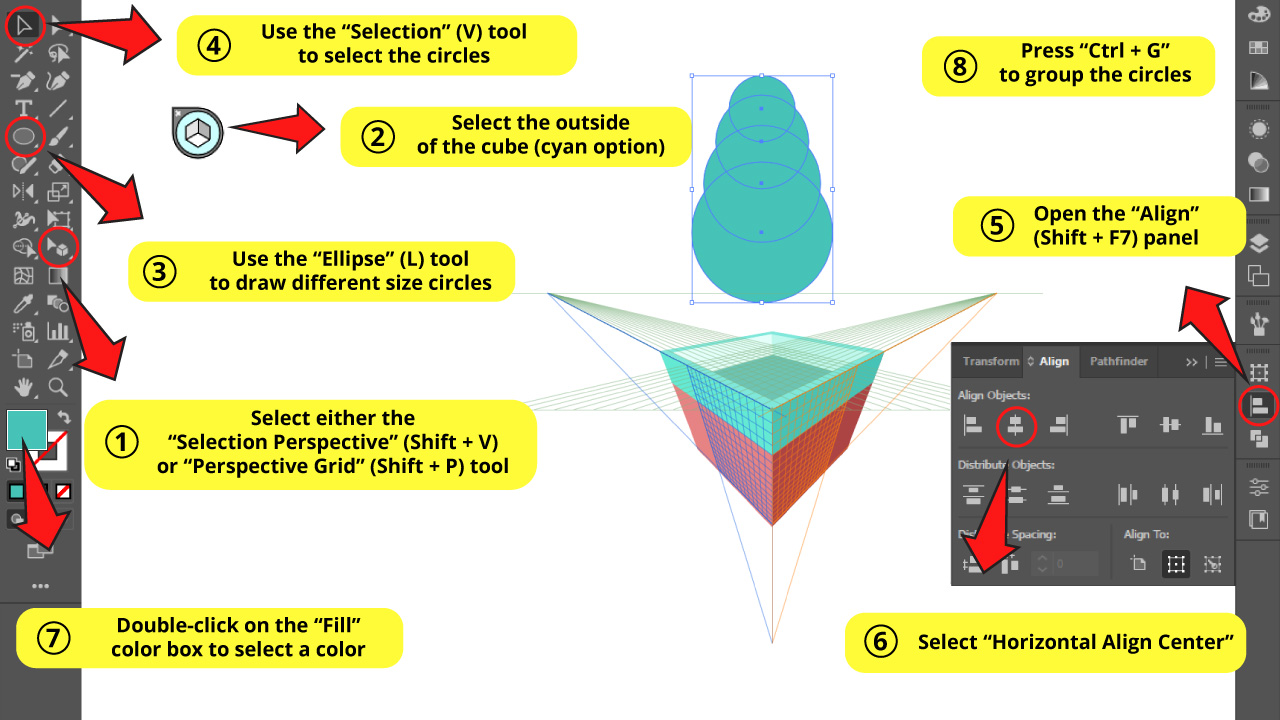

Click on the outside of the cube to select the cyan option in the “Plane Switching” widget.
This option enables us to work out of perspective.
Then use the “Ellipse” (L) tool on the left side toolbar to draw some different sized circles. Remember to hold the “Shift” key as you draw the ellipse to get a proportionate circle.
I made 4 circles, each one smaller than the other.
Now we have to center these circles. To center objects, first select all the shapes using the “Selection” (V) tool.
Then use the “Align” (Shift + F7) panel usually located on the right side toolbar, or on the toolbar at the top of the screen, and click on “Horizontal Align Center” to align all the circles on the same line.
Next, double-click on the “Fill” color box to pick a color.
To finish this step, we have to group these circles. To group objects, press “Ctrl + G” or right-click to unfold the options menu, and select “Group”.
This is important to be able to manipulate the plant during next steps.
Step 8: Make a Rectangle for the Trunk
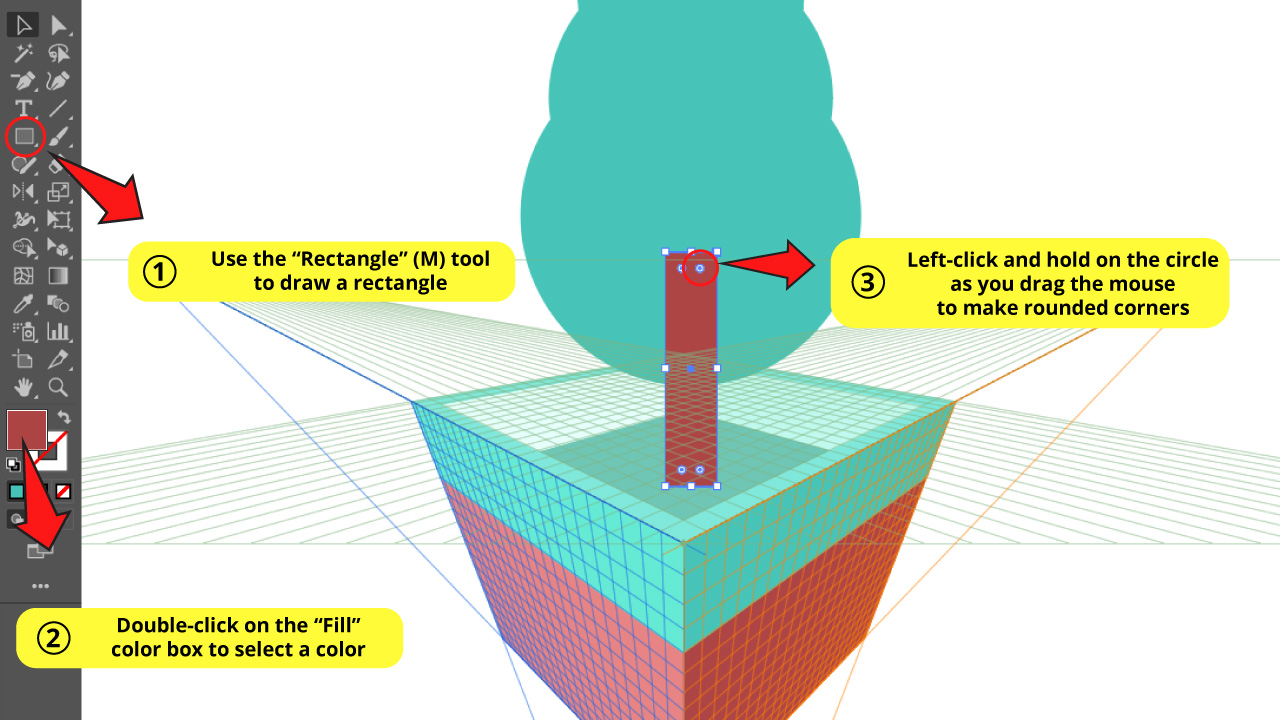
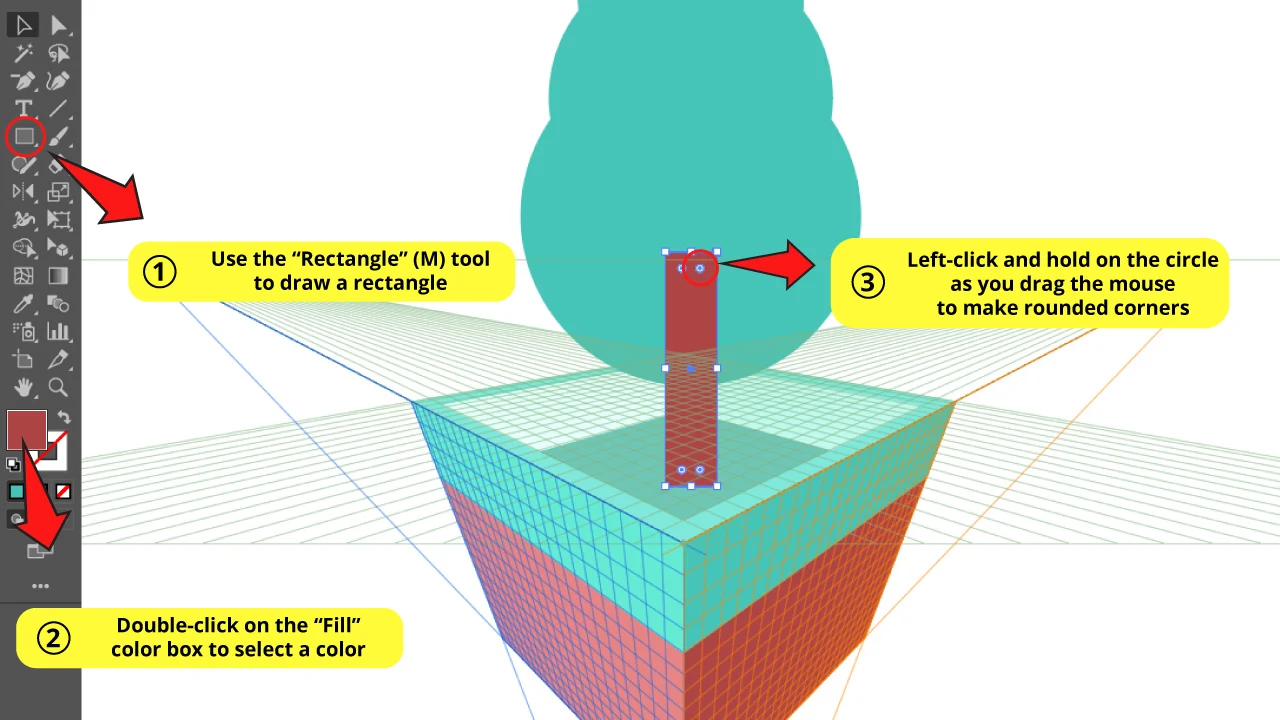
Make a rectangle using the “Rectangle” (M) tool, and then pick a color by double-clicking on the “Fill” color box.
To make rounded corners, with the rectangle selected, left-click and hold on one of the four circles displayed on the inner corners of the rectangle, and then drag until you get the desired shape.
Step 9: Set Shapes Order

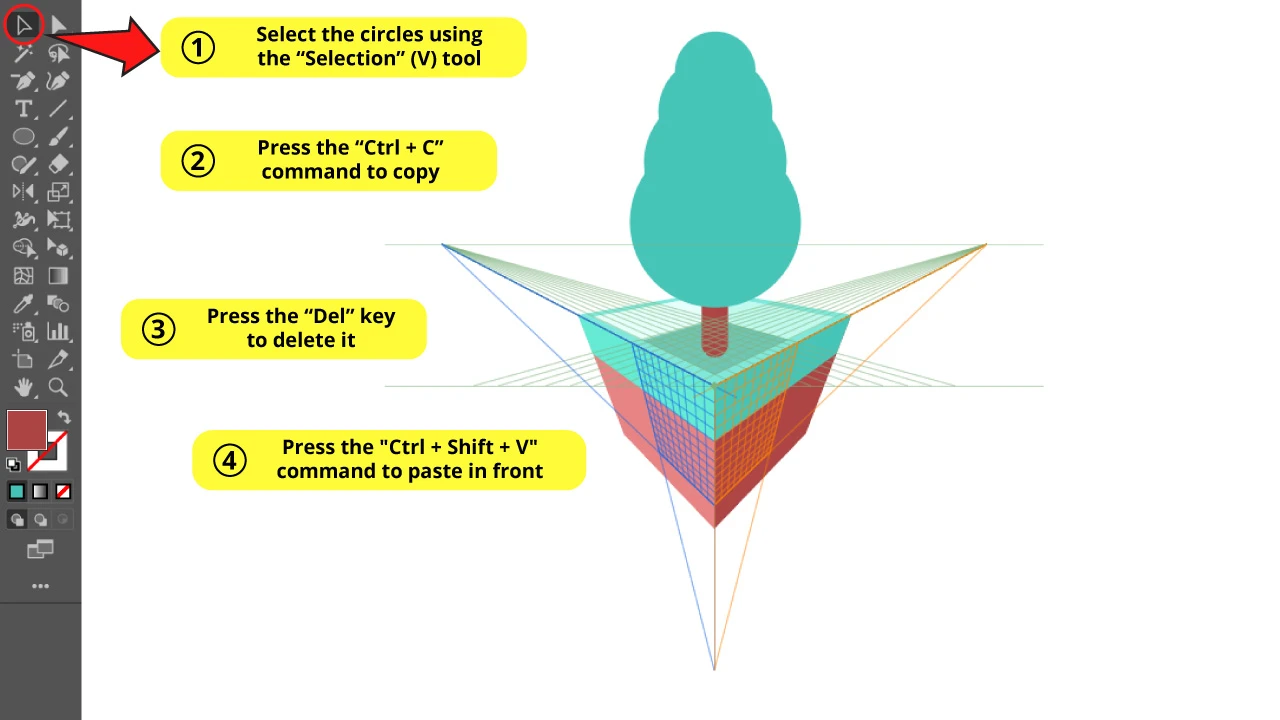
Notice that the trunk is in front of the plant. We need to move it back.
There are few methods to get this done, but we will do it very quickly .
Select all the circles using the “Selection” (V) tool.
With the circles selected, press the “Ctrl + C” command to copy them. Then press the “Del” key from your keyboard to delete them.
Finally, use the “Ctrl + Shift + V” command to paste it in front but in the same position.
Step 10: Make the Trunk’s Lower Section Flatter

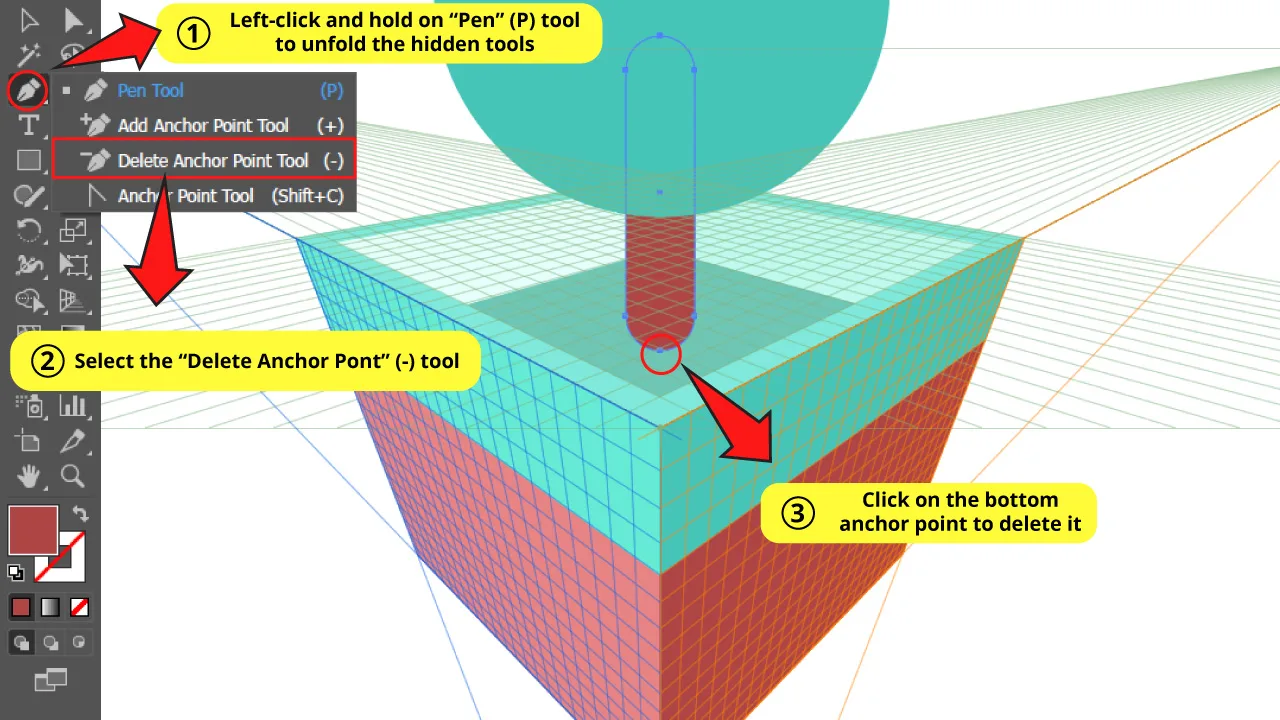
The last detail to take care of is fixing the trunk bottom to fit the perspective.
I fixed this using the “Delete Anchor Point” (-) tool hidden in the “Pen” (P) tool nest.
You can also select this tool by simply pressing the “-” key from your keyboard.
Once you have the “Delete Anchor Point” (-) tool selected, click on the bottom anchor point to delete it and make it flatter.
The Result

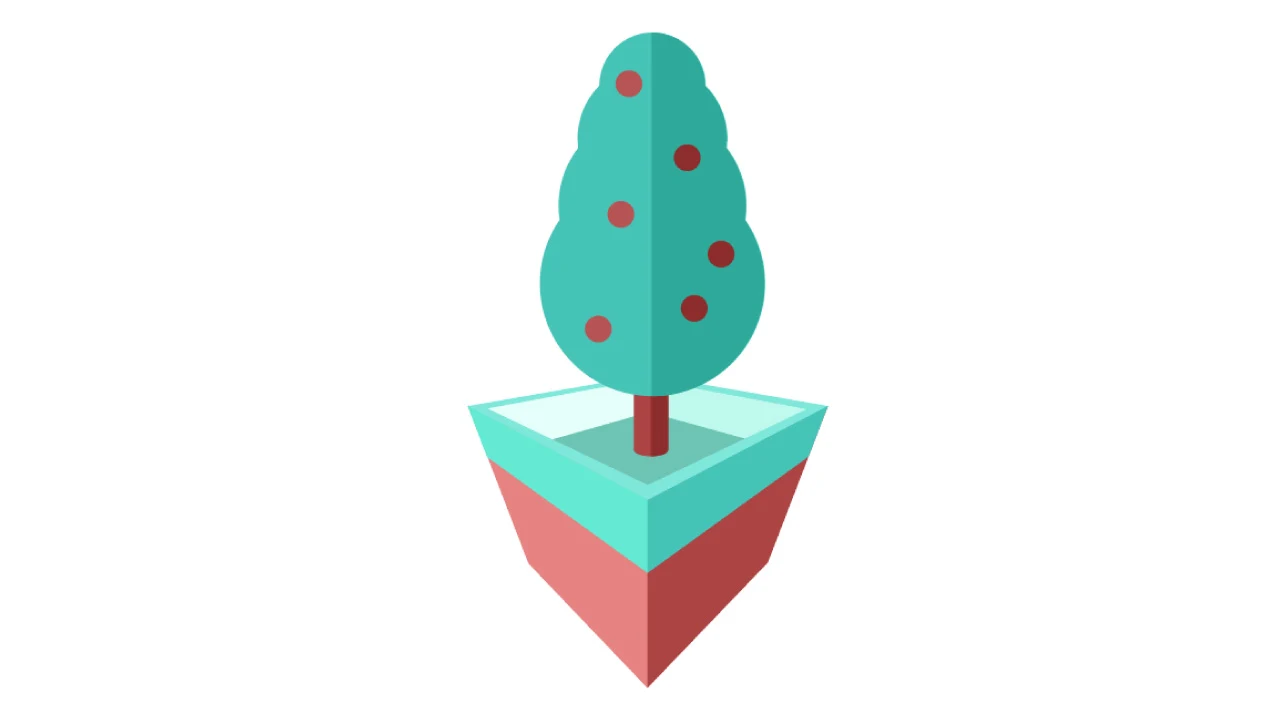
And this is how the flower pot looks!
I added some shadows for the plant and the trunk to make the tree look more catchy. I also added some circles, as fruits.
Since these details aren’t precisely relevant for this topic, these weren’t covered in a step. But please notice that the more you work on your graphics, the more interesting the result looks.
Frequently Asked Questions on “How to Use the Perspective Tool in Illustrator”
How to exit the “Perspective Grid” tool in Illustrator?
To exit the “Perspective Grid” tool, press the “Esc” key from your keyboard. Or you can place the mouse on the “X” in the “Plane Switcher” widget. Once the “Hide Grid” message box displays, click on the “X” to close.
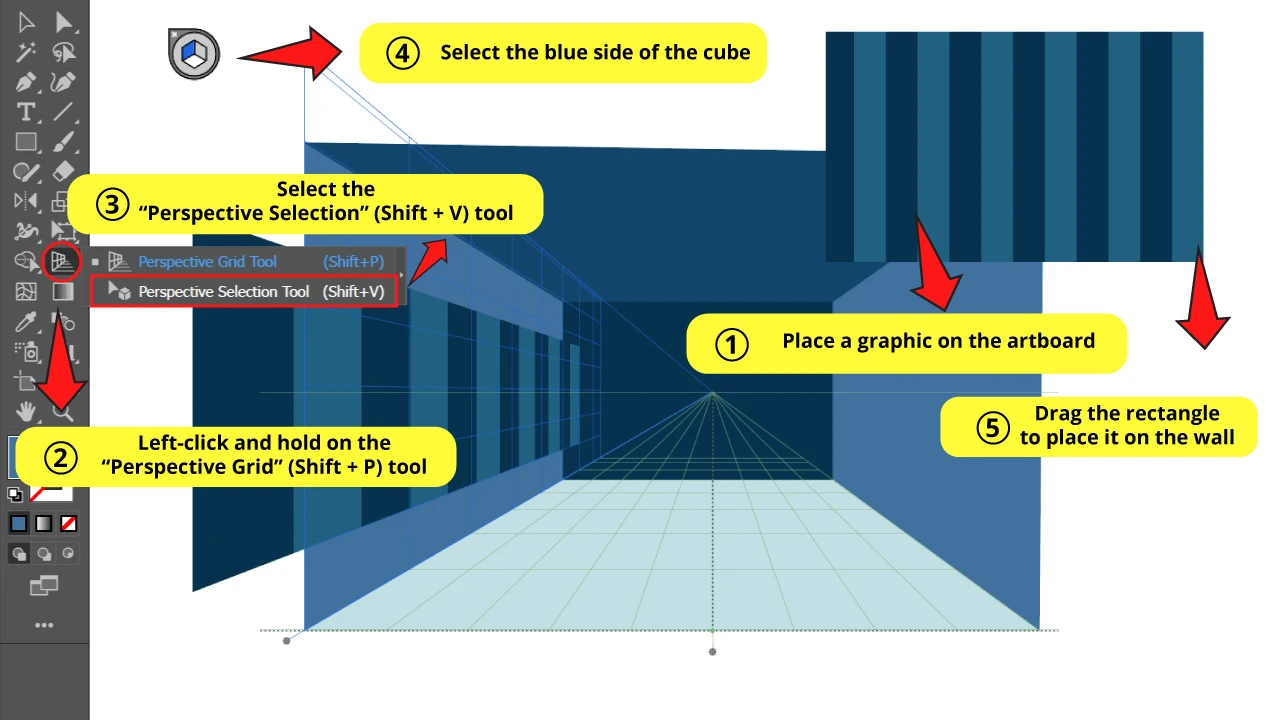
How to add graphics to the perspective grid in Illustrator?
Place a graphic on the artboard. Select the plane in the “Plane Switching” widget. Use the “Perspective Selection” (Shift + V) tool to place the graphic according to the selected perspective.
How can I readjust an object on the perspective grid in Illustrator?
To adjust the size of the object on the perspective grid, use the “Perspective Selection” (Shift + V) tool. To adjust the shape of the object, use the “Direct Selection” (A) tool to move the anchor points.
Can I make isometric illustrations using the “Perspective Grid” (Shift + P) tool in Illustrator?
It’s possible to make Illustrations using this tool, but it unfortunately can’t be as precise as isometric illustrations require. So it’s strongly recommended to make grids and then wrap them using measurable parameters.


Hey guys! It’s me, Marcel, aka Maschi. On MaschiTuts, it’s all about tutorials! No matter the topic of the article, the goal always remains the same: Providing you guys with the most in-depth and helpful tutorials!

