
When talking about vectorizing images, we can classify this procedure in two main groups.
The renowned live “Image Trace” feature, in which all the work is done by Illustrator itself.
And then we have the manual procedure, which requires certain skill and knowledge.
The idea of being able to convert an image to vector by only one click certainly sounds tempting, but even if every new version of Illustrator gets more and more sophisticated and accurate, since images can be so different, the automatic method is still not perfect and won’t always work as expected.
This is why professional graphic designers still use the manual tracing method very often when it comes to vectorizing images.
In this article we will be covering both methods, so it’s up to you to tell which one fits your needs better, and of course, the amount of dedication you are willing to invest into this vectorizing process.
Vectorizing an Image in Illustrator
Place an image. Click on “Image Trace” and select a “Preset” on the “Image Trace” panel according to your image’s needs. Or vectorize it manually by locking the current layer and use it as a guide to trace paths using drawing tools.
How to Vectorize a Black and White Image Using Live Image Trace in Illustrator
Place an image. Click on “Image Trace”. Open the “Image Trace” panel and set the “Threshold”, “Paths”, “Corners” and “Noise” values. Expand it. Use the “Magic Wand” (Y) tool to select the background and press “Del” to remove it.
The title of this method could be confusing. The image to vectorize doesn’t need to necessarily be black and white. It could be in two other colors. It could also originally be a full color image, but the result of this type of vectorization will be in black and white. Like a stencil. But of course, you can change the vector colors later.
Keep in mind that using images with the fewest possible shades of color will most likely get you better results.
If you are going to vectorize a two color image, but colors are similar in saturation or brightness, like it could happen with white and yellow, or black and red, the outcome might not be as accurate as you’d like.
So if possible, to get better results try to use images with different colors, with bold contrast, like black and white for instance.
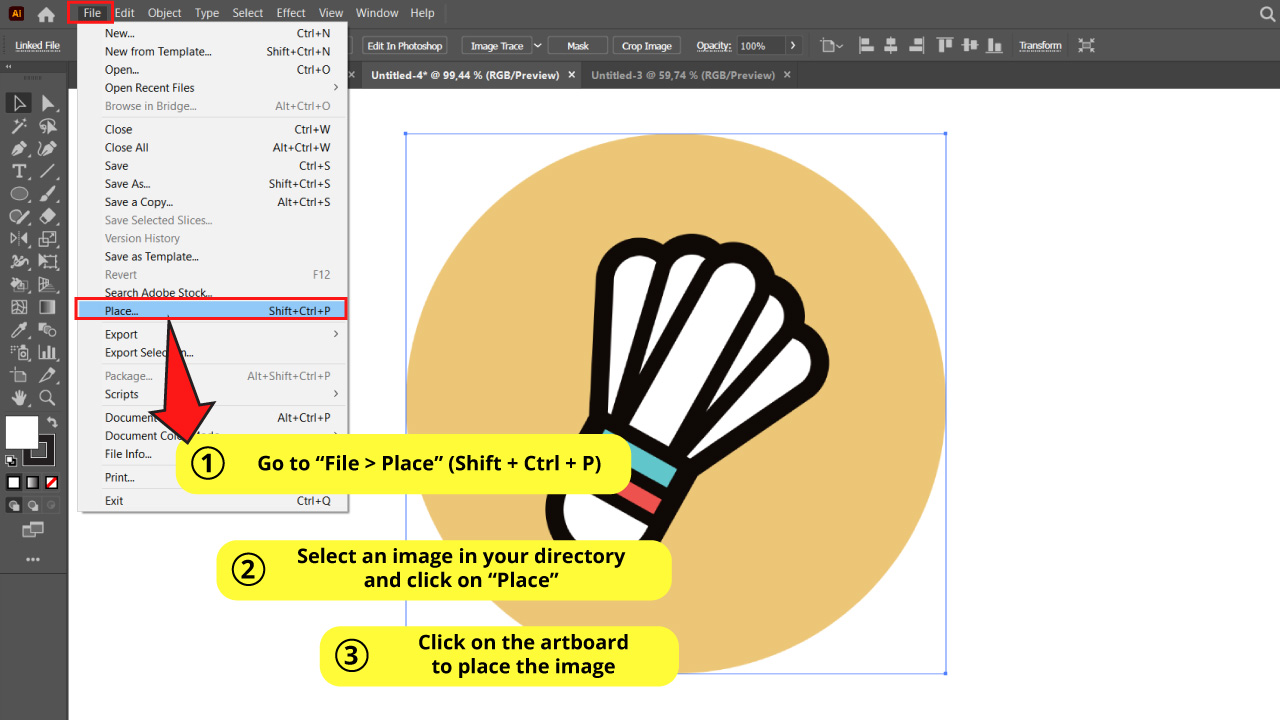
Step 1: Place an Image
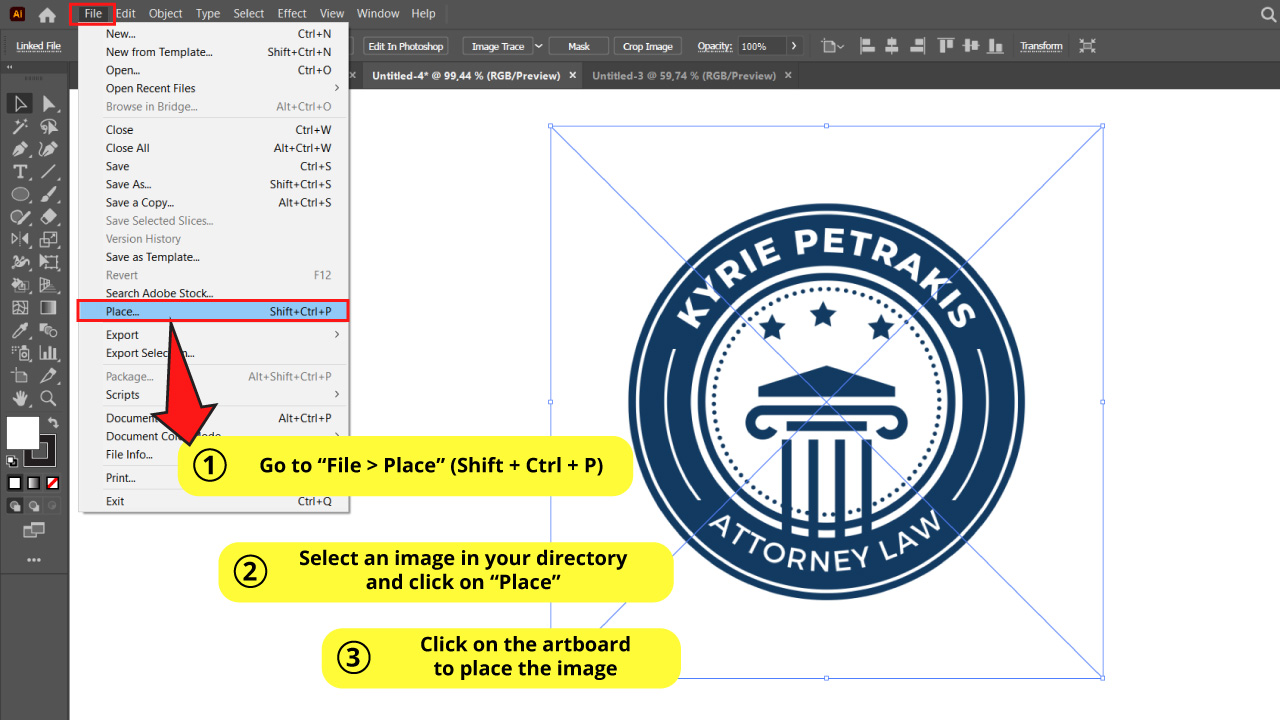
Go to “File > Place” (Shift + Ctrl + Place) on the menu at the top of the screen.
Select an image in your directory and click on “Place”.
Then click on the artboard to place that image.
You can also drag and drop the image directly onto the artboard.
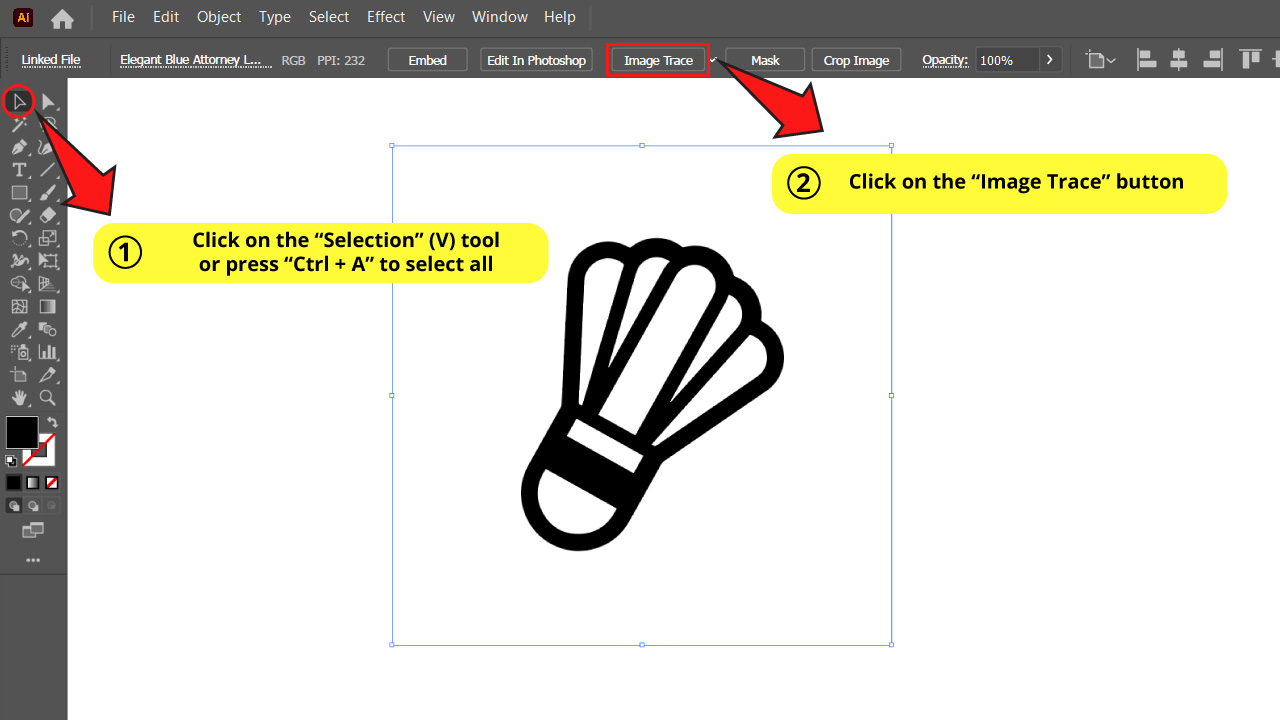
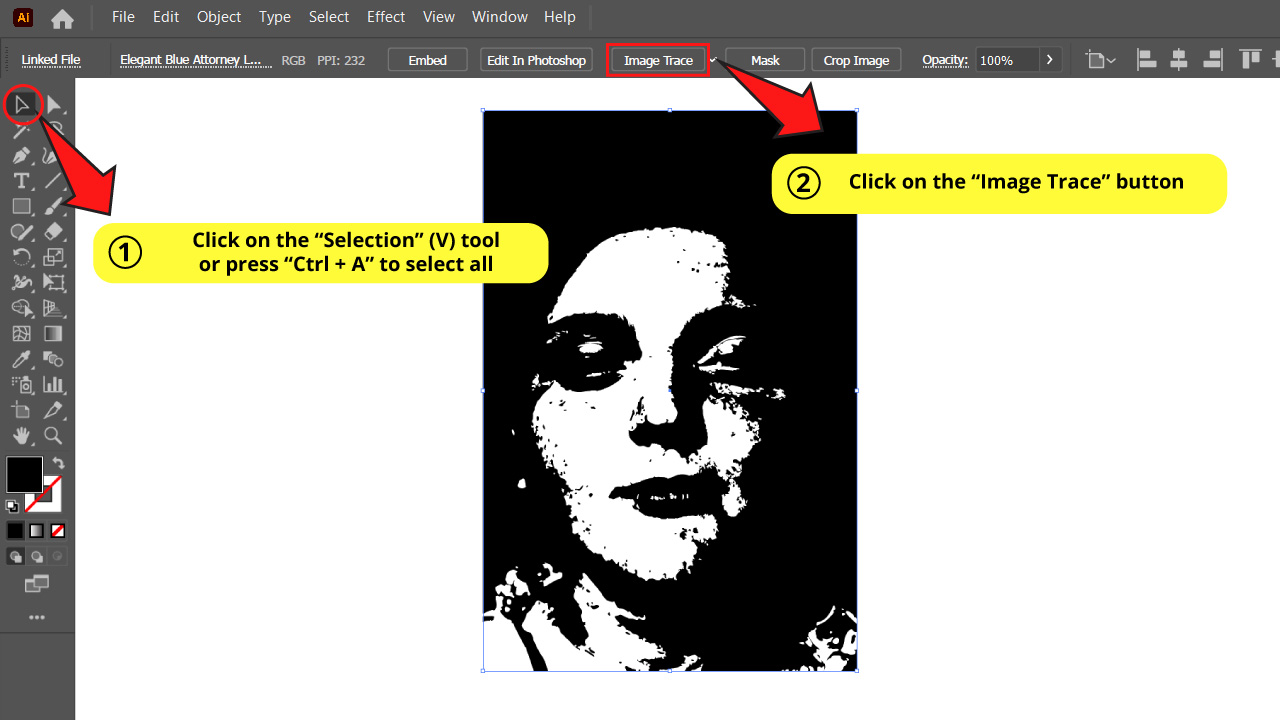
Step 2: Use the Live “Image Trace”
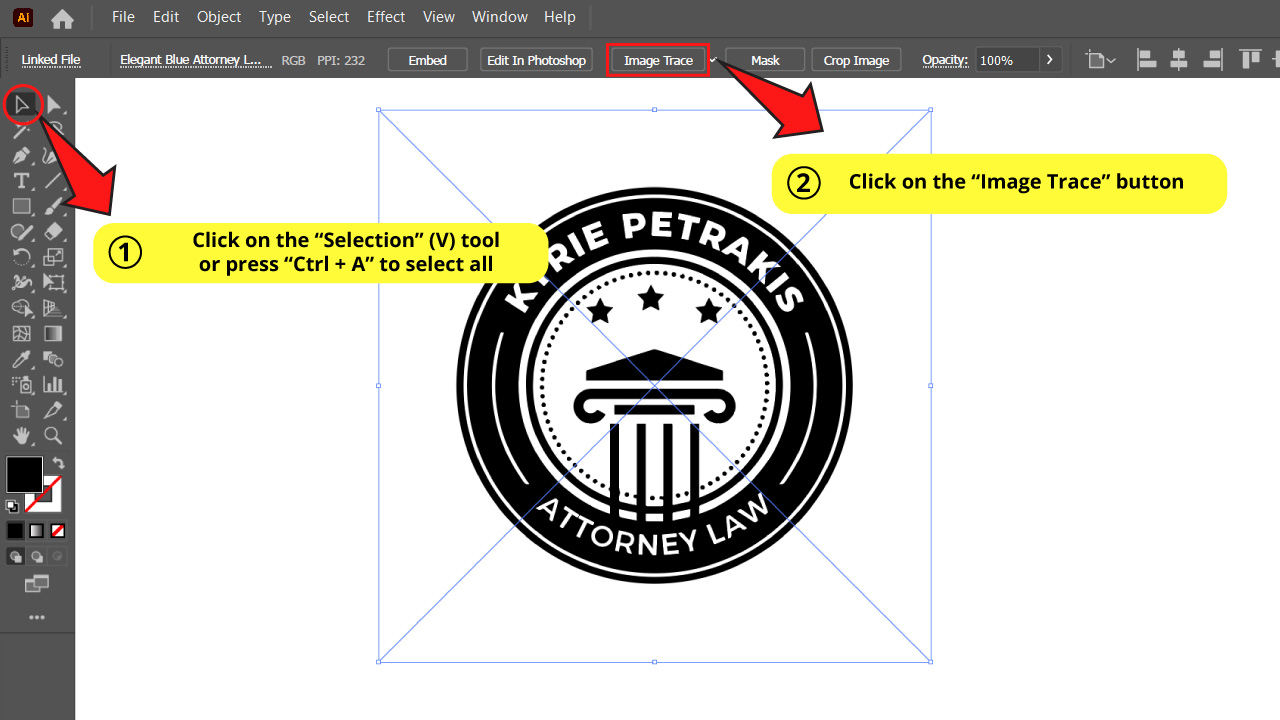
Select the image with the Selection (V) tool or press “Ctrl + A” to select all.
Then click on “Image Trace” on the toolbar at the top of the screen.
Step 3: Set the “Image Trace” Basic Adjustments
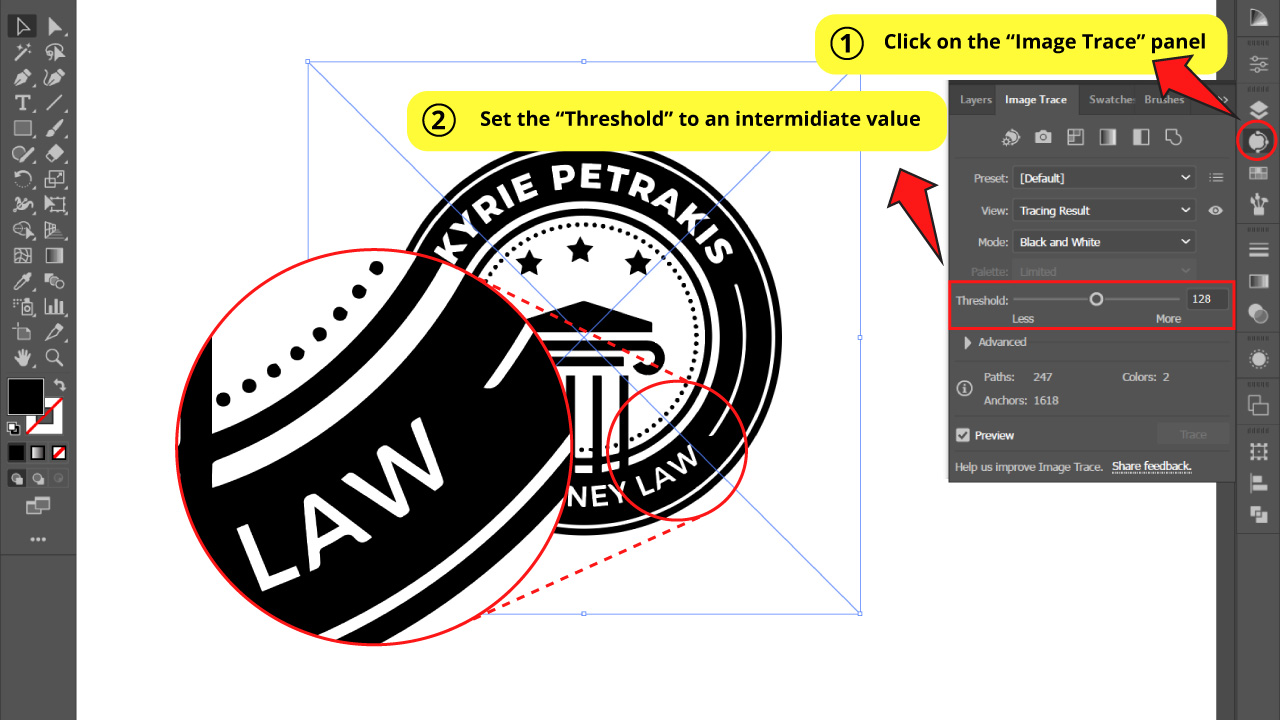
Open the “Image Trace” panel usually located on the right side toolbar.
If you can’t find it, you may have to enable it by going to “Window > Image Trace” on the menu at the top of the screen.
When you click on “Image Trace,” the default vectorization will be black and white.
Because of this, we won’t need to specify the vectorization to be black and white in the “Image Trace” panel when following this method.
In the “Image Trace” panel you can find the “Threshold” settings.
This basically sets the width of the black areas of the image. If you set it to a high value, the black areas will be wider. If you set it to a low value, they will be narrower.
For this particular example, this value won’t affect the vectorization much, because the limits between black and white are well defined. The image is not blurry at all.
I’ll set mine to an intermediate value.
Step 4: Set the “Image Trace” Advanced Adjustments
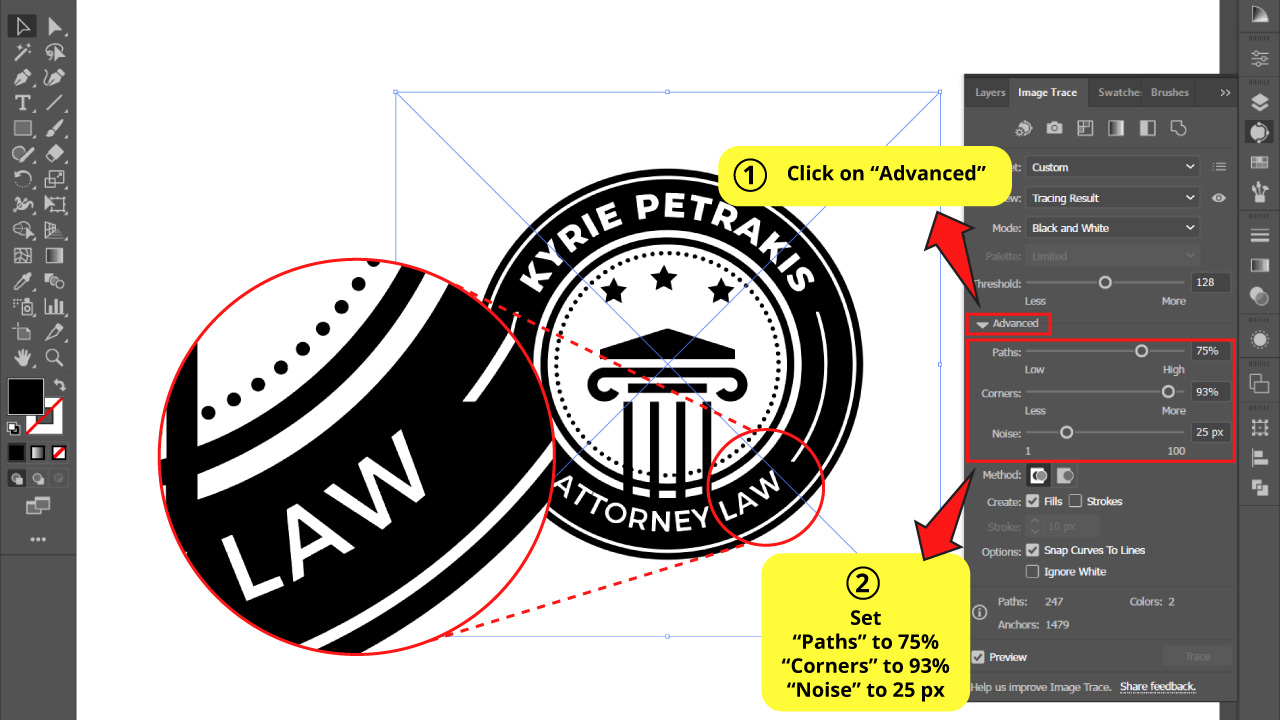
Click on “Advanced” to unfold the advanced settings panel.
The “Paths” field sets the number of anchor points the vector will have. There is not any rule of thumb for this. It will entirely depend on your specific image’s characteristics.
Let’s say you want to vectorize an image like a circle, and you set a very high value for “Paths”. It may happen that the edges look kind of wavy (wavy lines). But if you set the value to a very low number, the edges might end up being too squared, and curves won’t be as smooth as you’d like them to be.
Therefore, it’s probably a good idea to always try with different settings with the “Preview” box checked in until you find values that fit your particular image better.
The “Corners” field sets the sharpness of the corners. As a rule of thumb, set this number higher even if you are vectorizing a round shape.
You can look and compare the image in this step with the one of the previous step and notice how the letters and the round shapes notoriously improve by simply setting the “Corners” value higher.
The “Noise” field limits the size of the shapes to vectorize. If you set a low value, the small details will abide after the vectorization process. If you set a high value, the vectorization will look cleaner but will lose details.
Set this number low to capture as many details as possible, but make sure the image still looks clean enough.
This can be annoying when vectorizing complex images like photos or artworks with lots of details
Leave the rest of the settings by default.
Step 5: Expand it!
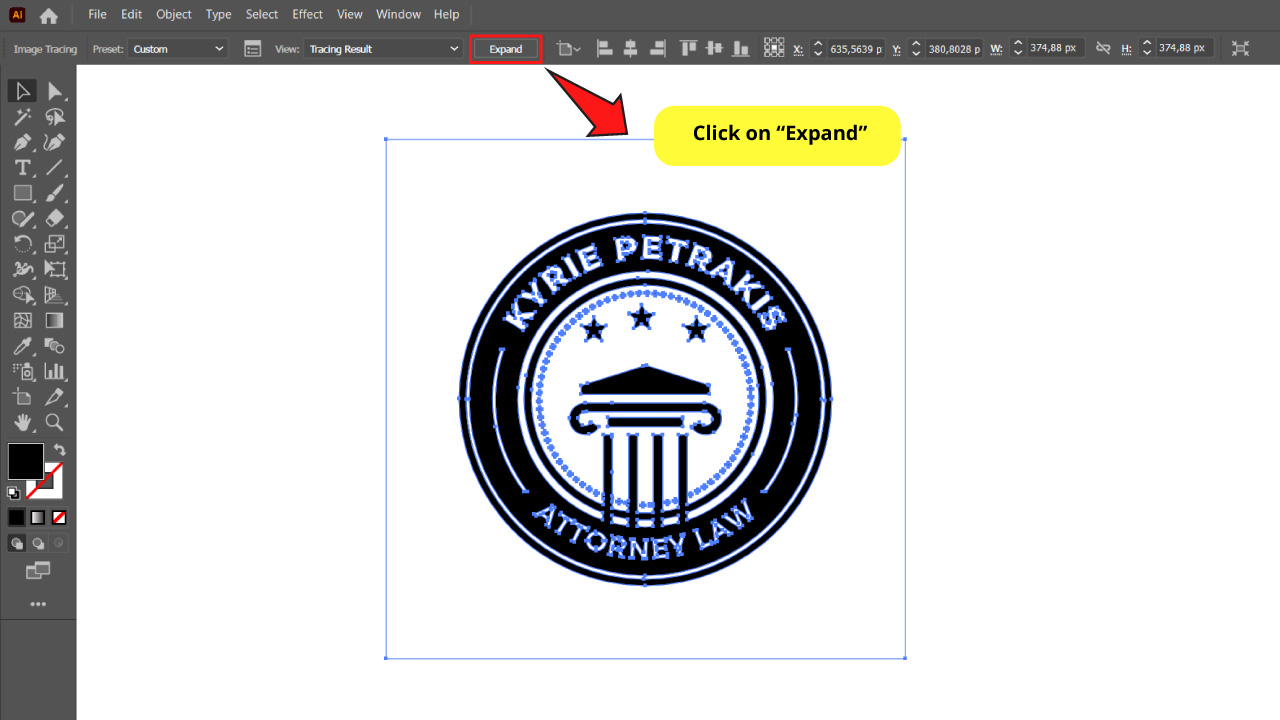
Now we have to expand the image to be able to manipulate the object as a vector.
To get this, with the image selected, click on “Expand” on the toolbar at the top of the screen.
You can also do this by going to “Object > Expand” on the menu at the top of the screen.
Step 6: Remove Background
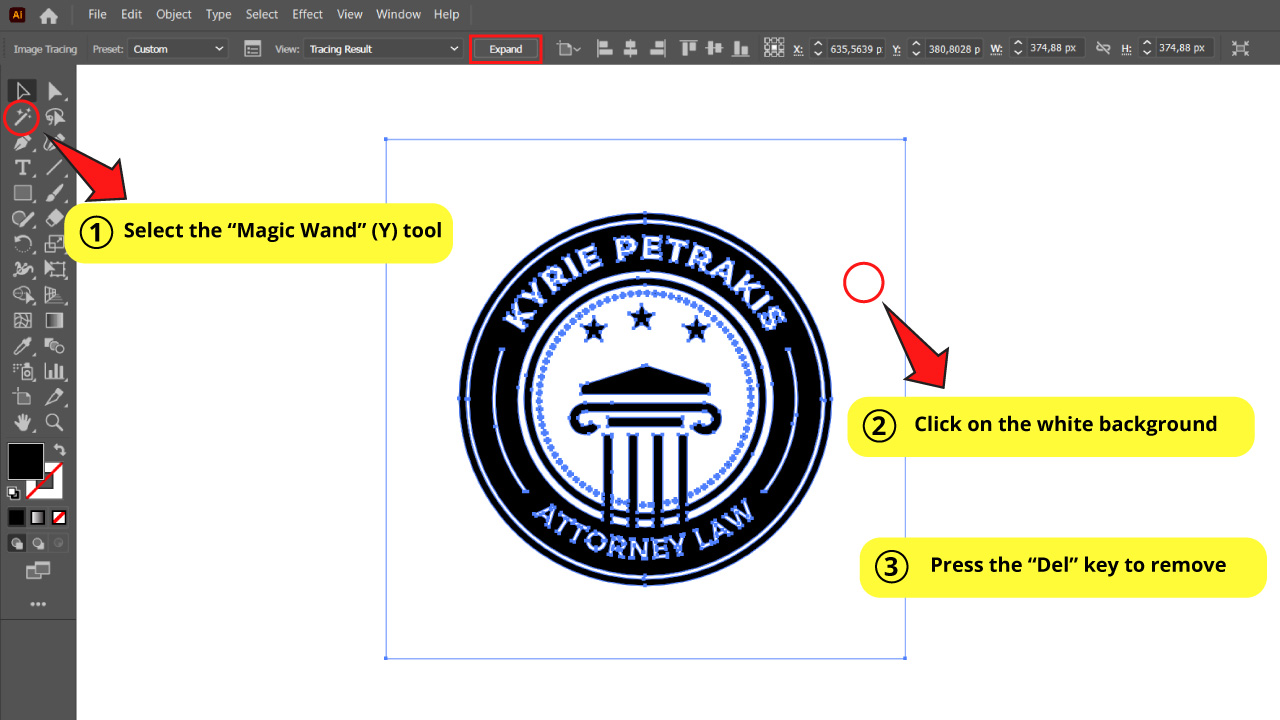
Now we need to get rid of the background. As a matter of fact, there is an option in the “Image Trace” panel to ignore the white areas when you vectorize.
But it’s usually better to do this manually, because in some cases you may be working with an inverted image (like something with black background and white art). In that case we will obviously want to get rid of the black areas instead of the white ones. We will have to take care of this manually, indeed.
So click on the “Magic Wand” (Y) tool on the left side toolbar. Then click on the white area (or any area with the color that you want to delete) and press “Del” to remove the background.
Step 7: Pick a Color
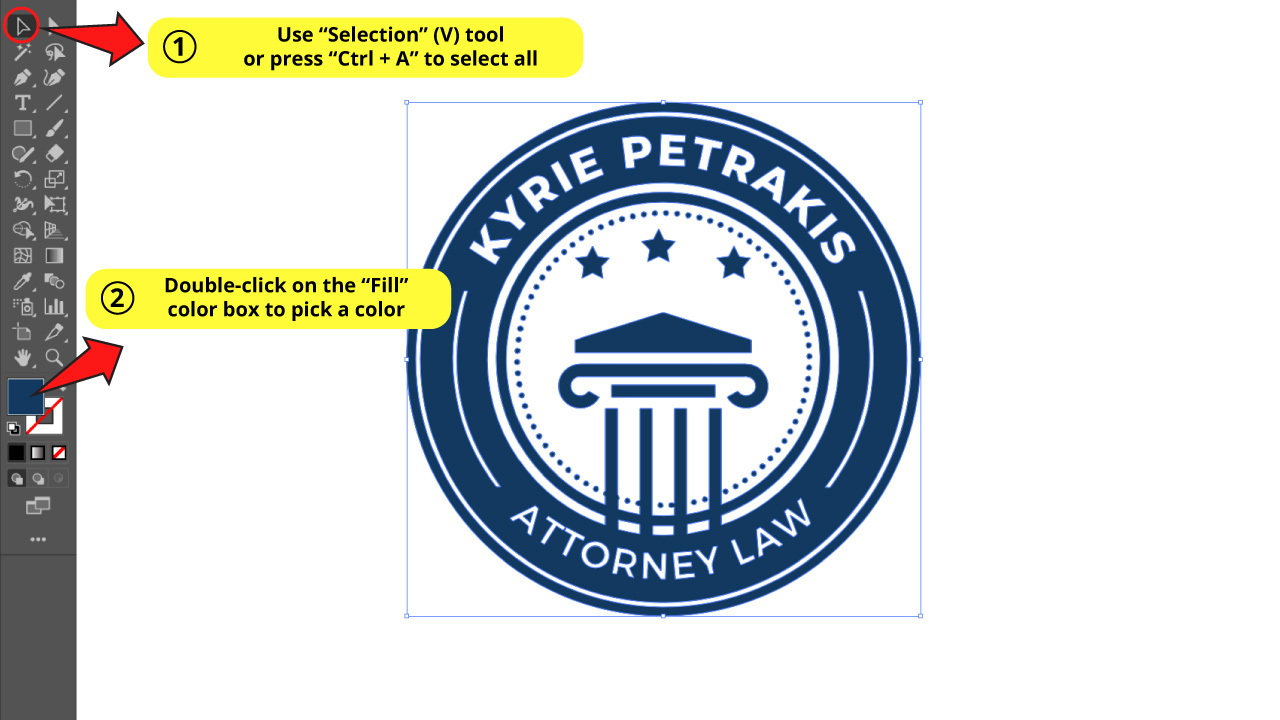
We finally get to select a color for the vector.
To accomplish this final step, select the vector using the “Selection” (V) tool or pressing “Ctrl + A” to select all.
Then double-click on the “Fill” color box and pick the color you want.
How to Vectorize a Basic Colored Image Using Live Image Trace in Illustrator
Place an image. Click on “Image Trace”. Open the “Image Trace” panel and set the “Preset” to “3 Colors”. Count the number of colors of your image and fill the “Colors” field with that number. Expand it. Select the background and press “Del” to remove it.
To vectorize an image with few colors, like could be with logos, or icons for example, you should probably follow this method.
Always try to keep the number of colors as low as possible. The fewer the colors, the better the results.
We strongly recommend to previously prepare the image with Photoshop or any similar software, reducing the number of colors to a very low quantity, or to black and white if possible.
Step 1: Place an Image

Go to “File > Place” (Shift + Ctrl + Place) on the menu at the top of the screen.
Select an image in your directory and click on “Place”.
Then click on the artboard to place that image.
You can also drag and drop the image directly onto the artboard.
Step 2: Use the Live “Image Trace”
Select the image with the Selection (V) tool or press “Ctrl + A” to select all.
Then click on “Image Trace” on the toolbar at the top of the screen.
Your image will be vectorized in black and white by default.
Step 3: Set the “Image Trace” Basic Adjustments

Open the “Image Trace” panel, usually located on the right side toolbar.
Or, if necessary, enable it by going to “Window > Image Trace” on the menu at the top of the screen.
On the “Preset” field, select “3 Colors” and your image will be vectorized in 3 colors.
Now, count the number of colors your image has. Don’t forget to also count the background color.
For the image in this example, we have five colors: white, gold, black, cyan and red.
So the value for “Colors” will be 5.
Step 4: Set the “Image Trace” Advanced Adjustments
If you consider your vectorized image looks good so far, you can skip straight to the next step.
Otherwise, continue reading this step.
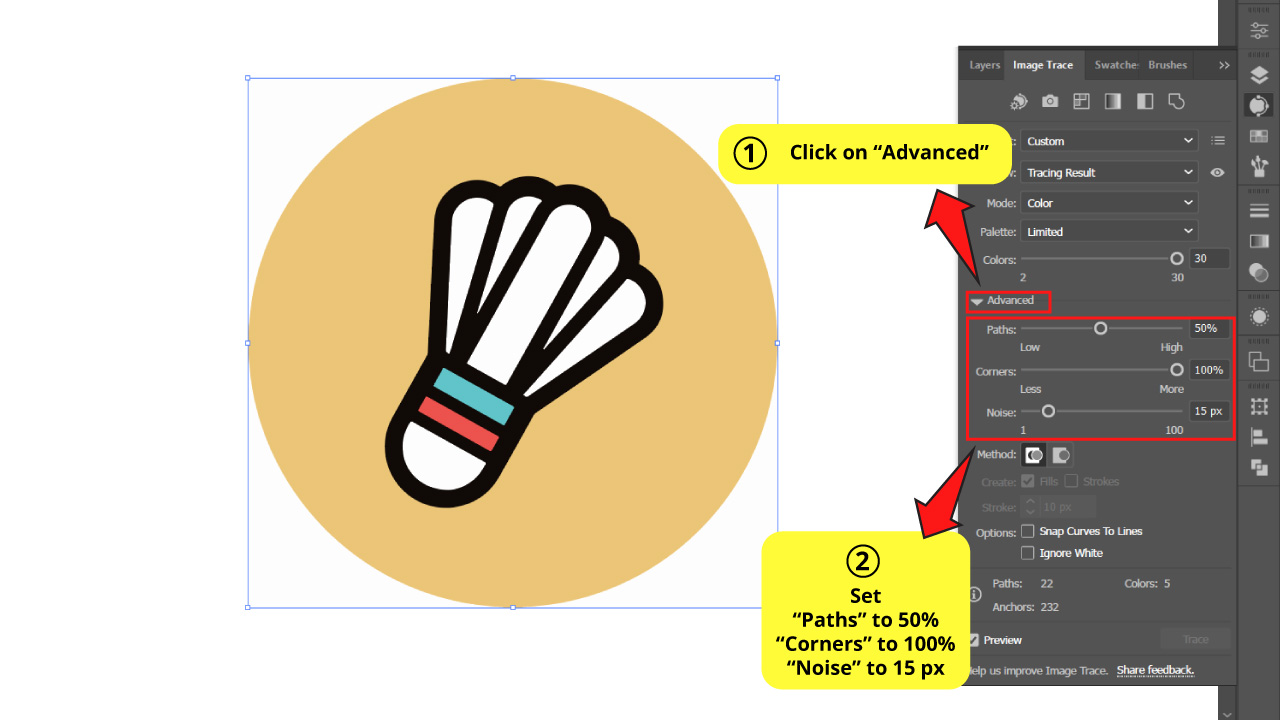
Click on “Advanced” to unfold the advanced options.
Set values for “Paths”, “Corners” and “Noise” fields.
Try with values similar to the ones we’re using for this example:
“Paths” to 50%
“Corners” to 100%
“Noise” to 15 px
Step 5: Expand it!
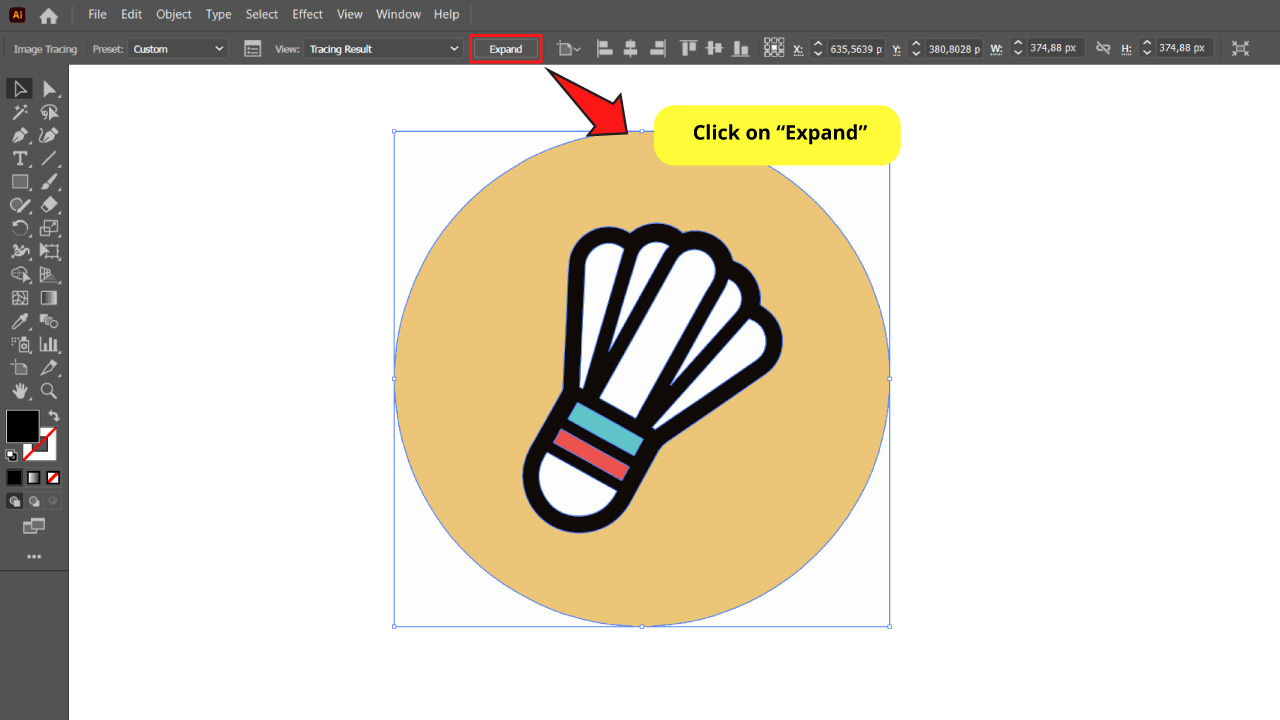
Click on “Expand” on the toolbar at the top of the screen.
Or you can also do this by going to “Object > Expand” on the menu at the top of the screen.
Step 6: Remove Background
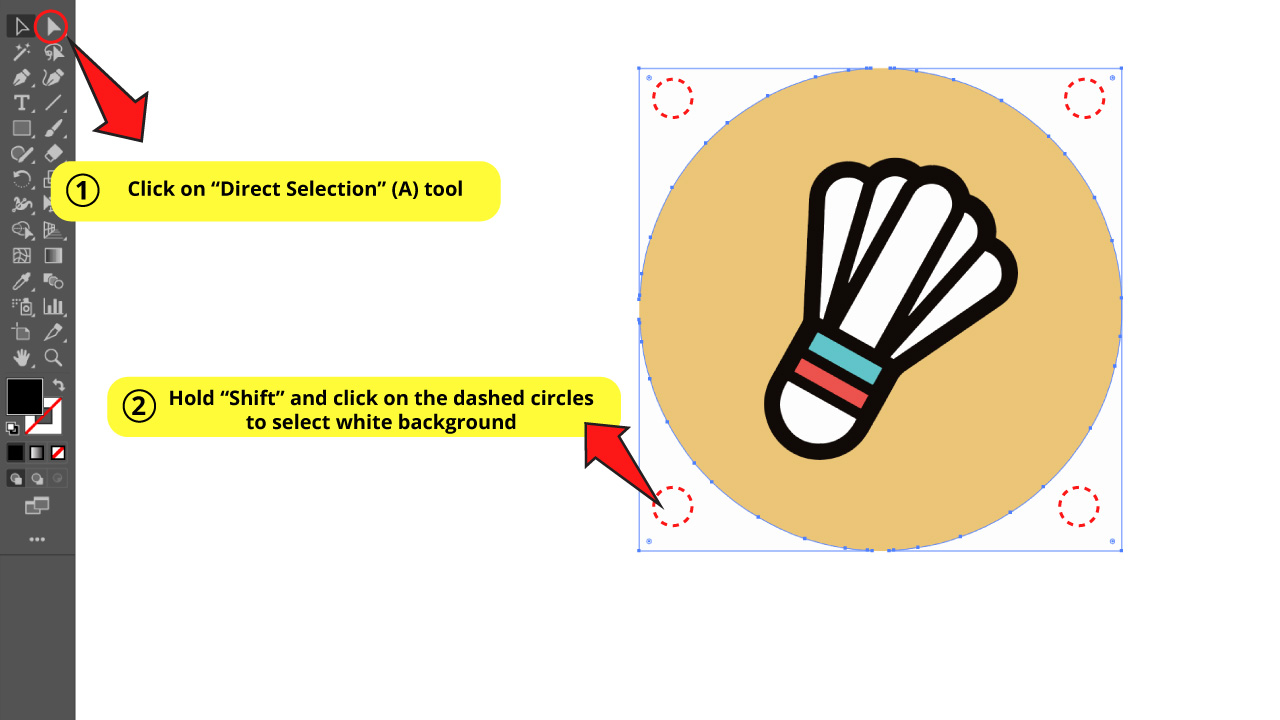
We can’t use the “Magic Wand” (Y) tool this time because we don’t want to delete all white areas. The badminton shuttlecock has white fills and we want to keep them.
So we have to use the “Direct Selection” (A) tool on the left side toolbar. Once you have selected this tool, hold the “Shift” key as you click on the white background corners to select them.
Then press the “Del” key to remove them.
How to Vectorize a Complex Image Using Live Image Trace in Illustrator
Place an image. Click on “Image Trace”. Open the “Image Trace” panel and set the “Preset” to “High Fidelity”, “Low Fidelity” or “Shades of Gray”. Set the number of “Colors” or “Grays” according to the previous settings. Expand it.
This method will show you how to vectorize images, like full color pictures, or textures, just to name a few.
Try to use high resolution files to get better results.
Step 1: Place an Image
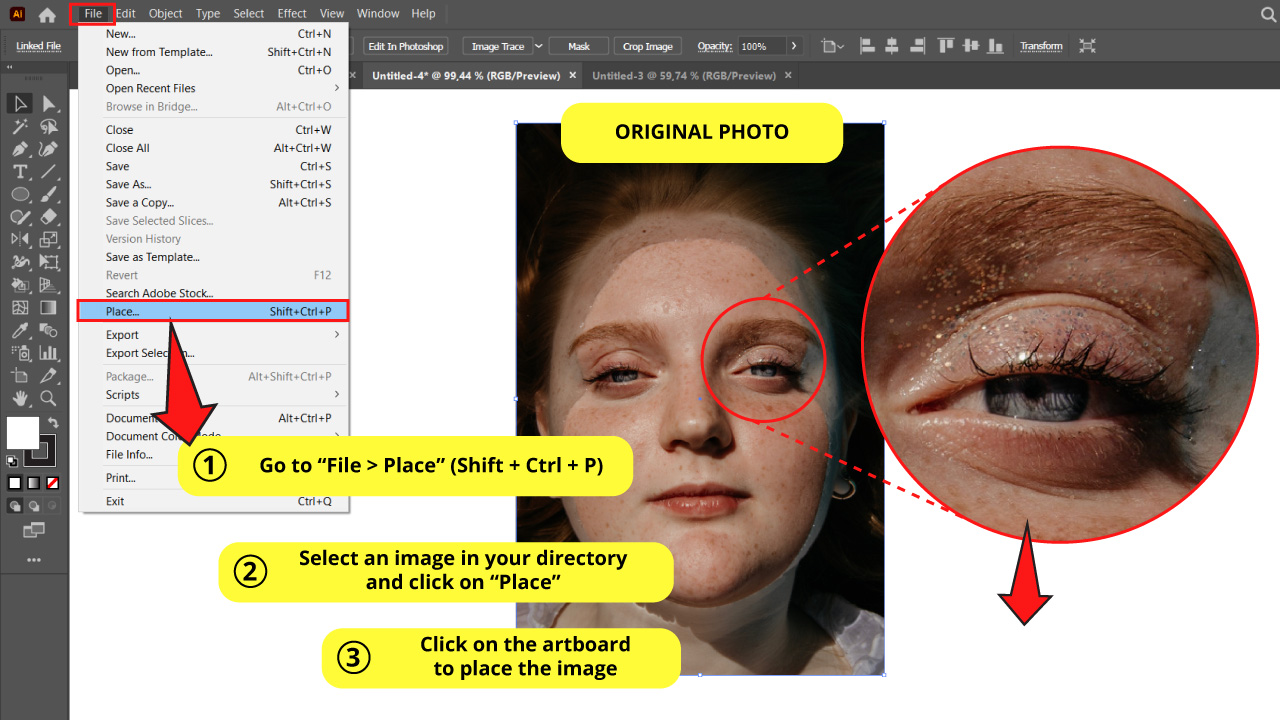
Go to “File > Place” (Shift + Ctrl + Place) on the menu at the top of the screen.
Select an image in your directory and click on “Place”.
Then click on the artboard to place that image.
You can also drag and drop the image directly onto the artboard.
Step 2: Use the Live “Image Trace”
Select the image with the Selection (V) tool or press “Ctrl + A” to select all.
Then click on “Image Trace” on the toolbar at the top of the screen.
It will be vectorized in a black and white image by default.
Continue with “Step 3” if you want to get a color vector.
Skip straight to “Step 4” if you want a grayscale vector.
Step 3: Set the “Image Trace” Adjustments to Color Images
Open the “Image Trace” panel usually located on the right side toolbar.
Or enable it by going to “Window > Image Trace” on the menu at the top of the screen.
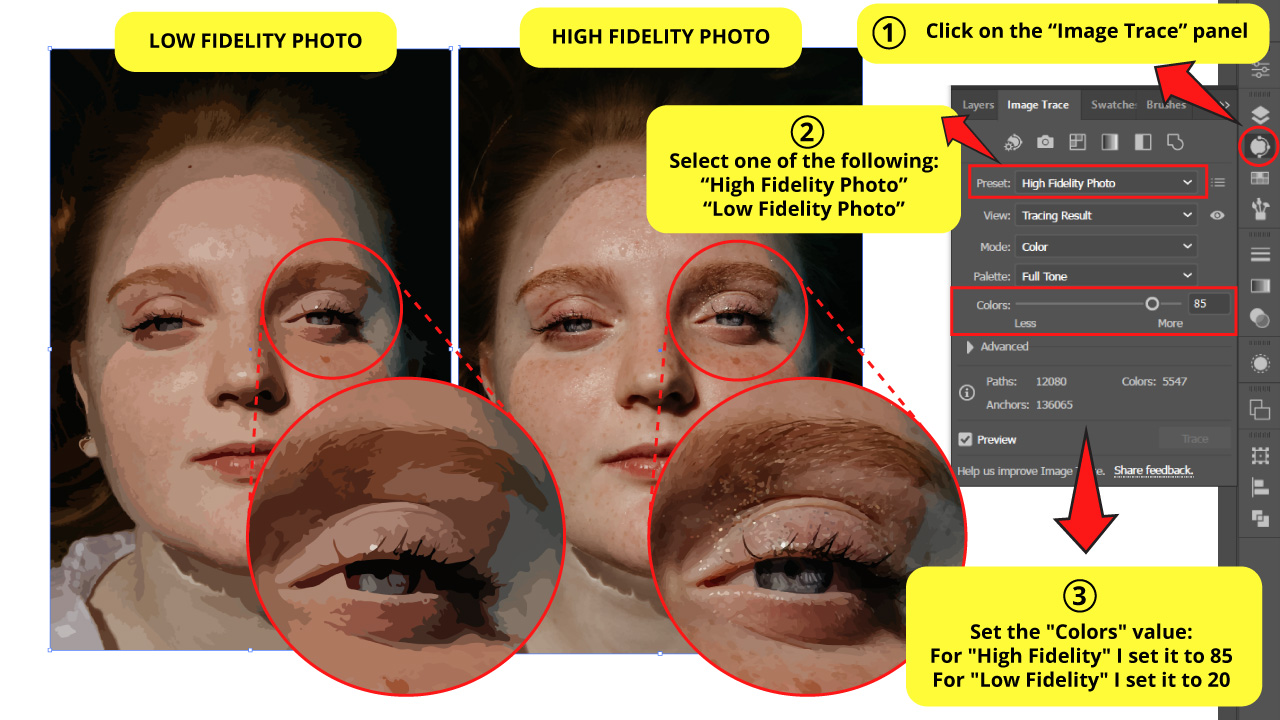
When you want to vectorize an image like a photo, you have 2 basic colored options: “High Fidelity Photo” or “Low Fidelity Photo”.
Select “High Fidelity Photo” if you want your vector to be as accurate as possible to the original bitmap image.
Select “Low Fidelity Photo” if you want your vector to keep the main aspects of the photo, but not the little details. This type of vectorization has fewer paths, so the manipulation of the vector requires less computer resources.
Select your type of vectorization on the “Preset” field.
Once you have selected your desired type of vectorization, you can then set the number of “Colors”.
The higher this number, the higher the fidelity will be, and also the higher the computer resources required.
I set the following “Colors” values:
For “High Fidelity Photo”, 85.
For “Low Fidelity Photo”, 20.
Step 4: Set the “Image Trace” Adjustments to Grayscale Images
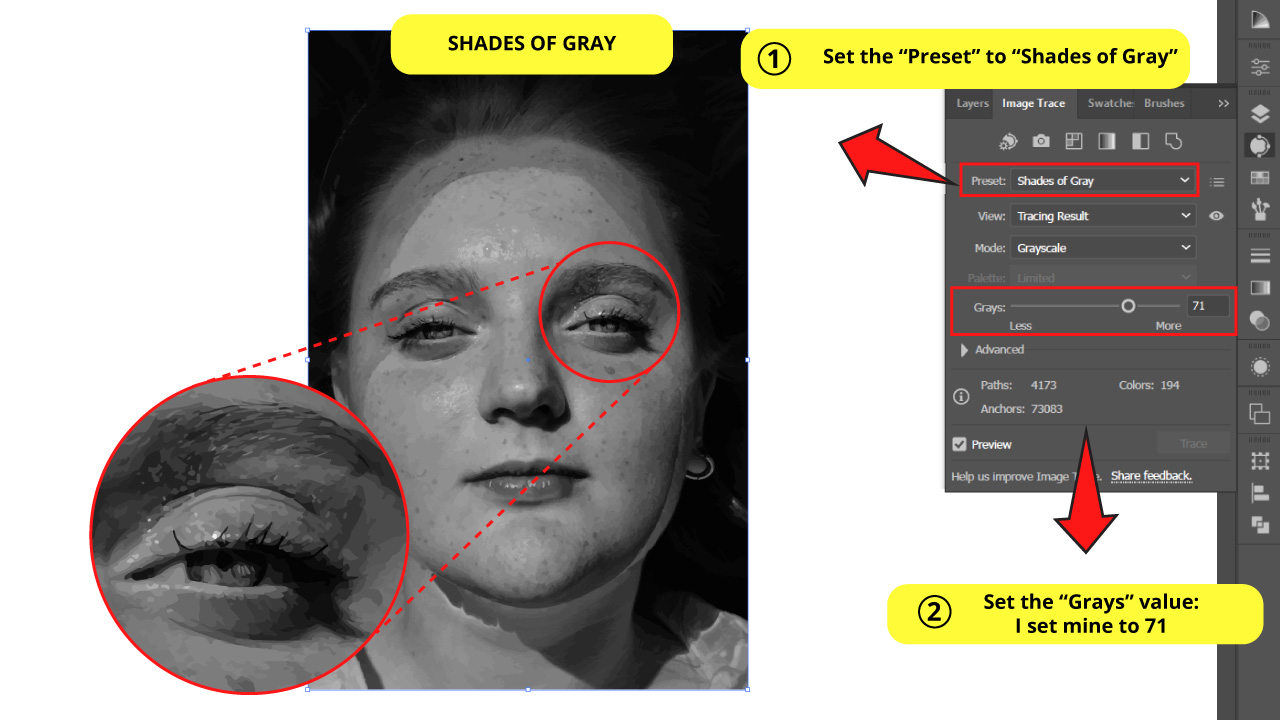
Set the “Preset” to “Shades of Gray”.
On “Grays”, select the number of grays you want to apply to the image. The higher this number, the higher the fidelity will be.
Step 5: Expand it!
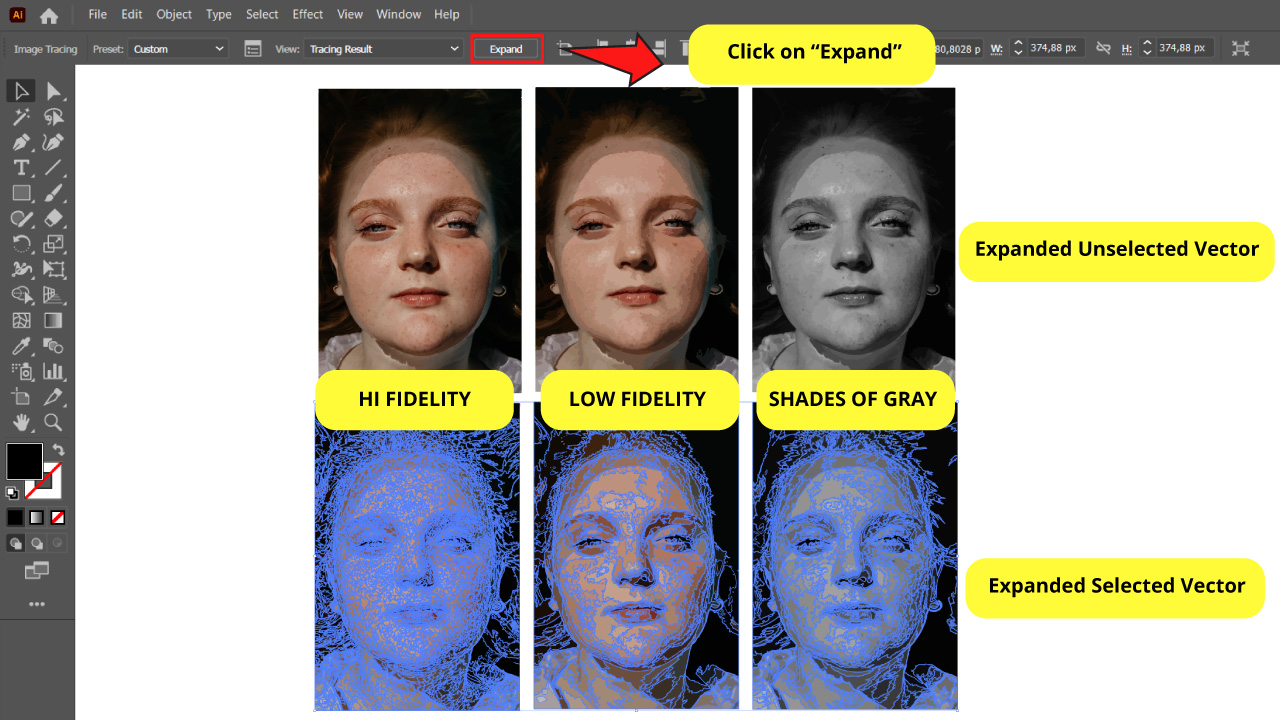
Click on “Expand” on the toolbar at the top of the screen.
Or go to “Object > Expand” on the menu at the top of the screen.
In this image you can appreciate the different types of vectorization with a full color image.
The top row images are expanded unselected vectors. And the bottom row images are expanded selected vectors.
You can notice the high number of paths in the “High Fidelity Photo” compared to the “Low Fidelity Photo”.
How to Vectorize a Image Using Drawing Tools in Illustrator
Place an image. Rotate it to be symmetrical. Set its “Opacity” to 20%. Open the “Layers” panel and lock the current layer. Create a new layer to work in. Use drawing tools to trace the shapes. Use the “Shape Builder” and the “Live Paint Bucket” tools to complete the tracing. Delete the guide layer.
This method aims to get the best results possible. It’s what professional graphic designers use to vectorize images.
Of course, it’s not always possible to vectorize images this way. Images like full color photos or textures are almost impossible to vectorize following this method.
But whenever possible, this technique is highly recommended for professionals.
In this section we’ll basically cover some tips to save time when you trace images manually.
Try to follow these tips to make your tracing work easier.
If your image is too complex, your best choice is probably using the “Pen” (P) tool for tracing.
We won’t explain how to use the “Pen” (P) tool now because it requires its own article due to its complexity.
Step 1: Place an Image
Go to “File > Place” (Shift + Ctrl + Place) on the menu at the top of the screen.
Select an image in your directory and click on “Place”.
Then click on the artboard to place that image.
You can also drag and drop the image directly onto the artboard.
Step 2: Rotate and Set the Opacity
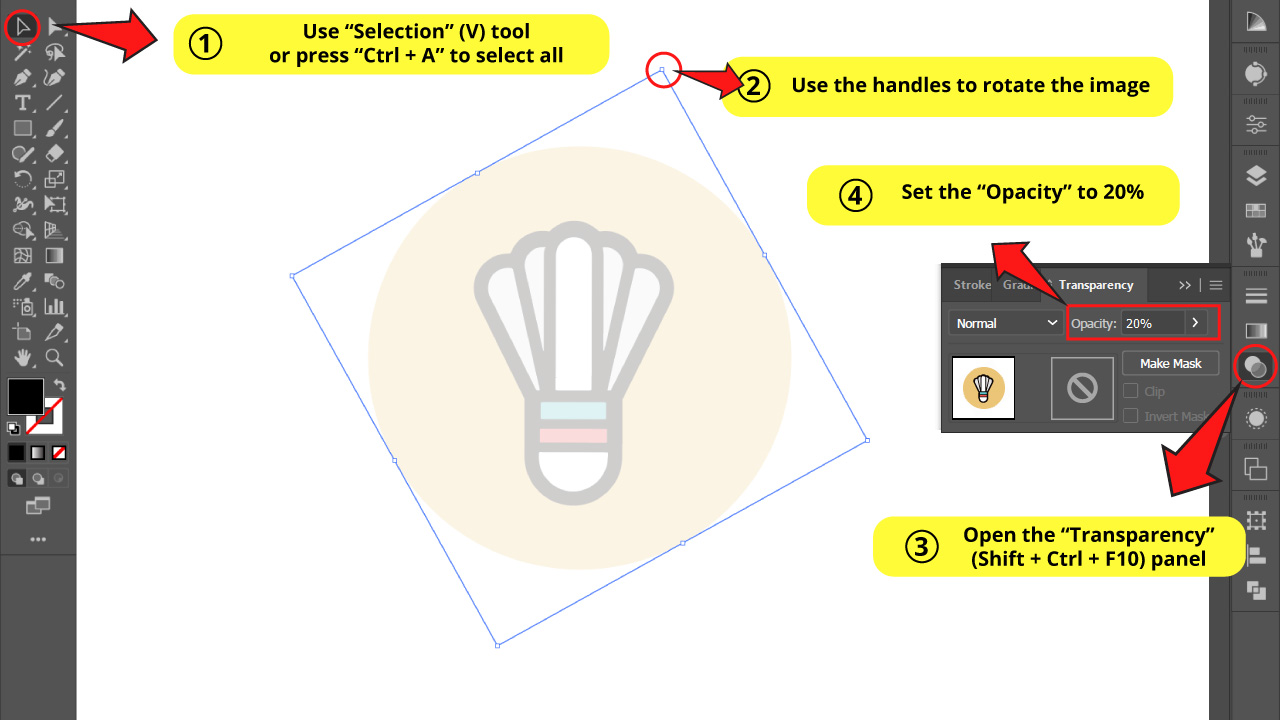
Select the image with the “Selection” (V) tool or pressing “Ctrl + A” command to select all.
Use the handles of the bounding box to rotate the image until it looks symmetrically on the left and right sides.
Then go to the “Transparency” panel usually located on the right side toolbar.
If you can’t find it, you may have to enable it first by going to “Window > Transparency” on the menu at the top of the screen.
You can also press “Shift + Ctrl + F10” to shortcut it.
On the “Transparency” panel, set the “Opacity” to 20%.
We are doing this to trace the paths using the original image as a guide.
Step 3: Lock the Layer and Create a New One
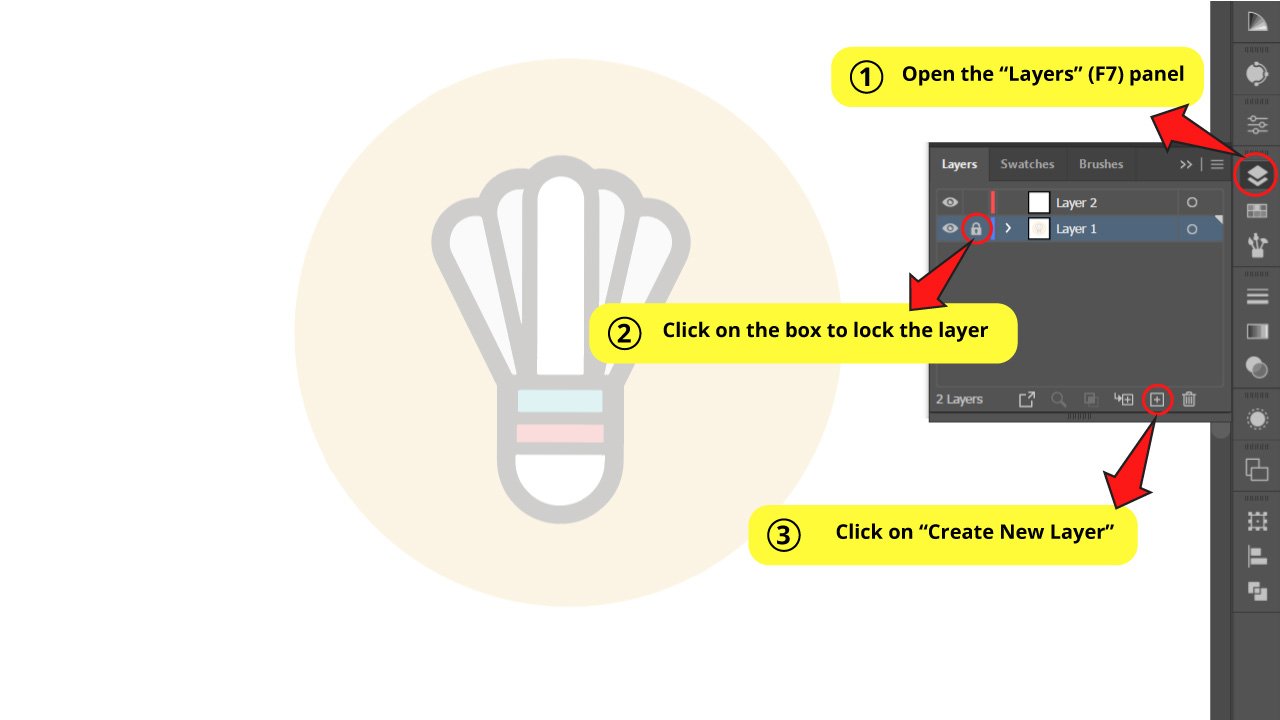
Go to the “Layers” panel on the right side toolbar.
If you can’t find it, you may have to enable it first by pressing “F7”, or going to “Window > Layers” on the menu at the top of the screen.
On the “Layers” panel click on the empty box next to the eye icon, to lock the layer.
This allows us to work over this layer without selecting it by mistake.
Next, create a new layer clicking on “Create New Layer”, at the bottom of the panel.
Click on the brand new layer to work on this layer from now on.
Step 4: Deconstruct the Image to Basic Shapes
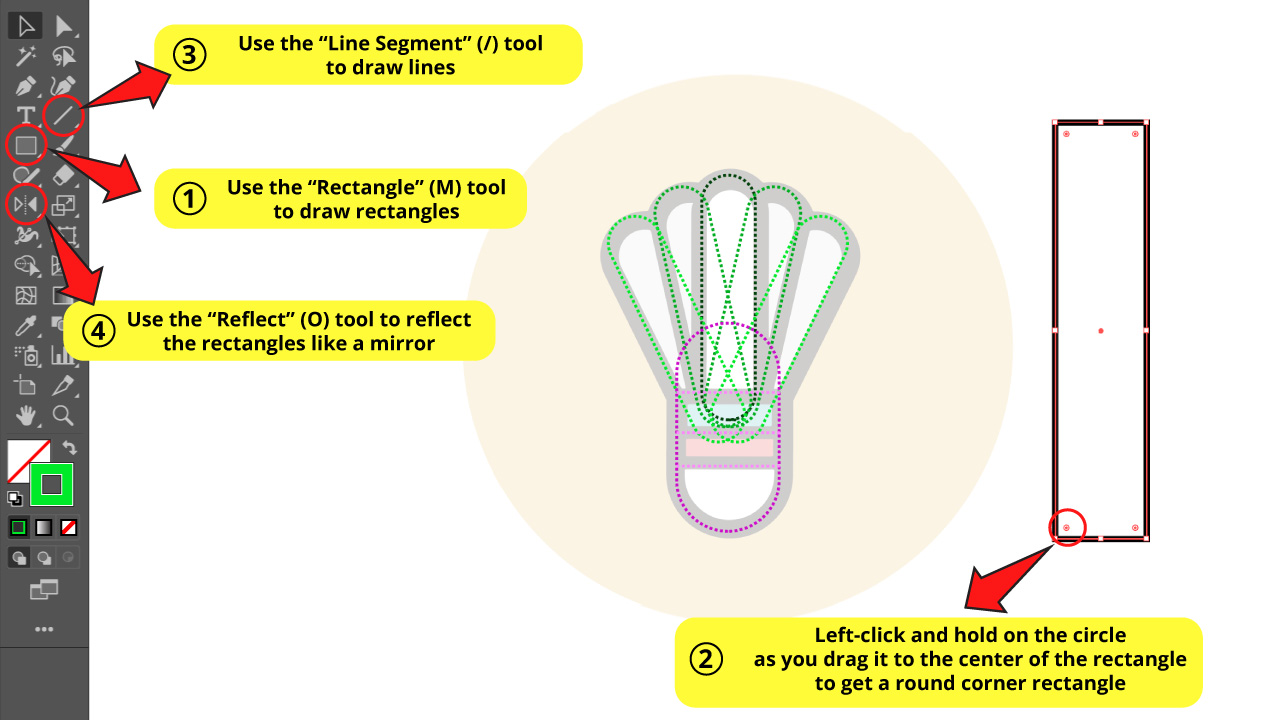
Try to visualize and deconstruct the artwork to basic shapes.
I drew colored dashed lines to appreciate the different shapes better, but when you draw them they will be in a continuous normal line.
For this example I was able to deconstruct the shapes into rounded corner rectangles and some horizontal lines.
Since this artwork is a symmetrical shape, I can save time by drawing only half of the badminton shuttlecock and then make a copy of it, reflect it like a mirror, and place it to complete the whole drawing.
Of course, this won’t always be possible, or even convenient. For this particular example, I’ll only use this option for the feathers.
First I’ll draw the middle feather, then I’ll make two copies and slightly rotate them to complete the feathers for one of the sides.
Then, I’ll duplicate the copies again, and I’ll reflect them like a mirror for the other side.
I basically made these shapes using the “Rectangle” (M) tool available on the left side toolbar.
Then, I rounded the corners of the rectangle to get that particular shape.
I also used the “Line Segment” (/) tool, located on the left side toolbar as well.
To reflect objects like a mirror, first select the shapes and then click on the “Reflect” (O) tool. Then press “Enter” to reflect them. Doing this, a window with “Reflect” options will pop up. Make sure to select “Vertical” and click “OK” to save.
Step 5: Use the “Shape Builder” Shift + M” Tool
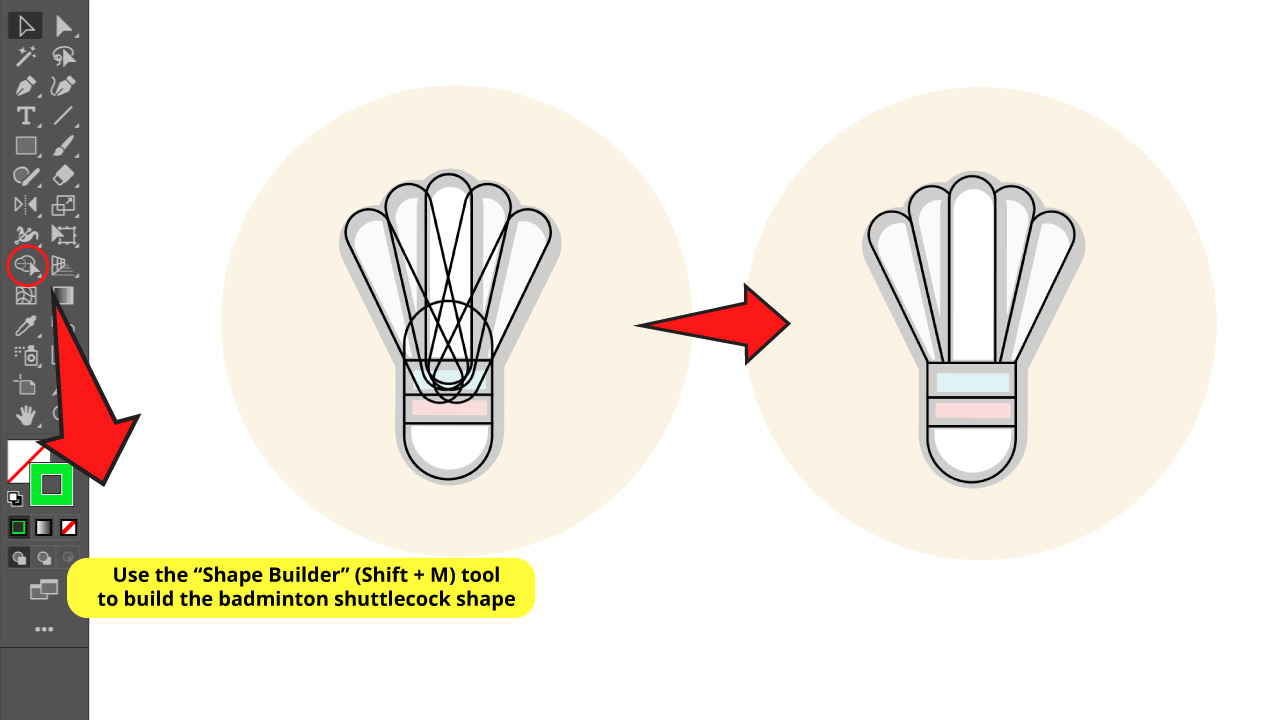
Once you have your basic shapes created, select all of them by pressing “Ctrl + A” and then use the “Shape Builder” (Shift + M) tool to combine shapes and get the badminton shuttlecock lines.
Step 6: Set the Stroke Width
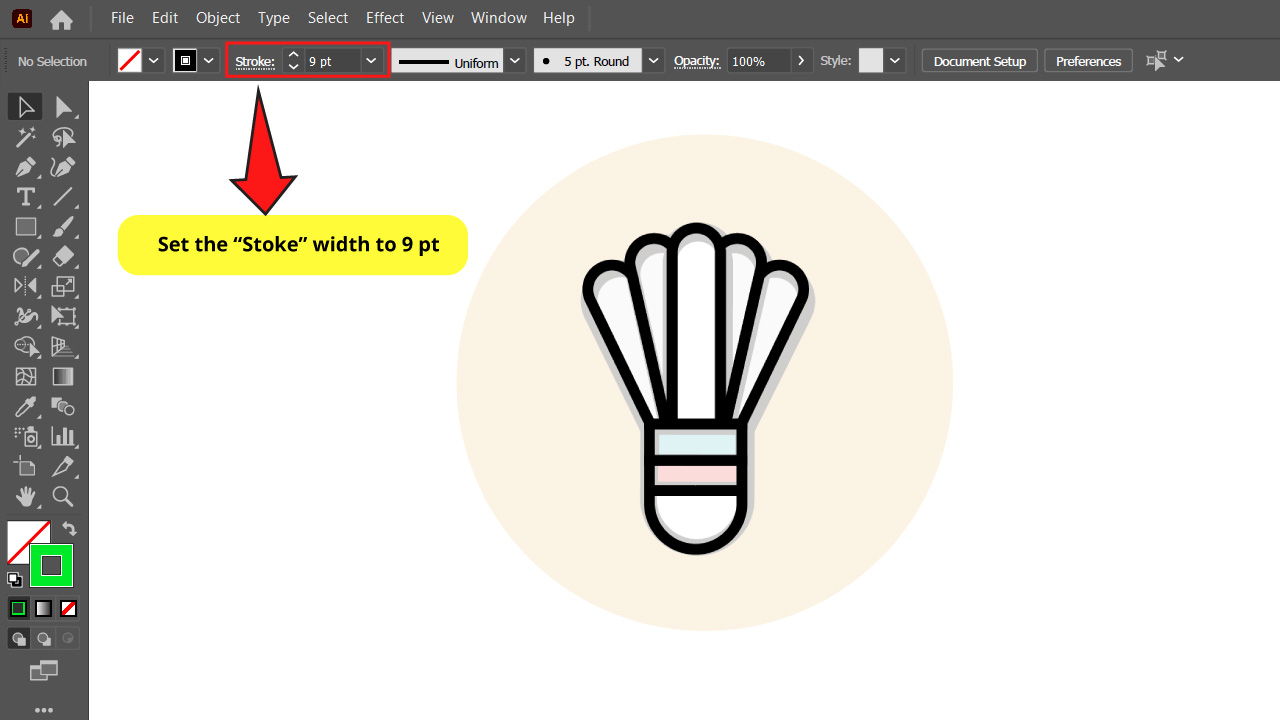
Select all the shapes using the “Ctrl + A” command.
Then set the “Stroke” width to a value to look similar to the guide image.
I set mine to 9 pts.
Step 7: Color it!
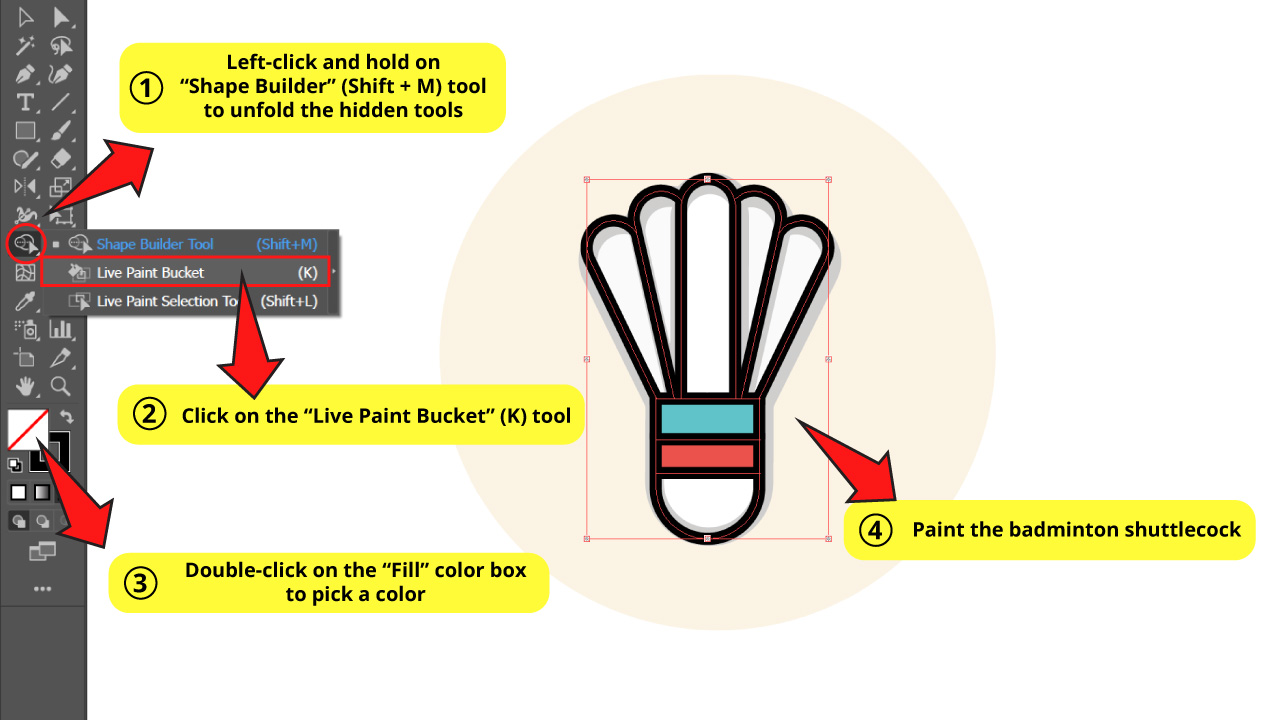
Left-click and hold on the “Shape Builder” (Shift + M) tool to unfold the hidden tools.
Select the “Live Paint Bucket” (K) tool from the unfolded tools.
Double-click on the “Fill” color box on the left side toolbar to select a color.
Click on a section of the tracing to fill color in it.
Repeat this process until you finish with all sections.
Don’t forget to also color the white fills.
Step 8: Draw a Circle
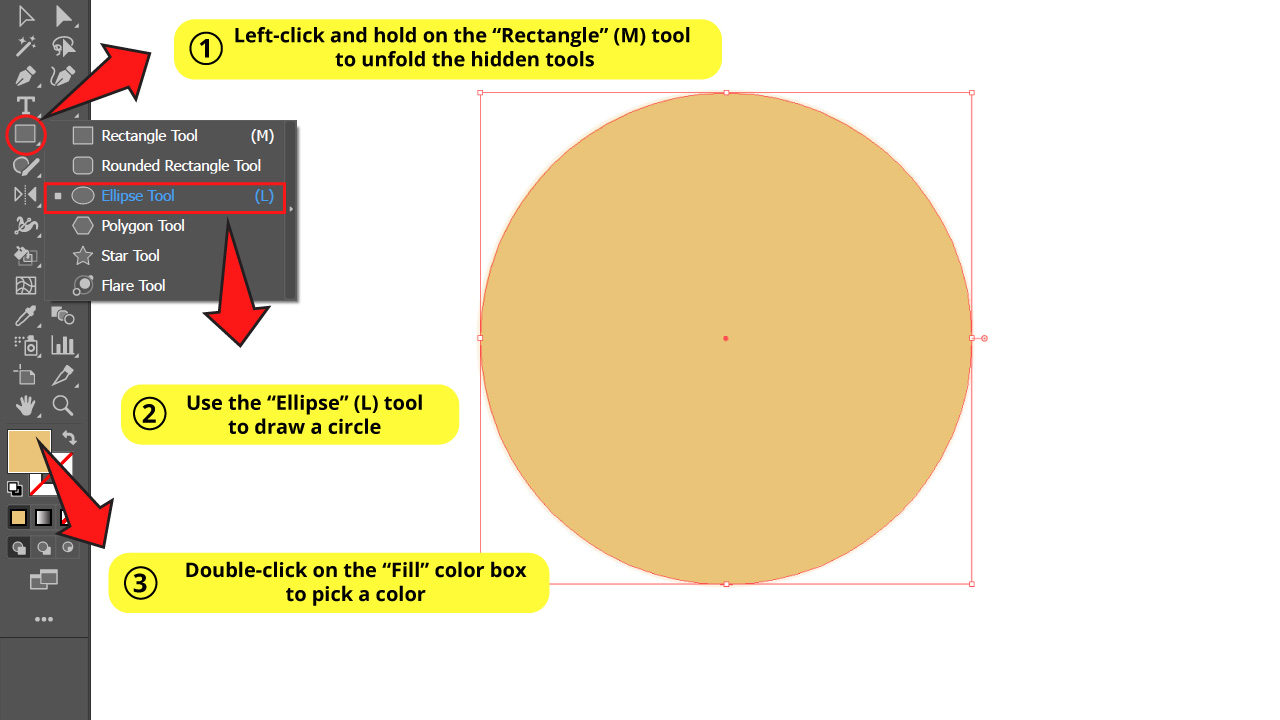
Left-click and hold on the “Rectangle” (M) nest to unfold the hidden tools and select the “Ellipse” (L) tool, or press the “L” key to shortcut it.
When using the “Ellipse” (L) tool remember to hold the “Shift” key to maintain proportions and get a perfect circle.
Once the circle is drawn, double-click on the “Fill” color box to select a color.
Step 9: Send the Circle to the Back
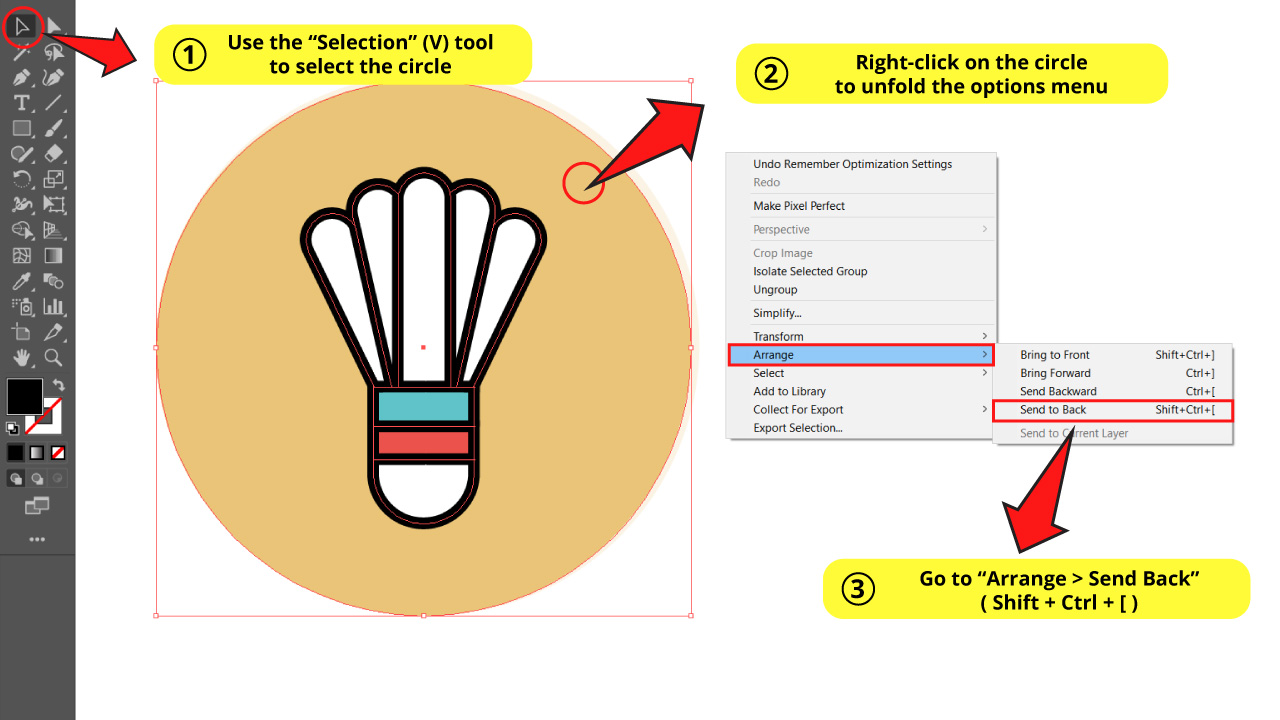
Select the circle using the “Selection” (V) tool and right-click to unfold the options menu.
Go to “Arrange > Send to Back” ( Shift + Ctrl + [ )
Now the circle has been sent to the back of the drawing.
Step 10: Center, Group and Rotate the Vector
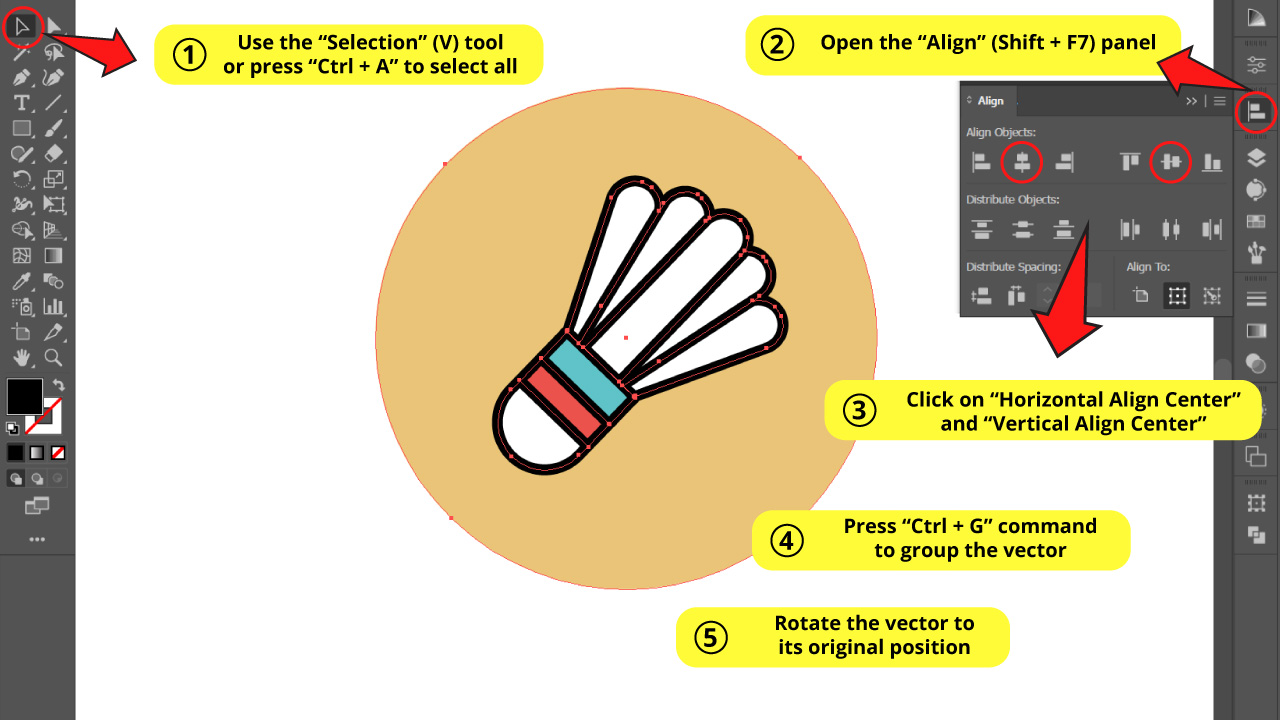
Now we have to center both objects.
First select all by pressing the “Ctrl + A” command.
Then go to the “Align” (Shift + F7) panel, usually located on the right side toolbar
If you can’t find it, you may have to enable it first by going to “Window > Align” on the menu at the top side of the screen, or by pressing the “Shift + F7” command.
Once you have opened the “Align” (Shift + F7) panel, click on “Vertical Align Center” and “Horizontal Align Center” to center it.
Next, press “Ctrl + G” or right-click to open the options menu and click on “Group” to group all the objects, so we can manipulate the vector as a single object.
Now, rotate the vector to its original position using the handles of the bounding box.
Step 11: Delete the Original Image

Open the “Layers” (F7) panel again, and select the locked original layer. Press the “Delete Selection” button at the bottom of the panel.
Frequently Asked Questions on “How to Vectorize an Image in Illustrator”
What is a “Bitmap” image?
A “Bitmap” image is an image composed of pixels. That means it has a certain resolution. Even high quality bitmap images look pixelated when you zoom in close enough. These types of images are the vast majority.
What is a “Vector” image?
A vector image is an image composed of paths, which has a start and an end anchor point. Every anchor point has handles for direction and magnitude. You can only visualize vector images with certain softwares, like Illustrator. Once you export a vector image, it will be converted to a bitmap image.
How can I improve the “Black & White” image vectorization using the live “Image Trace’ in Illustrator’?
To improve the quality, try vectorizing larger images with good resolution. And make sure you correctly set the adjustments on the “Image Trace” panel, specially the “Corners” value.
How can I improve the basic color image vectorization using the live “Image Trace” in Illustrator?
First get the best possible resolution image. Then try to reduce the image’s colors as much as you can. The ideal would be to reduce the colors to black and white. For this, you should use another software like Photoshop. Keep in mind the fewer the colors, the better the results.