
GIFs are funny, sometimes quirky, images that are animated but don’t have sounds.
You might think that creating such fun and intriguing GIFs is too intricate, but with Canva, creating stunning GIFs is a cinch.
So, if you’re ready to rock this GIF-making session, let’s begin!
How to Make GIFs in Canva
To make GIFs in Canva, follow these steps:
- Open a design with your desired dimensions
- Add a video file from “Videos” or “Uploads”
- Adjust the video added
- Add text, frame, effects, and other graphic elements
- Trim the video’s length
- Watch the preview of the GIF
- Download the GIF
Though there are different ways to make GIFs in Canva, the most common way is to use videos for the purpose. This is because videos already come with moving elements already.
There’s no need to add animations and such. A little editing work and you have a GIF.
Step 1: Open a new design file with your desired dimensions
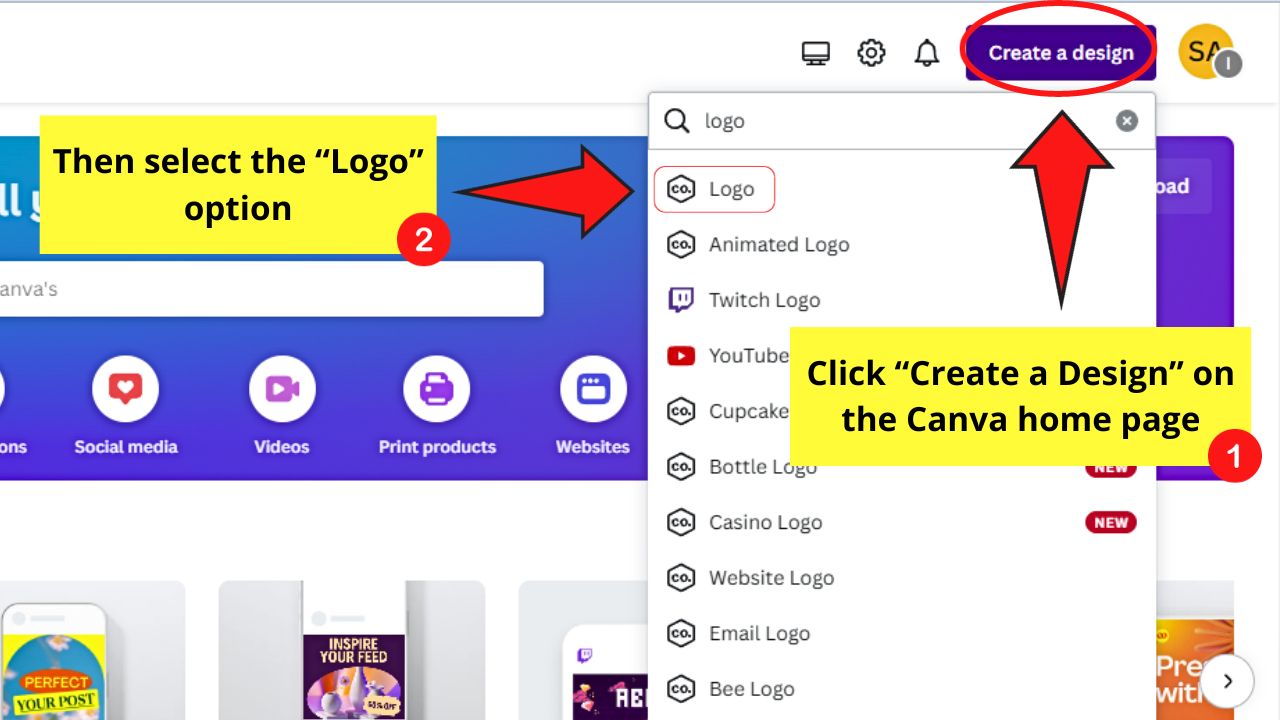

Though Canva has a video template available, sometimes the size used is not what’s ideal for a GIF.
Ideal dimensions for GIFs are 640px x 480px or at least 500px.
For example purposes, we’ll use the logo template to keep the GIF in a square shape.
Step 2: Add a video to your design
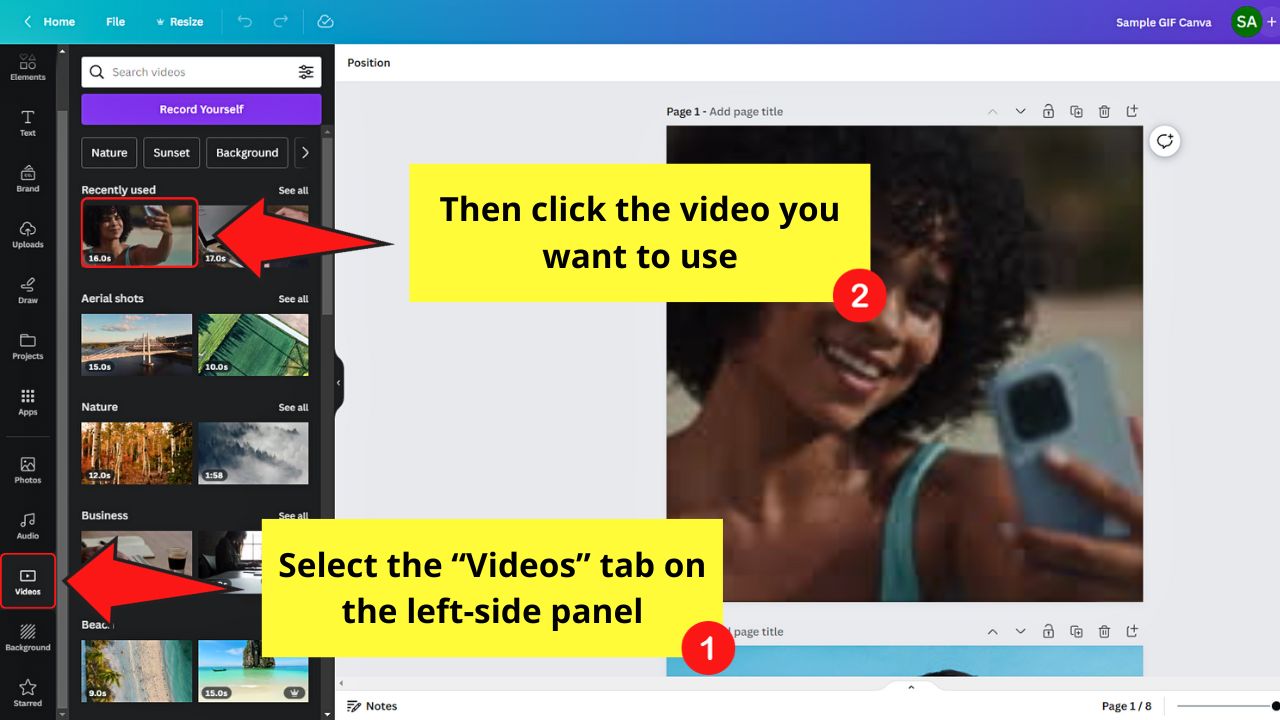

If you want to use stock videos, go to the “Videos” tab on the left-side panel and find the footage you’ll use for your GIF.
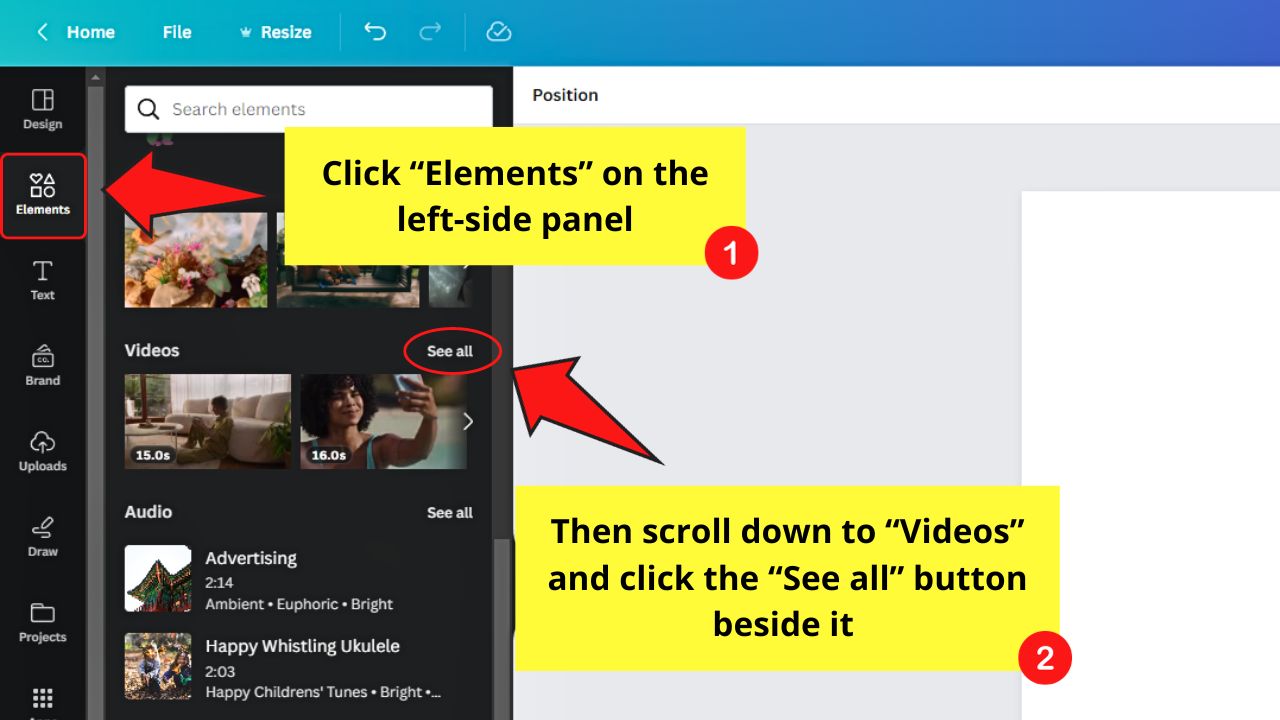
You can also click the “Elements” tab and select “See all” in the “Videos” section.

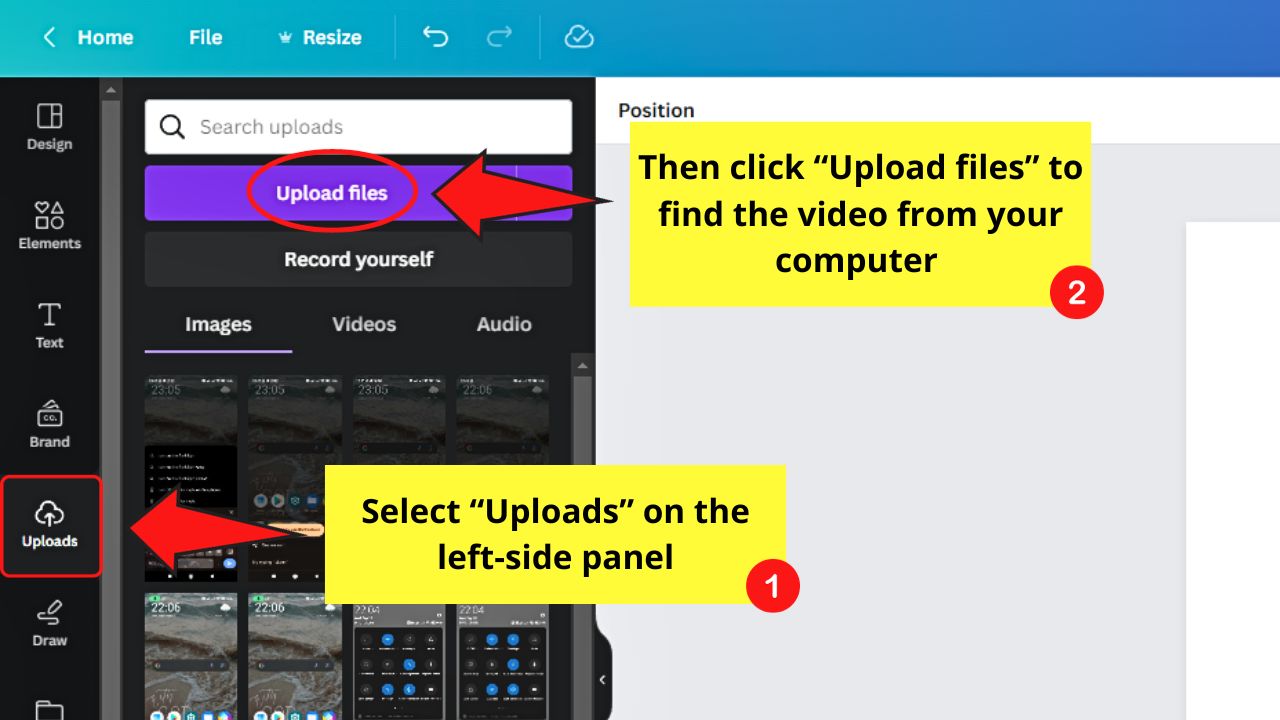
If you prefer using your own videos, click “Uploads” on the left-side panel and select “Upload files” to find the video file and upload it to Canva.


Step 3: Adjust the video added

To do this, double-click on the video and resize it.
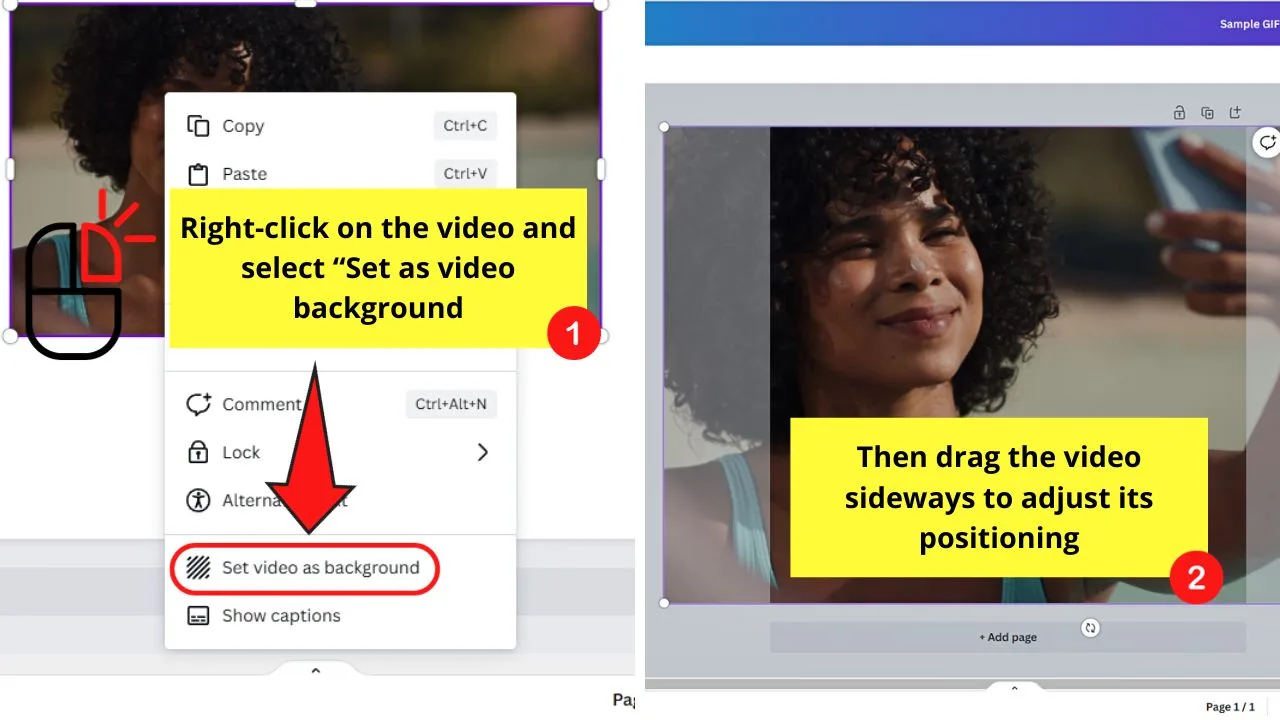
Or, you can right-click on the video and select the “Set video as background” option. Then drag the video sideways to change the part that will be shown as a GIF.
Step 4: Add graphic elements, frames, effects, and text to the video

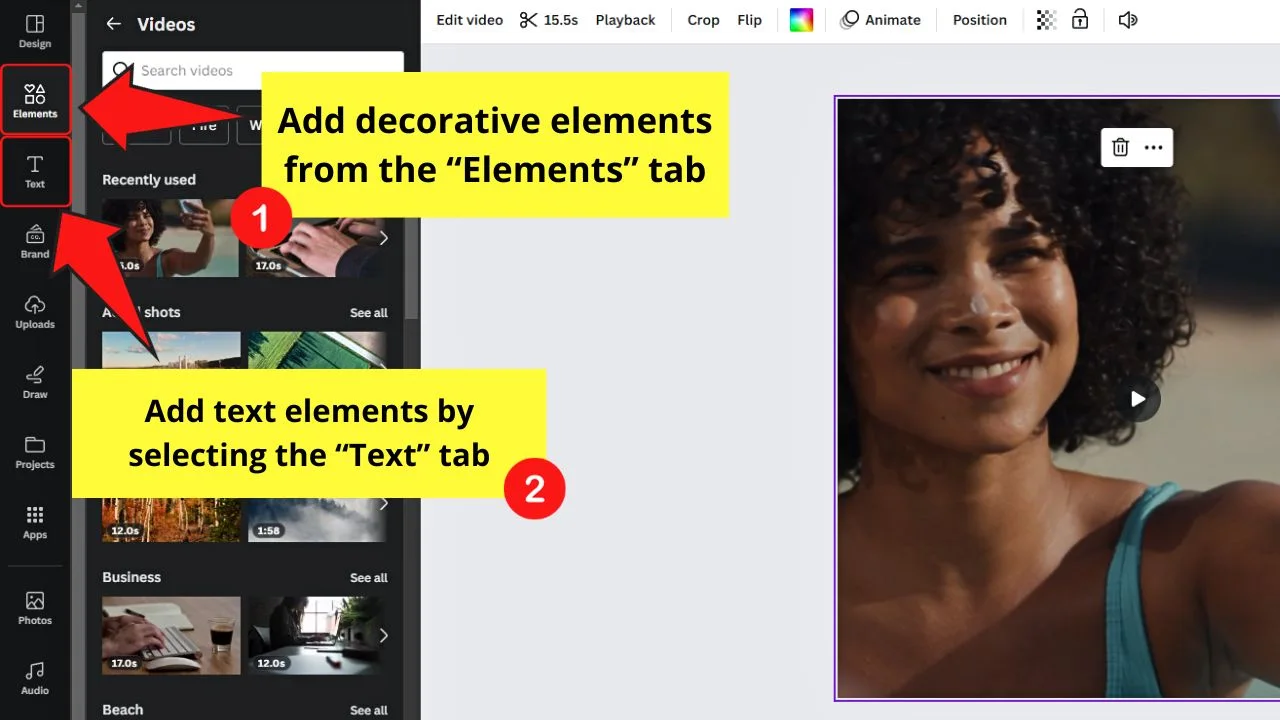
This step is optional though, as the video already contains moving elements. But if you want to, go to the “Elements” tab to add the frame and decorative elements to your GIF design.
For text, either click the “Text” tab and click on the text type you want to add or press the “T” key to directly a text box.
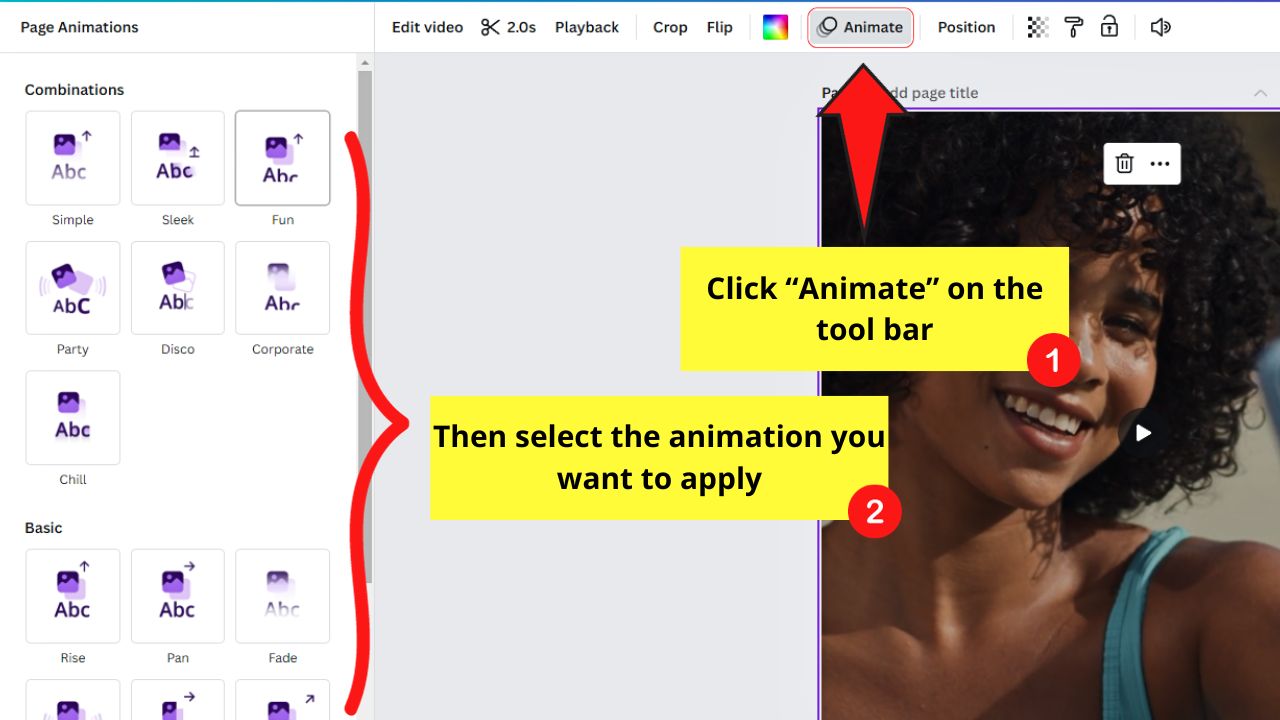
For effects, select “Animate” and click the animation you want to apply.

Step 5: Trim the length of the video

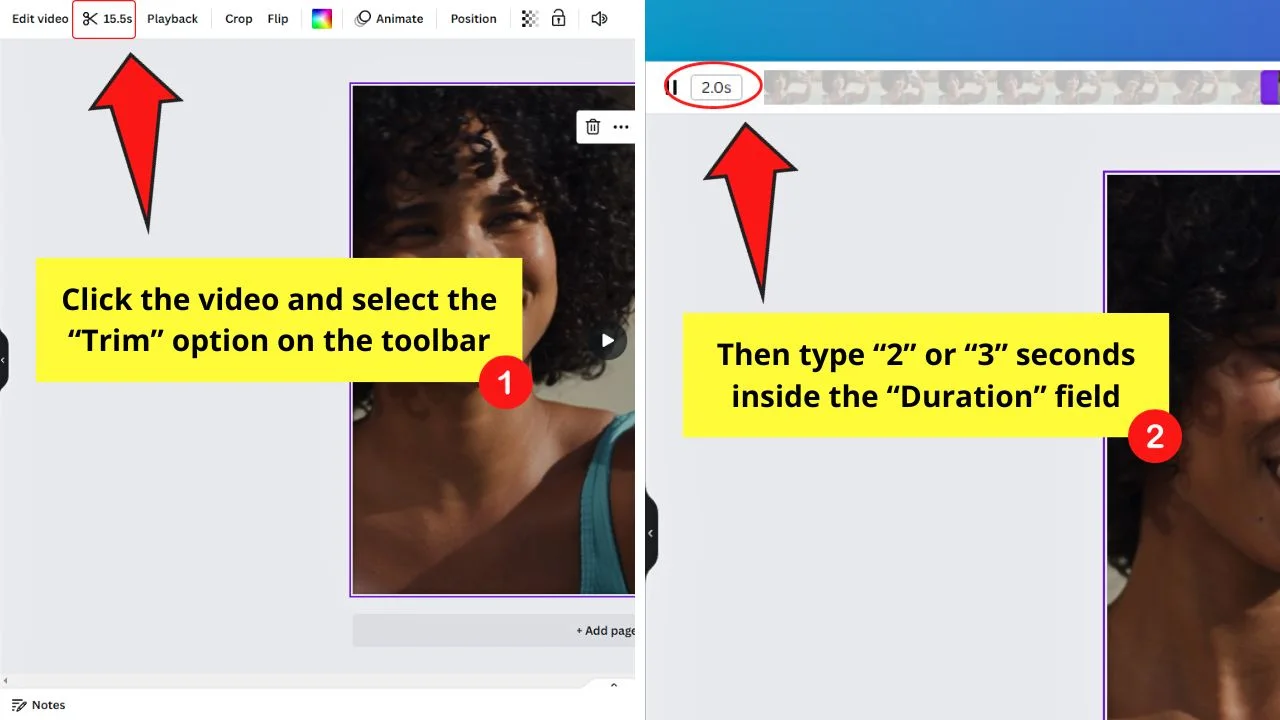
This step is crucial as longer videos or GIFs result in larger file sizes. And with larger file sizes, GIFs usually take longer to render.
Plus, the ideal length for GIFs is between 2-3 seconds.
To do this, click the video and select “Trim.” Then type in the box any value between 2-3 seconds.
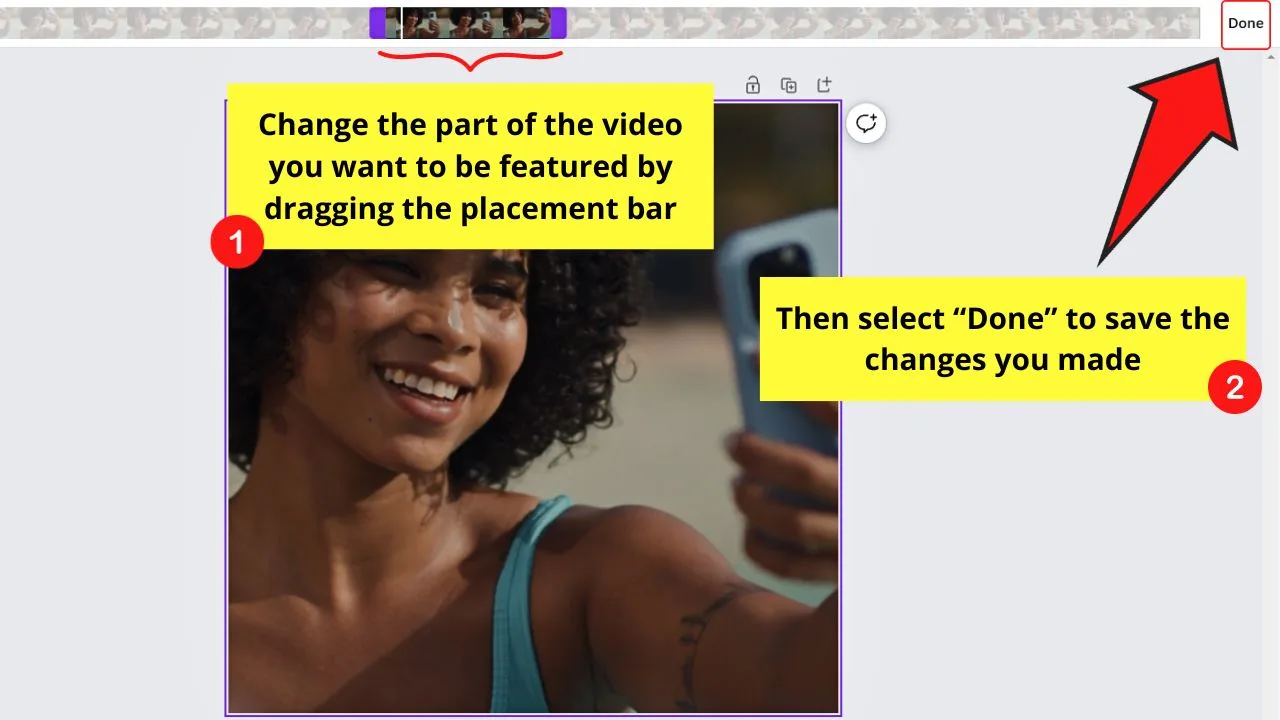
Change the part of the video you want to feature in the GIF by dragging the placement bars before selecting “Done.”

Step 6: Click the “Preview” button

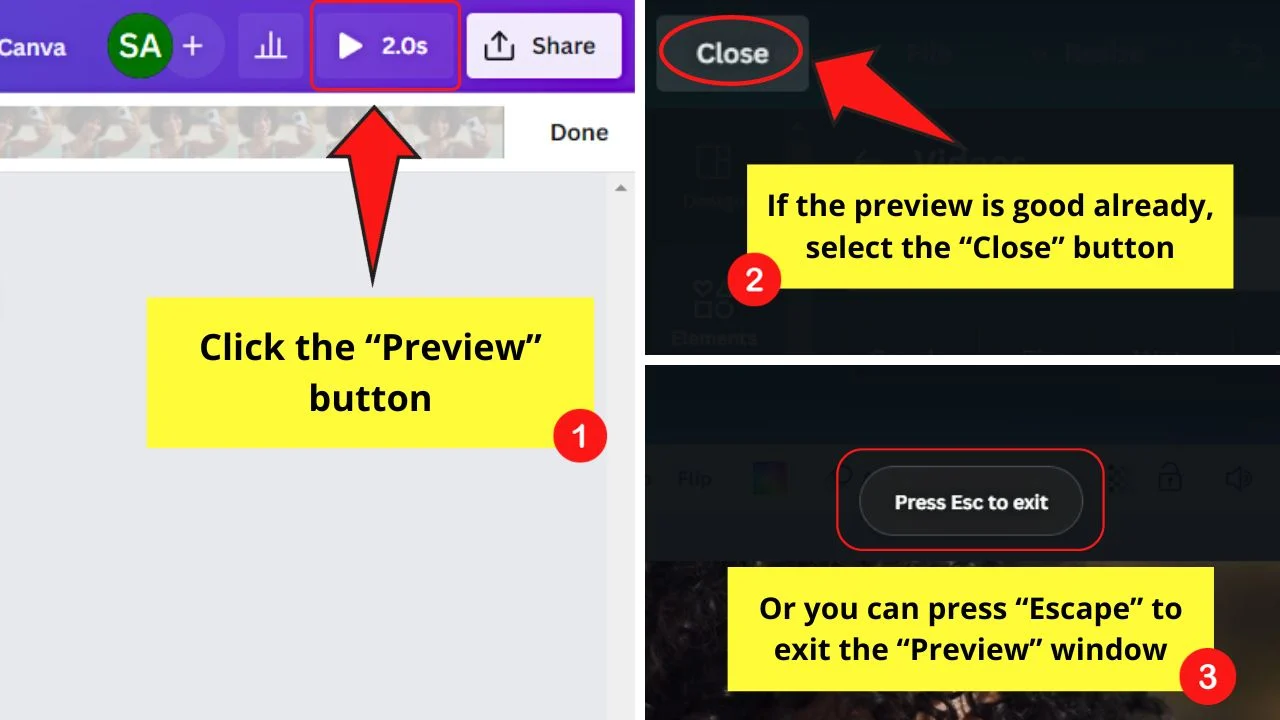
You’ll find this as the “Play” button on the menu bar.
You can then see how your newly created GIF looks and help you decide whether you need to make further adjustments.
If everything’s good, select the “Close” button or press the “Escape” key on the keyboard to exit the preview window.
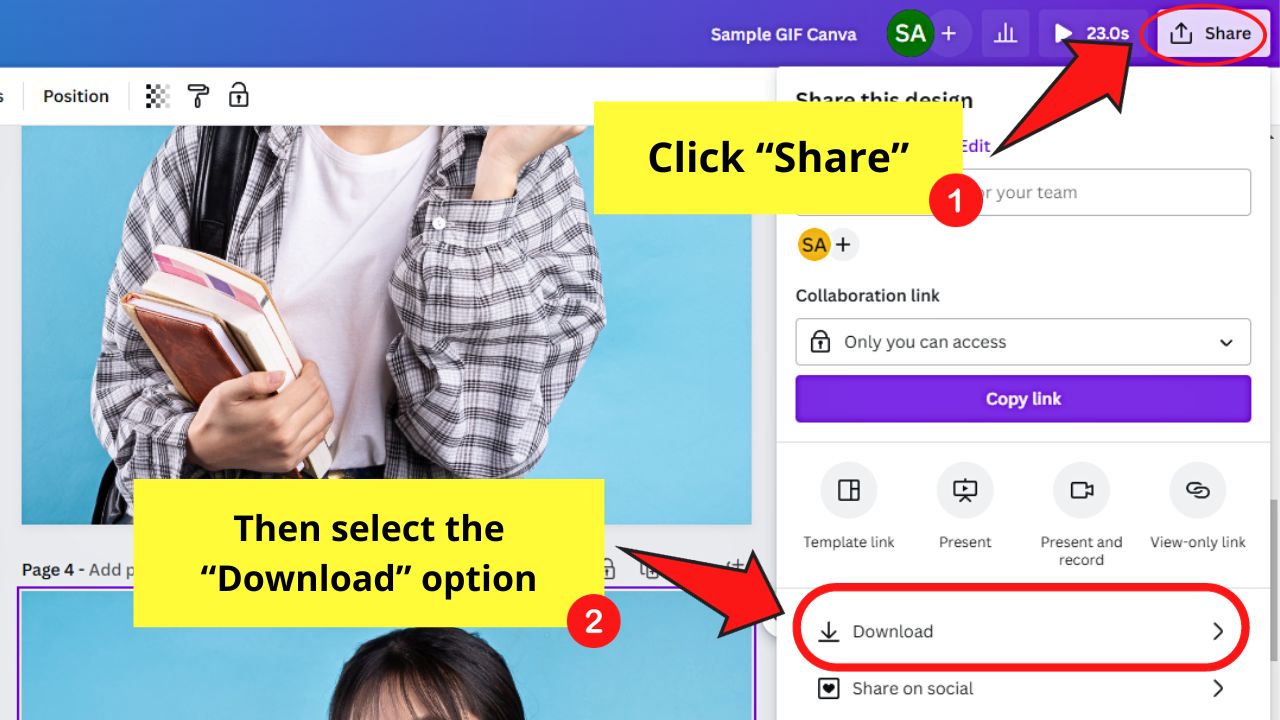
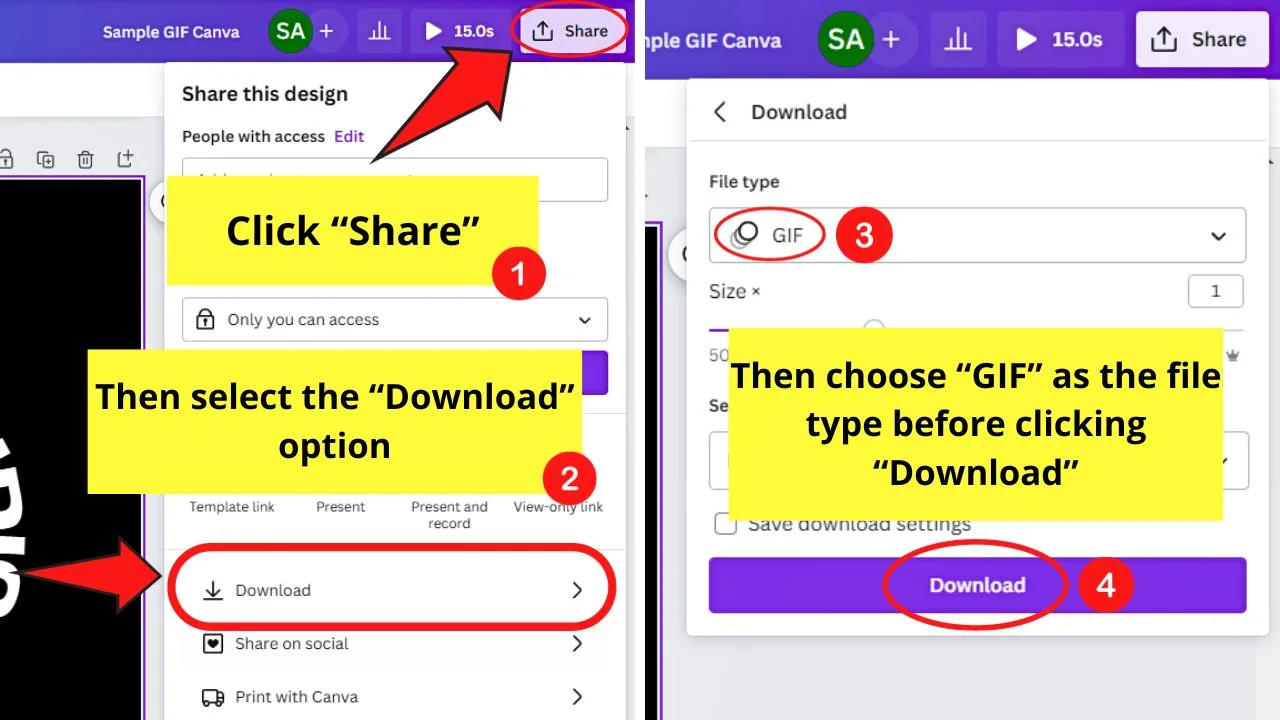
Step 7: Download the GIF
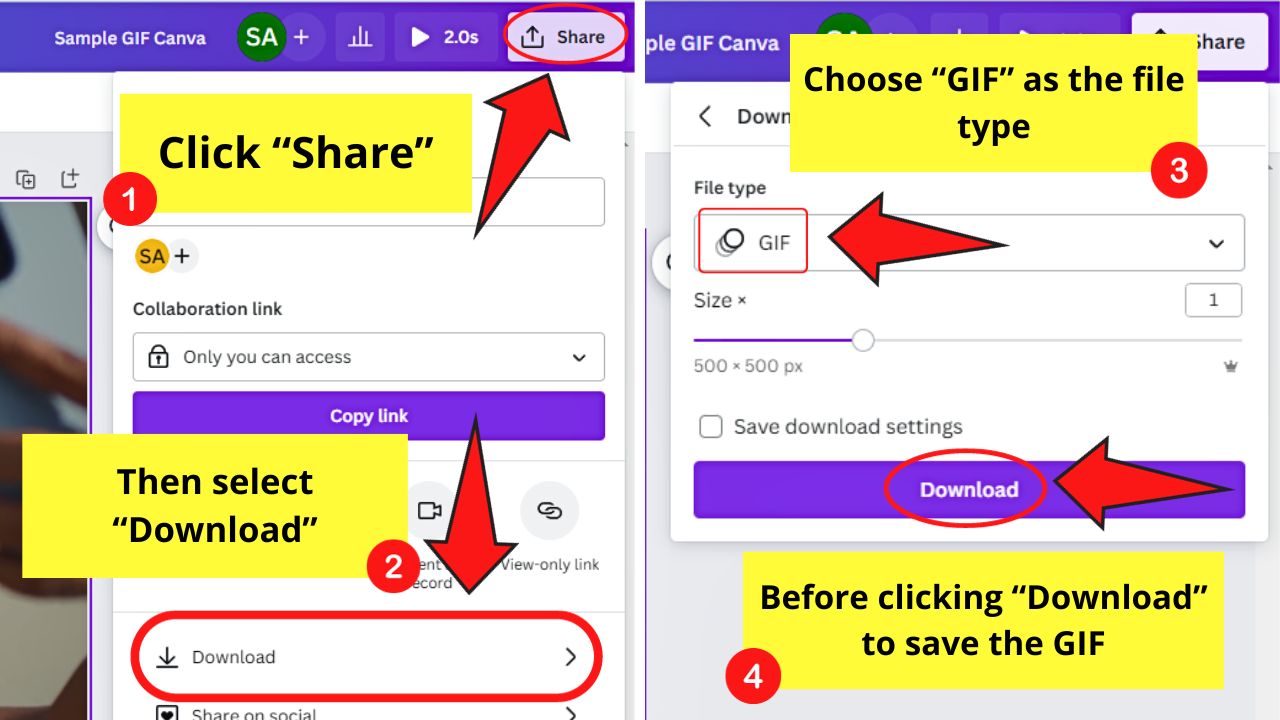
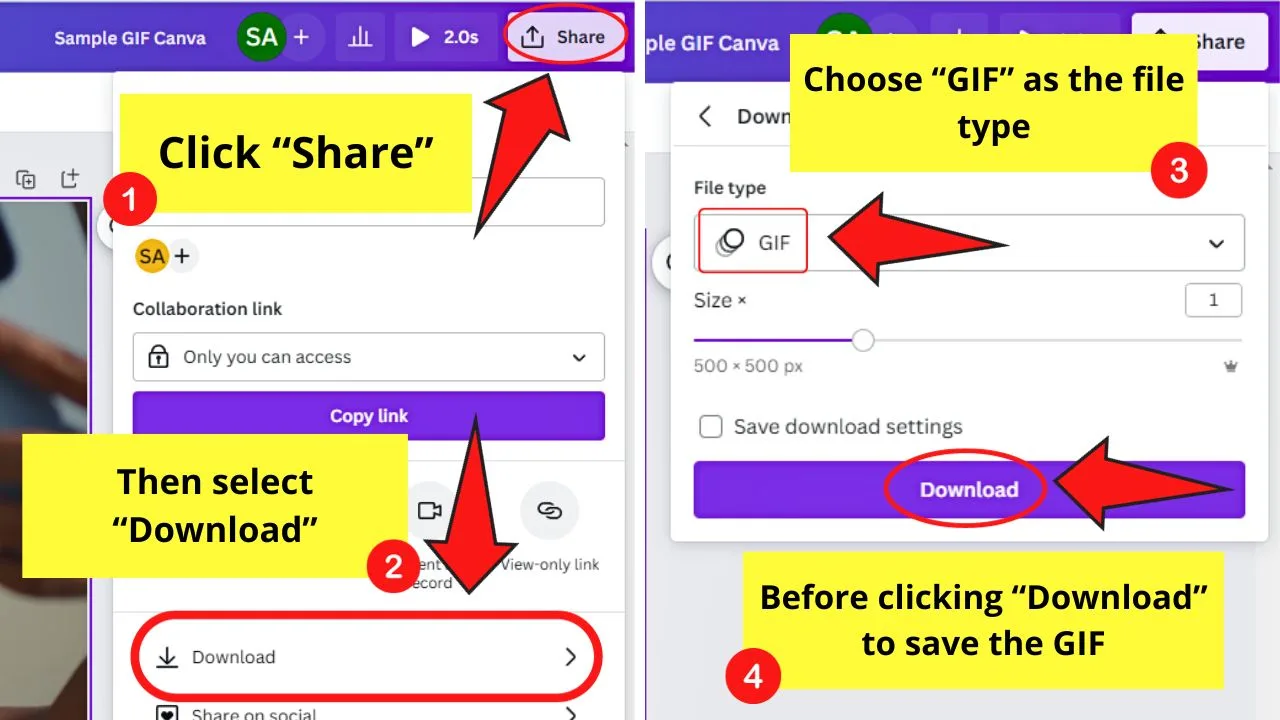
To do this, click “Share” and select the “Download” option.
Then select “GIF” under “File Type” before clicking the “Download” button.
Here’s an example of a GIF made from a video in Canva.
How to Make GIFs with Photos in Canva
Another way to create a GIF in Canva is to use photos. But unlike videos, images are still in nature — not moving. So to make them move as GIFs should, follow the next steps.
To make GIFs with photos, follow these steps:
Step 1: Add 4-5 pages to the design file

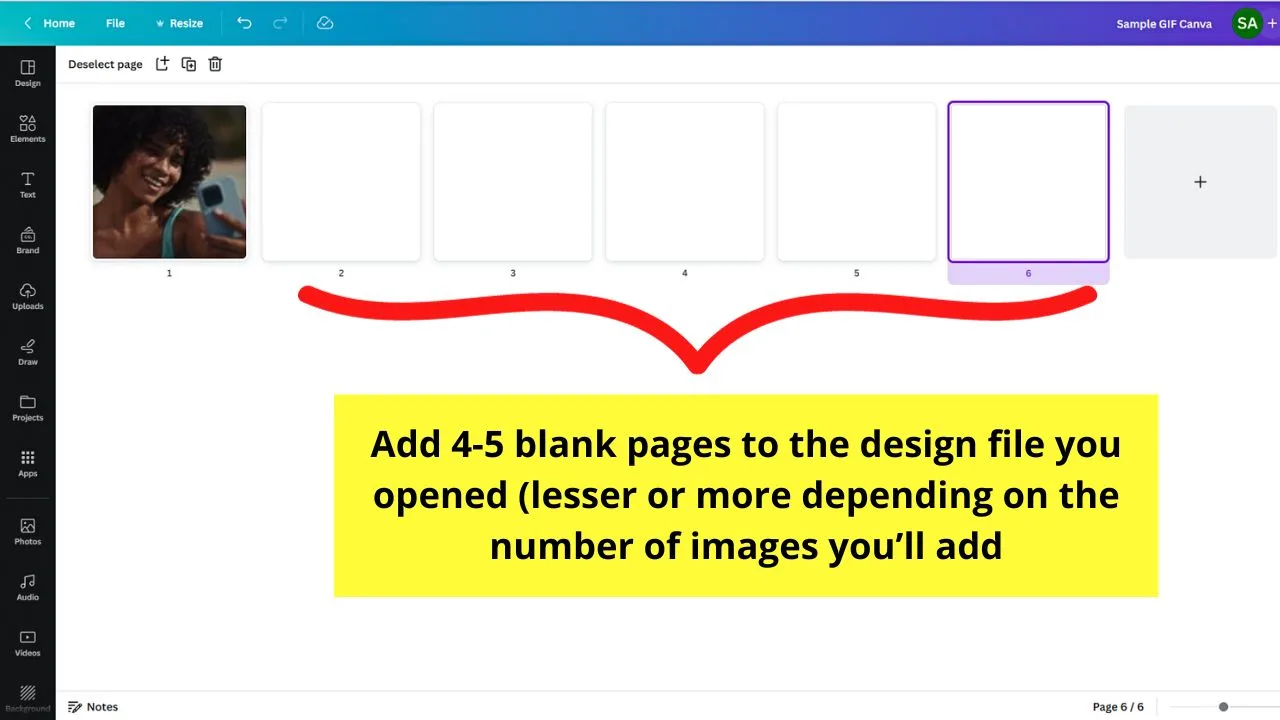
You need more than 1 page to create a GIF out of pictures as you need different shots of preferably the same image to make it seamless.
But for sample purposes, I’ll just add 3 pages.
Step 2: Add images to the blank slides or pages
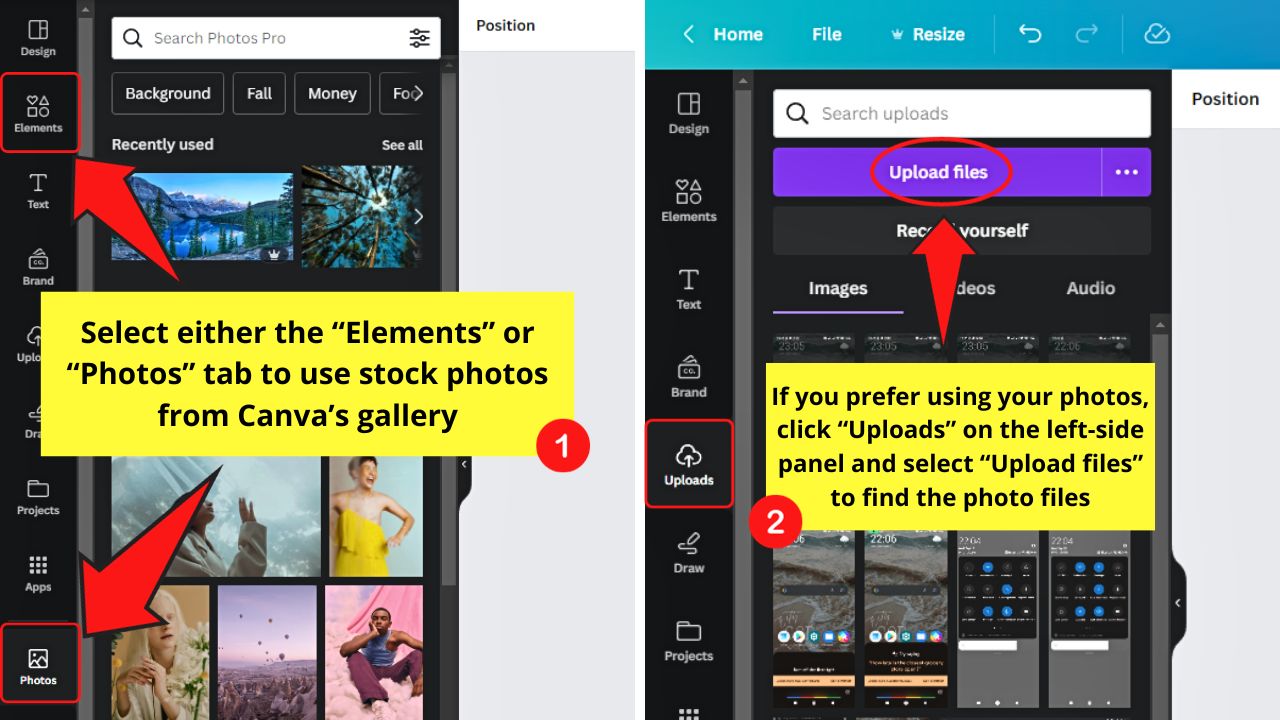

For stock photos, click the “Photos” or “Elements” > “Photos” tabs on the left-side panel.
But if you prefer using your own images, click “Uploads” and select the “Upload files” button.
Make sure to add 1 image to 1 blank page or slide for this to work.
Step 3: Resize the images to fit the page

Manually, you can click and drag the corner handles of the images until they cover the entirety of the page.
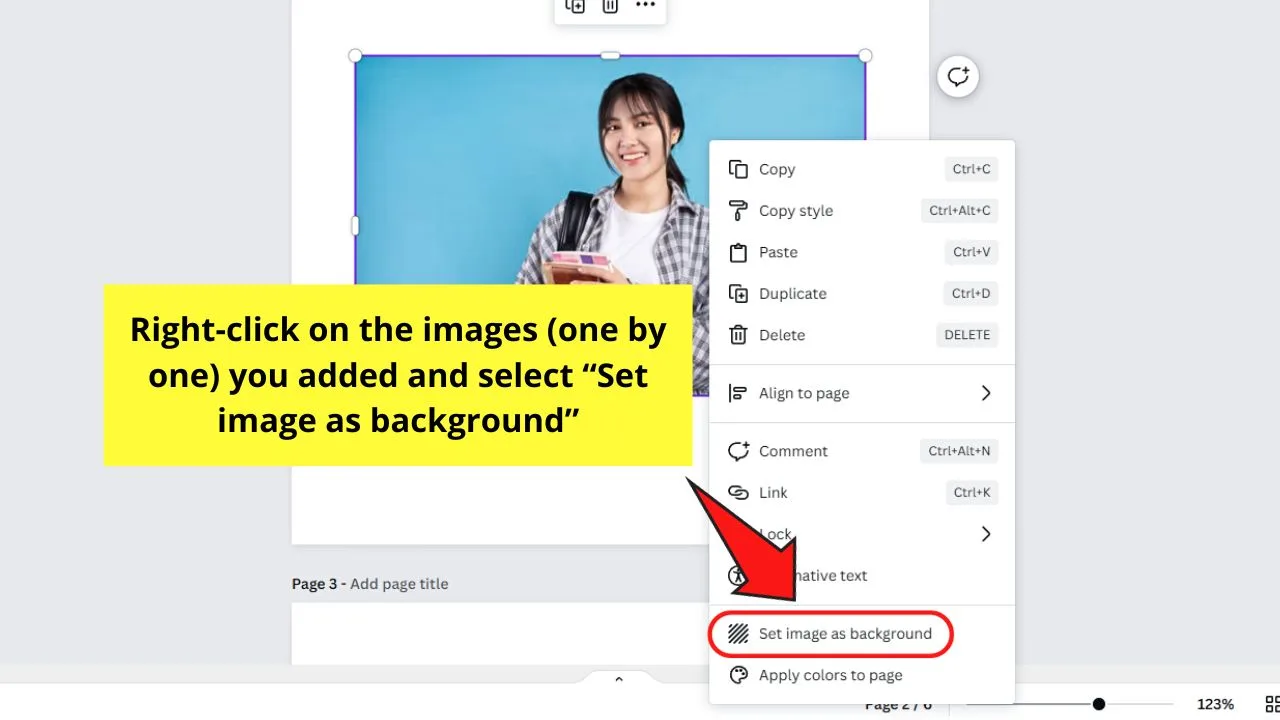
The easier method is to right-click on the photo before selecting “Set image as background.”
Step 4: Change the background of the images you added

This is an optional step if you want to change the photo’s original background.
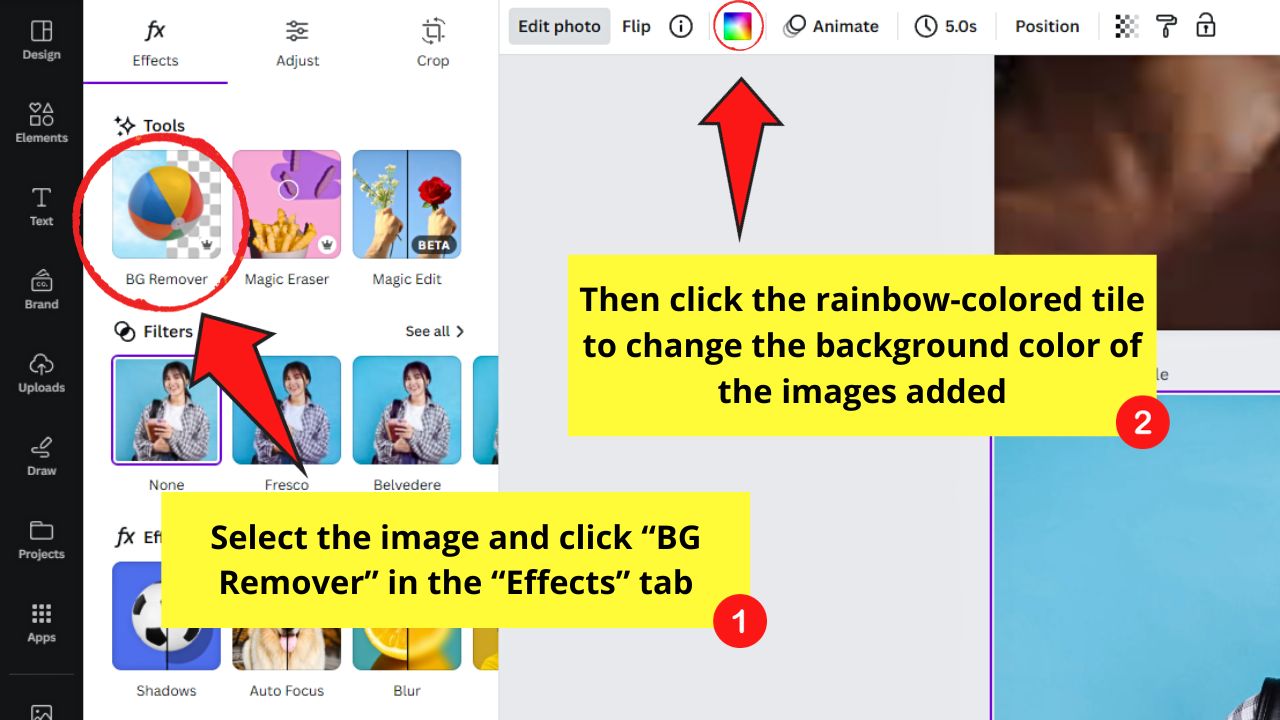
To do this, select the image, click “Edit Photo” and select the “BG Remover” option.
Then click on the rainbow-colored tile on the menu bar and choose the color you’ll use.
You can use the brand colors from the brand kits you created in Canva.
An outline of the images can also be added to them.
Step 5: Set the duration of each image to 1 second
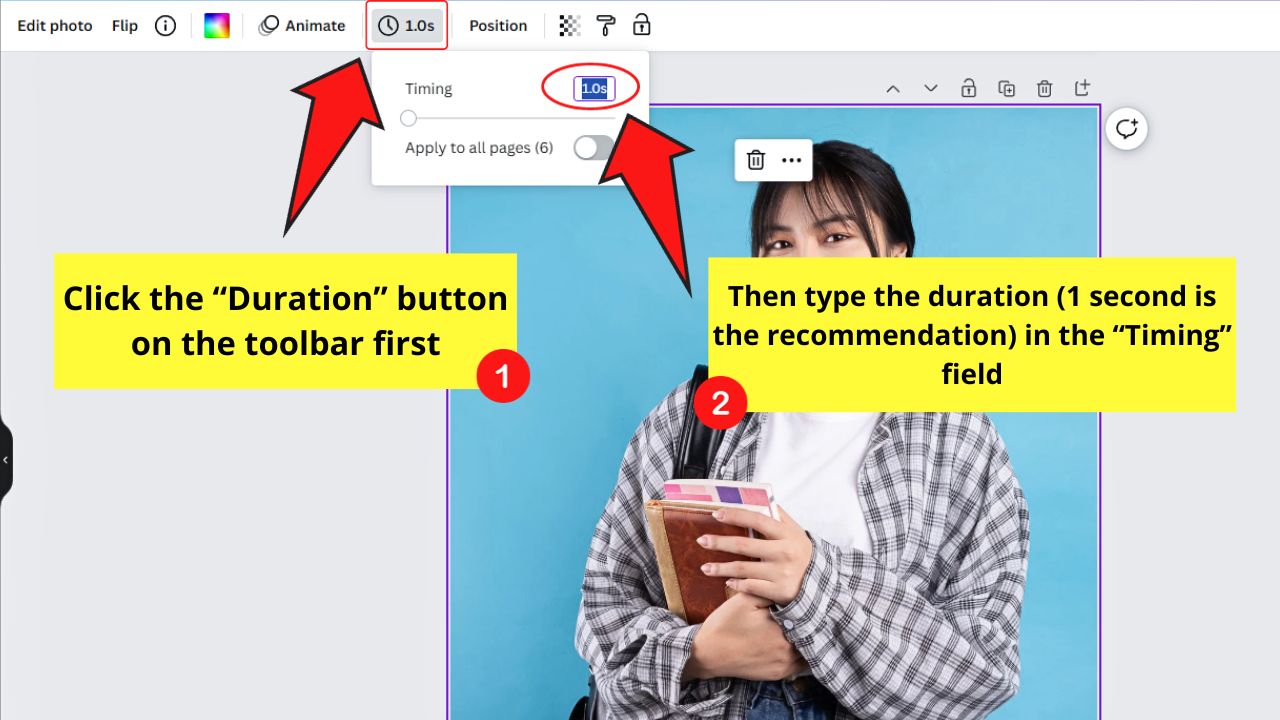

By default, the duration set per page is 5 seconds. But, for a faster transition between GIFs, the lower the number the better, which is what is ideal.
Adjust the transition by clicking the image and the “Timer” icon next. Then type “1” in the box or drag the slider to the left to the “1s” value.
Step 6: Adjust the images
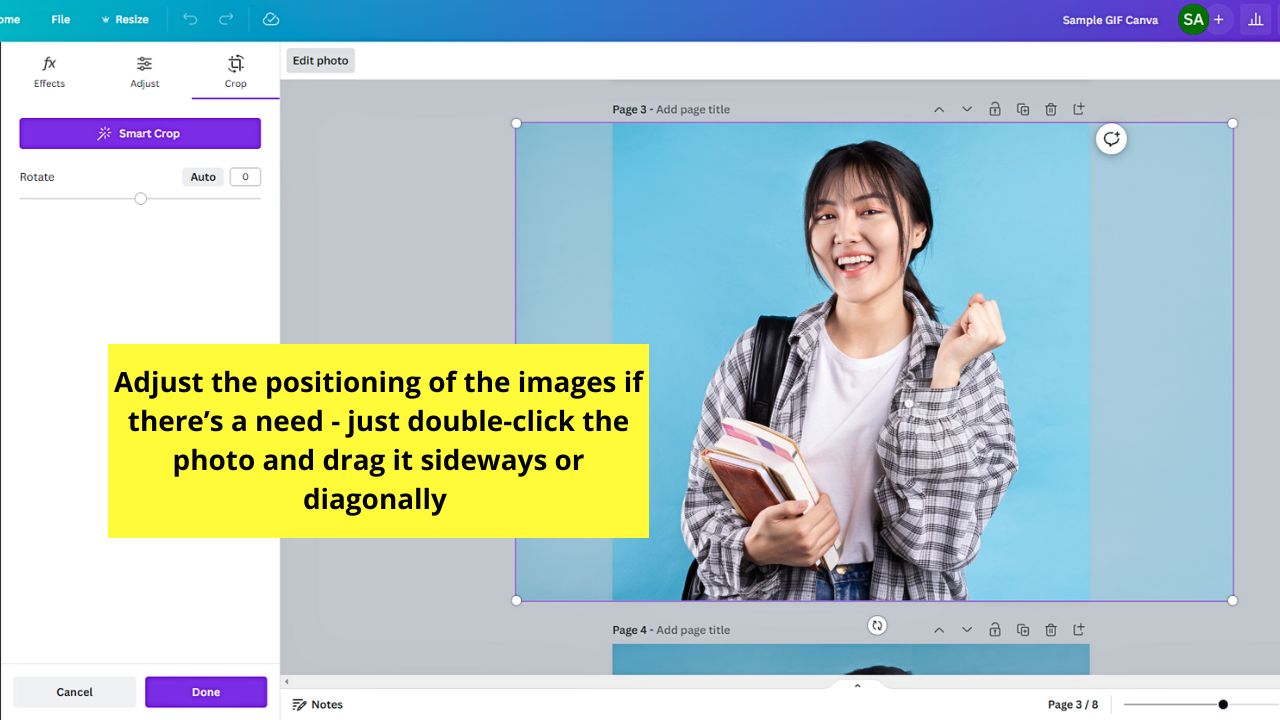

As GIFs need to be seamless, the images have to look as close to each other as possible. Hence, you need to adjust the photos in their respective slides.
If you need to zoom each image in, do so.
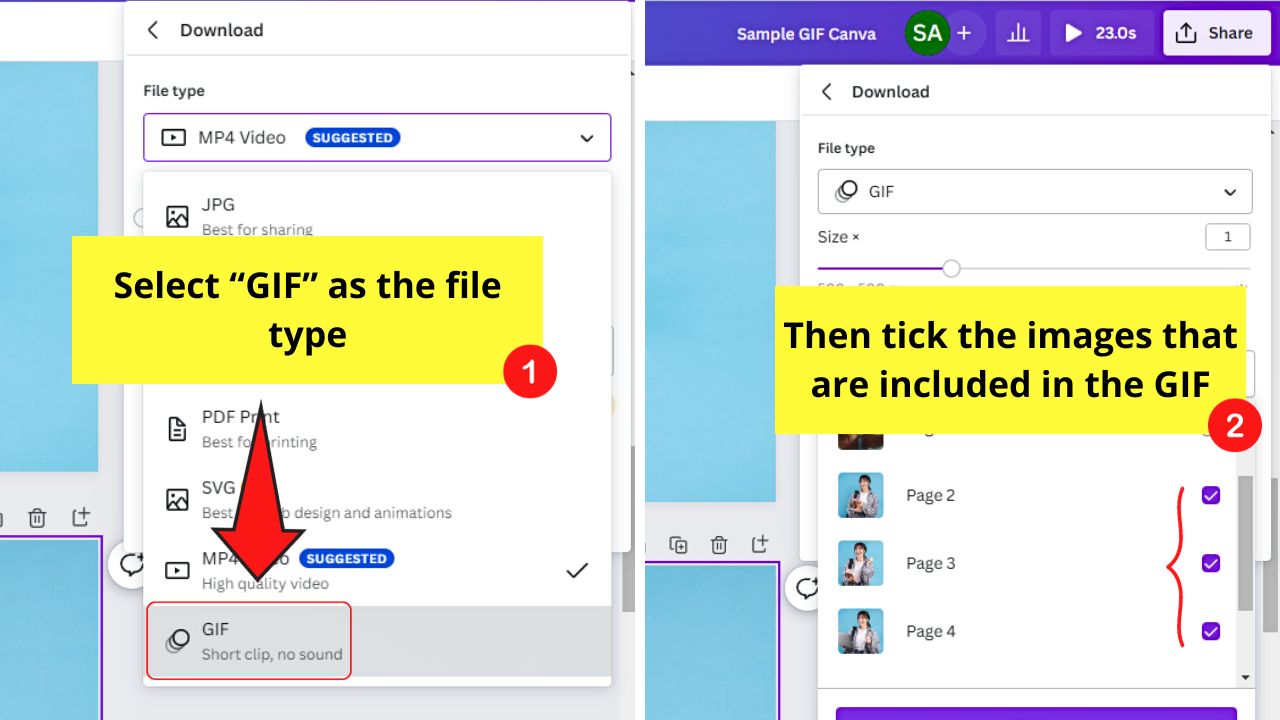
Step 7: Download the images as GIF

Select the “Share” button and click “Download.” Then on the “File type” section, select “GIF.”
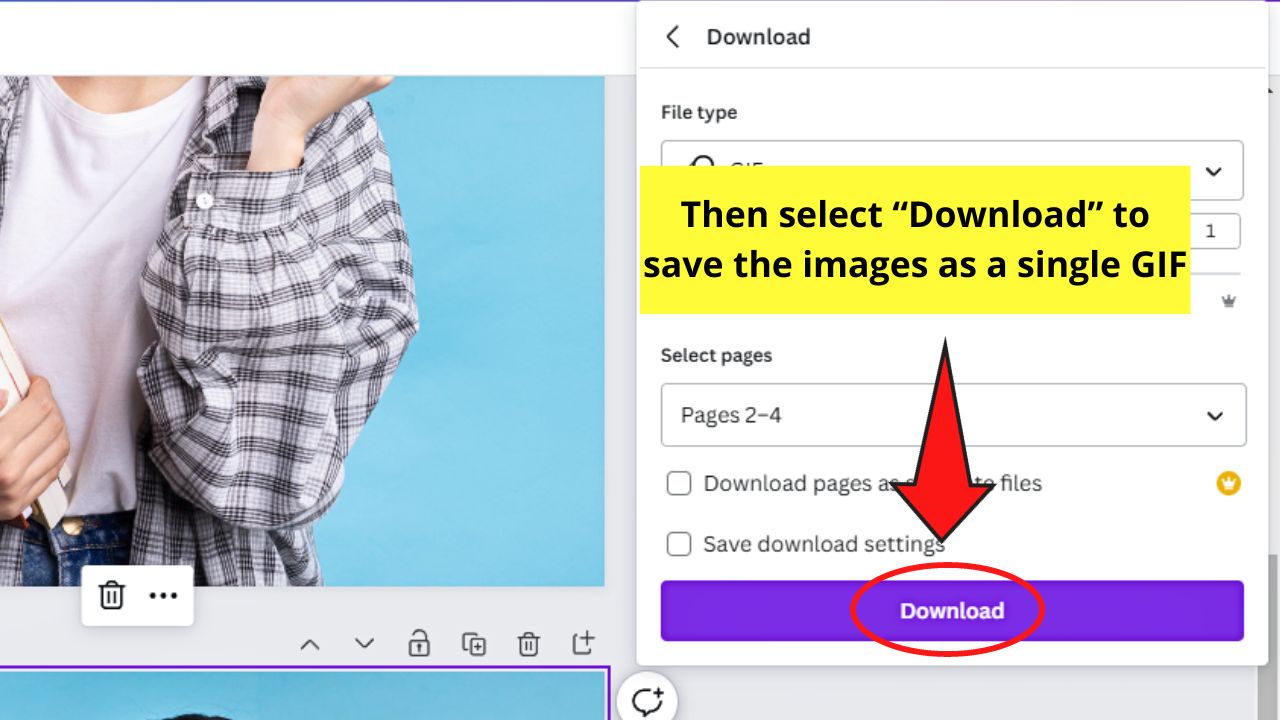
Then choose the images you have made earlier by ticking their respective boxes or typing their page numbers on the “Page number” field.

Then click “Download” again to save the images selected as a single GIF.

Here’s an example of a GIF made from photos in Canva.

How to Make GIFs in Canva by Adding Animations
Another way to make GIFs in Canva is by adding animations to still graphic elements.
Regardless of how you want to create it, animations bring life to these graphic elements to create a new GIF.
To make GIFs in Canva by adding animations, follow these steps:
Step 1: Add elements to the blank canvas
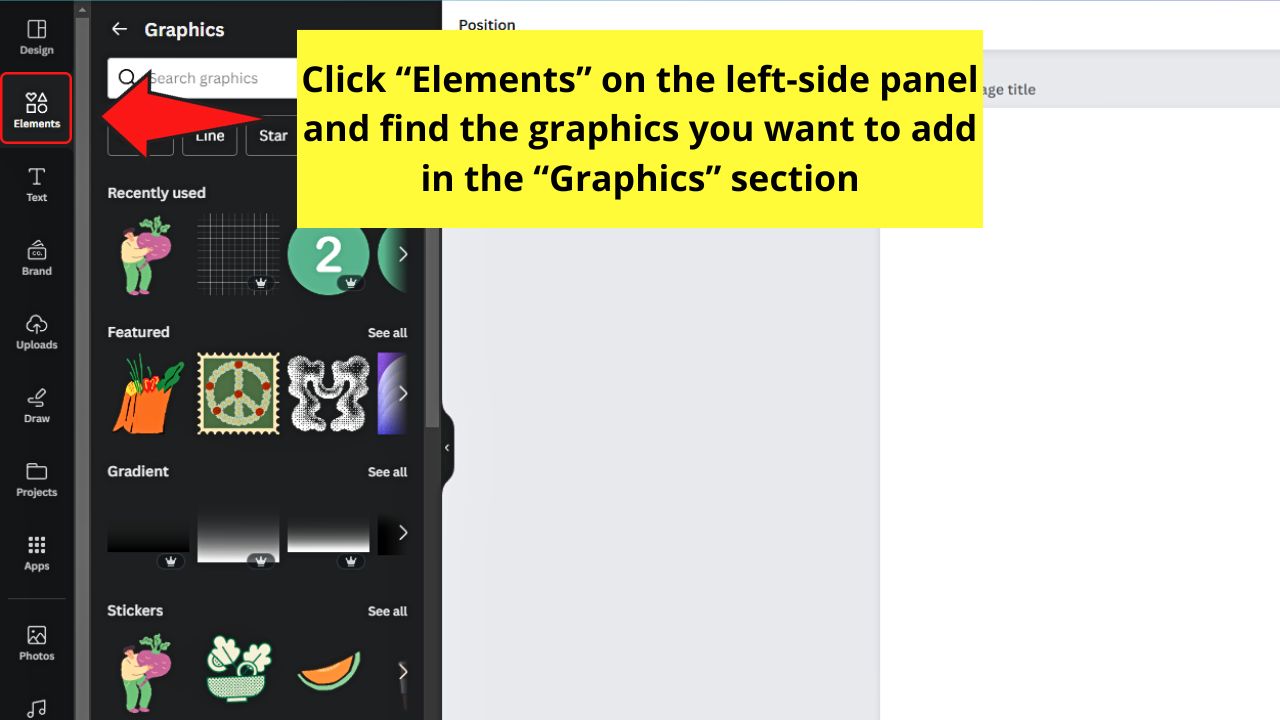
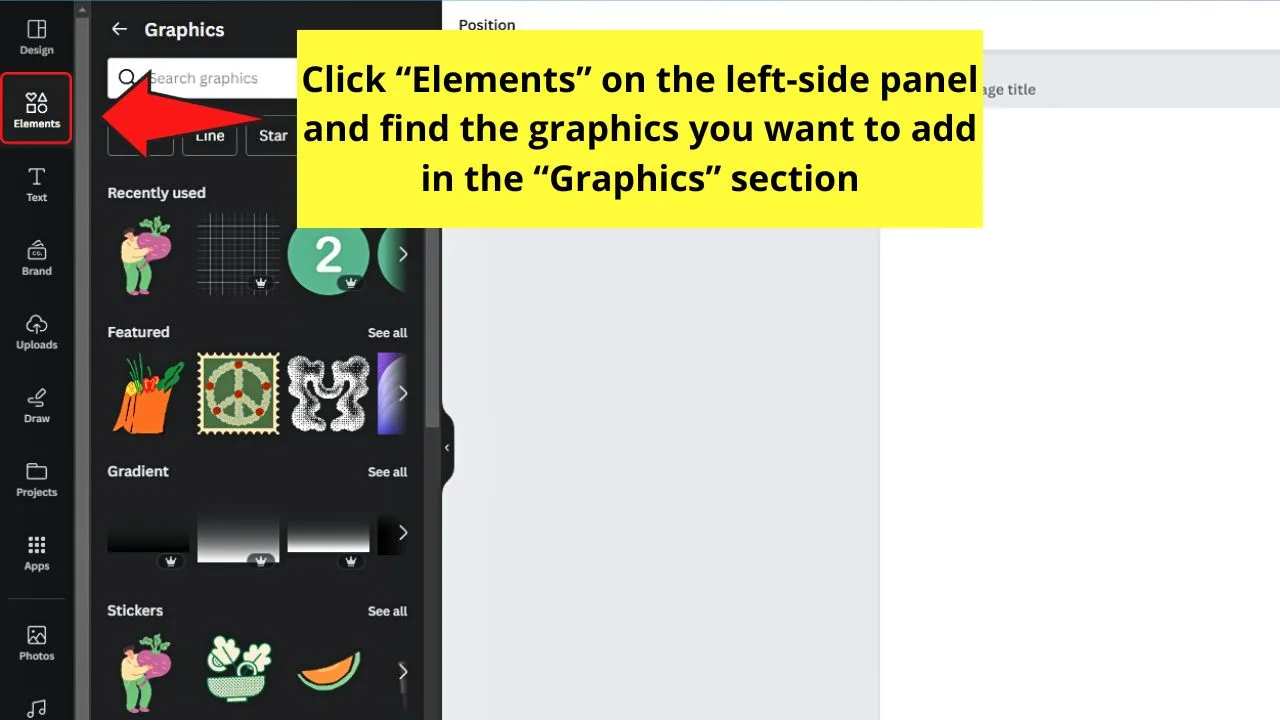
Do this by selecting “Elements” on the left-side panel. Then go to “Graphics” and find the still graphics you want to add.
But if you prefer not to create a design from scratch, skip this step and go to Step 2.
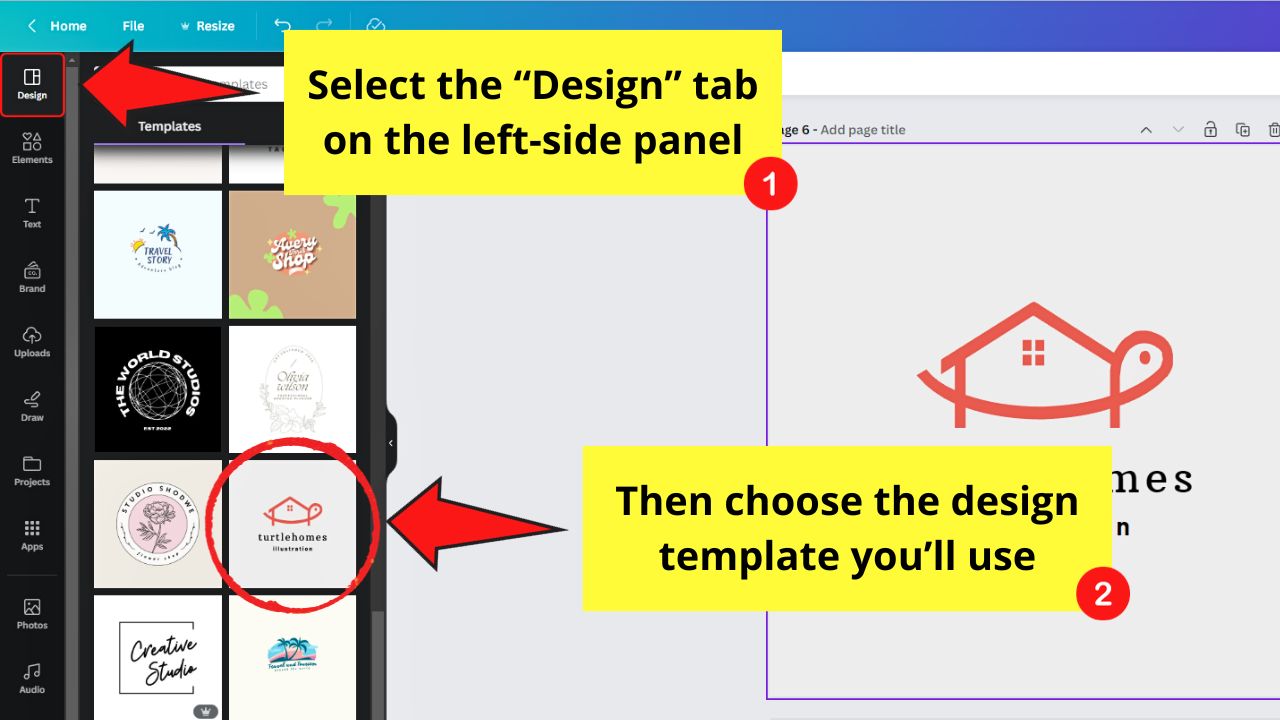
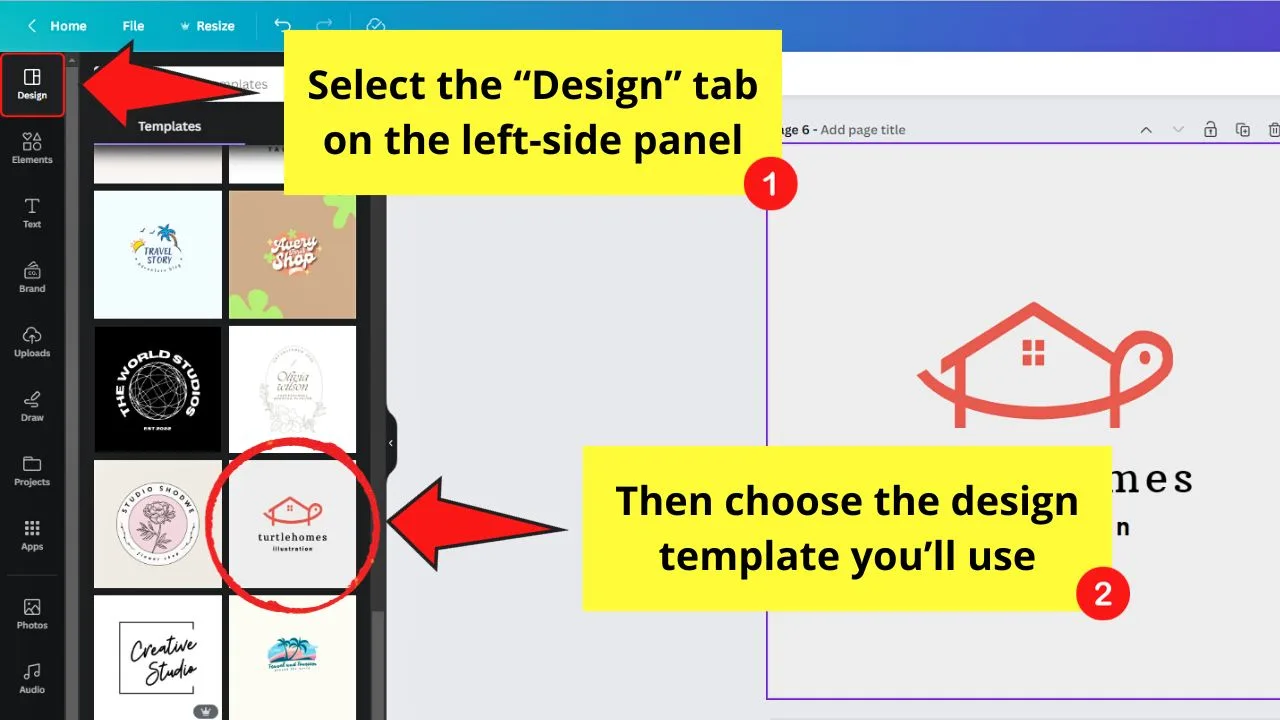
Step 2: Select a design template for your GIF

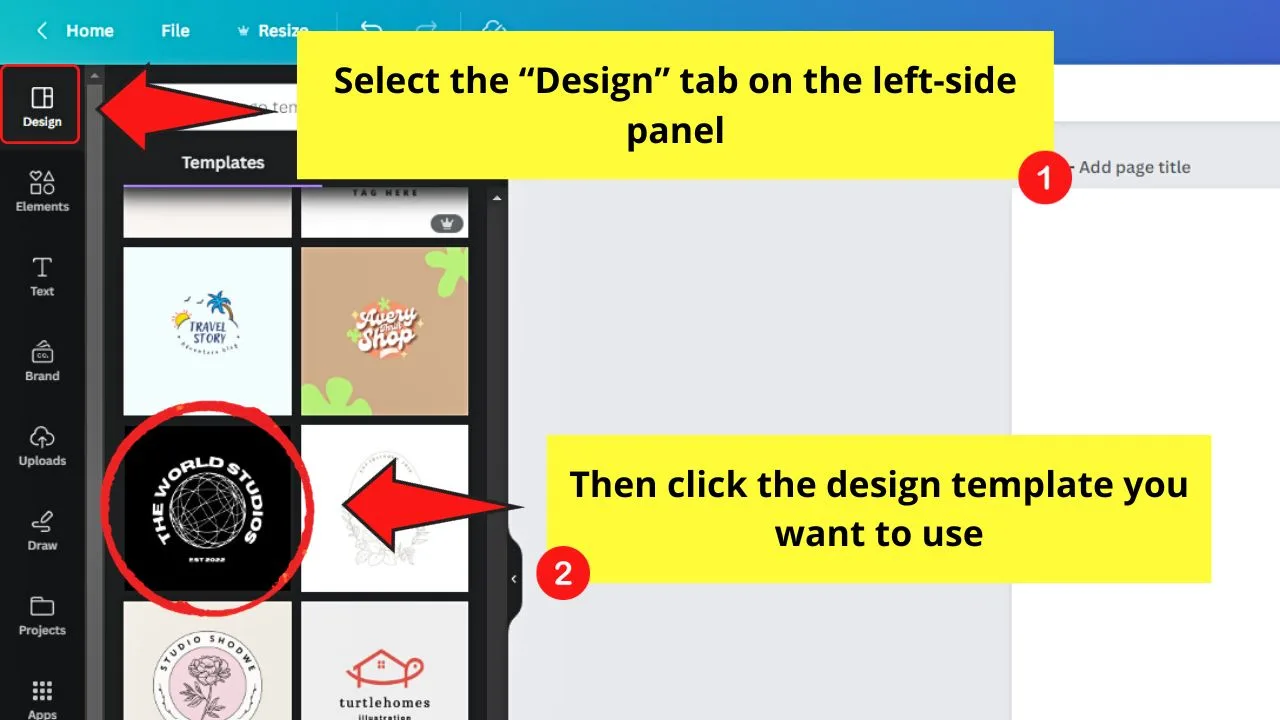
Click the “Designs” tab on the left-side panel and select a design you’d like to use.
The logo you designed in Canva can also be used for this step.
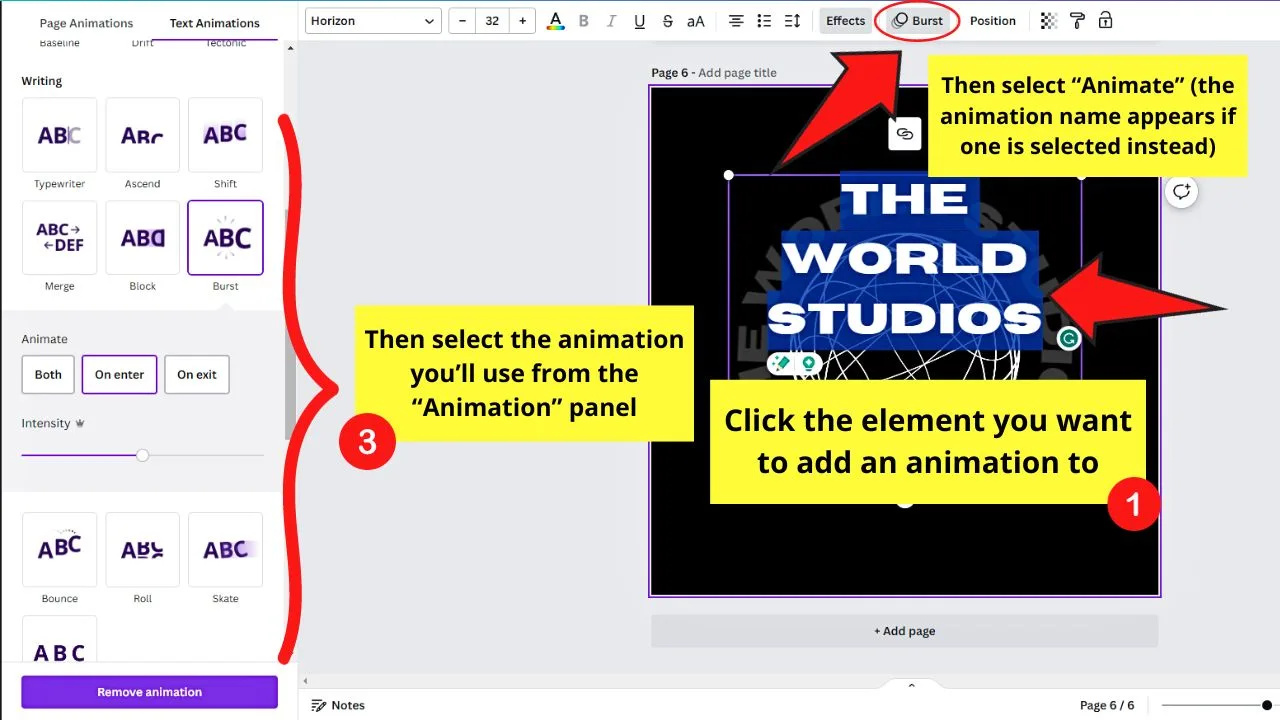
Step 3: Add animations to the page or the individual elements of the design
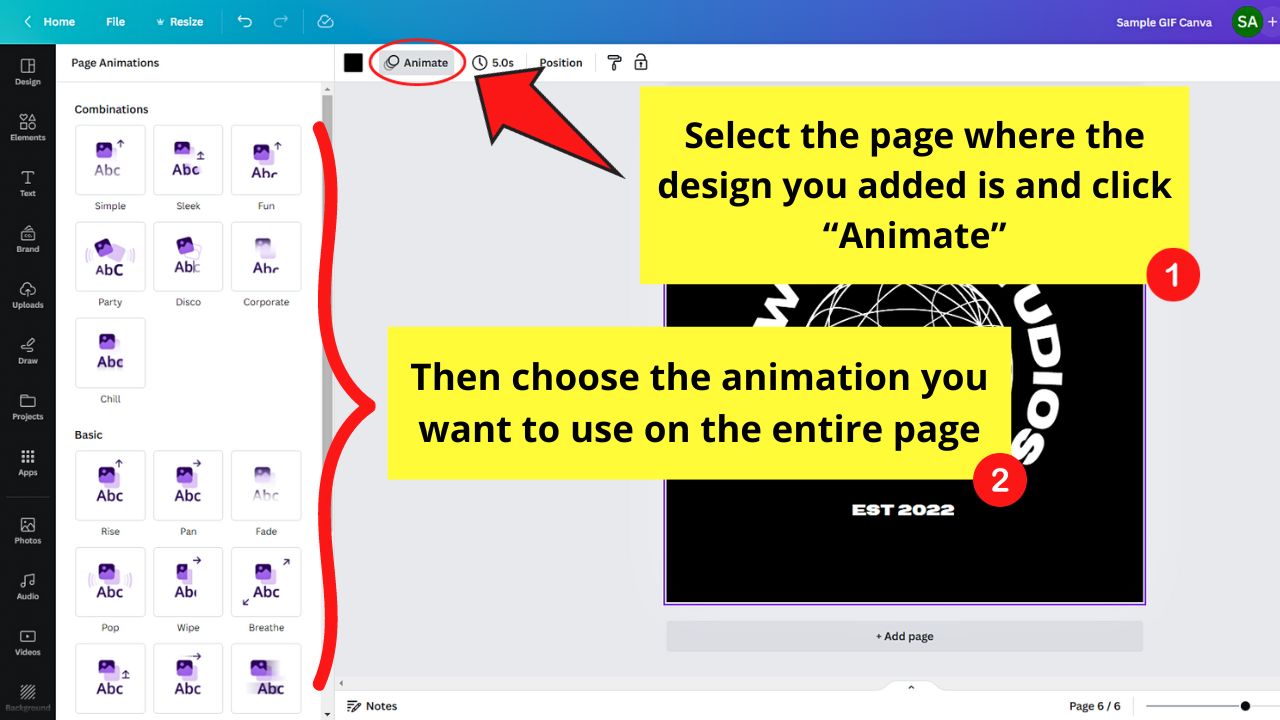

If you prefer to add one animation to the entire page, click on the canvas and select “Animate” on the menu bar.
Then click on the various page animations available. A preview of the animation on your design will be flashed when you click on an animation tile.
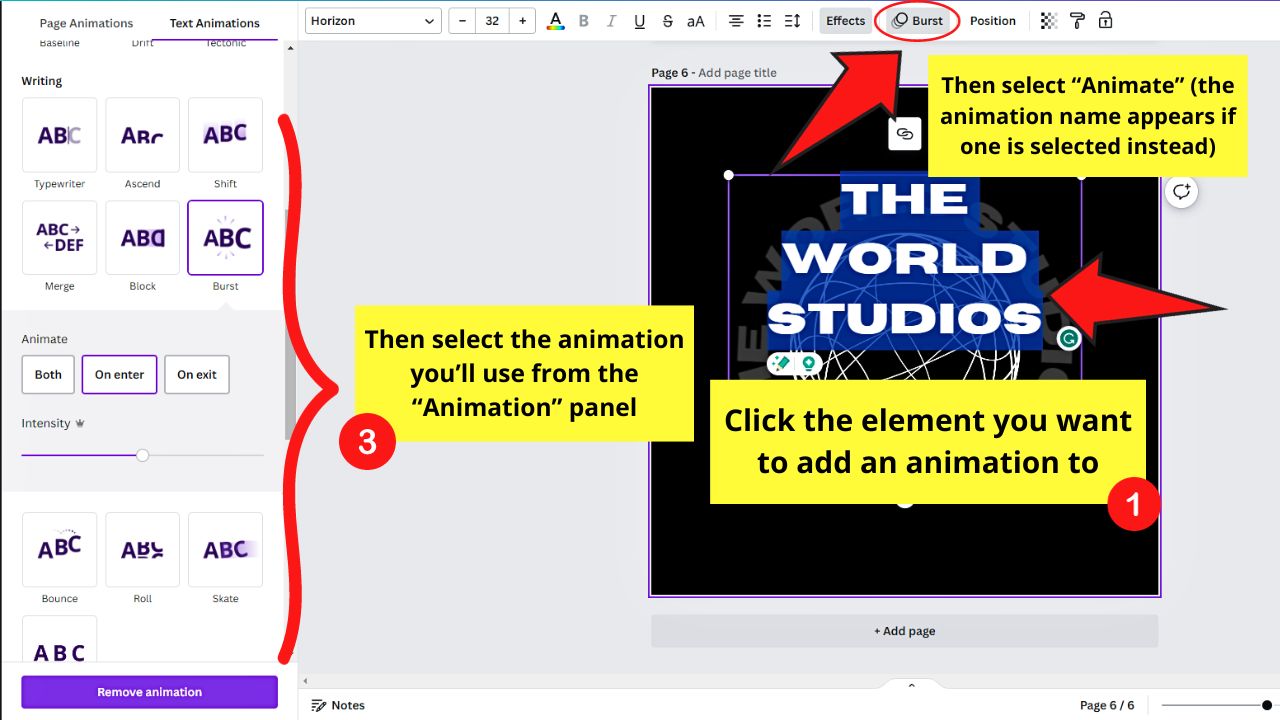
If you prefer to add different animations to the design elements, click on that element (text or graphic) and select “Animate.” Then select an animation on the “Animations” panel.
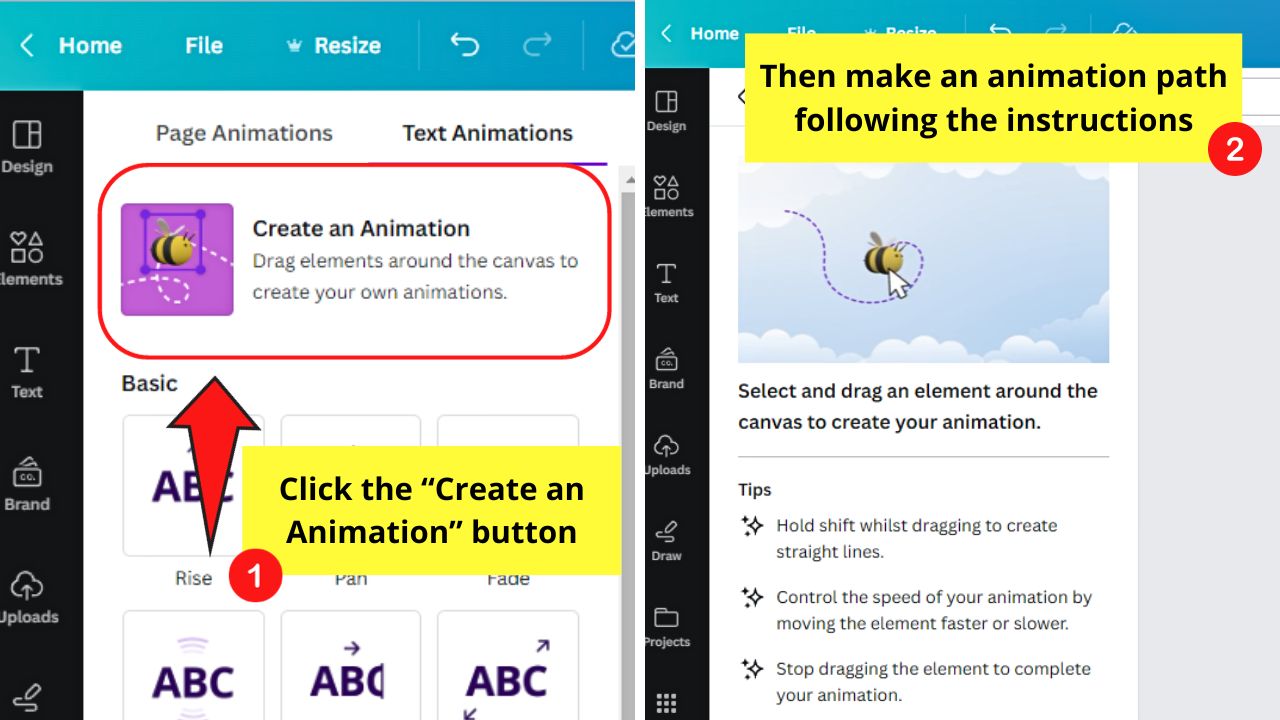
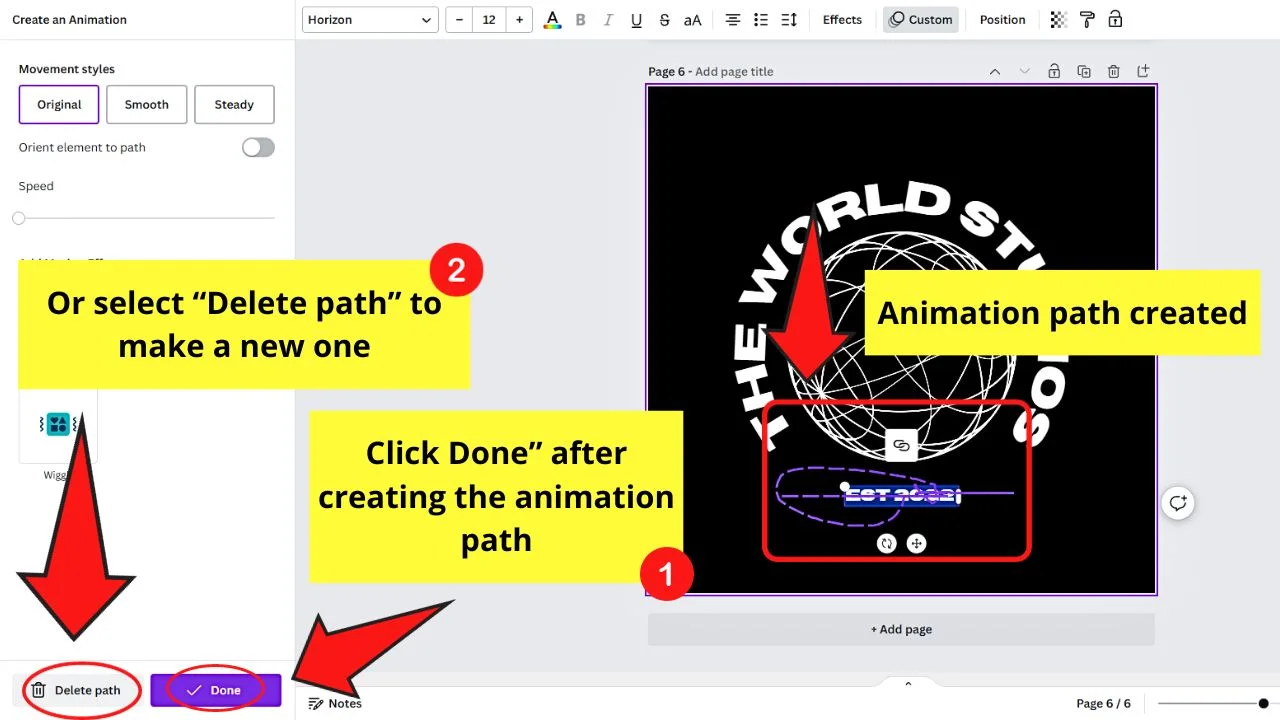
You can even create a new animation by clicking on the “Create an Animation” button and making an animation path.
Then select a movement style and adjust the speed of the animation by dragging its slider.
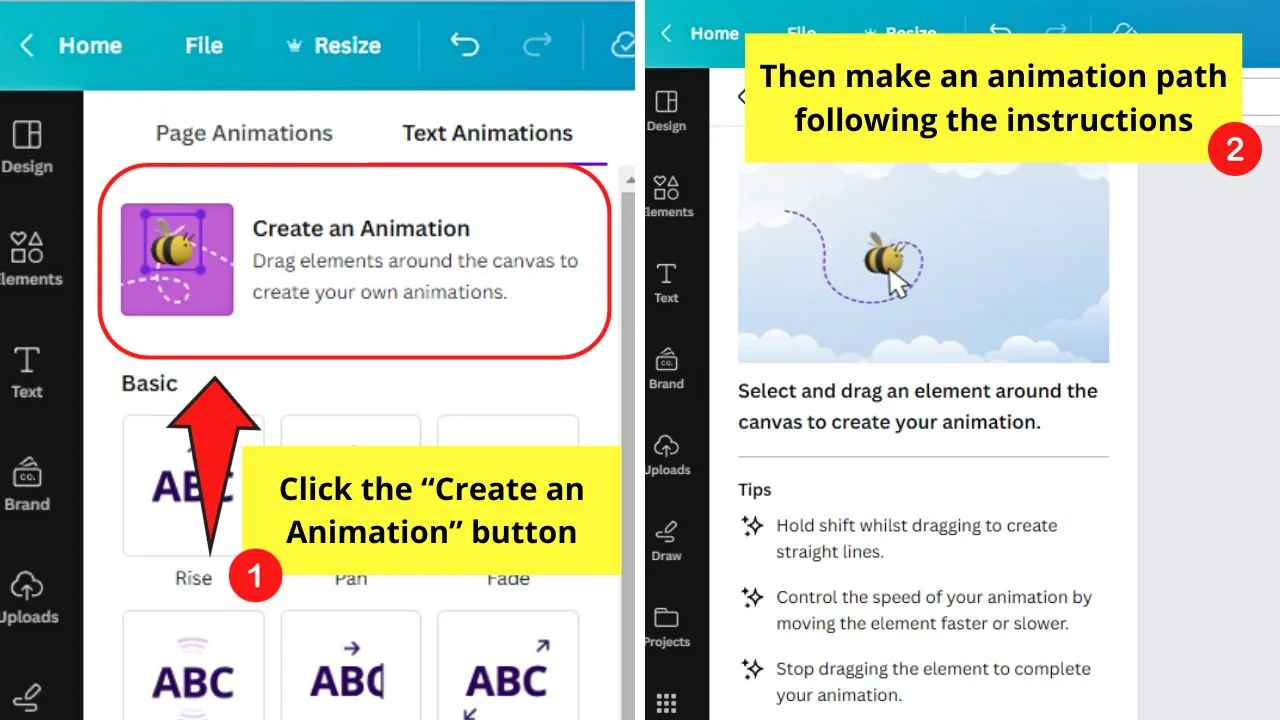
Once done, click “Done” to add the new animation. Otherwise, select “Delete Path” and make a new animation.

Repeat the process until you have added animations to all the elements in the design. If you need to adjust the layering of the elements to add those animations, do so.
Step 4: Download the GIF you created

Do this by clicking “Share” on the menu bar and selecting “Download.” Then select “GIF” under “File Type” and choose the page with the newly-created GIF.
Then click “Download” to save the GIF to your computer.
Here’s an example of a GIF made from photos in Canva.
How to Make GIFs with Transparent Backgrounds in Canva
You can make GIFs with a transparent background.
This is great if you plan on using the GIF for your brand kit so you can easily add it to the templates you’ll create.
However, a third-party GIF maker is needed to achieve this feat.
To make GIFs with transparent backgrounds in Canva, follow these steps:
Step 1: Add a design to the canvas
You can start designing from scratch, but the easiest way is to add a design template from the “Designs” tab.
Then customize the design selected by changing the colors of the elements. Or, you can add or remove any graphic elements.
Step 2: Duplicate the design
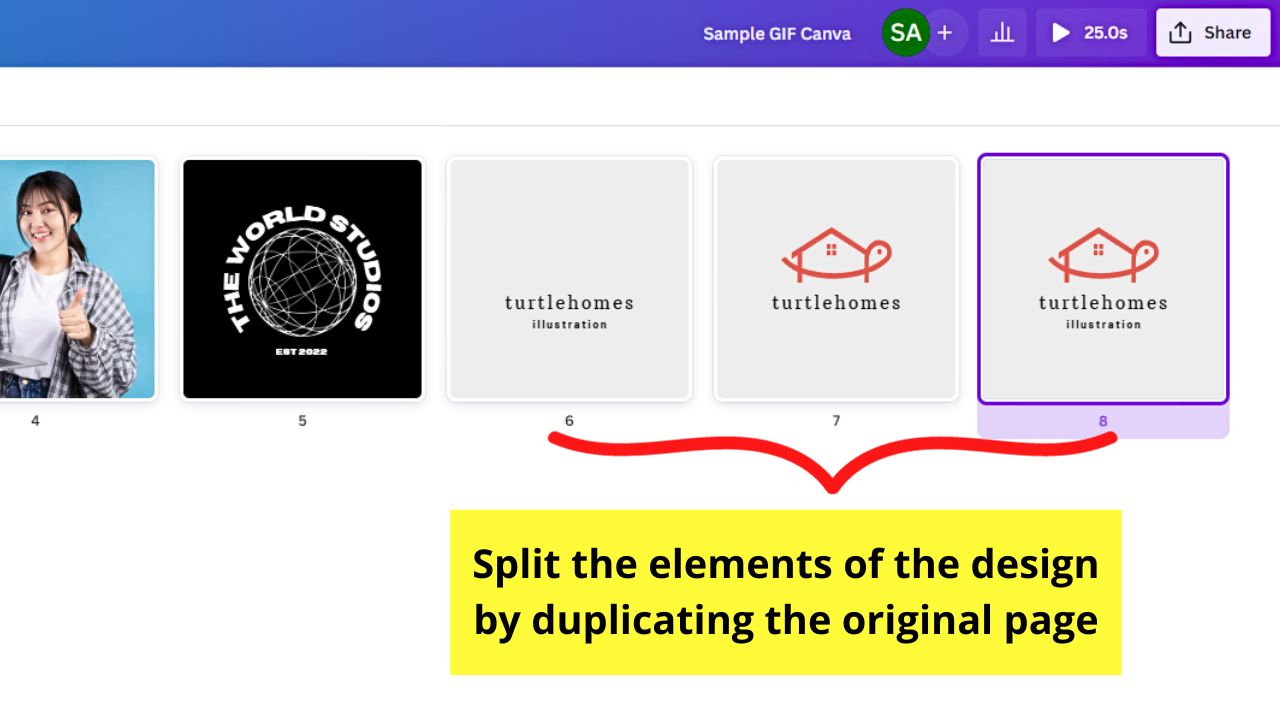

The idea here is to split the design elements according to how you want them to appear as a GIF. Hence the need to duplicate the original design you added.
The number of times you duplicate the original page depends on the number of elements present in the design.
Step 3: Download the slides as PNG files
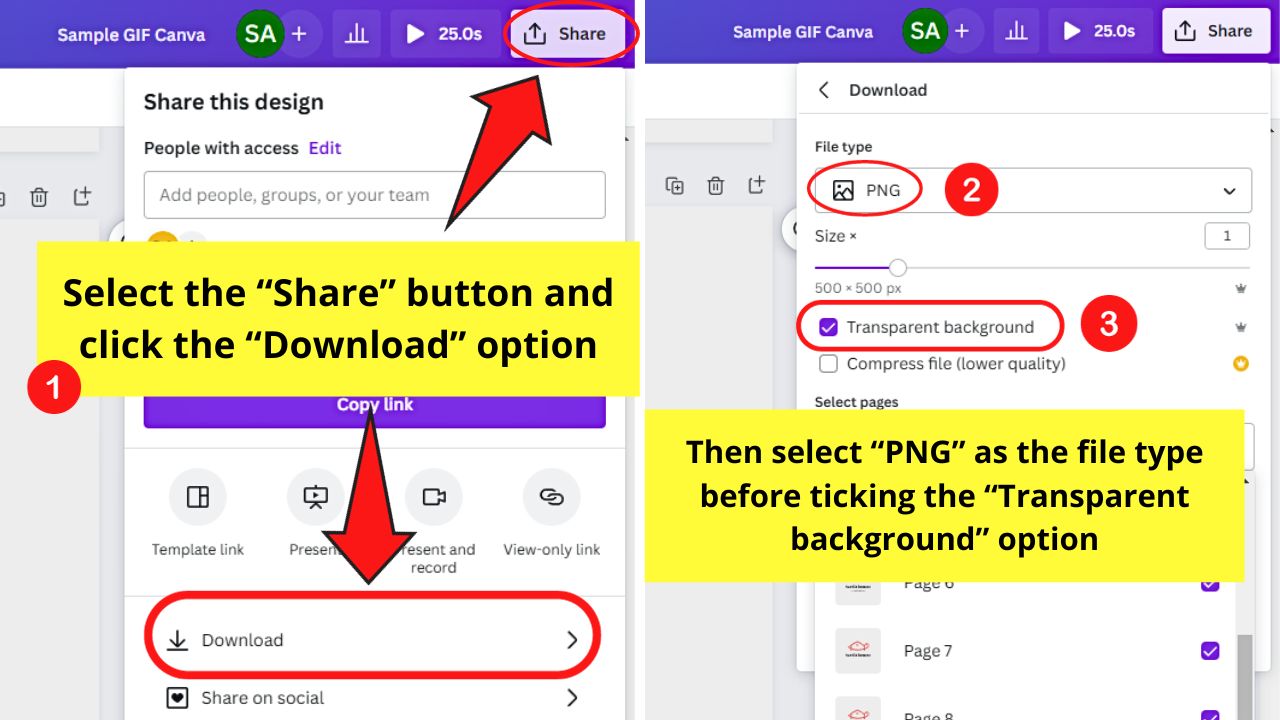

Do this by clicking “Share” and “Download” on the dropdown menu. Then choose “PNG” in “File type” and tick the “Transparent background” option.
However, you can only make the background of the images transparent if you’re on a Canva Pro account.
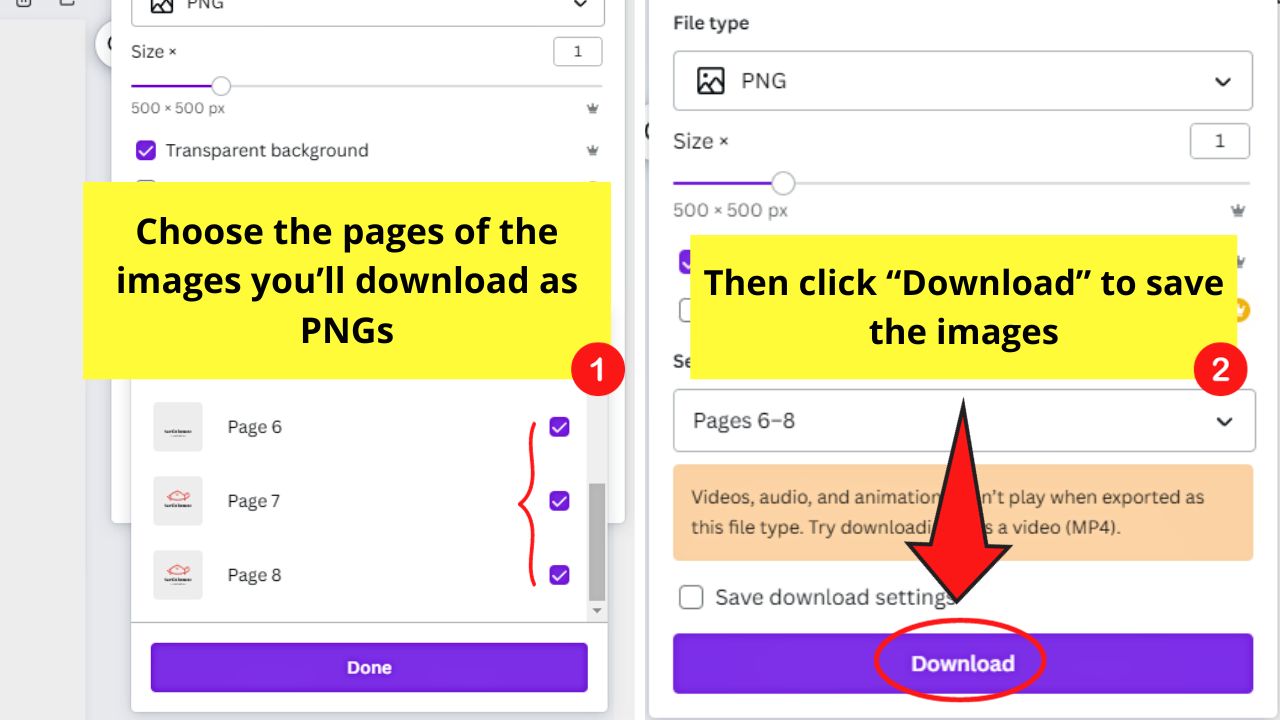
Then select the pages you want to save before selecting “Download.”

Step 4: Upload the PNG images to the GIF-maker website
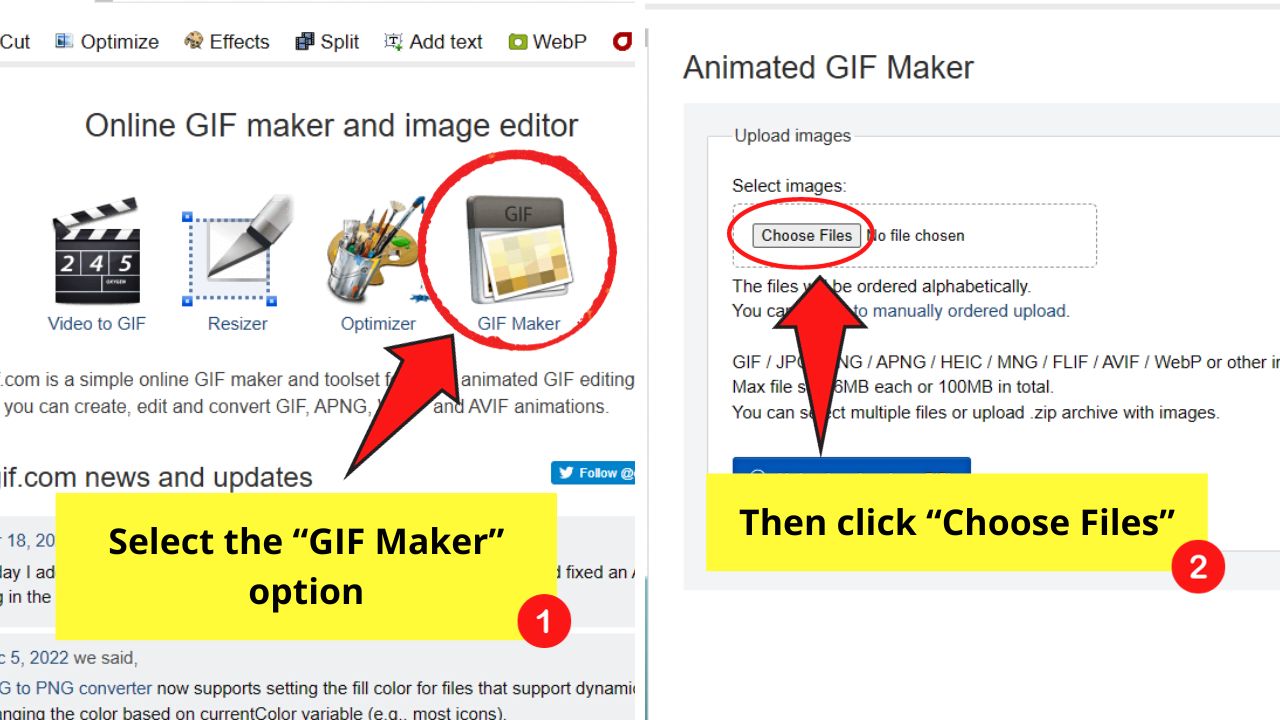
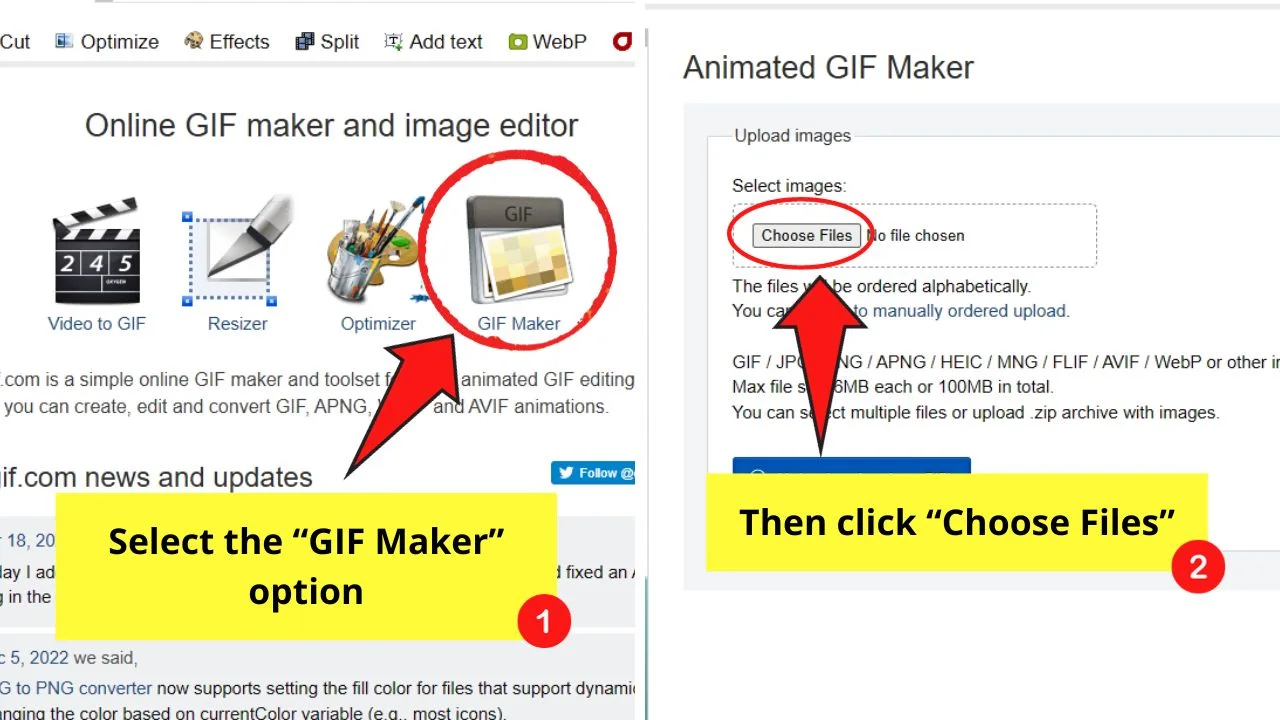
There are various GIF-maker websites you can visit, but the easiest to use is that of EZGIF.
Once there, select “GIF Maker” and click “Choose File” to select the needed images.
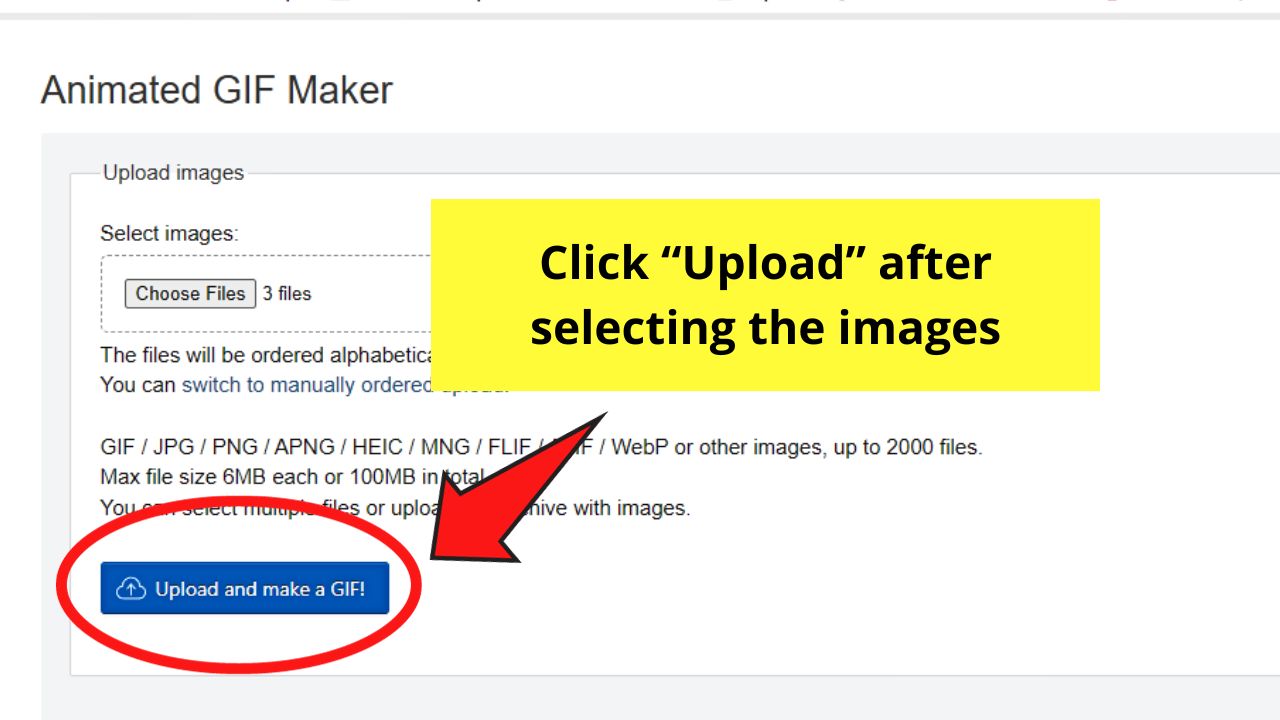

Then click the “Upload” button.
Step 5: Adjust the “Delay Time” option in the “GIF Options” section

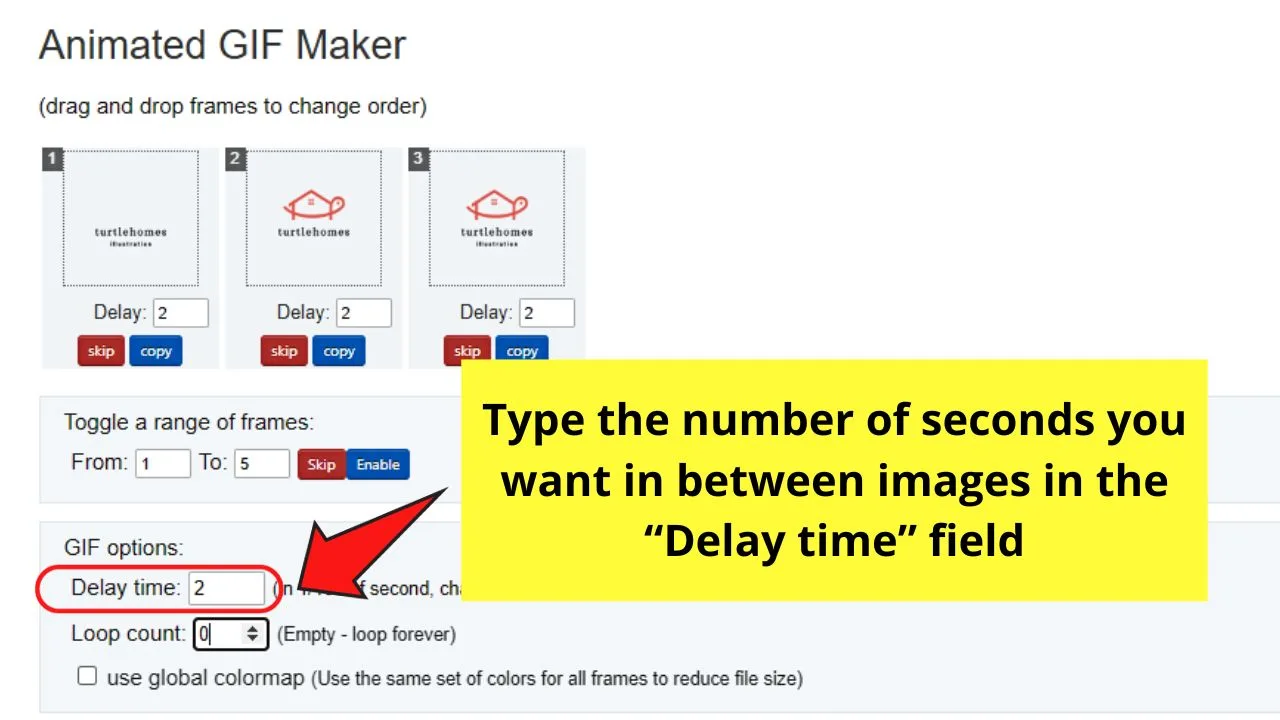
Delay time refers to the interval (seconds) between the appearance of the elements in the GIF.
You can choose any number here. But take note that the smaller the number you type, the faster the animation will be played.
And with GIFs, faster is better.
Step 6: Tick the “Don’t stack frames” option
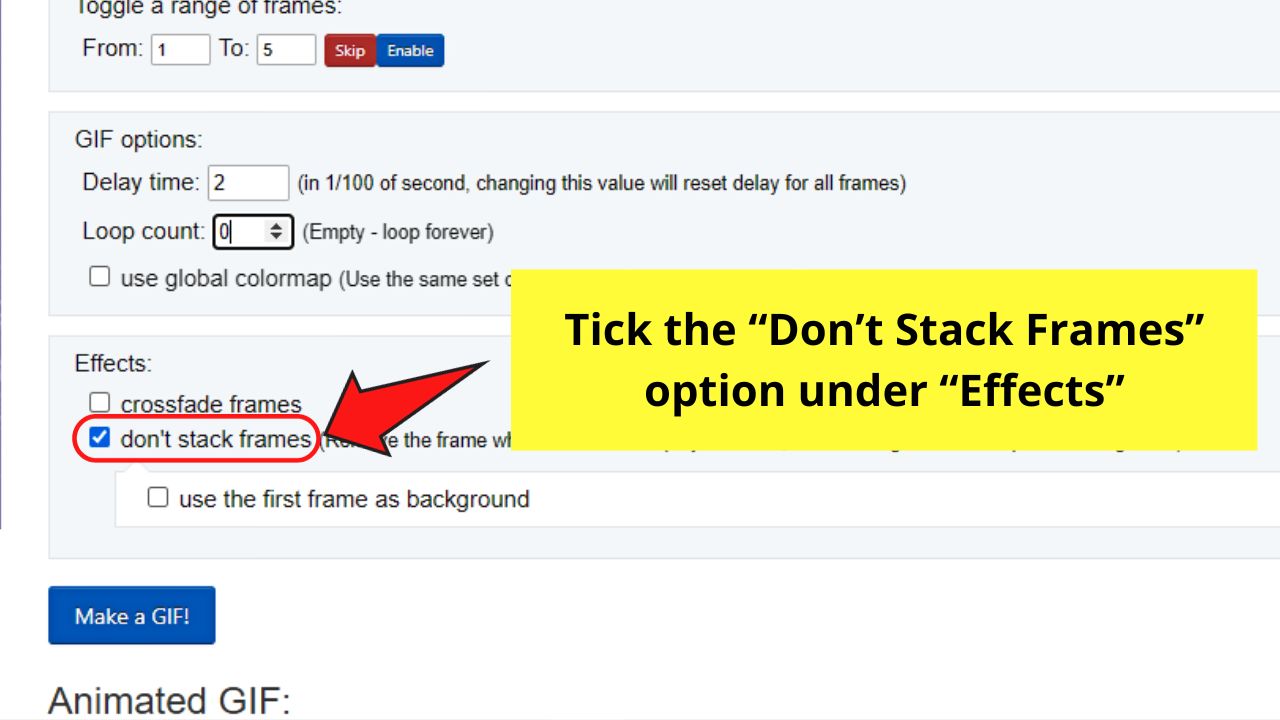
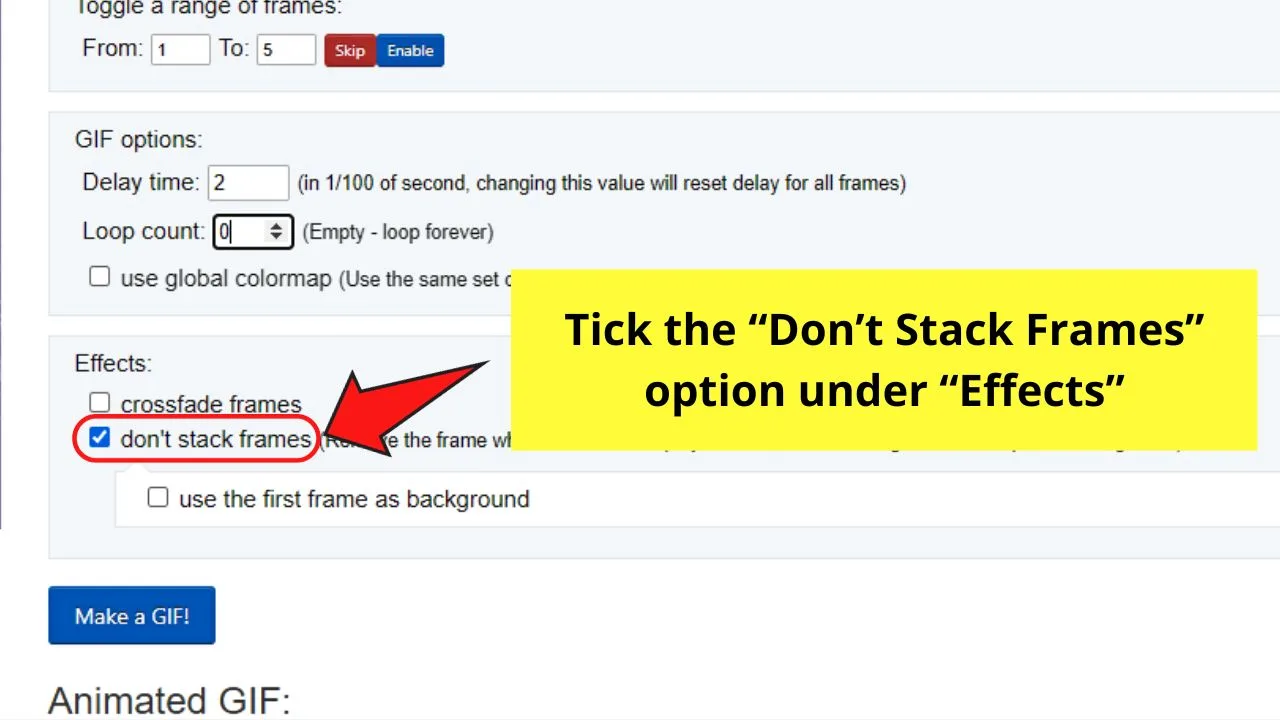
This removes the frame from the final GIF when the next frame appears especially with designs having transparent backgrounds.
Step 7: Click the “Make a GIF” button
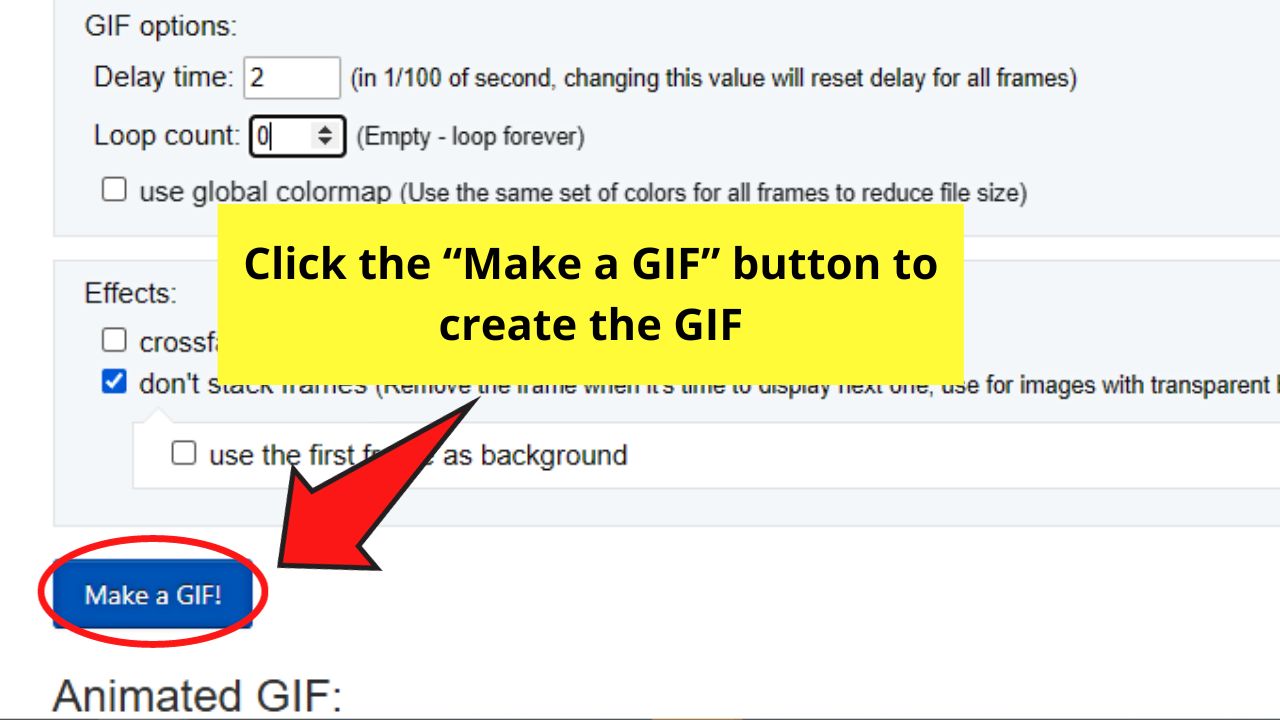

The website will then create the GIF you made if everything looks good in the “Preview” window.
Step 8: Save the newly-created GIF
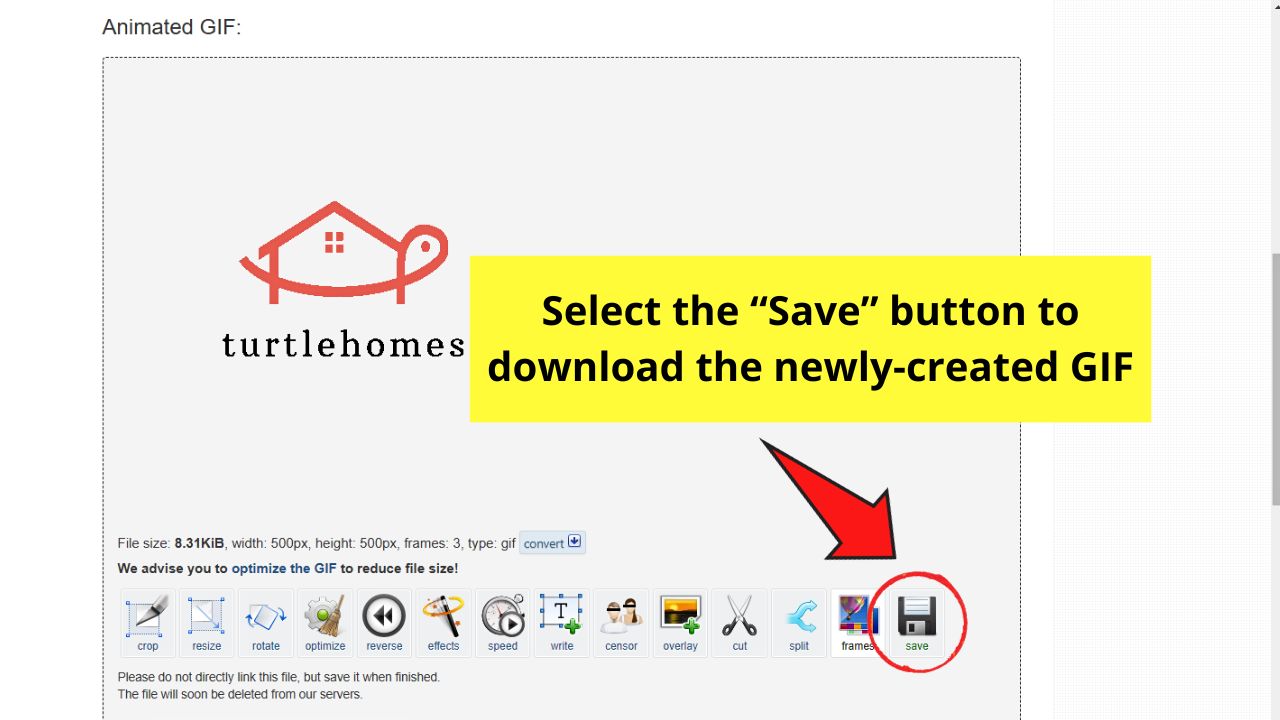

Click the “Save” button to save the GIF with a transparent background to your device.
You can then add this GIF to other designs you’re making like a watermark.
Here’s an example of a GIF with a transparent background made in Canva.
Why GIFs are Fast Becoming a Trend
Everyone’s (or almost) got a social media account, and it’s not unusual for most of us to gravitate towards and watch posts that are in motion.
Whether it’s a short video or simply a GIF, the adorable actions in that particular post lure us to watch it. And, since we’re talking about GIFs, it’s but right that we discuss what it is.
GIFs, or Graphic Interchange Format in long-form, is moving image that contains animation but doesn’t produce sounds. Think of it like a static JPG or PNG file that you added some movements to make things more interesting.
Though videos are indeed better in creating visual appeal and audience engagement, it takes time to create them. Add the technicalities that come with the production process as well.
But, with GIFs, you don’t have to be a video editor by heart. You can simply take advantage of Canva’s GIF maker, and you can create animated social media posts.
Hence, it’s no wonder that GIF posts for social media strategies are widely used for promotional posts. They’re cheaper and easier to make than videos — without taking out the fun.
So, the next time you’re wracking your brains for an idea to promote your business, why not give GIF-making a try.
Frequently Asked Questions about How to Make GIF’s in Canva
Can you create GIFs on Canve even if you’re using a free account?
Of course, you can! But, with the limitations of a free account, there are only a couple of animations/effects that you can use without charge. But, if you want to use Pro animations, you can still do so, but you’ll have to pay for it before downloading the file on your device.
Can you create GIFs without a Canva account?
Though quite absurd, you can make GIFs even if you don’t have a Canva account. You simply head over to Canva’s GIF maker and creating your design there. Then, if you’re planning to save your design or create more GIFs, simply link your email or Facebook account.
Can I use an animation for my GIF that has the Pro symbol on it?
You can, but you need to pay for it first before you can download your file.
Can you animate different elements individually?
Though it’s quite tasking, you can. Just make sure to ungroup those elements first before you start with the process. After which, tap on the individual elements and click on the “Animate” option to select the motion style for that particular graphic, text, or image. You can even adjust the length for each animation if you like.
Can I use my images for my GIF?
Definitely! Simply head over to the “Uploads” tab on the left-side Canva menu and tap on the “Upload” button in the menu that appears. Choose where you’re sourcing your image from, tap on it, and wait for the upload process to finish. Once done, click and drag it to the canvas and make the necessary edits or changes. You can then animate these pictures individually or as a whole.


Hey guys! It’s me, Marcel, aka Maschi. On MaschiTuts, it’s all about tutorials! No matter the topic of the article, the goal always remains the same: Providing you guys with the most in-depth and helpful tutorials!

