

“Nah, video editing is too hard!”
Well, if you haven’t tried editing footage with Canva, you surely won’t discover the ease of creating one.
But, if you only have a phone with you, there are various features that the Canva app can offer for you to create a video.
How to Make a Video on the Canva App
To make a video on the Canva app, you can use a video template or start from scratch. To use a video template, tap on a template and adjust the text, audio, and other elements in it. To start from scratch, tap “Blank template” and add elements, audio, and text. Then save the footage as an MP4 file.
How to Make a Video on the Canva App with Templates
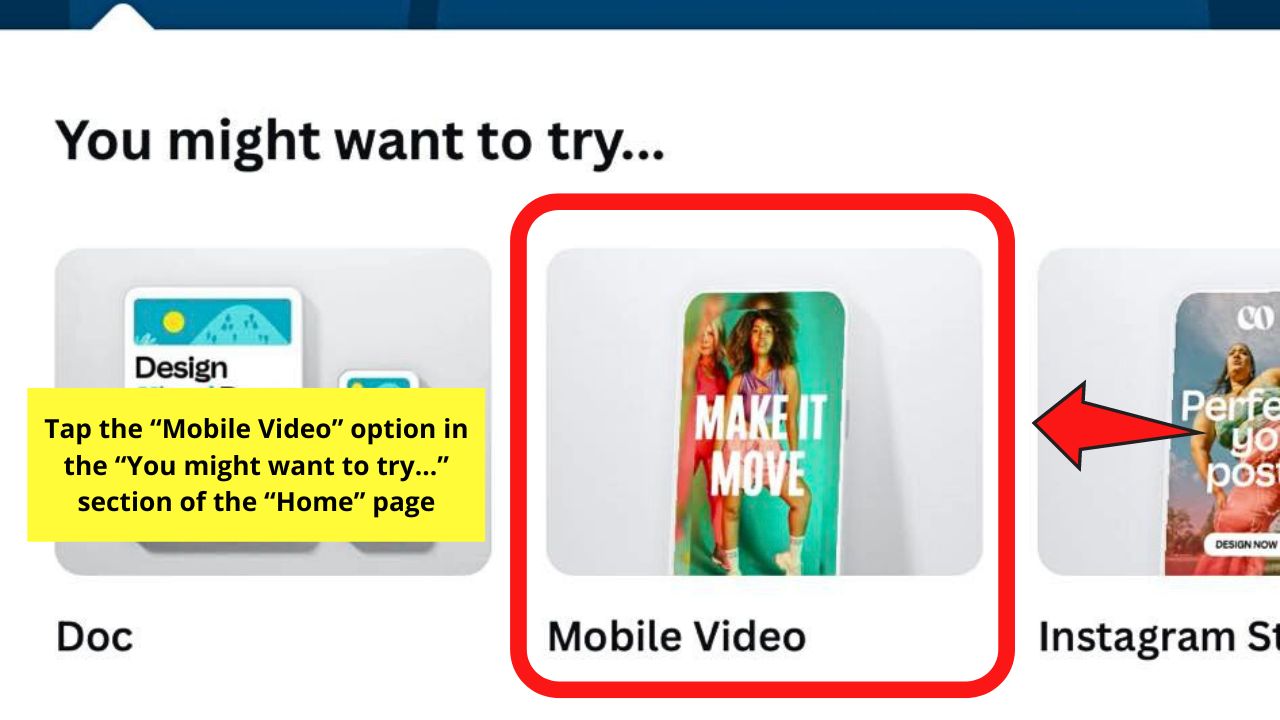
Step 1: Choose the design file you’ll use for your project


You can tap on the selections available on the home page, or narrow your search through the search bar function.
You can also press the “Mobile Video” option on the “You might want to try…” section.

Step 2: Press the thumbnail of the video template you’d like to use


Step 3: Customize the video template you chose earlier
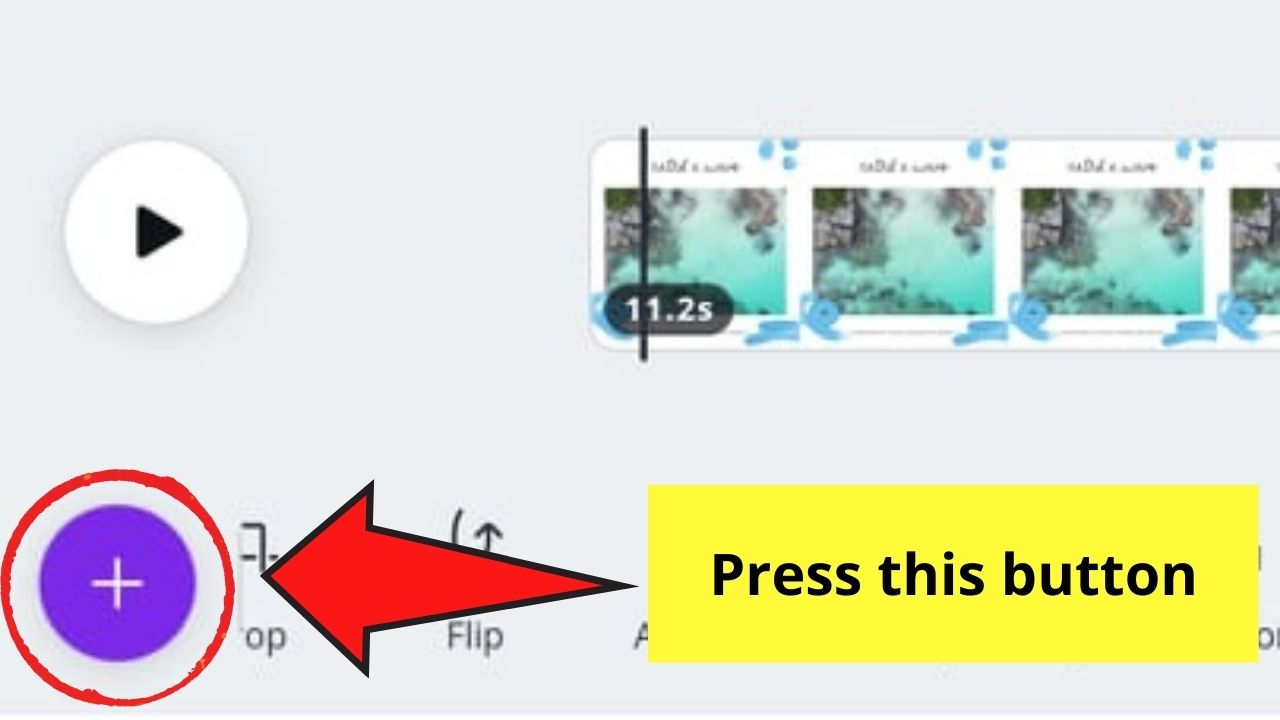

Replace the video or image on the template by pressing it. Then, tap the “+” button on the lower left of the screen to activate the menu panel.
Then, choose another footage from Canva’s video gallery, or upload your own video through the “Uploads” button.
Tap whatever video clip you want to use to make it appear on your project.
But, if you’re fine with the footage that comes with the template, just proceed to the next step.


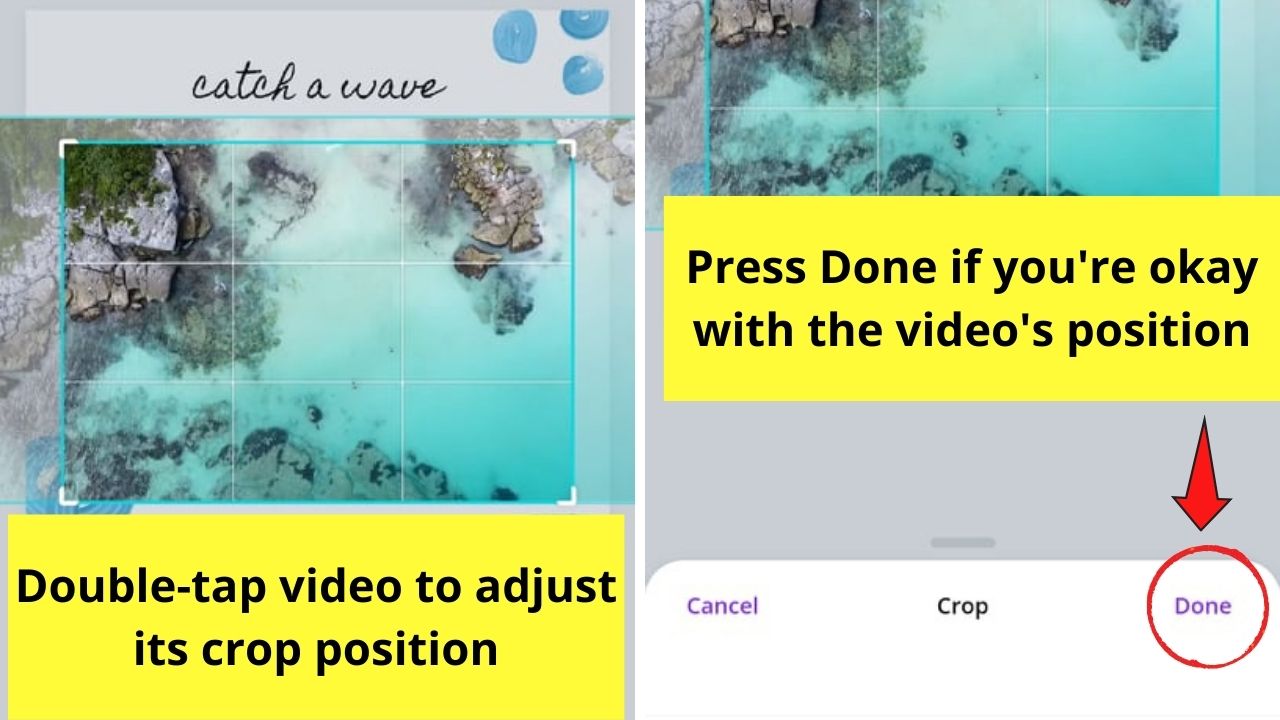
Step 4: Press twice on the video clip for you to adjust its crop position

Step 5: Press the video again to activate the editor toolbar


You will then see the video editing tools that you can use to customize your footage further.


Step 6: Tap the scissor icon to trim the video

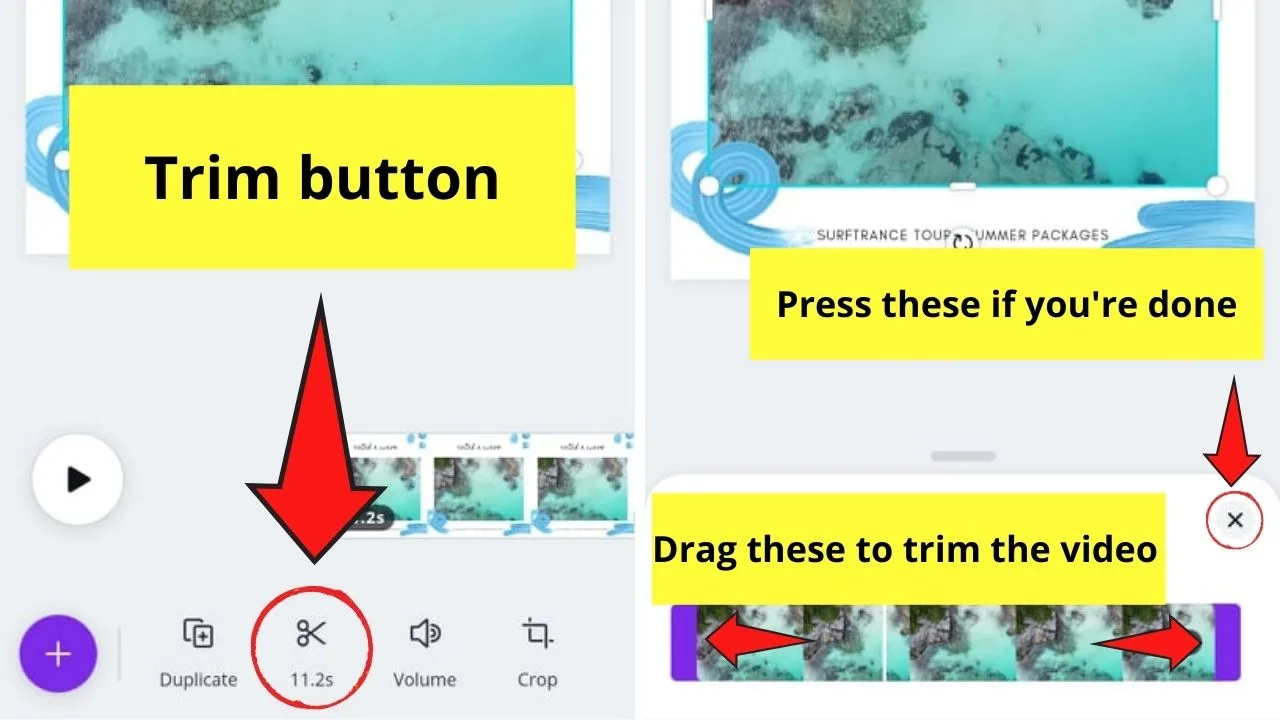
Then press and drag the violet handles on the video bar to shorten it. Tap the “Close” button once you’re done.
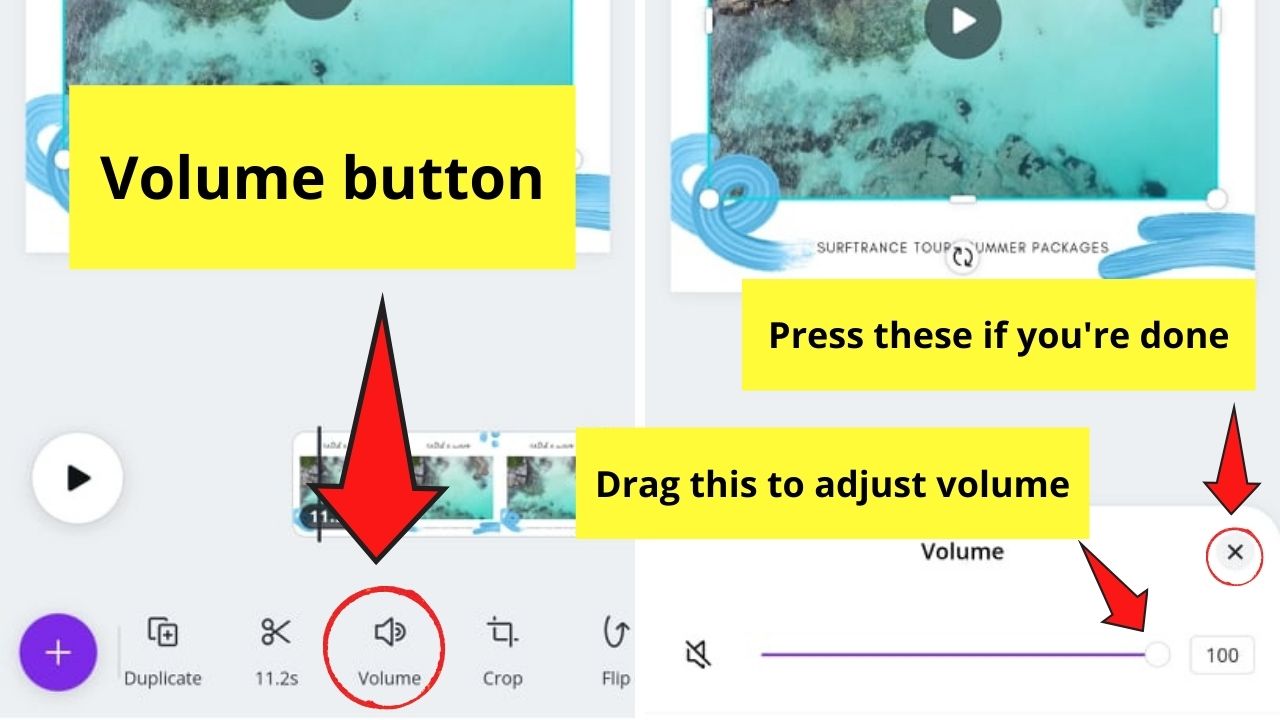
Step 7: Choose an audio to be applied to the video and adjust its volume


You can press the “Upload” tab and upload the audio file if you have your song to use.
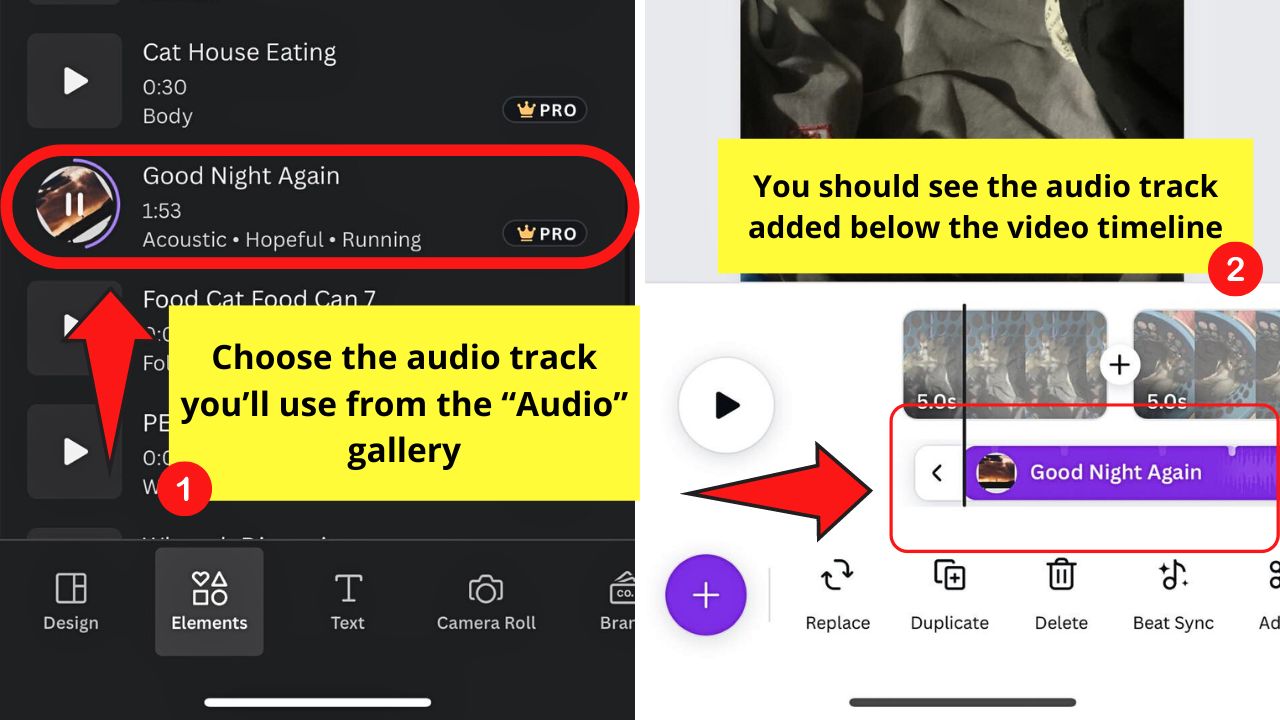
Otherwise, tap “+” and choose the “Elements” tab. Then swipe up and press the “See All” button of the “Audio” section.
Then type in the search bar to narrow your search or browse through the audio clip options available.
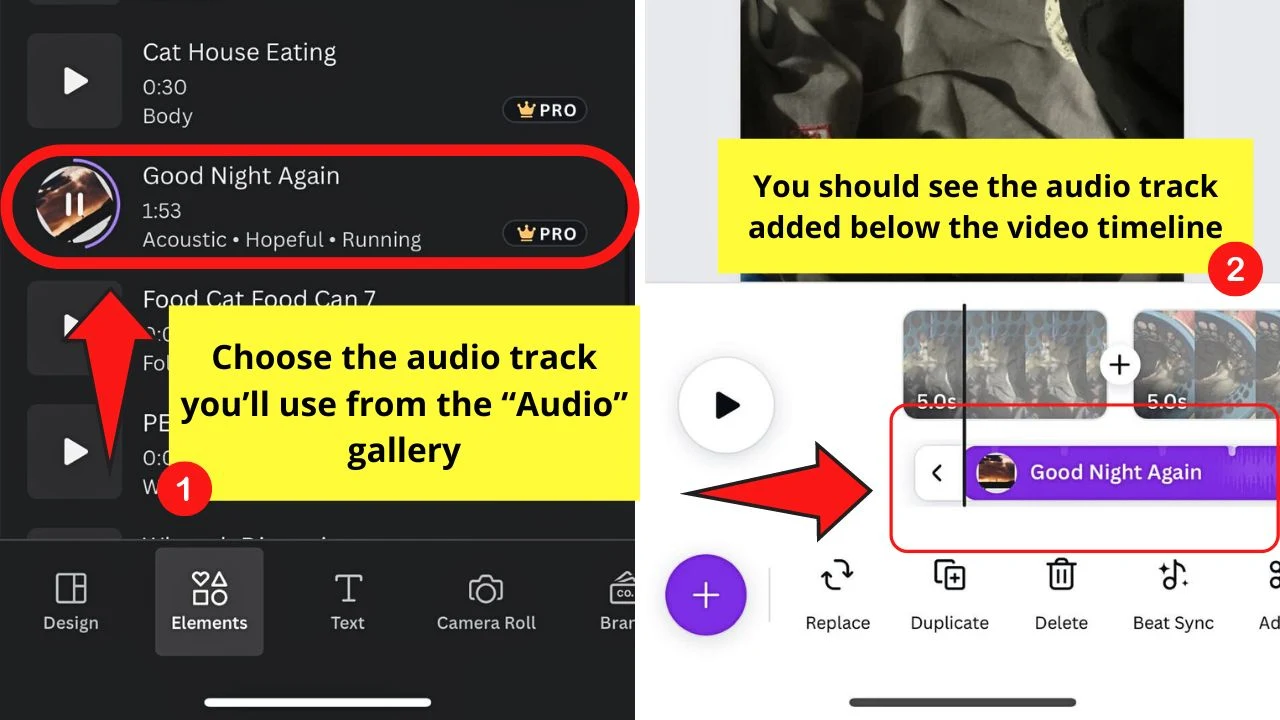
Press the audio clip you want to apply to the video. You should now see the audio track under the video timeframe.
Adjust the audio’s volume by tapping the “Volume” button. This appears as a speaker icon on the bottom toolbar.
Once done, press the “Close” button if you’re done adjusting the volume.

Step 8: Sync the audio added to the video you’re editing

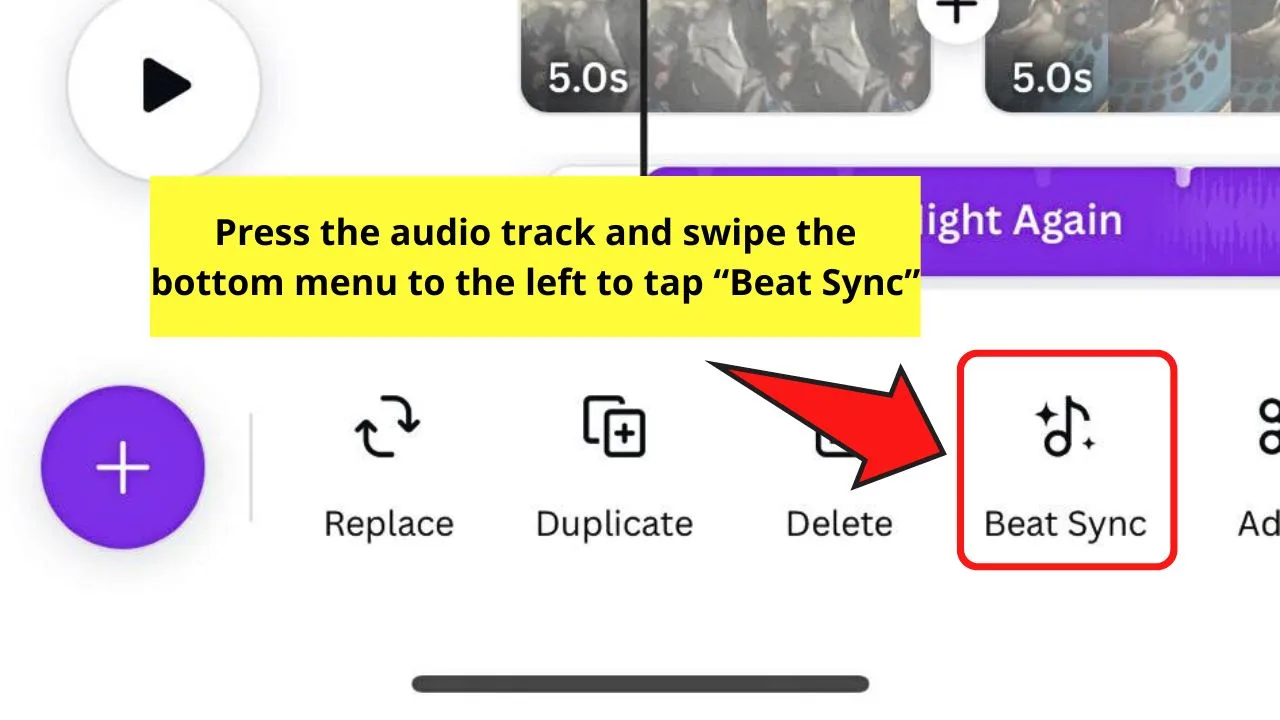
In previous Canva app versions, you manually adjust and align the audio clip with the images or videos on the video timeframe added to sync them.
But there is now a new feature called “Beat Sync.” With a tap of the toggle, the audio track is synced automatically to the timing of the video timeframe.
So once the audio track’s added, swipe the bottom toolbar to the left to tap “Beat Sync.”
Then press the “Sync now” toggle so all the elements and pages on the video timeframe are synced with the music.

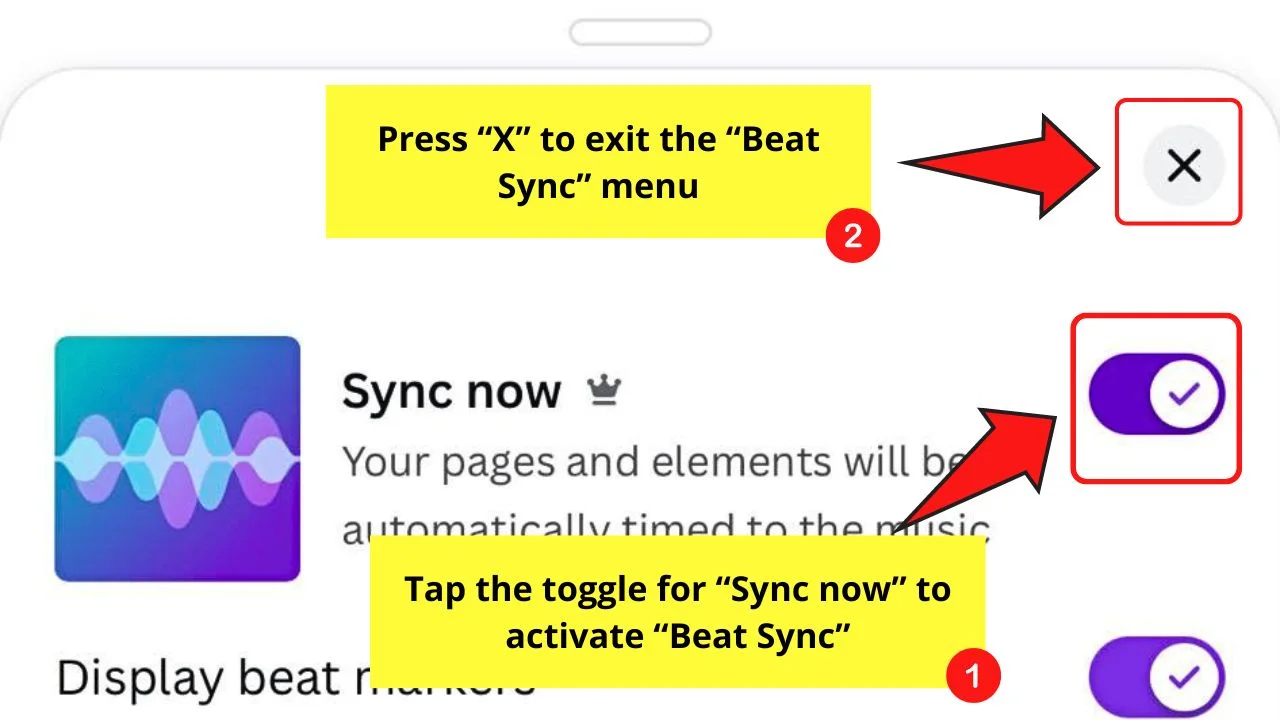
Press the “Close” button to exit the “Beat Sync” page. Then tap the “Play” button to check how well the video and audio track are synchronized.
Step 9: Tap the “Animate” button and select the video animations available to add page animations


You can also select to use photo animations to add another fun animation for the video itself.
Once you’re satisfied with the animations you added, tap the “X” button to exit.
Step 10: Press the “Transparency” button to adjust the video’s transparency


Drag the slider to adjust how opaque or transparent you want the video to be.
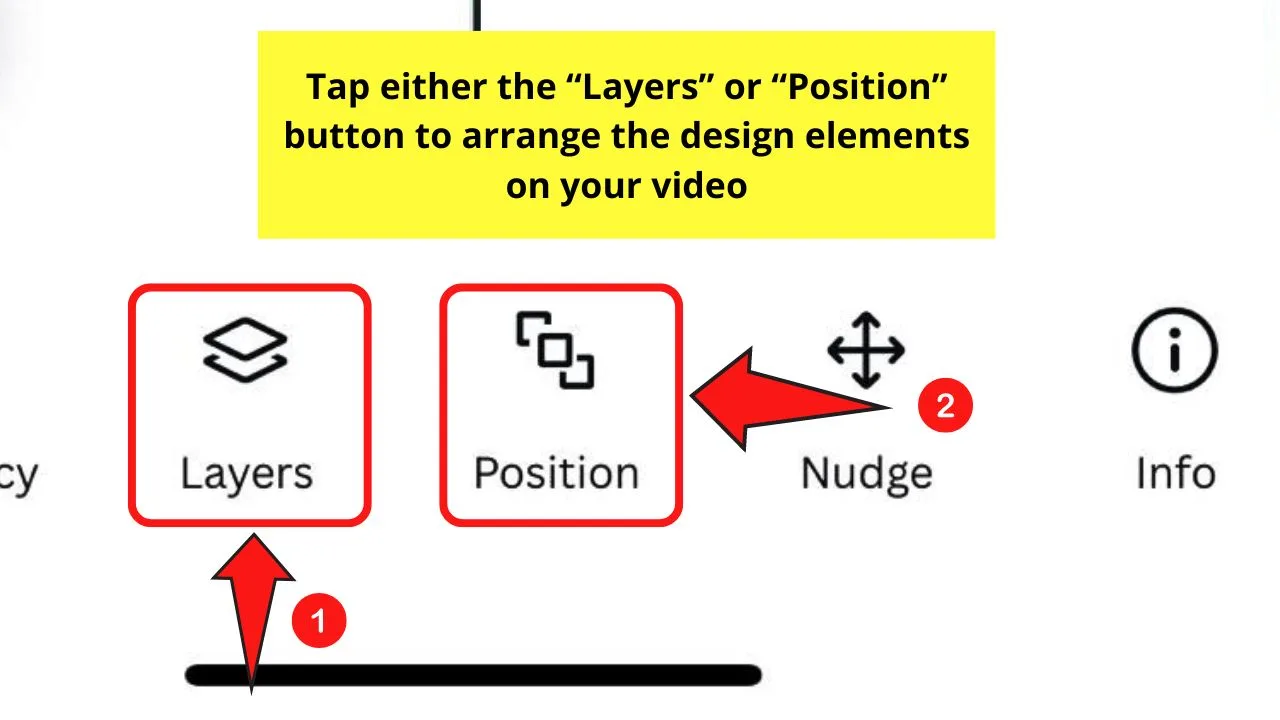
Step 11: Adjust the layering of the design elements in the video

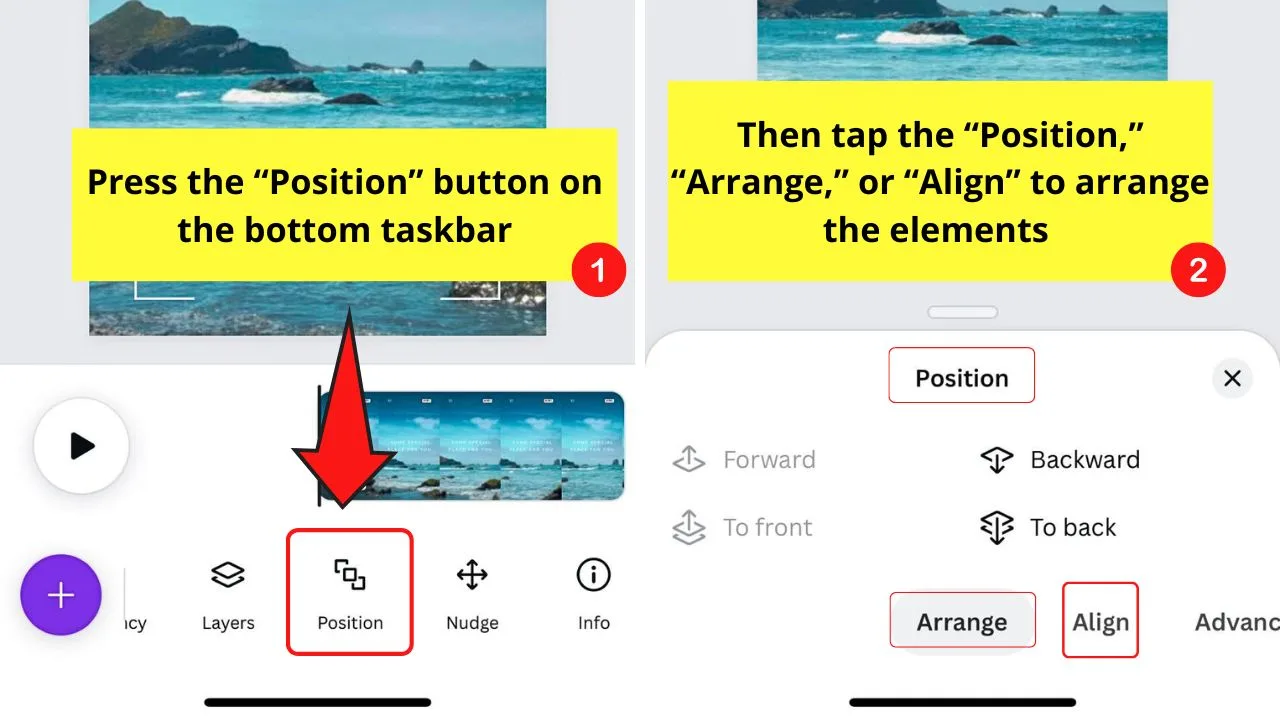
One way to do this is by pressing the “Position” button on the bottom toolbar (between “Layers” and “Nudge”).
Then press the “Arrange,” “Align,” or “Position” tabs to choose from the available choices in each category. This way, you can arrange the design elements according to your liking.
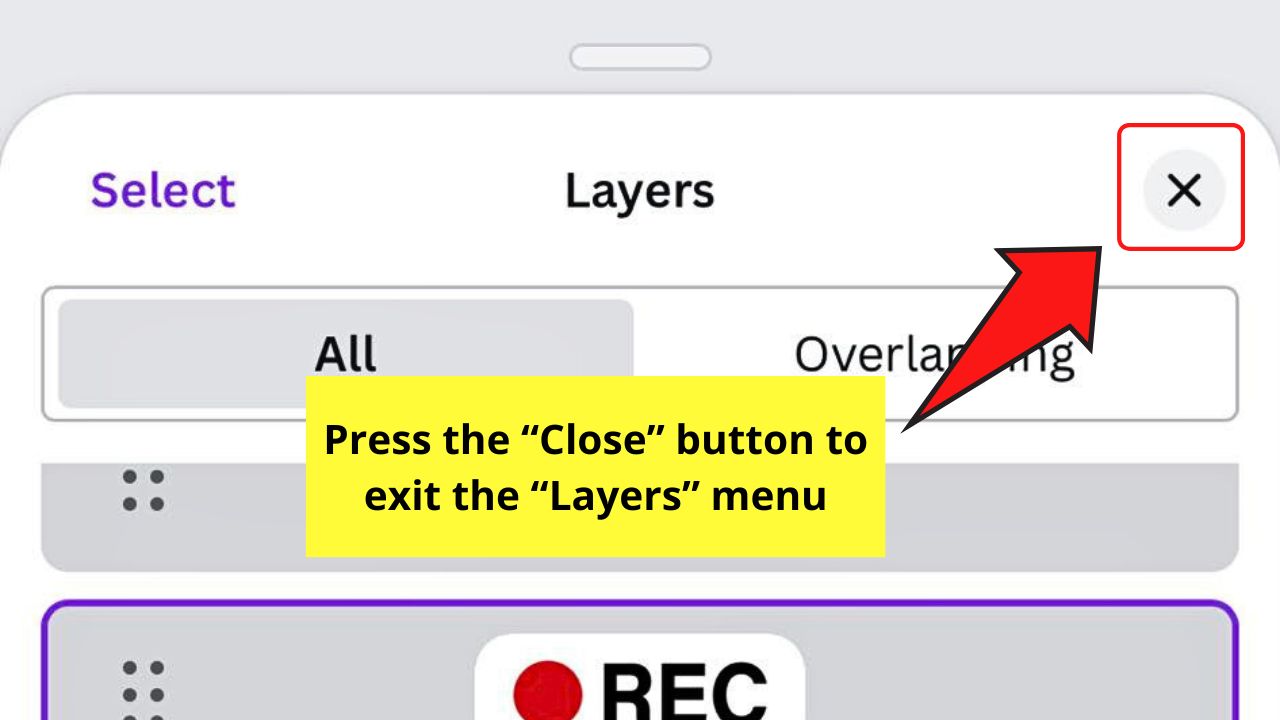
The other way is to tap the “Layers” button. Make sure the “All” tab is chosen.
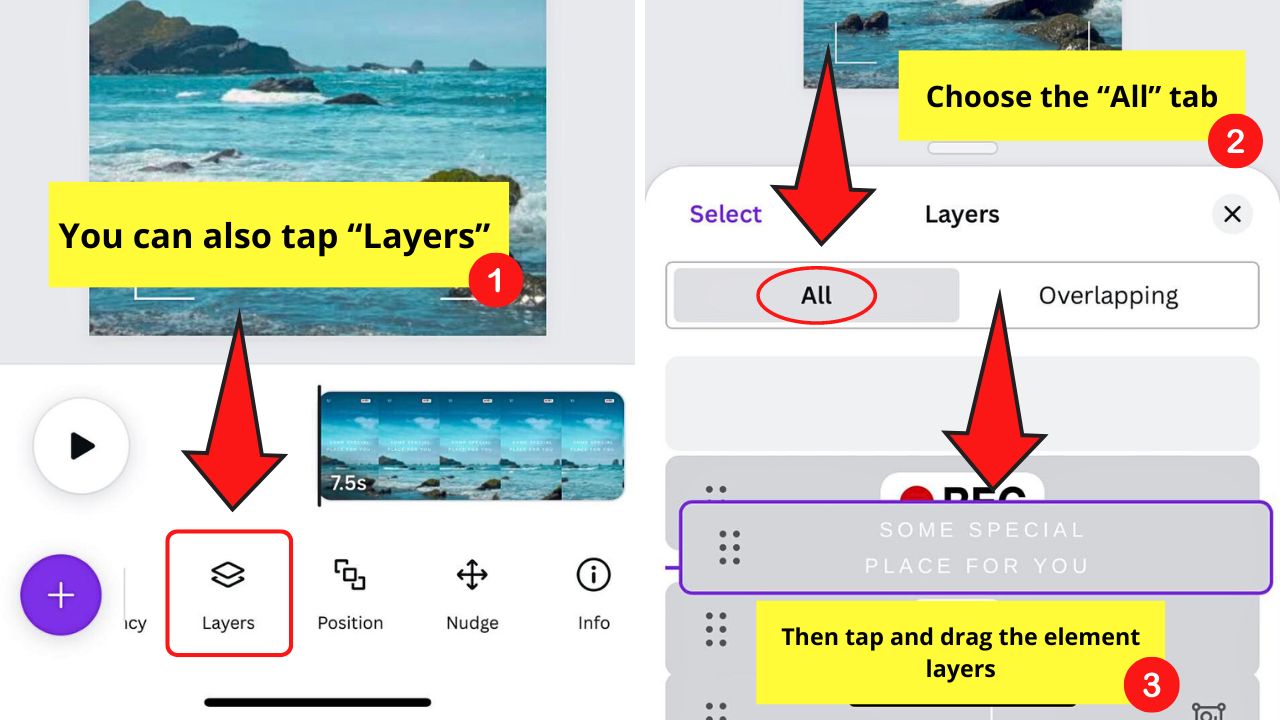
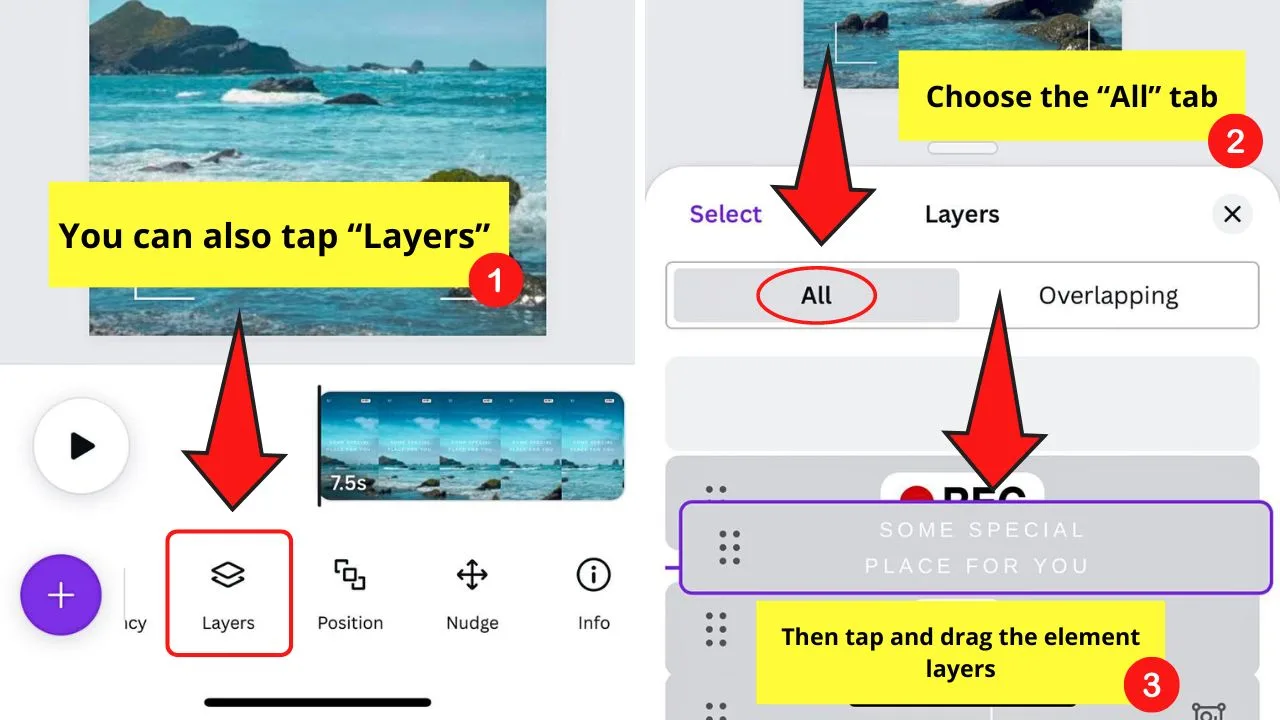
Then tap and drag the element layers according to how you want to arrange them.
Once done with arranging the layering of the design elements, press the “Close” button.

Step 12: Press the “Preview” button on the menu bar


You can also tap the “Preview” button found on the lower left of the screen if you want to see the slide transitions as the footage plays.


Step 13: Tap the “Share” button on the menu bar


Then select the “Save as” button, and tap the “MP4 Video” option.
Choose the pages you’d like to download and tap the “Download” button to export the video to your device.


It might look like an extensive process. But, once you master the basics, customizing video templates will be a breeze for you.
And, after mastering the basics of editing video templates, you can now begin designing videos from scratch.
So, how do you make a video on the Canva app using a blank template?
How to Make a Video on the Canva App from Scratch
Step 1: Tap the purple “+” icon on the bottom right of the screen


This will allow you to create a new design.
From there, scroll down to select the file type you’d like to use for your video project. Tap on the file type.


You can also select the file type from the home page itself by browsing through the design type suggestions.
Step 2: Tap on the blank canvas of the editor page
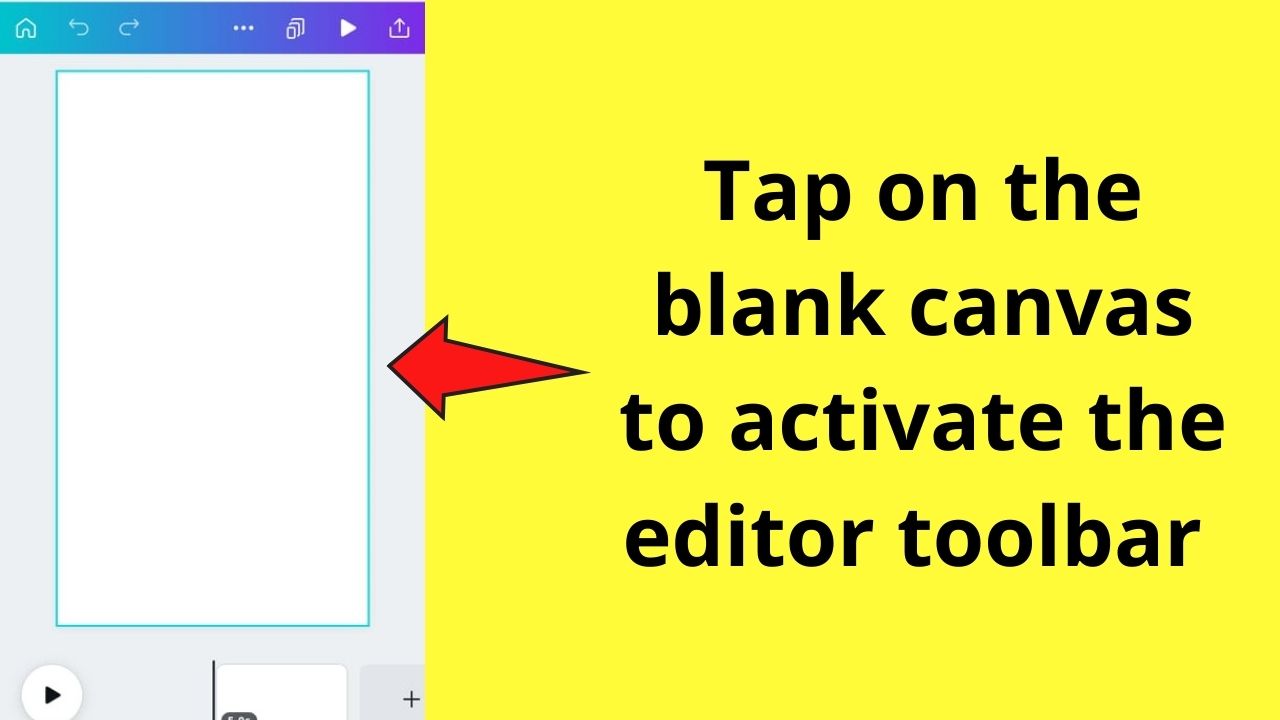
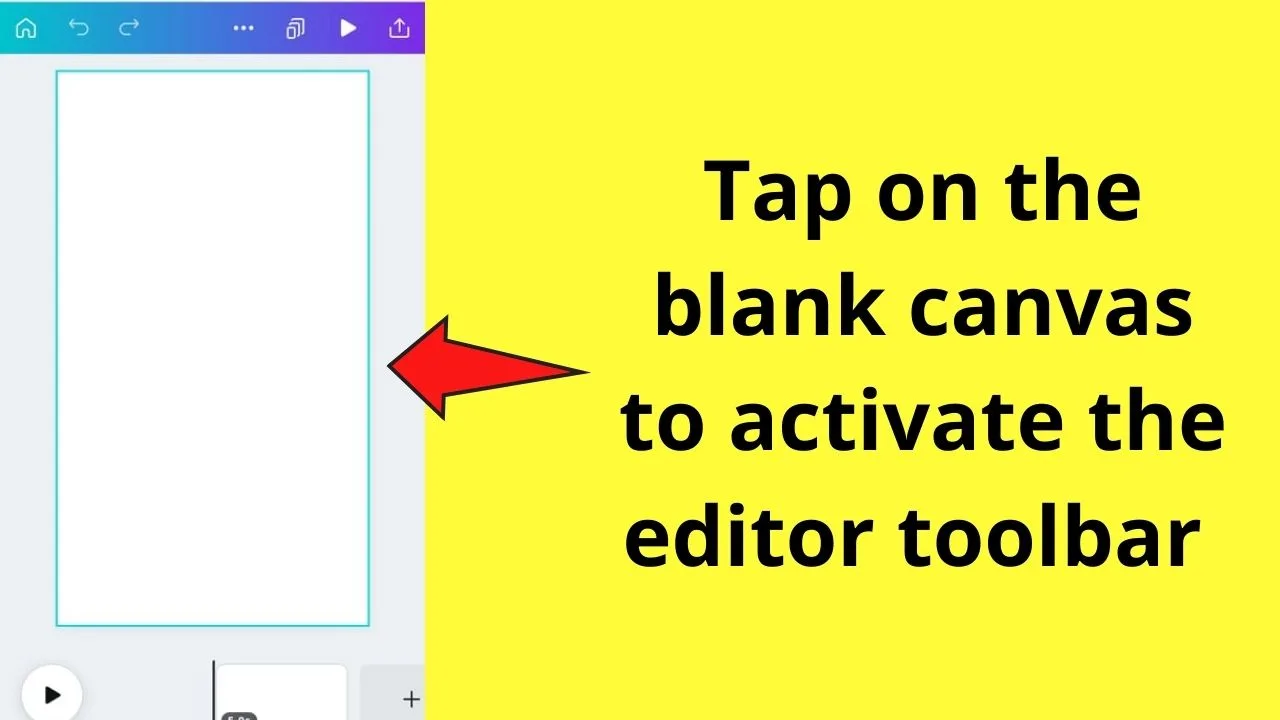
This activates the editor toolbar at the bottom of the screen.
Step 3: Tap on the color picker button to select your background for the video project
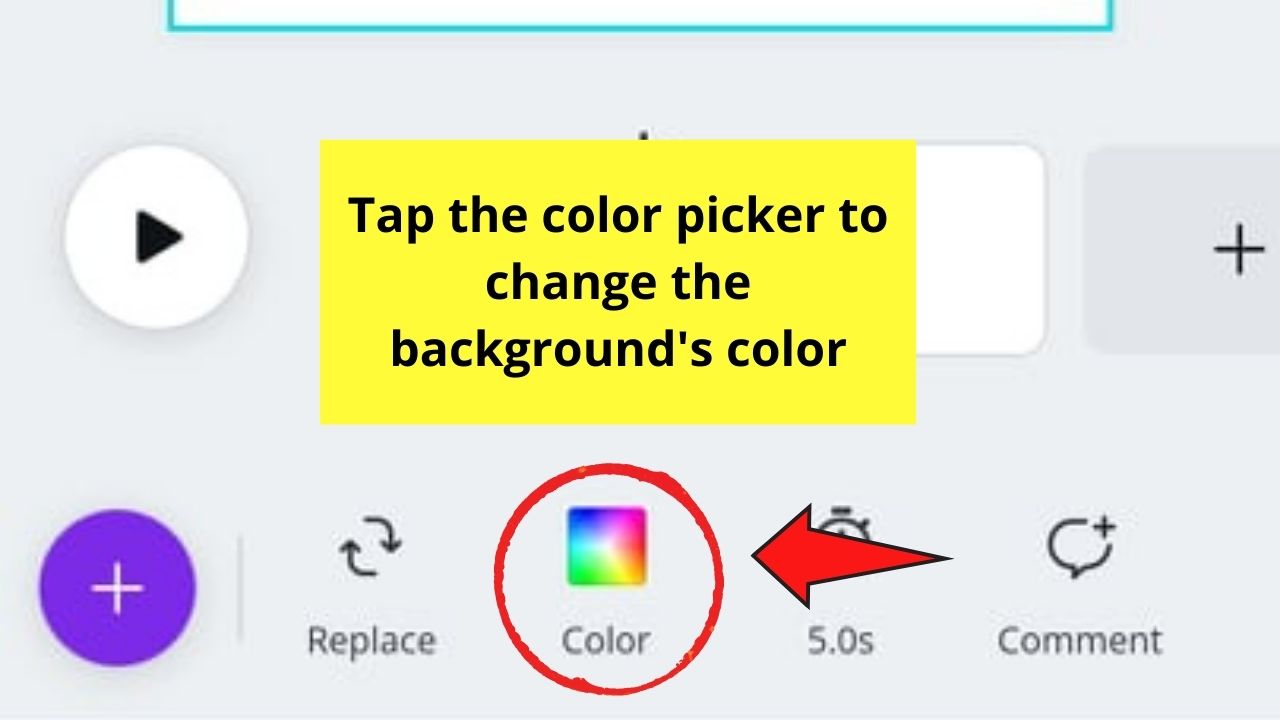

If you prefer using a photo or video for the background, press the “+” button on the lower left of your editor screen and tap either the “Photos” or “Videos” button.
Step 4: Tap the “Text” button to add some text to the design


Select what font style combination you’d like to use and edit the text inside accordingly.
In cases where the font style combination you selected is a grouped element, simply tap the “Ungroup” button to separate them.
Delete the text boxes that you don’t need accordingly. Then either double-tap on the text box or tap once and press the “Edit” button to type your message.
You can change the font color accordingly by tapping on the “Font color” button.


Resize and move the text box accordingly.
Step 5: Add design elements to the video

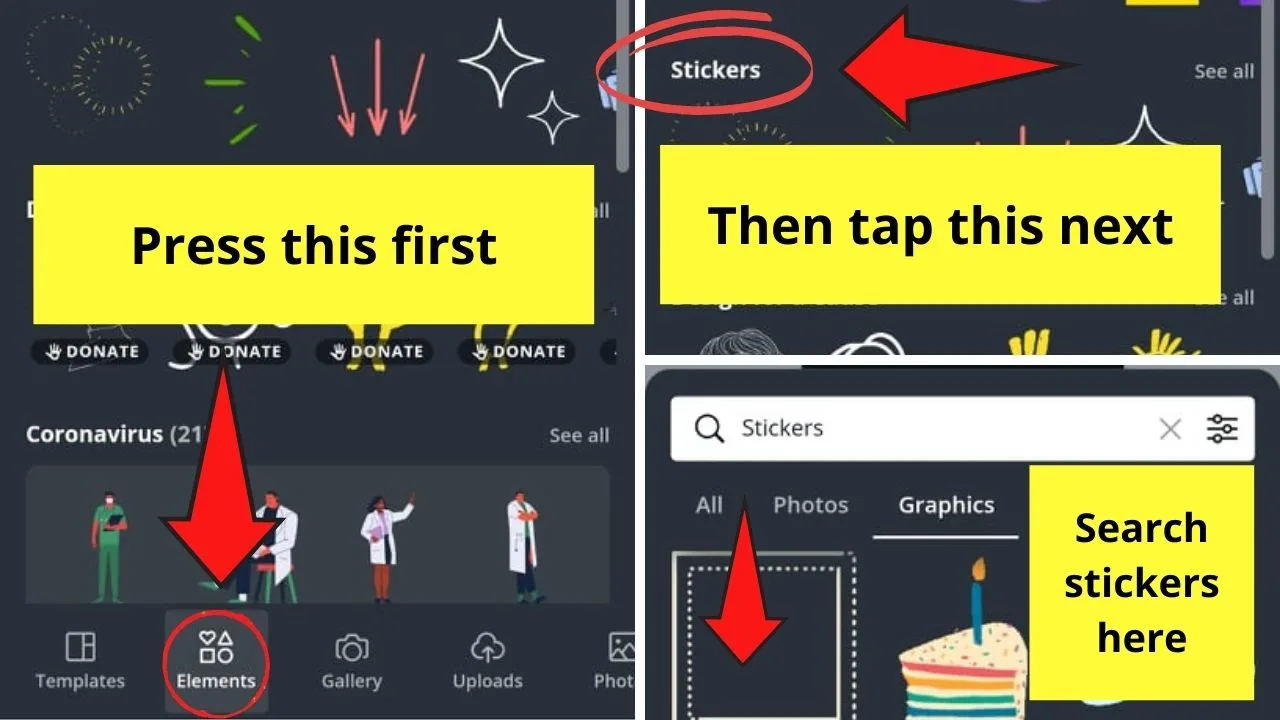
Tap on the “+” icon again, press on the “Elements” tab, and head over to the “Stickers” menu under the “Graphics” category.
Select the sticker you’d like to use for your design.
You can also add shapes or still graphics to your project, depending on what works best to achieve the end effect.
Step 6: Layer your design elements

Again, one way to do this is to tap the “Position” button. Another way is to press “Layers” to manually tap and drag the element layers when arranging them.
You can even flip the image (if you used a photo) or graphic using the “Flip” button.


Drag the elements across the canvas to where you want to place them.
Step 7: Add animations to the video


Tap on the blank canvas and press the “Animate” button on the editor toolbar.
Select from the various “Page animations” available. If you want to add additional flair, press on the text boxes you added earlier and add “Text animations” as well.


Step 8: Add background music to your video
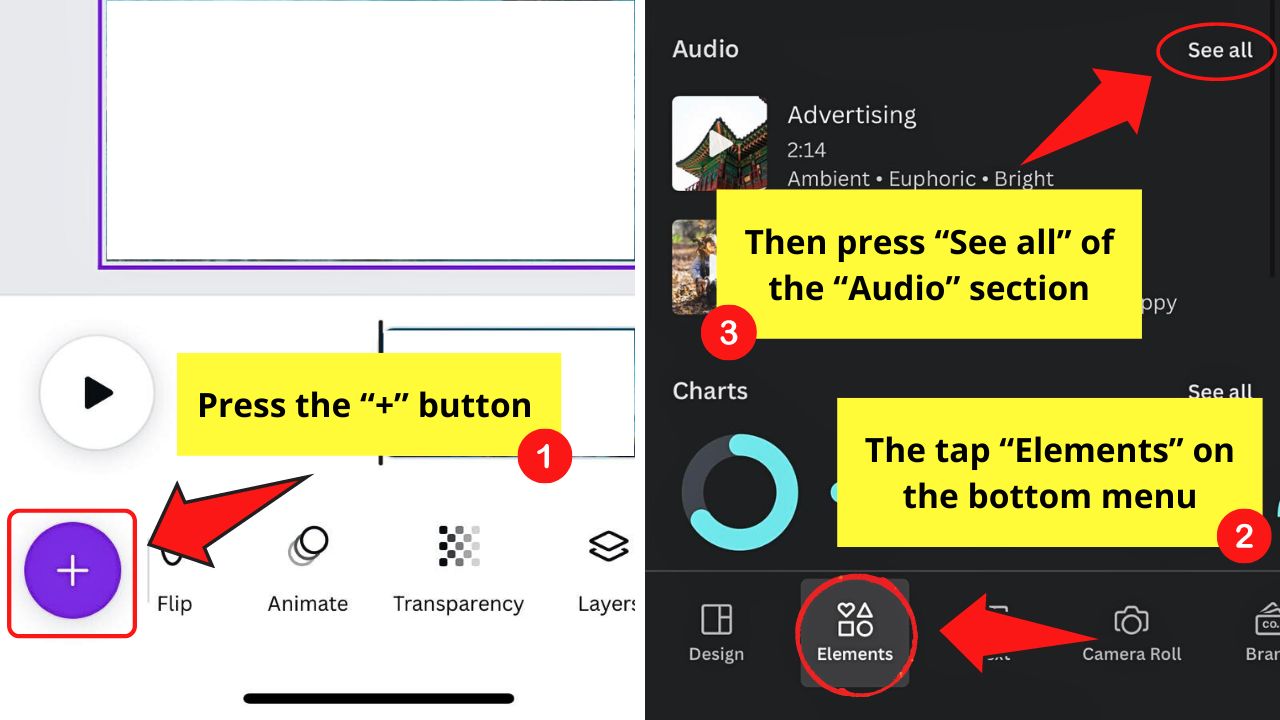
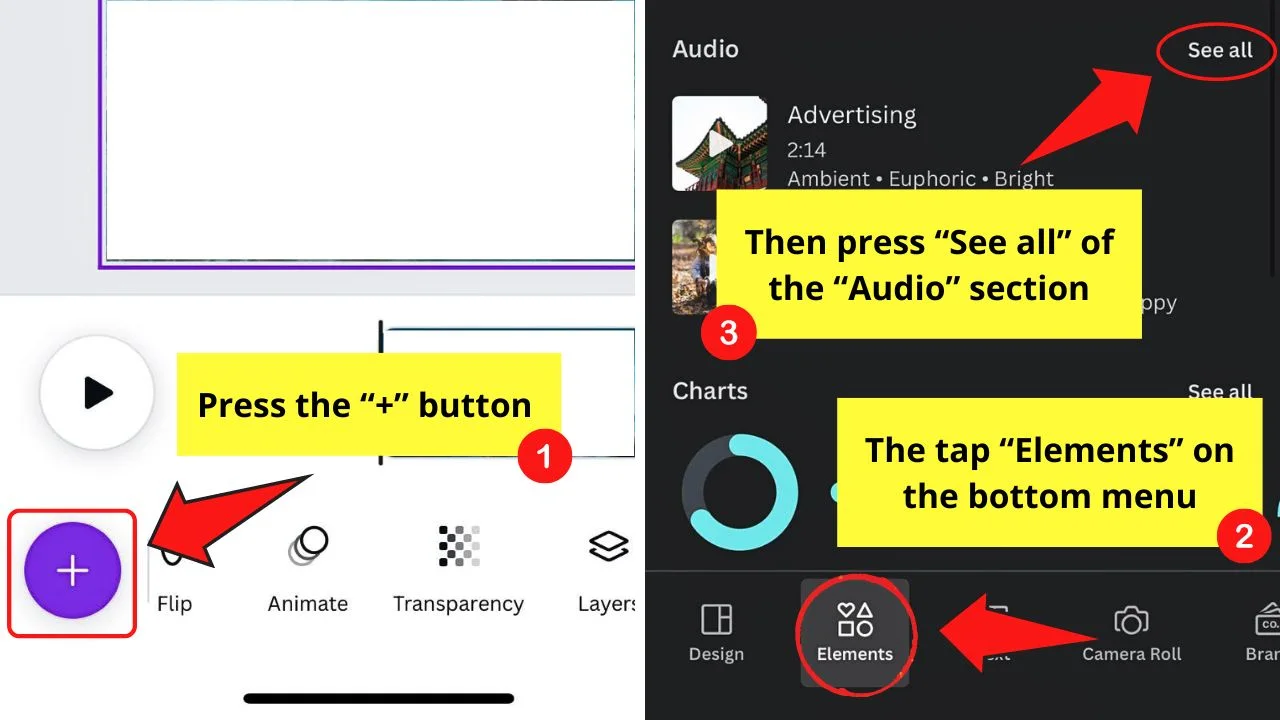
You can do this by pressing the “+” button on the lower left of the editor page. Then tap “Elements” and swipe up to reach the “Audio” section.
Choose the “See All” button beside it and tap the audio clip you want to add to the video you’re making.
Then edit the audio track you added accordingly.
Step 9: Tap the “Preview” button to watch the preview of the video


If you’re satisfied, tap on the “Download” button on the menu bar’s upper right.


Select the file type and ensure that you connect your social media accounts to avoid copyright infringement issues later on.
Tap on the “Download” button to jumpstart the import process.
Whew! That was quite a blast there!
Though the process is quite long, it’s actually a combination of all the designing elements you’ve learned so far on the Canva app.
So, just put them to good use, and you’ll be off designing like a pro in no time — even from a phone!
How to Make a Video on the Canva Mobile App with Magic Design
With recent updates, Canva added the power of artificial intelligence (AI) to further make designing easier for every user. You only have to use Canva’s newest “Magic Design” feature.
Take note that “Magic Design” is still in the beta phase. If you find your experience lacking, tell the Canva team your feedback if a feedback window appears.
Granting that you have already pressed the “Mobile Video” option on the “Home” page, proceed with these steps:
Step 1: Tap the “Media” button
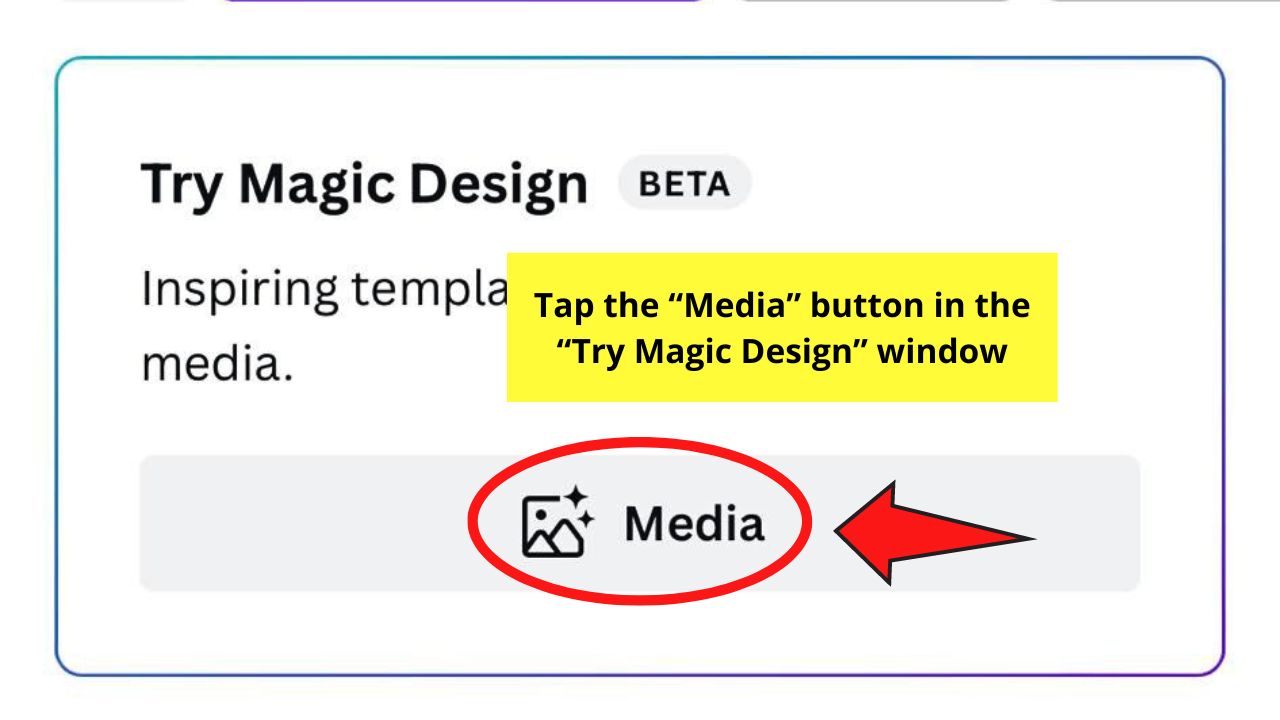

You’ll find this at the bottom of the “Try Magic Design (Beta)” window.
Step 2: Choose the image or video from your phone’s gallery

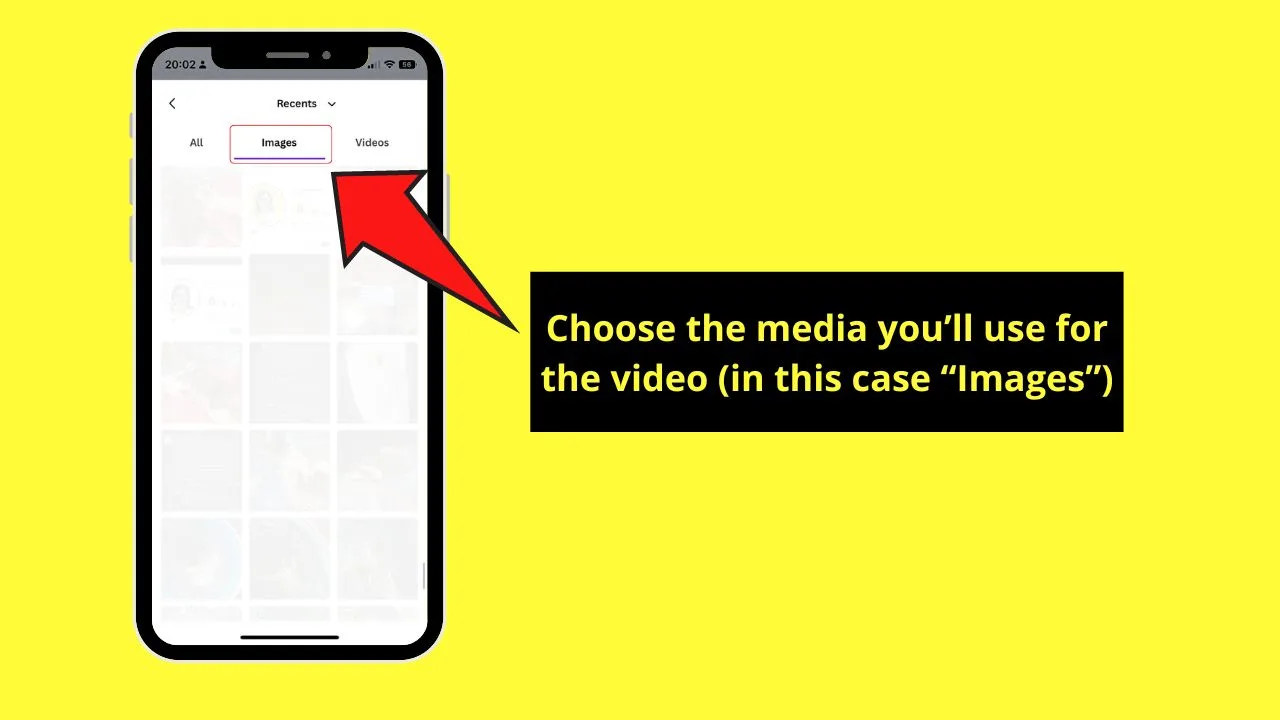
You can either find those media from the “All” page or press the “Images” or “Videos” tabs to see what you want to add.
For sample purposes, I chose “Images.”
Step 3: Press one media file from the gallery

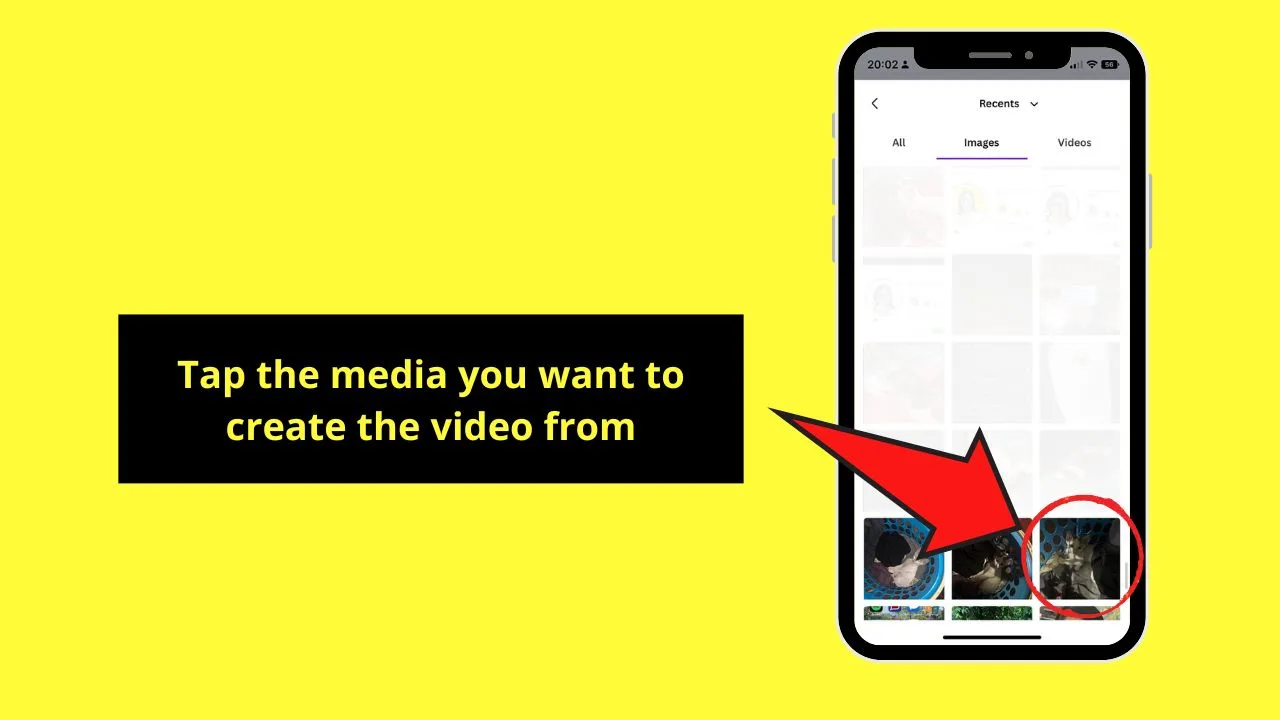
There currently is no option to add more than one image or video from the gallery for the video you create. Once you have chosen a media file, “Magic Design” automatically creates the video.
Then wait a few seconds for “Magic Design” to finish creating the video.
Step 4: Tap on a mobile video option

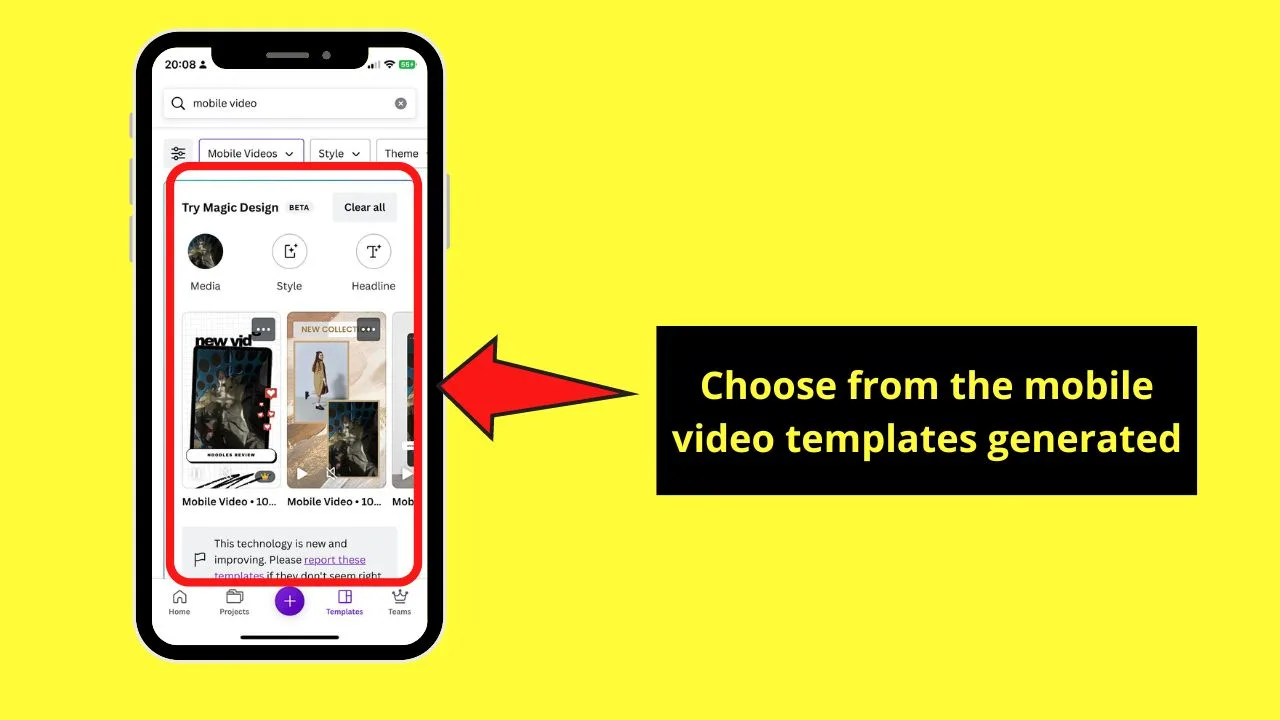
“Magic Design” then shows a gallery of mobile videos (which may vary depending on the type of video you chose earlier) you can choose from.
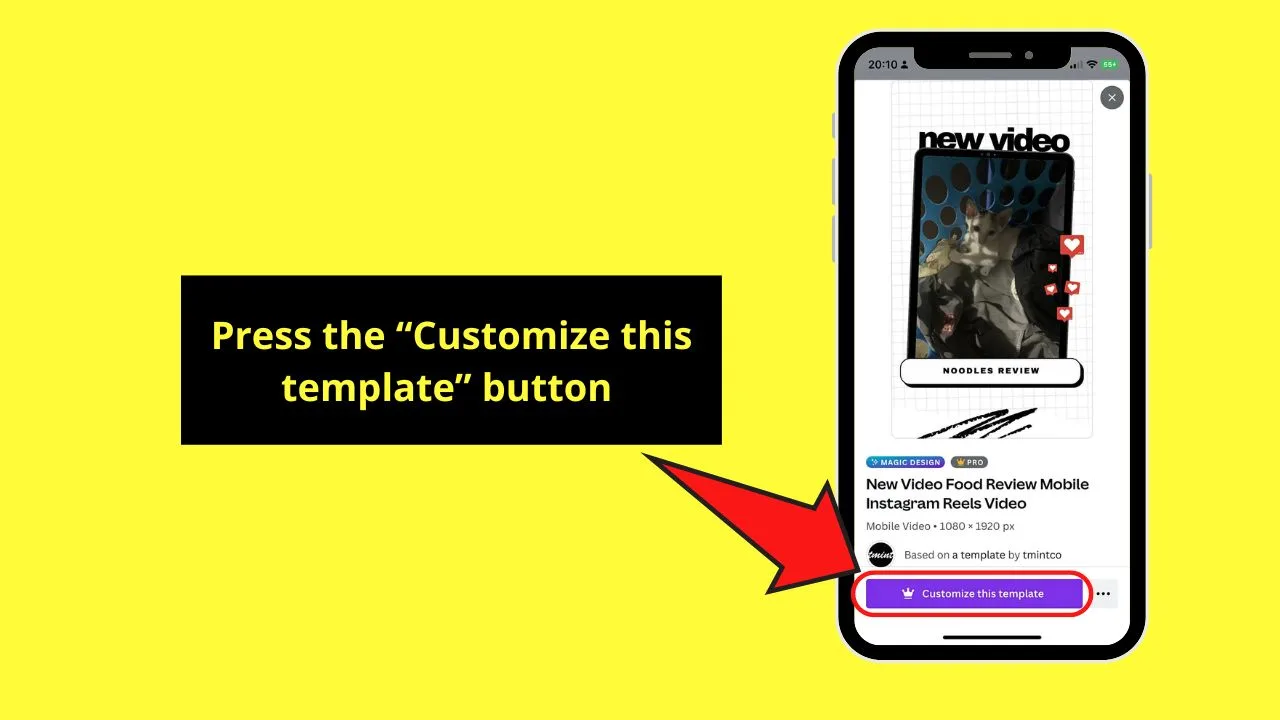
Once you have chosen a video, press “Customize this template.”

Step 5: Edit the mobile video
You’re then redirected to the editor page, where you can add graphics, text, and audio tracks to improve the video.
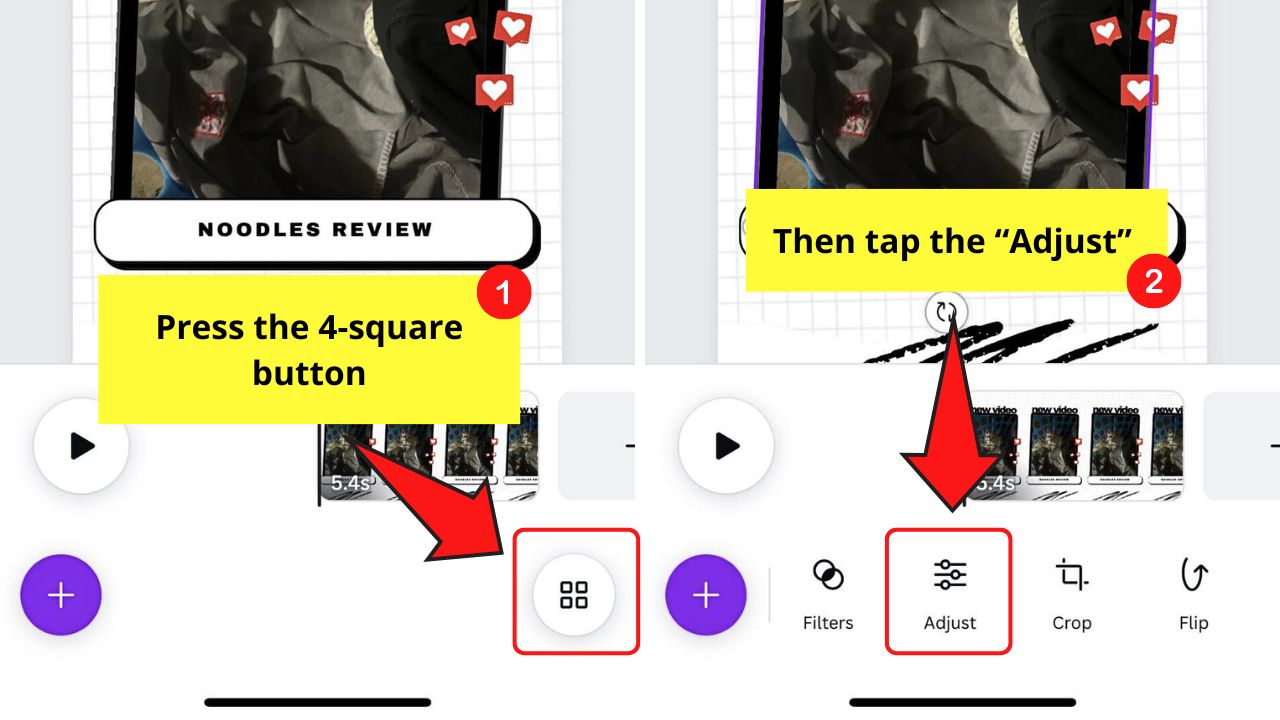
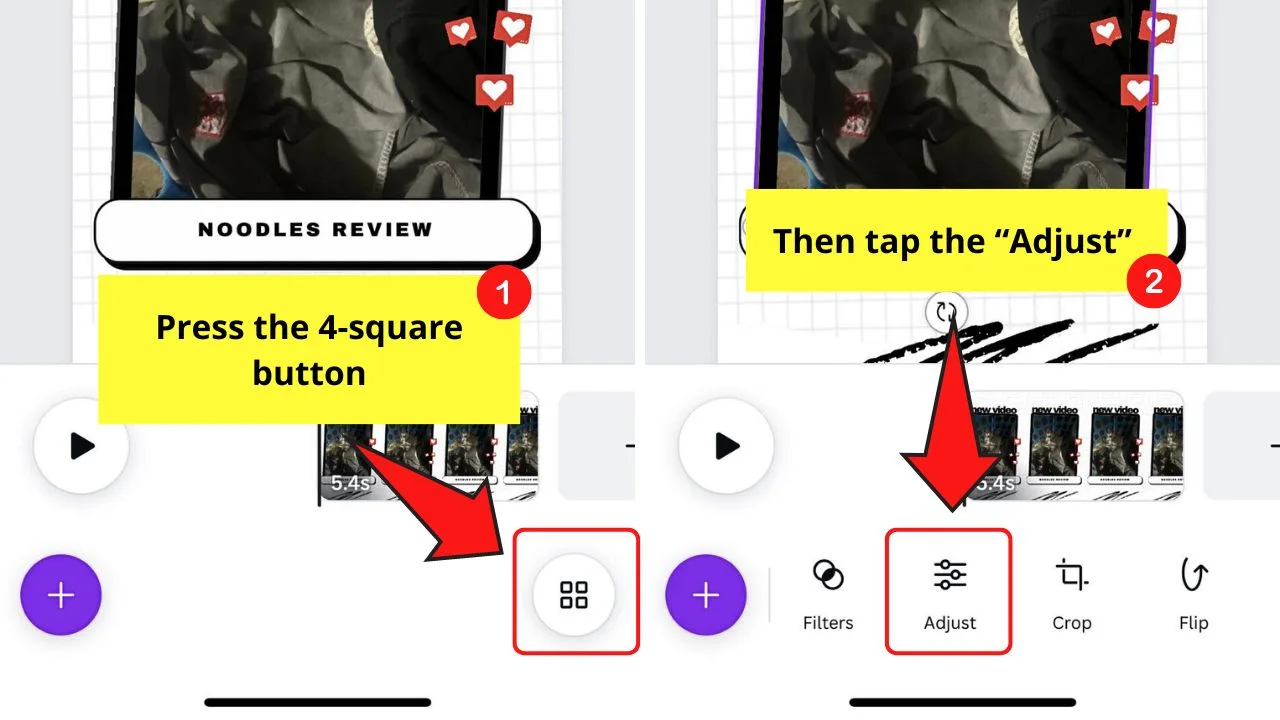
If you find the image or video too dim, tap the 4-square button and swipe to the right to tap “Adjust.”
You can then press “Auto-adjust” so Canva will do the tweaking of the light and other settings for the video.
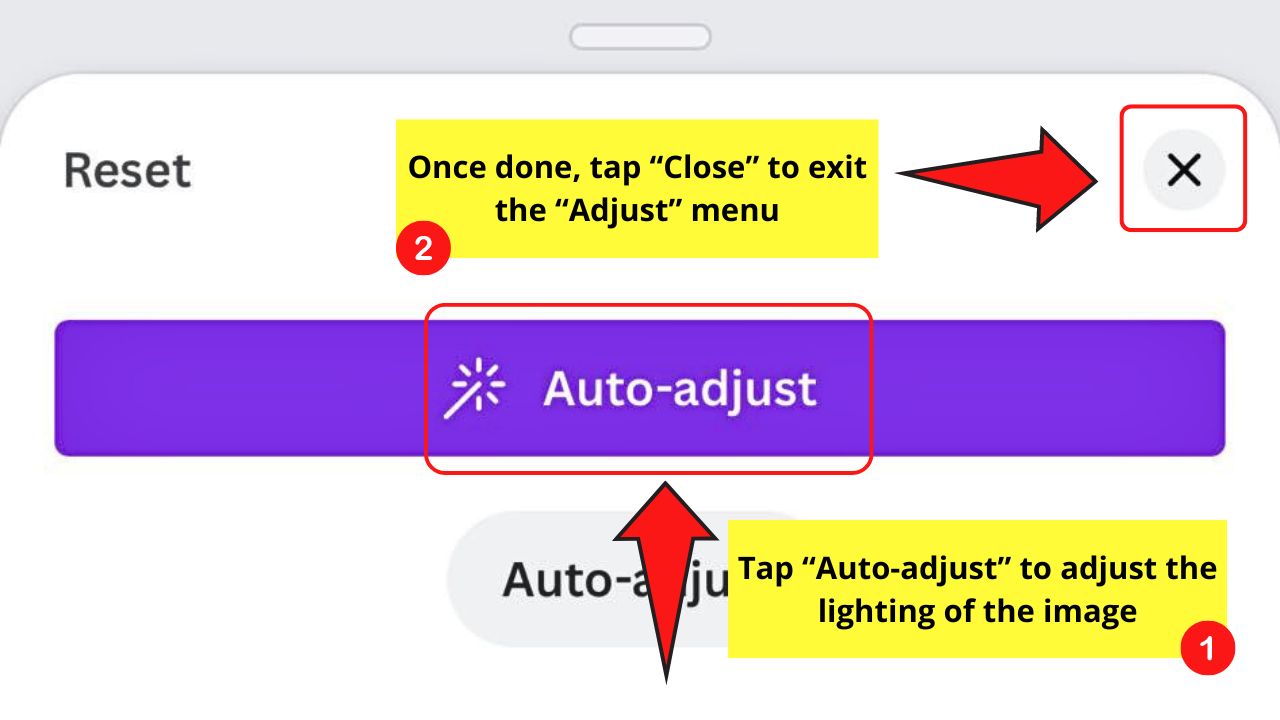

Just press “X” to close the “Adjust” pane.
Step 6: Press the “Share” button


Then tap the “Download” option to save the new video you created to your device.
Frequently Asked Questions about How to Make a Video on the Canva App
Can I add music to my video even if I’m a Canva free user?
You still can add music to your design even if you’re a Canva free user. You can choose to filter out the Pro audio on the search bar. You can still add a Pro music track but pay for it first before downloading. Just make sure to connect Canva to your social media properly to avoid copyright issues.
Can you add more than one video, element, and image on a single video slide?
It’s possible. Adding multiple design elements on a single slide will create a multi-media effect. Just select the elements you like to appear on the video slide and reposition them through dragging on the canvas.


Hey guys! It’s me, Marcel, aka Maschi. On MaschiTuts, it’s all about tutorials! No matter the topic of the article, the goal always remains the same: Providing you guys with the most in-depth and helpful tutorials!

