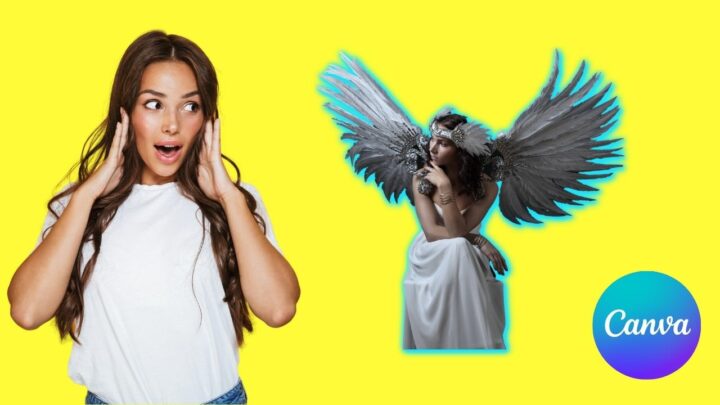
Wow! How’d you add an outline to the images on your design?
Did you need to use Photoshop or Illustrator to achieve such an effect?
Well, using Illustrator or Photoshop is a great help when creating outlines on your images.
But, if you’re a newbie simply wanting to try out this cool effect, the complex process might put you off.
However, if you’re a Canva user, you’ll be pleased to know that you can achieve a similar effect in just a few steps.
How to Create an Outline Around Your Photos in Canva
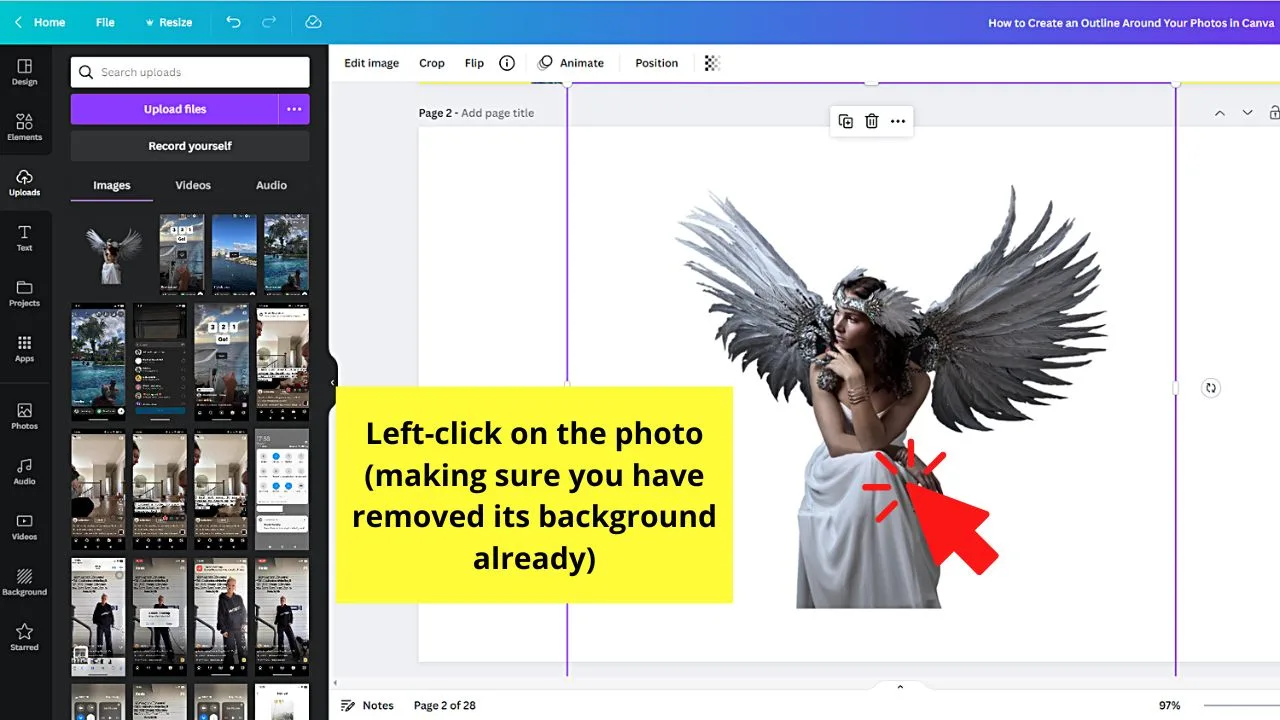
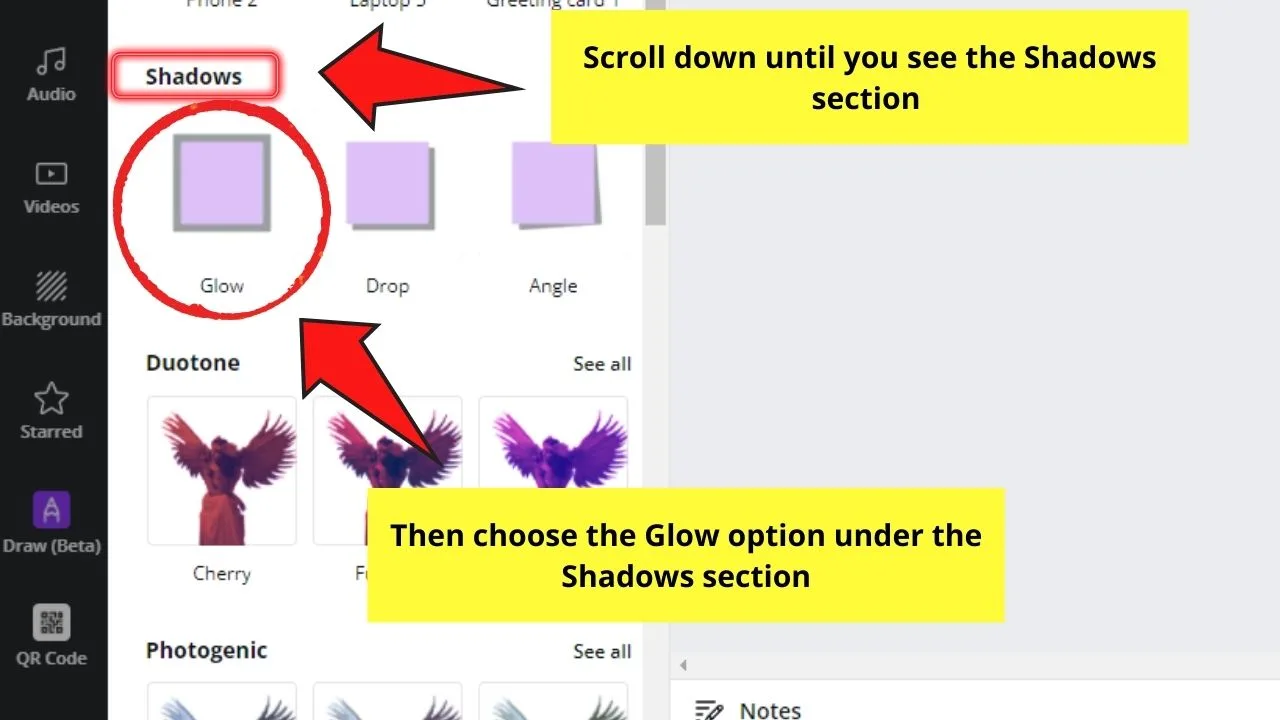
- Left-click on your photo
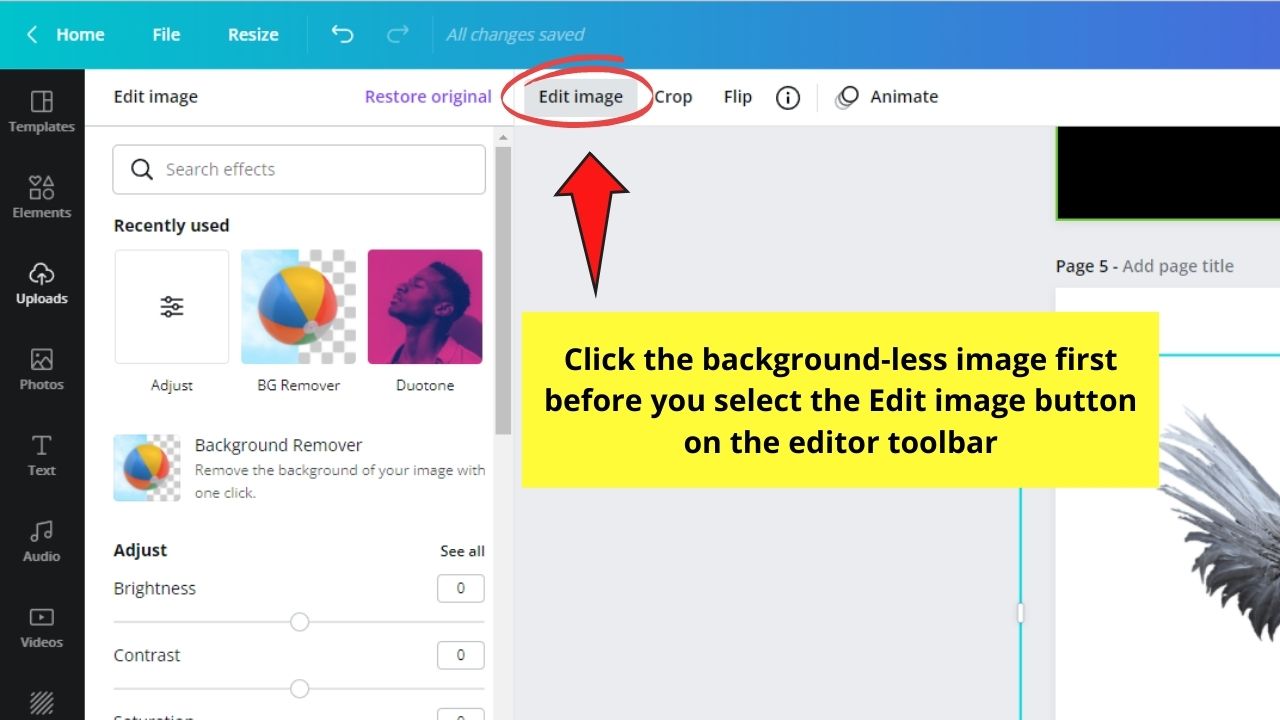
- Click on “Edit image” in the toolbar above the canvas
- Look for the “Shadows” app and then select “Glow.”
- Click on Glow again to adjust the parameters “Size” “Transparency” “Blur” and “Color”
- Once you are happy with the result, click on “Apply”
Creating outlines is really simply in Canva nowadays. Let us have a look at how to do it step by step, based on the steps as outlined above.
Step 1: Left-click on your photo

Step 2: Click on “Edit Image”

Step 3: Look for the “Shadows” app and then select “Glow.”

Allow for Canva to generate the Glow effect on your photo.
Step 4: Click on Glow again to adjust the parameters “Size” “Transparency” “Blur” and “Color”


Step 4: Set the color of your shadow (in our example we use white, but you can use whatever you want)

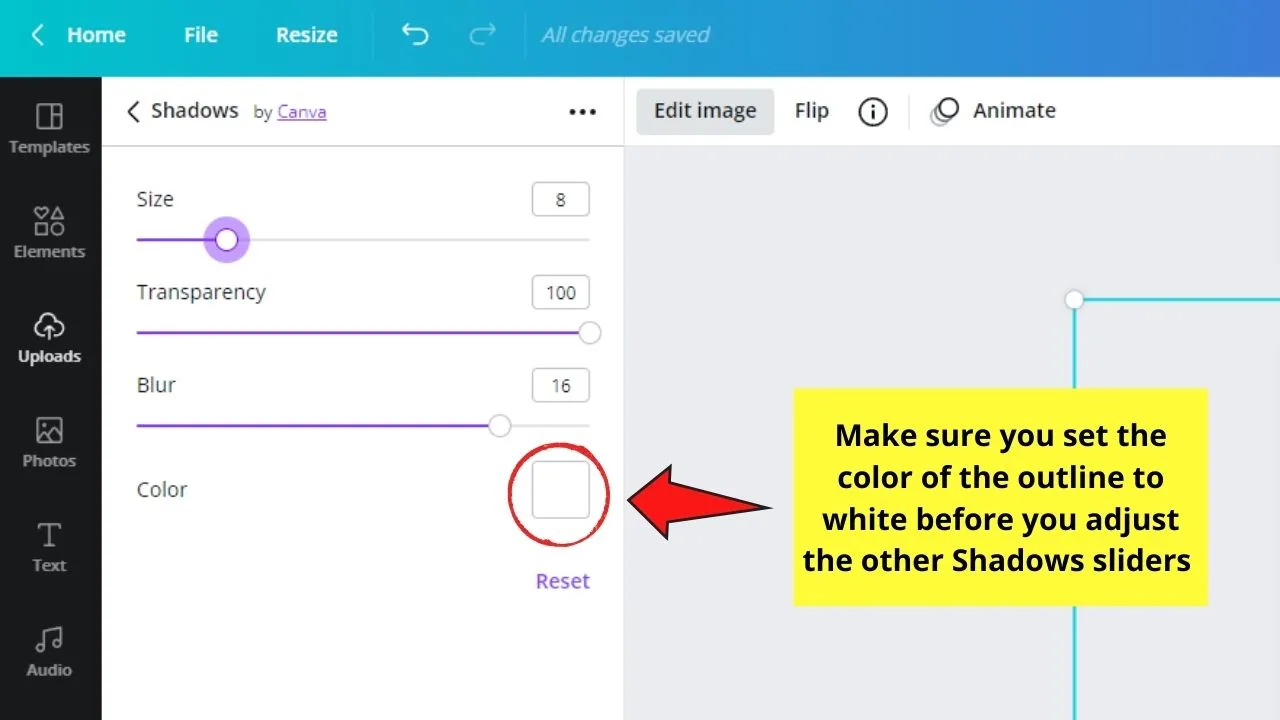
There are no set values for these parameters, but make sure that you choose the color white for the outline under the Color section.
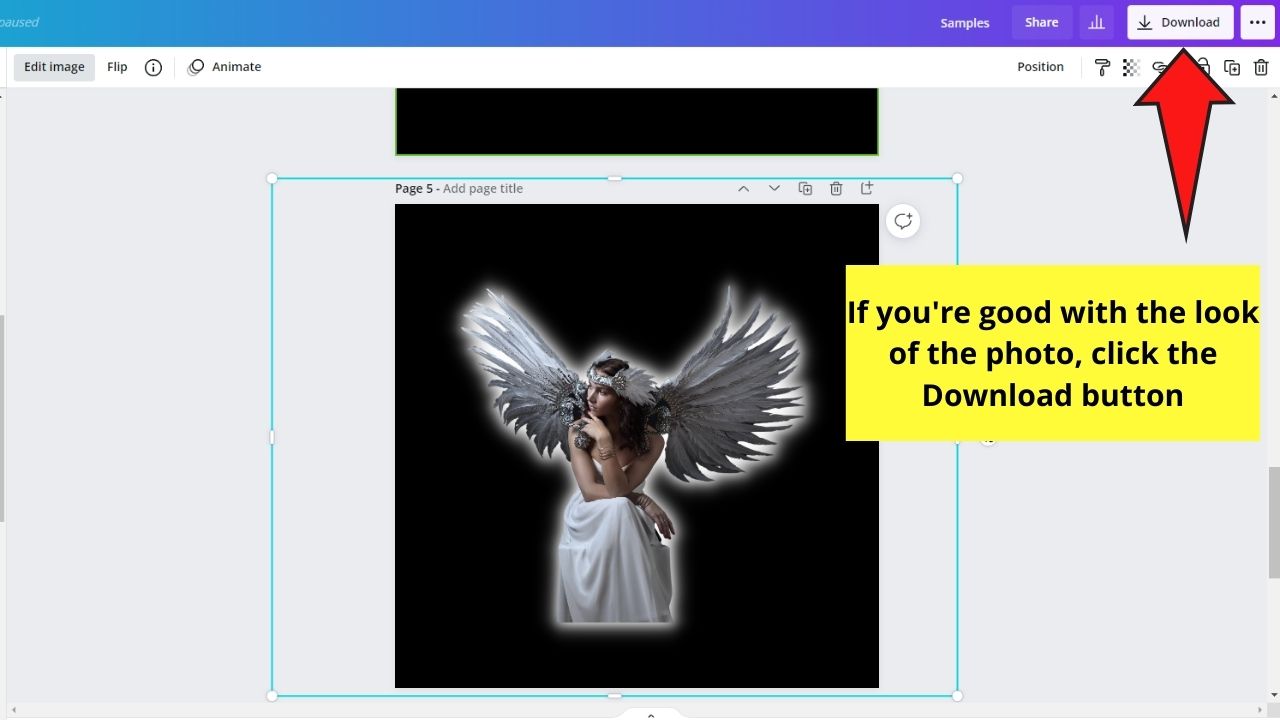
Step 5: Once you are happy with the result, click on “Apply”

Depending on the settings that you are using here, you can achieve a number of different effects.
If you would like to have a very sharp outline as you often see in Youtube Videos, make sure to set “Blur” to zero.


On the other hand, if you would like to have an outline that looks more like a shadow, you can increase the blur. In case the color you have chosen for your outline is bright, then this also pretty much looks like a glowing effect.
The “Size” and the “Transparency” parameters are pretty self-explanatory.
If you would like to have a thicker outline, simply increase the “Size.”
If you want to reduce the outline effect a bit, you might want to reduce the “Transparency” a tiny bit to achieve the desired effect.
Adding a Simple Outline to your Photo in Canva using Canva’s Duotone App
Step 1: Open a new design file by clicking the Create a Design button on Canva’s home page. Then, select Custom Dimensions and encode the document size.
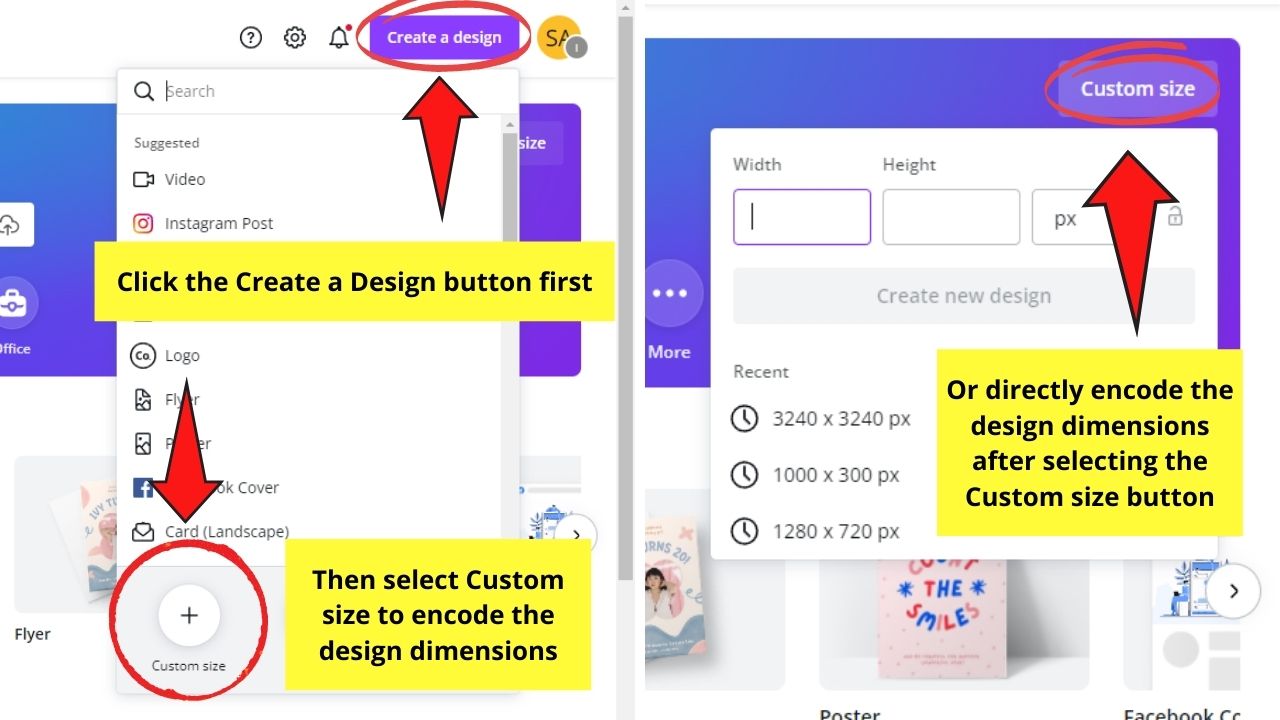
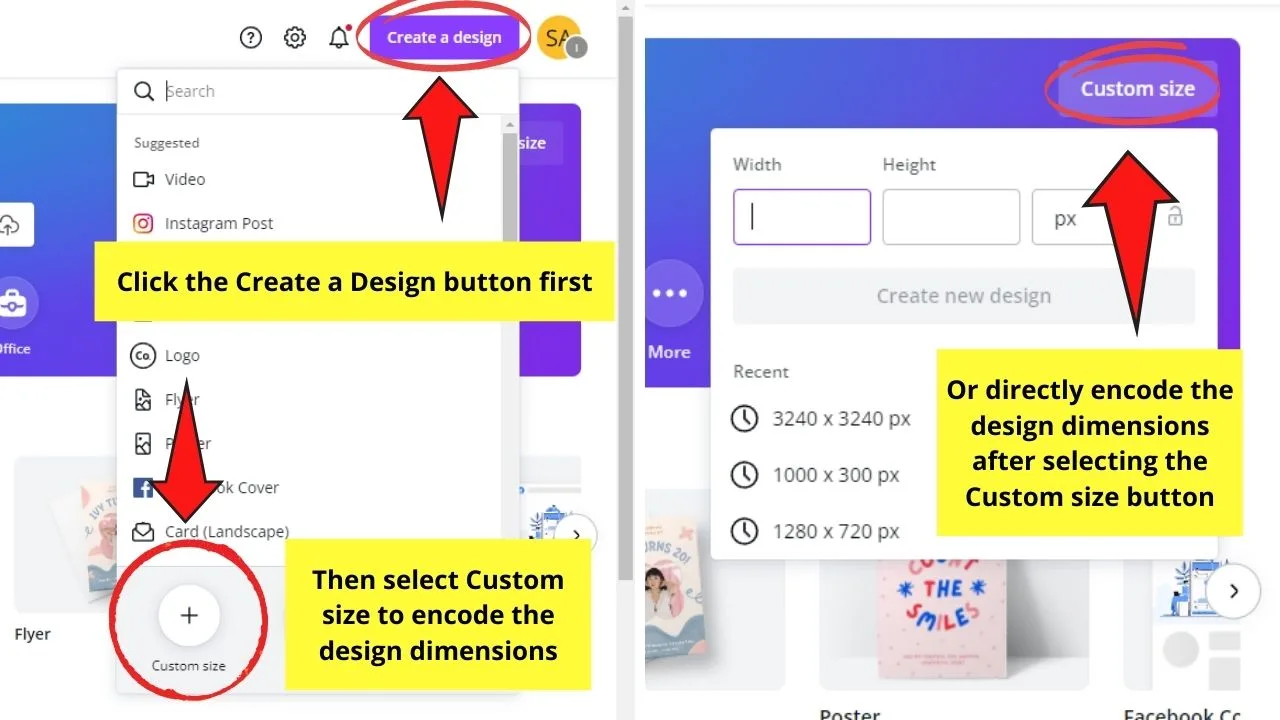
Or, you can head to the Custom Dimensions button and encode the size of the document you’re creating.
Step 2: Once you’re on the editor page, begin designing by adding an image to the canvas.
If you have a photo you’d like to use from your device, head to the Uploads tab on the left side panel and import the image.

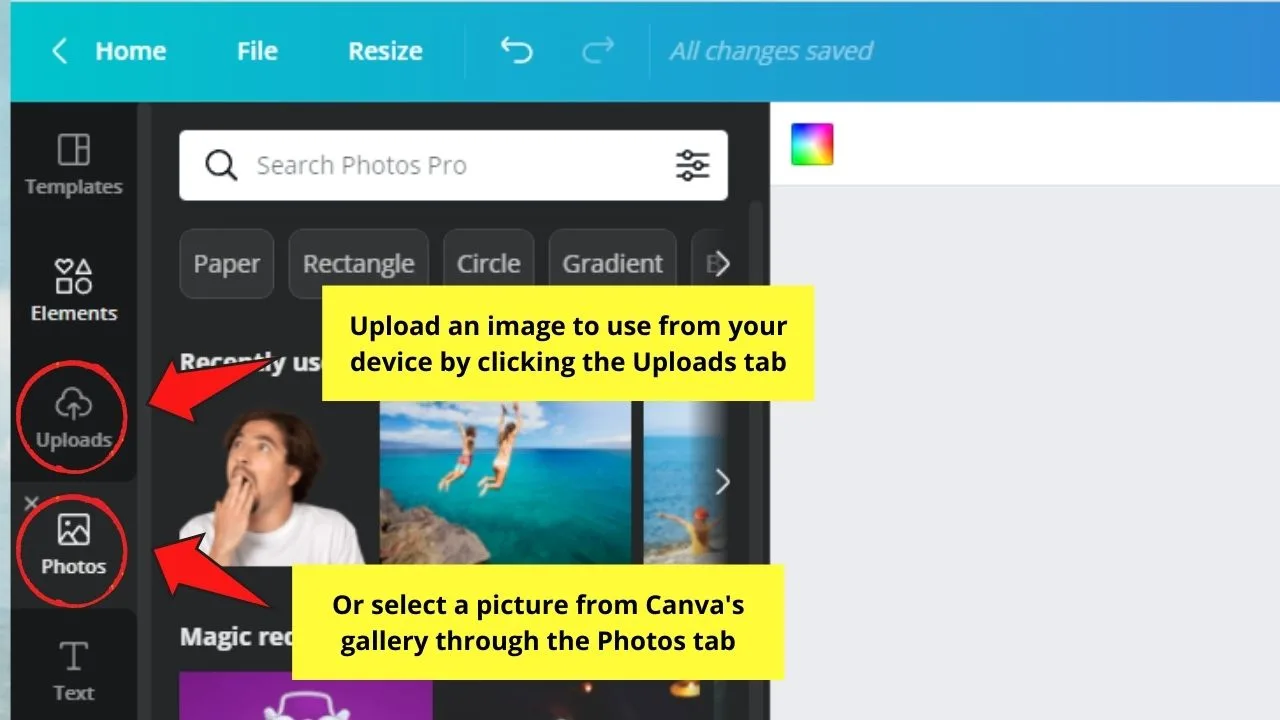
But, if you prefer using stock photos, head to the Photos tab on the same left side panel and use the search bar function to find the picture you want to use.
Click and drag that image to the canvas.
Step 3: After adding a picture to the canvas, resize it accordingly before you select it and head to the Edit image tab on the editor toolbar.
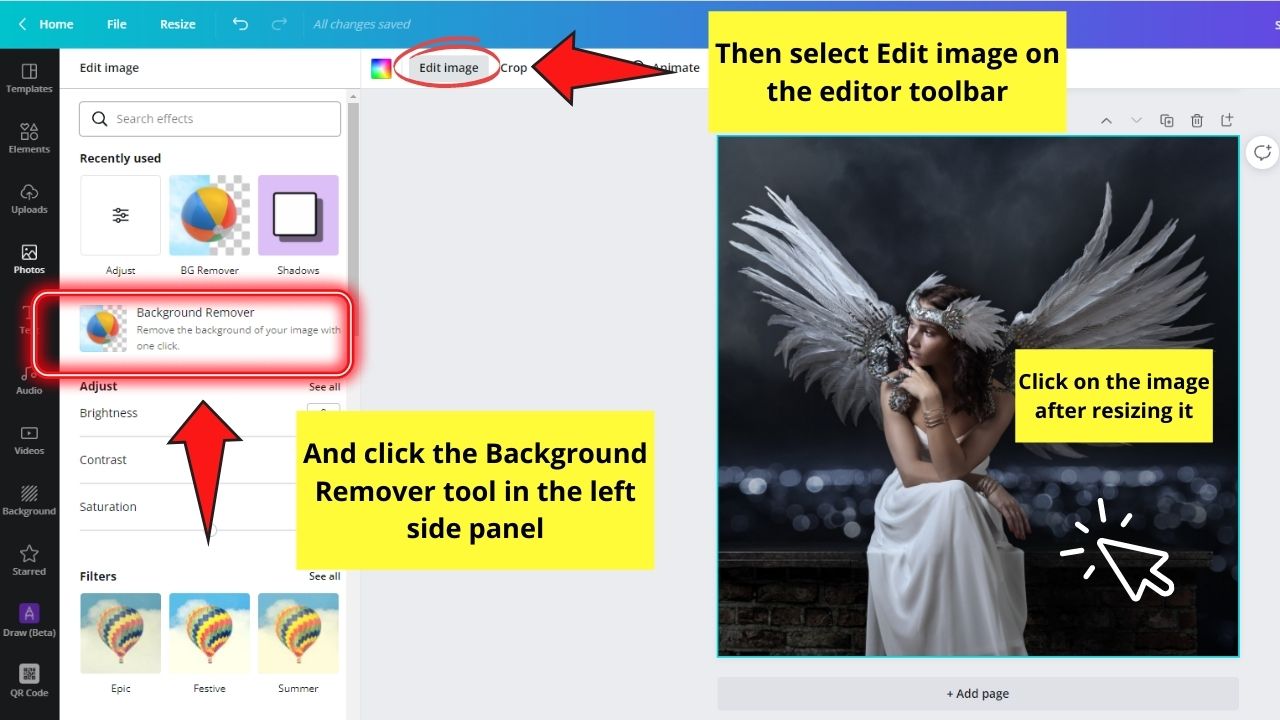

From the left panel that appears, select the Background Remover tool. But, you need to be on Canva Pro for you to enjoy this nifty feature.
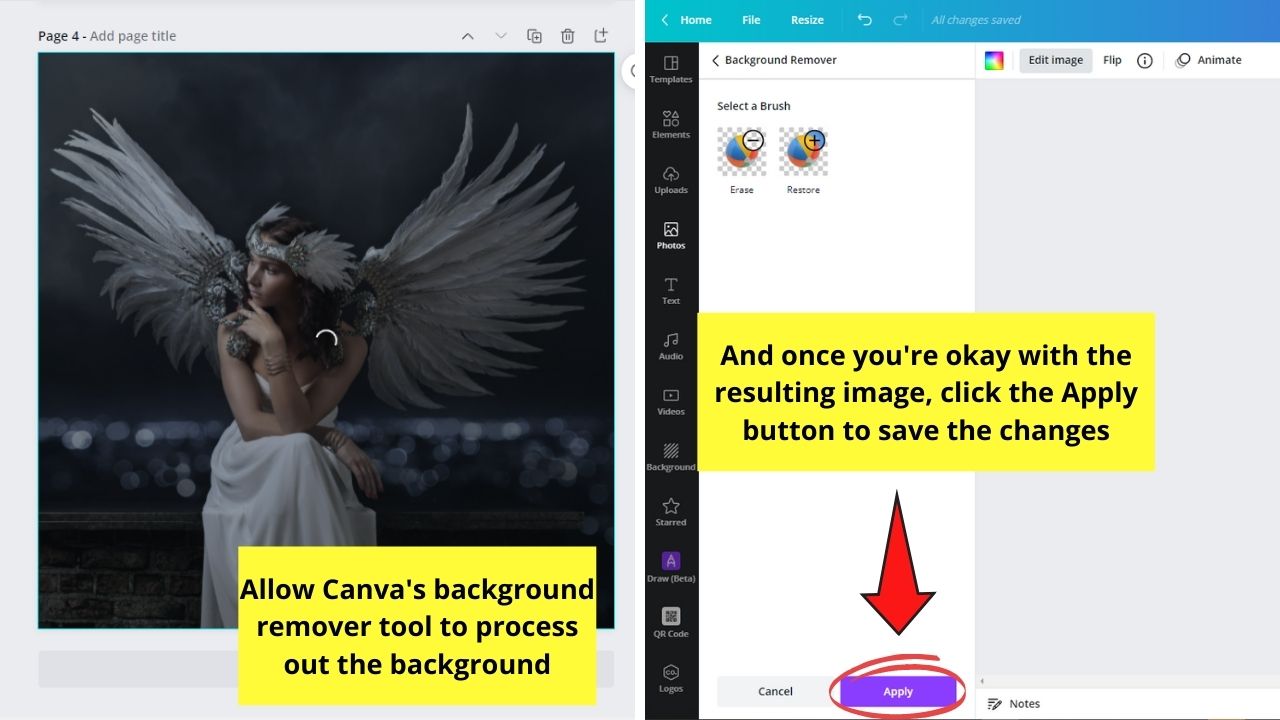
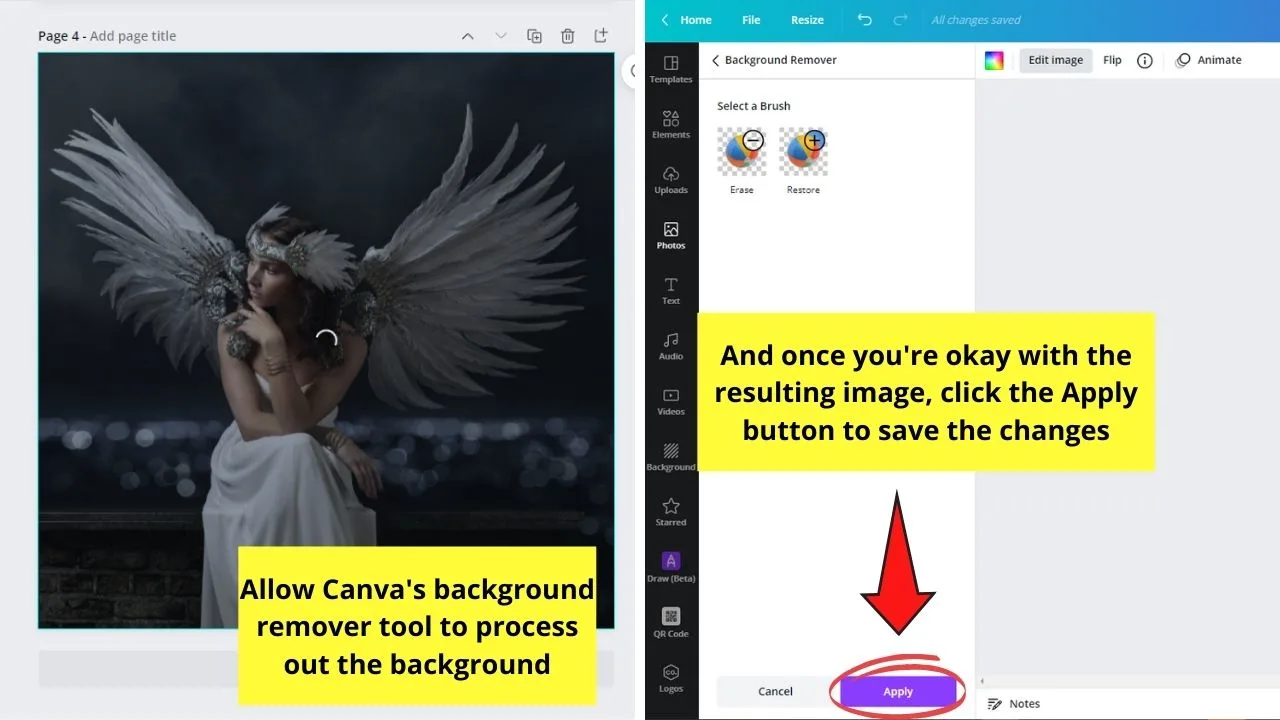
After clicking the Background Remover, give Canva a few moments to process out the background.
Once Canva successfully removes the background of a picture, review if the tool managed to erase everything in the background.
Select Apply changes if you’re satisfied with how the image looks.
If, however, you’re on Canva free, you can download the image you want to use from Canva first and upload it to remove.bg for the tool to remove the background.
After the tool’s done with removing the photo’s background, download it and reupload the background-less image to Canva through the Uploads tab.
Step 4: Once you successfully removed the background of the picture, duplicate it.
First, you’ll need to select the image and click on the Duplicate button on the editor toolbar.


Or, if you prefer using a useful Canva keyboard shortcut, press Alt while you click and drag the photo.
Then, place the newly duplicated photo to the side of the original image. Then, make the photo slightly bigger than the original one by dragging the white circles surrounding it.


Step 5: After resizing the 2nd photo, click it and select the Edit image button on the editor toolbar.

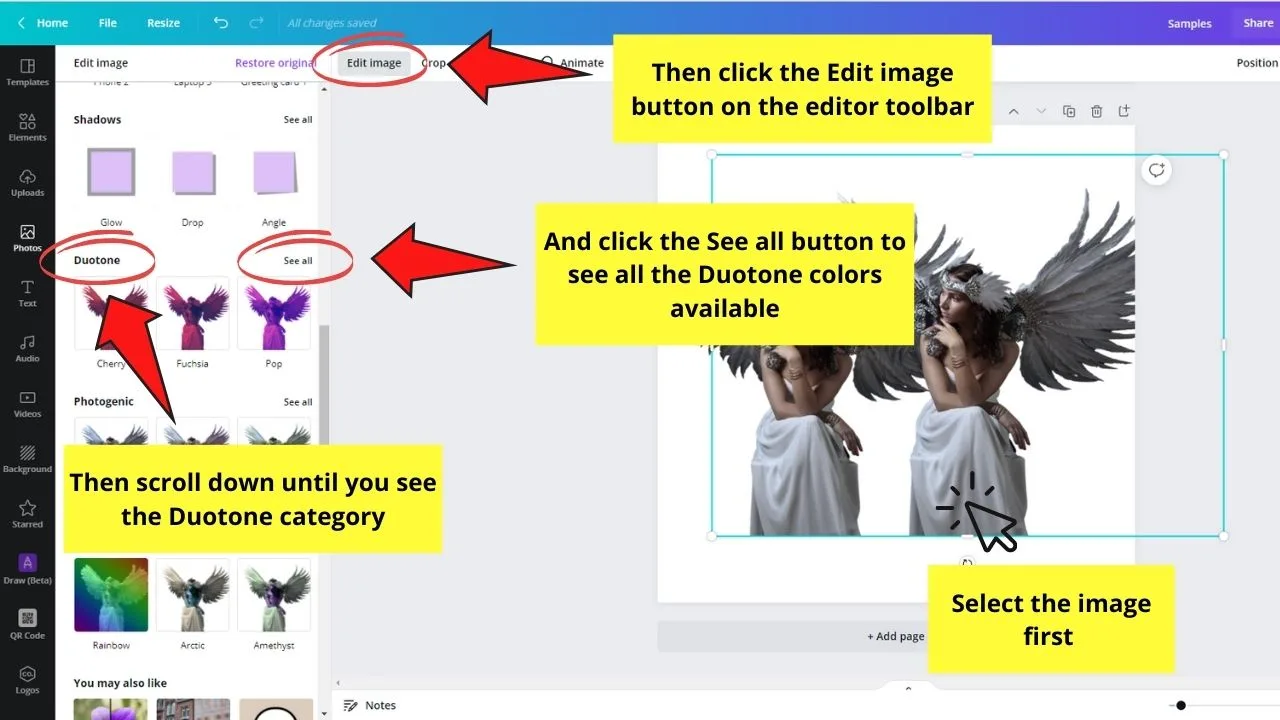
Then, on the left panel that appears, go to the Duotone section and choose the Duotone color you’d like to use.
Click the See All button to see all the choices available.
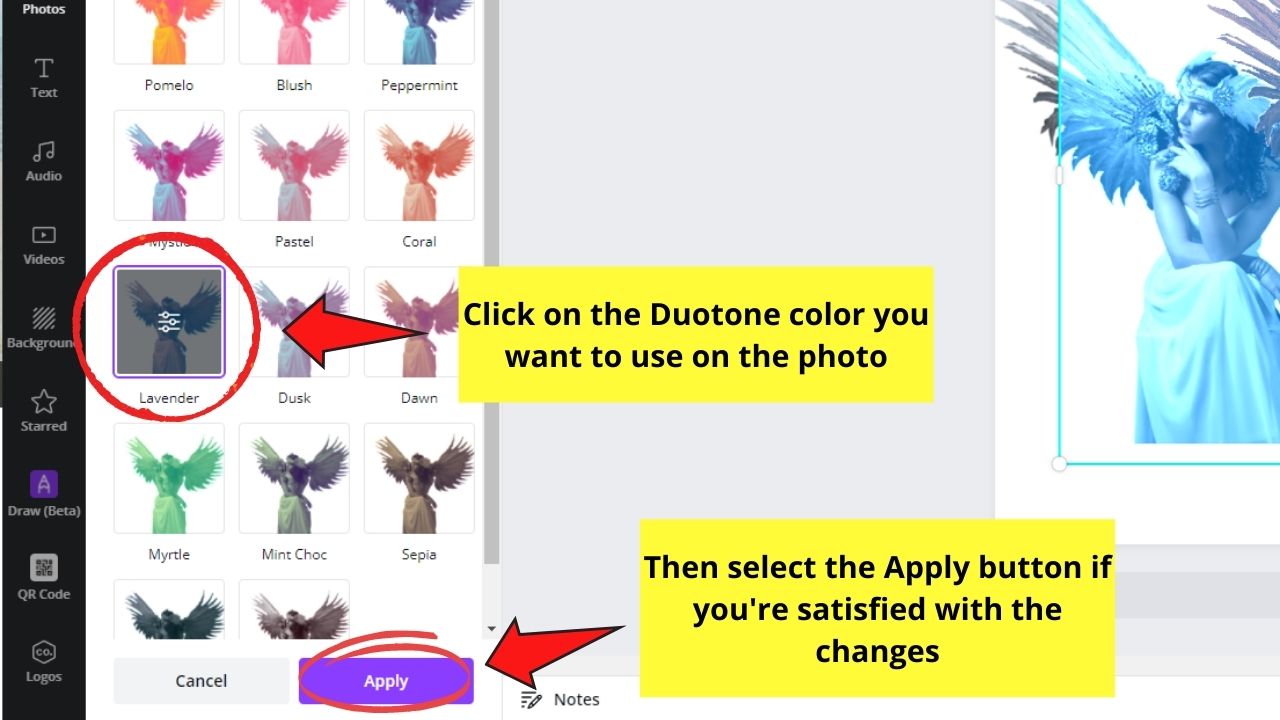
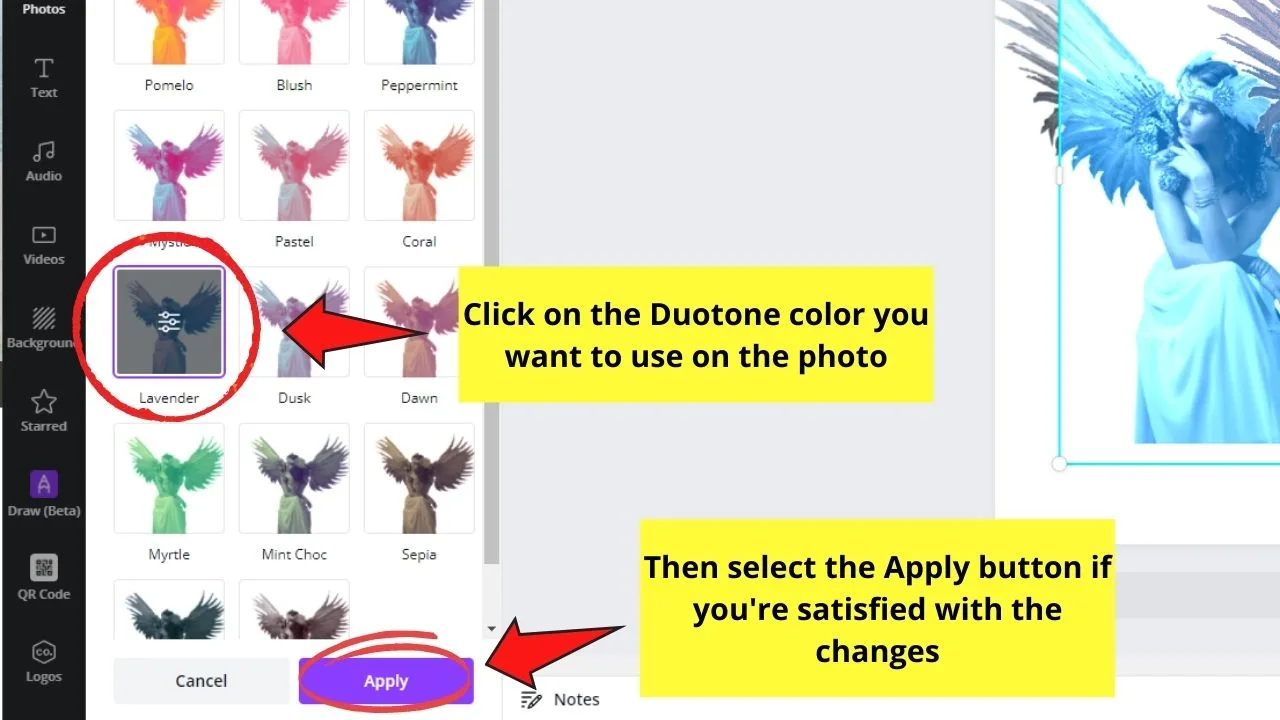
Click on the Duotone color you’d like to apply to the image. Choose the Apply button if you’re okay with the color you selected.
Step 6: Place the Duotoned image on top of the original image and align them accordingly.

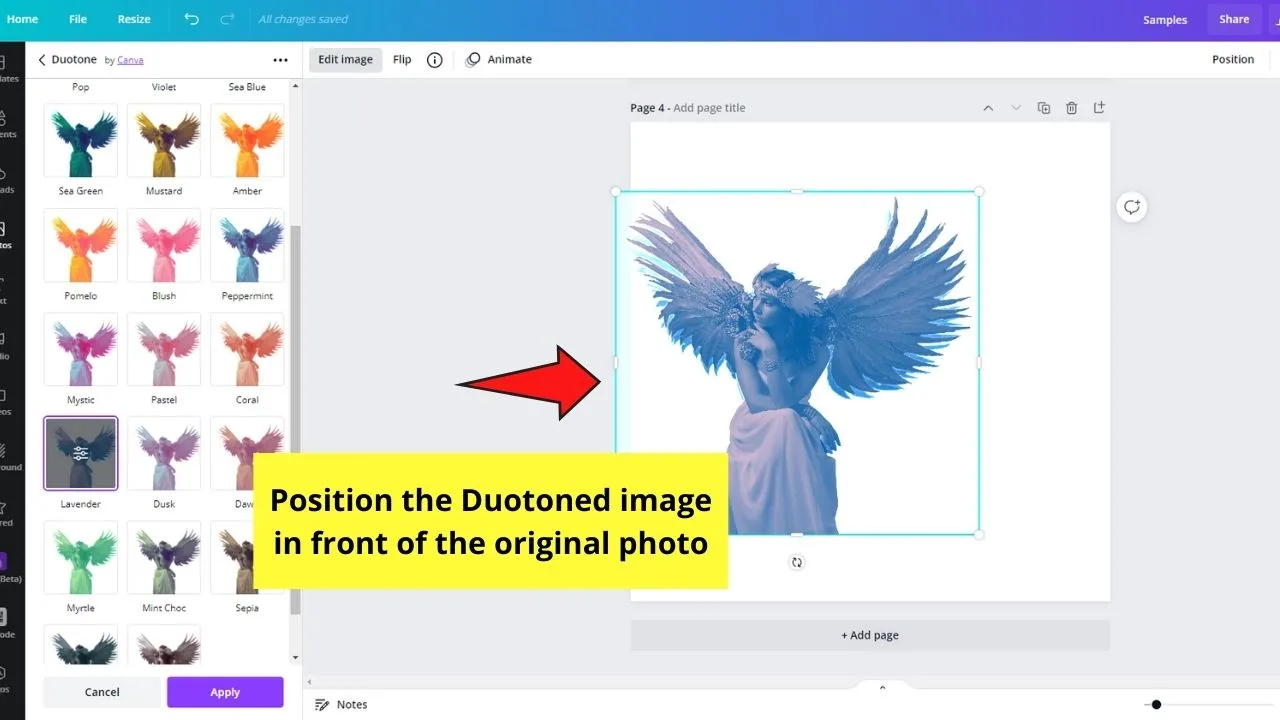
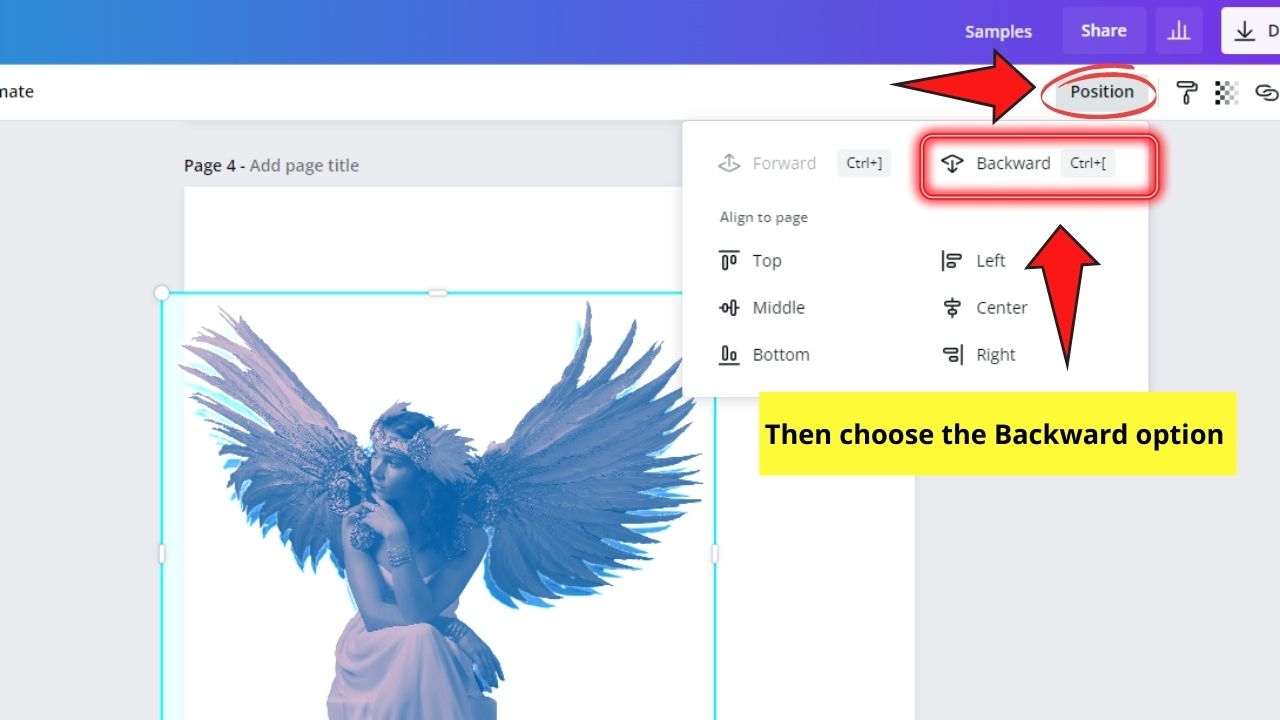
After which, click the photo, head to the Position button, and select the Backward option to send the Duotoned photo to the back of the original one.

Step 7: If you find that you don’t like the positioning of the outline you created, press Shift/Command + Tab on the keyboard to shift between the elements.
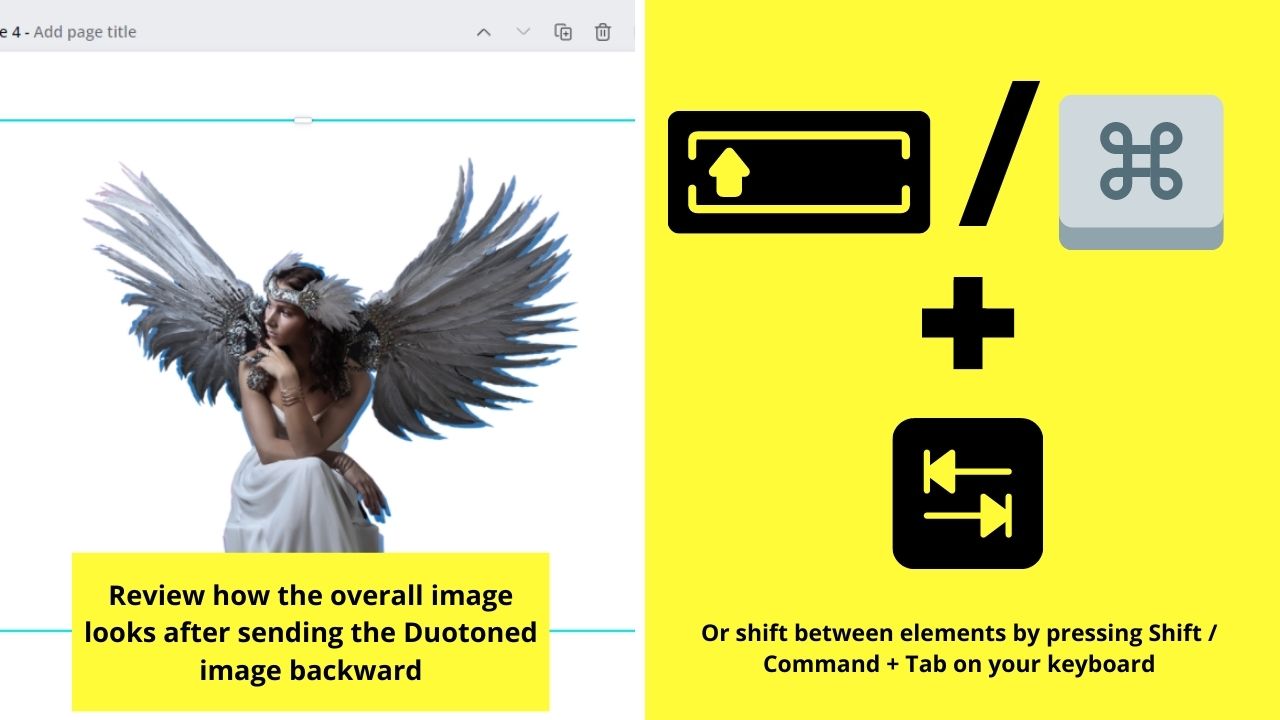

Then, make the adjustments you deem is applicable accordingly.
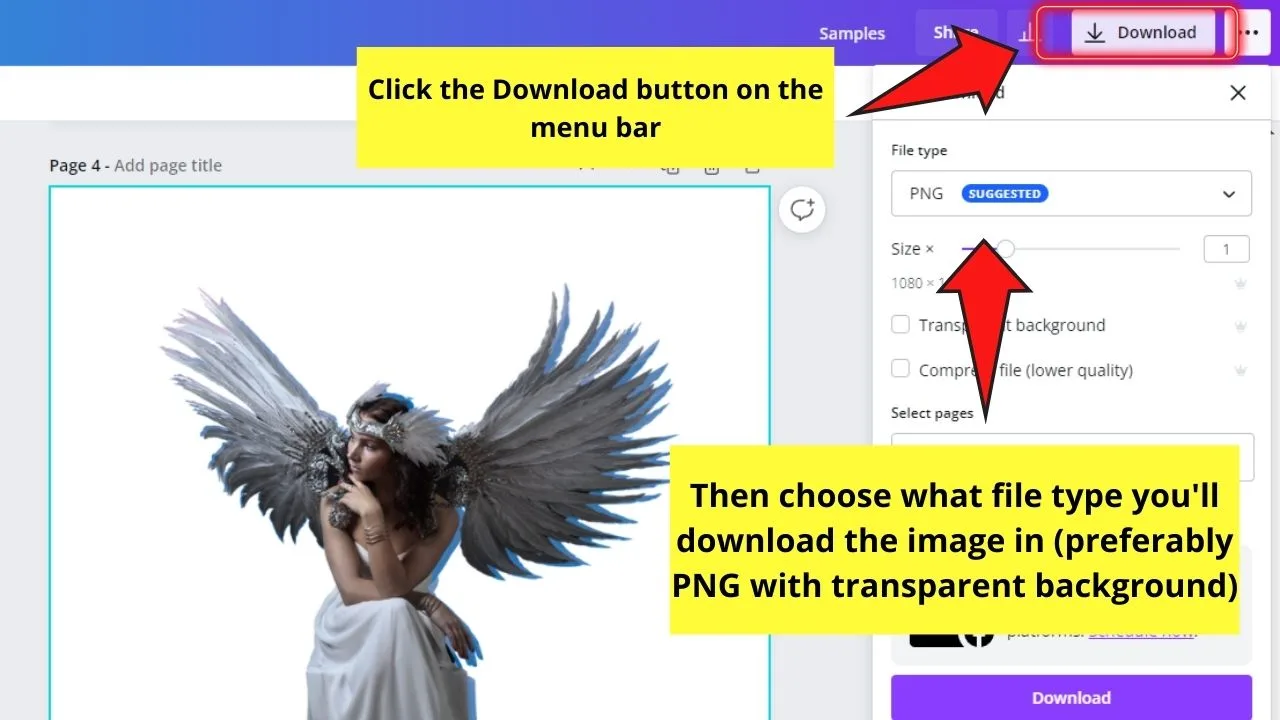
Step 8: If you’re okay with how the outlined image looks, then click the Download button and follow the steps to export your design accordingly.

But, what if I want the outline to have a glowing effect on it? Can I still achieve the said effect within Canva?
Well, you don’t have to leave Canva for you to create this incredible glowing outline on your Canva photos.
How to Add a Glowing Outline to your Photo in Canva
Step 1: After you’ve positioned the Duotoned image behind the original one, select it before heading to the Edit image button on the editor toolbar.

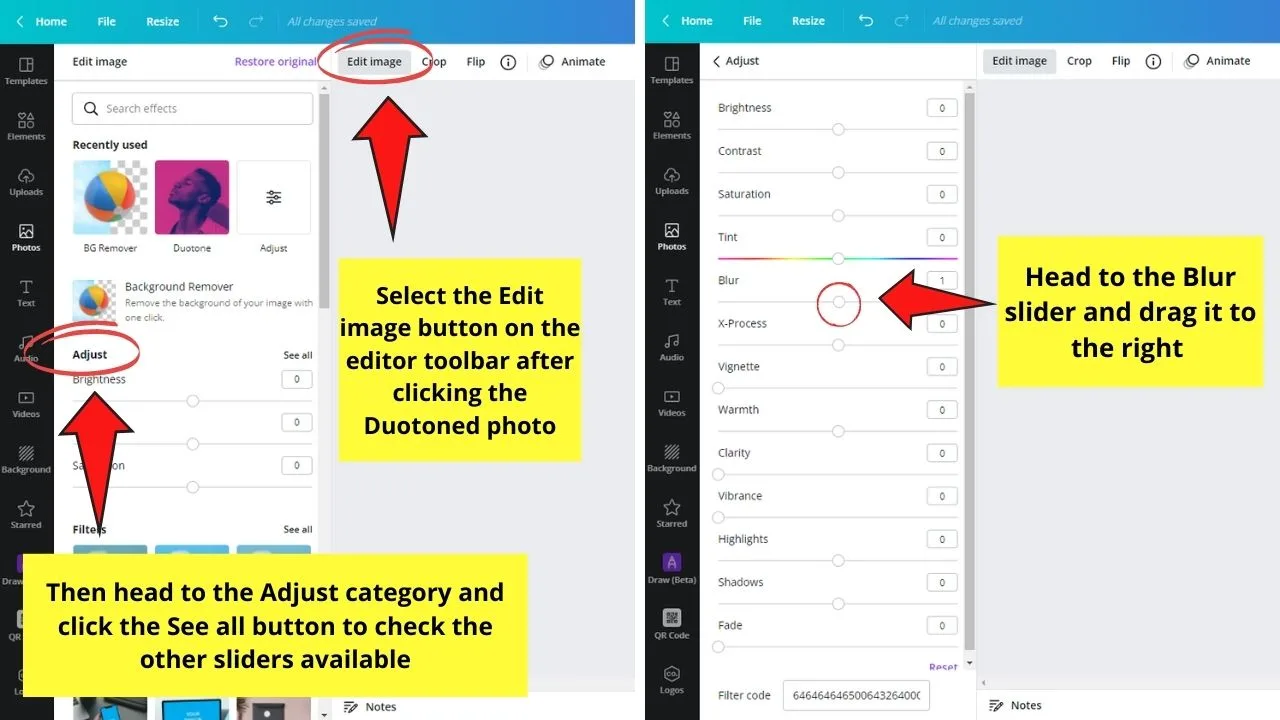
Step 2: On the left side panel that appears, you’ll notice several sliders. Head to the Blur slider and drag the circle to the right to make the Duotoned photo hazier.
Keep dragging the slider until you achieve the look of your photo. Click anywhere on the canvas to exit the Adjust gallery.
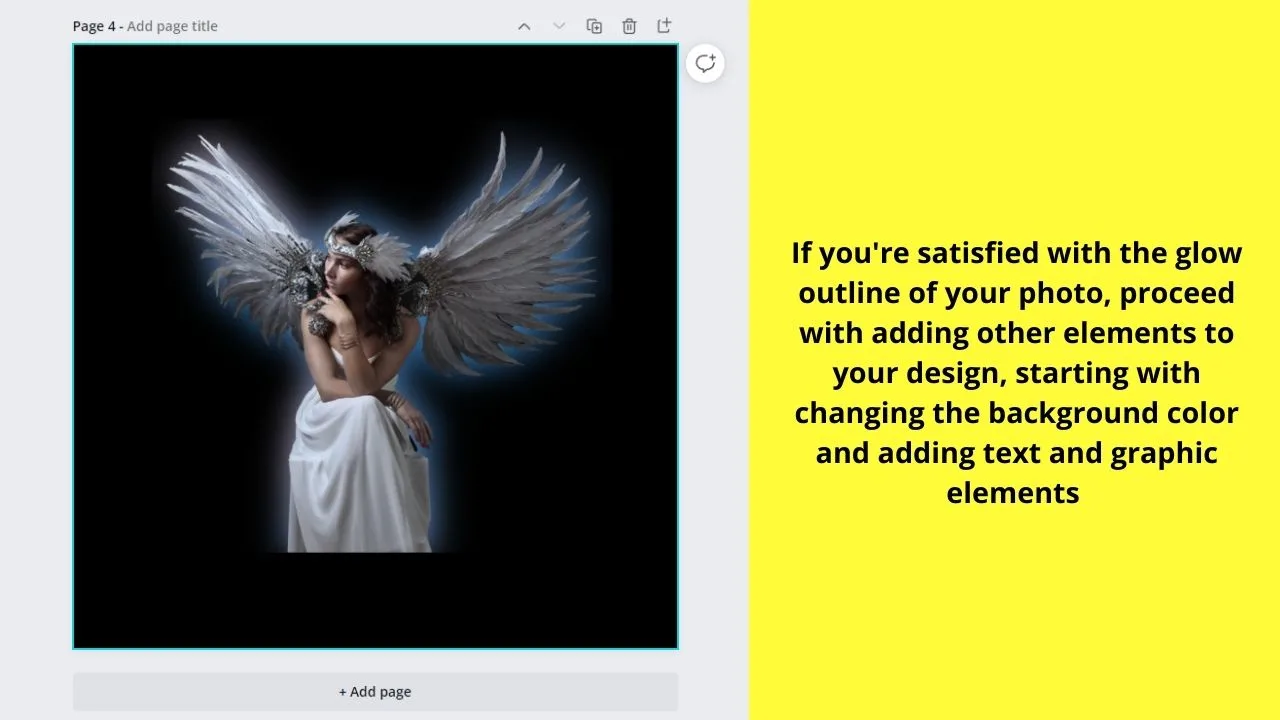
Step 3: If you’re satisfied with how the glowing outline looks, change the background of the canvas and add text and other graphic elements as needed.

Then, select the Download button and follow the next steps in exporting your design to your device.
While the steps to creating a glowing outline in Canva are pretty much straightforward, you can further simplify them by using a third-party app.
3. Creating a Glowing Outline for your Photos with Fontmeme
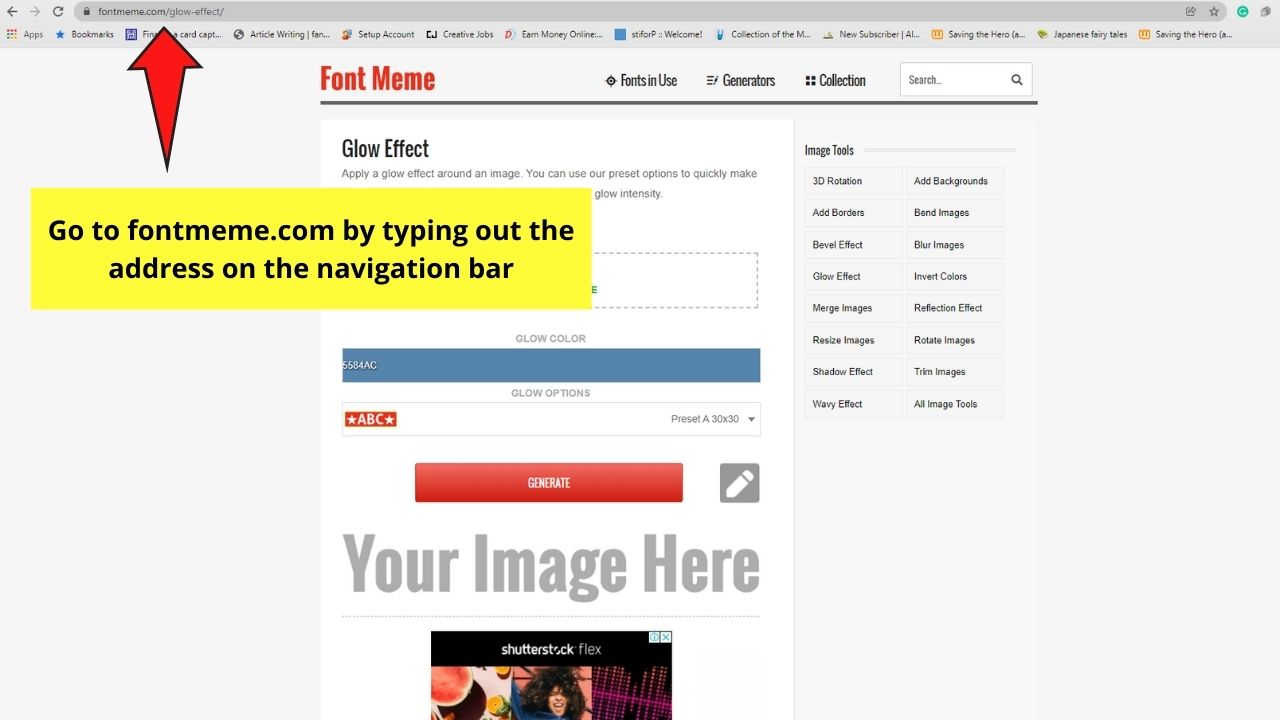
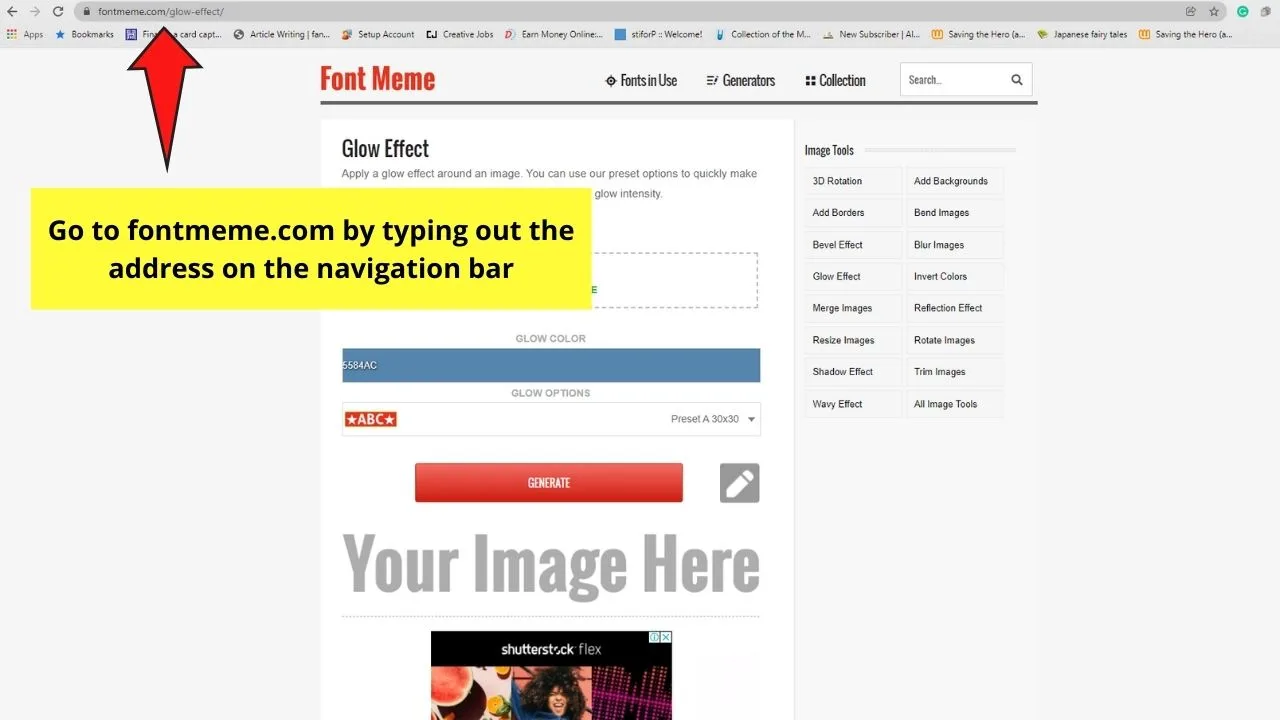
Step 1: On the web browser you’re using, type fontmeme.com/glow-effect on the navigation bar. This will direct you to the Glow Effect section of the said tool.
Step 2: Download the photo you removed the background from Canva by clicking the Download button.
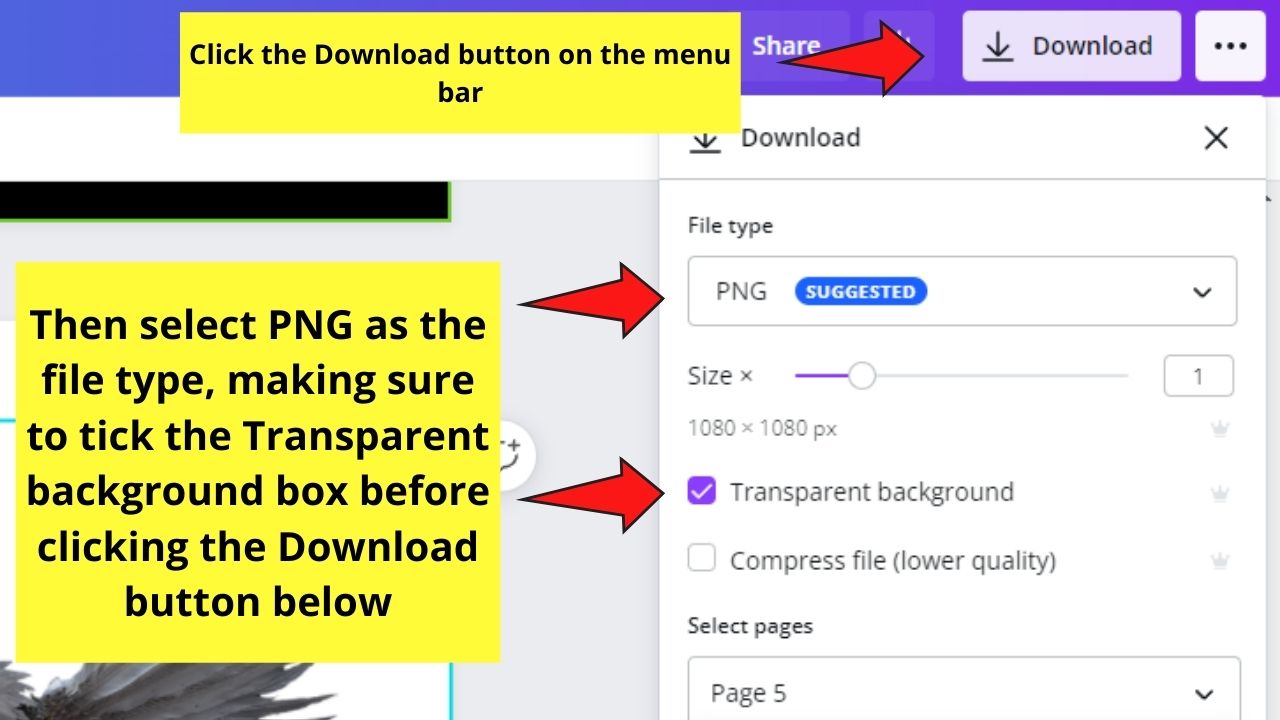

Make sure to choose the PNG file type and tick the Transparent background box before you carry on with the download process.
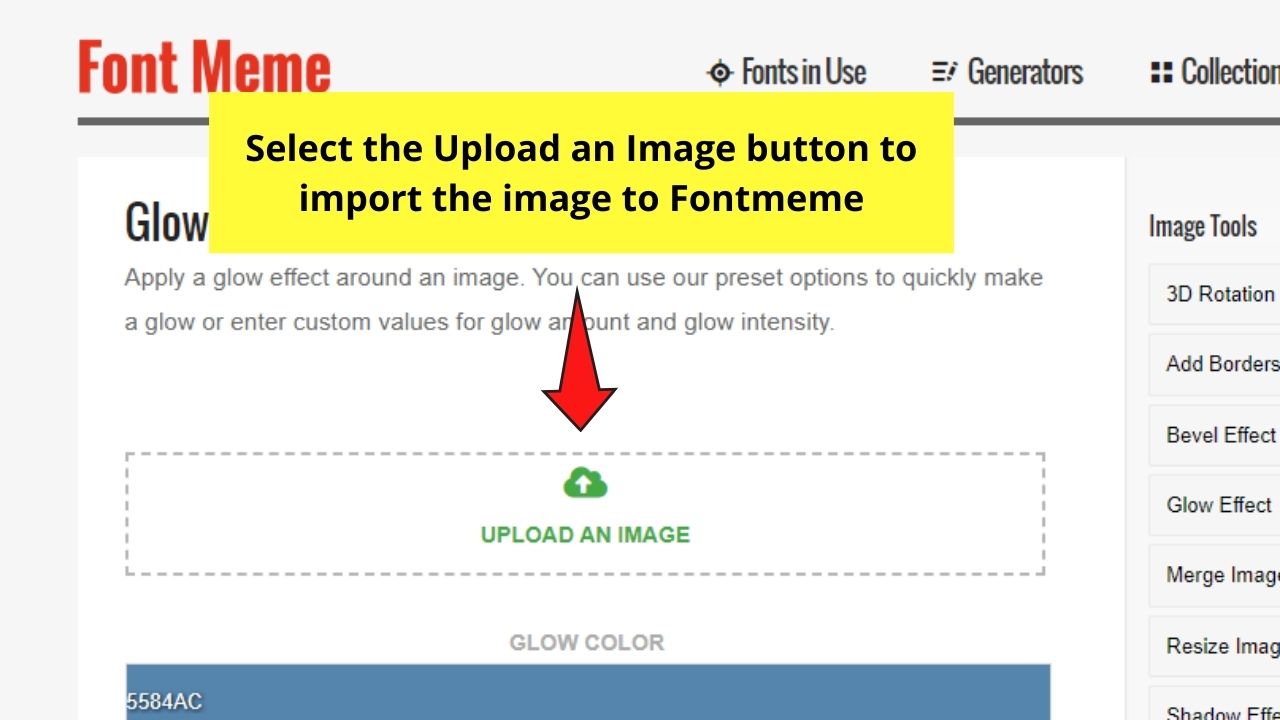
Step 3: On the fontmeme website, click the Upload an Image button to begin the process.

Step 4: After the photo’s successfully uploaded on the site, select the Glow Color button and choose the hue you want to have for the glow outline.
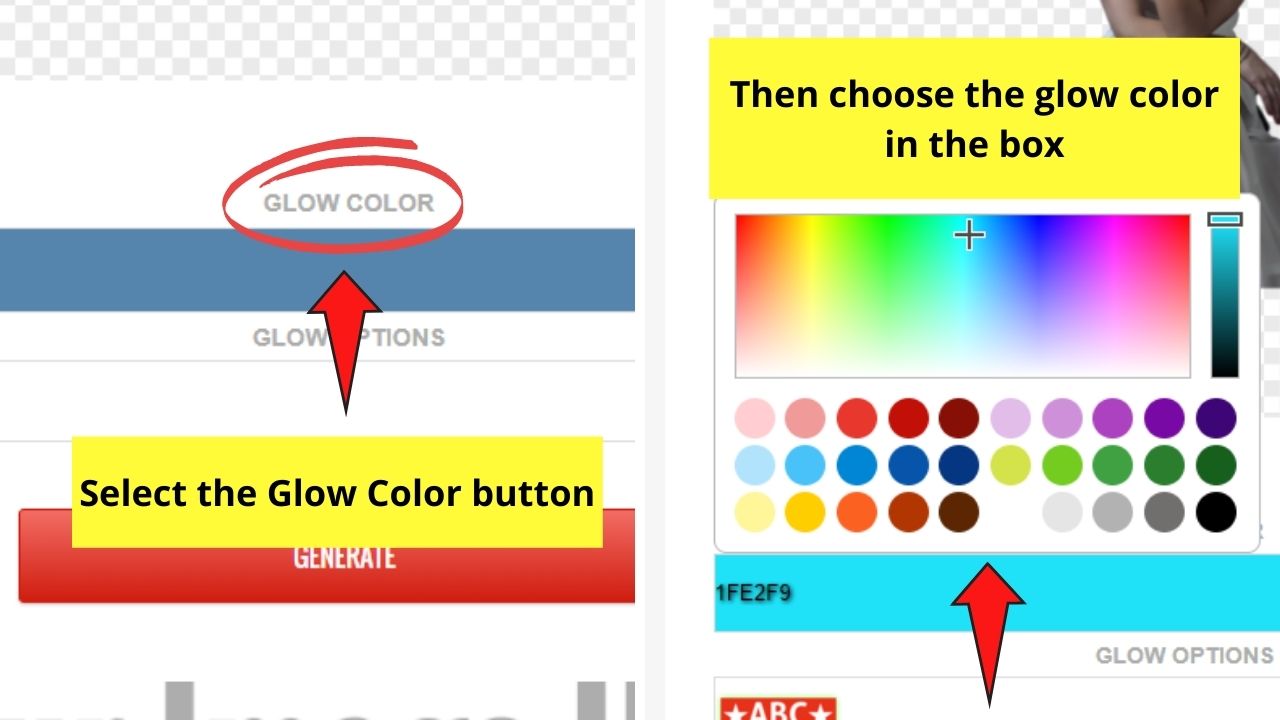

Wait for the tool to generate the image with the glow outline you created.
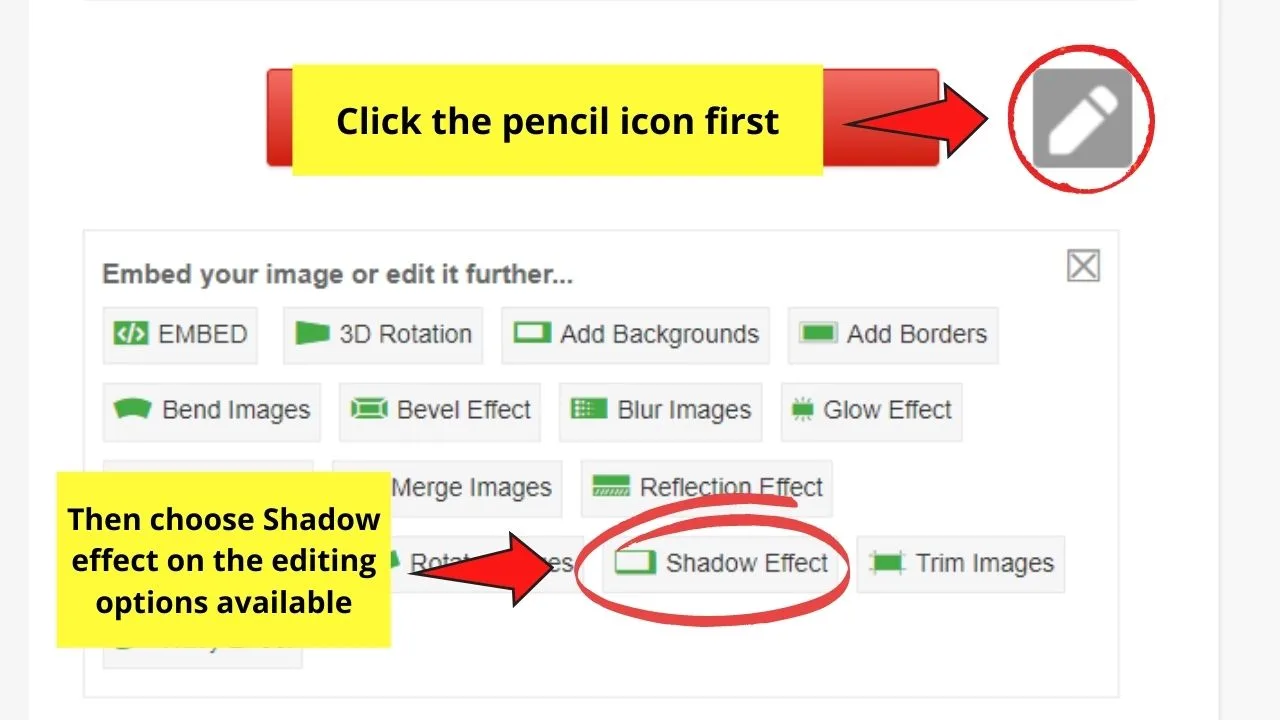
Step 5: To further enhance the glow outline, click the Pencil icon and choose the Shadow Effect option.

Step 6: If you’re good with how your photo looks, right-click on it and select the Save Image as option on the dropdown button that appears.

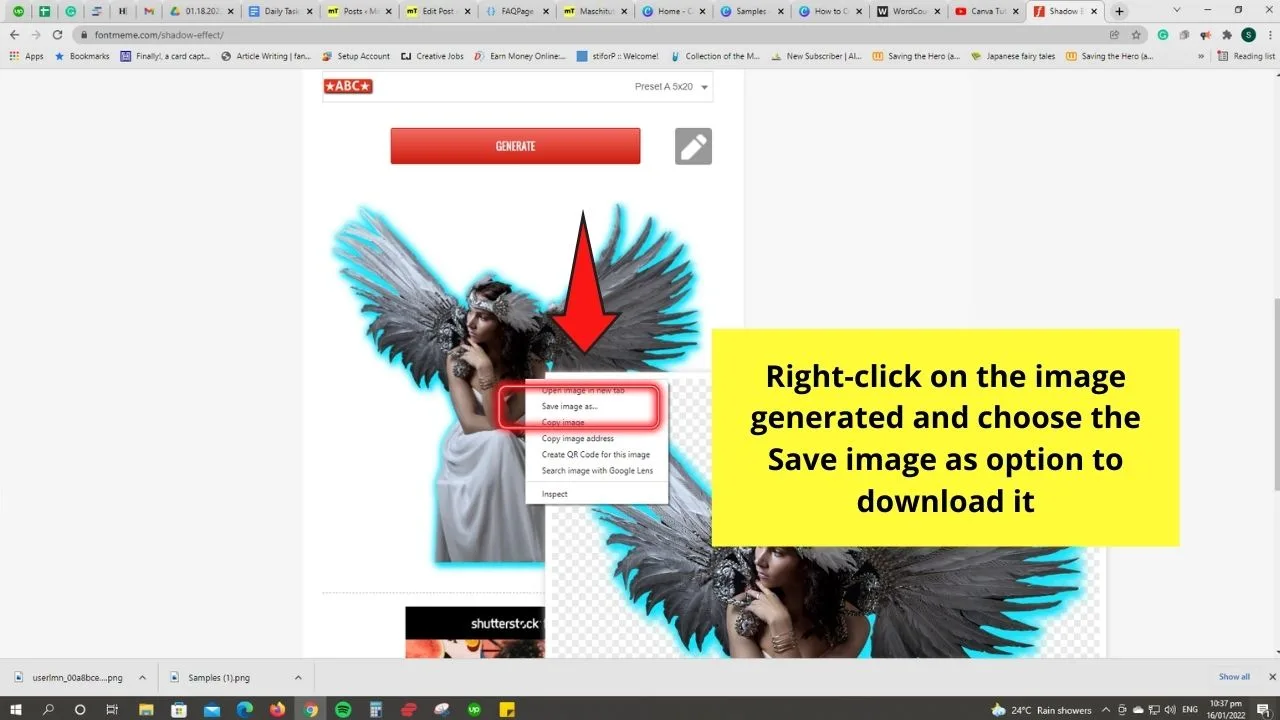
Then, check the newly-downloaded image on your device to see how the photo looks.
Step 7: Finally, re-upload the photo with the glow outline to Canva by selecting the Uploads tab on the left side panel.

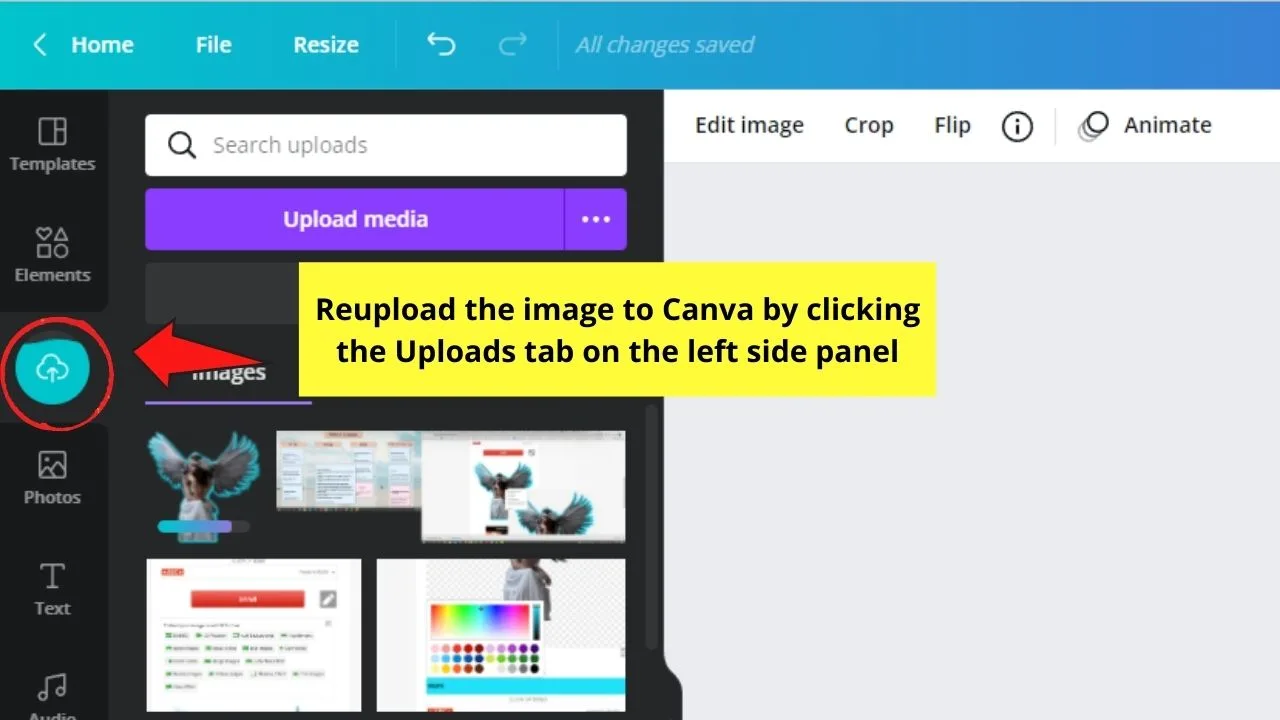
And, once the picture’s successfully uploaded, click and drag it to the project to edit it.
Yet, what if I only want a classic white outline to my photo? Do I use the same methods when creating glow outlines?
Frequently Asked Questions about How to Create an Outline Around Your Photos in Canva
How do I remove the background of an image if I’m a Canva free user?
The background remover tool in Canva is a feature that only Pro account users can enjoy. But, if you’re a Canva free user, you can upload the image to remove.bg and allow the tool to do the background removal. Just reupload the background-less image to Canva after the process.
Is the Duotone feature in Canva a Pro-user exclusive app?
Duotone in Canva can be used both by Canva free and Pro users. Hence, Duotone isn’t exclusive for Canva Pro users only.
How do I add Duotone and Shadows integration on the Edit image gallery if I can’t find them?
If you can’t find the Duotone and Shadows apps on the Edit image gallery, keep scrolling until you see the You may also like section. Select the Shadows and Duotone buttons respectively, and click the Use button to add them to the list of photo effects you can use.


Hey guys! It’s me, Marcel, aka Maschi. On MaschiTuts, it’s all about tutorials! No matter the topic of the article, the goal always remains the same: Providing you guys with the most in-depth and helpful tutorials!

