

Ooh! How can I prevent other people from claiming my designs as theirs?
Well, if you’re earning income from creating templates in Canva, you need to ensure no one can use and claim your work as theirs.
And, as templates are images, you need to add your stamp to them — in the form of a watermark.
But, how exactly can you create a watermark in Canva?
How to Create a Watermark in Canva
First, create a Canva project with minimum dimensions of 150 x 150px. Then, import your watermark text (or graphic) through the Uploads tab or create a new one in Canva. Then, lower its transparency before you download it as a PNG file, making sure to tick the “Transparent background” box.
Watermarks in Canva — Steps You Should Know
If you’re curious about the faint logos or branding you’ll see on some images, those are what we call watermarks.
Watermarks serve to protect creators from people stealing or using their photos without permission.
Another use of a watermark is for branding purposes, like how a logo works. With that said, you can create a watermark in the same way you design a logo in Canva.
But, there are 2 ways how you can create a professional-looking watermark in Canva.
Creating Watermark from Pre-designed Logo in Canva
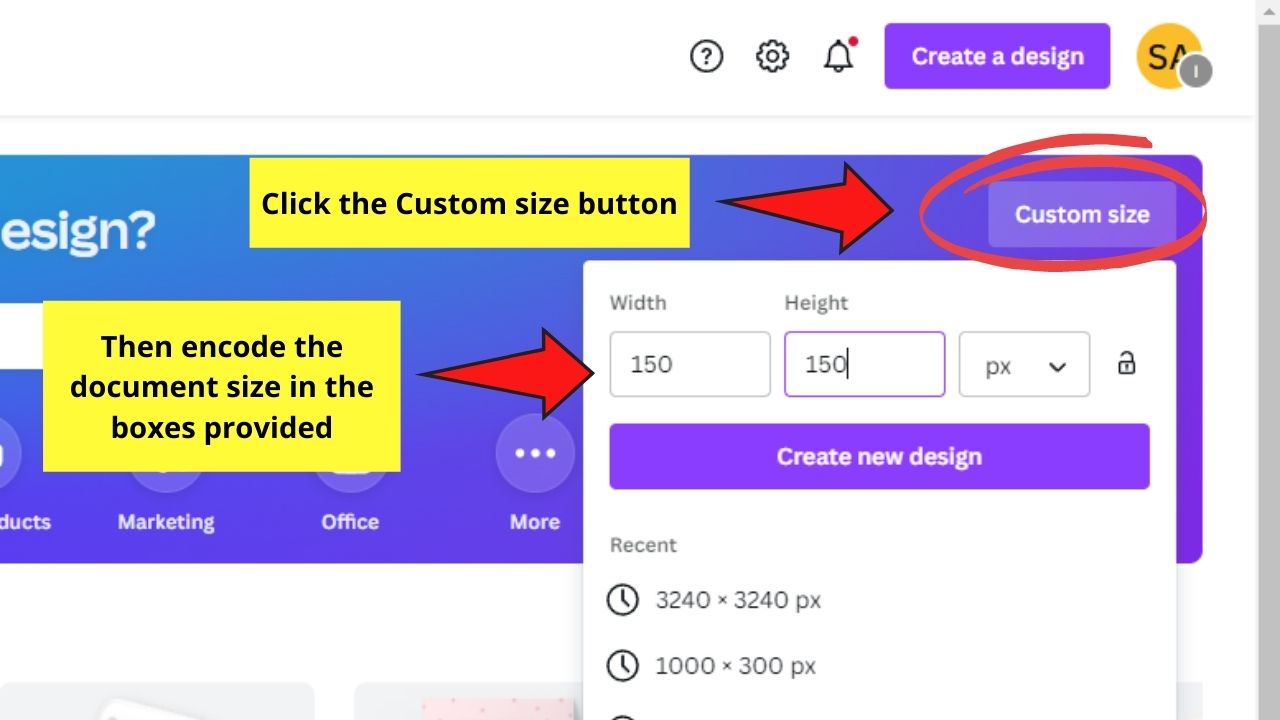
Step 1: On Canva’s home page, head to the Custom Size button and click on it.
![]()
![]()
You’ll then see a dropdown menu where you’ll be asked to input the dimensions of the design file you’re creating.
Since a watermark’s a logo, you can start with the 150 x 150 px size.
![]()
![]()
Of course, you can go bigger than this if the design file you’re making is square in shape.
Step 2: Once you’re on the editor page, you can head to the Uploads tab of the left side panel to import your brand logo (= watermark design).


Then, select the Upload media button for you to open the design file from your device and import it to Canva.
![]()
![]()
You can also do this step by clicking and dragging the logo from your desktop to Canva’s editor page. This will automatically upload the file onto the graphic design tool.
Step 3: Resize the logo by dragging the white circles or pill handles surrounding the image.
![]()
![]()
Adjust the positioning of the logo to make it occupy the space and align it with the page.
You can even change the logo color if you want.
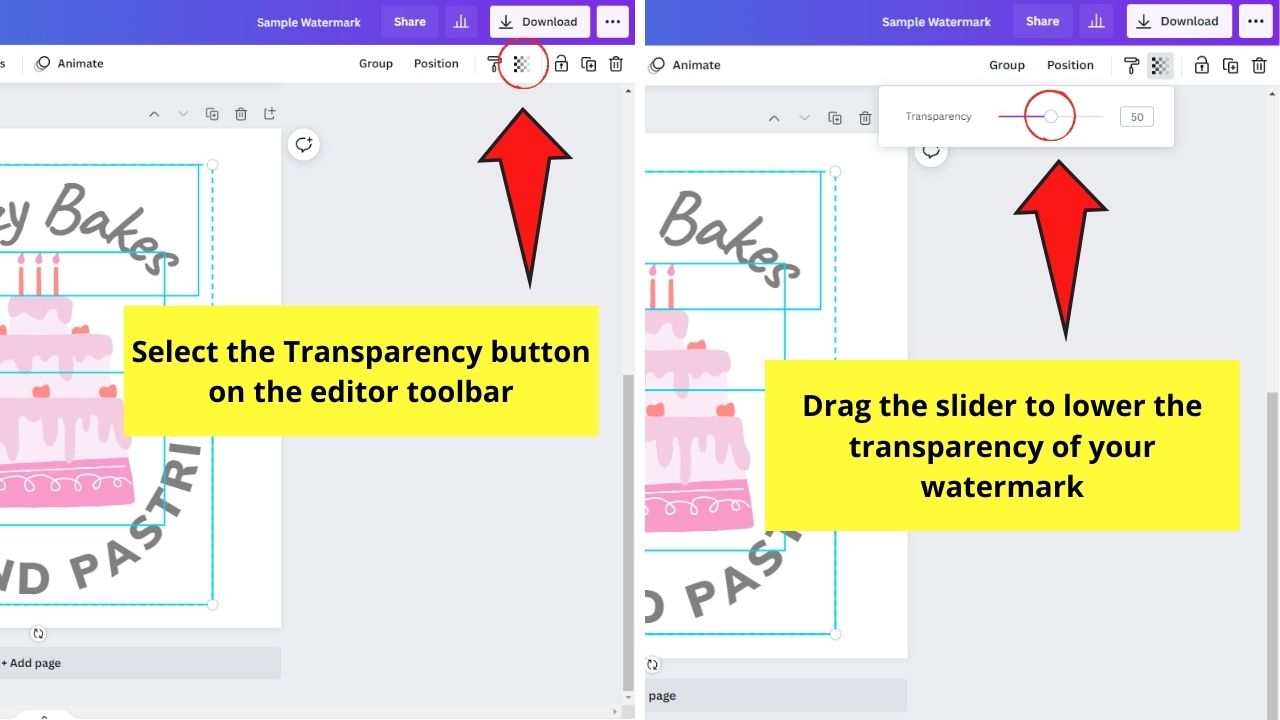
Step 4: Once you’re done resizing and repositioning the logo on the canvas, click once on it.
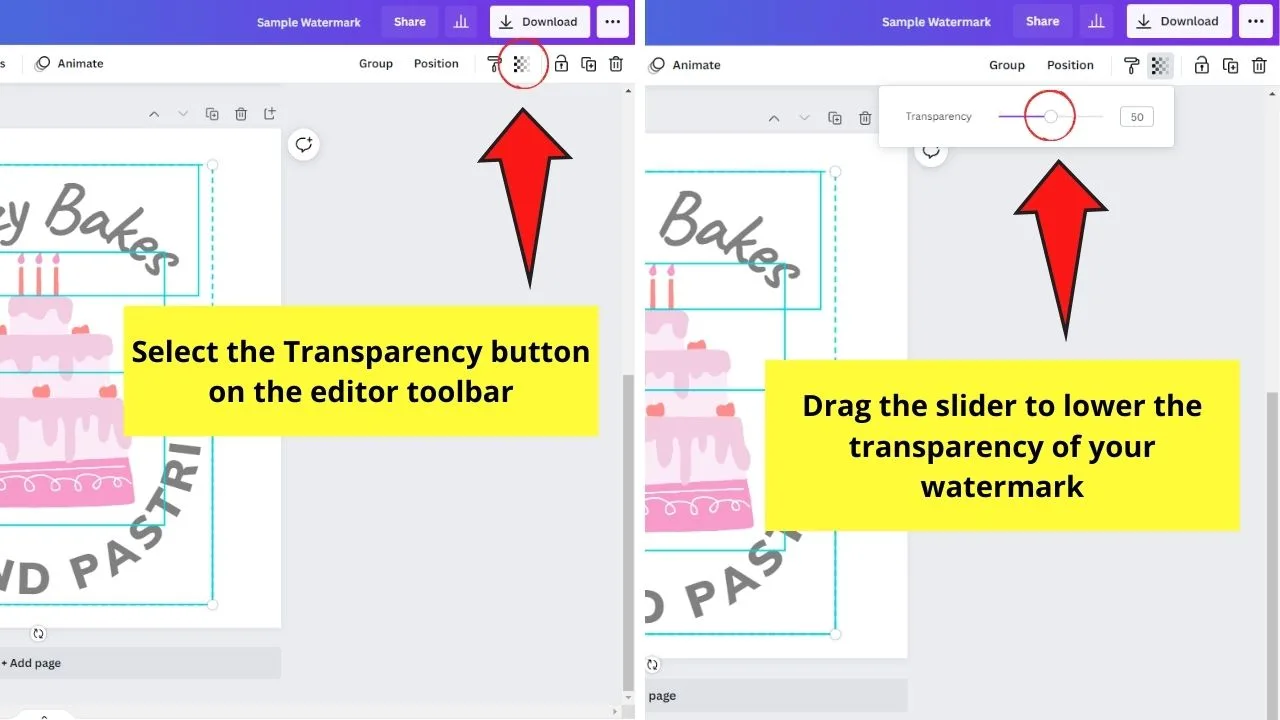
Then, head to the editor toolbar and click the Transparency button.
![]()
![]()
You’ll then see a dropdown menu featuring a slider you can drag to adjust a photo or element’s transparency.
Drag the slider to the left to lower the transparency level to the way you want your watermark to look.
![]()
![]()
Though there isn’t a hard rule on the percentage of transparency to use, 20-40% transparency usually works pretty well.
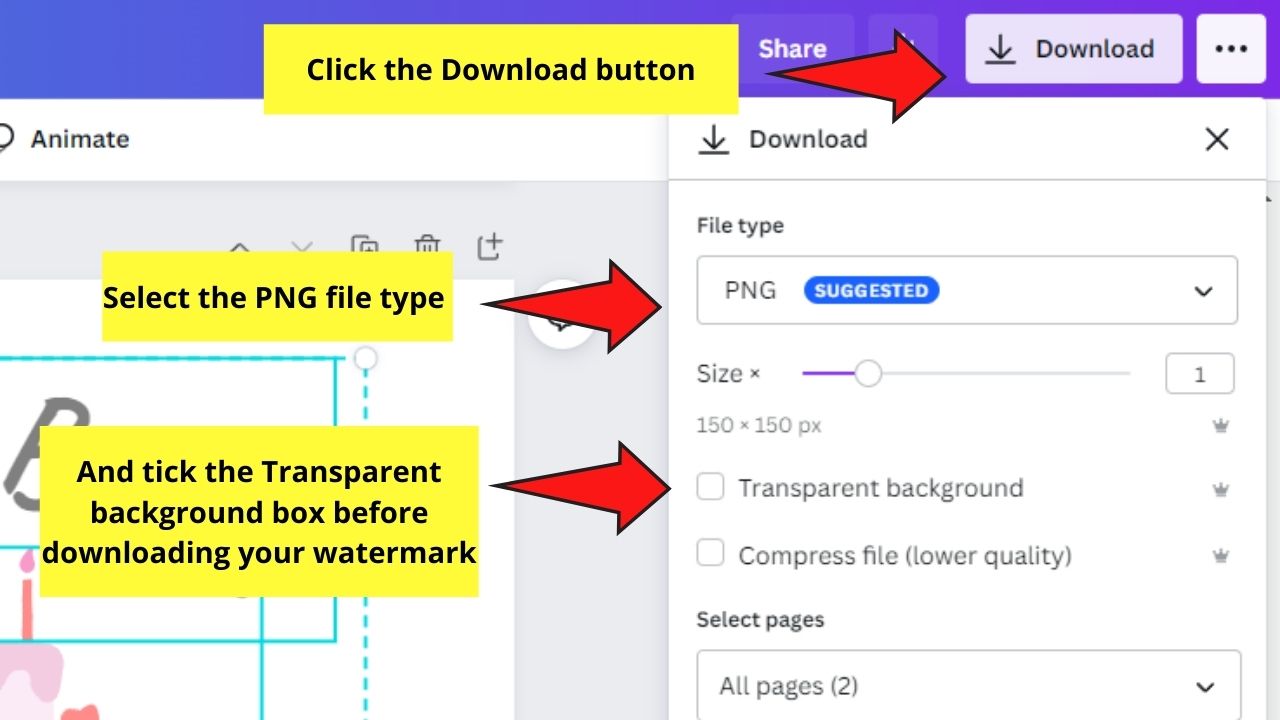
Step 5: After adjusting the transparency of your watermark, you can now proceed with downloading it.
Select the Download button. In the File Type section, choose the PNG format and tick the Transparent background box.
![]()
![]()
Saving your watermark with a transparent background is important as it’ll allow you to seamlessly add it to any design you have. If you don’t save it with a transparent background, then you won’t be able to layer it on top of your designs. So this is a must.
Please note that downloading your graphic with a transparent background only works if you are a Canva Pro user.
However, if you are a Canva Free user, do this:
- Download your watermark including the background
- Visit remove.bg
- Upload your watermark to remove.bg and the background of your watermark will get removed automatically
- Download your watermark (= background should be removed now!)
- If desired, reupload your watermark to Canva and use it there on top of any design
But what if you want to create a watermark from scratch? How would you do that?
Well, don’t worry. Just read on and you will know.
Creating Watermarks from Scratch in Canva
Step 1: Create a new design file by selecting the Custom size button and encoding 150 x 150 px in the dimension size.

Again, the 150 x 150 px size is just the minimum for creating any type of logo or watermark.
Depending on what kind of watermark you’re creating, you can opt to create one with a rectangular shape instead.
Hence, you’ll have to use a larger dimension for the width compared to the height.
Step 2: Head to the Elements tab first and select the graphic elements you want to use for your logo design.
Resize and position them accordingly on the canvas. But, if you prefer to customize the look of that particular element, click on it and see if color picker boxes appear on the editor toolbar.
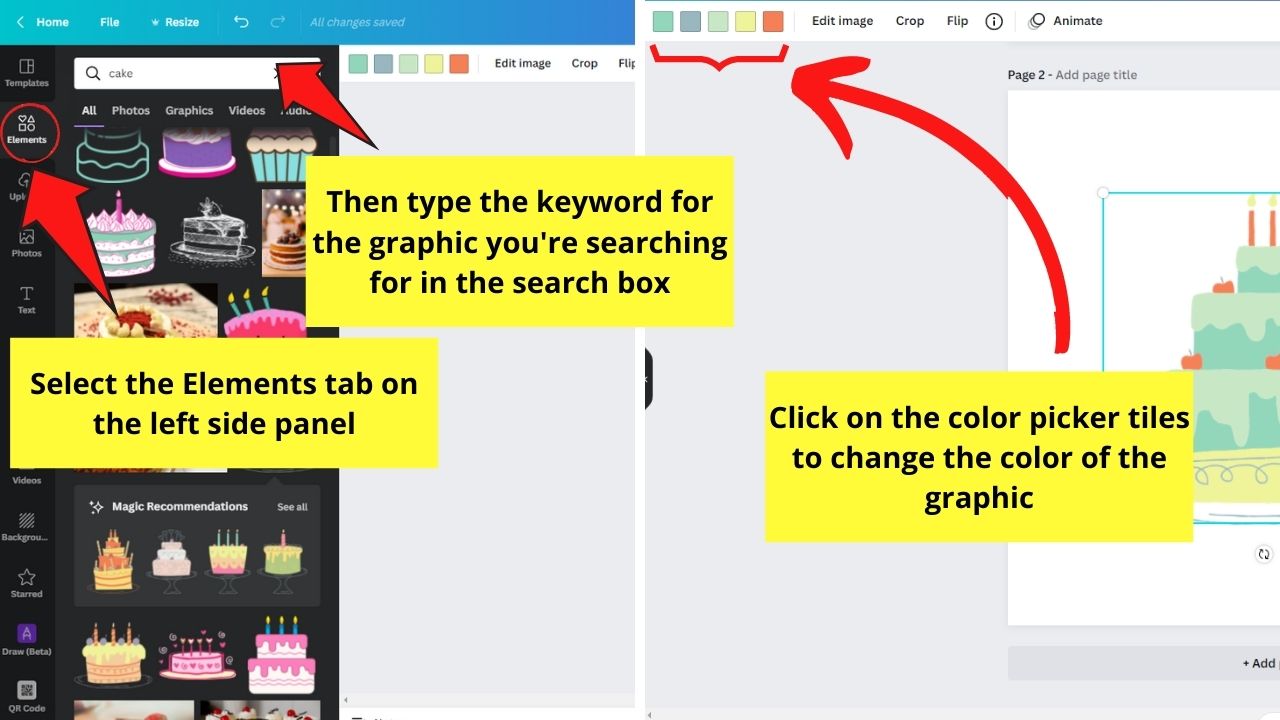

If you see those color picker boxes, then click on them to choose another color from the Default colors or add Custom hues through the rainbow-colored “+” tile.
You can read up on How to Edit an Element in Canva for you to have a firm grasp of the customization part of the elements.
Do the same steps in editing elements even if you’re editing a template you found in Canva’s gallery.
Step 3: After customizing elements on your logo, it’s time to add some text components (only if your logo design warrants such an aspect).
To do this, you can opt to directly add a text box by pressing T on your keyboard.
But, you can also click the Text tab on the left side panel to choose from the various font combinations available.

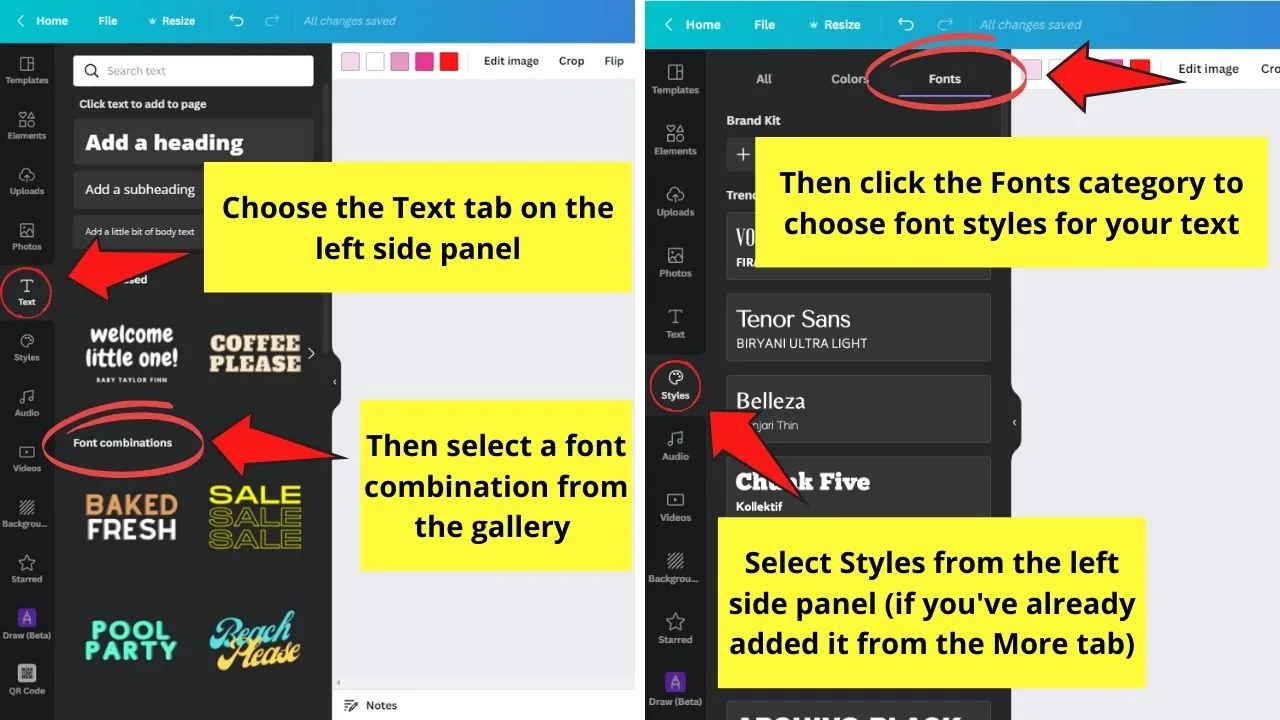
If you prefer other font combinations, you can also visit the Styles section under the More button. Just head to the Fonts category to choose the font style combination that you like.
Step 4: Once you’re done adding both the graphic and text components of your design, select them by dragging the cursor over them.


You can also individually highlight the elements by pressing Shift while clicking one by one on those elements.
The selected elements will then be surrounded by straight and broken lines.
Step 5: After highlighting the elements, head to the editor toolbar and choose the Transparency button.
Adjust the transparency of the elements by dragging the slider to the left to lower their opacity.
Step 6: If you don’t need to edit anything on your design, click the Download button, ensuring to select PNG and tick the Transparent background box.

Pretty simple, right? So, as you can see, you don’t need to use complicated photo editing software to create watermarks.
Even the basic knowledge of how to make a background transparent in Canva can allow you to create professional-looking watermarks in a few clicks.
Frequently Asked Questions about How to Create a Watermark in Canva
What will happen to my watermark if I fail to tick the Transparent background box before downloading?
If you forget to select the Transparent background option, your watermark will assume a white background instead. If you add a watermark logo on your designs with a white background, it affects the look of the design.
Do I need to have a Canva Pro account for me to download my newly-designed watermark with a transparent background?
Downloading designs with transparent backgrounds in Canva need one to be on the premium or paid account. Hence, you’ll have to upgrade to Canva Pro first before you can enjoy downloading designs with transparent backgrounds.
What are watermarks used for?
Watermarks allow creators to brand their work without affecting the design. Yet, a watermark’s foremost function is to add a layer of protection from unwanted use of the image on other people’s websites or to sell them.


Hey guys! It’s me, Marcel, aka Maschi. On MaschiTuts, it’s all about tutorials! No matter the topic of the article, the goal always remains the same: Providing you guys with the most in-depth and helpful tutorials!

