Whoah! Is that a Discord partner badge I’m seeing next to your server’s name?
How did you get that? What perks come with getting that cool partner badge on Discord?
Well, if you’re interested to know the basics of becoming a Discord partner, don’t wait and begin reading here.
How to Become a Discord Partner
To become a Discord partner, set your server as a community. Then, after checking your eligibility from the “Server Insights” page, click “Partner Program.” Then select “Apply for Partnership.” Fill out the application form and personal info sheet before selecting “Submit.”
The Ultimate Beginner’s Guide on Becoming a Discord Partner
Do you have a highly-engaged Discord server that you wish to become featured on the app’s “Discover” page?
Well, if you have such aspirations, start working for that goal by becoming a Discord partner.
Aside from becoming featured on Discord’s “Discover” page, there are also many perks that you will reap after becoming a partner for the app:
- Unique branding tools (custom URL, invite splash, and server banner)
- Recognition through a special badge
- Community rewards
- Access to the Discord Partners-only server
- Discord Nitro subscription
But, while these perks sure are great, not all can become Discord partners.
Why?
For you to become a Discord partner, you have to pass the app’s partnership program requirements.
Qualifying for Discord’s Partnership Program — The Requirements
While applying to the partnership program is open to all who are interested, not everyone is qualified.
First, you have to be an admin or owner of the Discord server if you wish to become a part of the partnership program.
Second, your server should be a “community” or “public” server.
If not, you won’t be able to access the “Server Insights” page that will allow you to track your community’s progress.
Aside from these 2 qualifications, here are the other requirements your server should meet before it’s deemed worthy of becoming a Discord partner:
1. Discord server age should be at least 8 weeks old
Why the need to wait for at least 2 months or 8 weeks before applying to become a partner?
Well, you need enough time to grow your Discord community.
If not, you won’t be able to meet the other requirements for becoming a Discord partner in terms of member count.
Plus, a Discord server that has been around for a longer time is more credible compared to a new one.
2. Having at least a 500-server member count
This reason is linked to the first requirement for becoming a Discord partner.
How can you grow a community with at least 500 members if your server has just been created?
It’s not that reaching the 500-member count is not achievable in a shorter period.
Discord only provides you with a reasonable time frame to increase your member count and hit this target.
3. Weekly communicator count of at least 50
After growing your community member count to 500, the next thing that you should be able to maintain is the number of people that is active on the server.
With that said, at least 50 different persons should exchange messages in your server channels per week.
But, it doesn’t have to be the same group of people actively conversing on your Discord server.
So long as you can reach the 50-communicator mark, you’re in.
4. Weekly participant count of at least 100
Aside from the previous requirement for communication, your Discord server should have at least 100 active members in a week.
Even if those members aren’t posting messages, so long as they check on your server, it will still be counted.
5. 20% retention rate weekly
Now, for the tricky bit — the 20% weekly retention rate.
What this requirement means is that at least half of the new members on your server stay in it for at least 1 week.
But, this count doesn’t include those new members that have immediately left after joining your server.
Yet, there’s nothing to worry about if there are members that do this thing. It doesn’t have a negative bearing on your server being featured on “Server Discovery.”
Do take note though that this requirement is only applicable to servers that are actively growing.
6. Bad words are not allowed or banned on the server
Of course, a thriving community on Discord is achievable only if your members deem your server safe.
In that sense, your Discord server should be free from any profane language.
Hence, you should ban bad or profane words to uphold the safety requirement for becoming a partner.
7. All admins and moderators have enabled 2FA (2-Factor Authentication) in their accounts
Another safety feature that should be ticked off from the list is the activation of the 2-Factor Authentication (2FA) for all your server’s moderators and admins.
Having the 2FA feature activated adds an extra layer of protection against hackers and anyone who have ill intentions for the server.
In this way, Discord’s sure that you and only you are allowed to have access to the server you joined into.
Thus, if you’re a server owner, an admin, or a moderator but haven’t activated the 2FA, take note of these steps:
Step 1: Access the “User Settings” page

If you’re using a desktop, you can just click the gear or cogwheel icon beside your avatar name.
But, if you’re using a mobile phone, you have to tap your Discord avatar on the bottom menu to access the “User Settings” page.

Step 2: Tap the “Account” option first “My Account” page if you’re using Discord mobile (both iOS and Android)
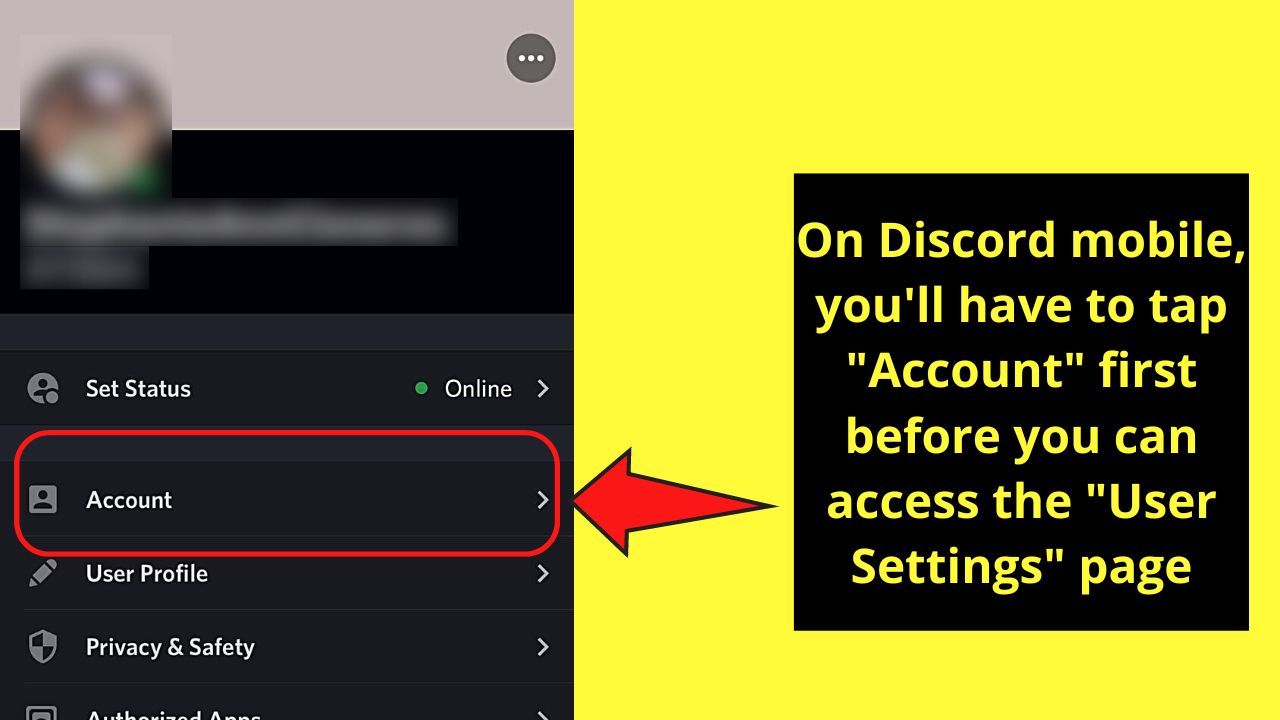
On the desktop app of Discord, though, you’re immediately redirected to the “My Account” page after clicking the cogwheel icon.
Step 3: Scroll down until you reach the “Password and Authentication” section
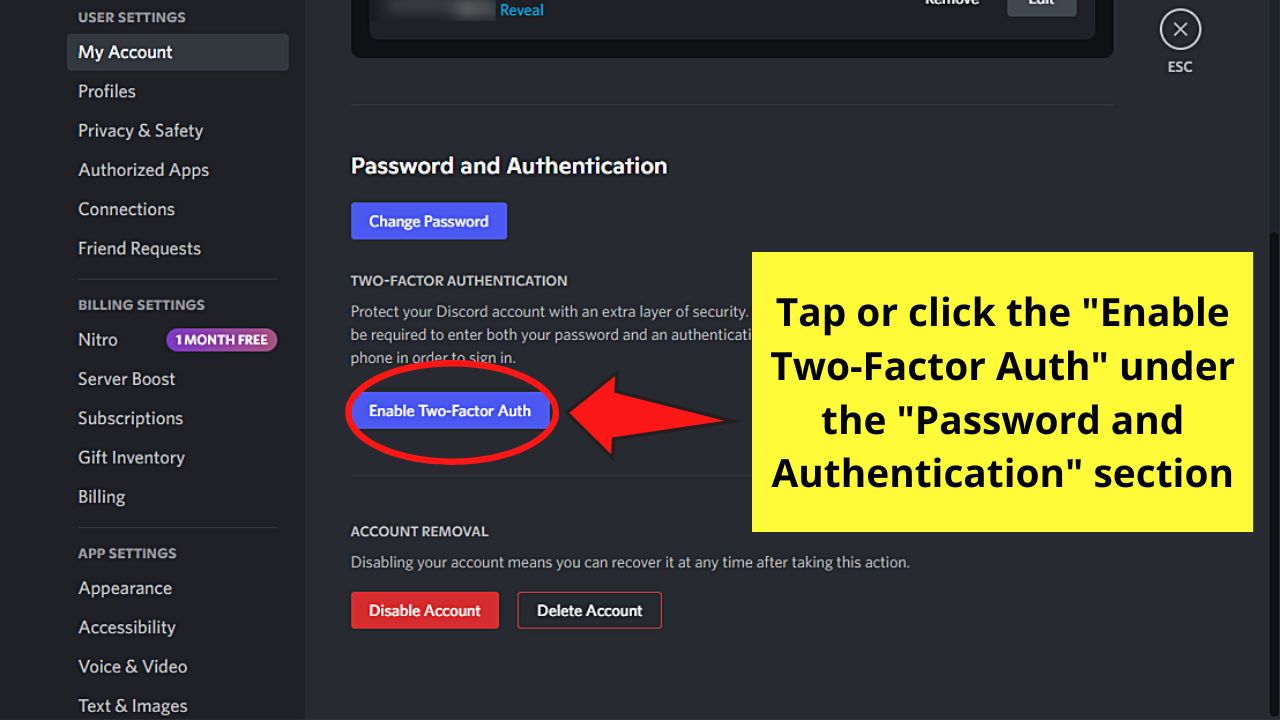
From there, click the “Enable Two-Factor Auth” to activate this feature.
Step 4: Download Authy or Google Authenticator on your device to begin setting up the 2FA
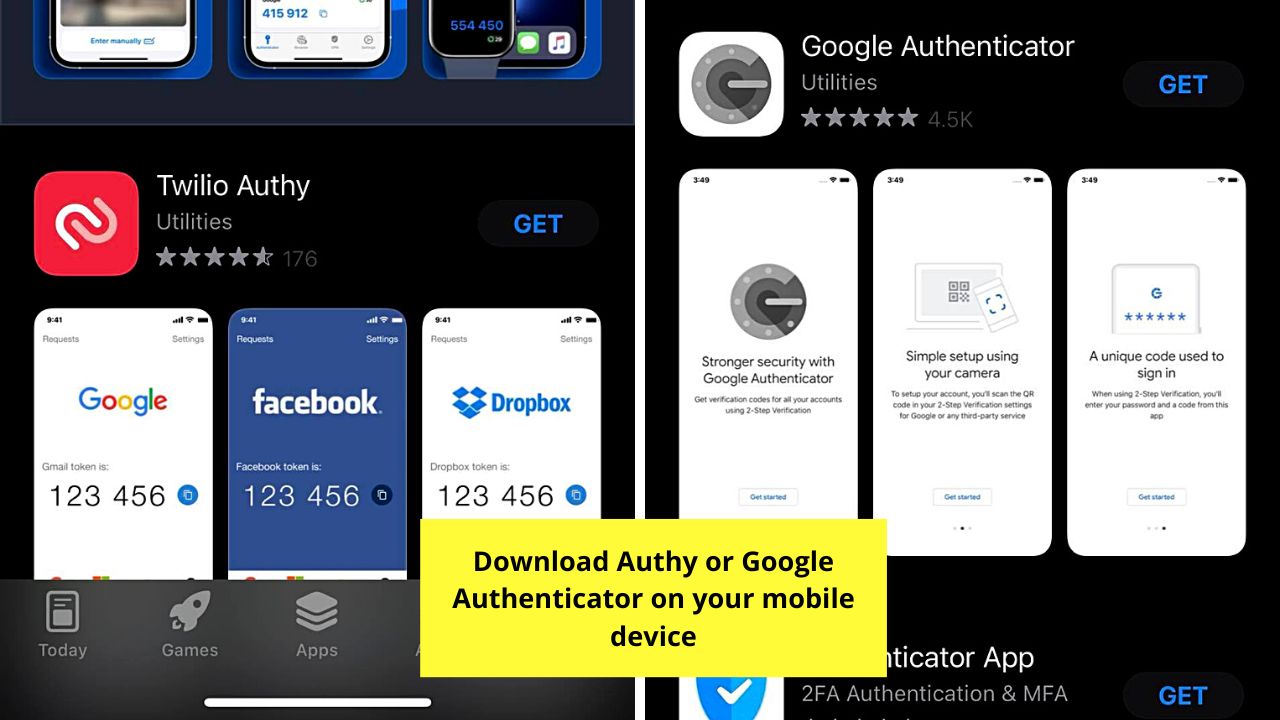
If you downloaded Google Authenticator, select an input method you want to use: “Enter provided key” or “Scan a barcode.”
Do take note though that if you’re on an Android device and have selected the “Scan a barcode” option, install the “Barcode Scanner” app by the ZXing Team as well.
Step 5: If you’re using Authy, you have to enter the mobile number and the email you’re using to set up your account
Then, you’ll be asked to authenticate the number you’re using.
Tap on the said button for you to receive a phone call or text message that will do the authentication.
Create an authenticator account by tapping the “+” button.
From there, manually enter the code or scan a QR code after reaching the “Authenticator Accounts” page.
Step 6: Now, go back to your Discord account and scan the QR code using Authy or Google Authenticator’s QR scanner
Step 7: Once the 6-digit code is generated, type it on the “Login with your Code” field and press or click “Activate”
Your 2FA feature is now activated.
Whoah! That’s quite a lengthy list!
Yes, it’s quite a lot to take in, but such high standards have been set by Discord to entice servers to become role models for the entire community.
So, if you have a hunch that your Discord server meets the 7 requirements, proceed with submitting your application.
Submitting Application for Discord Partnership Program
As mentioned earlier, you cannot become a Discord partner if you haven’t met all the requirements.
But, you will only be able to check your eligibility if your Discord server becomes a community.
With that said, let’s take a look at how you can enable the community feature and submit your Discord partnership using a desktop and a mobile device.
Enabling Community Server Settings on a Desktop
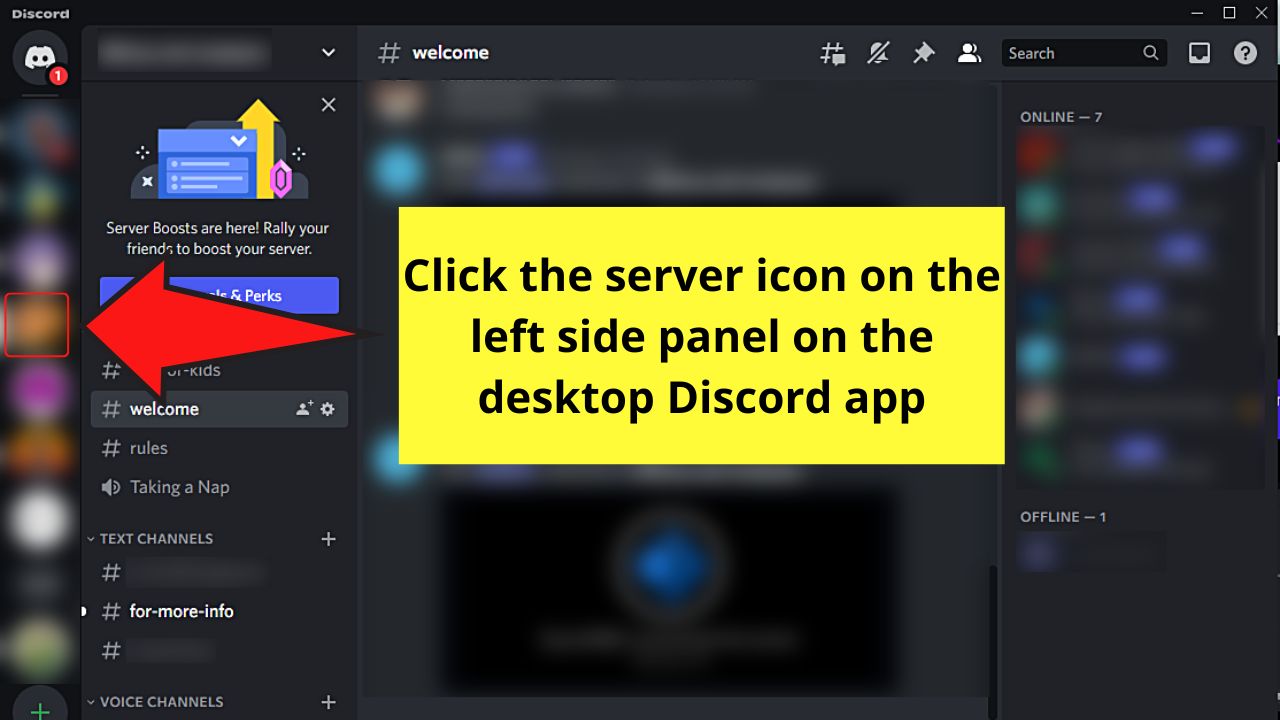
Step 1: Click the icon of the server you created on the left side panel
Step 2: Head to the server name section and click the “Down” button
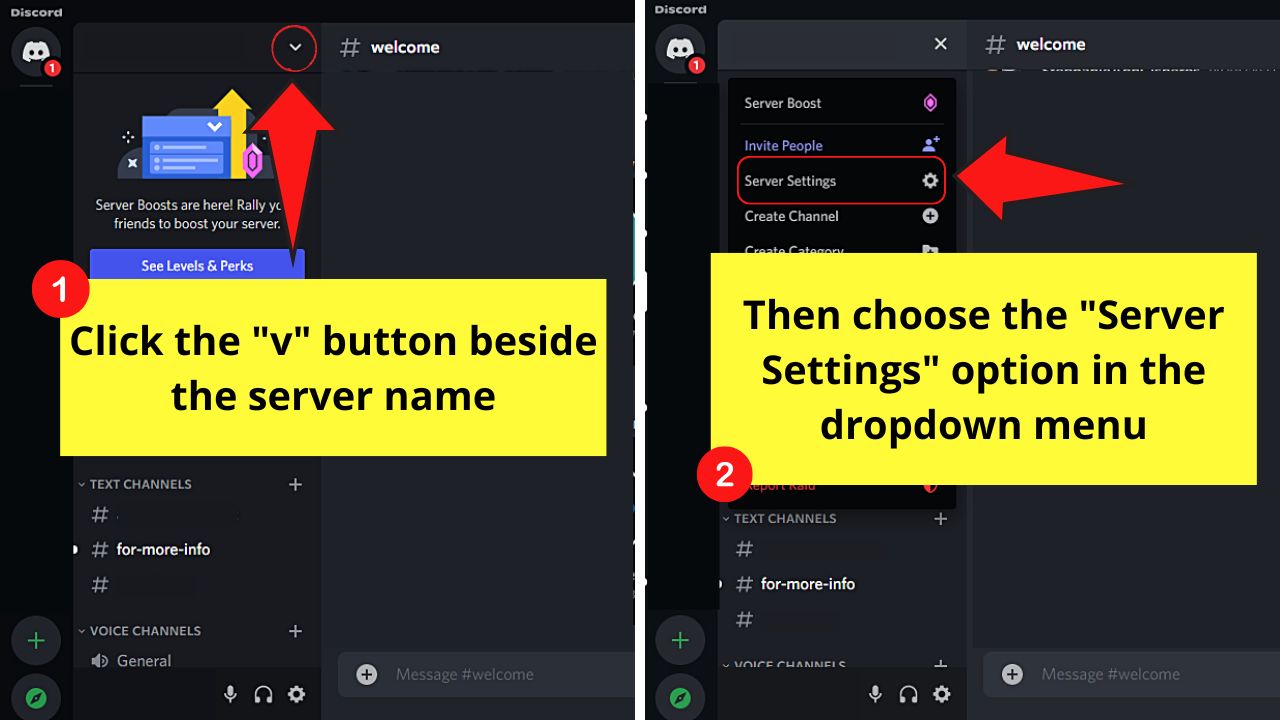
Then, select the “Server Settings” option.
But, in case you don’t see the said option, it simply means you don’t have admin access to the server.
With that, you’ll have to contact an admin or someone who has a higher role to do the deed for you.
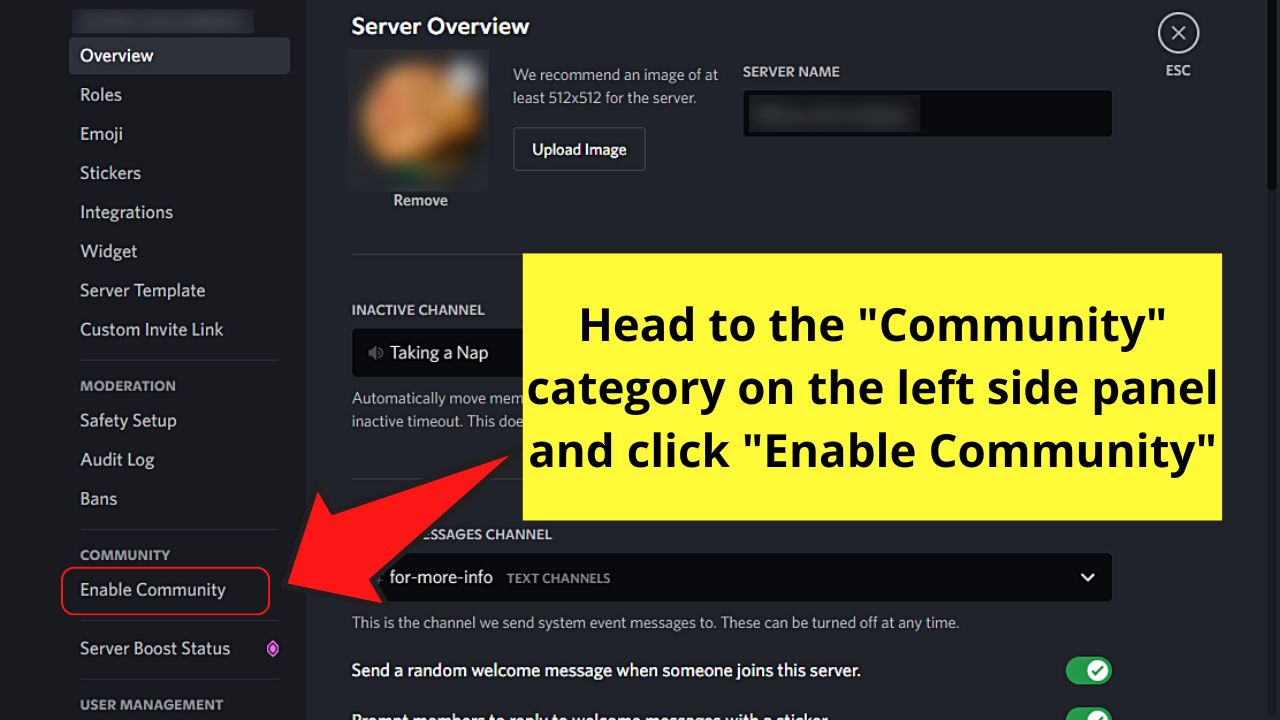
Step 3: Click “Enable Community” in the “Server Overview” section
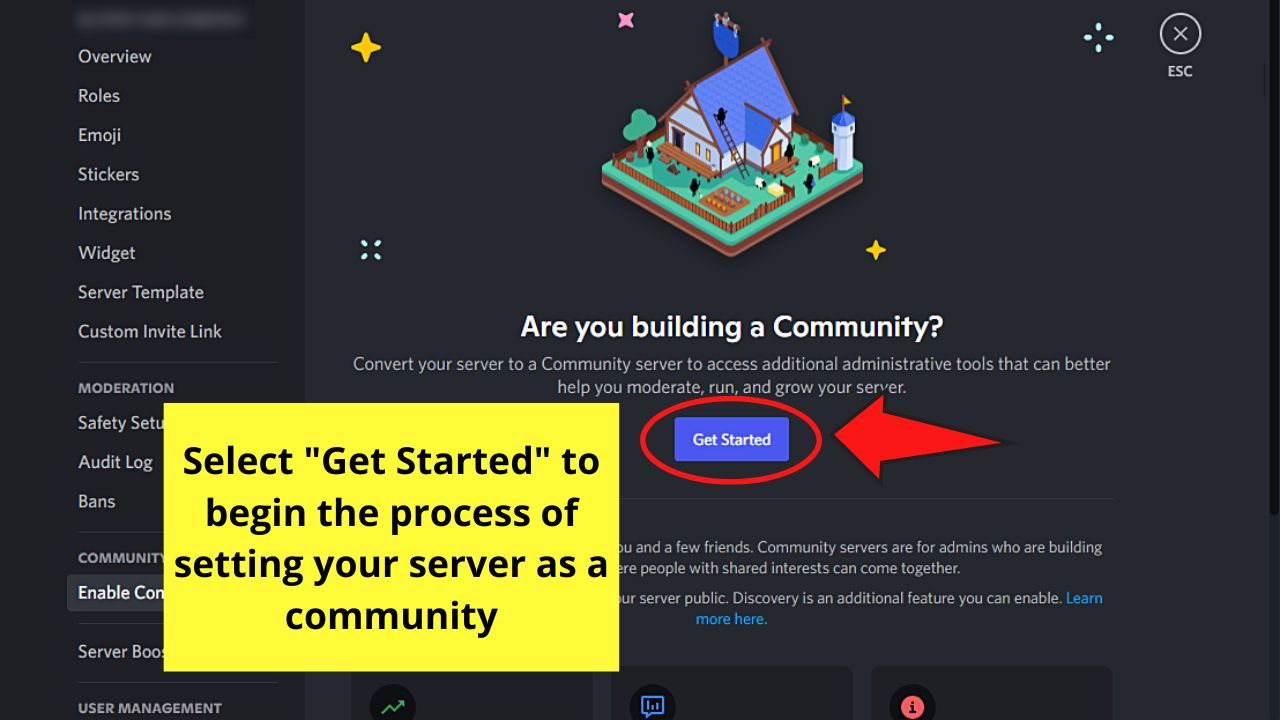
Step 4: On the “Community” page, click “Get Started”
Step 5: Activate the toggles for “Explicit Media Content Filter” and “Verification Level” in the window for setting up the community server

But, in case your server already meets the verification level and content filter requirements, just click “Next.”

Step 6: Now, set up a rules or guidelines channel and a community updates channel

If you currently don’t have those channels, select the “Create one for me” option after clicking the “Down” icon on the fields provided.
If you do, then choose the channel that you have already created for such a purpose.
Then, click “Next.”

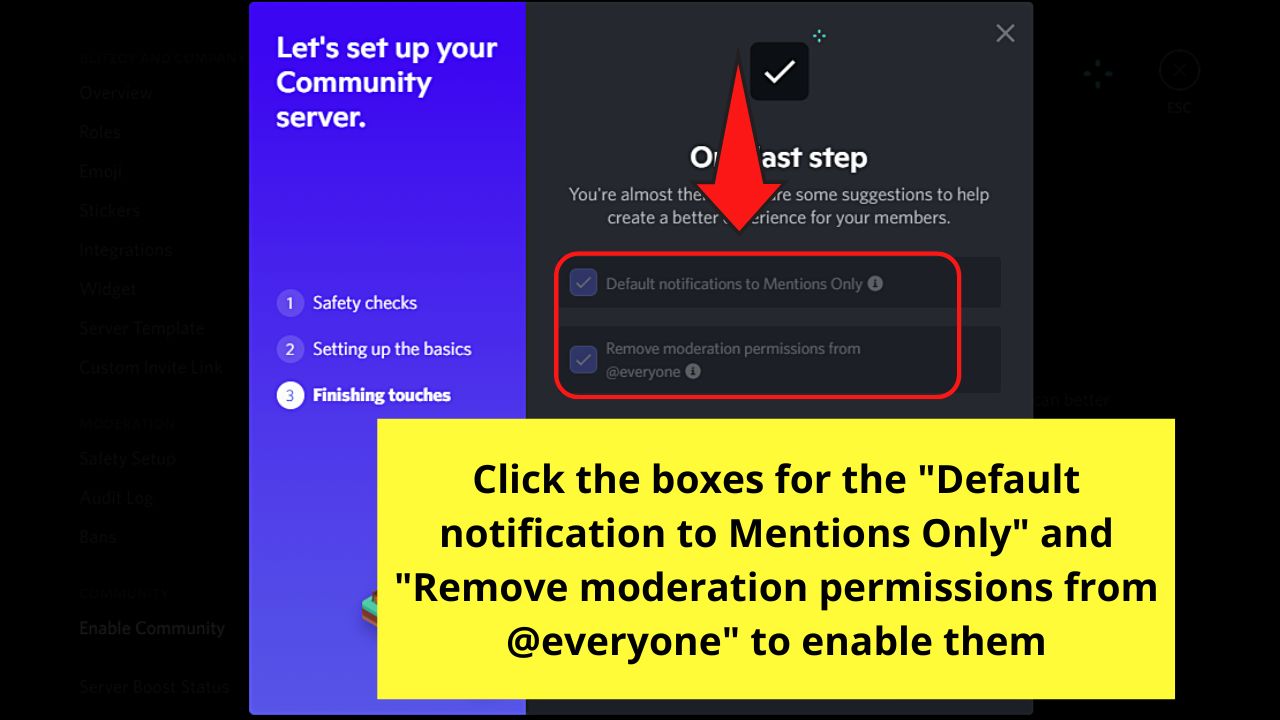
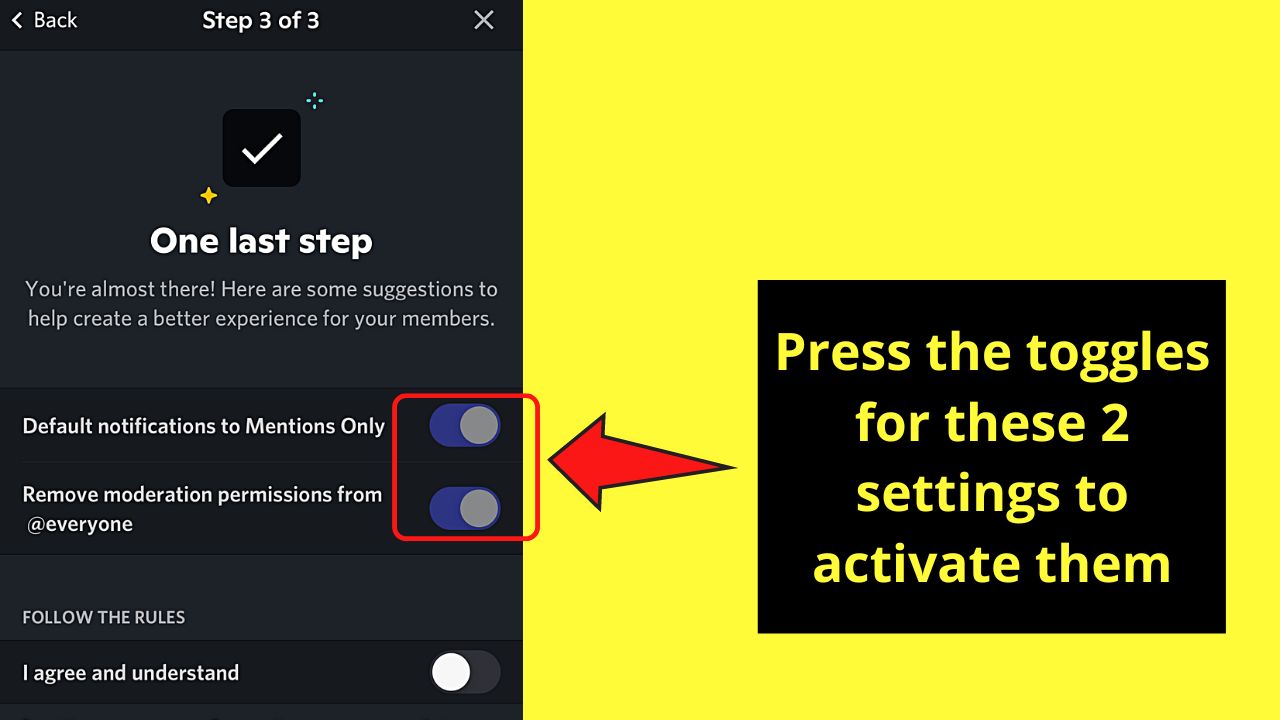
Step 7: Check the boxes for “Default notifications to Mentions Only” and “Remove moderation permissions from @everyone to enable these
Step 8: Click the “I agree and understand” box under the “Follow the Rules” section
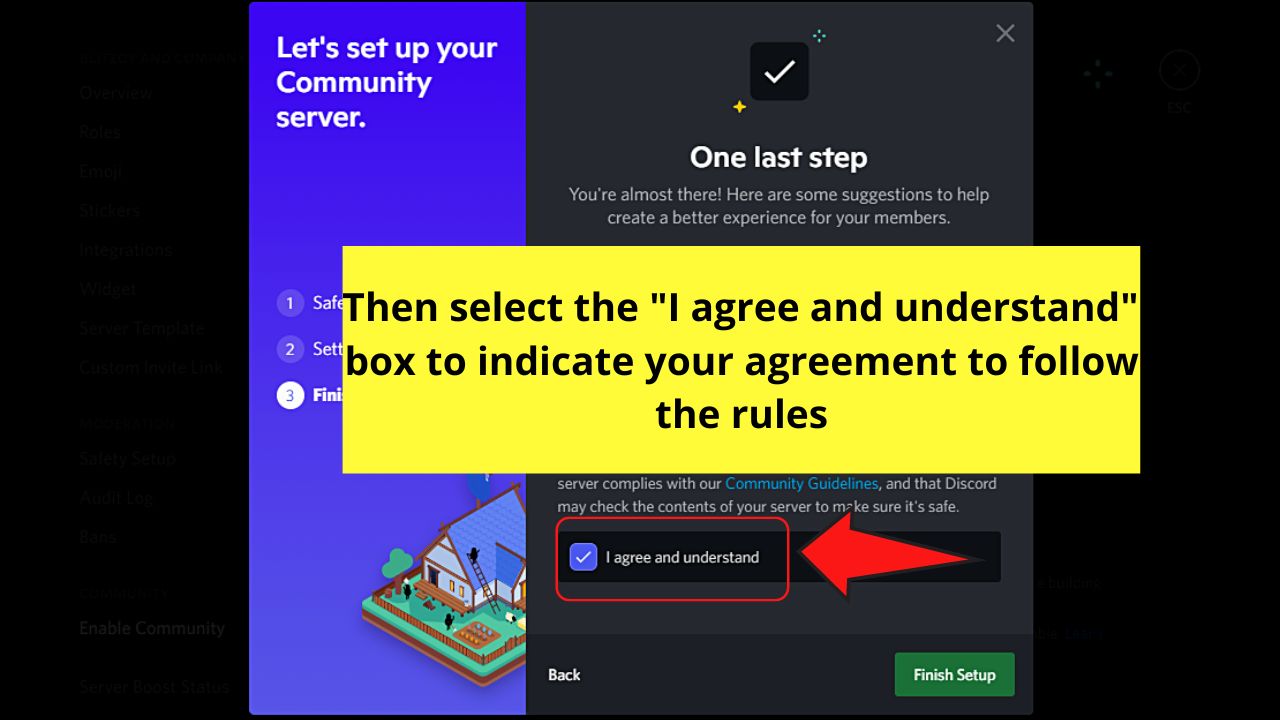
Step 9: Select the “Finish Setup” button
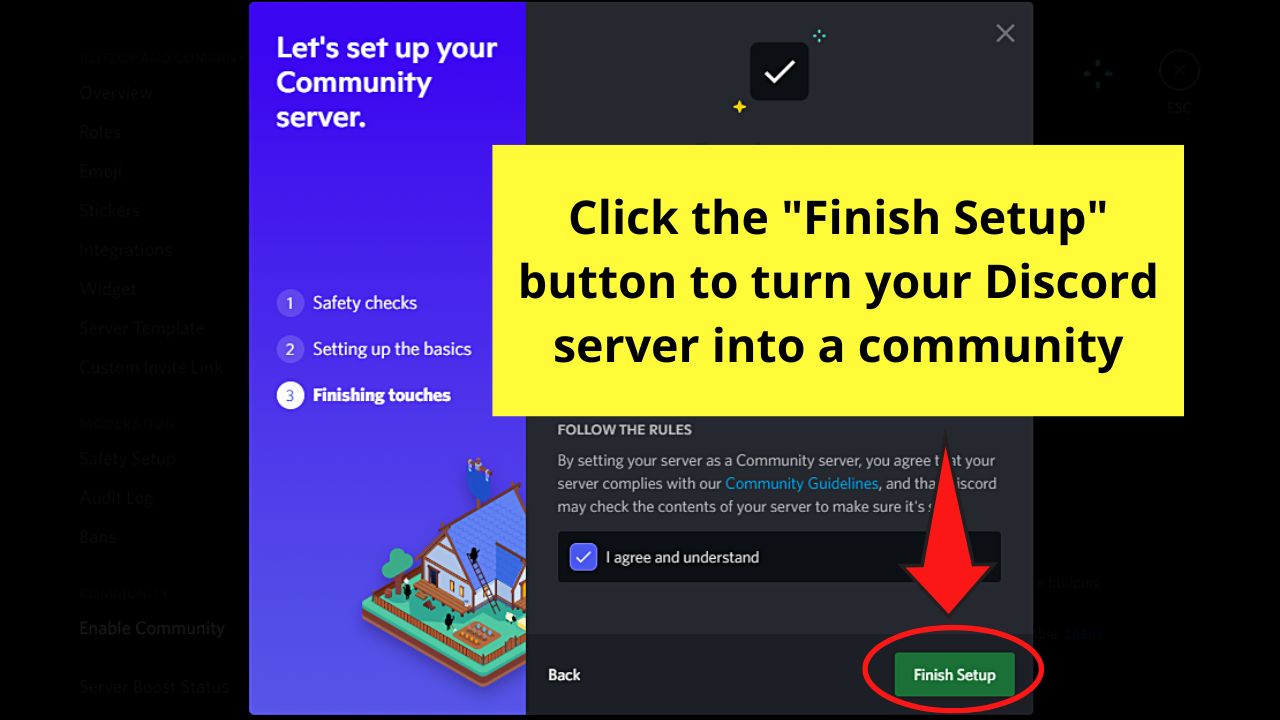
This will enable your server into a community.
Enabling Community Server Settings on a Mobile Device (iOS/Android)
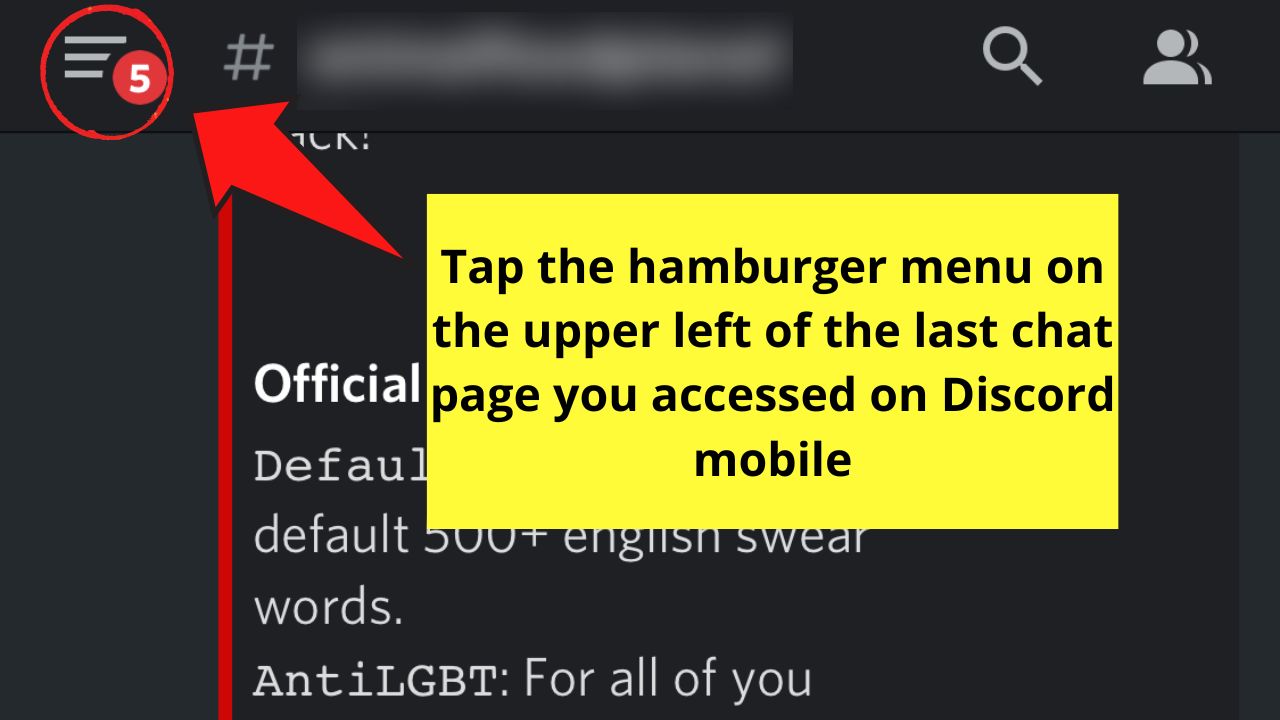
Step 1: Tap the hamburger menu
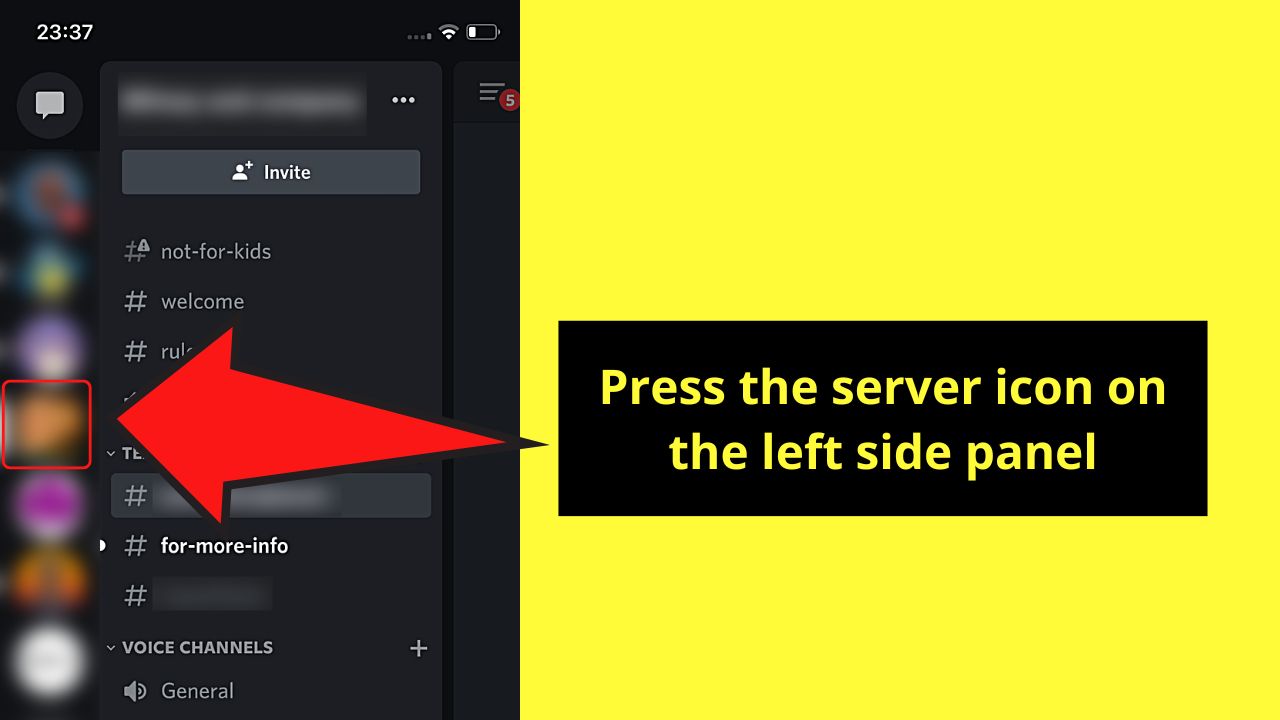
Step 2: Tap the server icon on the left-side panel
Step 3: Beside the server name, tap the meatballs menu
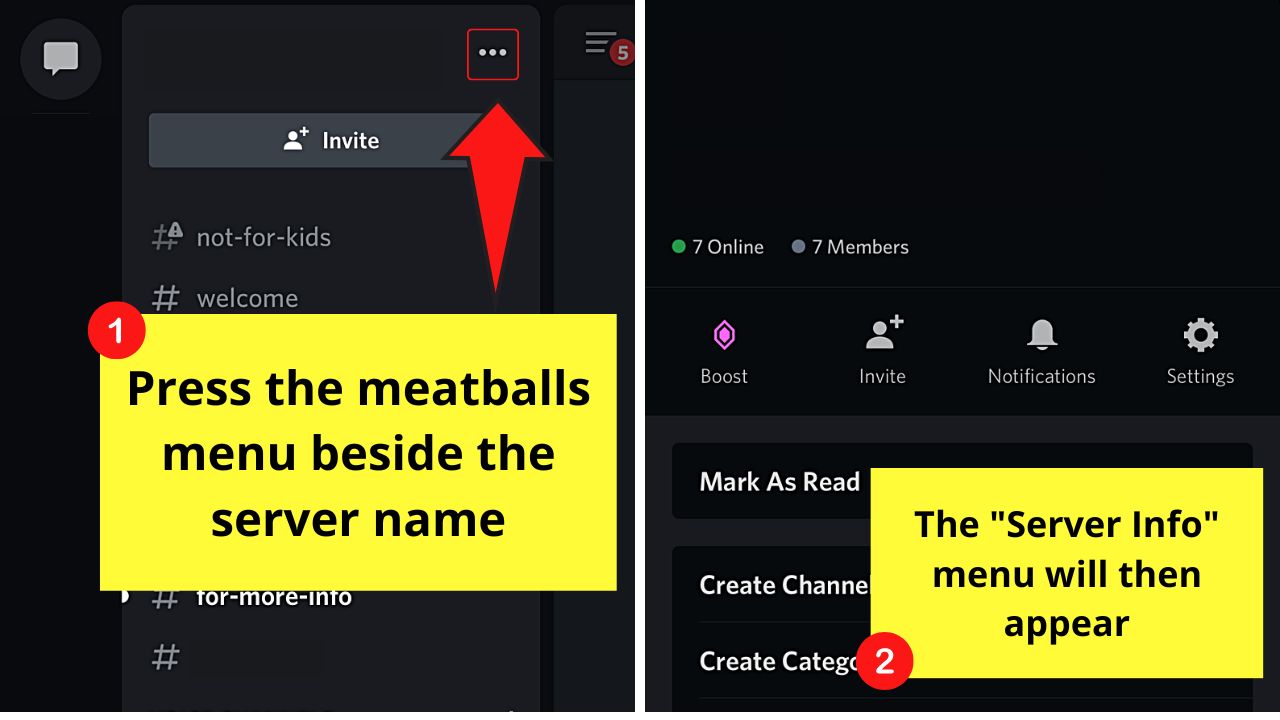
You will then see a menu appear from the screen’s bottom area.
Step 4: Tap the “Settings” button
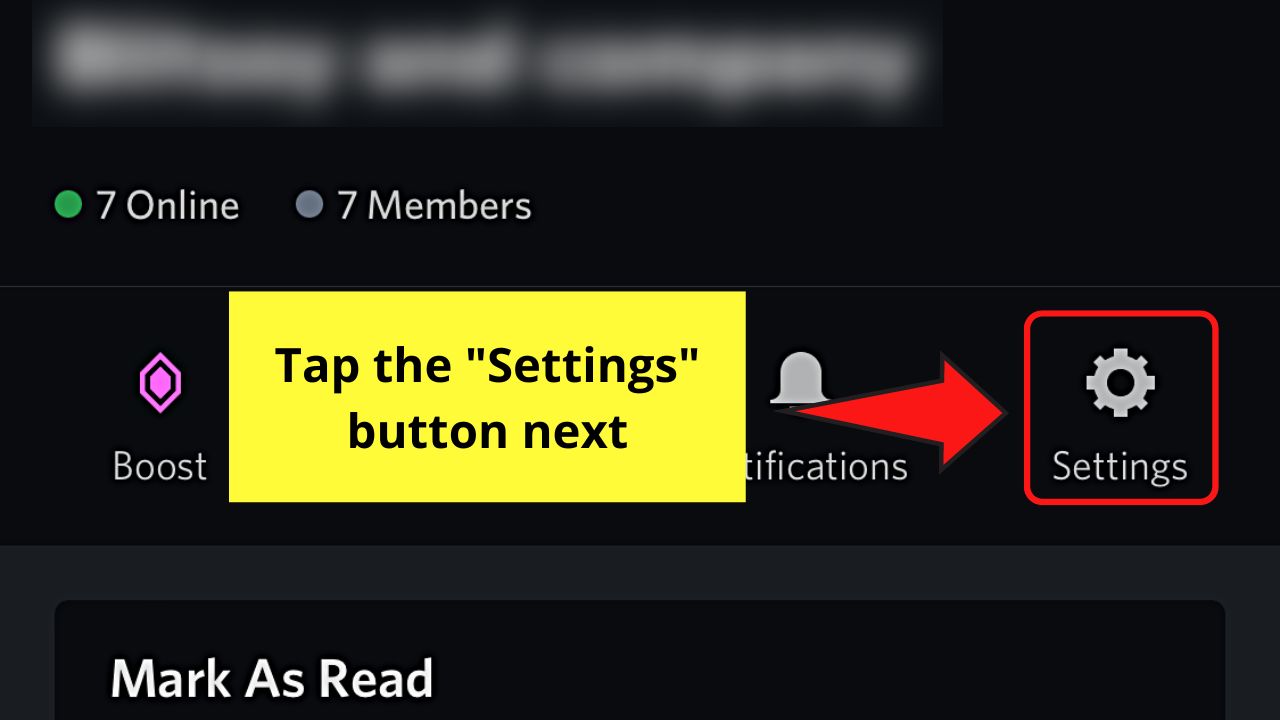
This appears as a cogwheel or gear icon.
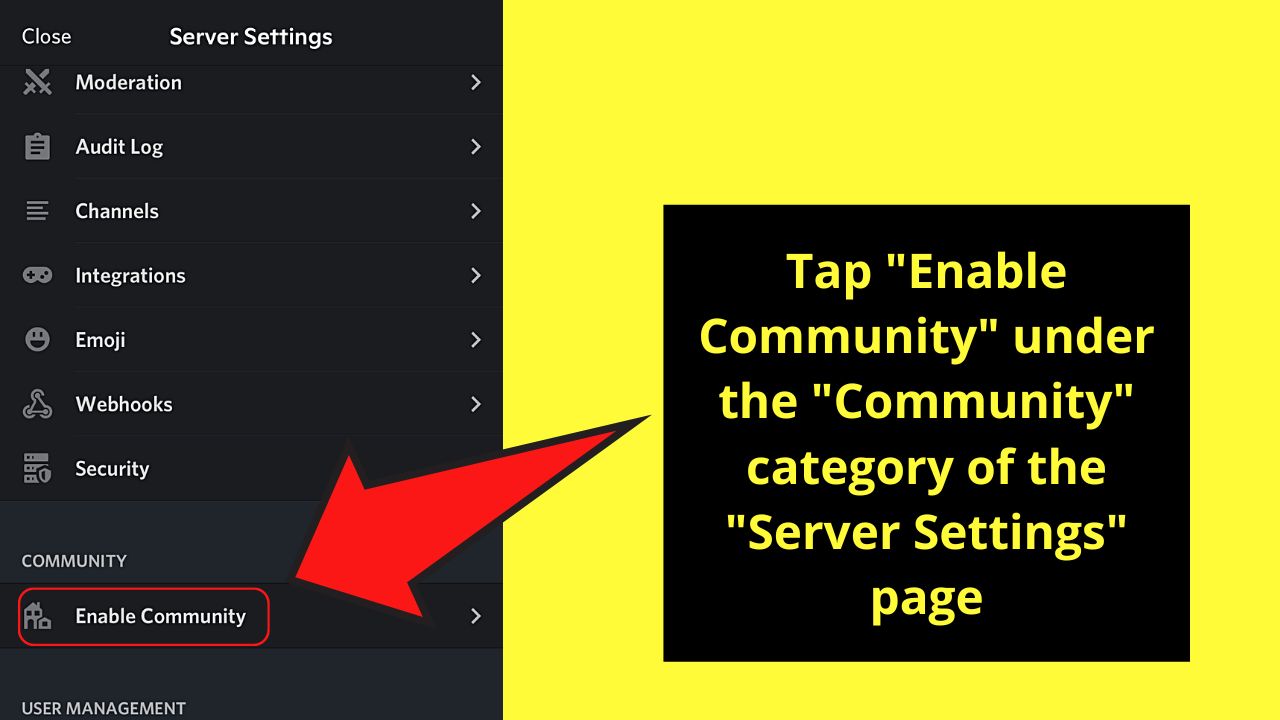
Step 5: On the “Server Settings” page, tap “Enable Community” under “Community”
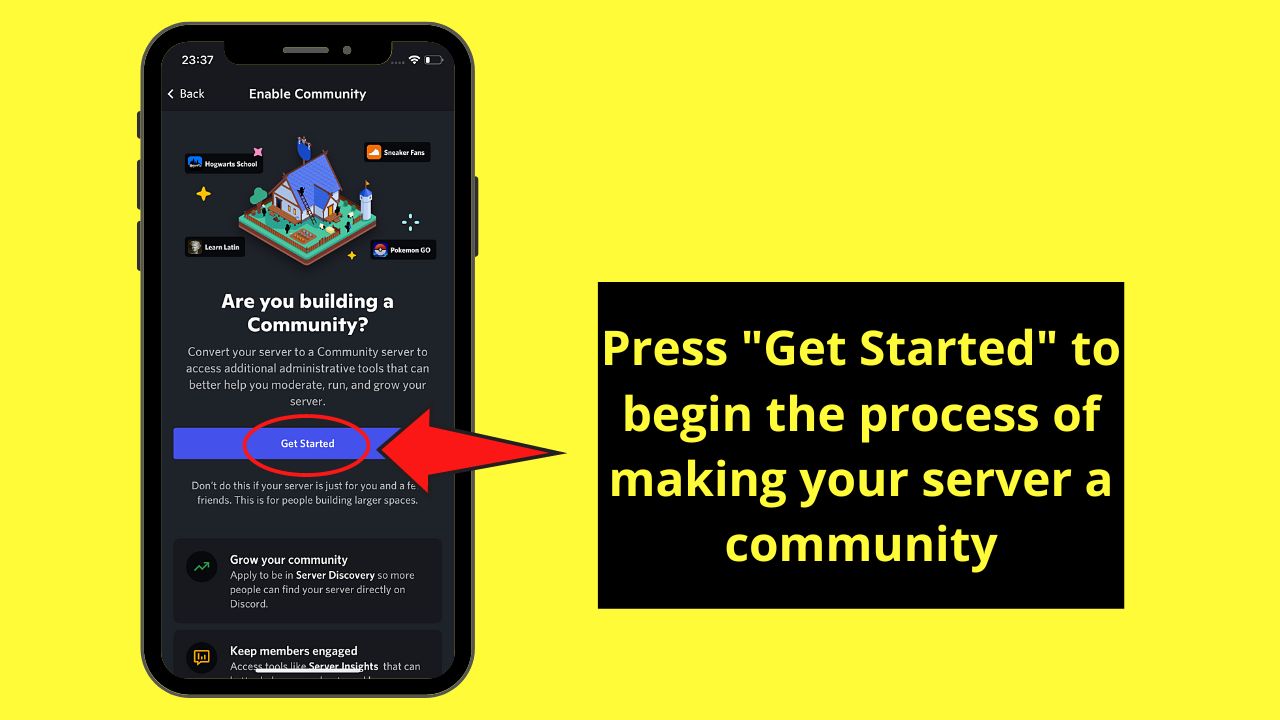
Step 6: Press the purple “Get Started” button
Step 7: Tap the toggles beside the “Verified email required” and “Scan messages sent by all members” to activate them

Then, press “Next” to head to the next step.

Step 8: Set up the “Rules or Guidelines Channel” and “Community Updates Channel”

Tap the “>” icon to choose the channel you wish to use. If you haven’t created a channel for those purposes, press the “Create one for me” option instead.
Then, press “Next.”

Step 9: On the “One Last Step” page, tap the toggles for the “Default notifications to Mentions Only” and “Remove moderation permissions from @everyone”
Step 10: Click the “I agree and understand” box
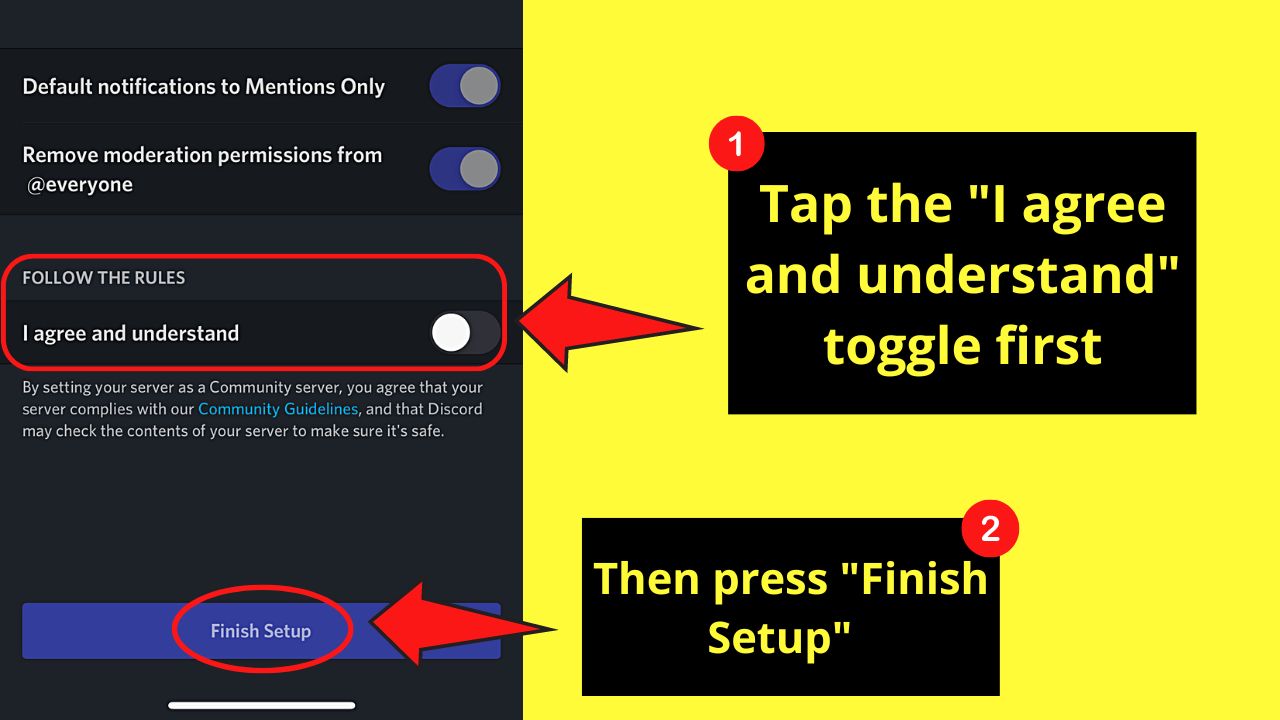
This will indicate that you’re following the community server rules.
Then, select the “Finish Setup.”
Now that you’ve made the switch to a community server, it’s time you submit your application for the partnership program.
Submitting Application for Partnership Program on Discord
While you can activate the community settings for your server on both desktop and mobile devices, there’s a catch.
You cannot apply for Discord’s partnership program from Discord mobile.
Hence, if you have made your server a community using a mobile device, you have to access Discord on a computer to continue submitting your partnership program application.
With that said, here are the steps to follow for applying to Discord’s partnership program.
Step 1: Click “Server Insights” under “Community”

This will appear after enabling the community settings for your server.
Then, select “Go to Server Insights” to view your server’s stats.
Step 2: Head back to the left side panel and choose “Partner Program”
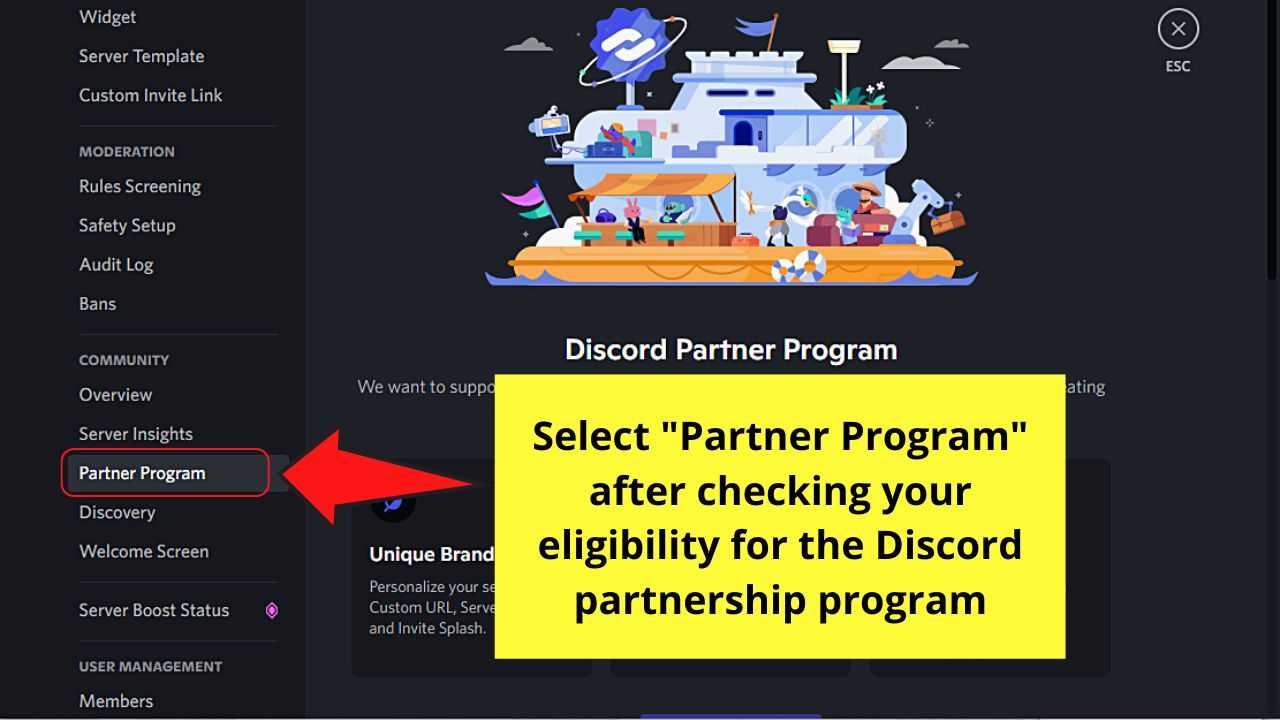
Do this only if your server meets the requirements.
Step 3: Click the “Apply for Partnership” button
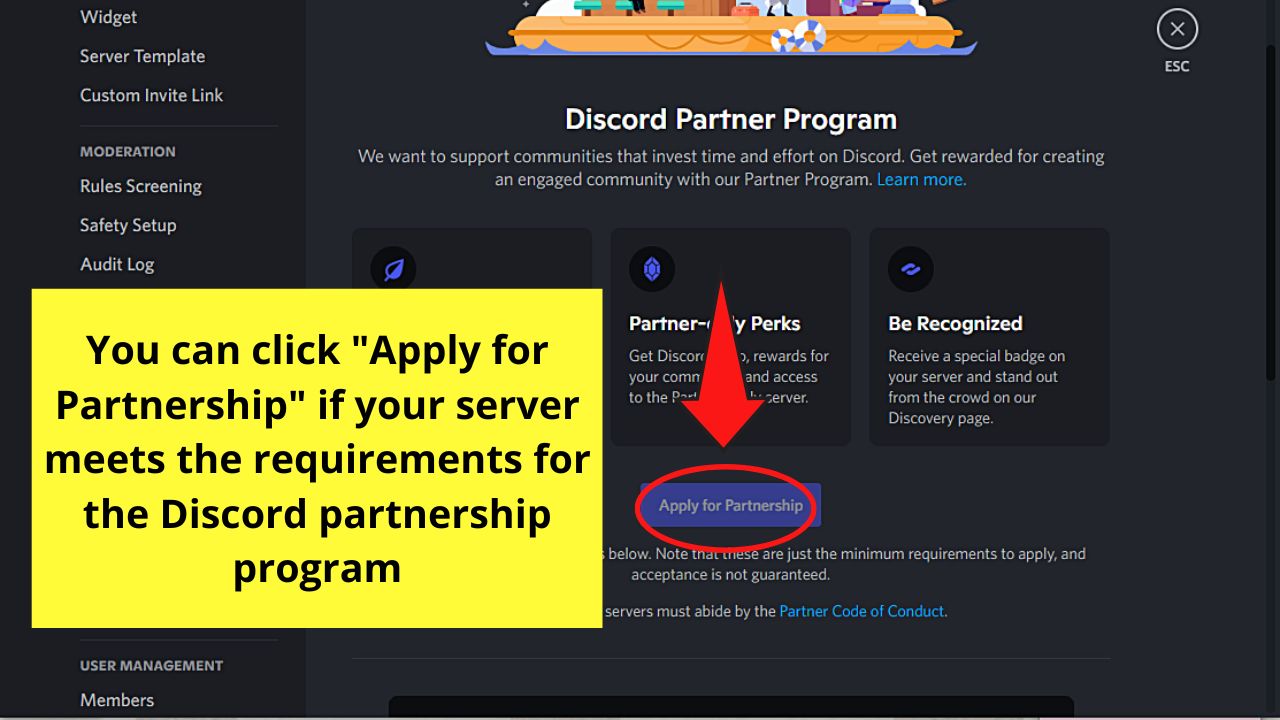
However, this button will only be clickable if your server’s eligible for becoming Discord’s partner
If not, your server doesn’t meet the requirements mentioned earlier, which you can check below the said button as you scroll down the page.
Step 4: After clicking “Apply for Partnership,” complete the details needed for the application form
You will then select what type of server you’re verifying from.
Step 5: Once the application form’s filled out, type the following details being asked
- First and last name
- Website
- Company or entity name
- Social media account for verification
- Server invite link
Step 6: Click the box for confirming that all the information in the form is correct
Then, select “Submit.”
And, wallah, you’ve successfully submitted your application to become a Discord partner.
You only need to wait for 5 days before you can receive the verdict for it in your email.
Yes, it’s quite a long time to wait to hear a decision from Discord, but it would surely be worth it knowing all the perks that your server will get.
So, what’re you waiting for? Jumpstart the application process and become Discord’s newest partner now!
Frequently Asked Questions about How to Become a Discord Partner
What is in for me when I apply to become a Discord partner?
Aside from server customization, Nitro subscription, and receive a special badge, you will also have access to the exclusive server for Discord partners. Your community will get rewards, as well as experience better talk on your server’s voice channels due to a better bitrate.
Why can’t I click the “Apply for Partnership” button even if I was able to label my Discord server as a community?
If you find the “Apply for Partnership” button is unclickable, it only means one thing — you’re not eligible for the application yet. You need to meet the requirements first before submitting an application form to Discord for the partnership program.
Do the views and likes from other platforms affect your eligibility for the Discord partnership program?
While the support staff includes the metrics about your server’s activity, they don’t include the views, followers, or likes on other platforms. It is because those numbers don’t represent how active a Discord community is.
Why is my application as a Discord partner denied even if I passed all the requirements they set?
While you certainly need to meet all the requirements for the partnership program, you need to pass a verification process first. If the server is based on your company or you as the server owner, you’ll pass. If it is simply a fan community or you’re not credible, your server won’t get verified.