
Where do you begin if you want to draw a border around an image in Illustrator?
Even though Illustrator isn’t the software that serves as a picture editor, there are still a few things that you can do and elements you can add to your images. You just need to know a few tricks.
In this tutorial, I will show you three different methods that will show you how to create a border around an image. It’s a really simple process!
How to create a border around an image in Illustrator
To create a border around an image in Illustrator, first open or place an image, then open the “Properties” panel, and click the “Mask” button to create a clipping mask around the image. To add a more personalized result, you can set a stroke value and a color on the same panel options.
Step 1:
Open or place an image.
As a start, you will need to open or place the image that you wish to edit.
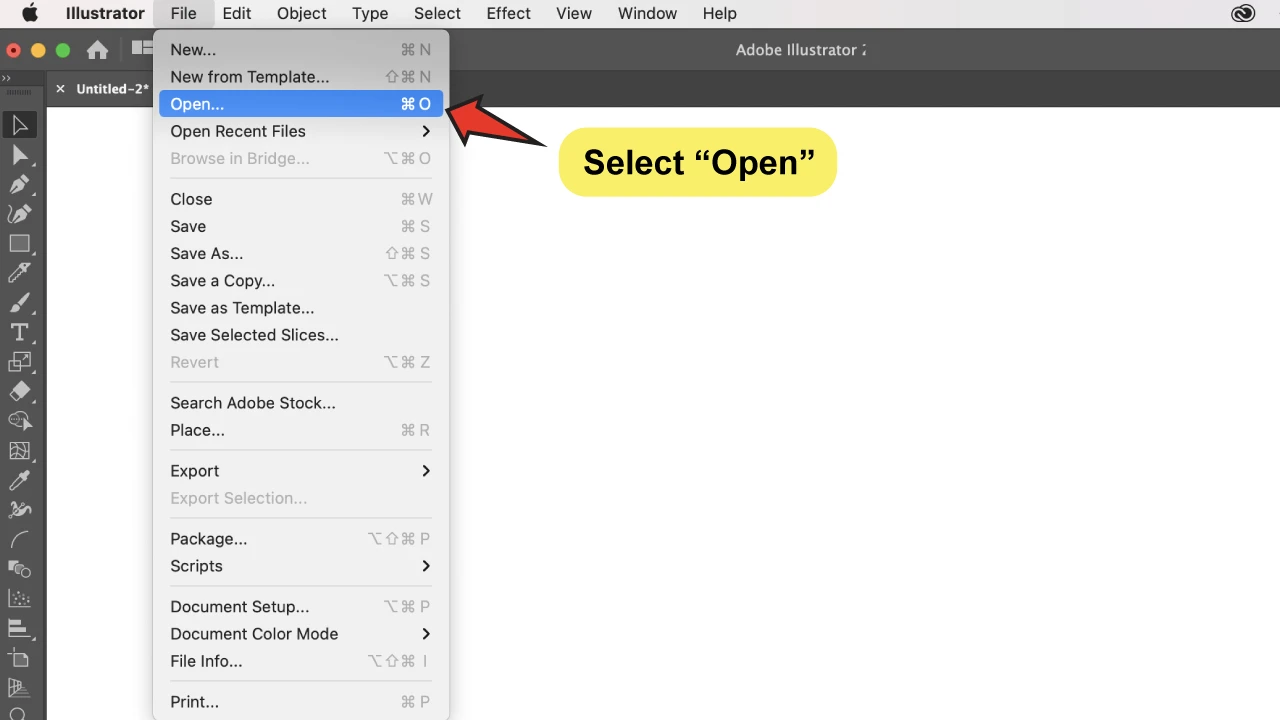
To open, go to “File”> “Open” and select the image you want to use.
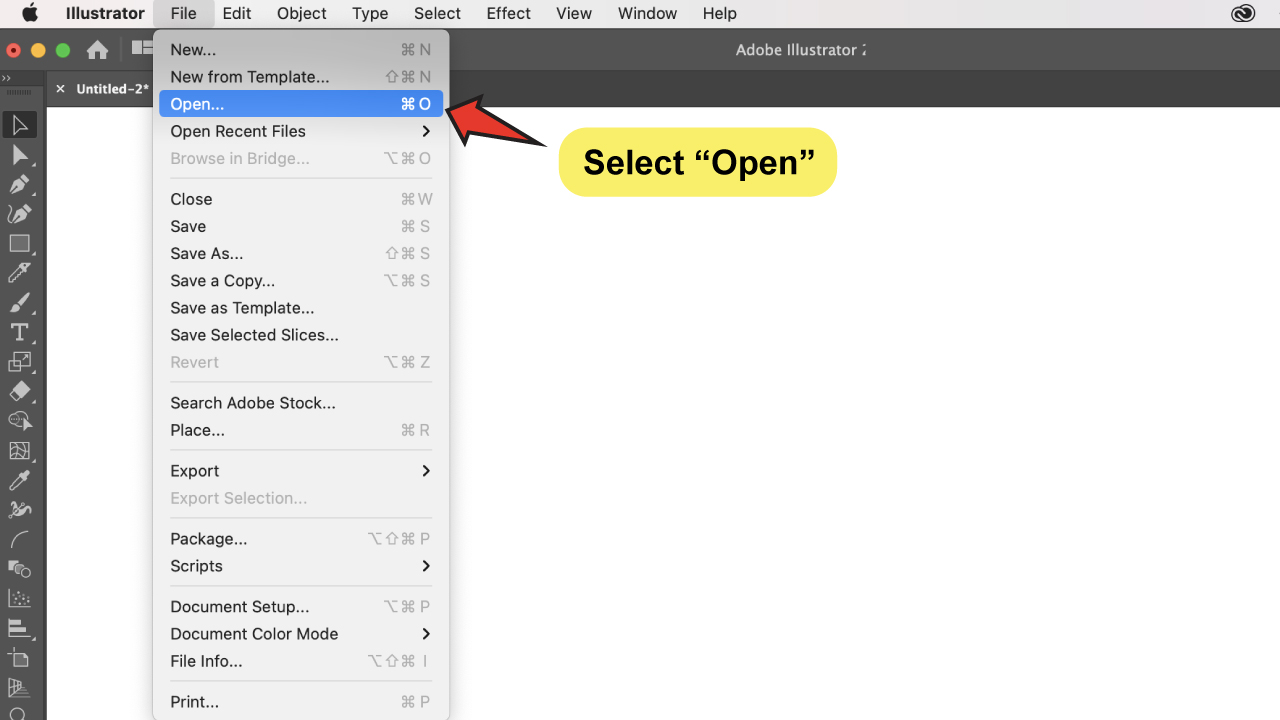

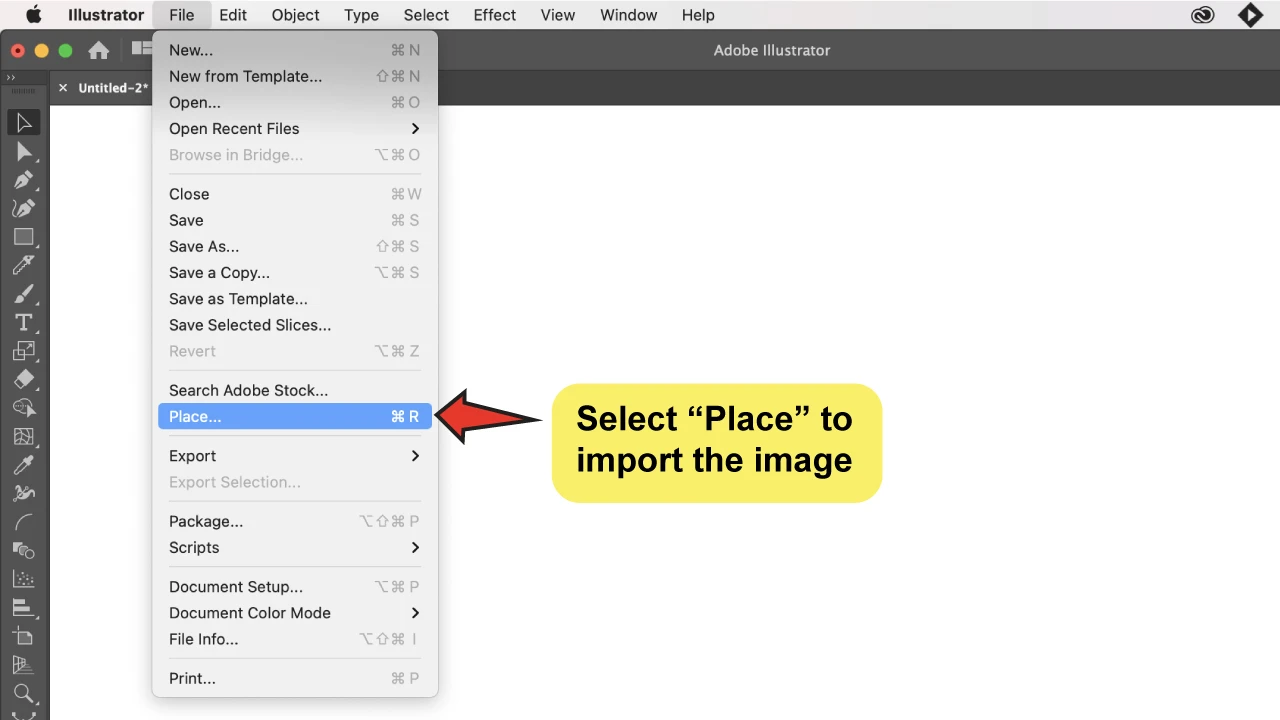
To place the image on the file you’re already working on, simply go to “File”>”Place” and select the image.

Step 2:
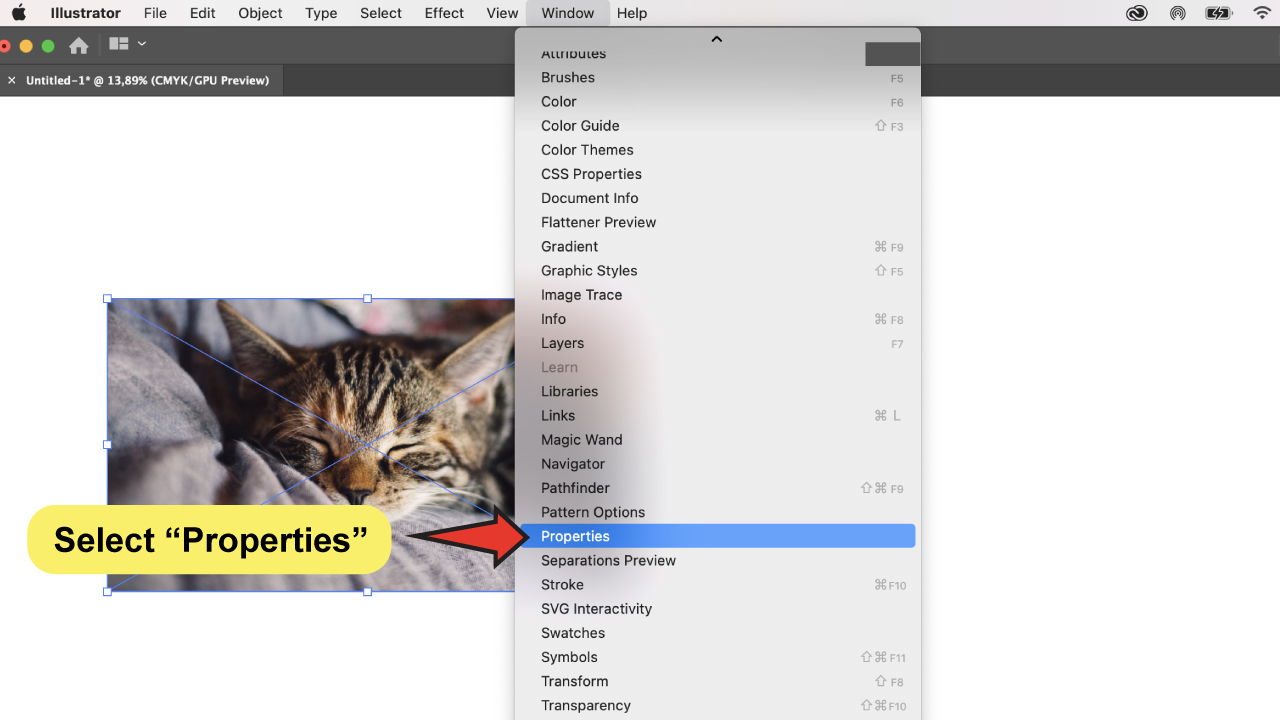
Open the “Properties” panel.
To open the “Properties” panel, go to the top-menu and select “Window”>”Properties”.

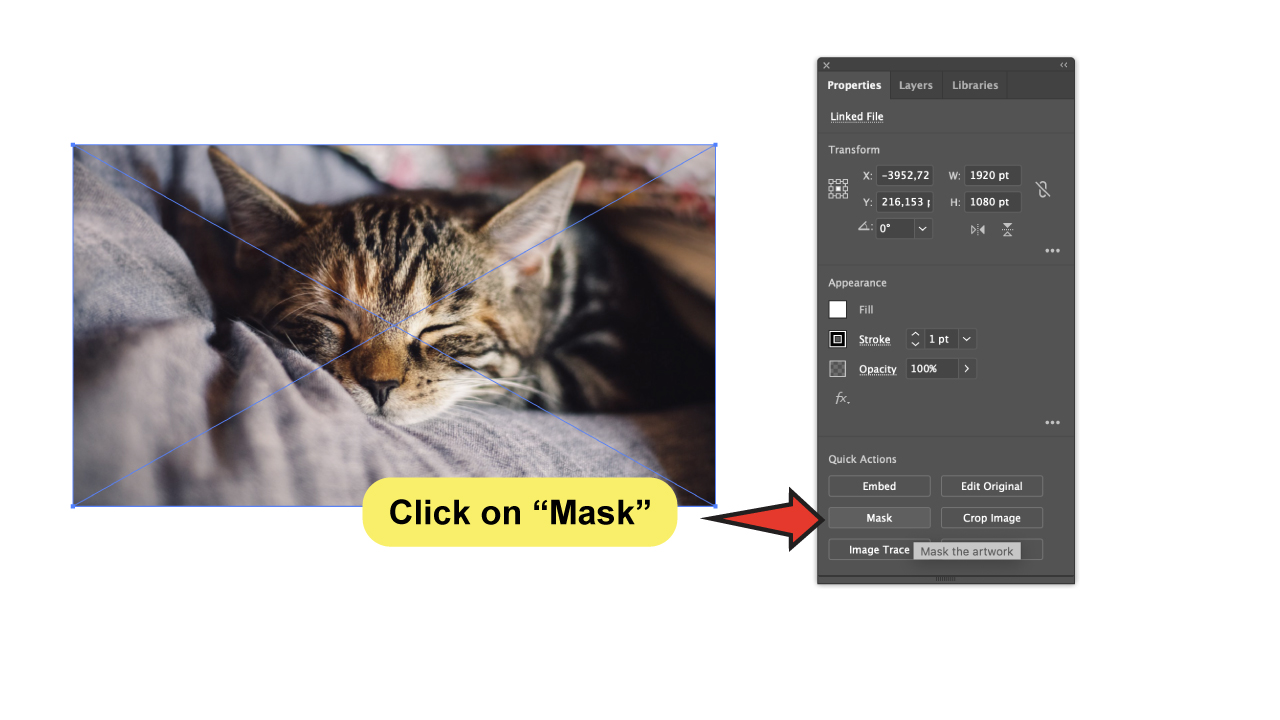
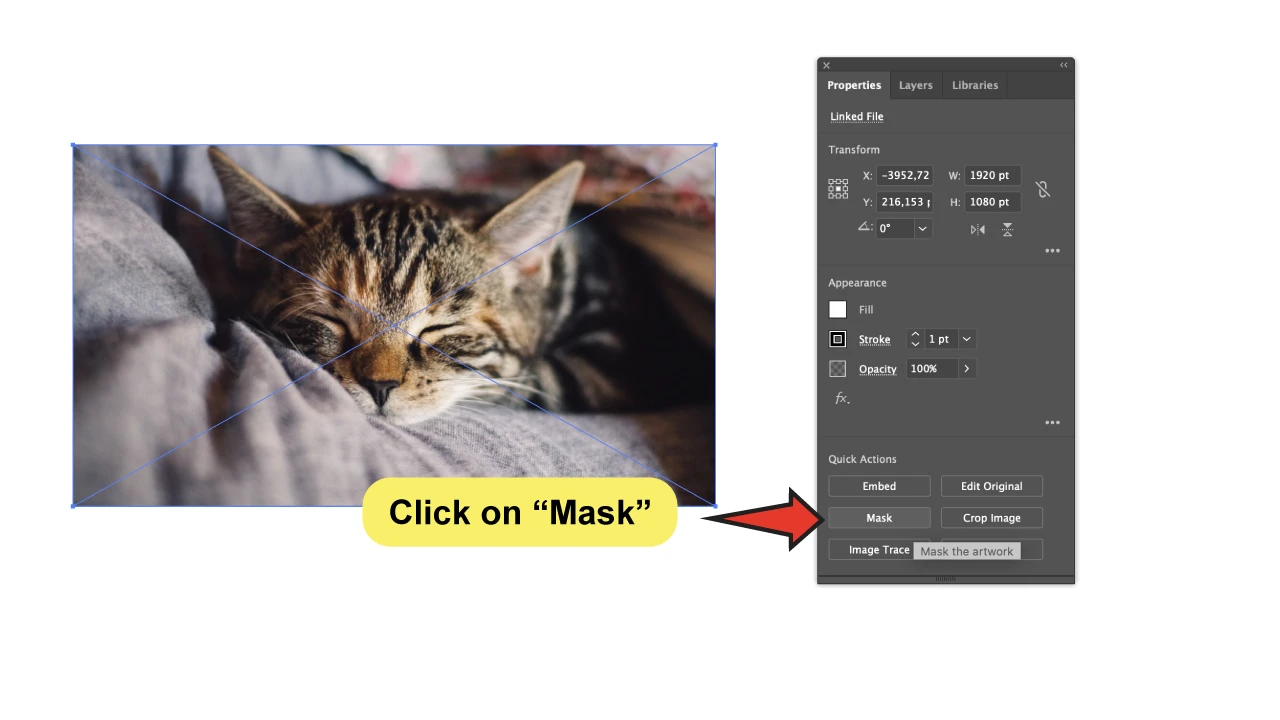
Step 3:


Create a mask on the image.
Select the image with the “Selection Tool” (V) and then click the “Mask” button in the “Quick Actions” area at the bottom of the “Properties” panel.
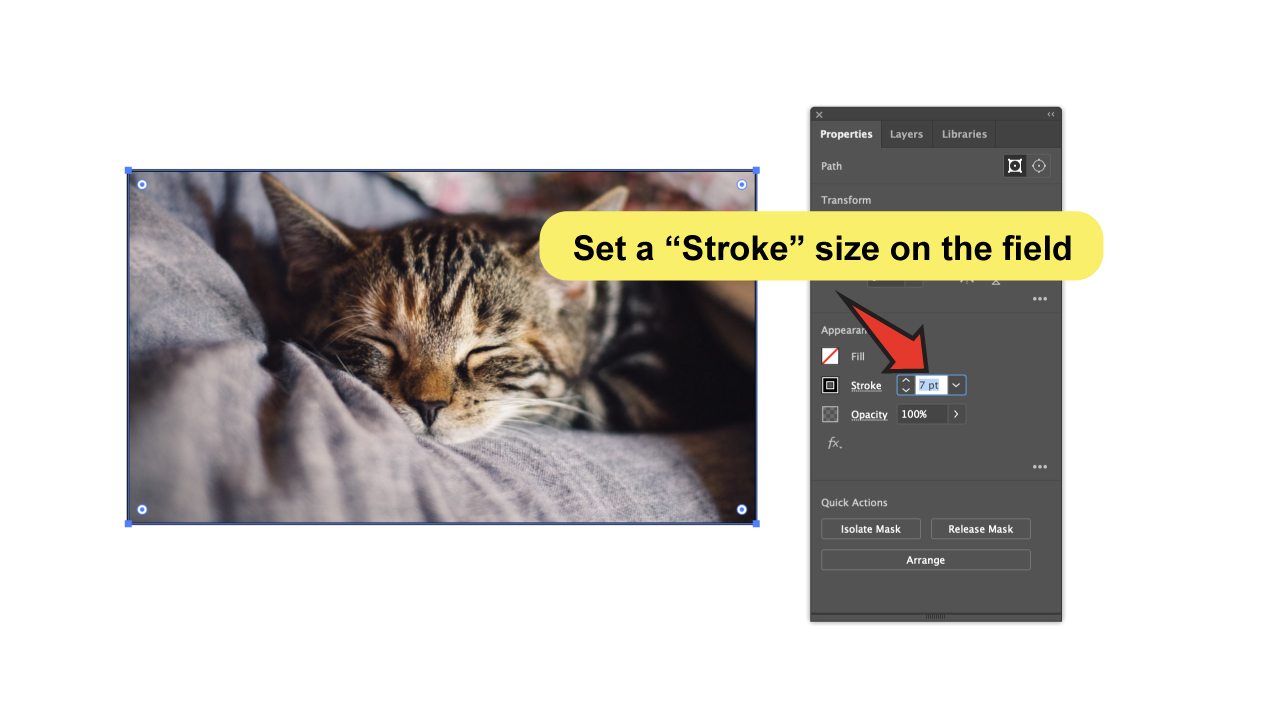
Step 4:
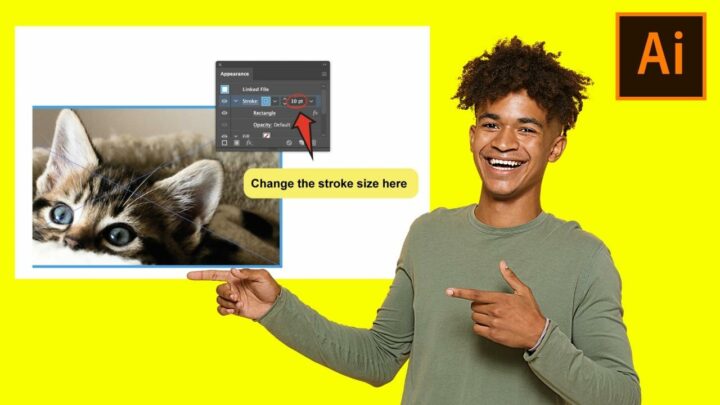
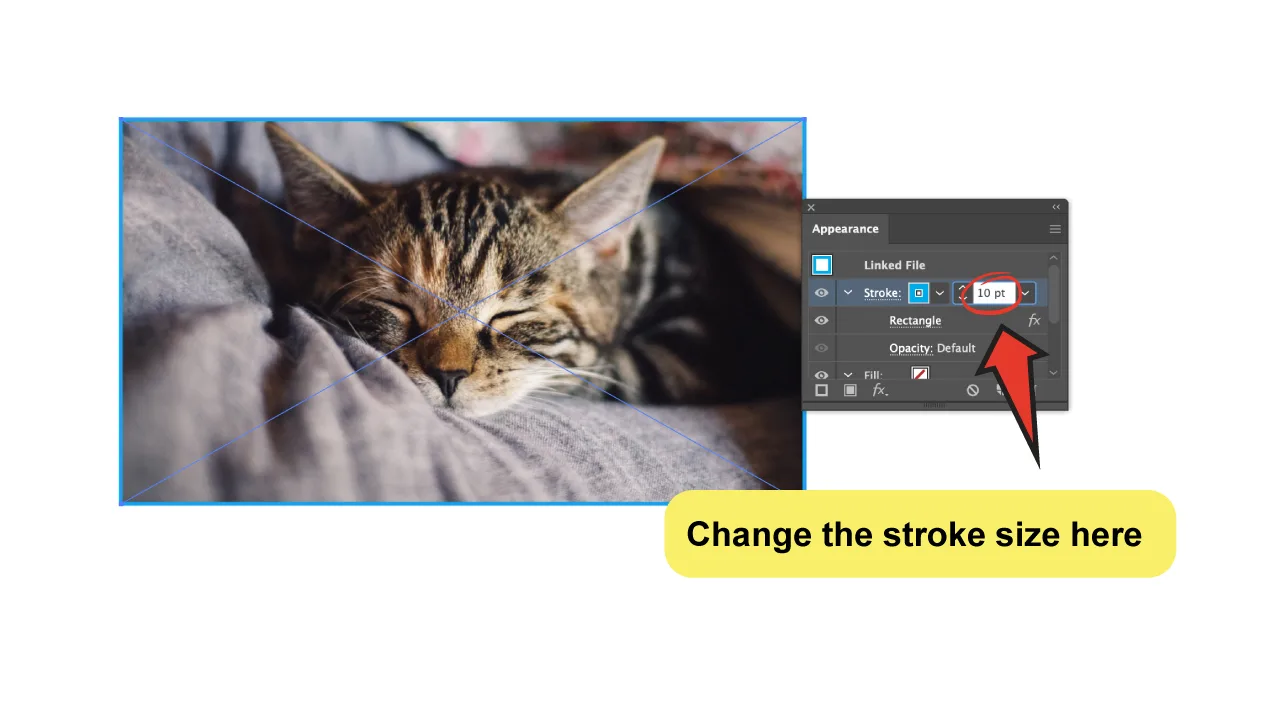
Set a “Stroke” size.
Set a “Stroke” value in the “Appearance” area of the panel.
You can manually increase or decrease the stroke size by typing a number into the field or by using the arrows up and down. As soon as you enter a value in the field, you will notice how the stroke appears on your image.

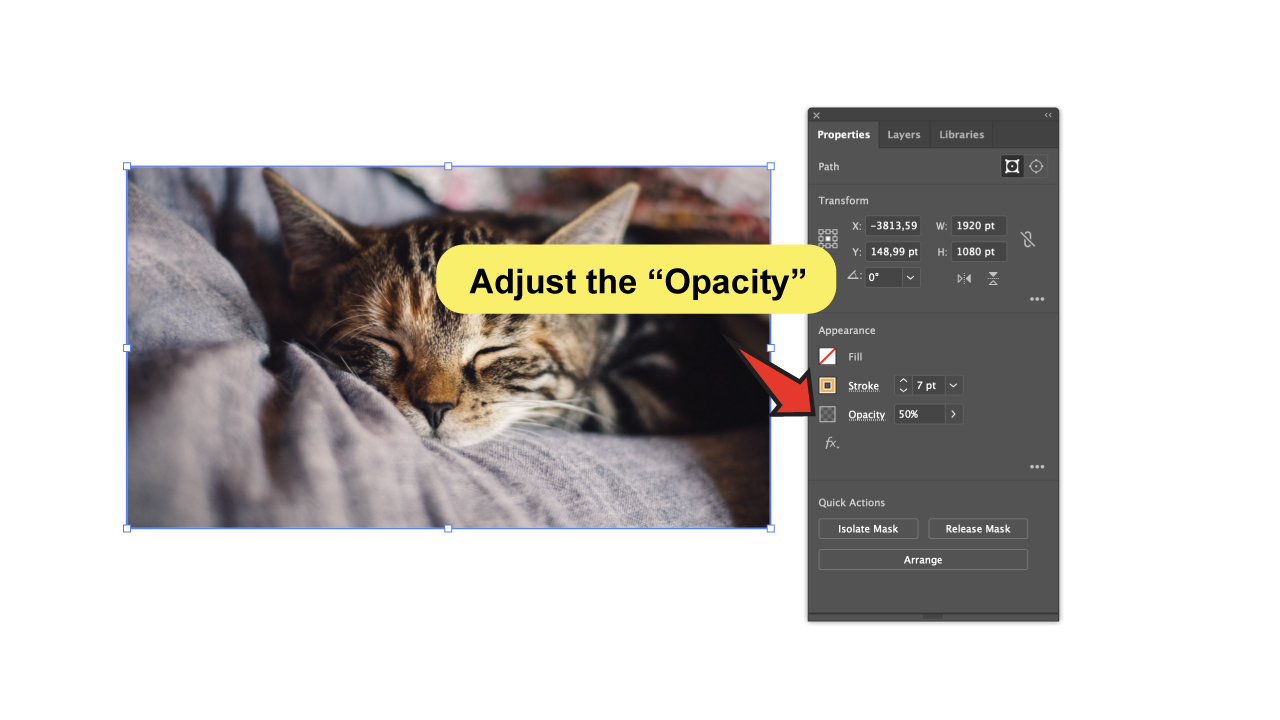
Step 5:
Set a “Stroke” color.
As with the previous method, you can change the color of the “Stroke” by pressing on the small square next to the “Stroke” name.

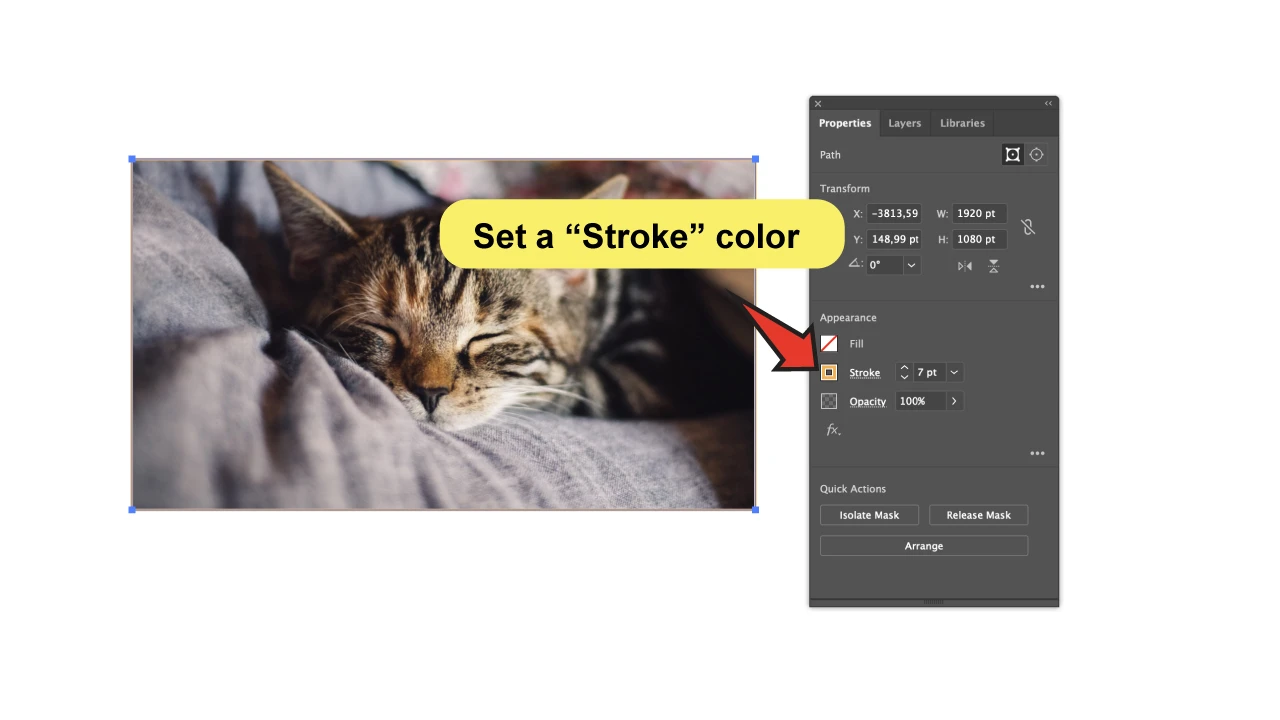
If you feel like it, you can also adjust its “Opacity.”

Creating a Border Around an Image in Illustrator Using the “Appearance” panel
To create a border around an image in Illustrator using the “Appearance” panel, follow these steps:
Step 1:


Open or place an image.
As a start, you will need to open or place the image that you wish to edit.
To open, go to “File”> “Open” and select the image you want to use.
To place the image on the file you’re already working on, simply go to “File”>”Place” and select the image.


Step 2:

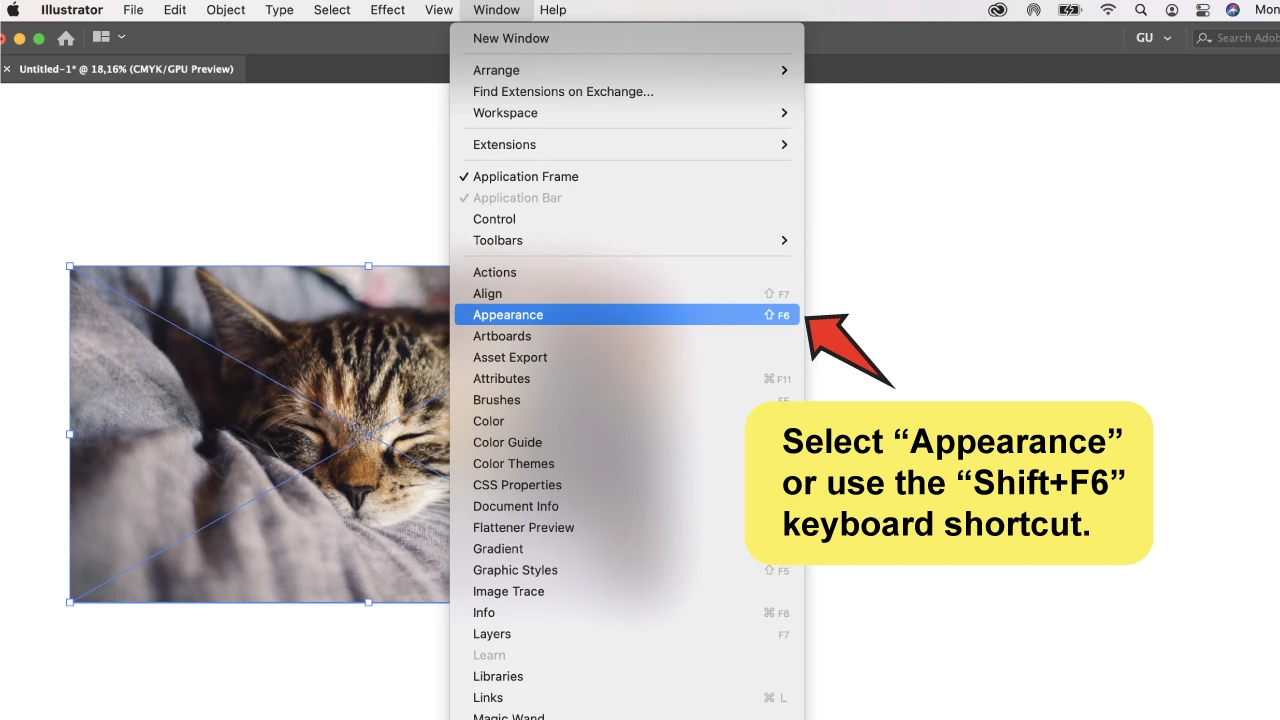
Open the “Appearance” panel.
For this method, we first must open the “Appearance” panel. To do this, go to the top menu and select “Window”>”Appearance,” or press “Shift+F6” on your keyboard.
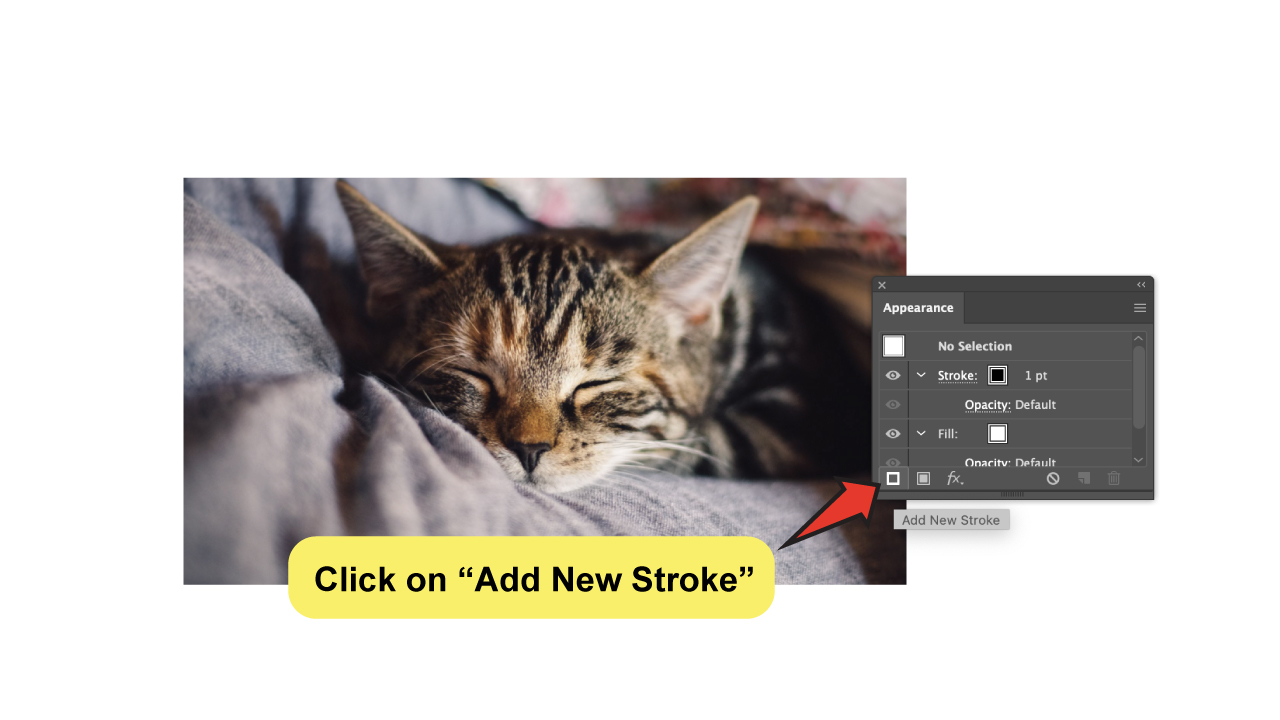
Step 3:
Add a stroke to the image.
Use the “Selection Tool” (V) first to select the image.
Now go to the bottom of the “Appearance” panel and click on the “Add New Stroke” button in the left corner.

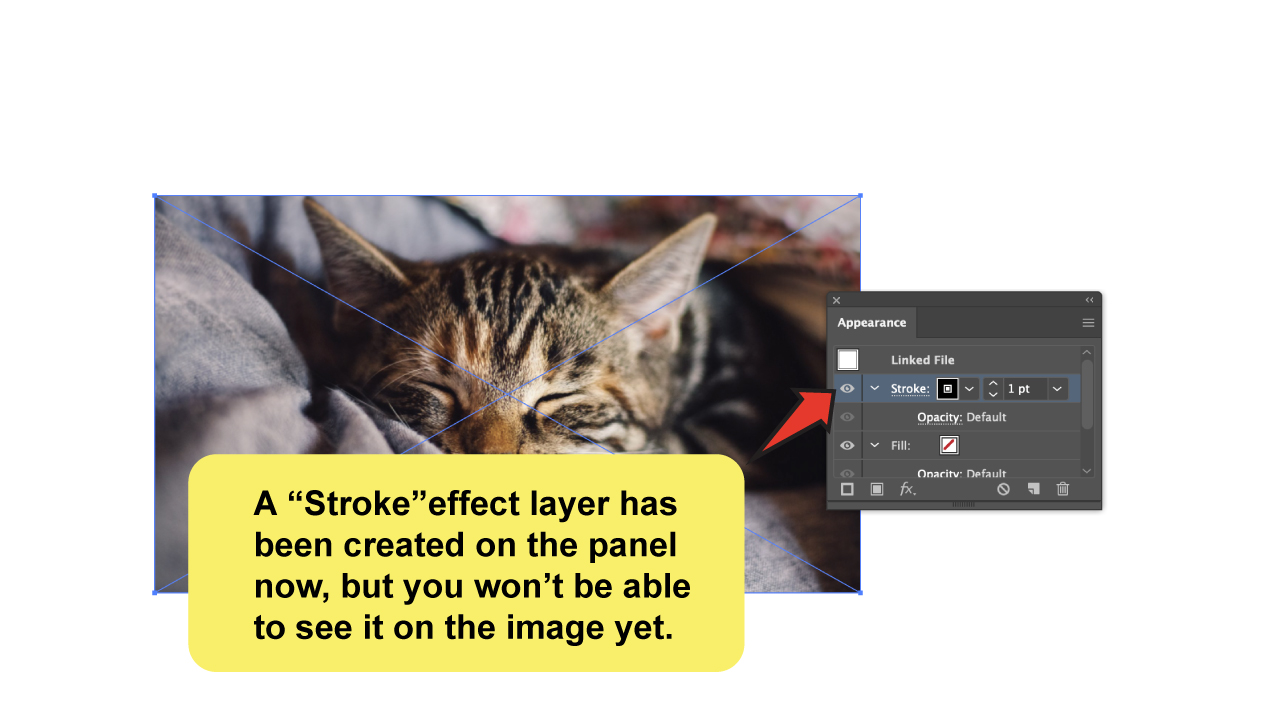
On the “Appearance” panel, you can now see the incorporation of a “Stroke” effect layer; however, the image itself hasn’t been updated.

Step 4:
Convert the stroke into a shape.
Now, on the panel, select the new stroke layer and press the “Fx” button at the bottom of it.
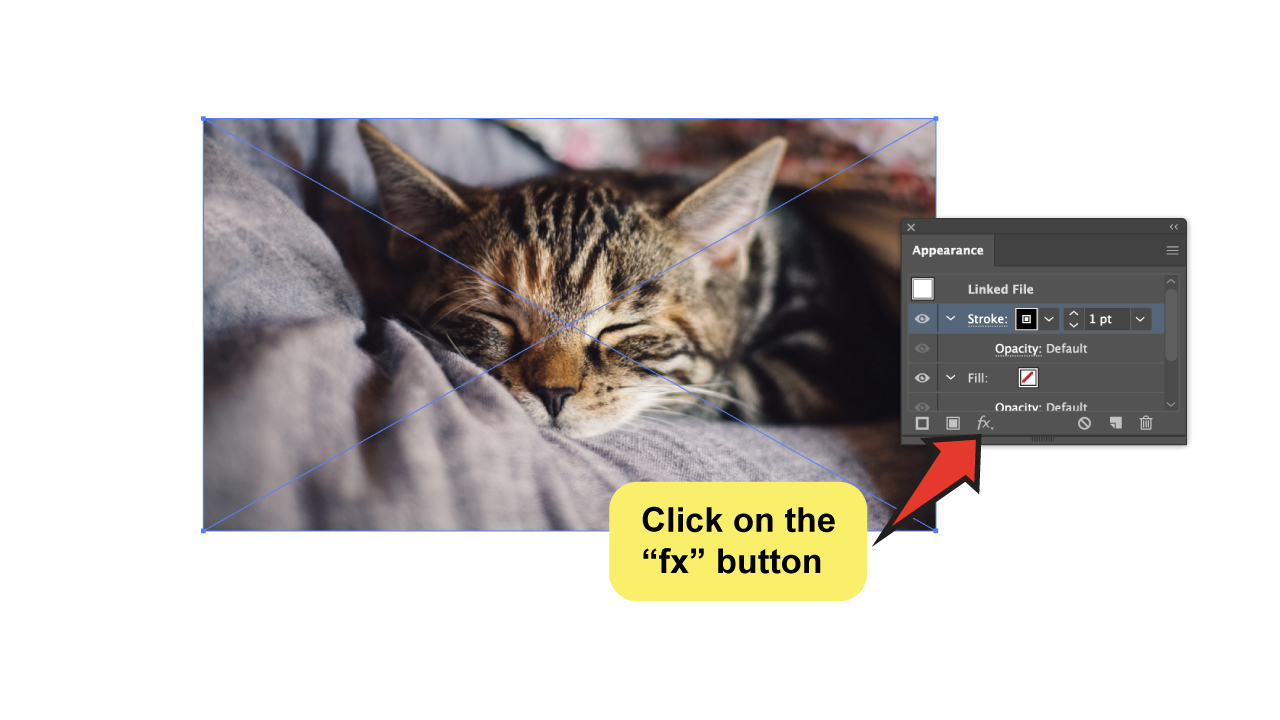

Then, on the drop-down menu, select “Convert to Shape” > “Rectangle.”


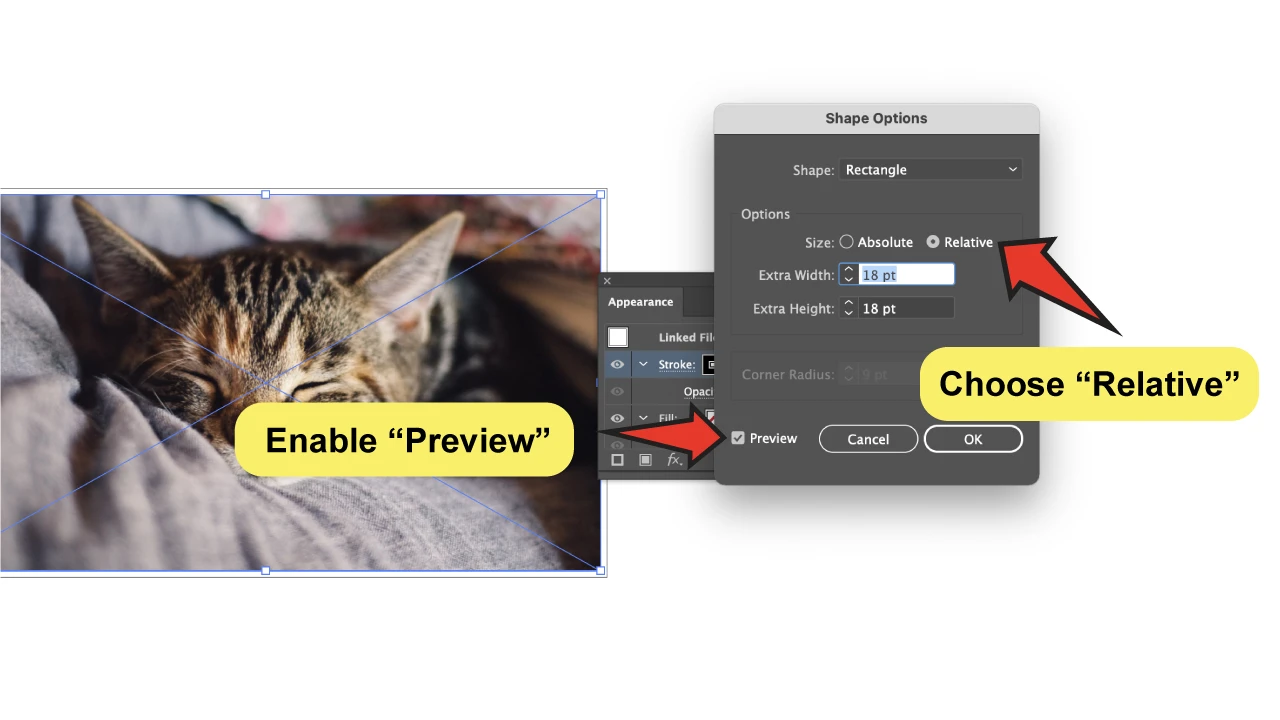
A menu box will appear. Remember first to check the “Preview” box to see the live changes. The stroke is now visible!
Set the “Size” option to “Relative” so that the border’s rectangle changes proportionally to the image. If you select “Absolute,” the image will not adapt to any size changes you make.

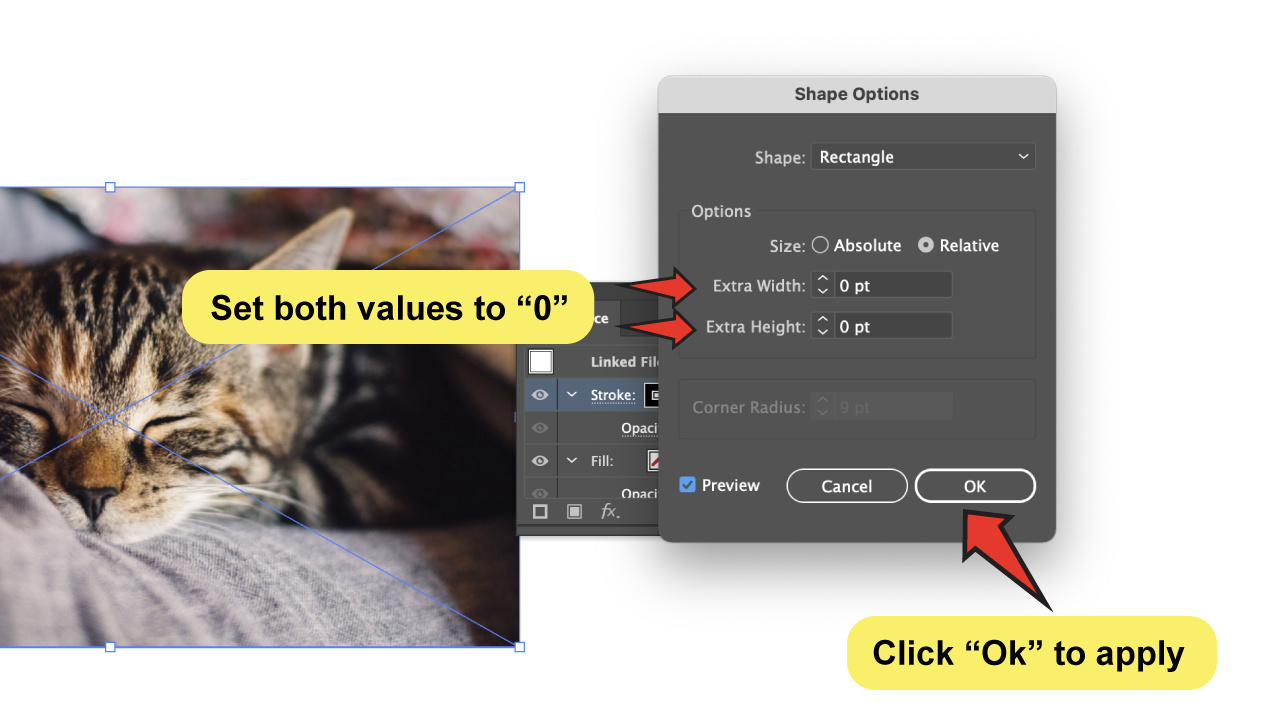
The “Extra Width” and “Extra Height” fields work to set the distance that the rectangle and its stroke will have from the image. If you want the border to be exactly the size of the picture, set them to zero.
Once you finish the settings, click “OK” to apply.

Step 5:
Adjust final details.
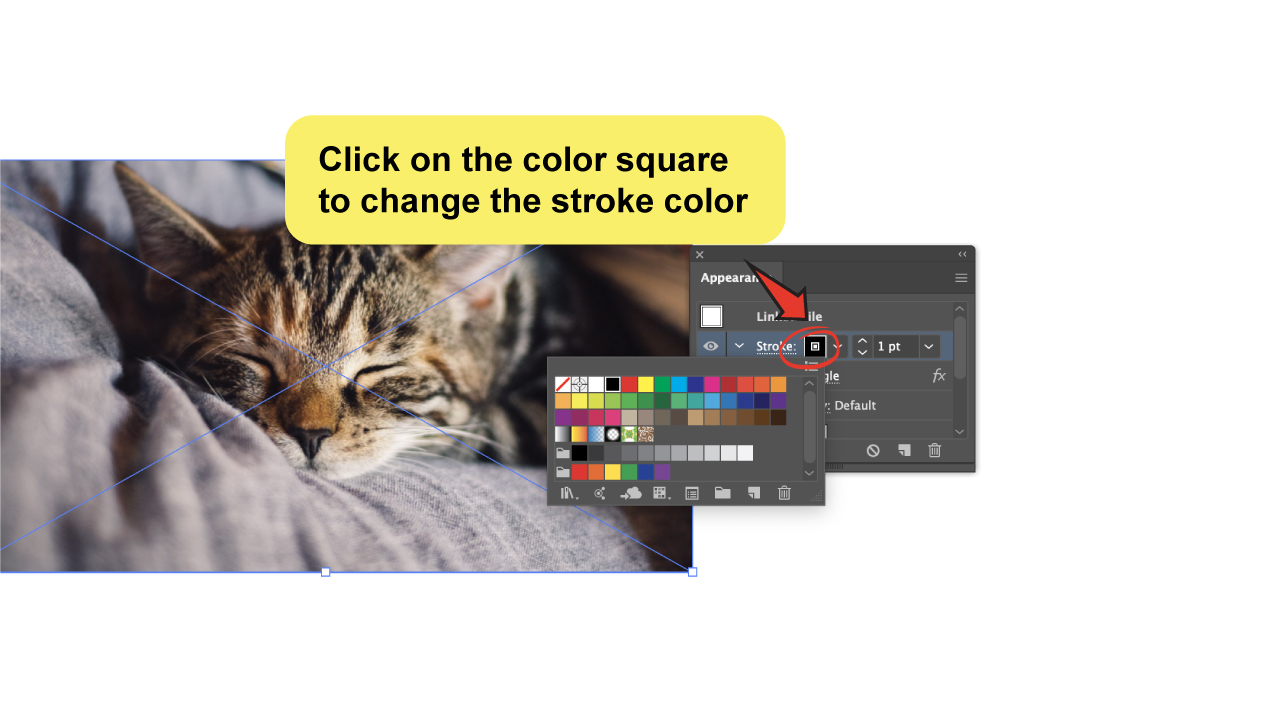
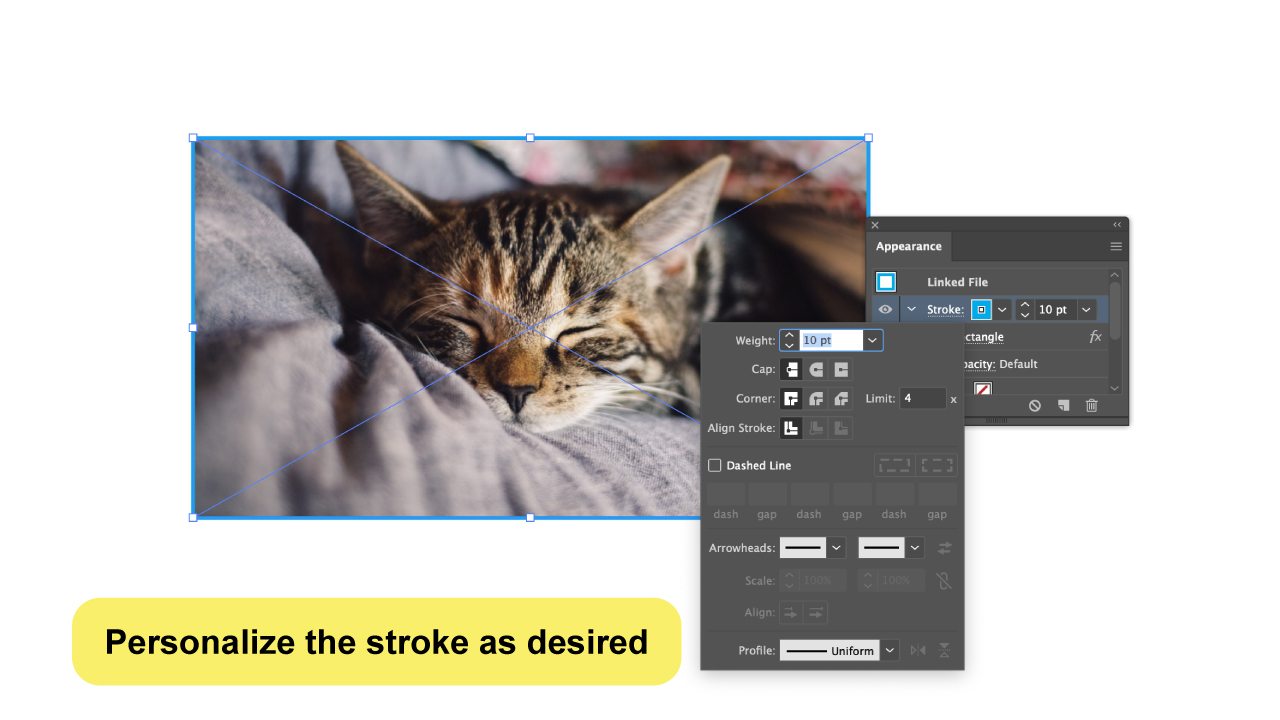
Now it’s the time to customize and bring some personality, which you can start by simply changing the color of the stroke!
On the same “Appearance” panel, you’ll see a little color square right next to the “Stroke” name. You can choose a new color from the swatches by clicking there.

Next to it, there’s also a field where you can alter the size. There is usually a 1-pt value set by default, but you can adjust the value to whatever you need. You may also use the arrows to manually increase or reduce the value by clicking up or down.

Last, you can apply any of the usual features found on the main “Stroke” panel by simply clicking on the “Stroke” name. This will display a whole new box with settings where you can customize a few other things.
For example, you can apply different styles to your stroke, edit the type of corners, and some other options, so, if you are already familiarized with the panel, you will know what to do.

Creating a Border Around an Image in Illustrator Using the “Rectangle Tool”
Step 1:
Open or place an image.
As a start, you must open or place the image you wish to edit.
To open, go to “File”> “Open” and select the image you want to use.

To place the image on the file you’re already working on, simply go to “File”>”Place” and select the image.


Step 2:
Open the “Stroke” panel.
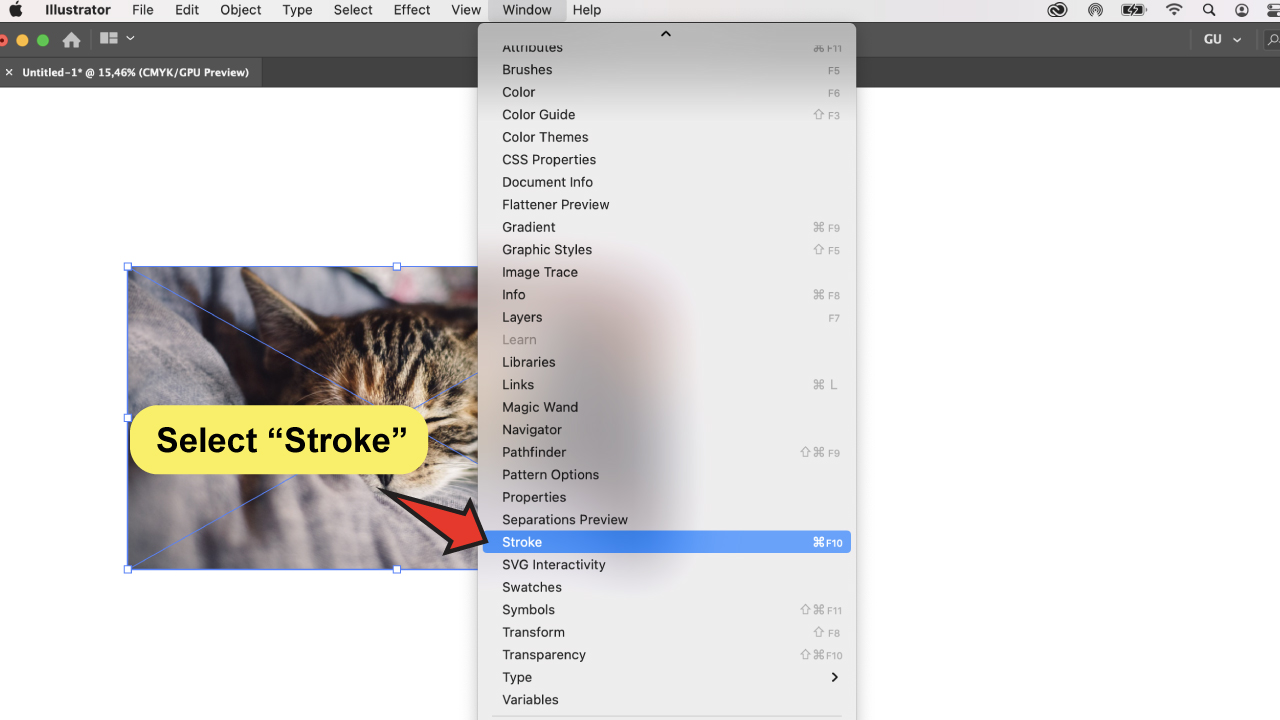
For this method, we’ll be using some properties from the “Stroke” panel, so if you don’t have it open yet, go to “Window”> “Stroke” or use the “Ctrl + F10” keyboard shortcut.

Step 3:
Create a rectangle over the image.
Once your image is open, use the “Rectangle Tool” (M) to draw a rectangle over it.
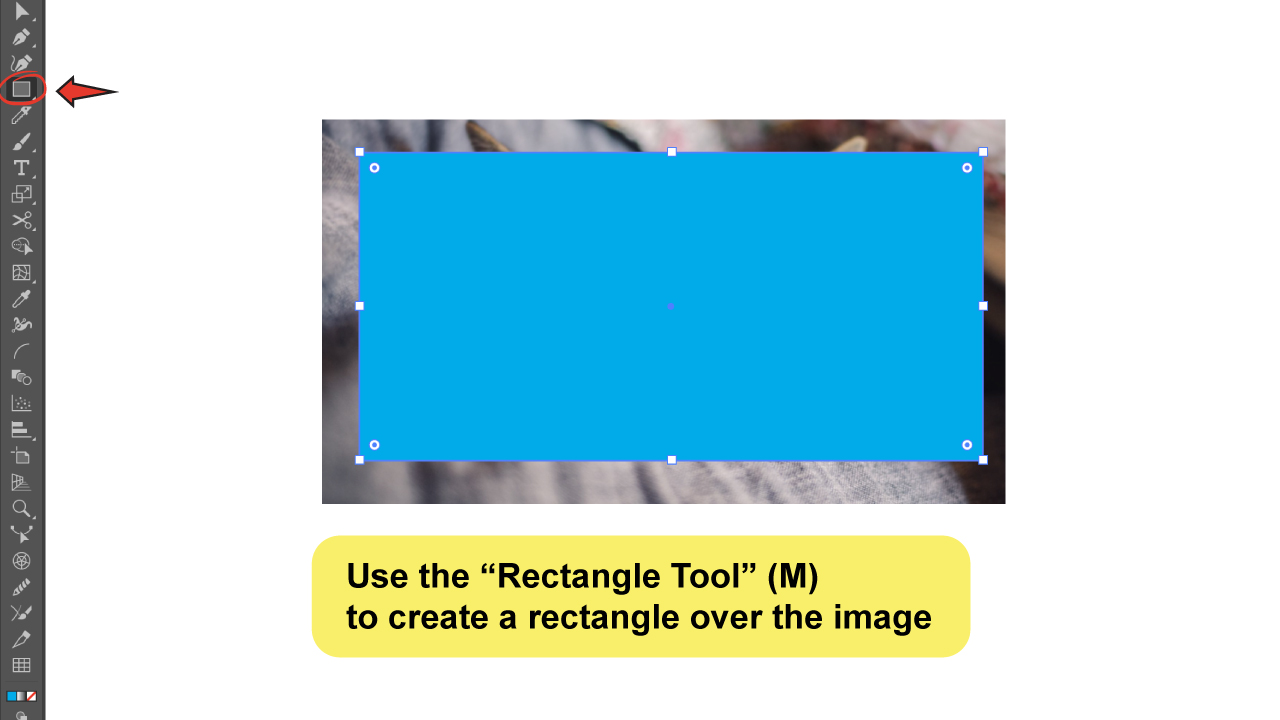

Keep in mind that the rectangle and the image must be the same size and that the rectangle must be placed above the image so that it is not covered by it.
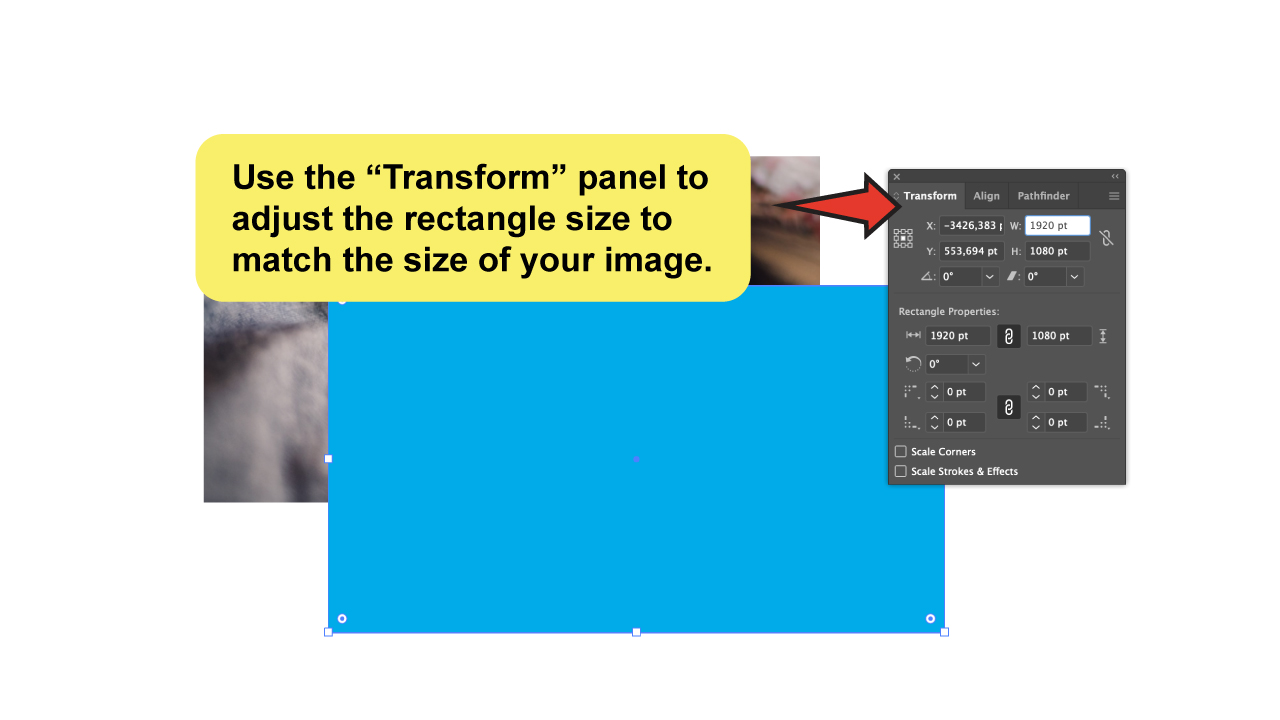
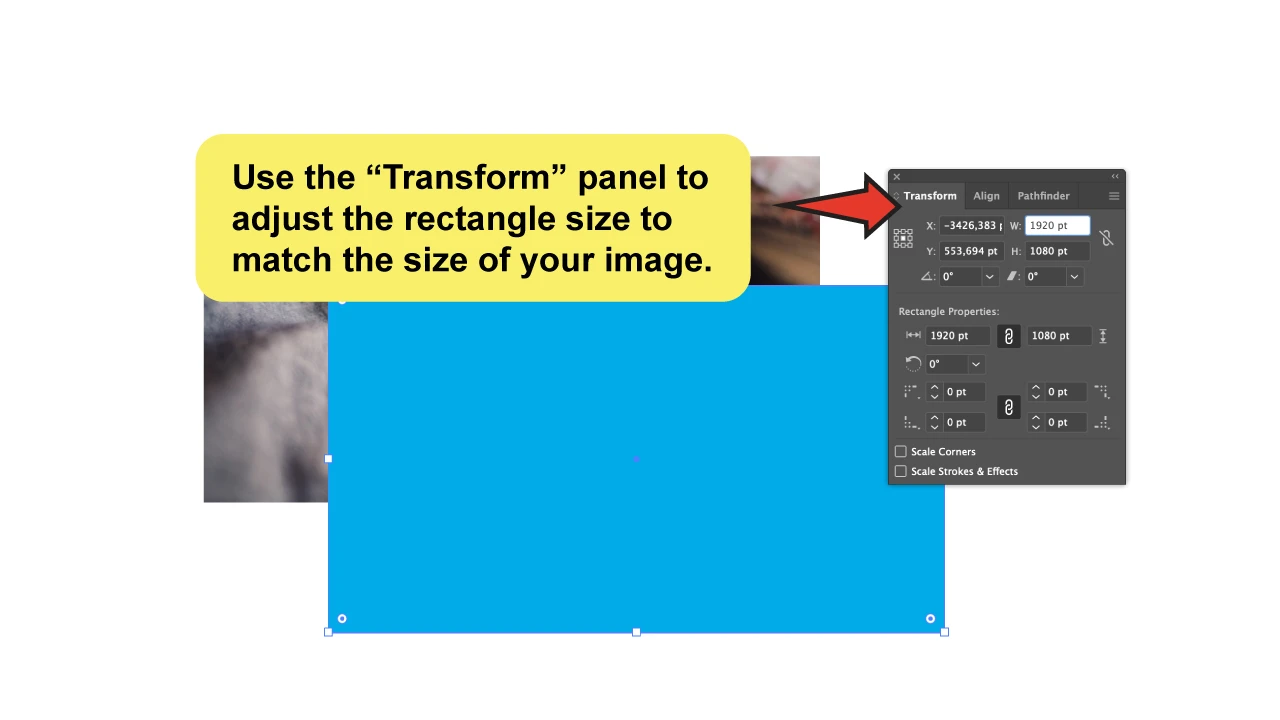
I recommend that you adjust the alignment and size of the rectangle to ensure that they match exactly, but don’t worry, you can do this in a few seconds by using some of the tools available.
To adjust the size, simply open the “Transform” panel by pressing the “Shift+F8” keyboard shortcut. (“Option” if you use a Mac).
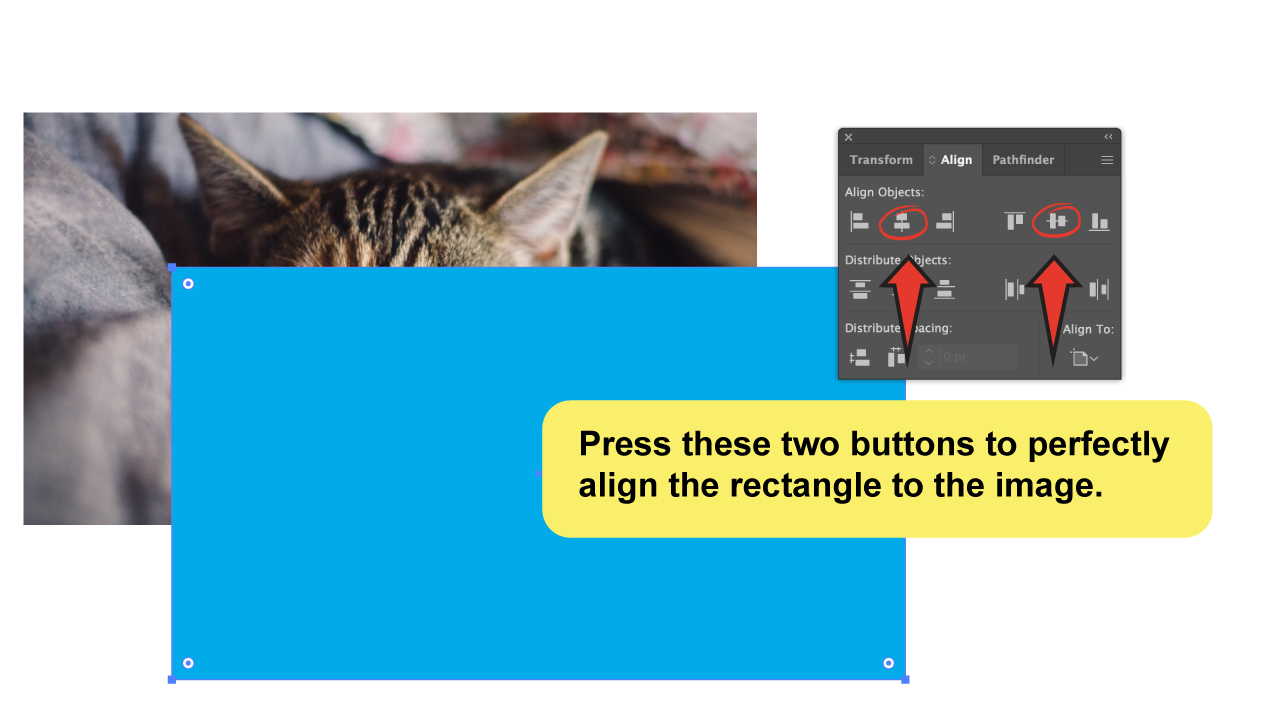
After you’ve adjusted the size, you can use the “Align” panel to nicely align both objects. Simply select both items at the same time and press the “Horizontal Align Center” and “Vertical Align Center” buttons.

Step 4:
Create a stroke.
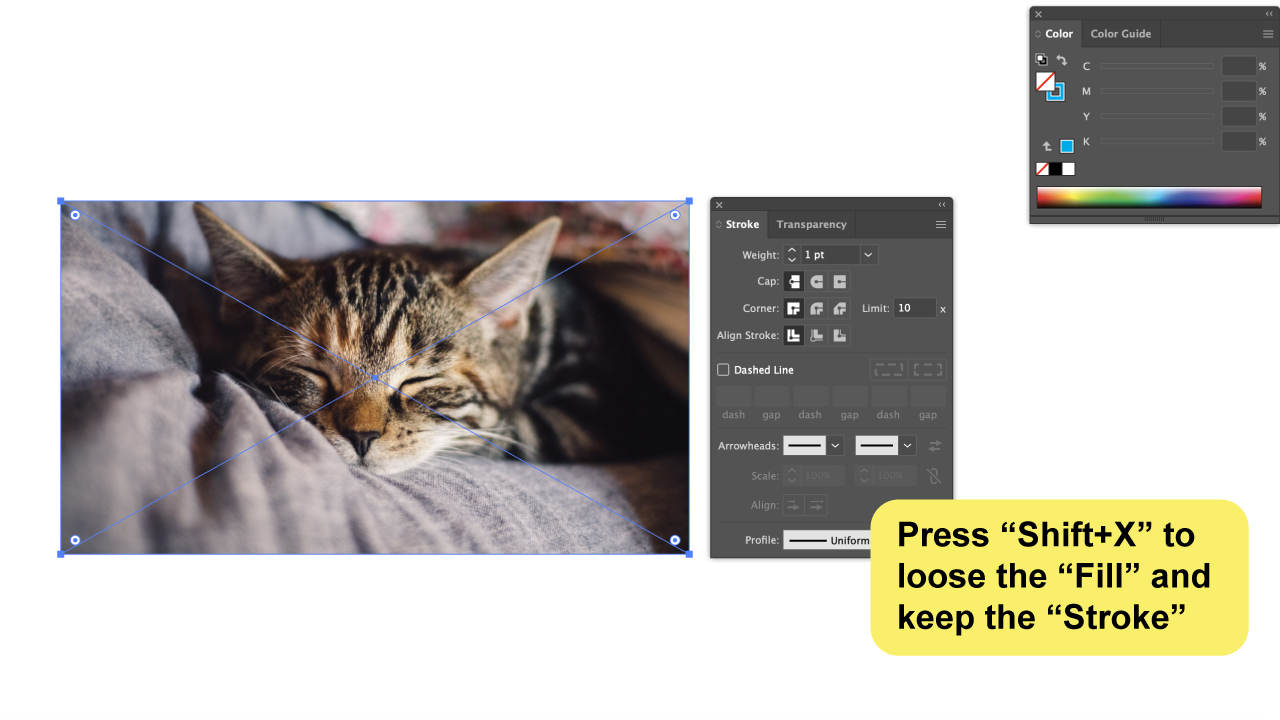
Now that we are all set with the rectangle, we will use it as a border, so, basically, we’ll need to remove the fill and keep the stroke.
To do this, first, jump to the “Color” panel by pressing the “Control+F6” keyboard shortcut. Now, to keep it going with the shortcuts and make a smooth process, press the “Shift+X” keyboard shortcut. This will invert the “Fill” and “Stroke” colors.

Step 5:
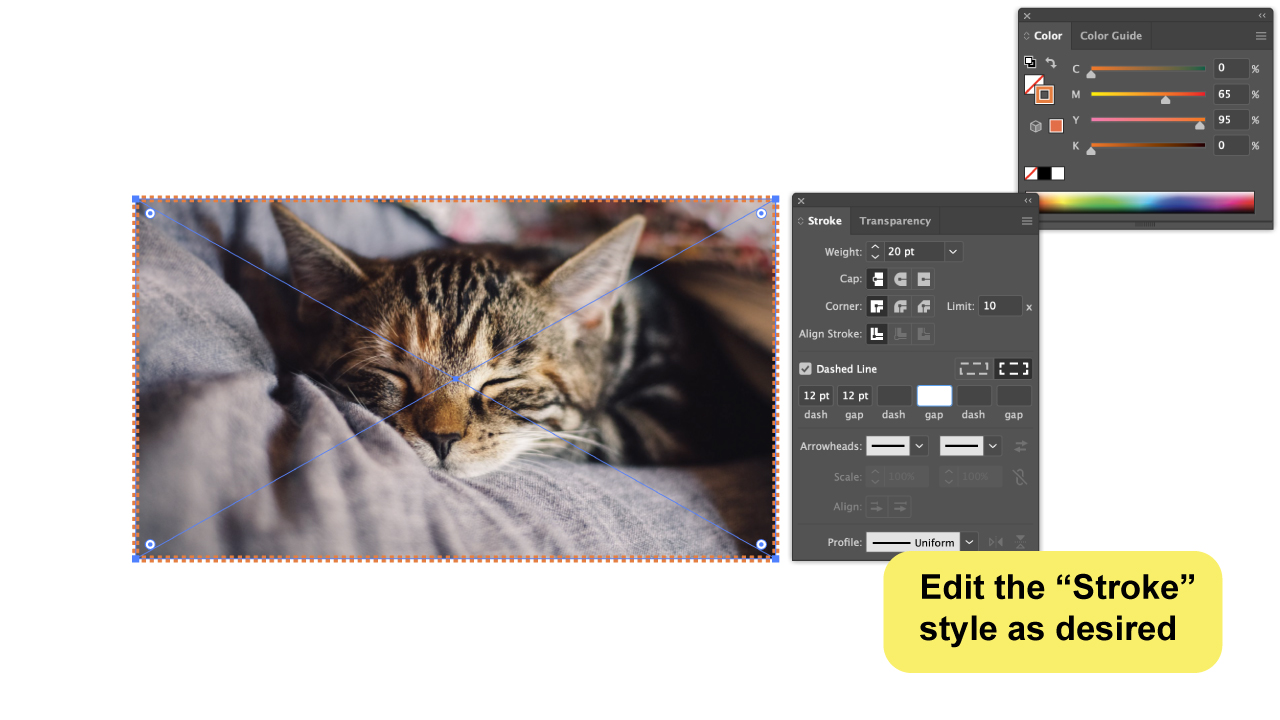
Edit the stroke details
There are many things you can do on the stroke panel in Illustrator. Some of the things you can do are to change the stroke color, stroke width, stroke alignment, and dash settings.
The stroke color can be changed by clicking on the color swatch and selecting a new color from the color picker.
The stroke width can be changed by entering a new value in the stroke-width text box or by clicking on the arrow buttons to the left and right of the text box.
The stroke alignment can be changed by clicking on the stroke alignment button and selecting a new alignment option from the menu.
By default, the stroke will be set to “Align Stroke to Center“, which means that it will appear half over the image and half outside of it.
If you switch this to “Align Stroke to Inside“, the stroke will be aligned to the inside edge of the rectangle. Meanwhile, “Align Stroke to Outside” will align the stroke to the rectangle’s outside border without covering the image.

Step 6:
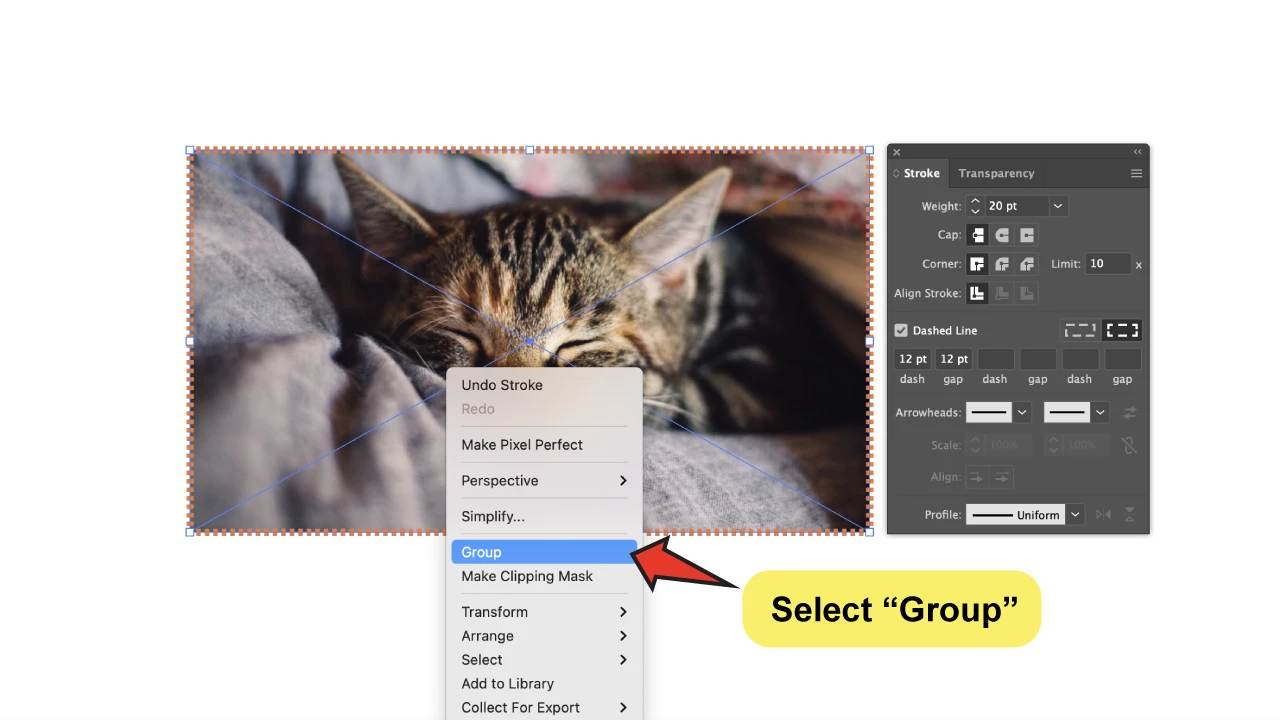
Make a group
Finally, you have the stroke and the image as separate items. If you want to group them, use the “Selection Tool” (V) to select both items and then press the “Ctrl+G” keyboard shortcut. You can also right-click and select “Group.”
This will create a group from both objects, allowing you to move them together without the risk of displacing any of them.

How to Add a Border Around a Shape in Illustrator
Let’s first clarify the difference between objects and shapes.
Objects include all the items in Illustrator, such as shapes, lines, text, and images, while shapes refer specifically to circles, rectangles, triangles, polygons, and so on.
All vector objects follow the same procedure for adding borders, while rasterized objects, including images, require a different procedure.
If you want to add borders to an image, there are three different methods covered earlier in the article:
“Creating a Border Around an Image in Illustrator Using the Appearance Panel”
“Creating a Border Around an Image Using the Properties Panel”
“Creating a Border Around an Image in Illustrator Using the Rectangle Tool”
If you want to add a border to a vector object, in this case, a simple shape, then keep reading because that is what we will discuss next.
To add a border around a shape in Illustrator, follow these steps:
Step 1: Select the Object

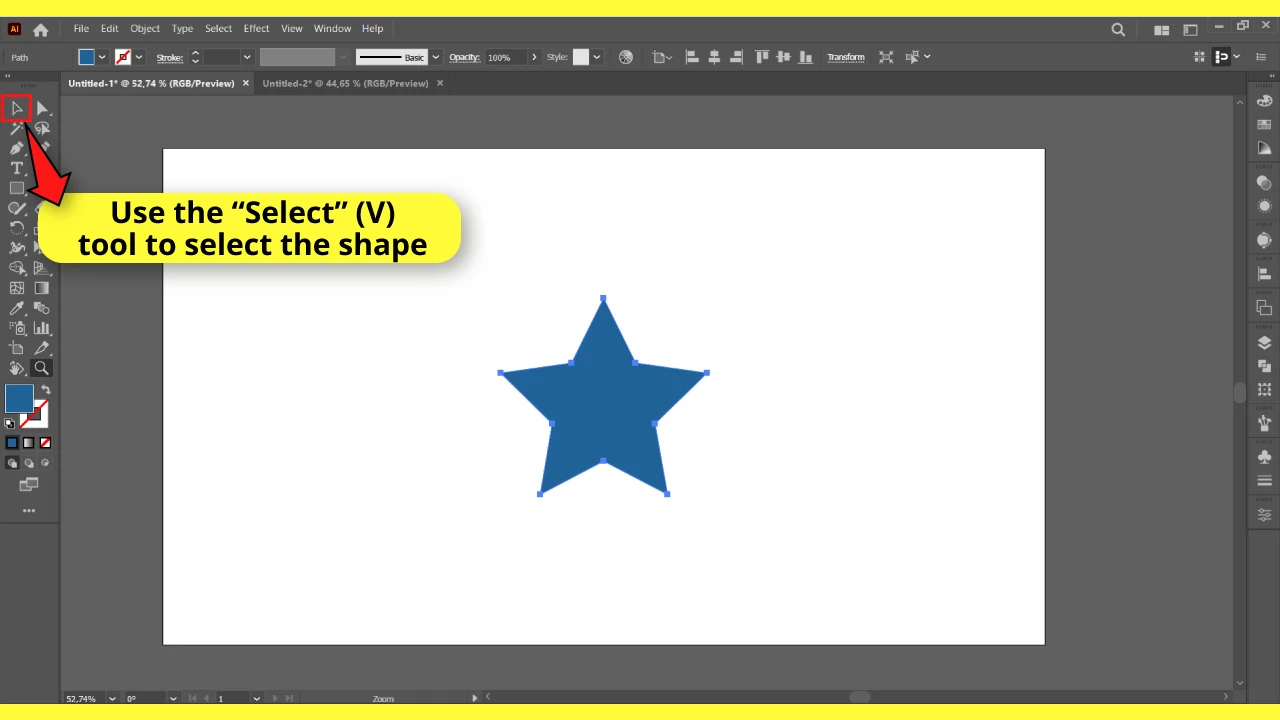
I’ll add a border to a star shape, for example, but you can use any shape you want.
There are three different ways you can make a star in Illustrator.
First, we need to select the object or shape to which you want to add a border.
To select the object, use the “Selection“ (V) tool located on the left side toolbar.
Alternatively, you can press the “V” key on your keyboard to use it as a shortcut.
Or, if you want to select all the objects and shapes on your artboard, press the “Ctrl + A” or “Cmd + A” command for Windows or Mac, respectively, to select all.
Step 2: Add Border

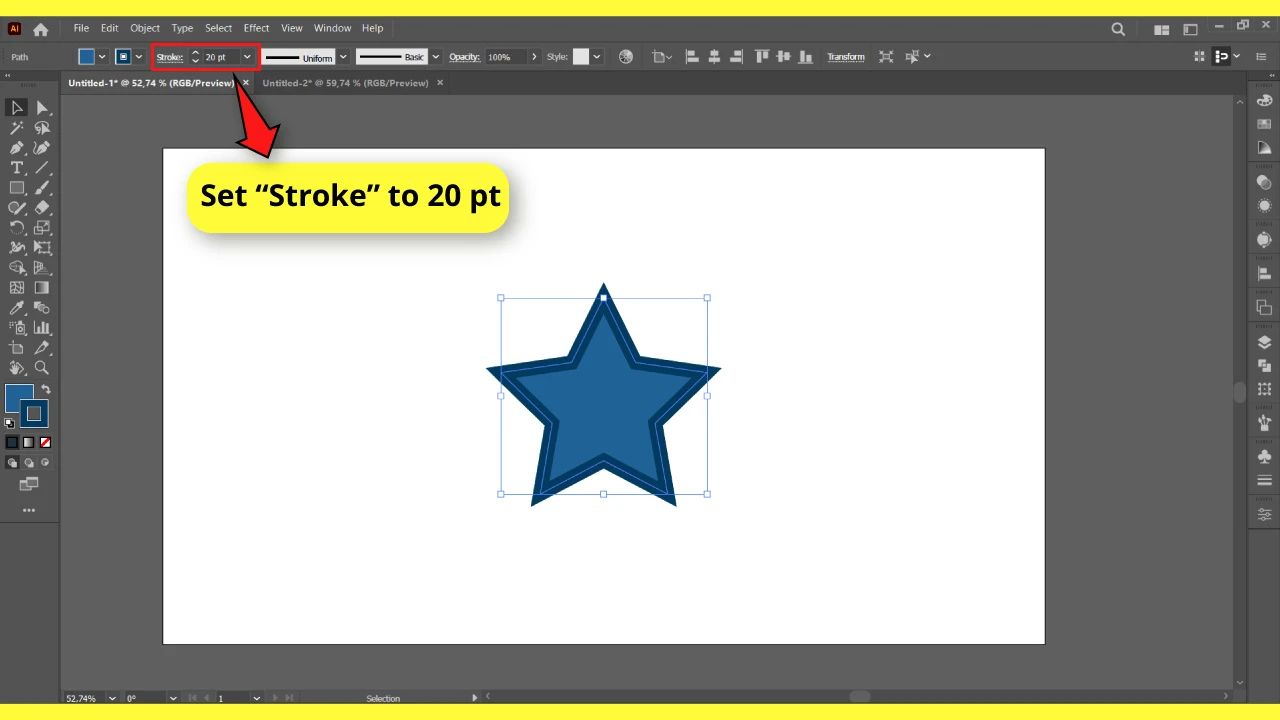
Next, enter a value in the “Stroke” box on the toolbar at the top of the screen.
For example, set the “Stroke” to 20 pt. You can set the value that suits you better for you.
If you can’t find the “Stroke” box, you can also do this by going to “Window > Stroke” in the menu at the top of the screen. Alternatively, you can use the shortcut “Ctrl + F10” or “Cmd + F10.”
On the pop-up “Stroke” panel, enter a value in the “Weight” box.
If you want to add two or more layers of border, you can refer to “How to Outline Text in Illustrator“ where it is covered.
Step 3: Customize the Border

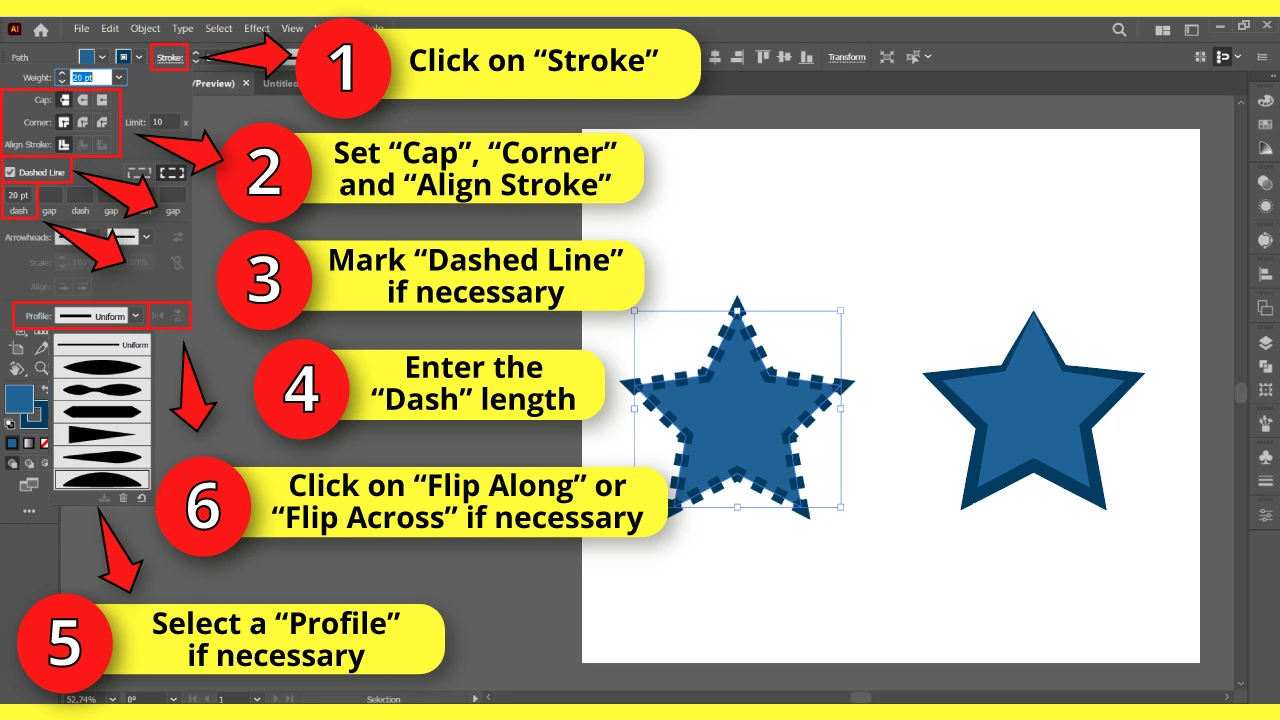
To customize the applied border, click on the “Stroke” panel located in the menu at the top of the screen.
On the “Stroke” panel, you can select the “Cap” type between “Butt Cap,” “Round Cap,” or “Projecting Cap.”
Then, you can select the “Corner” between “Miter Join,” “Round Join,” and “Bevel Join.”
You can also select the “Align” to “Center,” “Inside,” or “Outside.”
If you want to add a dashed line border, mark the “Dashed Line” checkbox. You can customize the dash line type by entering the length of the dash and gaps.
If you prefer a regular dash, just enter a length value for the first “Dash” field. For example, you can enter 20 pt.
Alternatively, you can make a dotted line in Illustrator instead of a dashed one.
Finally, if you are looking for an irregular border, you can set it by clicking on the “Profile” drop-down menu.
If necessary, you can click on “Flip Along” or “Flip Across” to flip the border profile.
How to Outline an Image in Illustrator
To add an outline to an image, select the image using the “Selection” (V) tool located on the left-side toolbar.
Then, go to the “Properties” panel on the right-side toolbar.
If you can’t find it, you may have to enable it by going to “Window > Properties” on the menu at the top of the screen.
Once you are on the “Properties” panel, click on the “Mask” button in the “Quick Actions” section.
Next, enter a value in the “Stroke” box on the toolbar at the top of the screen, as you typically do to add outlines to vector objects and shapes.
If you can’t find the “Stroke” box, you can also access it by going to “Window > Stroke” on the menu at the top of the screen. On the pop-up “Stroke” panel, enter a value in the “Weight” box.
If you prefer to add borders just to the subject instead of the whole image, you can remove the background of an image in Illustrator.
How to Outline the Subject of an Image in Illustrator
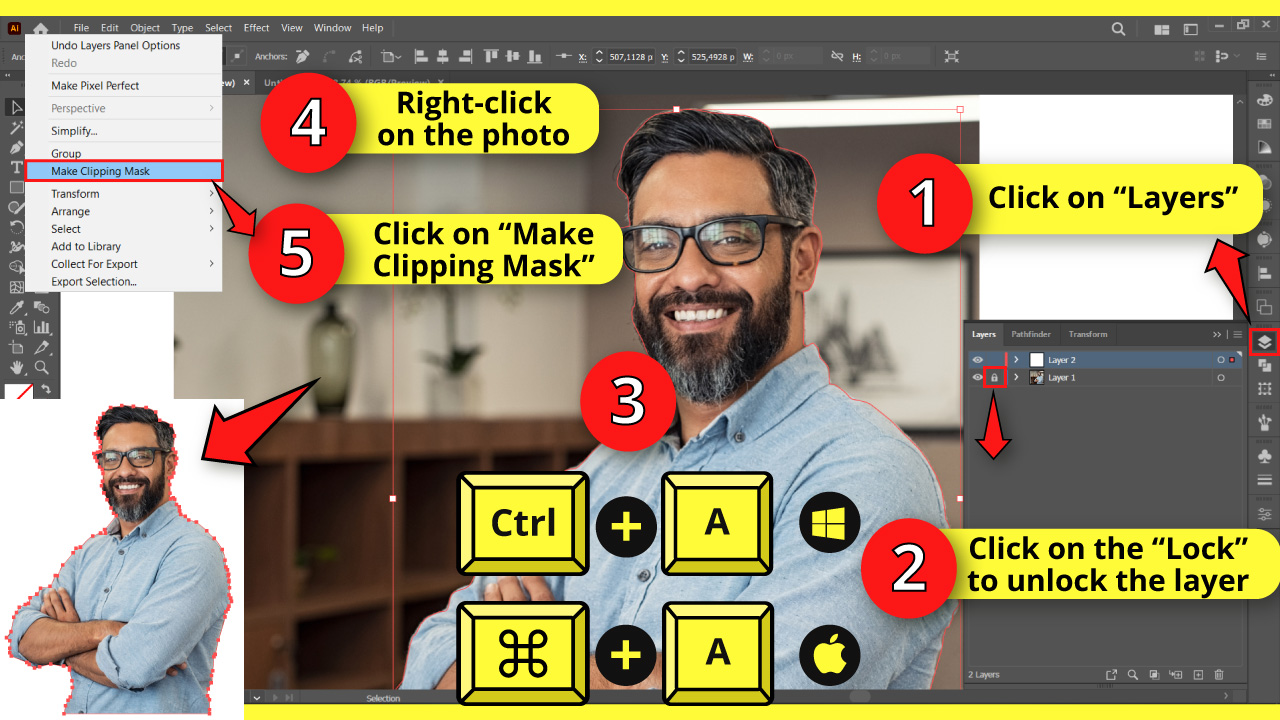
Step 1: Lock the Image Layer
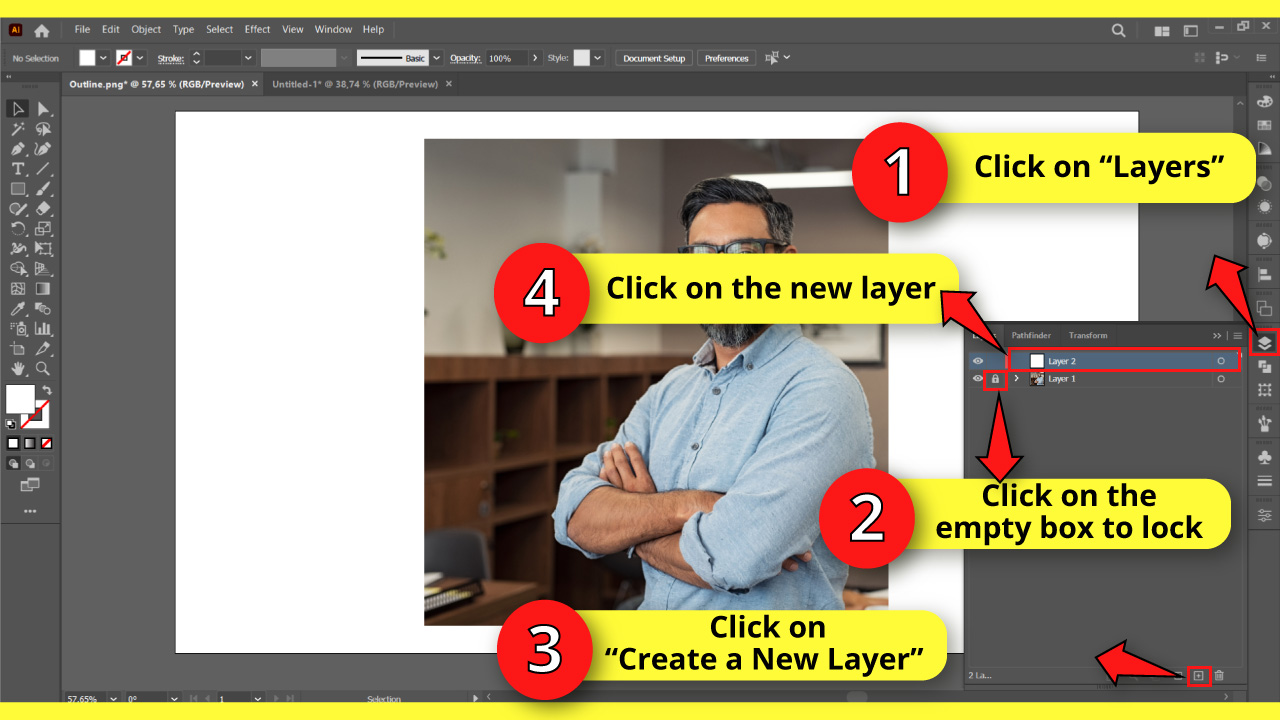

After importing the image you want to outline the subject of, click on the “Layers” (F7) panel, usually located on the right-side toolbar.
If you can’t find it, you may need to enable it by going to “Window > Layers” on the menu at the top of the screen. Alternatively, you can press the “F7” key on your keyboard.
On the “Layers” (F7) panel, block the image layer by clicking on the left side empty box until the “Lock” icon appears.
Next, click the “Create a New Layer” button at the bottom of the panel to create a new layer.
Finally, click on the new layer to work on it from now on.
Step 2: Trace the Subject Outline

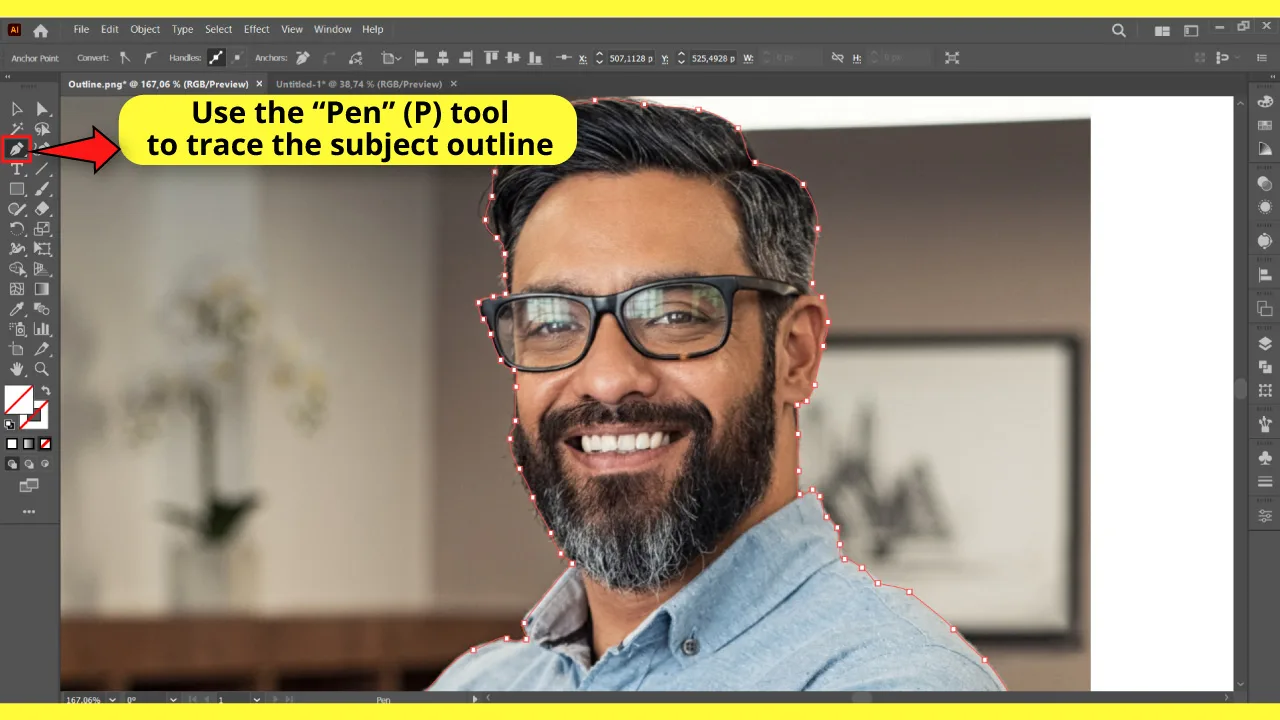
Click on the “Pen” (P) tool located on the left-side toolbar.
Then click on the “Fill” color box, followed by clicking on the “None” (/) color box, both located on the left-side toolbar.
Now, click on the “Stroke” color box, followed by clicking on the “None” (/) color box. These actions will delete the fill and stroke colors of the tracing we’ll do.
However, you can use a stroke color if it makes tracing easier for you.
If you choose to use a stroke color, you can adjust the stroke weight on the “Stroke” panel located on the toolbar at the top of the screen.
In my example, I’ll keep the “Stroke” color as none.
To trace the subject outline, click, hold, and drag to add anchor points and adjust the curve direction and intensity of each segment.
Continue adding anchor points until you trace the entire subject outline.
Step 3: Make Clipping Mask
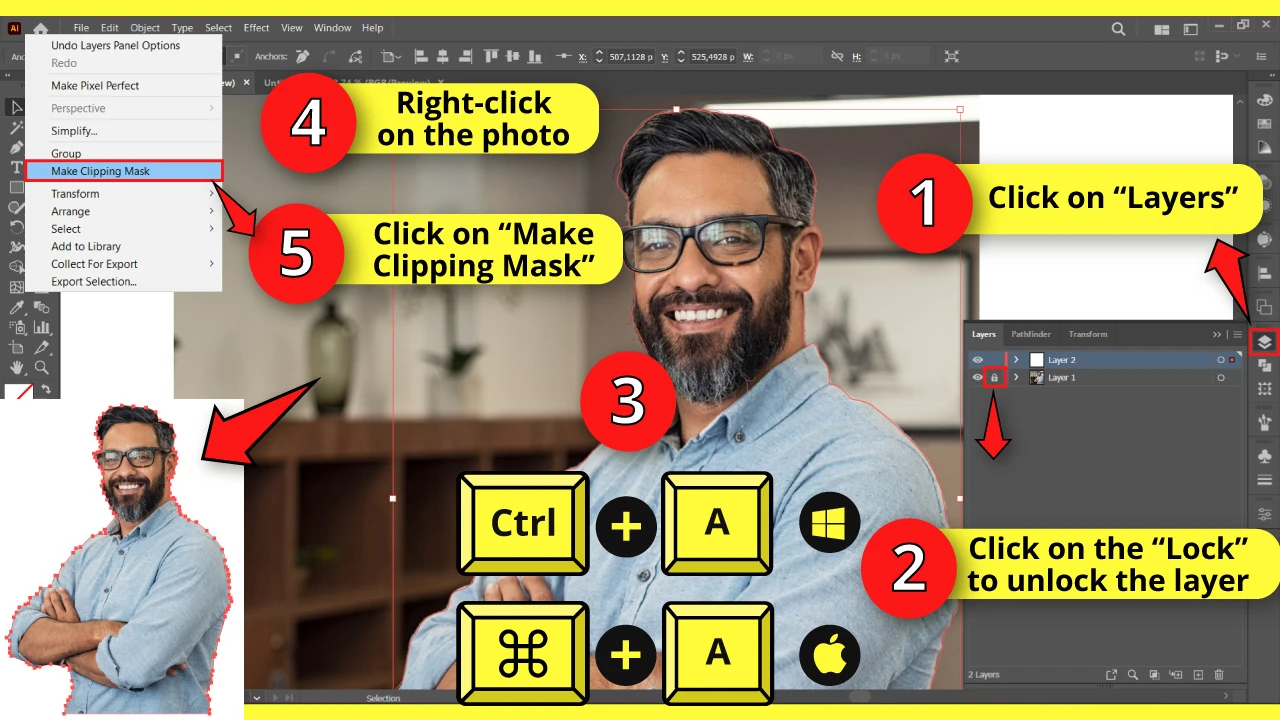
Go to the “Layers” (F7) panel and click on the “Lock” icon to unlock the image layer.
Next, press the “Ctrl + A” or “Cmd + A” command on your keyboard to select all so you can make a clipping mask in Illustrator.
Then, right-click on the image, and from the unfolded menu, select the “Make Clipping Mask” option.
Once you do this, the background will be hidden, and you will get your character cutout.”
Step 4: Add Strokes
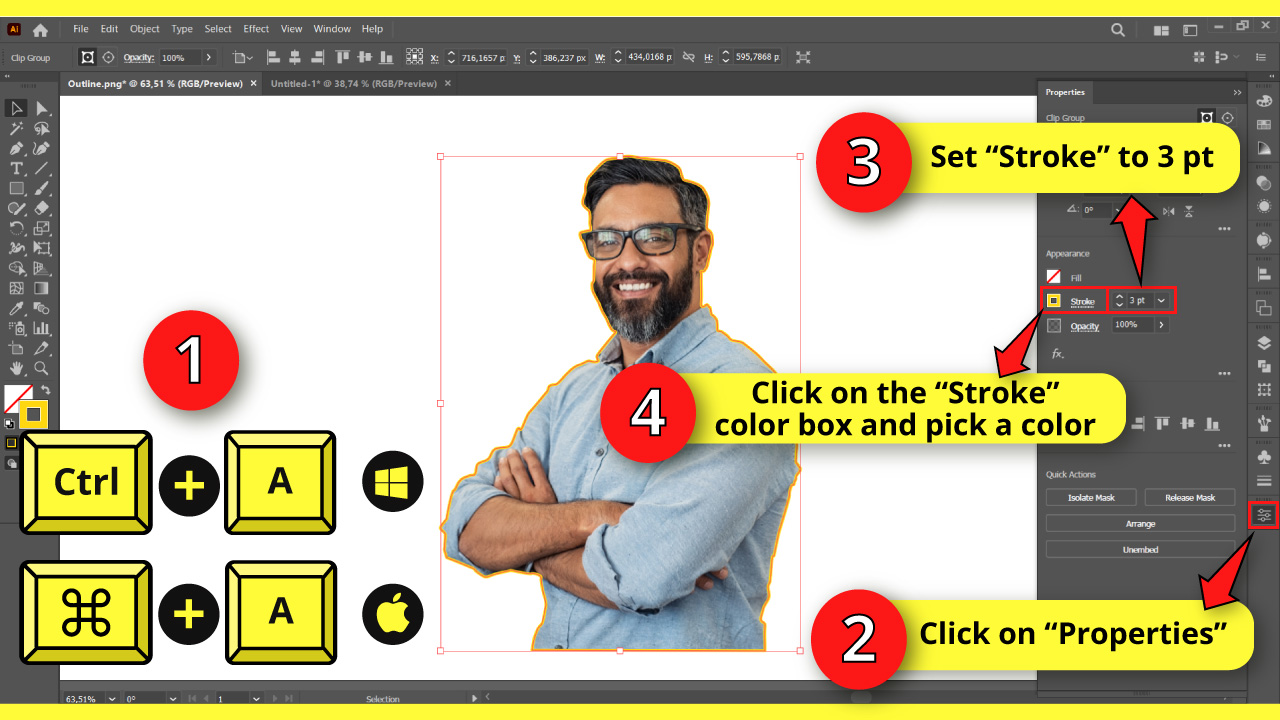

Make sure the subject is still selected by pressing the “Ctrl + A” or “Cmd + A” command.
Next, click on the “Properties” panel, usually located on the left-side toolbar.
If you can’t find it, you may need to enable it first by going to “Window > Properties” on the menu at the top of the screen.
Once you are on the “Properties” panel, adjust the “Stroke” weight.
For example, I will set it to 3 pt, but you can enter the value that suits you better.
Then click on the “Stroke” color box and choose a color. I will go with yellow.
Step 5: Smooth Outline
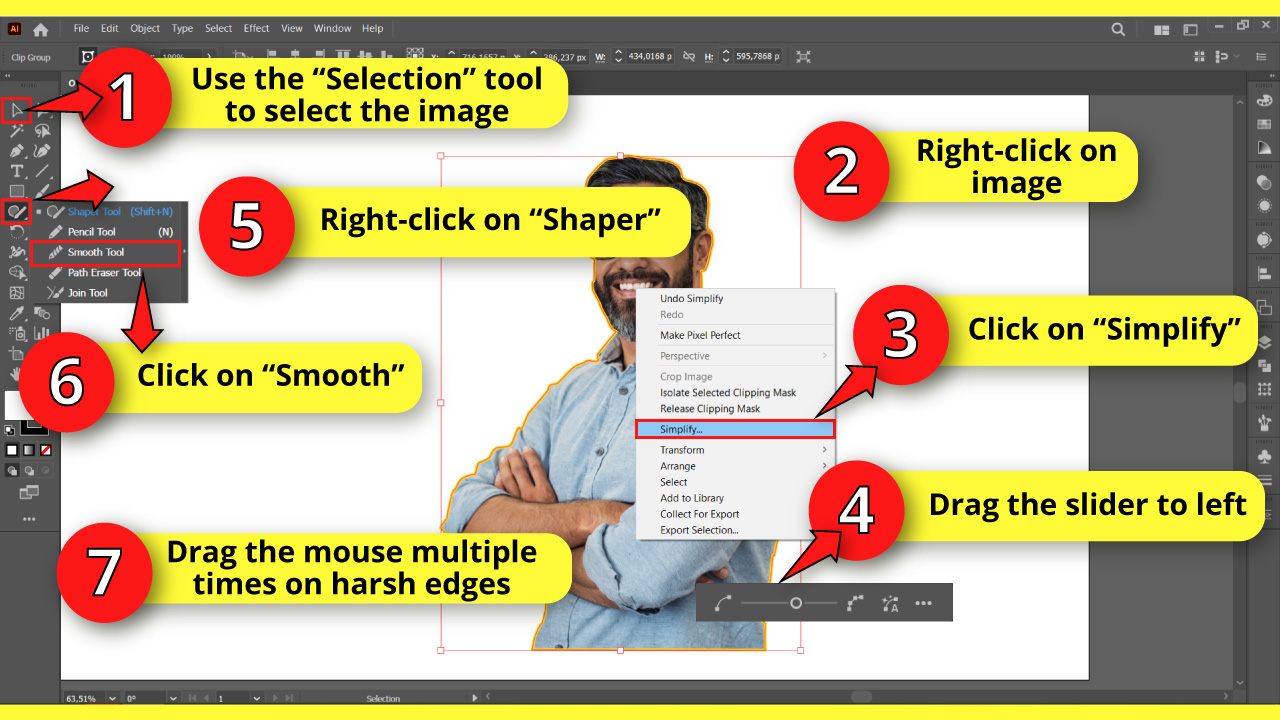
This step is optional. If you think that the outline looks too rough, you can smooth edges in Illustrator by using two tools.
You can use both of them, which is what I’ll do, or go with the one you prefer.
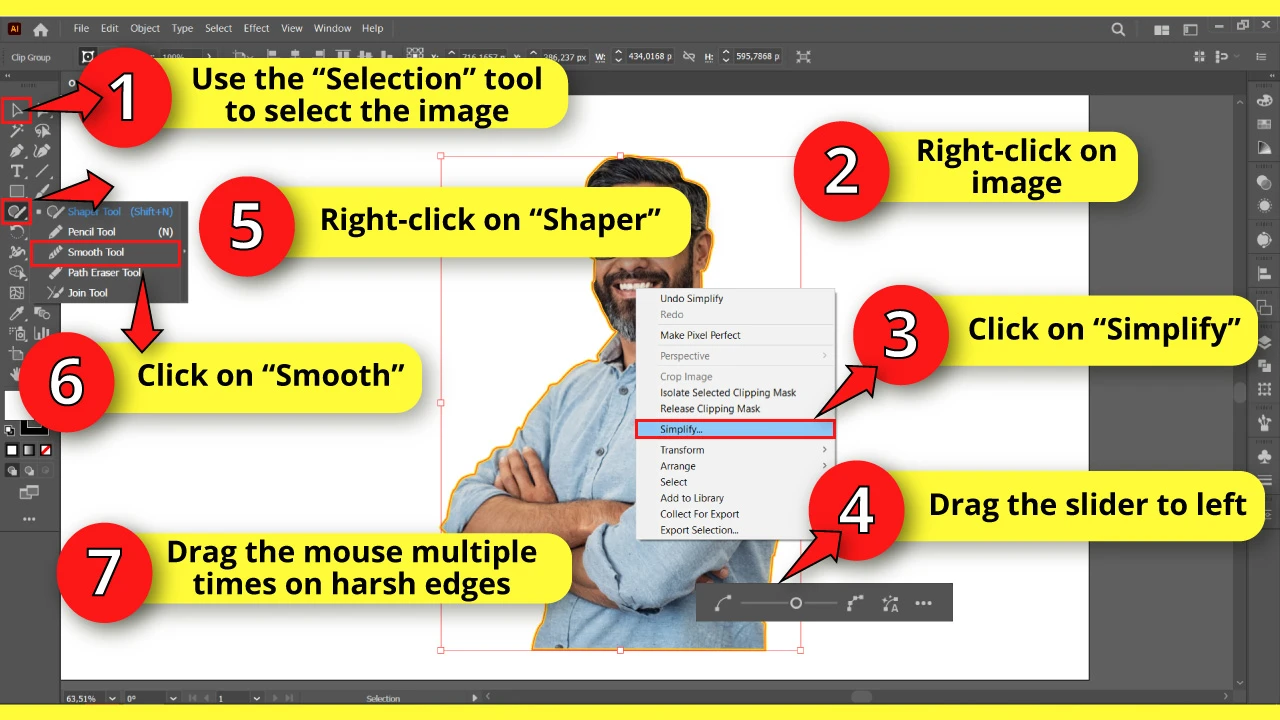
First, select the outline by using the “Selection” (V) tool located on the left-side toolbar. Then, right-click on the image and select the “Simplify” option from the unfolded menu.
Once the “Simplify” window pops up, drag the slider to the left to make the lines smoother.
To use the next tool, right-click on the “Shaper” (Shift + N) tool located on the left-side toolbar. From the collapsed hidden tools, click on the “Smooth” tool.
Use the “Smooth” tool by clicking, holding, and dragging multiple times over the outline segments you want to smooth.
The Result

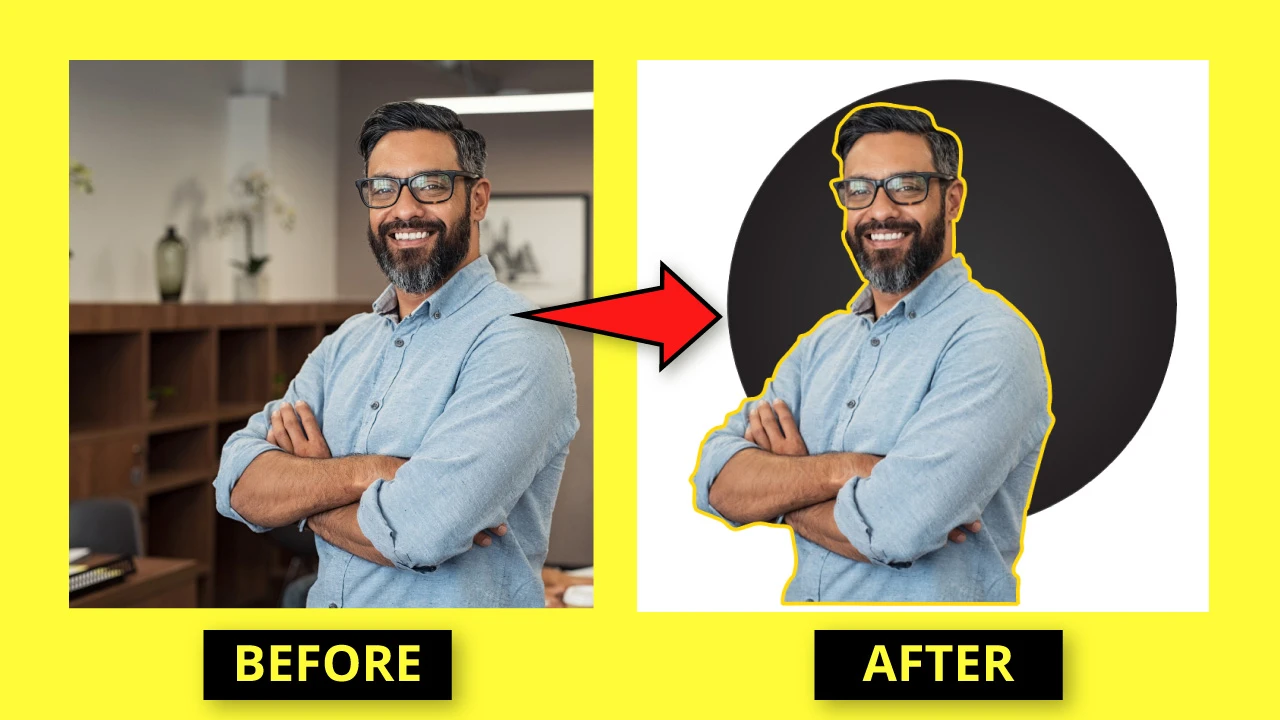
Here is the outcome of outlining the subject of an image in Illustrator.
How to Convert an Image to Outlines in Illustrator
To convert an image to outlines in Illustrator, follow these steps:
Step 1: Vectorize the Image

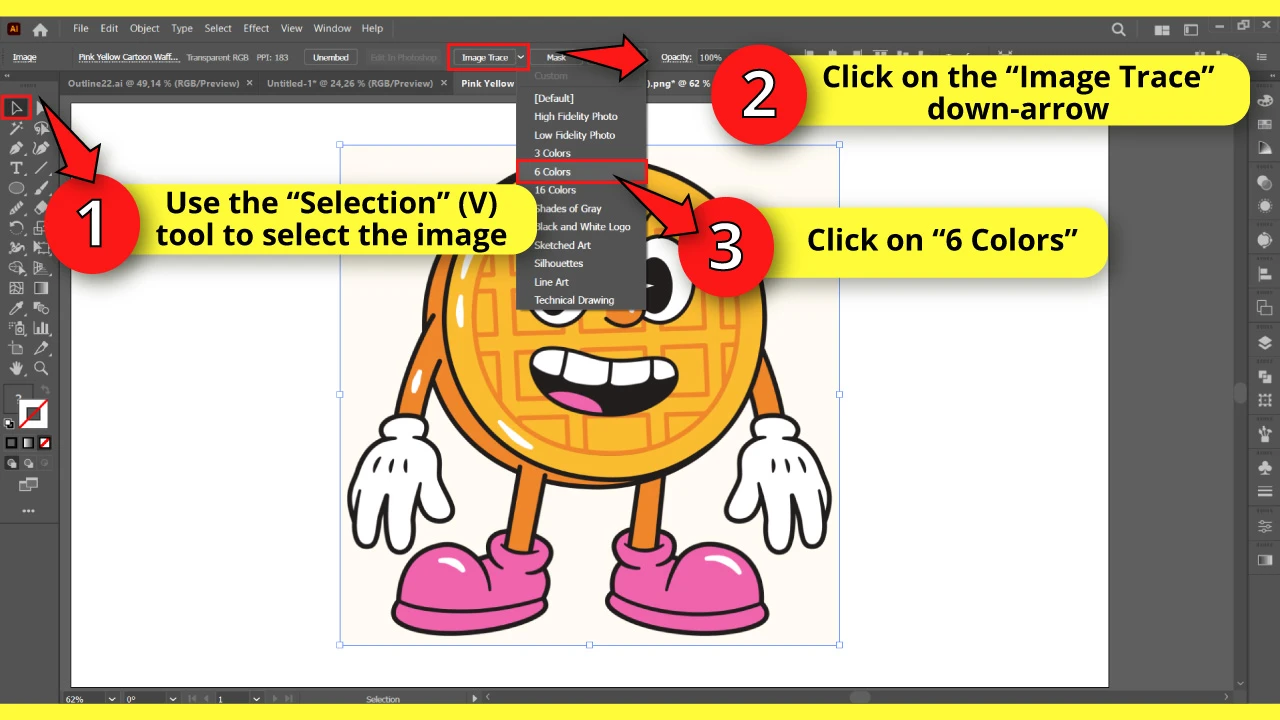
After importing the image you want to convert to outlines, select it using the “Selection” (V) tool located on the left-side toolbar.
To convert the image to outlines, we have to vectorize the image in Illustrator.
Once you have selected the image, the “Image Trace” button will be displayed on the toolbar at the top of the screen.
You can also access it by going to “Window > Image Trace” on the menu at the top of the screen.
Now, before proceeding, count the number of colors in your image; we’ll use it later.
In my example, I have six colors, including the milky background color.
Instead of clicking on the “Image Trace” button, click on the down-arrow symbol next to it to expand the options menu.
On the unfolded menu, select the option that includes the number of colors in your image.
Since I have six colors, I’ll select “6 Color”.
If, for example, your image has eight colors, you should select the “16 Color” option.
If you have more than 16 colors, just select the “Low Fidelity Photo” option.
Step 2: Expand the Vector
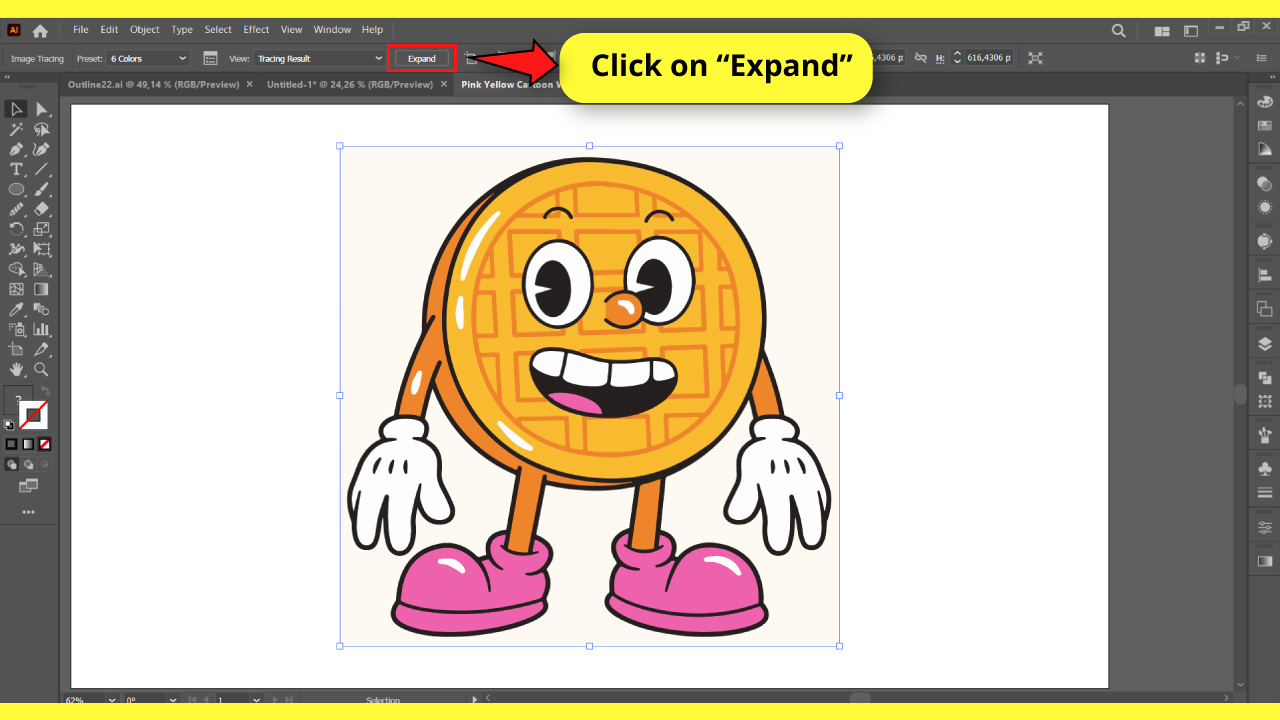

Once the image is vectorized, click on the “Expand” button located on the toolbar at the top of the screen. This will allow us to remove the character fill and keep its outline.
Step 3: Remove the Fill
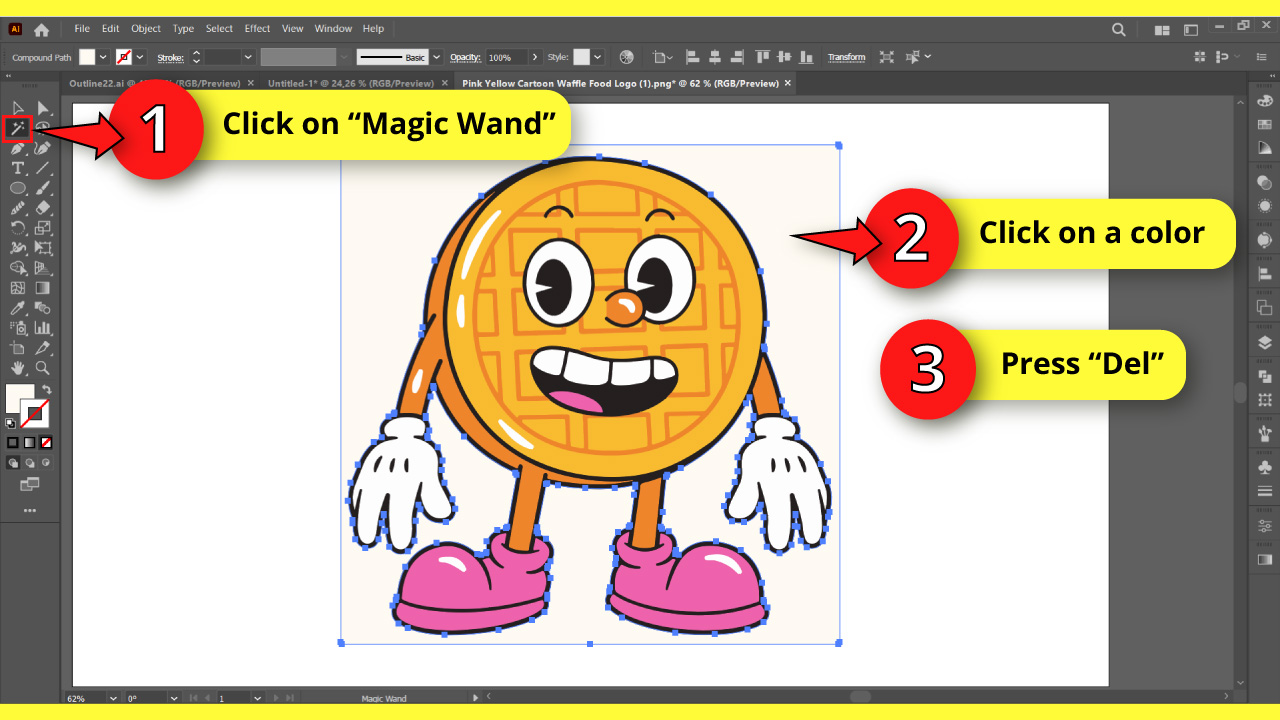

Click on the “Magic Wand” (Y) tool located on the left-side toolbar.
Then, click on a color of the vector and press the “Del” key on your keyboard to remove it.
Repeat this process until you have removed all the colors.
In my example, since the waffle texture is an important feature to recognize the character, I’ll keep it.
So, when it comes to deleting the orange color, I’ll select the orange fill shapes manually using the “Selection” (V) tool, and then delete them, keeping the face texture.
Step 4: Unite the Outline
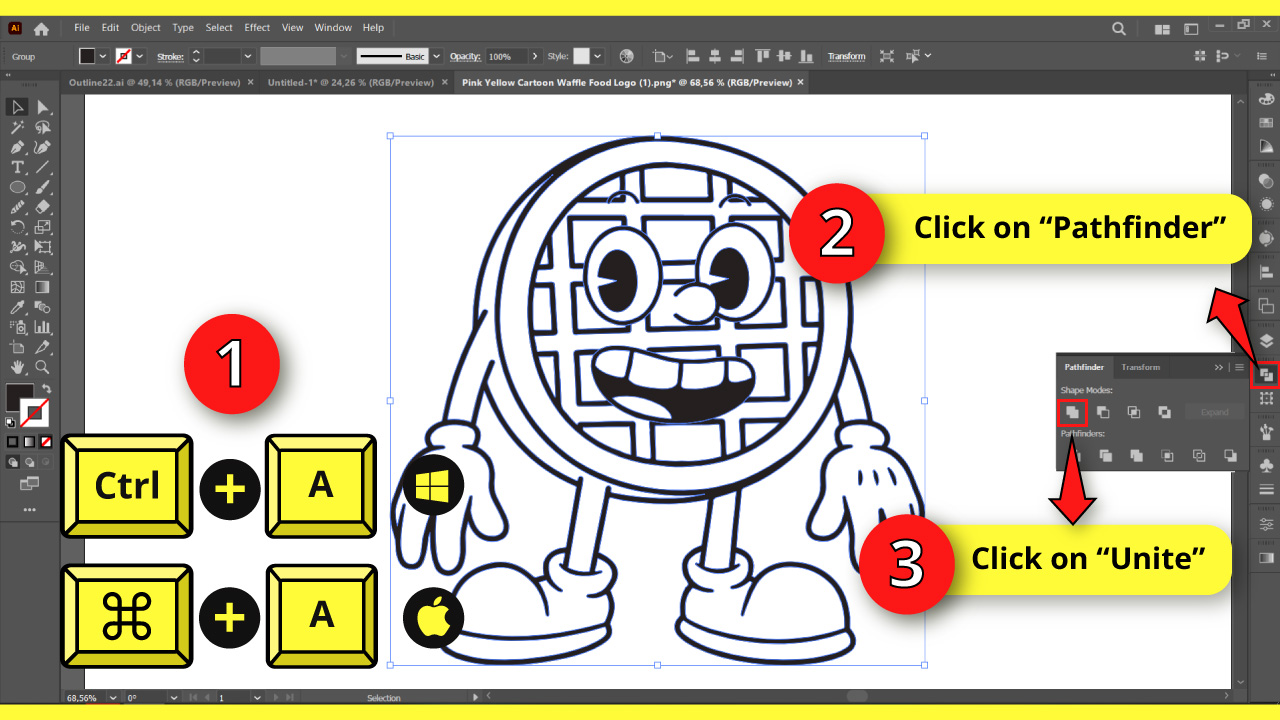

After removing the fill, select the outline by hitting the “Ctrl + A” or “Cmd + A” command to select the vector.
Next, we’ll combine the shapes in Illustrator. To do so, click on the “Pathfinder” panel usually located on the right-side toolbar.
If you can’t find it, go to “Window > Pathfinder” in the menu at the top of the screen. Alternatively, you can press the “Shift + Ctrl + F9” or “Shift + Cmd + F9” to shortcut it.
On the “Pathfinder” panel, click on the “Unite” button to merge the outline into a single shape.
Is There a Border Tool in Illustrator?
The border tool is called “Stroke”.
You can find the “Stroke” panel on the toolbar at the top of the screen or by going to “Window > Stroke” on the menu at the top of the screen.
Alternatively, you can use the keyboard shortcut “Ctrl + F10” or “Cmd + F10” for Windows or Mac, respectively.


Hey guys! It’s me, Marcel, aka Maschi. On MaschiTuts, it’s all about tutorials! No matter the topic of the article, the goal always remains the same: Providing you guys with the most in-depth and helpful tutorials!

