

If you ever wanted to add a bit of style to your strokes or highlight a particular piece of text, you might have considered using a dotted or a dashed line.
Adobe Illustrator treats both dashed and dotted lines as the same.
Although they don’t look the same at first glance, a dotted line essentially is a dashed line where the length of the dash is set to 0.
In this article, we’ll mainly focus on dotted lines in Illustrator.
1. How to Make a Dotted Line in Illustrator
2. Method 1: Create a Dotted Line from Scratch
3. Method 2: Apply a Dotted Line to an Already Existing Shape in Illustrator
4. Frequently Asked Questions on Dotted Lines in Illustrator
How to Make a Dotted Line in Illustrator
To make a dotted line in Illustrator, follow these steps:
- Create or select a path in Illustrator
- Open the Stroke menu
- Check the “dashed line” box in the Stroke menu
- Expand the menu by clicking on the hamburger menu if needed
- Tick the “Dashed Line ” box
- Reduce the dash value to 0
- Check the “round cap” option.
Method 1: Create a Dotted Line from Scratch
Create a path with “Pen Tool”.
For this purpose, we’re going to use the pen tool. It’s located right here at the top of the tool box or you can just press “p” on your keyboard which is Illustrator’s default shortcut for the pen tool.
Click anywhere on the canvas the create a point and hold shift to bring the line straight across your screen, locking it onto the horizontal axis.
Click again to create another point (you can keep clicking to create as many anchor points as you want which enables you to create almost any shape you can imagine ) and then press ENTER to close the path. You have now created a line path.
To create a dotted line from scratch in Illustrator, follow these steps:
Step 1:
Open up the Stroke menu.

Now let’s take this line and turn it into a dotted line. For this, we are going to be using the stroke menu.
This menu provides you with the information about the properties of your stroke, which is basically Illustrator asking you: “what kind of a line do you want me to draw along the selected path? “.
In case you don’t see your stroke menu, just come up to the menu bar, click “window” and go all the way down to stroke . Once opened, the stroke menu should provide you with a bunch of options.
If the look of your menu doesn’t provide you with as many editable properties as mine does, just go to this hamburger icon menu and click on options and it’ll show you all of the different parameters you can edit on your line.


Method 2: Apply a Dotted Line to an Already Existing Shape in Illustrator

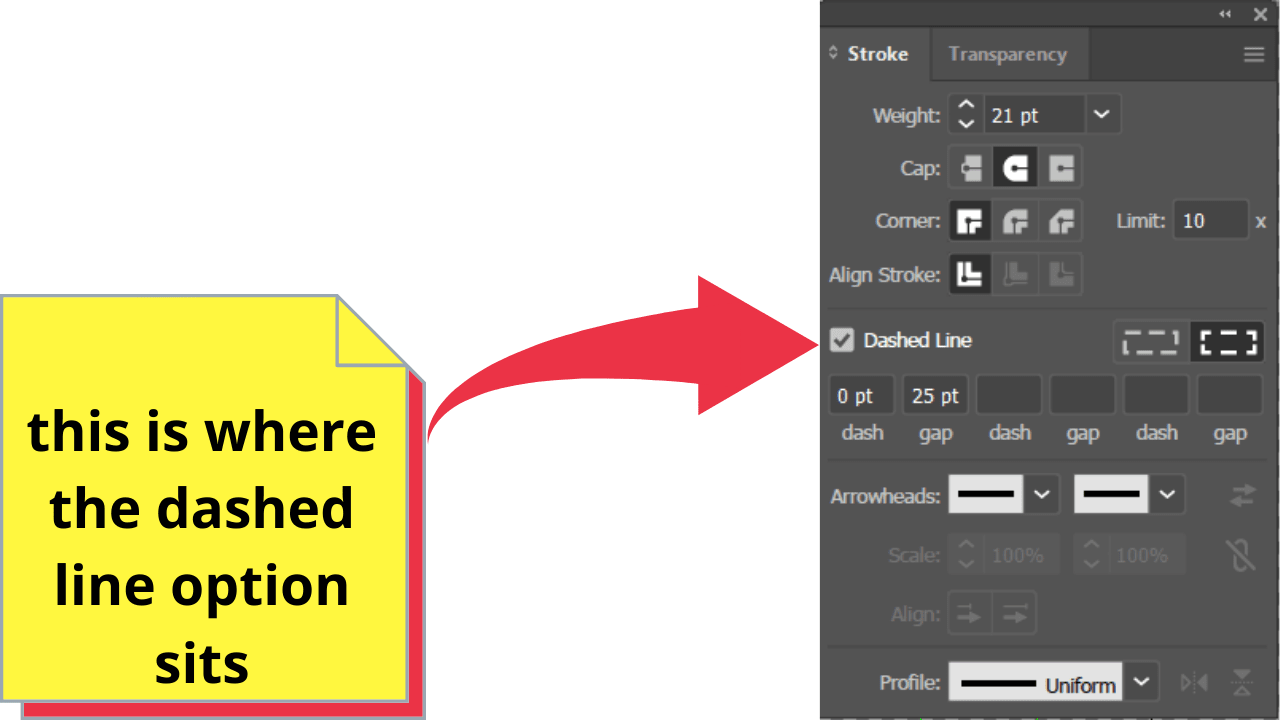
Now, we’ve already mentioned how dotted lines are essentially dashed lines so let’s find the check box that says: “dashed line” and enable it.
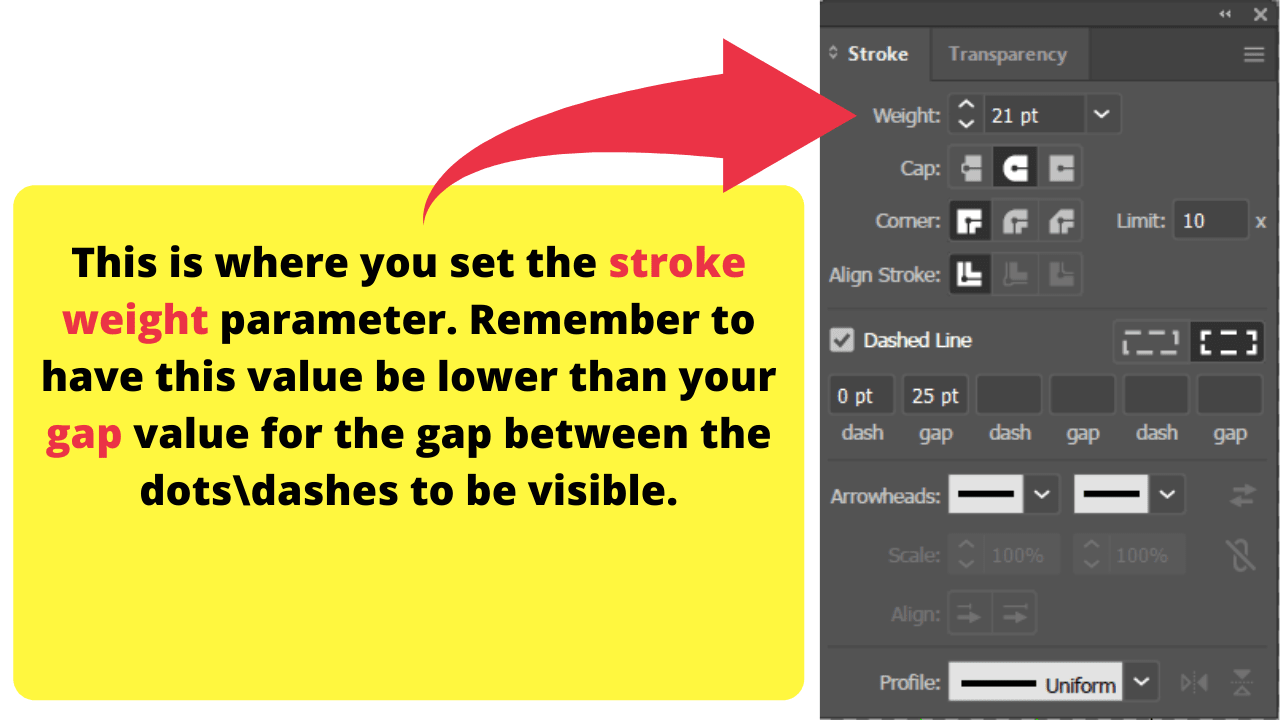
This is going to make our line into a dashed line but it still might be hard to see unless other parameters are set a particular way. If we click on the size or the weight right here and just roll up the mouse wheel (or click arrow up ) to increase the size of the stroke.
This works exactly as you might expect, broadening the stroke of the selected path. Since the path we’ve created is horizontal, this change should affect the “height” of our line(s).
Step 3: Convert the dashed line into a dotted line.

Then we’re going to come over here to where it says Cap since we want to make a dotted line – we’re going to make this have a rounded cap (else you’ll end up with a “squared” instead of a dotted line.
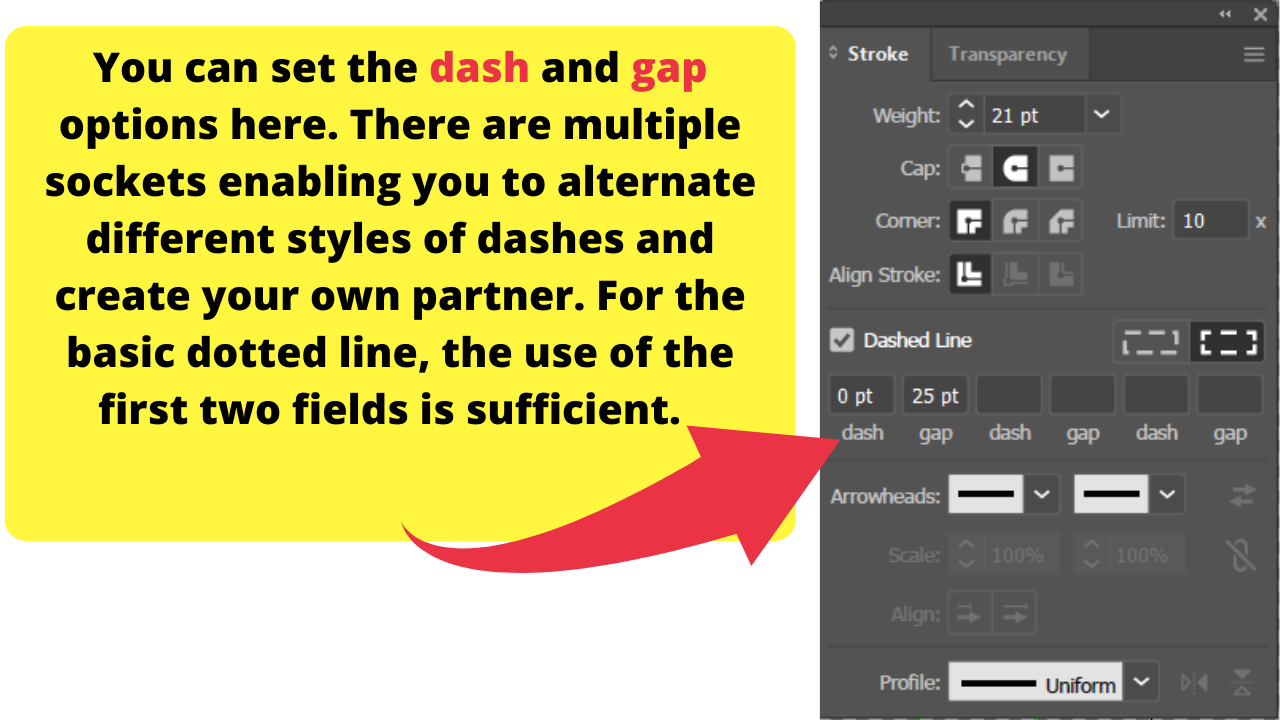
You might have noticed some dots already started to appear, and our line is beginning to take shape. What we can do to make it closer to what we’ve imagined is play with this parameter called “gap”.
As the name suggests, it’s used to control the gap between our dashes\dots. “Dash” controls the width (length) of the dashes. As you increase this number, you will notice the length of your dashes increasing as well.
Since we want our line to be dotted, all we have to do is bring this value down to 0. If you want to change the size of the dots, that is done by changing the stroke weight.
No matter how much you increase it you will still have a dot, as long as the dash value is set to zero. At the Anchor Point with the pen tool, you can curve this line and have a dotted line that follows any shape you want.
Step 4: Style accordingly.
As for the colors, Adobe Illustrator treats whatever is drawn along the path as a stroke so you might want to change the stroke color. If you want to convert it into a vector path you can just go to object \path and click on outline stroke and it will get a solid fill like any other effect or object.
Method 2: Apply a Dotted Line to an Already Existing Shape in Illustrator
Now, let’s take a look at how to apply a dotted line to an already existing shape that might already have some other type of stroke applied to it.
Simply grab the rectangle tool over here and create a rectangle. From here on out the procedure is pretty similar to what we’ve already done with the path created by the pen tool before.
Don’t forget to make the stroke color different from the fill color so that you can see the changes you are making in real time. Adjust the values of all the parameters based on what you now know each of them does.
Don’t forget to use a round cap to get dots (circles, as opposed to squares if you will). And there you go: that’s all you need to do to have a dotted line going around an object. You might want to adjust the spacing between these dots further.
If you want to alter the size of the dots again, use the stroke weight parameter (i), and then make sure to increase the spacing between them again if needed.
4. Frequently Asked Questions on Dotted Lines in Illustrator
My line in Illustrator appears jagged, but I see no dots. What’s the problem here?
The GAP value has to be greater than the stroke weight for the dots to appear as dots.


Hey guys! It’s me, Marcel, aka Maschi. On MaschiTuts, it’s all about tutorials! No matter the topic of the article, the goal always remains the same: Providing you guys with the most in-depth and helpful tutorials!

