

You’re working on a project and it’s nearly perfect, but a few of your objects are still a little rough around the edges. What can you do?
There are four ways to smooth the edges of an object in Illustrator. To smooth an edge, you can use the Smooth tool, the Sub-selection tool, the Simplify Window, or the Corner widget.
In some cases, you can even combine these tools to get the exact look you need. Here’s how to use each one.
1. Smoothing Edges In Illustrator Using The Smooth Tool – Quick Guide
Press “V” on your keyboard to equip the Selection tool, then click on your object. Next, right click on the Shaper tool, then click on the Smooth tool. Finally, drag the Smooth tool over the path along the shape you want to smooth.
The Smooth tool lets you smooth out a jagged edge or line at the drag of a cursor by automatically smoothing the line for you.
Smoothing Edges In Illustrator Using The Smooth Tool – Step-by-step Guide
Step 1:
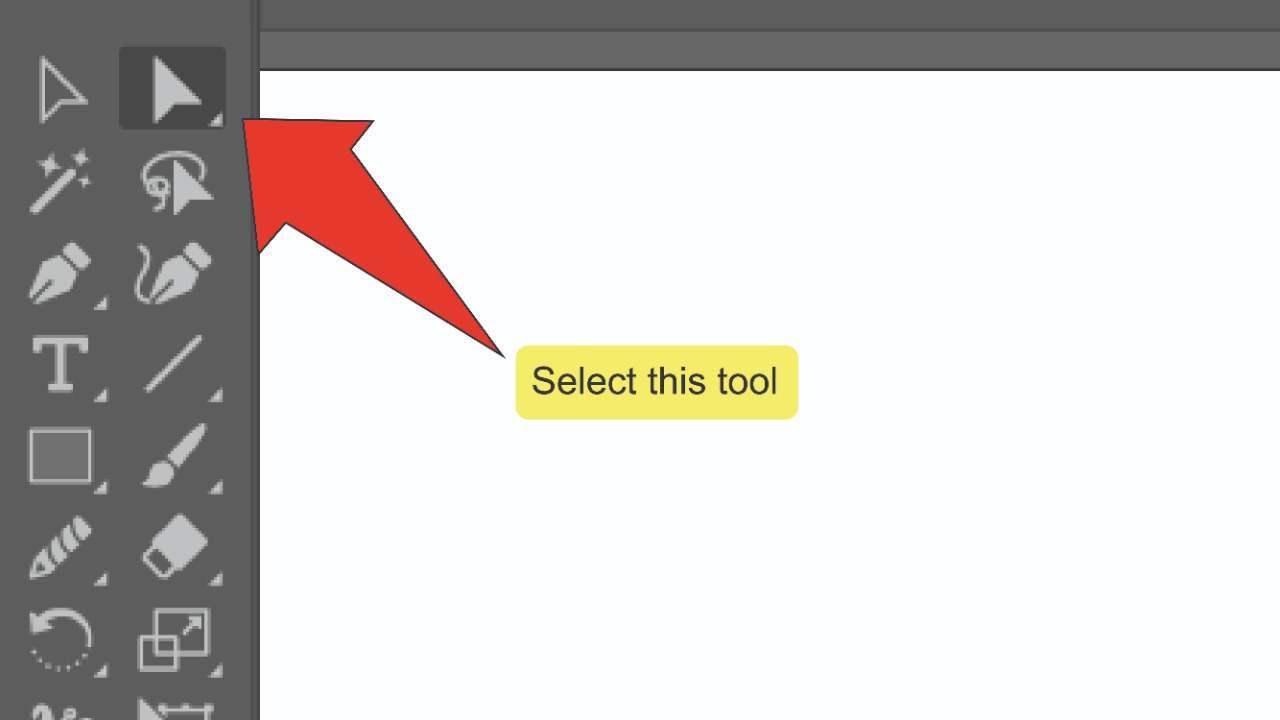
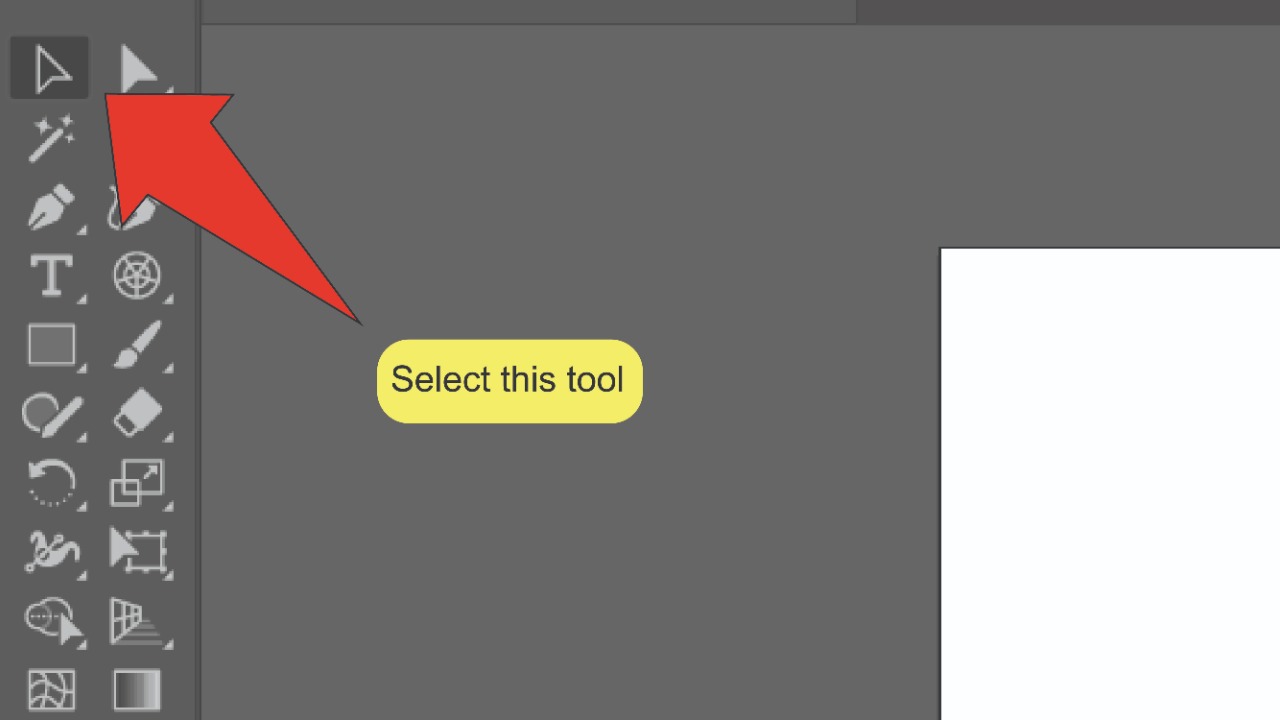
Find and select the Selection tool. Look for the Selection tool, located on the toolbar on the left side of your screen. You can also use the keyboard shortcut “V” to quick-select the tool.


Step 2:
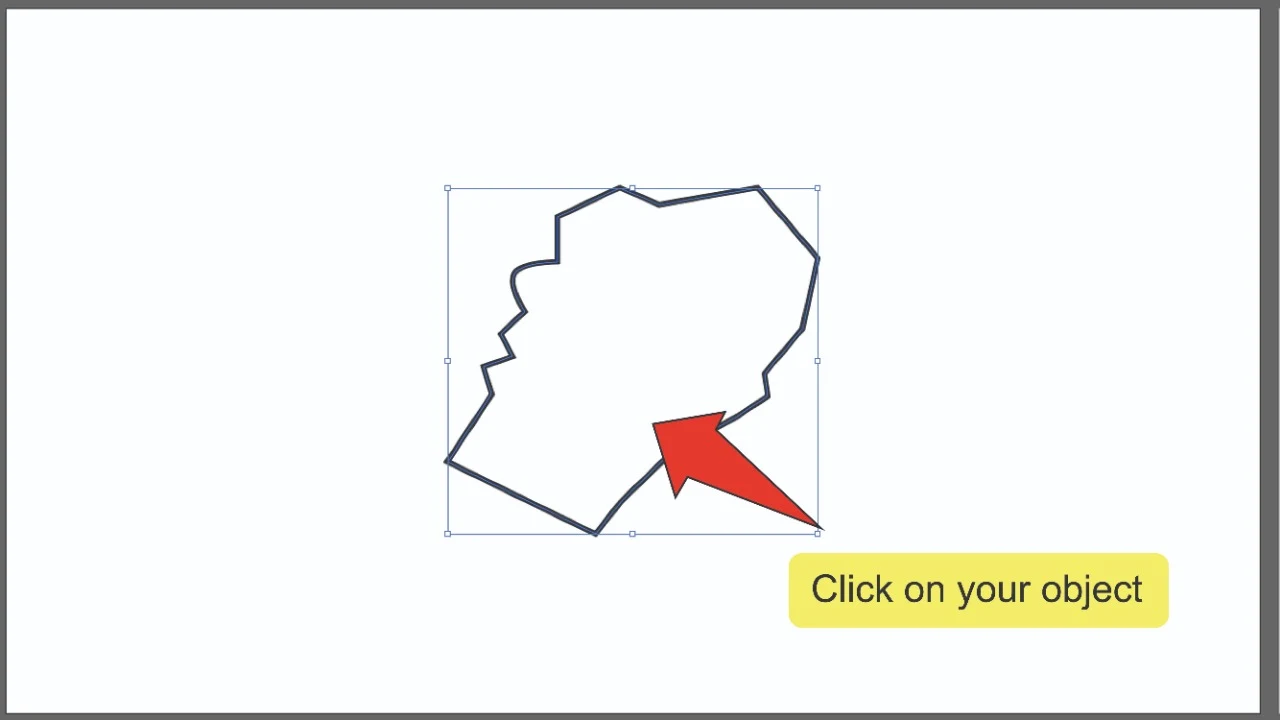
Select your shape. Use the selection tool to click on your shape. A highlighted border should appear around it.


Step 3:
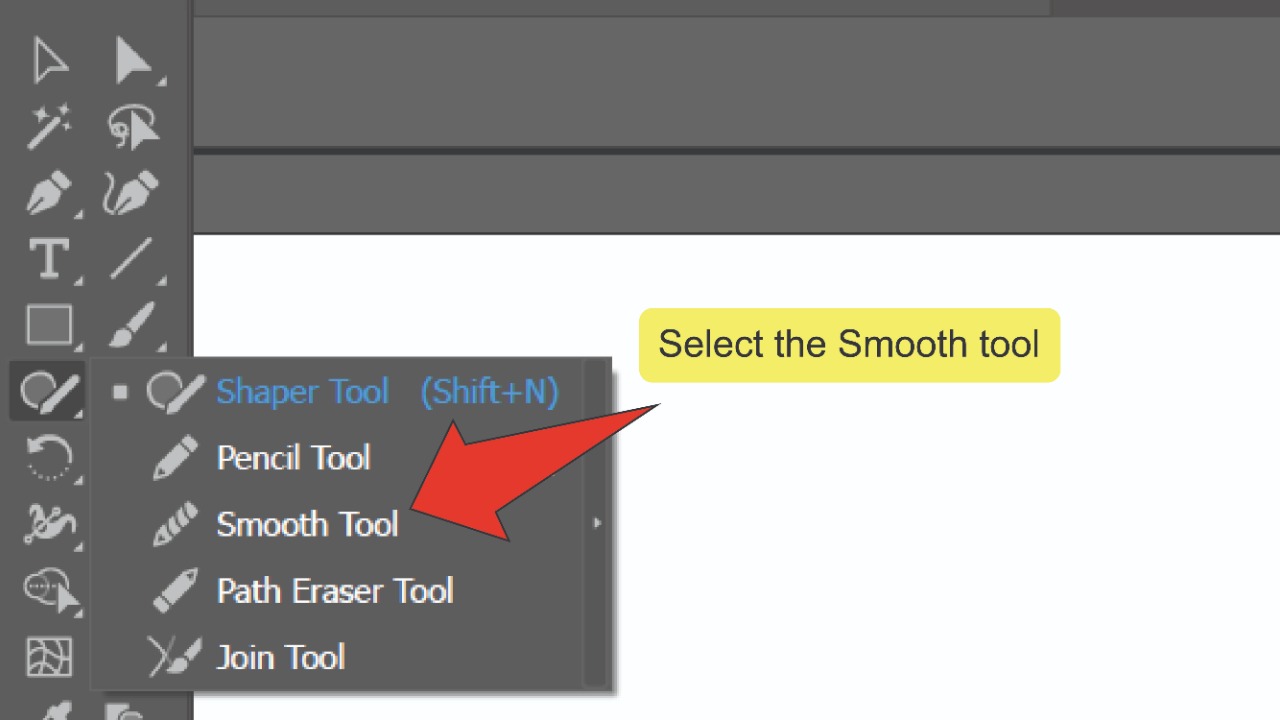
Find and select the Smooth tool. To equip the Smooth tool, right click on the Shaper tool, located on the toolbar on the left side of your screen, then click on the Smooth tool icon. While the smooth tool is equipped, all the anchor points on the border around your selected object will be highlighted and visible.


Step 4:
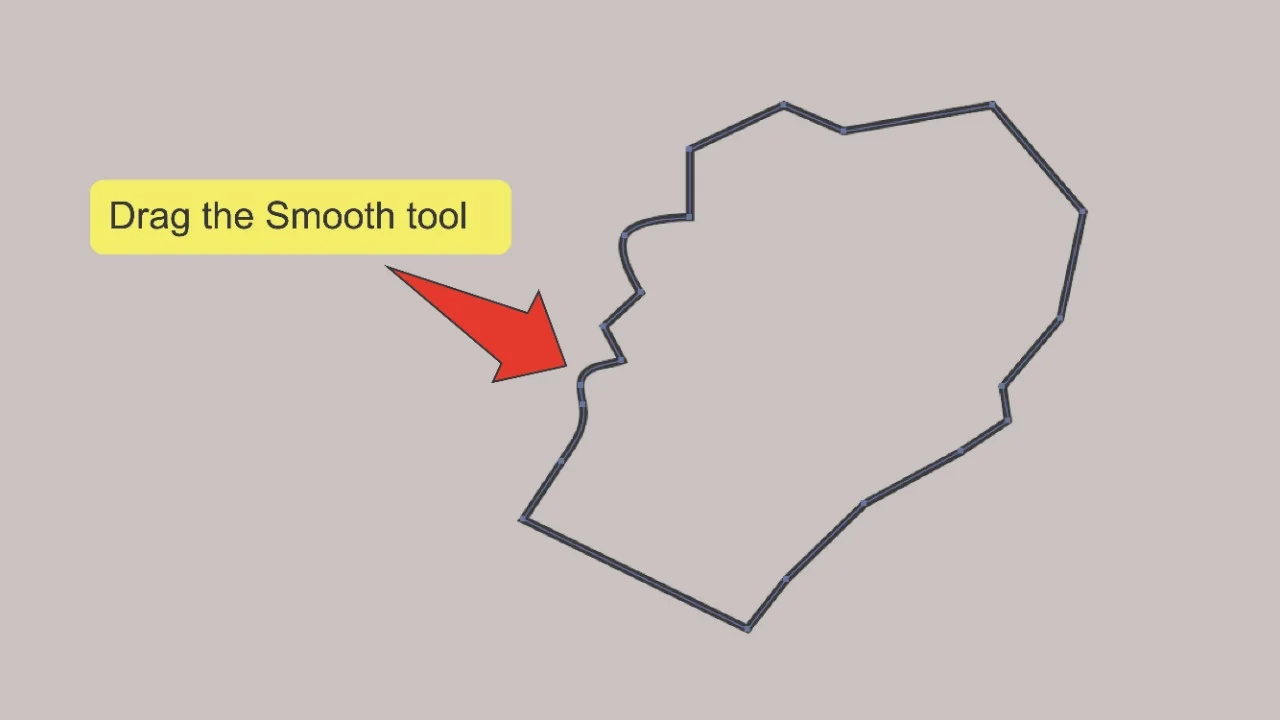
Smooth the edges of your shape. Click and drag the Smooth tool over the segment of the edge you want to Smooth out. Keep dragging the tool over this area until the desired result is reached.

2. Smoothing Edges In Illustrator Using The Sub-selection Tool – Quick Guide
Press “V” on your keyboard to equip the Selection tool, then click on your object. Next, Press the “A” key on your keyboard to equip the Sub-selection tool and “Shift+click” on each anchor point along the edge you want to smooth. Then use the Sub-selection tool to adjust the edge of your shape.
With the Sub-selection tool you can select and alter specific anchor points and the paths connected by them, as well as the curve of these paths. Here’s a full guide.
Smoothing Edges In Illustrator Using The Sub-selection Tool – Step-by-step Guide
Step 1:
Find and select the Selection tool. Look for the Selection tool, located on the toolbar on the left side of your screen. Alternatively, you can use the keyboard shortcut “V” to quick-select the tool.


Step 2:
Select your shape. Use the selection tool to click on your shape. A highlighted border should appear around it.

Step 3:
Find and select the Sub-selection tool. Look for the Sub-selection tool, located on the toolbar on the left side of your screen. Alternatively, you can use the keyboard shortcut “A” to quick-select the tool.

Step 4:
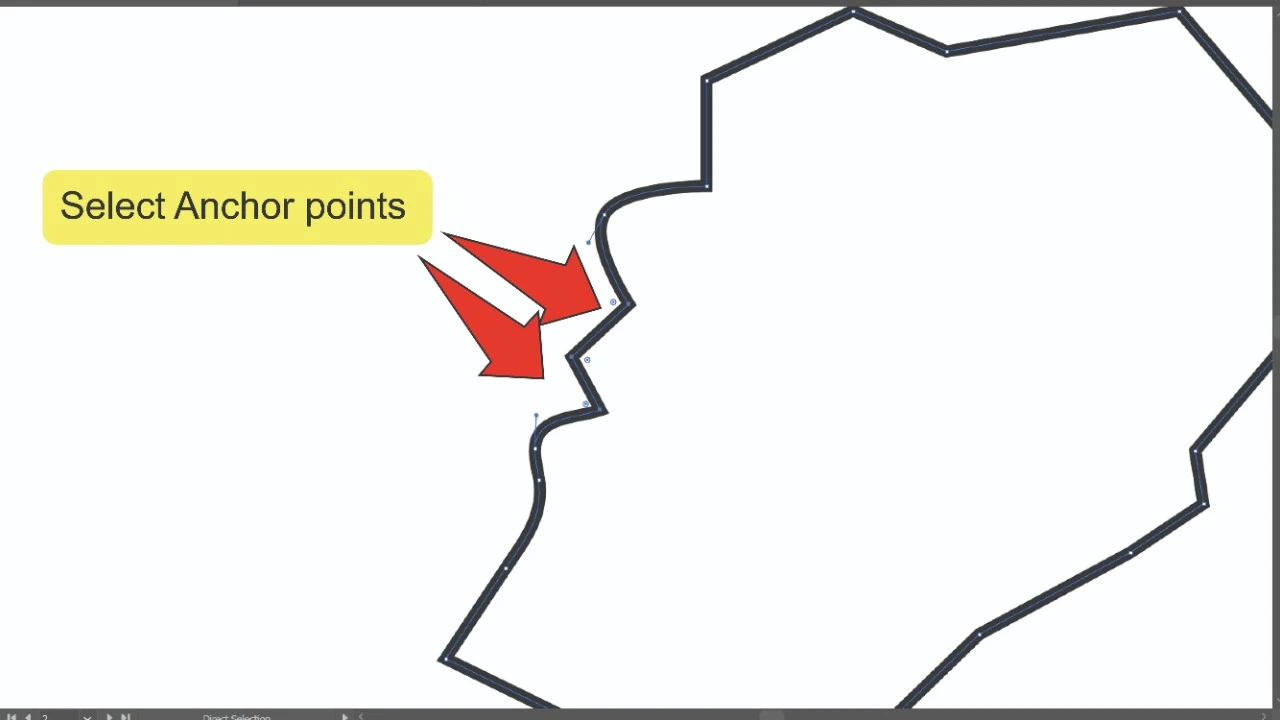
Select your anchor points. Use the Sub-selection tool to select the anchor point closest to the edge you want to smooth. Once selected, the anchor point should be highlighted while the rest remain white. To select multiple anchor points, press and hold the “Shift” key and click on each one.

Step 5:
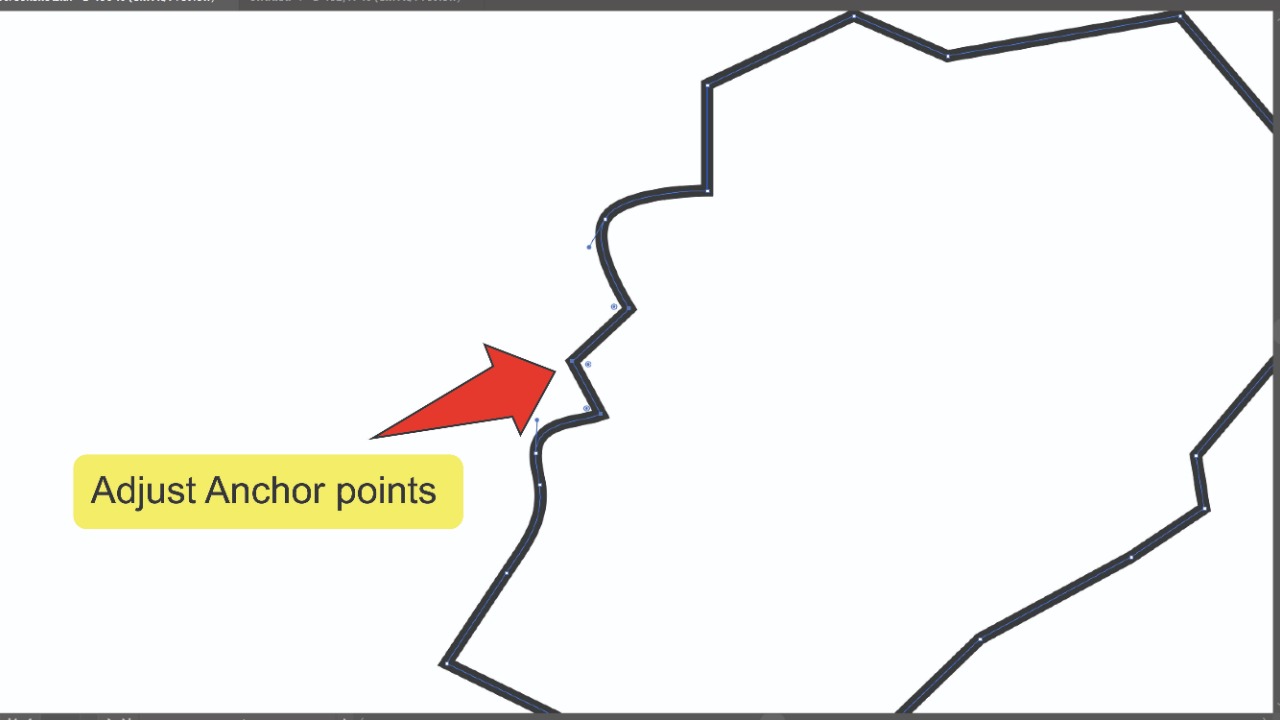
Adjust the edges of your shape. From here you can adjust your shape by moving your anchor points, as well as any path that connects them. You can also use the anchor handles attached to the anchor points on any curved line to adjust the curve of that line.

3. Smoothing Edges In Illustrator Using The Simplify Window – Quick Guide
Press “V” on your keyboard to equip the Selection tool, then click on your object. Next, go to “Object”, followed by “Path”, then click on “Simplify…”. Finally, use the slider on the resulting window to adjust the smoothness of your object.
Smoothing Edges In Illustrator Using The Simplify Window – Step-by-step Guide
Step 1:
Find and select the Selection tool. Look for the Selection tool, located on the toolbar on the left side of your screen. Alternatively, you can use the keyboard shortcut “V” to quick-select the tool.

Step 2:
Select your shape. Use the selection tool to click on your shape. A highlighted border should appear around it.


Step 3:
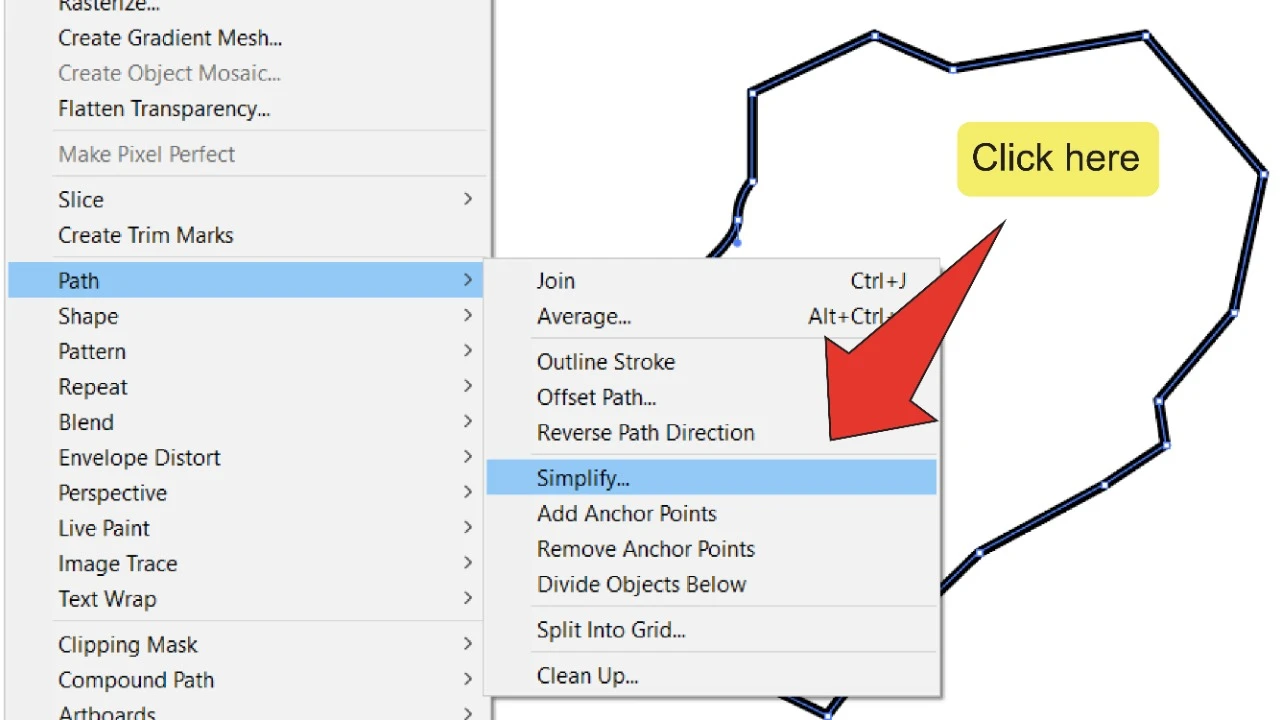
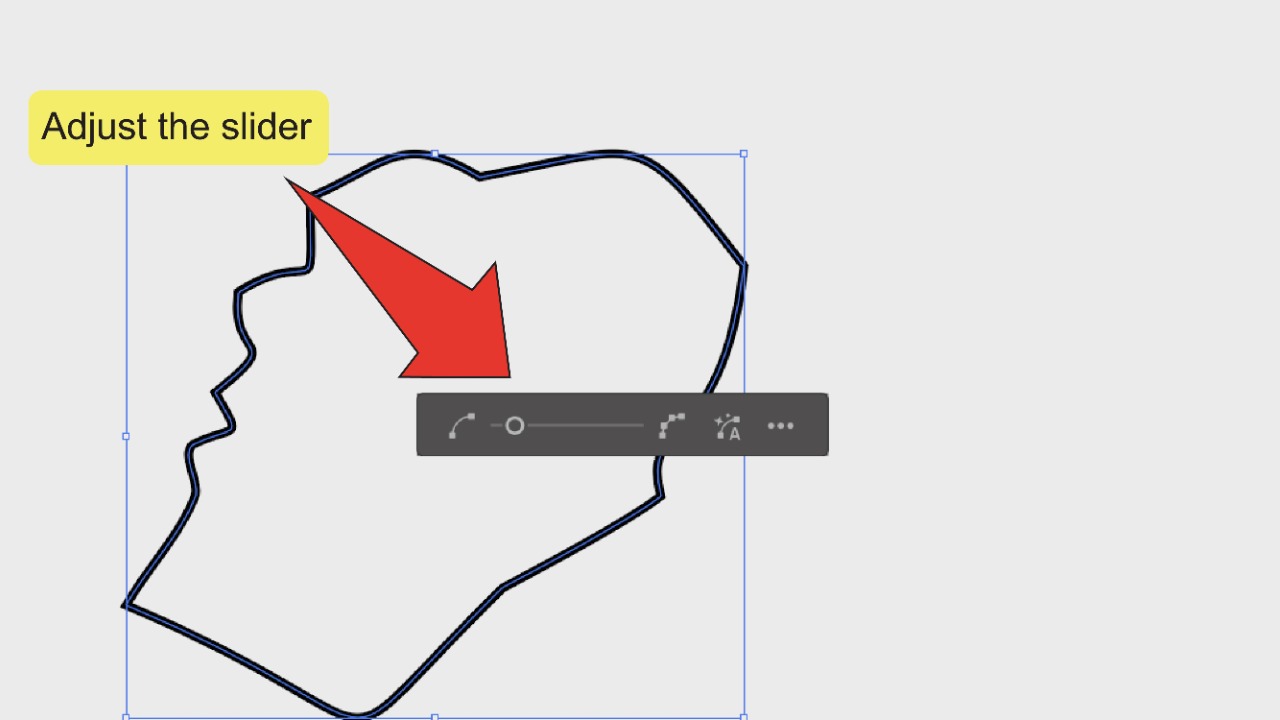
Open the Simplify window. On the menu at the top of the screen, go to “Object”, followed by “Path”, then click on “Simplify…”. A small toolbar featuring a slider and two icons should pop up on your screen.

Step 4:
Adjust your shape. Use the slider on the Simplify window to adjust the amount of anchor points around your object. You can also click the “Auto-Simplify” icon to have Illustrator set the number automatically or the “More Options” icon to open a window where you’ll have more adjustment-options.

4. Smoothing Edges In Illustrator Using The Corner Widget – Quick Guide
Press “A” on your keyboard to equip the Sub-selection tool. Next, select the anchor point(s) you want to smooth. Then, click and drag any related corner widget.
This method is perfect for big shapes with sharp edges that need smoothing.
Smoothing Edges In Illustrator Using The Corner Widget – Quick Guide – Step-
Step 1:
Find and select the Sub-selection tool. Look for the Sub-selection tool, located on the toolbar on the left side of your screen. Alternatively, you can use the keyboard shortcut “A” to quick-select the tool.


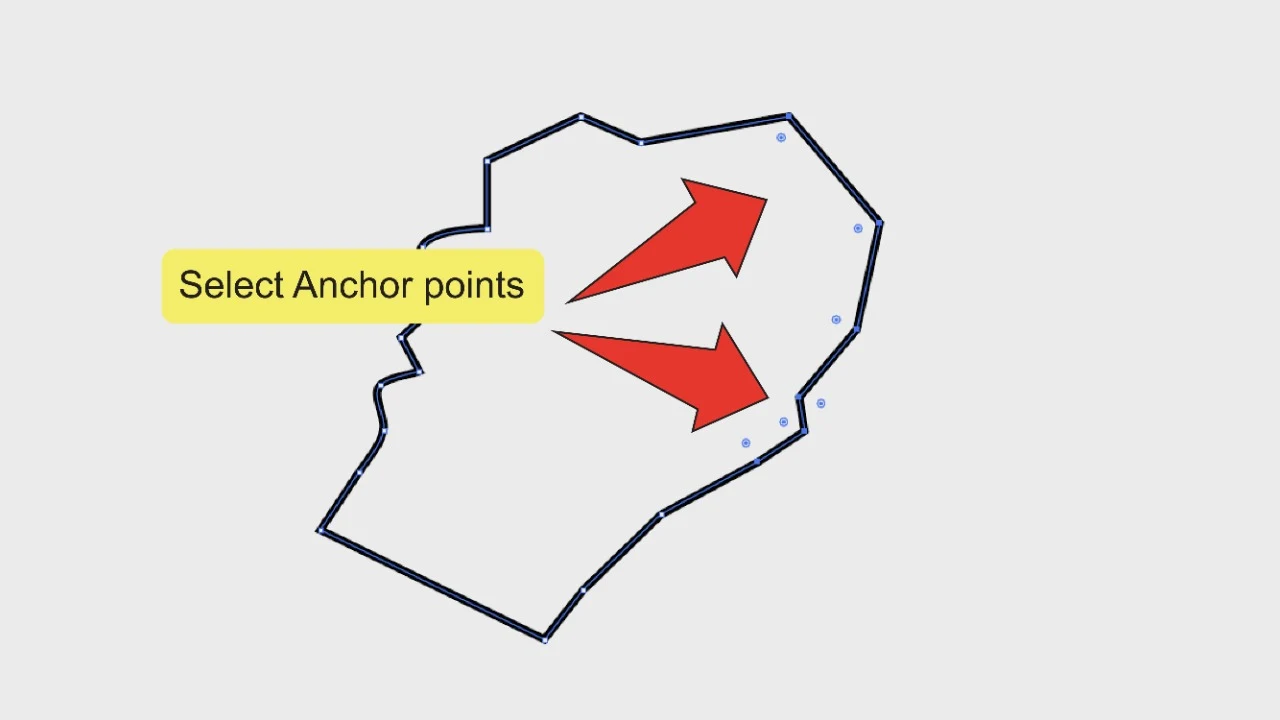
Step 2:
Select your anchor points. Press and hold the “Shift” key and click on each anchor point along the edge you want to smooth.

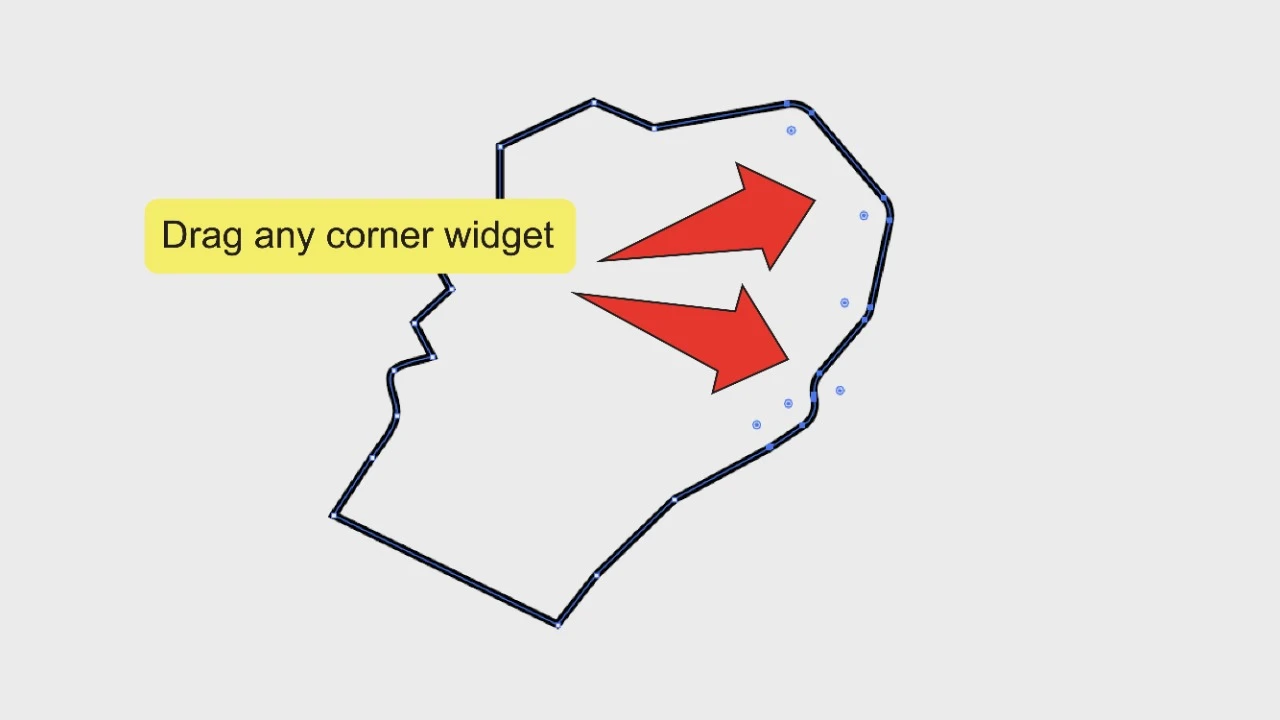
Step 3:
Adjust your edges. Click and drag any corner widget related to the selected anchor point(s) to smooth them.

How to Smoothen Lines in Illustrator
Smooth lines using 4 methods: Corner Widget, Convert Anchor Point, Simplify, or Smooth tools. Use the Corner Widget and Convert Anchor Point tools to get smooth, round corners. Use Simplify to reduce anchor points and make lines smoother. Or, use the Smooth tool to fix jagged lines.
1. Use the “Corner Widget” tool to Smoothen Lines in Illustrator
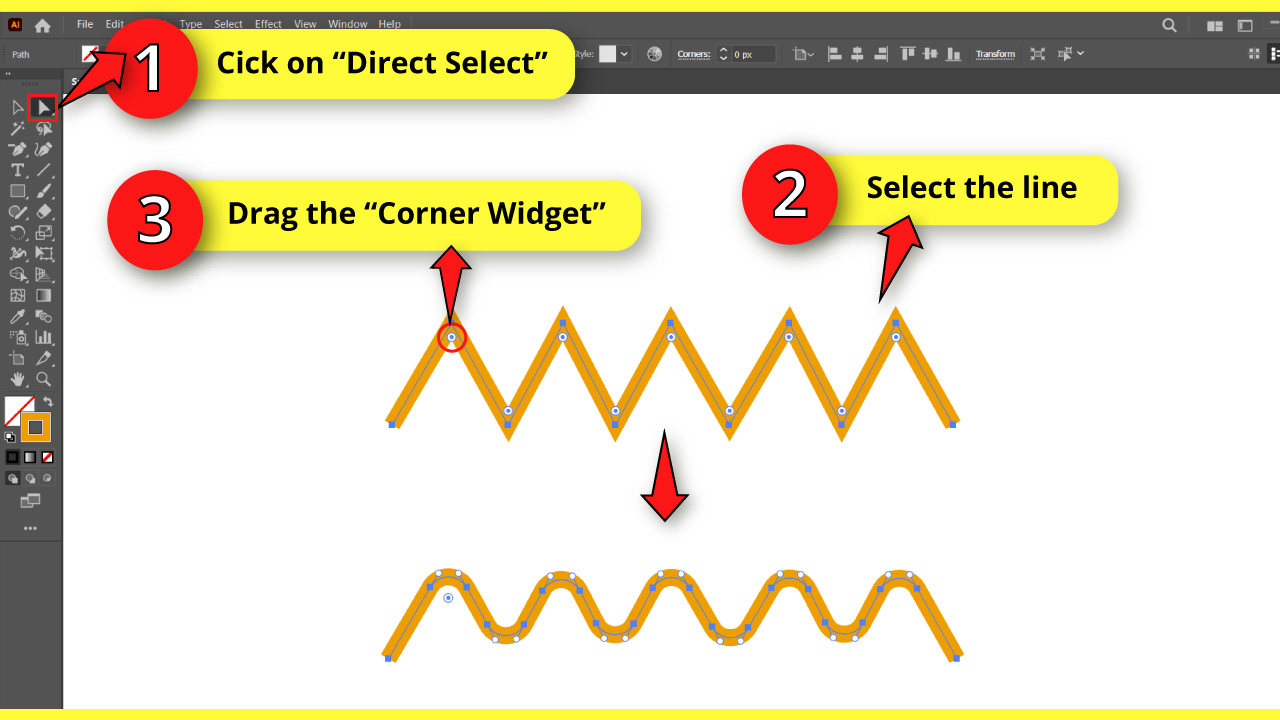
First, we need to select the line we want to smooth using the “Direct Selection” (A) tool.
To select the lines, click on the “Direct Selection” (A) tool located on the left-side toolbar.
Then, click, hold, and drag the pointer to enclose the lines in the selection rectangle.
Once the “Corner Widget” is displayed, click, hold, and drag on it to smooth the lines.
If you want to smooth just one anchor point, use the “Direct Selection” (A) tool to enclose that specific anchor point instead of all the lines.
With this technique, you can easily make wavy lines in Illustrator.
Note that it’s a frequent issue that the “Corner Widgets” are not visible. To fix this problem, follow these tips:
Go to “View” in the menu at the top of the screen and make sure that the “Corner Widget” item is set to “Show Corner Widget,” meaning that the “Corner Widget” should be visible.
If it’s already set to “Show Corner Widget,” try toggling it to “Hide Corner Widget” and then back to “Show Corner Widget.”
Go to “Edit > Preferences > Selection & Anchor Display” also in the menu at the top of the screen.
In the “Preferences” pop-up window, uncheck the “Hide Corner Widget for Angles Greater Than” checkbox.
Then, adjust the “Anchor Points, Handle, and Bounding Box Display” slider to the maximum setting.
Finally, avoid drawing at small scales.
2. Use the “Convert Anchor Point” Tool to Smoothen Lines in Illustrator
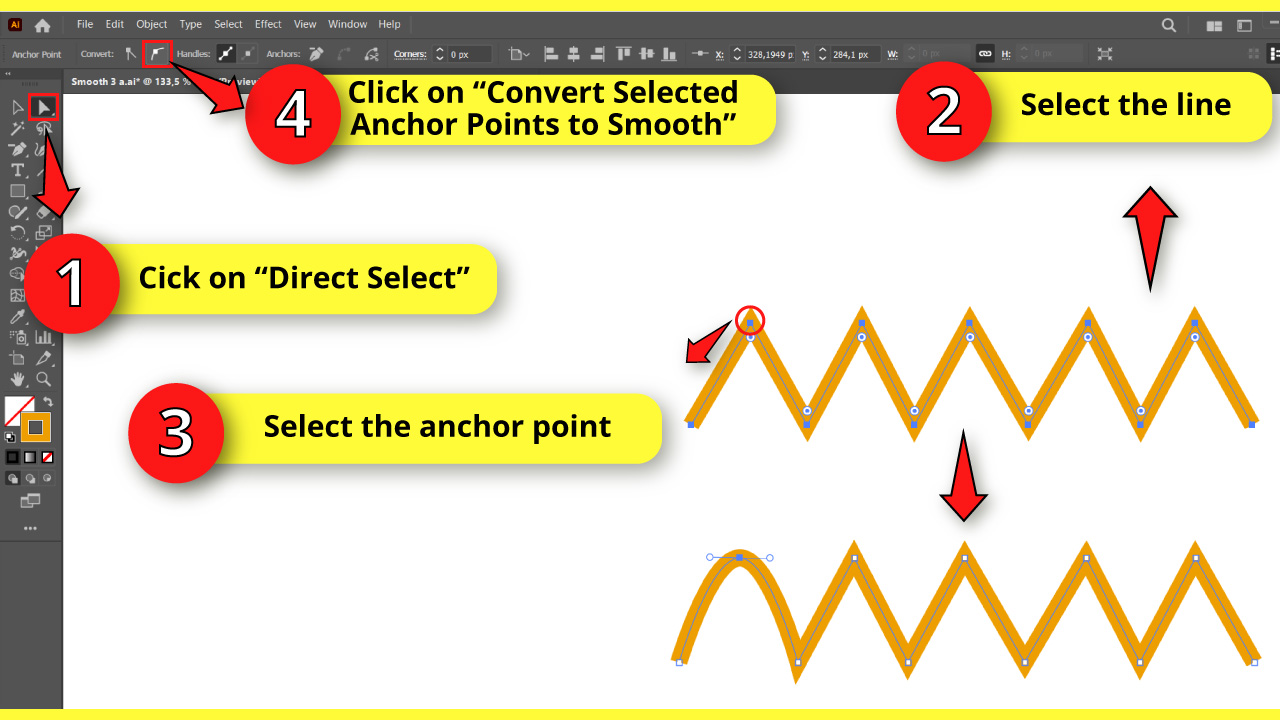
Click the “Direct Selection” (A) tool located on the left-side toolbar. Then, select the line by clicking, holding, and dragging the pointer to enclose the lines into the selection rectangle.
Once the anchor points are visible, click on the anchor point you want to convert.
If you want to convert several anchor points at the same time, use the “Direct Selection” (A) tool to select them.
Keep in mind that if you are going to select several anchor points, you need to have at least one anchor point unselected in the same path to be able to use the “Convert Anchor Point” tool.
After selecting the anchor points, the “Convert Anchor Point” tool will be displayed on the toolbar at the top of the screen.
On the “Convert Anchor Point” tool, click on the “Convert Selected Anchor Points to Smooth” option.
Once you have done this, you will have added handles to the anchor point in Illustrator. Use those handles to control the curve intensity if necessary.
Using this method, you can easily curve lines in Illustrator.
3. Smoothen Lines in Illustrator with the “Simplify” Tool
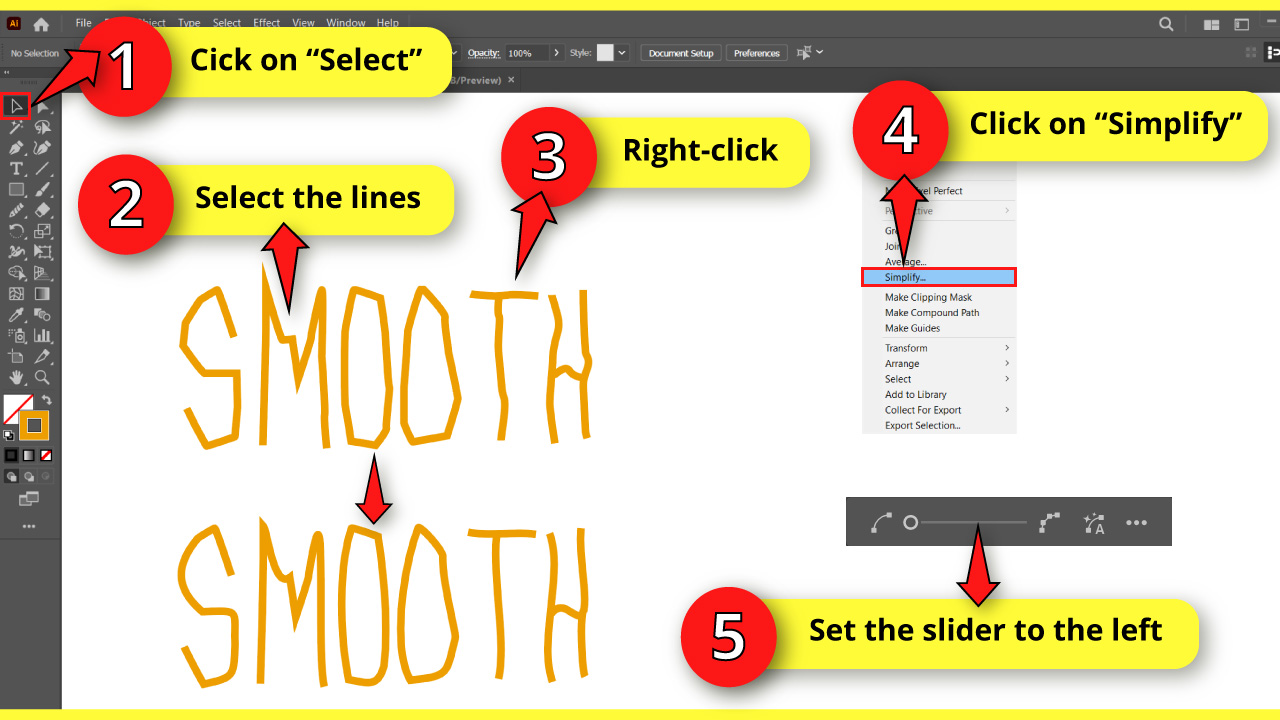
The “Simplify” tool reduces the number of anchor points to get cleaner and smoother lines.
To use the “Simplify” tool, first, use the “Selection” (V) tool located on the left-side toolbar to select the line you want to smooth.
Then, right-click on the line to unfold the options menu. On the unfolded menu, select the “Simplify” option.
You can also do this by going to “Object > Path > Simplify” on the menu at the top of the screen.
Once the “Simplify” window pops up, drag the slider to the left to smooth lines.
The success of the result will depend on the path shape and the number of anchor points.
However, if you are not satisfied with the result, you can try using another method covered in this article or by moving the anchor points in Illustrator.
4. Smoothen Lines in Illustrator with the “Smooth” Tool
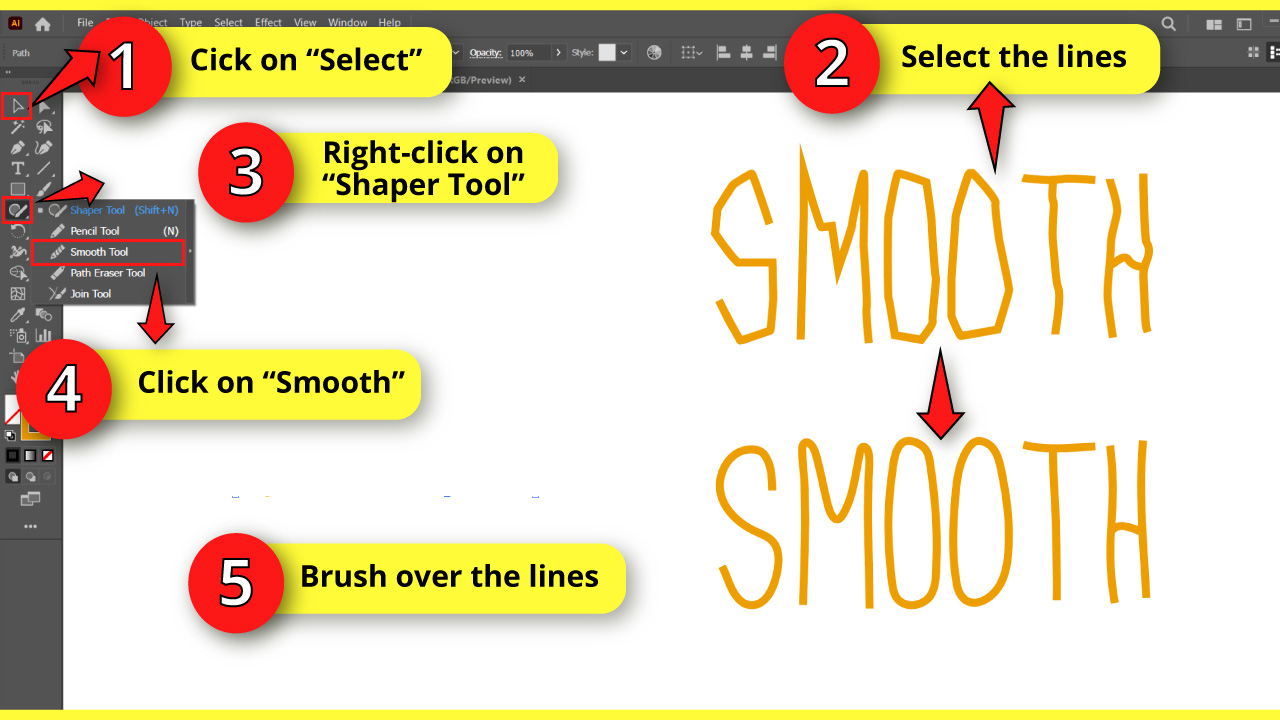
The “Smooth” tool is a freehand tool that enhances the line’s smoothness, and it works pretty well. You can apply this tool as many times as needed to a single line.
To use the “Smooth” tool, first, use the “Selection” (V) tool located on the left-side toolbar to select the line you want to smooth.
Then, right-click on the “Shaper” (Shift + N) tool located on the left-side toolbar. On the unfolded hidden tools, click on the “Smooth” tool.
Use the “Smooth” tool by clicking, holding, and dragging the tool over the line multiple times, tracing the shape you want to get.
Repeat as many times as necessary until you get your desired result.
Frequently asked question on “Smoothing Edges in Illustrator”
Where is the smooth tool in Illustrator?
The smooth tool is located in the left-side toolbar of Illustrator. To find it, right-click on the “Sharpen” tool and then select “Smooth tool.” If you don’t see the toolbar, go to “Window” and then “Toolbar” and then “Advanced.”
What is the shortcut for the smooth tool in Illustrator?
By default, there is no shortcut defined for the smooth tool in Illustrator. However, you can set your own shortcut for the smooth tool by going to “Edit” in the top toolbar, then select “Keyboard shortcuts” and then simply define a hot key for “Smooth tool.”
What does the “Smooth” tool do in Illustrator?
The “Smooth” tool transforms the shape of a path by smoothing it. To use the “Smooth” tool, click, hold, and drag over the path multiple times, tracing the shape you want to achieve.
How do I smoothen jagged lines in Illustrator?
To smoothen jagged lines use one or all of the following tools: “Corner Widget”, “Convert Anchor Point”, “Simplify” and “Smooth”.
How to fade edges in Illustrator?
Draw a rectangle or desired shape over the graphic you want to fade edges. Select both and on the Transparency panel, click on Make Mask. Then, select the mask thumbnail and go to Effect, followed by Blur, Gaussian Blur. Set the blur radius and click on OK.


Hey guys! It’s me, Marcel, aka Maschi. On MaschiTuts, it’s all about tutorials! No matter the topic of the article, the goal always remains the same: Providing you guys with the most in-depth and helpful tutorials!

