
When working on all kinds of artworks, overlapping lines are the order of the day.
It’s logical to get some overlapped lines when you work carelessly, but sometimes it’s also very hard or even impossible to avoid them in tidy and planned projects due to the nature of the program’s functioning.
Fact is, overlapping lines make your project look messy and sloppy.
The bad news is that Illustrator lacks any specific function or tool to solve this problem, but the good news is with this tutorial you are going to learn some tricks to get rid of these overlapping lines in two different ways.
How to delete overlapping lines in Illustrator
Lower the opacity to detect overlapping lines and using the “Scissors” tool to separate and delete undesirable overlapping. Or you can expand your artwork into paths and then use the “Unite” function from the “Pathfinder” panel to delete overlapping lines in Illustrator.
How to delete overlapping lines using the “Scissors” tool in Illustrator
Select your artwork and set the “Opacity” to 30% so you can detect the overlapping sections. Use the “Scissors” (C) tool to split these trouble sections. Select the split sections and press the “Del” key to delete them. Finally, set the “Opacity” back to 100% to finish it.
To explain how to delete overlapping sections, I’m going to use 3 squares with 2 overlapping sections.
We recommend you to use this method only if you need to preserve the lines of your artwork.
If you are intending to convert the lines into paths, or if this wouldn’t be a problem to you, please skip straight to the next method: How to delete overlapping lines using the “Pathfinder” tool in Illustrator.
Step-by-step Guide
Step 1: Detecting Overlapping Lines
The first thing we need is to detect the overlapping lines. Sadly, there is not any automatic way to do this, so we’ll have to use a gimmick.
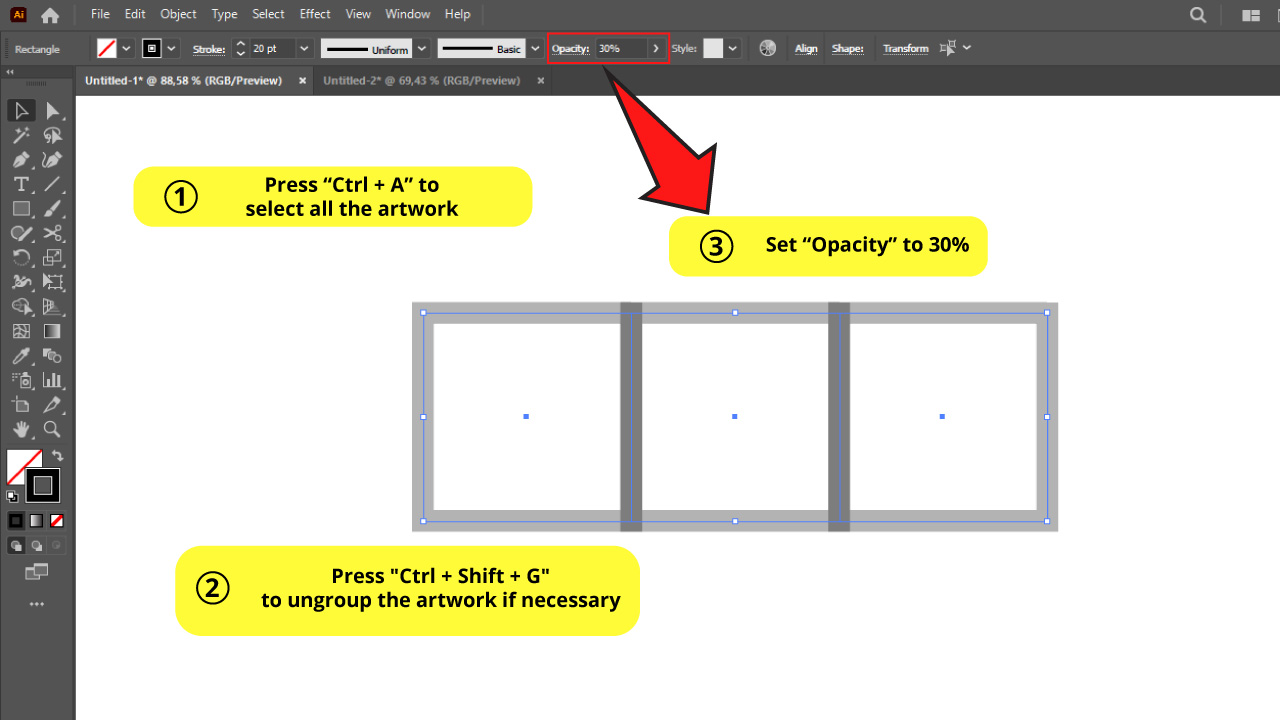
Select your whole artwork using the “Selection” (V) tool on the left side toolbar or by using the “Ctrl + A” command to select all of it.
Make sure that the lines are ungrouped. If they are grouped, press “Ctrl + Shift + G” to ungroup them.
Then go to the “Opacity” box on the top side toolbar and set it to 30% or similar.
If you can’t find the “Opacity” box, maybe you need to enable it first by going to “Window > Transparency” and then setting the “Opacity” from that panel.
Now that our artwork has transparencies, it’s important to know the darkest lines mean overlapping sections.
If you want to learn more about how to group and ungroup objects you can check this quick article about “How to Group Objects in Illustrator”.
Step 2: Finding the “Scissors” (C) tool
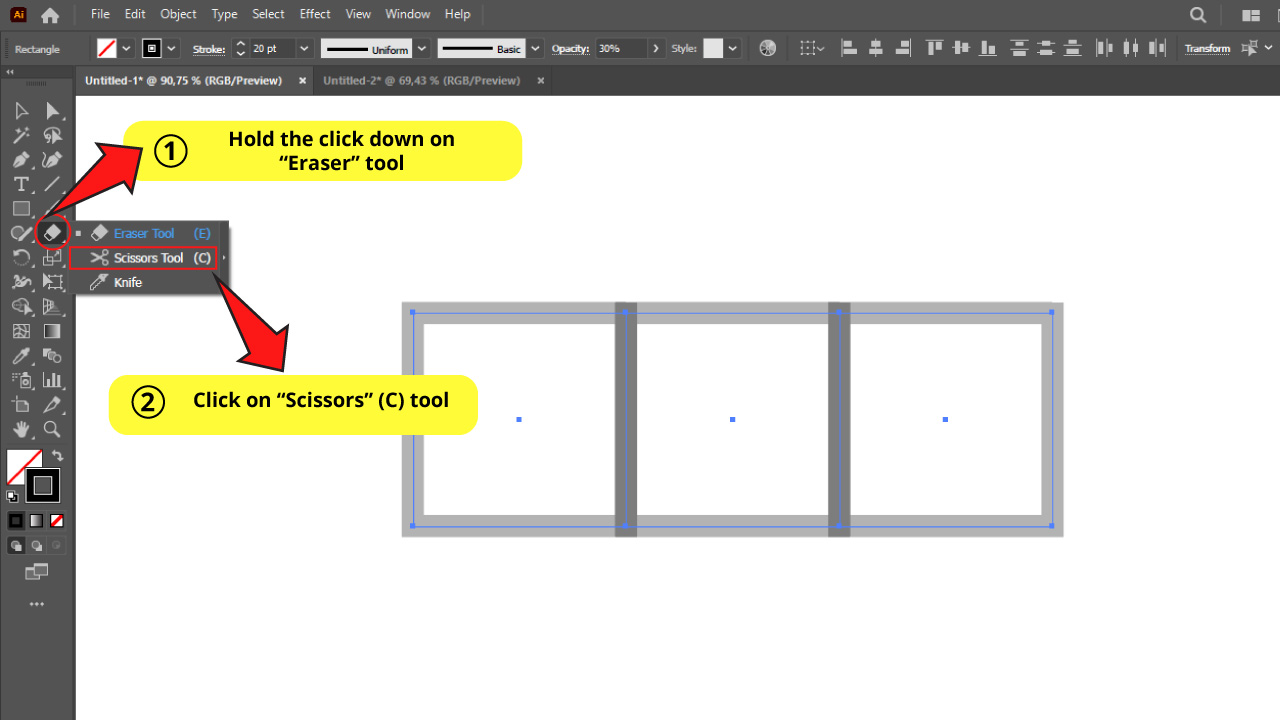
Go to the left side toolbar and find the “Eraser” tool.
Hidden inside the “Eraser” tool nest you’ll find the “Scissors” (C) tools. To unfold the hidden tools menu, hold the click down on the “Eraser” tool. Then click on the “Scissors” tool to select it, or simply press the “C” key on your keyboard to shortcut it.
If you want to learn more about the tools hidden in the “Eraser” tool nest, you may be interested in these two articles about “How to Use Eraser Tool in Illustrator” and “Illustrator: How to Use The Knife Tool”.
Step 3: Using the “Scissors” (C) tool
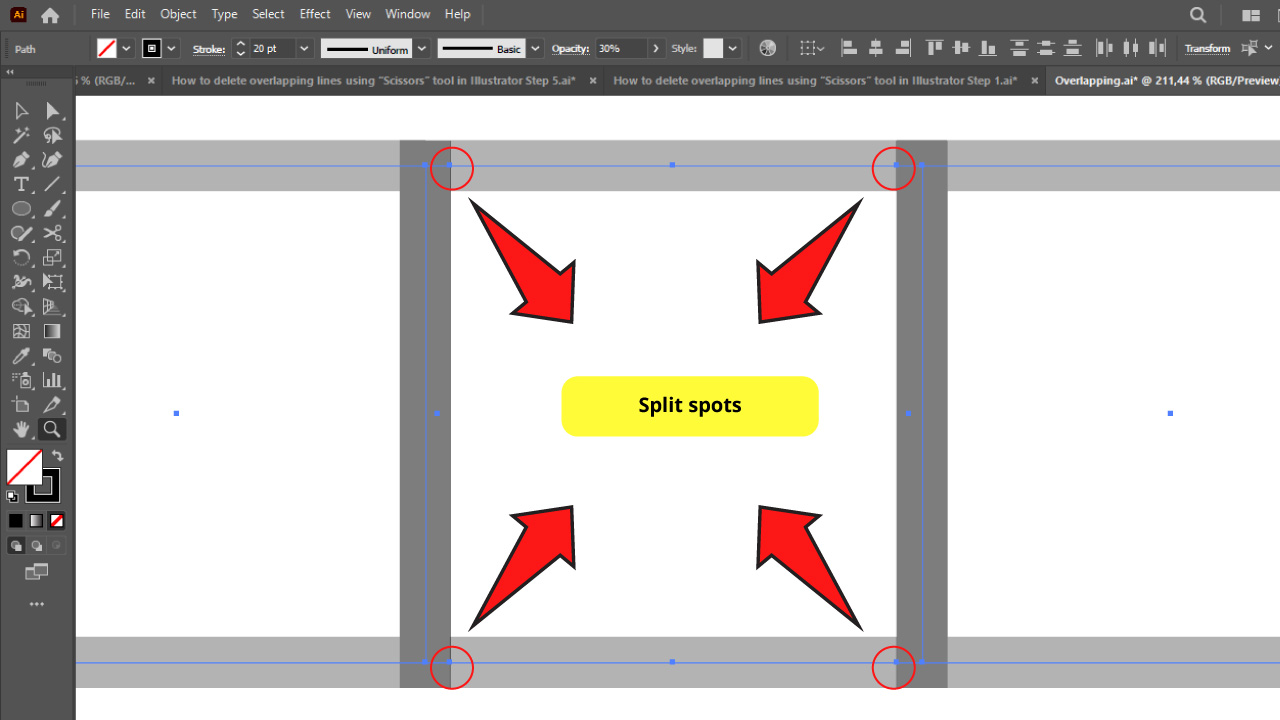
While the “Scissors” (C) tool is selected, click on the lines to split the overlapping section.
This tool works anywhere in the line. You don’t necessarily need to use it on anchor points. It will most likely always fit your specific needs.
Step 4: Deleting overlapping section
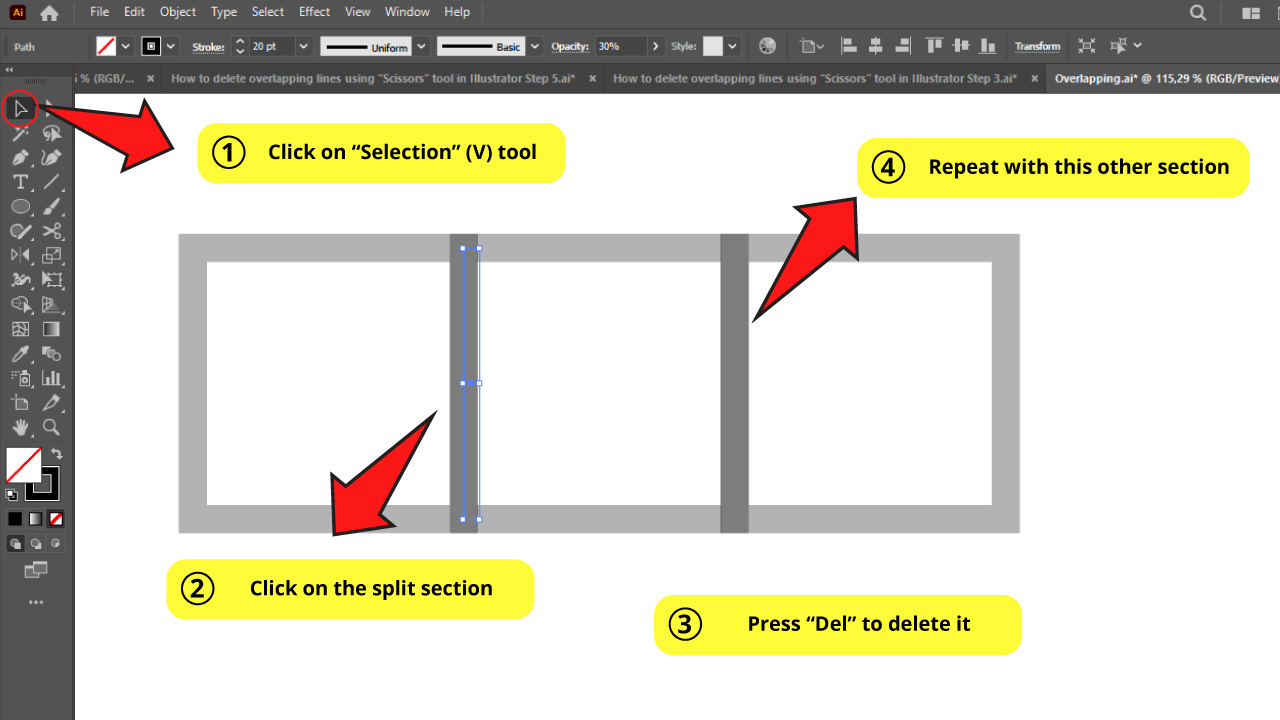
Use the “Selection” (V) tool to select the overlapping sections and then press the “Del” key to delete them.
Step 5: The Result

This is how your artwork should look now.
The top one still has the opacity set to 30%. Bottom one’s opacity is set to 100%.
Select your whole artwork with the “Ctrl + A” command and set the “Opacity” to 100% to get it done.
How to delete overlapping lines using the “Pathfinder” tool in Illustrator
Select all the artwork with “Ctrl + A” and go to the “Pathfinder” (Shift + Ctrl + F9) panel. Click on the “Unite” function to get rid of overlapping.
Step-by-Step Guide
This is arguably the best method. It is indeed cleaner and neater, but converting your stroke lines into paths is a necessary requirement. So if you need to preserve your artwork lines, use the previous method: How to delete overlapping lines using the “Scissors” tool in Illustrator.
Step 1: Expand Lines

Select your whole artwork with the “Selection” (V) tool, or use the “Ctrl +A” command.
Then click on “Object > Expand” on the top side menu.
Make sure you check the “Stroke” and “Fill” boxes in the “Expand” options menu.
Then click “OK” to save your settings.
Now your lines have been expanded to paths.
Step 2: Use the “Unite” function in the Pathfinder panel
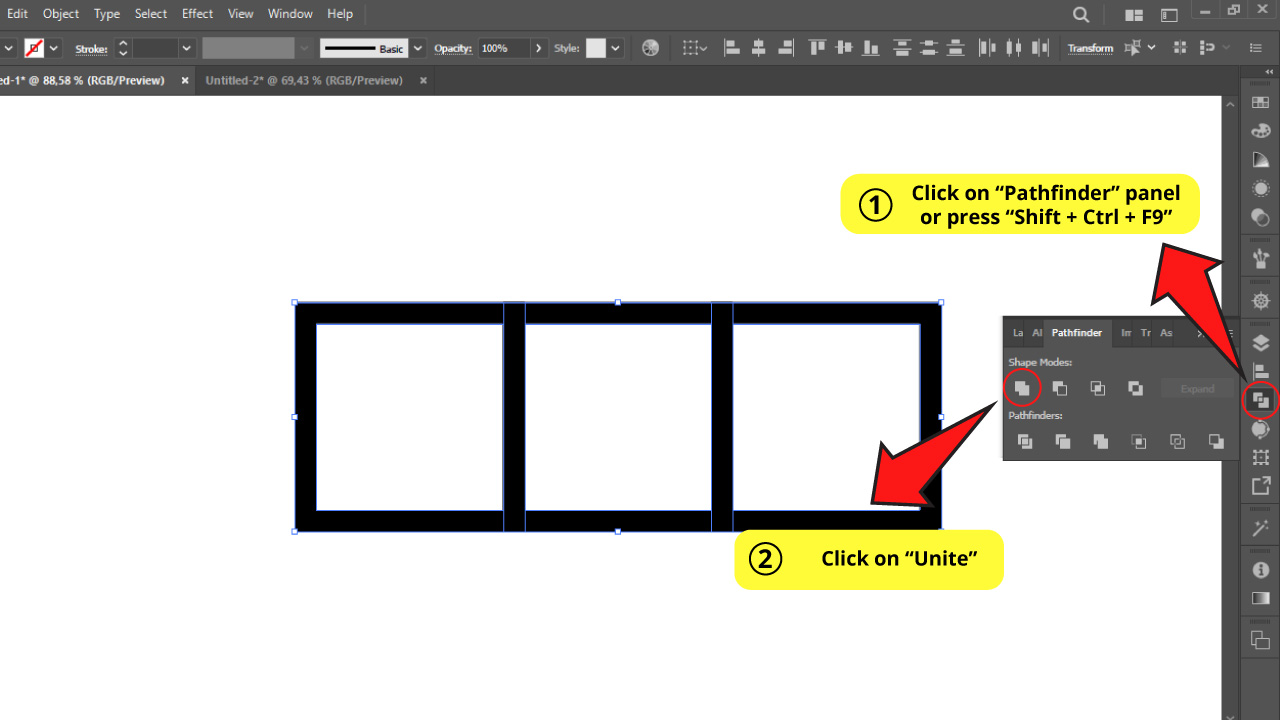
Go to the “Pathfinder” (Shift + Ctrl + F9) panel on the right side menu.
If you can’t find it, you may need to enable it first by going to “Window > Pathfinder” or by using the “Shift + Ctrl + F9” command.
Make sure your artwork is selected, and click on the “Unite” function in that panel.
The “Pathfinder” panel is very frequently used by designers in Illustrator. If you want to learn all the secrets behind this tool, we strongly recommend you to take a look at these two articles about “How to Combine Shapes in Illustrator” and “How to Merge Paths in Illustrator”.
Step 3: Checking the final result
If you wish to check the outcome and make sure the process worked as expected and overlapping lines are now fixed, select the whole artwork and set the “Opacity” to 30%.
Remember you can find the “Opacity” settings on the top side toolbar.
Notice how the color looks homogeneous in all the artwork. This means that the overlapping sections have been solved.
Frequently asked questions on” How to delete overlapping lines in Illustrator”
Does Illustrator have a function to delete overlapping lines?
Illustrator doesn’t have any specific function or tool to solve this problem, but there are some methods to get rid of overlapping lines. In this tutorial you will learn the two best ways to do it.
Can I preserve the lines as strokes in the process of deleting overlapping lines?
You can preserve the lines as strokes when using the Scissors Tool to remove overlapping lines in Illustrator”.