Oh! I want to start an online business, but I don’t have a website or a landing page to showcase my products.
What’s worse, I don’t have any knowledge about website design. Is there any way I can create a simple website for my business even if I’m a complete newbie in this field?
The good news is that Canva now offers a beta feature for creating websites — for free!
So, if you’re raring to learn how to create your simple yet eye-catching website on Canva, better keep reading.
How to Make a Website in Canva
First, search for a website template by using the search bar function on Canva’s home page. Click the template you’ll use. Then, start customizing by adding elements, editing the text, and embedding videos, links, and audio. Then, select the Publish as Website button to make it go live.
Making Websites in Canva — Basic Steps to Follow
You’d probably think creating websites out of a graphic design tool’s way out of its league. But, websites that are not only functional but eye-catching and increase click-through rate and traffic all boils down to how pleasant the site looks.
Yet, there’s no need to master web designing to do so. Canva’s got the perfect solution for this dilemma that even newbies can enjoy creating one.
Step 1: Type “website” on Canva’s home page
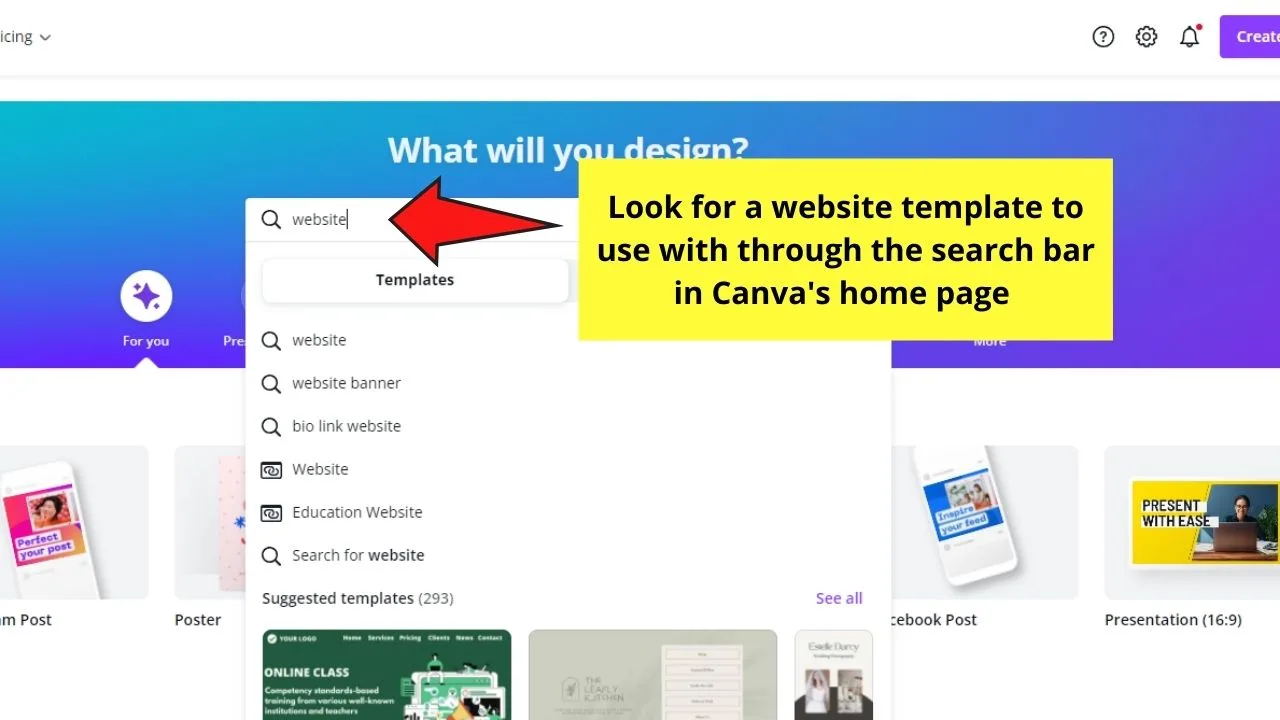
You’ll then see 3 website options: Website, Bio-Link Website, and Mobile-First Website (if you can’t find them in the options, just type those terms in the search bar directly).
In this tutorial, we will go with a Mobile-First template. However, if you follow along our tutorial video from above, you will find that we went with a regular website template (desktop).
For sample purposes, we’ll choose the Mobile-First Website option so the resulting website you create is already optimized for phone screens.
But, depending on the purpose behind your website creation, you can choose one out of the 3 options.
Just know that the Website template is set at 1350 x 650 px, the Bio-Link Website template is at 1080 x 1920 px size, and the Mobile-First Website’s at 1080 x 1920 px size as well.
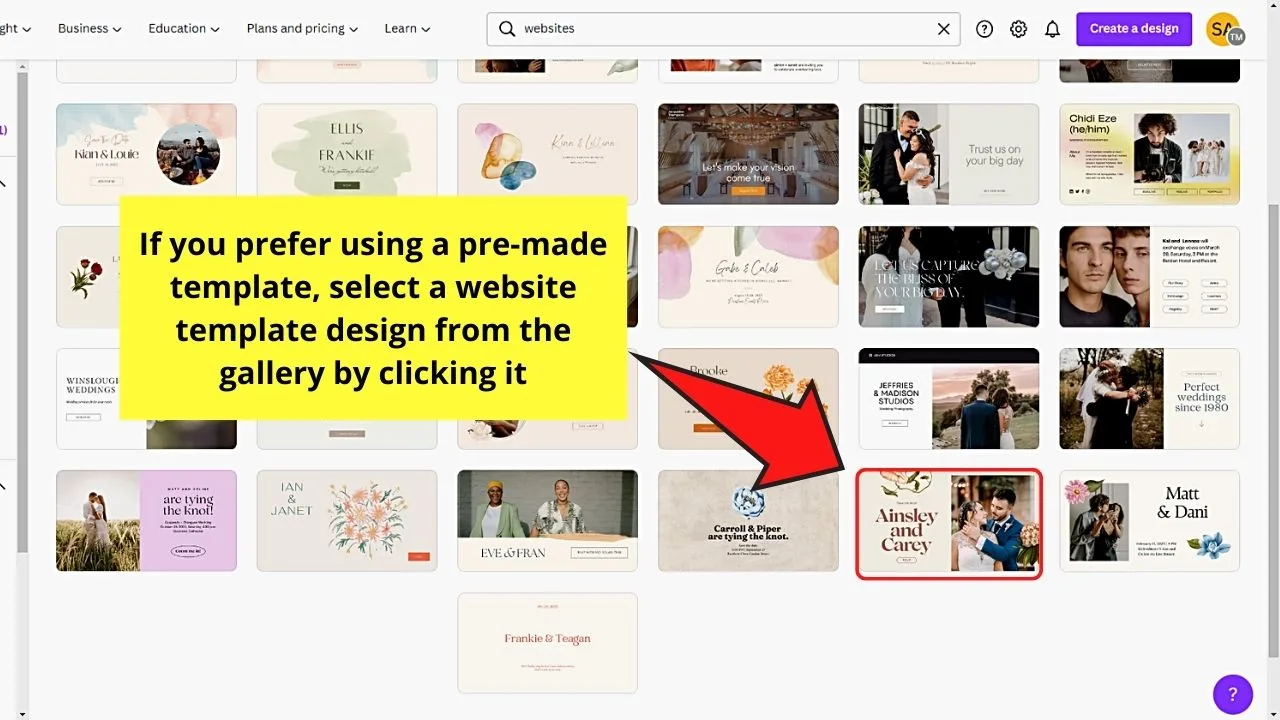
Step 2: Scroll down the template gallery until you see the design you want to use for your website
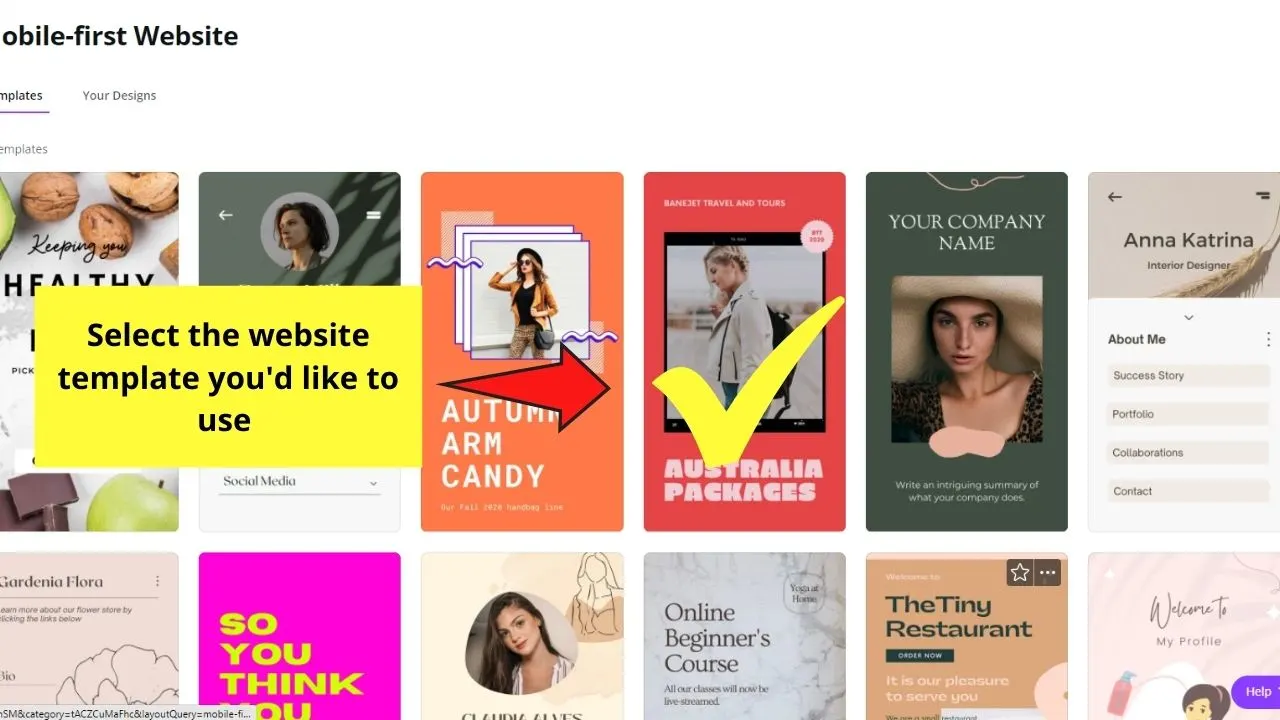
You definitely can start with a blank template, but, if you’re a complete greenhorn with web designing, you better start with pre-made ones.
Click on a website template you’ll use so you’ll be redirected to the editor page.
Step 3: Customize your website
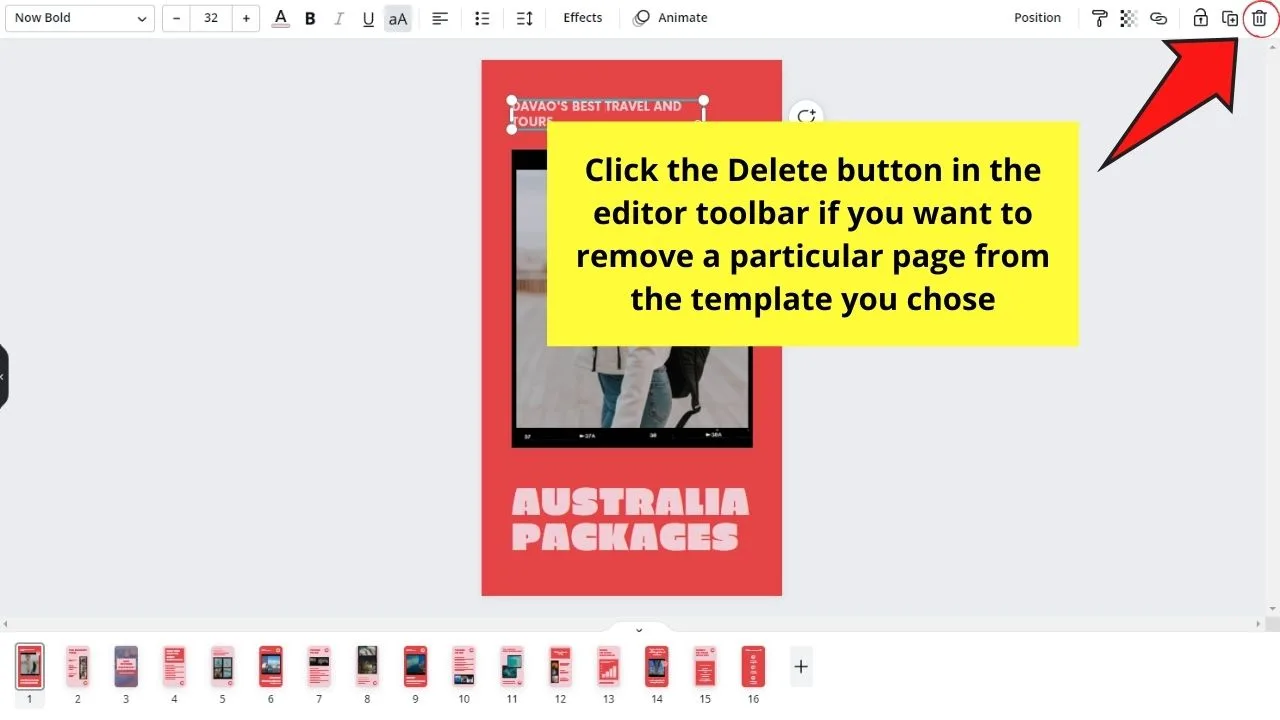
If you don’t like some parts of the template, you can delete those pages by clicking the Delete button found in the upper right corner of the current page.
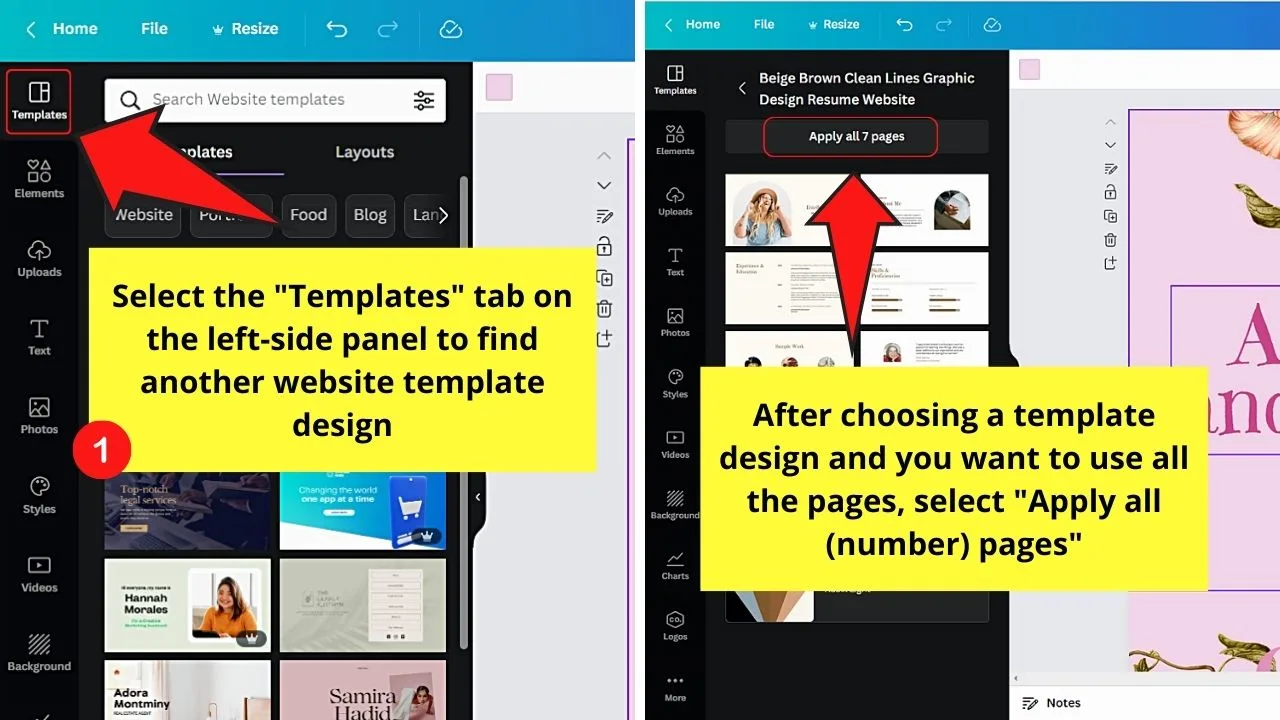
Then, head to the “Templates” tab and find another template style you’d like to add. Click on that page to add it to your current design.
Step 4: Click on the “Page Manager” button at the bottom of the editor page
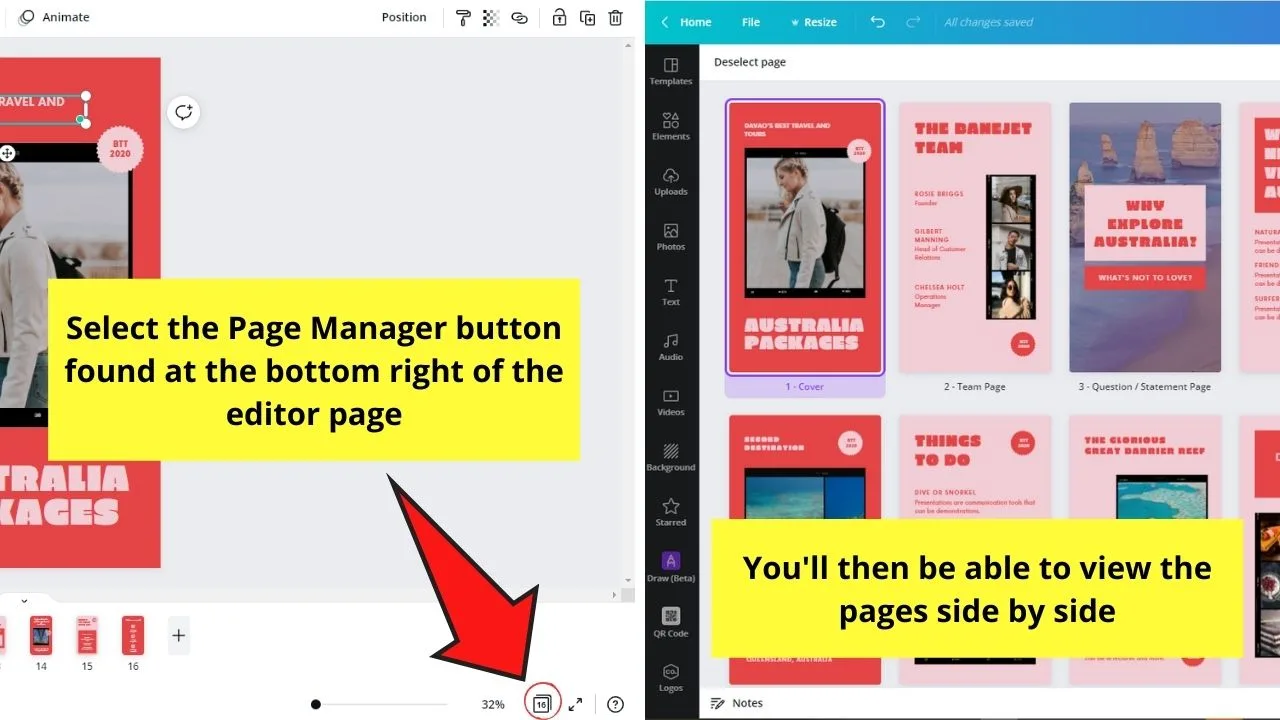
This will allow you to view Canva pages side by side.
Then, simply rearrange the order of the pages if you’re not satisfied with how the current one looks.
Once you’re done, click the Page Manager button again to exit the grid view.
Step 5: Edit the individual elements of the design
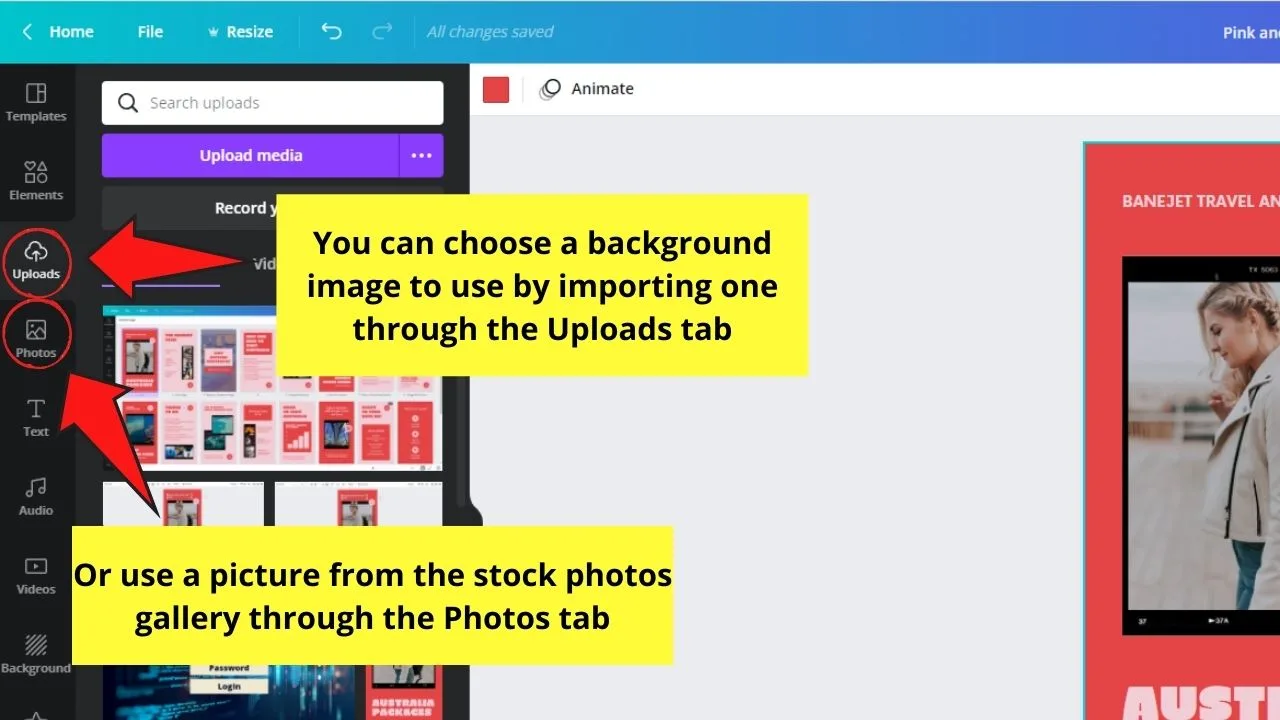
Start by changing the background of the template. You can opt to use one from the “Photos” tab on the left side menu, or you can also use your images by importing them through the “Uploads” tab.
Drag the said photo into the canvas and wait for the picture to replace the original image used.
You can then adjust the crop positioning by double-clicking on the image and dragging it accordingly.
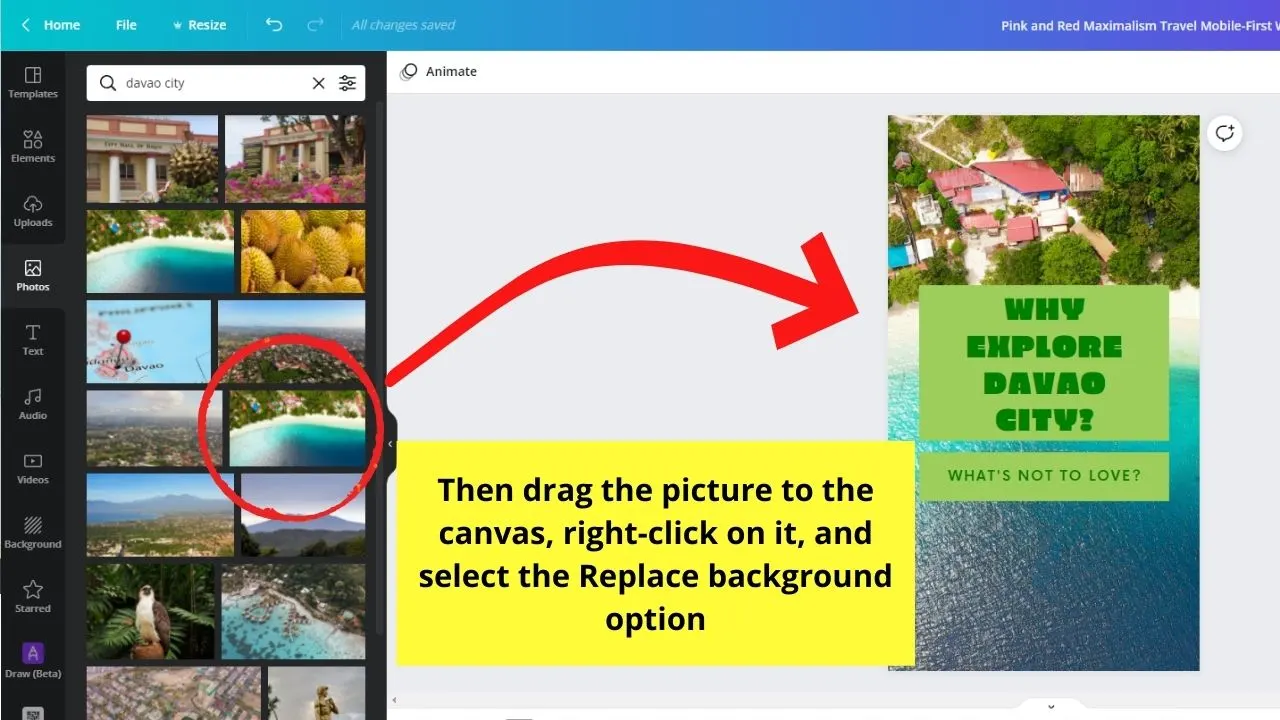
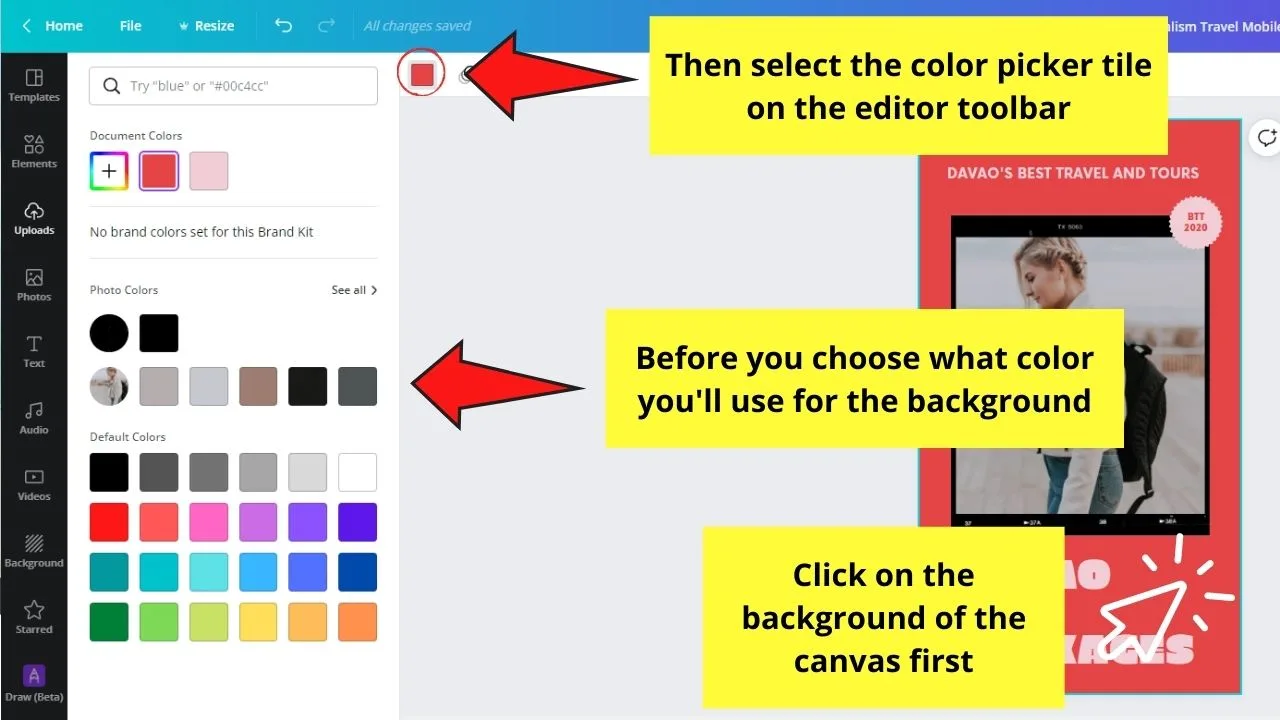
If you prefer a plain color, just click on the background of the canvas and select the color picker tile in the editor toolbar. You’ll then be able to choose from Default colors or add Custom hues.
Step 6: Add buttons to your website design
These buttons will help guide your audience to navigate your design, as well as learn more about what your website has to offer.
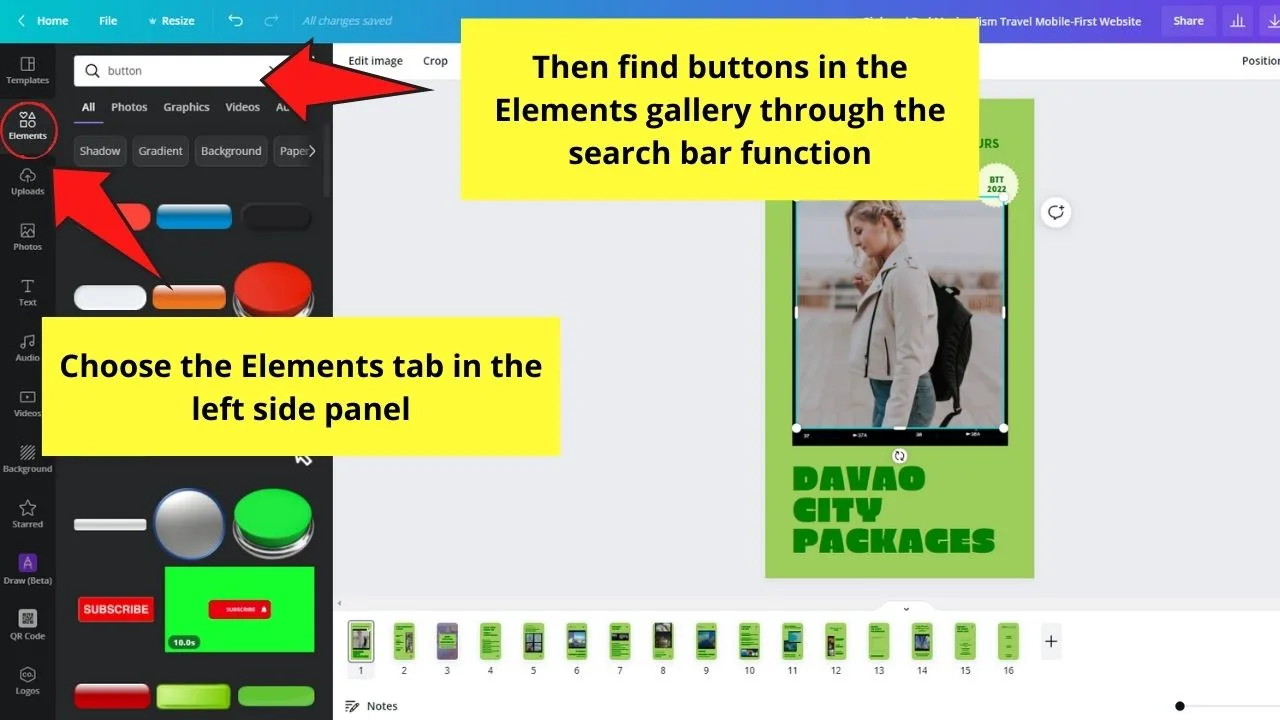
To add clickable buttons, head to the Elements tab first and search for one using the search bar function.
Then, choose a button design you’d like to use and drag it to your project. Edit its look by selecting it and clicking the color picker tile on the editor toolbar.
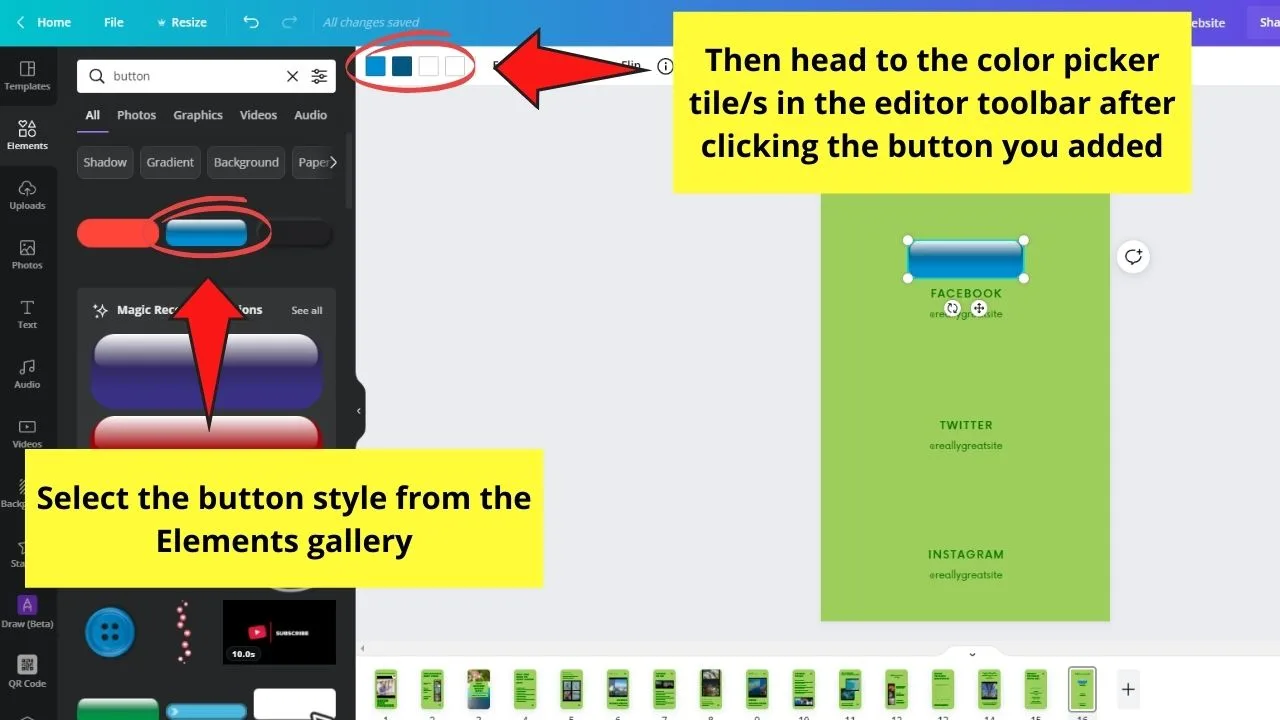
Choose from the default colors available or add custom ones through the rainbow-colored “+” tile.
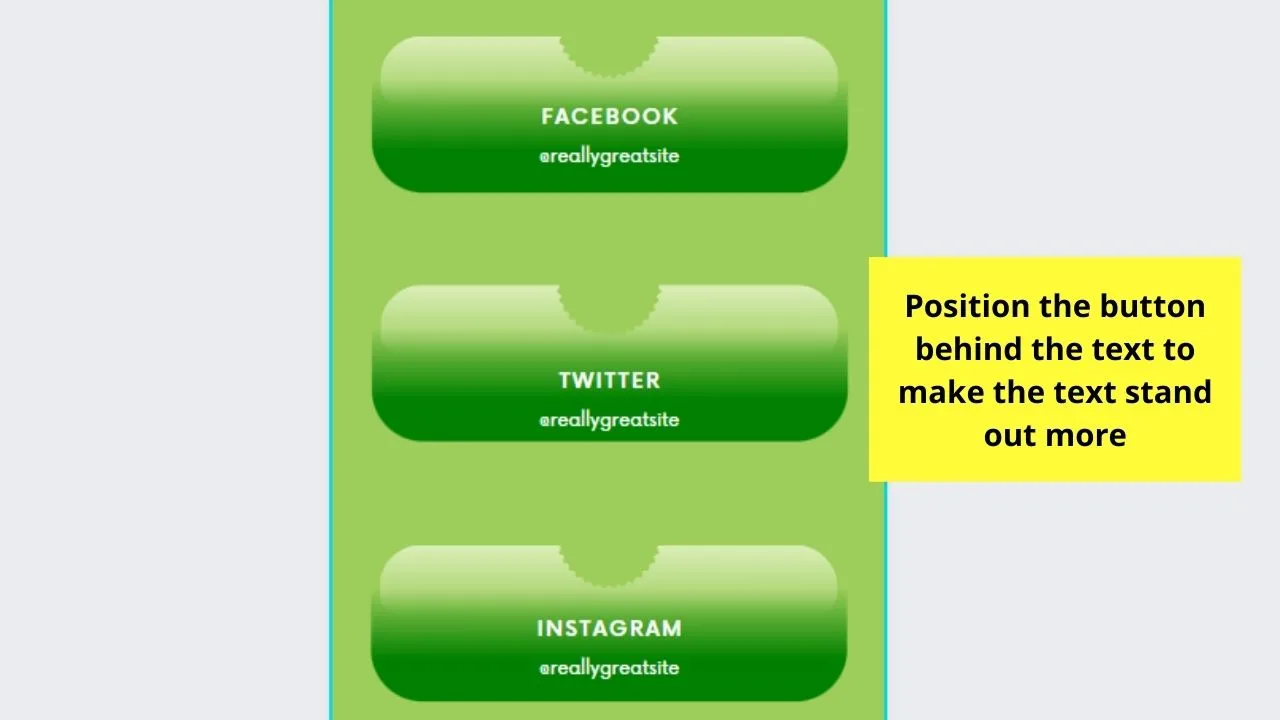
You can even place the button behind the text so it serves as a placeholder for that particular text, aside from making it more visible to the audience.
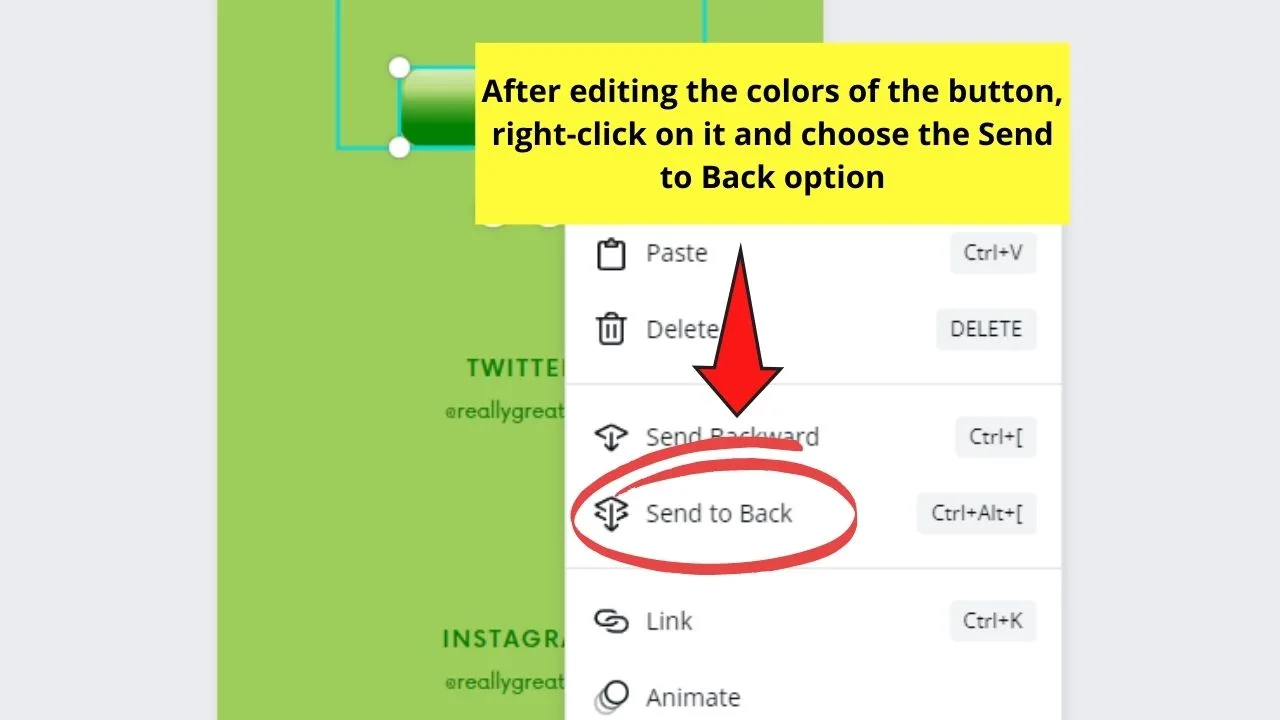
You can read more about layering in Canva to help you out with this process.
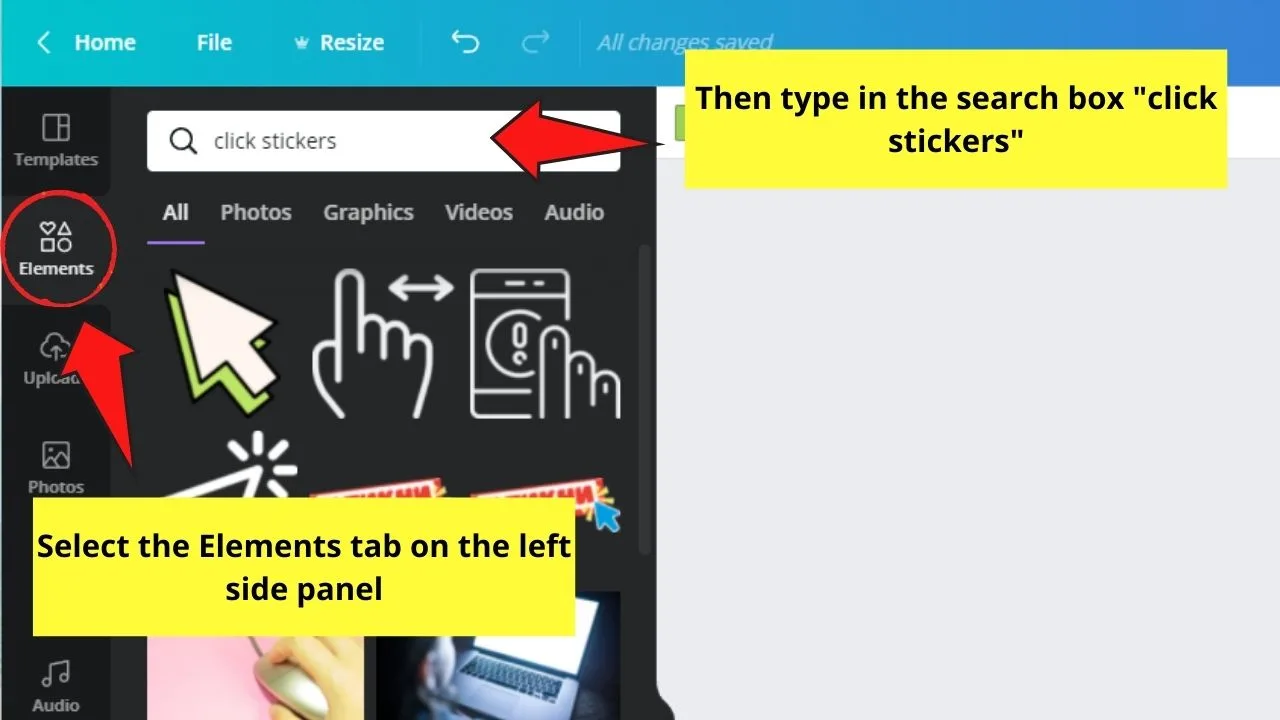
For added effect, you can also add click stickers to help you show your audience where to click. Head again to the Elements tab and search for those stickers through the search bar.
Continue adding these clickable buttons to other pages of your design wherever they’re applicable.
Step 7: Add links to create the clickable buttons
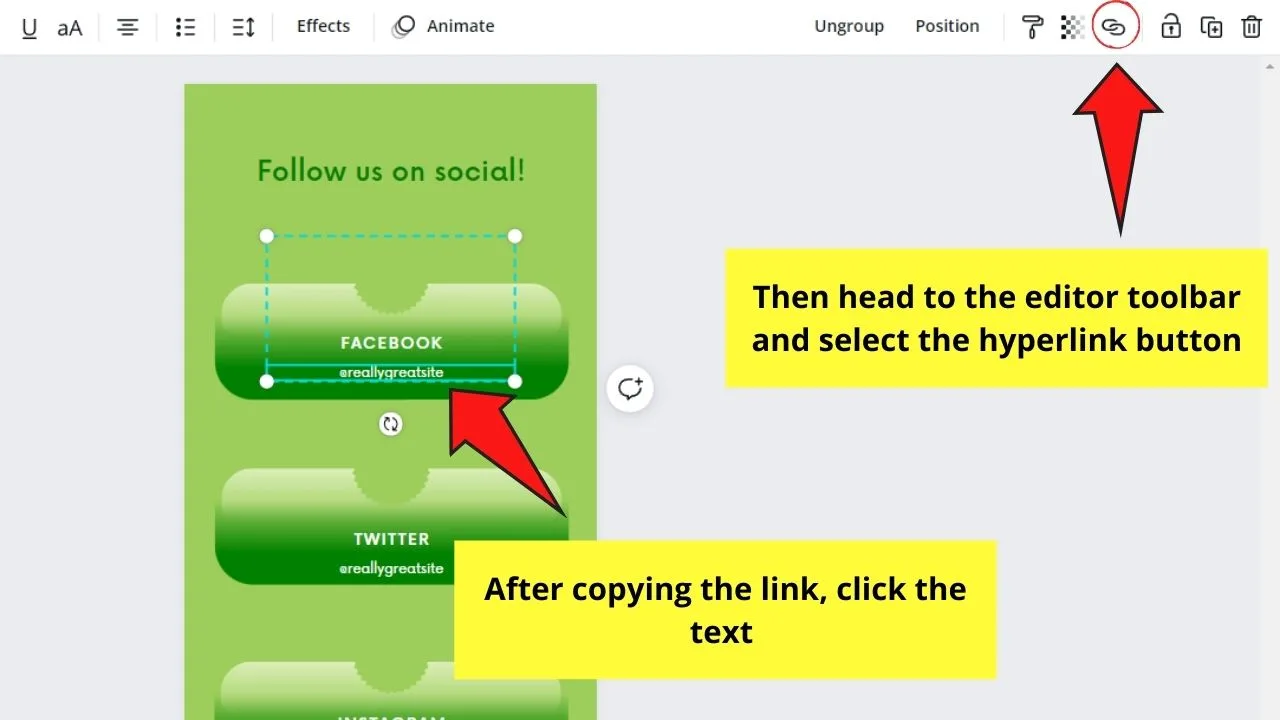
To achieve this feat, you first need to head back to the website you want to link with the one you’re creating.
Copy the URL from the address bar, then head back to Canva, and select the button before clicking the “Link” button on the editor toolbar.
Paste the website URL in the box provided before selecting the “Apply” button to finalize the linking.
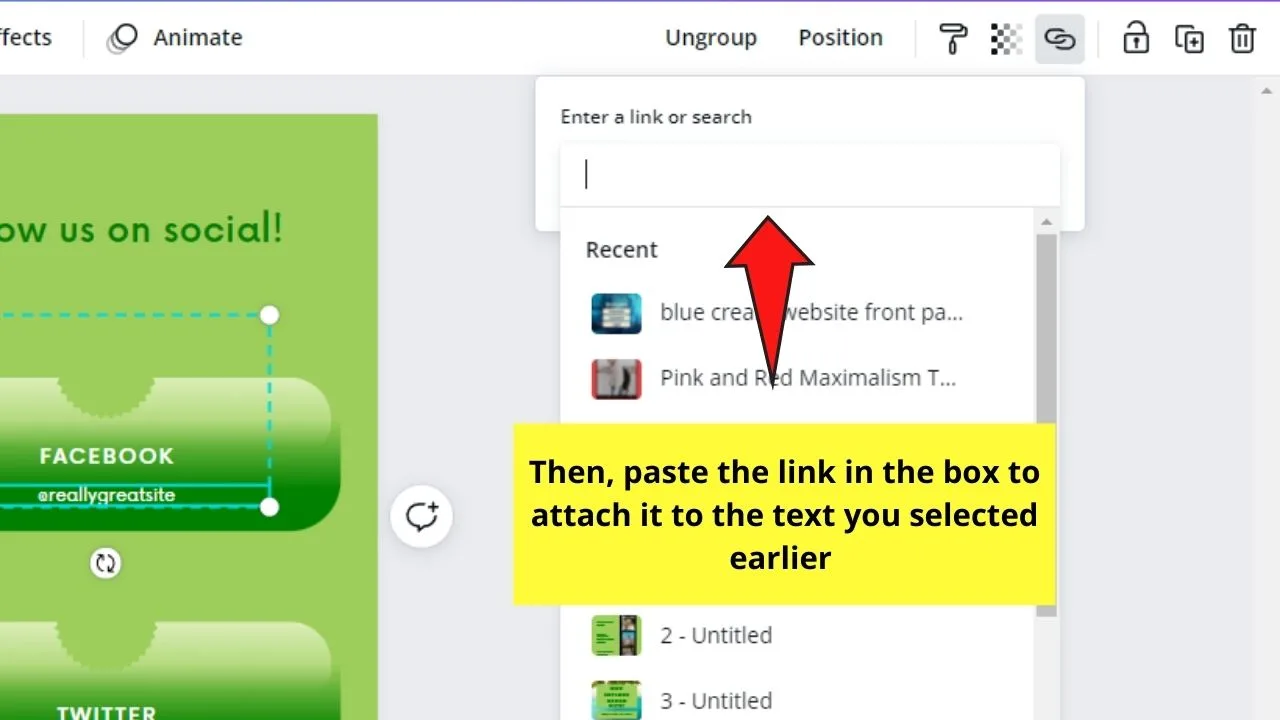
Repeat this step until all your clickable buttons have links attached to them.
Step 8: Embed videos (if you have some) so your audience can watch them from the site directly
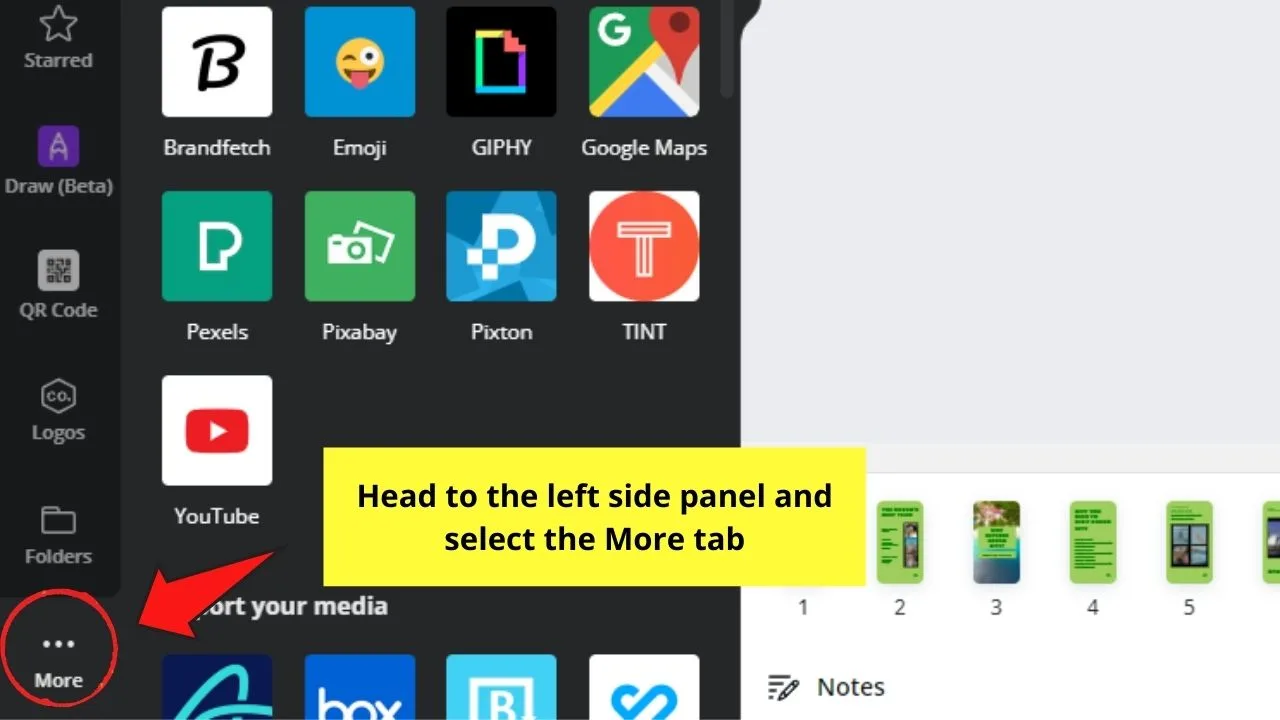
Copy the embed link of that particular footage then, head back to the editor page and select the “More” tab.
Then, in the right-side panel that appears, select the Embed button and paste the link you copied earlier in the box provided.
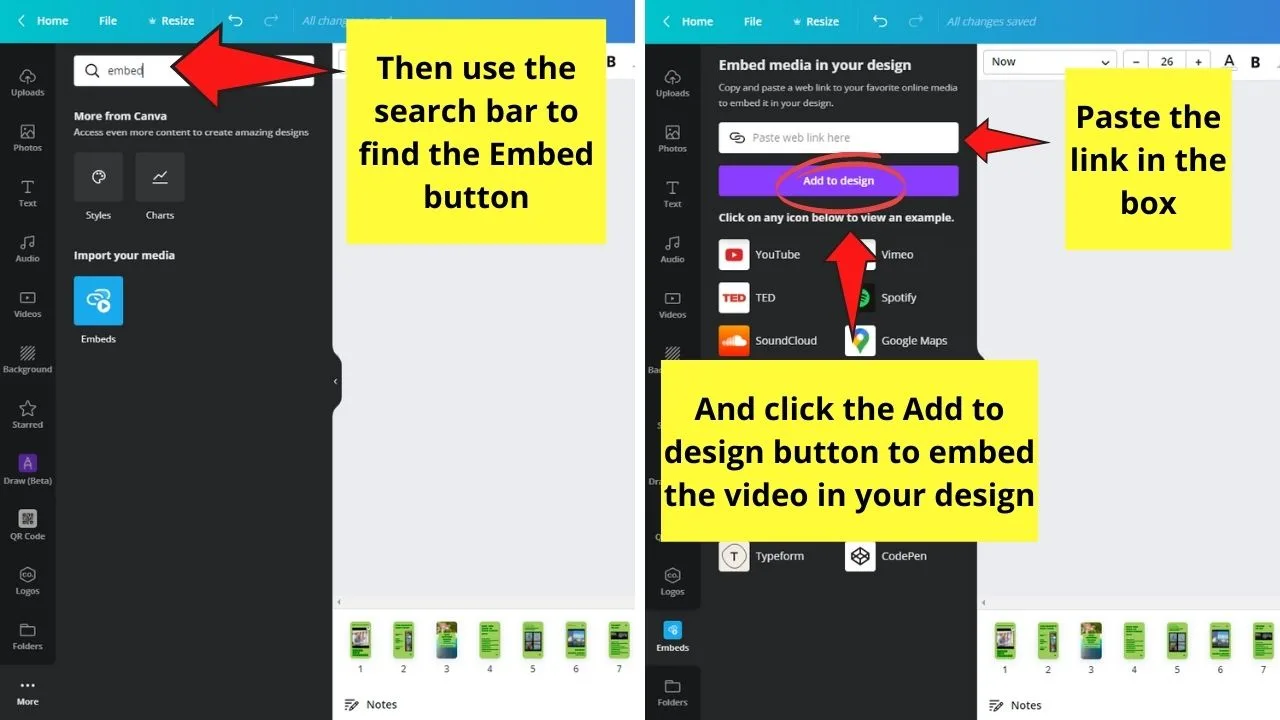
After which, just click the Add to Design button to finalize the embedding process.
Continue doing this step for all the pages where you want to embed videos into. Then, position the embedded videos accordingly by dragging them across the page.
You can even resize them to make them fit your design.
Step 9: Edit the text components of the website you’re designing
If, again, you want to remove some of the text boxes, just click on that particular text box and press Delete on your keyboard.
You can opt to resize the text boxes, and even fill the text box with color to make them stand out more on your website.
But, changing the font style of the text on your website design can be quite tedious to do individually.
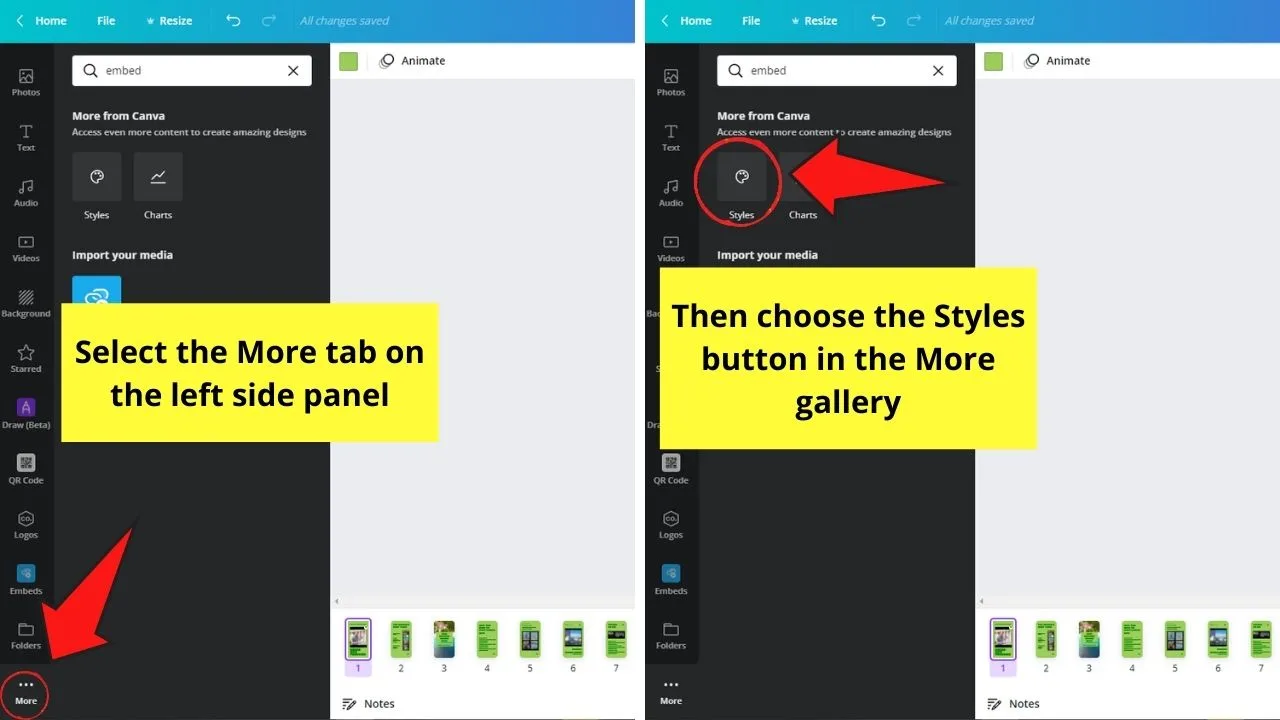
So, a faster way you can do this is to click the More tab on the left side panel and select the Styles button.
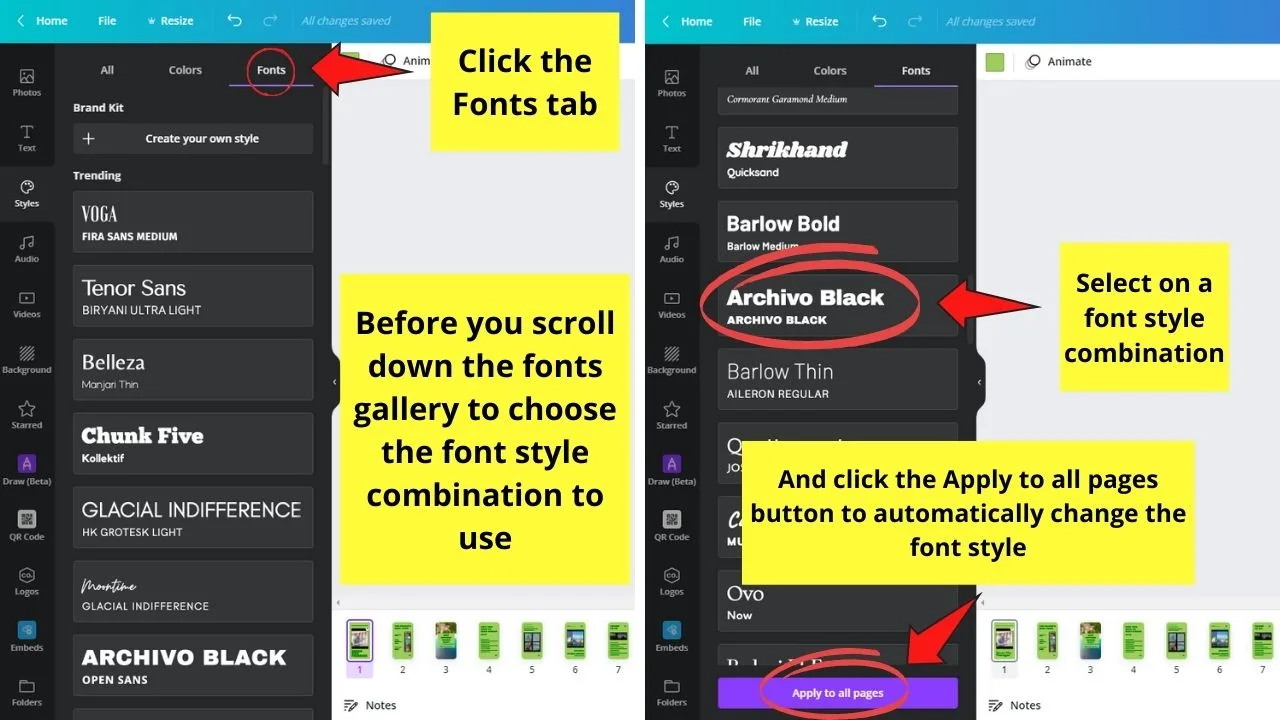
Then, click the Fonts tab and select the font style combinations you want to use. Select the Apply to all pages option so that font style will be used for all the text on your design.
Step 10: Head to the “Colors” tab in the Styles gallery to select a color scheme
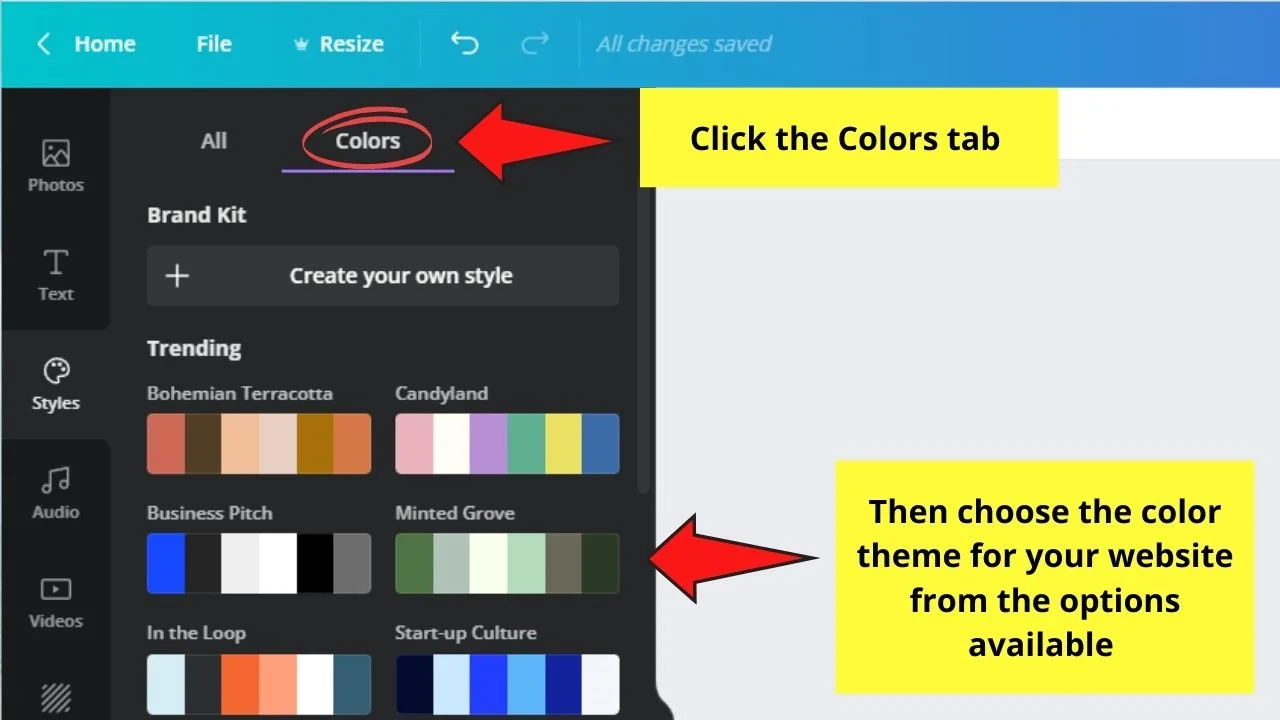
Click on the “Shuffle” button to see how the colors play on the site itself. Repeat this step until you customized the look of your website.
Step 11: Change the name of the design file before publishing the website
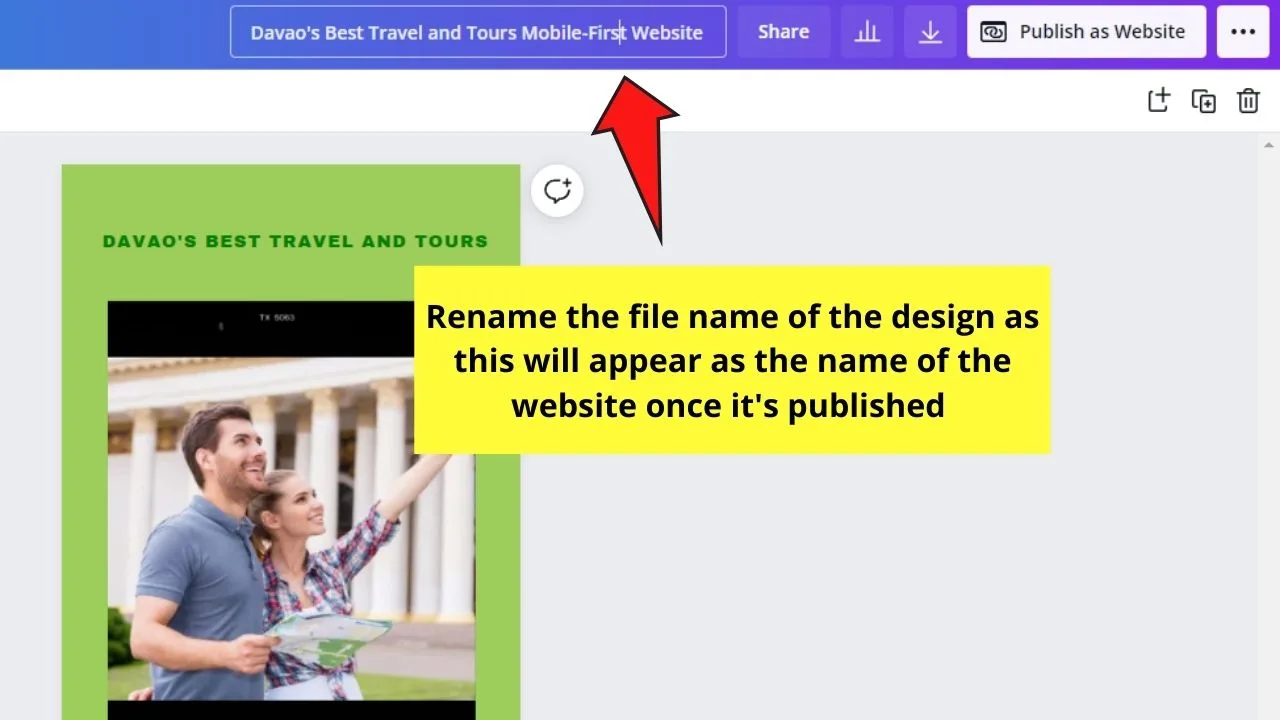
This step is important especially if you’re using a pre-made template as the name of the file will appear as your website’s name.
Step 12: Click the “Publish as Website” button on the menu bar
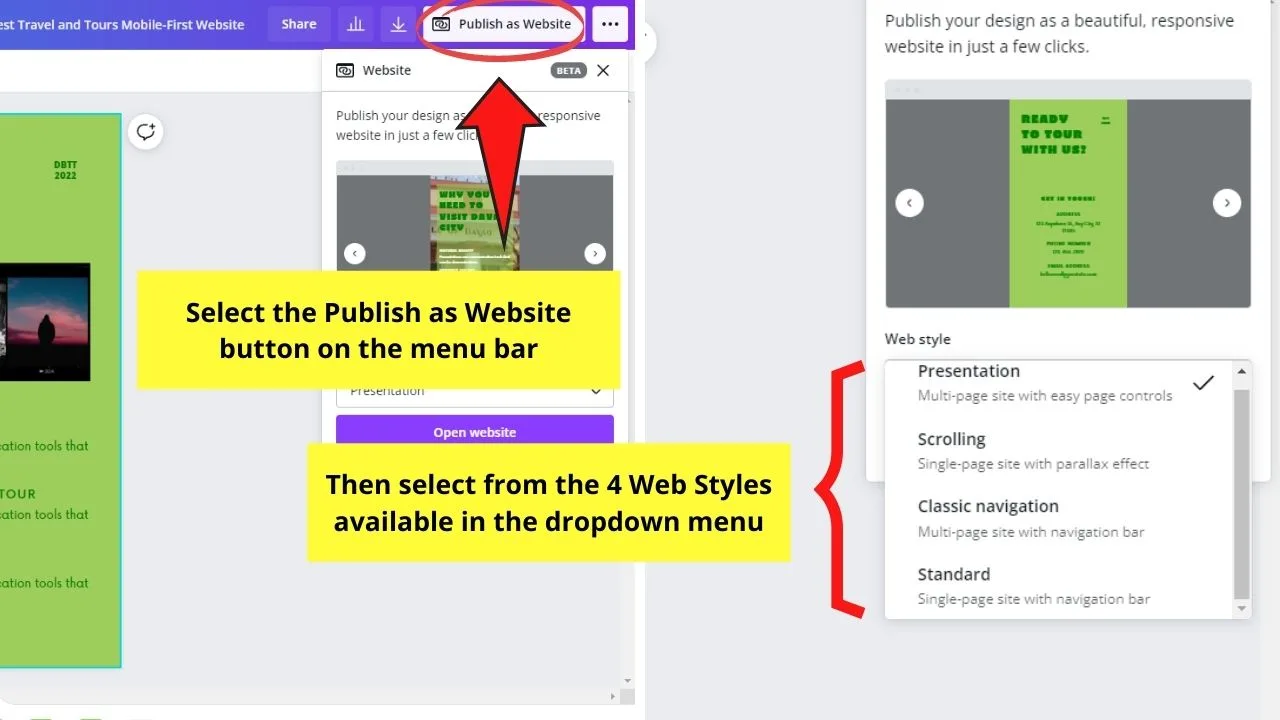
In the dropdown menu that appears, select the Web style you’d like to use: Presentation, Scrolling, Classic Navigation, and Standard.
These Web style options are the various ways your audience can navigate through the website. You can click on them first to check how the navigation styles work on your website.
But, if you’re aiming for a website that looks good both on desktop and mobile, the Scrolling web style’s your best bet.
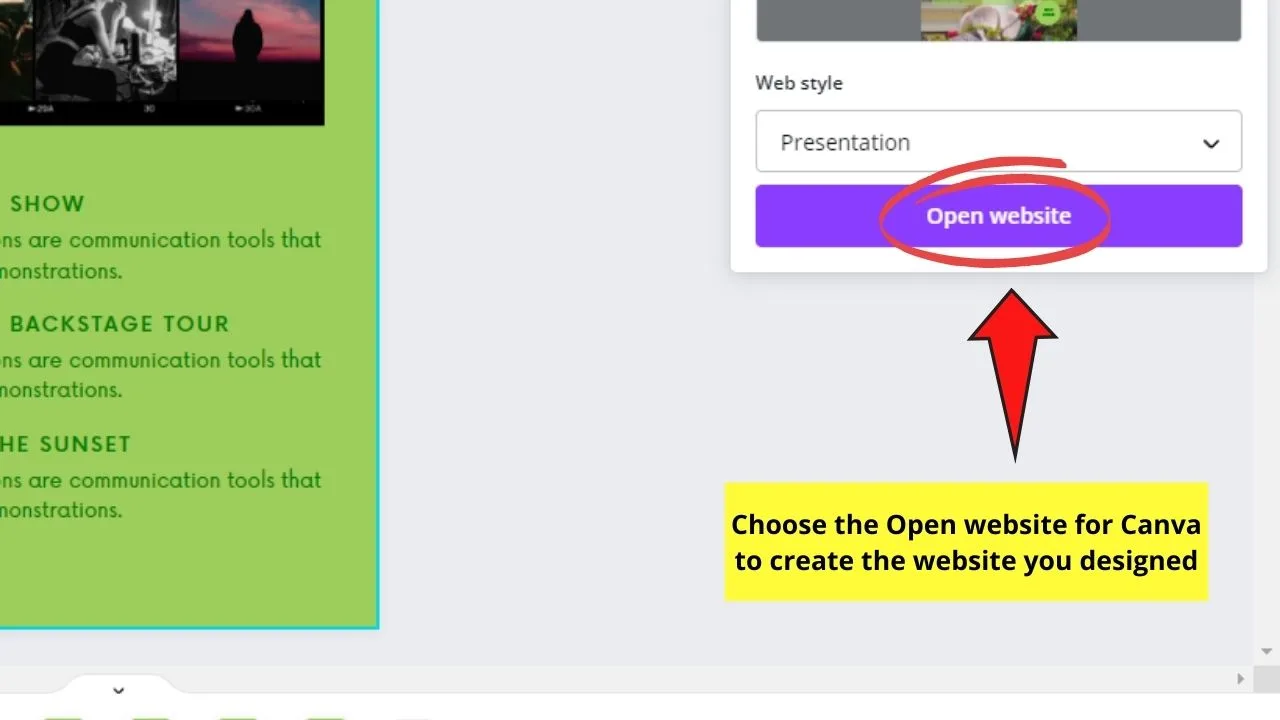
Then, select the Open website button to have a preview of your Canva-designed website.
Do a thorough review of the website, including checking the functionality of the clickable buttons you added.
You can even check if the QR codes you created in Canva work (in case you added one instead of hyperlinking).
If you’re planning to share the link to your website, just head to the address bar and copy the link indicated.
However, you can opt to shorten the link by using link shortener sites like Bitly.com.
Remember, the shorter the name in the link, the better will your audience recall your website.
And, just like that, you’ve created an aesthetic and functional website.
But, do note that this website designing feature’s still in Beta mode, so expect some limitations with what you can do with it.
What’s New With Canva Websites?
If you recall, Canva released its beta version of the Websites feature in the first quarter of 2022.
While you don’t need to do some coding to create websites on Canva, it wasn’t as responsive as what its users wanted.
But, thanks to the beta phase, Canva’s developers get to receive constructive feedback from their users.
And, that’s just what Canva did. In September this year, they launched their responsive, free, one-page website builder called Canva Websites.
Yet, how does this new version of the Canva website differ from its previous beta version? Let’s find out all about it by reading below.
What’s New With Canva Websites 2022
- Easy personalization of the website
- Easier editing using unlimited content
- Single-scrolling page design
- Availability of 3 device options for the “Preview” button
- Website publishing options
Though the process of making a website in Canva is the same, the official launch of the feature in September 2022 is not without major changes.
Take a look at these 5 upgrades from the beta version of the Canva Websites feature below.
1) Easy Personalization of the Website
One of the major drawbacks of the previous Canva Websites version is the inability to buy and host your website under your domain.
When you click the “Publish as Website” button, the Canva-designed website will have a lengthy URL to it.
To have some semblance of personalization of your website, the only way is to change the design’s file name.
But, with the recent updates, you simply choose what kind of domain you’ll publish and enter in the “Your URL” field the website name.
However, if you’re publishing your website as a free domain, expect that the “my.canva.site” tag is still visible after your website name.
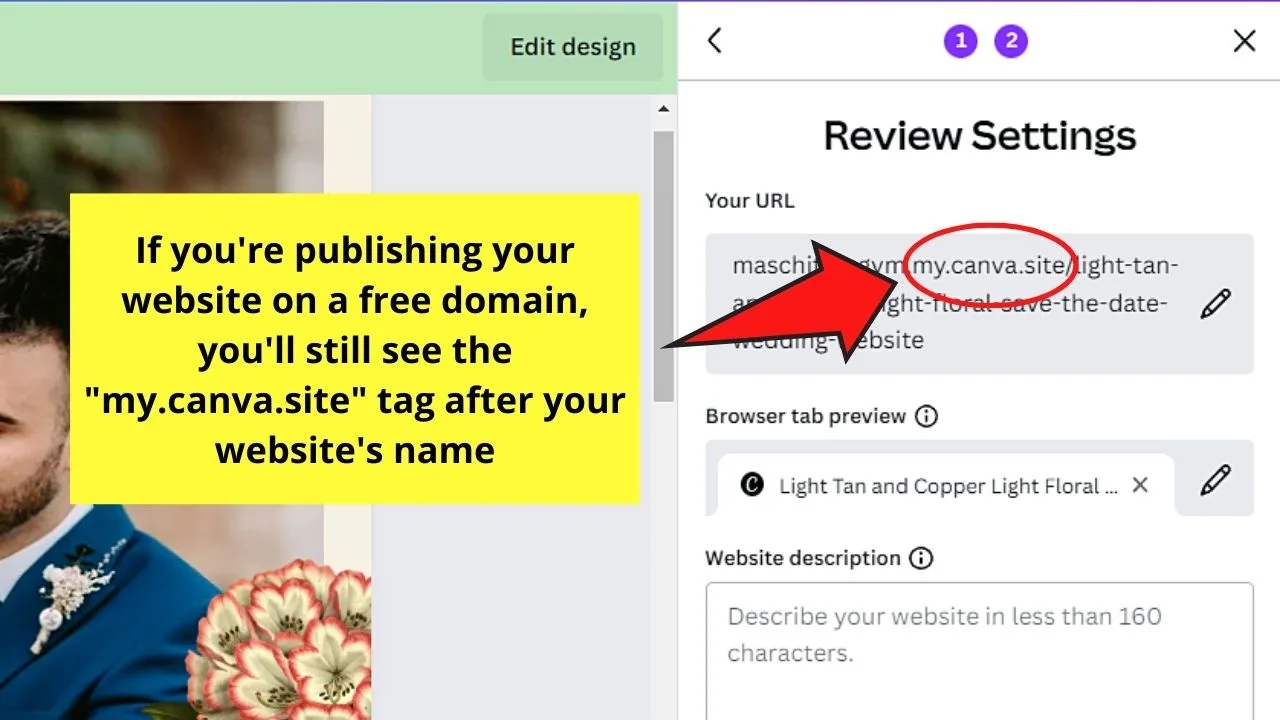
Changing one’s website favicon and site description is another major update added to the personalization features.
To do so, simply head to the “Browser tab preview” section after selecting “Publish as Website.”
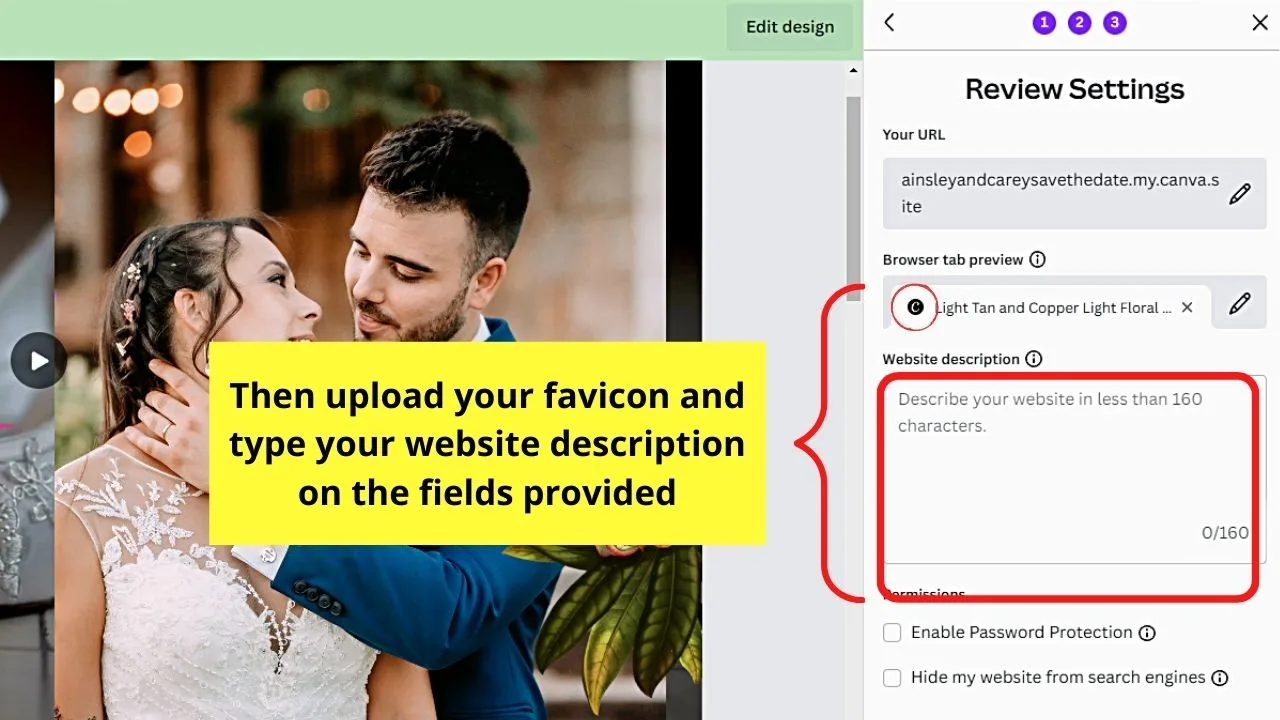
Then, click the favicon button and upload the favicon made in Canva.
![]()
Select “Done” to finish uploading your customized favicon.
![]()
You can also change the name of your website by selecting the “Edit” button and typing it in the box beside your newly-uploaded favicon.
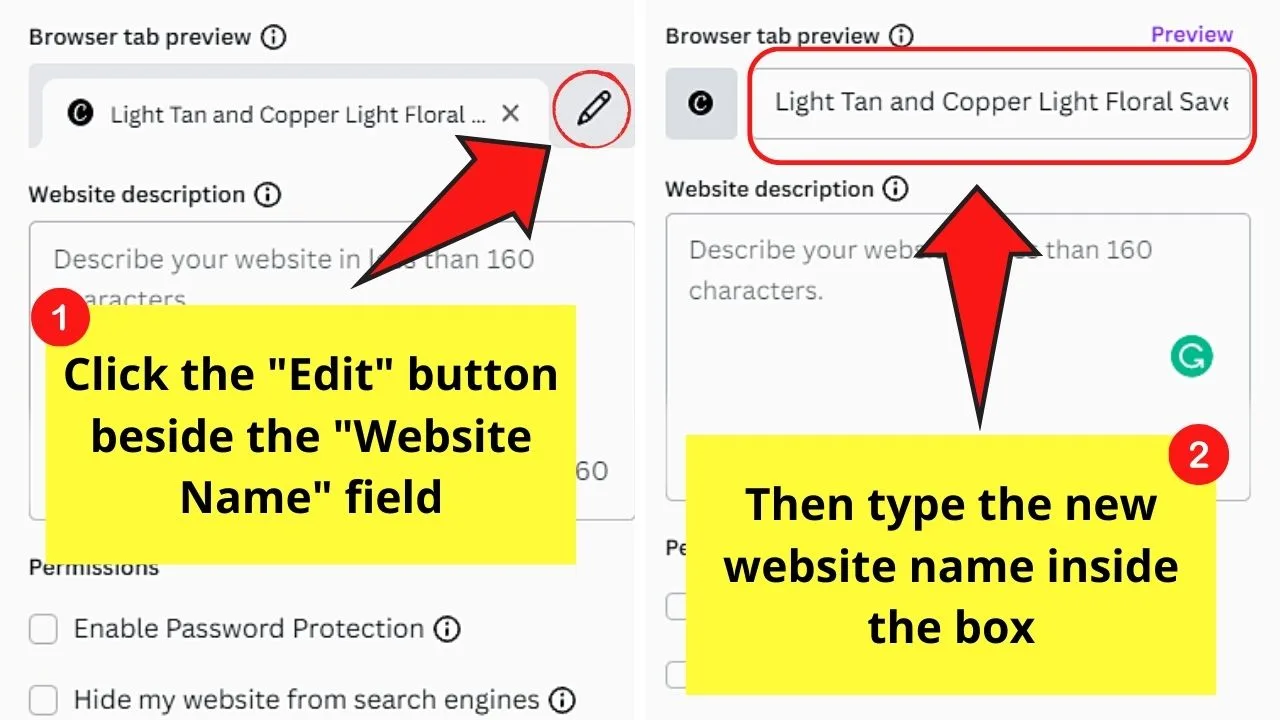
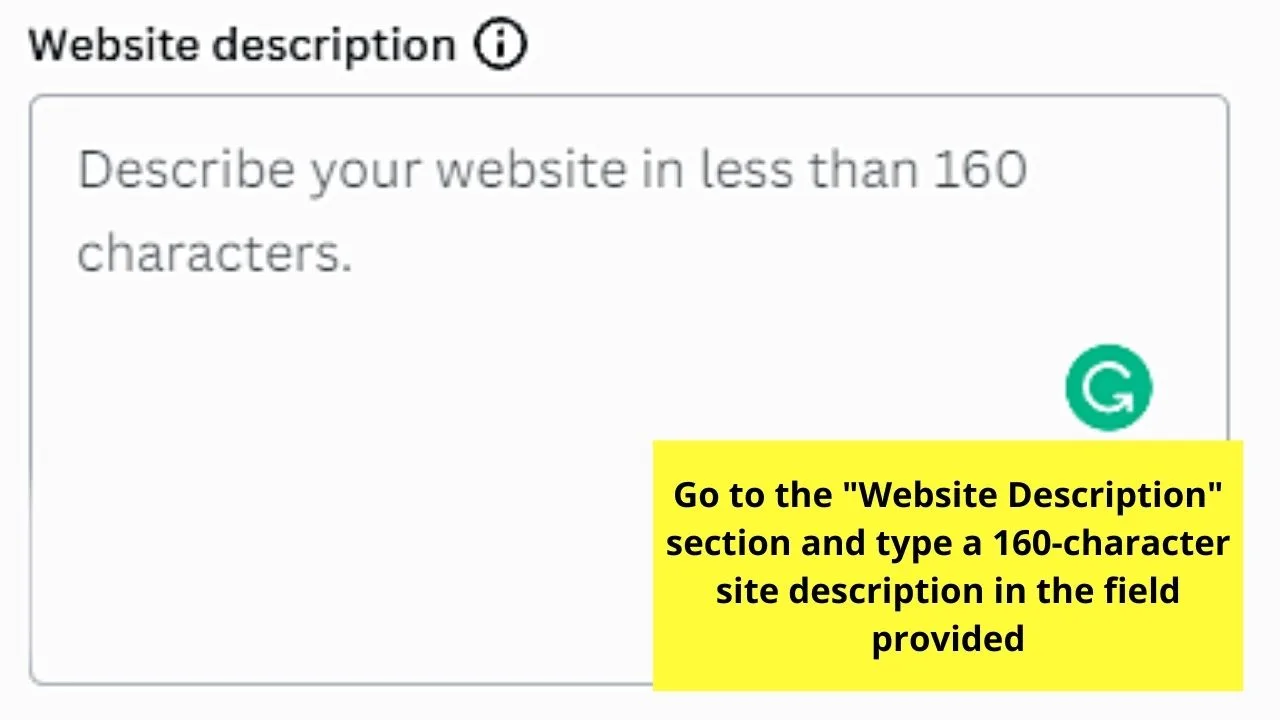
After which, go to the “Website Description” section and type a short description of your website. Just ensure you don’t exceed the 160-character mark indicated.
Lastly, you can now finally use your Canva brand kits to make your website on-brand with just a few clicks.
Simply head to the left-side panel and click the “Styles” tab.
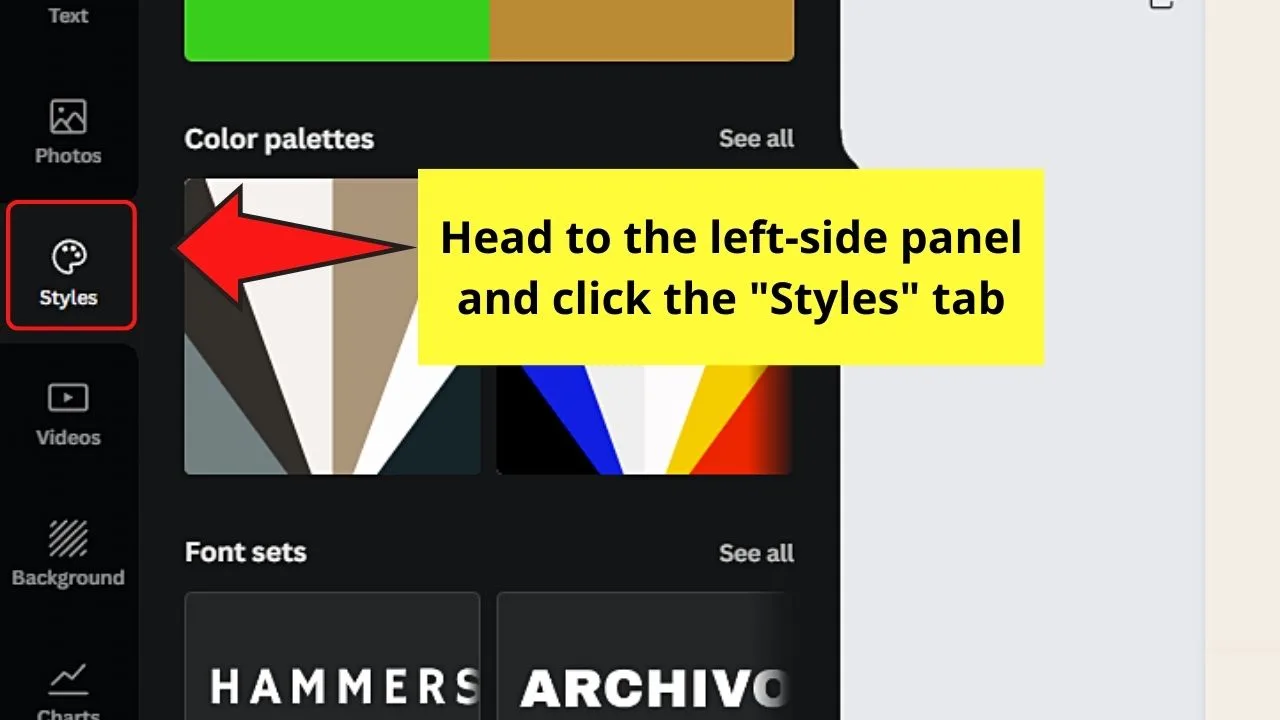
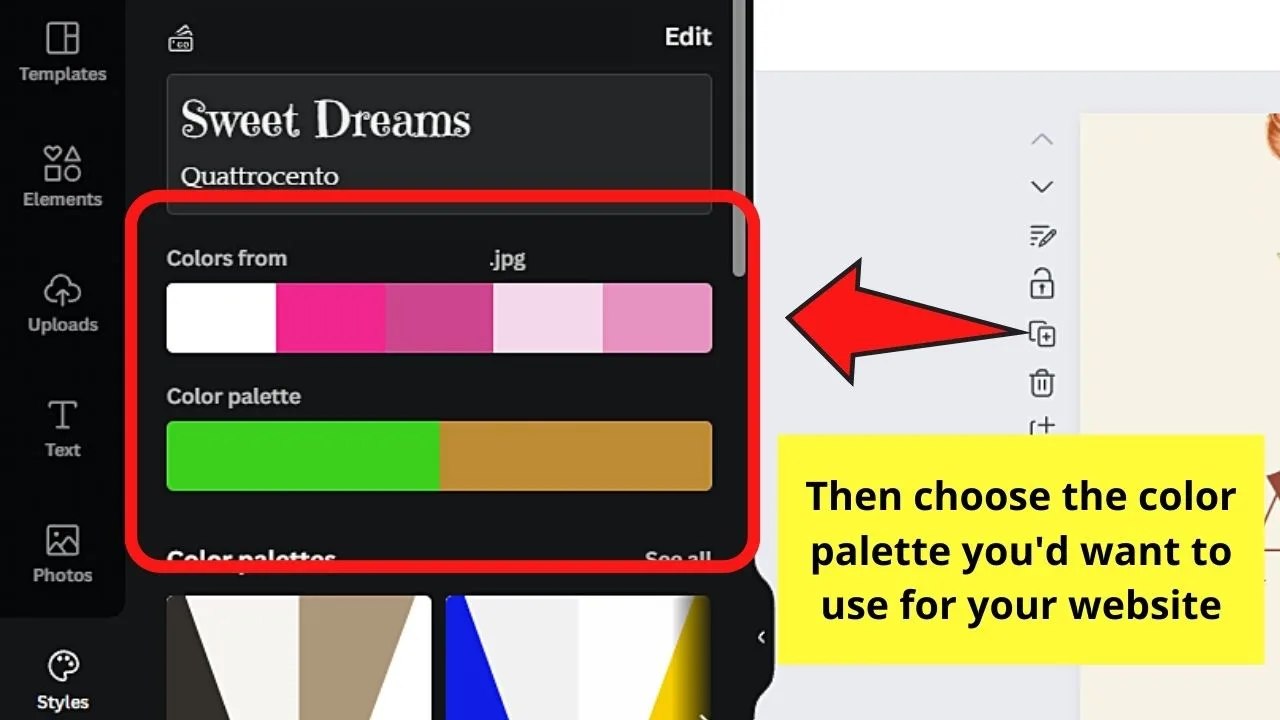
Then, select “Colors” on the header of the “Styles” panel. If you can’t find the “Colors” tab, then just choose the color palette you want to use for your website.
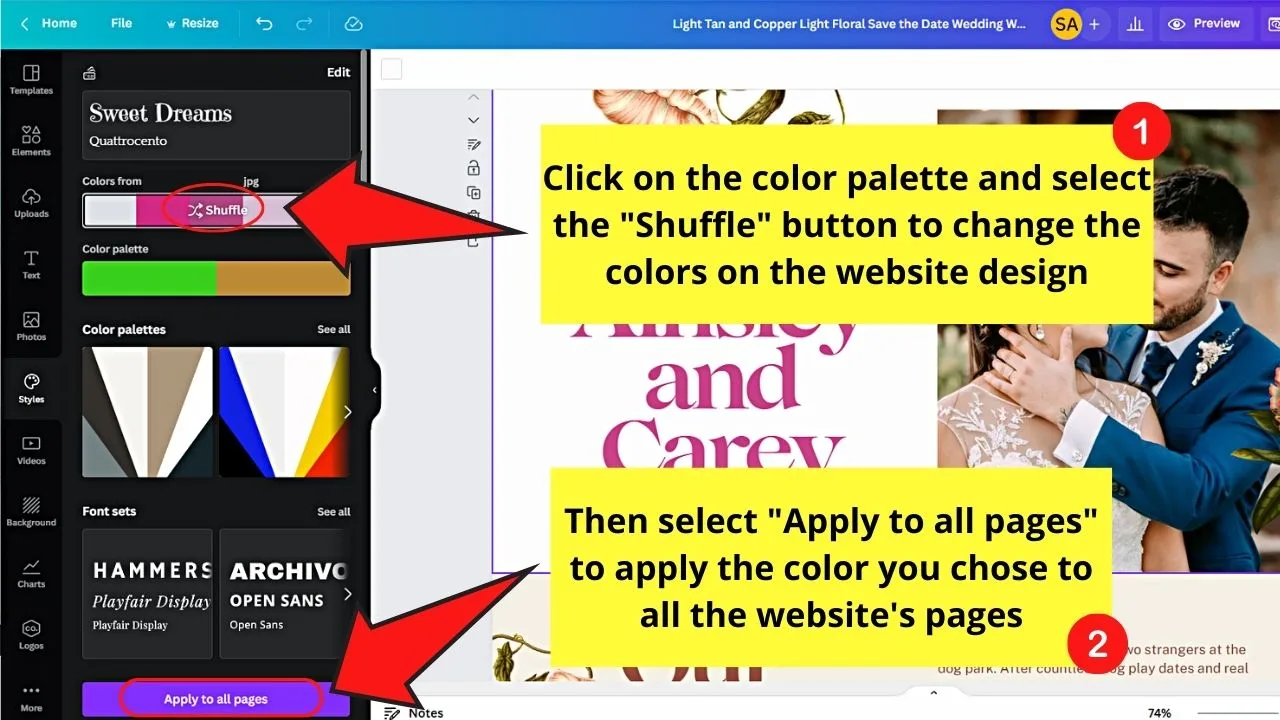
Then, select the “Shuffle” button for you to easily see the different colors on your website design. Click “Apply to all pages” once you have chosen the color.
Then, click “Fonts” next or scroll down the panel and select one from the fonts list. You can also just click the font style name if you only have added one font style for your brand kit.
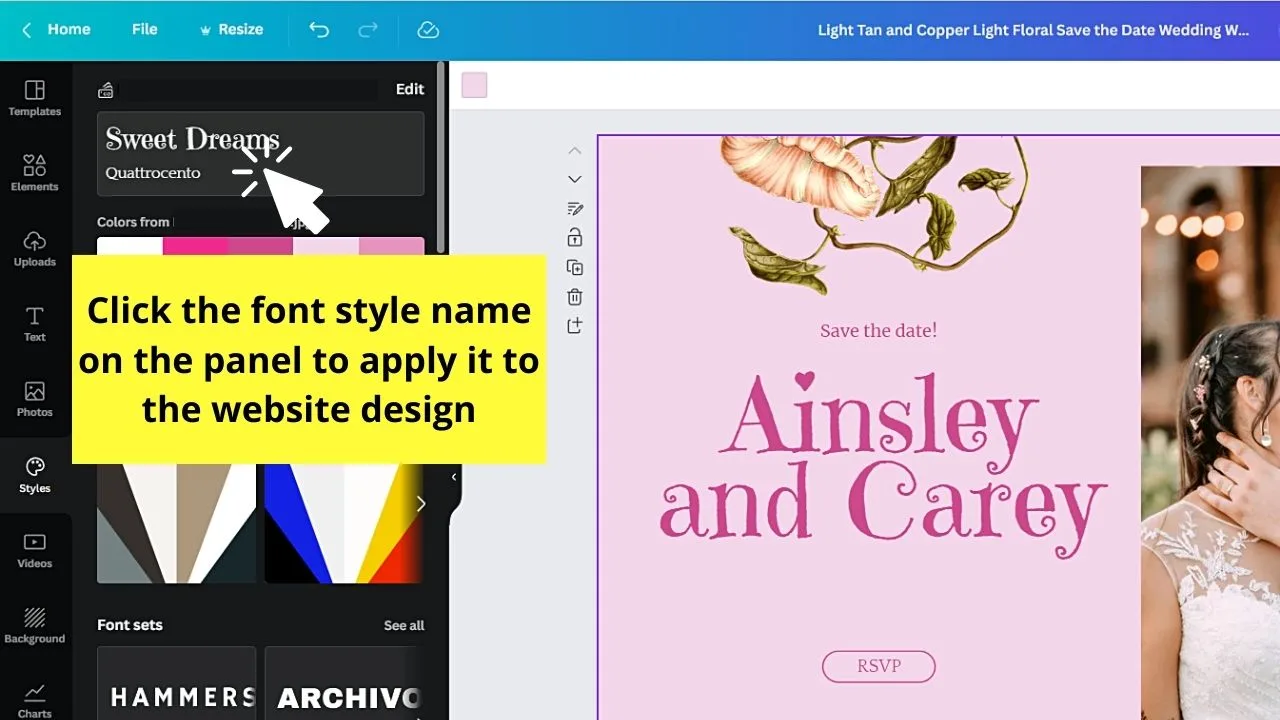
Click “Apply to all pages” next so the font style will be applied to all of your website’s text.
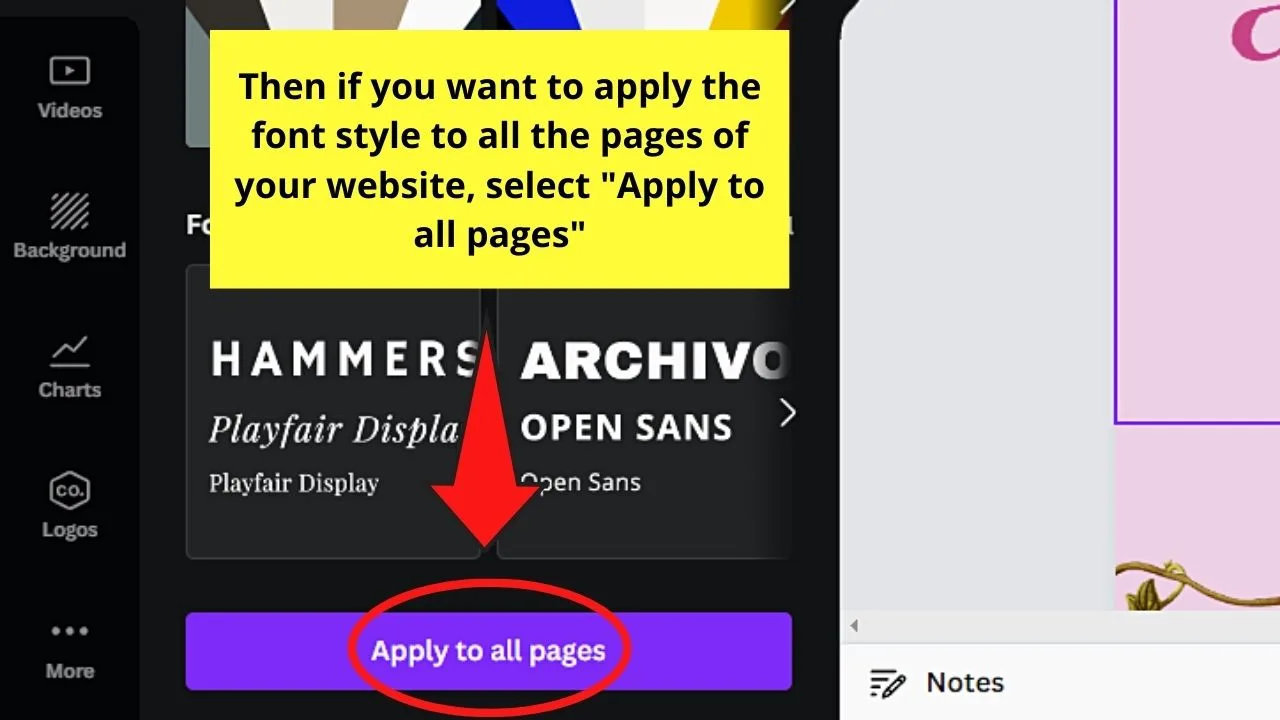
2) Easier Editing With Unlimited Content
Creating websites in Canva starts with the same process as how you create other designs within the tool. You begin with selecting a template from the gallery.
You can still opt to choose a pre-made one from the template gallery after typing and clicking “Websites” on the home page’s search bar.
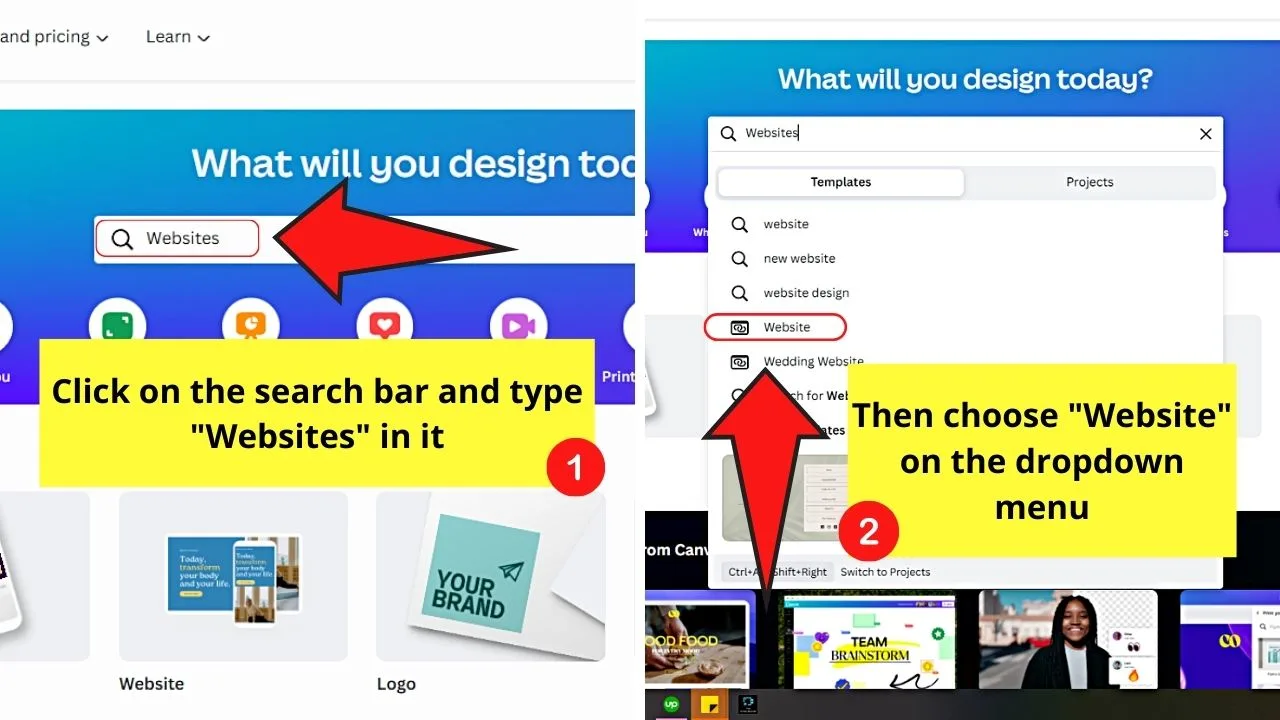
If you opted to use a blank template, select the “Create a blank website” button and choose “Website” on the dropdown menu.
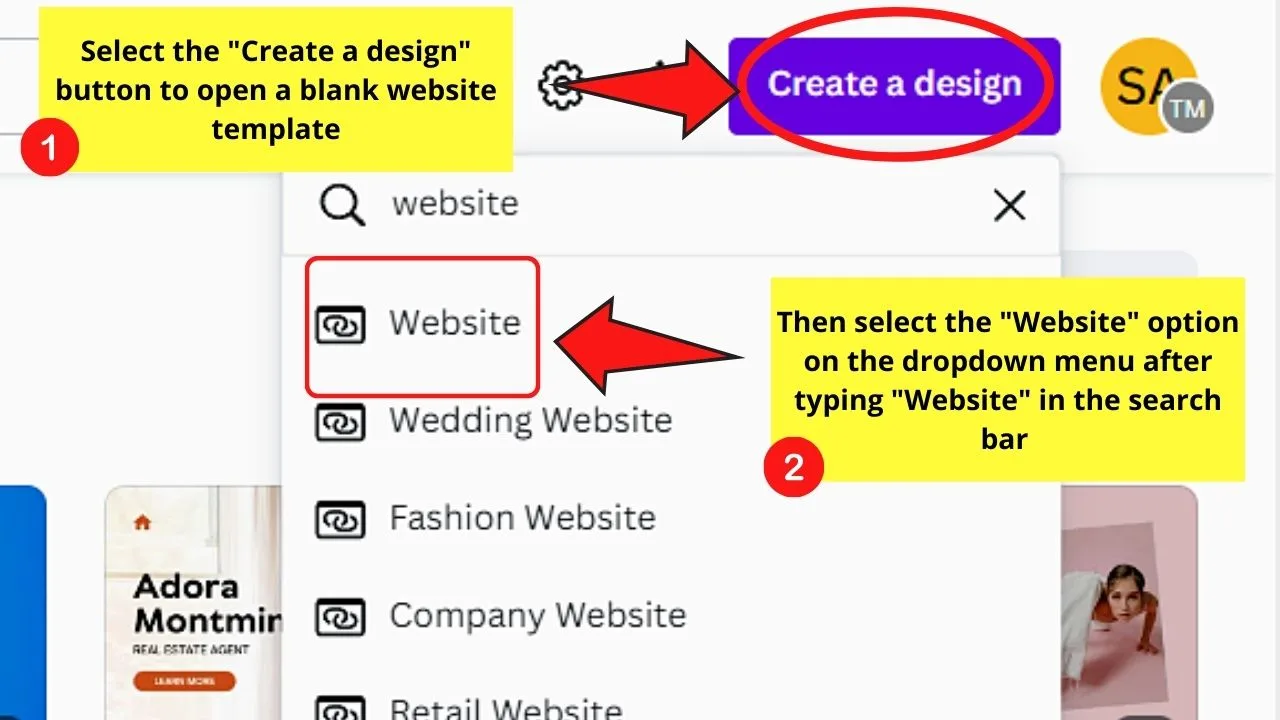
If you want a pre-made one, just select the template you’ll use.
Now, if you want to add another template design to your website, or you want to change website designs, click the “Templates” tab on the left-side panel.
Once you have selected a template, click it and then choose to apply the website design from all the pages of the template.
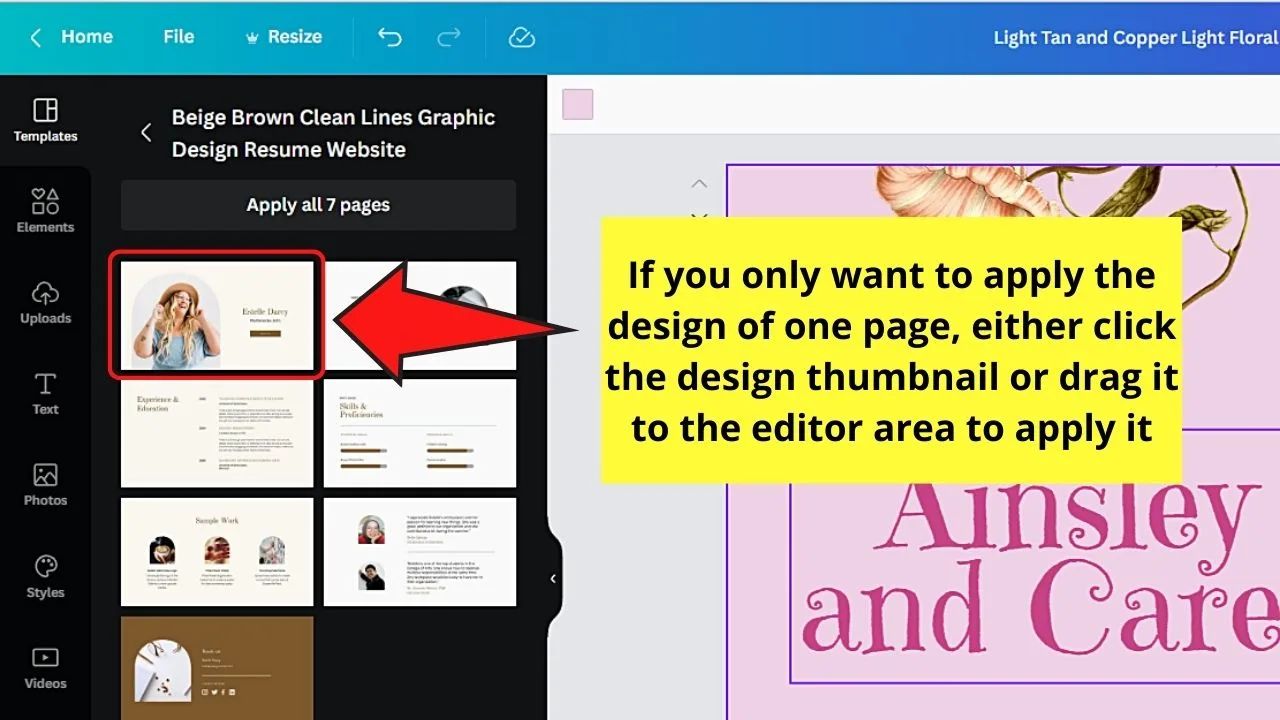
If you only want to apply the design of one page, either click or drag and drop the said template design to the editor page to apply it to a page of the website.
You don’t even need to fret about running out of design ideas. Canva made sure to incorporate a website design for the various business types out there.
For now, you can expect around 50+ website templates. But, again, expect the template count to increase later on.
Then, proceed with editing your website design, dragging and dropping the elements and photos you’d like to use to a certain page.
Now, if you’d like to change the background of your website, you don’t have to stick your options to colors and photos.
You can use a video instead to increase the appeal of your website.
Simply click the “Videos” tab on the left-side panel and find a video you want by typing your search term in the search bar.
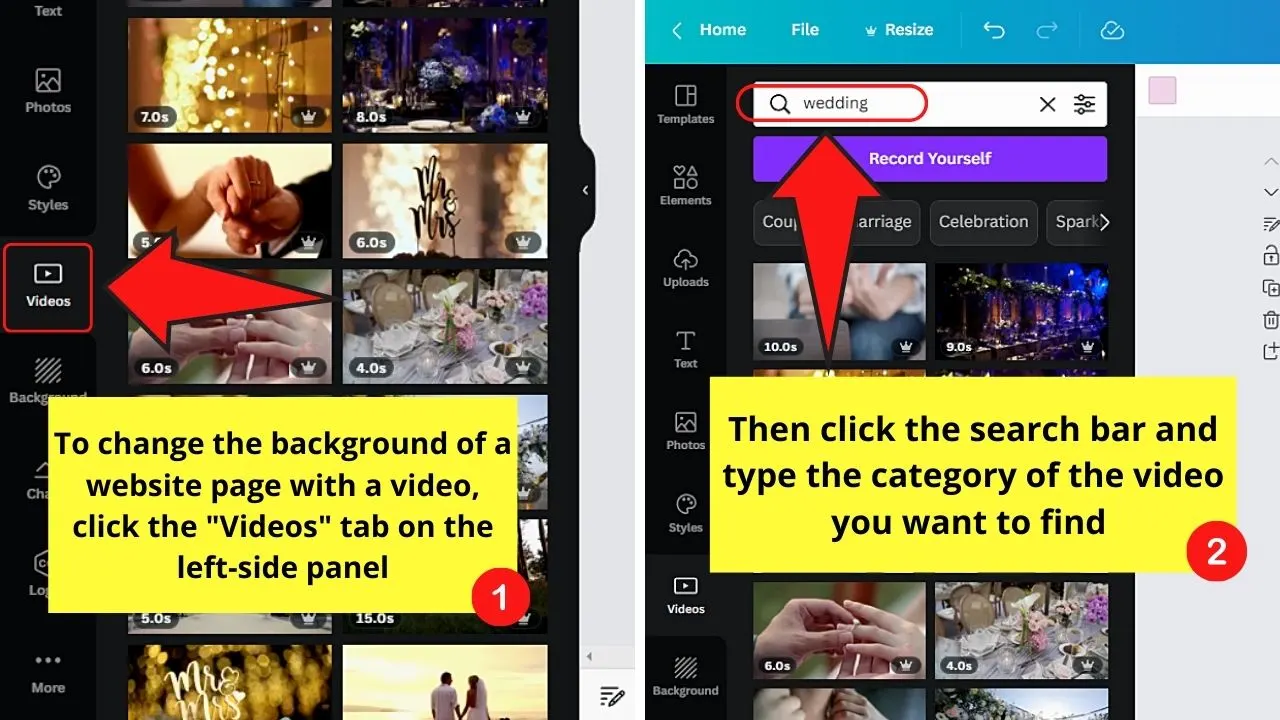
Once you find the video you want, drag and drop it to one of the pages and resize it, making sure it covers the entire page.
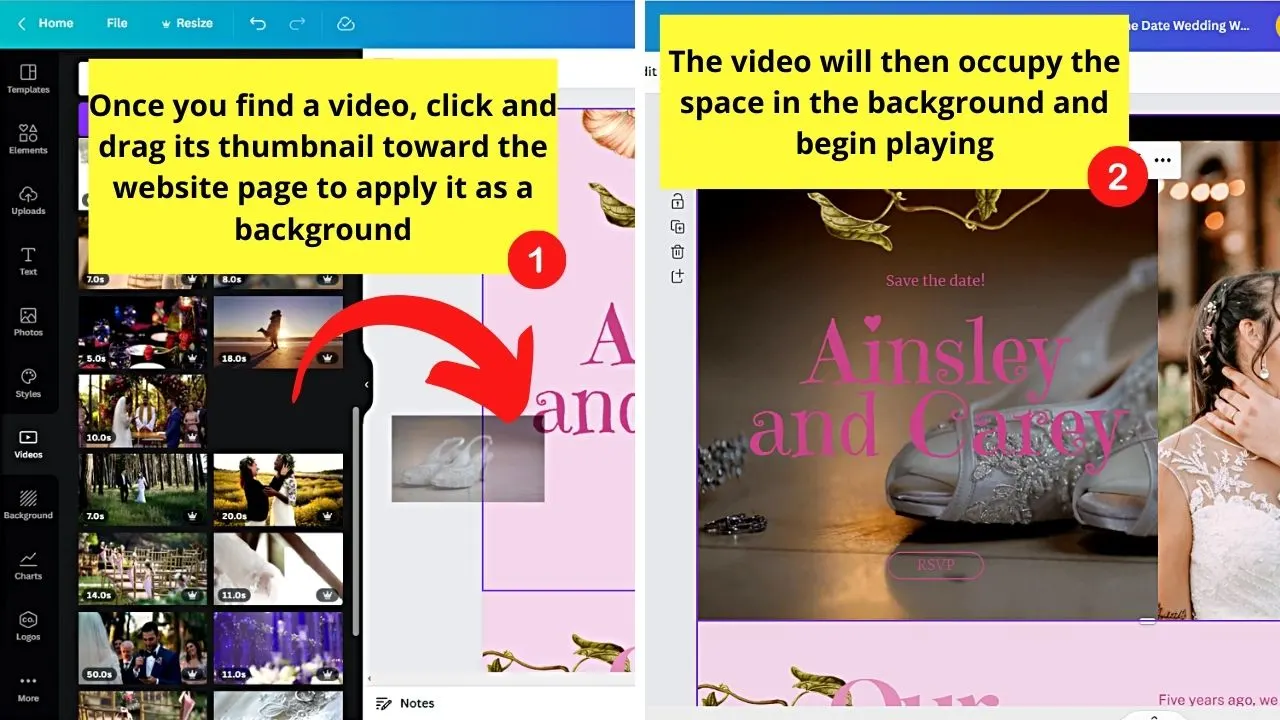
Then, the video you added will play as the background of your website.
If, however, you find that the background color for the other pages isn’t consistent with the color found on the video or photo you added, click the rainbow tile on the toolbar.
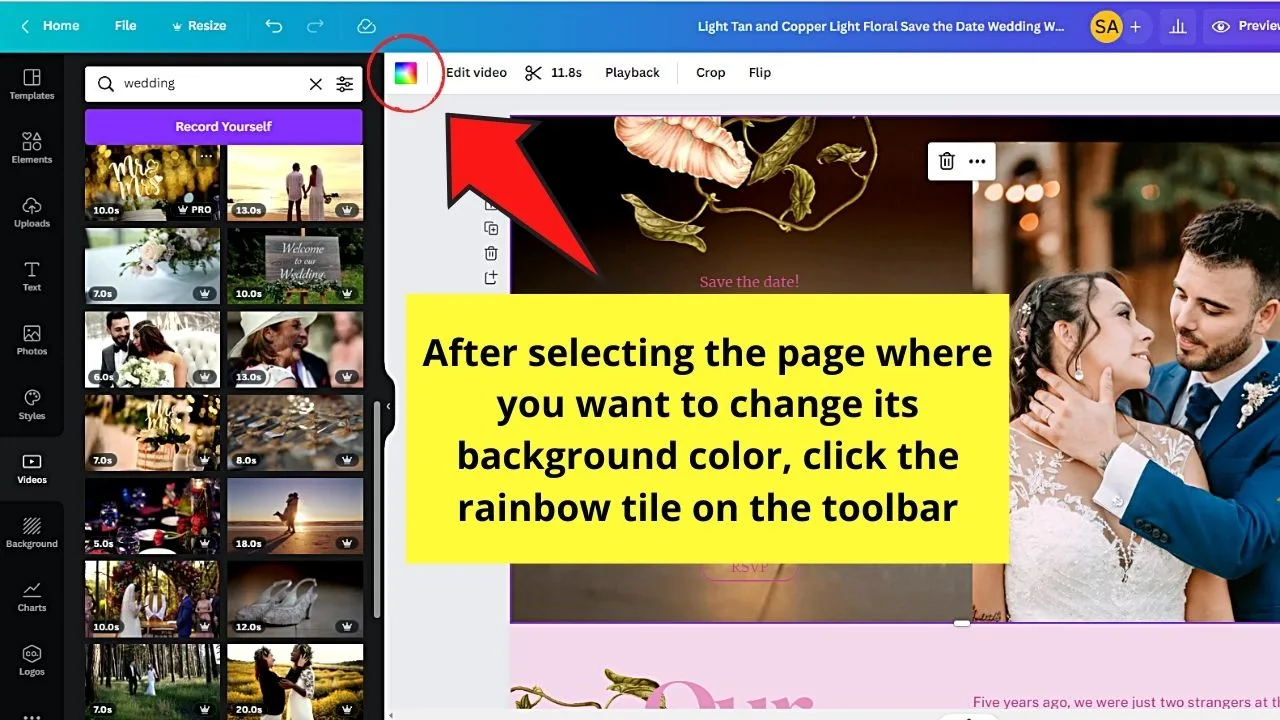
Make sure you have selected the page where you want the new background color to be applied.
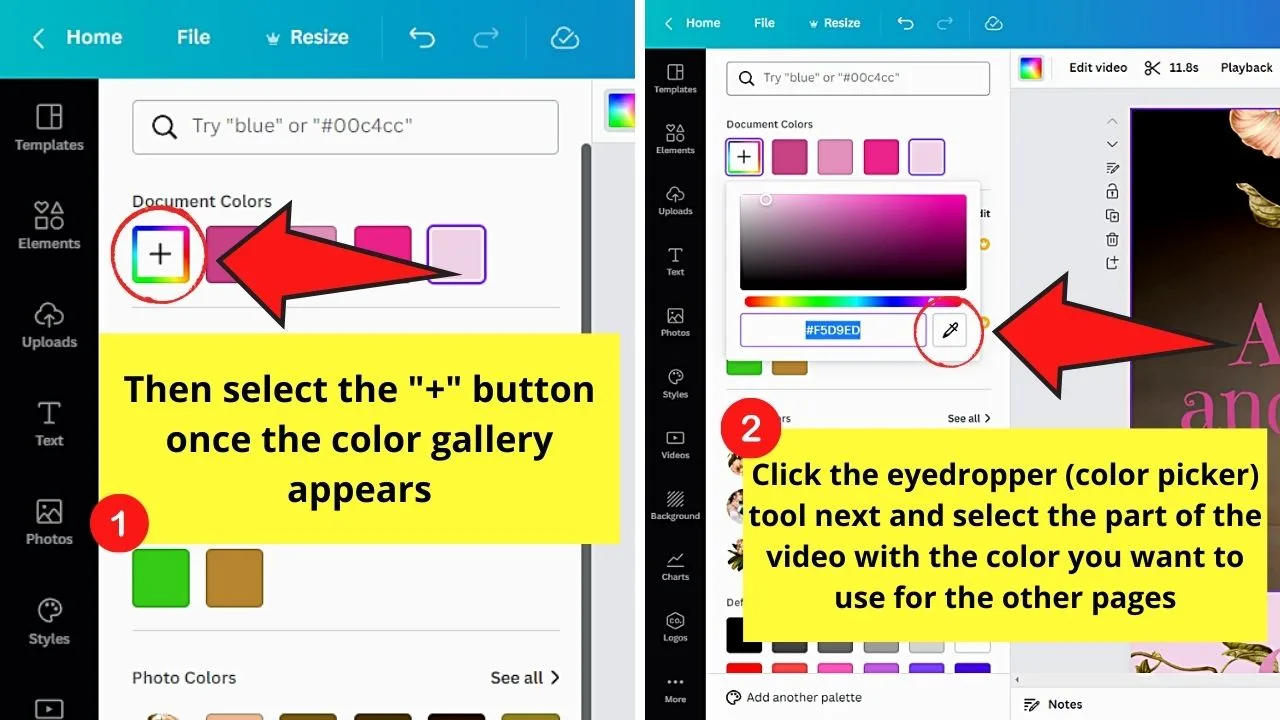
Then, select the “+” button and click the eyedropper tool (or the color picker) to apply the hue from the photo or video to your website pages.
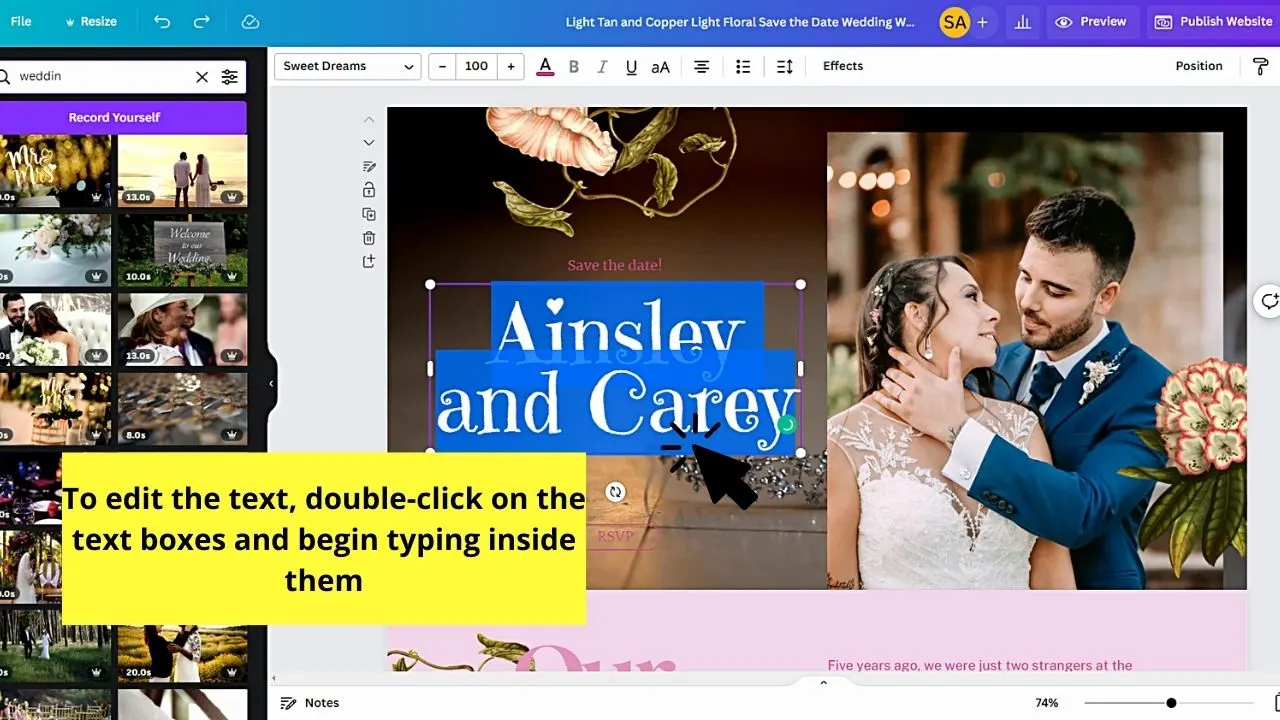
Edit also the text on the website by double-clicking on the text boxes and typing your preferred message. You can even indent the text for a more dramatic effect.
If you want to add clickable buttons to your website, you add a shape and text inside it.
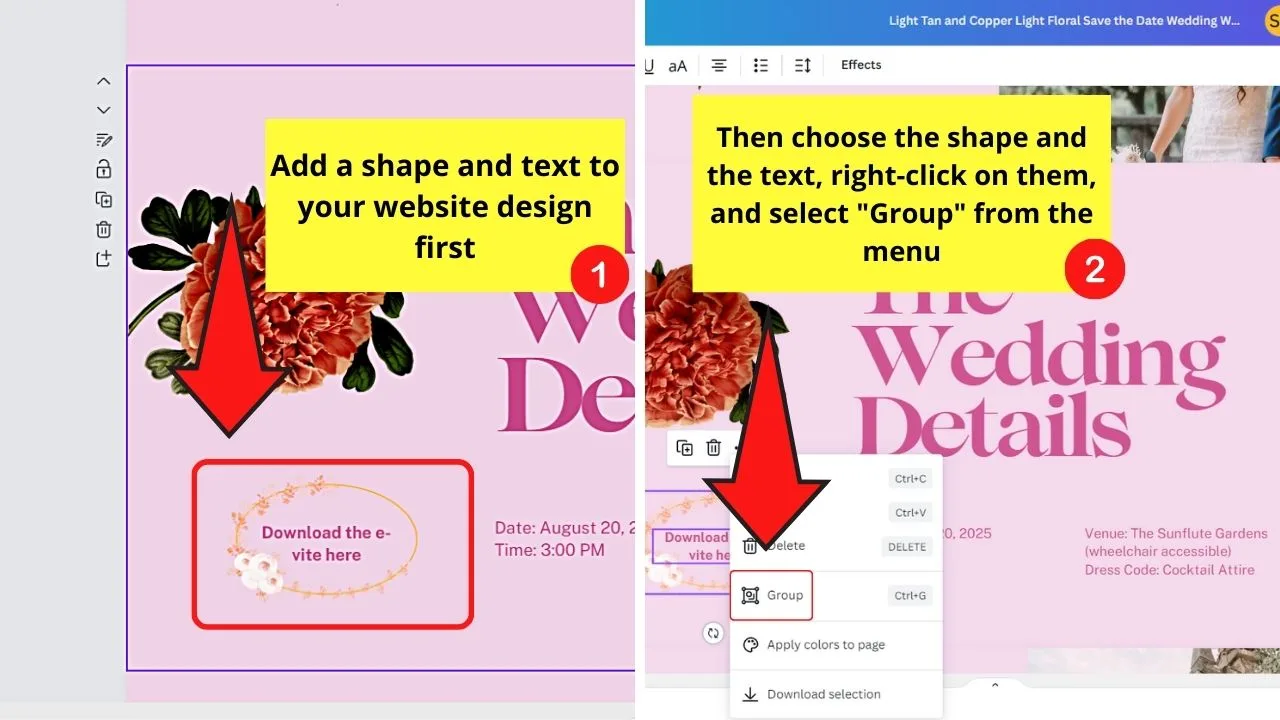
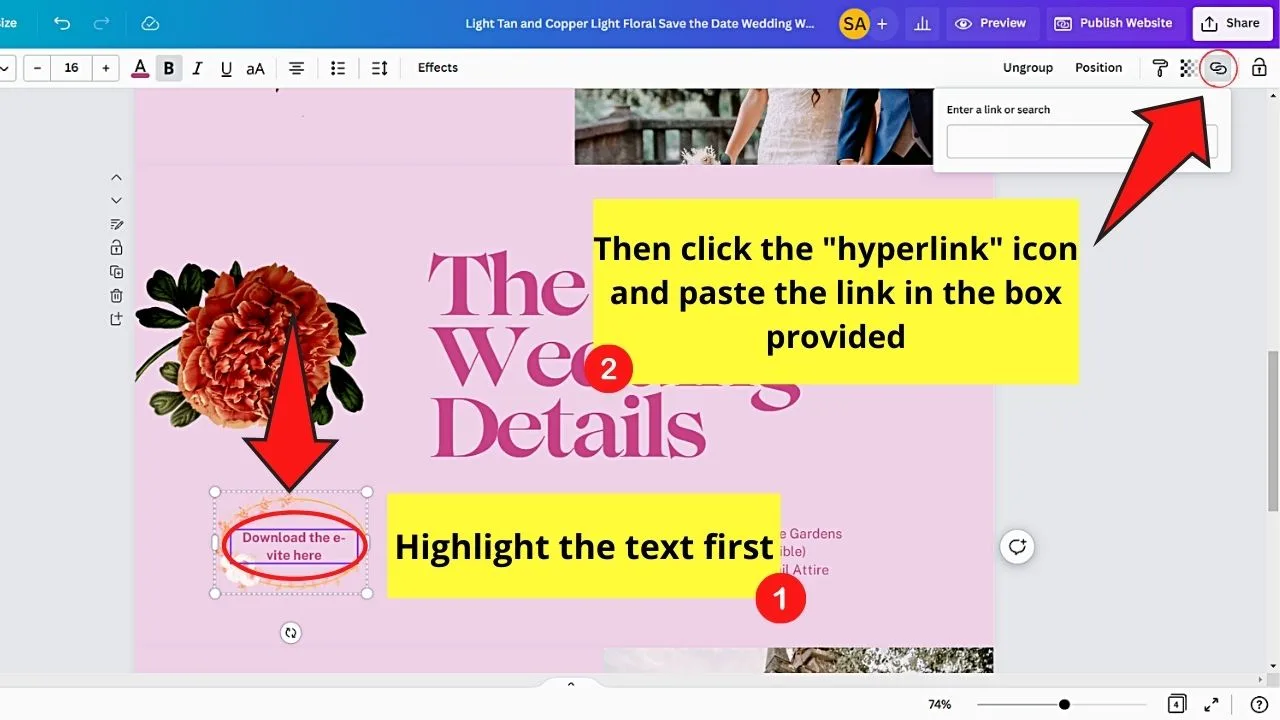
After which, group the shape and textbox and add a hyperlink to that button to link a page number or external website to it.
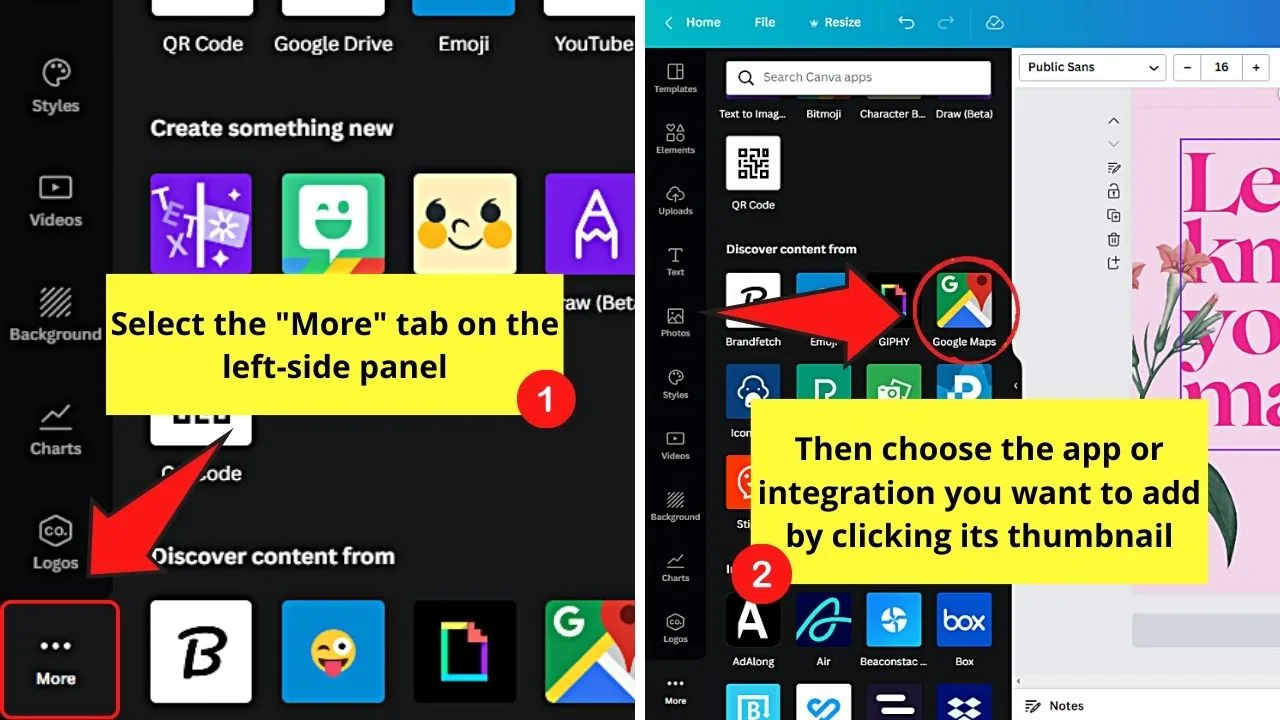
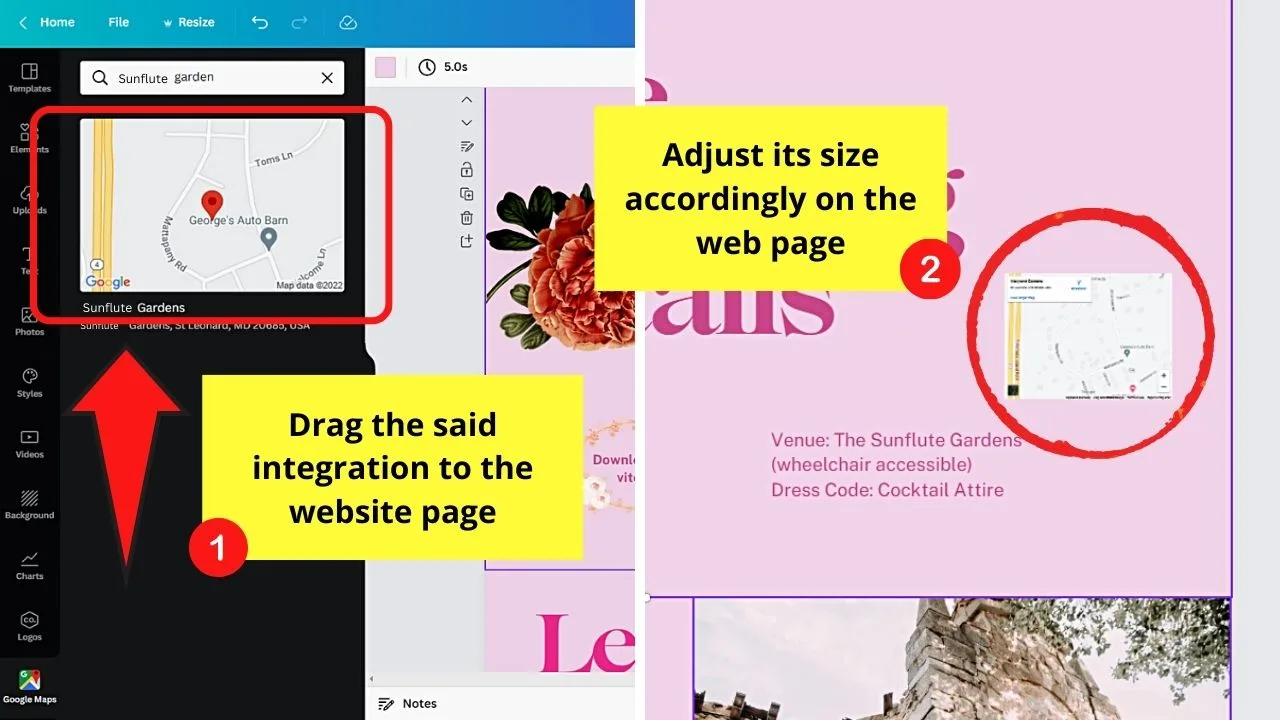
You can even add scrollable maps, fillable forms, and other integrations to your website.
Simply click “More” and choose the app you want to add.
Then, adjust and edit those integrations on your website to make them look aesthetic.
3) Single-Scrolling Page Design
One of the glaring differences that the Canva Websites editor has is the absence of spaces between the website pages.
You’d probably think that it is a glitch, but in reality, the absence of spaces is part of the scrolling page design for Canva websites.
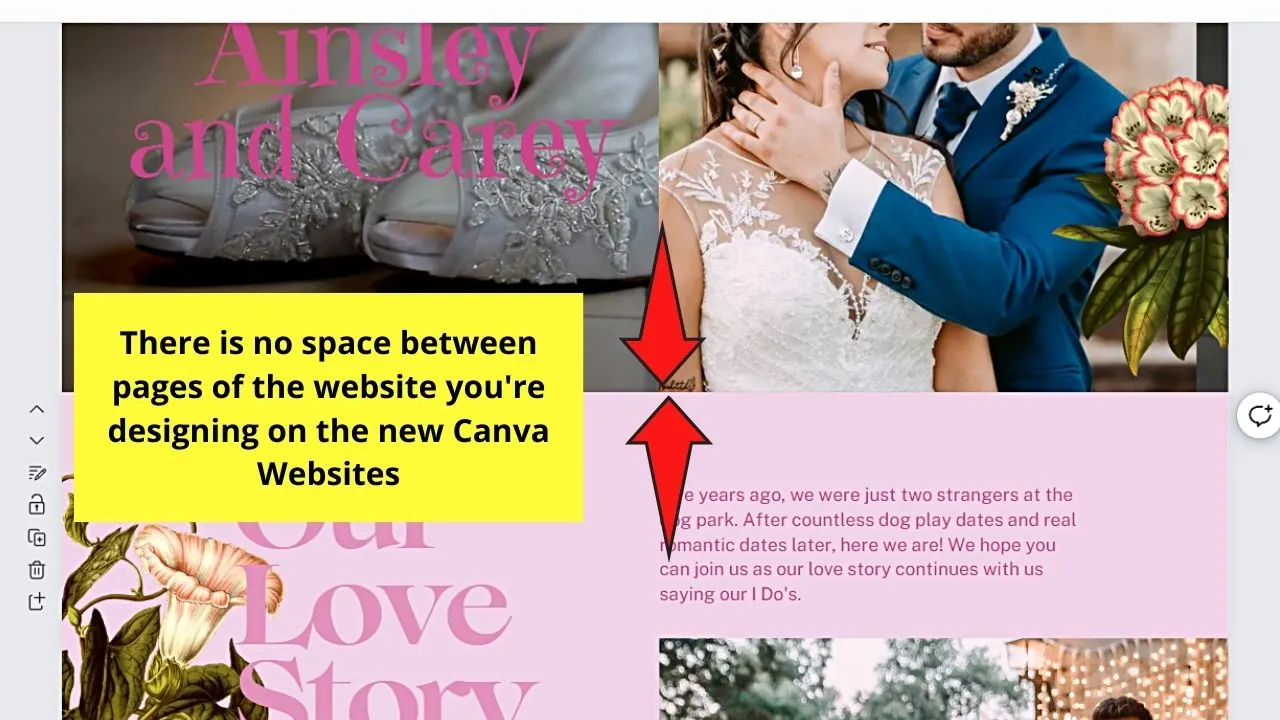
Don’t be bugged by not having any spaces between the pages. Thanks to that “glitch,” you can adjust the page’s height.
All you have to do is double-click on the said line and drag it either up or down.
This move will automatically make the page smaller or larger depending on how you want that particular page to appear on your website.
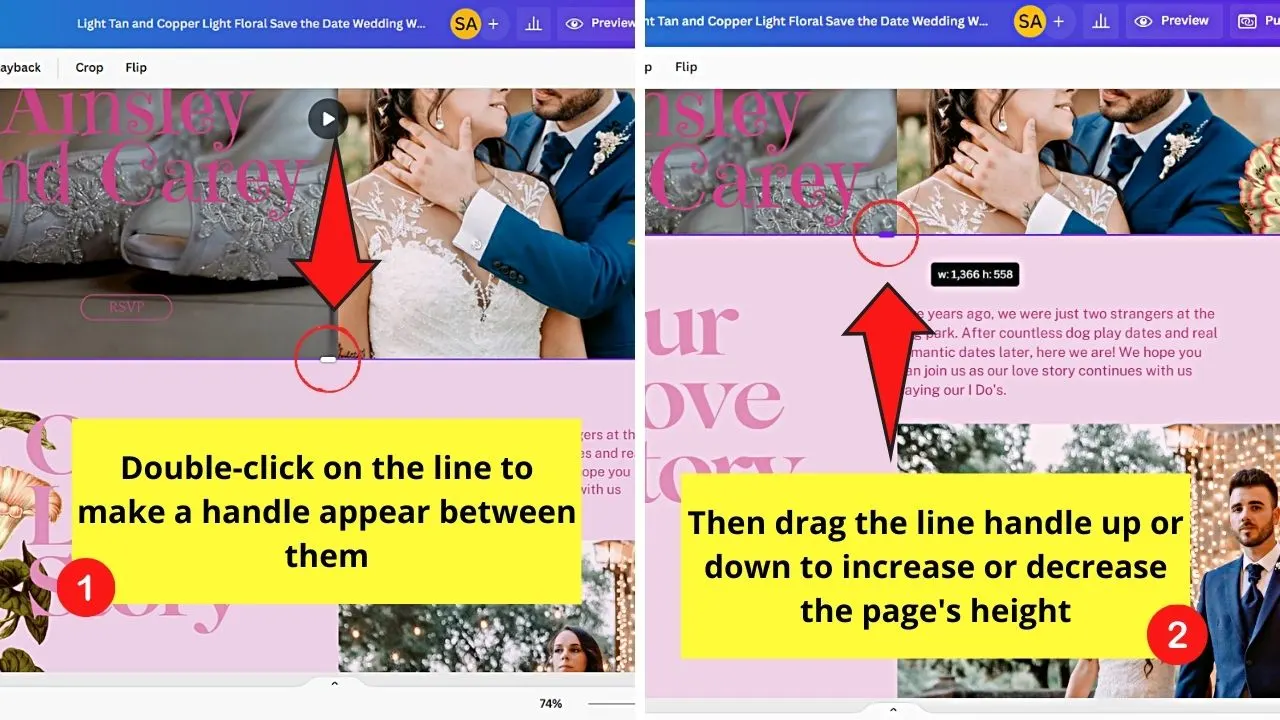
This “Adjust page height” feature is one nifty way of creating a footer or header on the website page you’re designing.
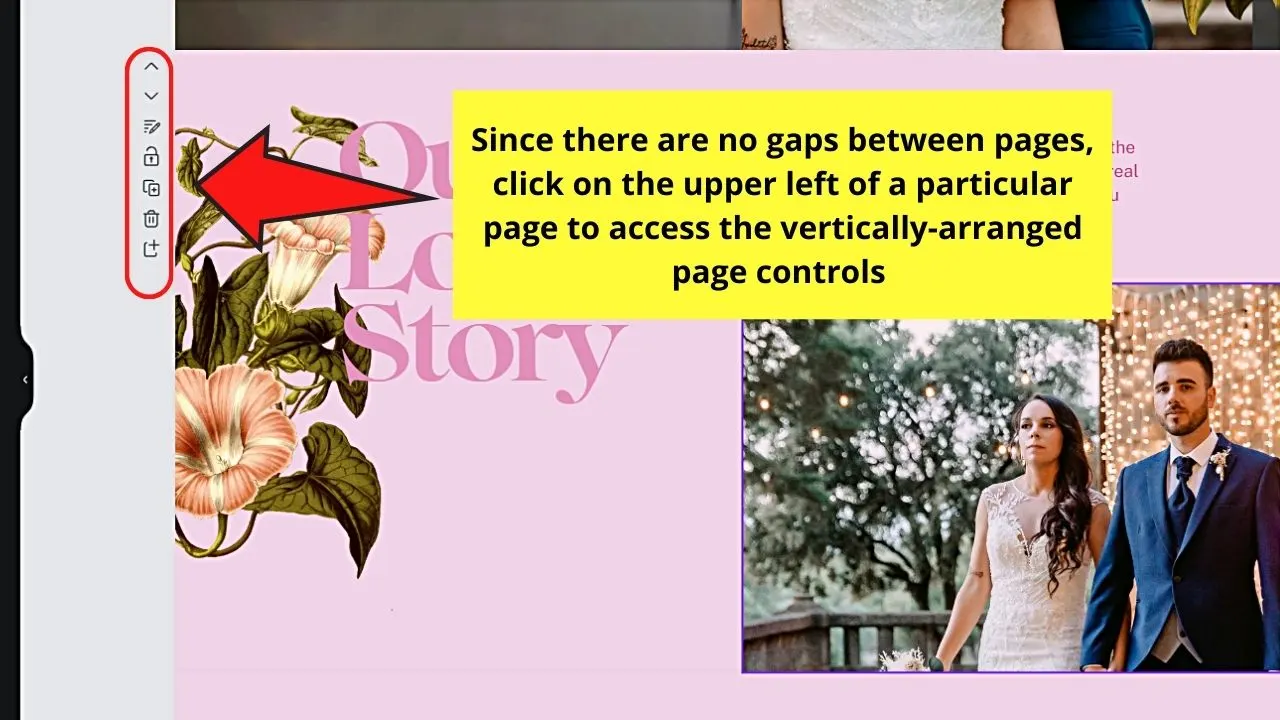
Since there are no spaces between pages, the Canva team has moved the page controls to the upper left. Plus, they’re vertically presented as well.
The only thing that stays the same is the page controls you’re used to finding on other Canva document types. You still have the “Duplicate page, “Delete page,” and “Add a page.”
4) Availability of 3 Device Options for the “Preview” Button
One of the most notable features in the beta version of Canva Websites is the ability to view the website you’re designing in “Preview” mode.
But, on the beta version, you have to choose the “Web Style” first. This serves as the way your audience can navigate your website.
And, if you recall, there are 4 types of web styles available: “Presentation,” “Scrolling,” “Classic Navigation,” and “Standard.”
However, with the updated Canva Websites, you simply have to click the “Preview” button first on the menu bar.
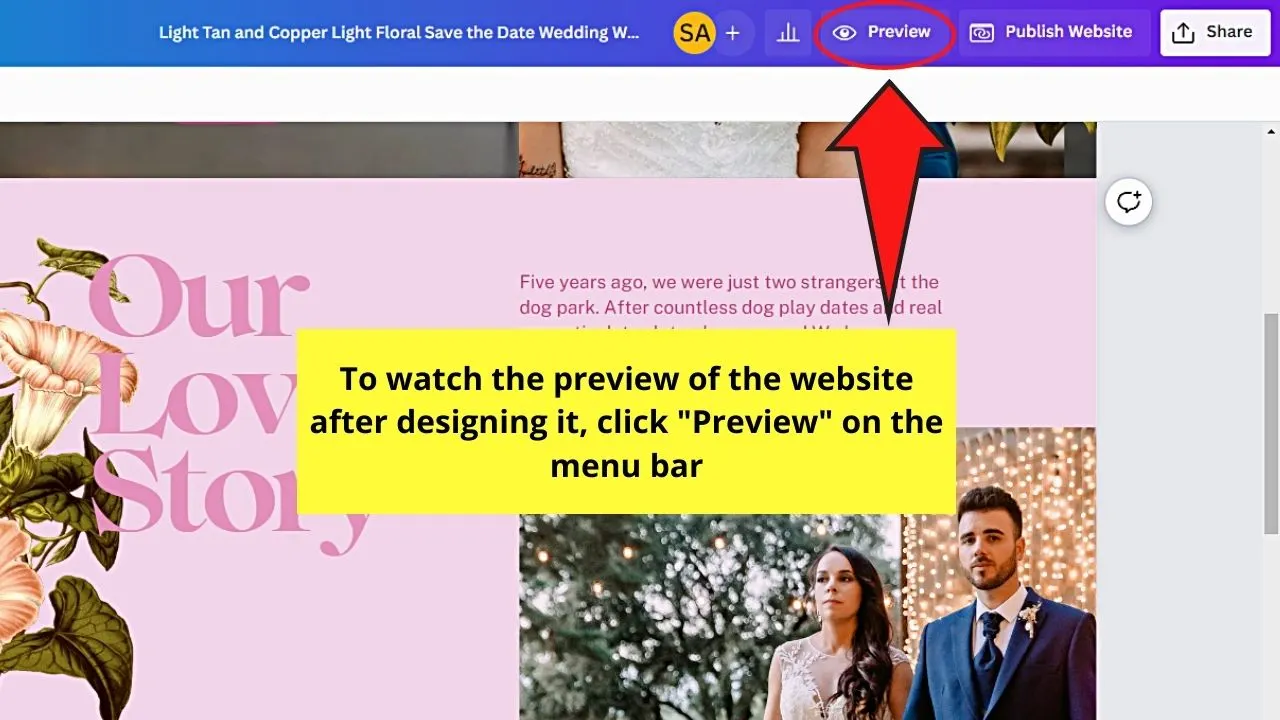
Then, your website will then open in a fictional browser window. You can scroll up and down to see if everything you have placed on your design is what you expected.
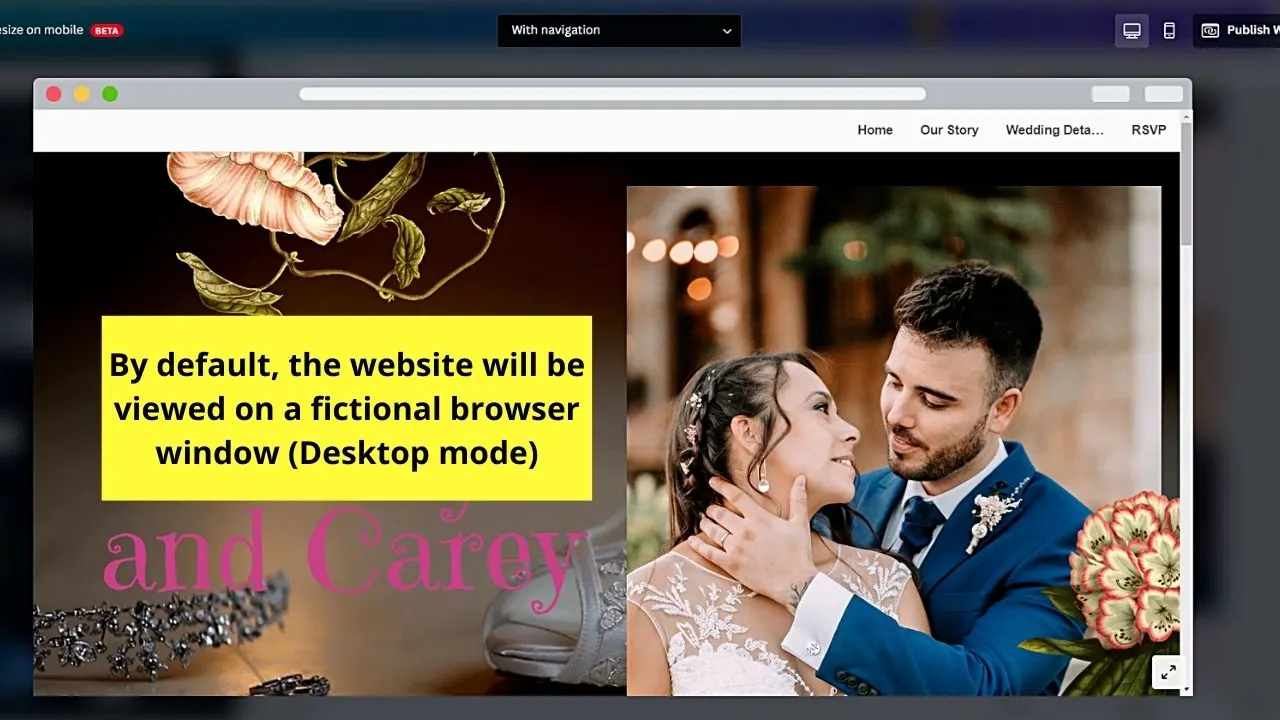
By default, your Canva website appears in the “Desktop mode.”
Yet, as the updated version is more responsive, you now have “Tablet mode” (if it’s still available) and “Mobile mode” options as well.
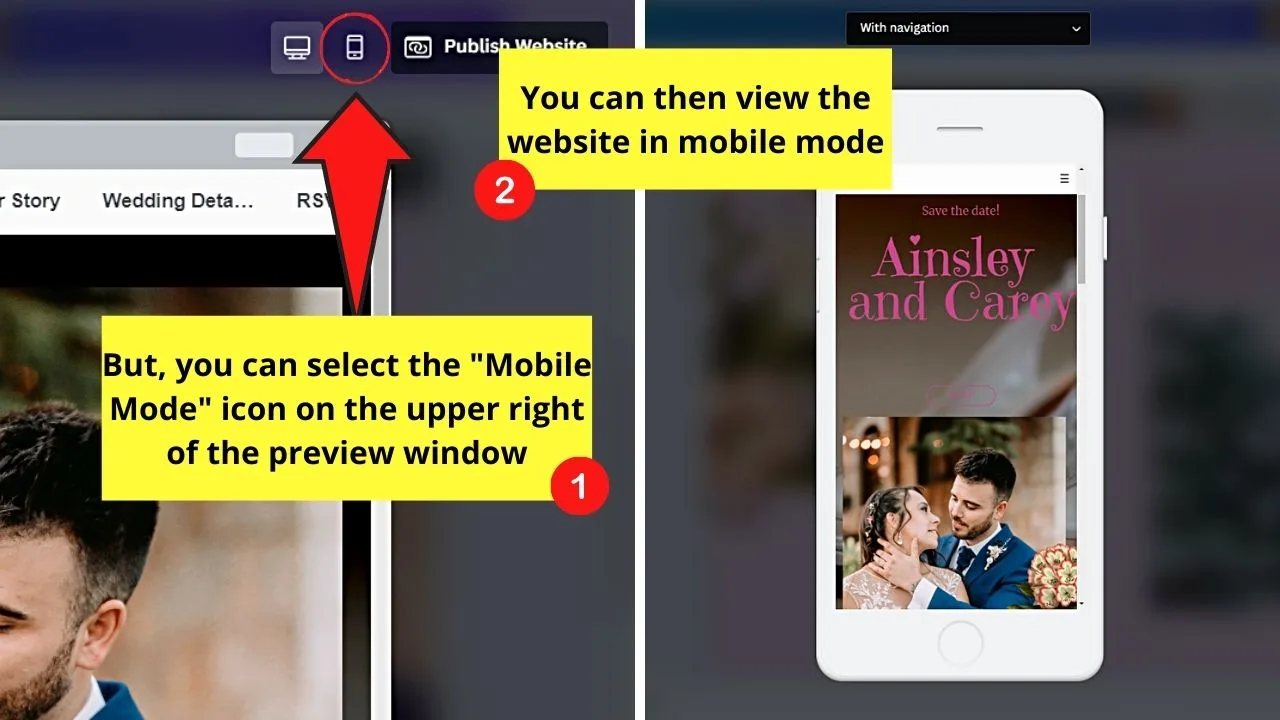
So, you only need to click on those view options to see how your website looks on a tablet and a mobile phone. No need to choose a “Mobile first” website design to make sure everything’s in place when viewed on a mobile phone.
You can then test out the hyperlinks you added as they’re working as well on a preview mode.
If everything looks good, just click “Close” and proceed with editing your website after selecting “Edit Design.”
You’ll find that the website editor is locked once you go into “Preview” mode.
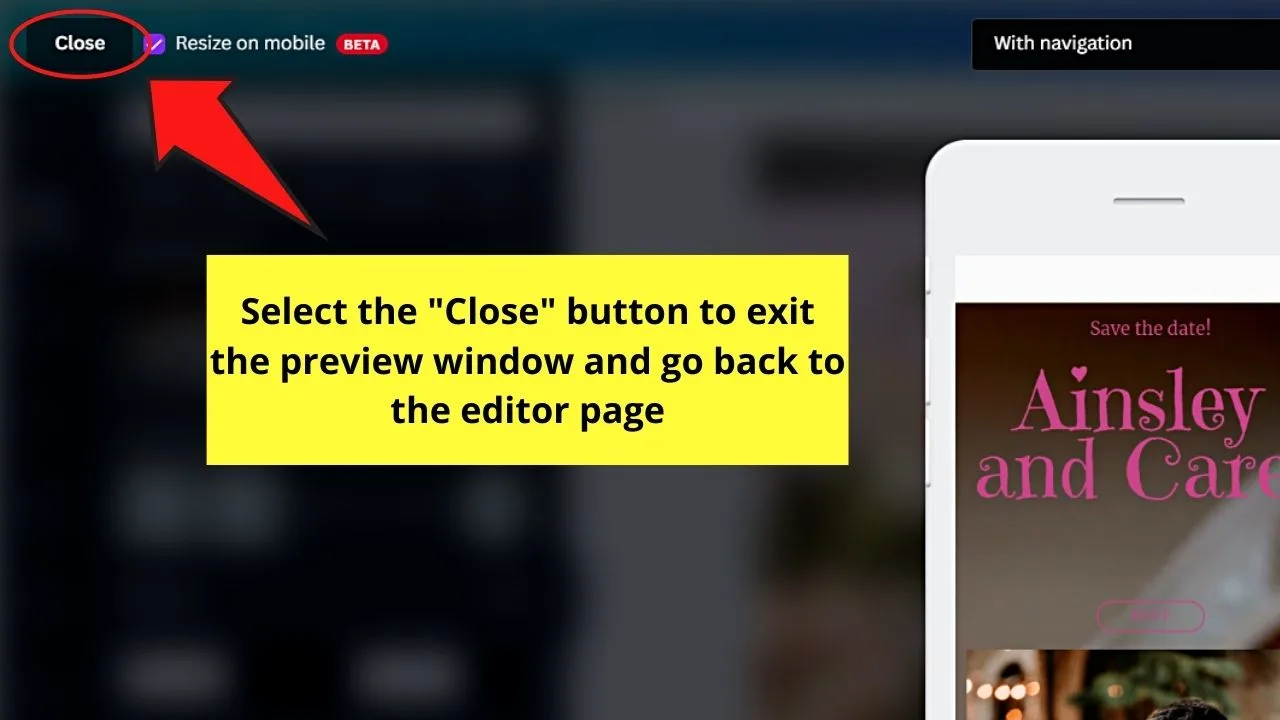
If you have nothing else to edit, then proceed with publishing your website.
5) Website Publishing Options
Publishing your Canva-made website is still as easy as ever as you only need to click “Publish as Website” on the menu bar.
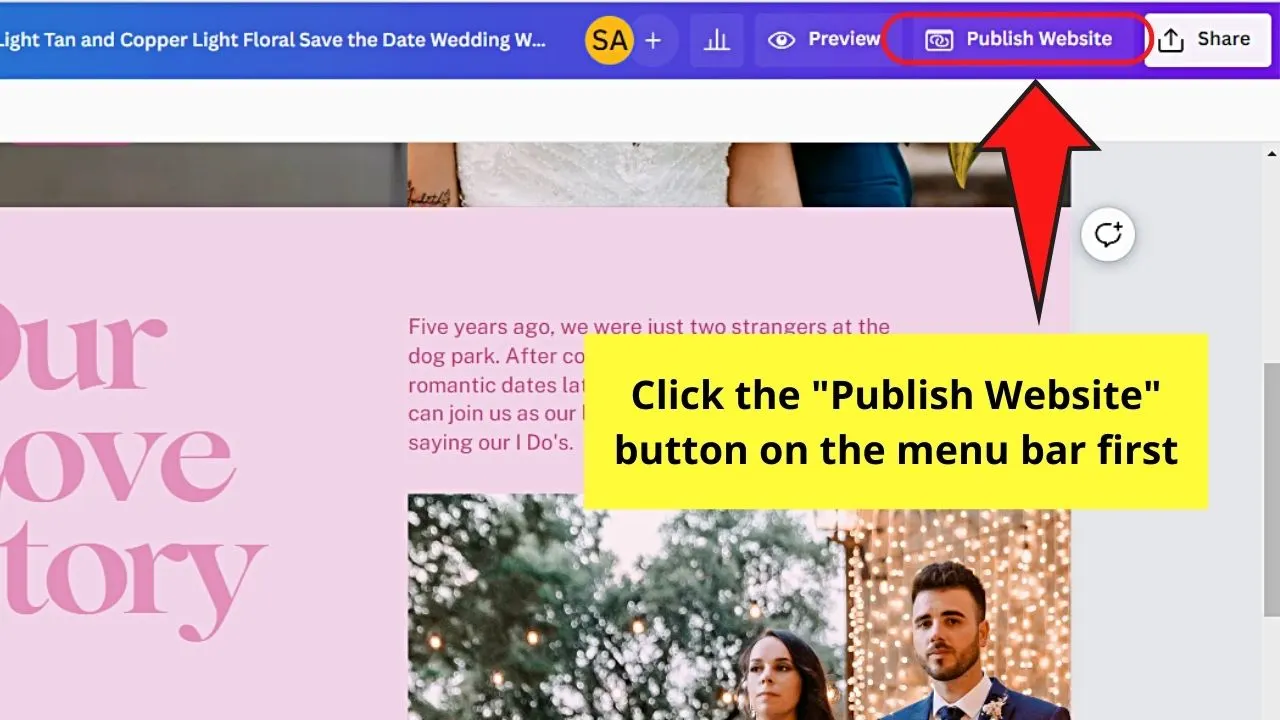
But, unlike before, you don’t need to manually set the web style for your audience. Since Canva Websites has a more responsive design, the design adjusts to the device your audience is using.
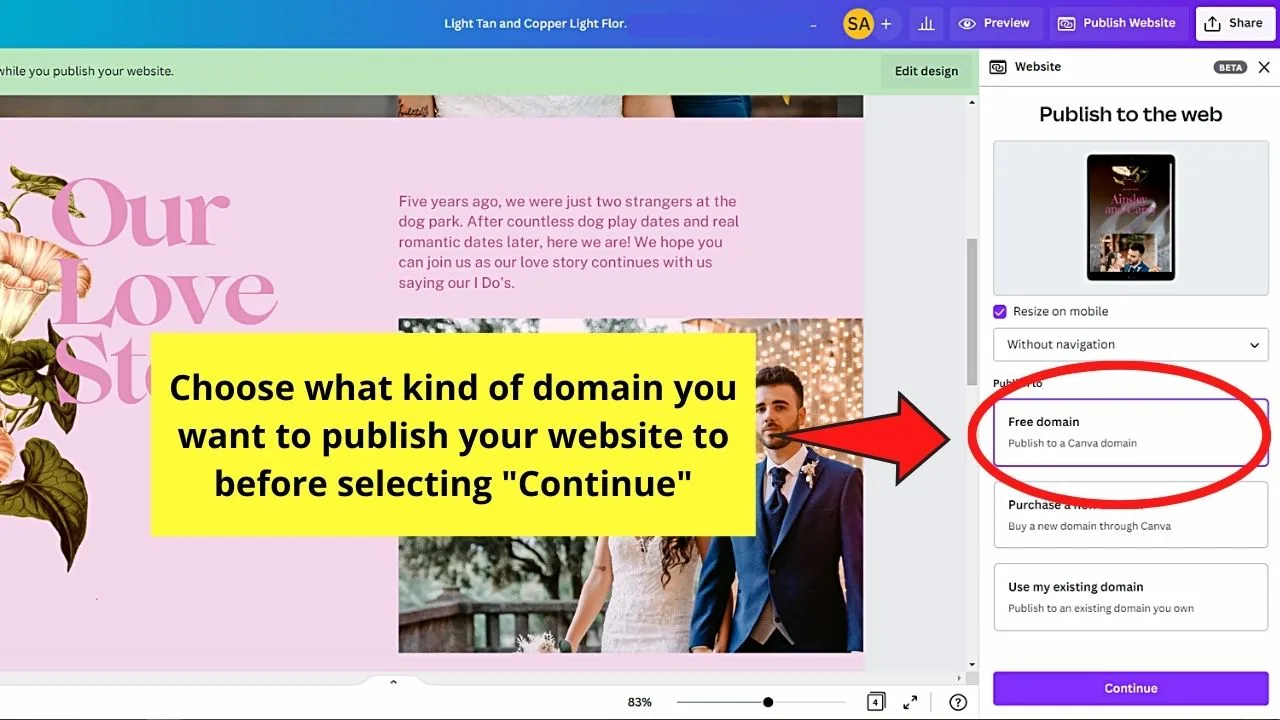
With that said, the first thing you’ll choose after clicking “Publish as Website” is if you’ll use a “Free Domain” or “Purchase a New Domain.”
If you plan to use the “Free Domain,” you won’t be able to fully personalize your URL as the “my.canva.site” still appears after the website name.
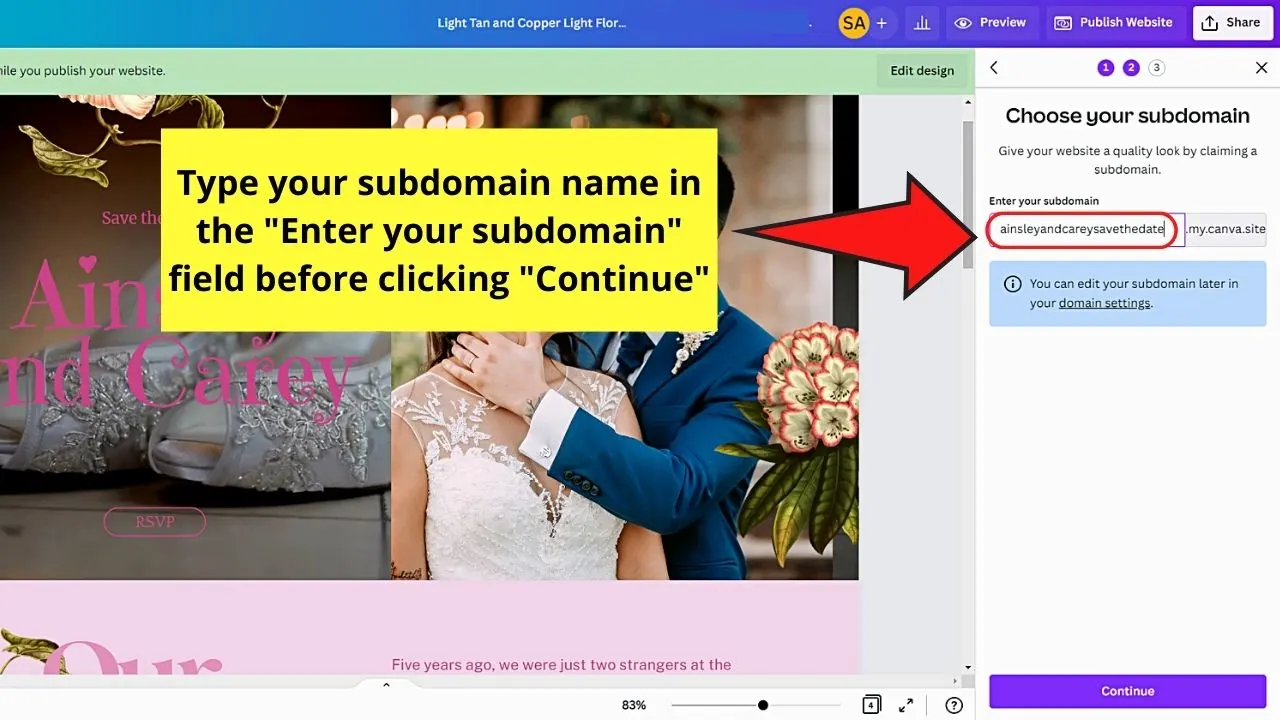
Enter your subdomain next on the “Choose your Subdomain” page before you click “Continue.”
Then, proceed with editing the “Browser Tab Preview” section by adding a favicon and a site description.
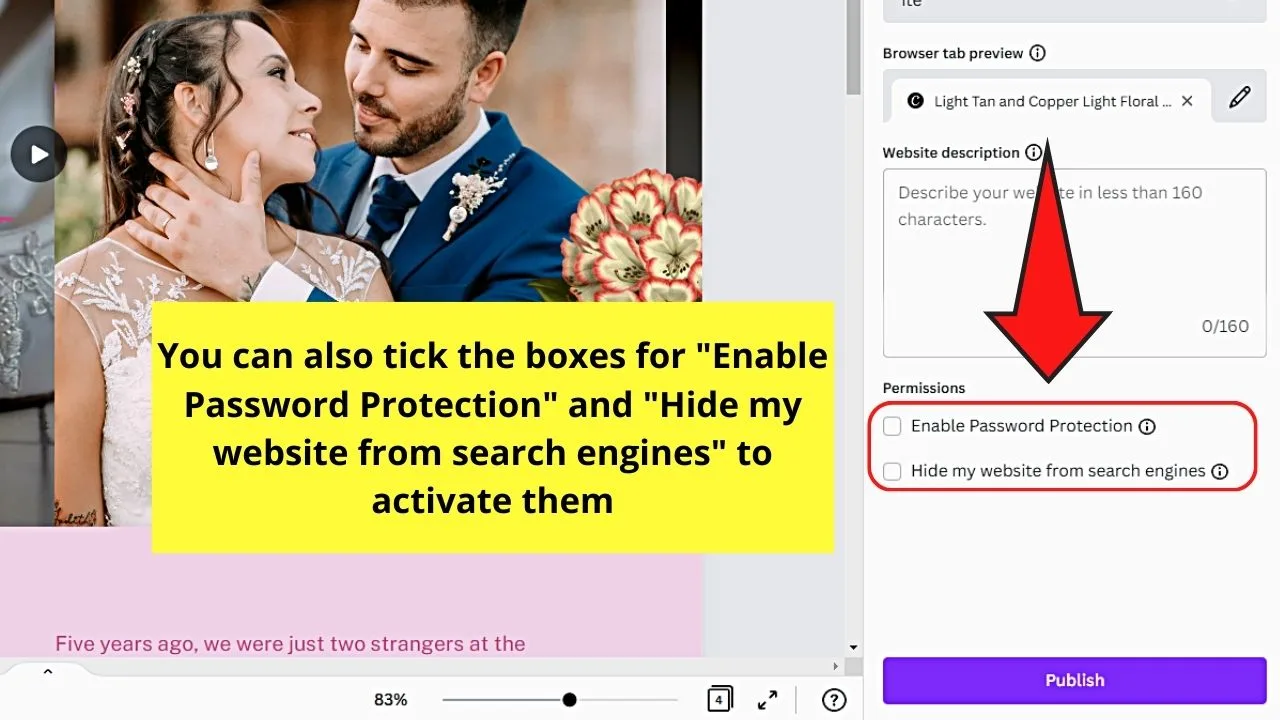
You can even opt to enable password protection so that only those who have the password can enter the website.
And, if you want to be more secretive, you can also choose to hide your site from search engines.
However, if you’re eager to start your website with a purchased domain, you don’t have to leave Canva to do so.
Select “Purchase a New Domain,” search, and choose the domain name.
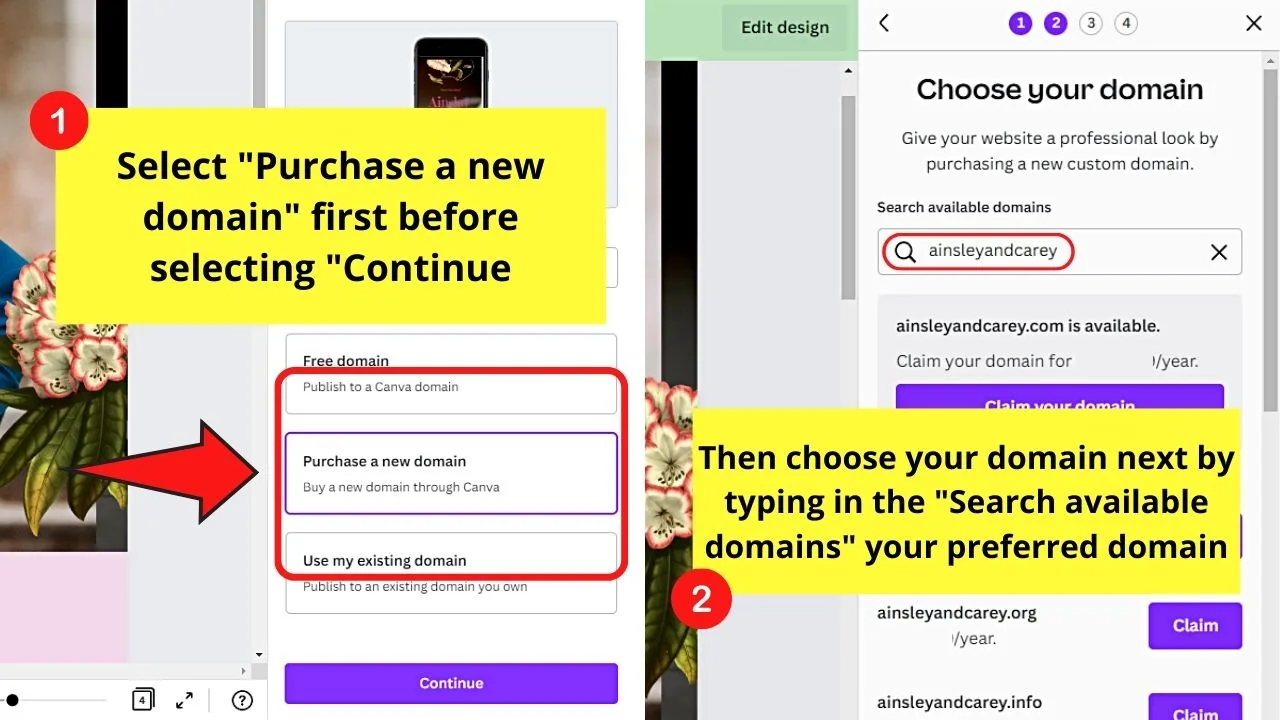
Then, click “Claim” to start buying the said domain.
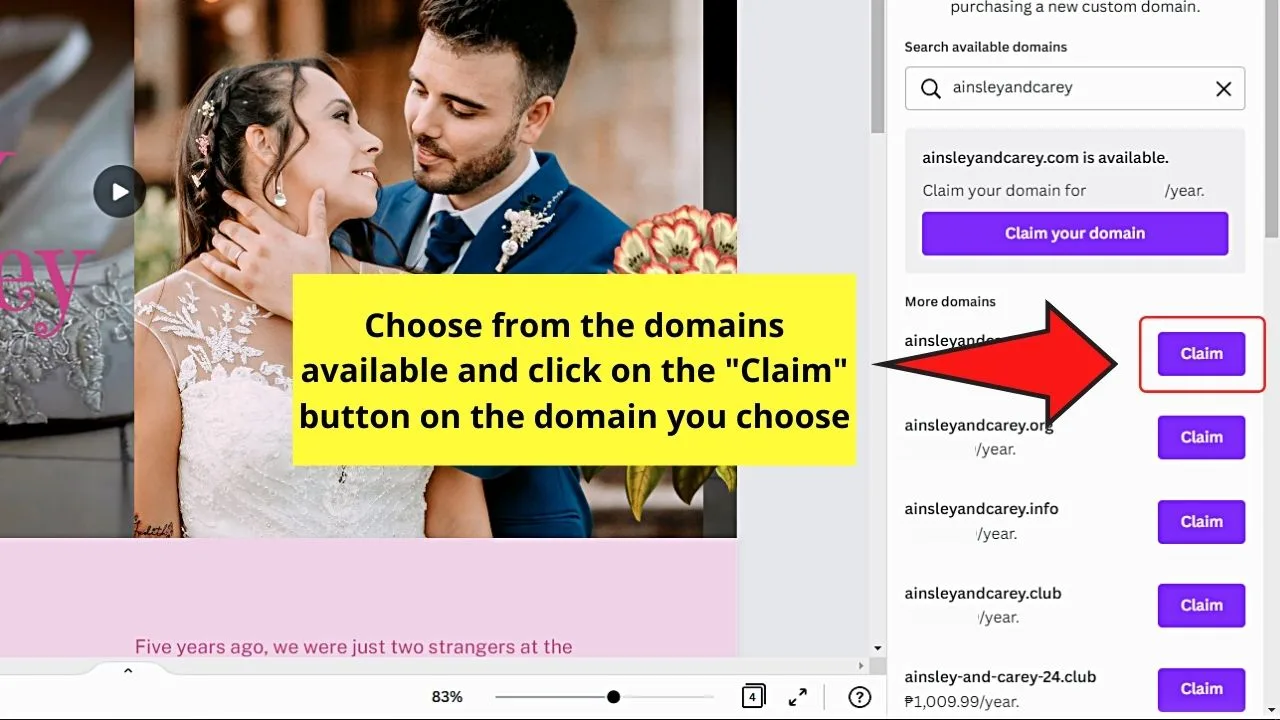
Then, register your personal information and other details and select your payment method for the recurring fee for the domain you purchased.
Included in your payment already is your purchase of the SSL certificate and the Privacy/Security protection for the website.
There is also a third publishing option available called the “Use My Existing Domain” option. Previously, only the CCCs (Certified Canva Creatives) can access it.
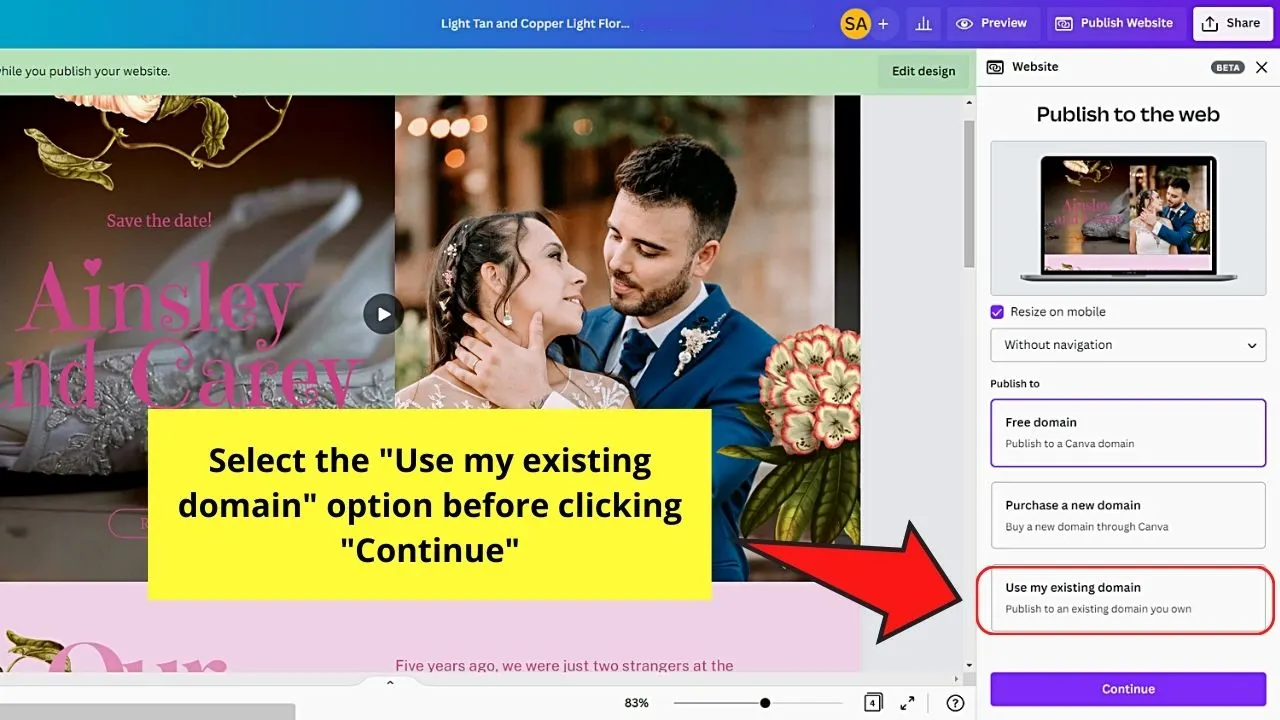
Clicking the said option then allows you to publish your Canva-made website on a URL or domain you already own.
From there, you can type in the “Enter your Domain” section the URL of the other website domain you purchased before. After which, click “Continue” to proceed with the other steps of linking that domain to Canva.
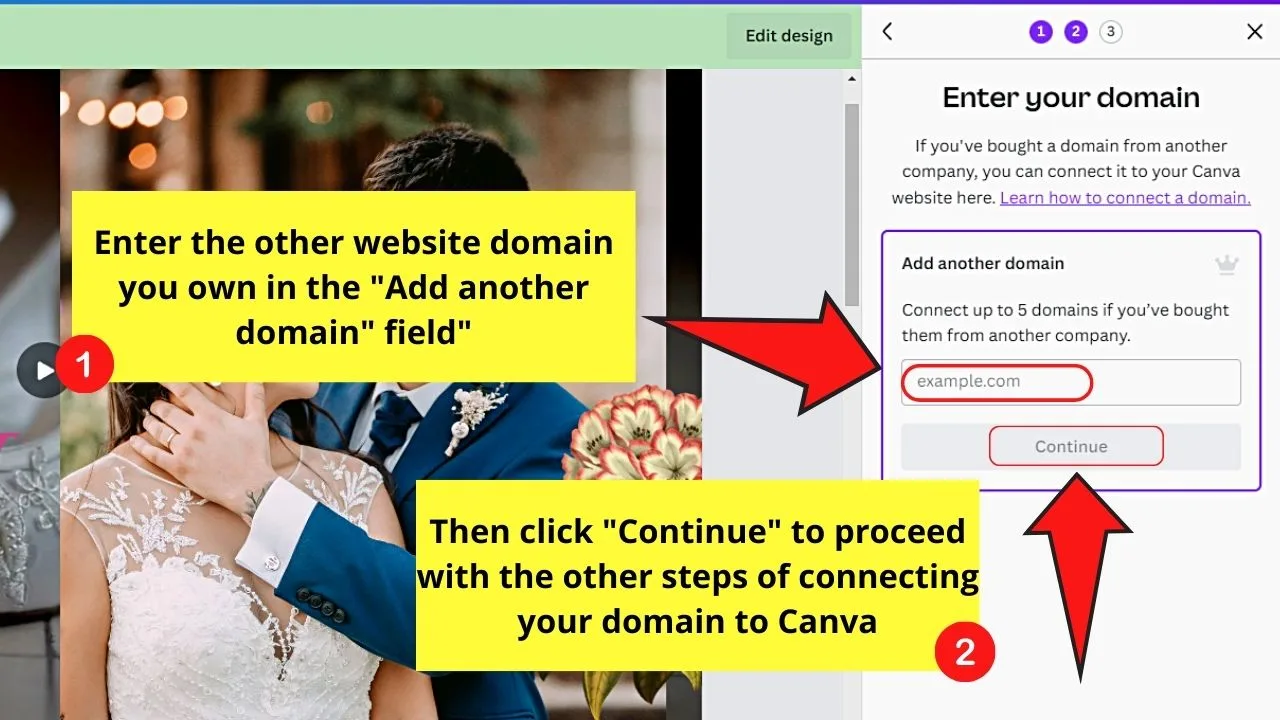
Whichever website publishing option you choose, you’re guaranteed that once it goes live, it’s responsive.
So, are you now ready to begin publishing a website with Canva’s latest website features?
Uploading Canva Website to WordPress — Possible or Not?
With the exciting new features for Canva websites, you’d think about uploading it to your WordPress site. But is this feat even possible?
Unfortunately, you cannot directly upload a Canva website to WordPress. The main reason is that Canva is not a website builder. Aside from that, WordPress is a CMS (Content Management System). This means that WordPress is for creating blogs and other websites.
You’ll need a third-party website builder (GoDaddy, Squarespace, Wix, Weebly, etc.) to create a website with Canva.
There are workaround methods though if you want to proceed with uploading a Canva website to WordPress.
One is to export the Canva website as an HTML file and then upload it to your WordPress site through the “Appearance” section under “Editor.”
Another workaround method is to use a plugin to import designs to your WordPress website.
But any of these workaround methods aren’t recommended as they can cause problems for your website. The site might even look broken, and some WordPress features aren’t available for use.
Frequently Asked Questions about How to Create a Free Website in Canva
Can you shorten the link that Canva generated after publishing the website?
The only way for you to shorten the Canva-generated link is to head to a third-party site like Bitly.com. Copy the Canva-generated link and paste it in Bitly. You can then change how the link’s named in Bitly.
Is it possible to add shopping carts on your Canva website if you intend to use it as an online store?
The current features of web designing in Canva don’t support the addition of shopping carts. It’s best to use other platforms like WordPress or Shopify instead. But, you can link your online catalog to the Canva-designed website through clickable buttons.
Do viewers need to have a Canva account to view the website you created?
While you need to sign in to your Canva account to create a website in it, viewers don’t need to have one for them to see it. The viewers will only need to type the URL of your website onto the address bar to be able to access it.
Can you share your newly-designed website as a template if you’re planning to sell them?
Like other designs made in Canva, you can share the website design you created as a template. Just head to the Share button on the menu bar, click the “v” button and choose the Share a link to use as template option. Copy the link before sending it to your client.
Do you need to have your own hosting account to publish a Canva website?
Owning a hosting account is not necessary as you can host your website on Canva for free. However, if you do have your own hosting, you can indeed publish your website on your own server.

Hey guys! It’s me, Marcel, aka Maschi. On MaschiTuts, it’s all about tutorials! No matter the topic of the article, the goal always remains the same: Providing you guys with the most in-depth and helpful tutorials!


