
Canva is known worldwide for being a graphic design tool. But, in recent years, Canva’s team has expanded its features.
Not only can you make stylish graphic designs, but you can now edit videos within the app.
But, the graphic tool’s biggest leap is incorporating word processing features in the form of Canva Docs.
Whether you’re a loyal Canva user or a newbie to this graphic design tool, let’s all learn the basics of using Canva Docs.
How to Get Access to Canva Docs
To get access to Canva Docs, head over to canva.com/docs and click on “Sign Up for Canva Docs”. After that, to use it, log out of your account and then log in again and you will then see “Docs” in the top toolbar of Canva’s homepage.
Adding Text to Canva Docs
Step 1: Type the text in the blank document on the editor page.
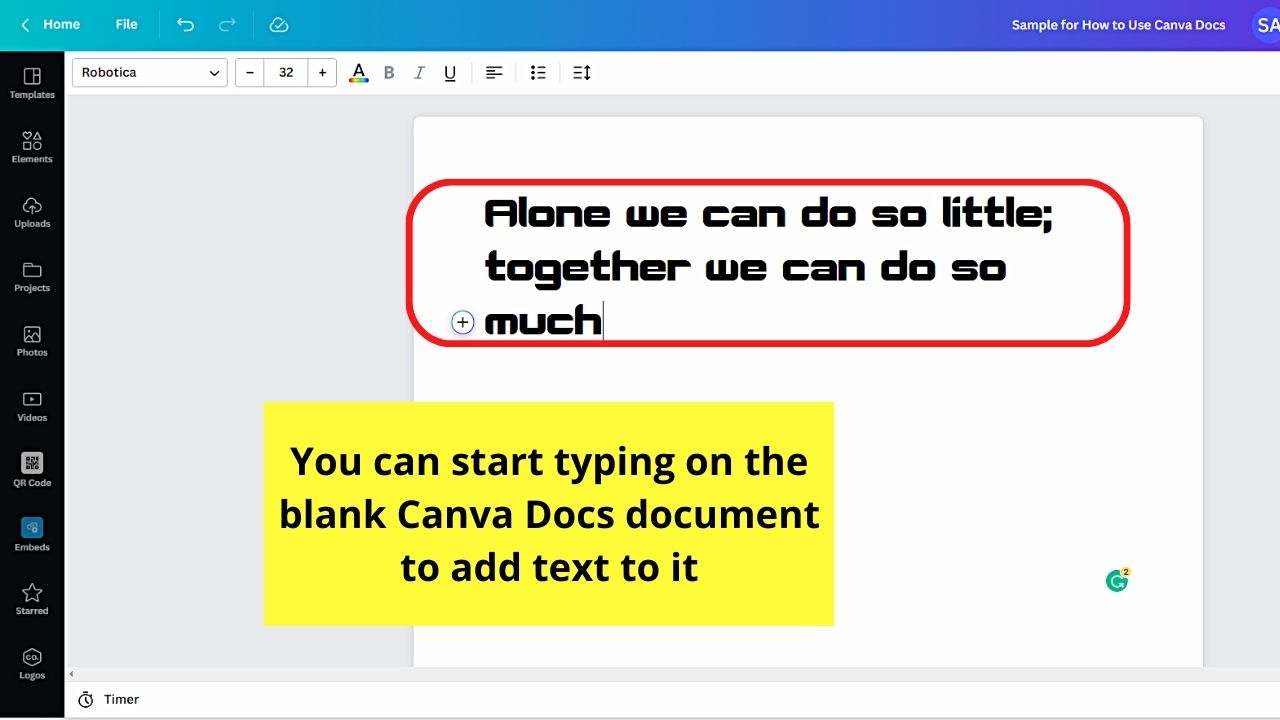

Do this step if you prefer to create a Canva Docs document from scratch.
Step 2: Adjust the text’s font style by highlighting the said text before clicking the “Font style” button.
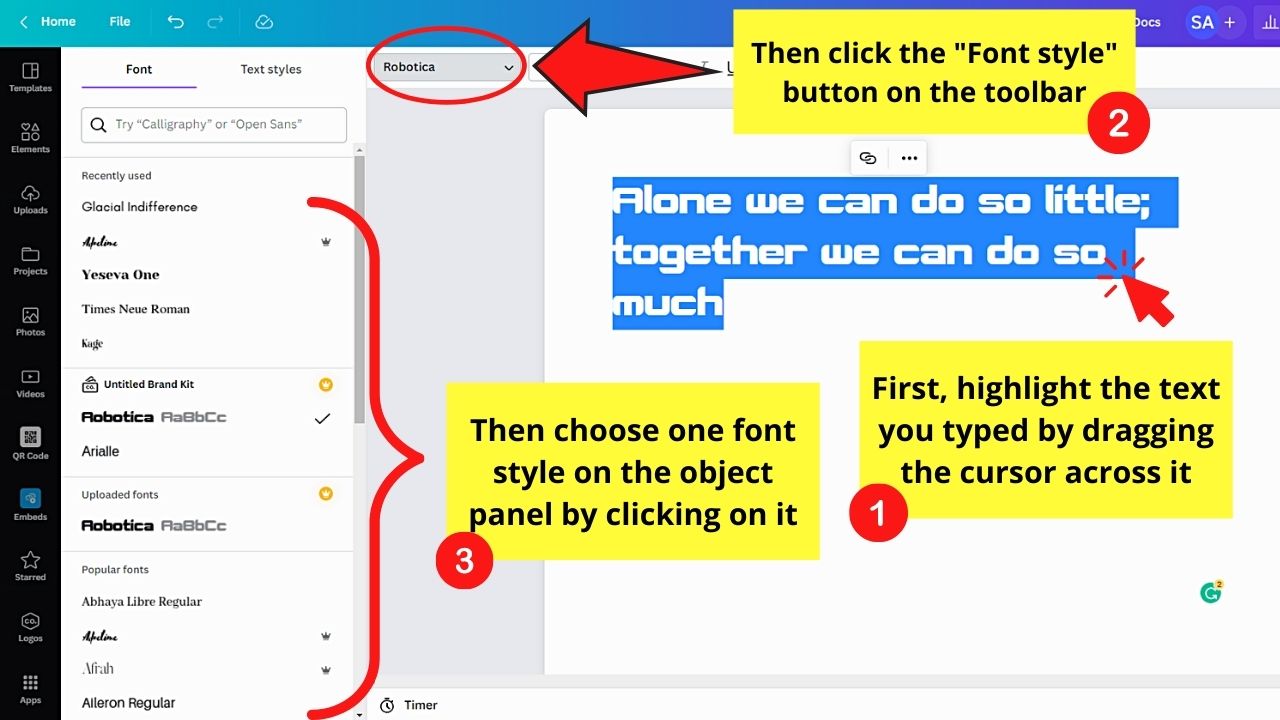

Choose the font style you’ll use from the dropdown menu.
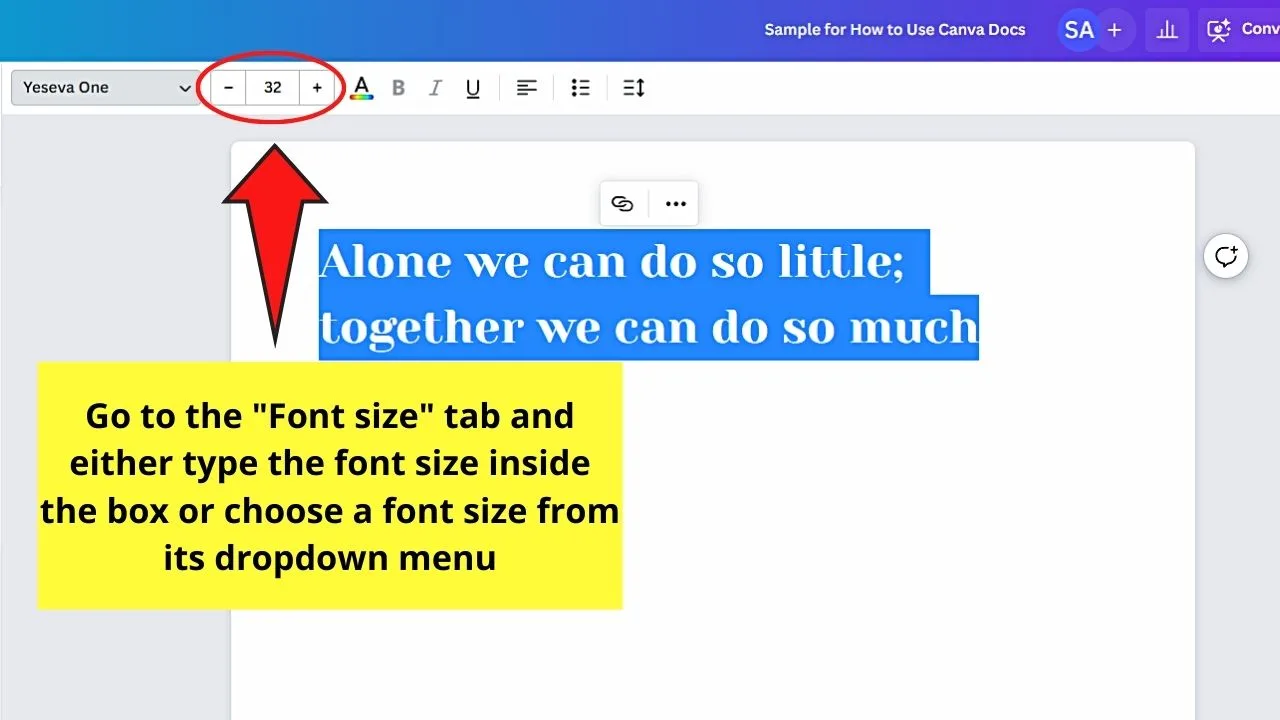
Step 3: Adjust the font size by selecting the “Font size” button or typing the size directly in the box.

Step 4: Select the “Alignment” button on the same toolbar to adjust the text’s alignment.

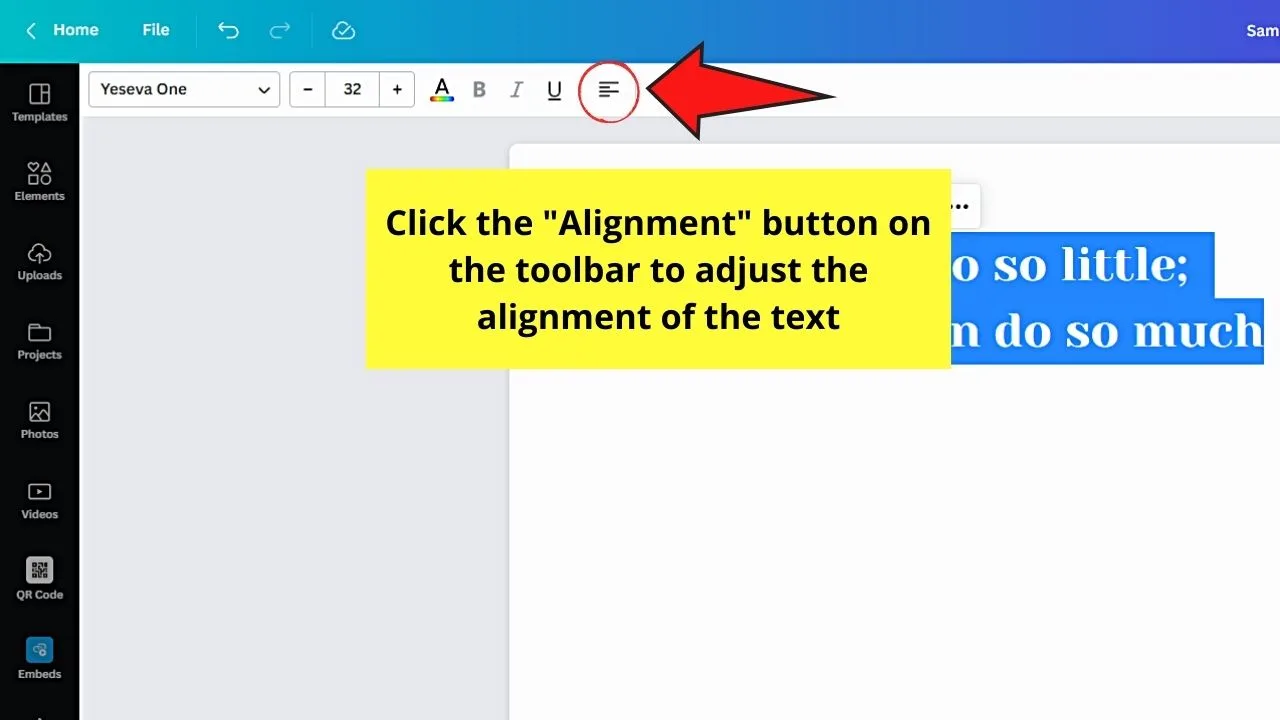
Keep clicking on the said button until you achieve the text alignment you wanted. One click is for “Left-align,” two clicks are for “Center,” and three clicks are for “Right-align.”
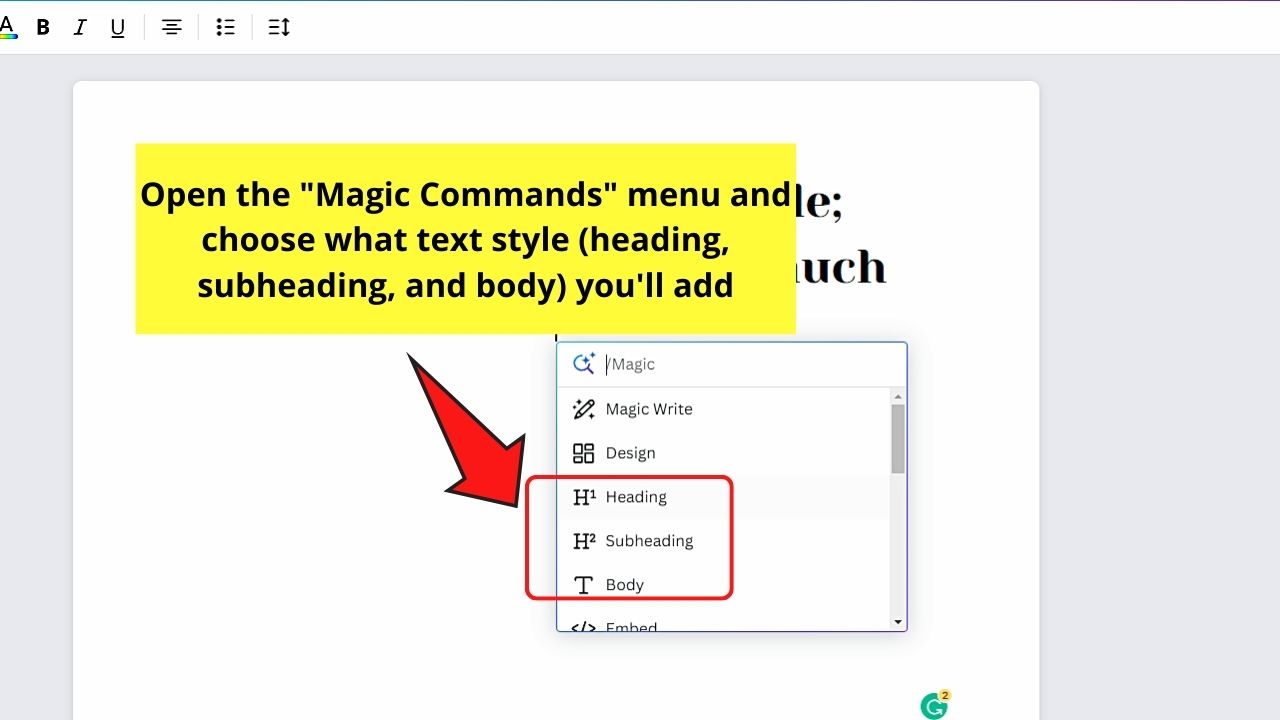
Step 5: Open the “Magic Commands” menu.

This step will allow you to insert new text if you already added other design elements. You can refer to the next section for the detailed steps in opening Canva’s “Magic Commands” menu.


Then click one of the three text style options available: “Heading,” “Subheading,” and “Body.”
After selecting one of them, proceed with typing out the text for your design.
Canva Docs: Accessing the “Magic Commands” Menu
After adding text to your Canva Docs document, open the “Magic Commands” menu to add more design elements to it.
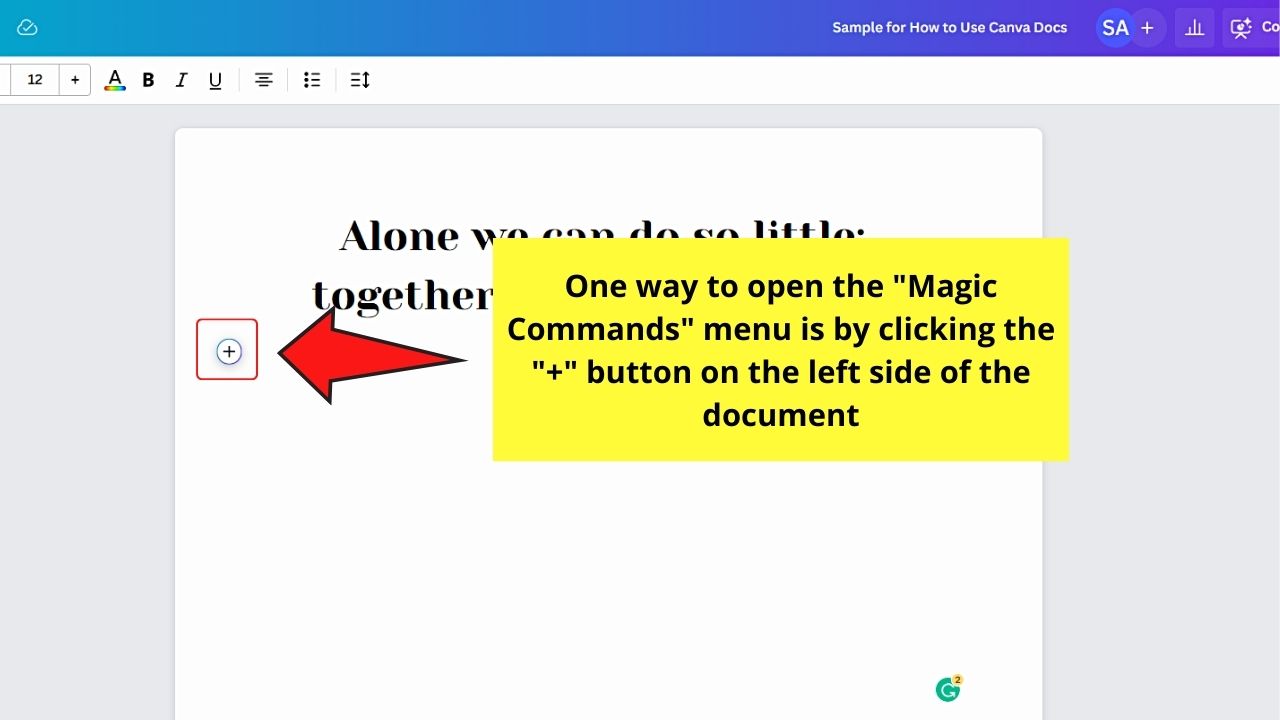
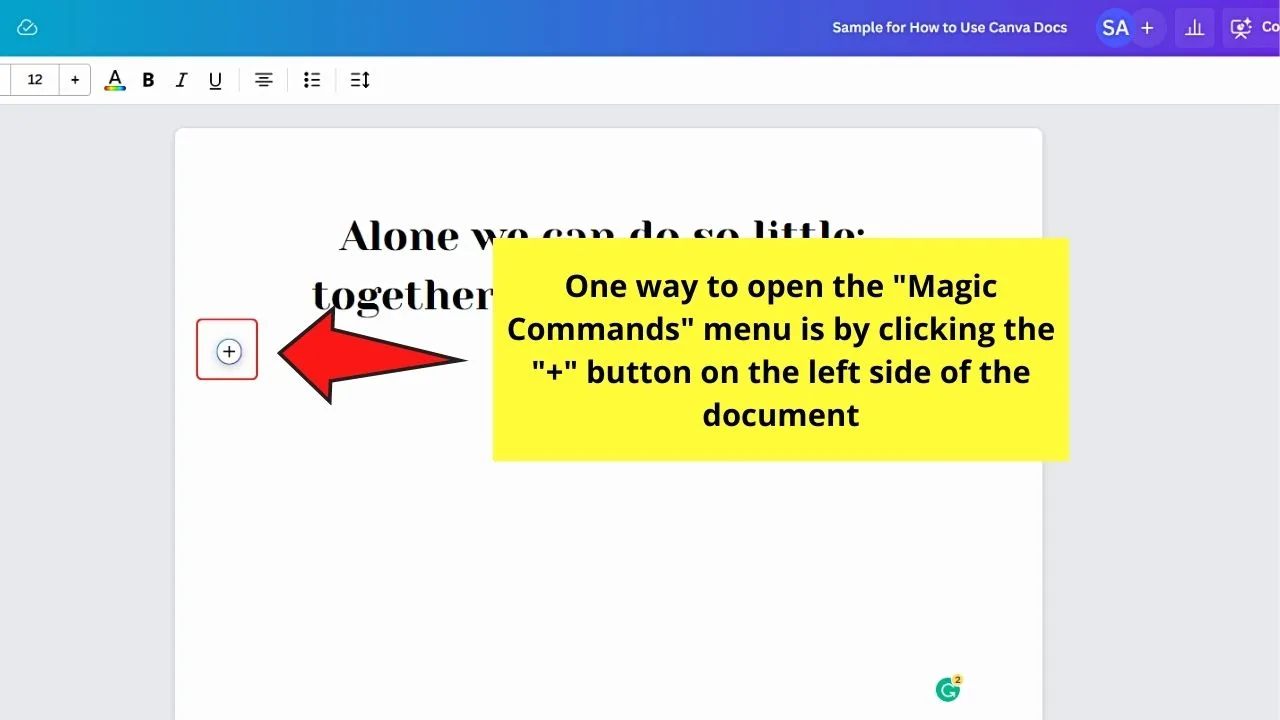
One way to open this “Magic Commands” menu is to click the “+” button. You’ll find it on the leftmost part of the text you typed.
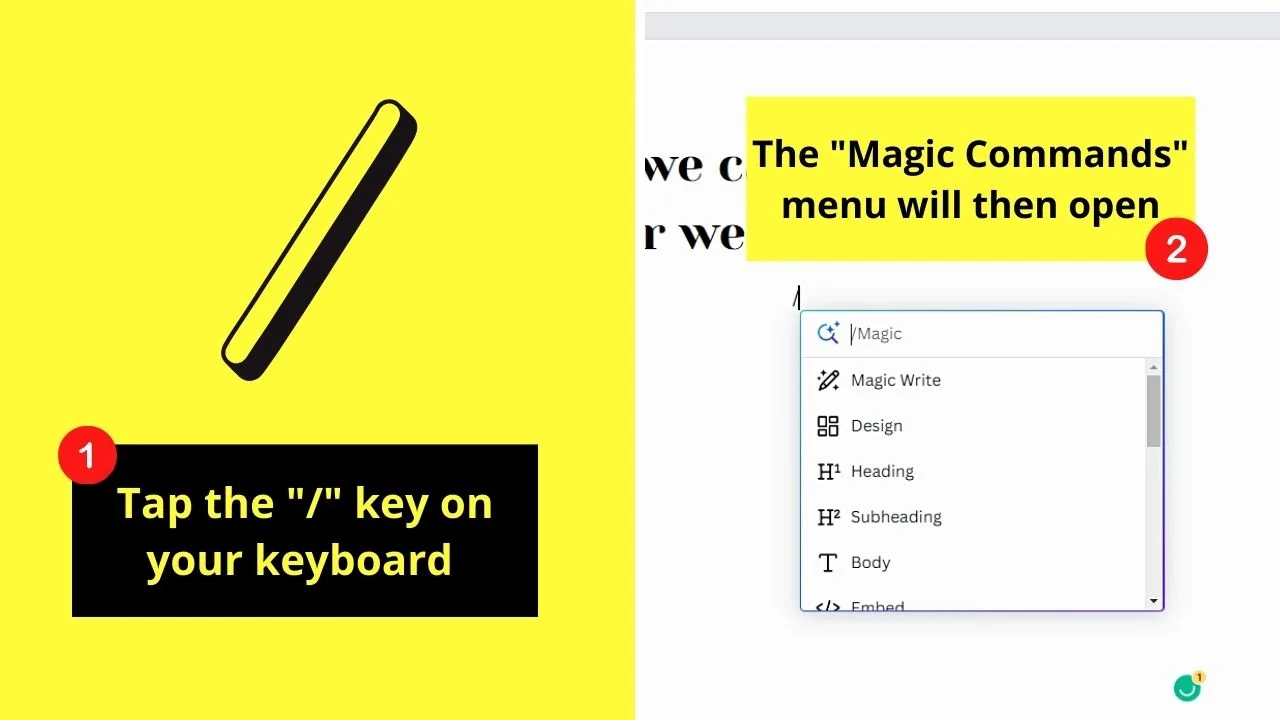
If you prefer using shortcuts, the easiest shortcut is to tap the “/” key.

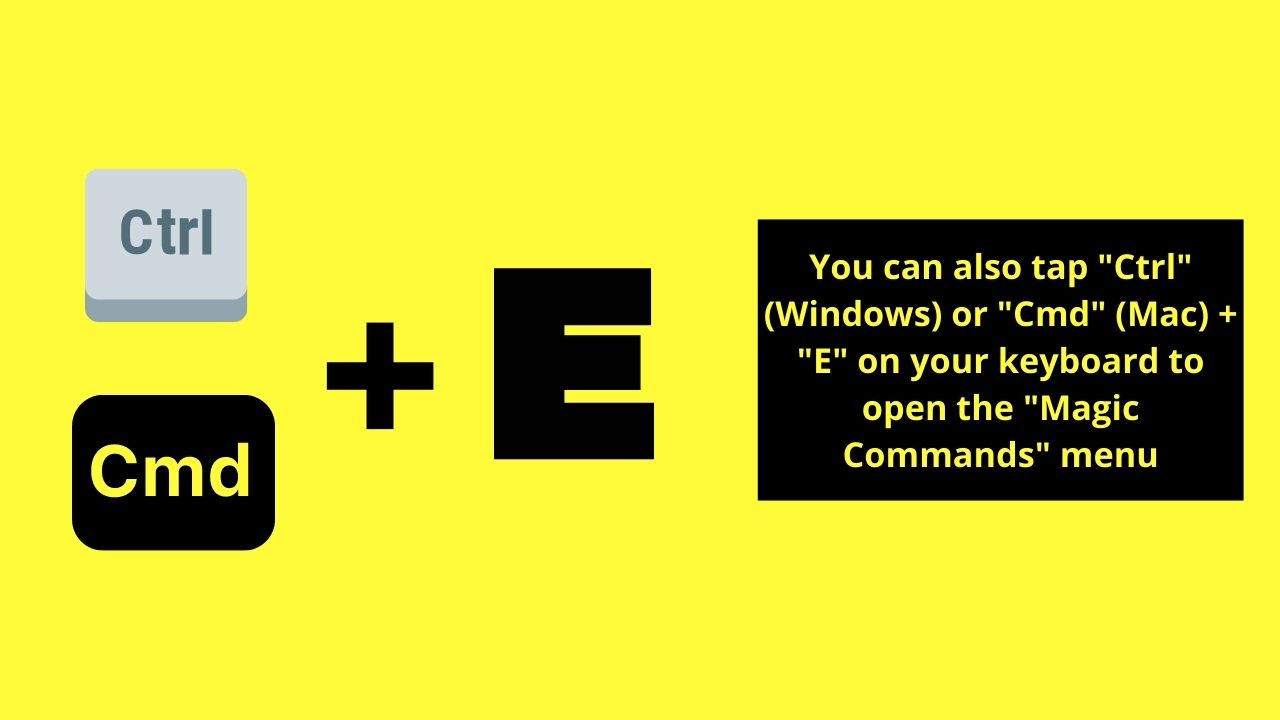
Another shortcut to open the same “Magic Commands” menu is tapping the “Ctrl (Windows) or Cmd (Mac) + E” keys on the keyboard.

You will then see the various Canva Docs elements you can add to your current project and features you can use on the dropdown menu:
- Magic Write
- Design
- Text Styles (Heading, Subheading, Body)
- Embed
- Table
- Checklist
- Lists (Bulleted List, Numbered List)
- Emoji
- Graphics
- Charts (Pie Chart, Bar Chart, Line Chart)
- Timer
- Logos
- Help
Now that you have opened the “Magic Commands” menu, you can begin inserting elements apart from the text.
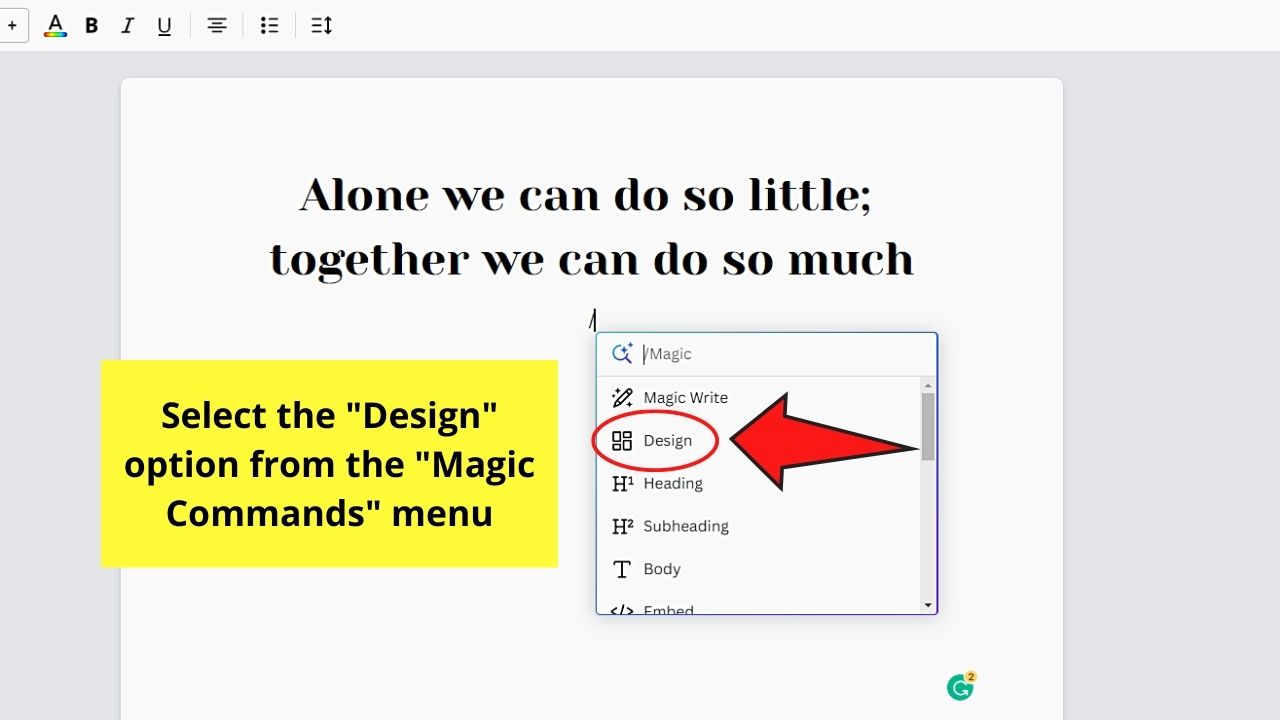
Inserting Design in Canva Docs
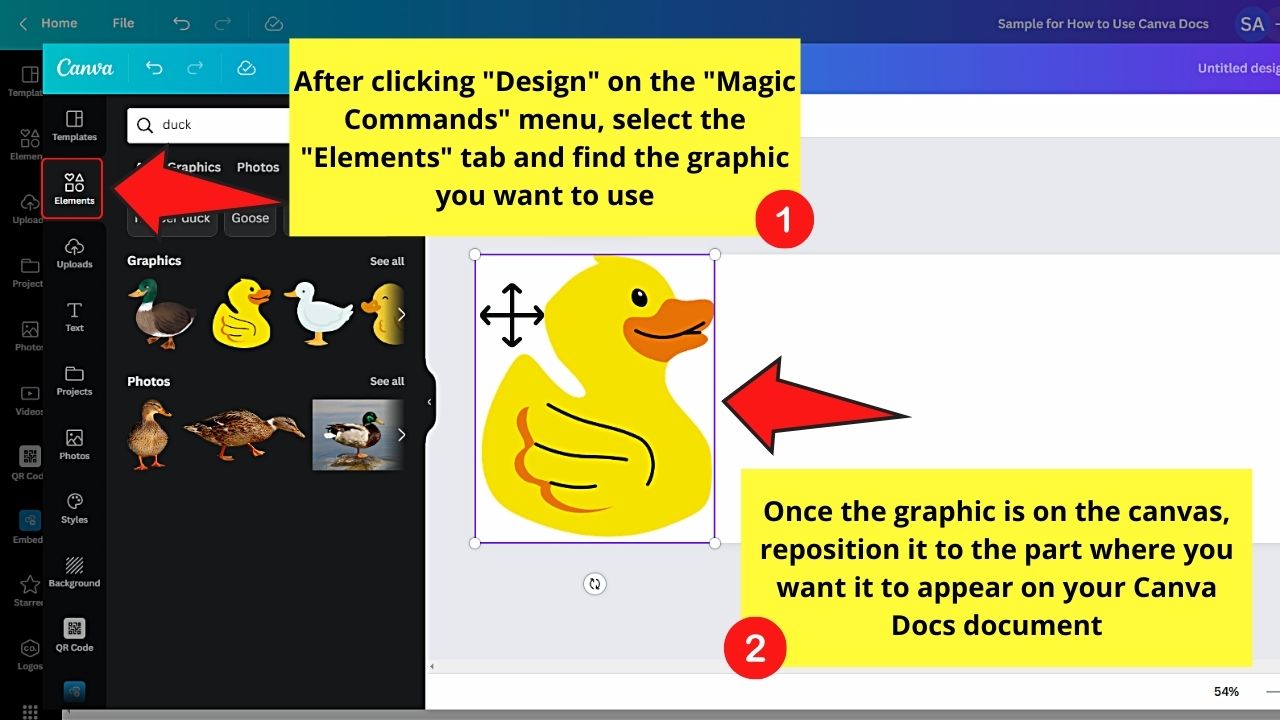
Step 1: Select the “Design” option on the dropdown menu.

Step 2: Choose a design template from the “Templates” gallery.
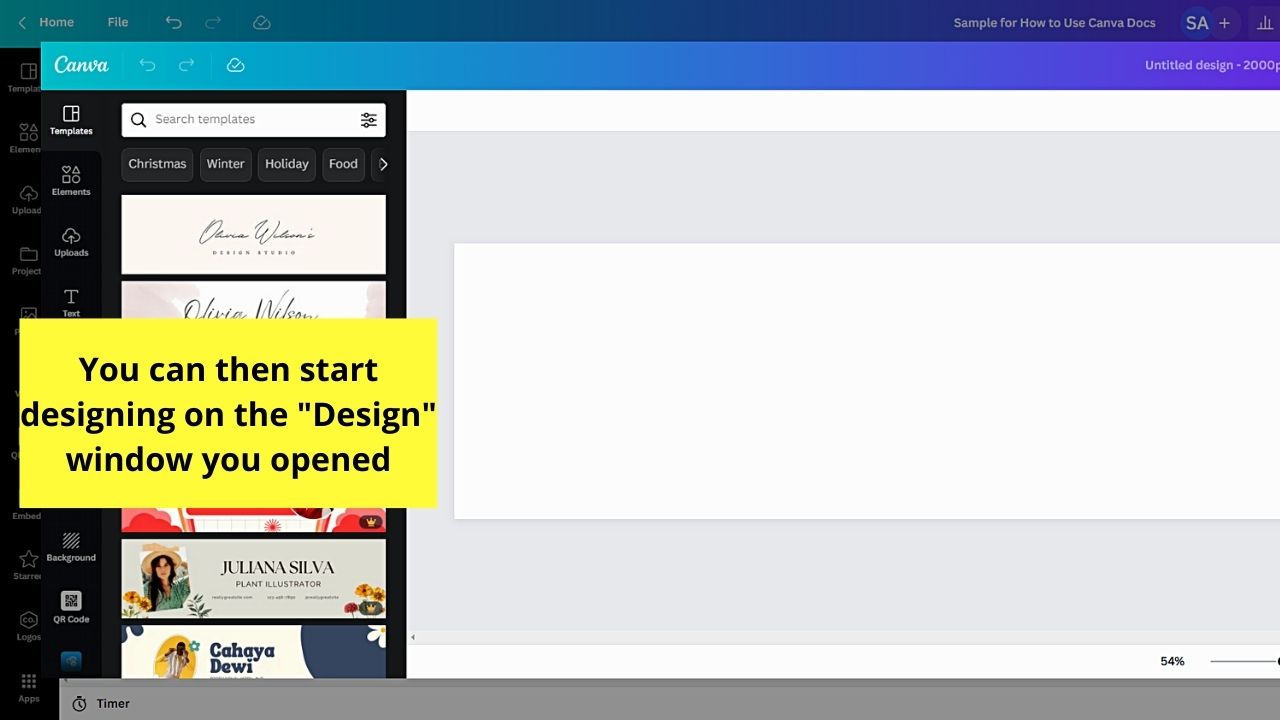
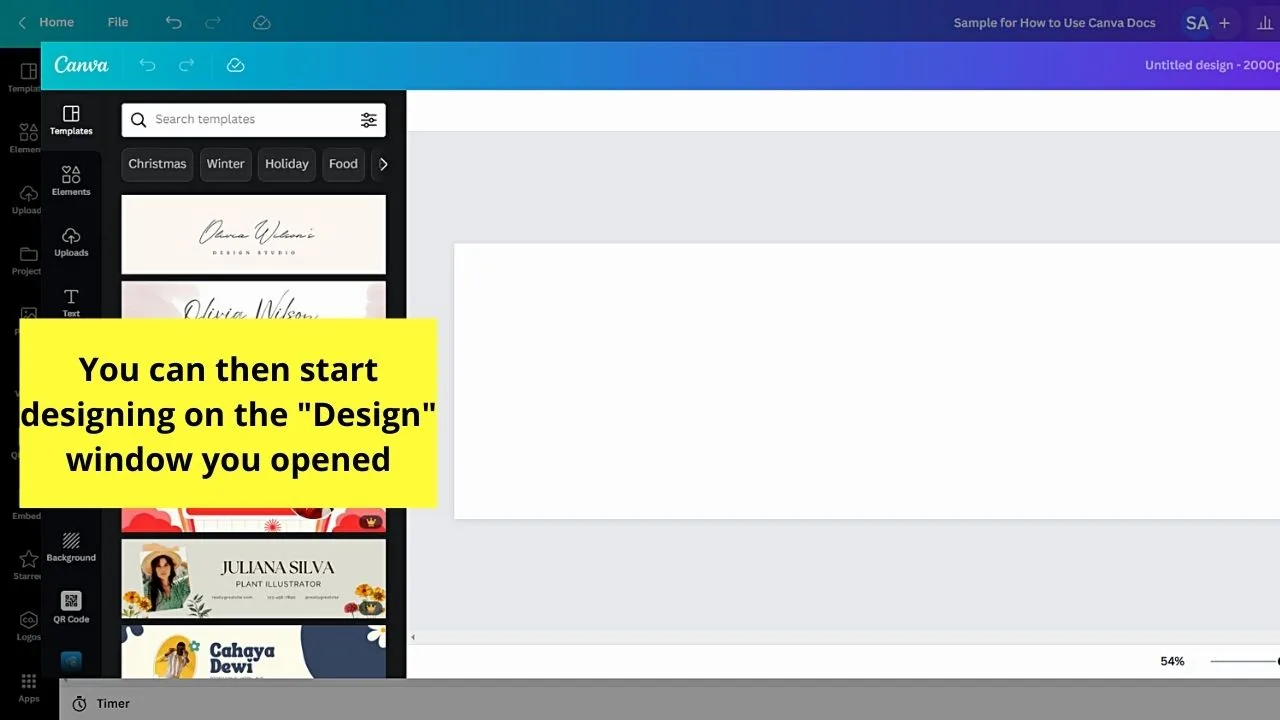
You can now start designing like how you usually do on regular Canva projects. If you need to insert a logo, simply craft the said logo within the same window.
Step 3: Select the “Save” button after editing the design.

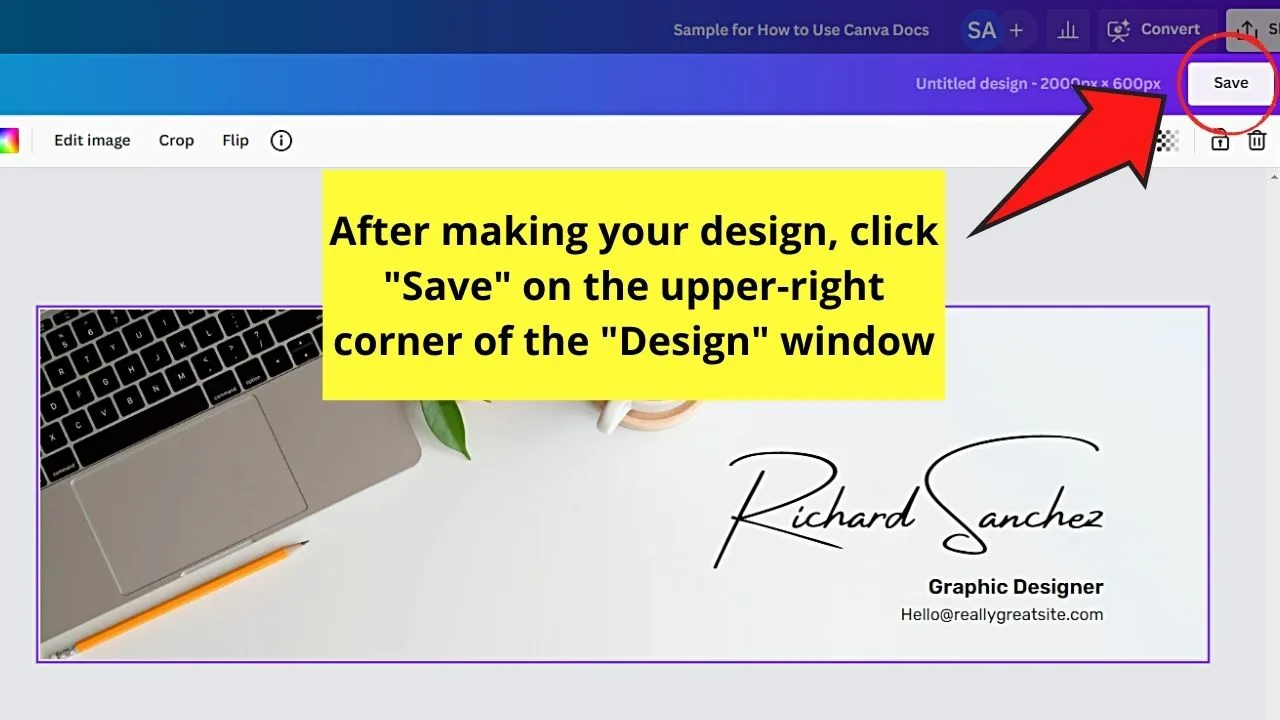
The design will automatically be inserted into your Canva Docs document.
Step 4: Select the “Edit Design” button to make some changes to the “Design” template you inserted.

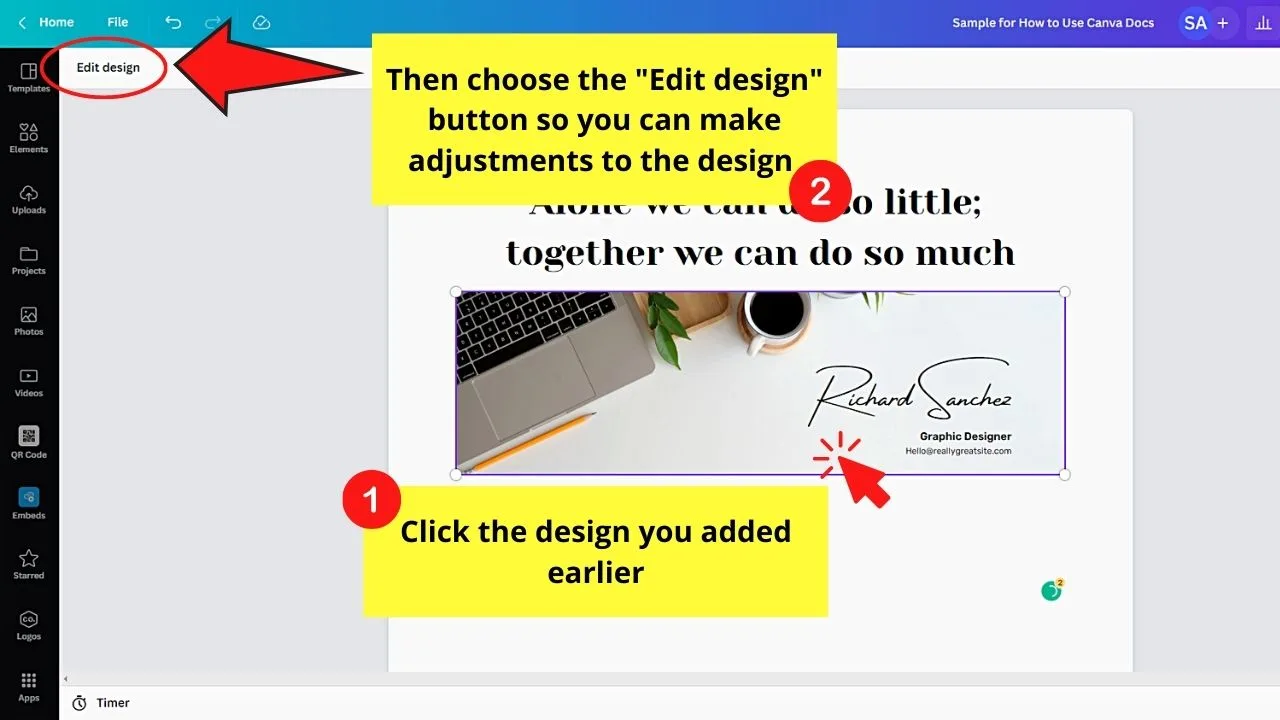
The “Design” window will then open so you can make changes to it.
Step 5: Reposition the design by hovering your cursor over it before dragging it.

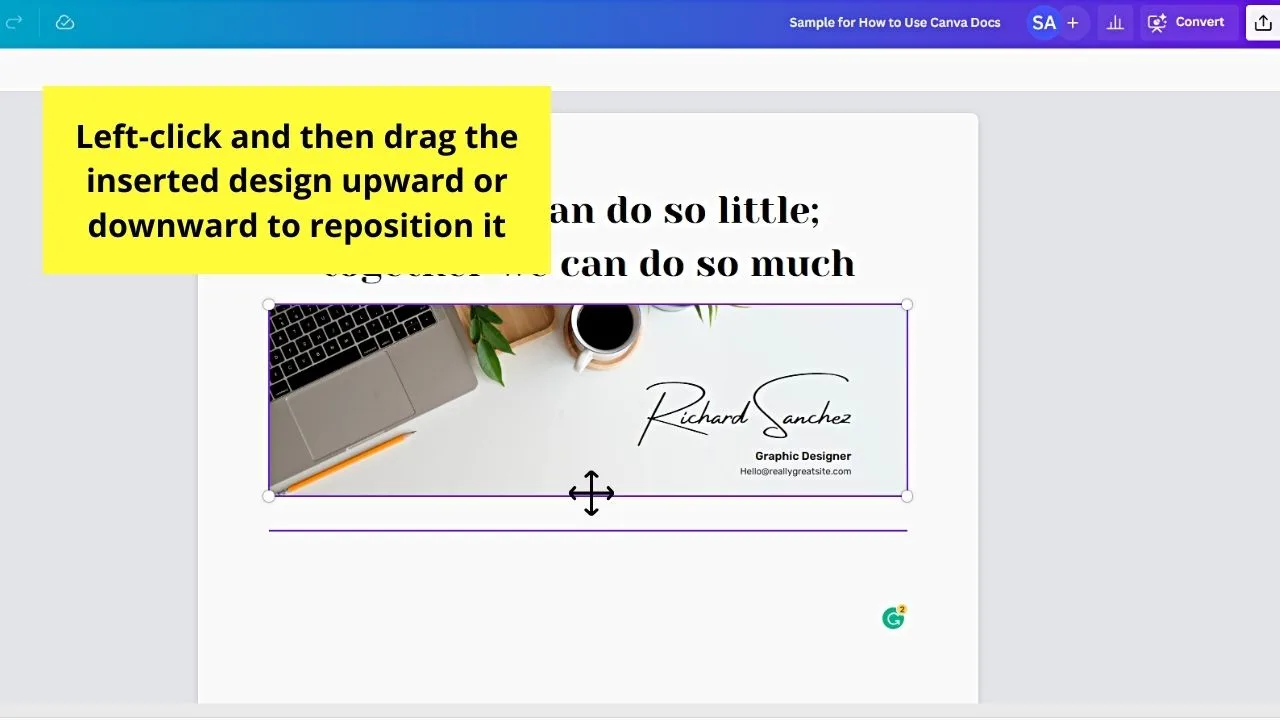
You can now drag the design upward or downward until you reach the part of the document where you want it placed.
Just release your hold on the left-click to leave the said design there.
Inserting Tables in Canva Docs
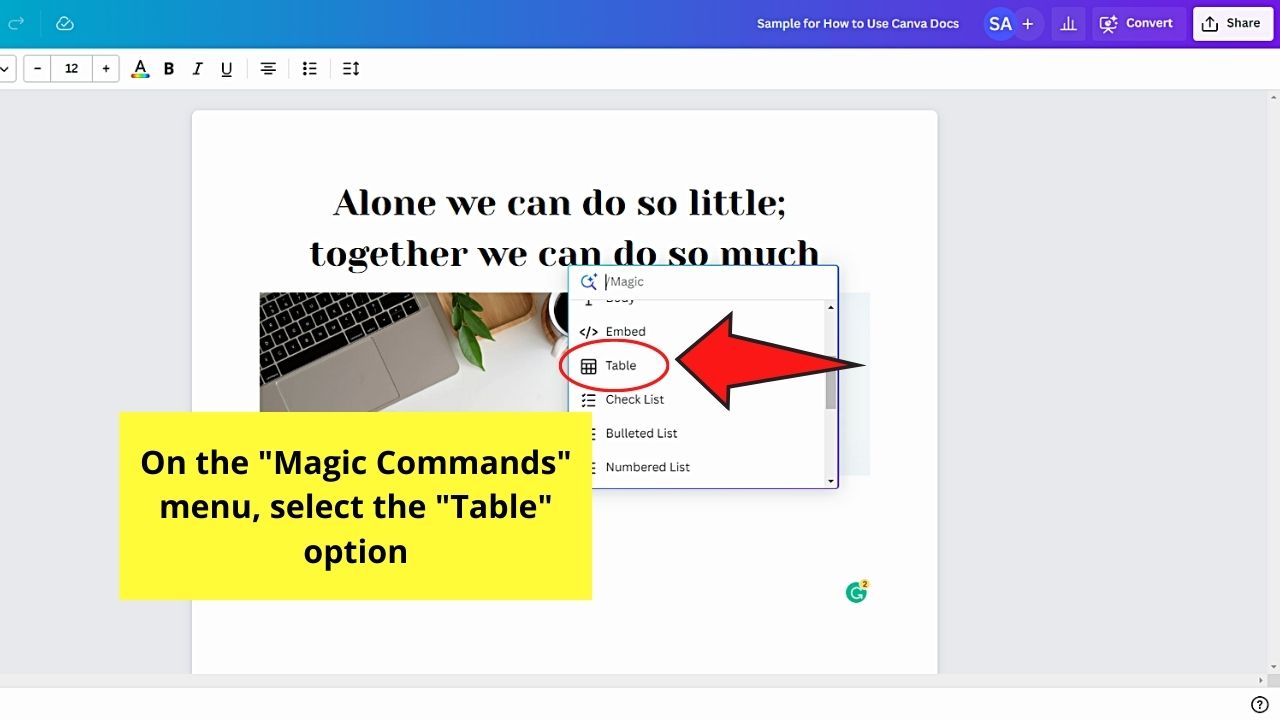
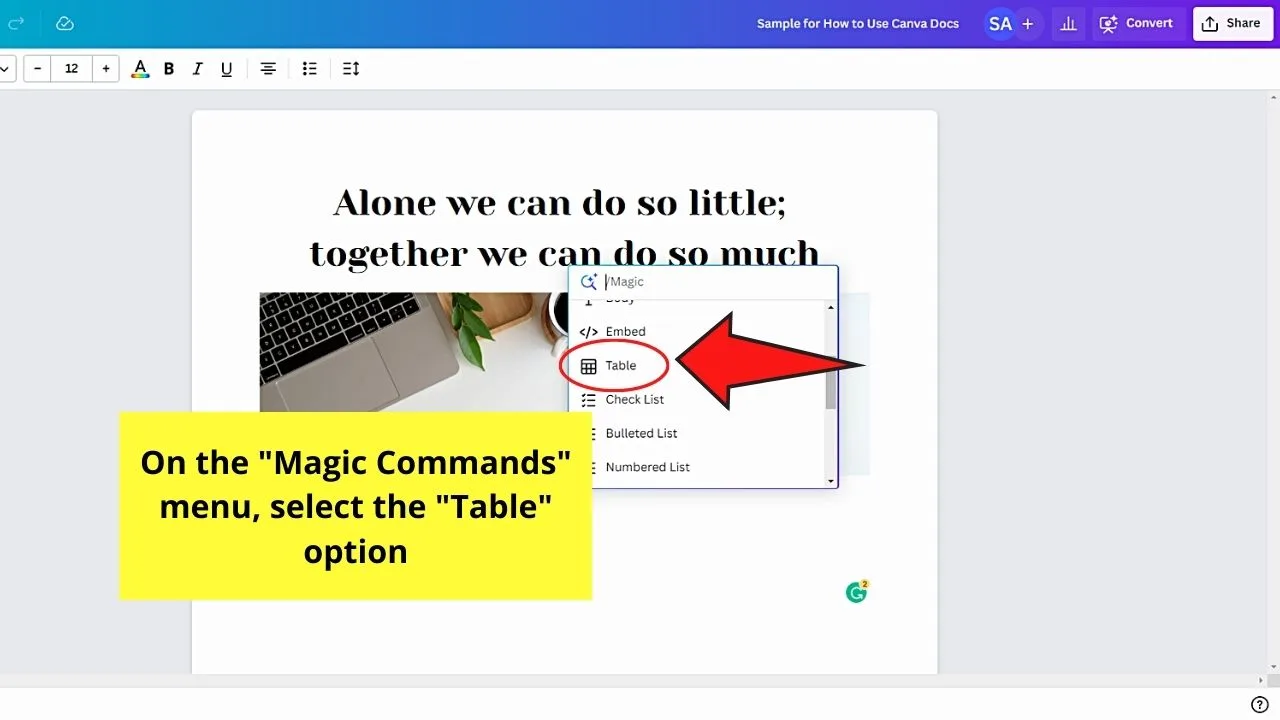
Step 1: Click the “Table” option on the “Magic Menu.”
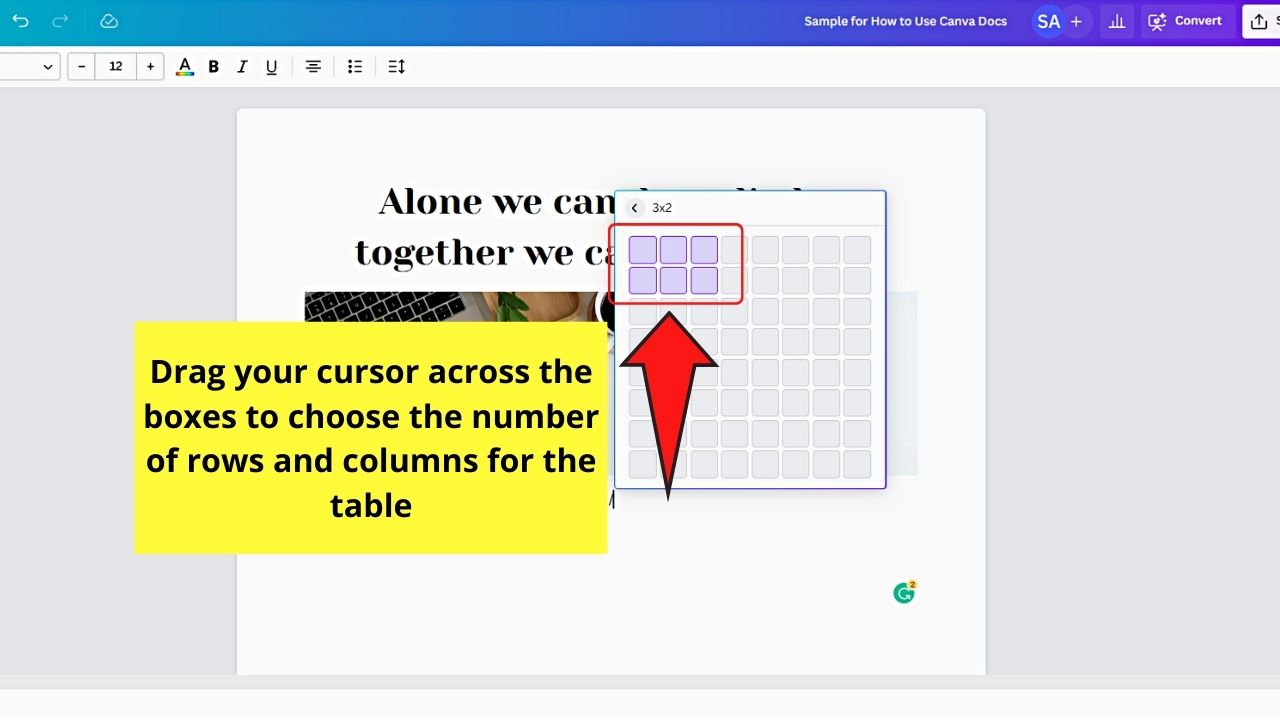
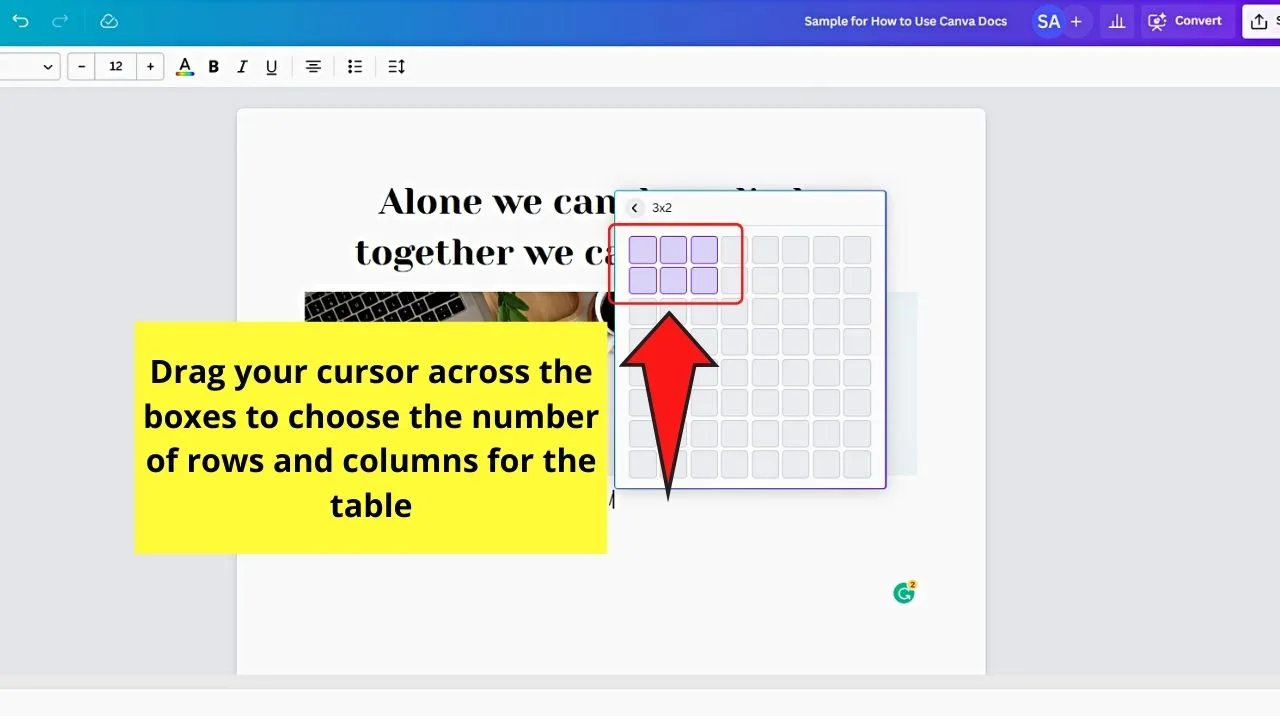
Step 2: Choose how many rows and columns your table will have by highlighting the boxes on the window.
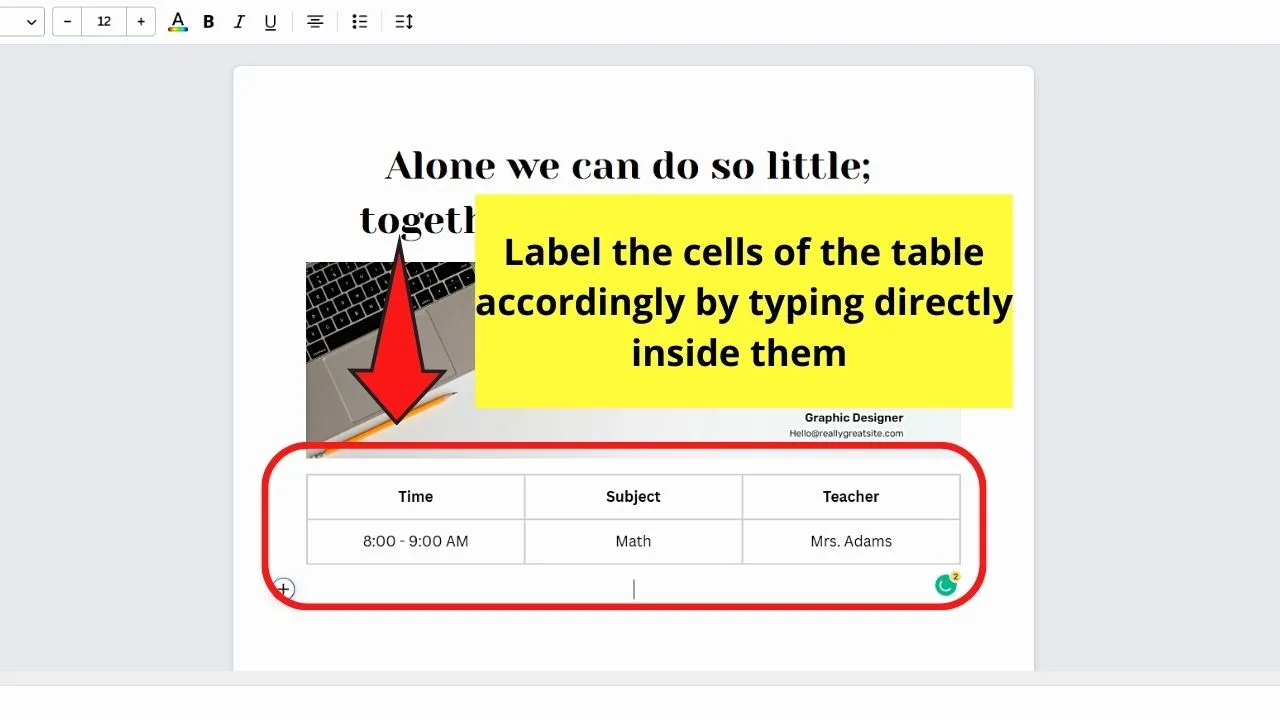
Step 3: Proceed with typing in the entries directly in the cells by clicking on one of the cells and typing the details inside it.
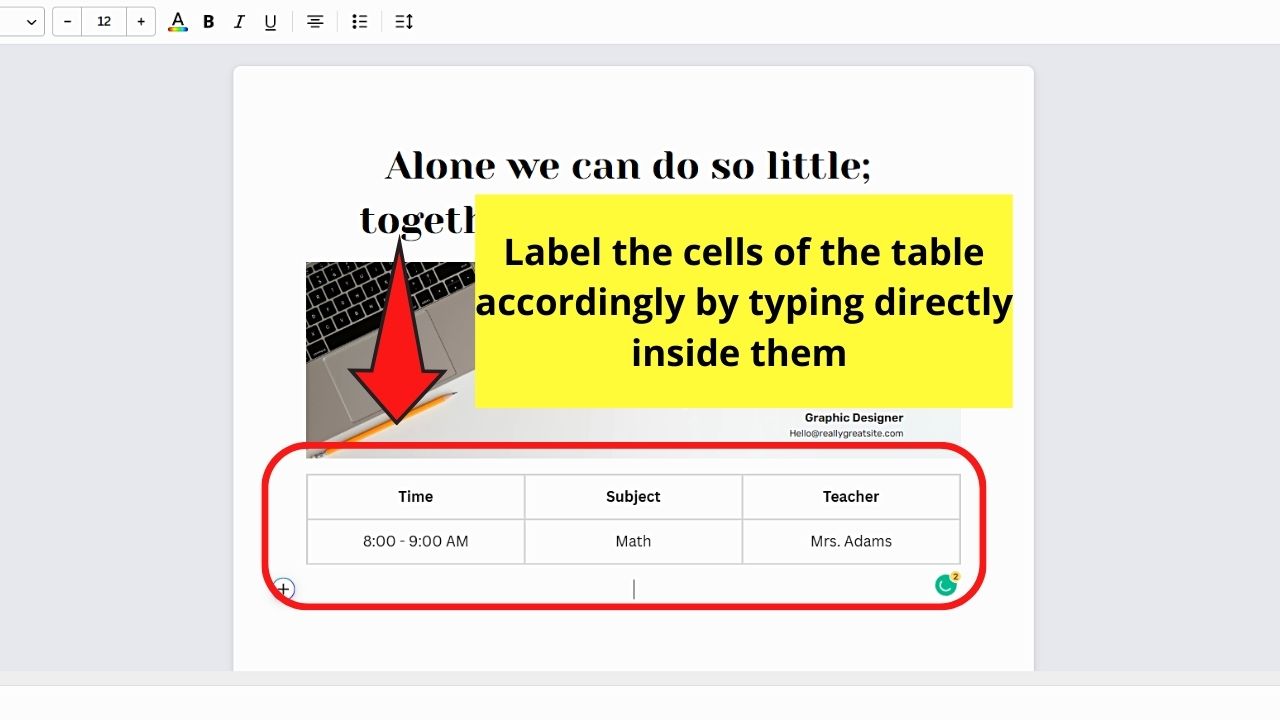
However, if you need to readjust its positioning, it’s currently not possible. Tables in Canva Docs aren’t movable element designs.
Hence, make sure that you only insert them if you’re sure where you want them placed.
Inserting Lists in Canva Docs
In Canva Docs, you’ll find 3 types of list options on the “Magic Commands” menu: “Checklist,” “Bulleted List,” and “Numbered List.”
Regardless, the process of adding these type of lists are the same.
Step 1: On the “Magic Commands” menu, click the list type you’ll add.

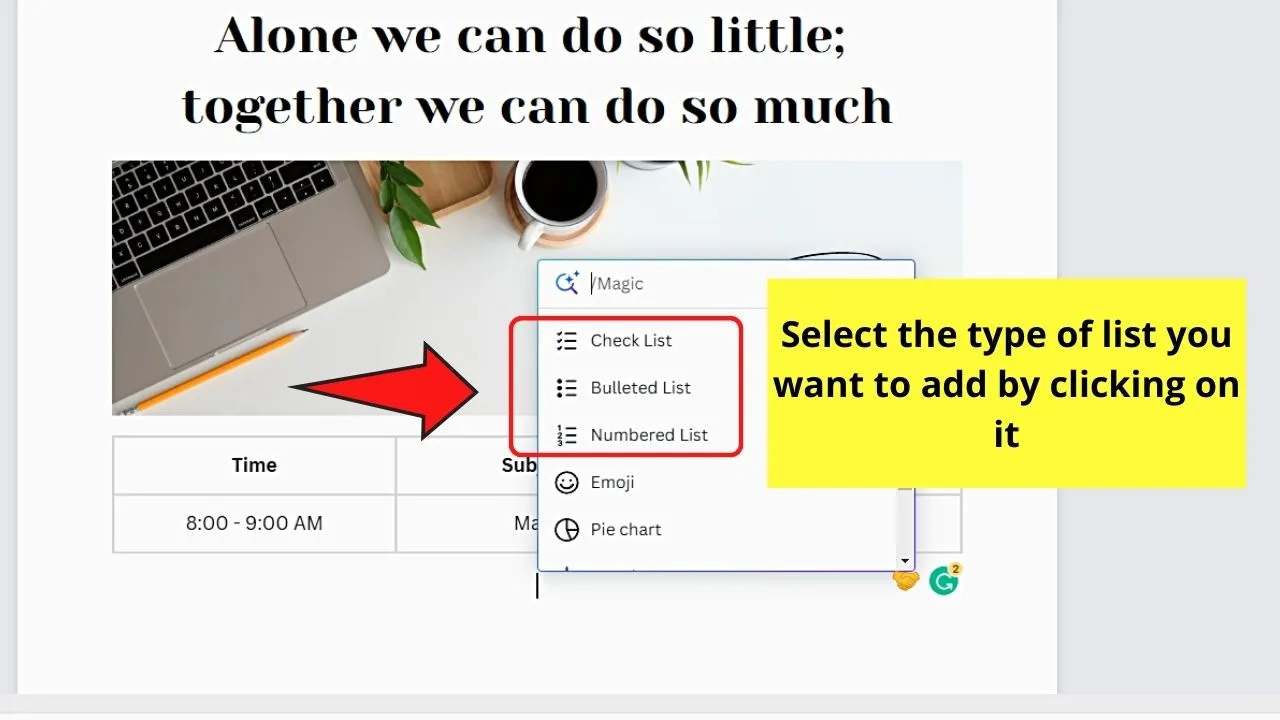
If you selected “Checklist,” a checkbox will appear. If you clicked “Bulleted List,” a round bullet appears. If you selected the “Numbered List,” number 1 will appear.


Step 2: Select “Alignment” on the toolbar to change the checkbox/bullet/number’s alignment on the document.

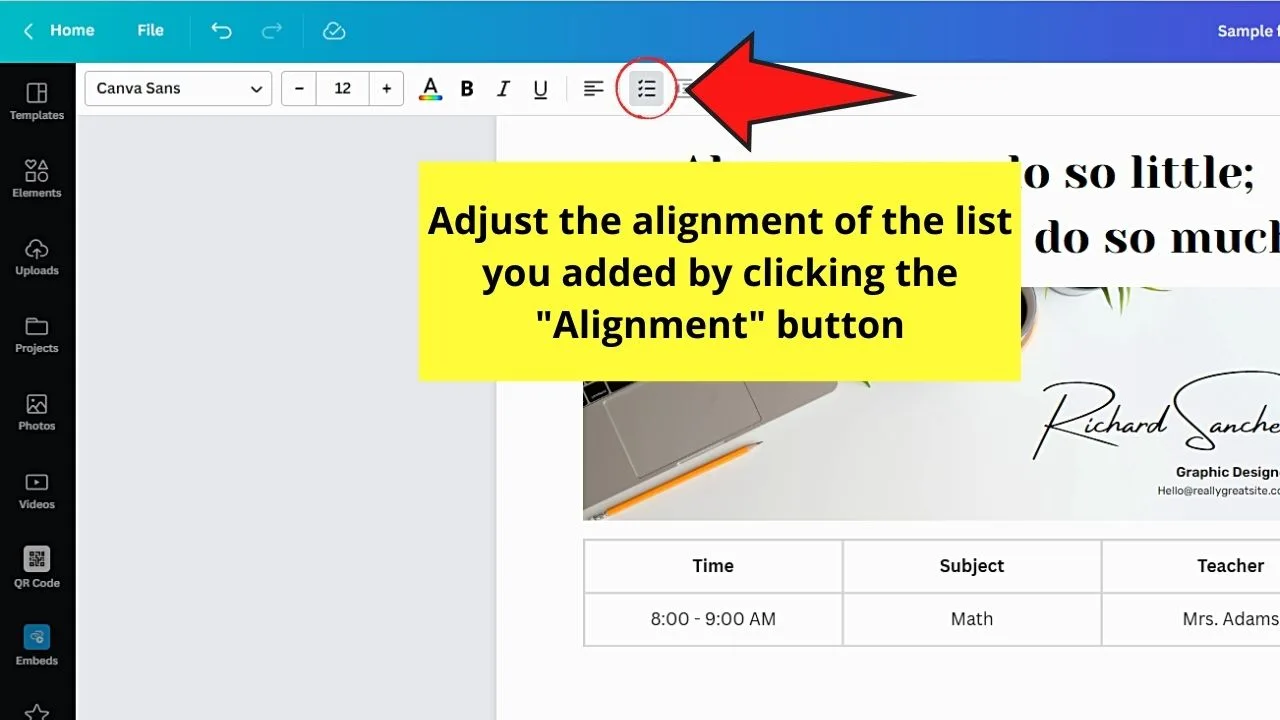
Continue clicking on it until you have the right alignment option.
This is because the alignment used will be the last alignment type you selected for the text you added.
Step 3: Type the entries beside the checkboxes/bullets/numbers after placing them correctly on the document.


Adding Charts in Canva Docs
Charts are visual ways of presenting data that can easily be understood by one’s readers or audience.
There are 3 types of charts you can add in Canva Docs: “Pie Chart,” Bar Chart,” and “Line Chart.”
If you need to add one to your Canva Docs document, follow these steps:
Step 1: On the “Magic Commands” menu, click the chart type you’ll use.

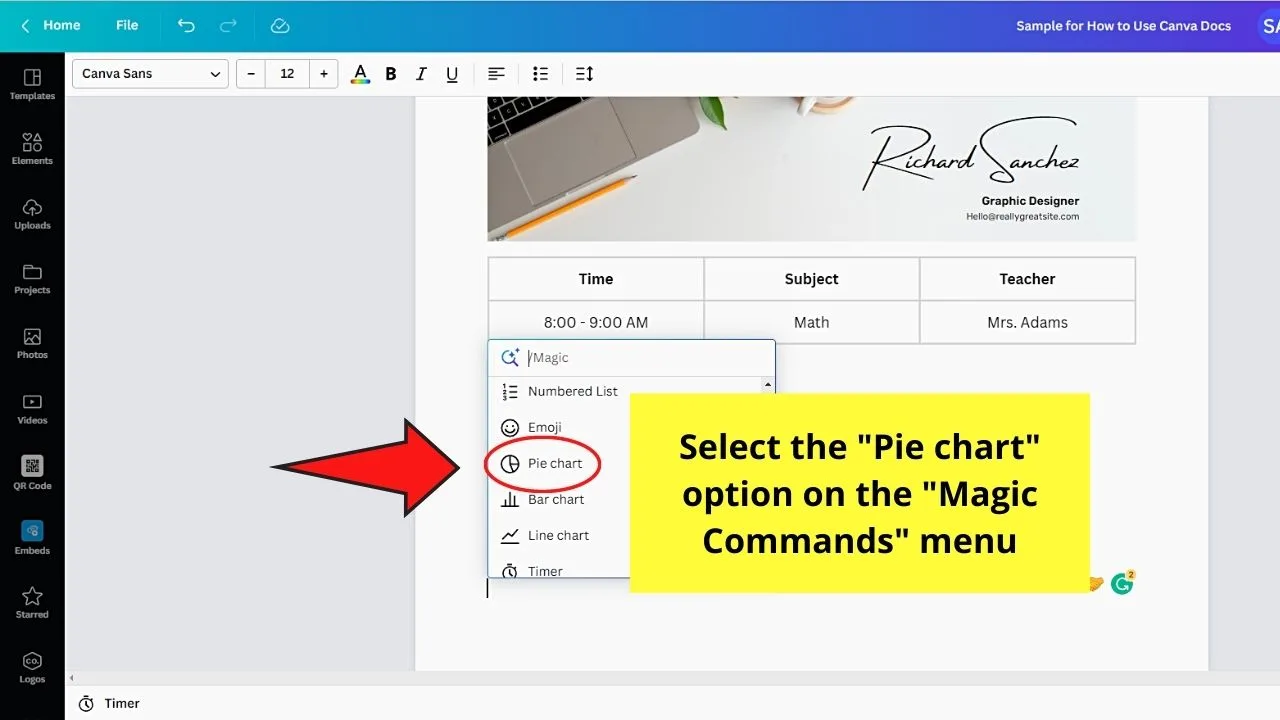
For sample purposes, I’ll select “Pie Chart.”
Step 2: Type inside the boxes or rename the entries inside the boxes of the table appearing on the object panel.
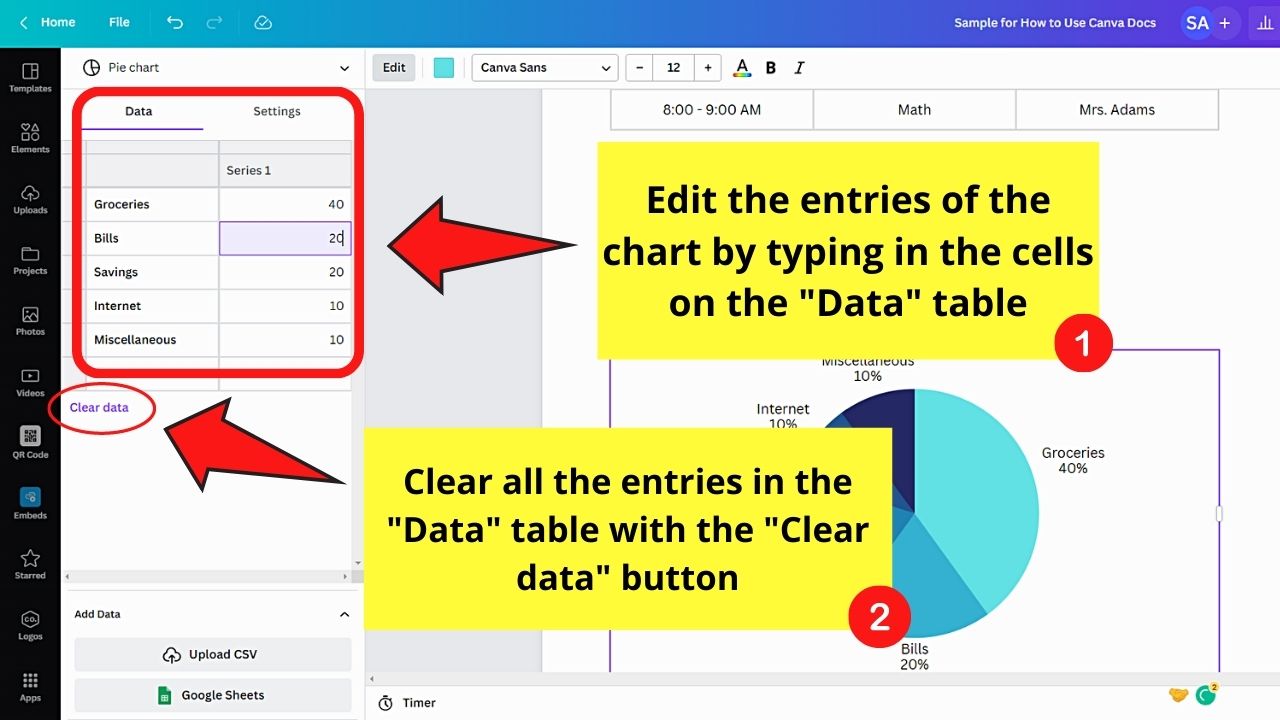

The chart, on the other hand, appears on Canva Docs with a table on its left side. The said table is where you’ll edit the values that will appear on the pie chart.
Simply type inside the boxes or rename the entries inside the boxes. You can also clear out all the data in one go by selecting the “Clear data” button below the editable table.
Step 3: Click on a cell below the last one you edited to add new cells to the table.
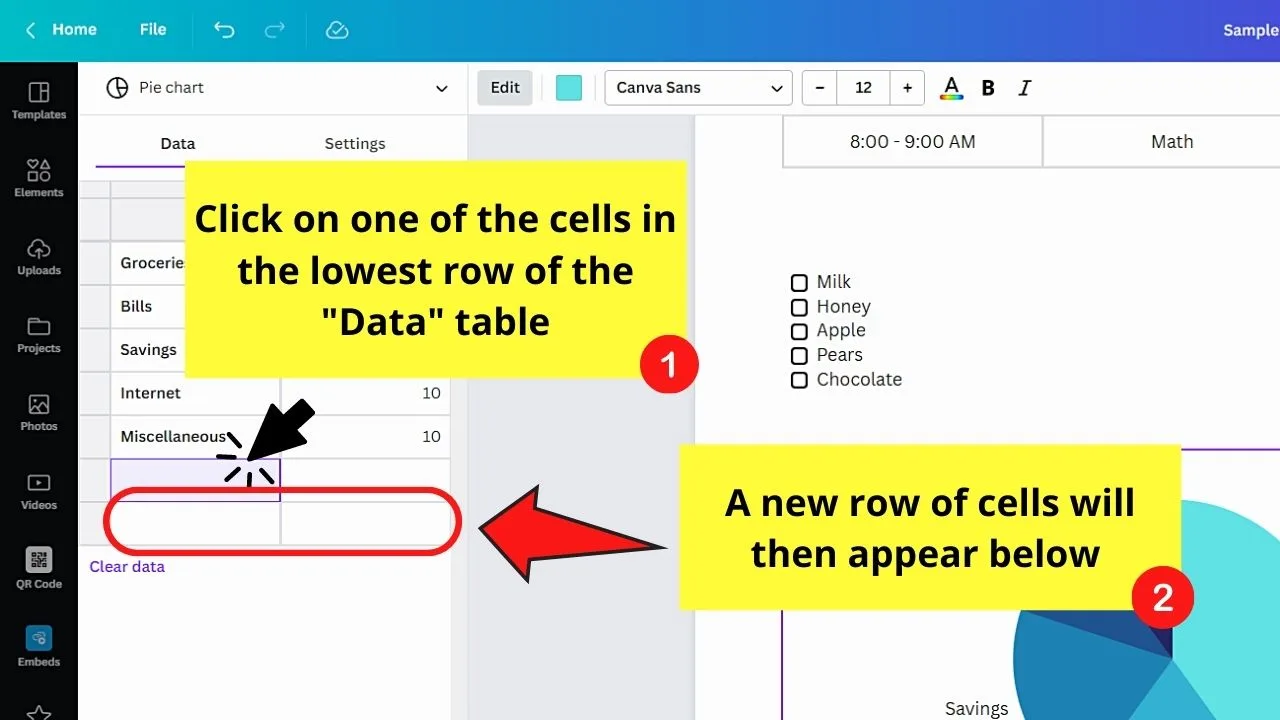
A new row of cells will then appear below the ones you clicked.
Step 4: Click on either the “Upload CSV” or “Google Sheets” button to update the tables’ data.

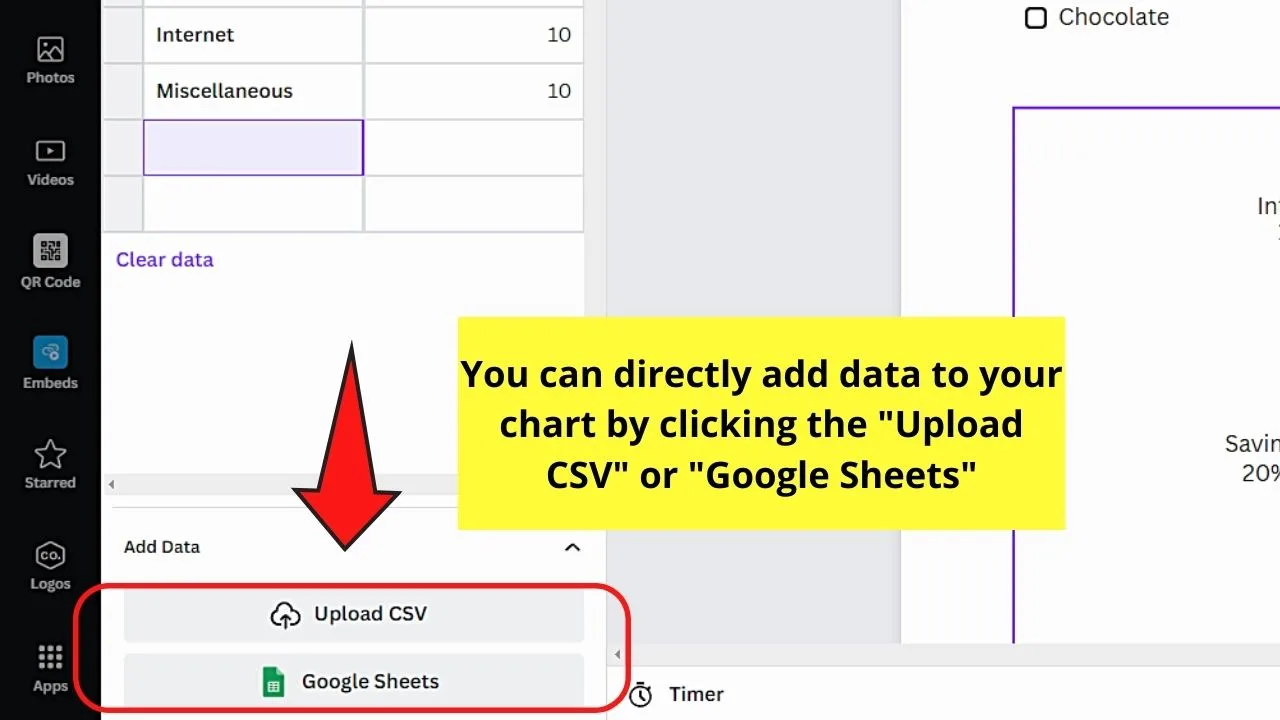
This step is applicable if you already have a table made on Google Sheets or a CSV file as you can upload them directly to Canva.
Automatically, new data from the tables of those files will be extracted and uploaded to the tables for the chart you’re making.
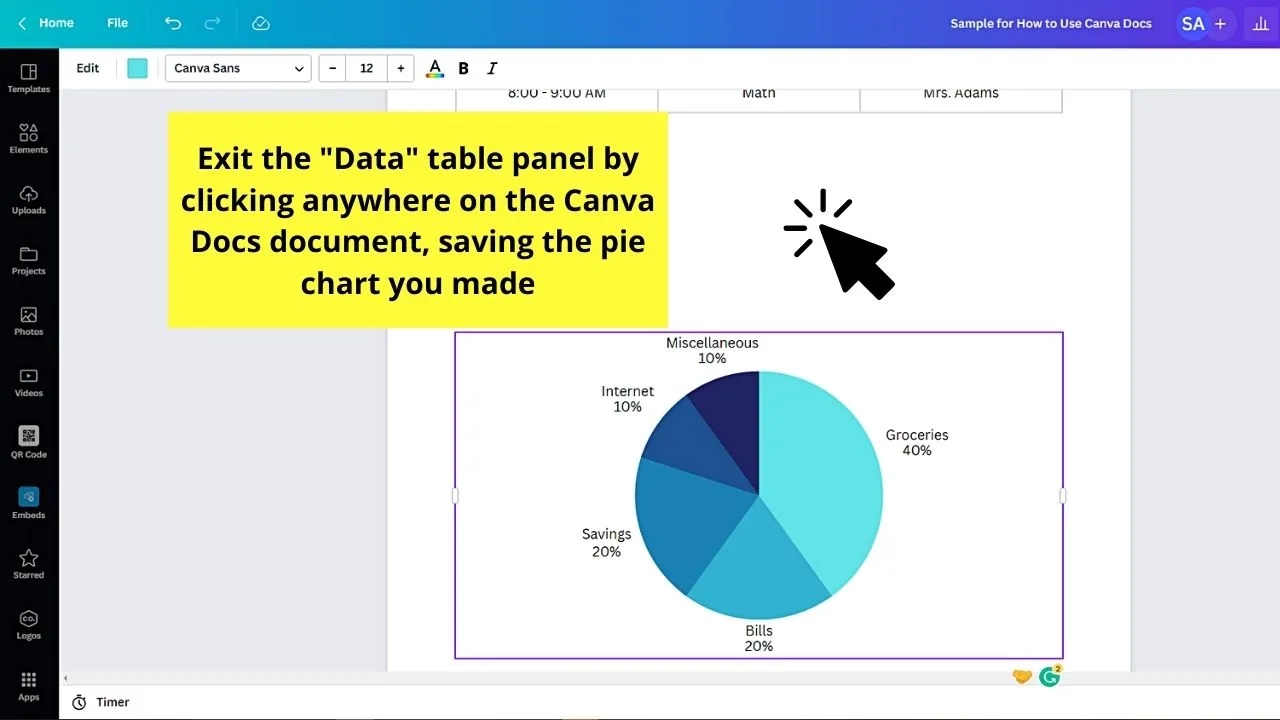
Step 5: Click anywhere on the Canva Docs document to exit the table panel after editing the chart’s entries.

Inserting Graphics in Canva Docs
Step 1: Type the keyword of the graphics you’re searching for in the search bar before tapping “Enter.”
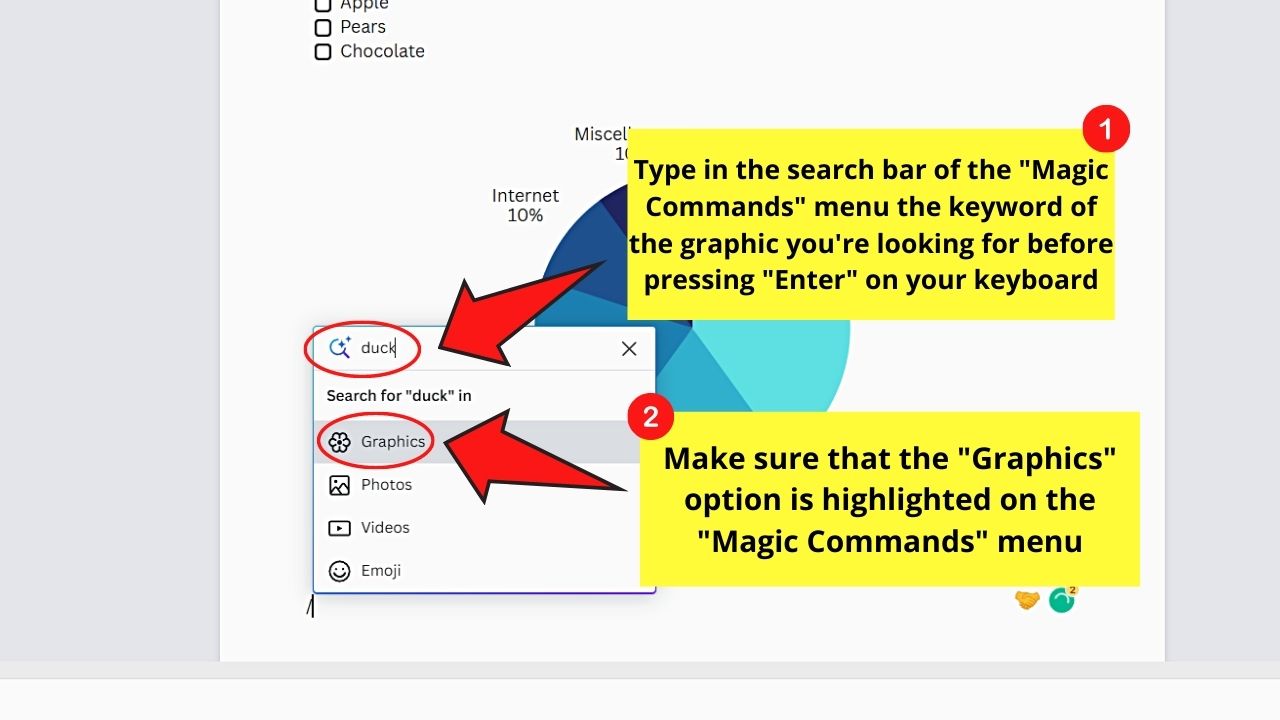

Make sure though that the “Graphics” option is highlighted on the “Magic Commands” menu.
Step 2: Click the graphic you’d like to use from the list that appears related to the keyword.
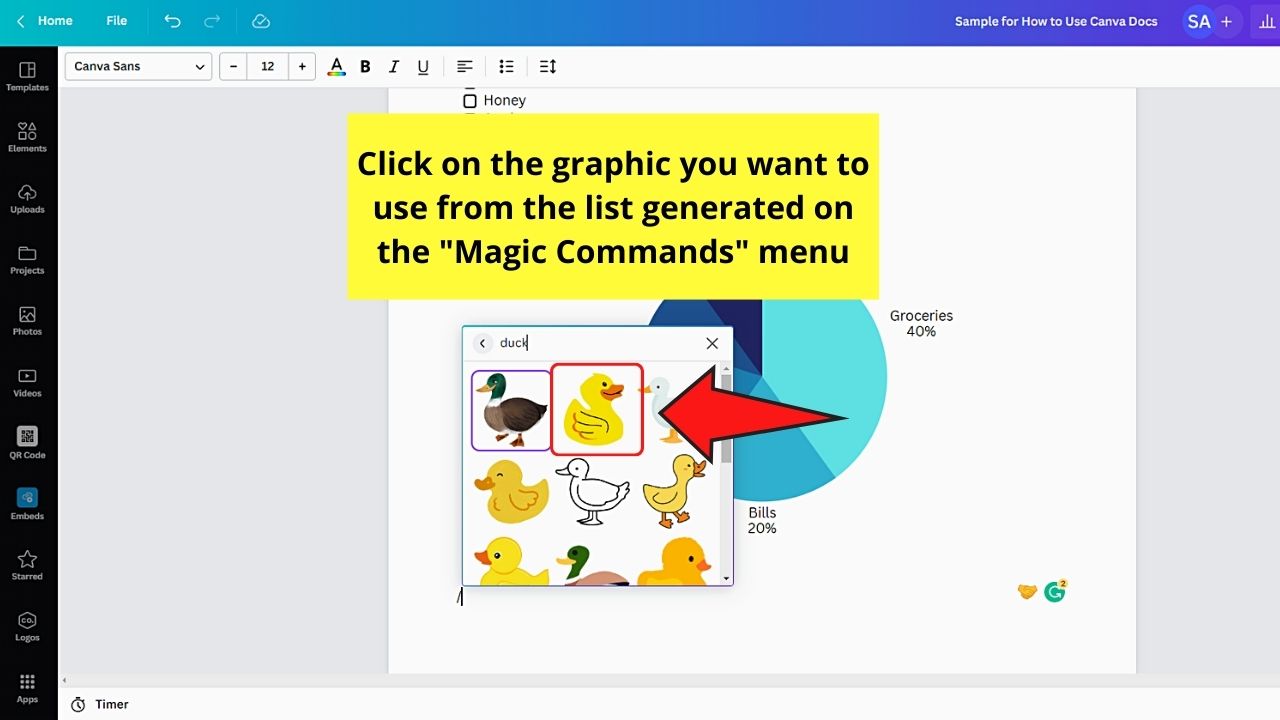

It will then be directly added to your Canva Docs document.
Step 3: If you need to reposition the graphic you inserted, insert a design instead and click on the “Elements” tab.
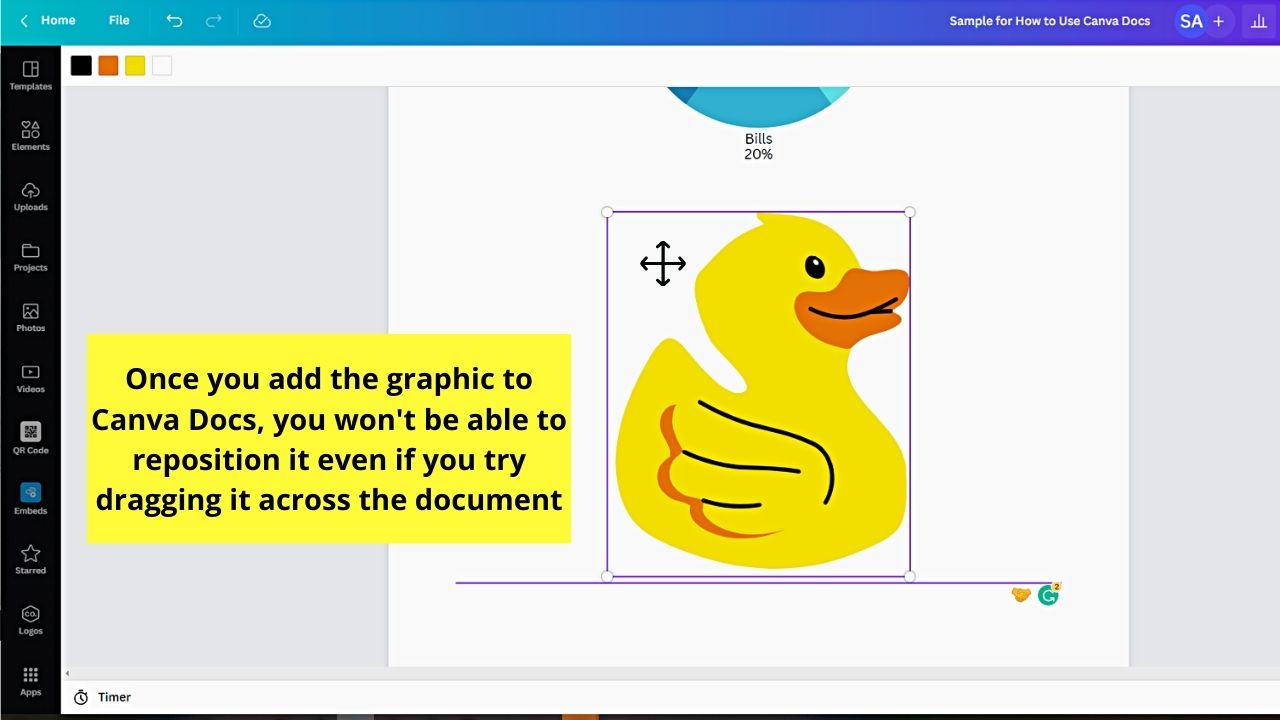

This is because any graphics you added to Canva Docs can’t be repositioned with the usual drag-and-drop process. Just like tables, graphics aren’t movable design elements yet in Canva Docs.
Just follow the steps for inserting a design and ensure that you place the graphic how you want to make it appear on Canva Docs.

Step 4: Click “Save” so the graphic will be inserted into Canva Docs.


This time, the graphic will be positioned in the exact place you put it on the “Design” window.
Inserting Emojis in Canva Docs
Emojis, as defined by Brittanica, are pictographs of symbols, faces, and objects. They’re different from emoticons in that the latter makes use of letters, numbers, and punctuation marks to create images.
So, to insert emojis, these are the steps you should take note of:
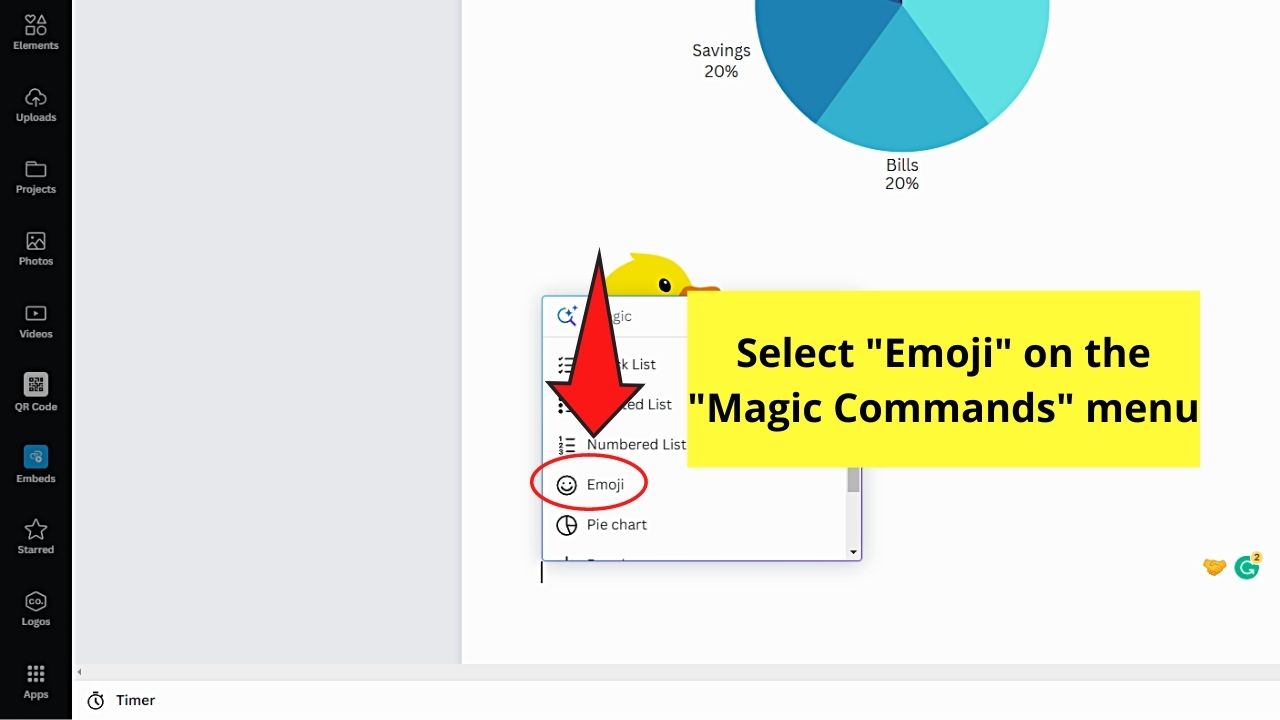
Step 1: After opening the “Magic Commands” menu, scroll down and click “Emoji.”

Step 2: Manually search for the emoji you’ll use by scrolling down the gallery of emojis that appear.

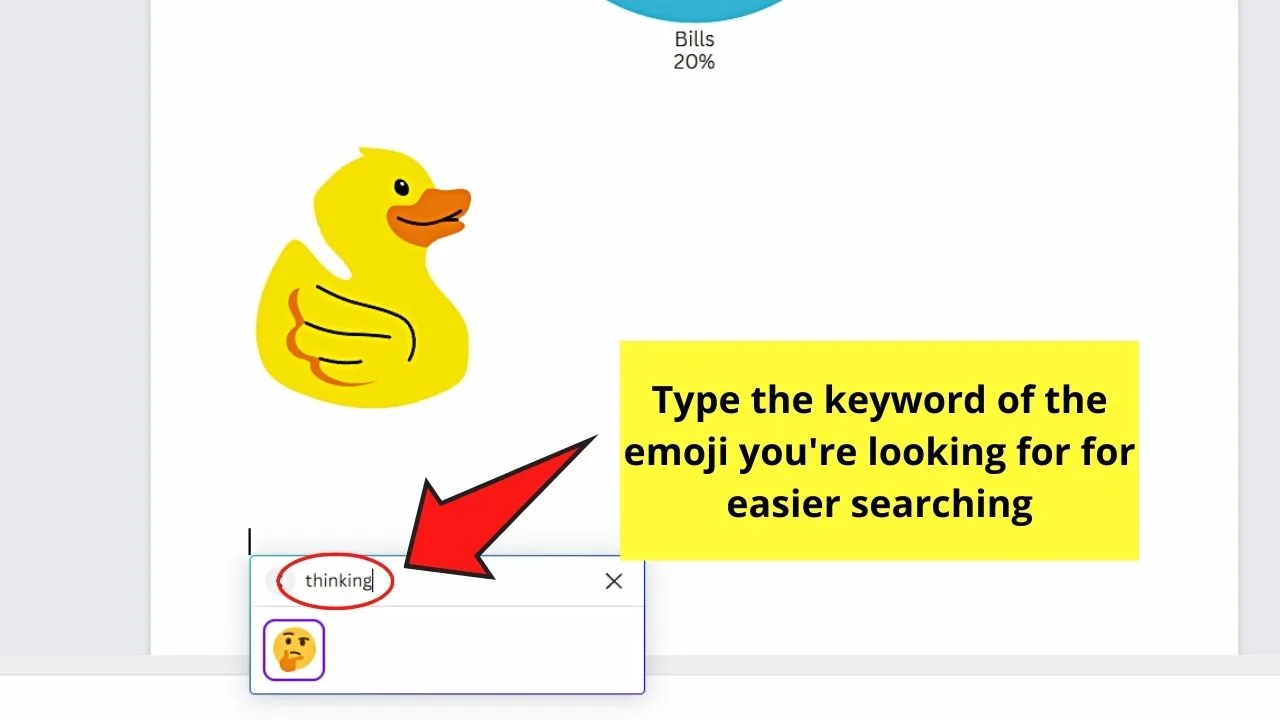
But, for easier searching, type the emoji keyword on the search bar.
Step 3: Click to select the emoji you want to use.
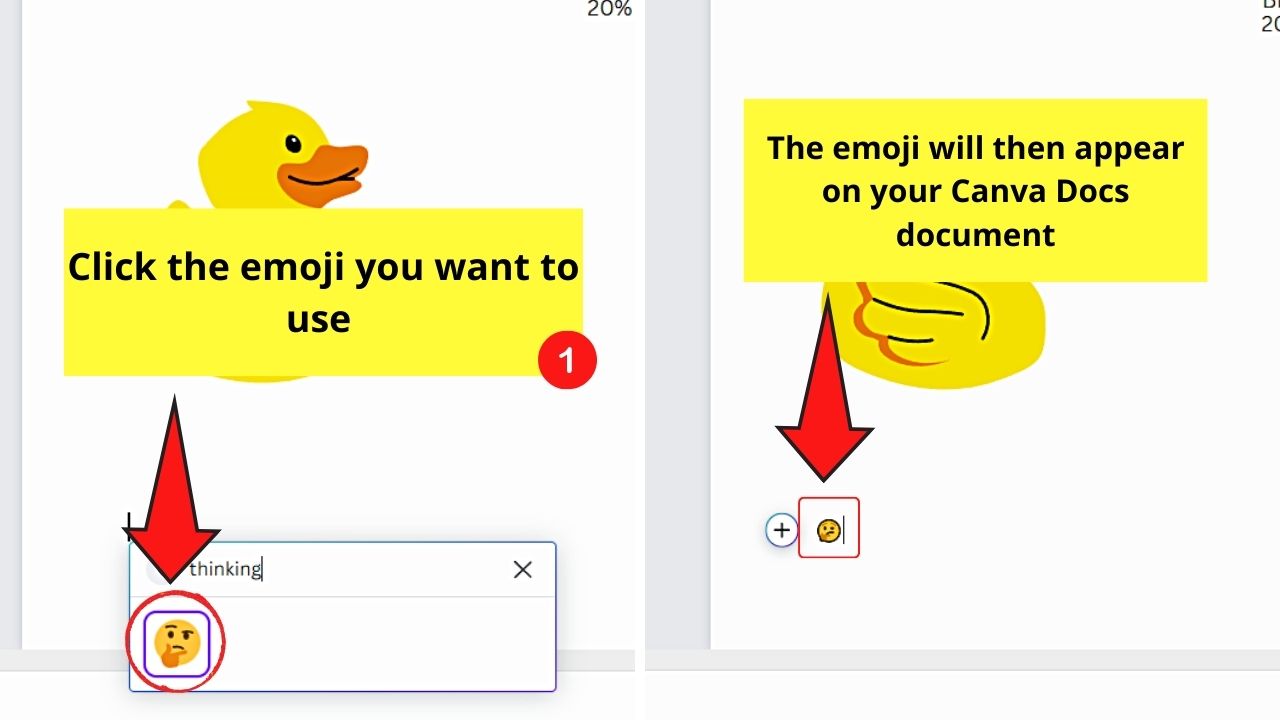
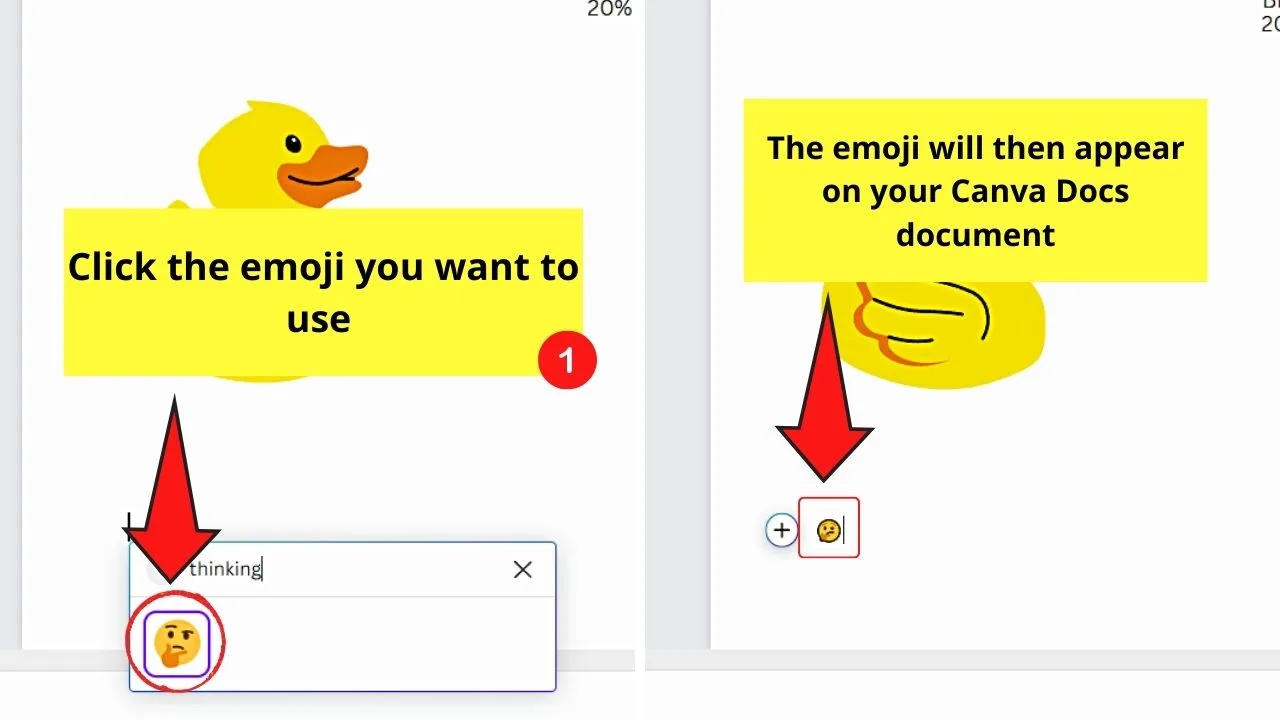
The said emoji will then automatically appear on Canva Docs.
But, like graphics and tables, you cannot move the emojis after inserting them.
Embedding Videos in Canva Docs
Embedding videos in Canva Docs works like how you add YouTube videos to other projects in Canva.
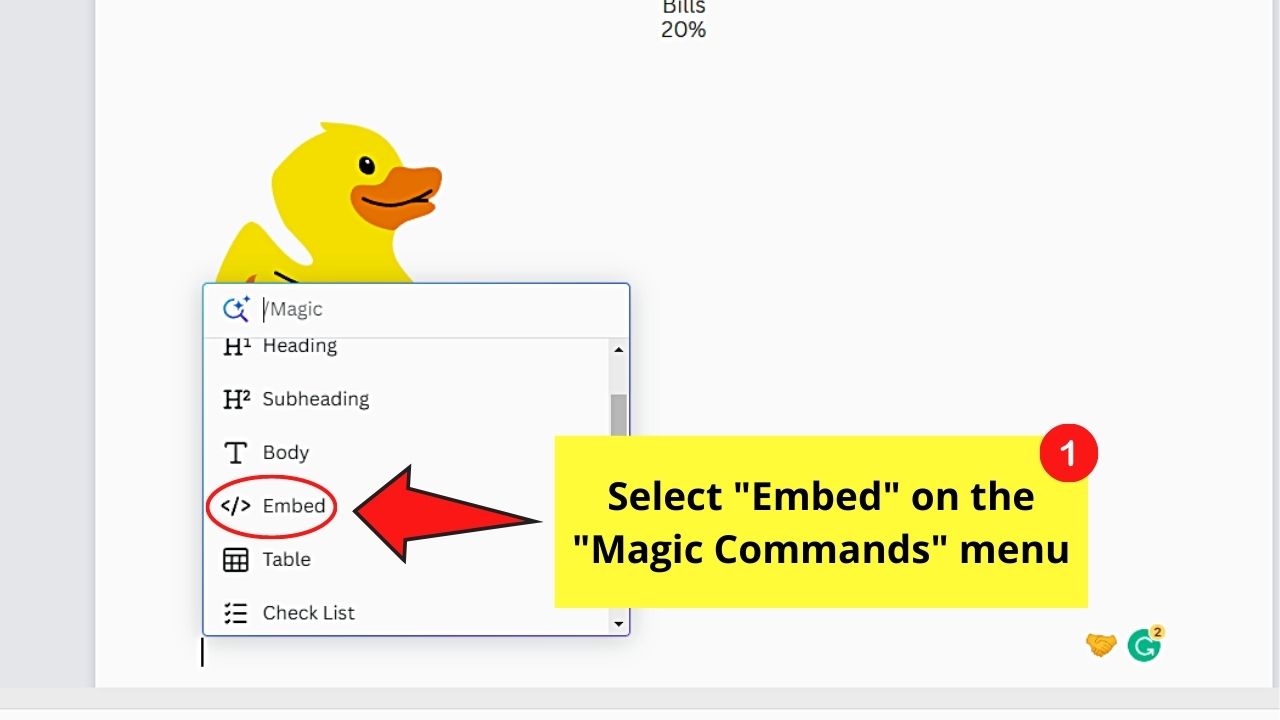
So, after opening the “Magic Commands” menu, here’s what you should do next:
Step 1: Click the “Embed” option on the dropdown menu.

Step 2: Copy and paste the video link on the blank rectangle that appears on Canva Docs.
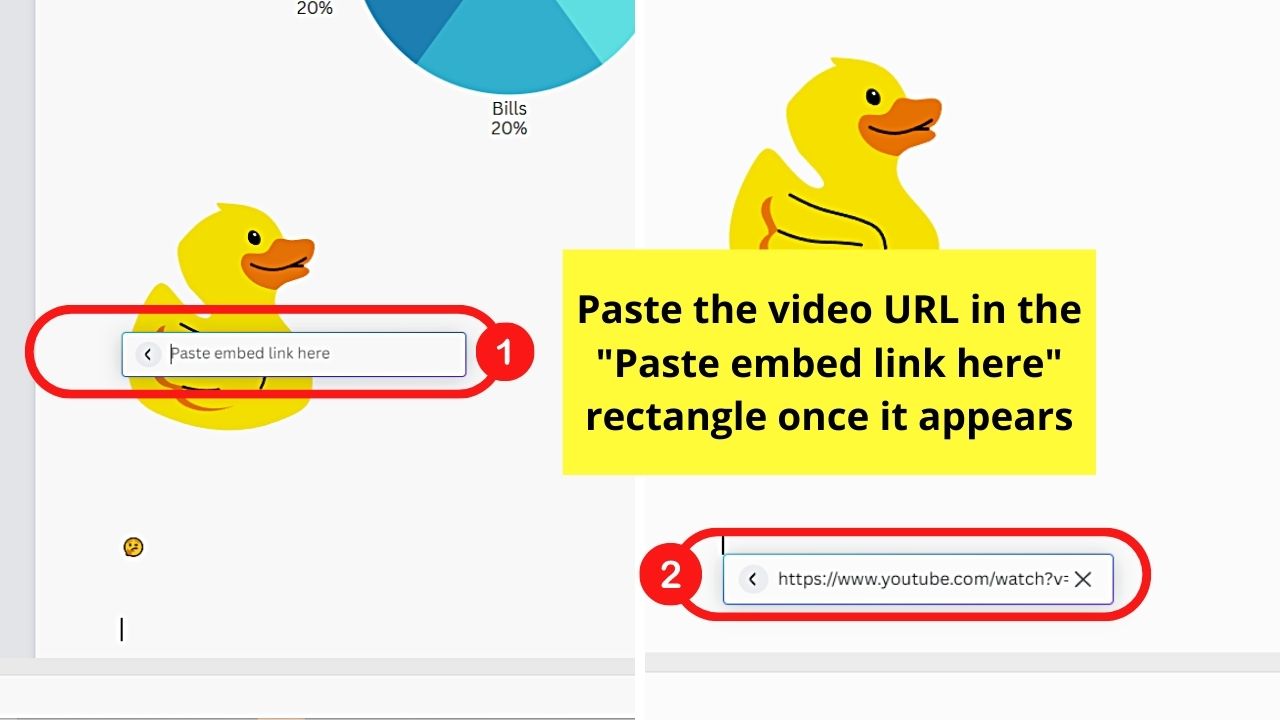

Step 3: Tap “Enter” on the keyboard.


The video’s thumbnail will then appear. Double-click on the said thumbnail to interact with it.
Canva Docs Magic Write Feature
Canva Docs’ Magic Write feature is probably the coolest new feature added here. It’s an AI-based co-author that will help you craft essays, blogs, and outlines for brainstorming purposes.
Here’s how you can use this nifty Canva Docs feature:
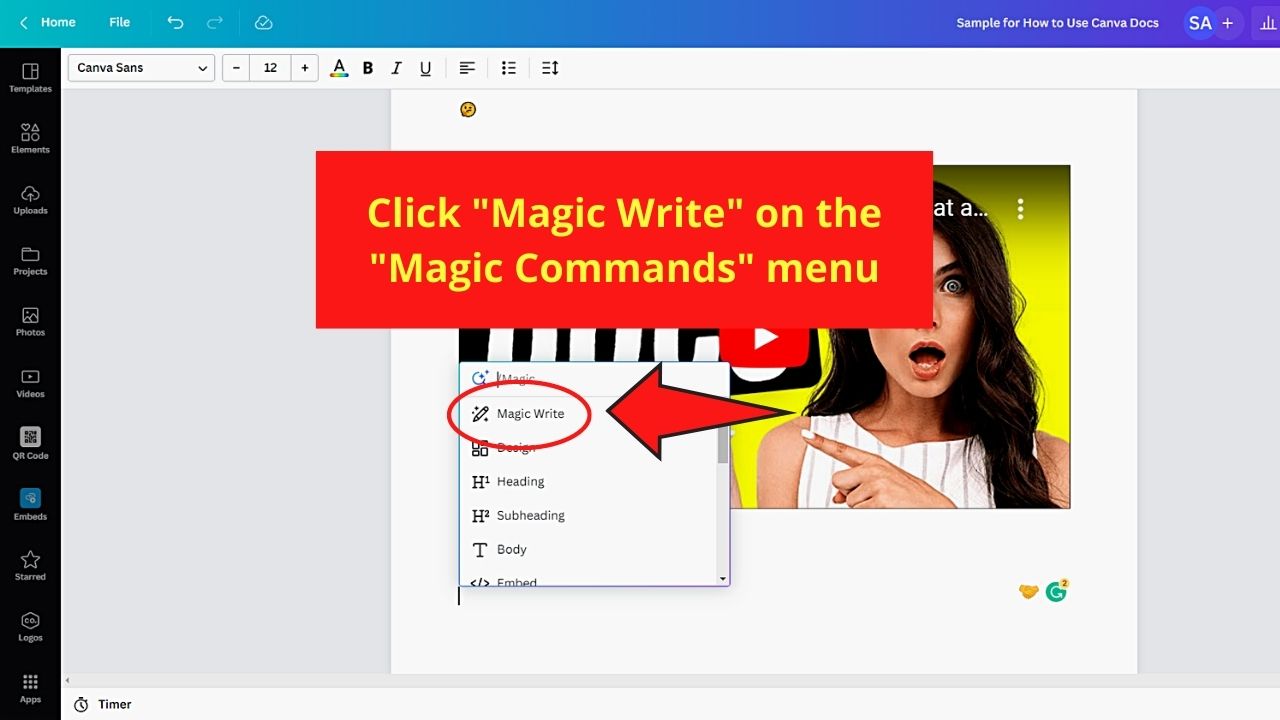
Step 1: Click “Magic Write” on the dropdown menu after opening the “Magic Commands” menu.

Step 2: Type in the blank space the keywords for your content.


A title will also do for this step.
Step 3: Tap “Enter” on the keyboard.
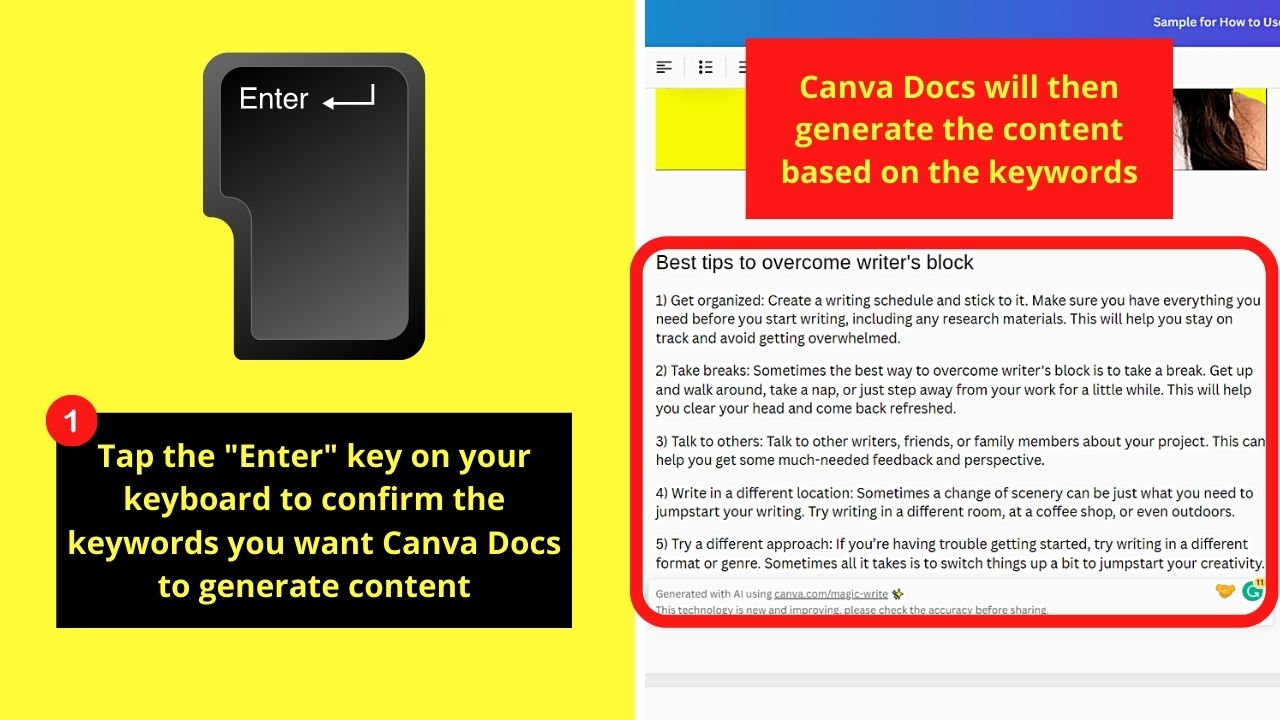
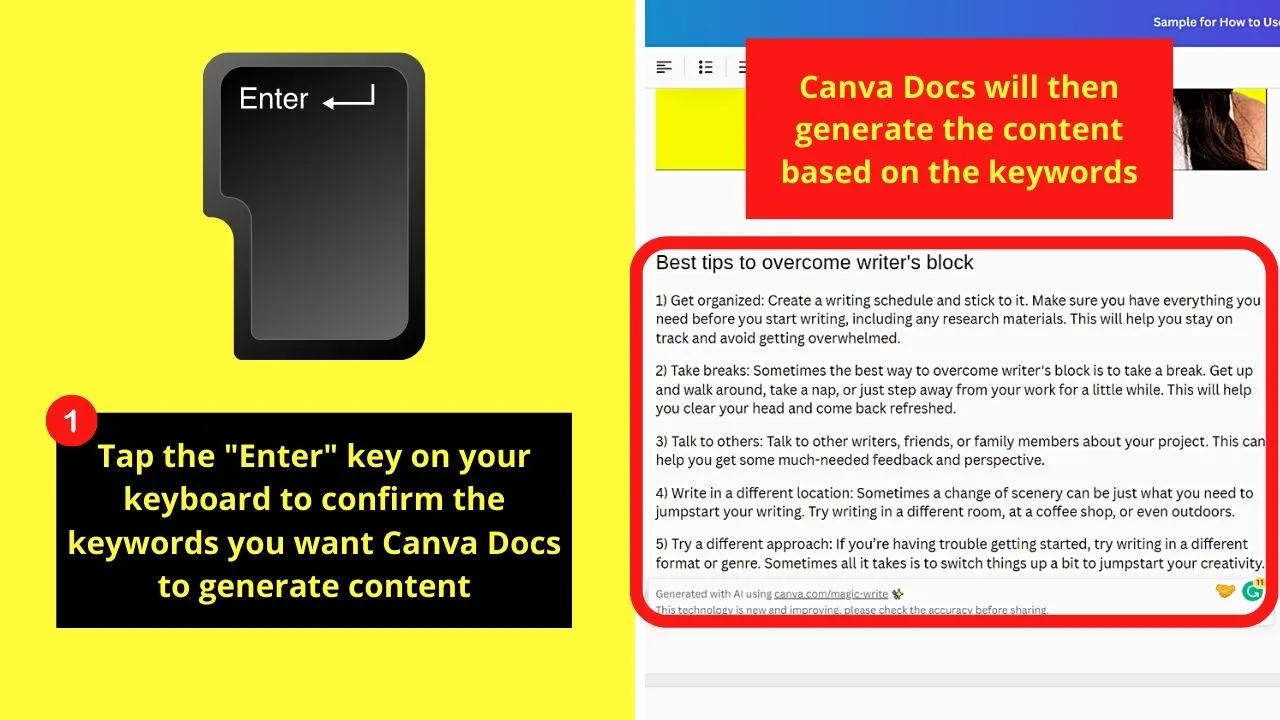
From there, Canva will generate the content based on the keywords inputted earlier.
After a few seconds, “Magic Write” will generate for you its suggested content based on the keywords you added.
You can then proceed to edit and expound on what Canva’s “Magic Write” feature has added.
Adding Videos and Photos to Canva Docs
Adding videos and photos in Canva Docs works in the same way as Canva’s regular workflow.
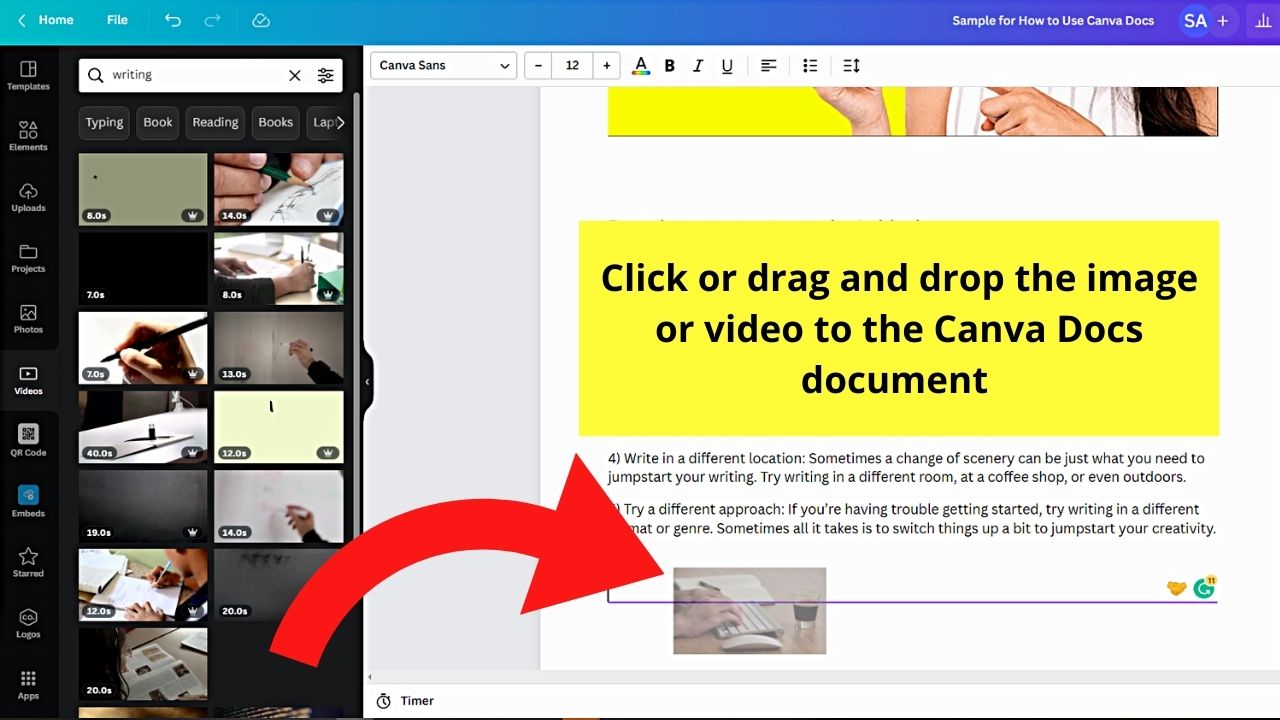
Step 1: Go to the left-side panel of the editor page and click the “Photos” and “Videos” tabs.


Step 2: After selecting an image or footage from the gallery, drag and drop them onto the canvas.

Step 3: Proceed with editing the photo or video you added.

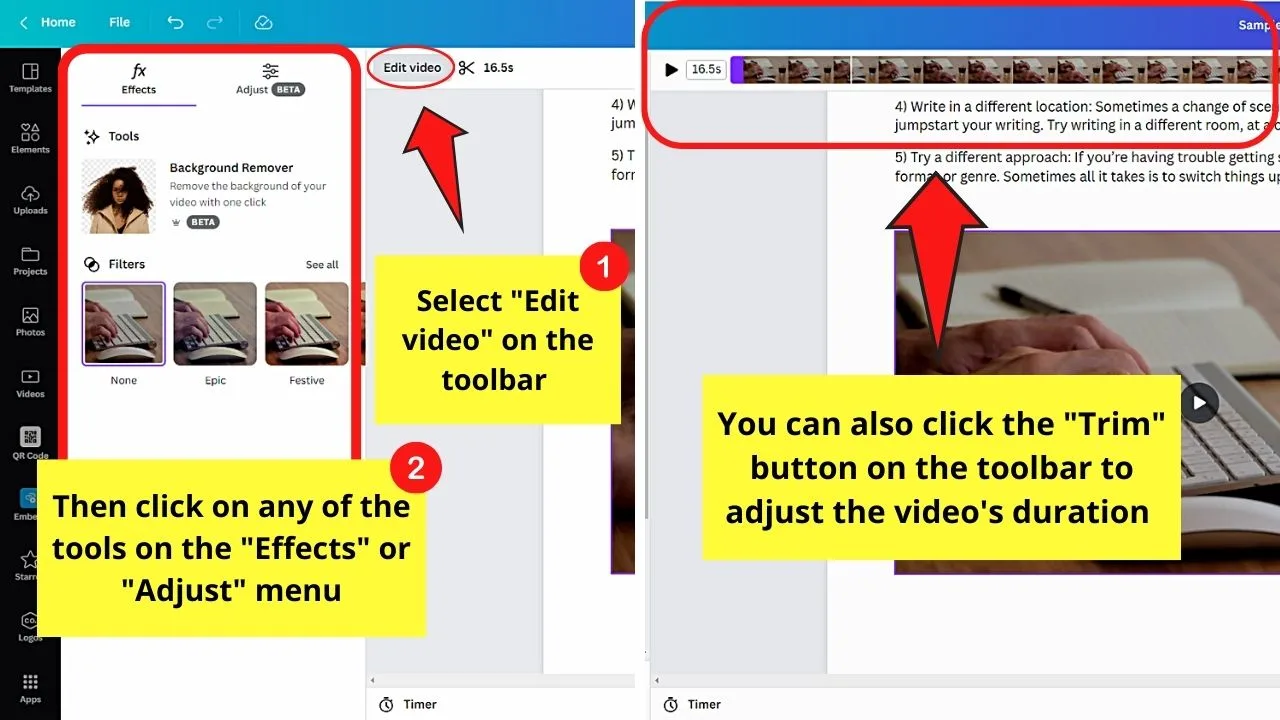
You’ll still have access to the photo and video editing features that Canva has.
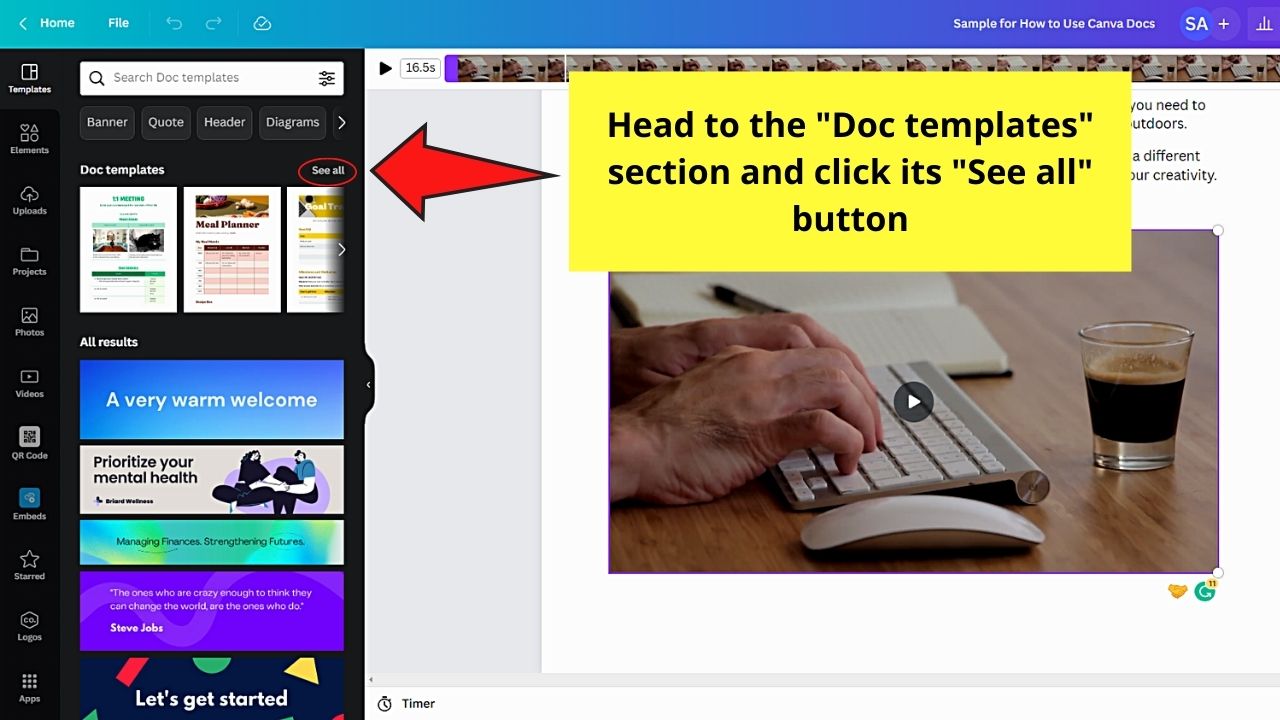
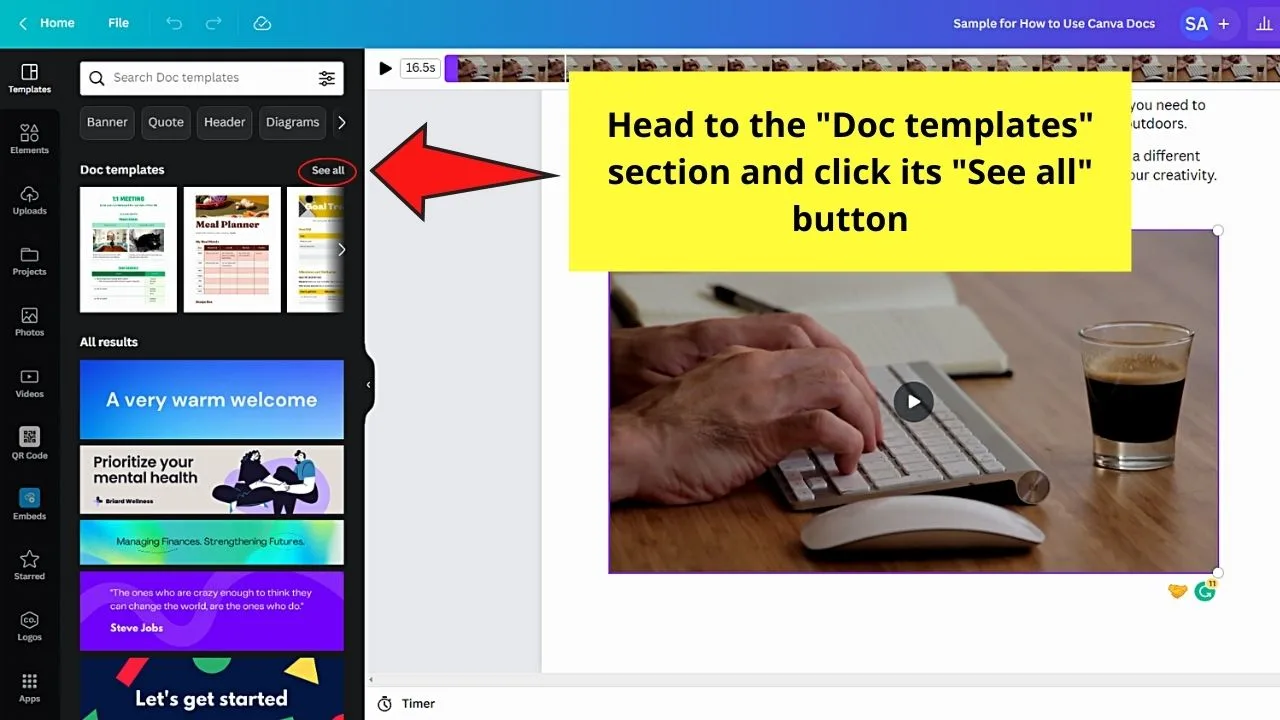
Templates on Canva Docs
Step 1: Go to the left-side panel and click “Templates.”


This will allow you to create a Canva Docs document if you don’t want to make it from scratch.
Step 2: Click the “See all” button of the “Doc Templates” section to access the various Canva Docs templates you can use.
Currently, there are only about 30 available, but wait for the Canva team to update it.
Step 3: Once you find a particular template, click its thumbnail and select “Replace” (if you started working on a design from scratch).

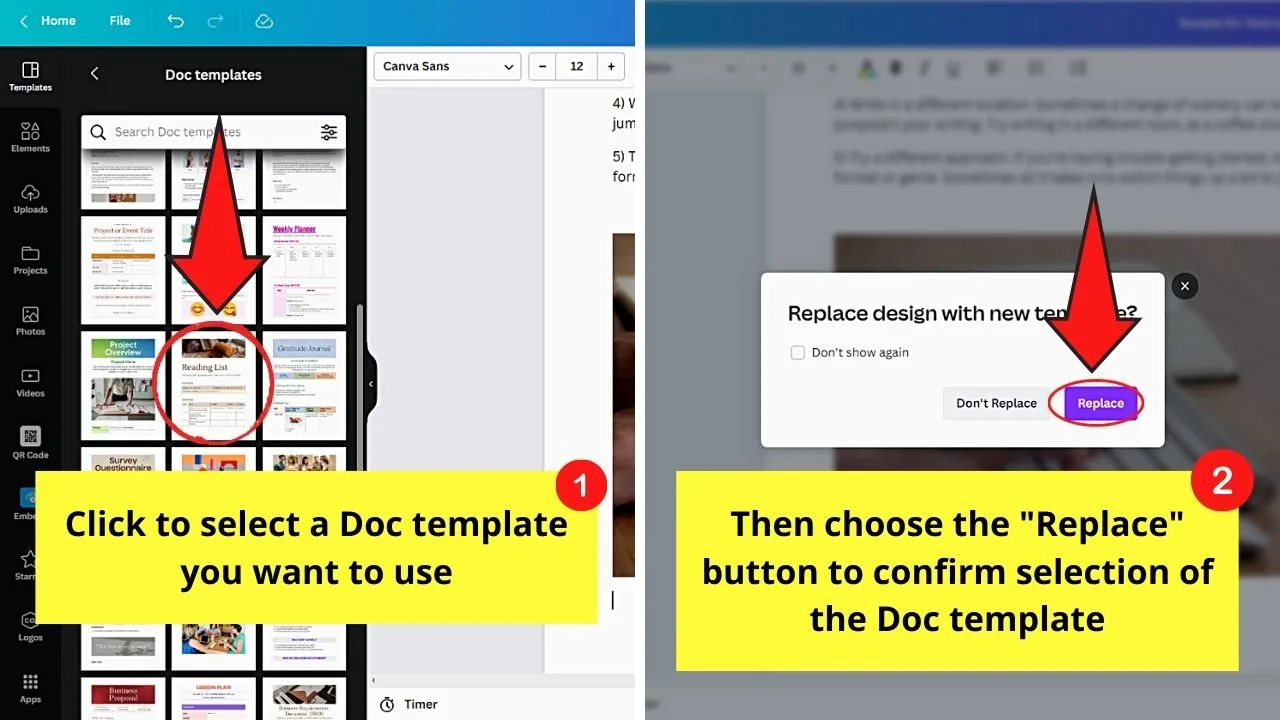
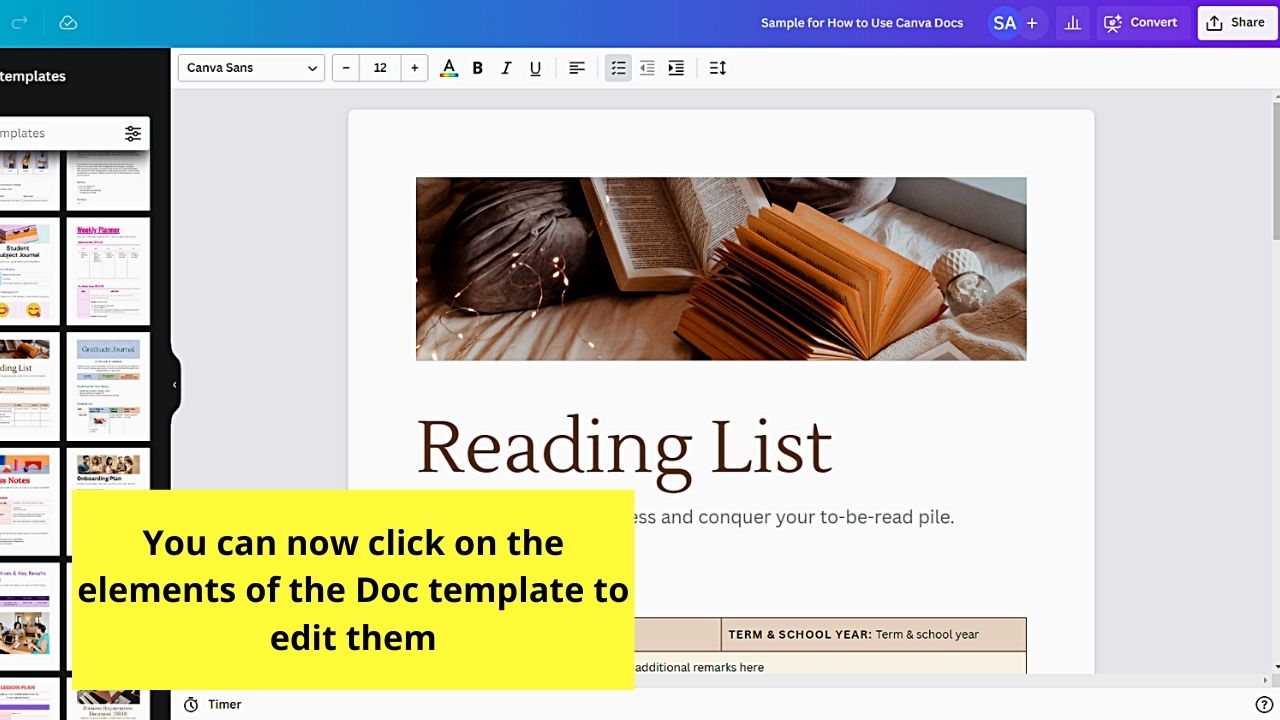
Step 4: Edit the template accordingly.

Downloading and Sharing Documents in Canva Docs
Like Google Docs, you can share a document you made in Canva with your team members to work on your project in real-time.
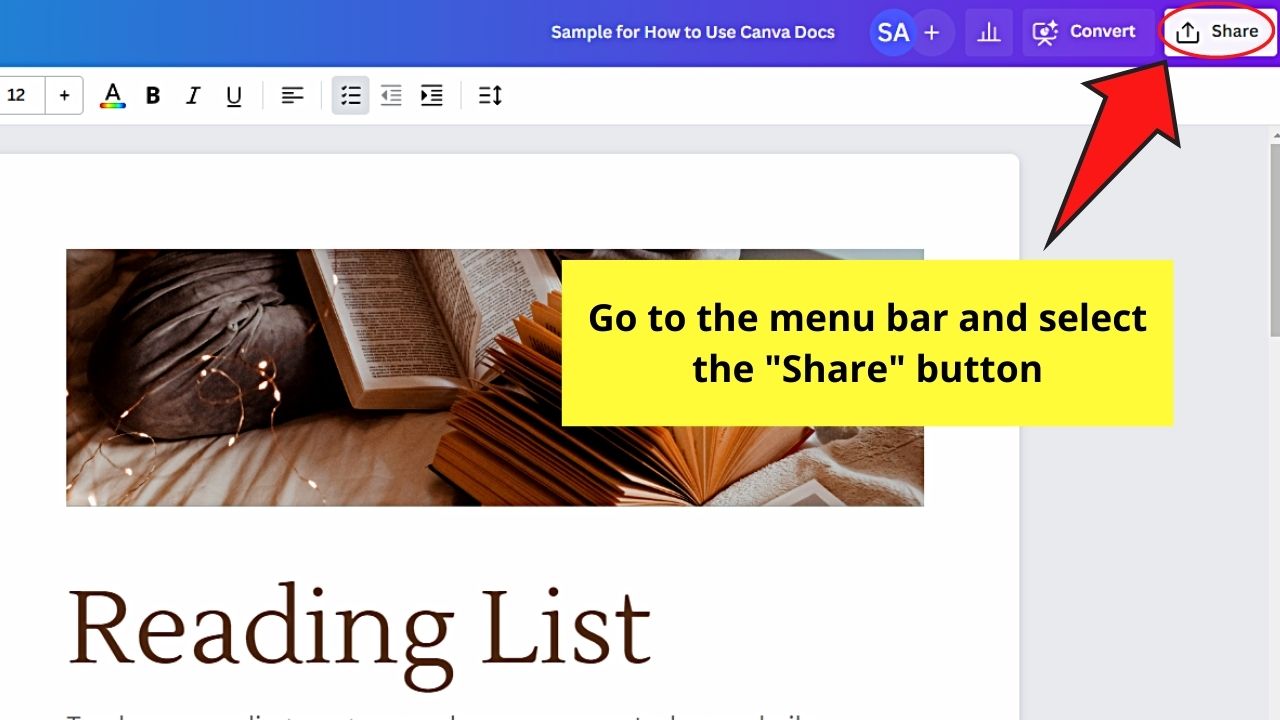
Step 1: Click “Share” on the menu bar once you’re done working on your Canva Docs document.

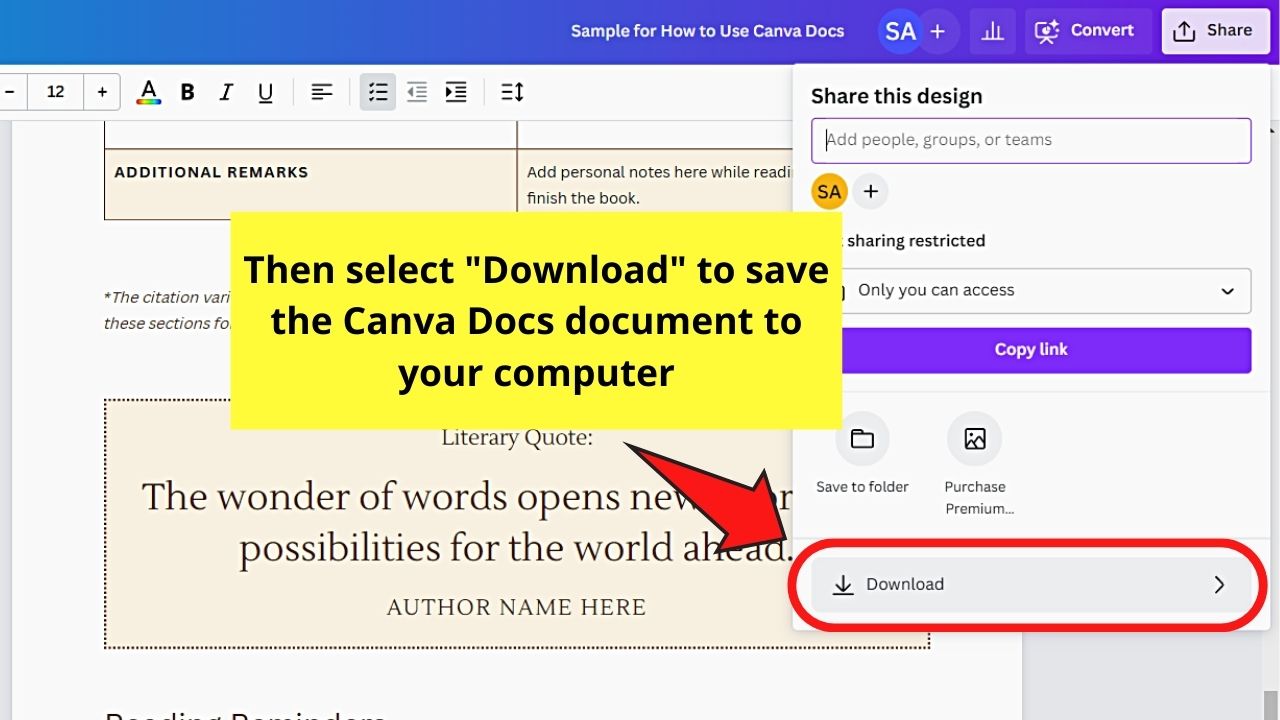
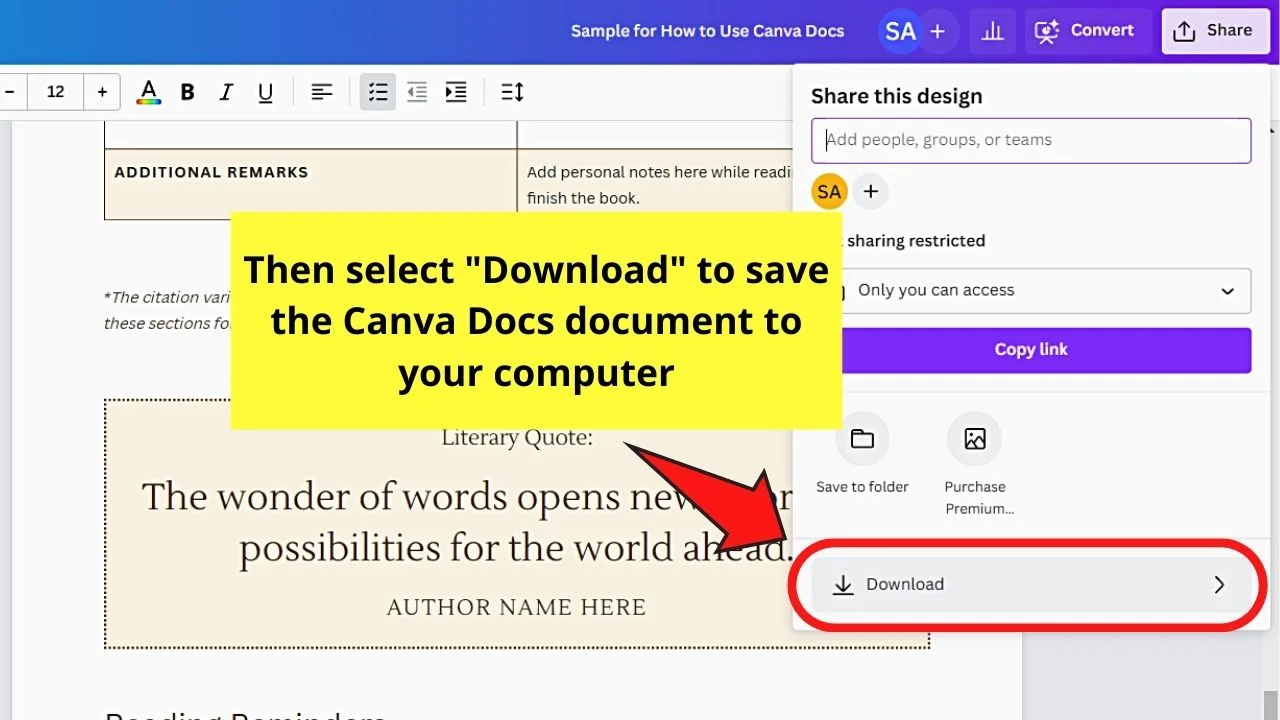
Step 2: Select the “Download” button on the dropdown menu to save the document.
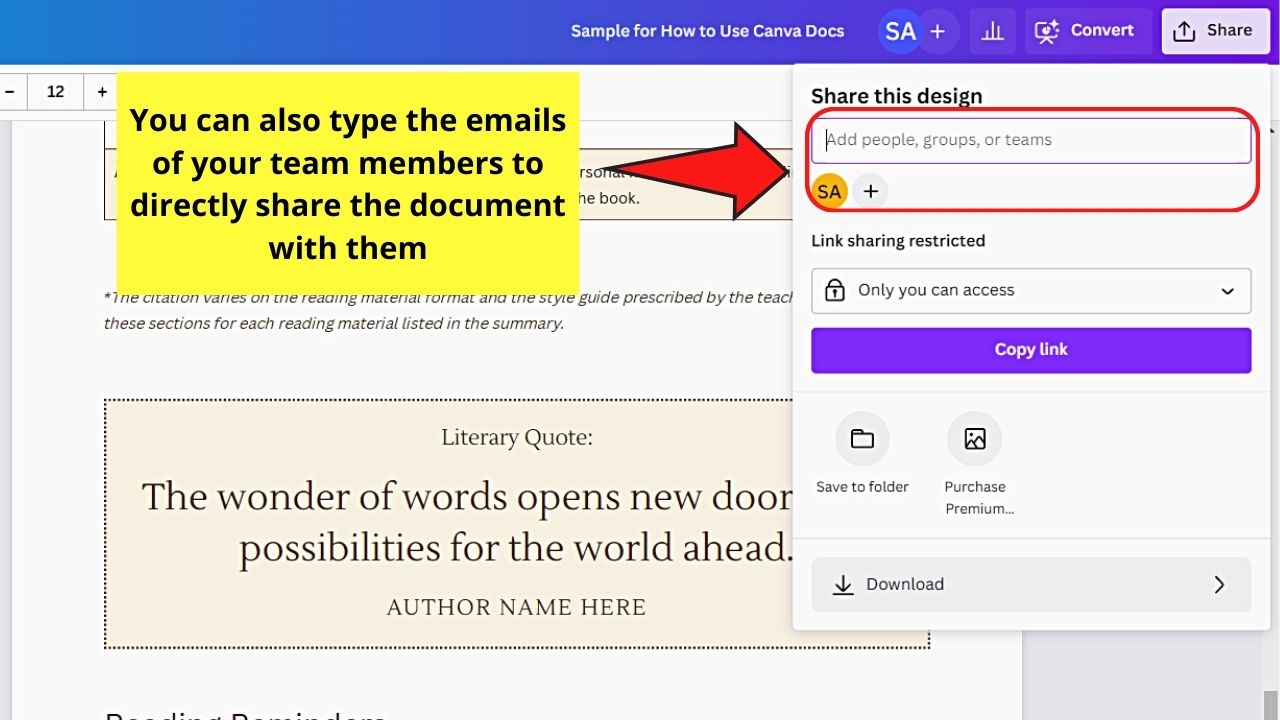
Step 3: Type the emails of the persons in the blank box under the “Share this design” section to collaborate with your Canva team on this document.

You can also just copy the link for the document and send it to your teammates via email or another messaging app.
Step 4: Change the viewing restrictions for the said link by clicking the “v” button under the “Link sharing restricted” section.
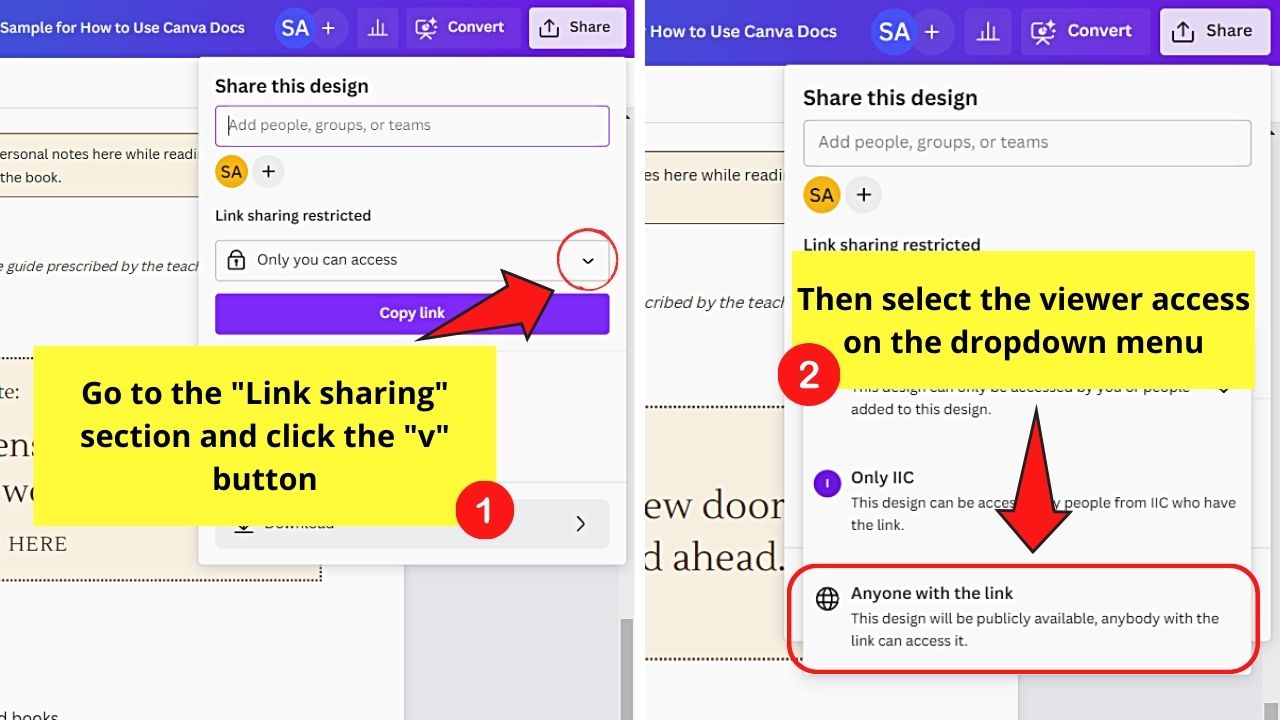

On the dropdown menu, choose the “Anyone with the link” option.
Step 5: Select what the link’s recipients can do on the design: “Can view,” “Can comment,” and “Can edit.”
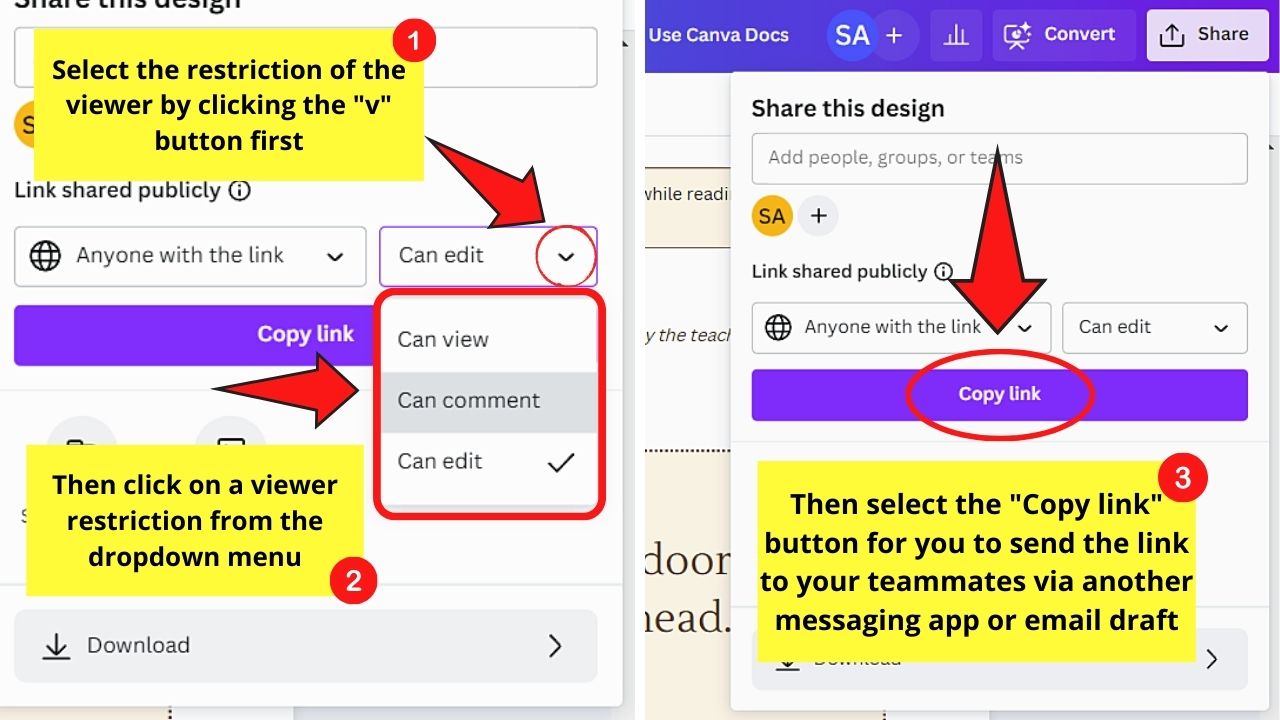
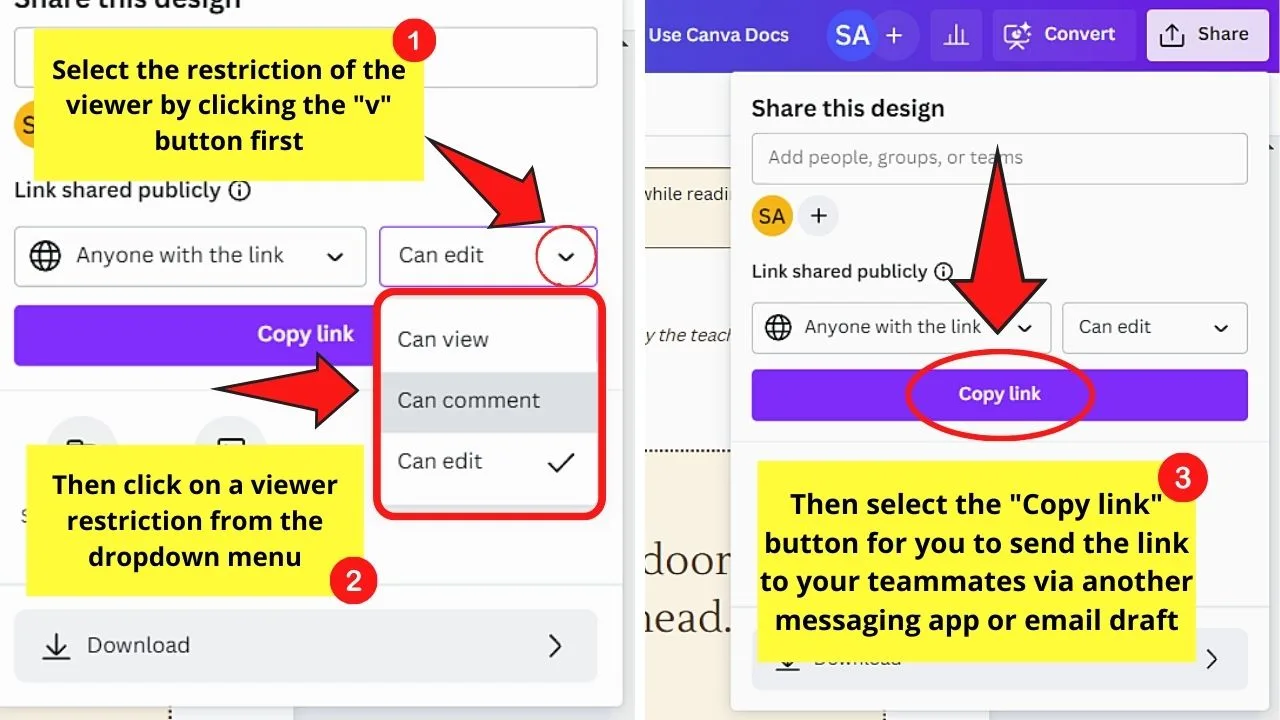
Once done with editing the viewing restrictions, select the “Copy link” button and paste the said link into your email draft or messaging app used.
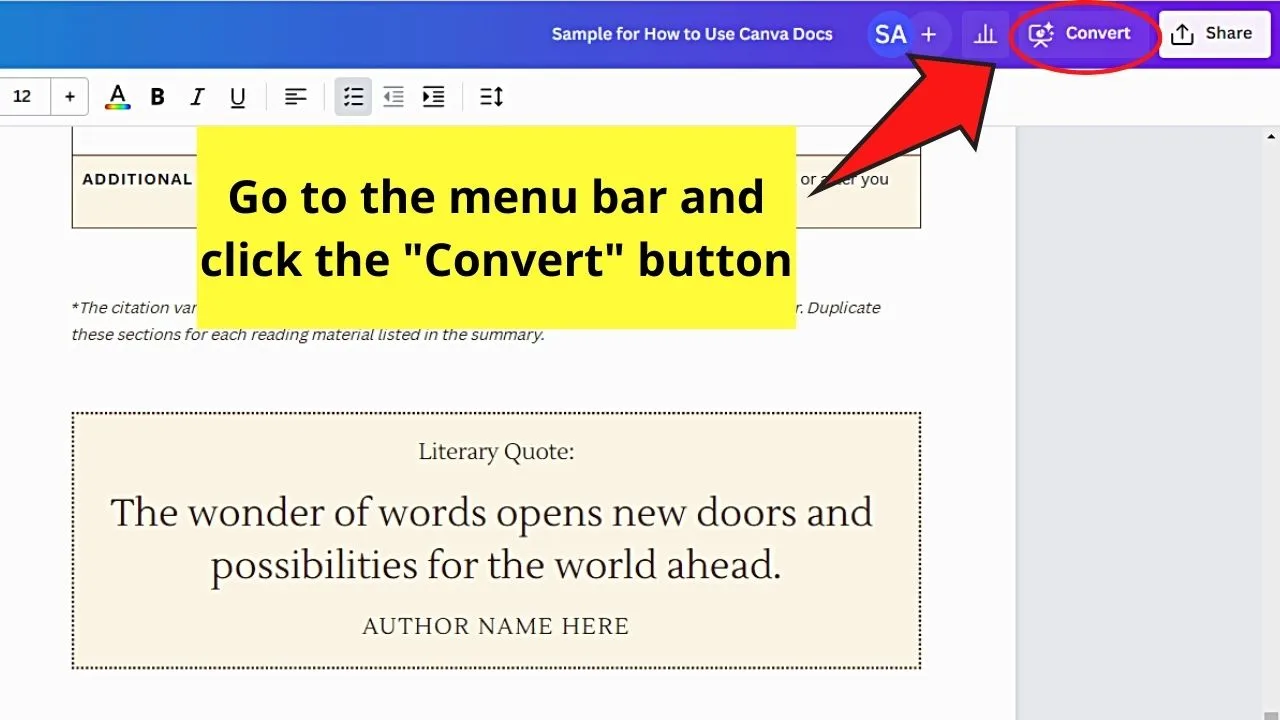
Step 6: Go to the menu bar and click “Convert” if you prefer to make a presentation version of the document you crafted (Canva Docs to Decks feature).

Step 7: Click the presentation slide style you’ll use from the gallery.

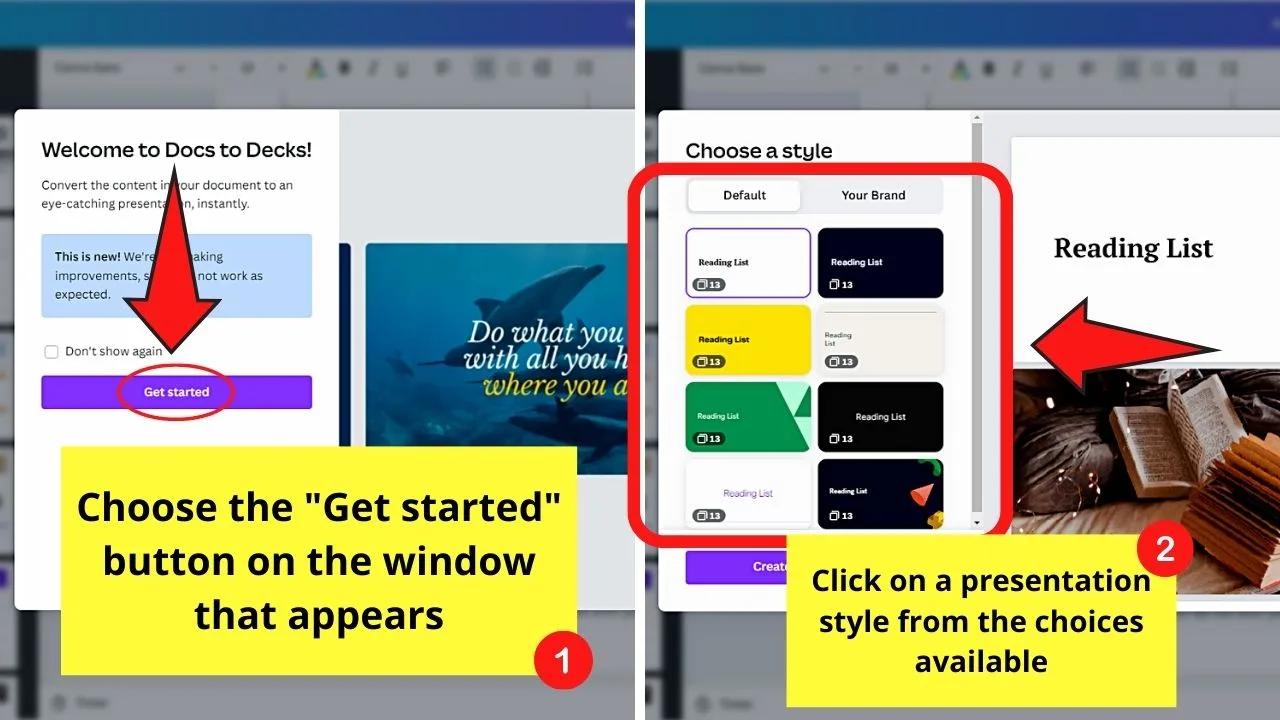
Step 8: Select the “Create your Presentation” button.
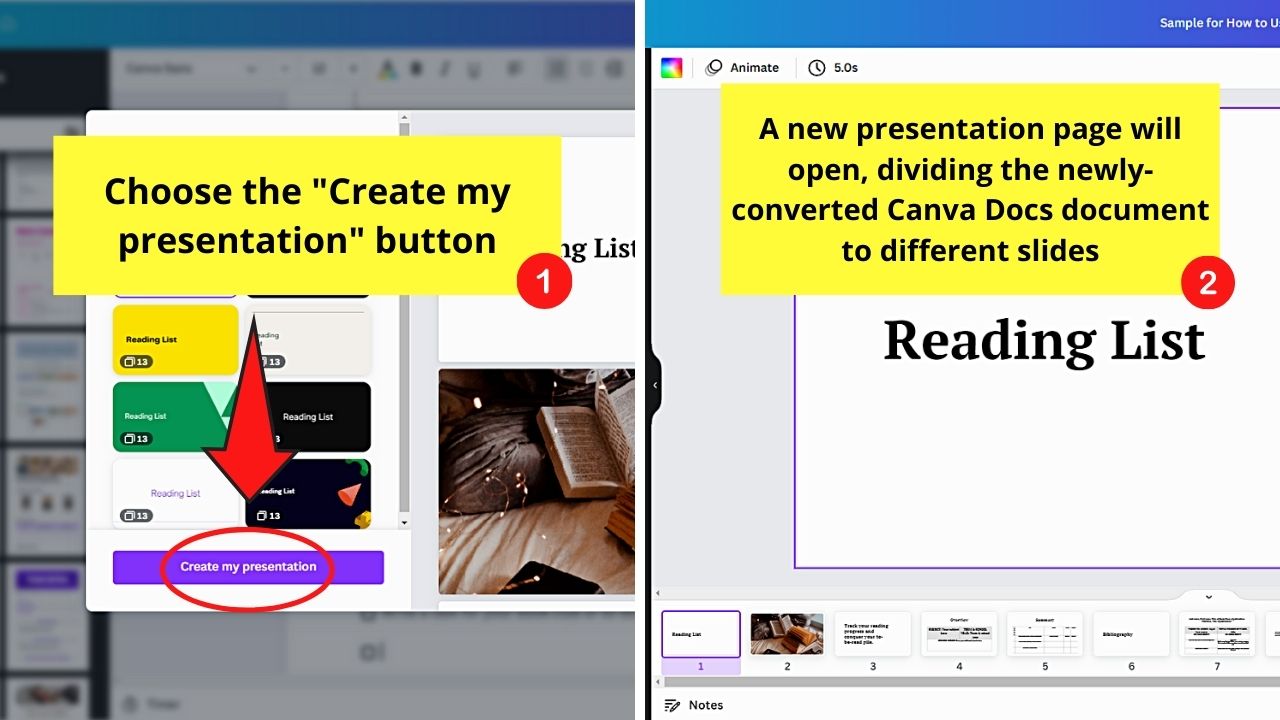

Your Canva Docs file will then be divided into video slides that you can proceed with editing.
Frequently Asked Questions about How to Use Canva Docs
Can you move all the elements added to Canva Docs?
Not all elements you added in Canva Docs are movable. Charts, emojis, lists, and text are some of the elements you cannot reposition once added. Embedded videos and designs are the two elements you can still change their position once added to Canva Docs.
Do I need to be on Canva Pro to use Canva Docs features?
Canva Docs is still in the beta phase. Hence, you can only use it after signing up for the waiting list. It’s not based on whether you’re on Canva Free or Pro user. You will then be notified when the feature is available so you can use it.
Can I use the “Magic Write” tool even when I’m on Canva Free?
You still can use Canva Docs’ “Magic Write” tool even if you’re a Free account user. But, you’re only allowed to make 25 prompts. So, if you want to have access to more prompts, upgrade to a Canva Pro account.
Is the Canva Docs feature available in the mobile app?
You can access Canva Docs even when you’re using the mobile app. Like on the web version, you can only use it after signing up for the waitlist beforehand.


Hey guys! It’s me, Marcel, aka Maschi. On MaschiTuts, it’s all about tutorials! No matter the topic of the article, the goal always remains the same: Providing you guys with the most in-depth and helpful tutorials!

