

I’ve got a ton of things to do today, and I don’t know where to start!
Oops, hold your horses over there! Maybe all you need is to create some sort of a checklist to guide you on what tasks you ought to do next.
Yet, how can you exactly create a checklist? Well, if you’re a Canva user, you won’t have to worry.
Canva’s such a great graphic design tool that you don’t need to become an expert to be able to use it.
Hence, all you need to do is hold that checklist design idea in mind and allow Canva to help you turn that into a reality.
How to Make a Checklist in Canva
To make a checklist in Canva, follow these steps:
- Type “Checklist” in the search bar of Canva’s “Home” page
- Choose either a premade checklist template or a blank template
- Remove parts of the template you don’t want to use
- Add graphics and other elements to the template
- Save the checklist template or print it
Creating Checklists in Canva: 2 Methods
As mentioned earlier, there are 2 ways how you can approach creating a checklist in Canva.
If you just want a quick designing process, then starting with a pre-made Canva template will do good for you.
Creating Canva Checklists from Premade Templates
Step 1: On Canva’s home page, head to the search bar and type in “checklist”
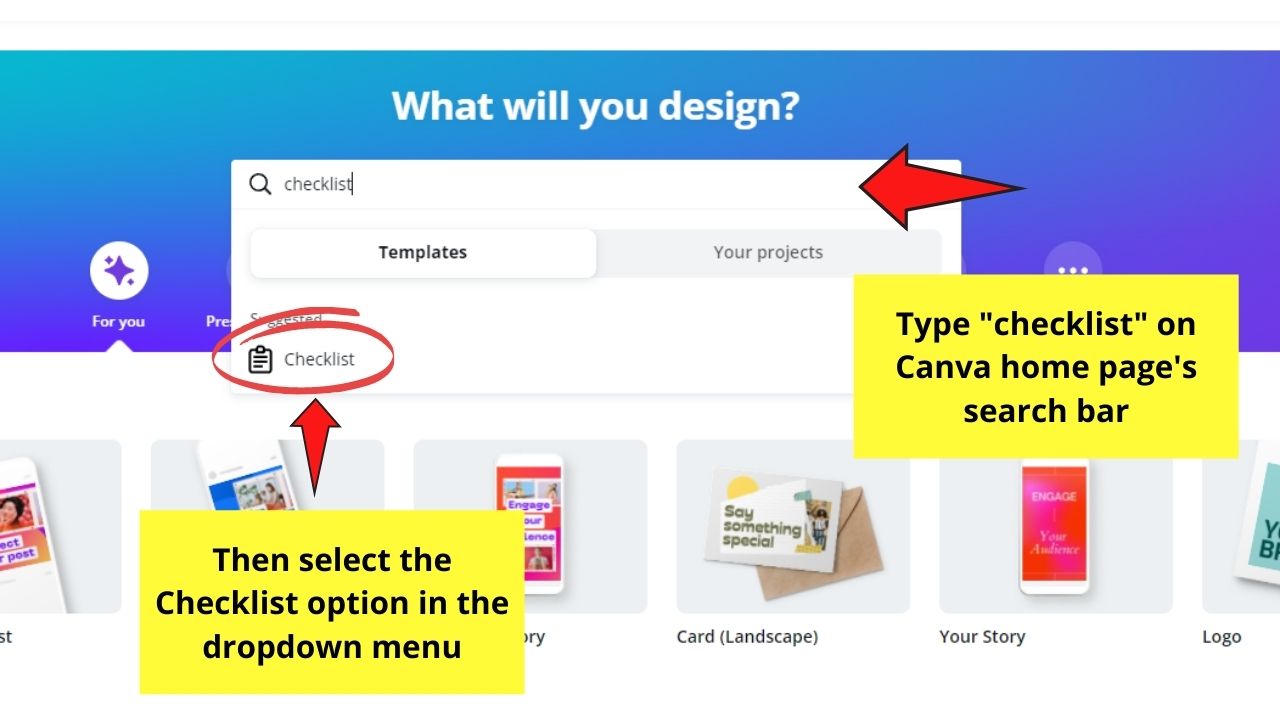
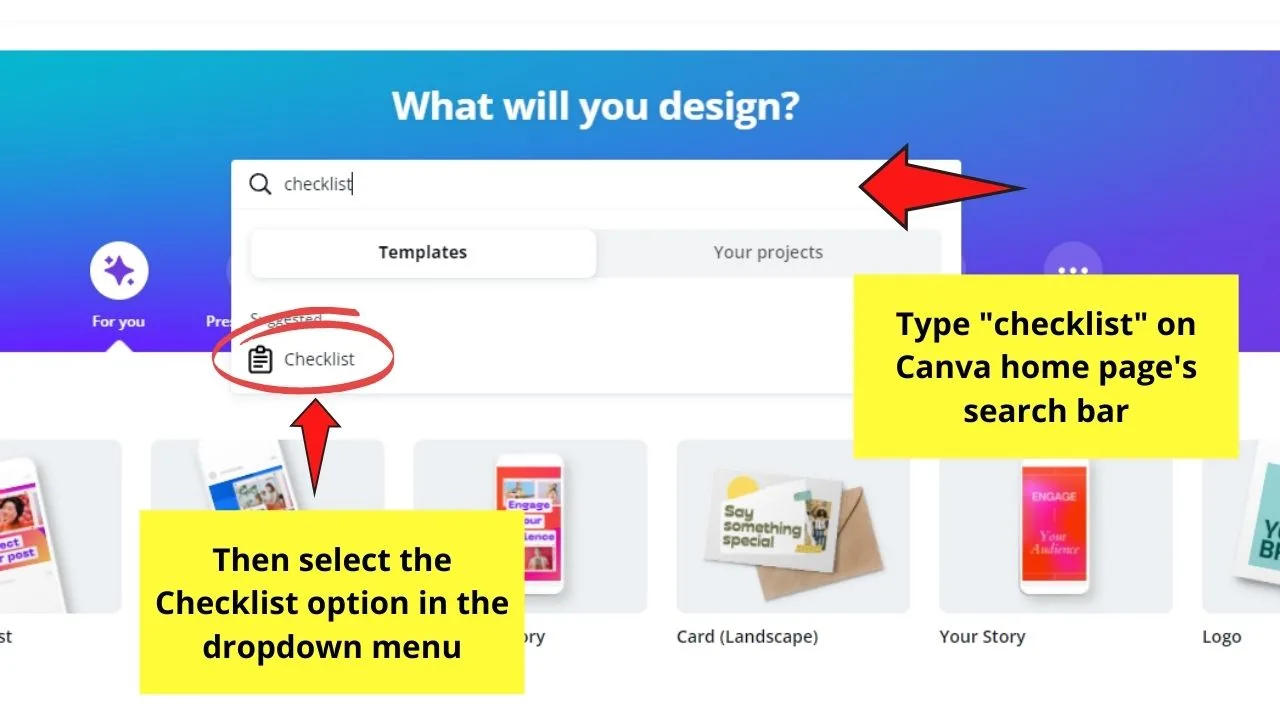
Then, select the Checklist option in the dropdown menu. This step will then lead you to the Canva checklist design gallery.
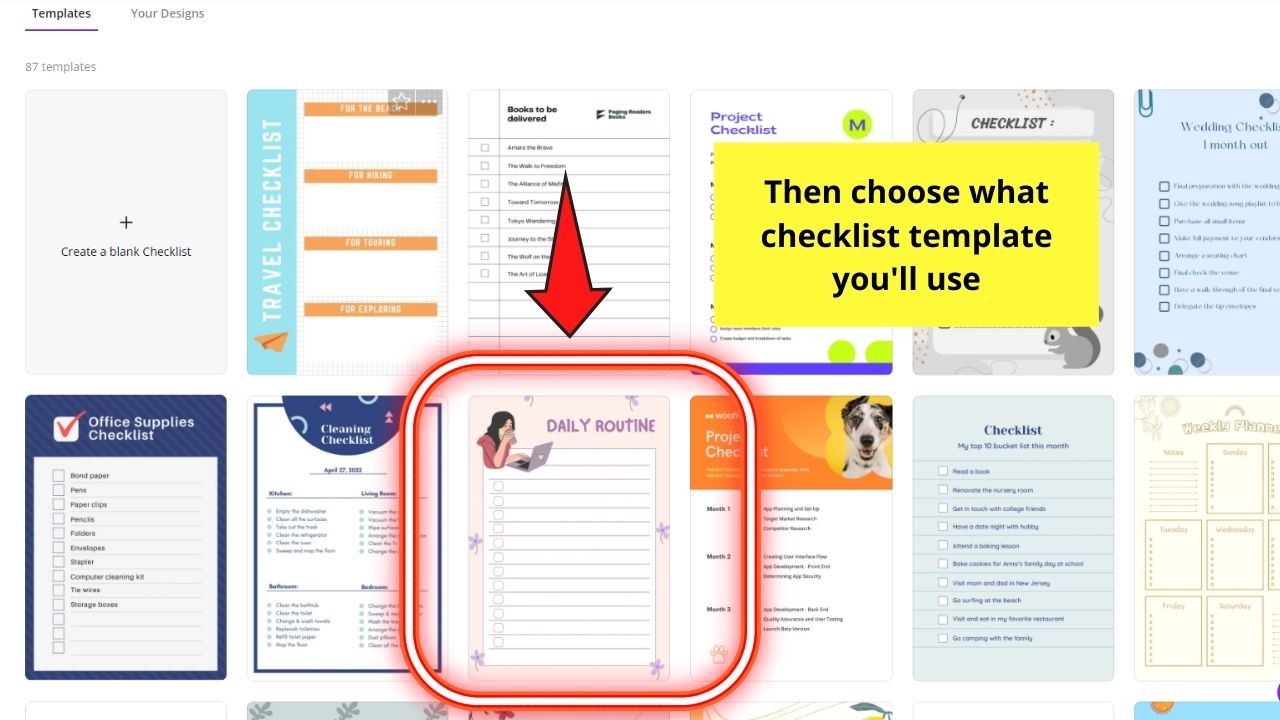
Step 2: Click on the design thumbnail

Step 3: Change the titles as well as the other design elements on the checklist template


To start, edit out the main title of the checklist by double-clicking on it. You can now then type in the title that you want.
After that, change the font style, size, and color by selecting the text first and clicking on the appropriate buttons in the editor toolbar.


Do this to all the text components on the design.
Step 4: Delete all the unwanted elements added to it and leave out those that you want to use
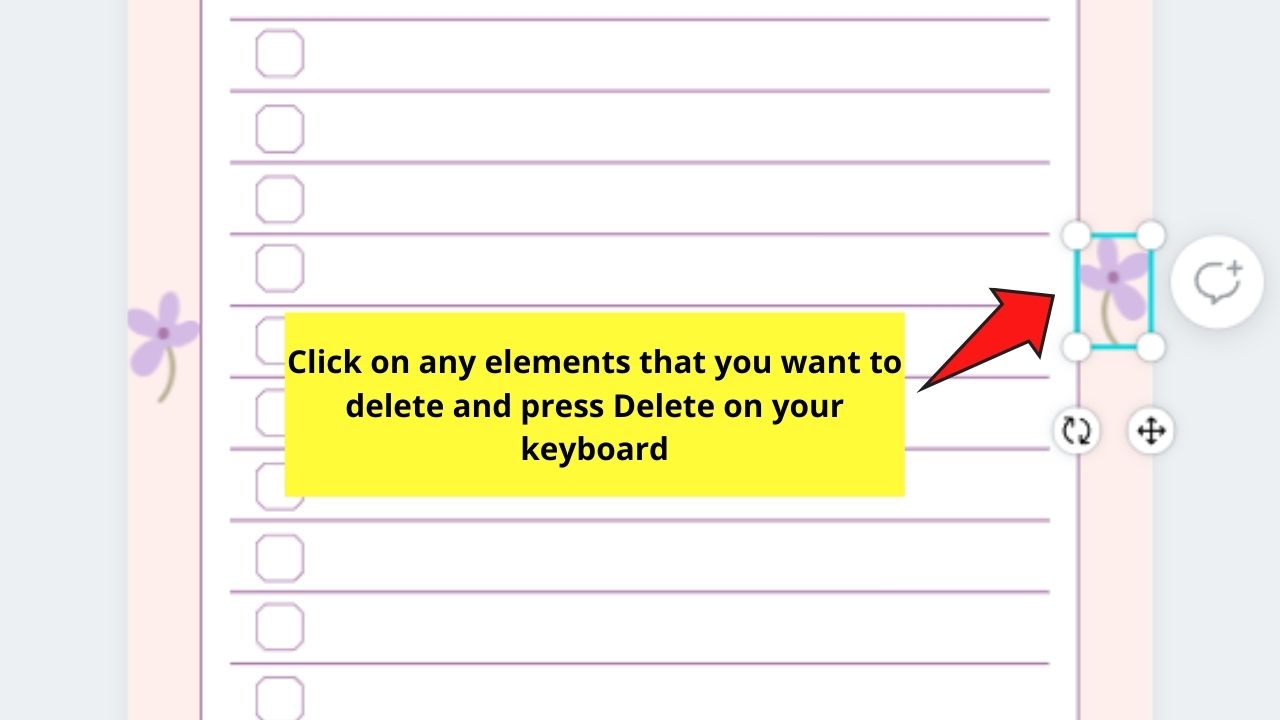
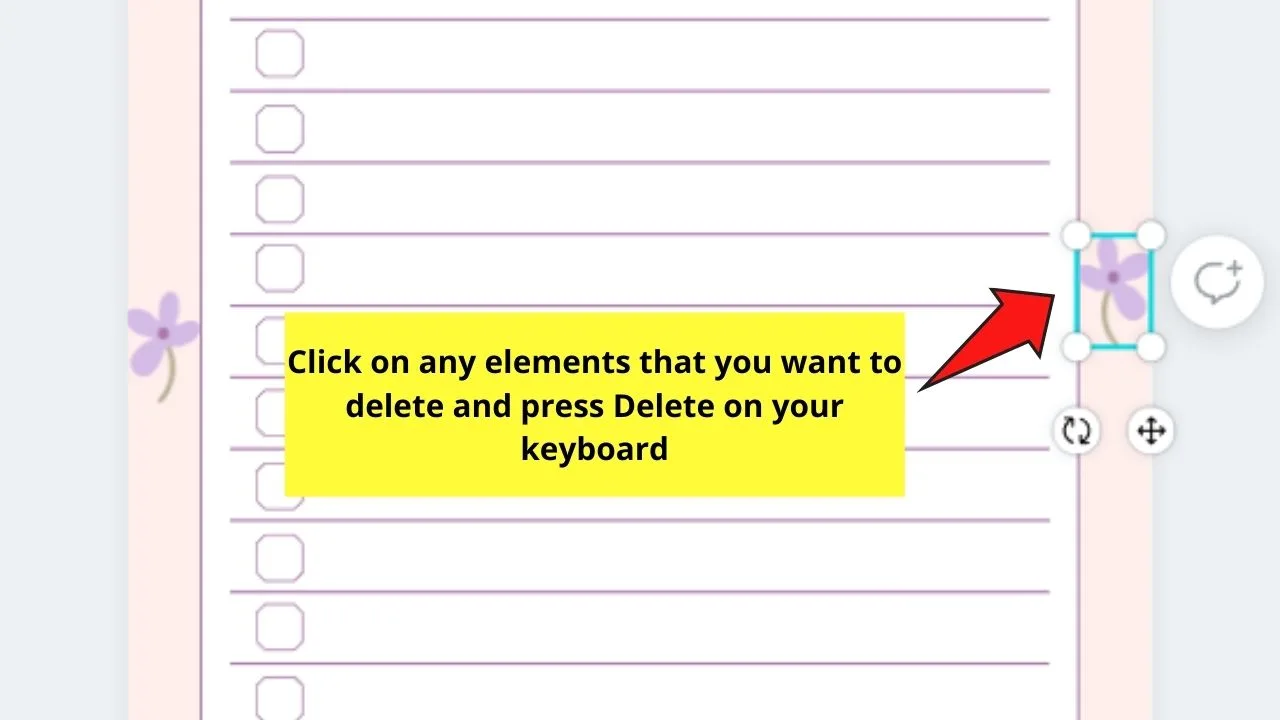
Do this step by highlighting those elements and then pressing “Delete” on the keyboard.
Step 5: Add more design elements that you want to your project
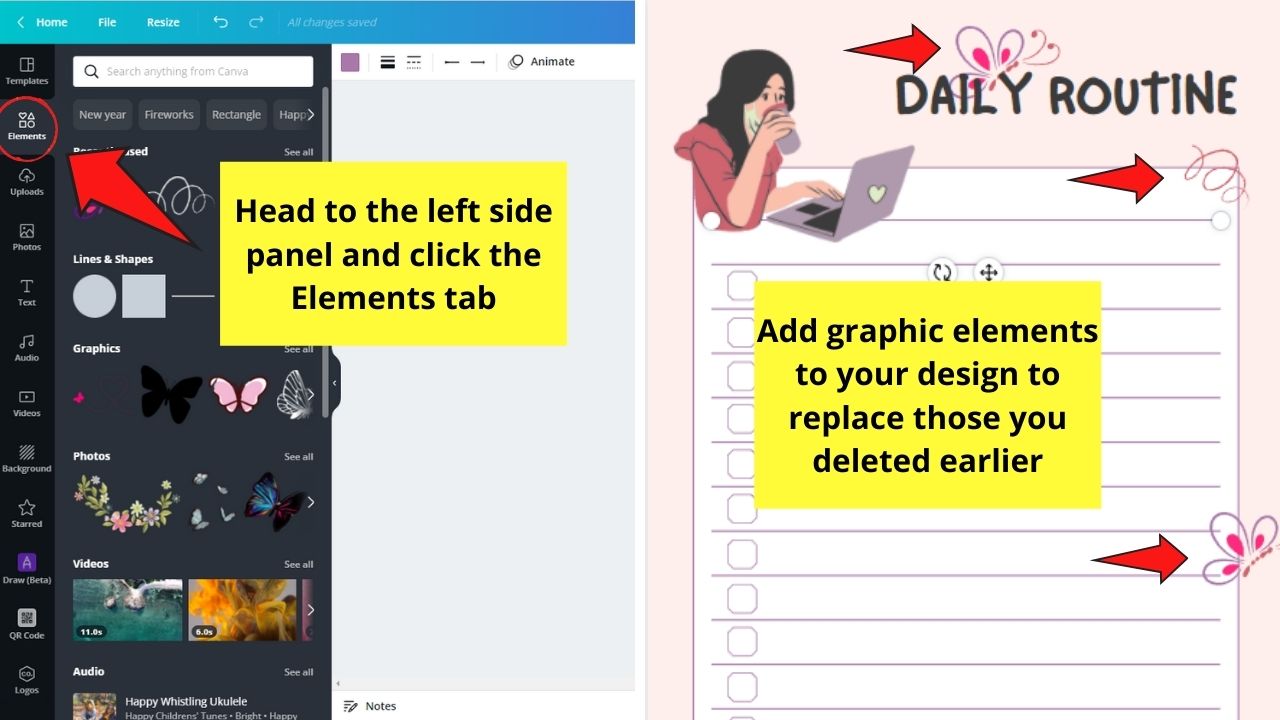
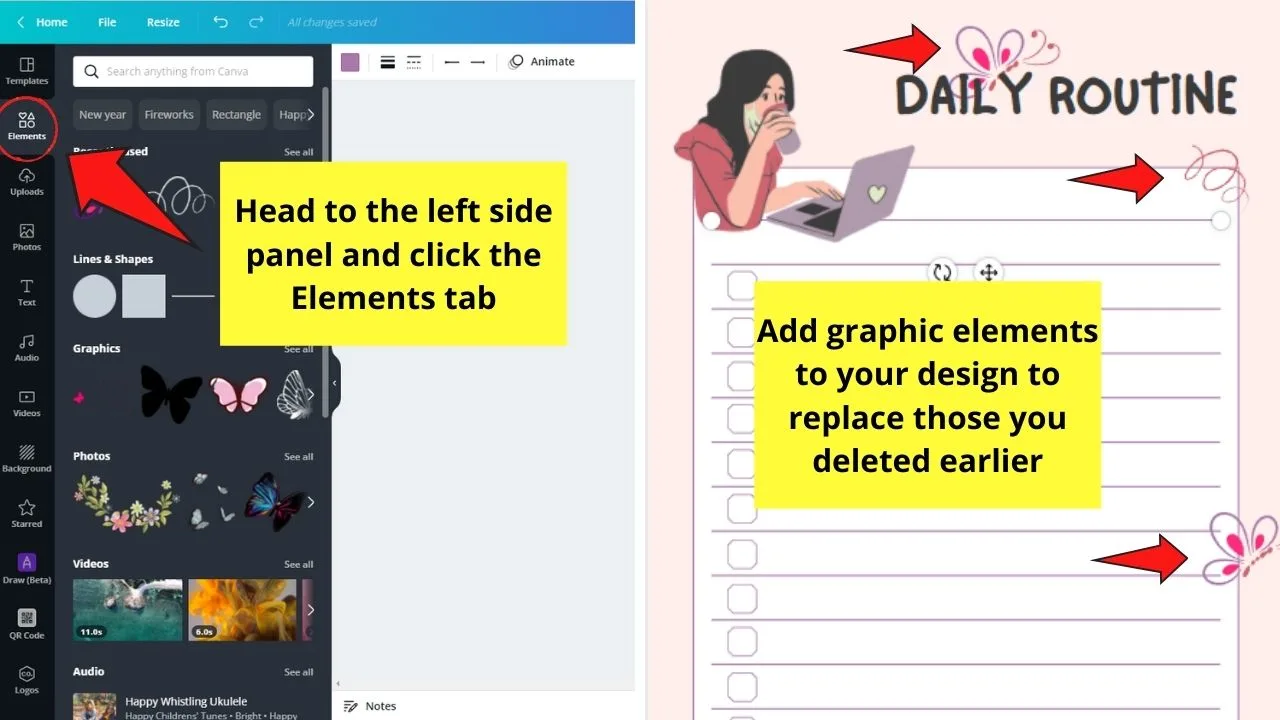
Just head to the “Elements” tab on the left side panel and select from the various graphic elements available.
Step 6: Edit out the text beside the checkboxes if there’s a need to
Just double-click on the text box for you to type in the new message on it.
Continue doing this step until you’ve swapped out all the text on the checklist items.
Step 7: Select the background color of the checklist and click the color picker tile on the editor toolbar
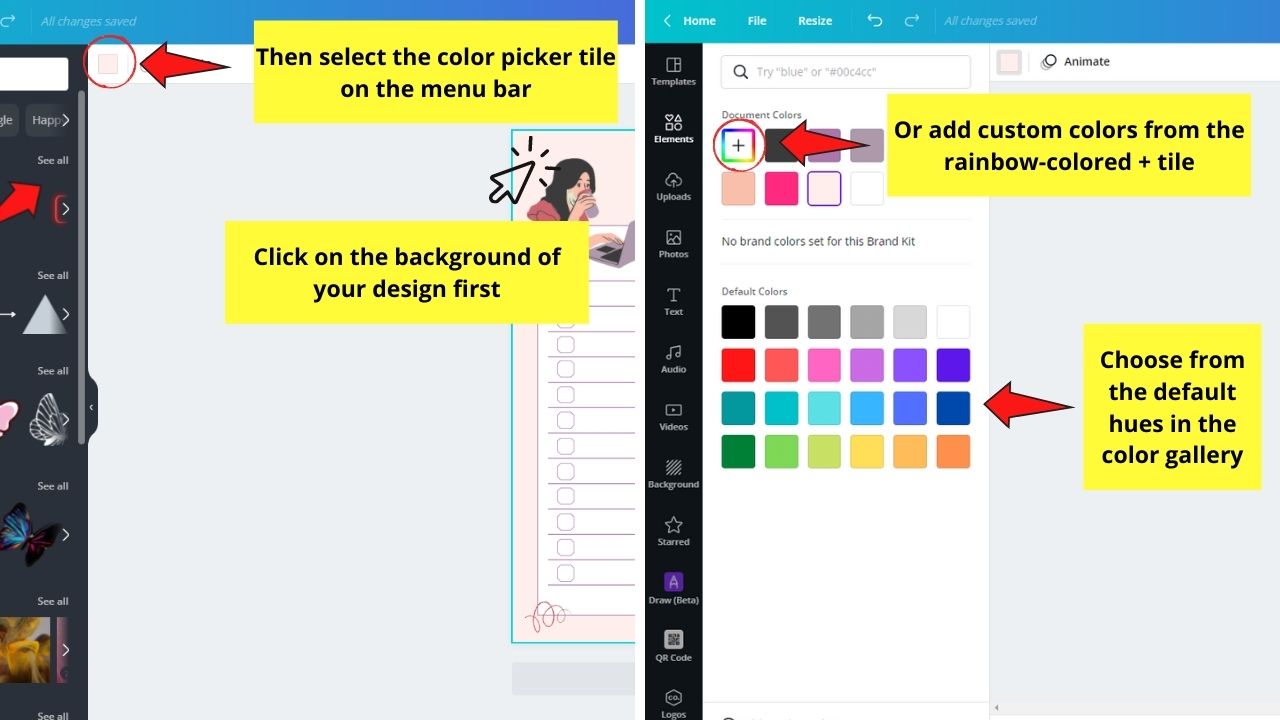
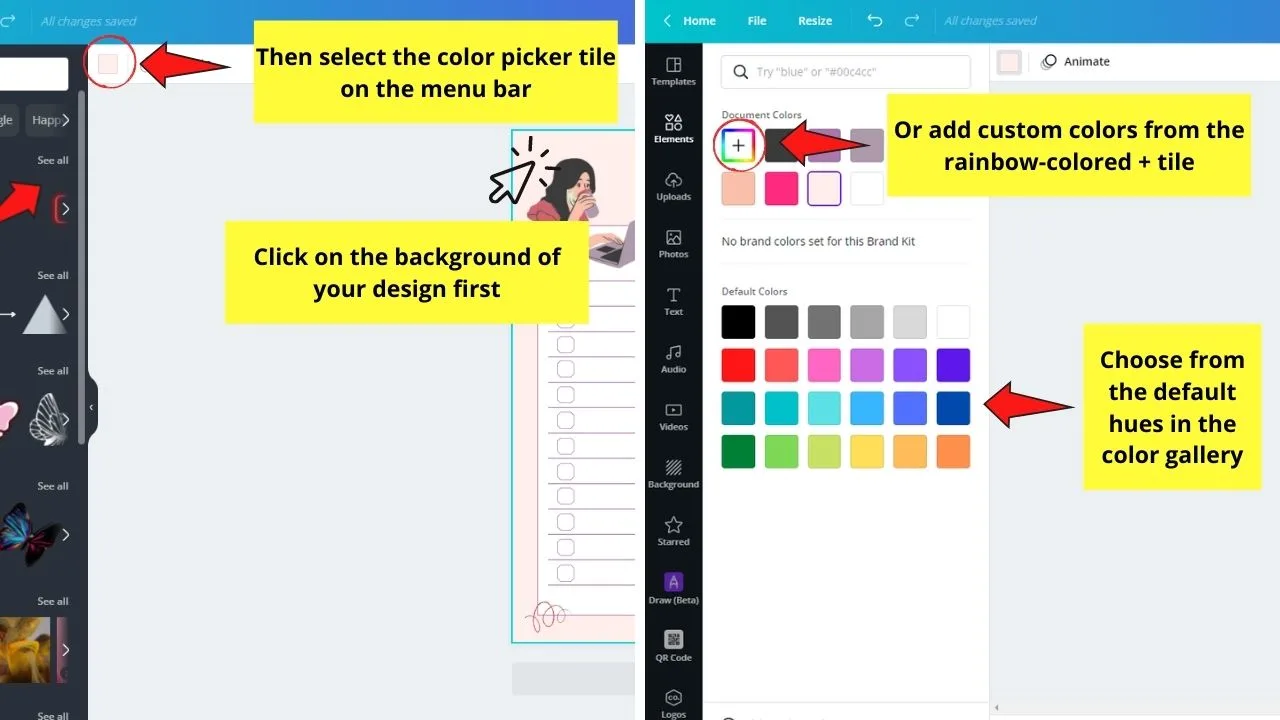
Choose what hue you’ll use by selecting from the default color category or add a new one by clicking the rainbow-colored “+” tile.
Step 8: Select the “Share” button


You’ll find this on the rightmost corner of the menu bar. From there, you can click the “Download” button to export your design.
Now, if you want to be more original, then perhaps creating checklists from a blank template works for you.
Creating Canva Checklists from Blank Templates
Step 1: Create checkboxes after creating a new design file from a blank template


You can do this by heading to the Elements tab on the left side panel of the editor page.


Then, go to the Lines & Shapes section and select the square shape.
Step 2: Edit the square shape by changing its colors


Click on the square and edit its color fill by selecting the color picker tile on the editor toolbar.


From there, you can select from a wide variety of default colors or add custom ones through the rainbow-colored + tile.
You can go ahead with adding borders to the square for a more professional look, but you can skip this step if you opt for something simple.


Step 3: Add the lines that will allow you to write off the checklist items


Head again to the Elements tab and go straight to the Lines & Shapes section. Then, choose what line type you’ll use for your checklist.


Click and drag that line style and place it beside the square you added earlier.
Step 4: Adjust the look of the line by editing its weight and length accordingly


Click and drag one end of the line to adjust its length.
Once you get the line length that you want, select the line again and head to the Weight button on the editor toolbar.


From there, drag the slider to adjust the line’s thickness. Keep on dragging the slider until you reach the look you want.
You can read about How to Draw Lines in Canva for you to have a better idea of how you can go about editing lines in the tool.
Step 5: Group the checkboxes and lines you added so you can move them as a single unit
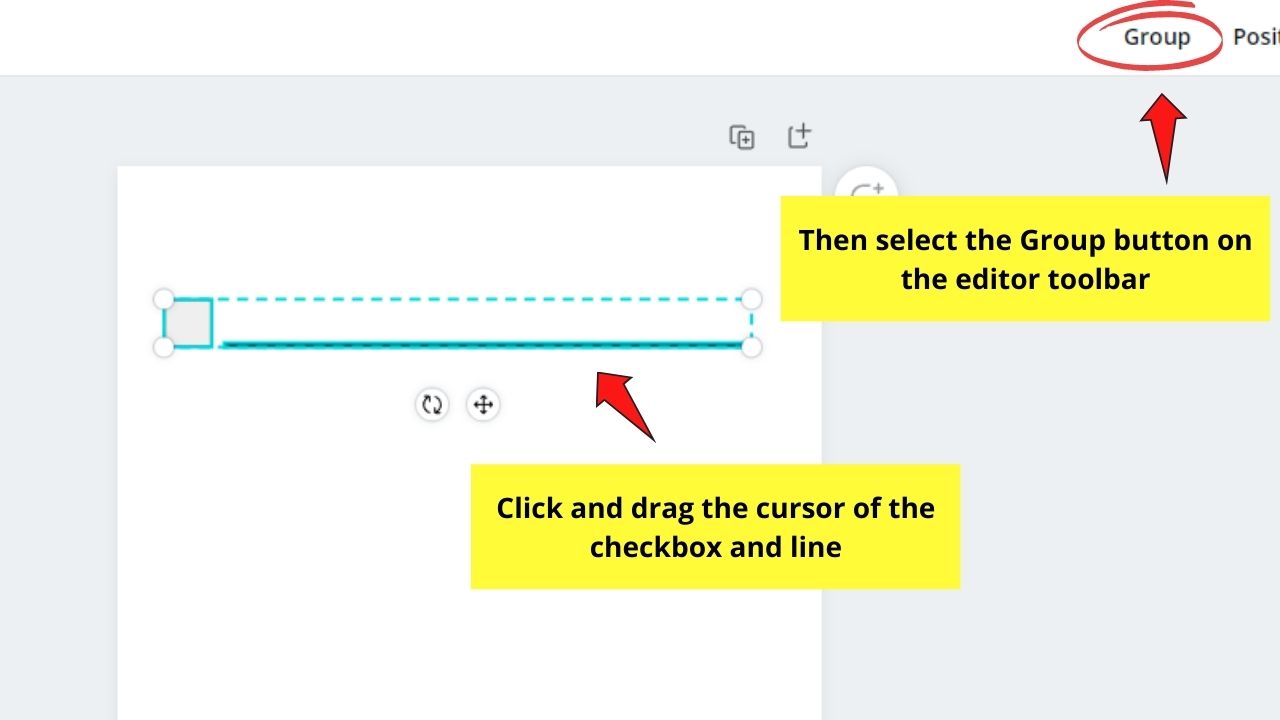
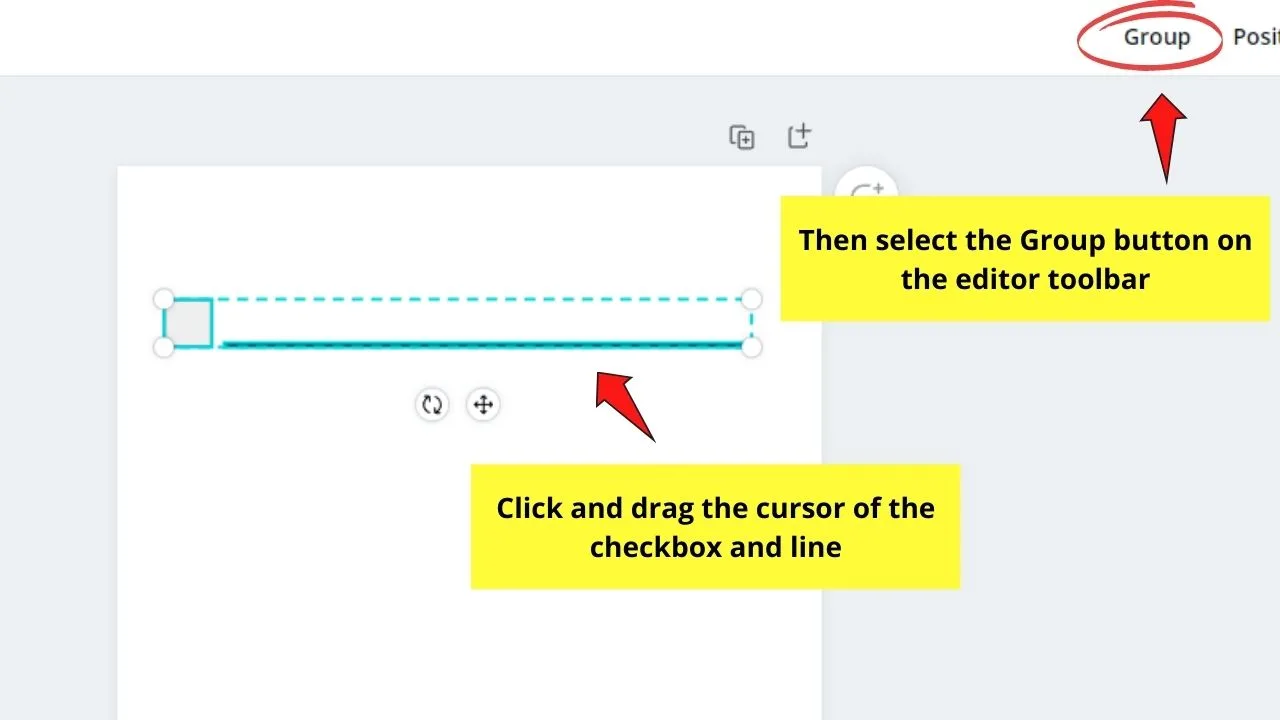
Click and drag the cursor over the checkbox and the line to highlight them before you select the Group button.
You can also press Ctrl + G together on your keyboard to activate the same function.
Step 6: Press “T” on your keyboard to add text beside the checkboxes
Then position the text box above the line but beside the checkbox. Edit the text accordingly first before you proceed with grouping the elements.
Step 7: Duplicate the elements you grouped 
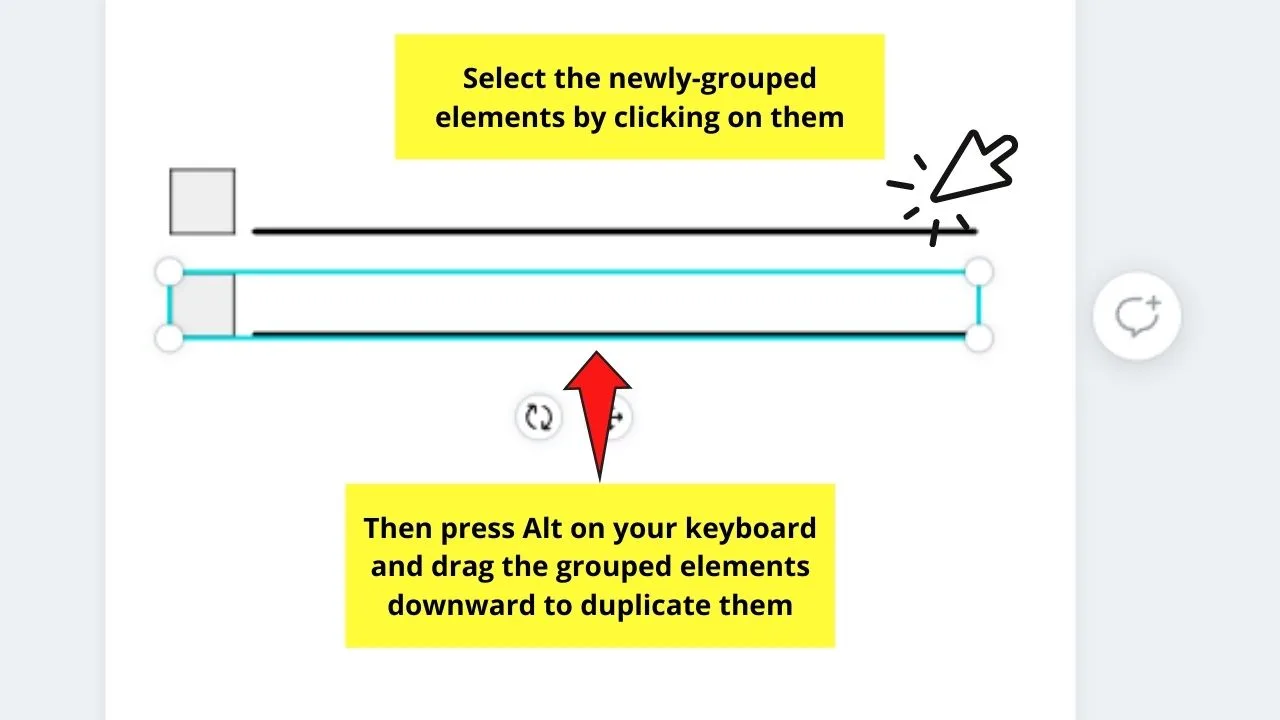
To do this step, select the newly-grouped checkbox and line before you press the “Alt” key and drag them downwards.
Continue with this step until you achieved the number of checklist items.
Step 8: Select the elements you copied and choose the “Position” button


Then, select the Tidy up option, so Canva will automatically align those checkboxes and lines you’ve created.


Step 9: Add a title to your checklist by pressing “T” on your keyboard
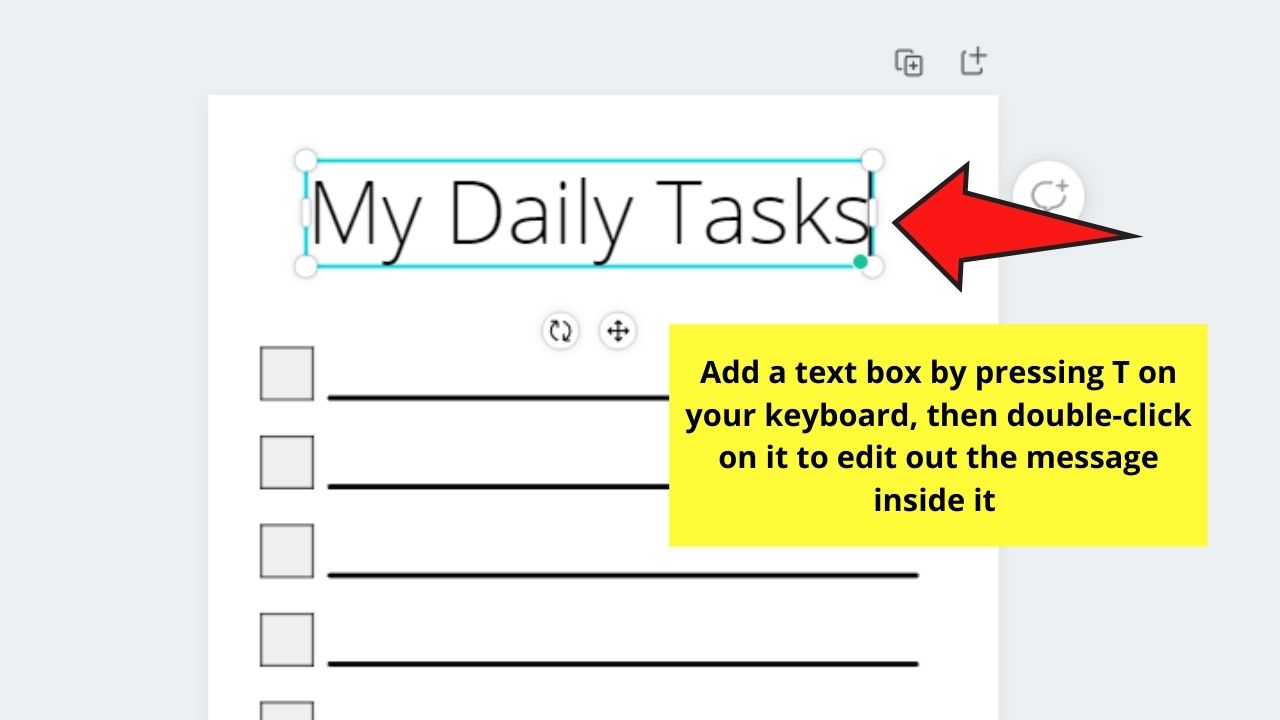
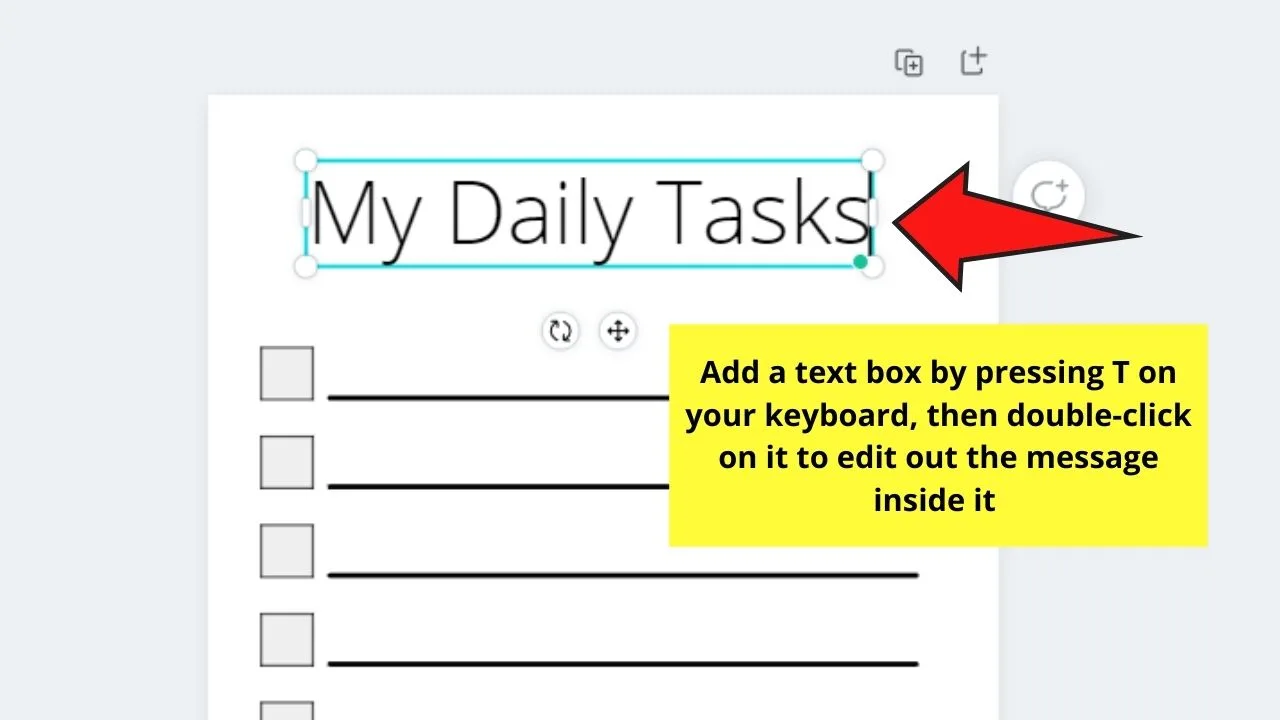
This move will add a textbox to your project.
From there, you can simply type inside the text box the title you have in mind. Then, change its font style, size, and color accordingly.
Then, place that newly created title on the top center of your design.
Step 10: Save the checklist to your device by clicking the “Share” button
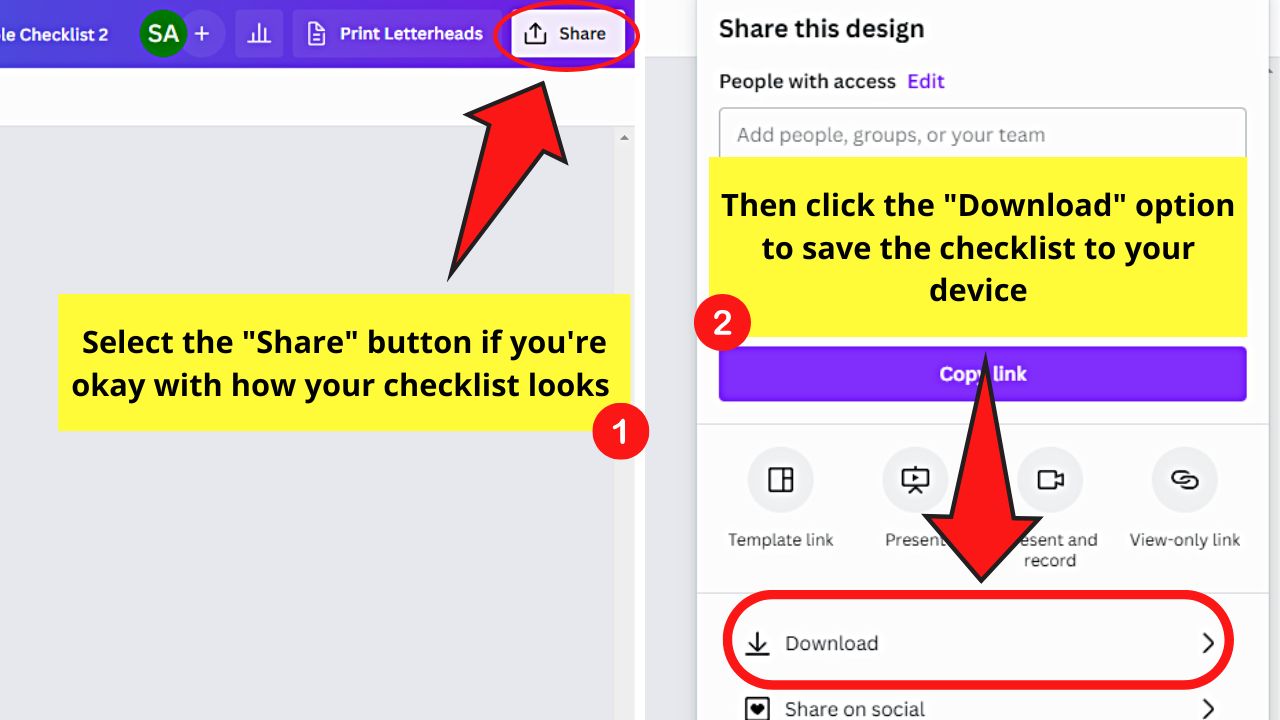
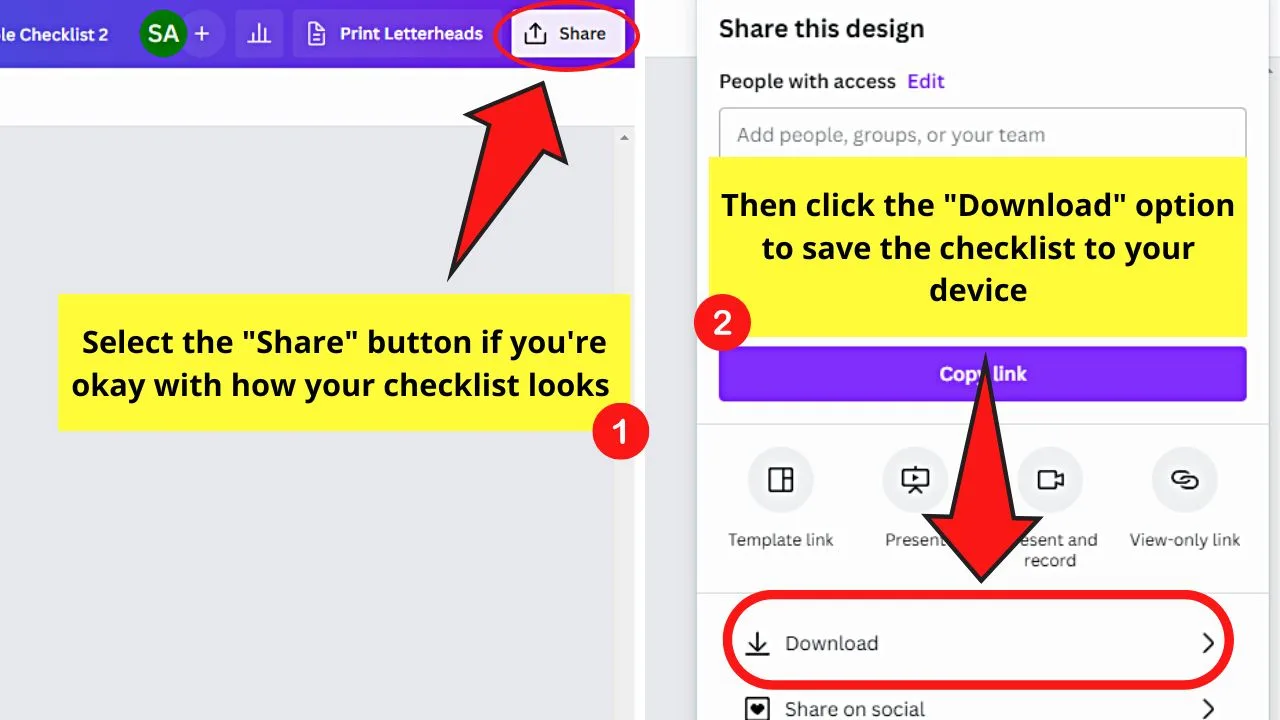
You’ll find this on the rightmost of the menu bar. Then, on the dropdown menu, select “Download” to save the new checklist you created to your device.
But, if you want to add more fun elements to the checklist design, you can head to the “Elements” tab and add graphic elements to it.


You can also change the color of the background by selecting the hues from the color picker’s color gallery.


So, whether you opt to create a checklist from scratch or a template, there’s nothing wrong with them.
Just follow the steps laid out earlier, and you’re all set!
Using Tables to Make a Checklist in Canva
With the addition of the tables feature in Canva, it’s now easier to create a checklist.
There’s no need to manually add checkboxes and lines to create the checklist that you want.
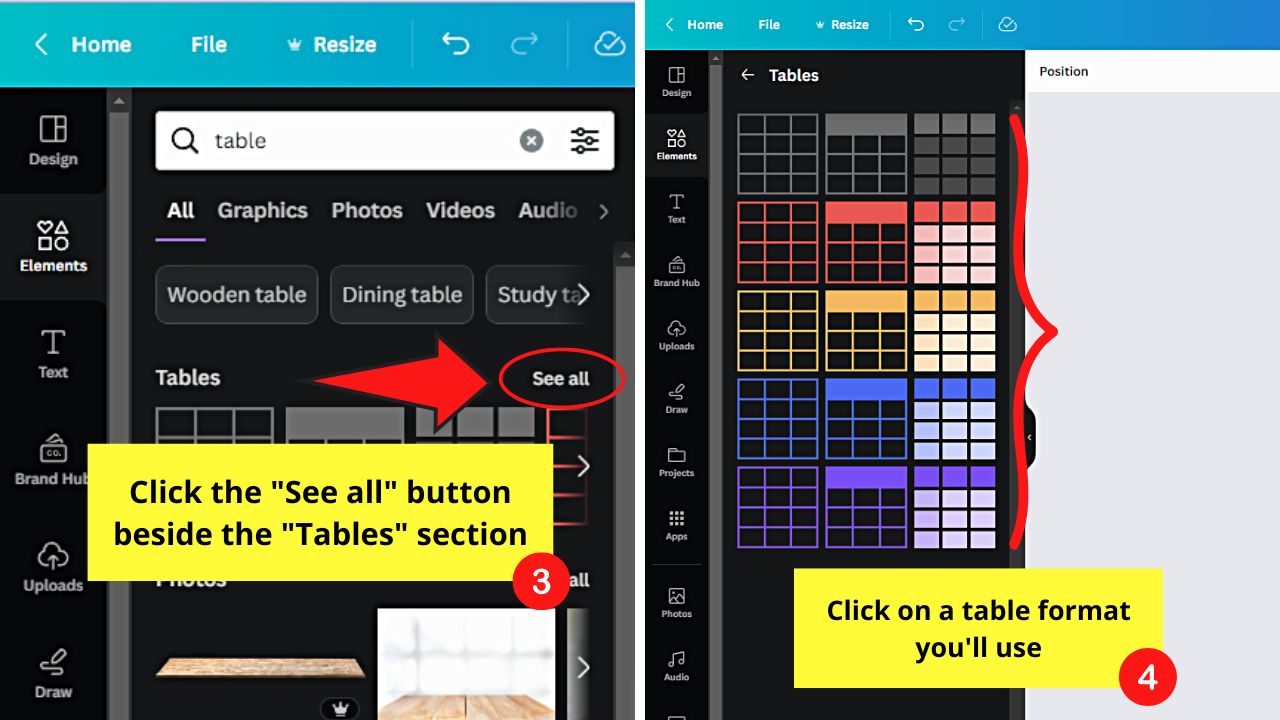
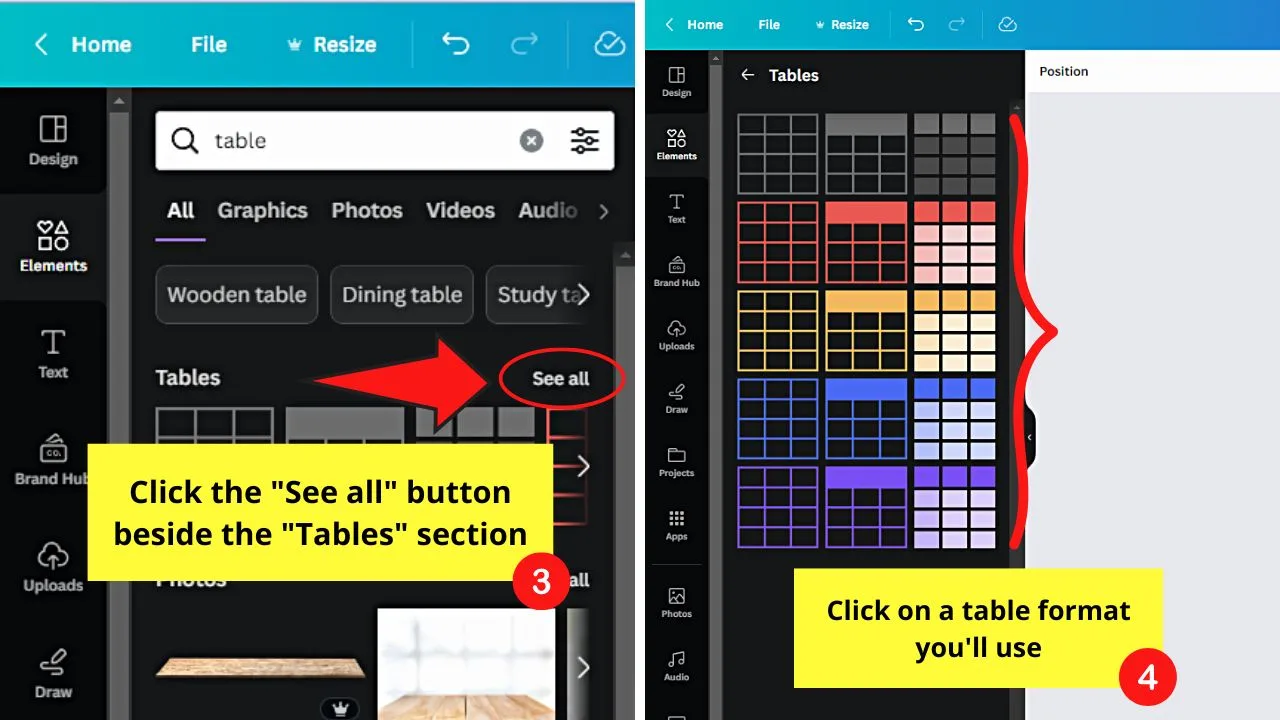
Step 1: Add a table

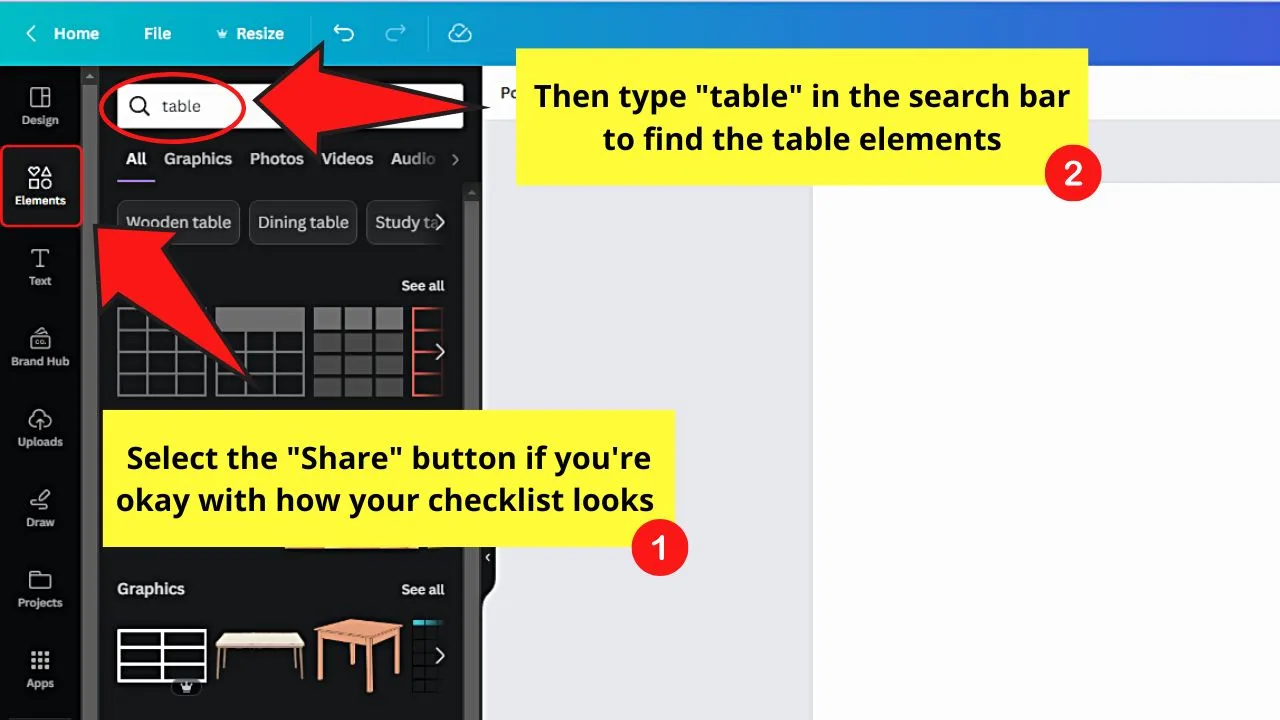
The long way of doing this is by clicking “Elements” and typing “tables” in the search bar.
Then click “See all” to view all the table formats available. Click the table format to select it.
If you prefer a shortcut, press the “/” key after selecting a page and type “table” in the search bar of the magic menu. Then select a table format from the ones shown.
Step 2: Select the 3-dot icon above the last column

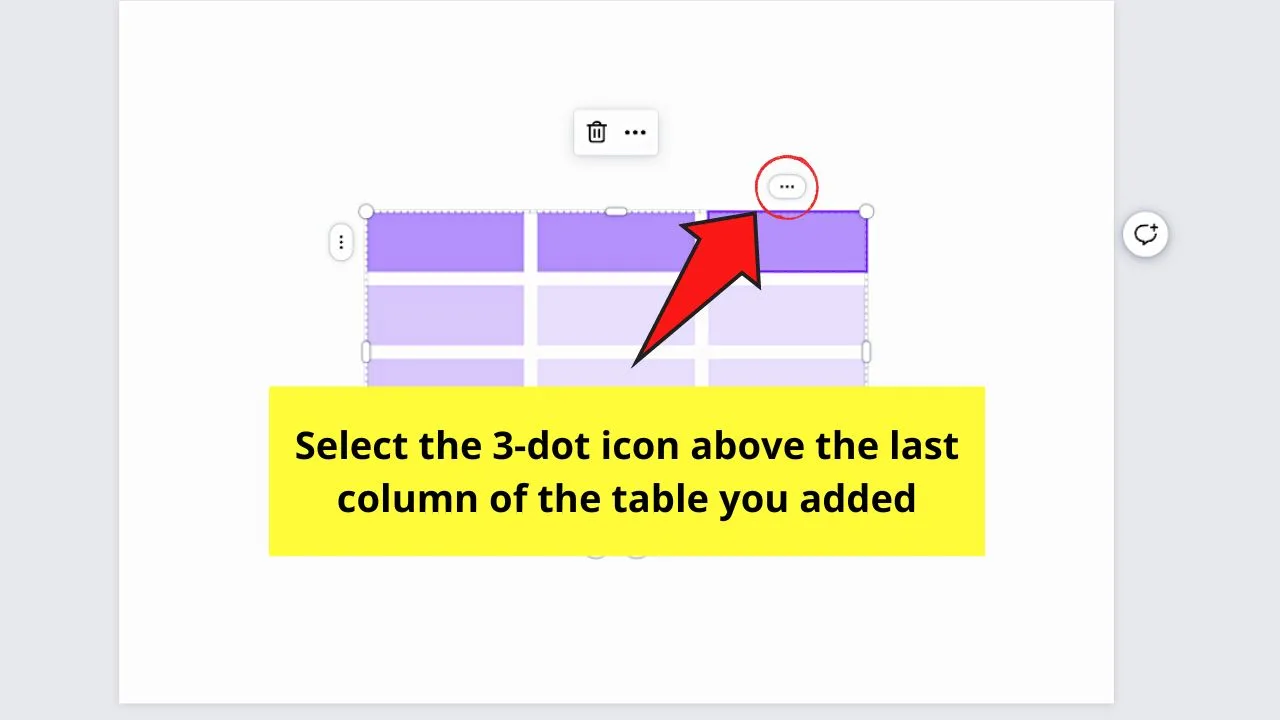
You can only see this if you click the table. A dropdown menu then appears.
Step 3: Repeatedly click the “Add column” option


You’ll see this between the “Merge cells” and “Delete column” options. Do this step until you have added all the columns needed for your checklist.
Step 4: Select the 3-dot icon on the left side of the table
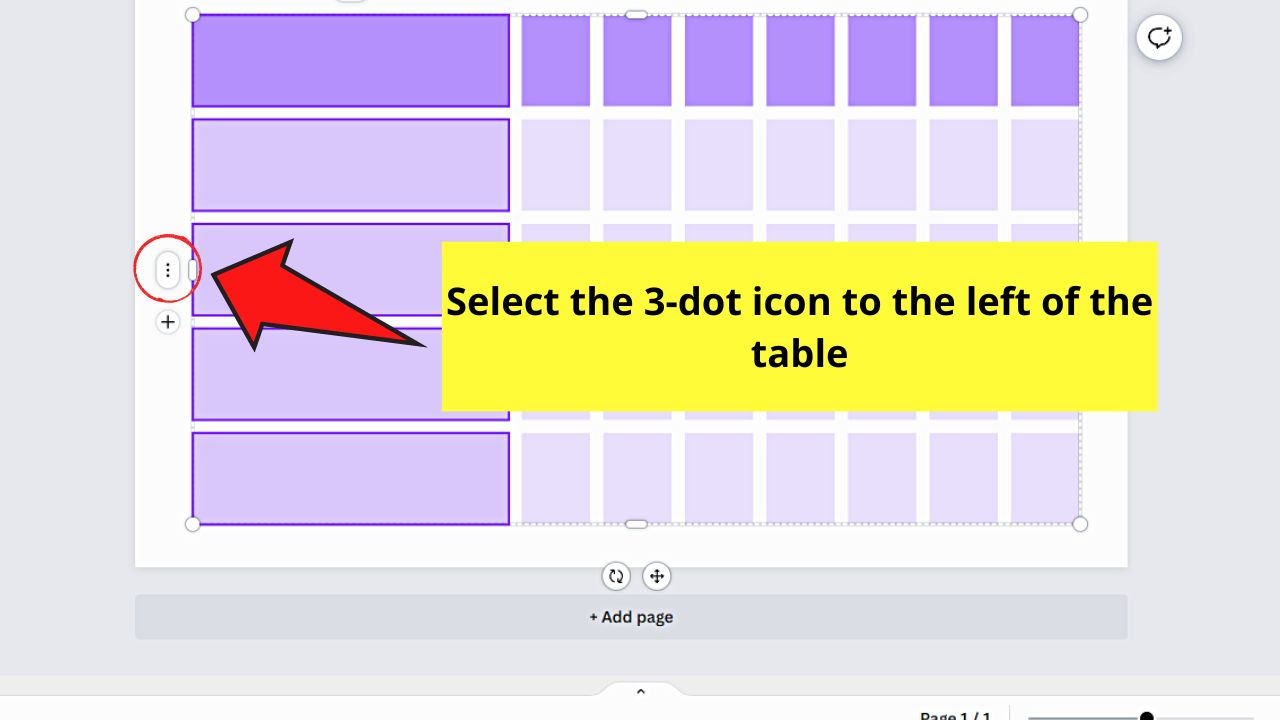
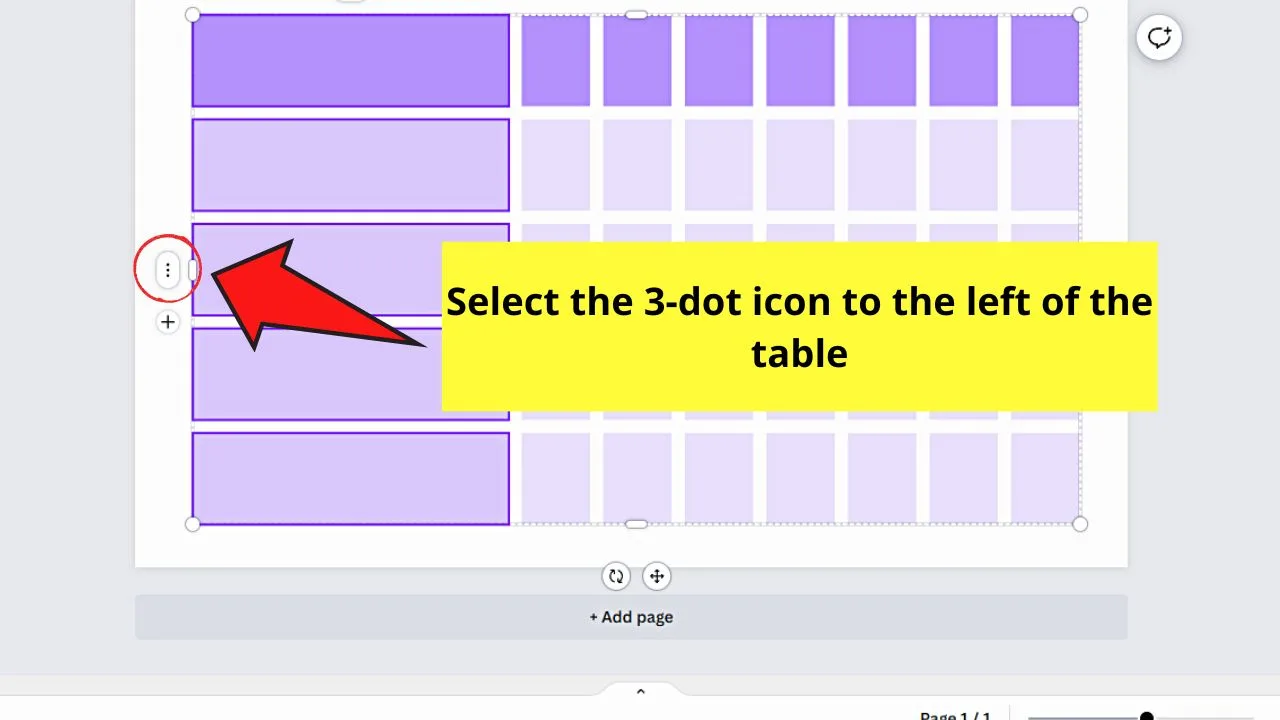
A dropdown menu then appears, showing all the options for editing the table you added.
Step 5: Click the “Add row” option

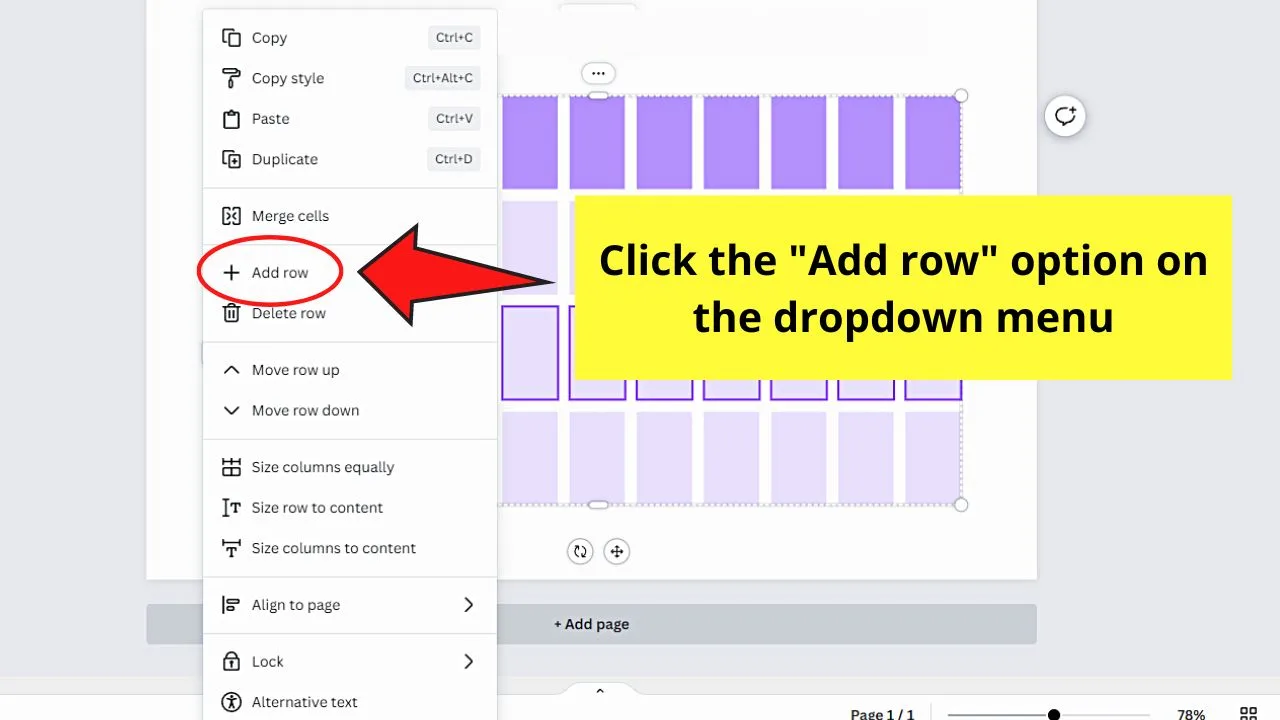
You’ll find this between “Merge cells” and “Delete Row” in the dropdown menu.
Repeat until all the rows needed are added.
Step 6: Adjust the table’s size
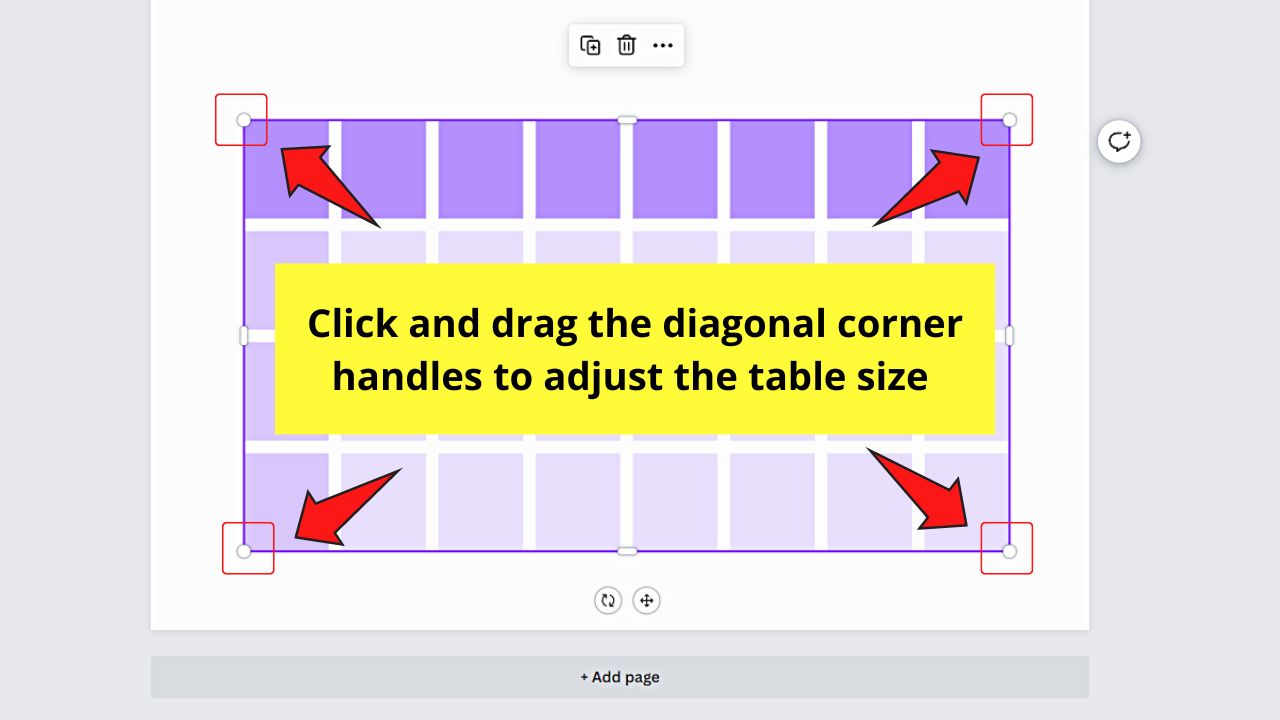
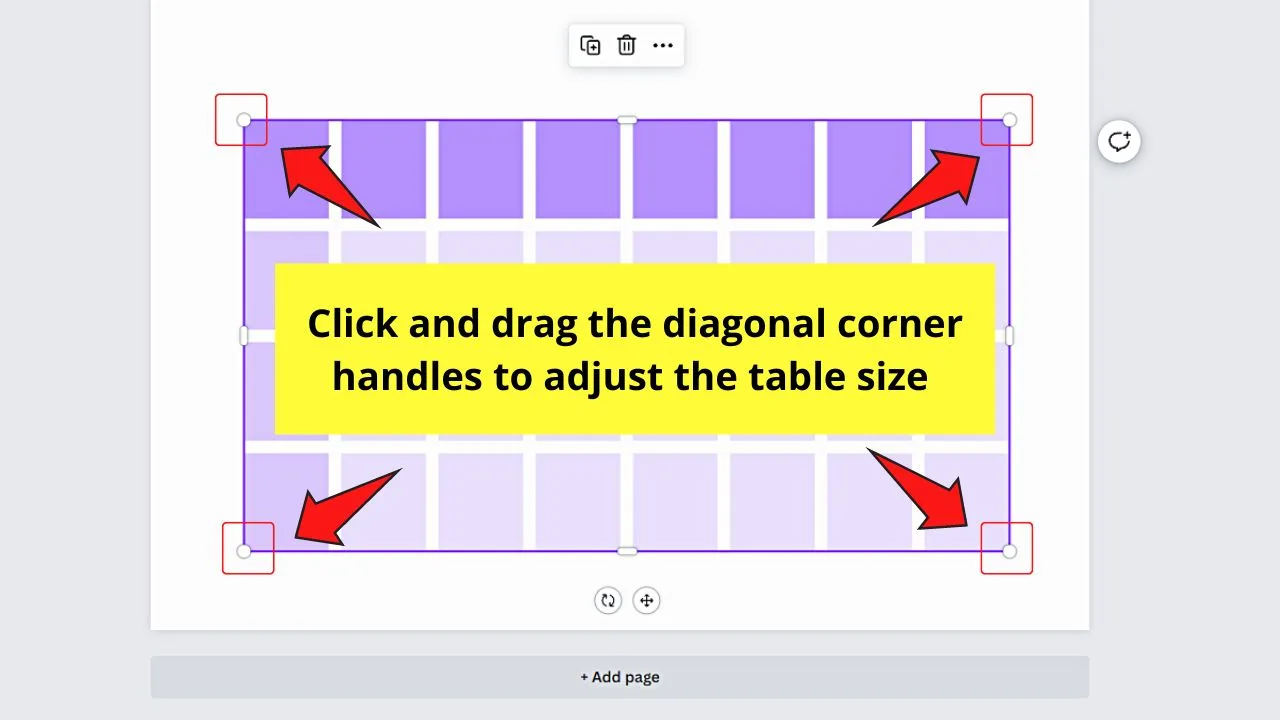
Click and drag the diagonal corner handles to achieve the size of the table you want.
Step 7: Adjust the column dividers
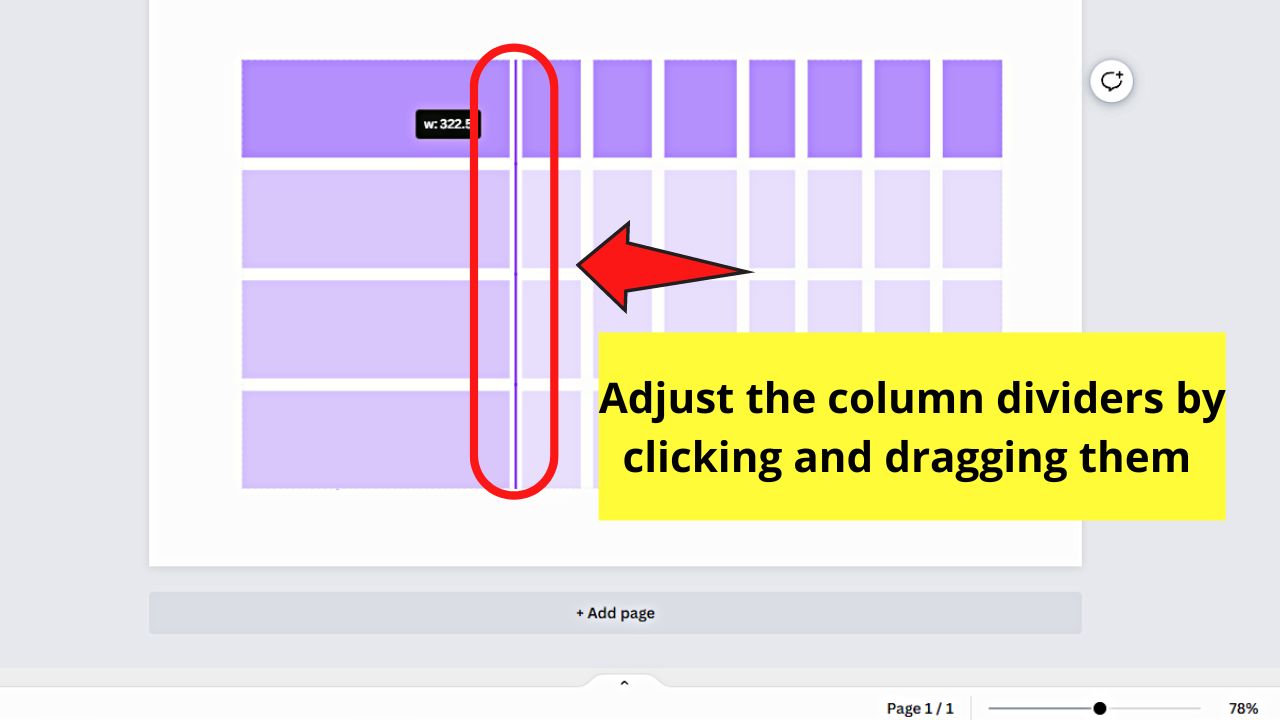
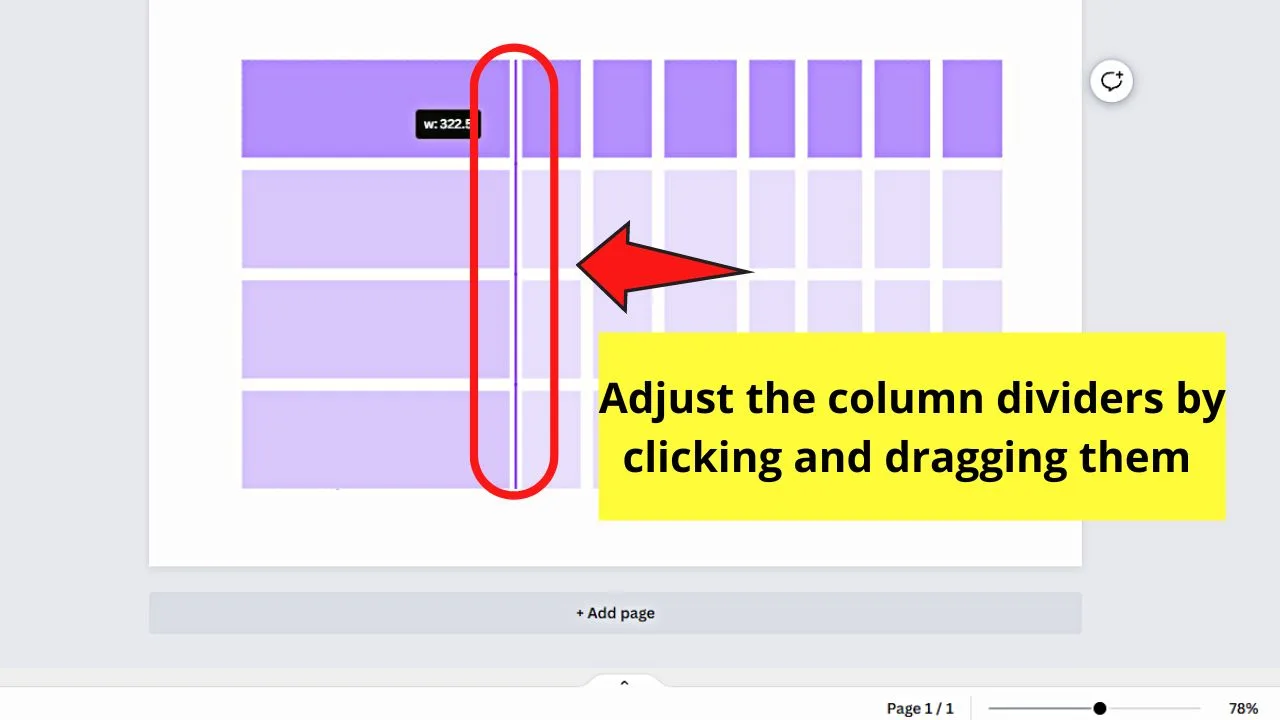
Click and drag the lines dividing the columns to the right, big enough to add the checkmarks in the cells that are formed.
Ensure that the first column has a larger space than the other columns to add to the checklist entries.
Step 8: Even out the spaces between the columns
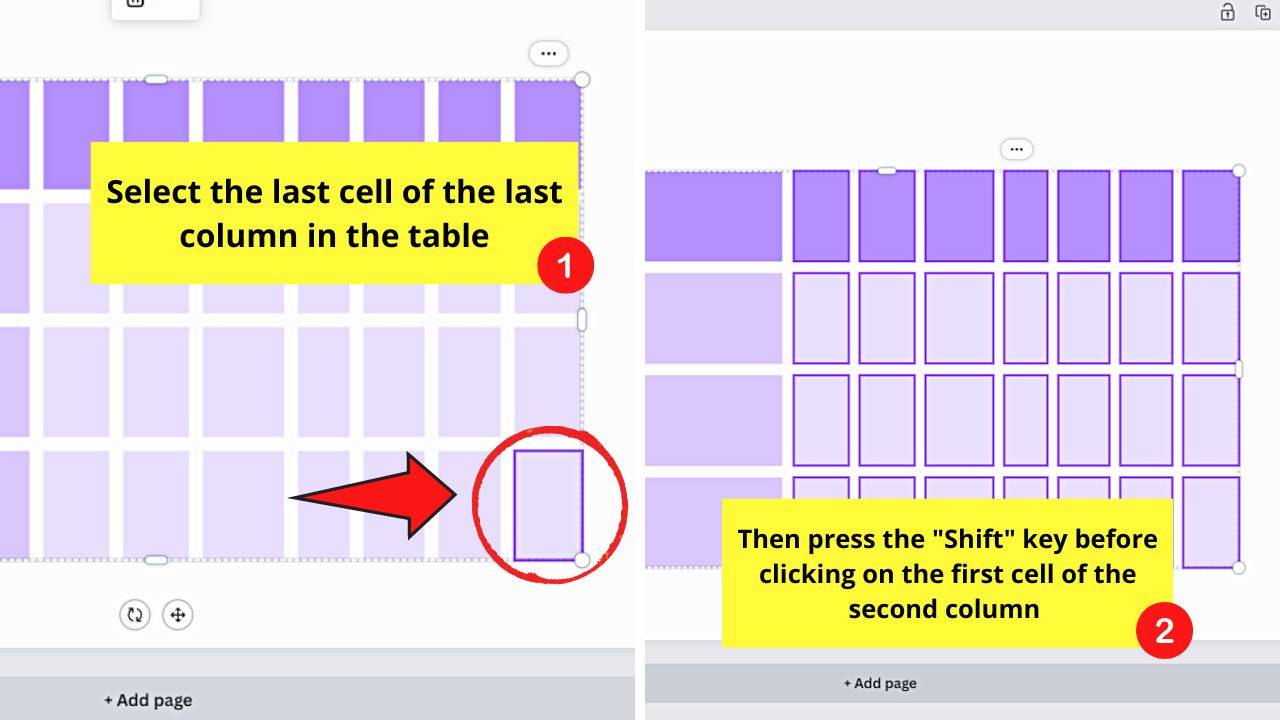
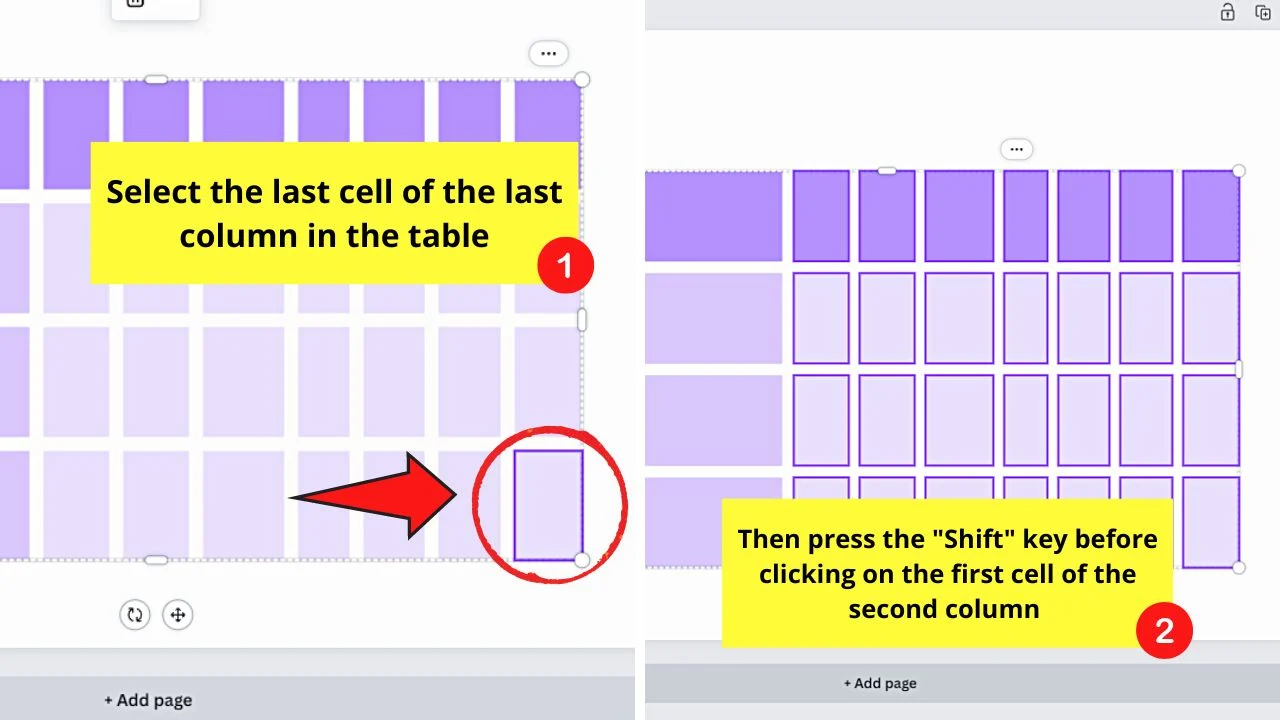
Do this by clicking the last cell of the last column in the table. Then press the “Shift” key before clicking the second column’s first cell.
All the cells in the checklist area are then highlighted.
Then click the 3-dot icon above a column and select “Size columns equally.”


The spaces between columns are automatically evened out.
Step 9: Add the text elements for the checklist
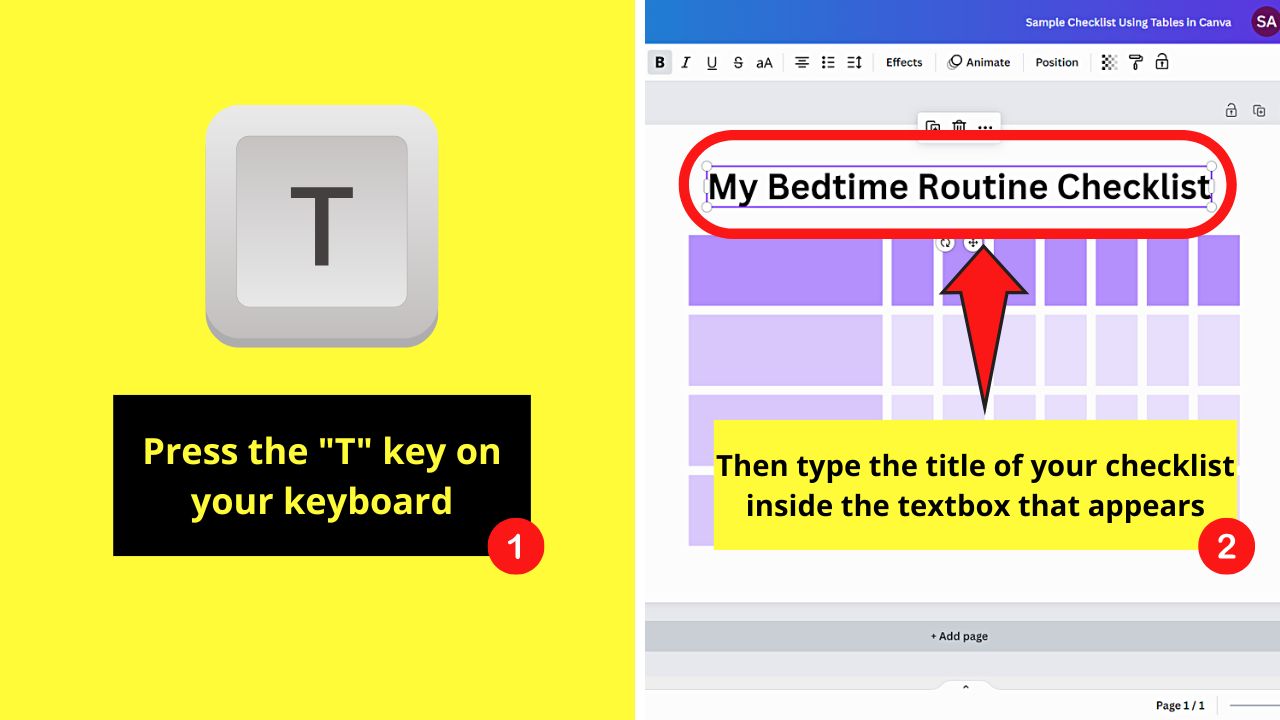

To add the checklist title, press “T” on your keyboard. Then, type the title inside the textbox.
For the column headers and checklist entries, double-click inside the cell to add the text.
Step 10: Add other graphic elements to the checklist to customize it


You can then change its background and add graphics to the checklist by clicking the “Elements” tab on the left-side panel.
Continue with this step until you’re satisfied with how your checklist looks.
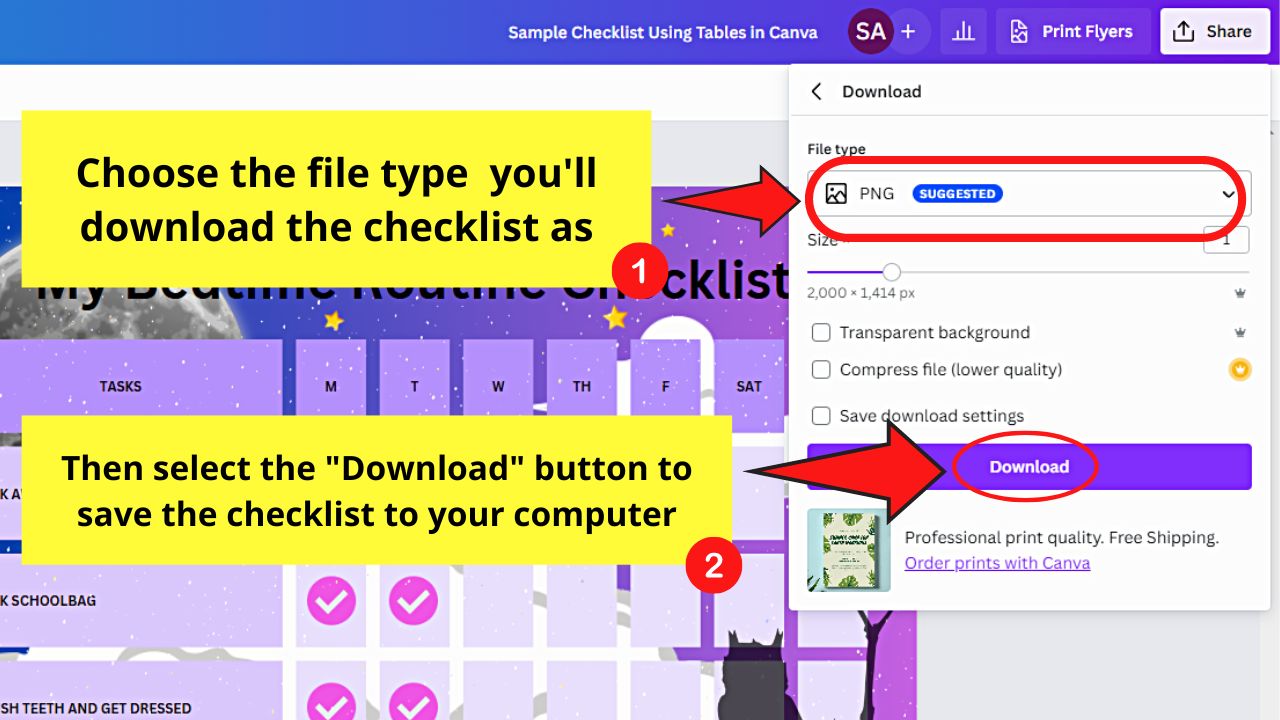
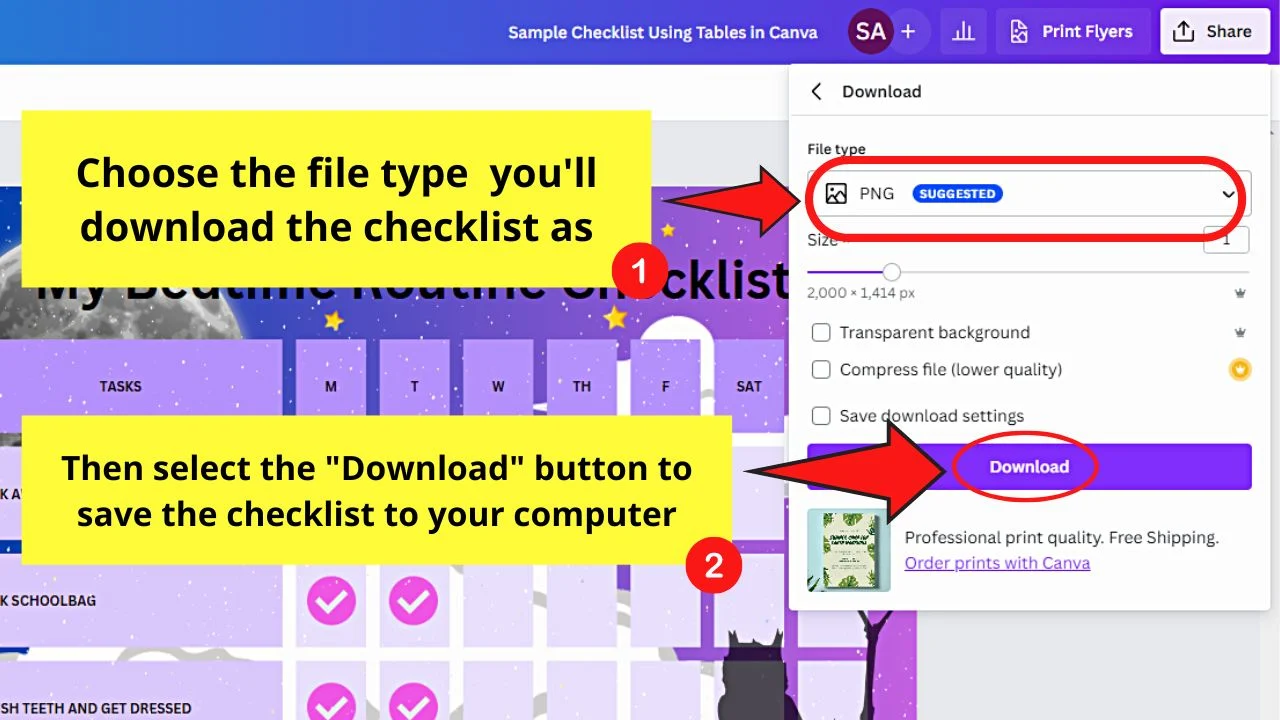
Step 11: Save your checklist to your computer
Select “Share” before clicking “Download.”
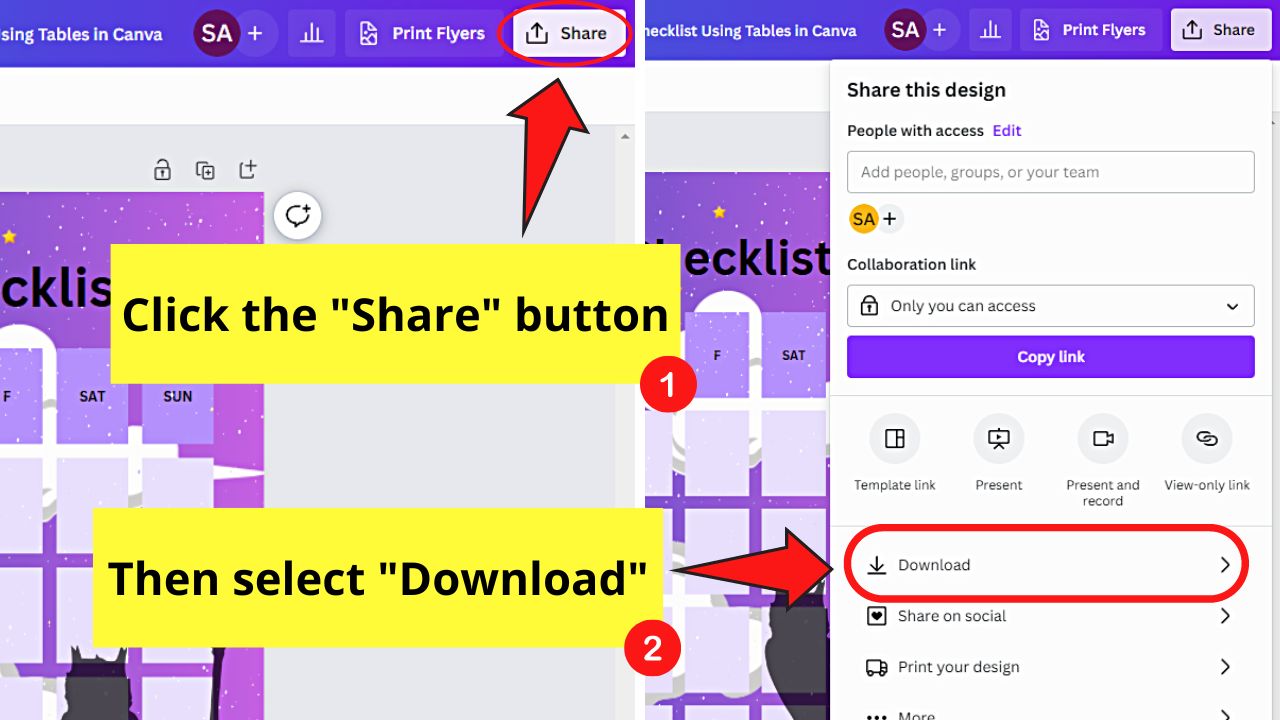
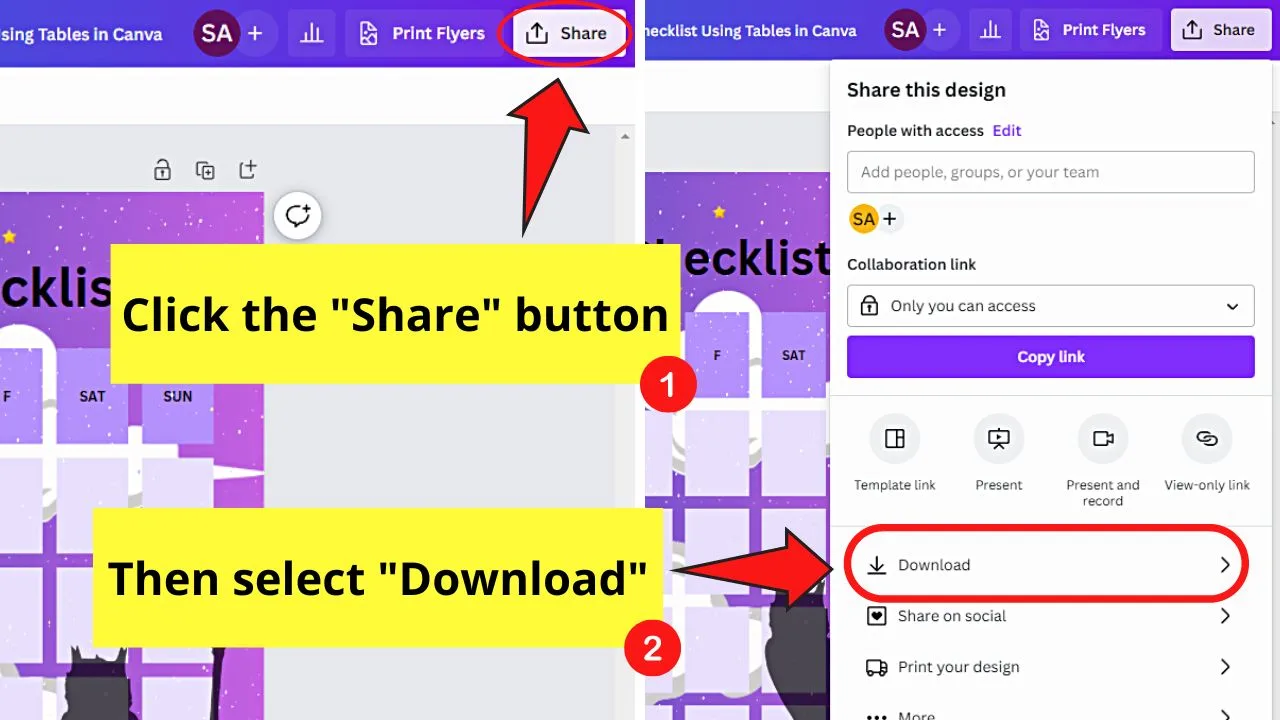
From there, choose “File Type” before downloading the newly-created checklist.
How to Make a Clickable Checklist in Canva Using Canva Docs
Since adding the handy Canva Docs feature in 2022, designing Word documents has never been easier.
Whether you create a Docs template from scratch or use the various templates available, there is something for everyone to use. And this includes making clickable checklists in Canva.
If before you had to export the Canva checklist as a PDF first and edit it in third-party PDF readers to make the checkboxes clickable, no need to do that now.
There are two ways to make a clickable checklist in Canva. One way is to find a Canva Docs template that features clickable checkboxes.
Making a Clickable Checklist in Canva Docs Using Premade Templates
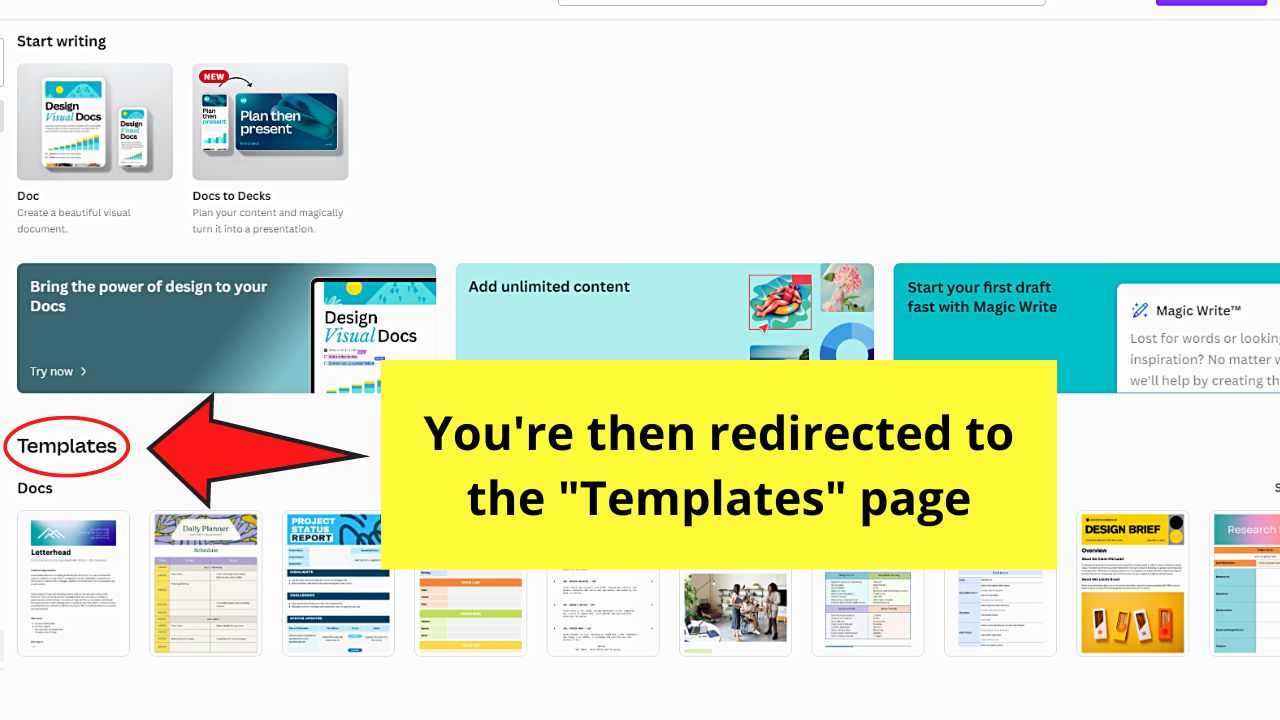
Step 1: Select the “Docs” tab
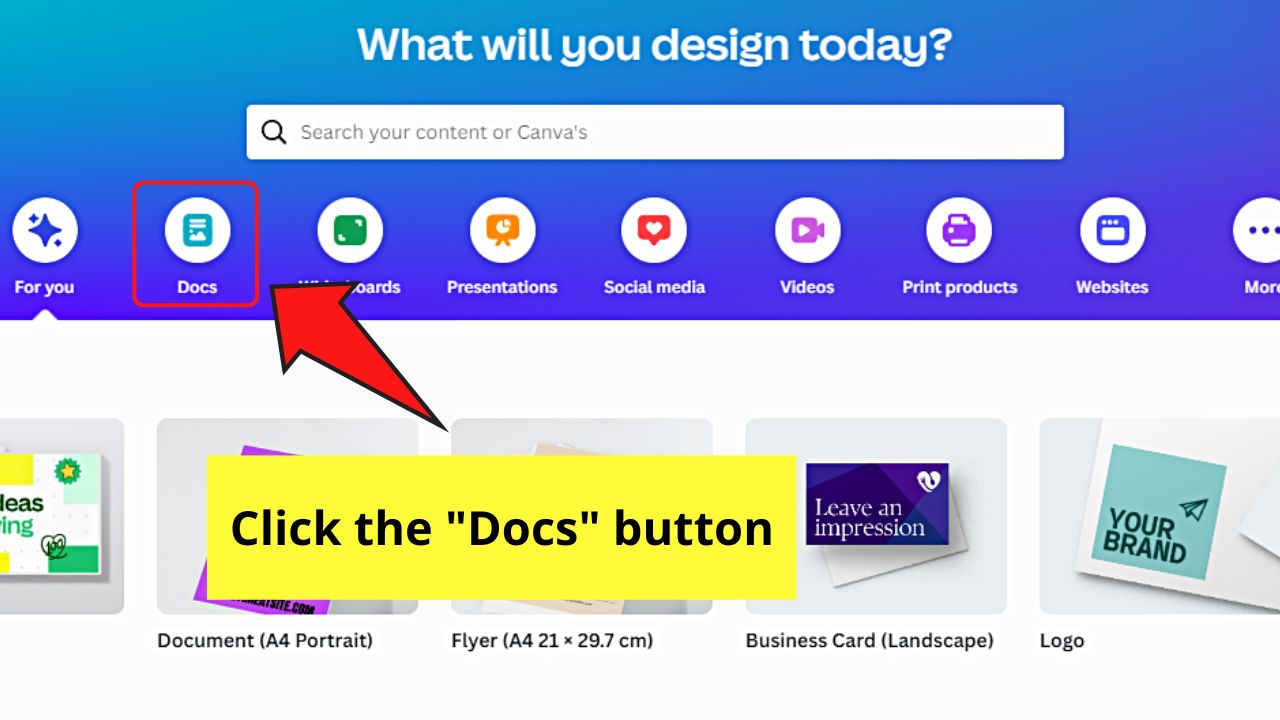

This is the second feature featured on Canva’s menu bar on the “Home” page. The “Templates” page for Canva Docs then appears.

Step 2: Scroll down and click a template with clickable checkboxes
There are various templates available with checklists in them. But find one that allows you to click the inside of the box to mark that item off the list.
I used the “Personal To-do List Doc in Cobalt Gold Vibrant Professional Style” template.
Step 3: Open the template with clickable checkboxes to edit it
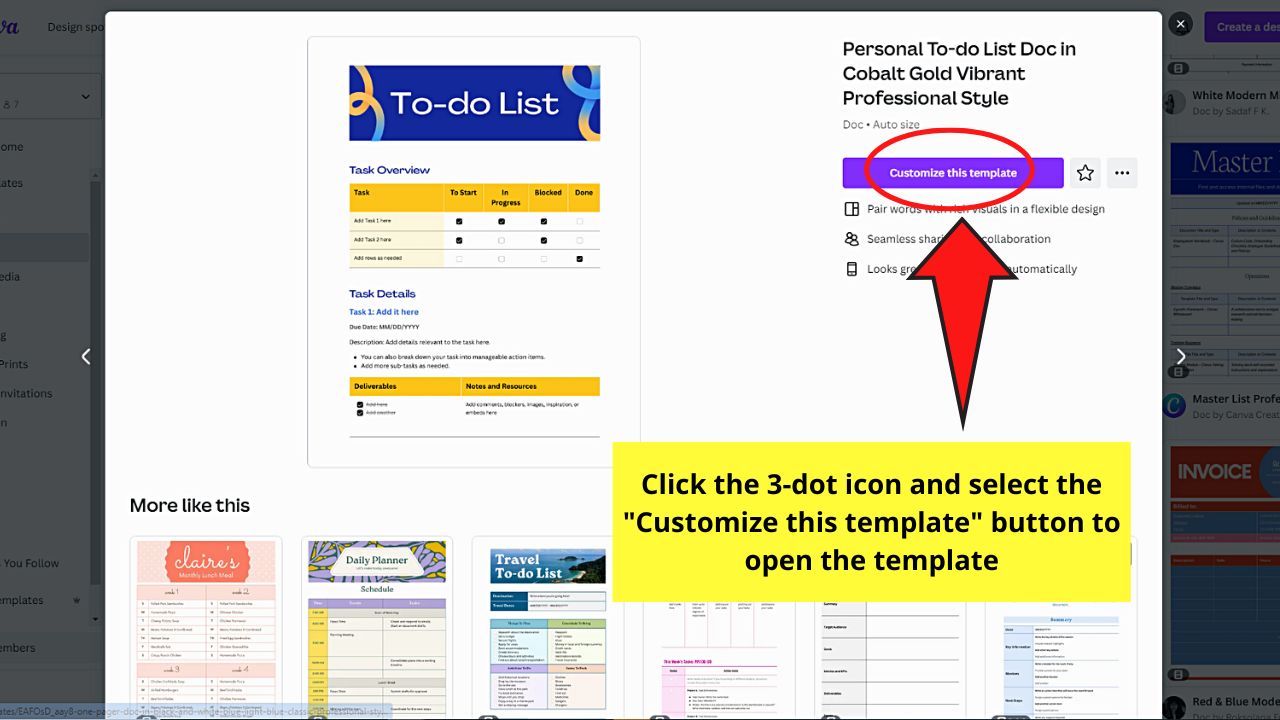
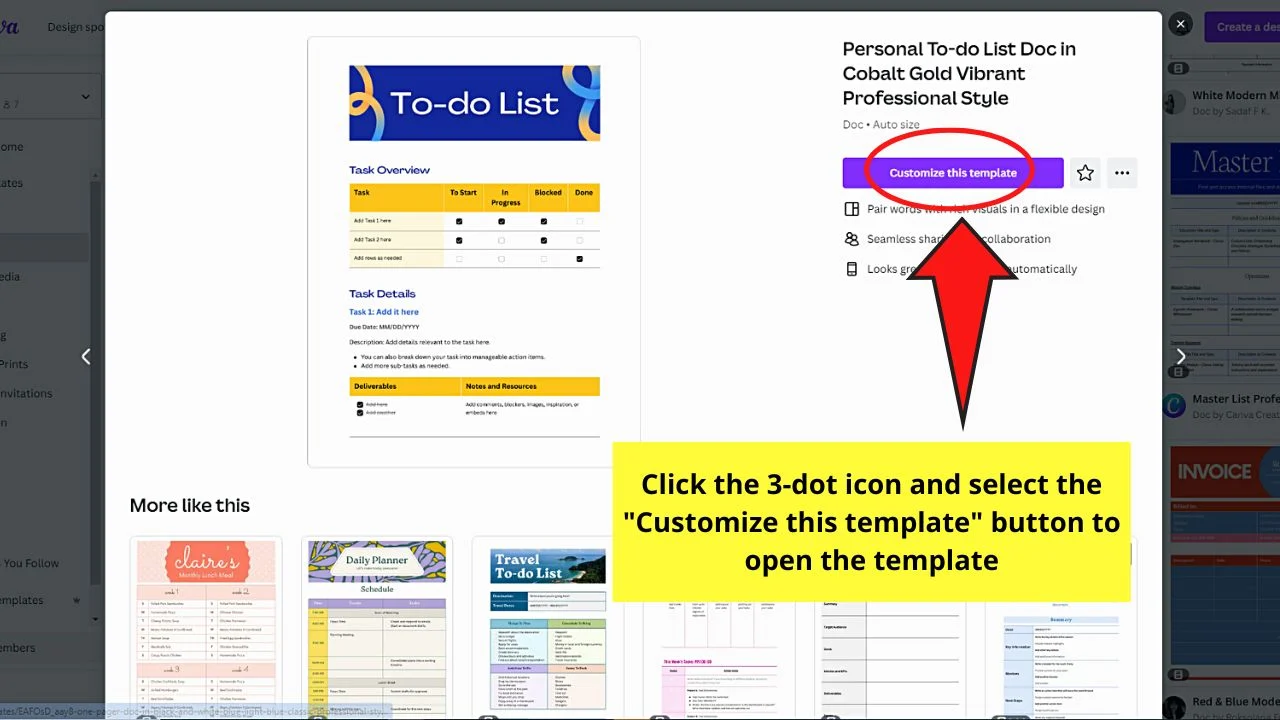
You can either select the 3-dot icon and click “Preview this template” or click on the thumbnail to open it.
Then proceed with editing the entries in the checklist template to personalize it. You can add graphic elements and change its background if you want.
Making a Clickable Checklist in Canva Docs From Scratch
Unlike the regular Canva design templates, it is only in Canva Docs that you can add clickable checkboxes with the help of the “Magic Menu.”
Granting that you have already opened a blank Canva Docs template, follow these steps.
Step 1: Open the “Magic Menu”


One way to do this is by clicking the “+” button on the lower right of the editor page. Another way is to press “/” on your keyboard.
Step 2: Type “Checklist” in the “Magic Menu” search bar
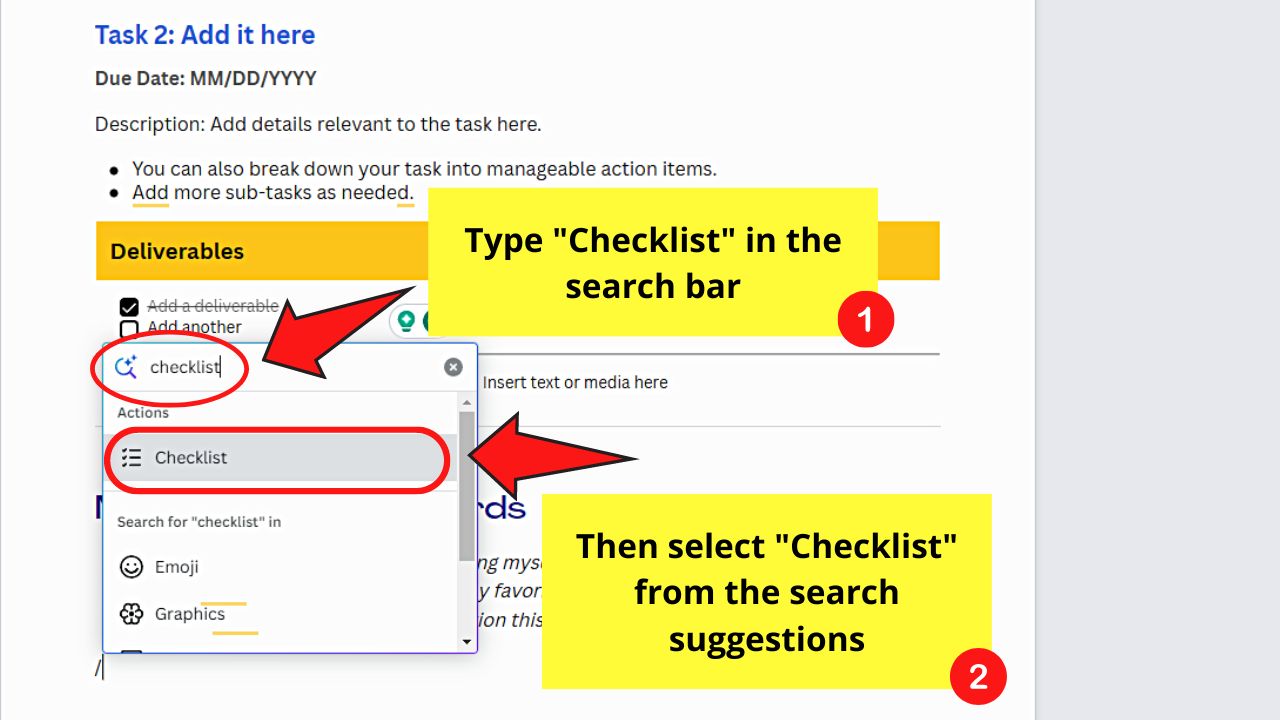

All search suggestions related to your keywords then appear on the dropdown menu. Click the “Checklist” option.
Step 3: Edit the checklist
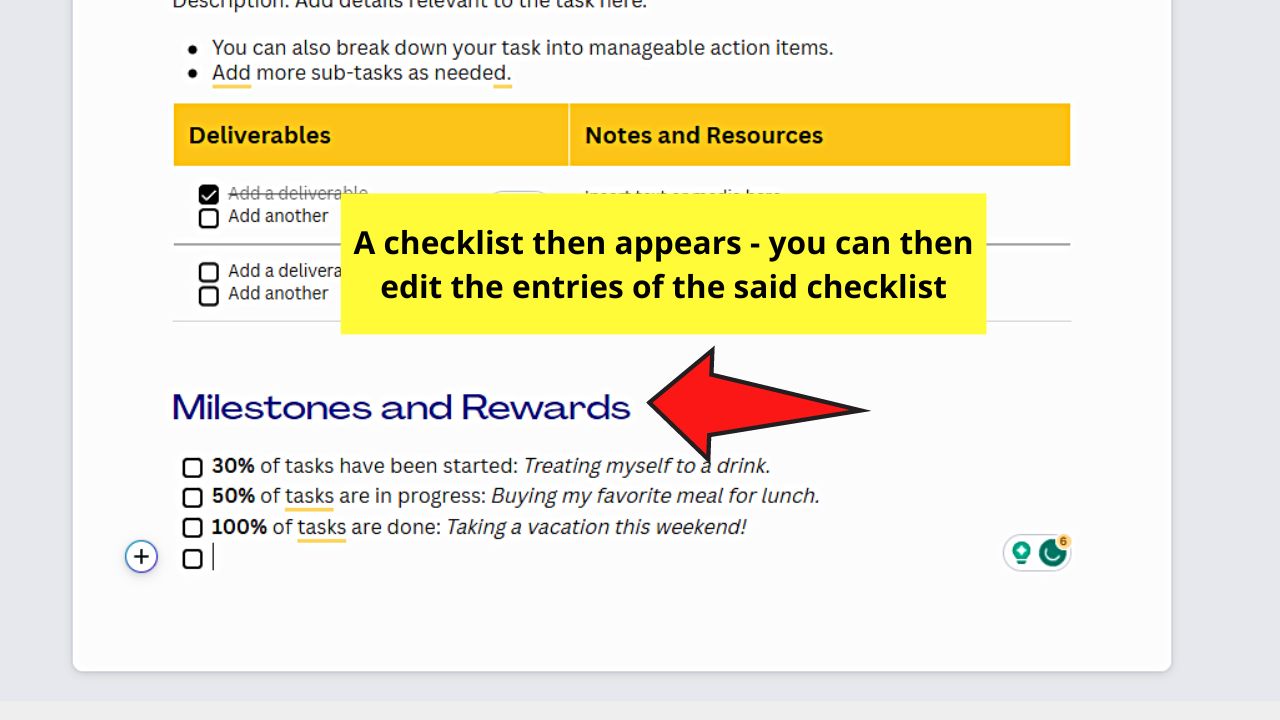

After clicking the “Checklist” from the “Magic Menu,” a default “Milestones and Rewards” checklist appears on the page.
Customize it by clicking on the text boxes to change the text. Add new graphic elements if needed to make the checklist more eye-catching.
Frequently Asked Questions about How to Make a Checklist in Canva
What are the basic elements of a good checklist?
Since a checklist serves as a guide, it should include titles, task objectives, and detailed descriptions of those tasks. Make sure there are minimal images added to the design and don’t forget about adding ample space for adding more details if needed.
Does Canva require a premium subscription to create a checklist?
There’s no need to be on Canva Pro to create a checklist. But, if you’re a free Canva user and you added premium design elements, make sure to pay for them first before selecting the Download button.
What’s the best format for a checklist?
There’s no clear-cut answer about the best format for a checklist. But, the best way of arranging your checklist items is by doing them chronologically or by priority.


Hey guys! It’s me, Marcel, aka Maschi. On MaschiTuts, it’s all about tutorials! No matter the topic of the article, the goal always remains the same: Providing you guys with the most in-depth and helpful tutorials!

