

There are several methods to make bubbles, but what all have in common is that these techniques require several steps to reach that amazing final result.
Making bubbles is not precisely difficult, but it can be challenging because it requires patience and following some reiterative steps. Just take in mind that the more steps the better the final product.
Anyways, this is something anyone can do, so let’s begin!
Making Bubbles in Illustrator
Make 3 circles in white gradient. Make 4 half moon shapes, 2 in green and 2 in pink gradient. Make 2 ovals in yellow and pink gradient. Make 2 arched window shapes in gradient. Use gradient mesh to add colors. Twirl and warp it. Add 2 blurry arcs to the edges.
How to Make Bubbles in Illustrator: Step-by-Step Guide
Let’s learn how to make a realistic and colorful bubble in this step-by-step guide.
Since the bubble will have transparencies, I’m going to use a background so we can appreciate the details.
Step 1: Make “Circle 1”

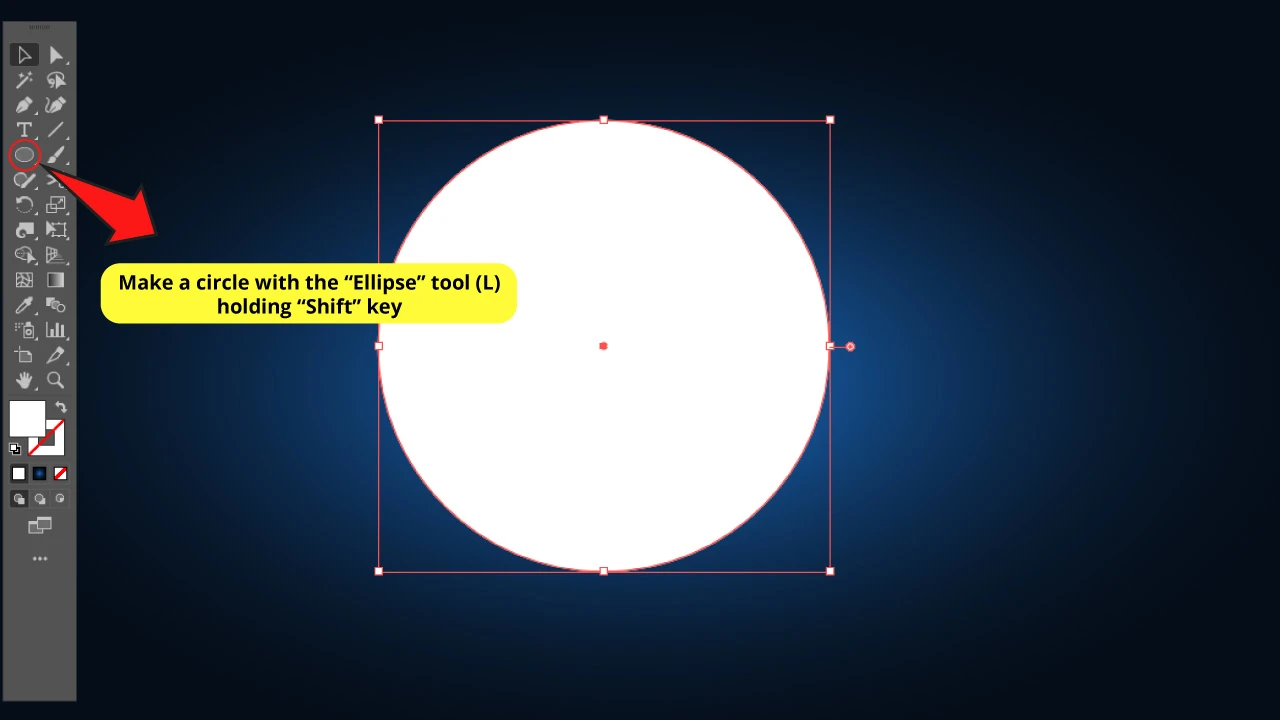
Make a circle using the “Ellipse” tool (L) on the left side toolbar. Make sure to hold the “Shift” key to make a proportional perfect circle.
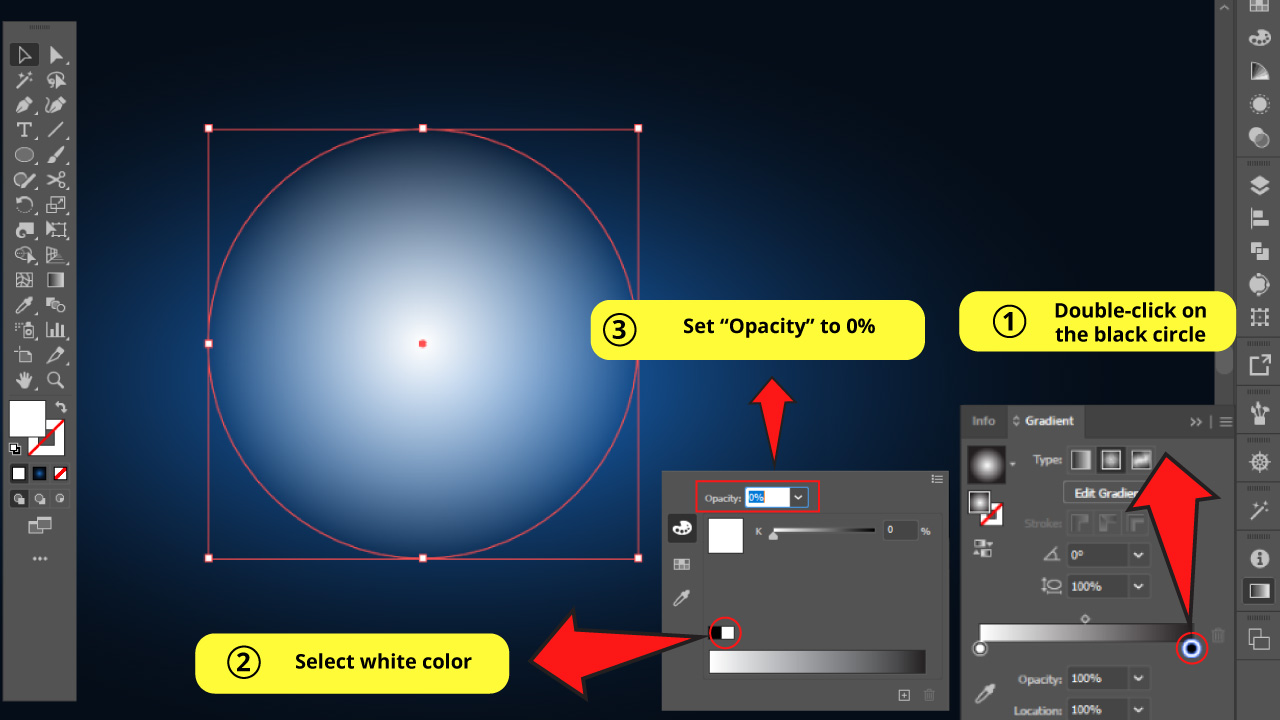
Step 2: Add Gradient Color
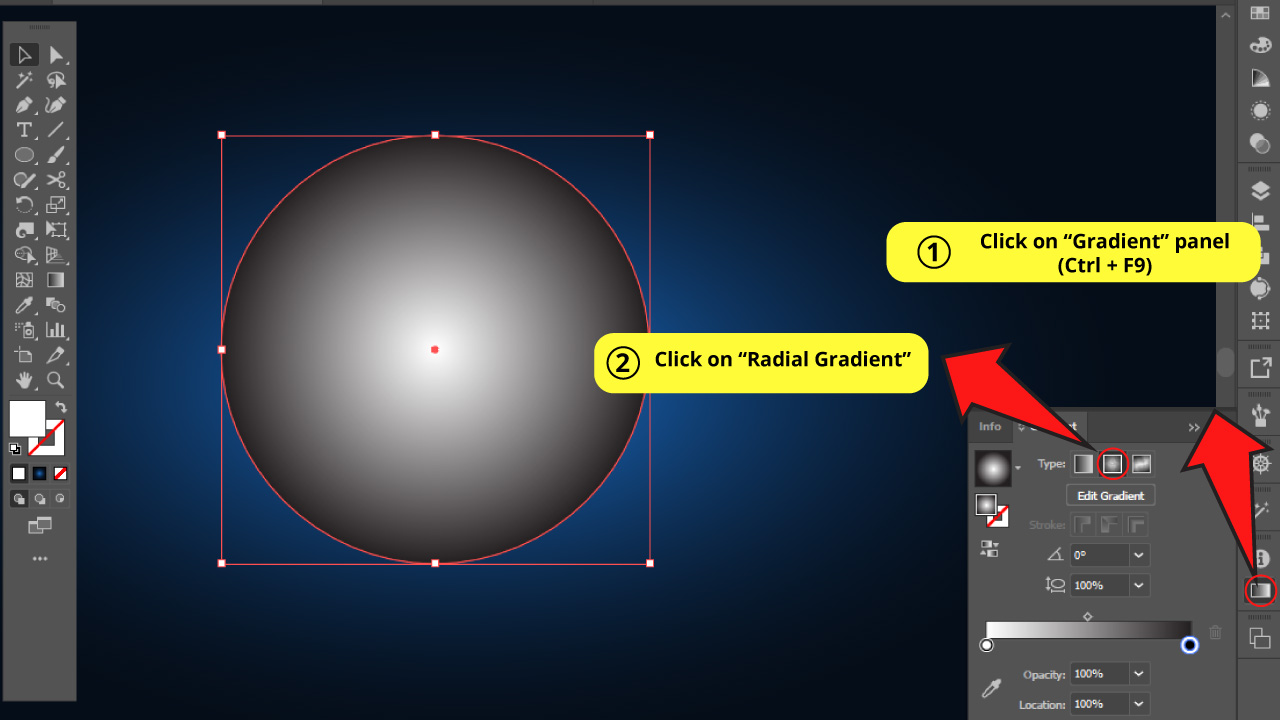
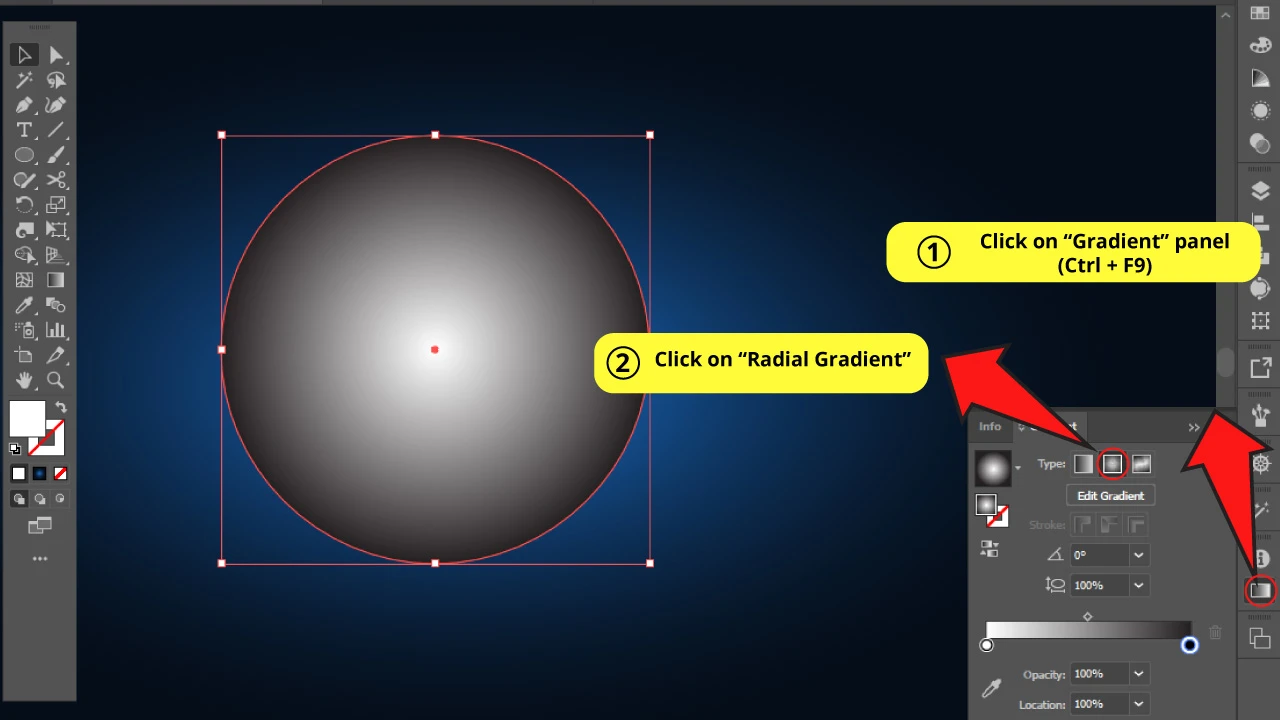
Go to the “Gradient” panel on the right side toolbar. If you can’t find it, you have to enable it first by going to “Window > Gradient” on the top side menu. Or you can shortcut it with “Ctrl + F9”.
Once you have opened the “Gradient” panel, select “Radial Gradient” and double-click on the black circle so you can change that color to white. Then set “Opacity” to 0%.

If you want to go deeper and learn all sorts of gradient techniques, take a look at this complete tutorial about “How To Use Gradients in Illustrator”.


Step 3: Set Gradient
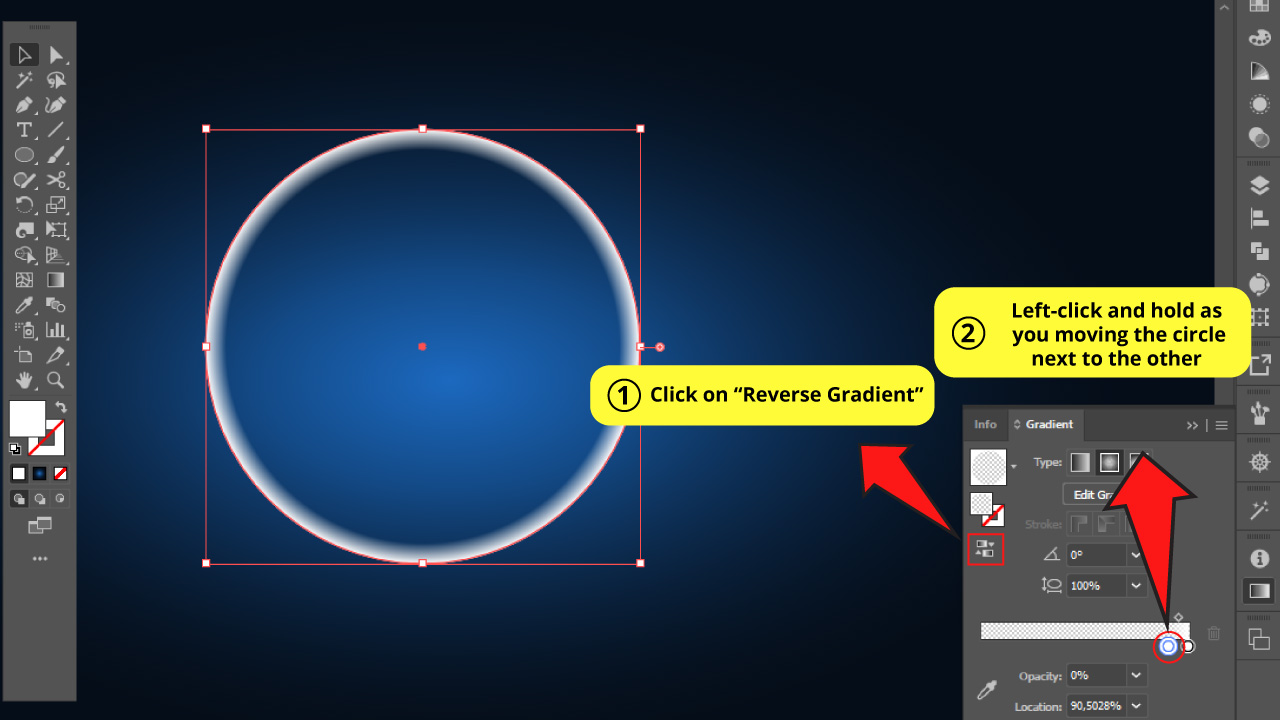

Click on “Reverse Gradient” to change it to transparent in the middle and white opaque on the edges.
Then left-click and hold on the left white transparent circle and move it next to the other as you can see on the image.
Step 4: Set the “Opacity”

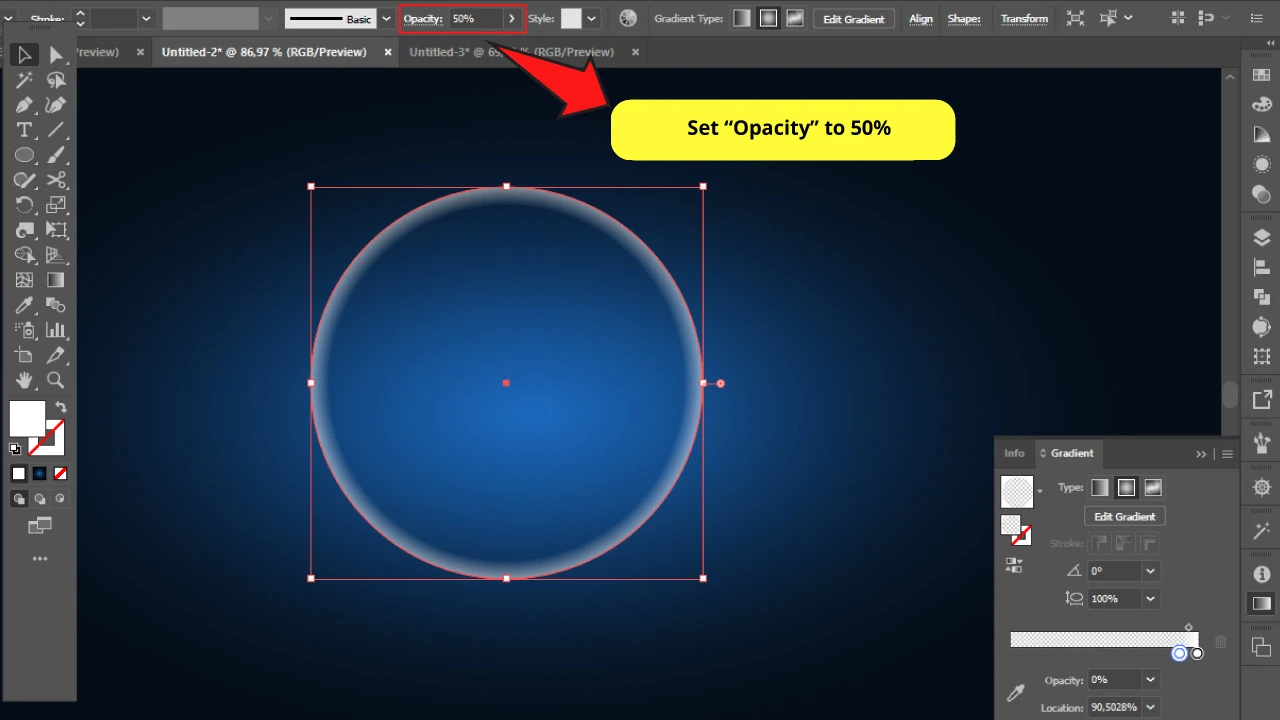
While the circle is selected with the “Selection” tool (V) go to the top side toolbar and set the “Opacity” to 50%.
If you can’t find the “Opacity” panel, you can enable it by going to “Window > Transparency” or using the “Shift + Ctrl + F10” shortcut.
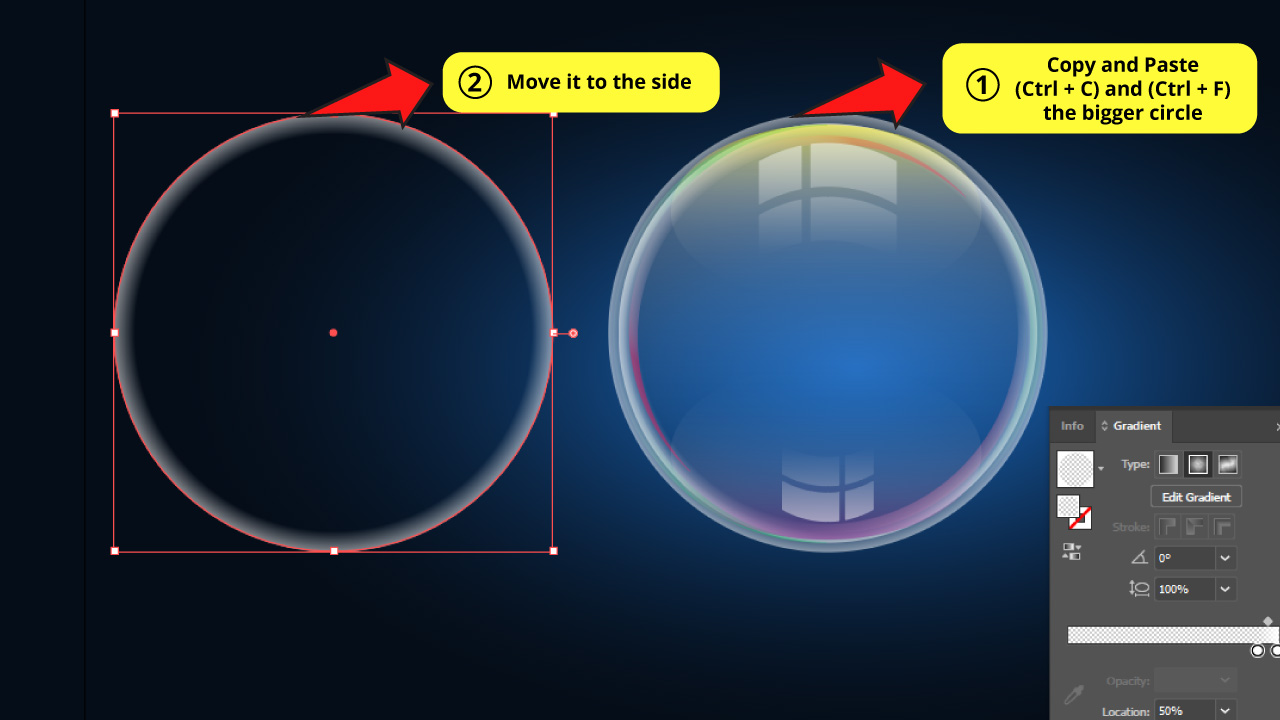
Step 5: Make “Circle 2”

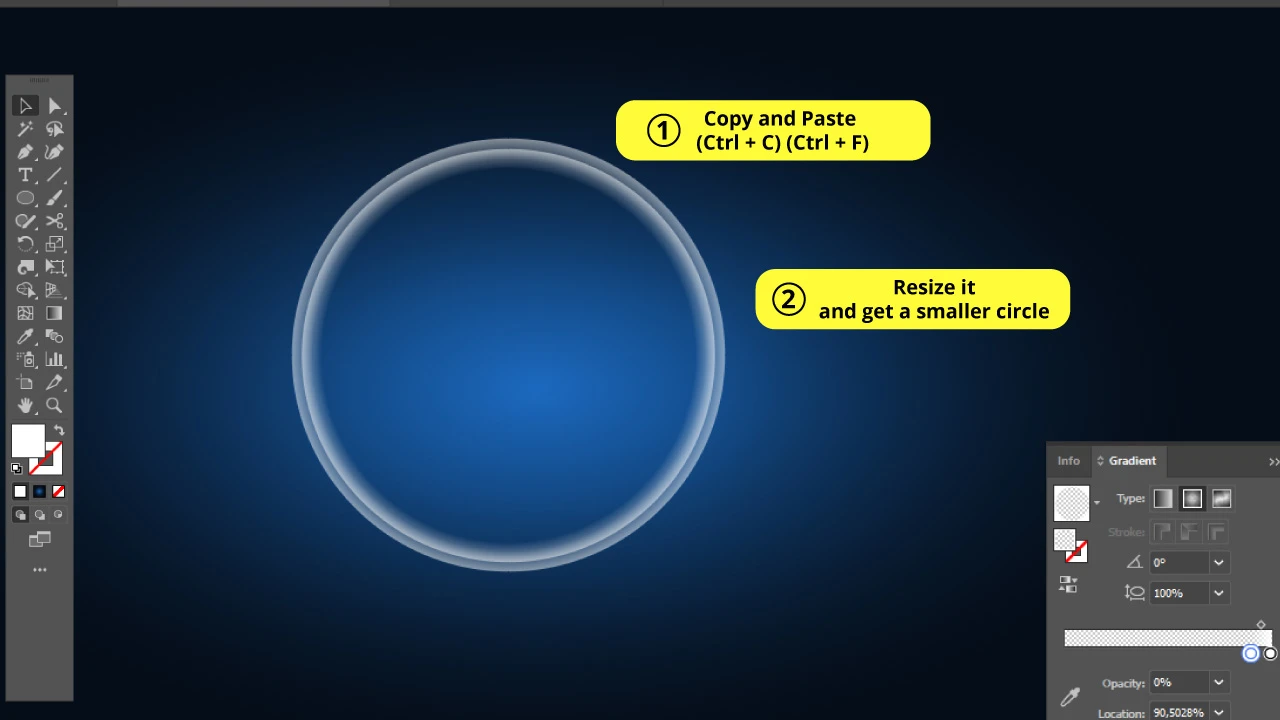
Make sure that the circle is selected and press “Ctrl + C” and then “Ctrl + F” to paste it in front.
Then resize it to make it a little smaller using the handles on the corners of the bounding box. Now align it to the center so both circles share the same axis.
If you’d like to learn more about aligning methods and how the “Align” tool works in Illustrator, we recommend you to check this ultimate guide about “How To Center Objects in Illustrator”.
Step 6: Make “Circle 3”

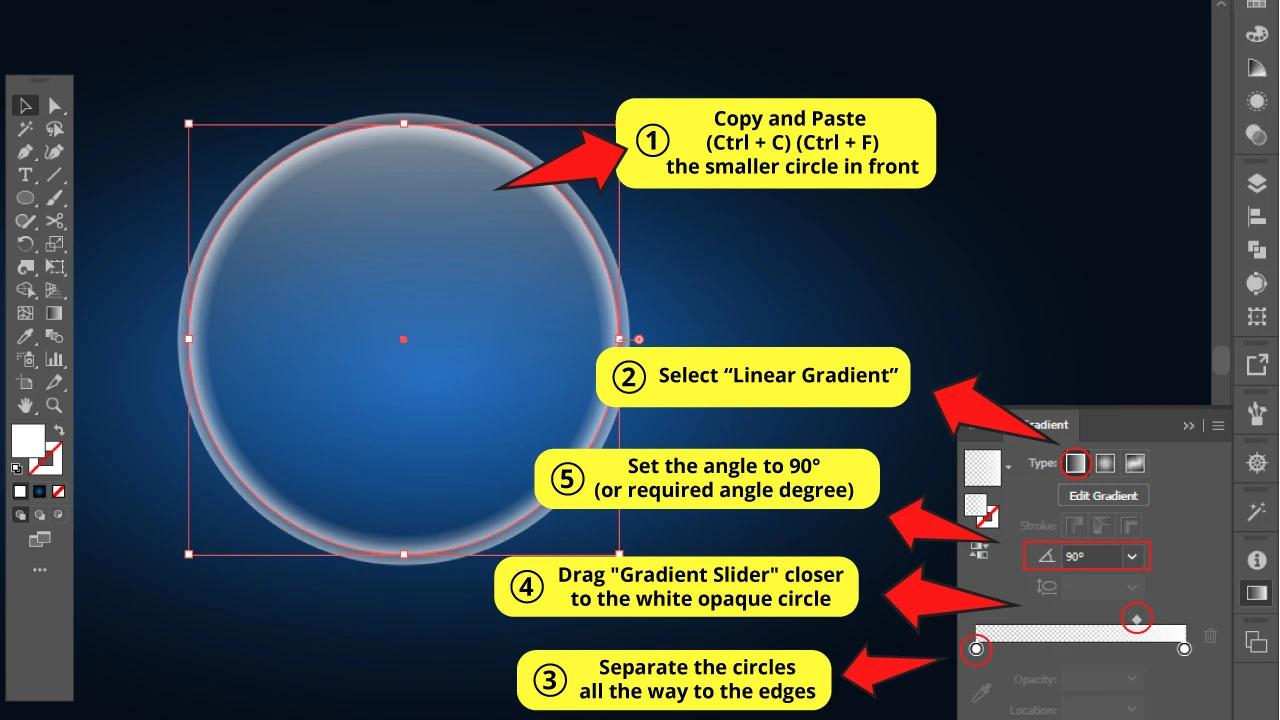
Select the last circle that you have created and make a copy of it using “Ctrl + C” and “Ctrl + F” to paste it in front.
Go to the “Gradient” panel and select “Linear Gradient” this time.
Separate the color circles all the way to the edges.
Make sure you place the “Gradient Slider” (diamond symbol) near the right circle (it’d be near the white opaque color).
The gradient effect that we want to get is white opaque on the top to transparent on the bottom.
For this circle we have to set the “Angle” to 90° to rotate the gradient to be from top to bottom. But maybe you need to set another rotation for a different type of circle, like 180°, -90° or -180°. So if you don’t get the same gradient results, try with different angle degrees until it works.
Step 7: Make “Circle 4”

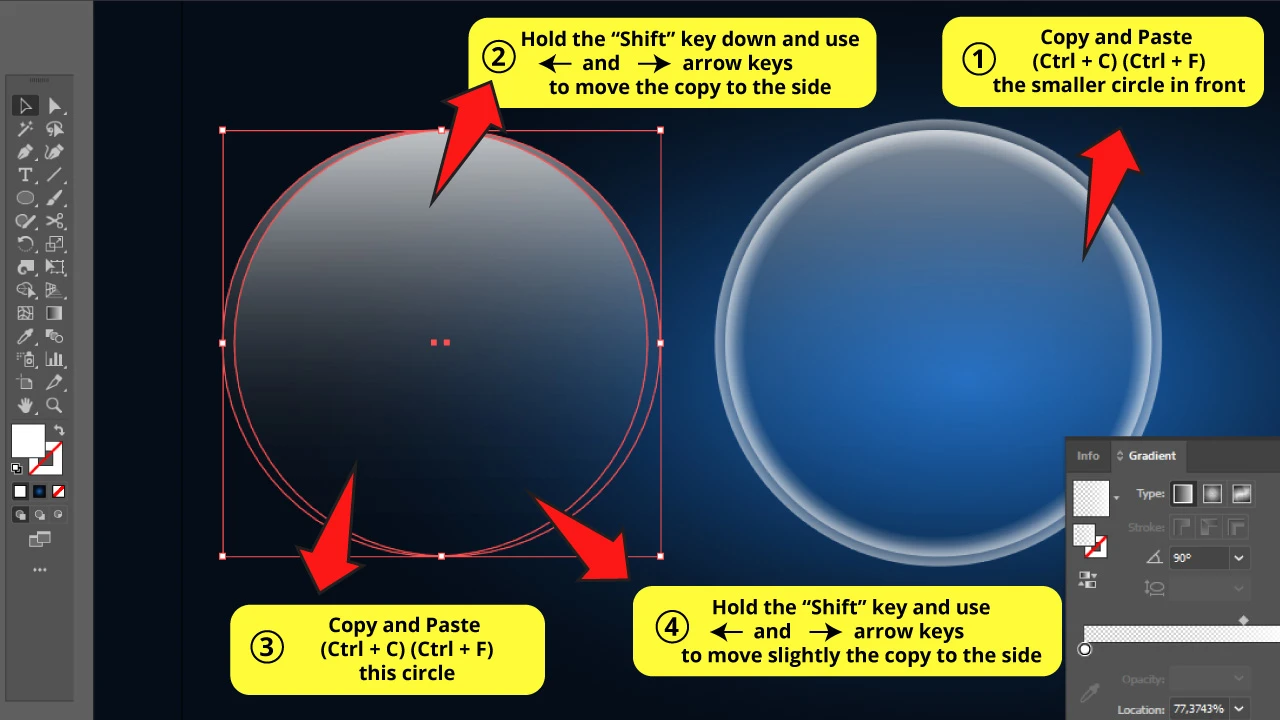
Select the last circle you made and make a copy using “Ctrl + C” and “Ctrl + F”. Then while the circle is selected, hold the “Shift” key and use your keyboard’s arrow keys to move it to one of the sides.
Then make another copy of the circle and move it just a little bit to one of the sides until you get two misaligned circles as you can see in the reference image.
Step 8: Use “Shape Builder” Tool on “Circle 4”
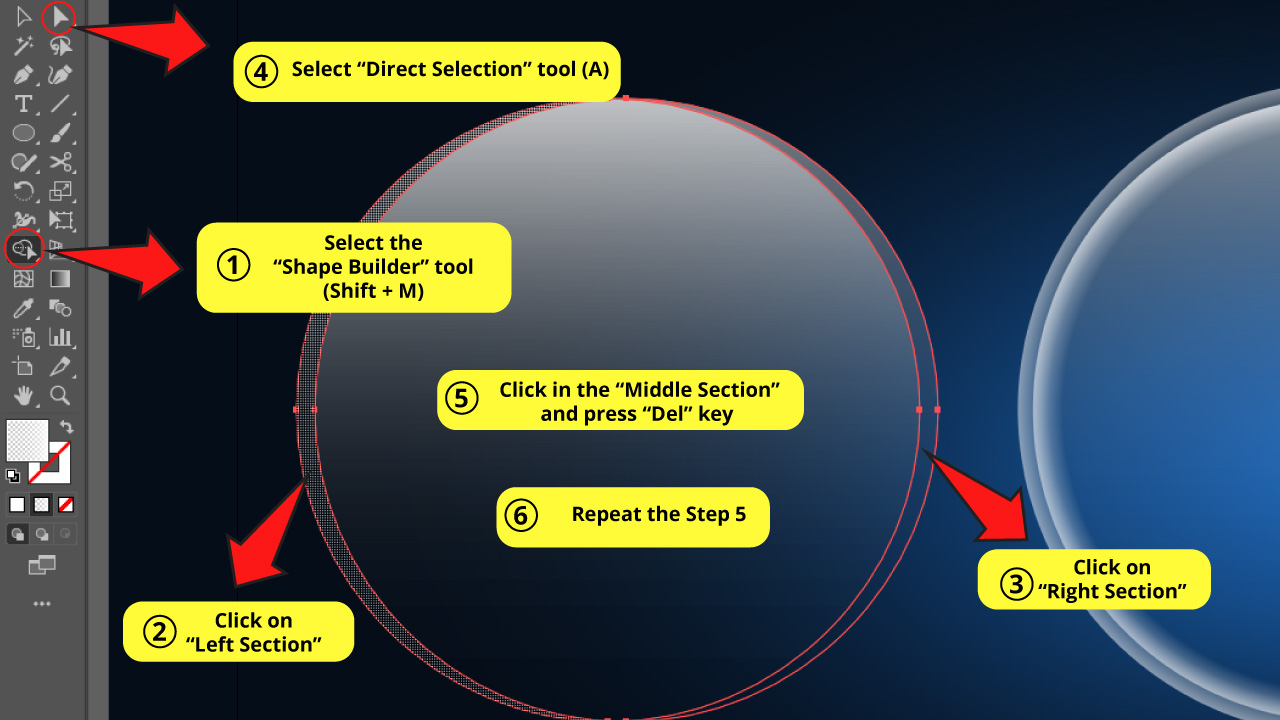

Select both misaligned circles and click on the “Shape Builder” tool (Shift + M) on the left side toolbar.
If you have correctly selected this tool, a dotted pattern will appear when you drag the mouse over the circles. This dotted pattern shows us different sections of the circles.
So click on the left section and then on the right section.
Then click on the “Direct Selection” tool (A) that you can find on the left side toolbar.
Use this tool to select the middle section and then press the “Del” key to delete it. Repeat this action one more time to delete the whole middle section.
If you’d like to know more about the “Shape Builder” tool you can check these articles about “Illustrator: “How to Use Shape Builder Tool” and “How to Combine Shapes in Illustrator”.
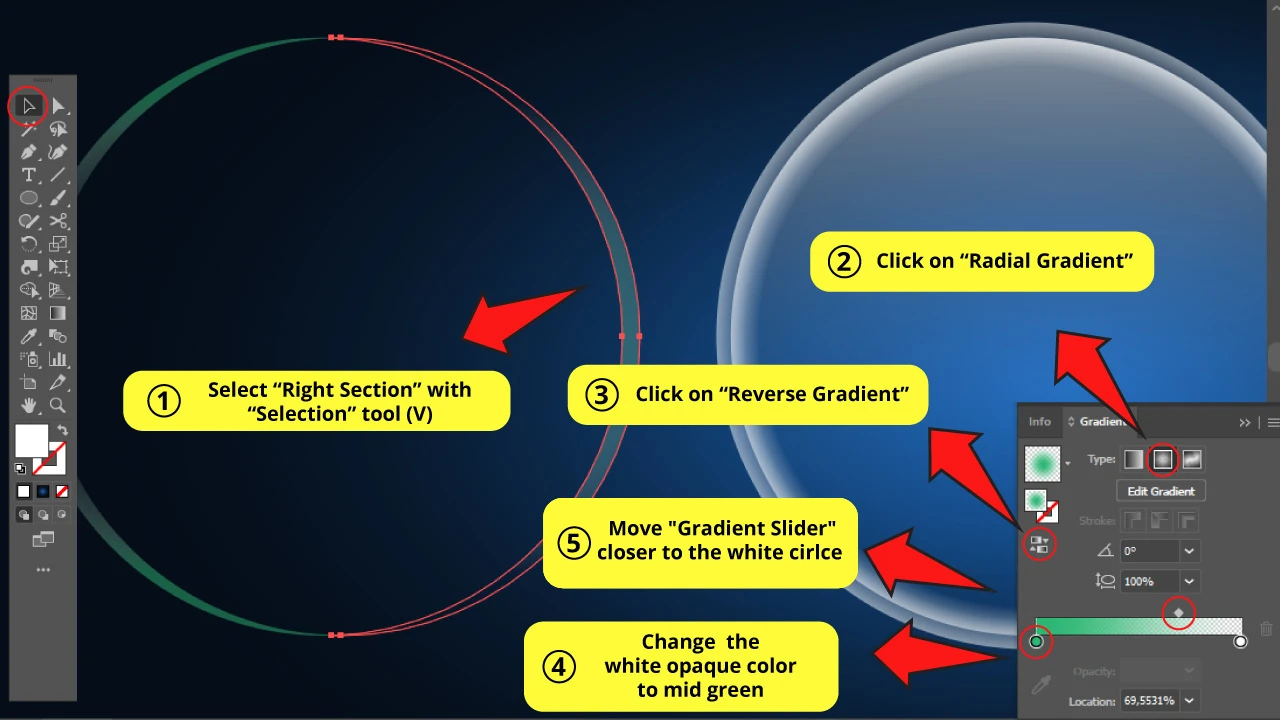
Step 9: Add Radial Gradient on Left Section

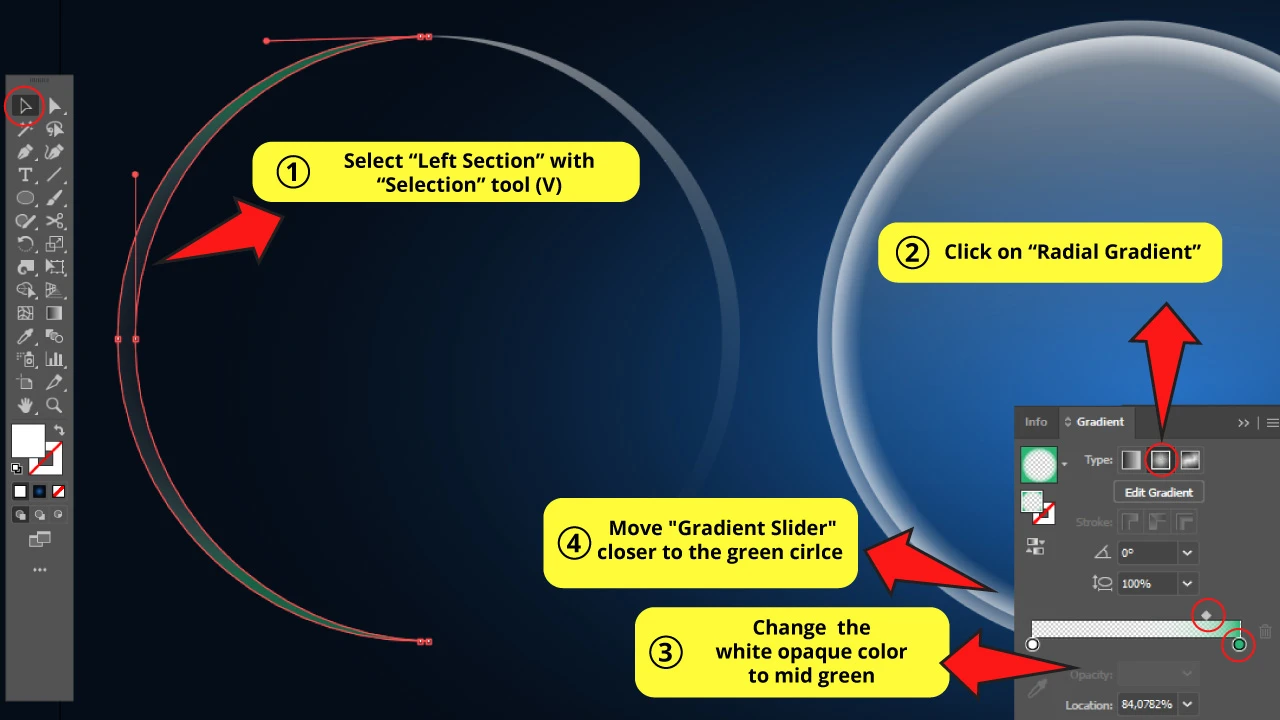
Now select the left section with the “Selection” tool (V) and go to the “Gradient” panel.
Click on “Radial Gradient”.
Double-click the left circle and make sure that its gradient is white and its “Opacity” is set to 0%.
Double-click on the right circle and make its gradient mid green with “Opacity” set to 100%.
Now move the “Gradient Slider” closer to the green circle (this focuses the color on the edge).
Step 10: Add Radial Gradient on Right Section
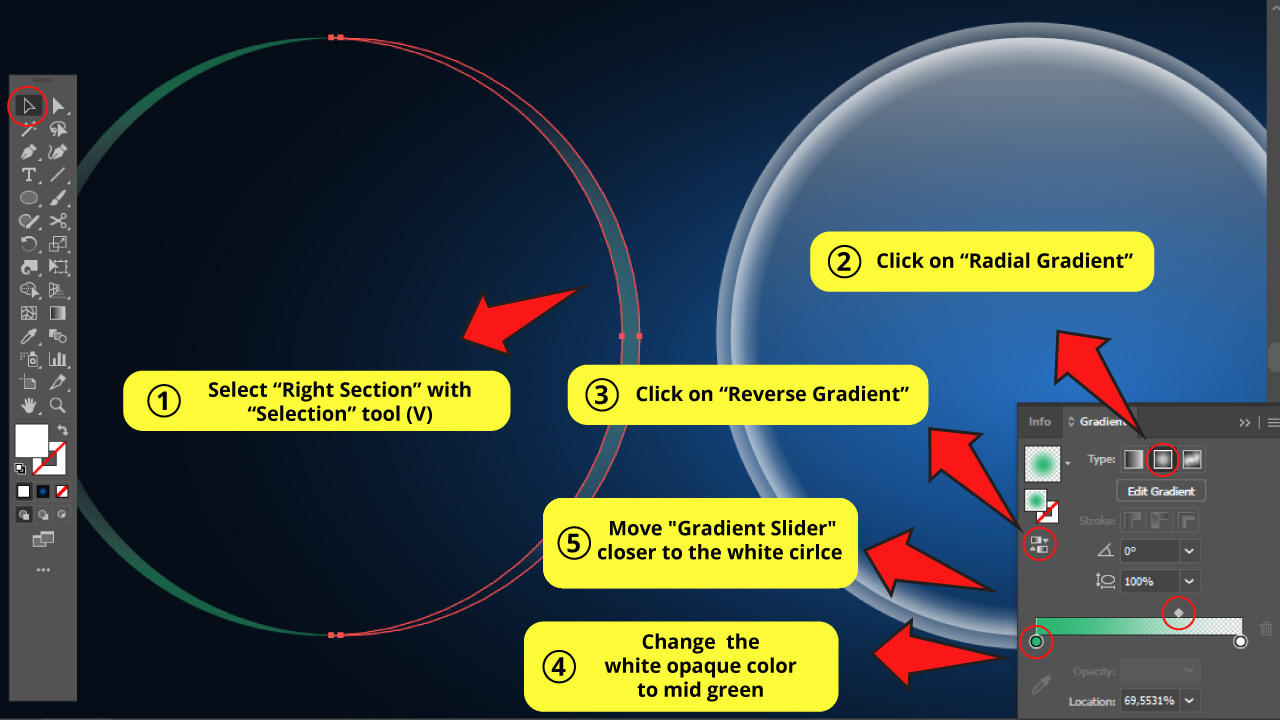
Select the right section and go to the “Gradient” panel. Select “Radial Gradient”.
Then click on “Reverse Gradient” to invert the gradient arrangement (color in the center and transparency on the edges).
Next, double-click on the white opaque color and change it to mid green.
The other circle’s color has to be white, with the “Opacity” set to 0%, just like in “Left Section”.
Finally, move the “Gradient Slider” closer to the white transparent circle to widen the green range.
Step 11: Make a Copy of the Sections
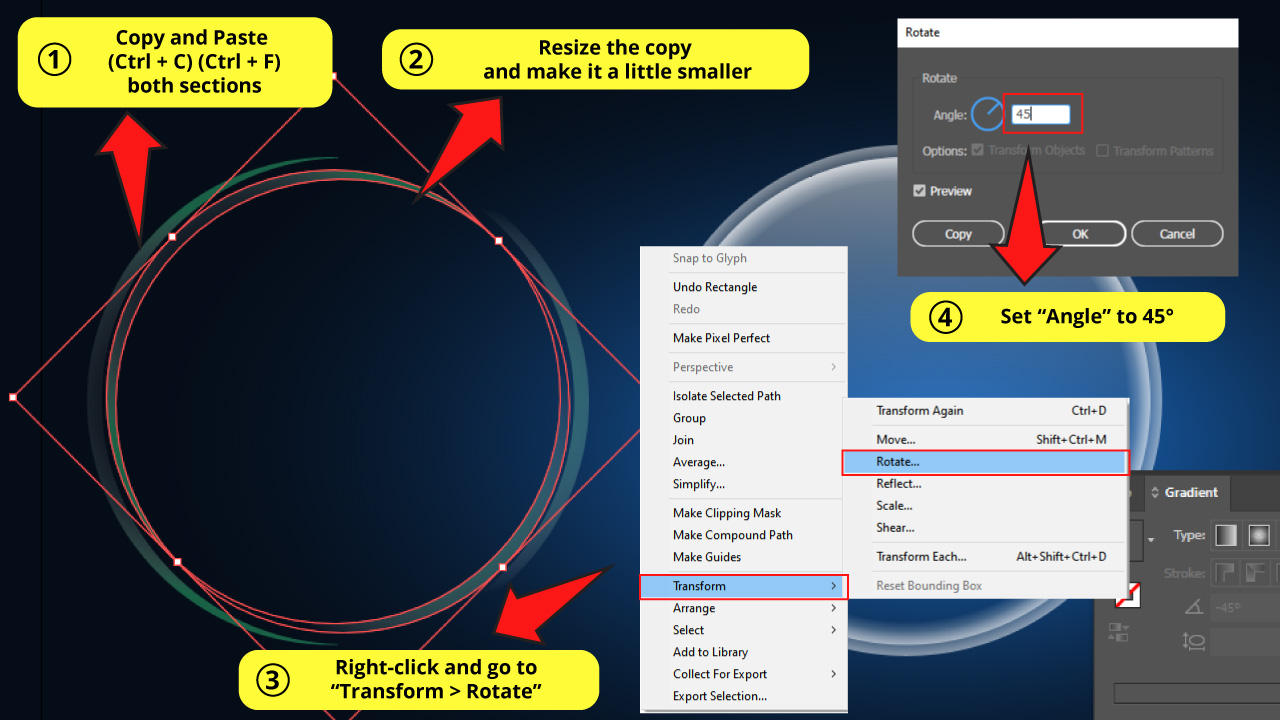

Select both sections and press “Ctrl + C” and then “Ctrl + F” to paste in front.
Resize the copy to make it a little smaller than the original one.
Now we want to rotate the copy 45°.
For this you have to select the copy and right click to display the options menu. Go to “Transform > Rotate” and set “Angle” to 45°. Then click “OK”.
Step 12: Change the Color of the Sections

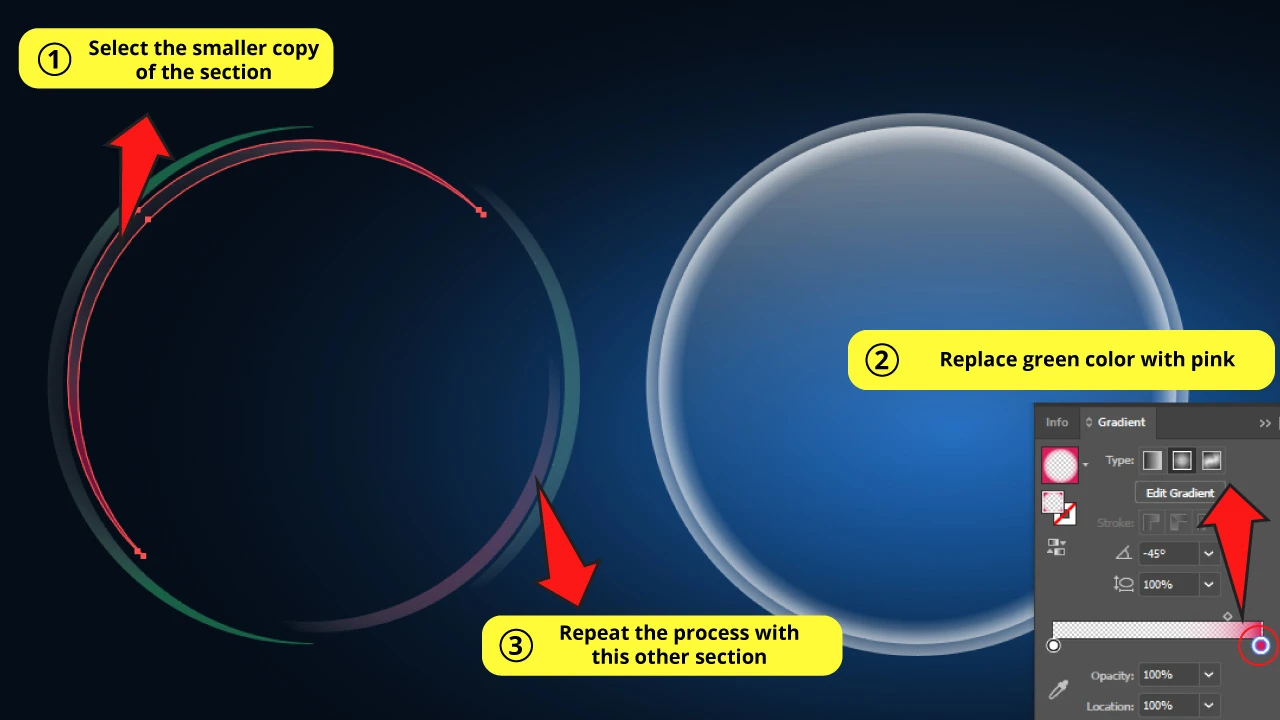
Select one of the sections of the new copy and go to the “Gradient” panel once again.
Double-click on the green circle and change its color for mid pink.
Repeat this action on the other section.
Step 13: Align Sections

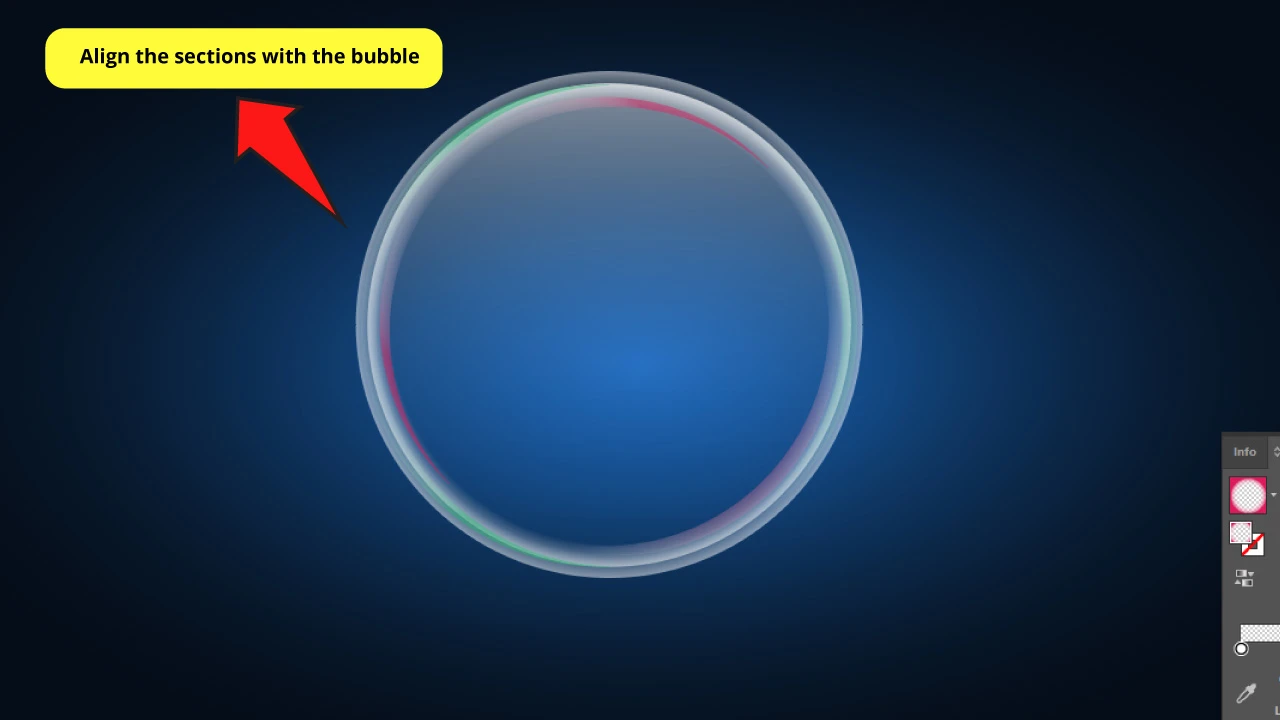
Select all the shapes that we just created next to the bubble.
Then while you’re holding the “Shift” key, use the arrow keys to align them with the bubble.
Step 14: Make “Circle 5”
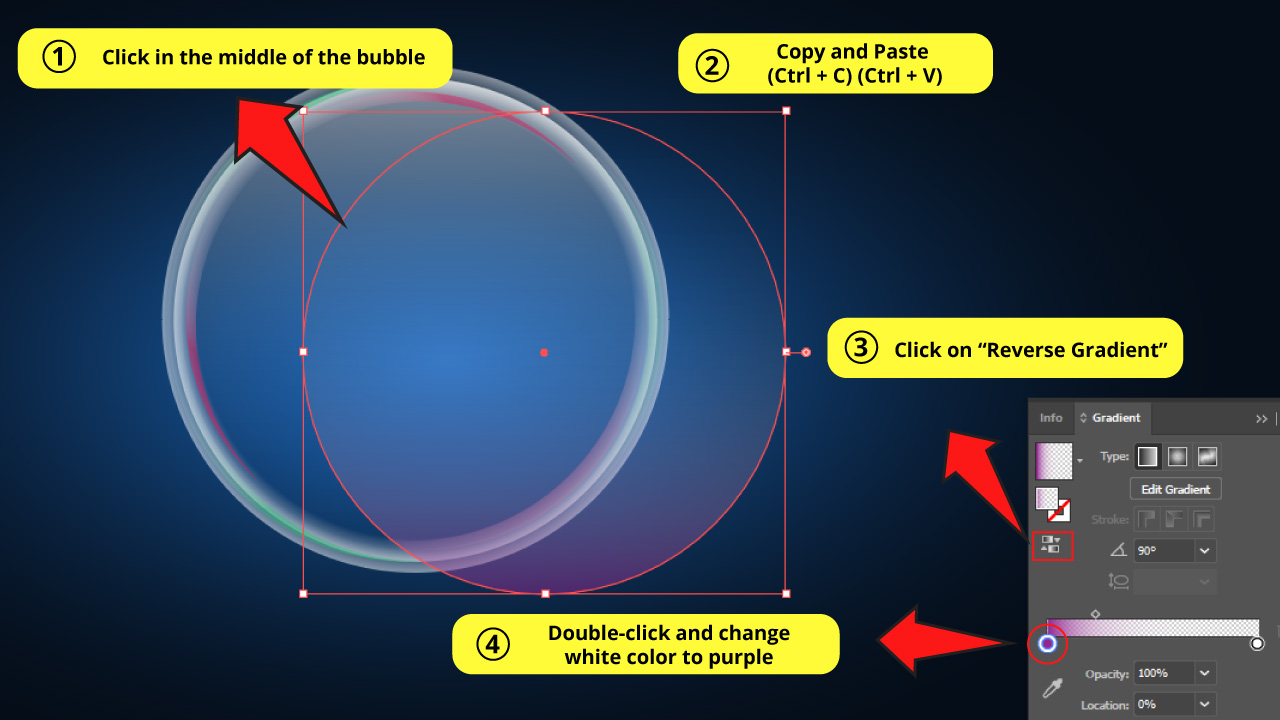

Click in the middle of the bubble with the “Selection” tool (V) to select the “Circle 3” and make a copy using “Ctrl + C” and “Ctrl + V”.
Go to the “Gradient” panel and click on “Reverse Gradient” so we flip its colors upside down.
Then double-click on the white opaque circle and change its color to purple color.
Step 15: Oval “Circle 5”
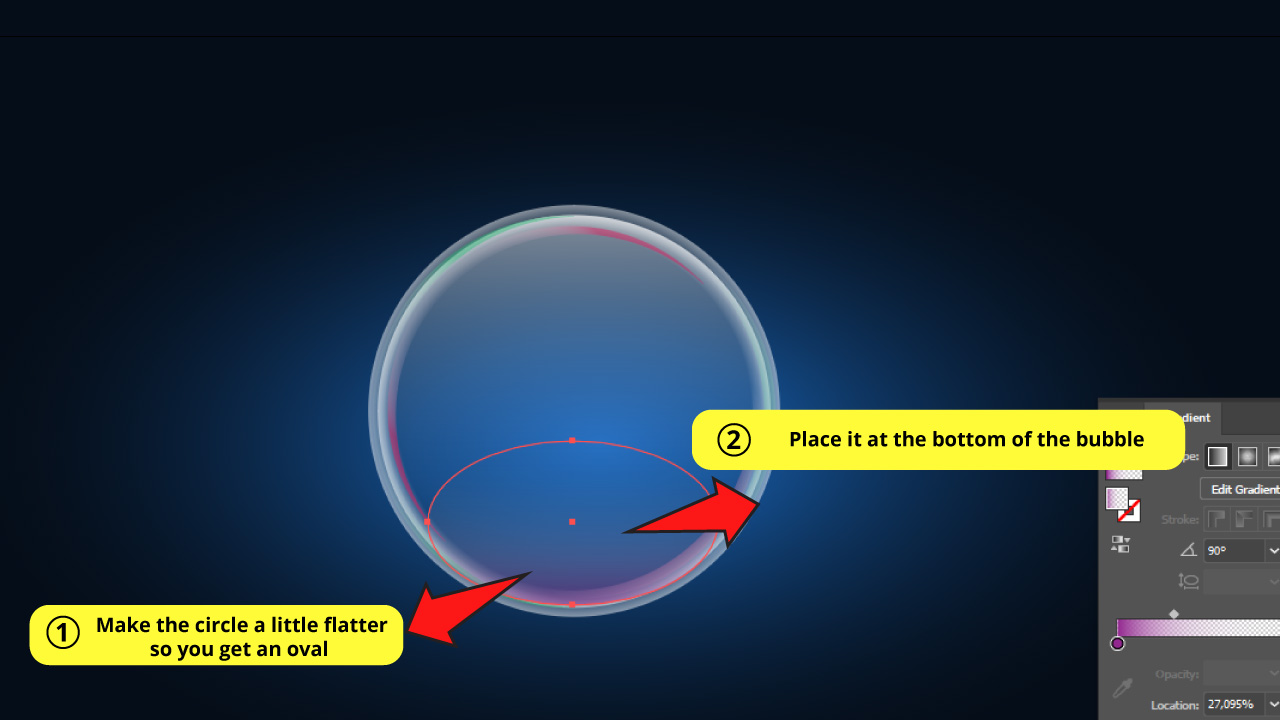
Select the new circle that you just created and use the handle at the top of the bounding box to make it flatter so you get an oval.
Then move the oval to the bottom of the bubble.
Step 16: Make a Copy of the Oval
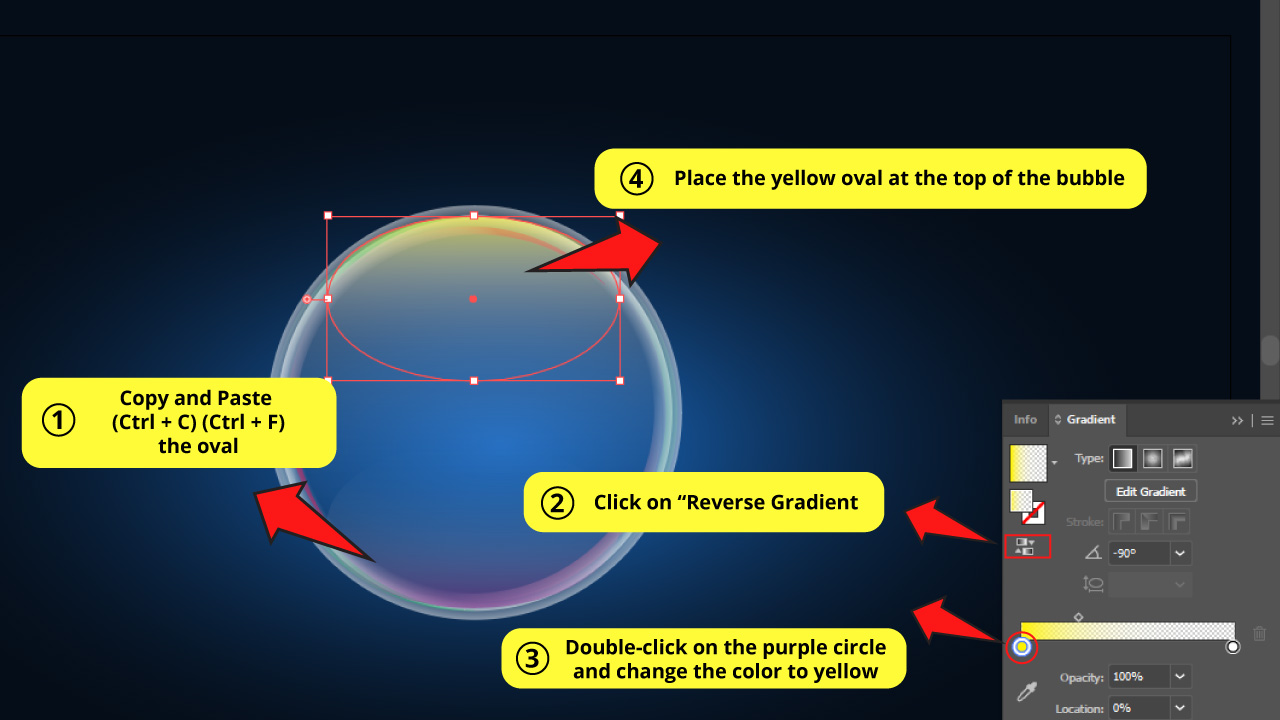
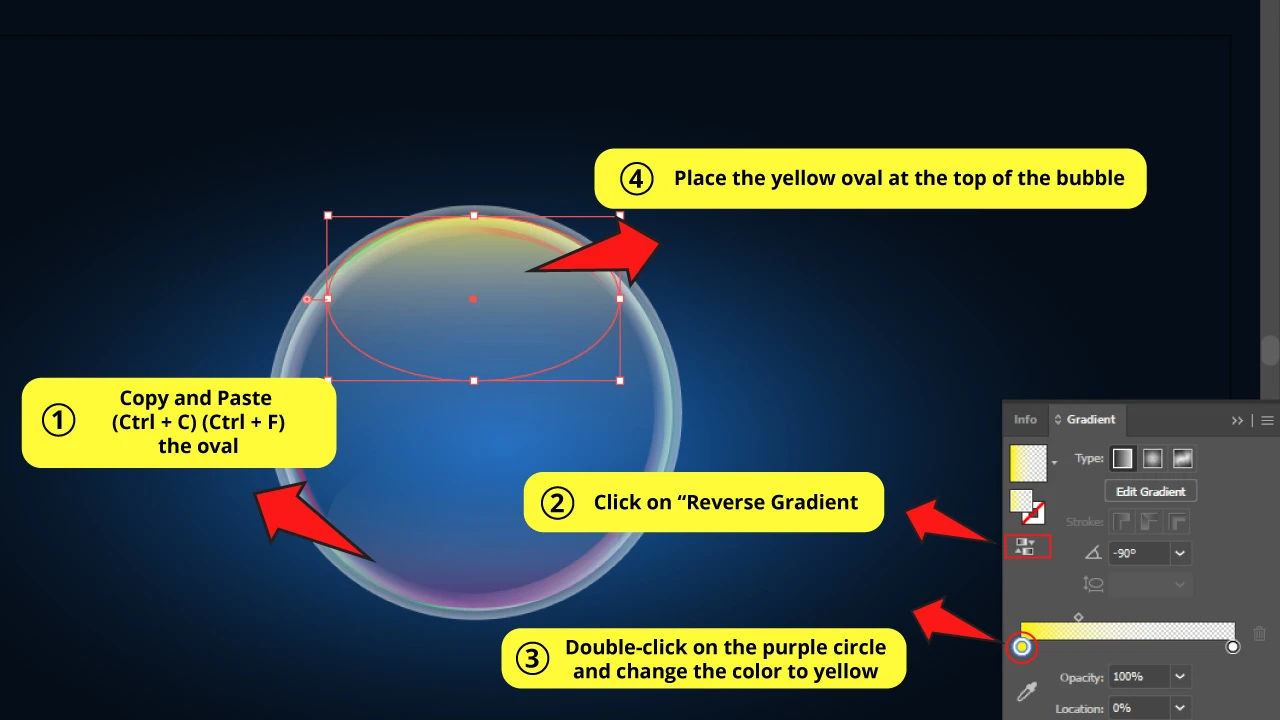
Select the oval that you just created and make a copy of it pressing “Ctrl + C” and “Ctrl + F” to paste it in front.
Go to the “Gradient” panel and double-click on the purple color and change it to yellow.
Finally, move the new yellow ovale to the top of the bubble.
Step 17: Make Rectangles
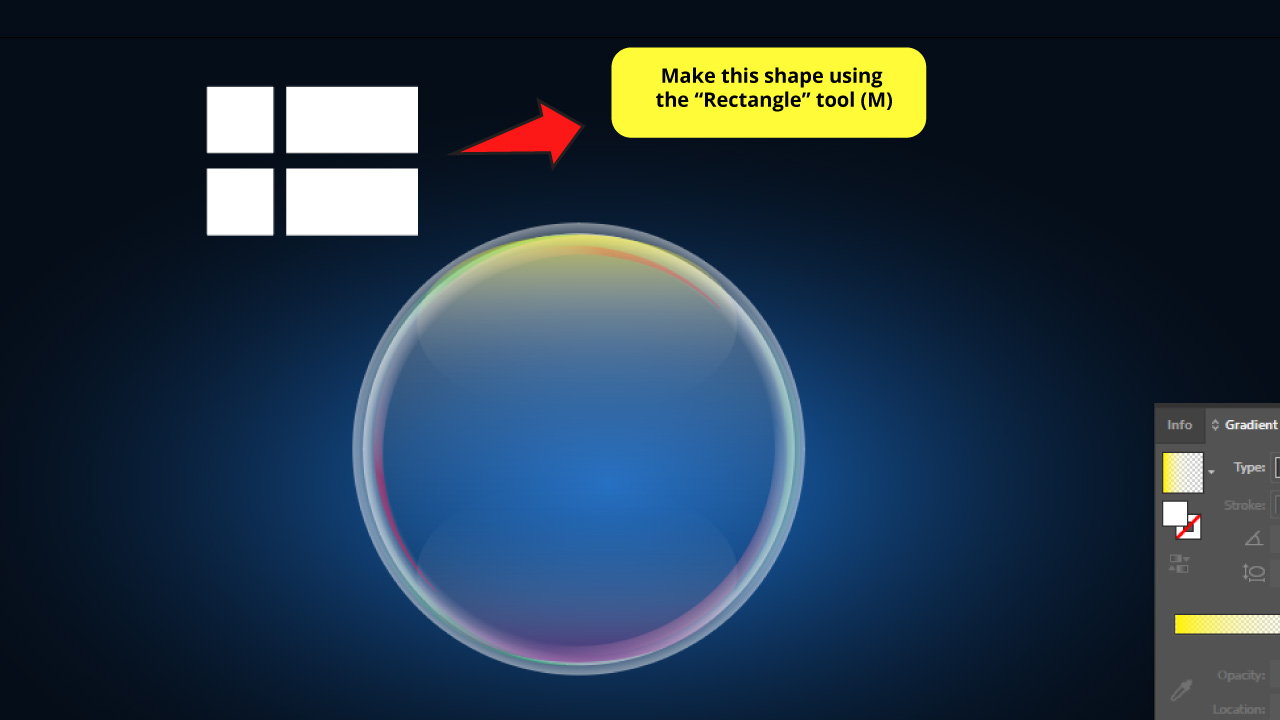

Bubbles have light reflections. This is a detail that we can’t overlook. It’s essential. So we are going to create shapes like windows.
For this, use the “Rectangle” tool (M) that you can find on the left side toolbar and make a square. To get a perfect square remember to hold the “Shift” key while you are dragging the mouse.
Select that square and make a copy of it and paste it in front.
Hold the “Shift” key and use your keyboard’s arrow keys to move the copy to the side.
Then select the copy and use the handles on the sides of the bounding box to stretch it and get a rectangle.
Now select the square and the rectangle and press “Ctrl + C” and then “Ctrl + F” to paste them in front.
Again, hold the “Shift” key and use the arrow keys to move that copy down.
And there you go. A window shaped object.
Step 18: Click on Compound Path


To bend this window shaped object, first we need to go to “Object > Compound Path > Make” on the top side menu, or you can use the “Ctrl + 8” command. Remember you must select the window before doing this.
The “Compound Path” step is crucial because this allows us to add the arch effect to the whole window.
Step 19: Arch the Window

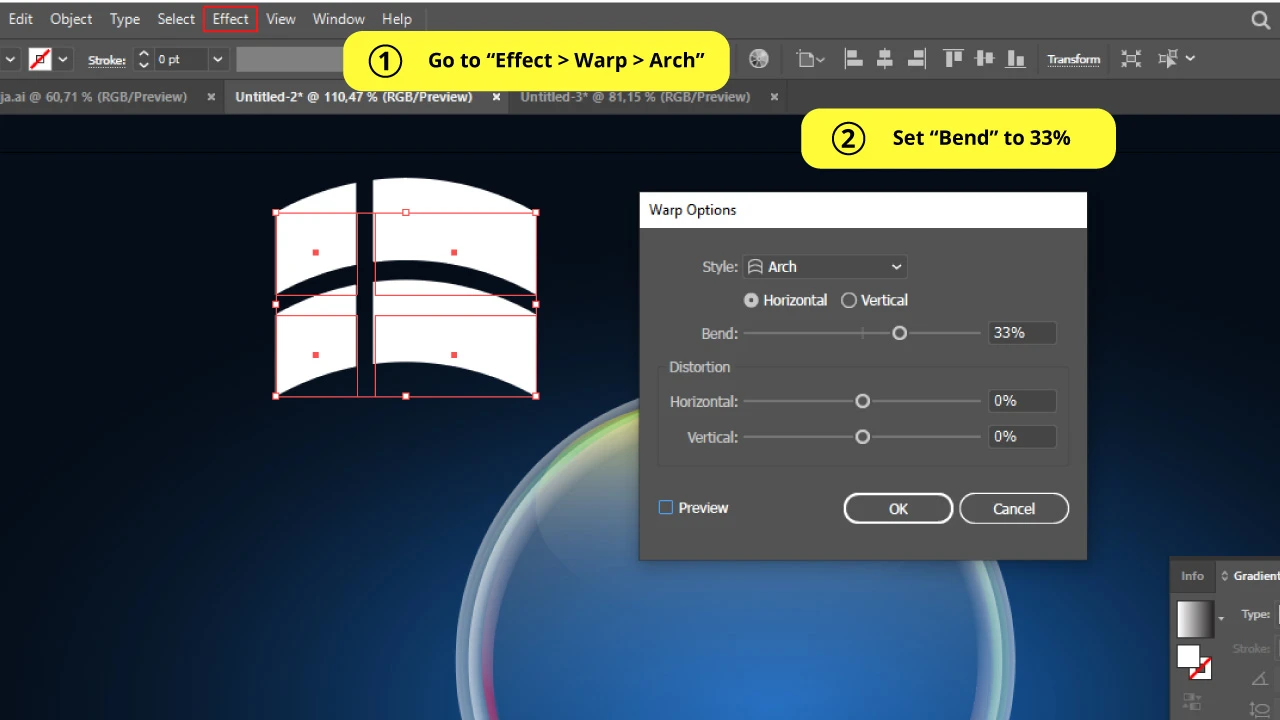
Now go to “Effect > Warp > Arch” on the top side menu bar.
In the “Options” menu select “Horizontal”, and set “Bend” around 33%. Leave all other settings on 0%.
Step 20: Click on Expand Appearance

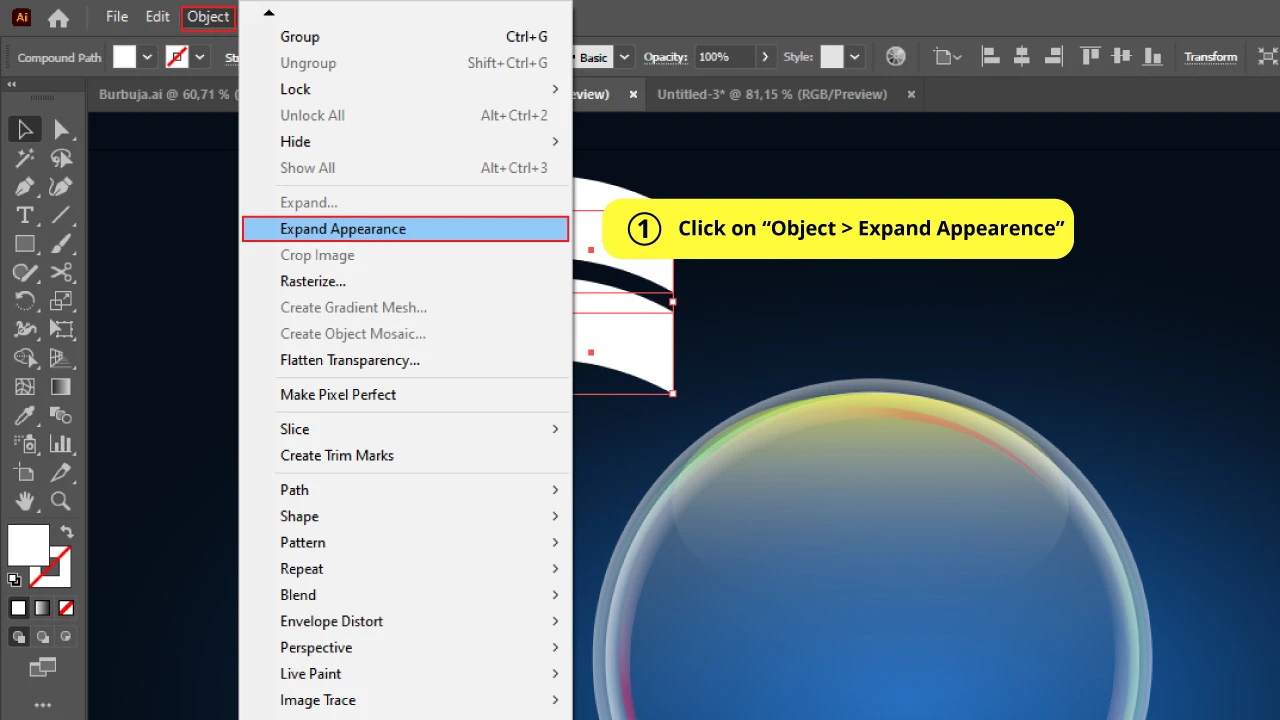
To complete this process go to “Object > Expand Appearance” so we can work with more ease.
Step 21: Add Gradient Color to the Window Shaped Object

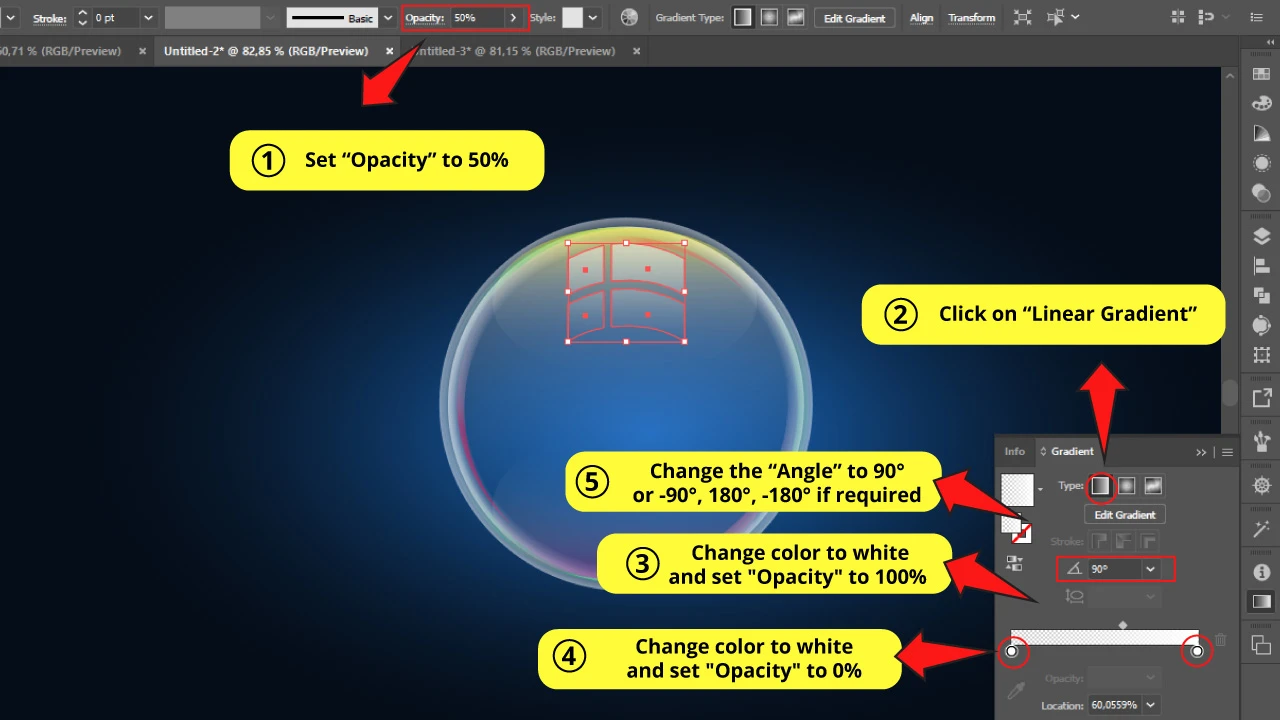
First set the “Opacity” to 50% on the top side toolbar.
Then go to the “Gradient” panel and select “Linear Gradient”.
We need the window shaped object to have a gradient going from opaque white color at the top, to transparent at the bottom.
So, double-click on one of the circles to make it white, with the “Opacity” set to 100%. Then double-click on the other circle and make it white with the “Opacity” set to 0%.
If the gradient is set “side to side” instead of “top to bottom”, use the “Angle” setting to change the orientation. I needed to set my gradient to 90° to make it work. If you can’t get the same gradient that you can see in the image, also try with 180°, -90° or -180° until it works.
Then move the “Gradient Slider” to adjust the gradient position. The idea is to make it almost all transparent at the bottom of the window. Play with this setting to reach the desired effect.
Step 22: Make a Copy of the Window Shaped Object
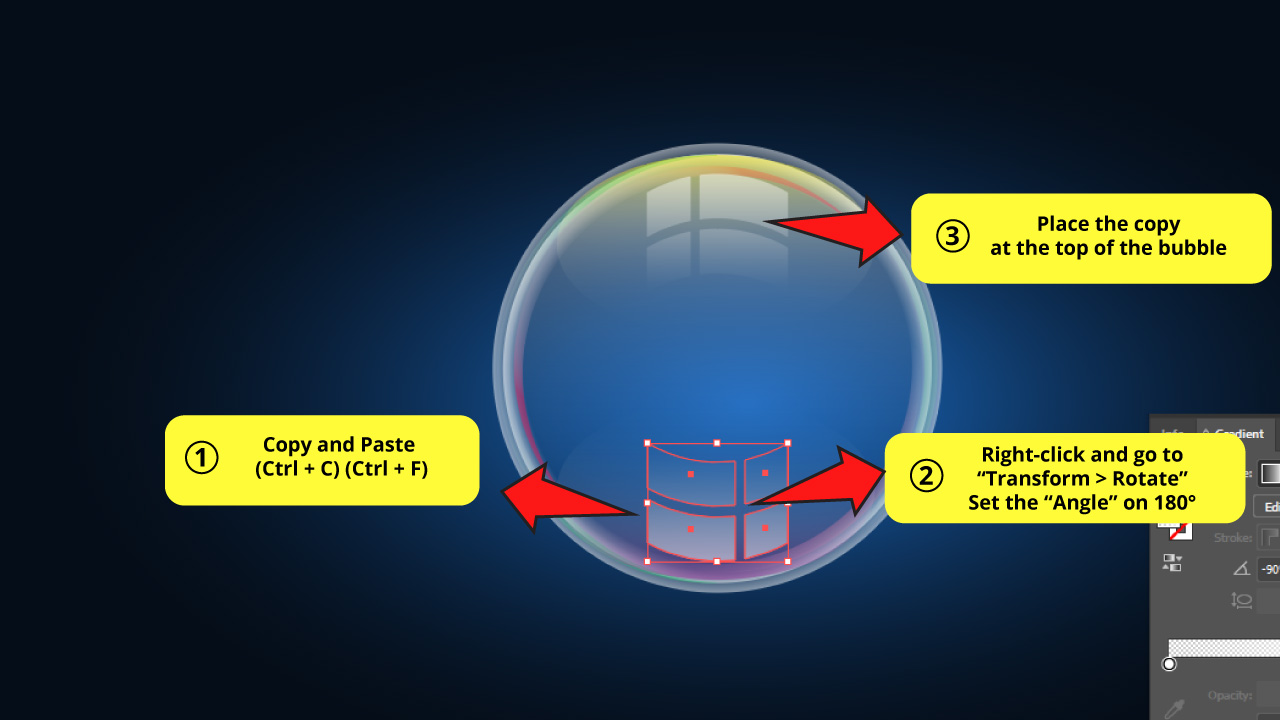

Select the window shaped object and press “Ctrl + C” and then “Ctrl + F” to paste it in front.
Then use right-click to open the “Options” menu and go to “Transform > Rotate”.
In the Rotate options window set the “Angle” to 180°.
Now move the recently rotated window shaped object to the top of the bubble as you can see in the image.
Step 23: Resize the Window Shaped Object
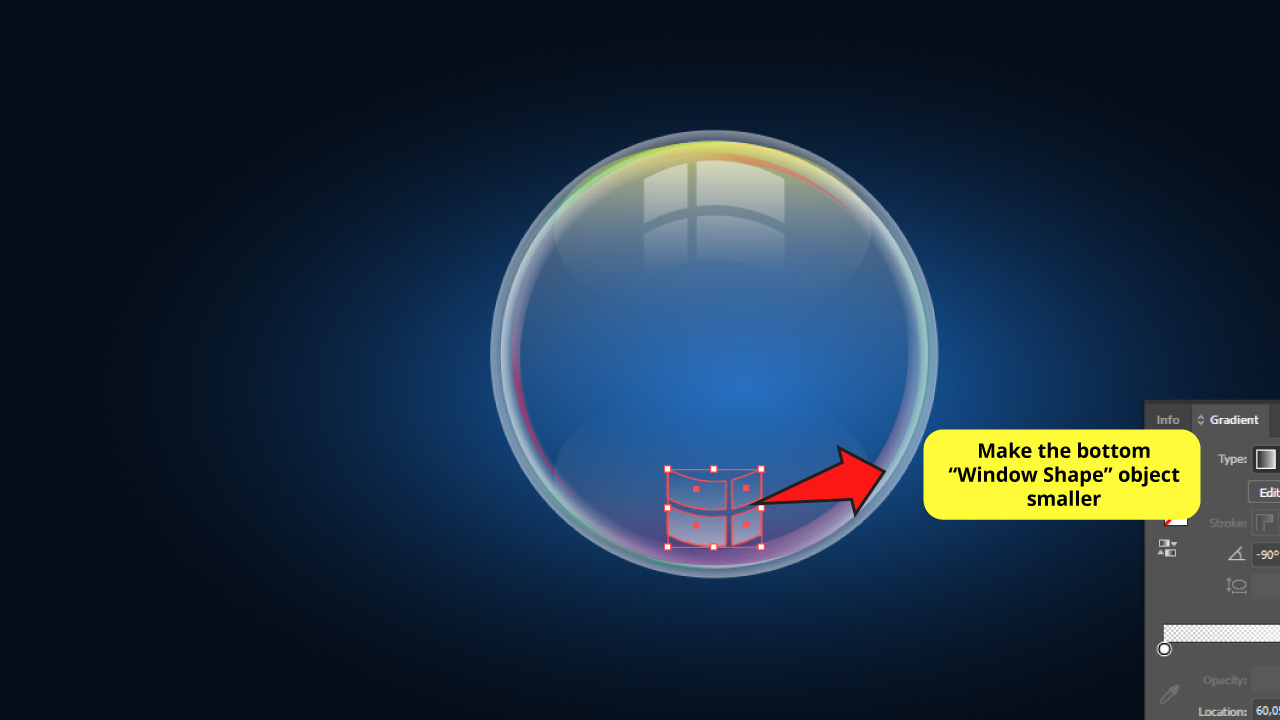
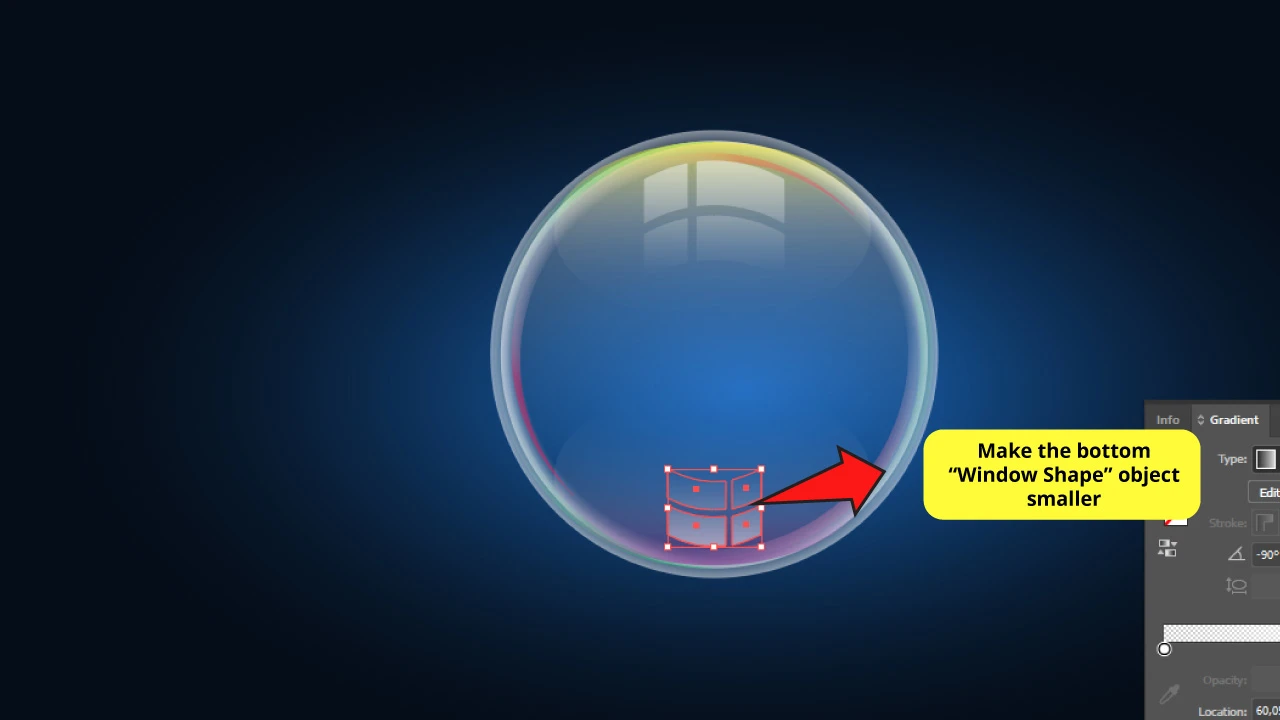
Select the bottom window shaped object again and make it a tad bit smaller than the top one.
Step 24: Make “Circle 6”

Select the bigger circle from the bubble. You can select it by clicking the very edge of the bubble.
Make a copy and paste it in front. Then hold the “Shift” while you use the arrow keys from your keyboard to move it to the side.
Step 25: Add Color and Opacity to “Circle 6”

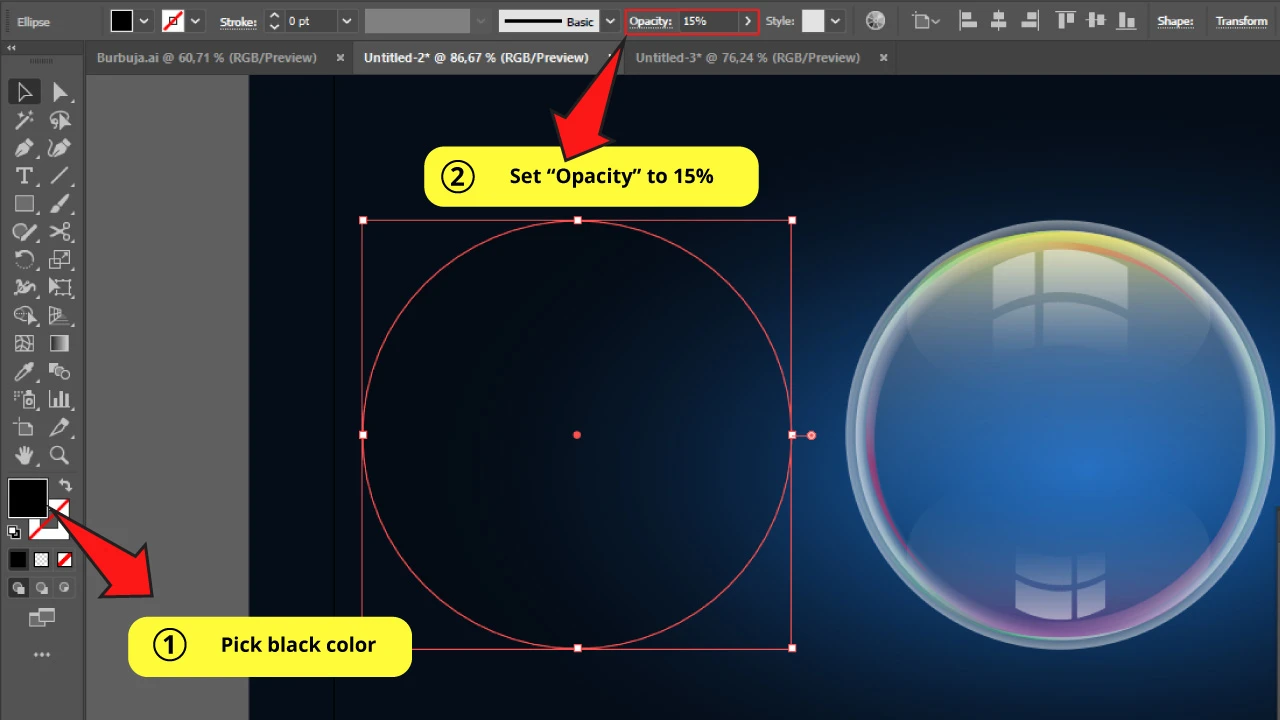
Set “Opacity” to 15% on the top side toolbar. And then double-click on the fill color box on the left side menu so you can set the color to black.
Step 26: Add Gradient Mesh to “Circle 6”

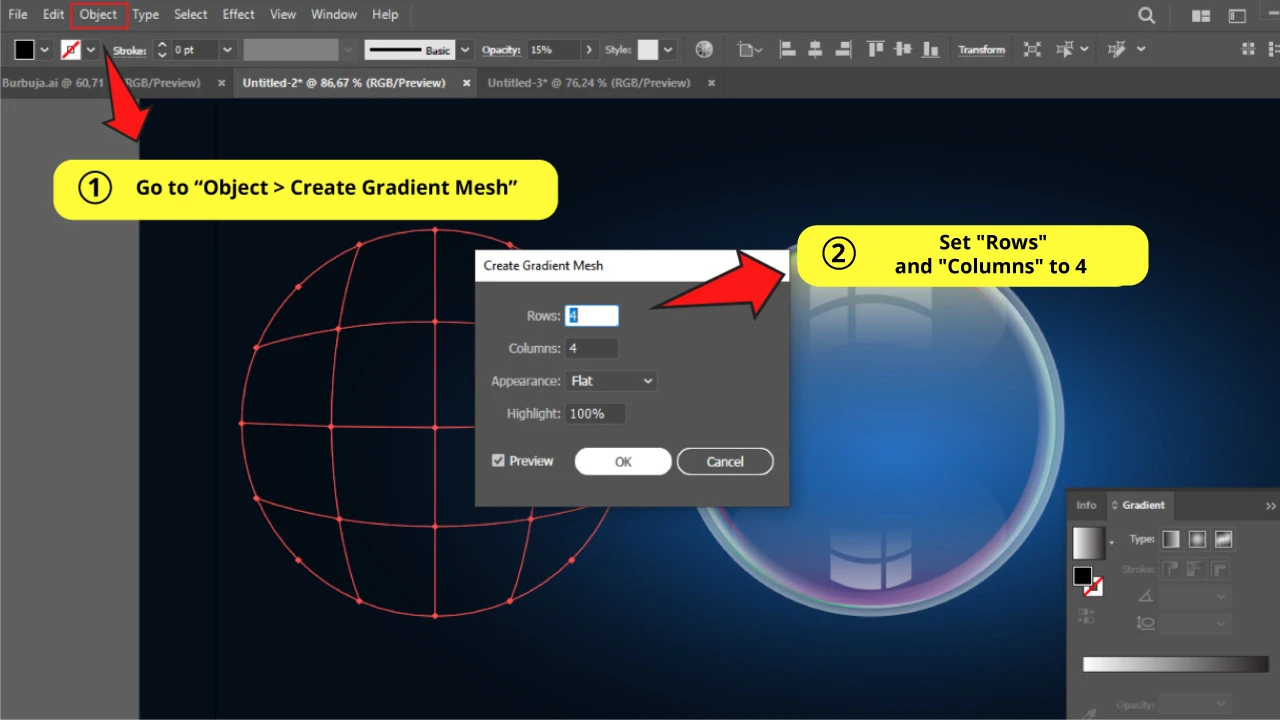
Go to “Object > Create Gradient Mesh” on the top side menu.
In the “Gradient Mesh” options window leave all settings by default: “Rows” and “Columns” on 4, “Appearance” on “Flat”, and “Highlight” on 100%.
Then click “OK” to save it.
Step 27: Add Color to “Circle 6”
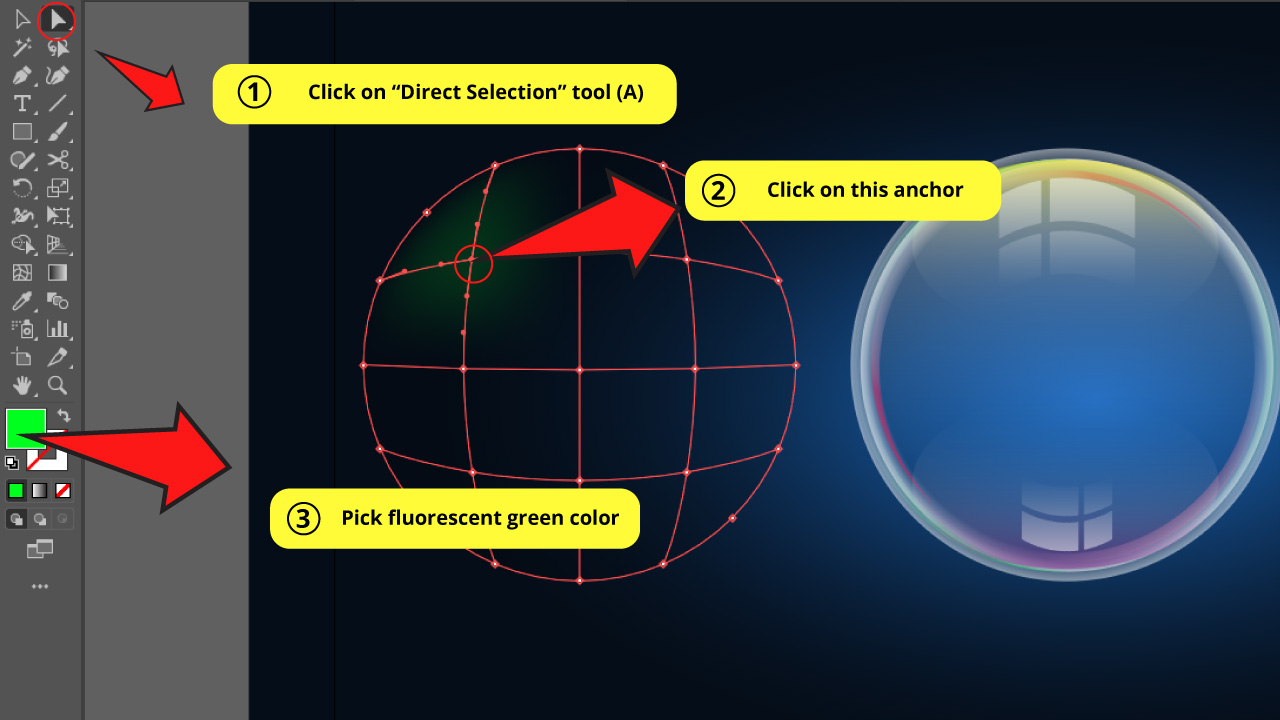

Now the circle will be filled with mesh. This will allow us to create a customized gradient being able to choose the spots we want to add gradient color.
For this we need to use the “Direct Selection” tool (A) to select the first intersection of horizontal and vertical lines.
Once it is selected, you will be able to set a color. The idea is to use the rainbow colors, trying to respect that order.
But you can also try with different color combinations and play with this feature all you wish.
I’m setting fluorescent green for the first intersection.
Step 28: Finish Coloring of “Circle 6”
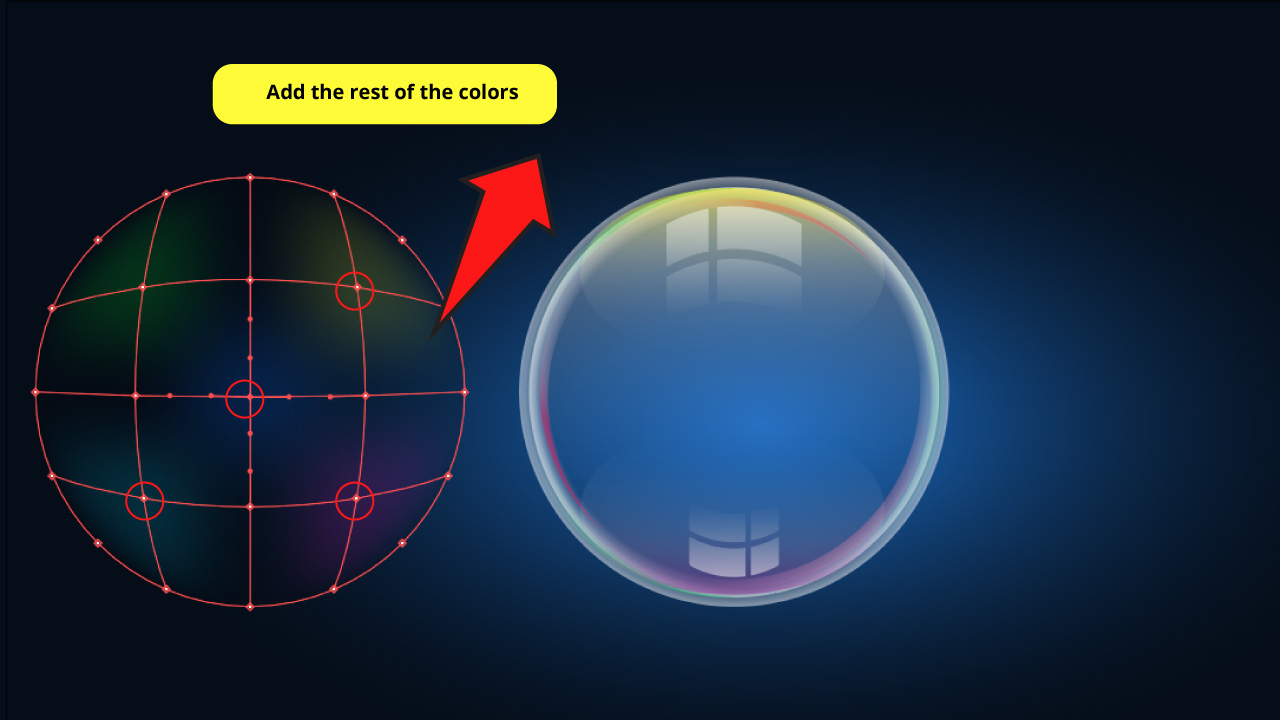
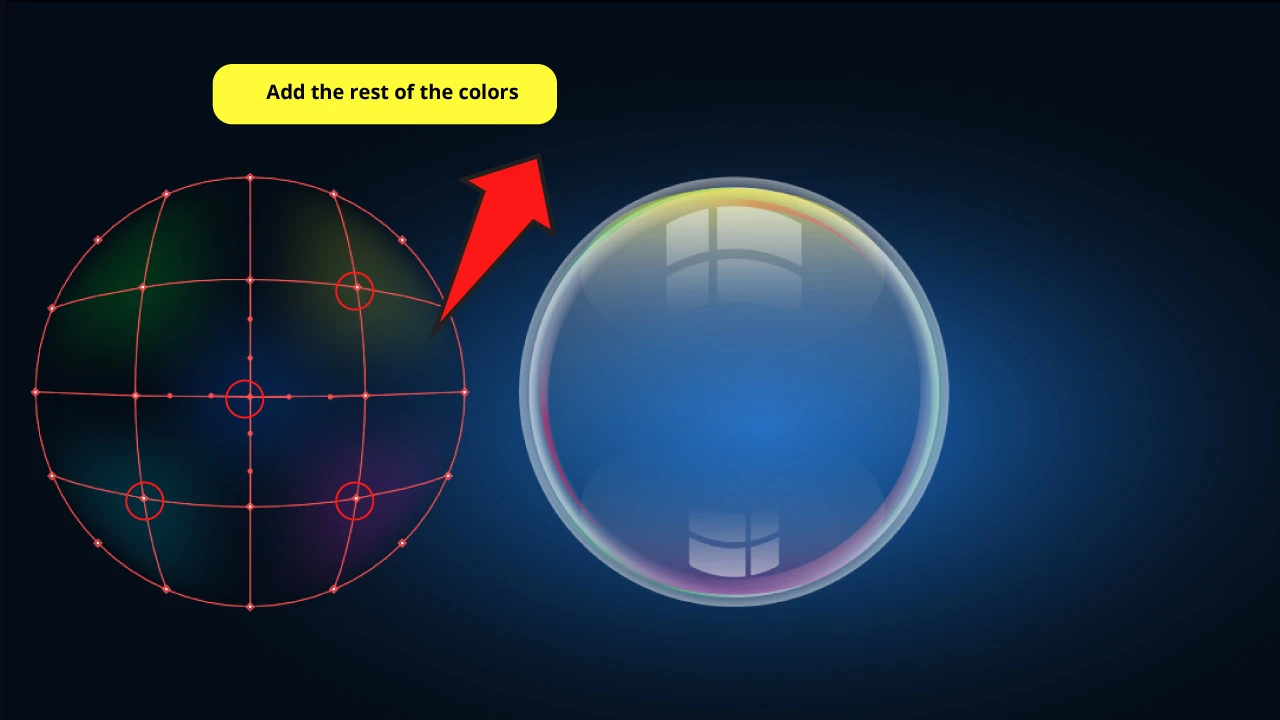
Then complete the process adding the rest of the colors on the remaining spots of the mesh.
I’m using fluorescent shades of yellow, pink, light blue and blue in the middle.
Step 29: Use the Twirl Tool on “Circle 6”
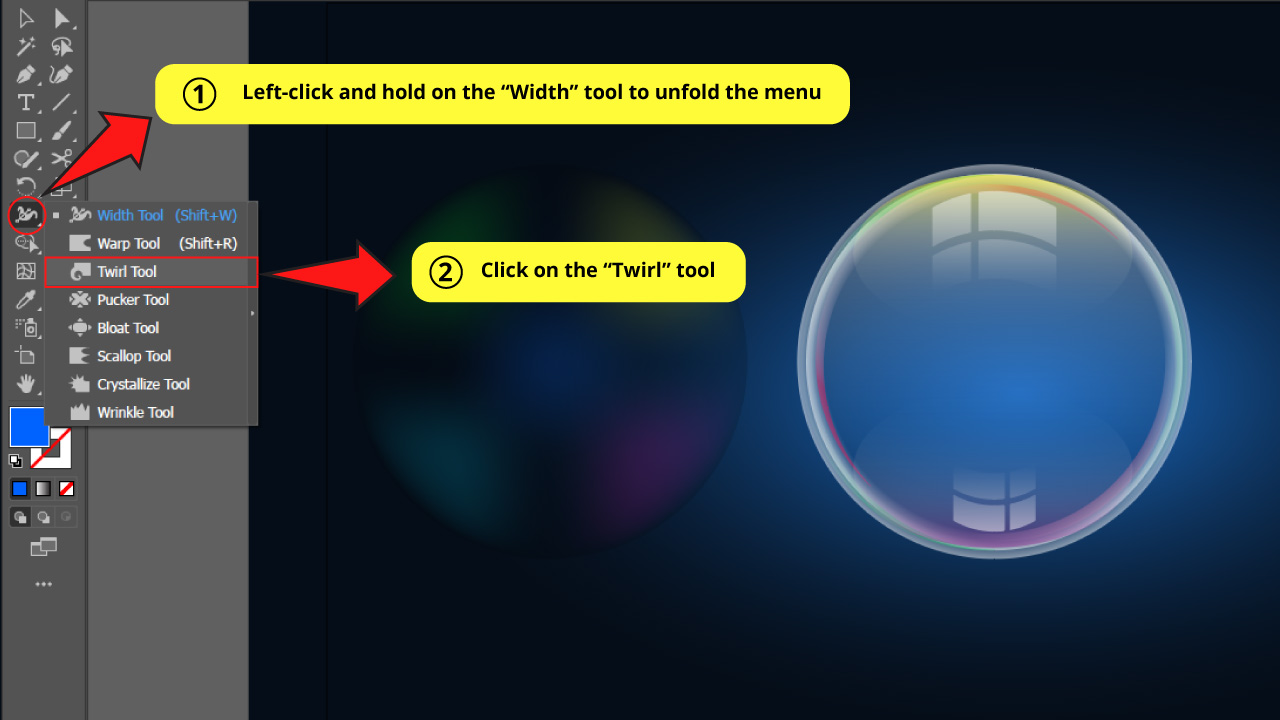

Now we have to blend the colors. For this we are going to use a tool called “Twirl”.
You can find it hidden in the same nest the “Width” tool is located, on the left side toolbar. To unfold it, left-click and hold on the “Width” tool and a menu with the rest of the tools will unfold.
Click on this tool to select it.
Step 30: Set Twirl Tool Radius on “Circle 6”

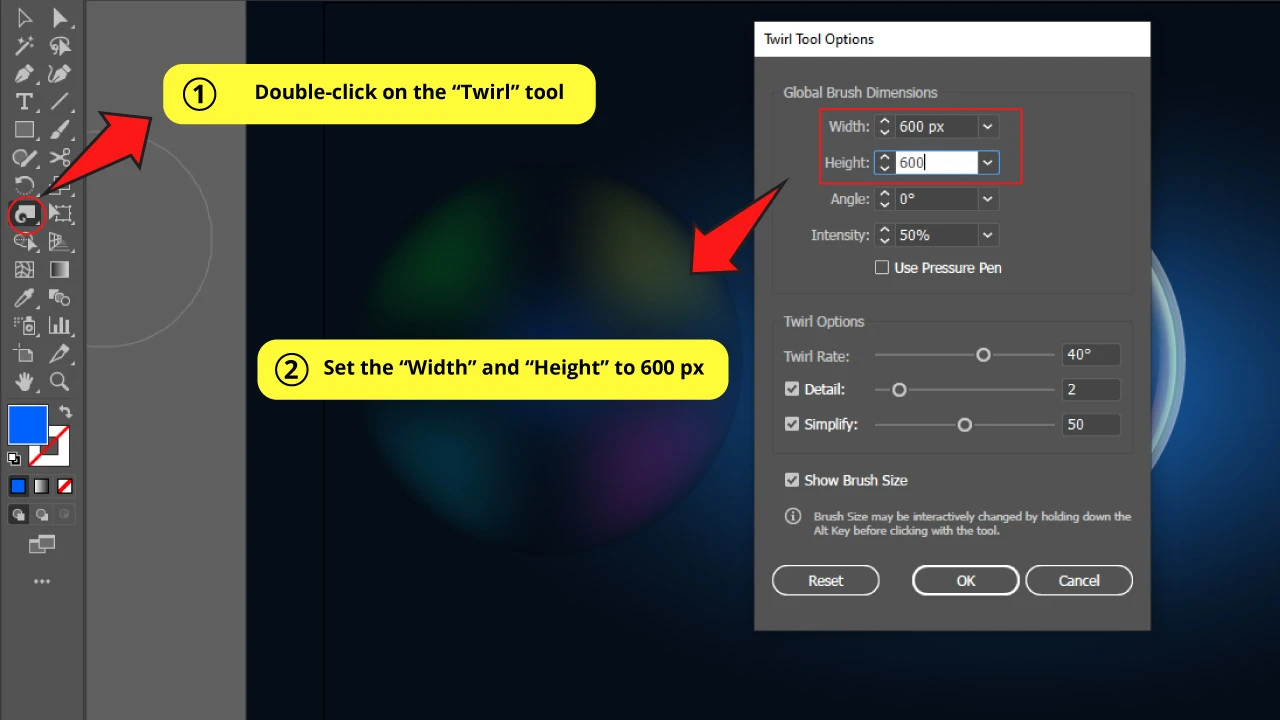
We need the radius of our “Twirl” brush to completely cover the radius of the bubble.
So, once this tool stops being hidden and it’s displayed in the toolbar, double-click on it.
A window with options will pop up. I’m going to change “Width” and “Height” to 600 px each. But maybe you need to set it to a different size depending on your bubble.
Regarding the rest of the settings, I’m going to leave everything by default.
Then click OK to save it.
Step 31: Use Twirl Tool on “Circle 6”
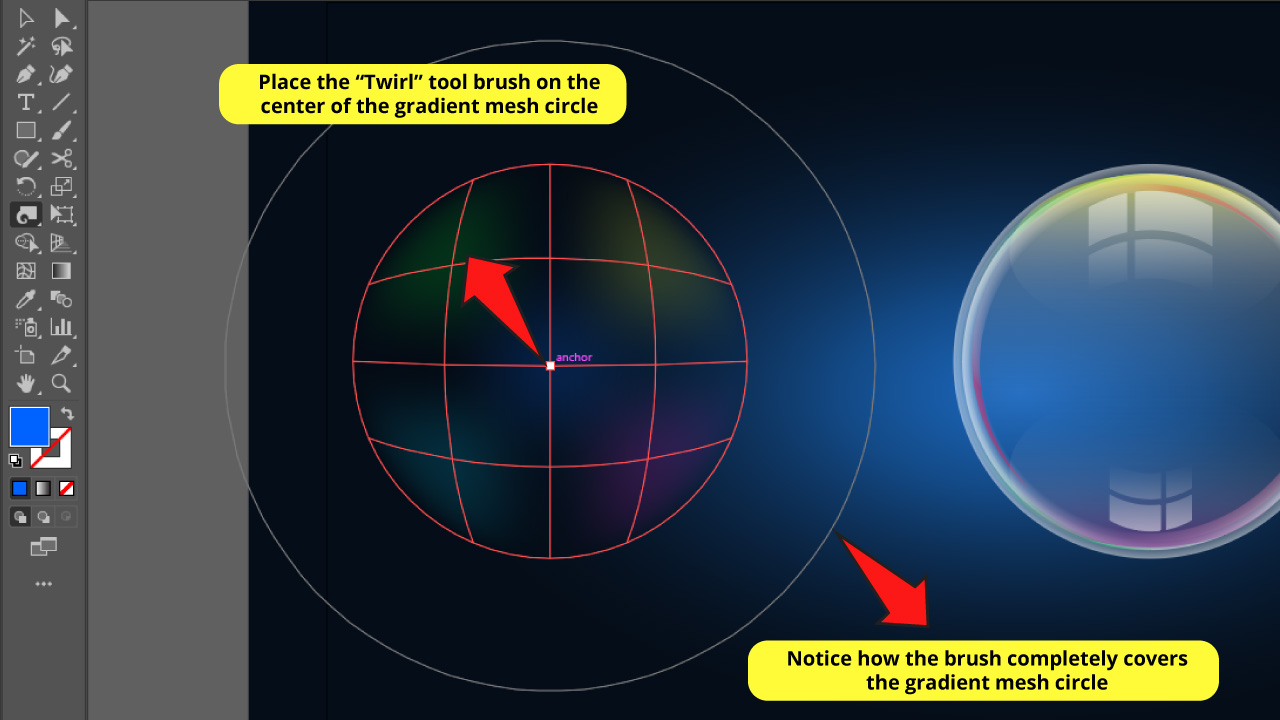

Place the “Twirl” brush on the center of the gradient mesh circle and click two times to get a deep twirl.
Notice how the “Twirl” brush completely covers the gradient mesh circle.
Step 32: Use Warp Tool on “Circle 6”

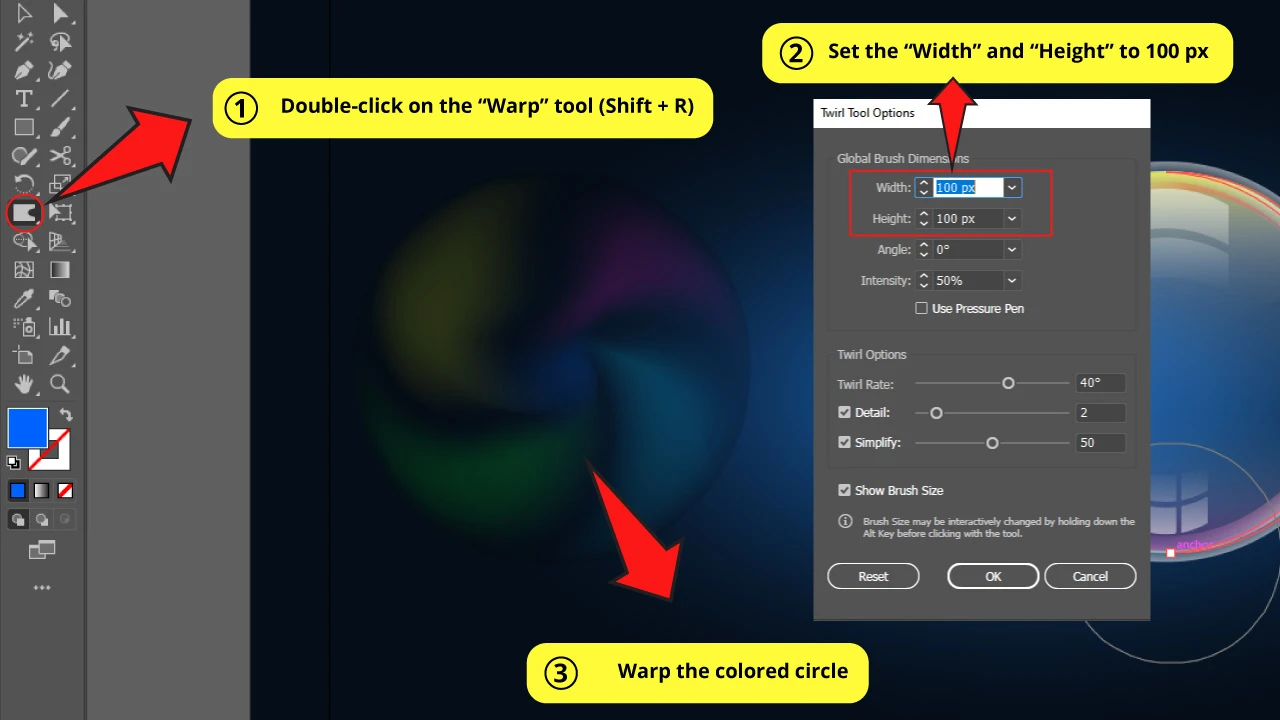
We are reaching what we’re looking for, but the “Twirl” tool works too symmetrical. We need to make it more organic and realistic. We need to make it a little messier.
For this, go to the “Warp” tool that is also hidden behind the “Width” tool (now it’ll be hidden behind the “Twirl” tool). Left-click and hold to unfold the menu and select the “Warp” tool (Shift + R). Then click on the “Warp” tool to select it.
As you can notice, the brush is too big now. To fix this double-click on the “Warp” tool and set the “Width” and the “Height” to 100 px for example. This size will work for my bubble’s size.
Once you have done this, with a smaller brush size, left-click and hold on the gradient mesh circle and drag the mouse just a tad bit to mix it up until you get the desired effect.
Step 33: Add Overlay Mode on “Circle 6”


Now we have to modify the circle blending (or transparency).
First select the gradient mesh circle and go to the “Transparency” panel that you can find on the right side toolbar.
If you can’t find it, you can enable it by going to “Window > Transparency” or shortcut it with “Shift + Ctrl + F10”.
Once you have opened it, change from “Normal” to “Overlay” mode.
What we want to do now is bring the gradient mesh circle to the front of the other bubble circles. There are several ways to get this done, but we are going to use the following method.
Select the gradient mesh circle and copy it with “Ctrl + C”. Then press the “Del” key to delete it. Now press “Ctrl + V” to paste it. Now this circle will be the top layer.
Now just move this gradient mesh circle to align it with the bubble.
Step 34: Make “Circle 7”
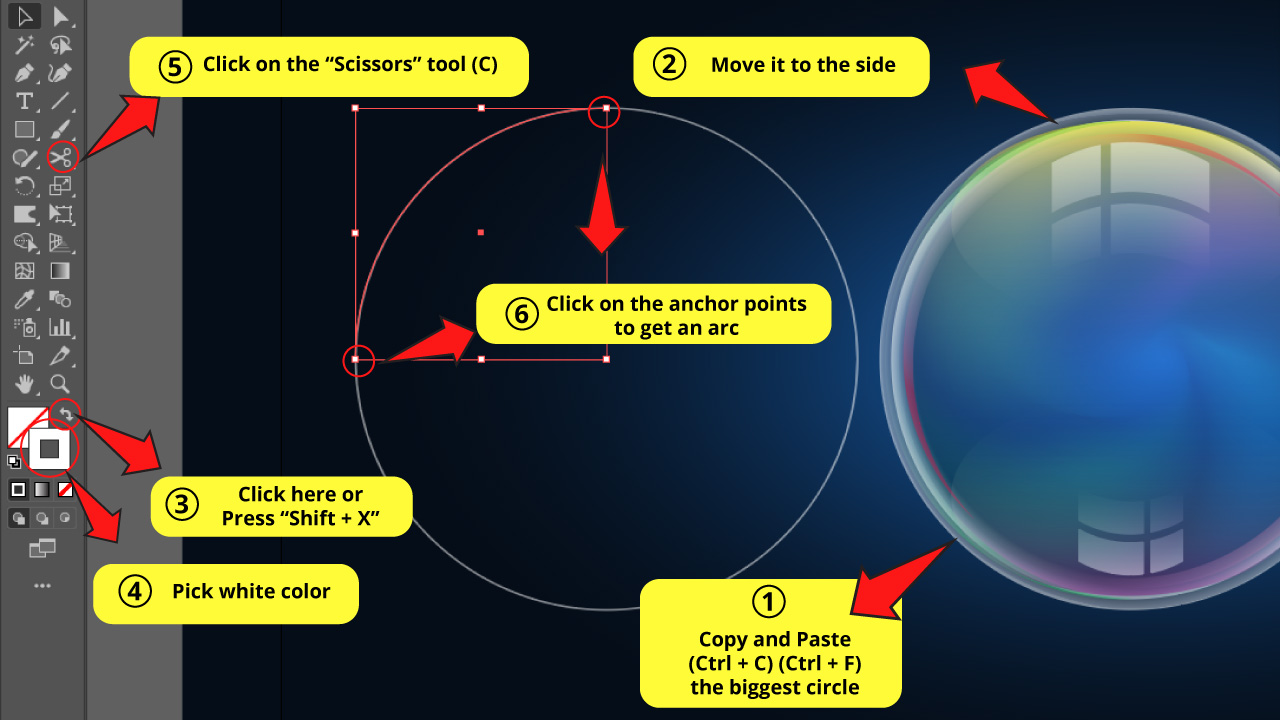
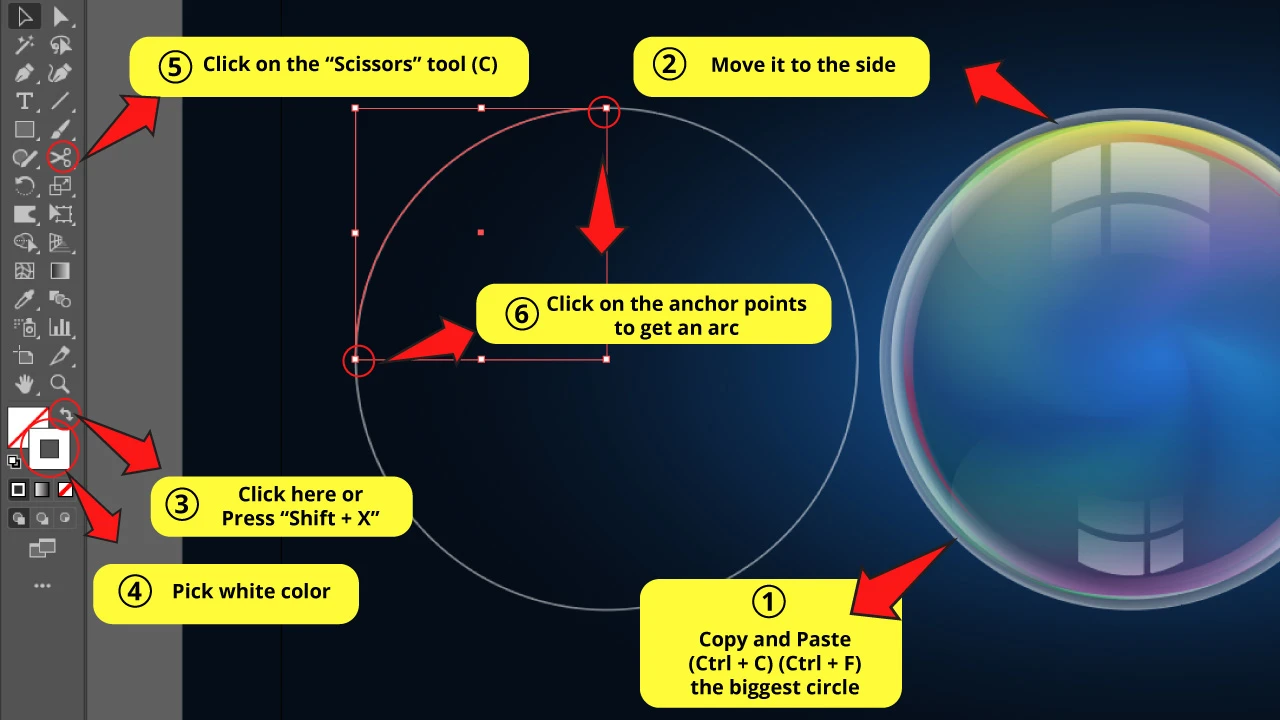
We are reaching the end of the road.
We need to make another copy of the biggest circle of the bubble. So select, copy and paste it in front. Then move the circle to one of the sides.
Change the color to white. Then press “Ctrl + X” to switch the fill color for stroke color.
Now use the “Scissors” tool (C) on the left side toolbar. It is hidden inside the “Eraser” tool nest.
Next, click on the anchor points at the top and one of the sides to cut a section of the circle, that is an arc.
Use the “Selection” tool (V) to delete the rest of the circle and keep that arc.
There are few methods to make arcs. If you want to learn another way to do this, make sure to check this quick tutorial about: “How To Use The Arc Tool In Illustrator”.
If you also want to know how to make half circles, go ahead and check this helpful article about “The Best Methods to Make a Half Circle in Illustrator”.
Step 35: Set Width and Opacity on Arc


Go to the “Stroke” panel on the top side toolbar.
Set the “Stroke” width to 8 pt (this will work fine for my bubble, but perhaps you need to set yours to a different width).
Then, click on the “Width Profile” box which is set by default as “Uniform” and switch it for the first Width Profile as you can see in the image.
Make sure that the “Opacity” is set to 50%.
Step 36: Add Gaussian Blur on the Arc
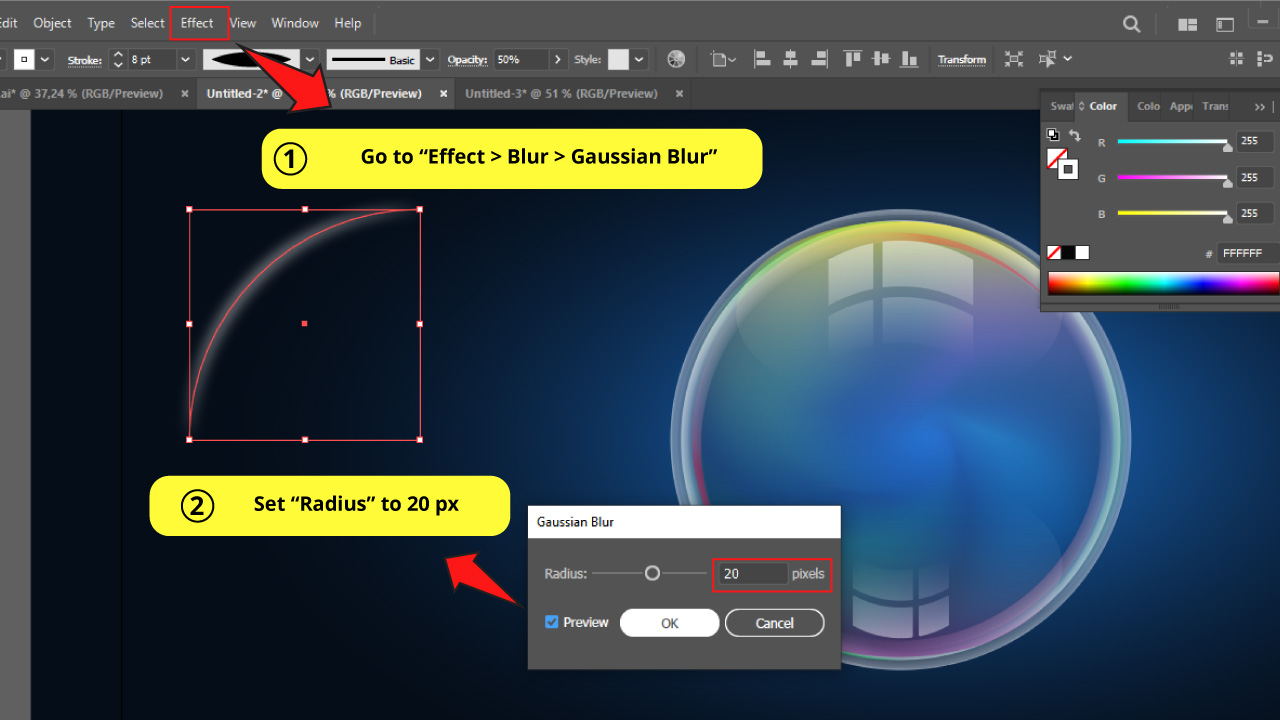

Finally go to “Effect > Blur > Gaussian Blur” on the top side menu.
Set the blur “Radius” to some point around 20 px and click “OK” to save it.
Step 37: Align Arc
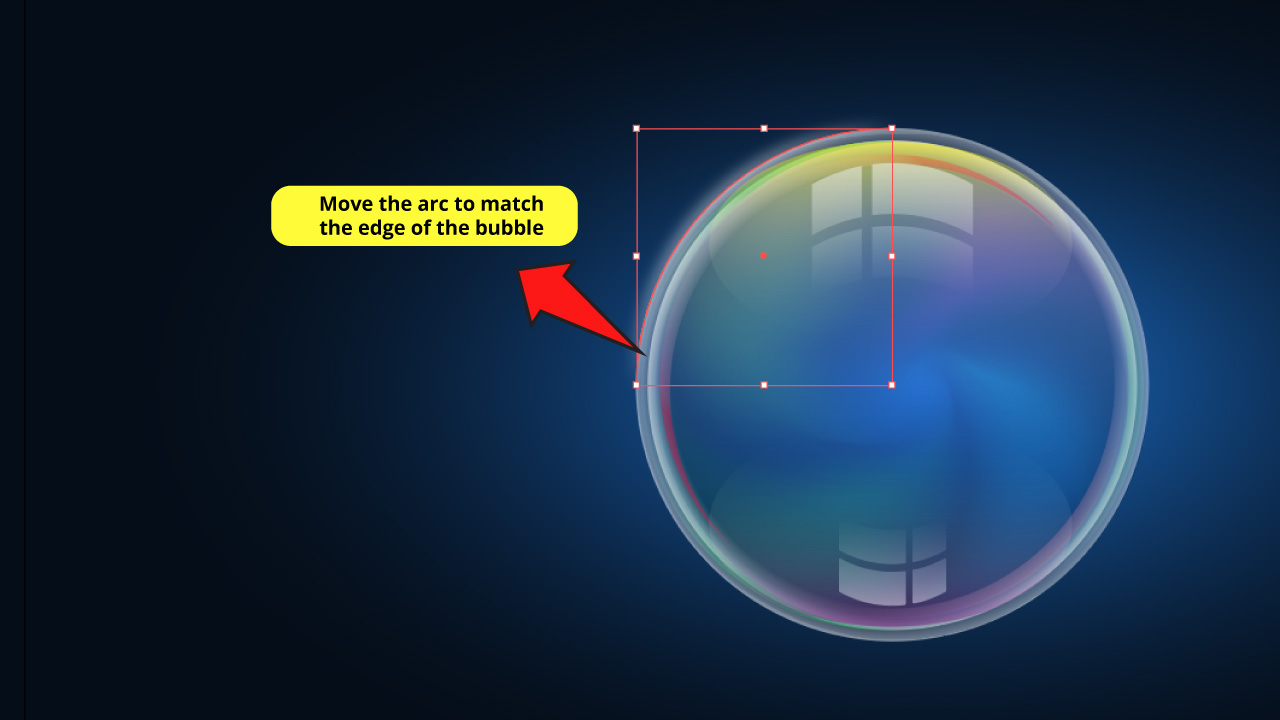
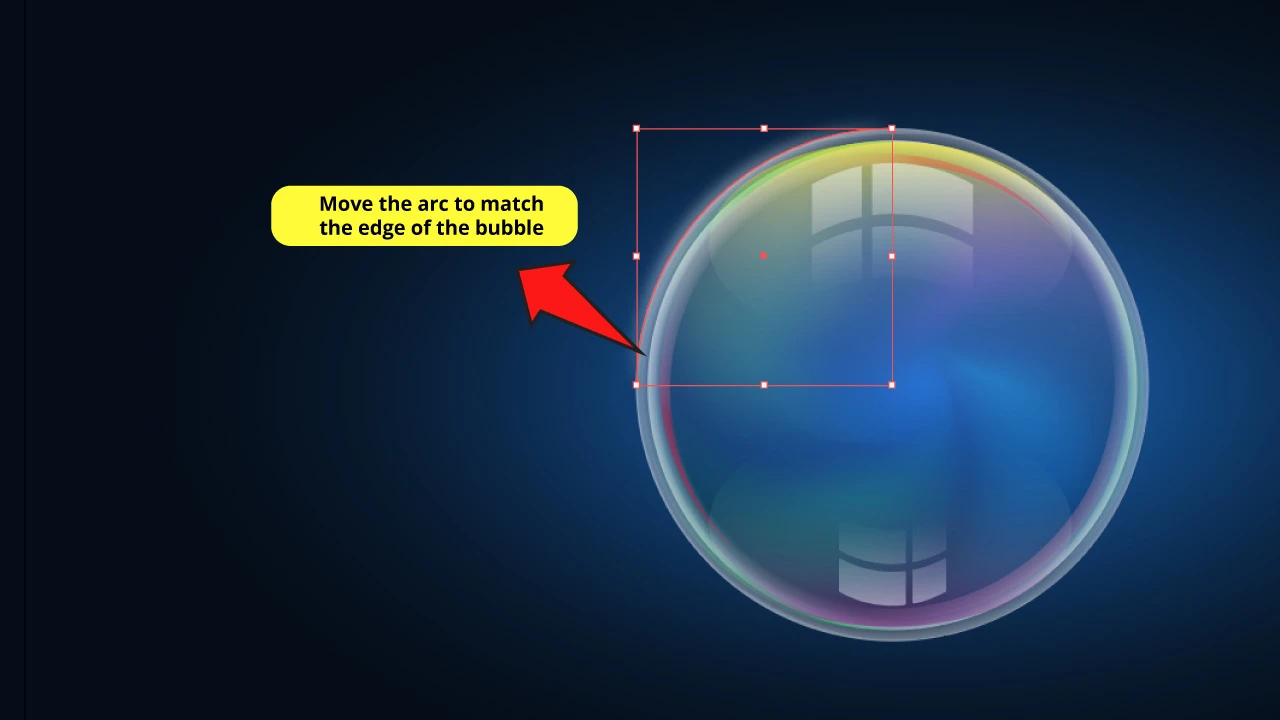
Move the arc to align it matching one of the edges of the bubble edges.
Step 38: Make a Copy of the Arc

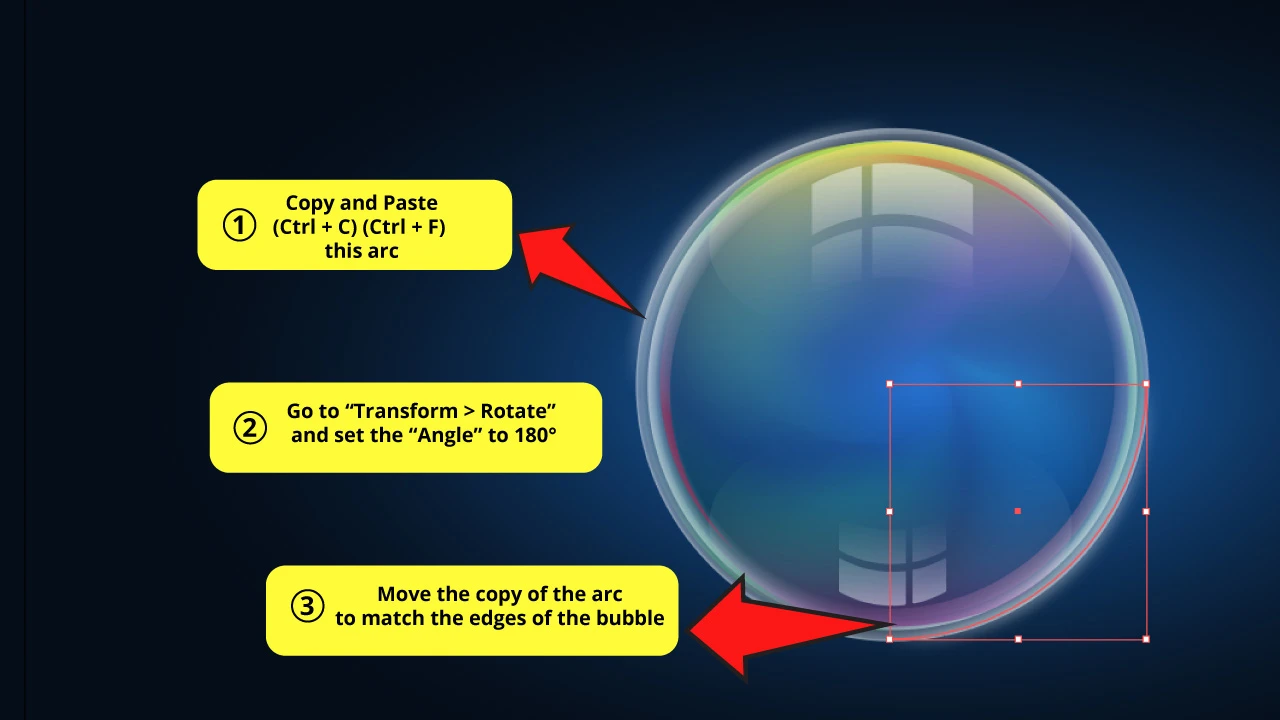
Select the arc and press “Ctrl + C” then “Ctrl + F” to make a copy.
Then right-click to open the options menu, go to “Transform > Rotate” and set the “Angle” to 180°. Then click “OK” to save it.
Finally place the copy of the arc on the opposite side of the original arc, and align it to match the edges.
Step 39: Group and Rotate the Bubble
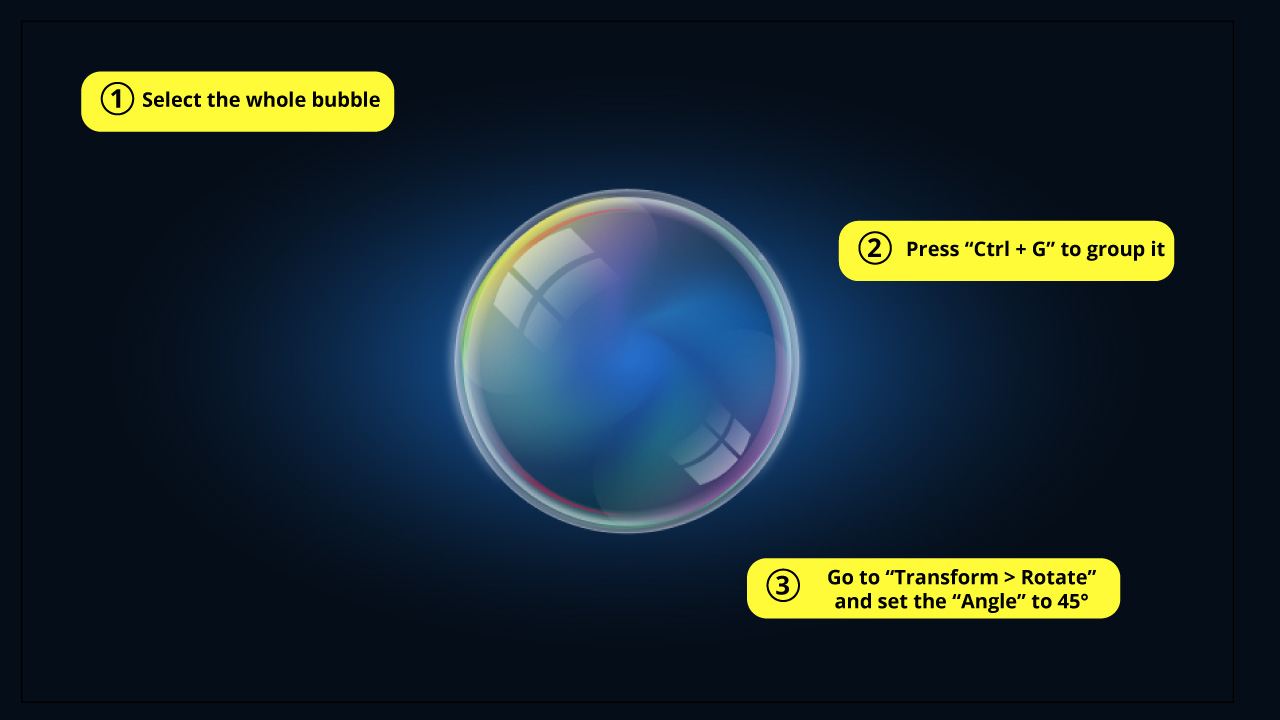

Select the bubble and press “Ctrl + G” to group it.
Then go to “Transform > Rotate” and set the “Angle” to 45°. You can change the angle depending on the light source you are working with in your illustration, but if you’re using more than a single bubble, remember to be consistent with the angle you select.
And there is your bubble.
If you want to know more about how to group objects in Illustrator, we invite you to visit this quick tutorial about “How to Group Objects in Illustrator in 4 Simple Steps”.
The Result of “How to Make Bubbles in Illustrator”


And this is how a group of several bubbles of different sizes would look.
Frequently Asked Questions on “How to Make Bubbles in Illustrator”
Is there any quick way to make realistic bubbles in Illustrator ?
I mean, you can’t get realistic bubbles without making several layers with different gradients and effects. If you try to make bubbles with simply one or two gradient layers, the only thing you will get is a very lifeless and dull bubble.
Is there any quick way to make any kind of bubbles?
If you don’t need your bubble to be realistic, the best choice is a very minimalistic bubble, like a circle with a small arc to accentuate the lighting. This also looks great and it works for several projects.
Can I skip some of the layers of the bubble?
Yes, in theory you can. It won’t look as amazing and complete as the result you can get following all of the steps, but it will also look great. Just keep in mind some steps are more important than others, and that the more steps you skip the worse the final result will be.


Hey guys! It’s me, Marcel, aka Maschi. On MaschiTuts, it’s all about tutorials! No matter the topic of the article, the goal always remains the same: Providing you guys with the most in-depth and helpful tutorials!

