
Illustrator, just like Photoshop, counts with guide features to help us improve our workflow. Learning how to use these tools will allow us not only to save time but also to achieve professional projects.
In this article you will learn all you need to know about Illustrator guides.
Adding Guides in Illustrator
Press Ctrl + R to show the rulers. Then left-click and hold on the ruler and drag it to the artboard to add Ruler Guides. To add Grid Guides go to View > Show Grid and enable Snap to Grid to draw accurately. You can also enable the Smart Guides so aligning your artworks manually becomes easier.
Adding Ruler Guides in Illustrator
Press the “Ctrl + R” command to show the rulers. Left-click on the ruler to select the unit of measurement. Left-click and hold on the ruler and then drag it to the artboard to add the guide. Release the click to place the guide. Finally, lock them going to “View > Guides > Lock Guides”.
When we think of guides, the first thing that comes to our mind is this kind of guide. These are similar to those you can find in Photoshop, but we unfortunately don’t have a feature to place the guides in the exact place we want in Illustrator.
Let’s move forward to learn how to solve this problem.
Step 1: Enable Rulers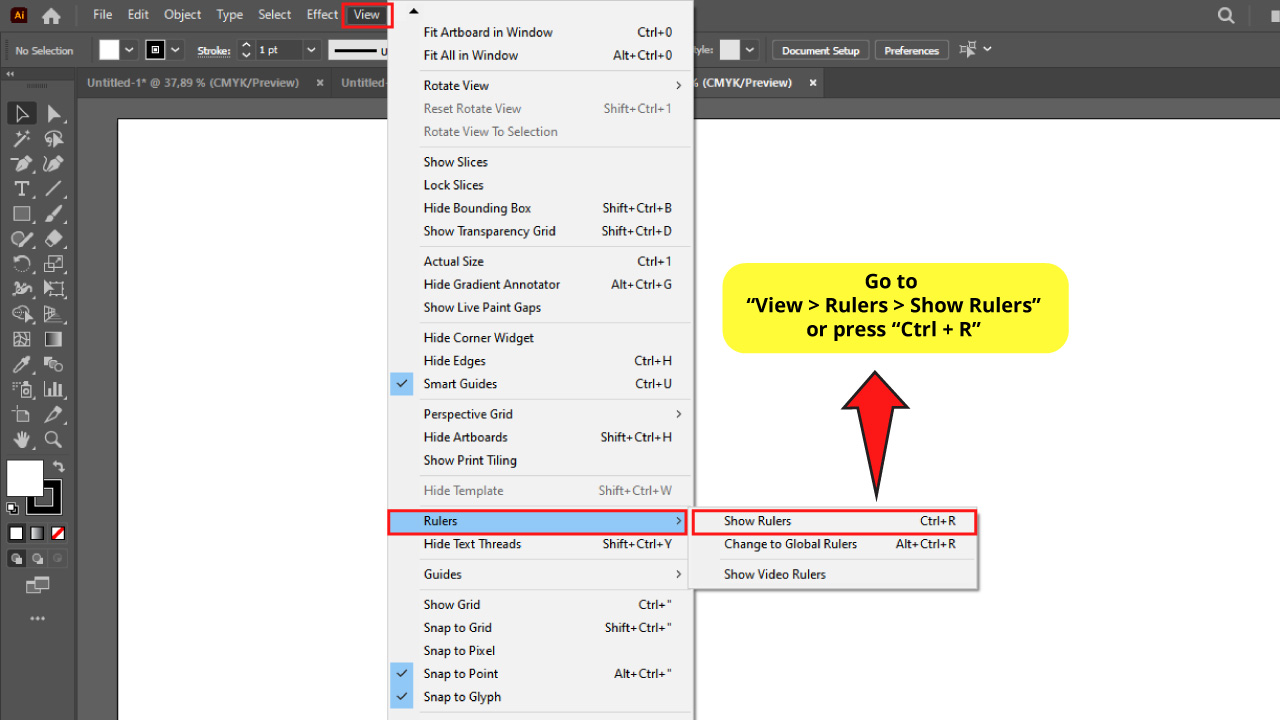

Go to “View > Rulers > Show Rulers” on the top side menu. Or use the “Ctrl + R” command.
Step 2: Set Rulers’ Unit of Measurement
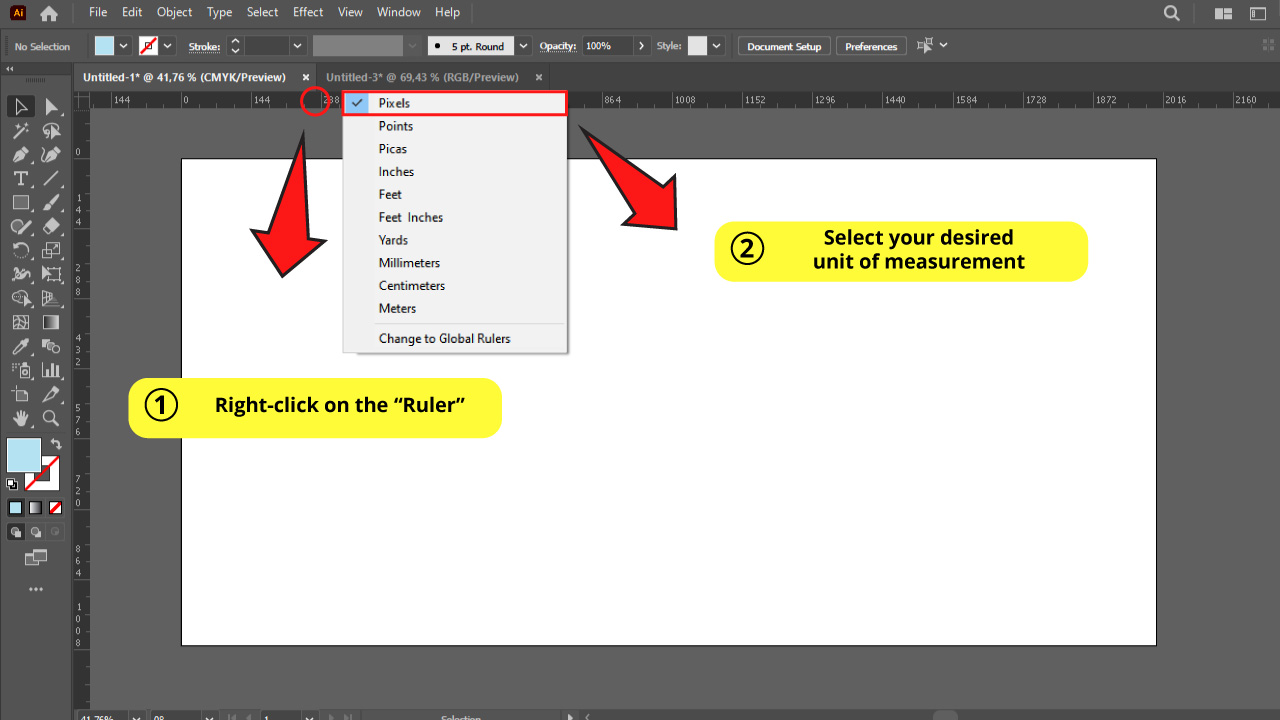

Now vertical and horizontal rulers are displayed.
Right-click on the ruler and select your desired unit of measurement. I’m going to select “Pixels”.
If you don’t need to place your guides on specific spots of your artboard, you can skip Steps 3 and 4. Otherwise continue with the next step.
Step 3: Make a Square
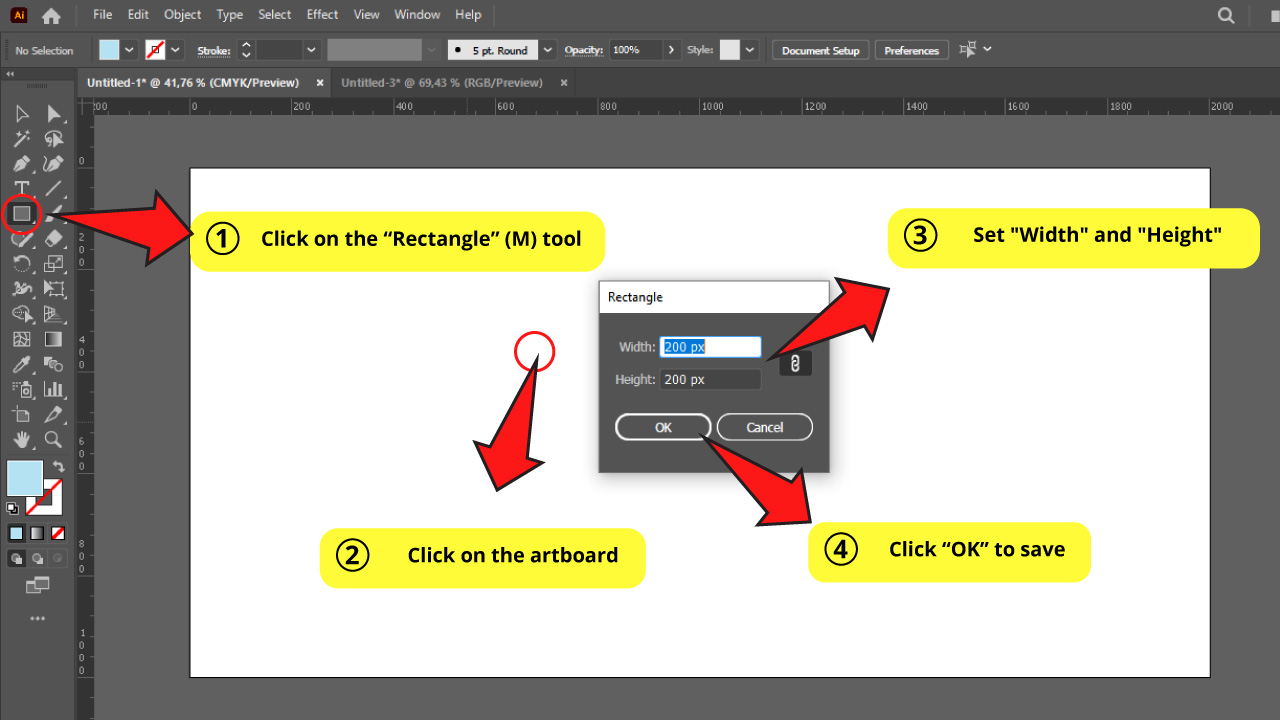

Since Illustrator doesn’t feature a function to set the exact position of the guides, we will have to use a gimmick to place the guides where we exactly want.
For this example I need to place my guides 200 px away from my artboard edges. This could work as a safety margin for printing. So I’m going to create a rectangle of this size to use as a measurement sample.


So click on the “Rectangle” (M) tool on the left side toolbar. Then click anywhere in the artboard.
A window with rectangle size settings will pop up. I will set my rectangle as a square with both “Width” and “Height” at 200 px. Set these measures according to your needs.
Then click OK to save.
Step 4: Make Copies of the Square
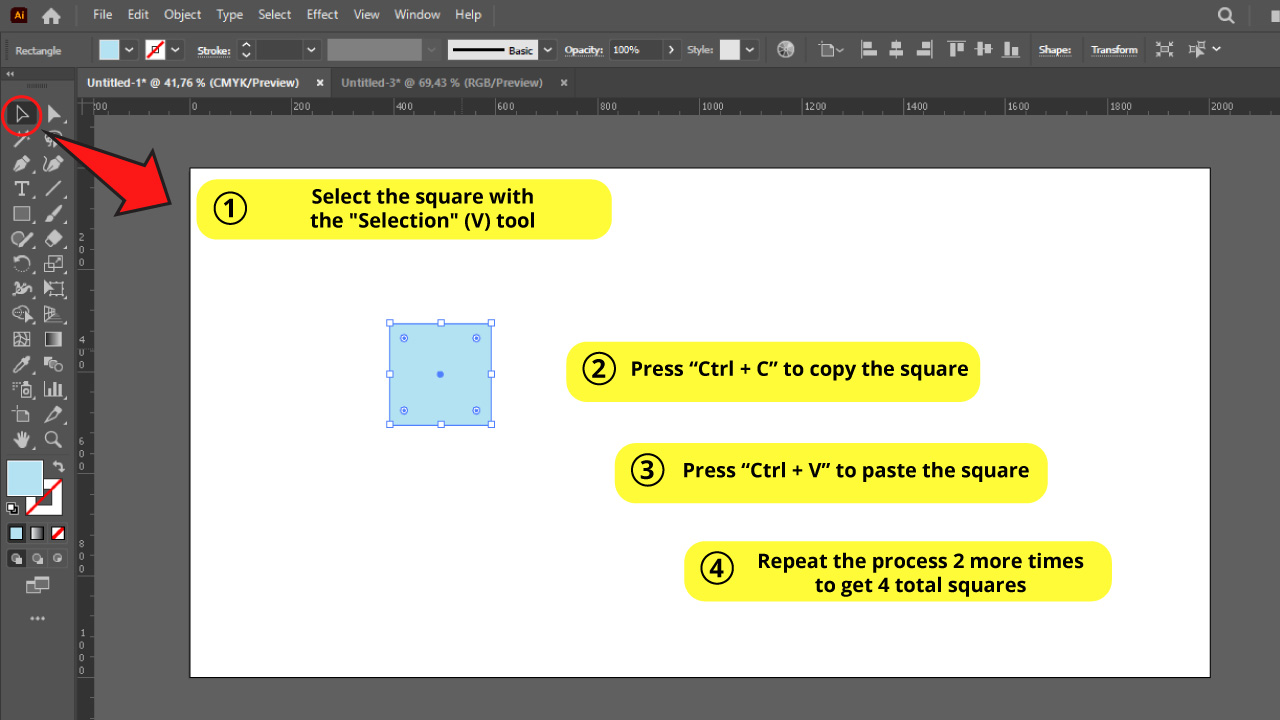

In this step you will have to make 3 copies of the square. Select the rectangle using the “Selection” (V) tool or pressing the “Ctrl + A” command to select all.
Then press “Ctrl + C” to copy it, and then press “Ctrl + V” to paste it.
Repeat the “copy & paste” process two more times to get 4 total squares.
Step 5: Place the Squares on the Corners
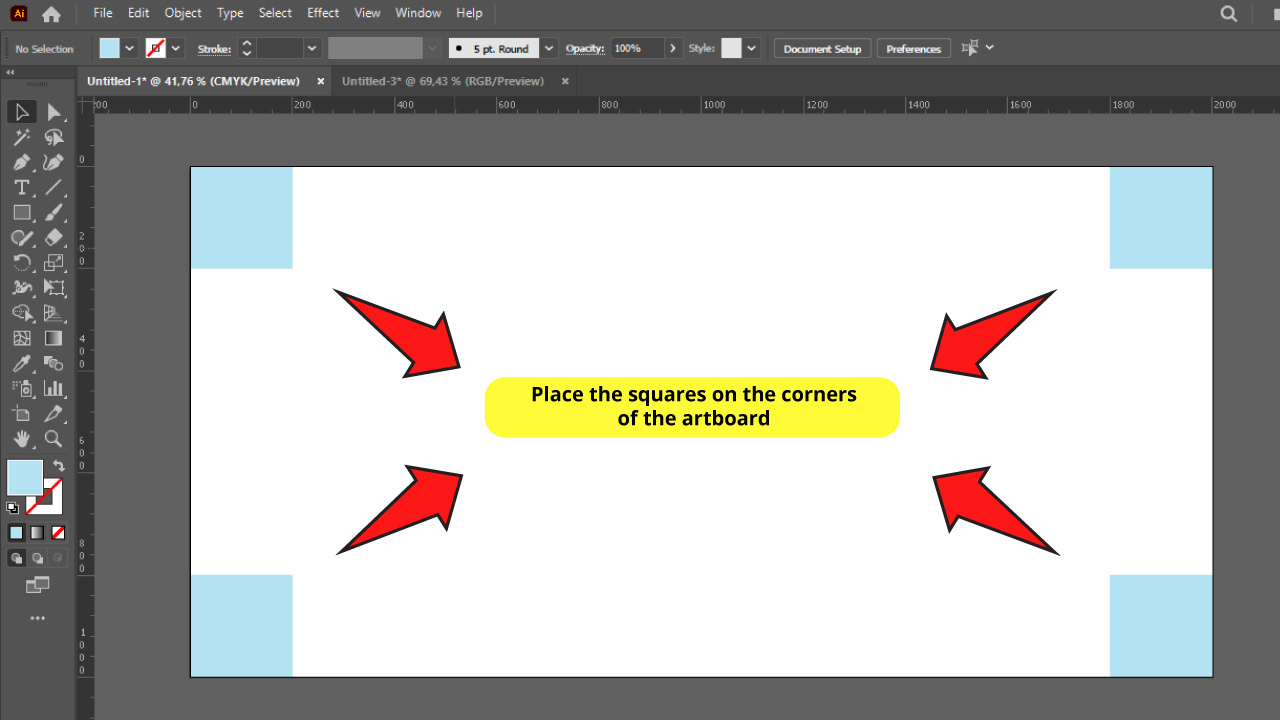

Now place each square on each corner of the artboard to use them as measurement samples.
Step 6: Add the Guides
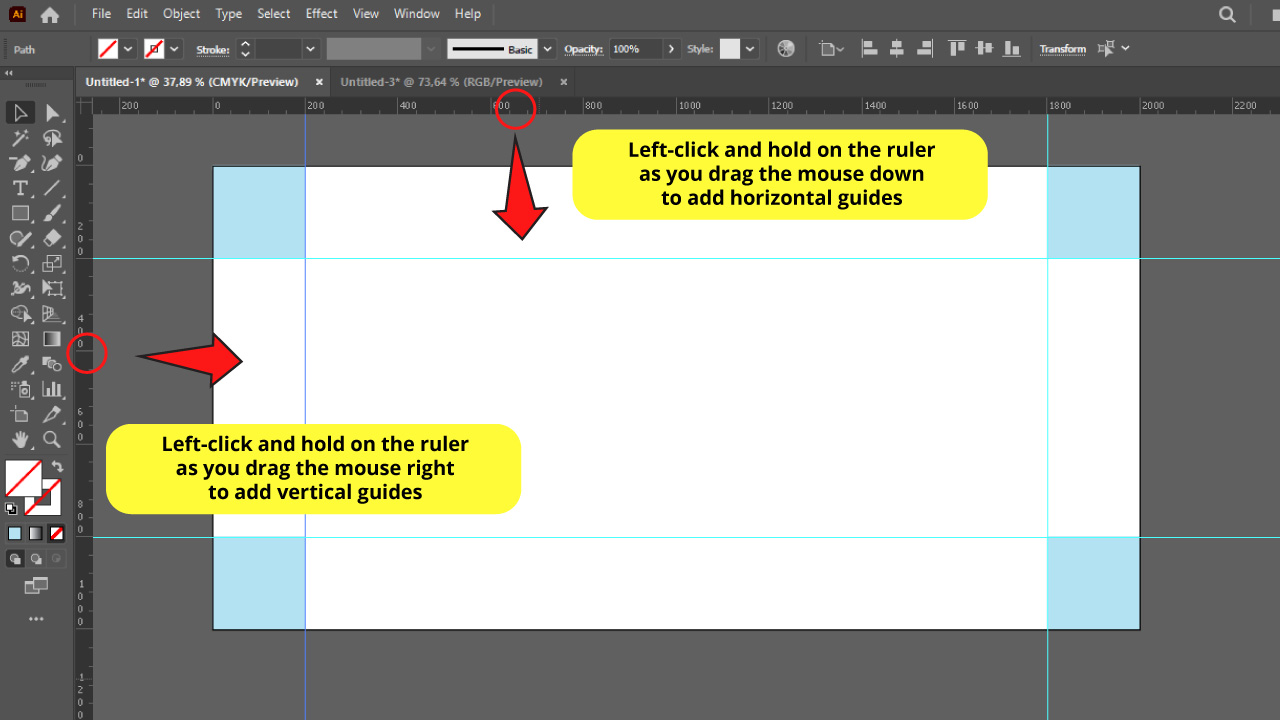

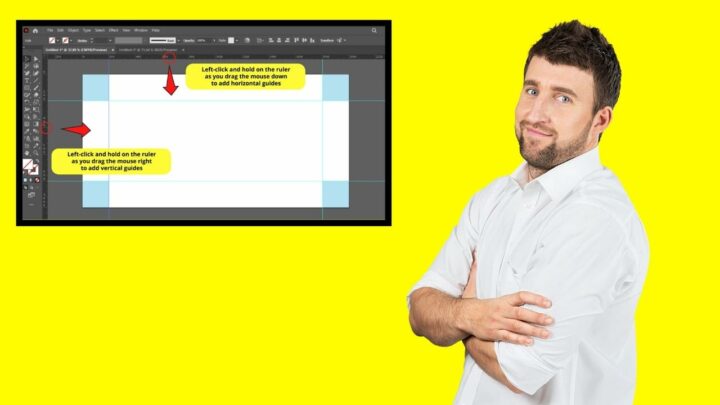
To add guides, just left-click and hold on the ruler as you drag your mouse to the artboard. Then release the click to place the guide.
If you are adding horizontal guides, left-click and hold on the top side ruler and drag to down.
If you are adding vertical guides, left-click and hold on the left side ruler and drag to right.
You can repeat this process as many times as you need.
You can also double-click on any spot of the ruler and you will be creating a guide in that place. If you use this method on the horizontal ruler you will add vertical guides, and if you do it on the vertical ruler you will add horizontal guides.
I’m going to add two horizontal and two vertical guides, using the squares as measurement samples.
If you weren’t able to place the guide where you wanted, you can select the guide with the “Selection” (V) tool and manually drag it to the spot you wish to.
Did you know that you can add guides to multiple artboards simultaneously?
Learn how to add multiple artboards and how to rearrange them in these two full articles about “The 2 Best Methods to Add Multiple Artboards in Illustrator” and “How to Rearrange Artboards in Illustrator in 5 Easy Steps”.
Step 7: Lock, Unlock, Hide, Show and Clear Guides
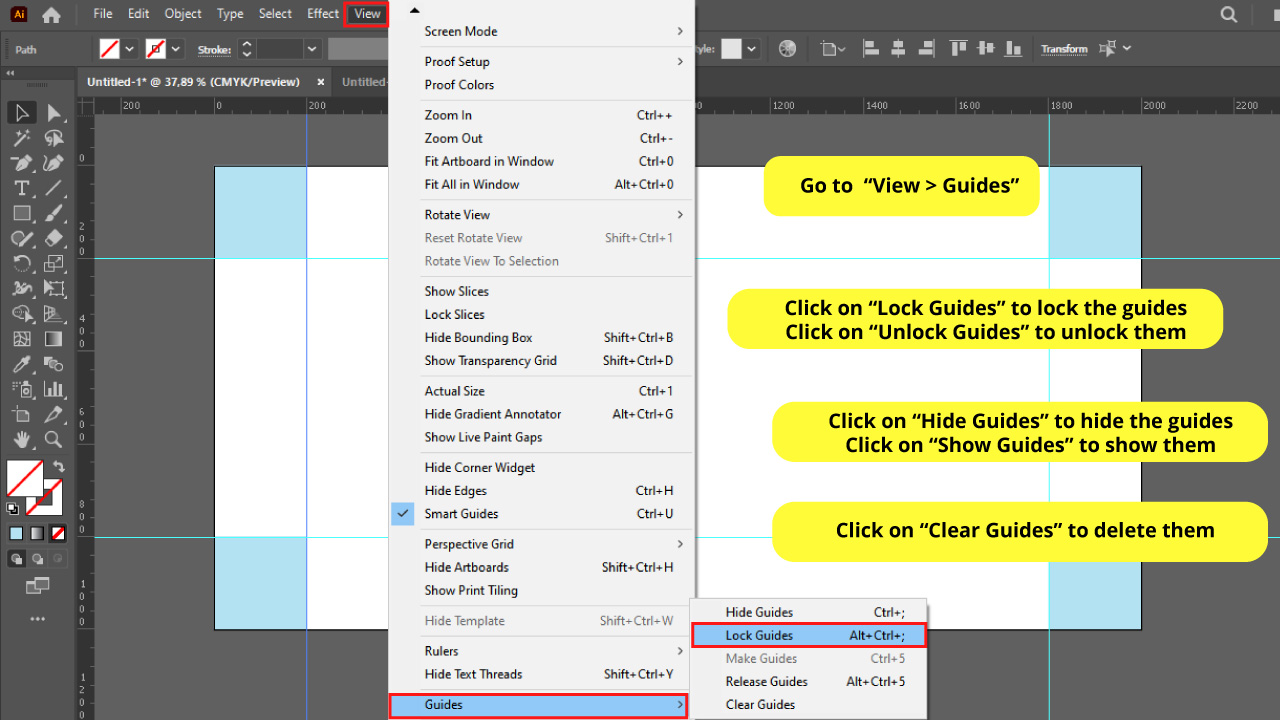
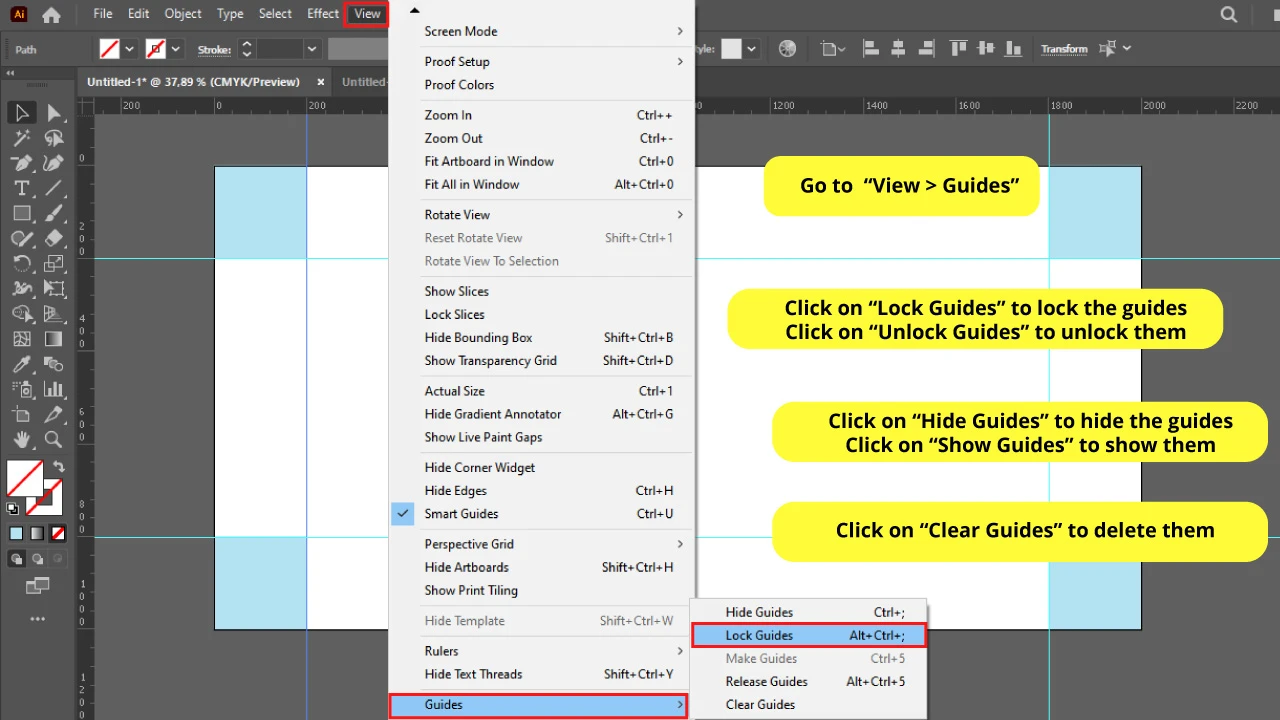
Now you have your guides placed. But you will sooner or later notice that guides can cause some trouble because since these aren’t locked, you can select them and move them by mistake.
To lock guides, go to “View > Guides > Lock Guides” or use the “Alt + Ctrl + ;” command. Now your guides are locked and you won’t select them by mistake.
You can unlock them by repeating this process but clicking on “Unlock Guides”. However, you can use the “Alt + Ctrl + ;” shortcut to toggle between lock and unlock.
Here are some more functions that you might find useful.
If you want to hide the guides go to “View > Guides > Hide Guides” or press “Ctrl + ;”. If you want to display them again go to “View > Guides > Show Guides” or press “Ctrl + ;”
Finally, if you want to delete the guides, you can do it one by one, selecting them with the “Selection” (V) tool and pressing the “Del” key. Or you can delete them all at once by going to “View > Guides > Clear Guides”.
Adding Custom Guides in Illustrator
Draw the lines you are going to use as guides using “Line Segment” (\) or any drawing tool you want. Press “Ctrl + A” to select all. Go to “View > Guides > Make Guides” on the top side menu to make them guides. Finally, lock them by going to “View > Guides > Lock Guides”.
This is something not many users know, but Illustrator actually has the option to add customizables guides, which is really cool!
These custom guides can have any shape you want, including diagonal lines, circles, stars, or any shape or line you wish.
And the best thing is it is really easy to do.
Step 1: Draw Lines
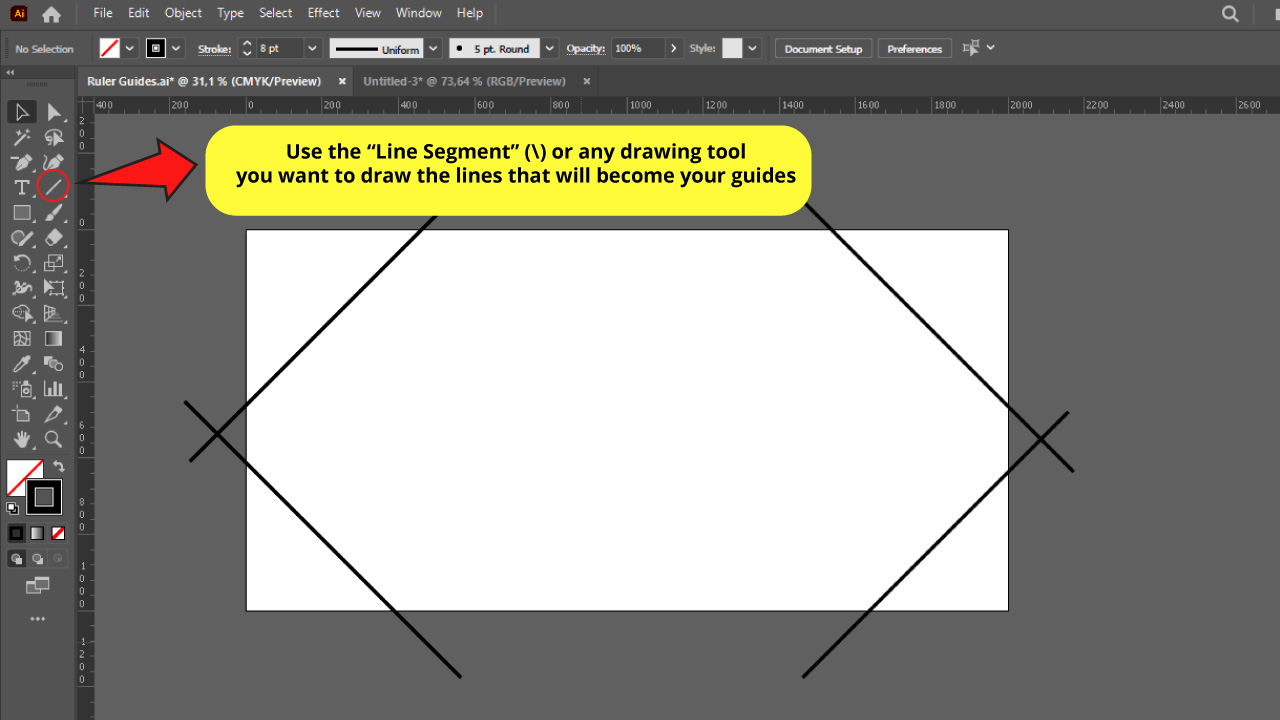
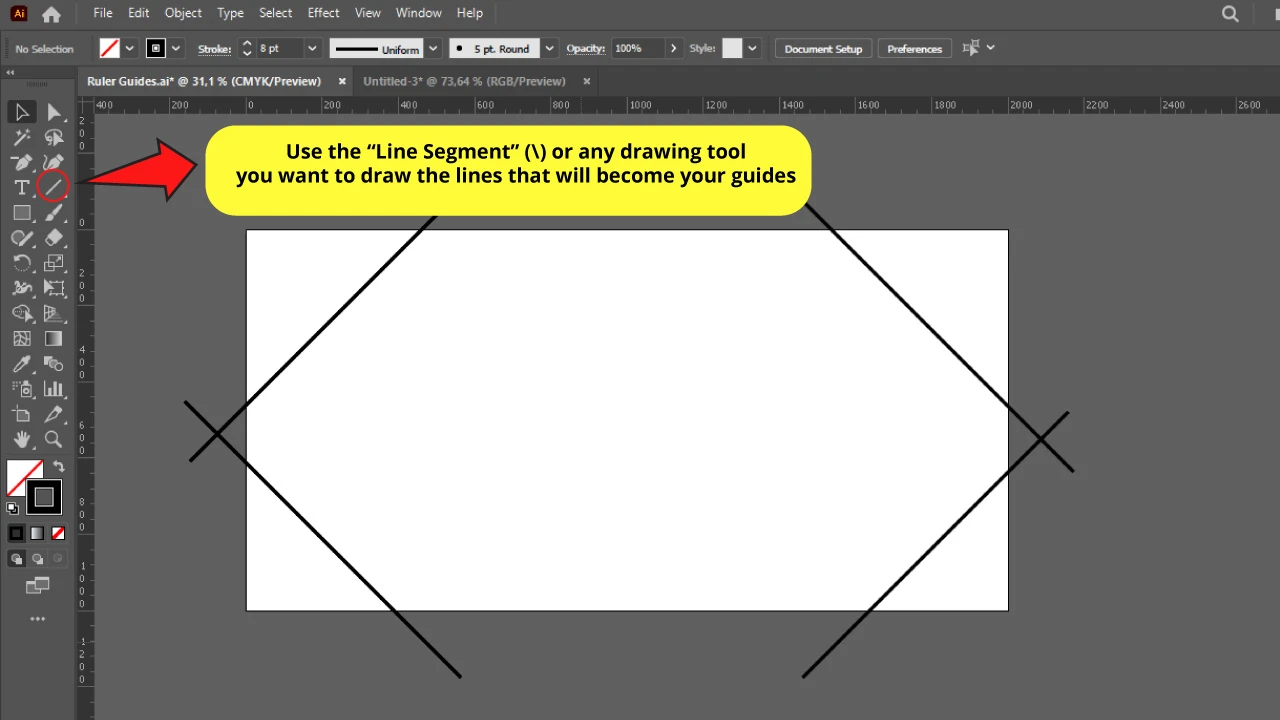
Draw lines to use as guides using the “Line Segment” (\) tool located on the left side toolbar, or any other drawing tool you prefer.
Step 2: Select the Lines
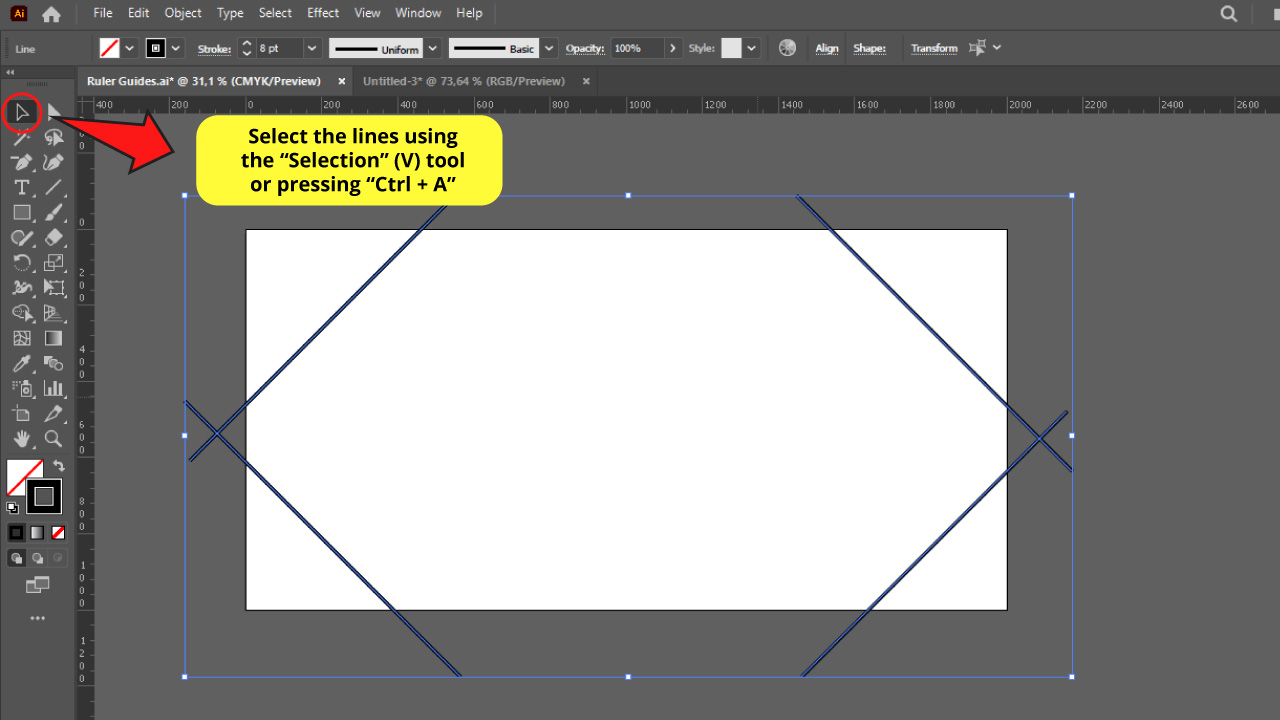
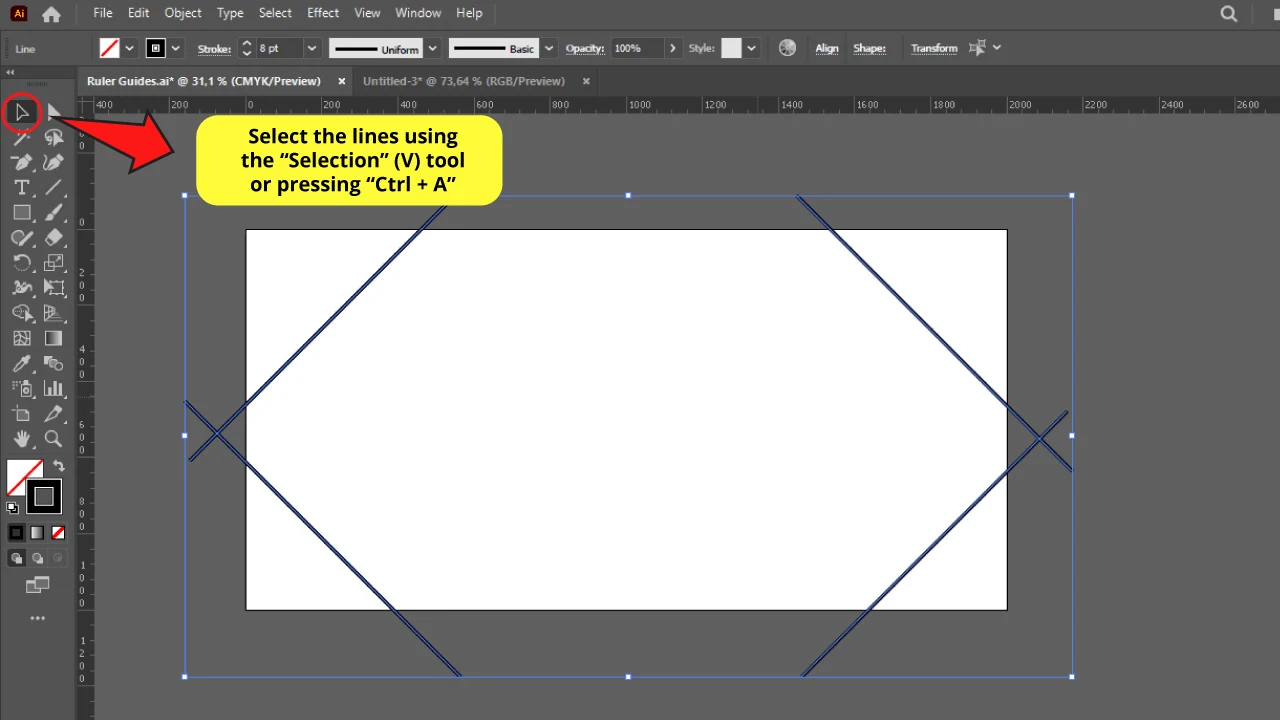
Select the lines using the “Selection” (V) tool or pressing “Ctrl + A” to select all the lines at once.
Step 3: Make them Guides
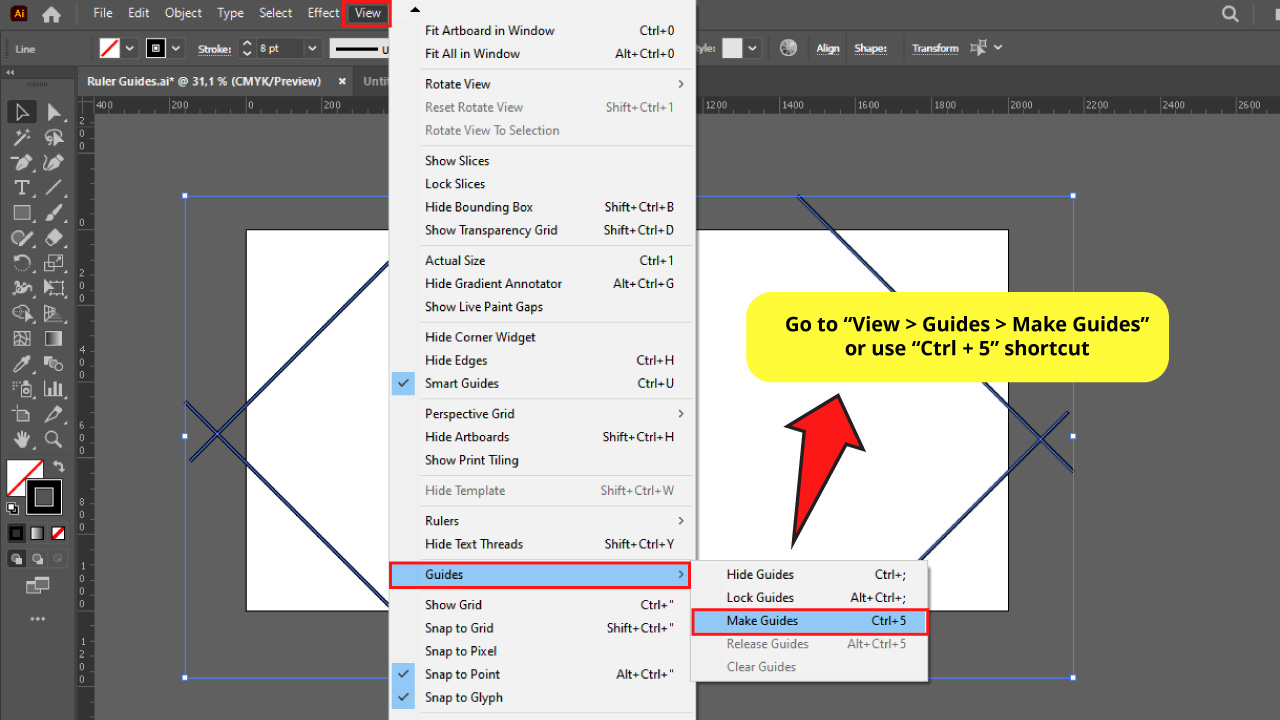
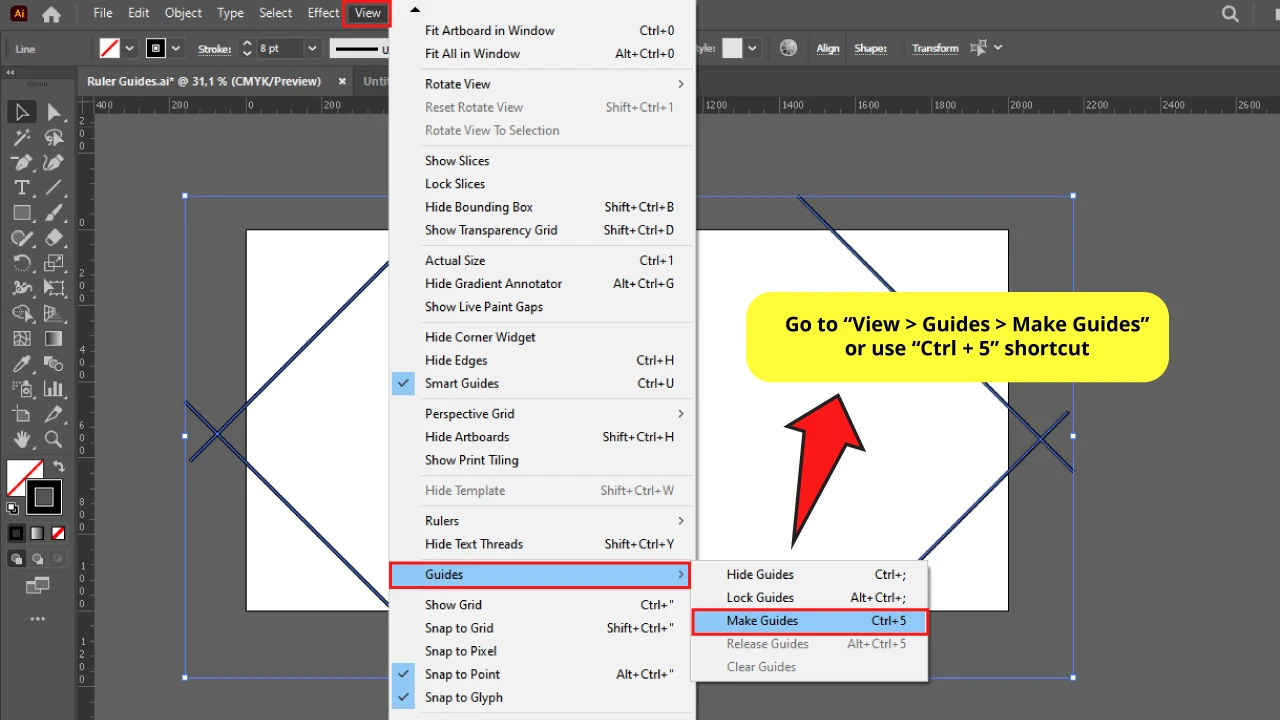
Go to “View > Guides > Make Guides” on the top side menu or use the “Ctrl + 5” shortcut.
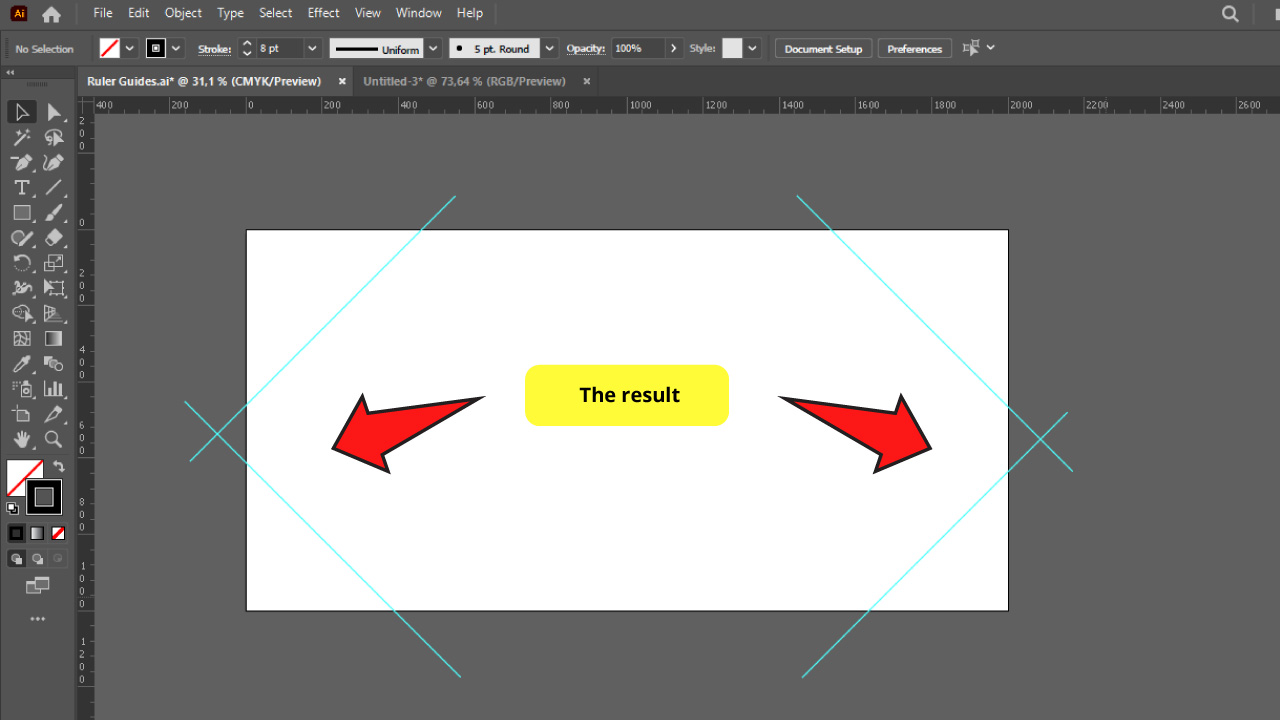
And there it is! Now your lines have been converted to guides.
Remember to lock your guides before you start working on your artboard to avoid selecting and moving them by mistake.
To lock guides click on “View > Guides > Lock Guides” or use the “Alt + Ctrl + ;” command.
If you are enjoying this tutorial so far, you may also be interested in this article about “Three Ways to Make a Grid in Illustrator”, where you can learn how to customize different types of grids and apply them in your future projects.
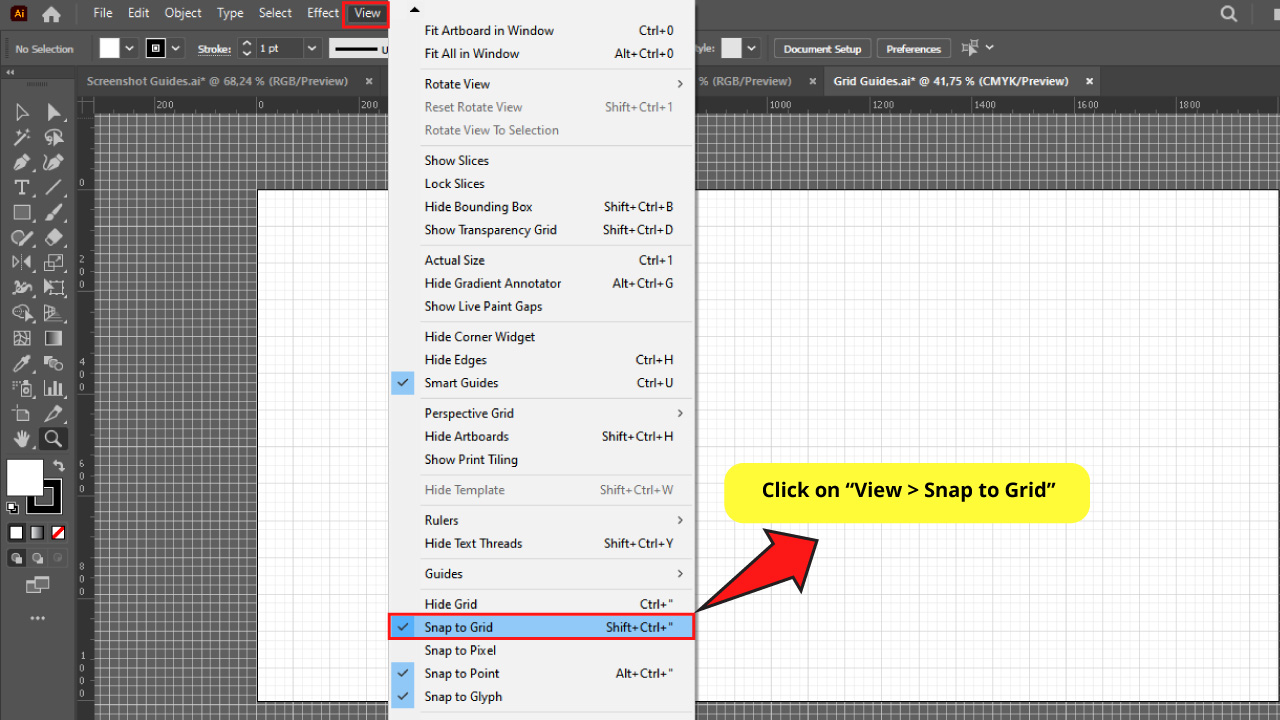
Adding Grid Guides in Illustrator
Click on “View > Show Grid” (Ctrl + “) on the top side menu. Then go to “View > Snap to Grid” to enable the “Snap to Grid” function to place objects strictly using the grid lines as guides.
Grid Guides are commonly used to draw very precise artworks or figures, where each pixel or point unit matters.
Grid Guides themselves can be really useful, but the highlight feature of grid guides unveils when you enable the “Snap to Grid” function.
This function allows you to draw or place objects strictly using the grid lines as guides, so you can perform really accurate drawings.
Step 1: Add Grid


To display the grid go to “View > Show Grid” (Ctrl + “) on the top side menu.
Step 2: Snap to Grid

The “Snap to Grid” function works like a magnet constraining our traces to the grid lines.
To enable this function go to “View > Snap to Grid”. As long as this function is enabled, all the drawings you make will snap to the grid.
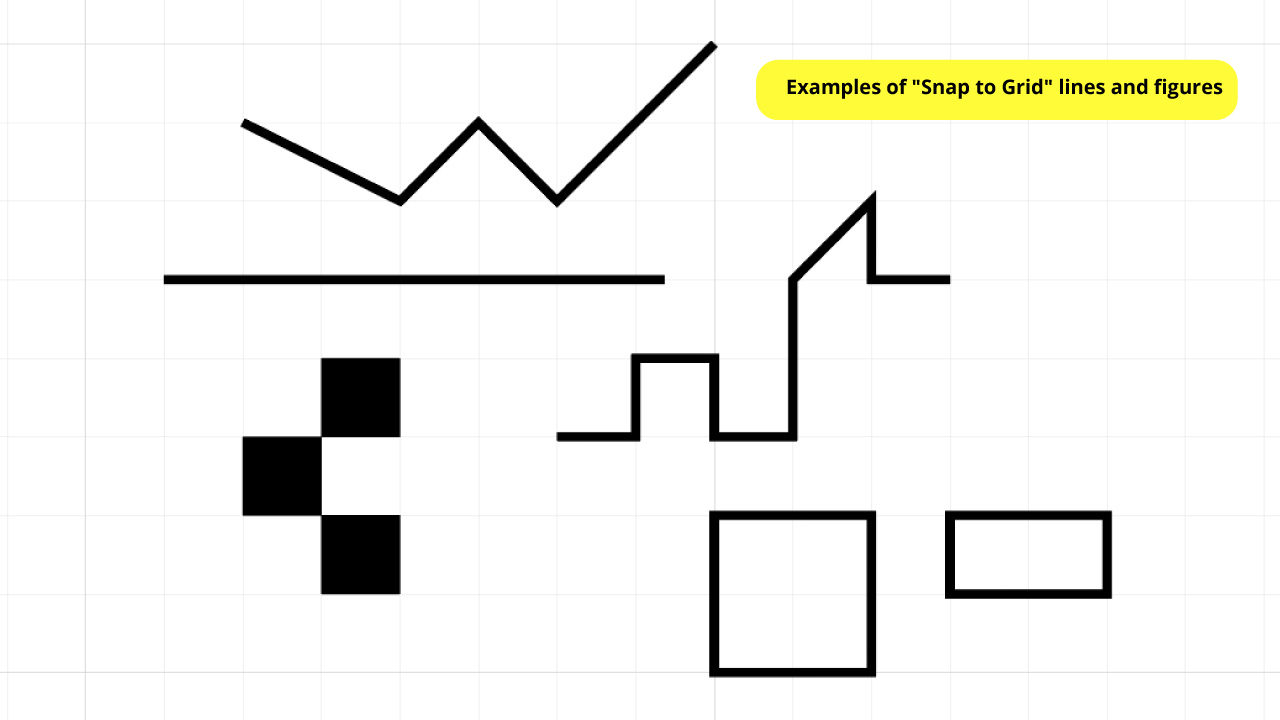
This means that if you’re using the “Pen” (P) tool you will only be able to add anchor points on the grid lines’ intersections.
Or that if you’re using the “Line Segment” (\) tool, or the “Rectangle” (M) tool to draw figures, you will only be able to create them strictly over the grid lines.
Here you can appreciate some examples of “Snap to Grid” lines and figures.

Would you like to know some cool things you can do using Grid Guides? Now drawing pixel art is easier than ever. If you are interested in pixel art, check this article about “How to Make Pixel Art in Illustrator”.
Adding Smart Guides in Illustrator
Go to “View > Smart Guides” on the top side menu, or press “Ctrl + U” to shortcut it.
The Smart Guides are the most used guides in Illustrator. These are almost everywhere. The default color of these guides is magenta.
This kind of guide is designed to help us align objects easier when it comes to working manually.
Smart Guides appear when you are dragging objects to let you know the moving distance. These are also displayed when you place objects next to each other showing you a suggested align line to guide you.
Step 1: Add Smart Guides
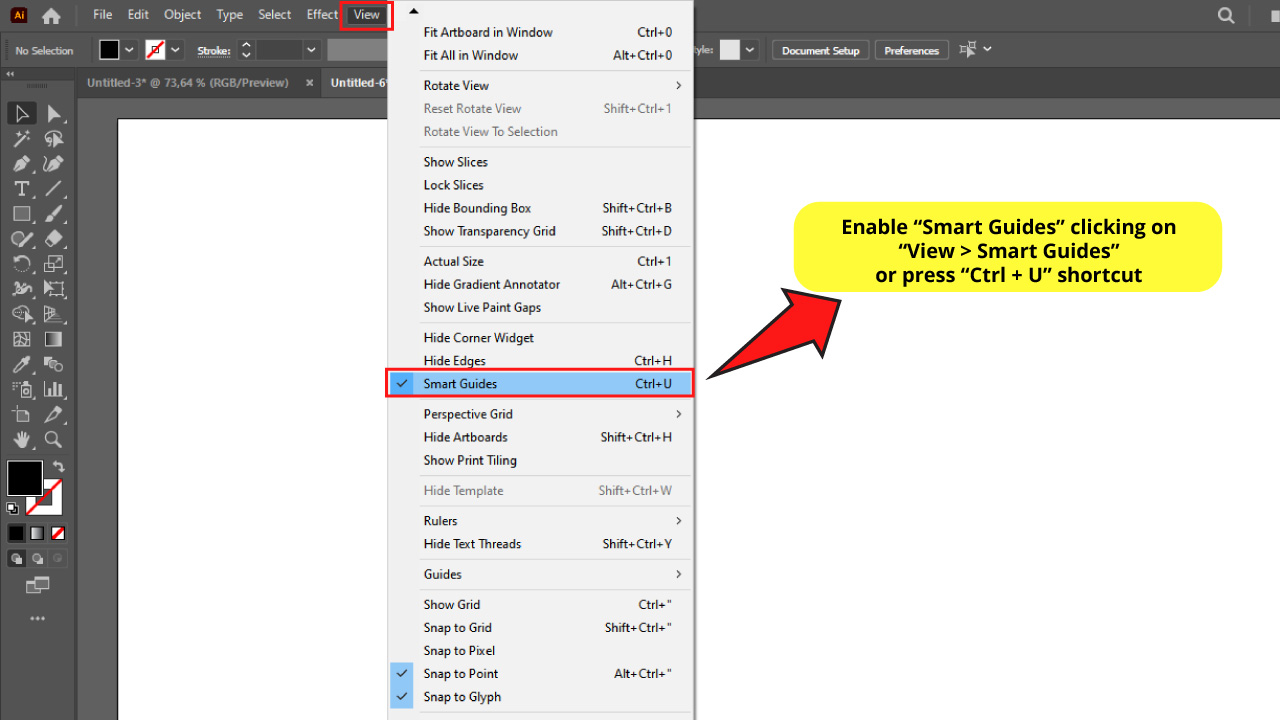
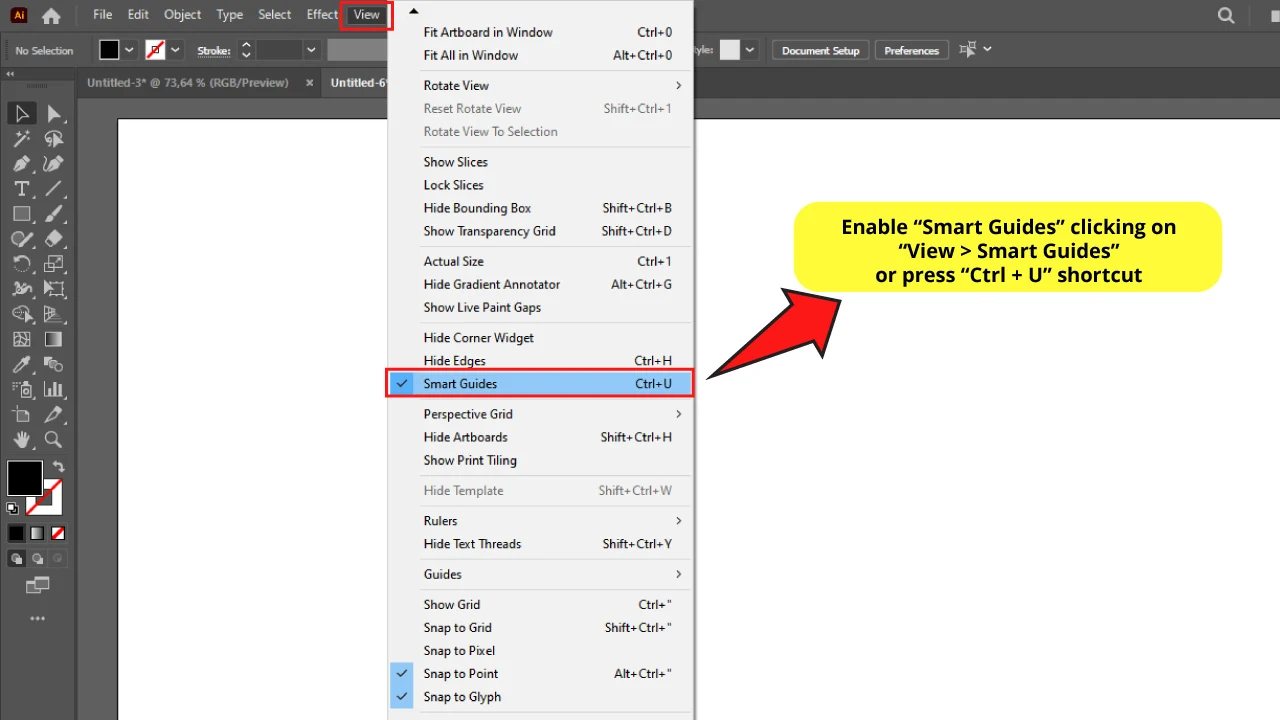
To enable or disable smart guides go to “View > Smart Guides” or press “Ctrl + U” to shortcut. To continue with Step 2 make sure that it is enabled.
If the “Smart Guides” feature is enabled, it will show every time to help you align paths and objects.
If you don’t always want to work with this function on, remember you can toggle between able and disable with the “Ctrl + U” command.
Step 2: Use Smart Guides
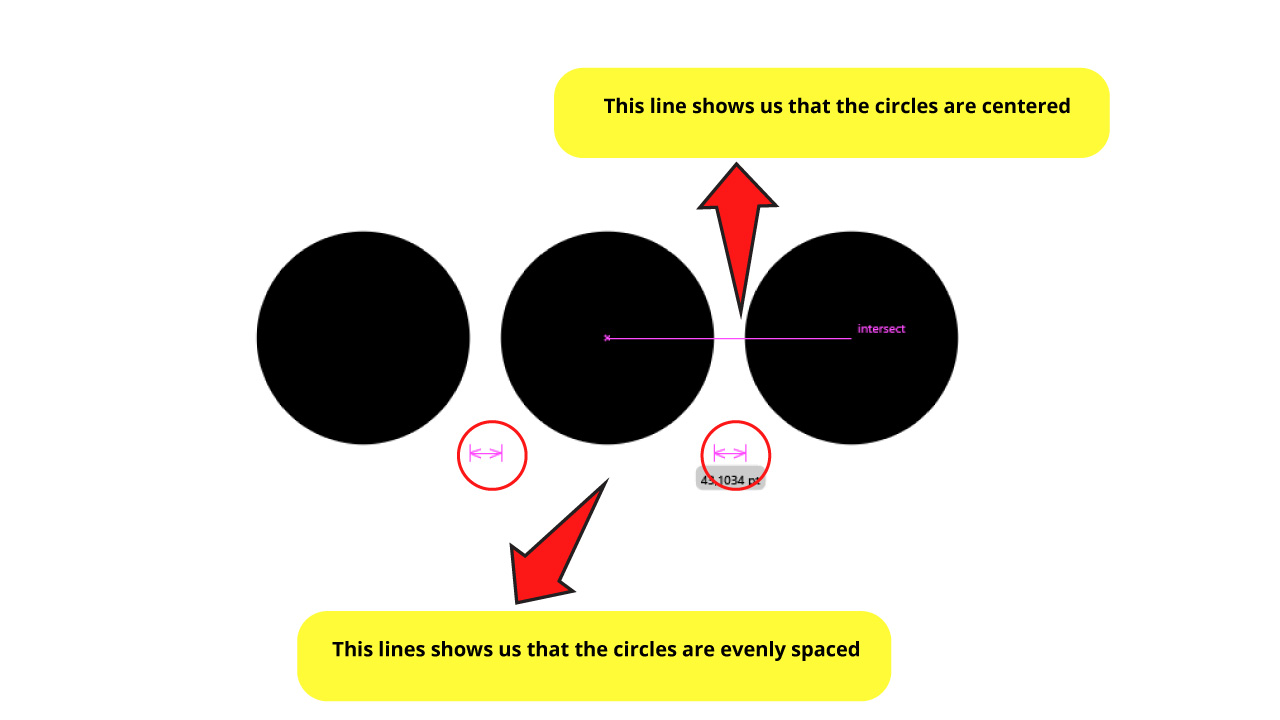

Here’s an example.
I have three circles, and when I want to manually align them, smart guides automatically show up to help me align them with no effort.
In this example the displayed guides show me the intersection of the center of each circle, and the even spacing between them.
Would you like to know how to align objects or evenly space them using the “Align” tool? Take a look at those tutorials about “How to Center Objects in Illustrator” and “How to Evenly Space Objects in Illustrator in 6 Simple Steps”.
Frequently Asked Questions on “How to Add Guides in Illustrator”
What is the Glyph Guide in Illustrator?
Since this function recognizes features such as text baseline, height, bounds, etc, this guide is specially designed for texts. If you want to know more about this, check this article featuring Snap Objects To Glyph.
How can I change the guide’s colors in Illustrator?
Depending on your needs, go to “Edit > Preferences > Guide and Grid”, or “Edit > Preferences > Smart Guides” on the top side menu. Here you can set the guide’s colors.
How can I disable the “Snap to Grid” function in Illustrator?
To disable the “Snap to Grid” function, go to “Edit > Preferences” on the top side menu and make sure that the “Snap Grid” function is unchecked.
How can I disable Illustrator’s “Grid Guides”?
To disable the ”Grid Guides” go to “Edit > Preferences > Hide Guides” on the top side menu.


Hey guys! It’s me, Marcel, aka Maschi. On MaschiTuts, it’s all about tutorials! No matter the topic of the article, the goal always remains the same: Providing you guys with the most in-depth and helpful tutorials!

