

Did you look all over Adobe Illustrator to find the Trapezoid tool? Sorry to break your bubble, but it doesn’t exist, you need to make it yourself by using other tools.
There are a few ways to make a Trapezoid in Illustrator. Using the “Rectangle Tool”, “Polygon Tool” and “Pen Tool”. After this tutorial, you will choose your favorite, fastest and easiest way to create the Trapezoid.
How to make a Trapezoid in Illustrator
There are a couple of ways to make a Trapezoid in Illustrator, using different tools such as the “Rectangle Tool,” the “Pen Tool,”and the “Polygon Tool.” The easiest way to make a trapezoid in Illustrator is by using the Rectangle Tool.
How to make a Trapezoid in Illustrator using the Rectangle Tool
Create a New File in Adobe Illustrator. Select the “Rectangle Tool” and draw a rectangle. With the “Direct Selection Tool” select the top two anchors. Then use the “Scale Tool” and drag it to the left or to the right in order to create the Trapezoid.
Step 1:
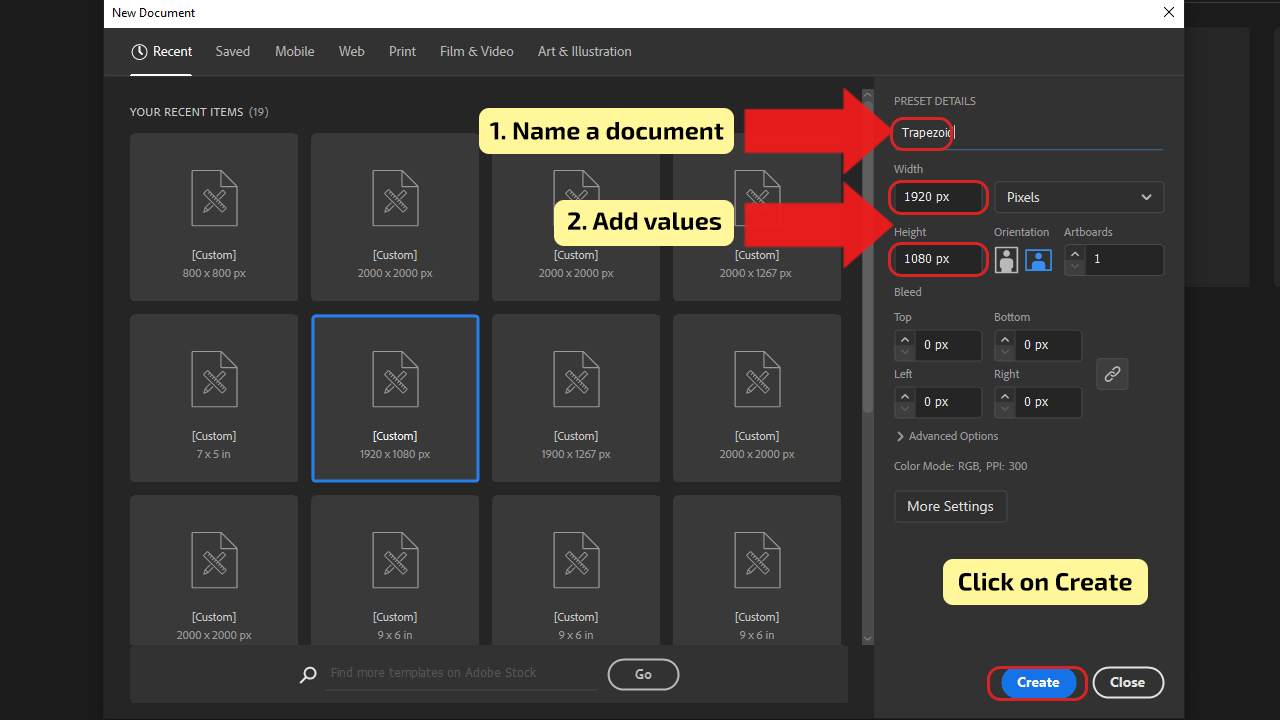
Create a New File in Adobe Illustrator. Open your Adobe Illustrator and create a new document by clicking on the “Create New” button. The window “New Document” will pop up, and choose the canvas size.
In this tutorial, the dimensions of the canvas are set to 1920×1080 px. Name your document, set chosen “Width”, and do the same for “Height”. Click on “Create”, and let’s begin.
The shortcut for creating a new file: Control (CTRL) + N (Windows) or Command + N (MAC).

Step 2:
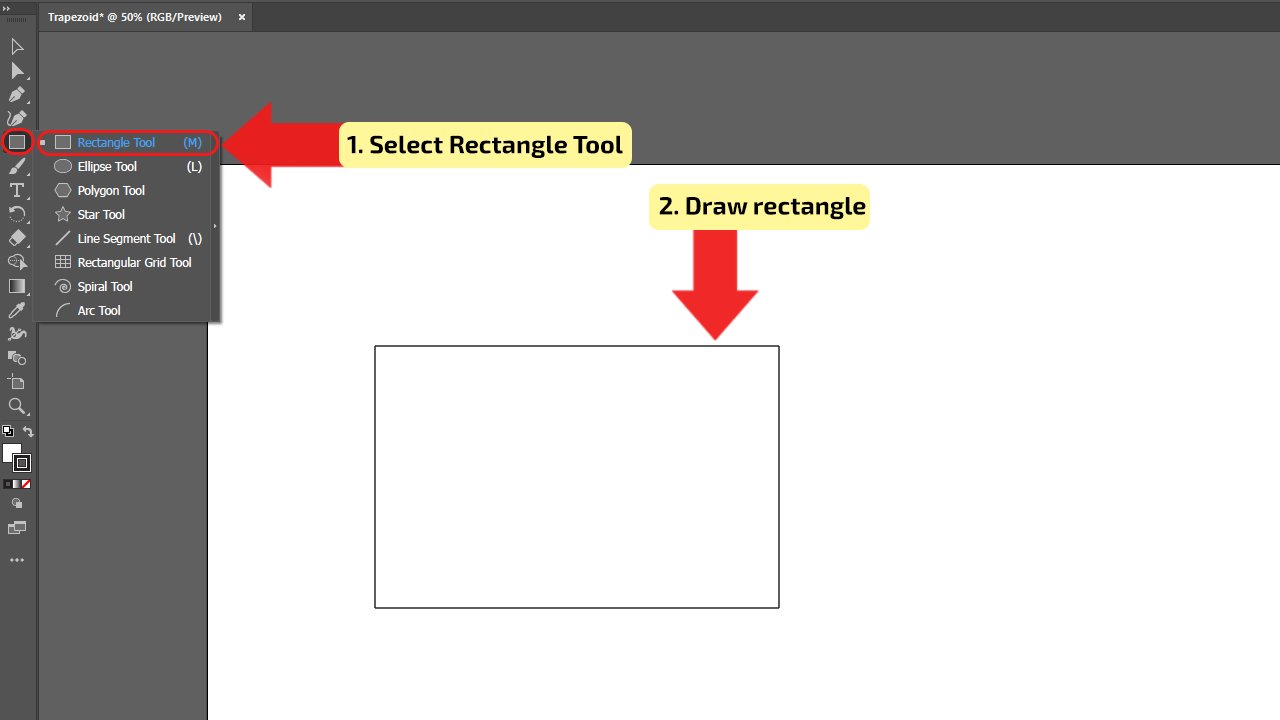
Draw a rectangle. In the Tool menu, find “Rectangle Tool” and select it, or use the shortcut, press the letter “M” on your keyboard. Draw the rectangle on your canvas. Make it a bit bigger, so you can easily manipulate the points. In the tutorial, the size of the rectangle is 400x250px, you can always choose the size that you prefer.

Step 3:
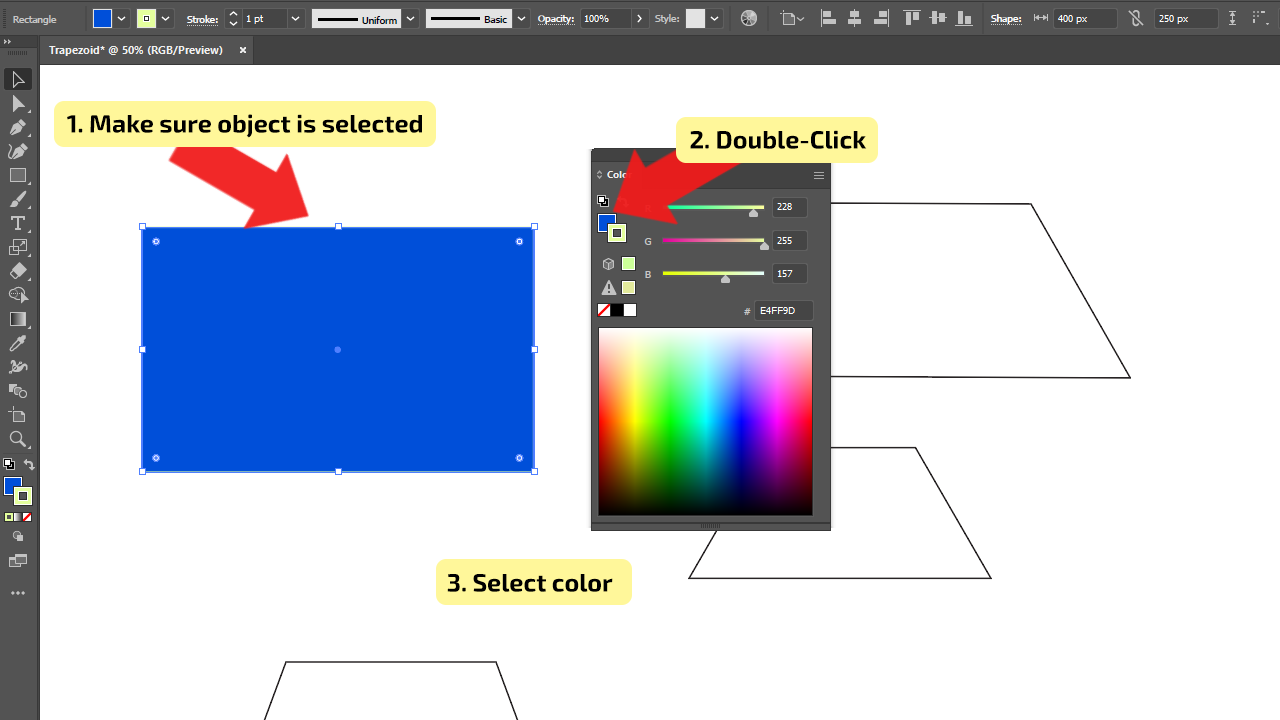
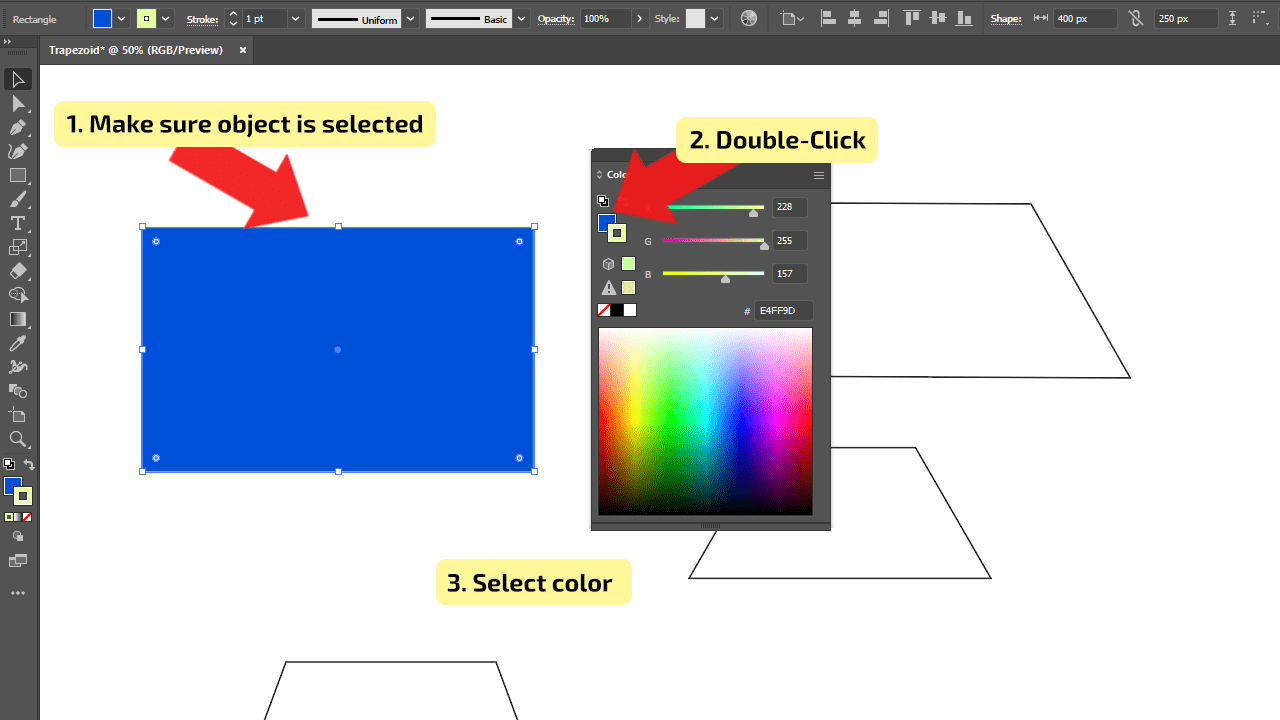
Adjust the color. Before changing the color, make sure the rectangle is selected. In “Color Panel” choose the colors for the fill and stroke. It depends on what you want to achieve, but you can remove the fill or the stroke. In the tutorial, the color of the stroke is black and the fill is removed.
To open the “Color Panel”, go to “Window”, in the drop-down menu, select the “Color”, or use the shortcut on your keyboard, press F6.
Step 4:
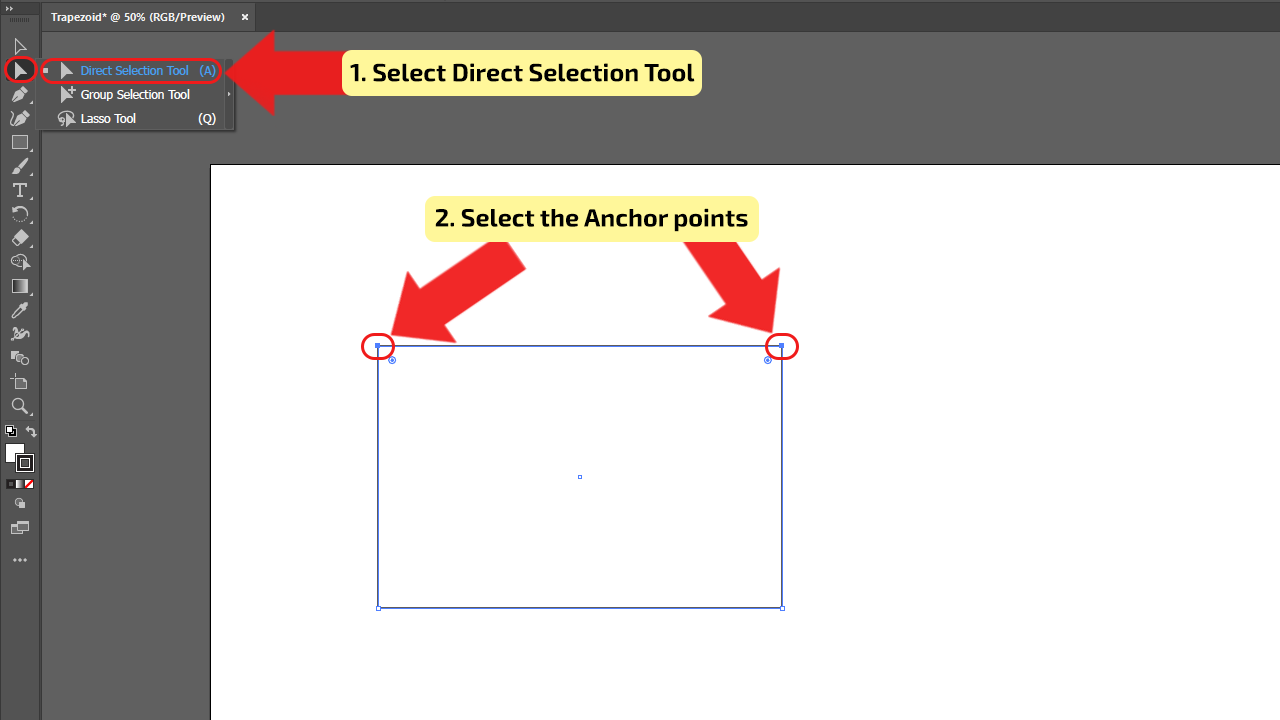
Select the anchor points. Choose the “Direct Selection Tool” in the Tool menu, or use the shortcut on the keyboard, by pressing the letter “A” the tool will be selected. With this tool, select the top two anchors (top horizontal line) by drawing the box over them.


Step 5:
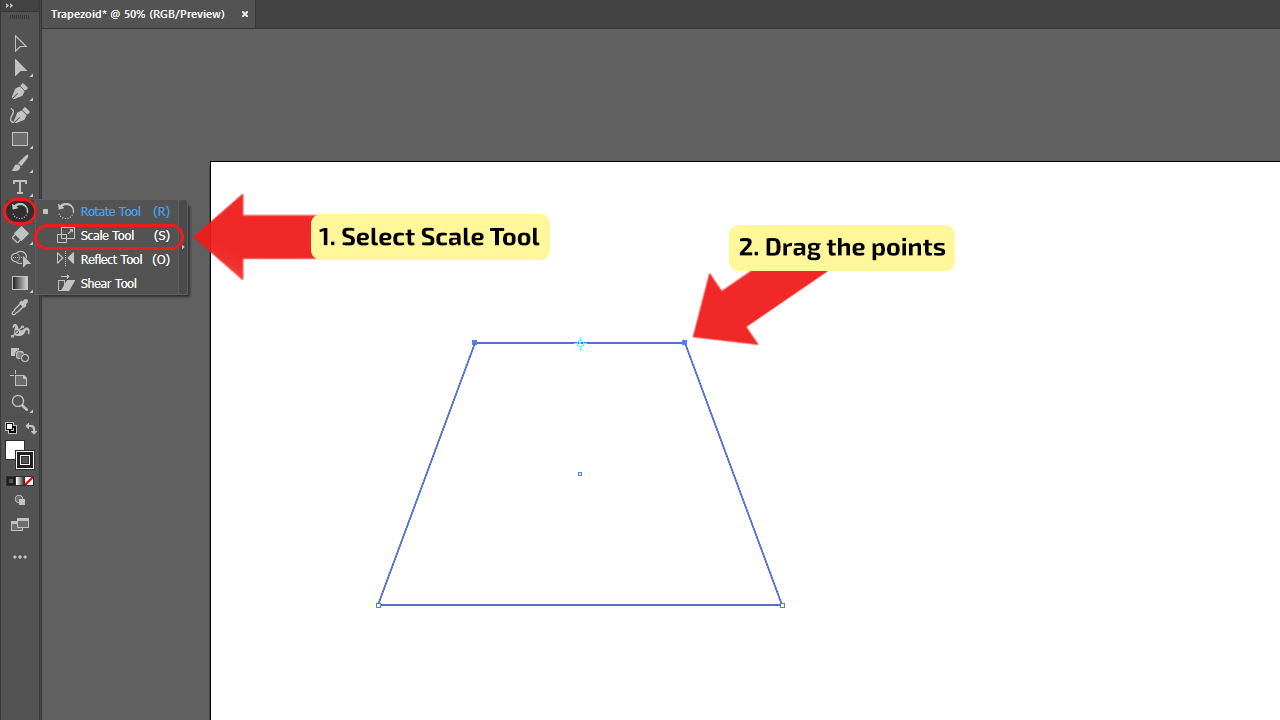
Make your trapezoid. Use the “Scale Tool” from the Tool menu, or press the letter “S” on your keyboard. Then click anywhere on the canvas, hold left-click and drag to the left or the right to scale the top line, until you create the needed engle. In this way, you will create the trapezoid. If you are not satisfied with the outcome, in the same way as it was explained in previous steps, adjust the trapezoid by selecting the anchors and scaling it.

How to make a Trapezoid in Illustrator using the Polygon Tool
Select the “Polygon Tool” and draw a hexagon. With the “Direct Selection Tool” select the bottom two anchors, then drag one of the anchors to the middle anchor in order to create the Trapezoid.
Step 1:
Draw a Hexagon. In the Tool menu, select the “Polygon Tool”. Draw the hexagon on your canvas by clicking and dragging it. For your element to be leveled with canvas, hold Shift on your keyboard while drawing it. The size of the hexagon should be big enough for you to easily manipulate the points. If you are not satisfied with the size or rotation of the hexagon, change it by dragging the anchor for resizing and rotating the point for changing its angle.

Step 2:
Adjust the color. Before changing the color, make sure the hexogen is selected. In “Color Panel” choose the colors for the fill and stroke or remove one of them. In the tutorial, the color of the stroke is removed and the fill is light blue.
To open the “Color Panel”, go to “Window”, in the drop-down menu, select the “Color”, or use the shortcut on your keyboard, press F6.


Step 3:
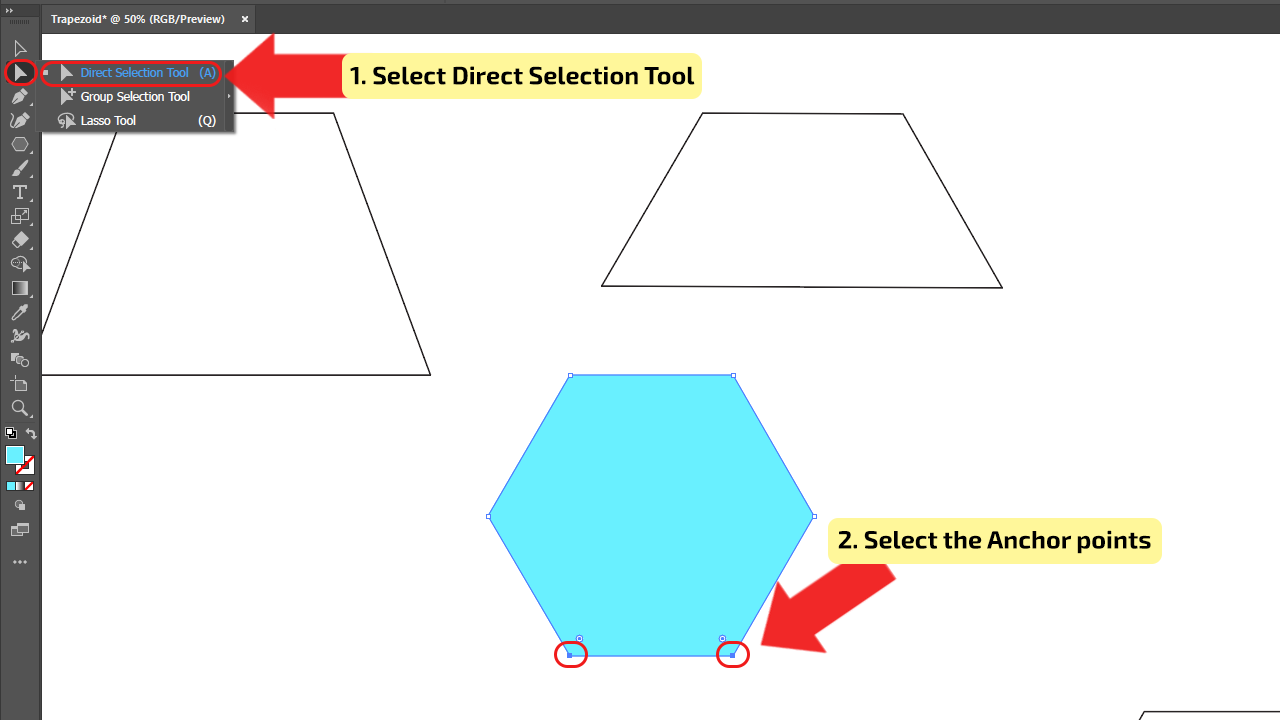
Select the anchor points. With the “Direct Selection Tool” select the bottom two anchors on a horizontal line by drawing the box over them.
The shortcut for “Direct Selection Tool” is the letter “A”.
Step 4:
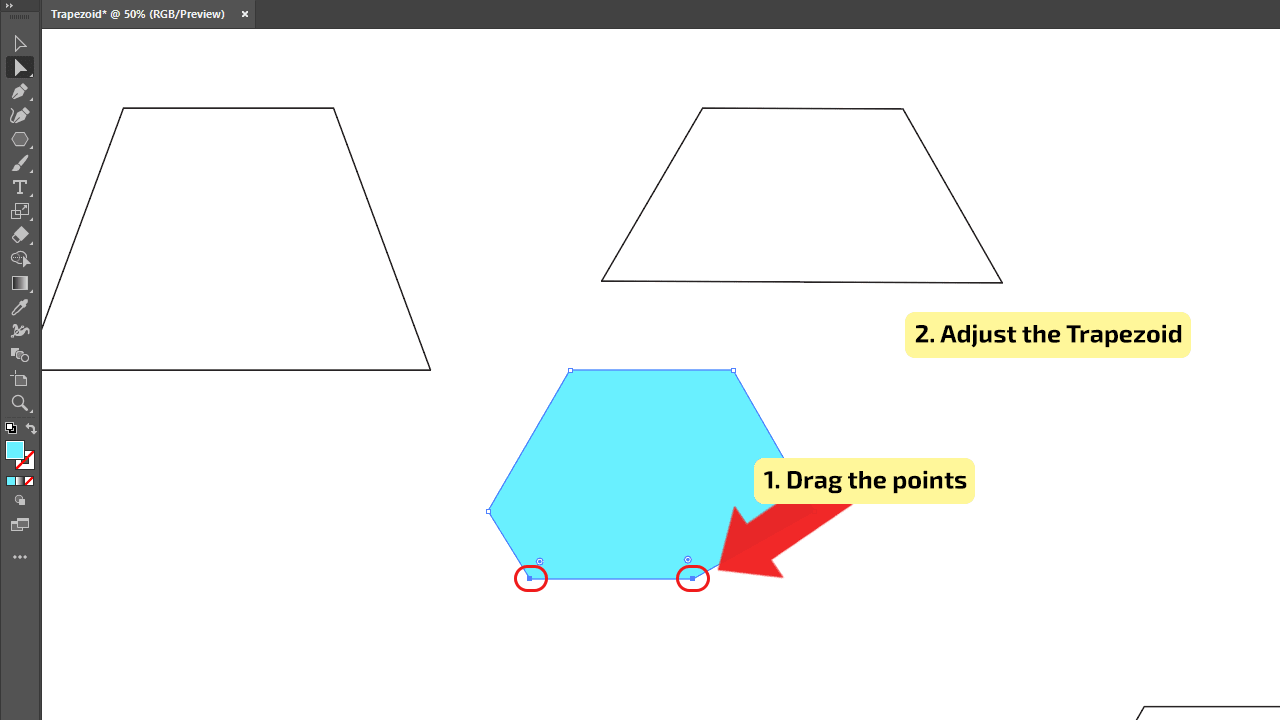
Make your trapezoid. After selecting the bottom two anchors, choose one of them and drag it to the middle anchor point, using the “Direct Selection Tool” for this action. If you choose the anchor on the bottom left, drag it to the middle left anchor until you get the bottom line of the Trapezoid. Also, you can hold Shift while dragging the bottom horizontal line in order for the angle to stay the same.

How to make a Trapezoid in Illustrator using the Pen Tool
Use the “Pen Tool” and draw an isosceles triangle. Add points on each equal side of the triangle, on the same height. With the “Direct Selection Tool” select the added points, and drag them to the top anchor, holding Shift, for the horizontal line to be leveled with the anchor.
Step 1:
Draw a triangle. In the Tool menu, select the “Pen Tool”. Draw the isosceles triangle on canvas. Make sure the base of the triangle is leveled with canvas, hold Shift on your keyboard while drawing it. As it was explained in previous steps for the size of elements, it should be big enough for you to easily manipulate the points. If you are not satisfied with the size or rotation of the triangle, change it by dragging the anchor for resizing and rotating the point for changing its angle.


Step 2:
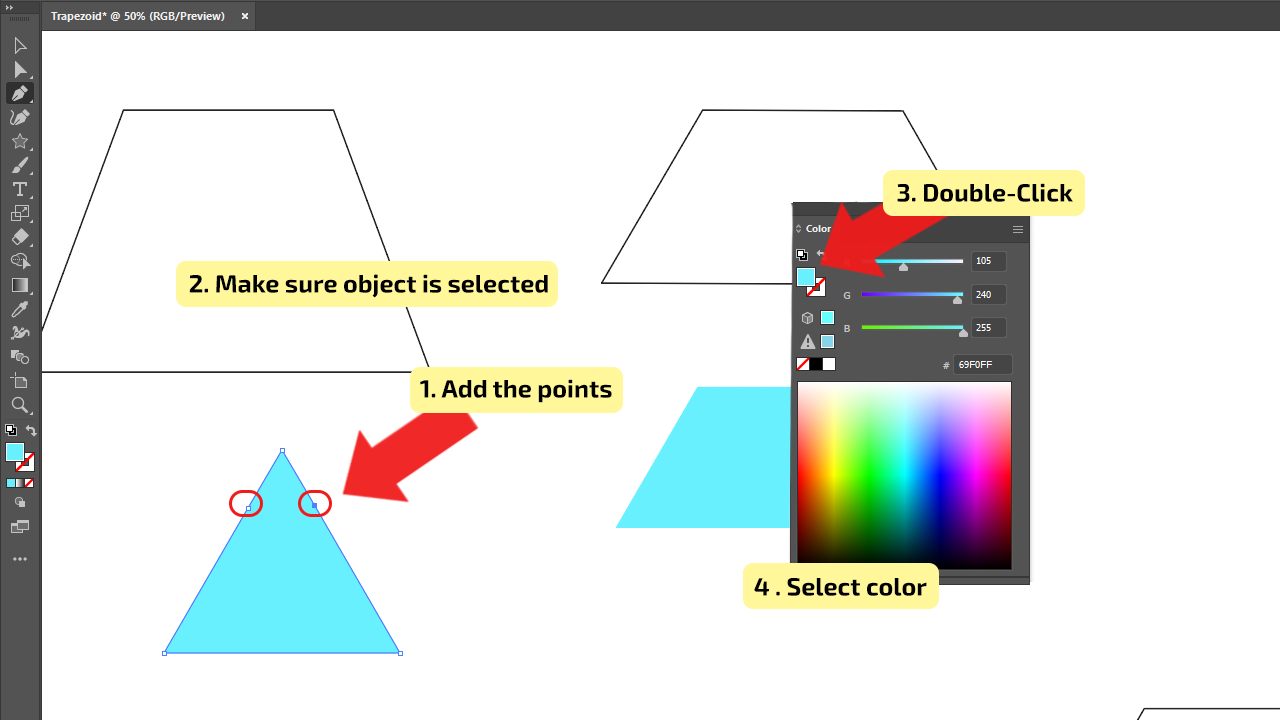
Add anchor points and adjust the color. When you are satisfied with the size of the triangle, add points on each equal side, on the same height with “Pen Tool”. Then select the triangle to change the color. Open the “Color Panel”, go to “Window”, in the drop-down menu, select the “Color”, or use the shortcut on your keyboard, press F6. In “Color Panel” choose the colors for the fill and stroke or remove one of them. In the tutorial, the color of the fill is yellow and the stroke is removed.

Step 3:
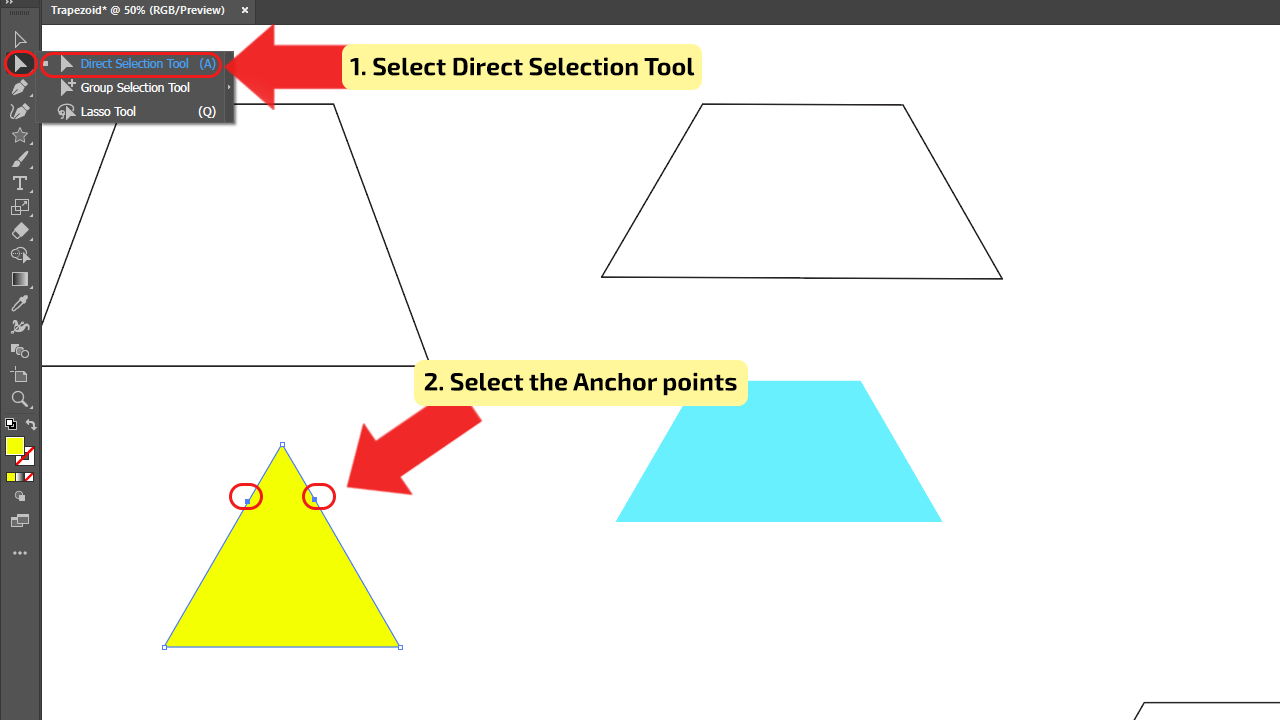
Select the anchor points. Using the “Direct Selection Tool”, select the added points on both sides of the triangle, by drawing the box over them. Make sure that just those two points are selected, the top anchor has to be left unselected.
The shortcut for “Direct Selection Tool” is the letter “A”.

Step 4:
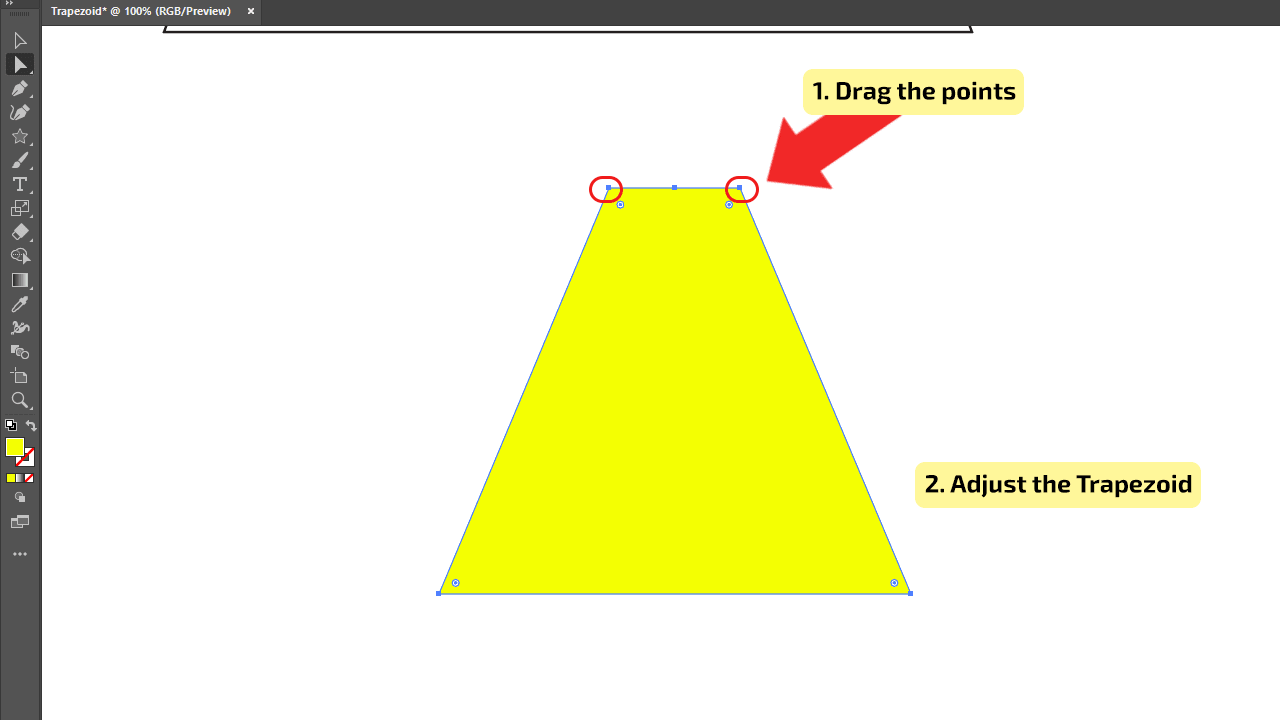
Make your trapezoid. After selecting the points, using the “Direct Selection Tool”, drag them to the top anchor point, while holding the Shift to create the horizontal line on the top. If your top line isn’t perfectly parallel with the base, adjust the crooked point.

Step 5:
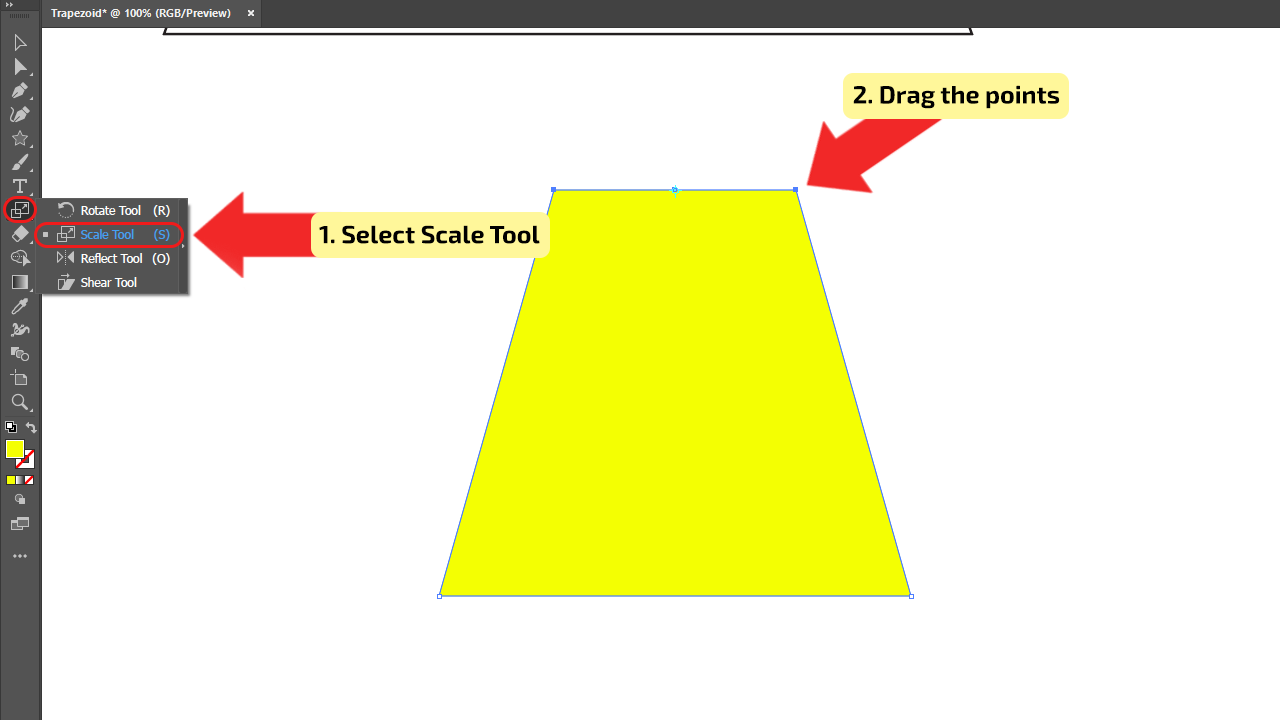
Resize. If the top line of the trapezoid is too narrow, resize it by selecting top points, as explained in previous steps. Select the “Scale Tool”, then click anywhere on the canvas, hold left-click and drag to the left or the right to scale the top line, until you create the wider top of the trapezoid.
The shortcut for the “Scale Tool” is the letter S on your keyboard.


Hey guys! It’s me, Marcel, aka Maschi. On MaschiTuts, it’s all about tutorials! No matter the topic of the article, the goal always remains the same: Providing you guys with the most in-depth and helpful tutorials!

