
With Twitch, gamers can now stream their games and have the chance to watch others play and even interact with them!
But, for you to stream effectively, you’ll need to catch your viewers’ attention with eye-catching graphics.
So, if you’re planning to take this route, you might want to consider learning to set up your Twitch overlays, panels, and other stuff with Canva.
How to Use Canva for Twitch
To use Canva for Twitch, do the following:
- Open a blank design template or choose a Twitch template
- Change the design’s background color
- Add videos, frames, shapes, icons, and other graphical elements
- Add text, animations, and effects to the design
- Click “Share” and select “Download”
How to Use Canva for Twitch — Don’t Dare Miss These!
As mentioned earlier, Twitch is a live streaming platform for gamers and growing a community.
And, that’s where Canva can help as this graphic design tool has allowed Twitch streamers to use it for designing the following:
(Note: You’ll find these options once you type the word “Twitch” in the search bar of Canva’s homepage)
- Twitch Overlay
- Twitch Panel
- Twitch Logo
- Twitch Banner
- Twitch Background
- Twitch Screen
- Twitch Emote
- Twitch Webcam Overlay
- Livestream Twitch Screen
Whatever Twitch component you need to design, basically the steps of creating them are the same.
Yet, for sample purposes, let’s focus on creating Twitch Overlay and Twitch Panels.
How to Create Twitch Panels in Canva
- Type “Twitch” in the search bar and select “Twitch Panel”
- Select the blank Twitch panel template
- Add a background color to the design
- Add shapes to the Twitch panel design
- Edit the shape you added
- Add icons to the Twitch panel design and edit it accordingly
- Add text elements to the design
- Make more Twitch panels by clicking “Duplicate Page”
- Click “Share” and select “Download”
Twitch Panels are your call to action (CTA) boards that tell your viewers what to do while they’re in your channel.
Others even liken it to an information banner.
Regardless of what you call them, you should use the 320 x 160 px dimension size for Twitch panels.
Yet, you don’t need to remind yourself of those dimensions constantly as Canva already set it for you.


So, to start with…
Step 1: Type “Twitch Panel” in the search bar


A dropdown menu then appears, listing all the Twitch designs that you can do in Canva.
Since we want to create a Twitch panel, click the “Twitch Panel” option.


Step 2: Select the blank Twitch panel template


But if you don’t want to design from scratch, select a pre-made Twitch panel template in the gallery.
For sample purposes, we’ll go with creating from a blank template.
Step 3: Add a background color to your Twitch panel design


You might want to plan this out beforehand as you’d want the colors to reflect your branding and complement the personality of your stream.
Click on the canvas to activate the editor toolbar. You’ll then see a rainbow-colored color picker tile.
Click on that tile to select the color of your background.
Select what hue you’ll use for your background.
You can choose to use the “Brand Kit” colors, “Photo Colors,” or “Default Colors.”
But if you don’t want to use the default hues available in the color gallery, click the rainbow-colored + icon.
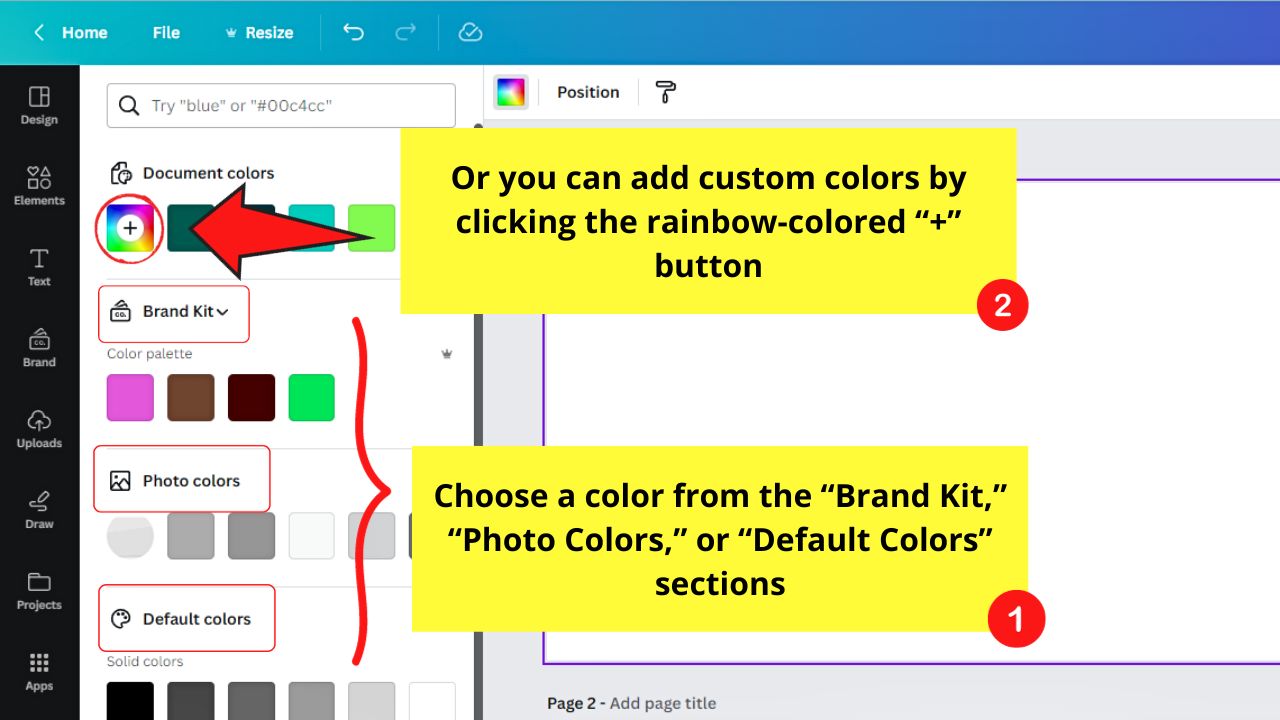

You will then see 3 options to add a custom color to the choices available:
- Color slider
- Color hex code
- Eyedropper tool


Choose what method you want to add your custom colors in. After adding your new color, click on it for it to be applied to your blank canvas.
Step 4: Add shapes to the Twitch panel design

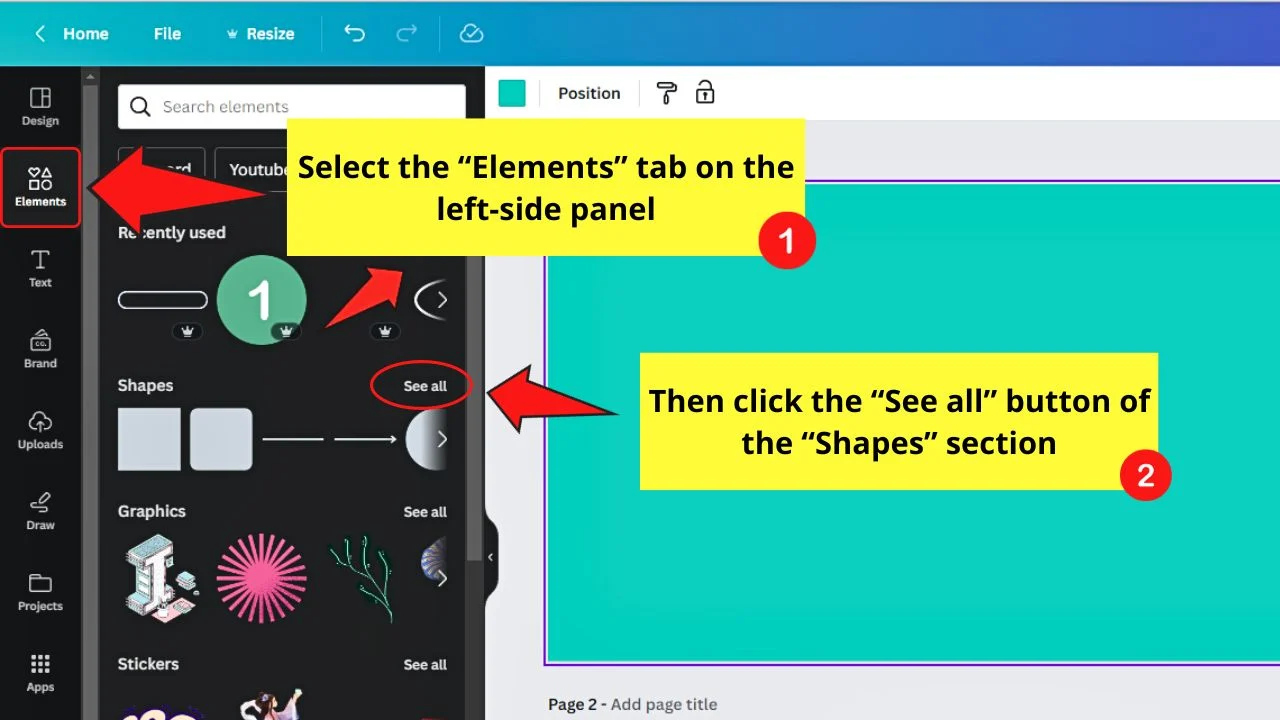
Head to the left side panel of the editor page and click the “Elements” tab. Keep scrolling until you reach the “Shapes” category.
After clicking the “See all” button, scroll down until you find the shape you want to use for your design. Type keywords on the search bar for a faster search.


Click and drag the shape toward the canvas.
These shapes you’ll add will form the division between the icons and the call-to-action text.
Step 5: Edit the shape or shapes you added


Resize the shape using the white pill bars and circles surrounding it. If there’s a need to rotate the shape, just click and drag the “Rotate” icon until you achieve the desired look.
Edit the shape’s color by selecting it first before clicking on the color picker tool. Just follow the steps mentioned earlier in selecting a color.
Step 6: Add and edit icons added to the Twitch panel


Head again to the left side panel and select the “Elements” tab.
You can either scroll down to search for the “Icons” category or directly type the keywords in the search bar.
Once you’ve selected an icon to use, click on it so you can resize and position it.
Change the icon’s color as well (if it’s editable) by clicking on it. You’ll know you can change its colors if the color picker tile appears on the editor toolbar.


Step 7: Add text elements to your Twitch panel design


After editing the look of your icon, it’s time to add some text.
You can directly add text boxes to your project by pressing the “T” button and manually editing the text’s font style, size, and color.
Or, if you’re not too good with font combinations, you can select one from Canva’s text gallery.
Just click the “Text” tab on the left side panel and scroll down to choose the font combination you’ll use.
Edit the message accordingly before you click anywhere on the project to save the changes.


Step 8: Make more Twitch panels by clicking “Duplicate Page”


Once you’re satisfied with the look of your first Twitch panel, continue making more by clicking the “Duplicate” page icon.
This will allow you to keep the first panel’s formatting on the added page.
With that, you can simply switch out the colors of the text and elements you added, as well as use another icon for that particular panel.
Repeat steps 1 to 8 until you’ve reached the desired number of Twitch panels for your account.
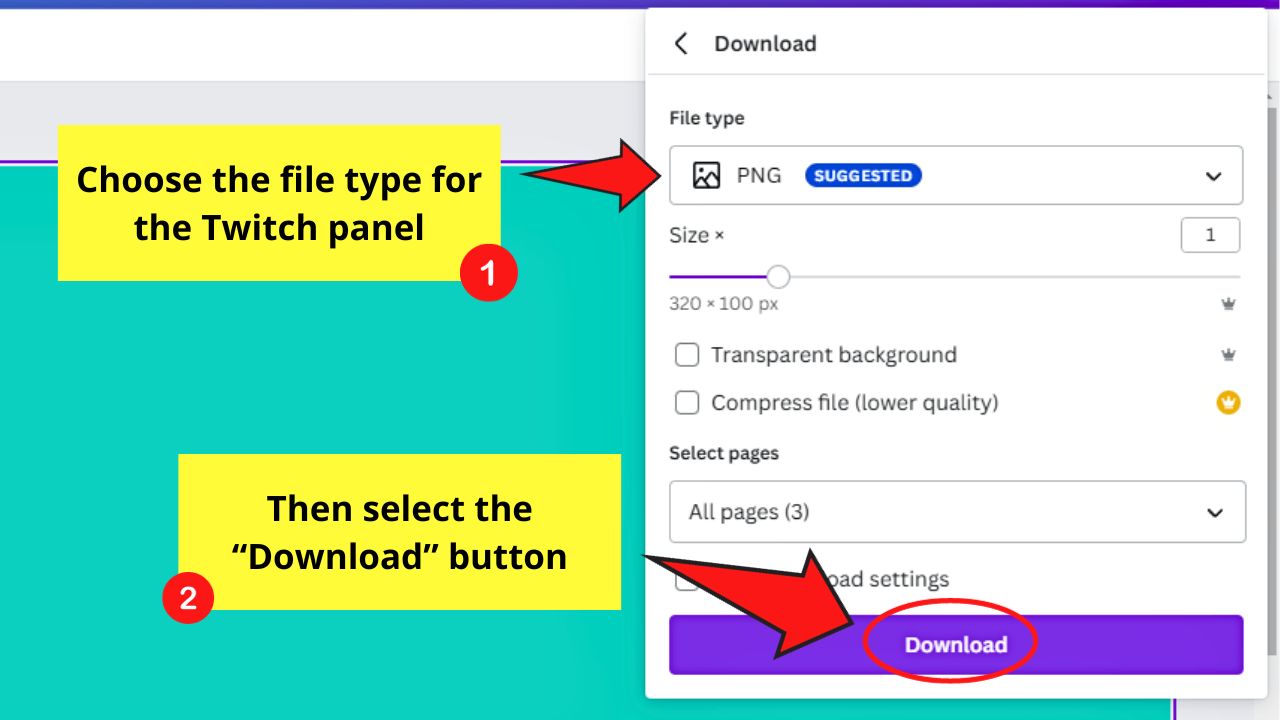
Step 9: Select the “Share” button and click “Download”
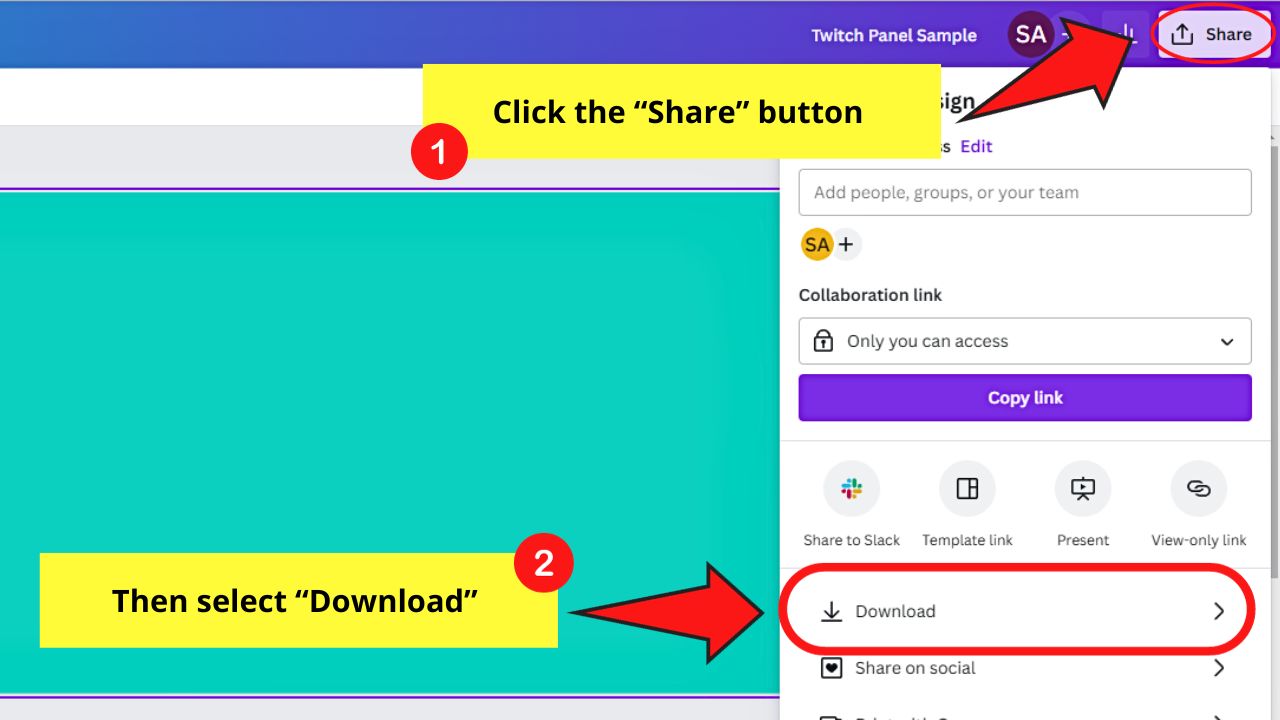
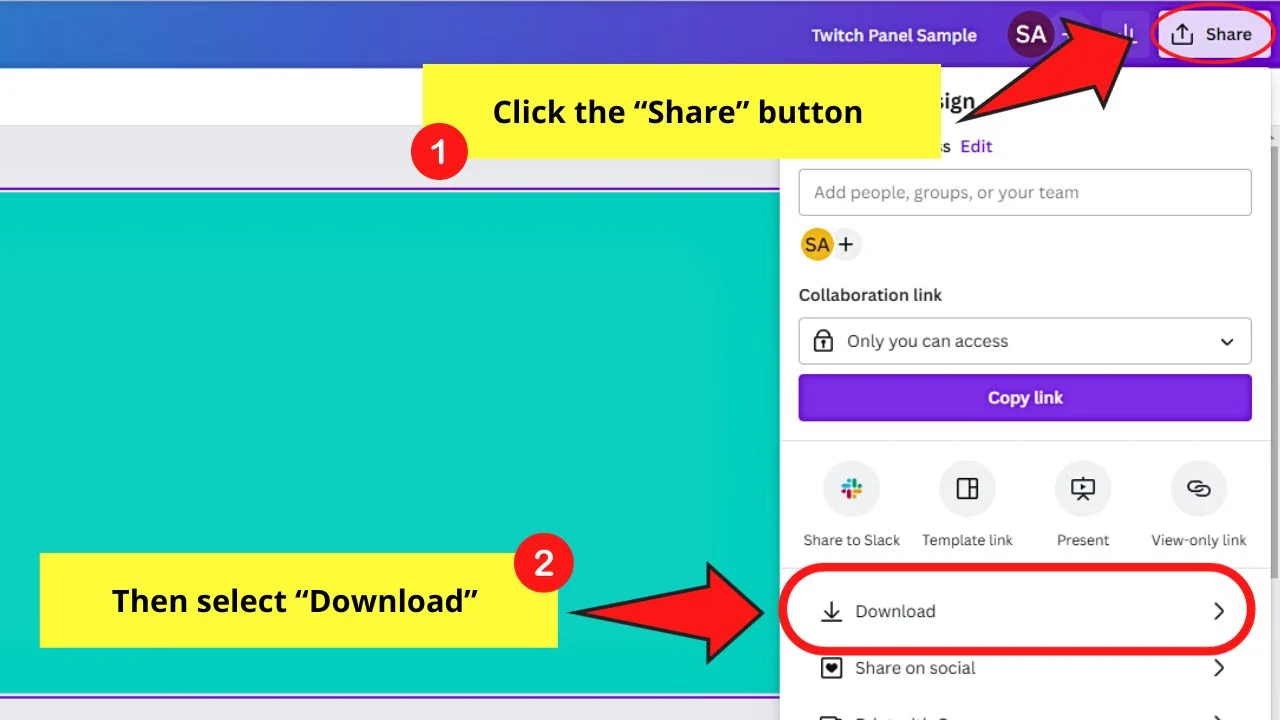
Select the file type and the pages you’d want to save before clicking the purple “Download” button at the bottom of the dropdown menu.

Now, if you think creating Twitch panels is a cinch, then you better brace yourself as you create your very own Twitch overlay.
How to Create Twitch Overlays in Canva
To create Twitch overlays in Canva, do these steps:
- Search for a Twitch overlay template in Canva
- Select a template for the Twitch overlay
- Change the background color used on the template
- Edit the graphic elements of the Twitch overlay template
- Delete unwanted graphic elements
- Edit text elements in the template
- Select “Share” and click “Download” to save the Twitch overlay
Twitch overlays generally consist of graphics added to your live stream.
These graphics range from the usual border surrounding the webcam area to extra border panels.
Step 1: Search for a Twitch overlay template in Canva


Type “Twitch” in the search bar on Canva’s “Home” page. Then on the dropdown menu, click the “Twitch overlay” option.
Its dimensions are automatically set to 1920 x 1080 px.
Step 2: Select a template for the Twitch overlay


If you prefer starting from scratch, just select the blank Twitch overlay template.
But for this part, I’ll start by selecting a pre-made template. Click on the template design thumbnail so you’ll be redirected to the editor page.
Step 3: Change the Twitch template’s background color


Just select the background with your cursor until you see the color picker tile appear on the editor toolbar.
Click on the color picker tile and select from the preset hues in the gallery.
If you prefer adding custom color, just follow the directions mentioned in Step 2 of Creating Twitch Panels in this text.
Step 4: Edit the graphic elements used on the Twitch overlay template
Click on an element to see if it’s editable. When you see the color picker tile on the editor toolbar, that means you can change its color.
You can even rotate and mirror the said element to somehow give it a new look with a change in its orientation.
Step 5: Delete any unwanted elements on the Twitch overlay template
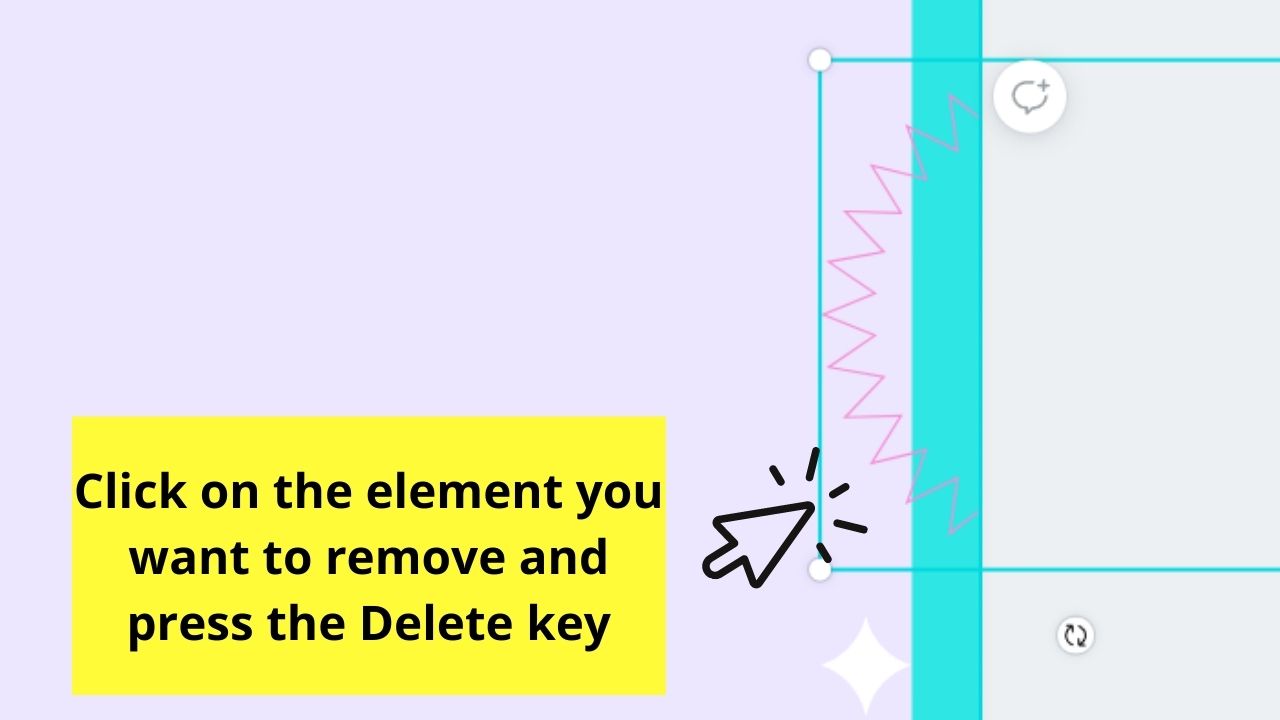
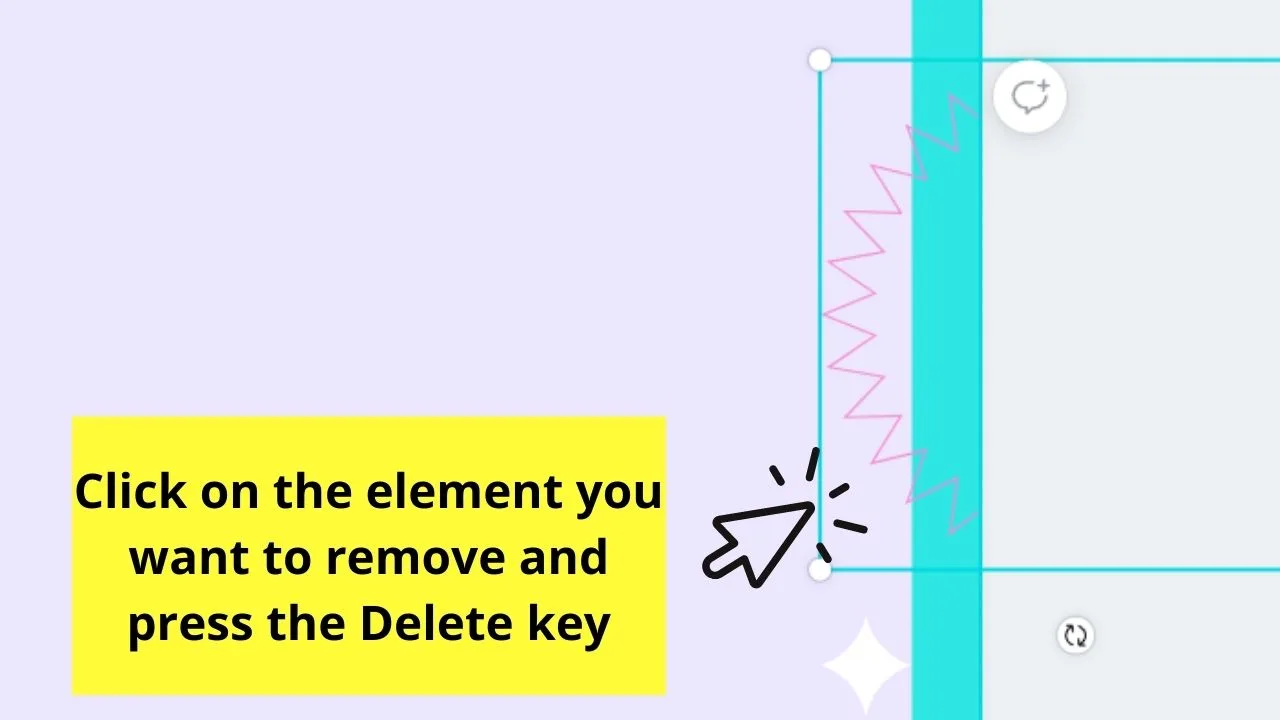
Then, head to the “Elements” tab on the left side panel and search for the graphic elements you’d want to add.
Easily locate icons and other elements you’re looking for by typing on the search bar.
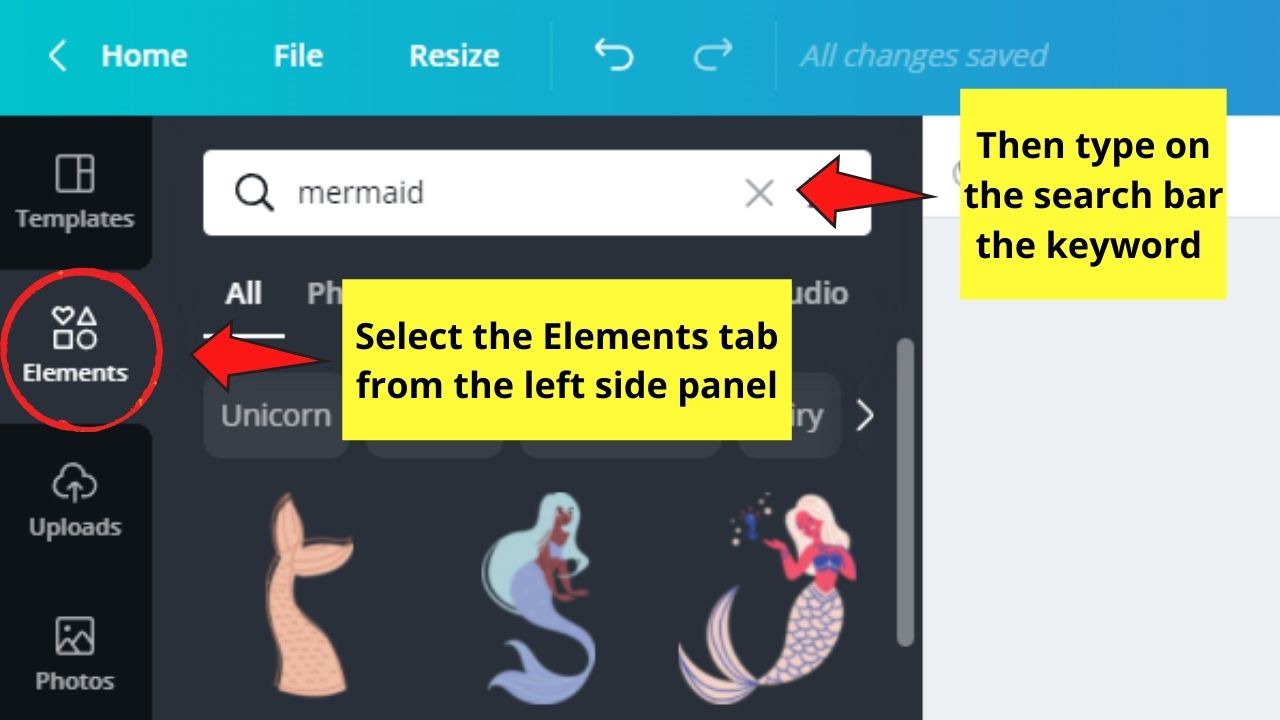
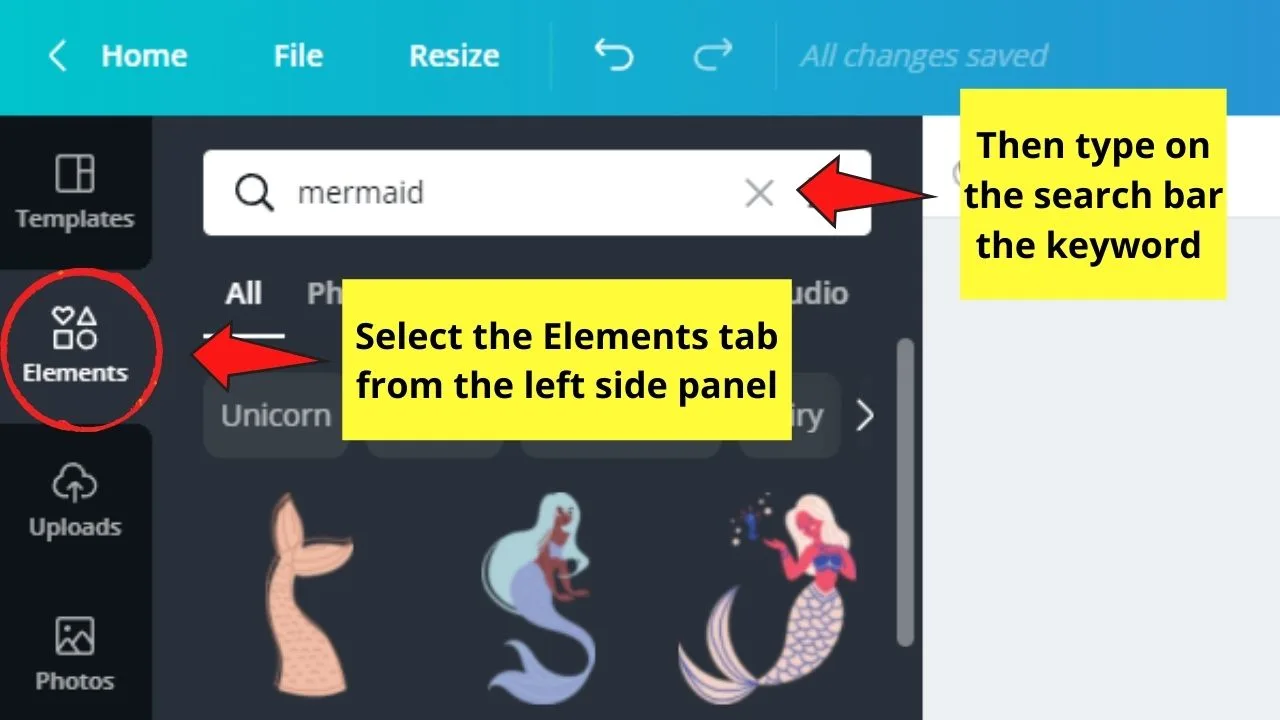
Once you find the element you’ll use click and drag it to the design, resize, and position them accordingly.
Repeat until you added the desired elements to your project.
Step 6: Edit the text elements in the template


Do this by double-clicking on the text boxes to edit the message inside them. This move will highlight the entire text inside the said text box.
Change the font color by selecting the text and clicking on the font color button in the editor toolbar.


You can even resize the text box to make your text pop out more from the background.
Repeat the steps until you’ve edited all the text components of the overlay template.
Step 7: Click the “Share” button and select “Download” to save the Twitch overlay

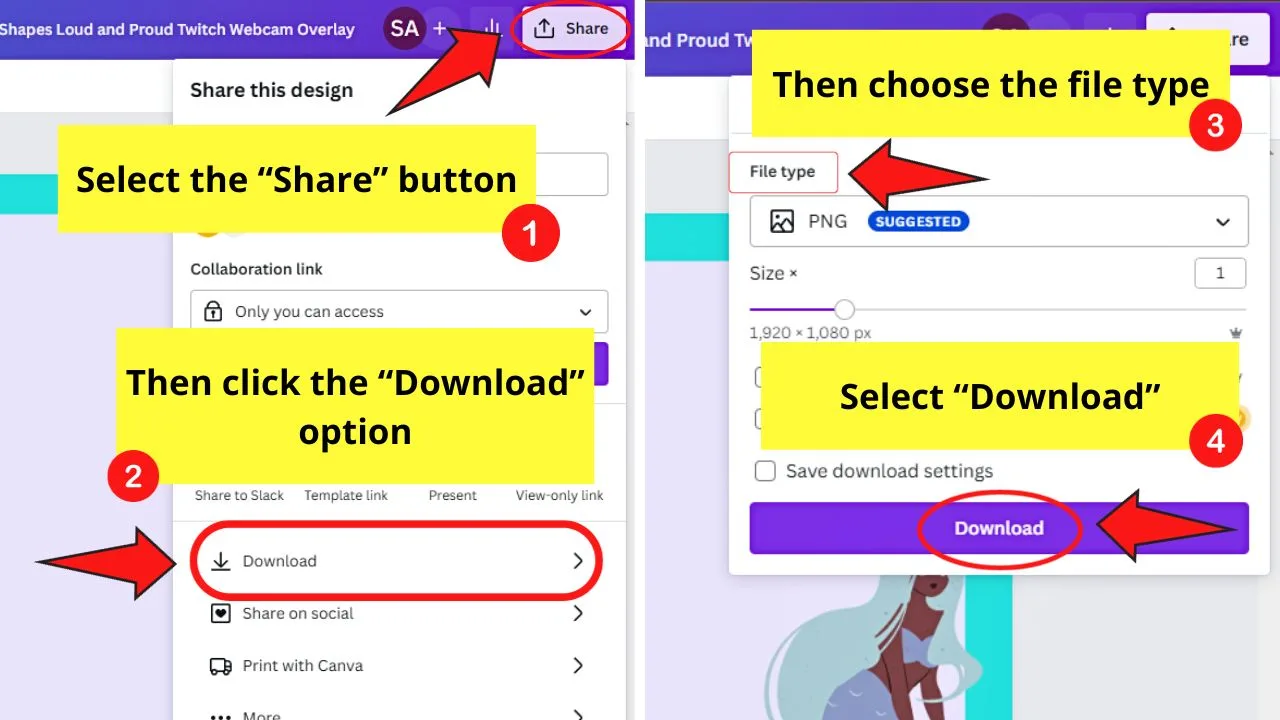
Then select the file type and pages before you choose the purple “Download” button.
Do this once you’re satisfied with how your Twitch overlay design looks so you can upload it to the streaming software.
And, just like that, you can head over to your account on Twitch and upload the overlay design you created.
How to Create Twitch Alerts in Canva
- Click “Create a Design” and select “Presentation (16:9)”
- Add a background color similar to the one used for your Twitch channel
- Add stickers from the “Elements” tab
- Add text elements to the design
- Animate your Twitch alerts design
- Duplicate the page and change the text
- Select “Share” and click “Download”
Another cool thing that you can do in Canva for your Twitch account aside from the ones mentioned is the Twitch alerts feature.
Though Canva still doesn’t have premade templates for Twitch alerts, you can create one from scratch.
Twitch alerts are real-time notifications that you get whenever a viewer interacts with you — and they’re customizable! Common Twitch alerts that you can have include:
- New Subscriber
- New Follower
- New Cheer
- Host
- Raid
- New Donation
Regardless if you want to create all or just some of these alerts, the steps for making them are the same. You have to make sure you use the recommended Twitch alerts size, which is 800px x 600px.
Step 1: Click the “Create a Design” button and select “Presentation (16:9)”
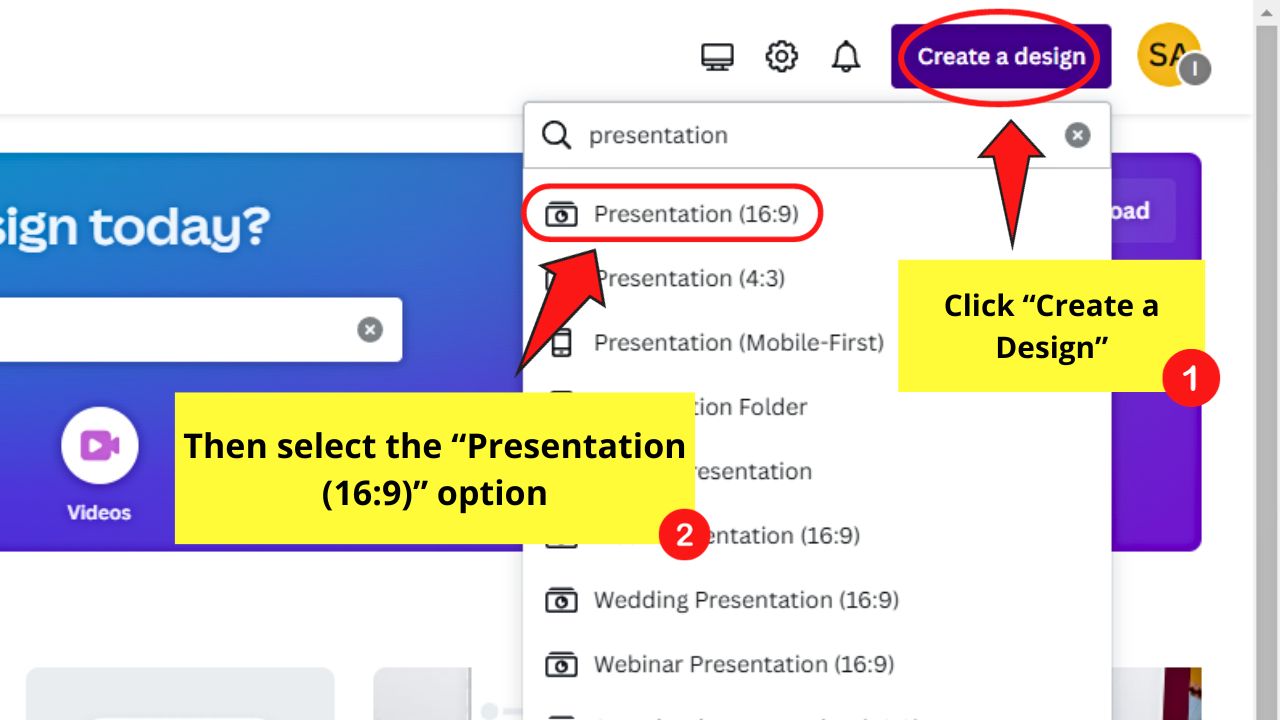

The recommended Twitch alerts dimension is 800px x 600px.
However, selecting the “Presentation” template with the 1920px x 1080px dimensions makes it easier to work its full resolution in the OBS.
You should by now be redirected to a new editor page.
Step 2: Add a background color to the blank template
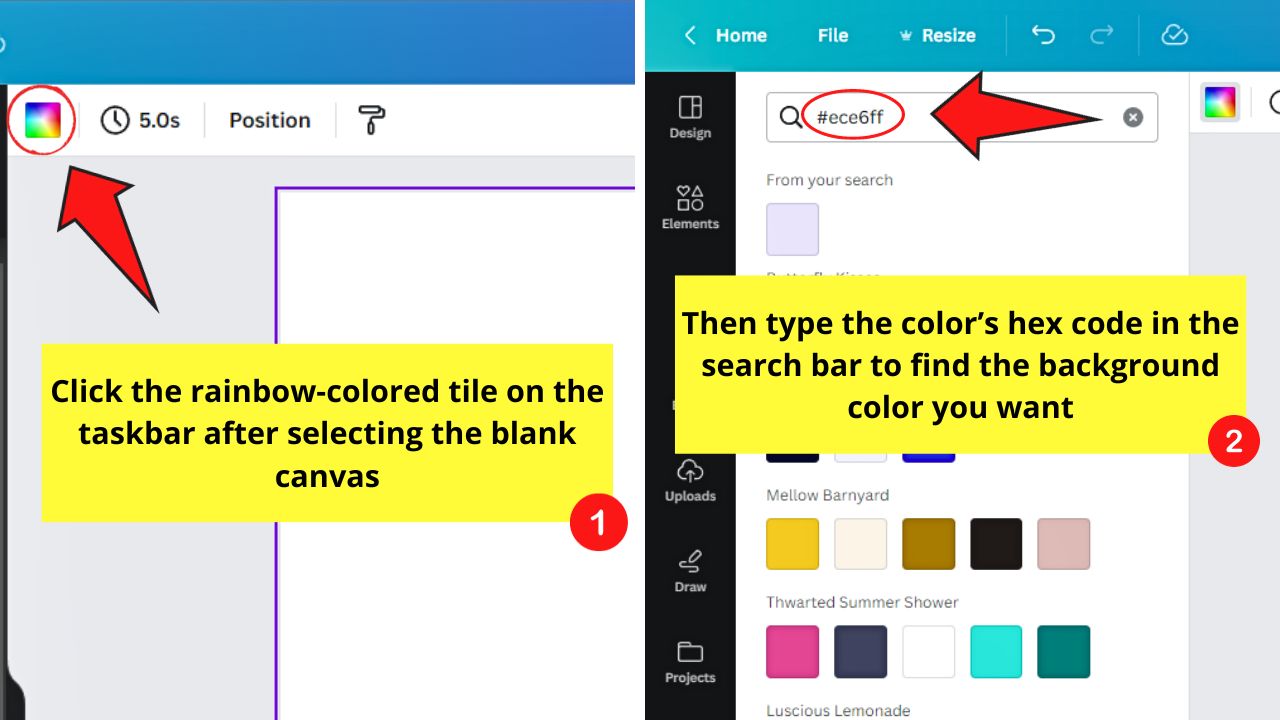
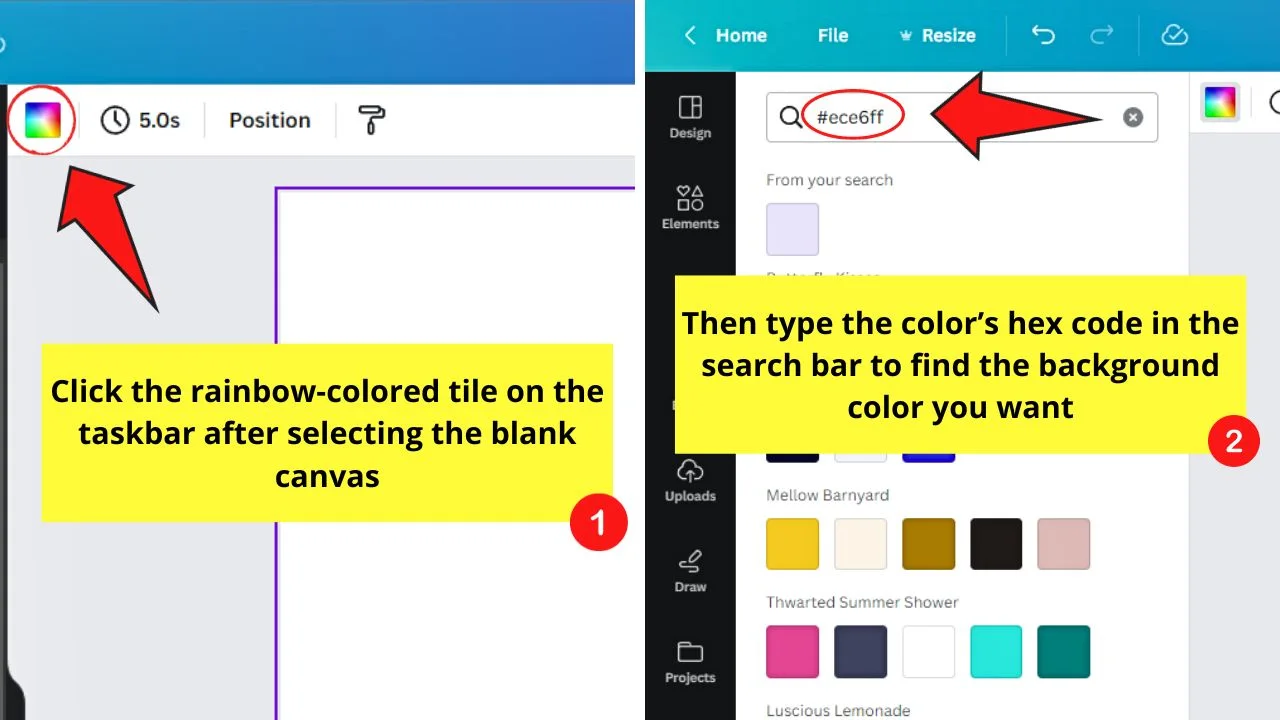
Make sure that the color you select is in theme with the ones used in your Twitch panel and overlay. This is to reinforce your Twitch channel’s identity.
Aside from selecting a background color from the default ones in Canva, you can type the color’s hex code in the search bar.
Otherwise, you can select the rainbow-colored “+” button and click the eyedropper tool to get the hue from a picture.
Step 3: Add stickers from the “Elements” tab

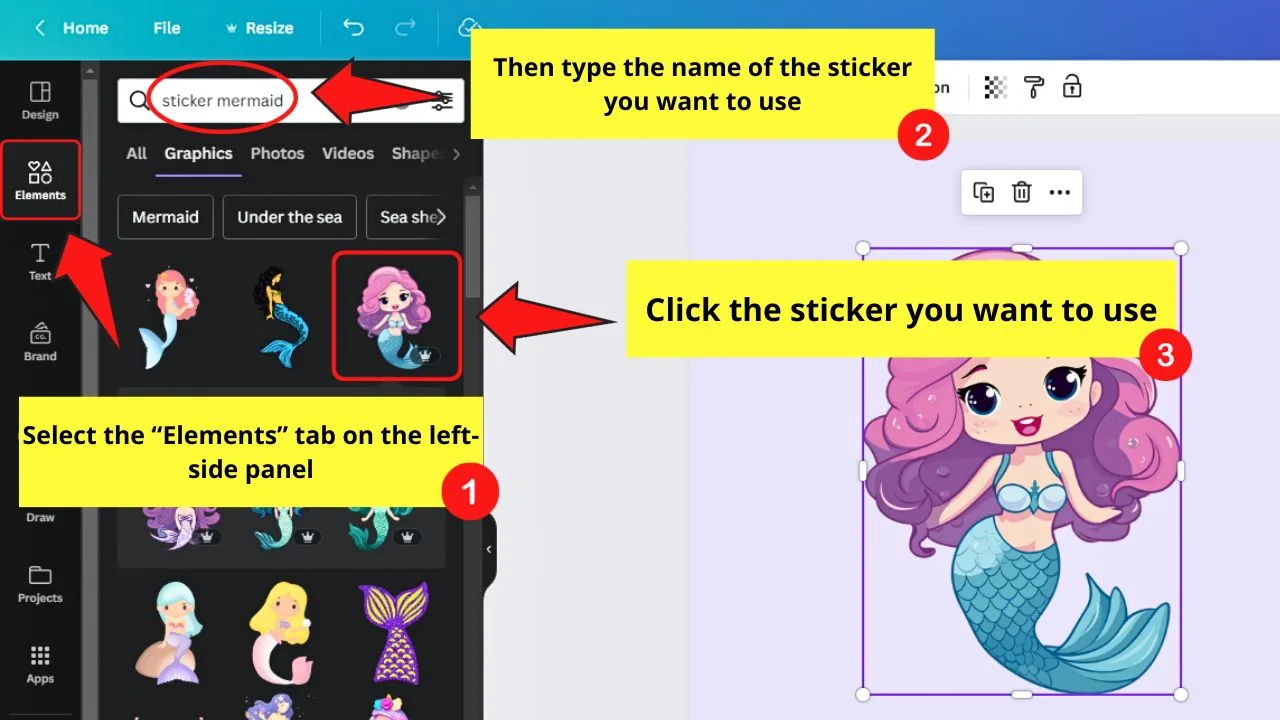
You’ll see the “Elements” tab on the left-side panel of the editor page, between “Design” and “Text.”
Then type “Sticker + [type of sticker]” in the search bar.
You can also click the “See all” button in the “Graphics” section to find the sticker you want to use.
Preferably, the sticker you’ll use should be animated already. But an inanimate sticker is completely fine; you only have to add an animation later.
Then resize the sticker you added and position it on the design however you want it to.
Step 4: Add text elements to the design
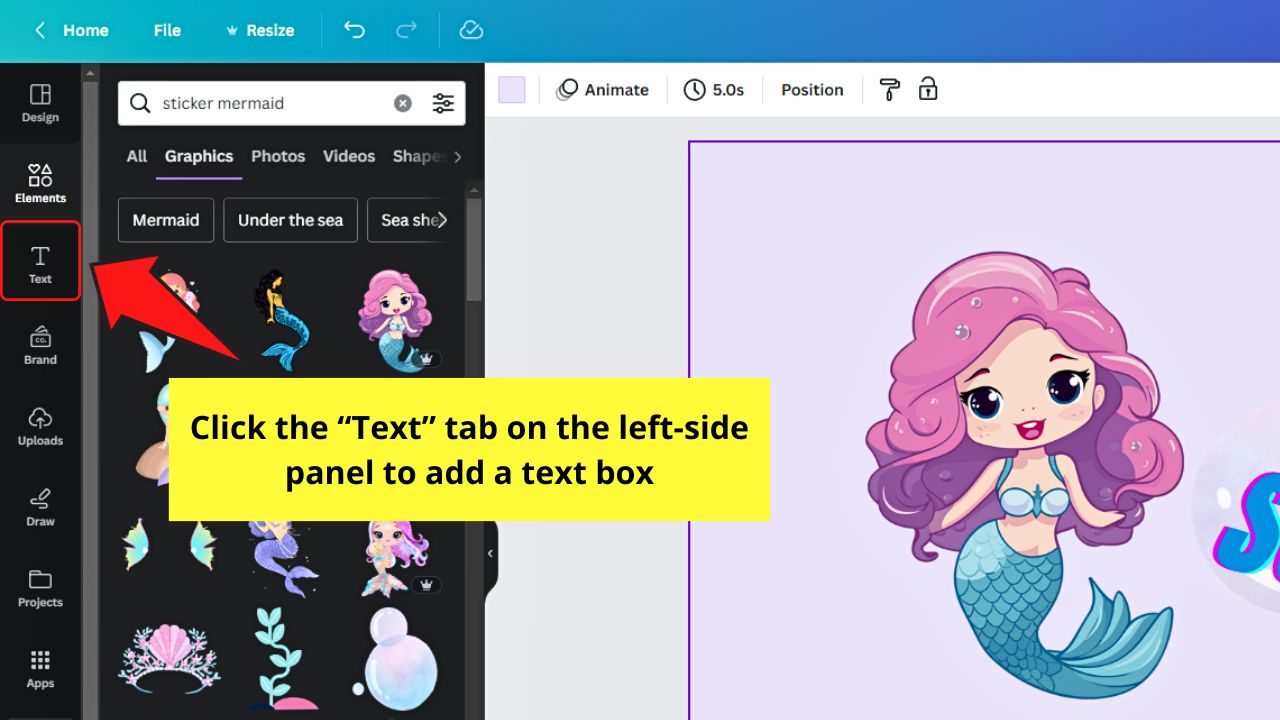

Since Twitch alerts announce the interaction the viewers have with the streamer, it makes sense to add text to your Twitch alert design.
You can click the “Text” tab and select the text type, font, and size of the text.
But you can also press “T” to add a textbox using Canva’s keyboard shortcut.
You can also add text effects by selecting “Effects” on the taskbar.

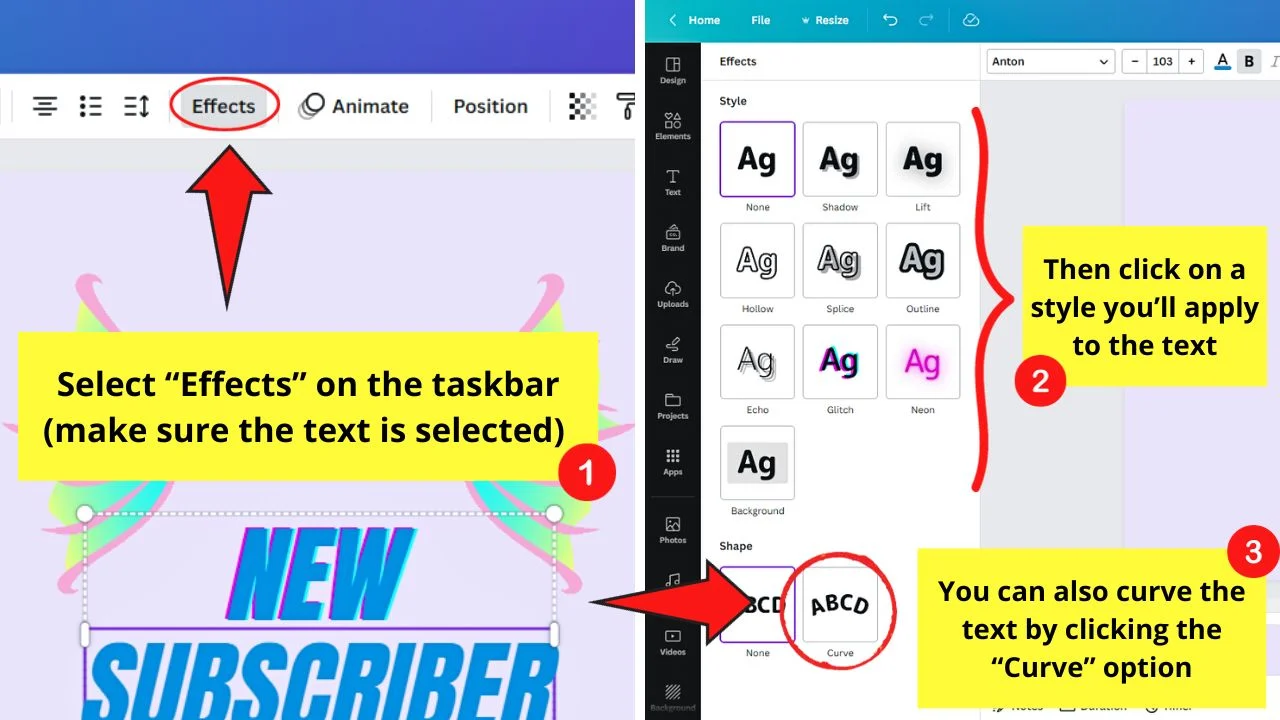
Then curve the text if needed for the design.
Step 5: Add animations to your Twitch alerts

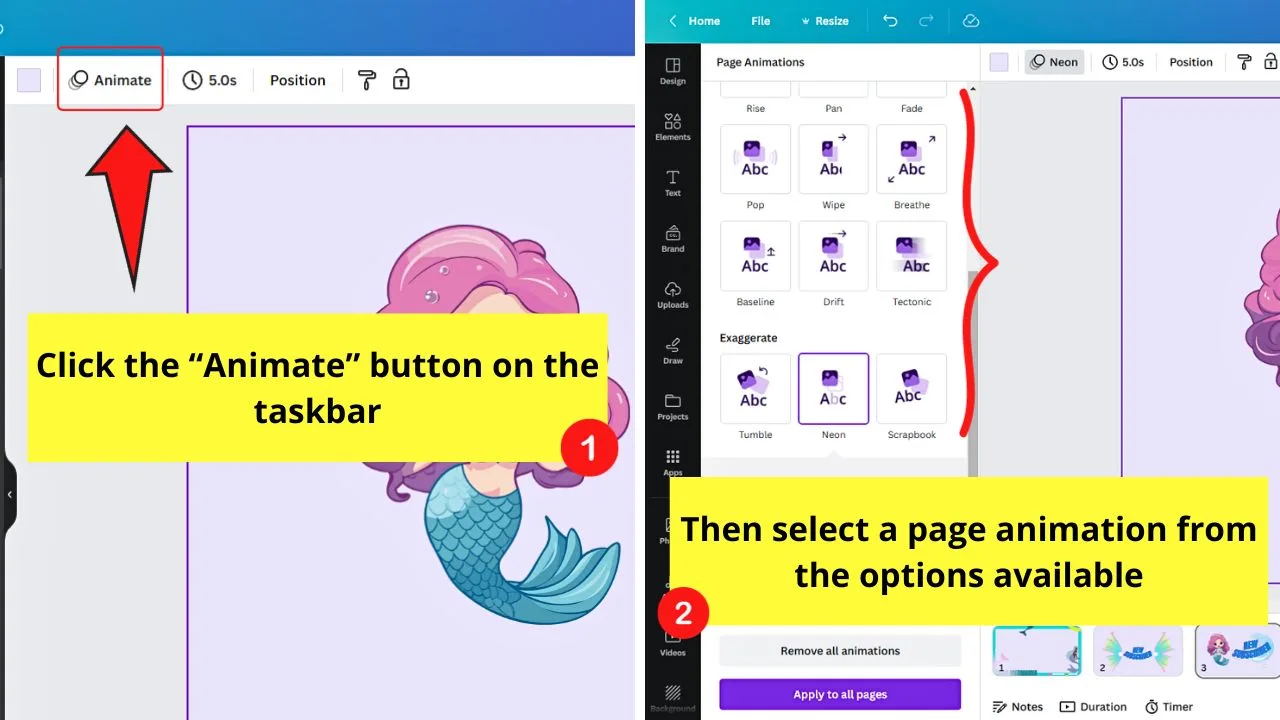
To do this, click the “Animate” button on the taskbar. Then select the animation you’ll use.
Try out as many animations as you want until you find the one you like.
Then select when the animation will play and adjust its intensity. Click “Apply to all pages” to apply the animation selected to all the pages of the design.

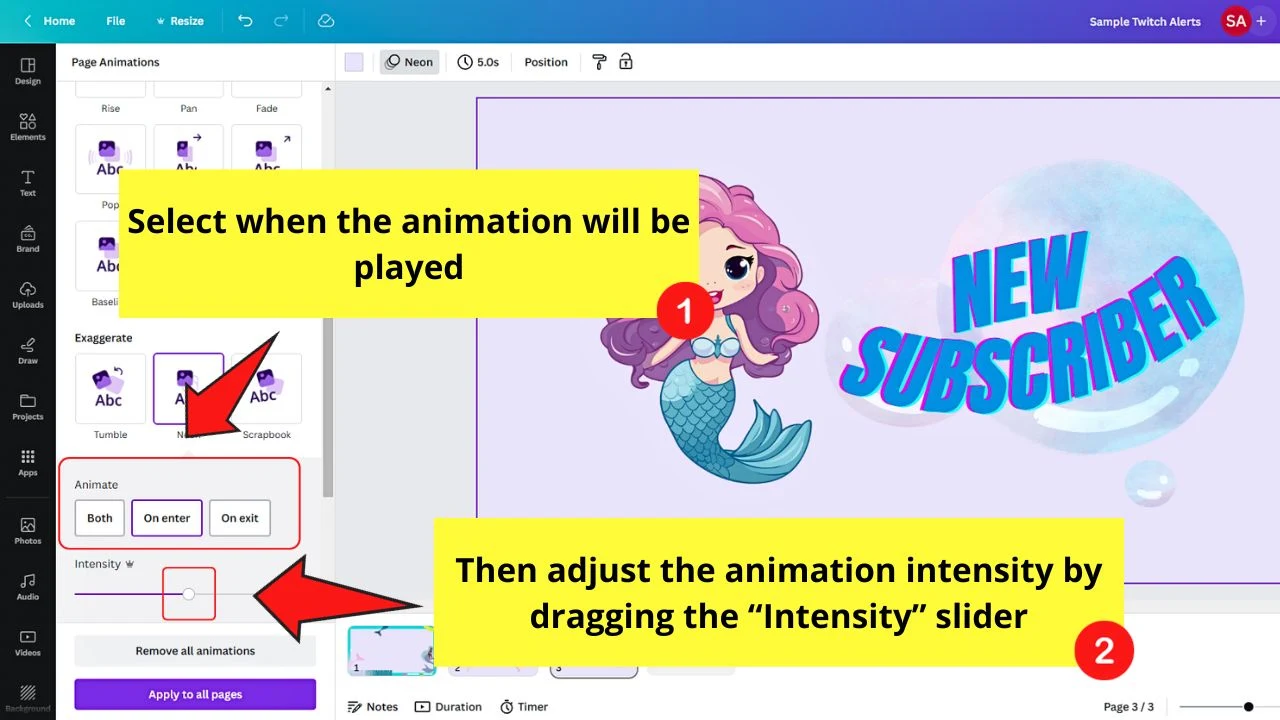
Then adjust the elements’ size before proceeding to the next step.
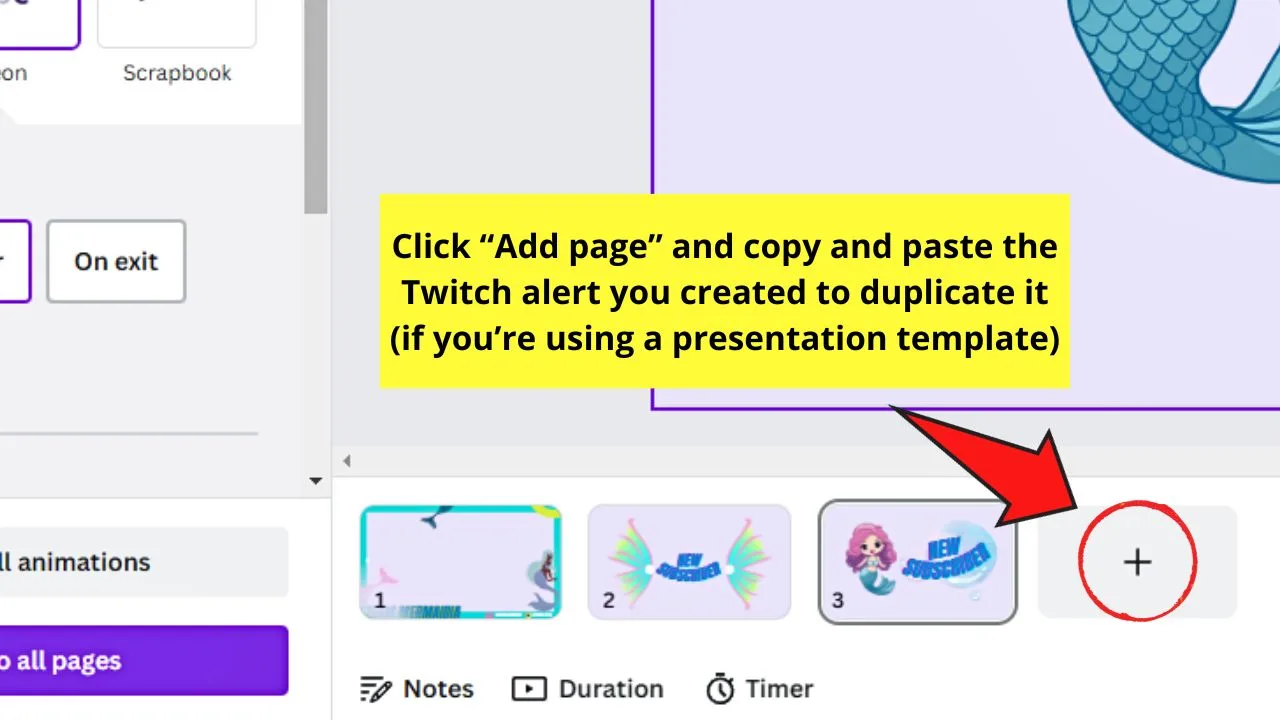
Step 6: Duplicate the page and change the text and stickers used
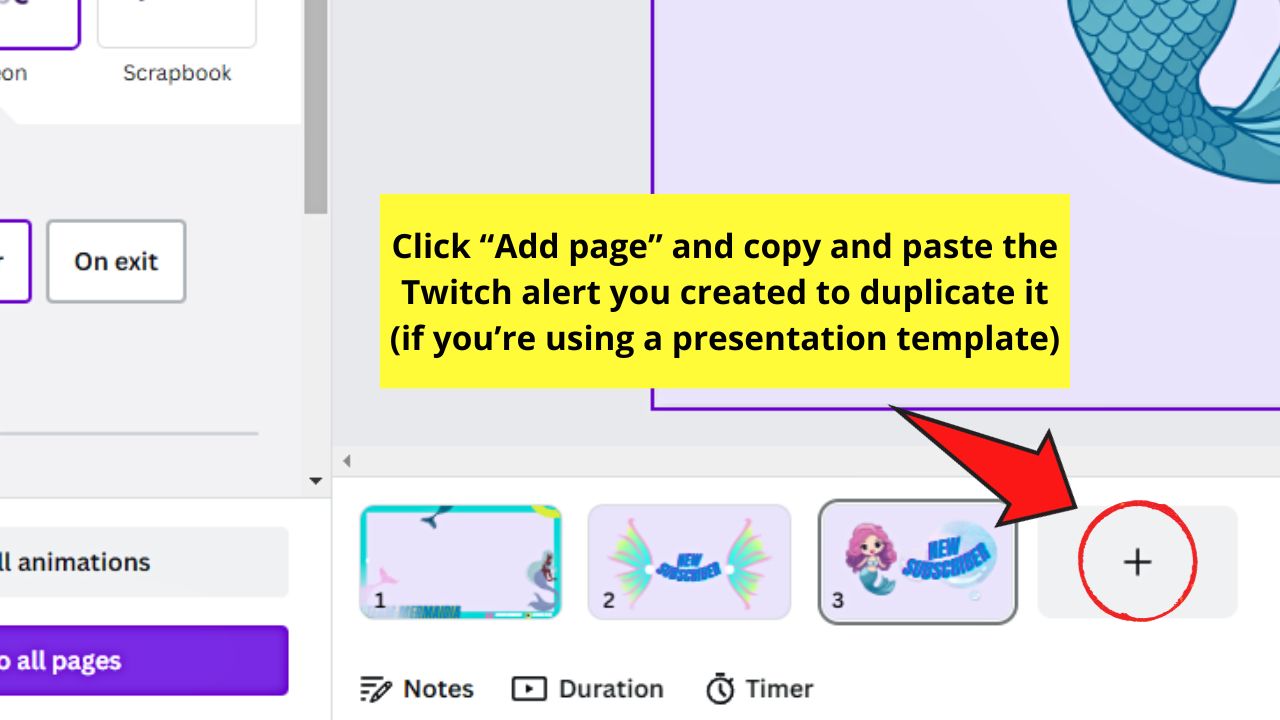
Then just change the text elements depending on the Twitch alert you’re making.
If you created a customized template, select “Duplicate page” at the upper right of the page you’re working on.
But if you created your Twitch alerts using a “Presentation” template, select “Add page” and copy and paste the previous Twitch alert sticker you designed.
Once done, edit the text in the design to make another Twitch alert sticker. Change the stickers used, too to differentiate the Twitch alerts from each other.
Repeat until you have created all the Twitch alerts you need.
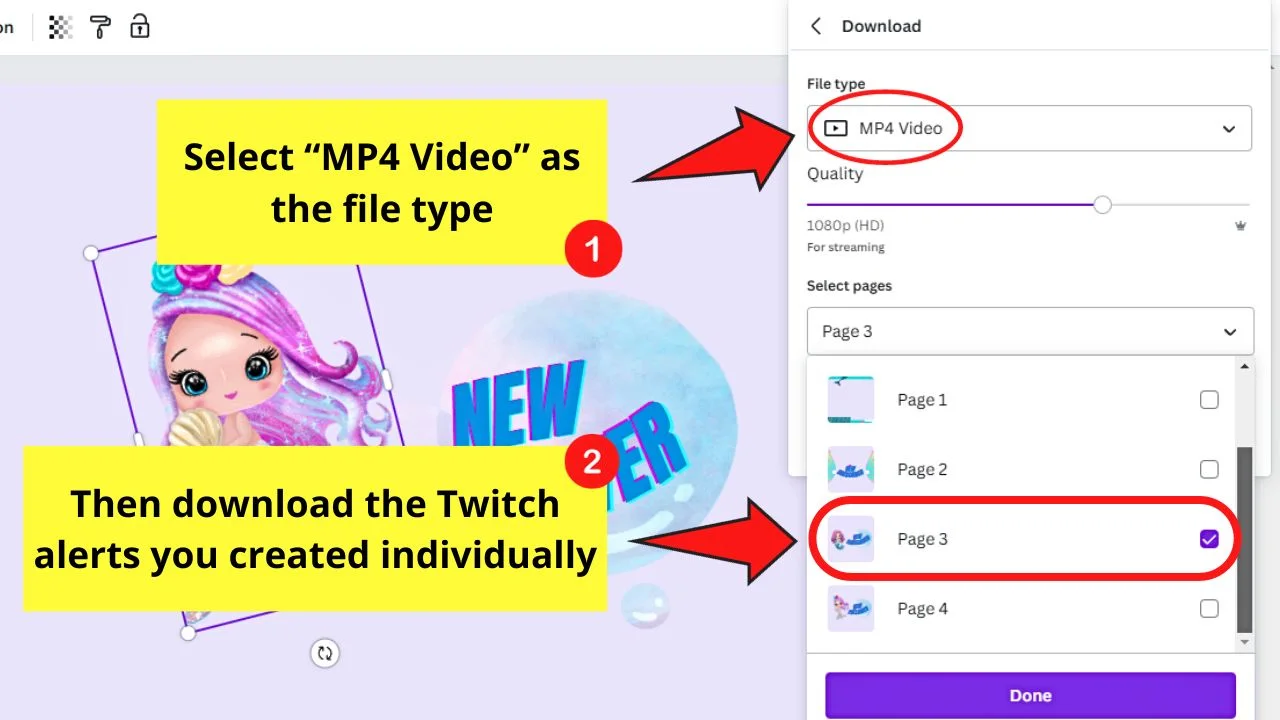
Step 7: Click “Share” and select “Download”
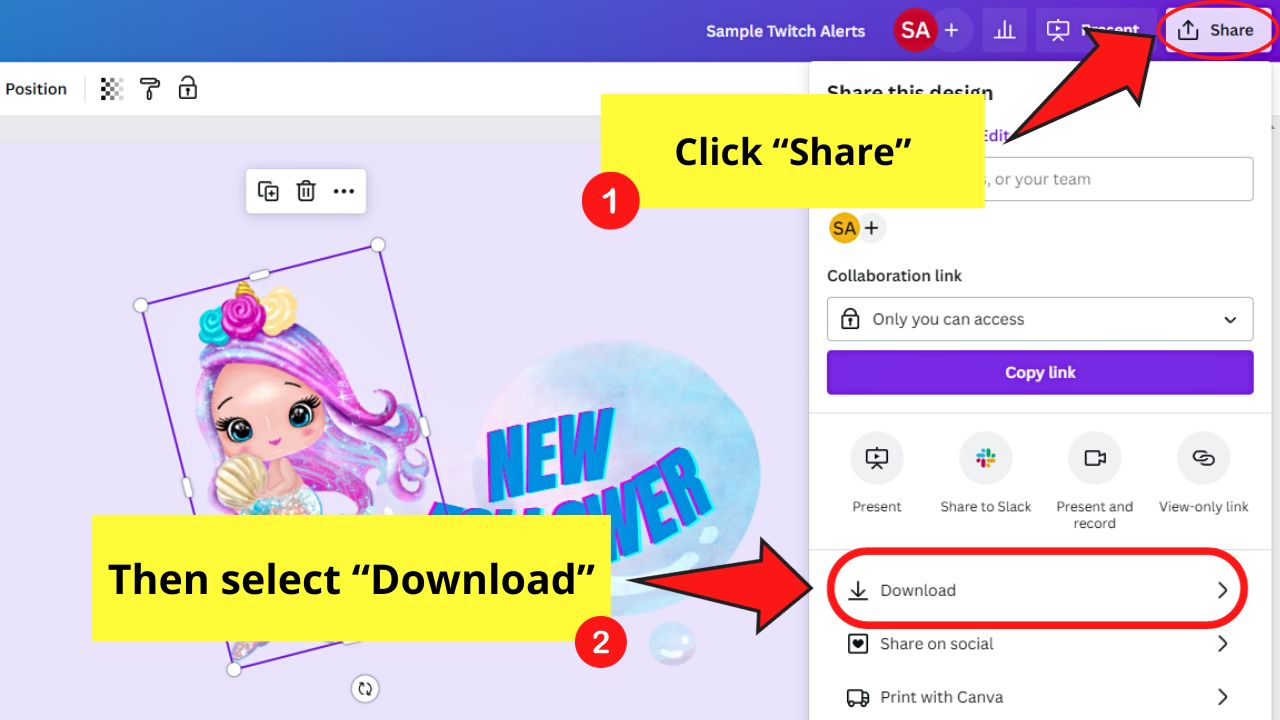

This allows you to save your new Twitch alerts before uploading them to your Twitch channel later.
Just make sure not to choose “All pages” when downloading your Twitch alerts.
Individually download each page as a separate MP4 video. This way, you can upload the different Twitch alerts separately and not as a single video.

So, these designs are just two of the various things you can use Canva for Twitch. Whatever design file you’re making, just follow the steps mentioned here, and you’re all set.
Frequently Asked Questions about How to Use Canva for Twitch
What’s the ideal size for creating Twitch-related designs?
If you’re creating overlays, screens, and backgrounds, Canva recommends the 1920 x 1080 px size. For the Twitch logo, it’s 800 x 800 px. The Twitch Panel is set at 320 x 100 px, and the Twitch emote size’s at 112 x 112 px.
How come the design I created on Canva is blurry when uploaded on Twitch?
For one, you probably used the wrong dimensions for that specific Twitch-related design. You can get back to the design file in Canva and use the Magic resize button to edit the dimensions. Then, just reupload the design with the new dimensions on Twitch to see if it’ll still look blurry.
Can you create Twitch-related designs even if you’re a free Canva user?
You can create Twitch-related designs even if you’re not on Canva Pro. Make sure to select a template or element that doesn’t have the crown icon at the bottom so you can download your design without paying anything.


Hey guys! It’s me, Marcel, aka Maschi. On MaschiTuts, it’s all about tutorials! No matter the topic of the article, the goal always remains the same: Providing you guys with the most in-depth and helpful tutorials!

