Canva Docs is one of the much-awaited features of Canva users. Aside from the usual features of adding design elements, you can now create word documents right within the app.
And the good news is this new feature is also available on Canva’s mobile app. So, how exactly can you use Canva Docs on a mobile phone?
How to Use Canva Docs on on a Mobile Phone (Canva Mobile App)
Step 1: Click on Docs in the top toolbar on Canva’s homepage to open up the Canva Docs Mobile App
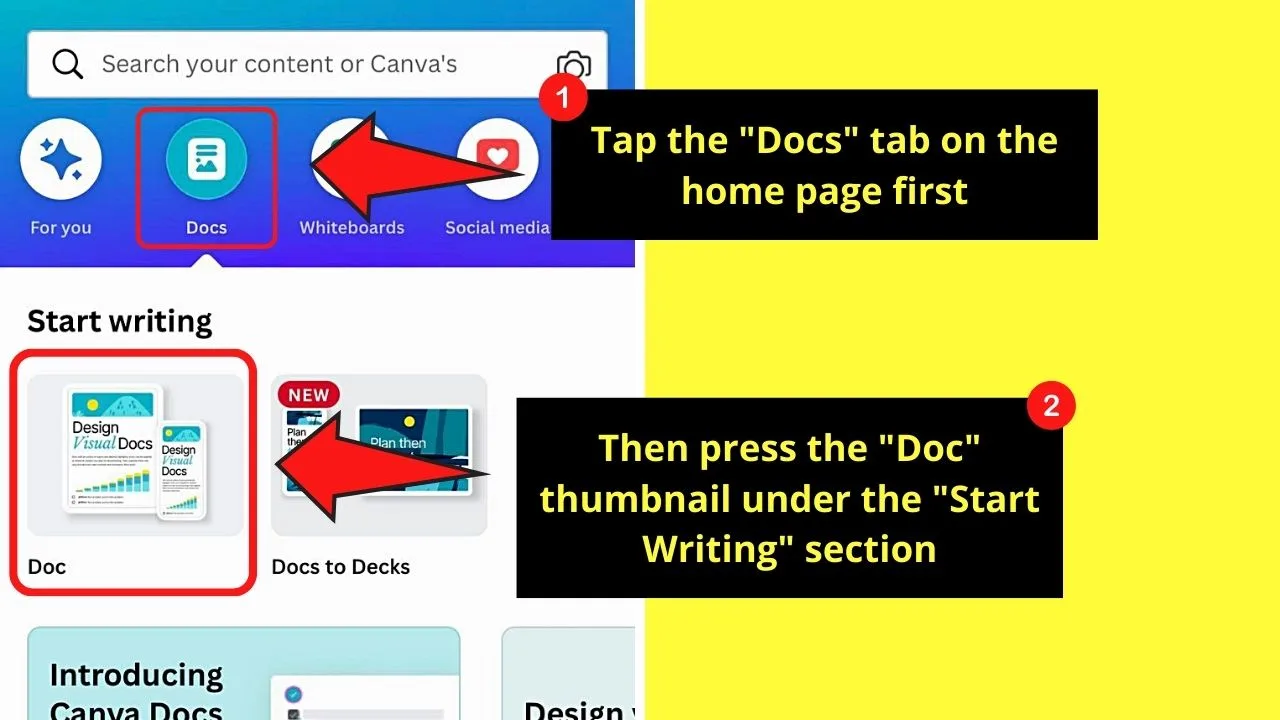
Once inside the editor page, you can begin editing your Canva Docs document from scratch.
Step 2: Tap on the blank document to begin typing text
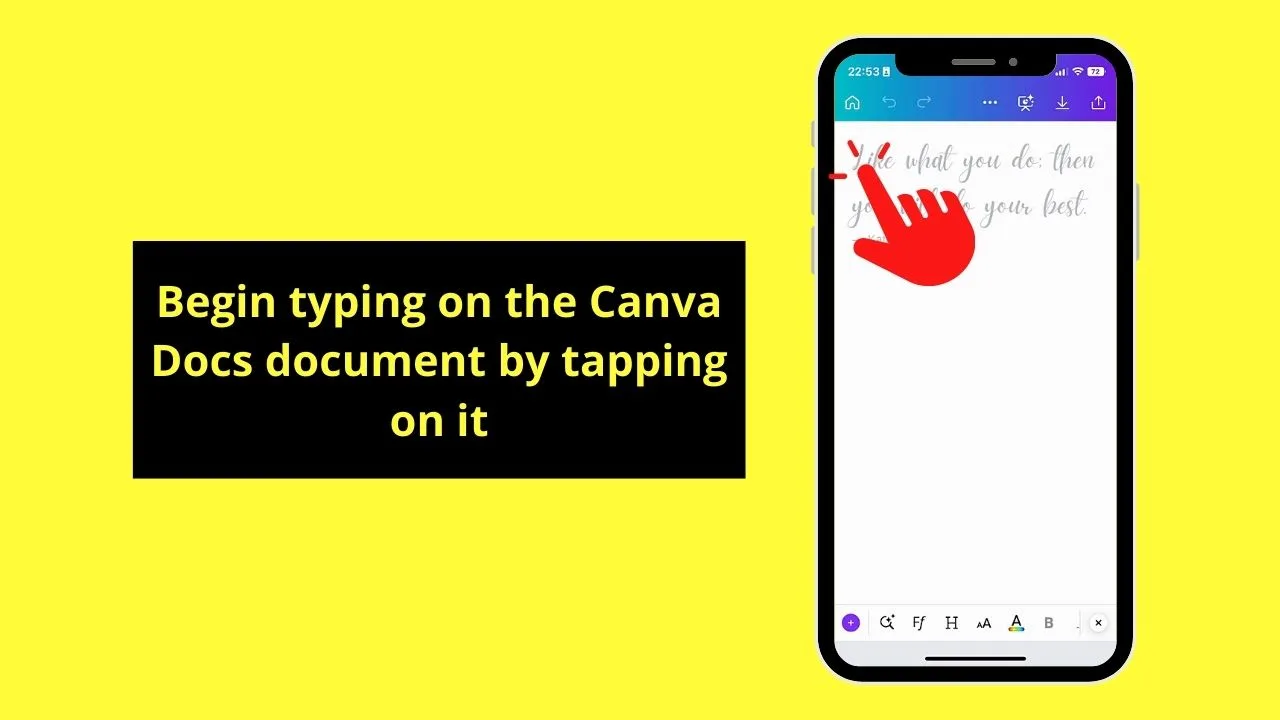
Step 3: Add other design elements by tapping the purple “+” button
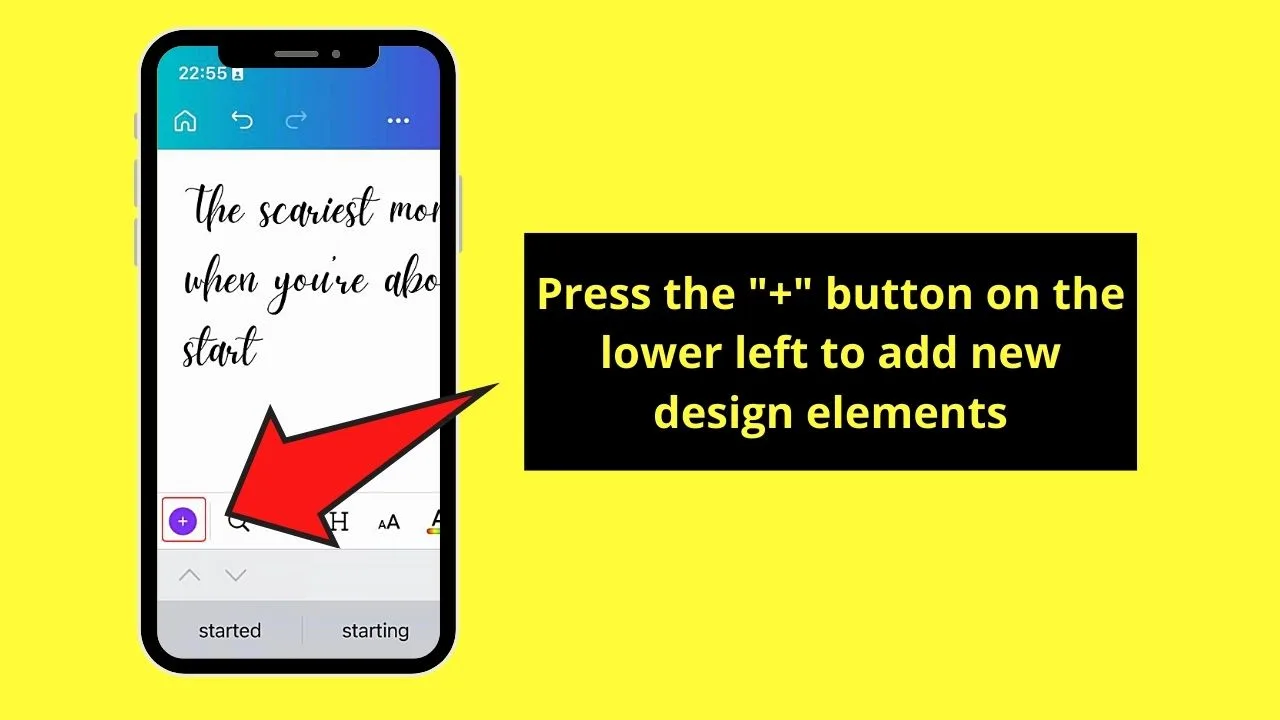
You’ll find this in the lower left corner of the editor page.
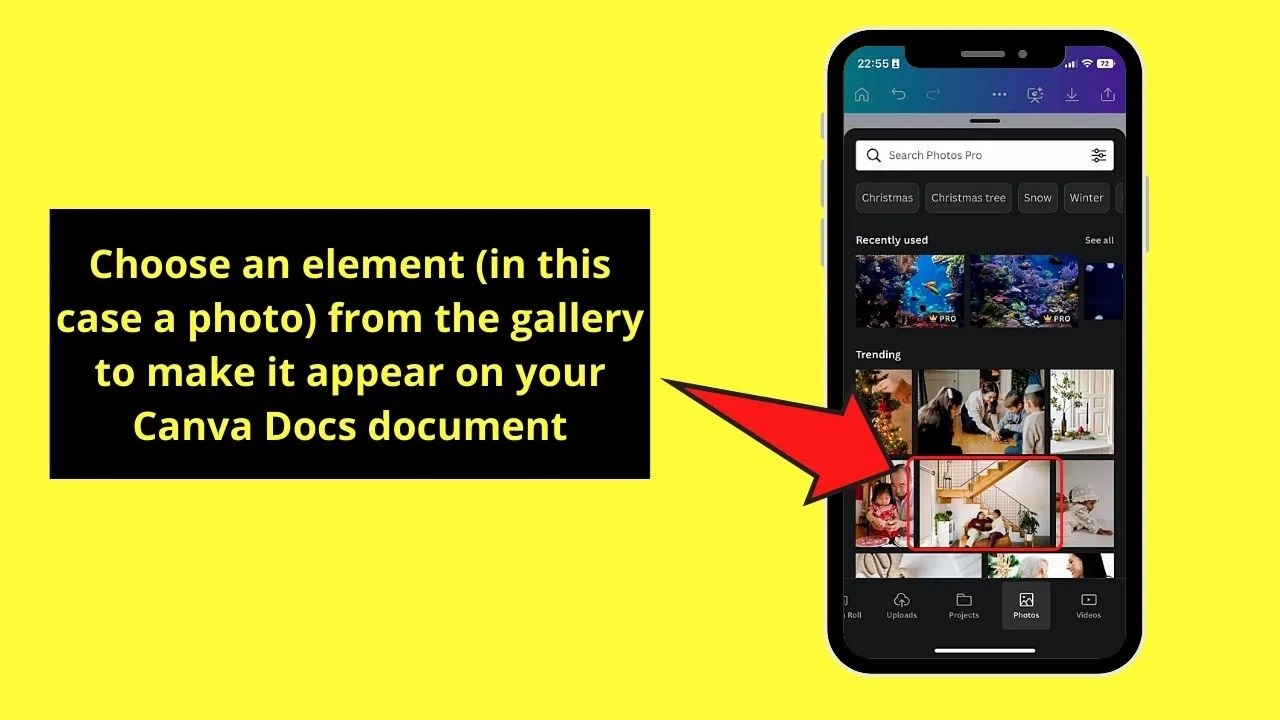
Step 4: Add design elements to the document by tapping “Photos,” “Videos,” or the “Elements” tab
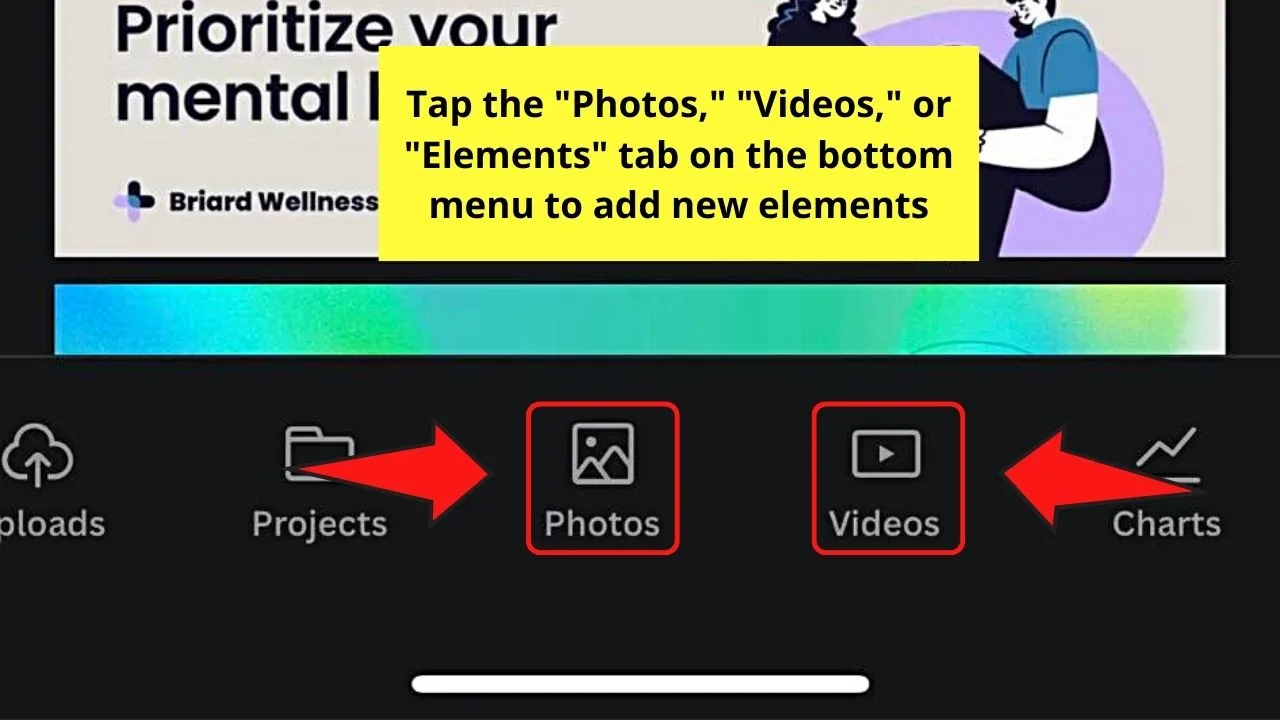
You’ll all find these tabs on the bottom menu. Swipe your finger leftwards to access them.
Once their respective galleries open, tap the one that you’d like to use to make it appear on your blank document.
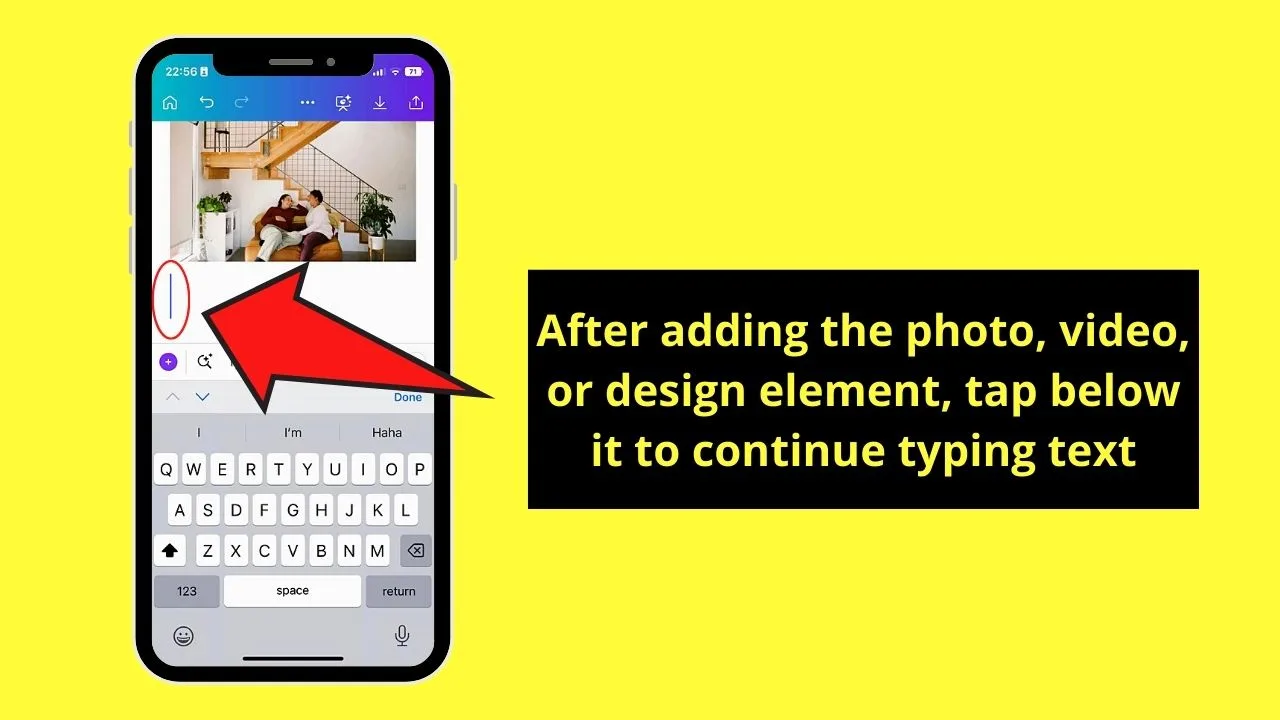
After which, proceed with typing text on the document. But, in case you need to change the text style, you need to open the “Magic Commands” menu first.
Opening the “Magic Commands” Menu in Canva Docs Mobile
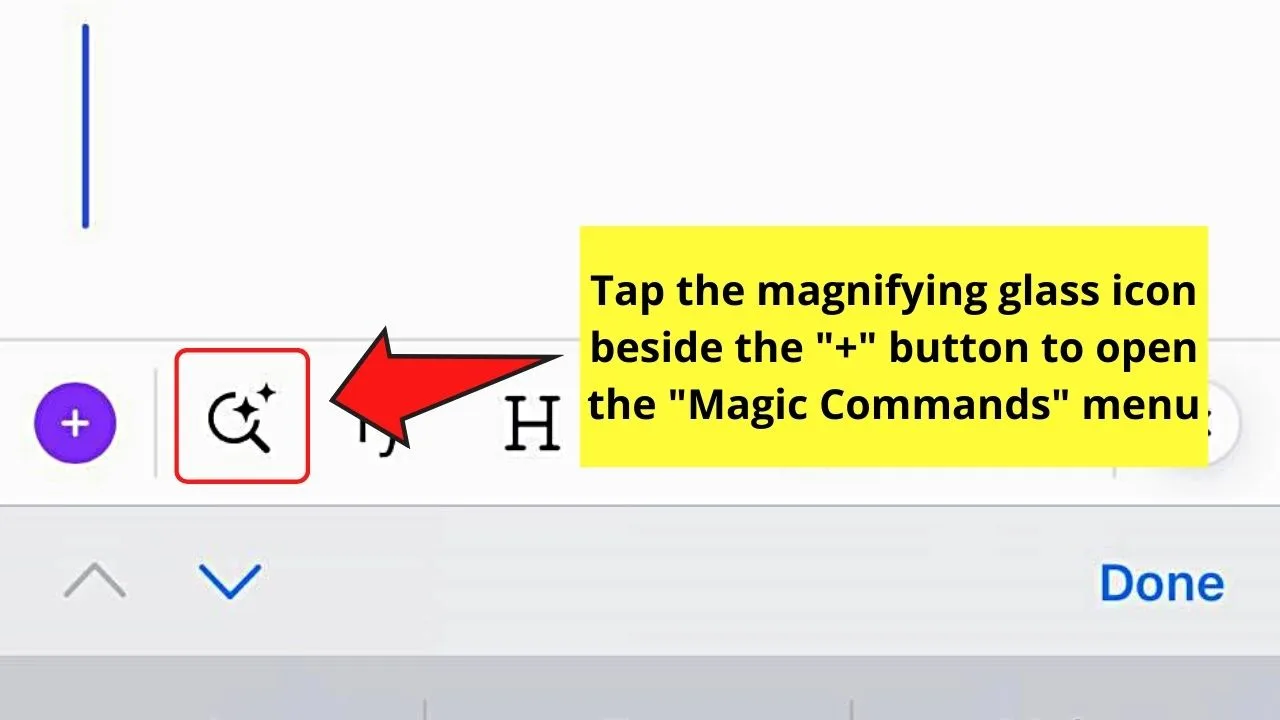
Unlike in the web version of Canva Docs, there’s only one way to open the “Magic Commands” on Canva Docs mobile.
Just tap the magnifying glass icon beside the purple “+” button. You’ll then see all the available options on the said “Magic Commands” menu.
Inserting Designs on Canva Docs Mobile
Designs on Canva Docs mobile can be used to insert logos you created within Canva for brand-related content.
Aside from that, you can also use this method for any type of graphics that you can reposition later.
Regardless of the reason, here are the steps to follow in inserting designs on Canva Docs mobile:
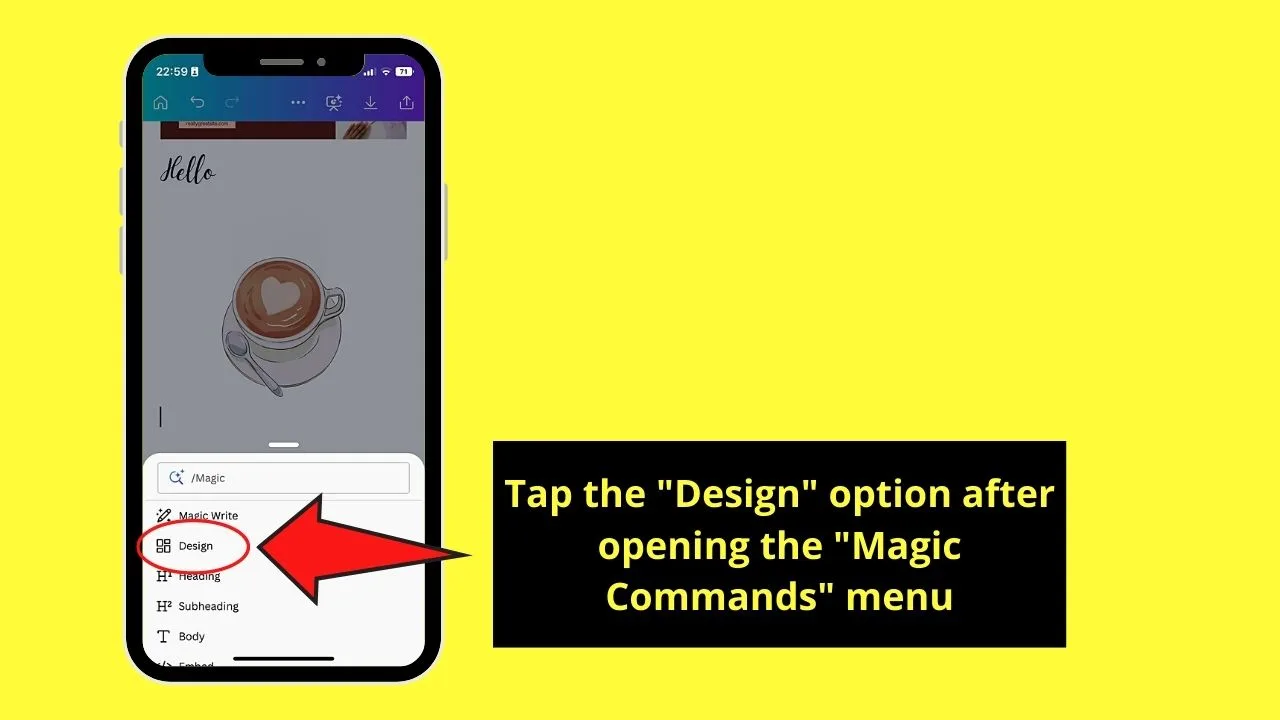
Step 1: Press the “Design” option on the “Magic Commands” menu.
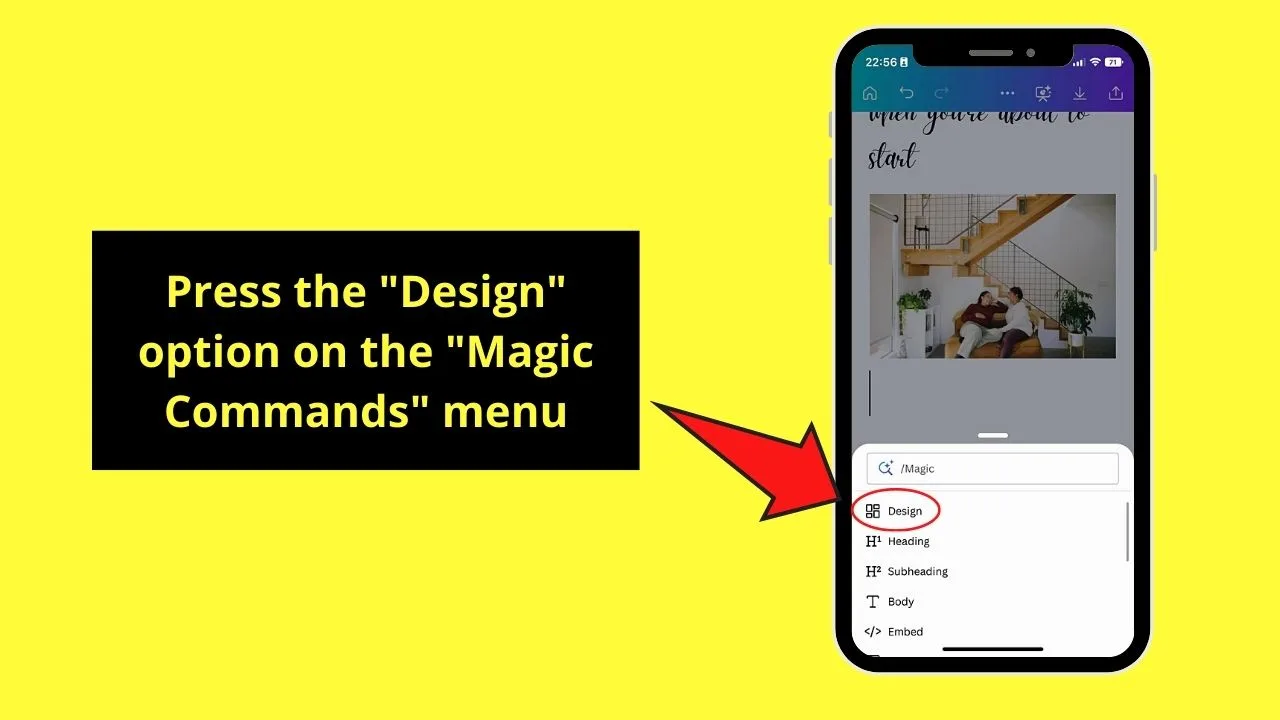
Then, wait for Canva mobile to open a new design window.
Step 2: Choose a template you’ll use for your project by tapping on it.
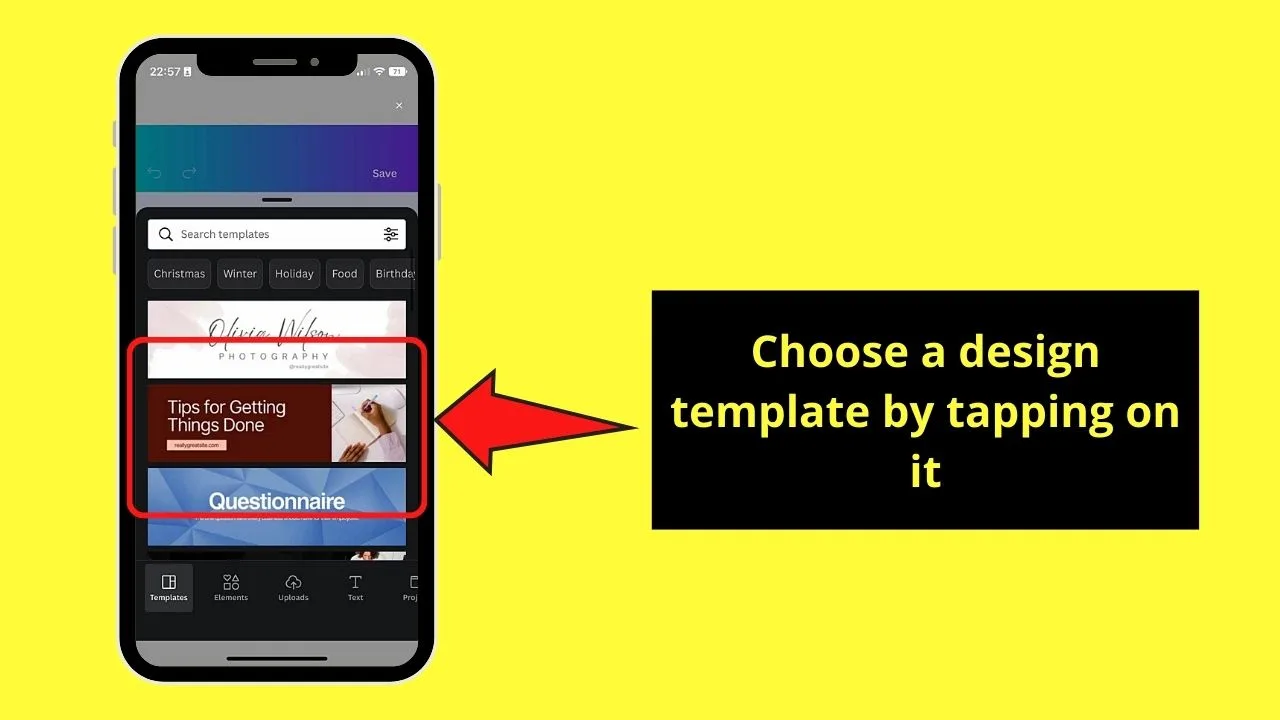
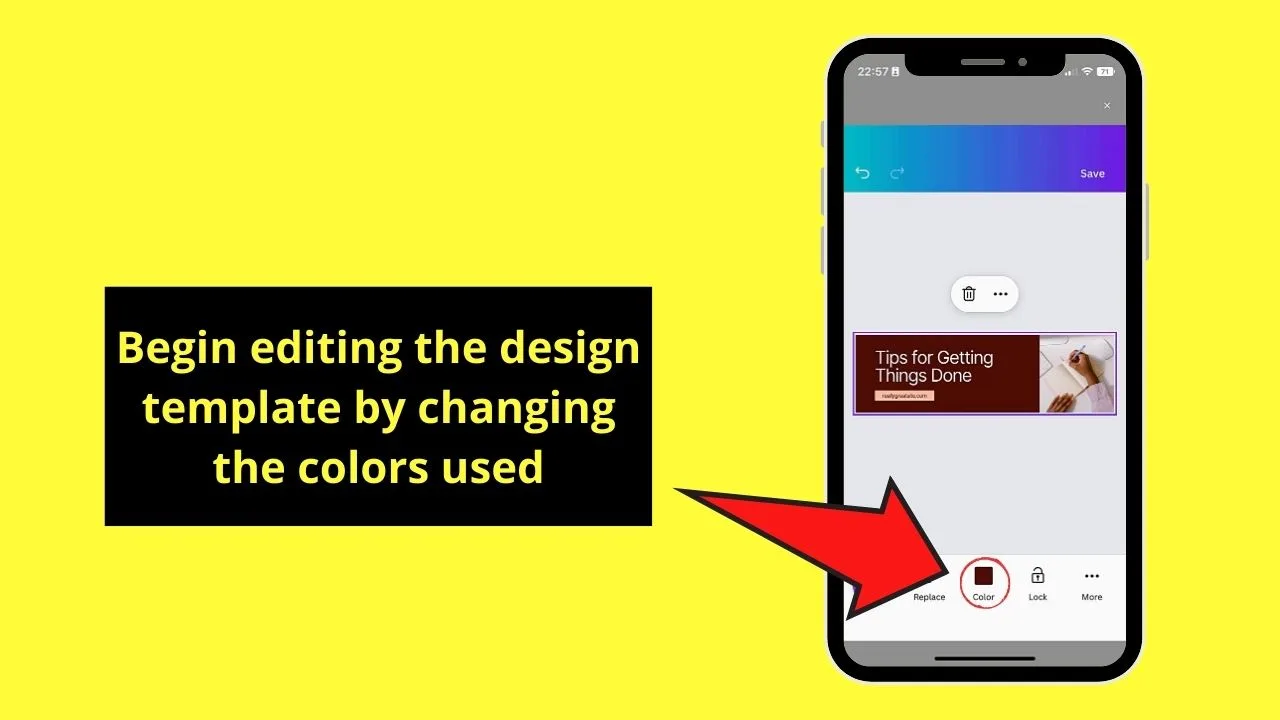
The said template will then be inserted into your Canva Docs document. Then, proceed with editing the elements within that design template.
You can also alter the design’s colors if you want to.
Step 3: Tap the “Save” button once you’re done editing the design.
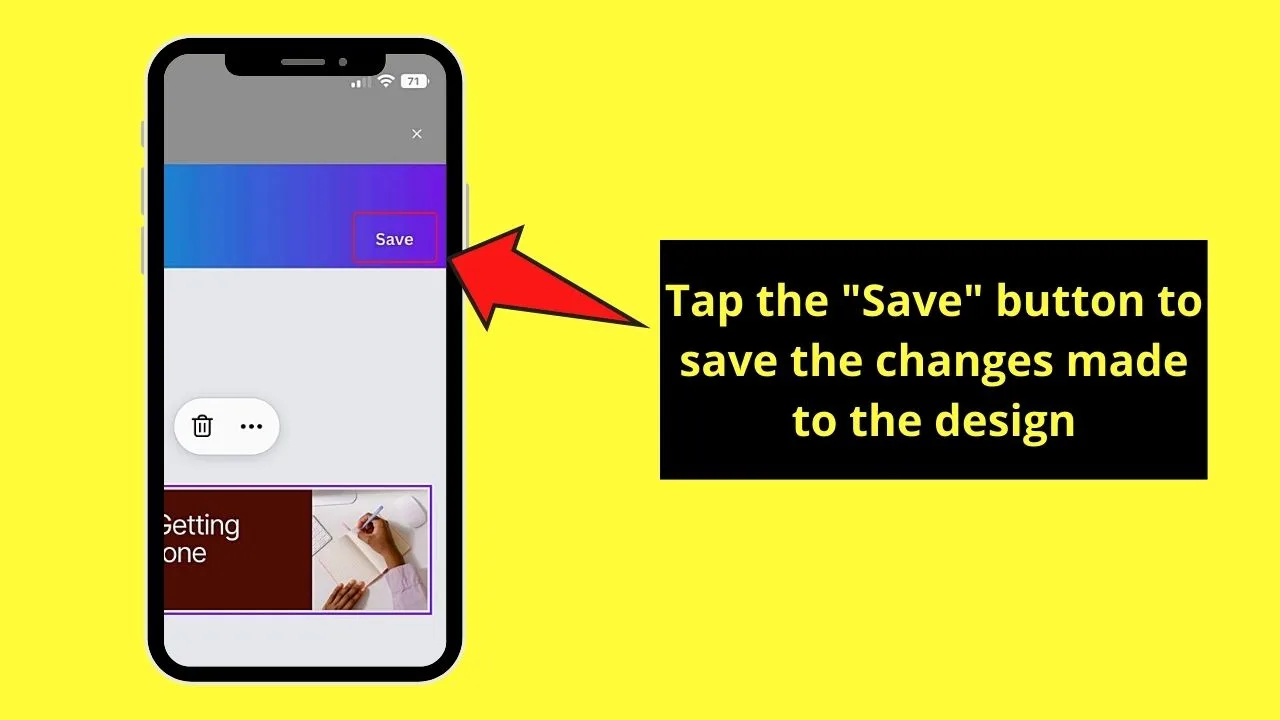
You’ll then be taken back to Canva Docs’ editor page, where you can continue adding other elements to your document.
Adding Text to Canva Docs Mobile
Aside from directly typing text into the document, you can change its text style as well.
Step 1: Tap one of the 3 text styles on the “Magic Commands” menu: “Heading,” “Subheading,” and “Body.”
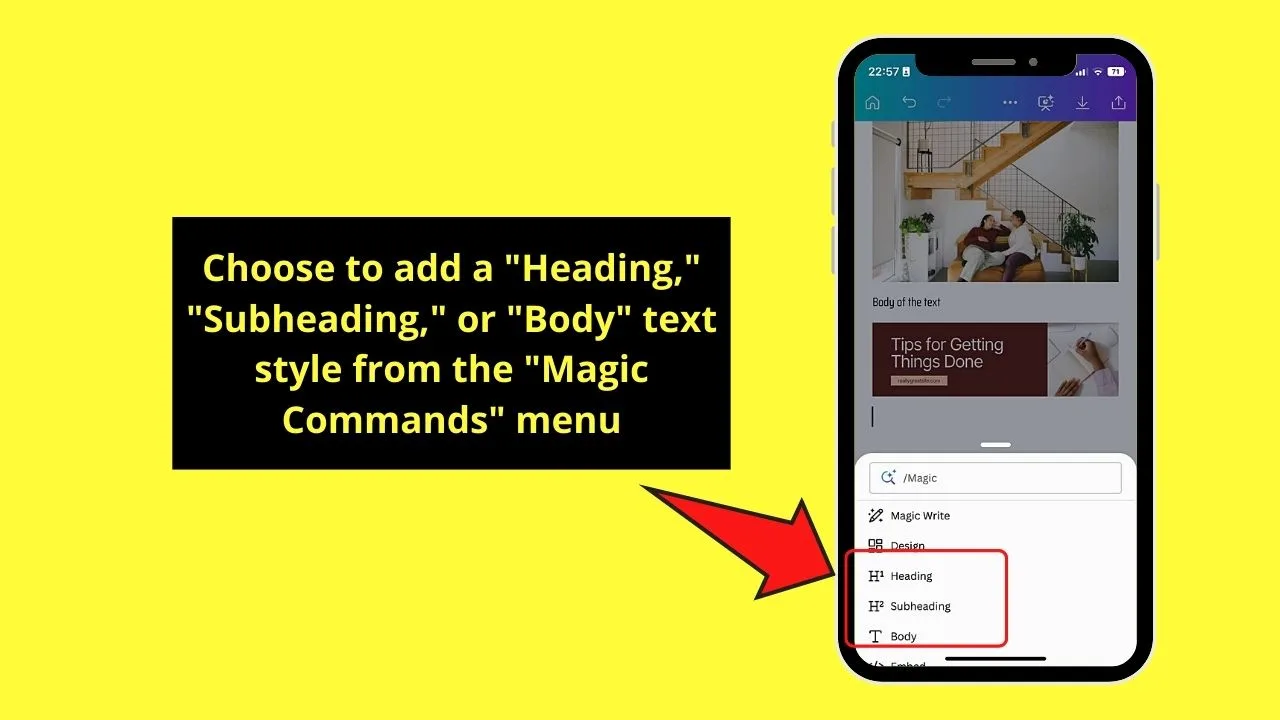
Step 2: Press on the document and begin typing.
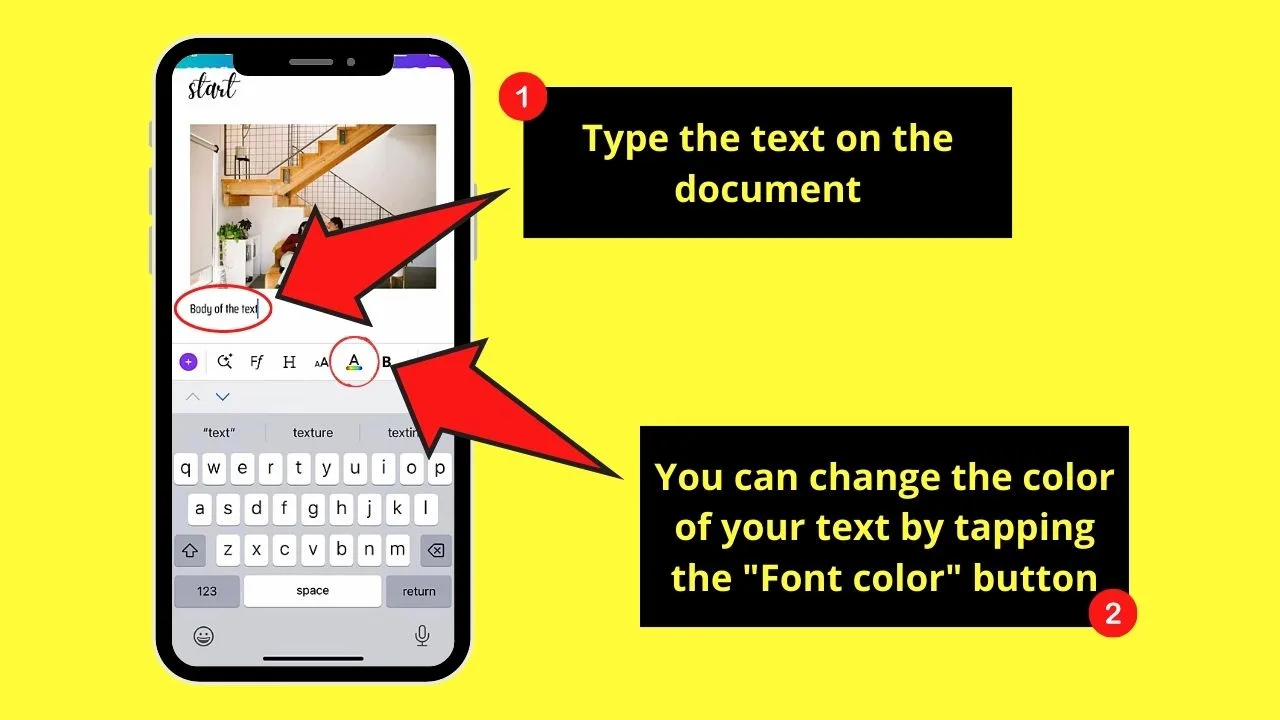
If you need to change the text color, you can always do. Just highlight the text and press the “Color” option on the bottom menu.
Once you’re done adding the text to your document, you can proceed to add tables to it.
How to Insert Tables in Canva Docs Mobile
Just like in word processing tools like Google Docs, you can insert tables in Canva Docs as well.
After all, tables are major parts of any document no matter the word processing tool you use.
Step 1: Tap the “Table” option on the “Magic Commands” menu.
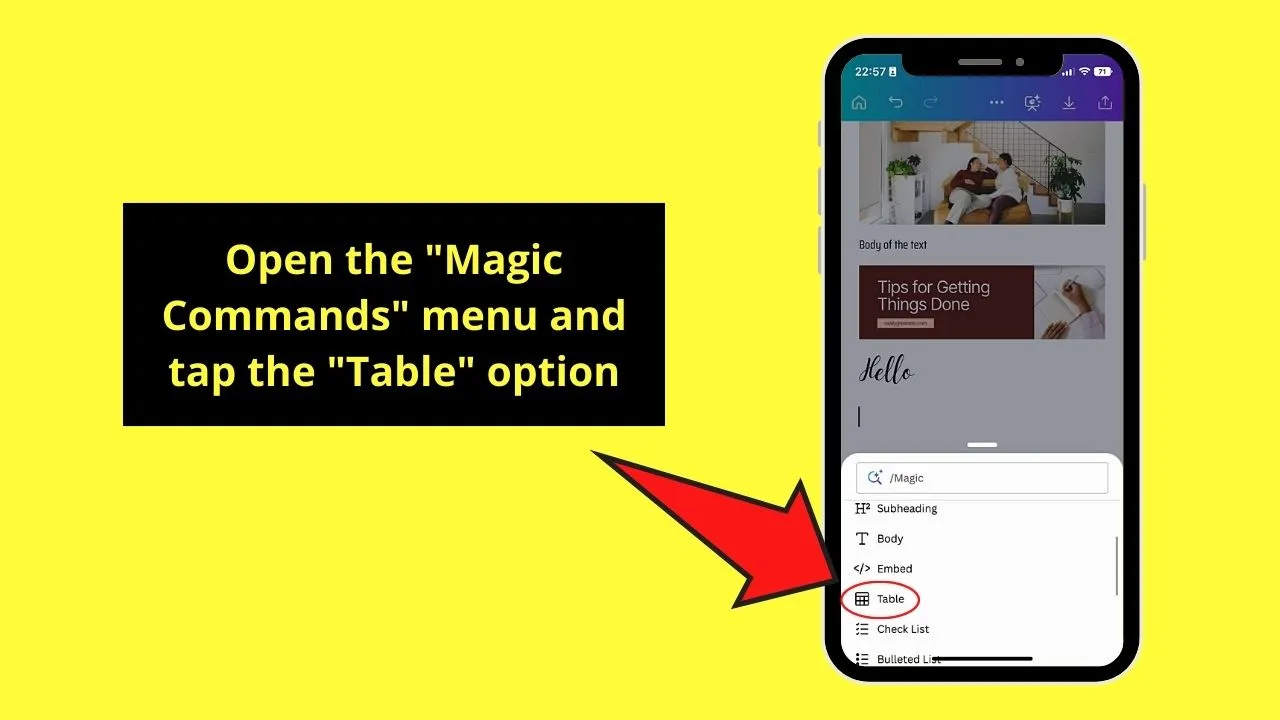
A menu full of squares will then appear from the screen’s bottom.
Step 2: Choose the number of cells for your table by tapping on the squares.
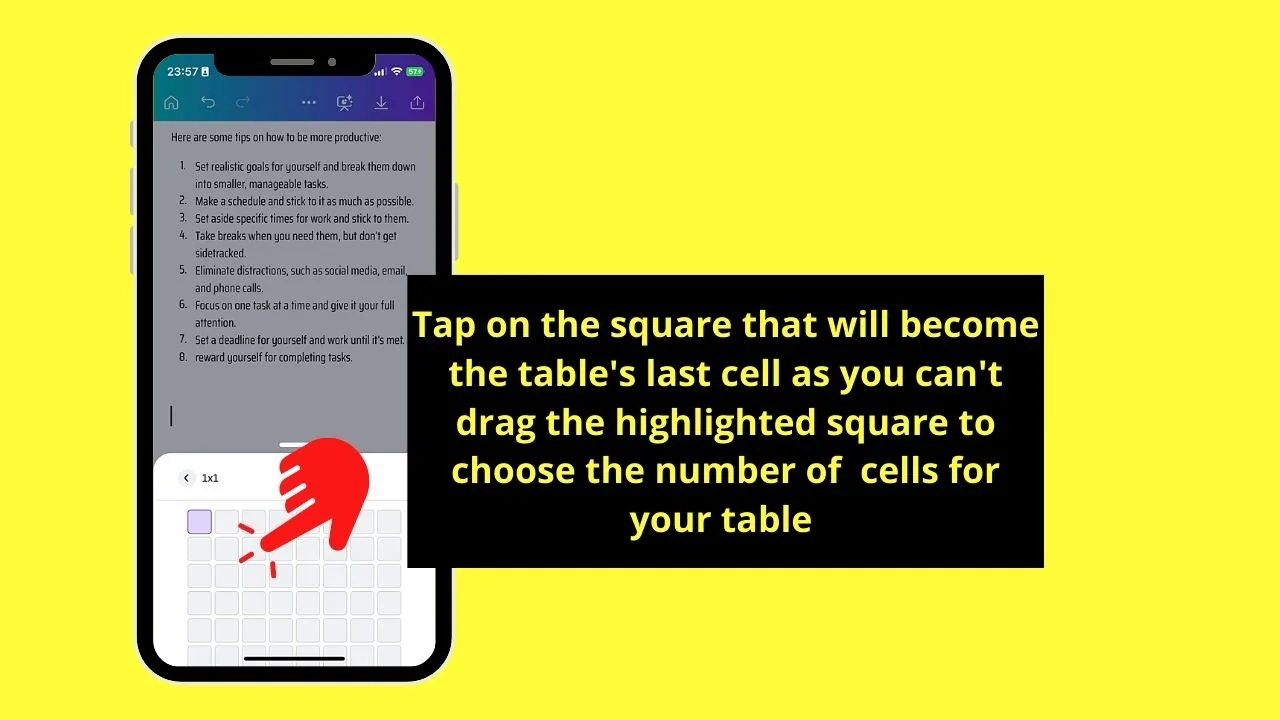
But, unlike on Canva Docs’ web version, you can’t drag the highlighted square on the said menu. Think of it like as the marker cell for the table you’re crafting.
Hence, decide how many columns and rows your table will have. Then, press on the square that will serve as the table’s last cell.
Doing so will make the table appear directly on the document.
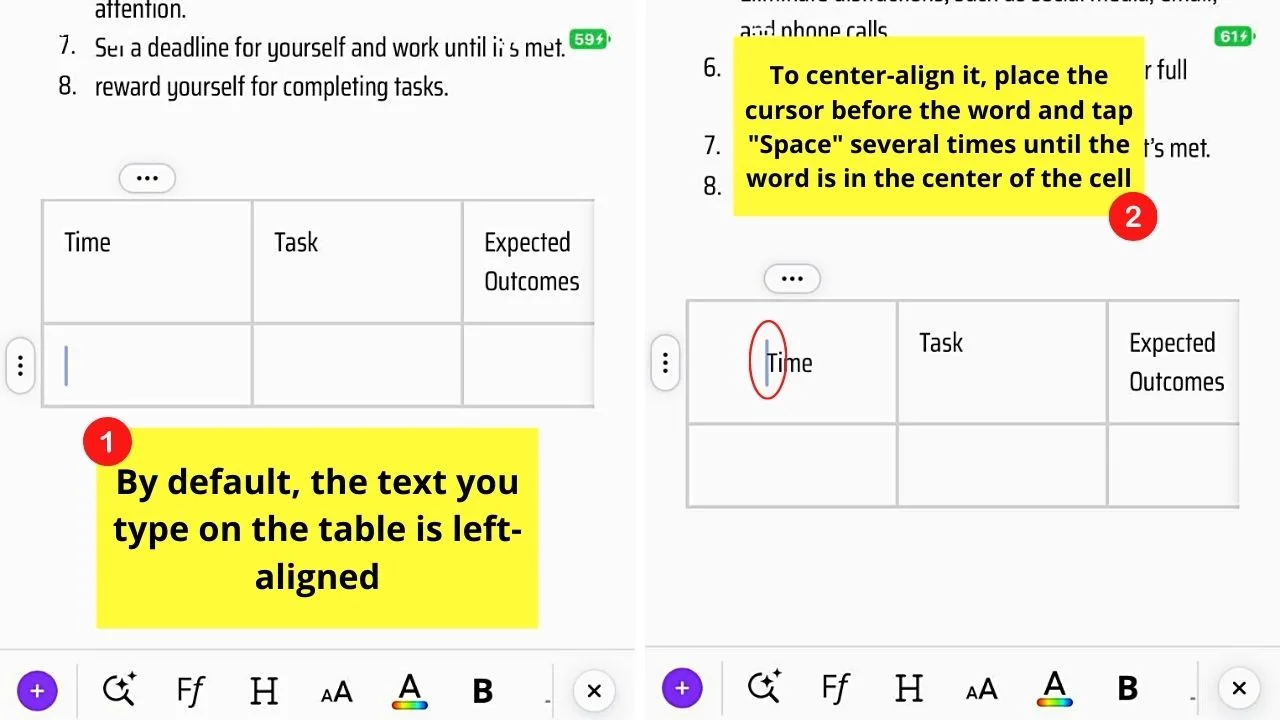
Step 3: Double-tap on the table cells to type text in them.
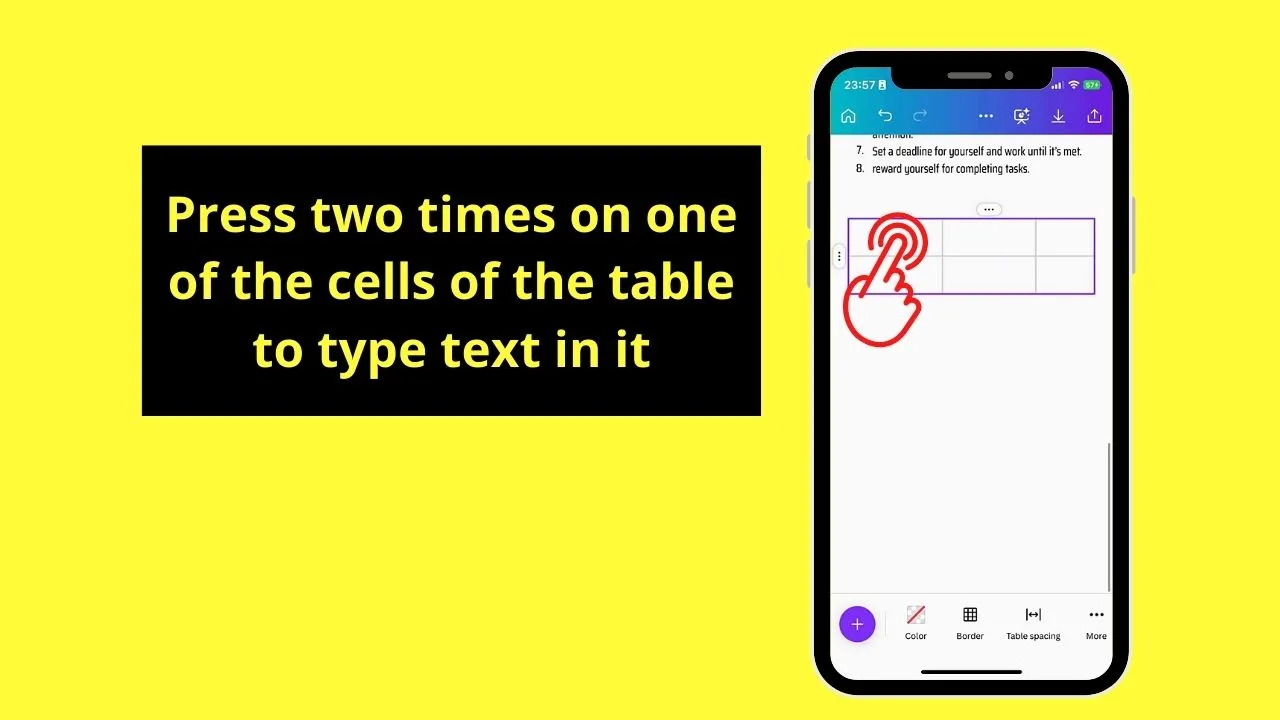
By default, the text is left-aligned. Yet, unlike on the web version, there’s no alignment button on Canva Docs mobile.
What you can do instead is tap and put the cursor before the word. Then, keep pressing “Space” on the on-screen keyboard until the word is centered inside the cell.
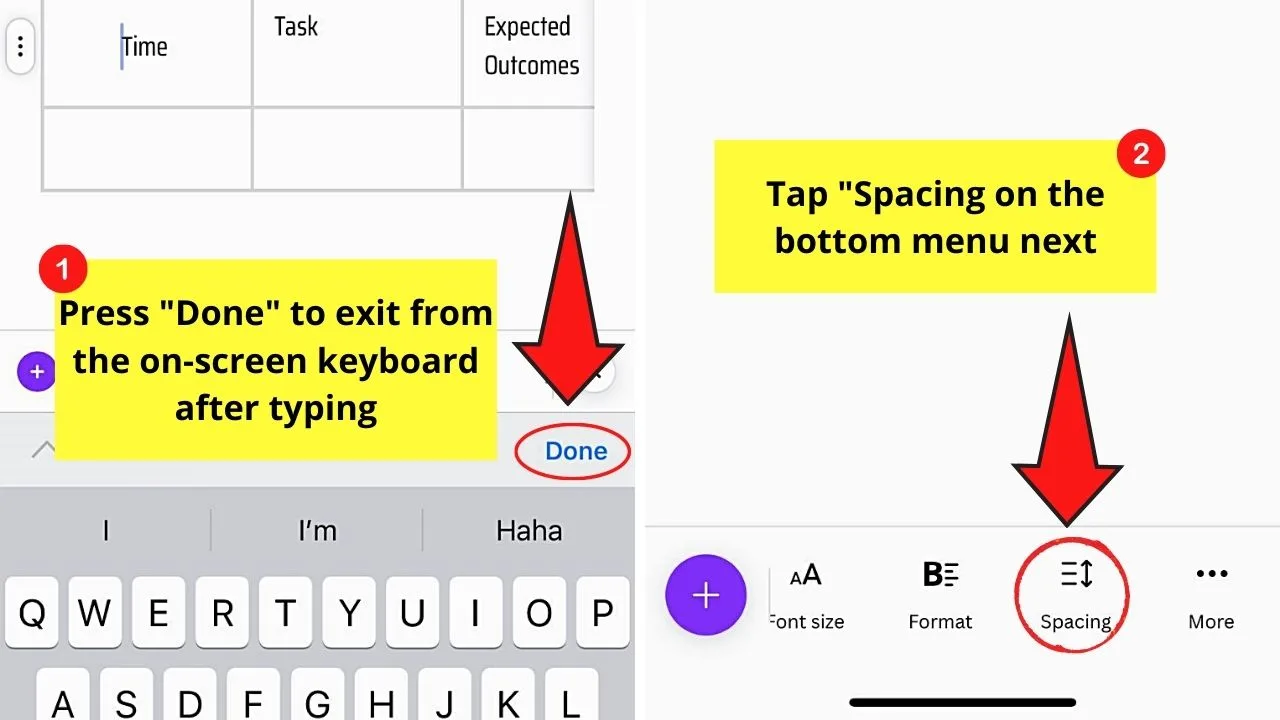
Then, press “Done.” Tap the cell again and swipe the bottom menu leftwards and press “Spacing.”
On the menu that appears, go to the “Vertical Alignment” option and choose by tapping any of the 3 alignment styles available.
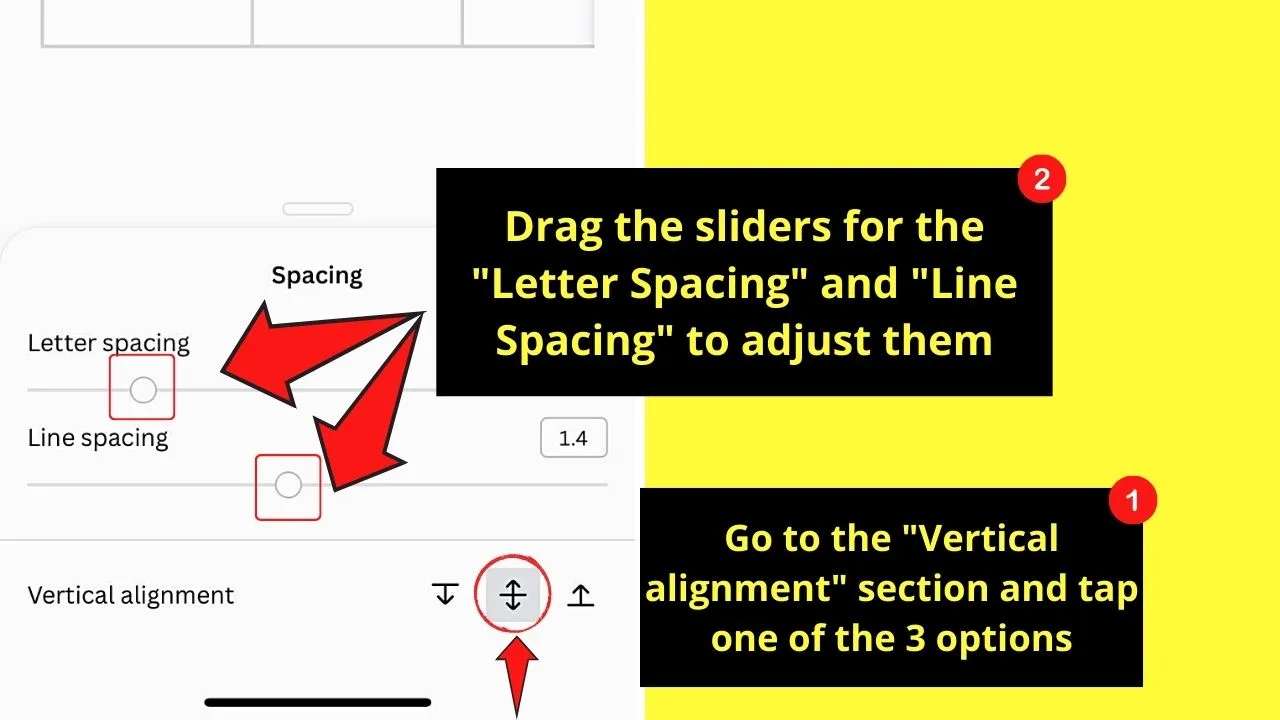
You can even adjust the sliders for “Letter Spacing” and “Line Spacing” if you want to.
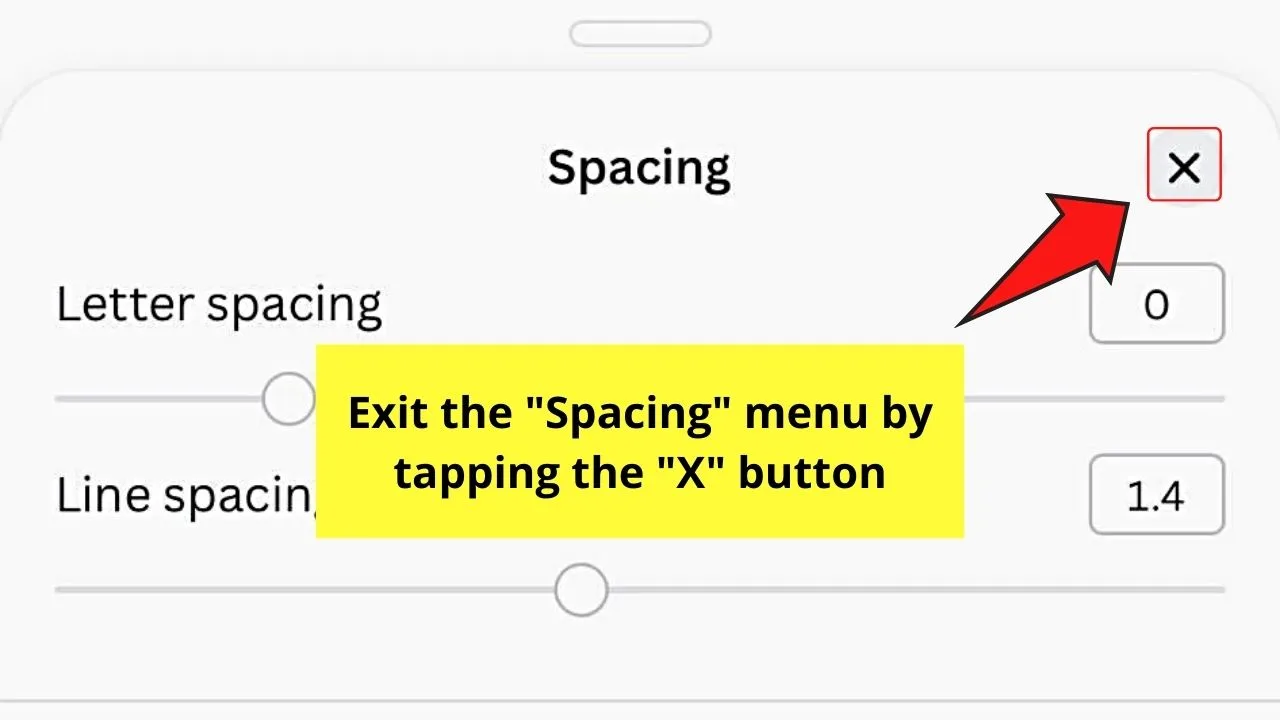
After which, exit the “Spacing” menu by tapping “X.”
Step 4: Add new rows and columns by highlighting a cell and tapping “More” on the bottom menu.
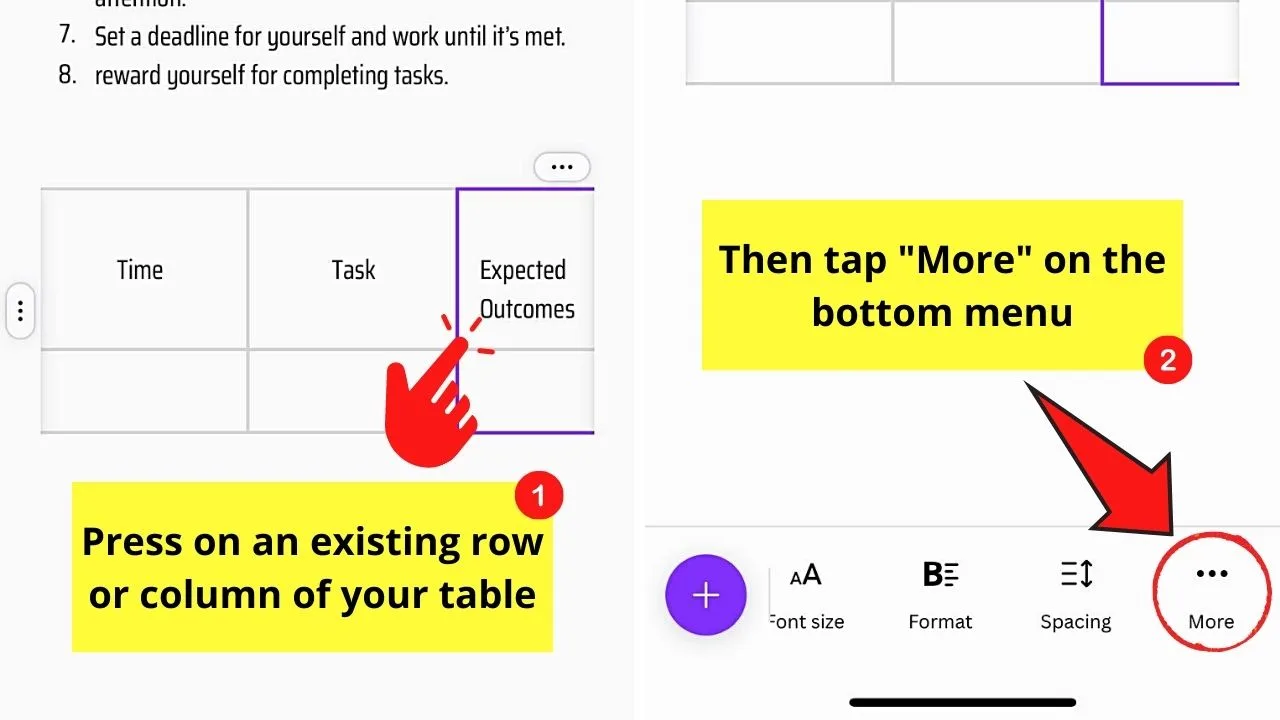
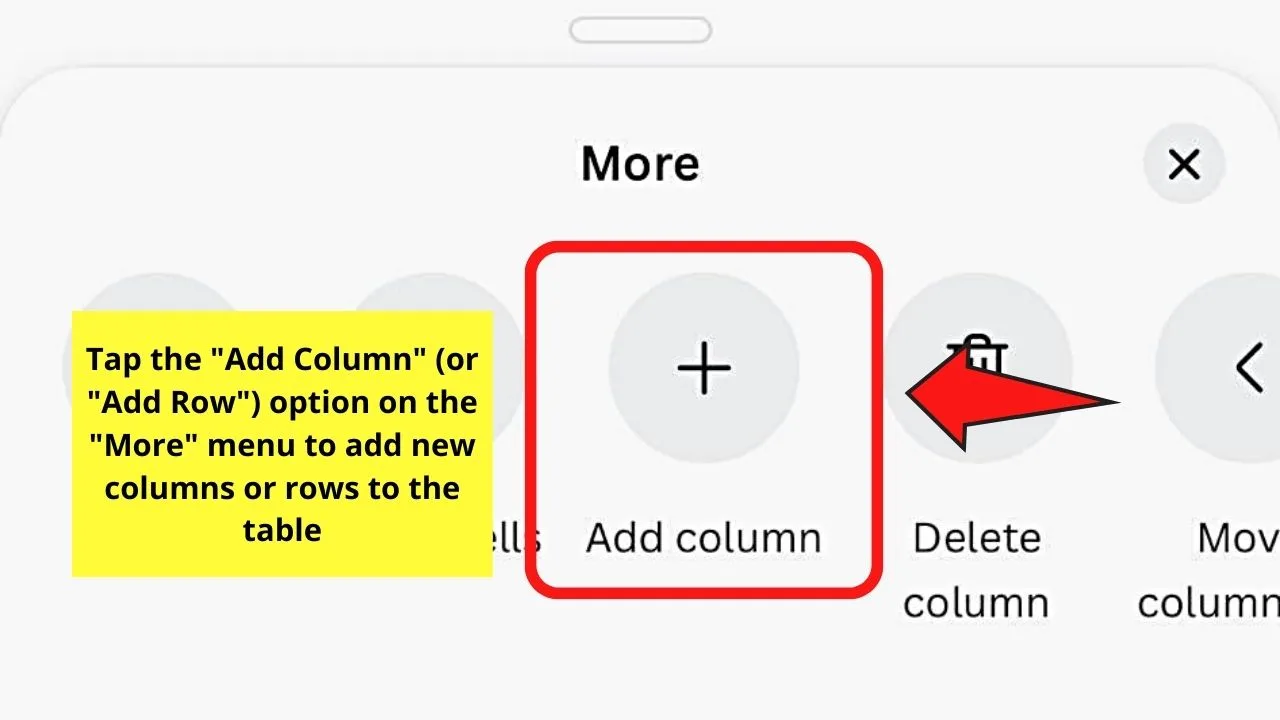
Then, swipe to the left and choose the “Add Column” or “Add Row” option. This move will automatically add another row or column to the table.
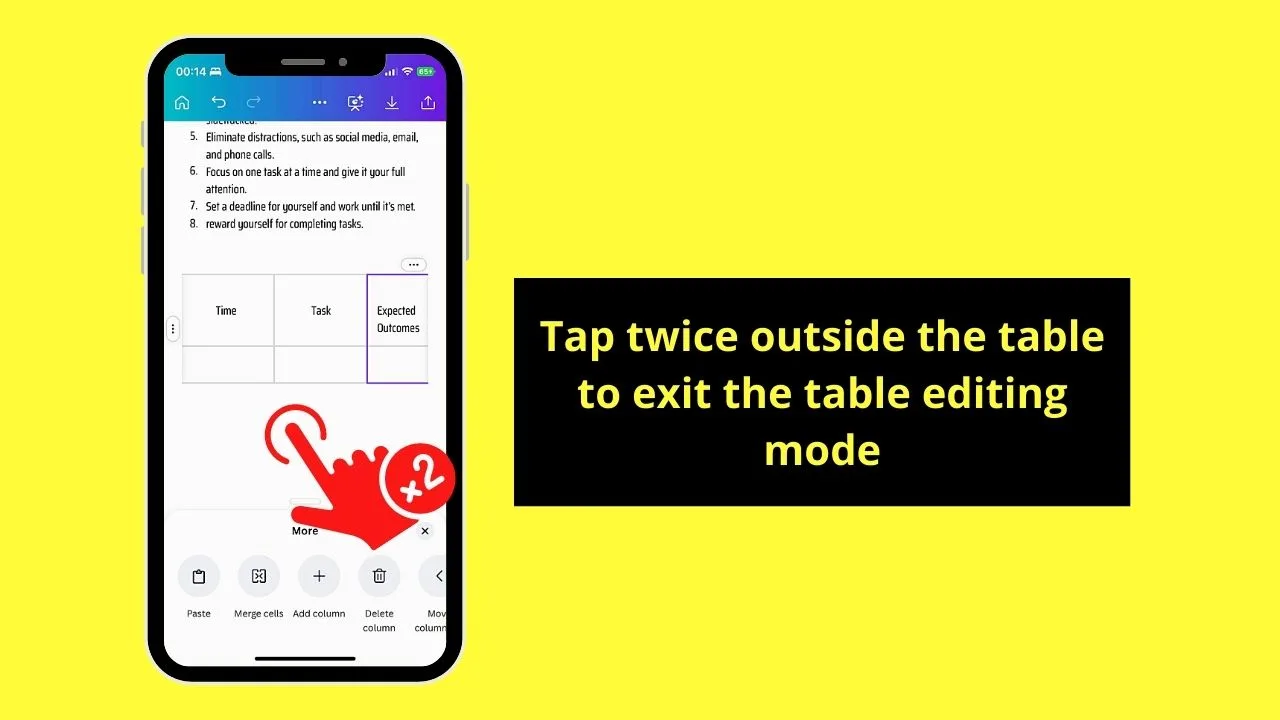
Step 5: Double-tap on any space outside of the table and exit the table editing mode.
Inserting Lists to Canva Docs Mobile
Just like on Canva Docs’ web version, there are 3 list types that you can use: “Check List,” “Bulleted List,” and “Numbered List.”
Step 1: Choose a list type from the 3 list types available on the “Magic Commands” menu.
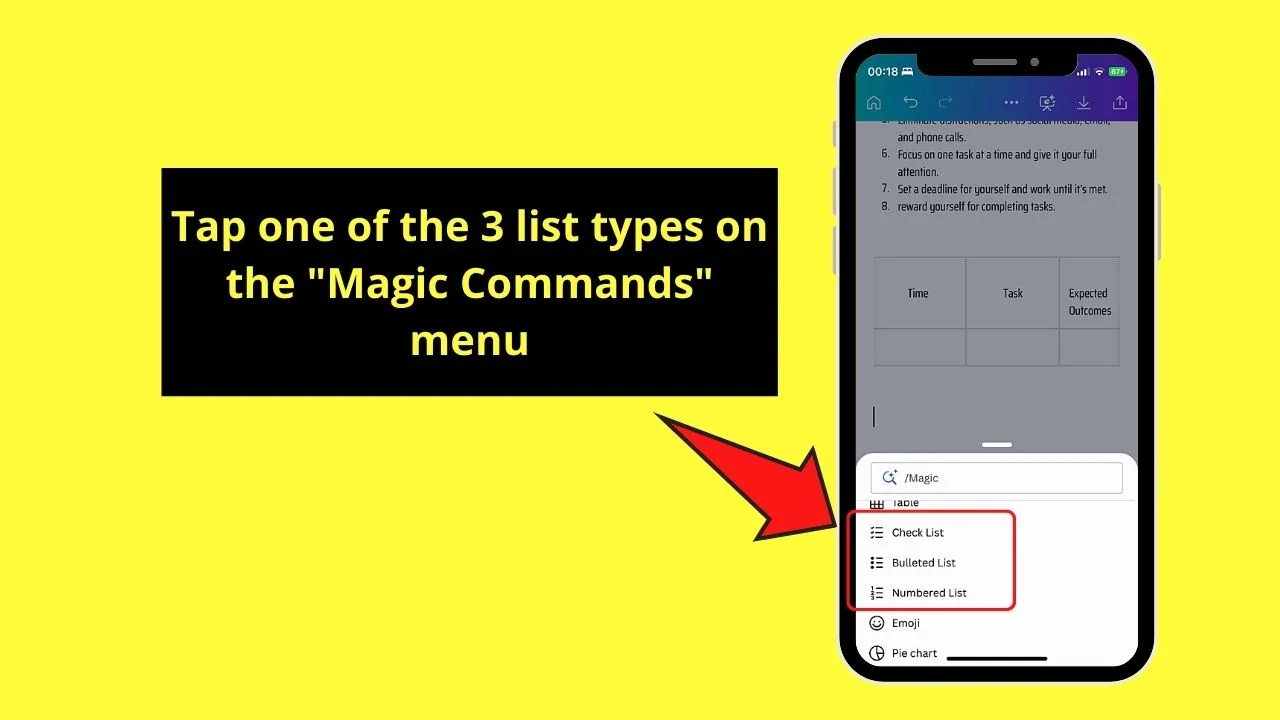
For sample purposes, I’ll tap “Check List.” This will then make a check box appear on the document.
Step 2: Type the entry beside the check box.
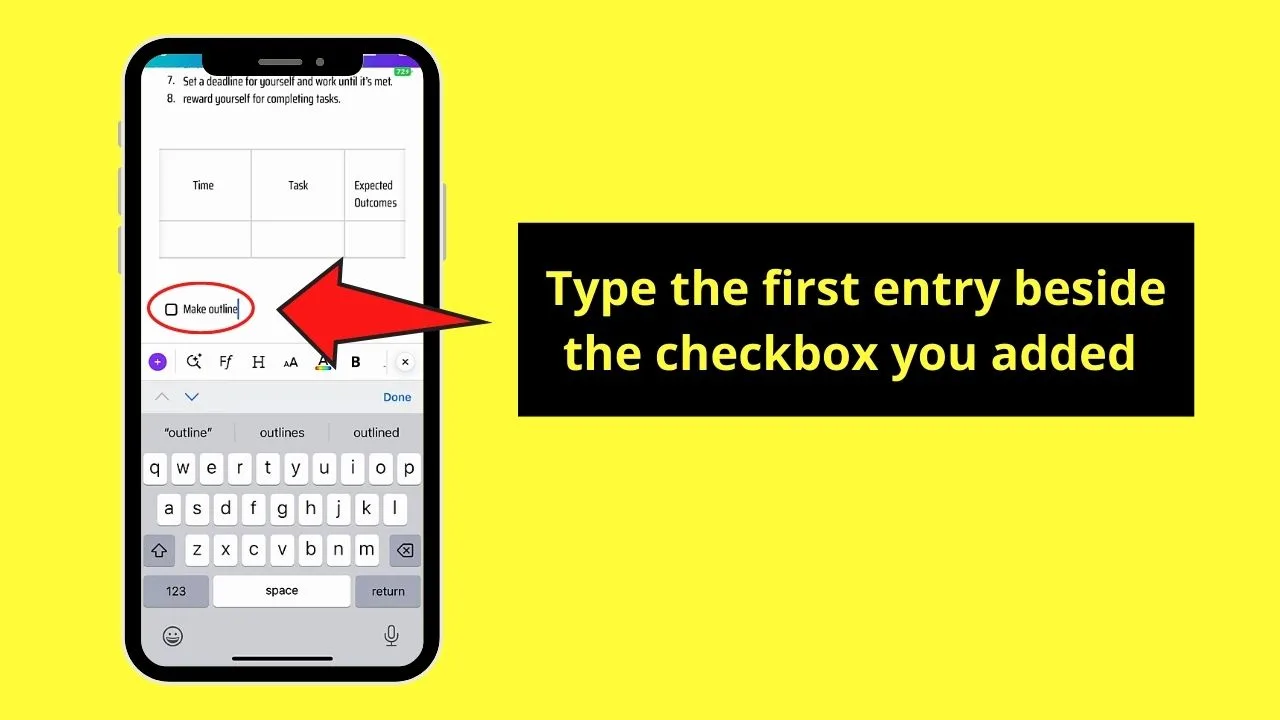
Step 3: Press “Enter” or “Return” to add another entry to the list you’re making.
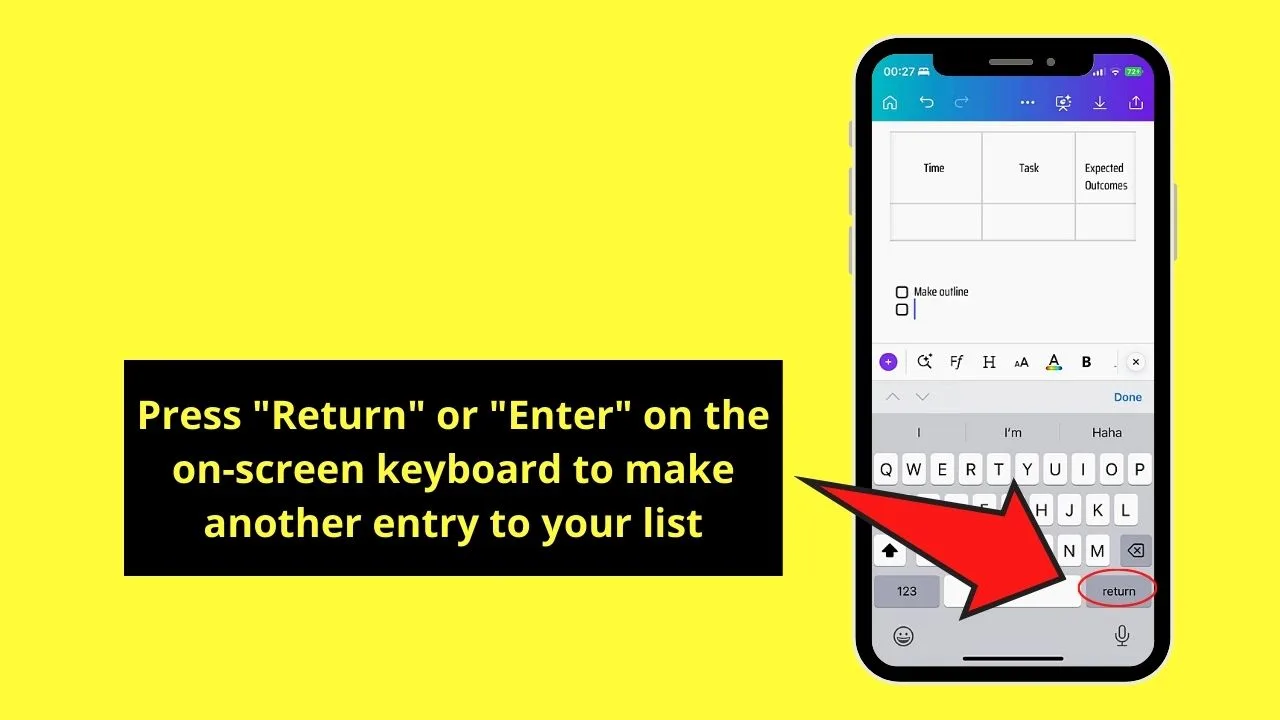
A new check box will then appear where you can proceed with typing the next entries.
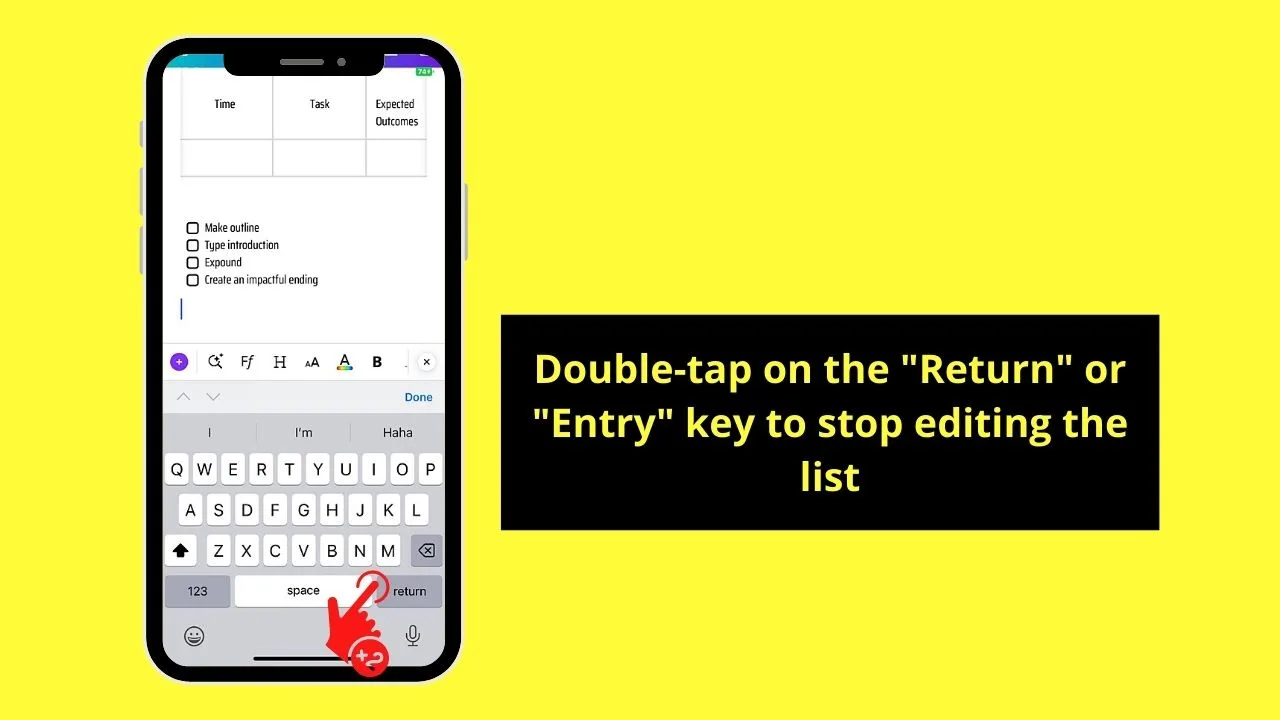
Repeat steps 2 to 3 until you have added all the entries to the list.
Step 4: Double-tap on the “Return” or “Enter” key to stop editing or adding entries to the list.
Adding Charts to Canva Mobile
Charts serve as visual presentations of data to help your viewers understand the concept better.
Like in the web version, there are 3 types of charts that you can add on Canva Docs mobile: “Pie Chart,” “Bar Chart,” and “Line Chart.”
So, to add one, do the following steps:
Step 1: Tap on the chart type you want to insert into your document.
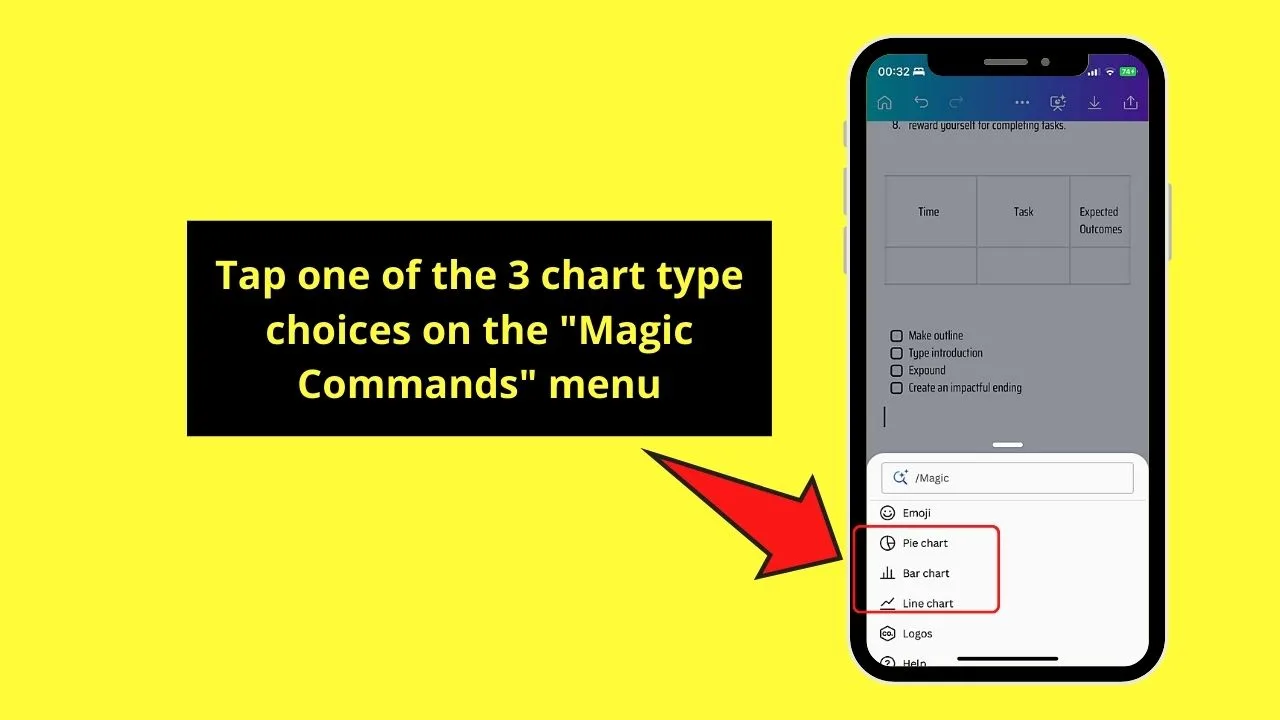
For sample purposes, I’ll choose the “Pie Chart.”
Step 2: Edit the entries of the chart by pressing “Edit” on the bottom menu.
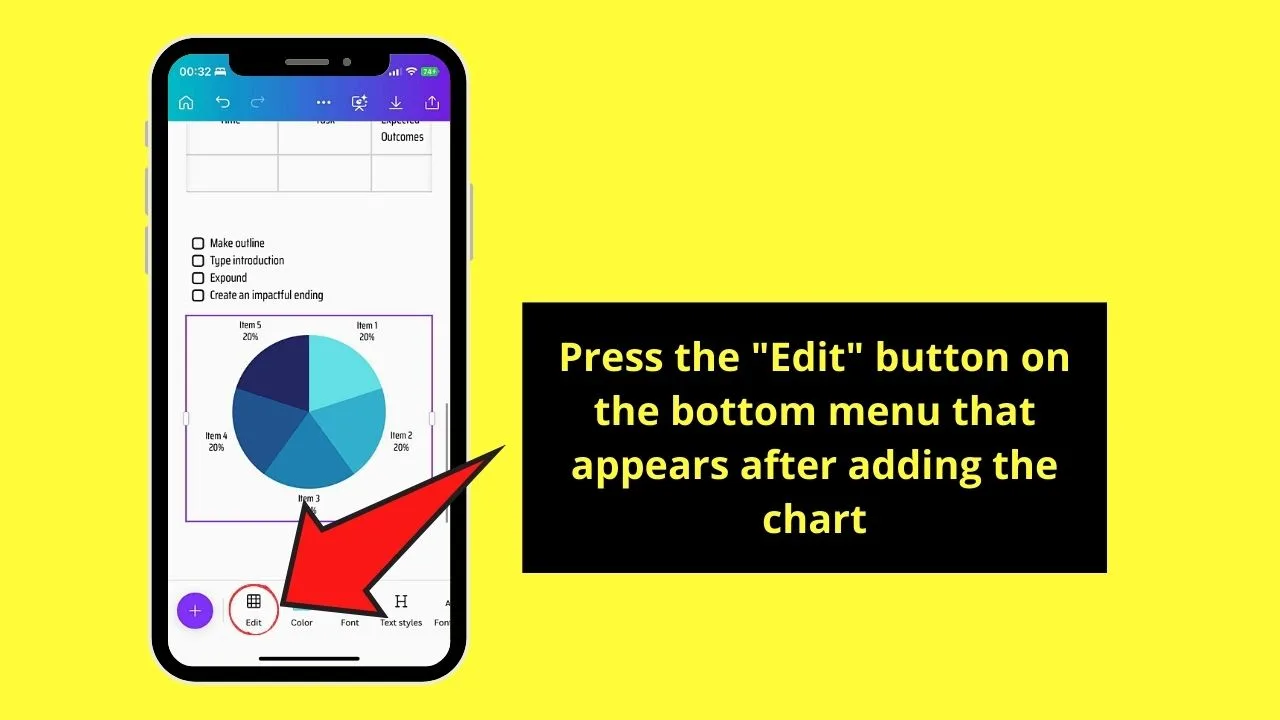
A table will then appear on the “Edit” menu. This is where you’ll change the entries for your pie chart.
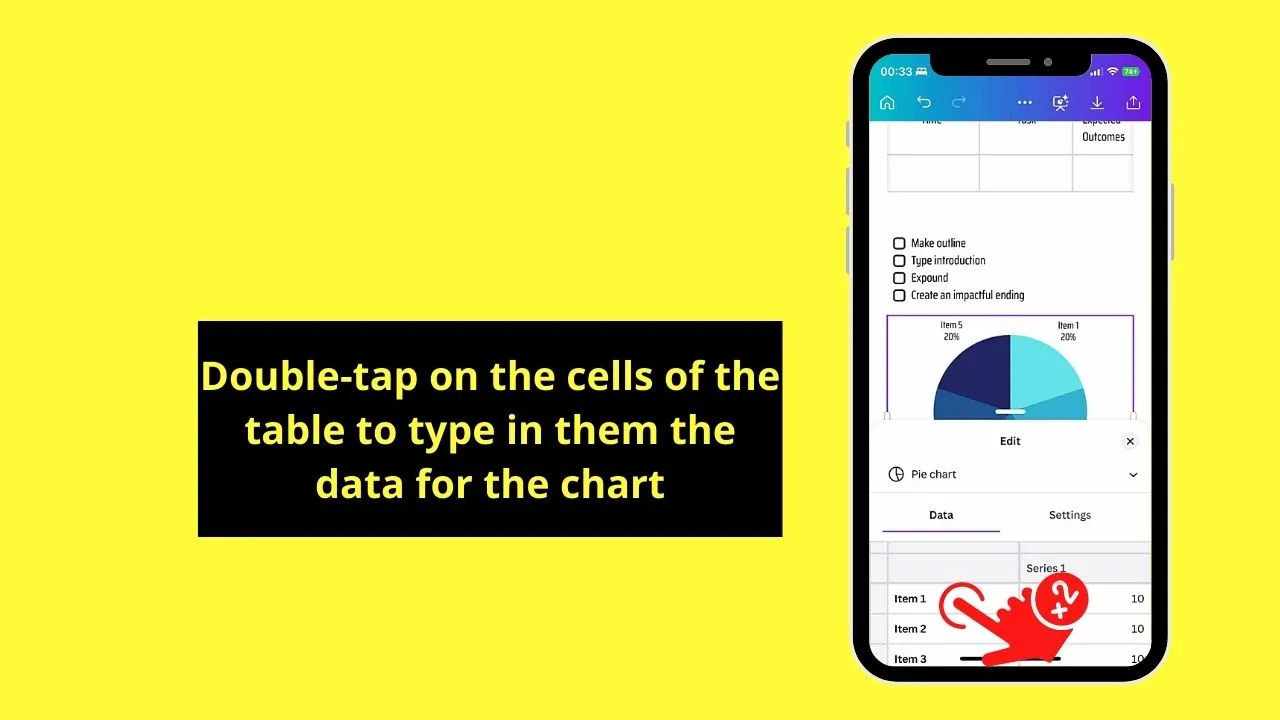
Just double-tap on those cells to begin changing the text and titles in them.
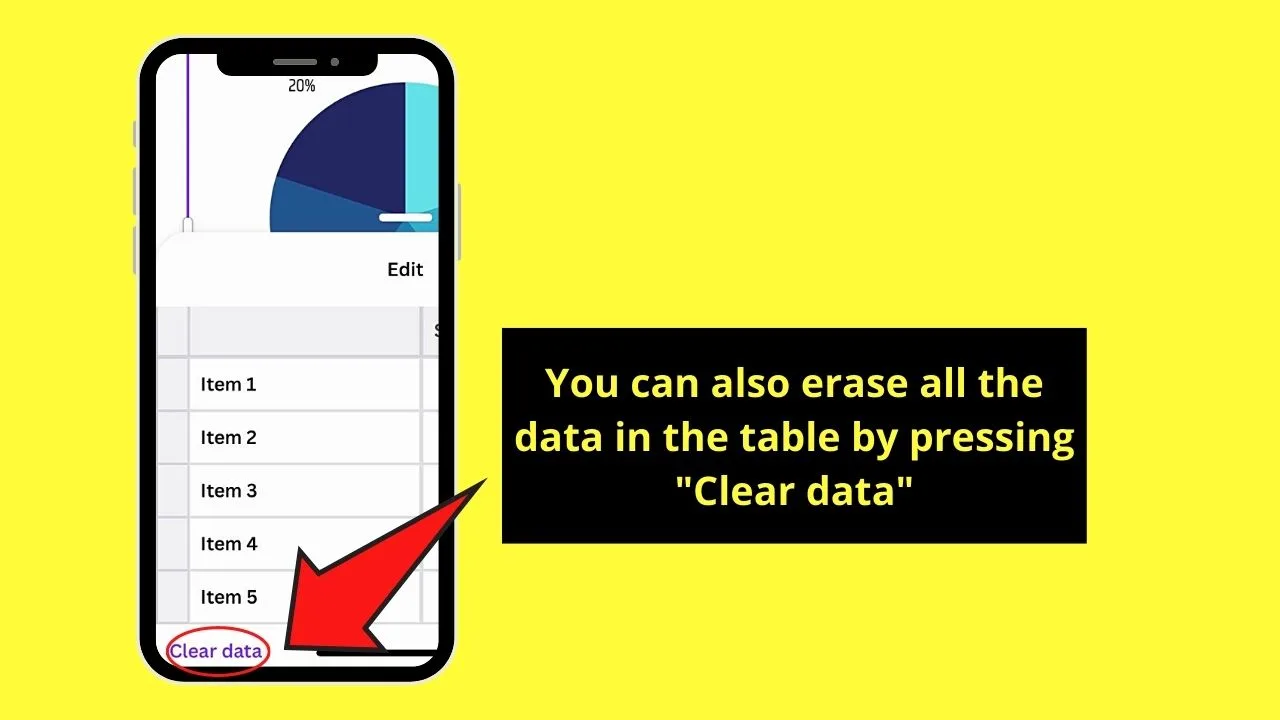
Step 3: Press the “Clear Data” button to erase all the data inside the pie chart table.
Step 4: Change the chart type you’re using by tapping the “v” button.
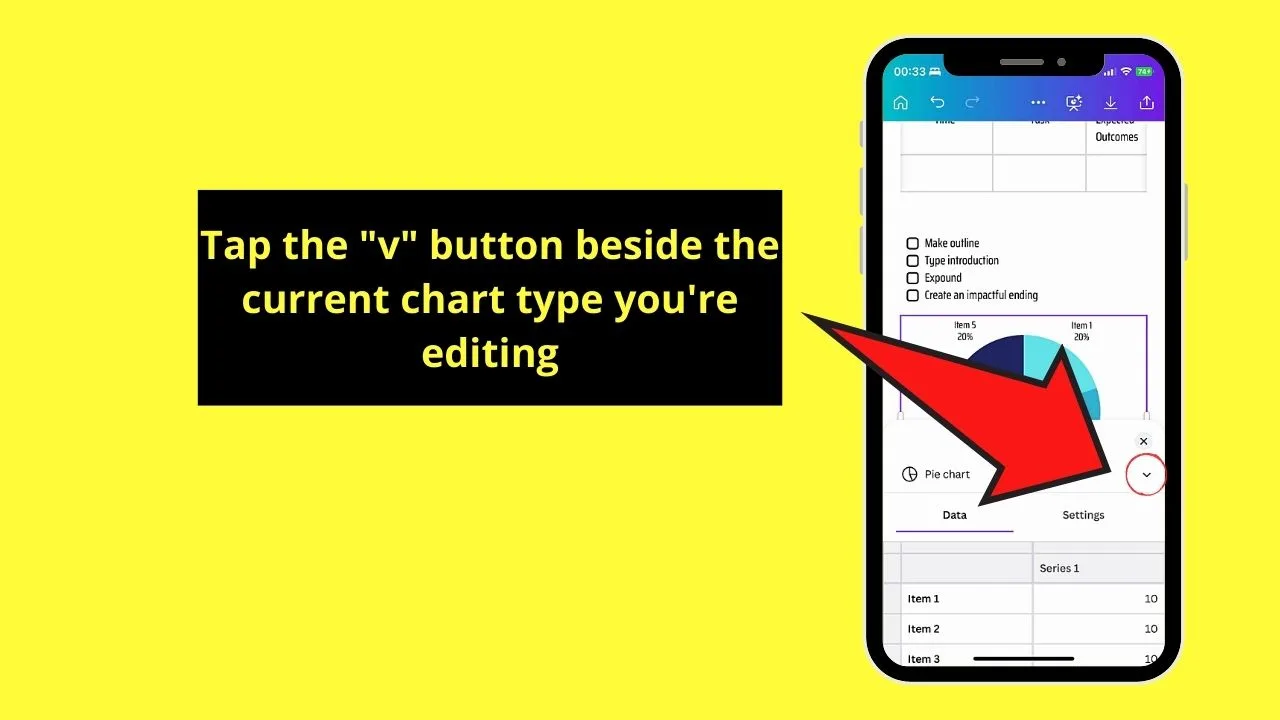
This step is optional. In case you do want to change the chart type you’re using, tap on one of the choices on the menu.
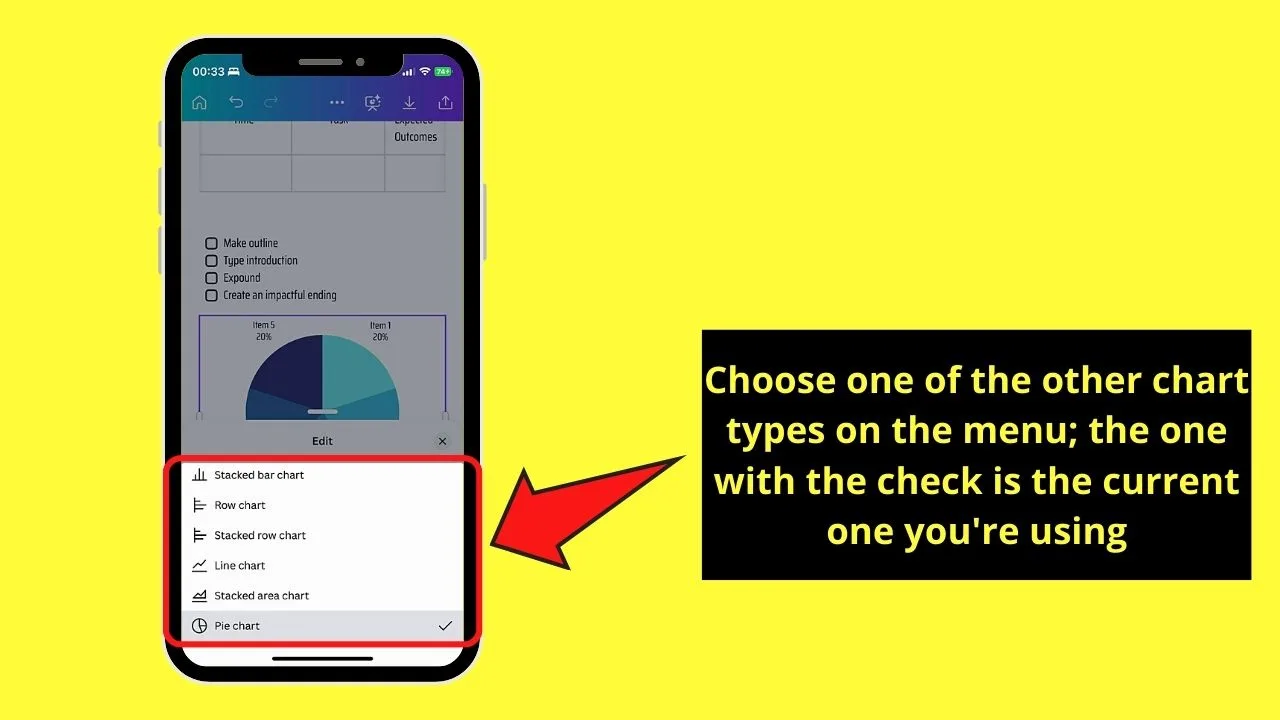
Automatically, the pie chart will be changed to the new chart type you selected.
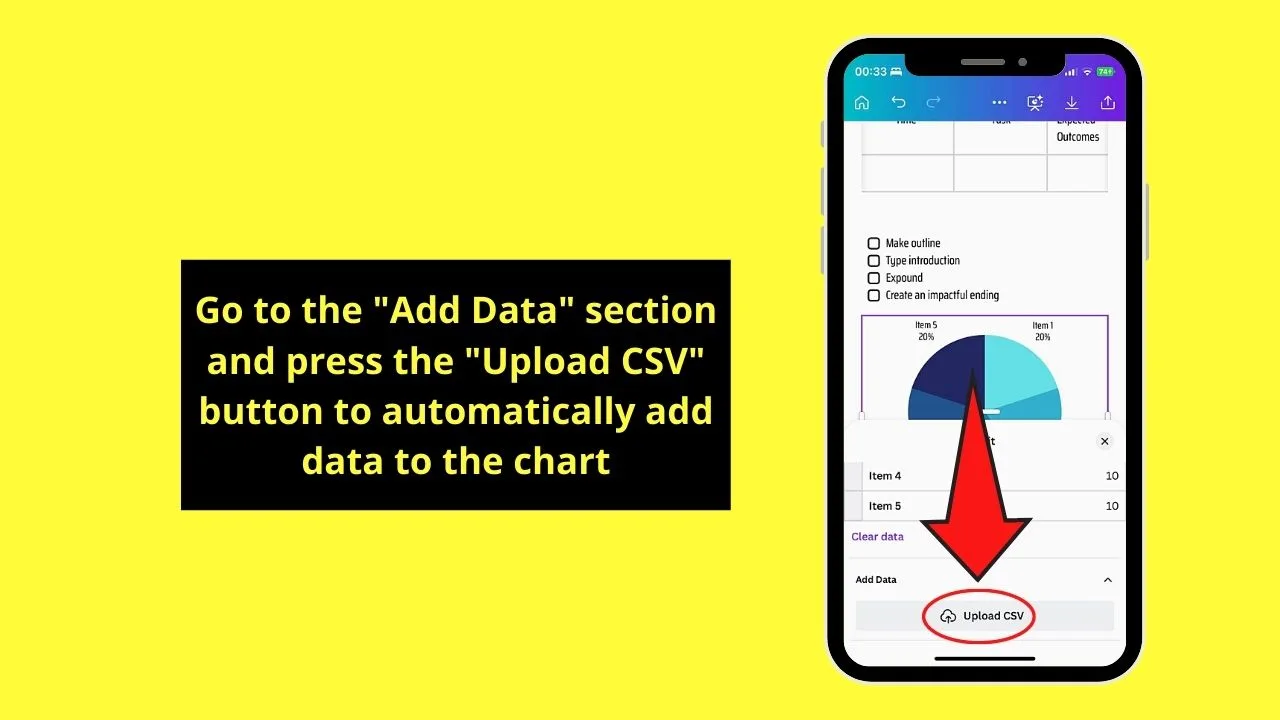
Step 5: Tap the “Upload CSV” button if you want to automatically add data to the pie chart.
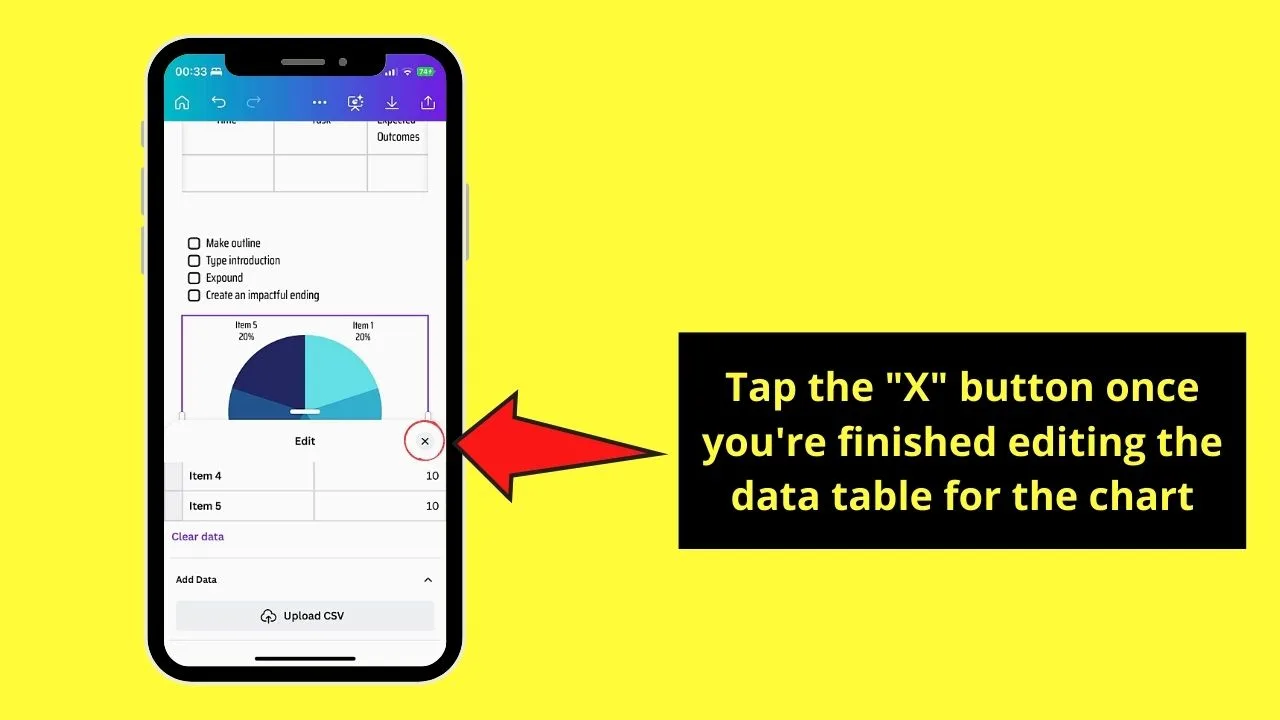
Step 6: Press the “X” button after you’re done editing the chart.
Inserting Emojis in Canva Docs Mobile
Emojis are smileys, pictograms, or logograms used in web pages and electronic messages.
If you want to add a bit of fun to your document, here’s how you can add those cute emojis.
Step 1: Tap the “Emoji” option on the “Magic Commands” menu.
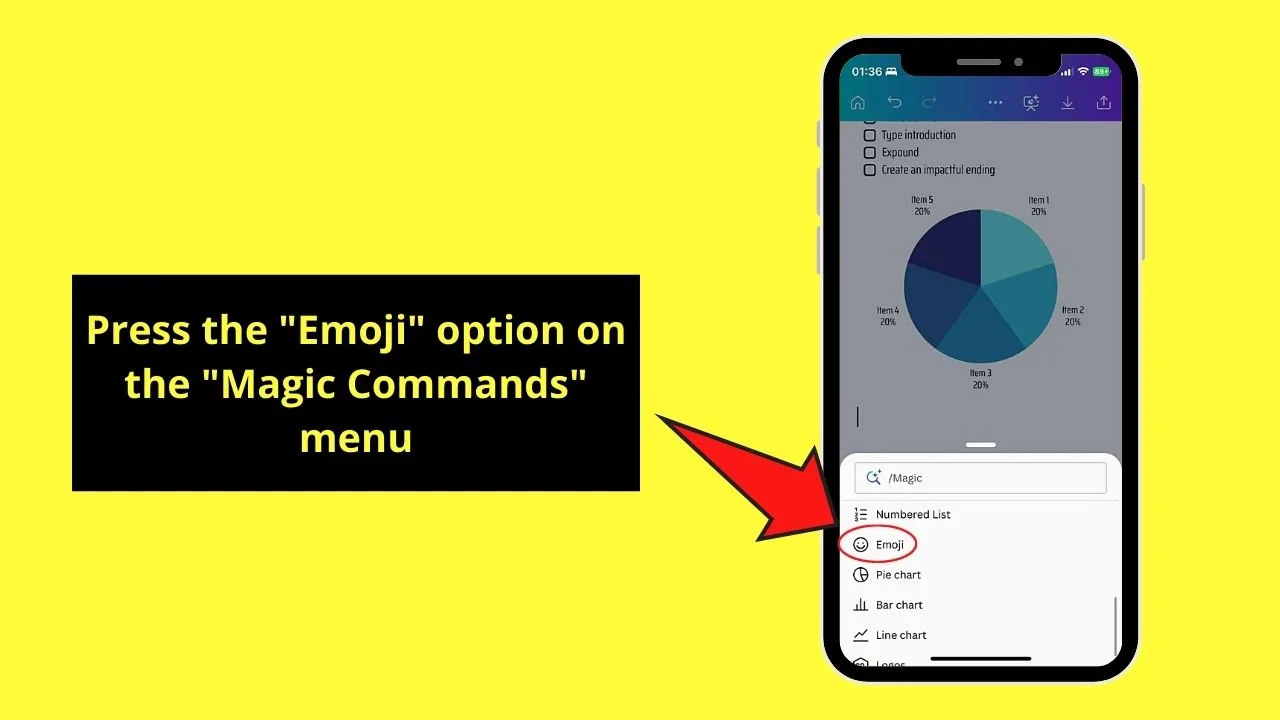
Step 2: Scroll down the emoji gallery and tap the emoji that you want to use.
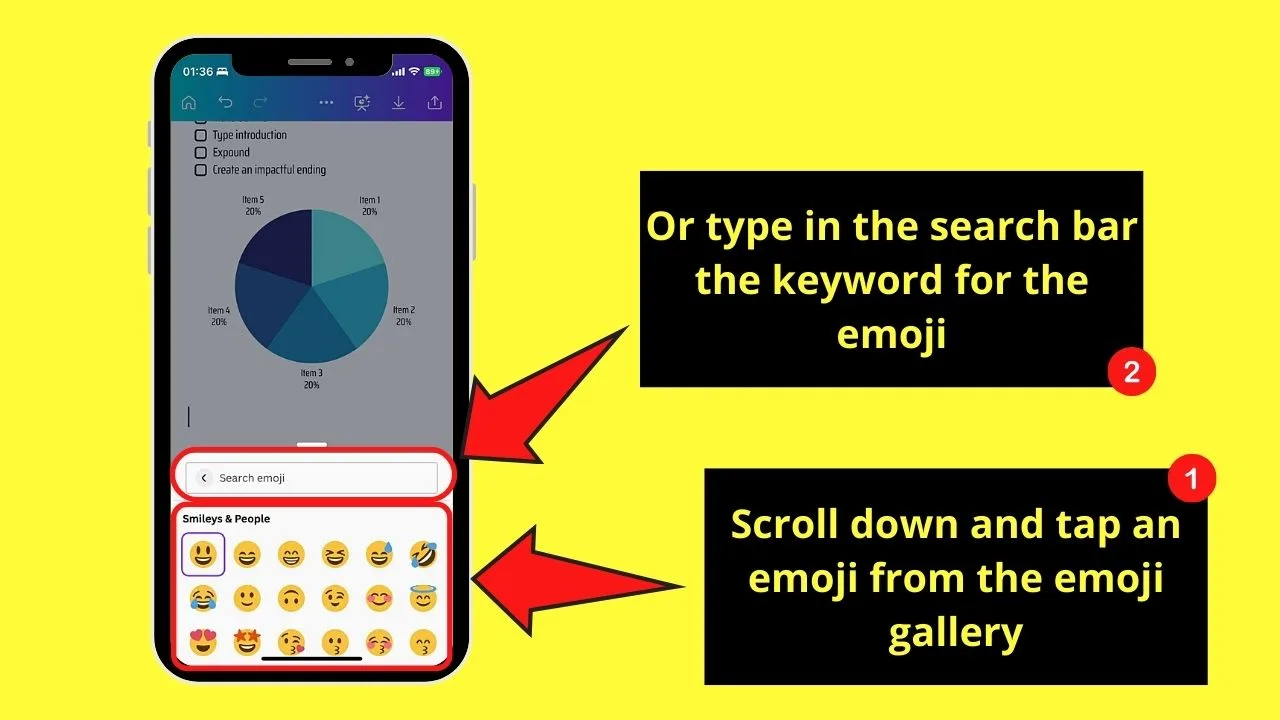
Typing the keyword of the specific emoji on the search bar can also be done. Once the emojis related to that keyword appear, tap on the one you’ll use.
Adding Embeds to Canva Docs Mobile
If you want to add a video to your Canva Docs document, the easiest way to do is to embed it.
To do so, here are the steps you should take:
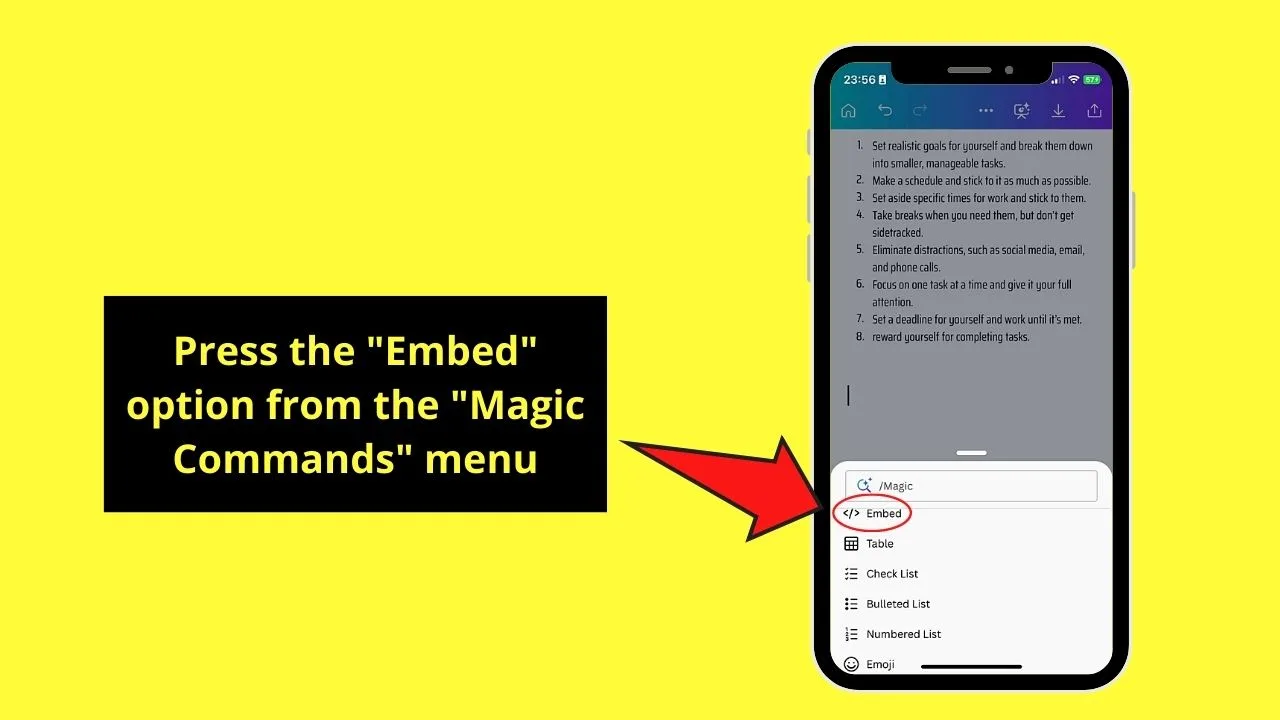
Step 1: Press “Embed” on the “Magic Commands” menu.
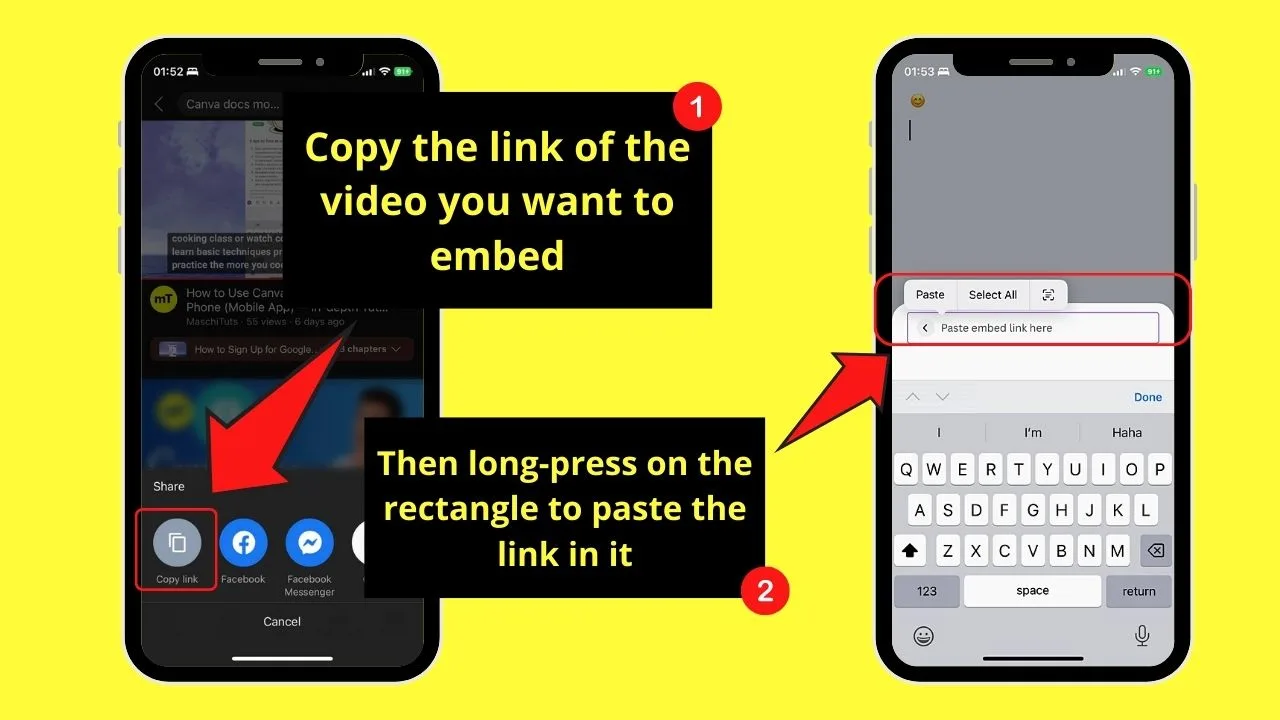
Step 2: Long-press on the blank rectangle and paste the link of the video you have copied.
Step 3: Tap the “Return” or “Enter” button to finalize embedding the video into the document.
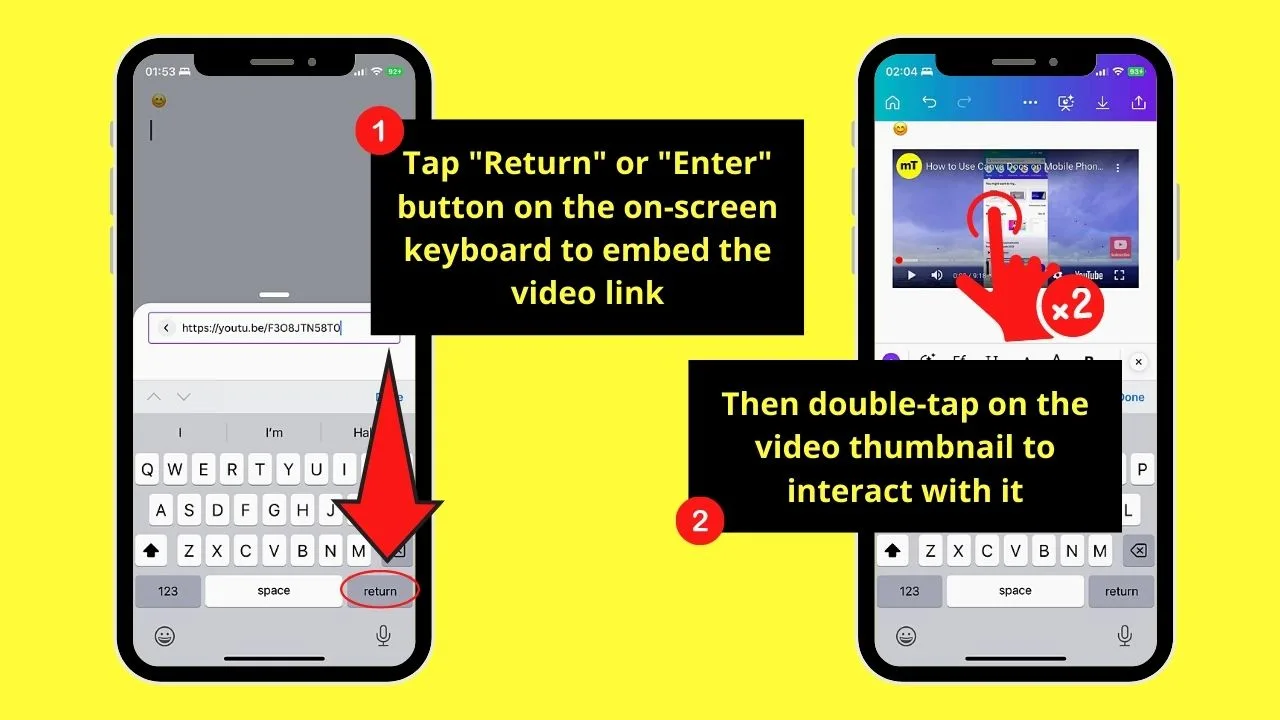
Then, all you have to do is double-tap on the video thumbnail to interact with it.
Adding Graphics to Canva Docs Mobile
Step 1: Type in the search bar the keyword of the graphic you’re looking for.
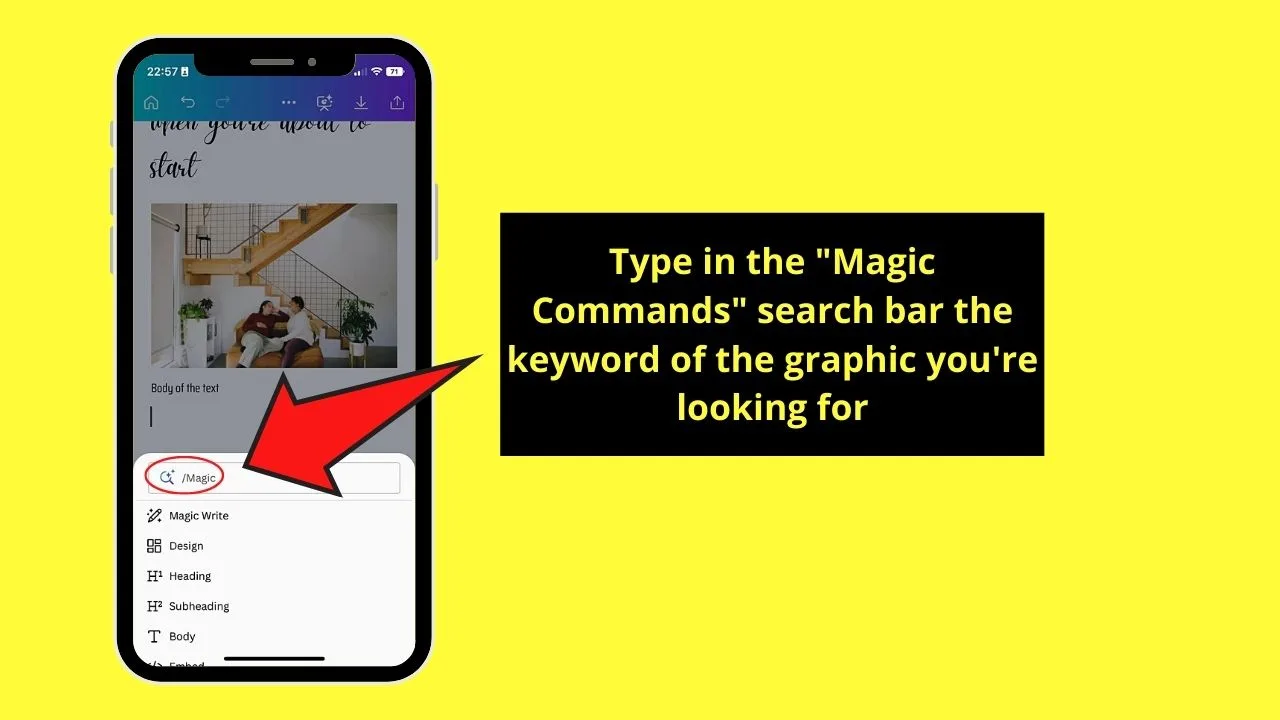
This search bar only appears after you have opened the “Magic Commands” menu.
Step 2: Press the “Graphics” option on the menu that appears below the search bar.
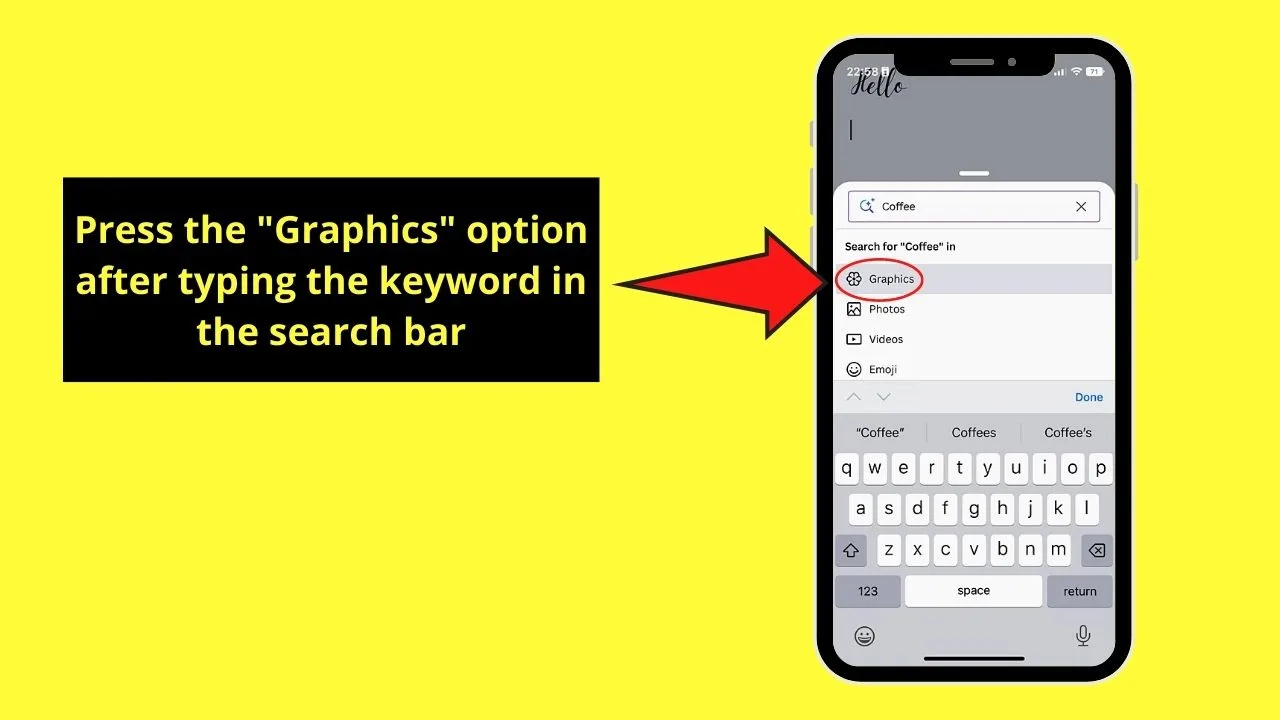
This move will then make Canva Docs mobile generate the list of graphics related to the keyword you typed.
Step 3: Tap on the graphic you want to use.
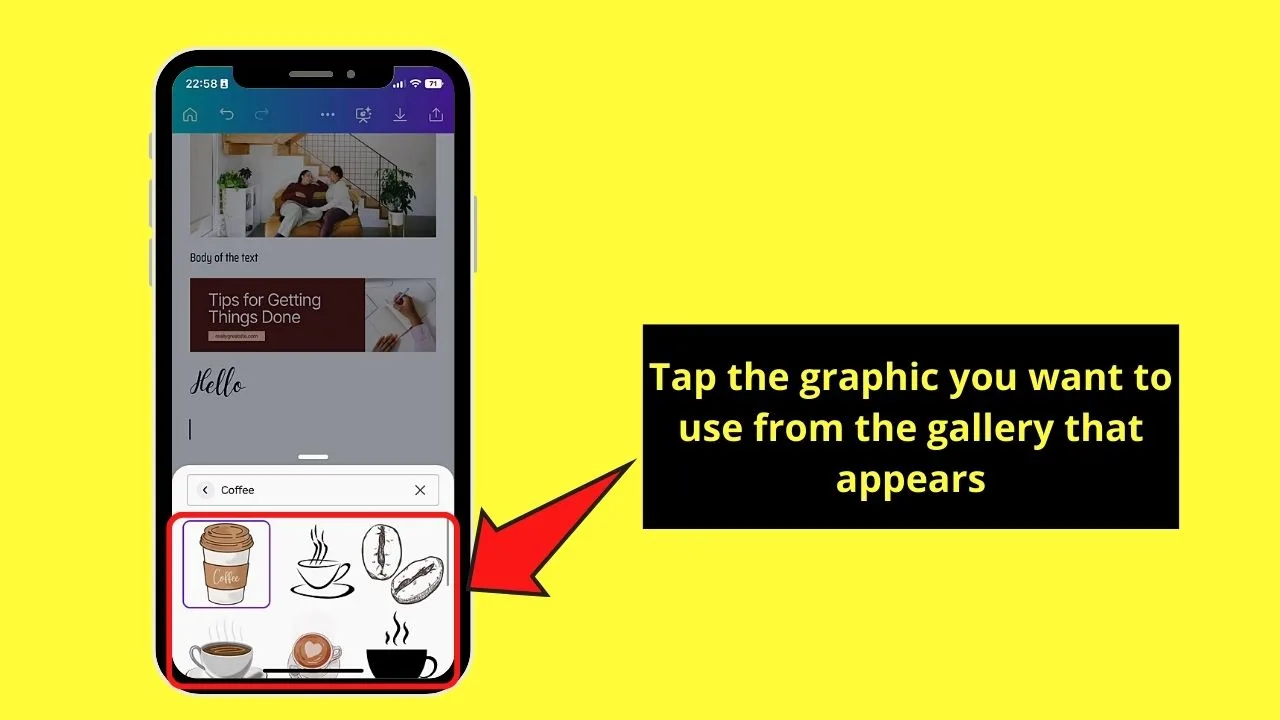
Step 4: Adjust the graphic’s size by dragging the handles that surround the graphic.
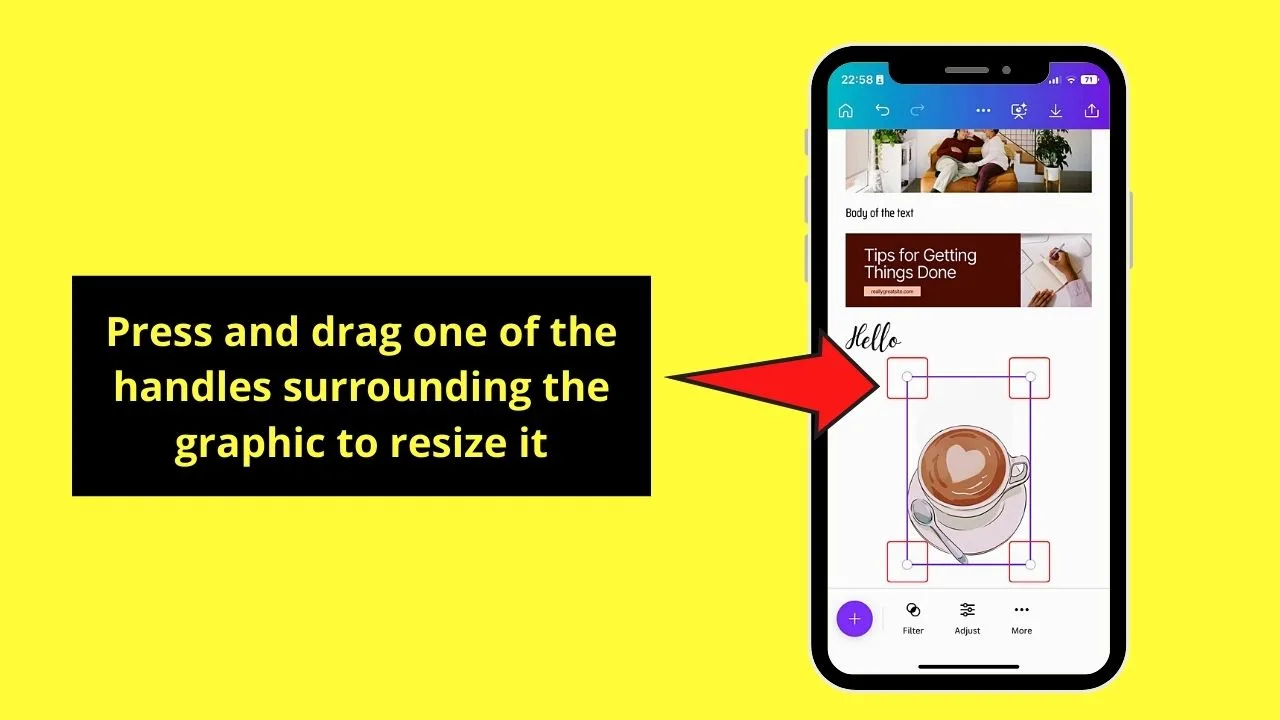
But while you can resize the graphic you added, you can’t move it freely across the document. Even if you try dragging it up, down, or to the side, it won’t budge.
What you can do is insert the graphic as a design instead.
Step 5: Tap the “Magic Commands” button and press the “Design” option.
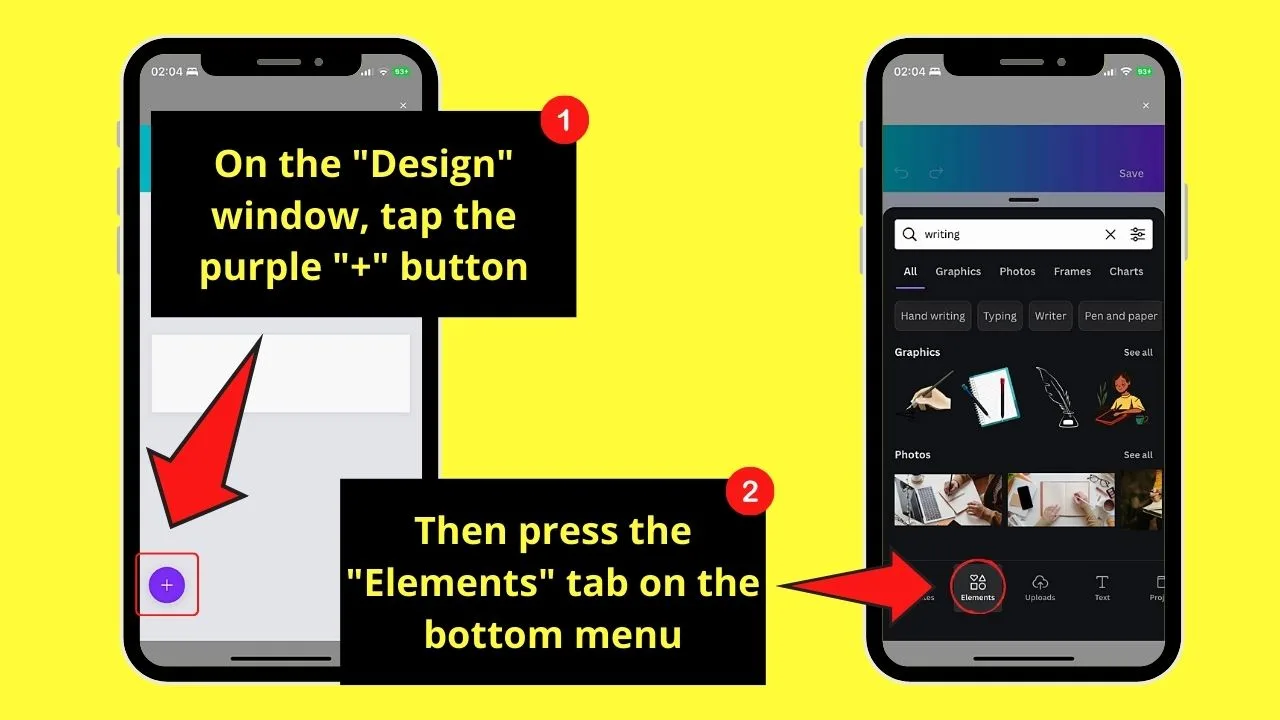
Step 6: Press the purple “+” button and tap “Elements” on the bottom menu
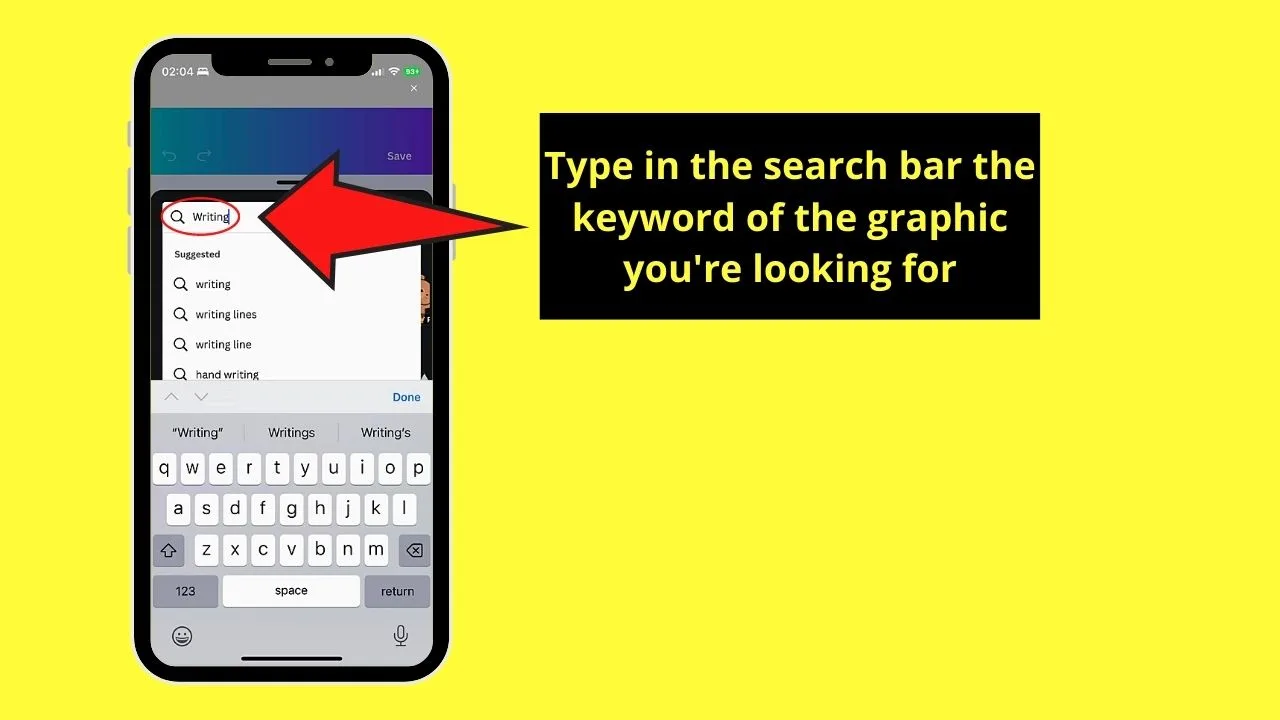
Step 7: Type in the “Elements” gallery search bar the keyword of the graphic you’re looking for.
A list of videos, photos, and graphics related to that keyword then appears.
Step 8: Go to the “Graphics” section and tap the “See all” button.
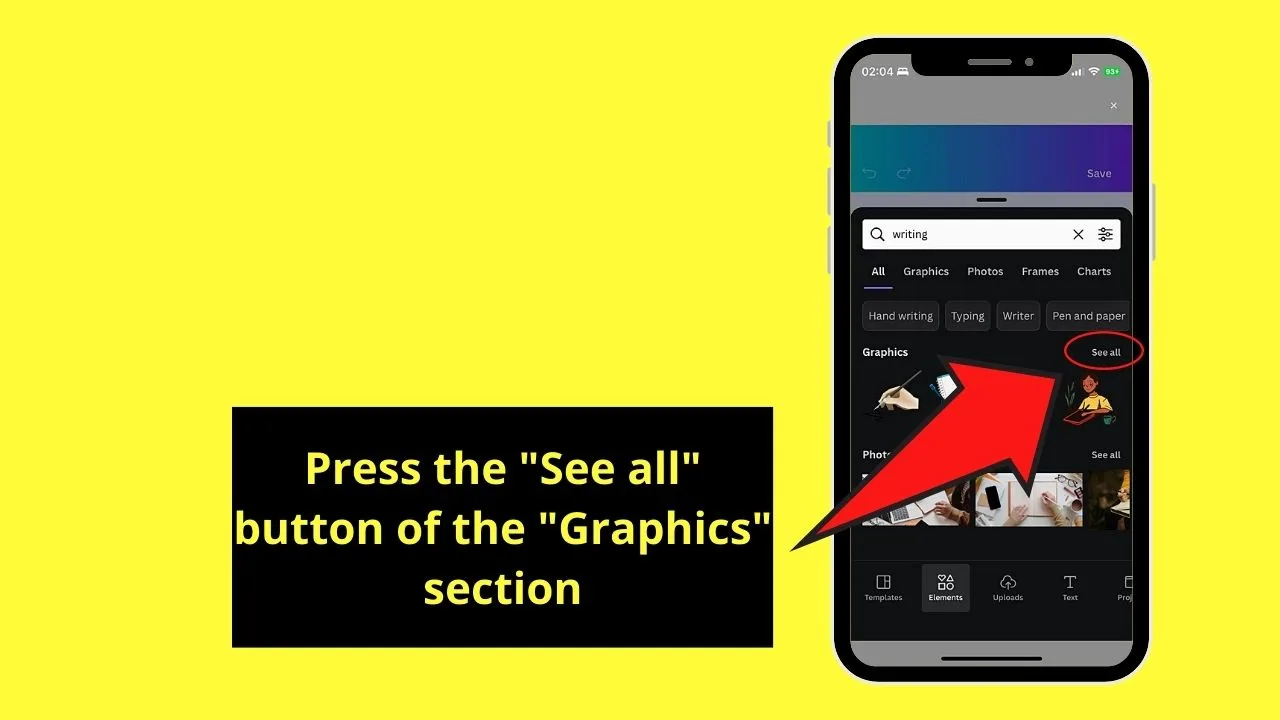
Step 9: Press once on the graphic you selected to make it appear on the “Design” canvas.
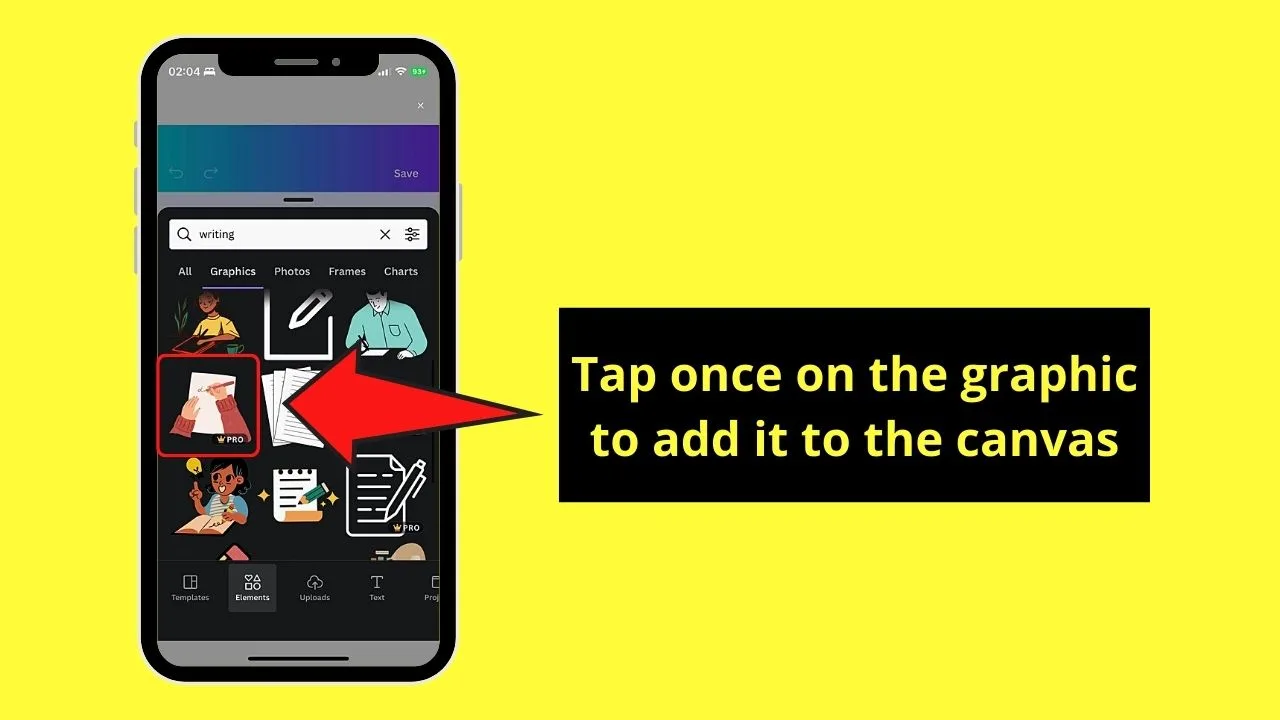
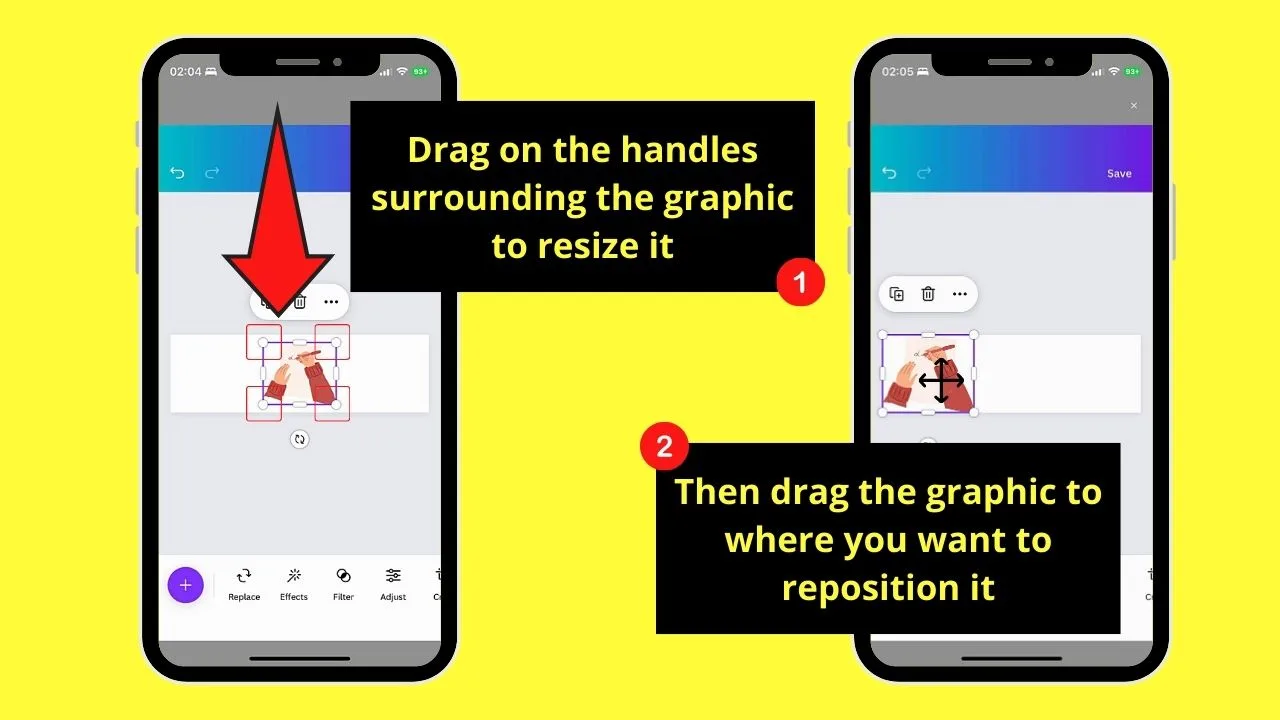
Then, drag the graphic’s handles to resize it. You can also reposition it within the “Design” window by dragging the said graphic to where you want it to be.
Step 10: Save the graphic by tapping the “Save” button.
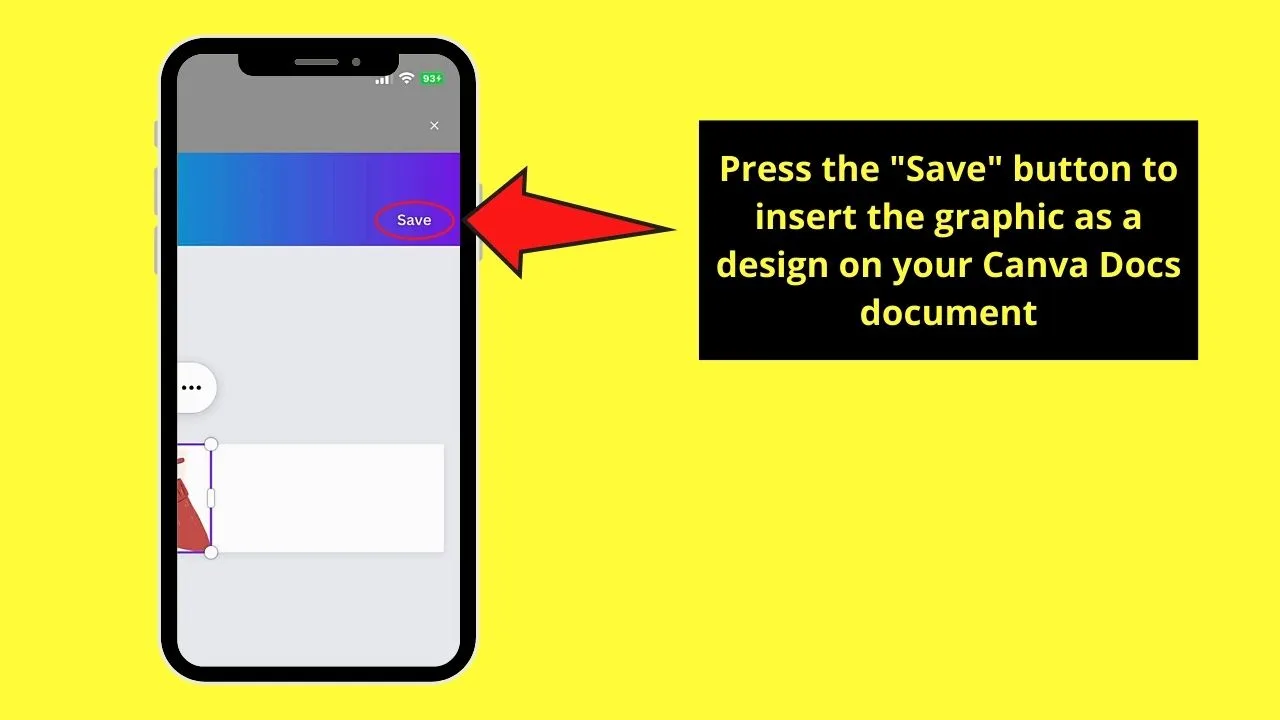
This will then insert the graphic you selected as a design on Canva Docs mobile.
Using Magic Write on Canva Docs Mobile
Magic write, simply put, is Canva’s AI-based co-author that allows users to generate content with a mere typing of a few keywords.
If you want to try this nifty feature when you’re having a bad case of writer’s block, here’s what you should do:
Step 1: Press “Magic Write” on the “Magic Commands” menu.
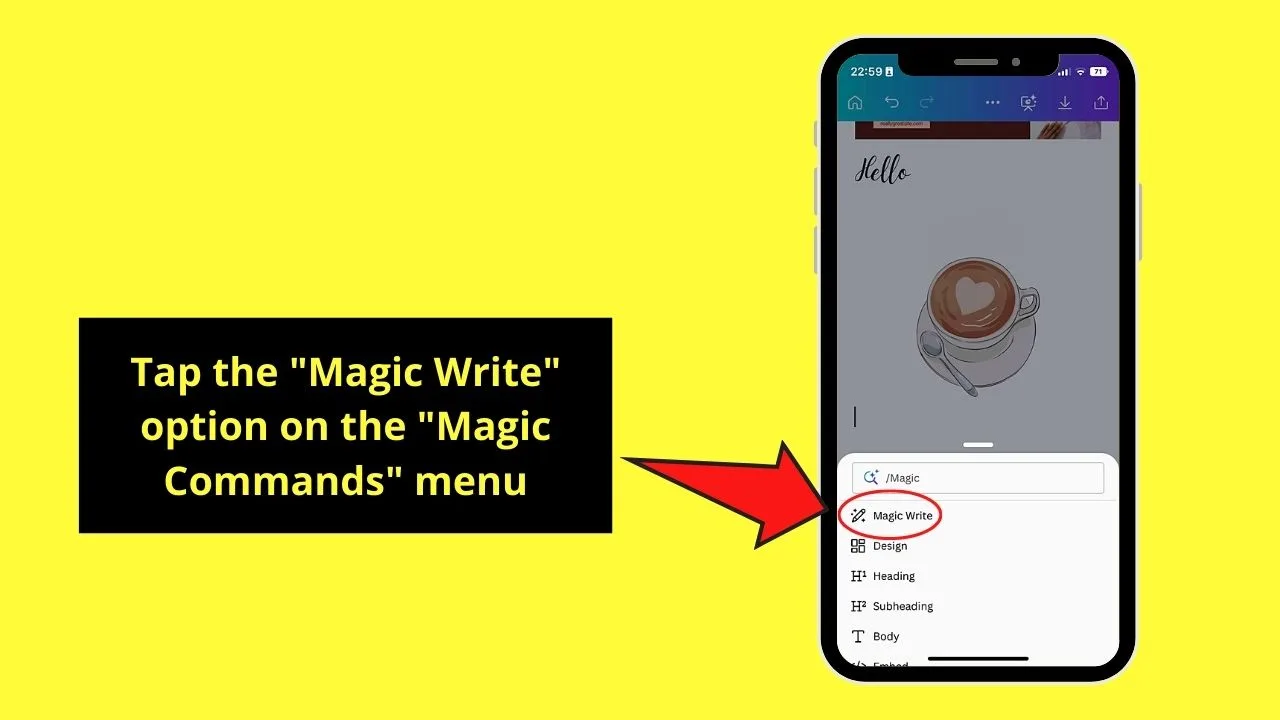
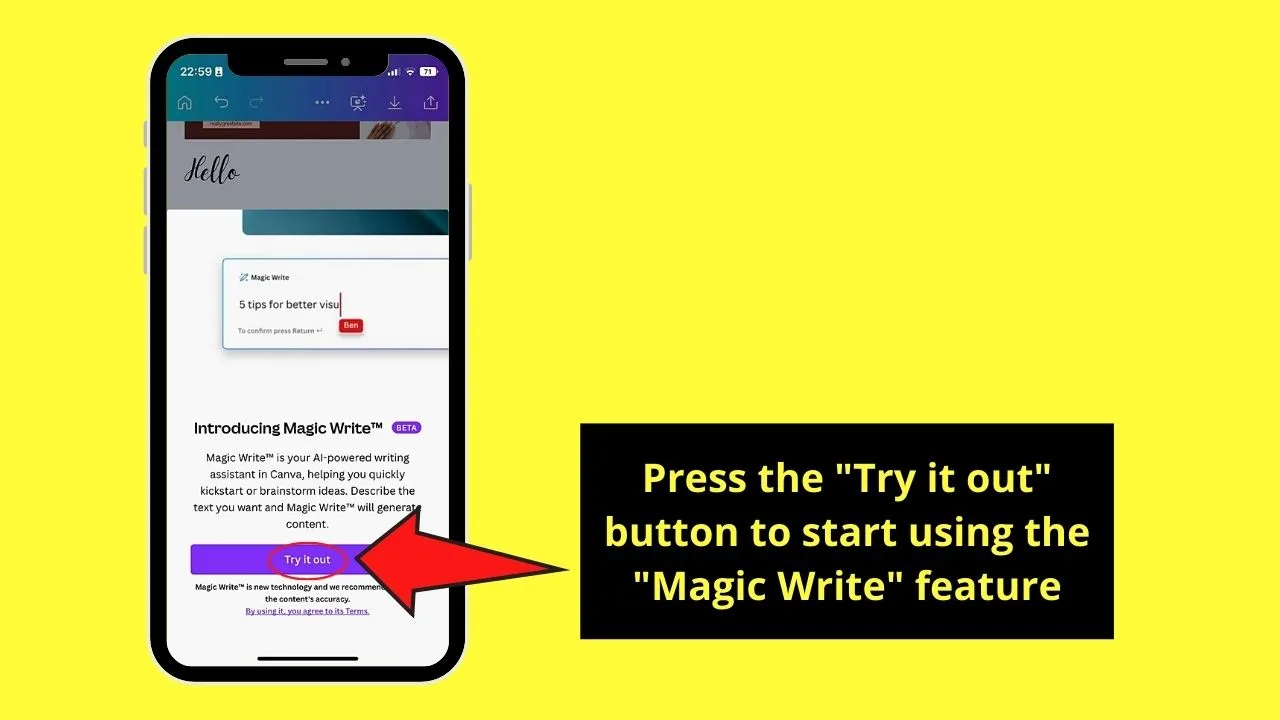
If you’re new to using this feature, a menu will appear from below the screen, introducing you to it.
Since you want to try it, tap the “Try it out” button.
Step 2: Type in the “Magic Write” window the keywords to the content you want Canva Docs to generate.
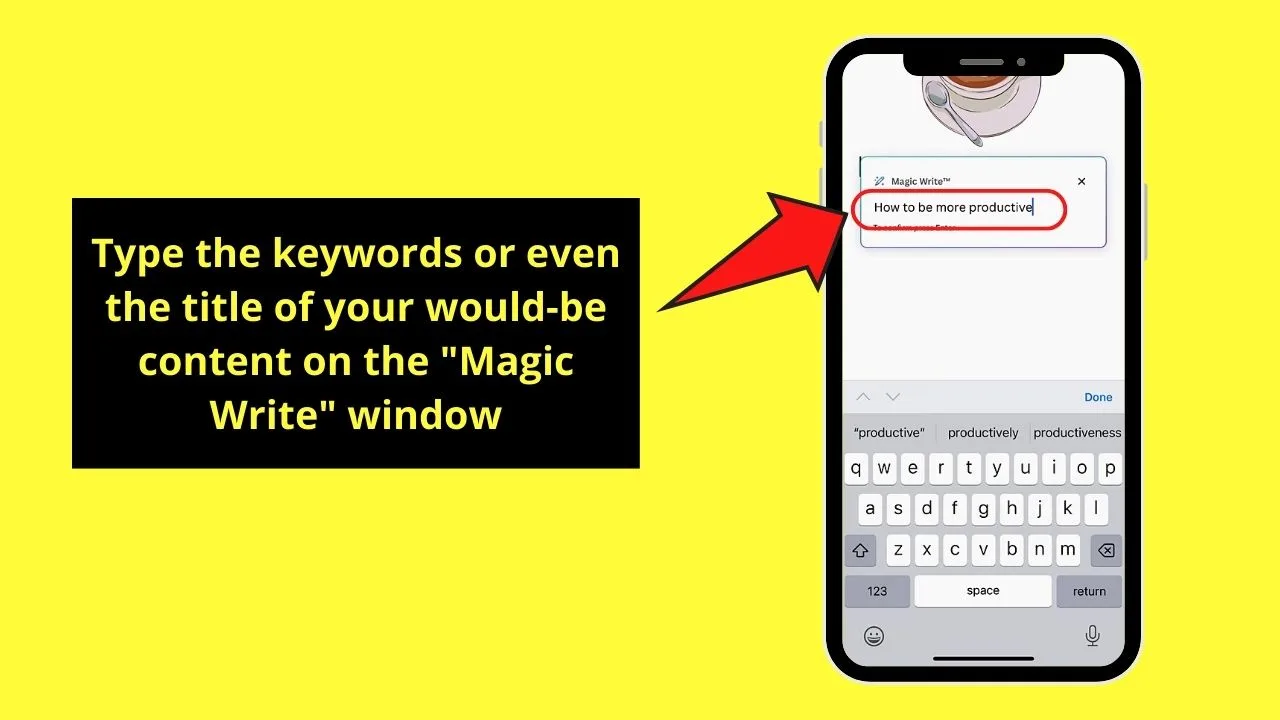
These keywords can be a title if you want “Magic Write” to curate content accurately.
Step 3: Press “Enter” or “Return” to confirm the keywords added.
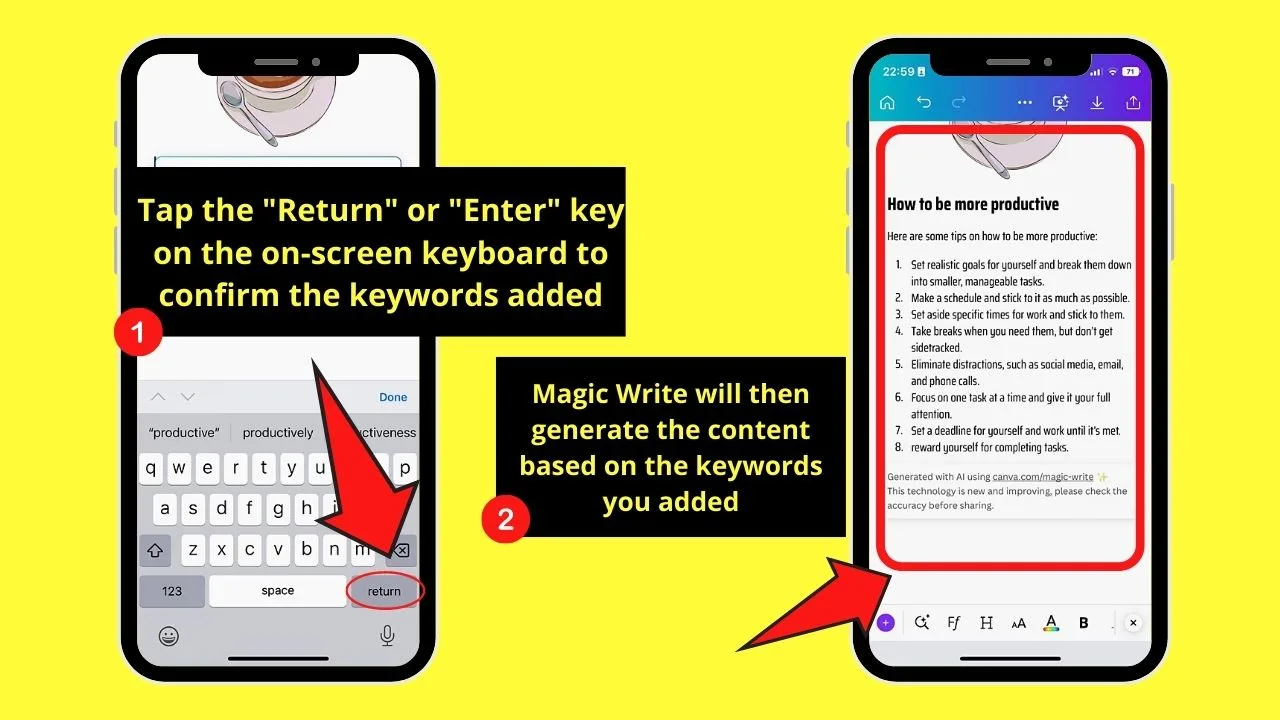
Then, just wait for Canva Docs’ “Magic Write” to generate the content for those keywords.
Then, you can begin expounding on the content generated by this AI-based feature.
Downloading on Canva Docs Mobile
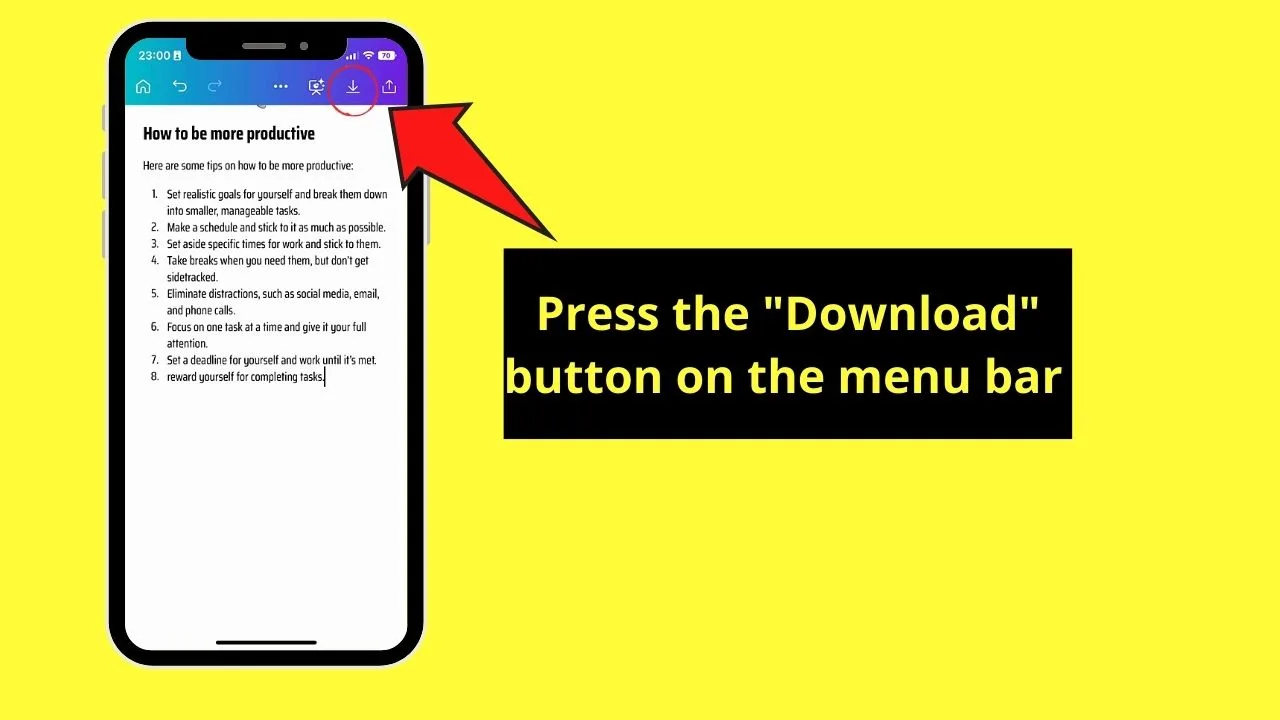
Step 1: Tap the “Download” icon on the menu bar.
Step 2: On the “Save as…” page, go to the “Size” section and tap the “v” button.
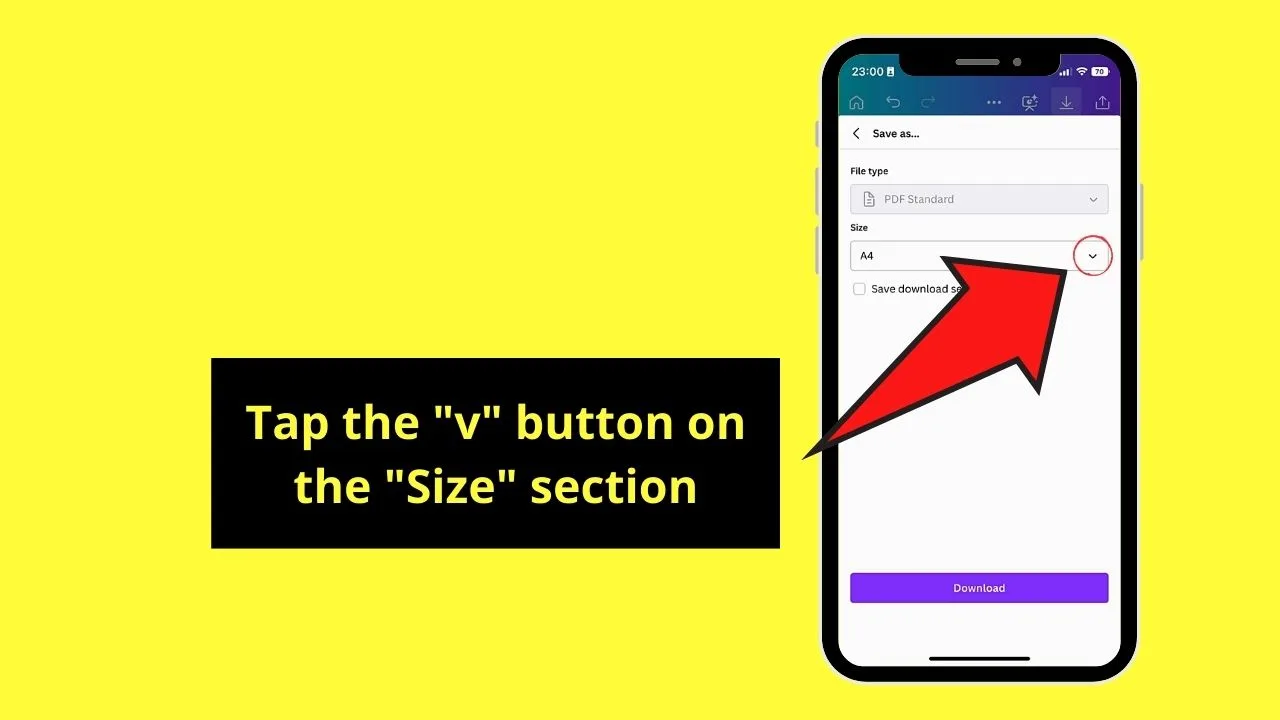
This will then open a menu that shows all the document types you can download for your Canva Docs project as.
But, while you can change the size of the Canva Docs document, you can’t switch the file type.
It’s because Canva Docs mobile currently has the “PDF Standard” file type as its only format option for the document.
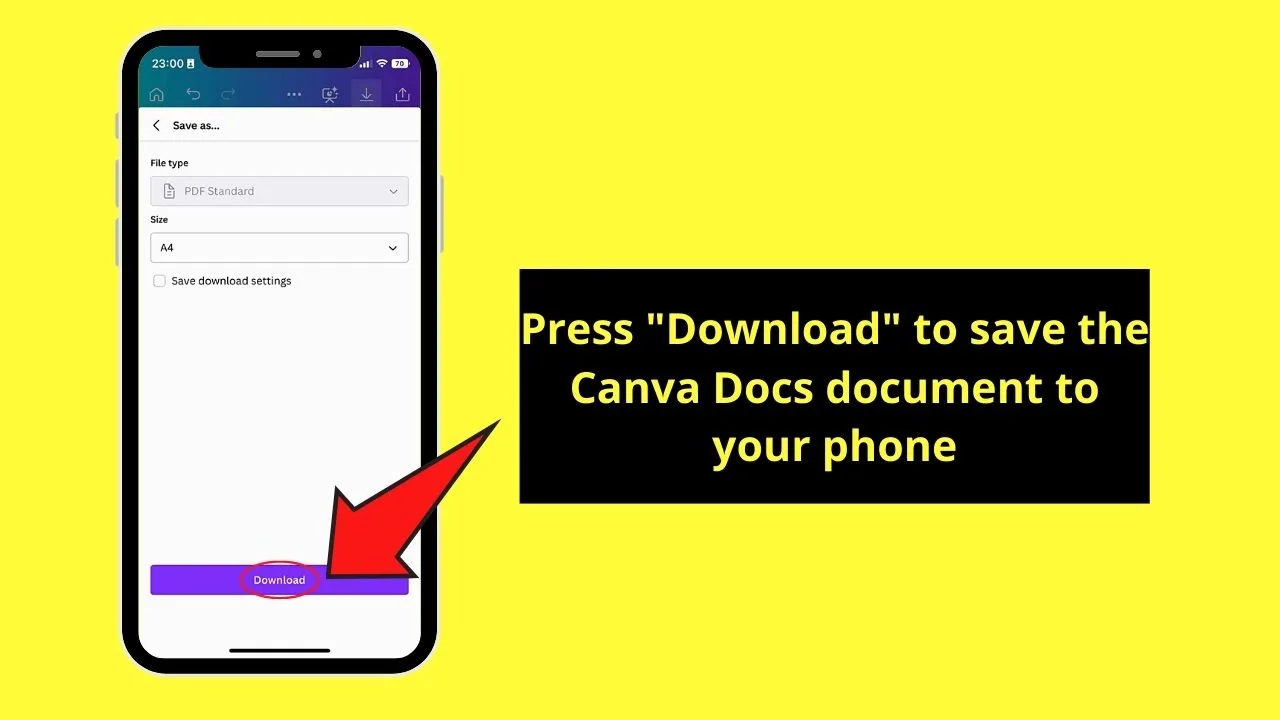
Step 3: Tap “Download” to proceed with saving the document to your mobile phone.
Sharing on Canva Docs Mobile
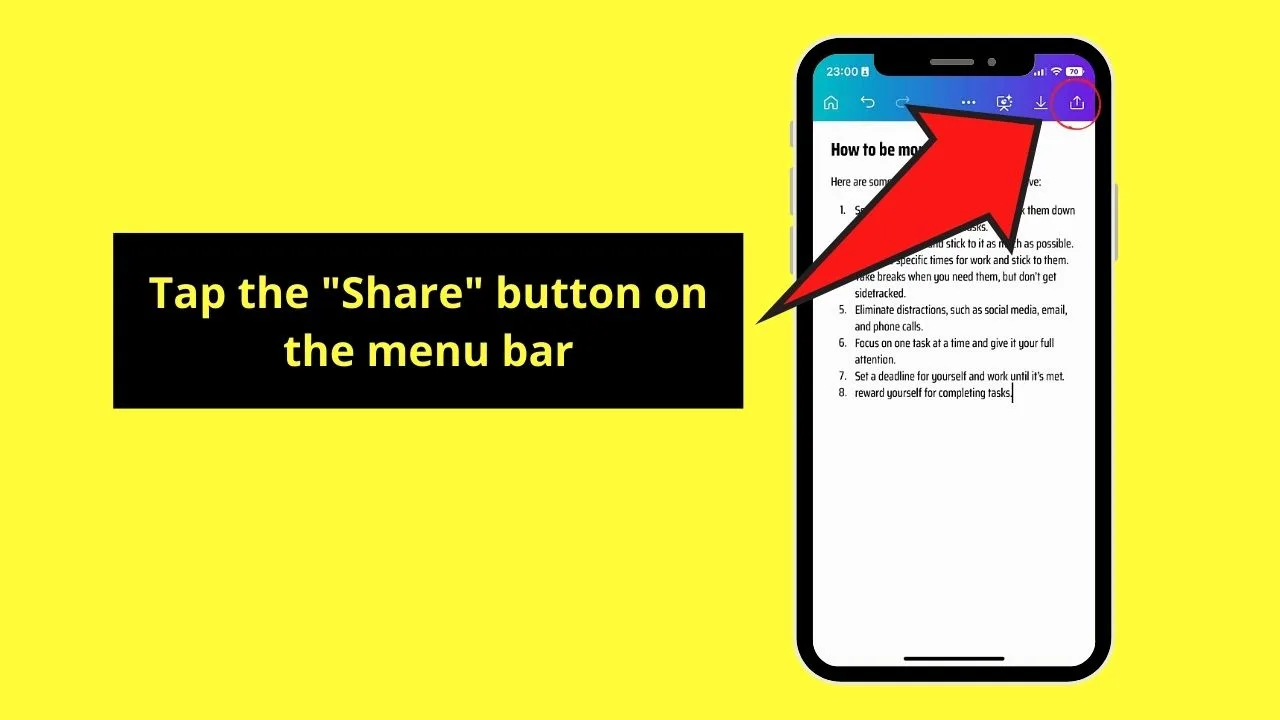
Step 1: To share the Canva Docs project with your teammates, tap the “Share” button on the menu bar.
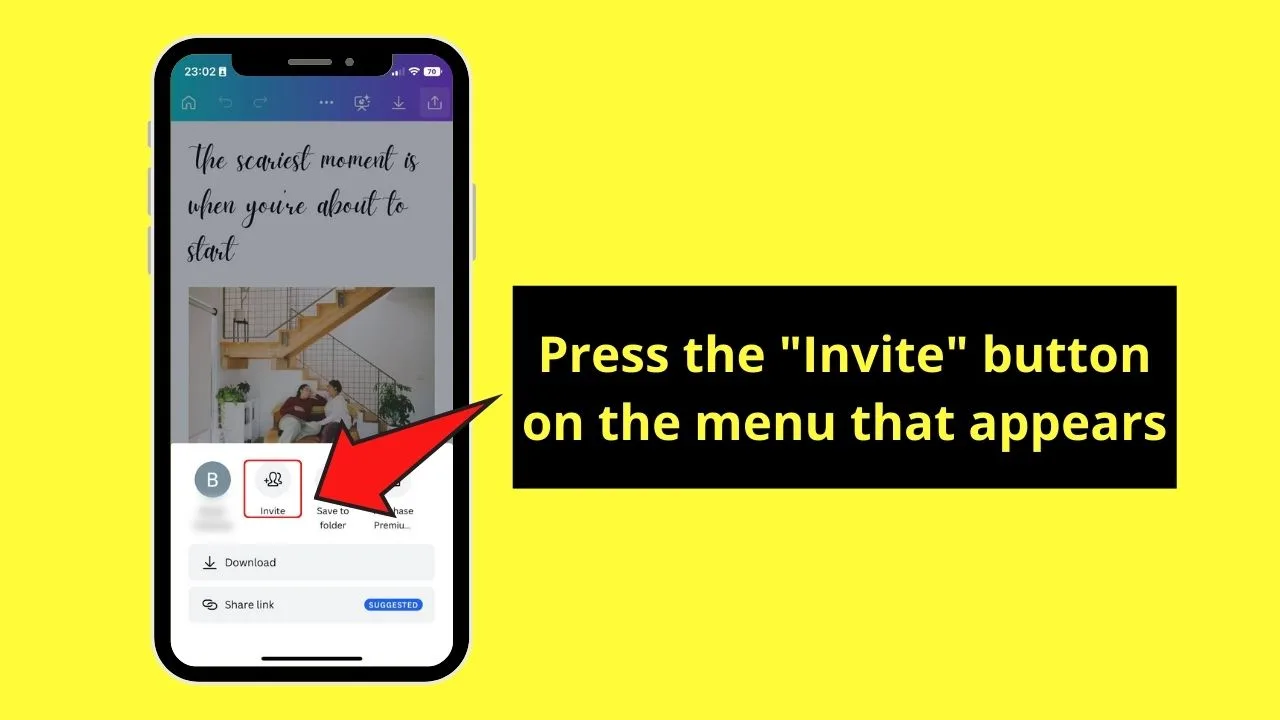
Step 2: Press the “Invite” button on the menu that appears.
Step 3: Type the emails of the recipients in the rectangle under the “Share this design” menu.
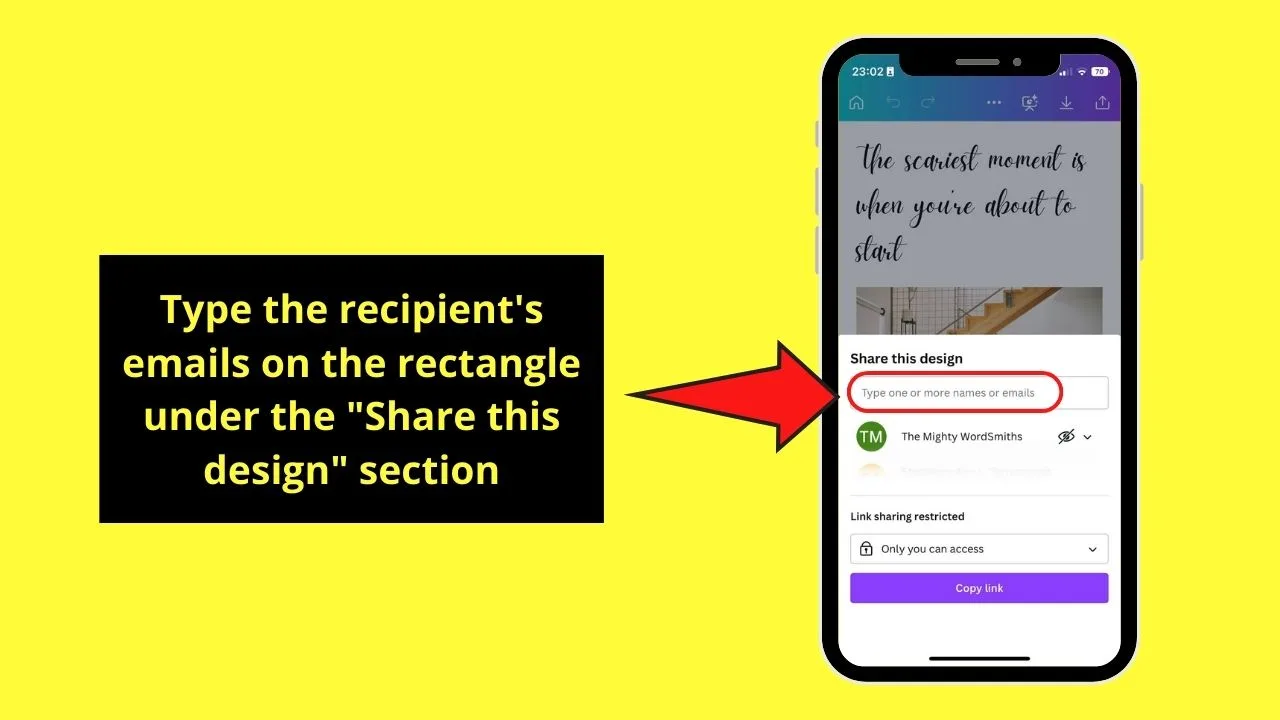
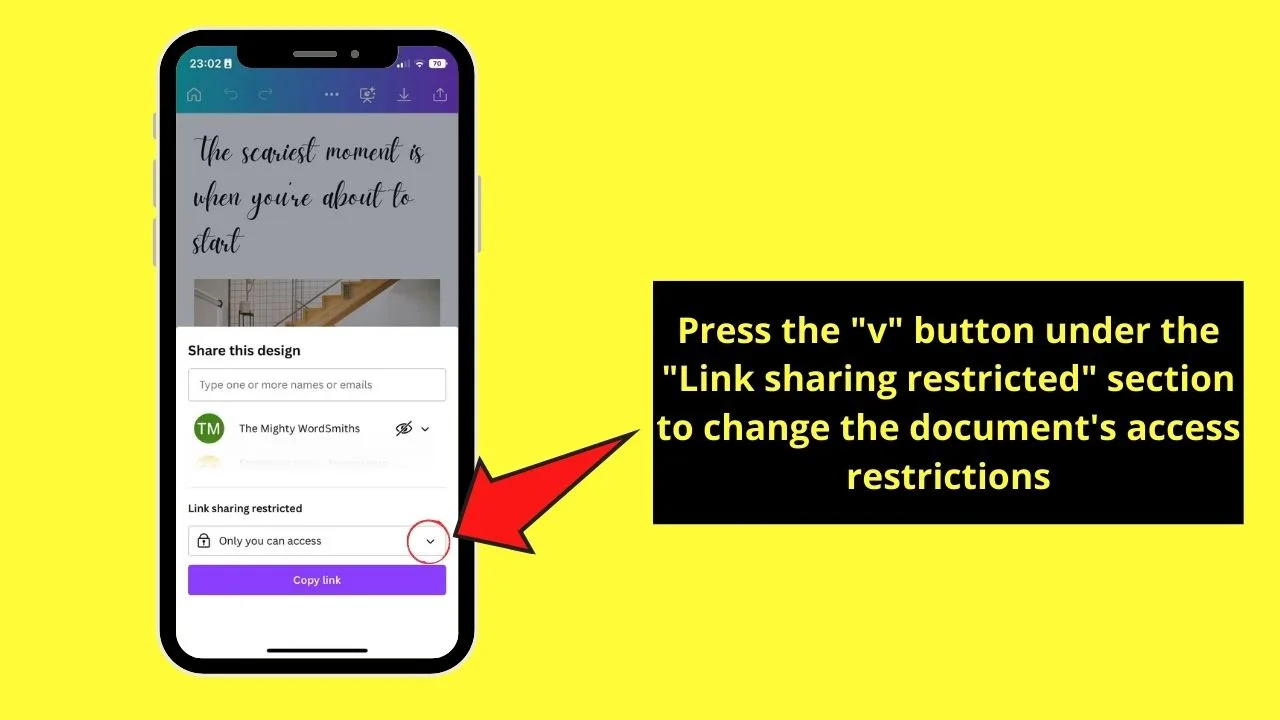
Step 4: Change the access restrictions by tapping the “v” button under “Link Sharing Restricted.”
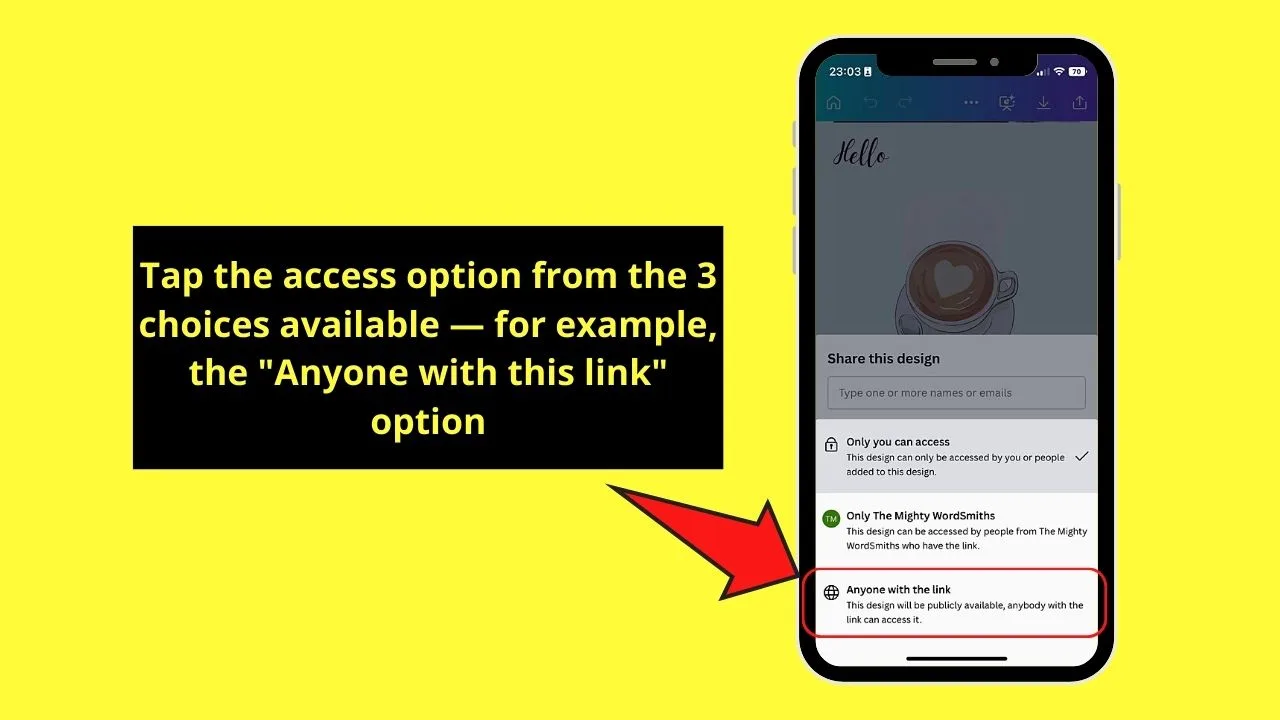
Then, select who can access the document you’re sharing. For sample purposes, I’ll choose the “Anyone with this link” option.
Step 5: Tap the “v” button on the viewing restrictions section and press what your recipients can do with the document.
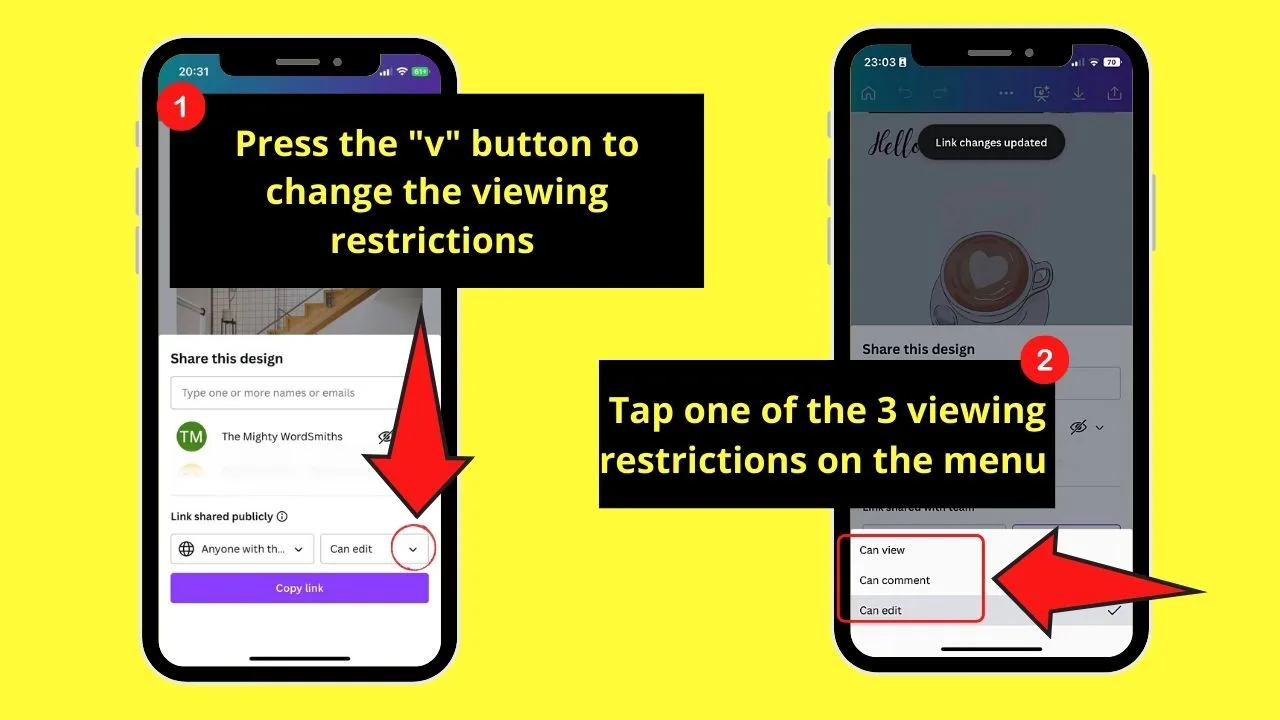
You can choose from “Can view,” “Can comment,” and “Can edit.”
Step 6: Press the “Copy link” button.
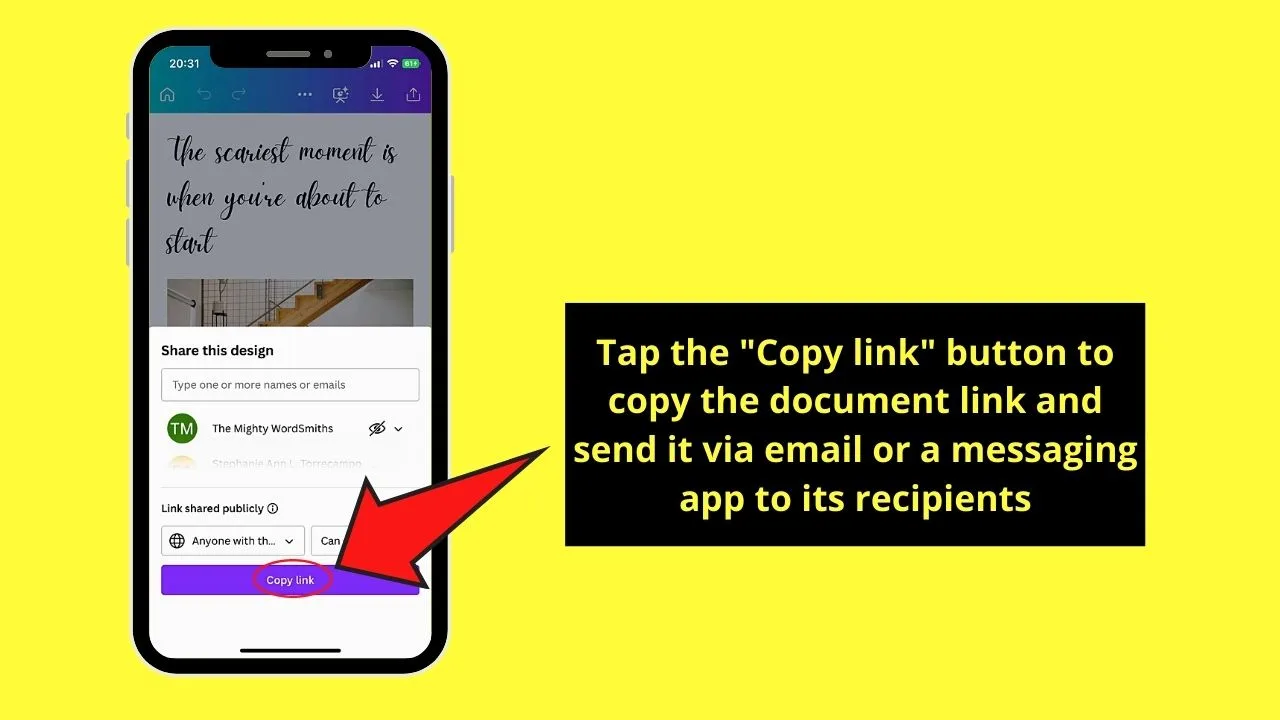
From there, you can paste the Canva Docs link to your teammates so they can work on the design in real time.
How to Convert Canva Docs to a Presentation (Docs to Decks)
Gone are the days when you have to separately create a slide presentation after making a report on a word document.
With Canva Docs, you can easily convert the document into a presentation through the “Docs to Decks” feature. And, the good news is that you can use the same feature even on Canva’s mobile app.
Step 1: Tap the “Convert” button on the menu bar
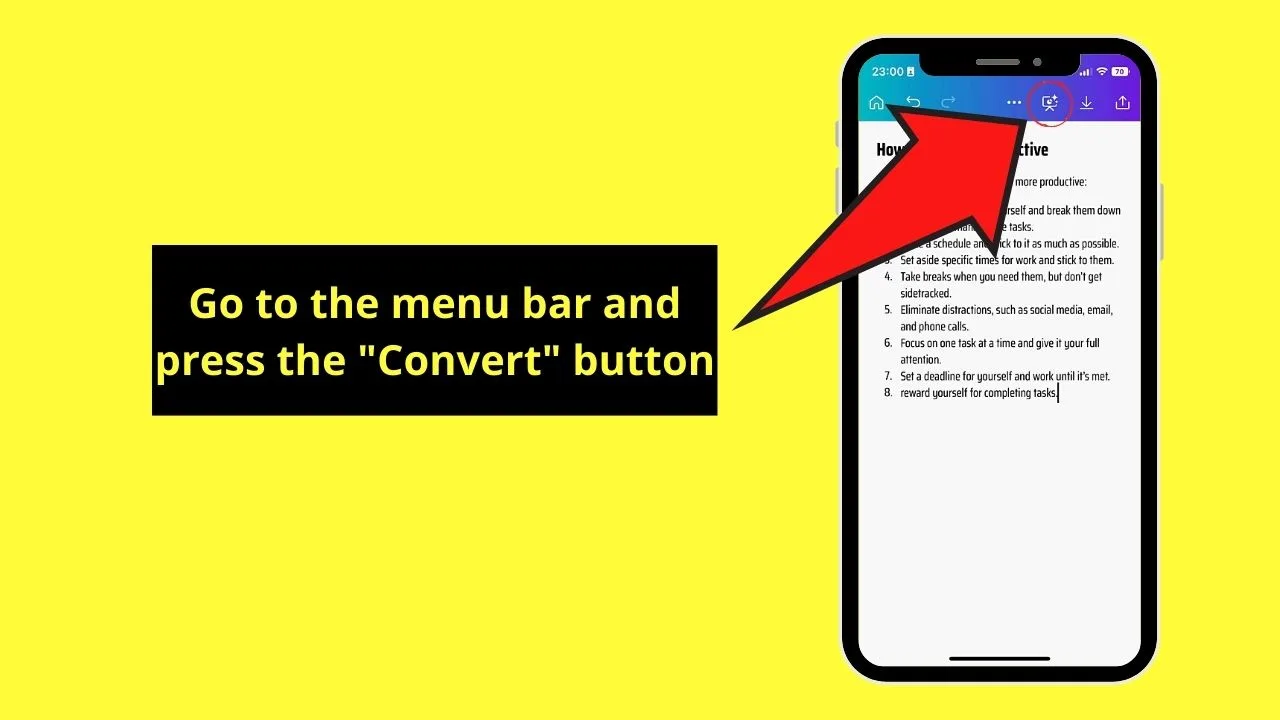
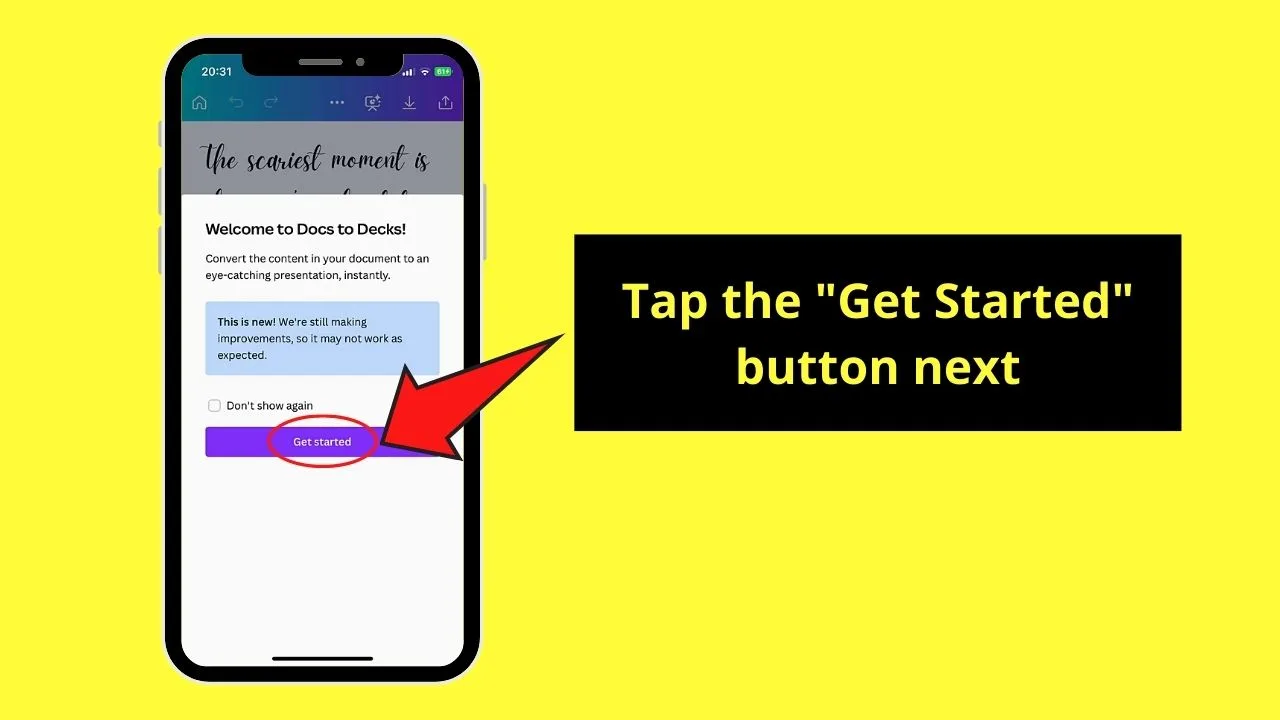
Step 2: Press the “Get Started” button on the “Welcome to Docs to Decks” menu
Step 3: Choose a presentation style from the list of choices available by tapping on a thumbnail
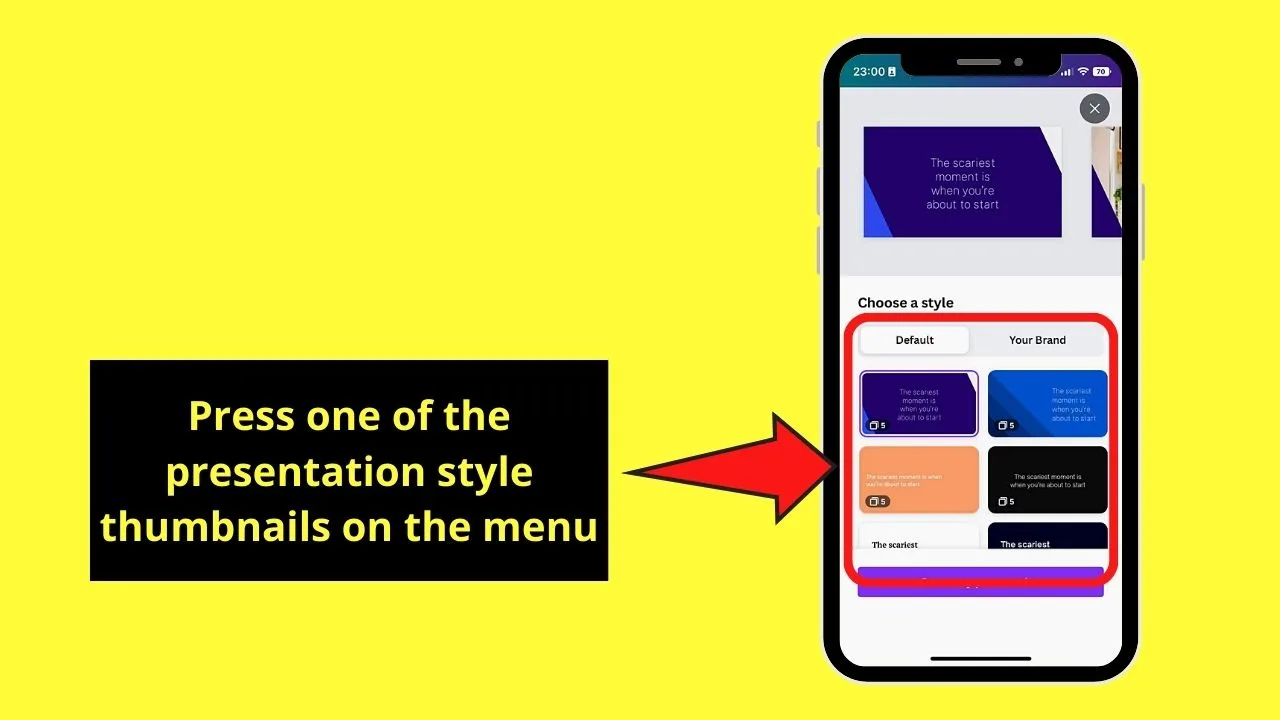
Step 4: Tap “Create my presentation” for Canva Docs
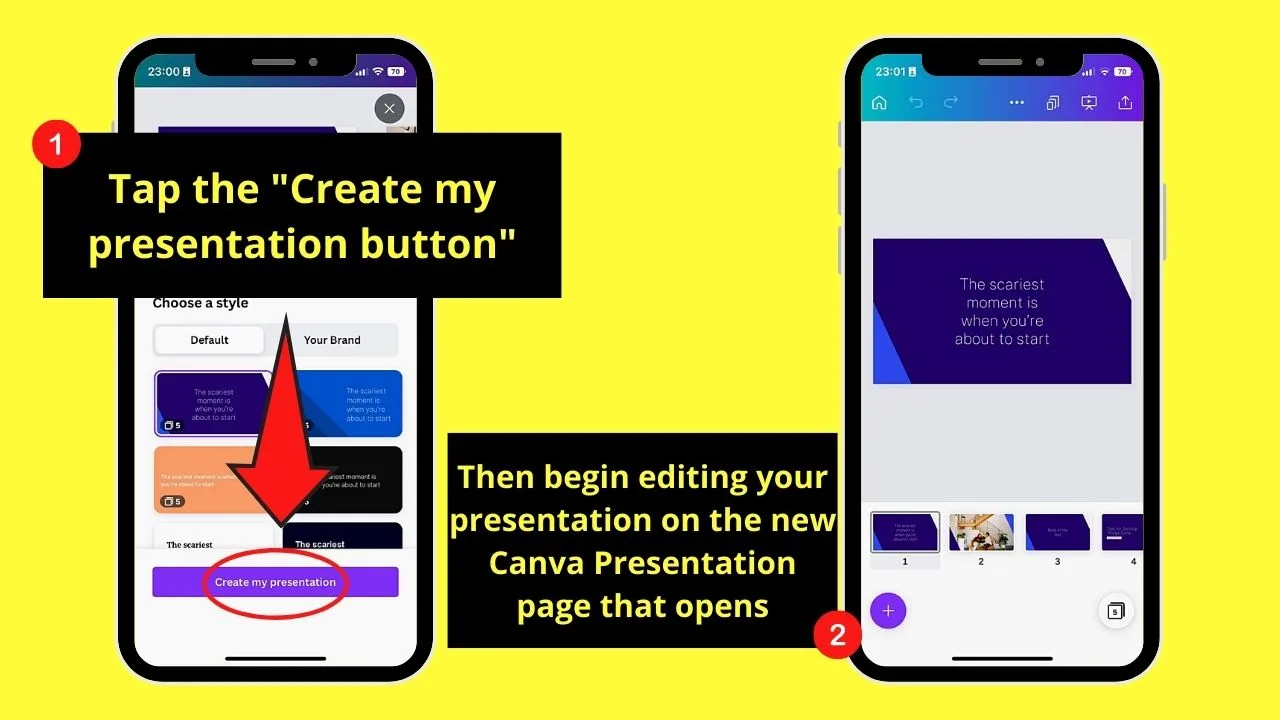
Canva Docs will then open a new editor page, with the document you created converted into a slide presentation.
You can then proceed to edit the slide presentation and even make text appear on click if you want.
Using Templates for Canva Docs on Mobile Phone
In case you’re in the middle of editing your document and you want to switch to a pre-made template instead, here are the steps you should follow:
Step 1: Press the purple “+” button on the bottom menu
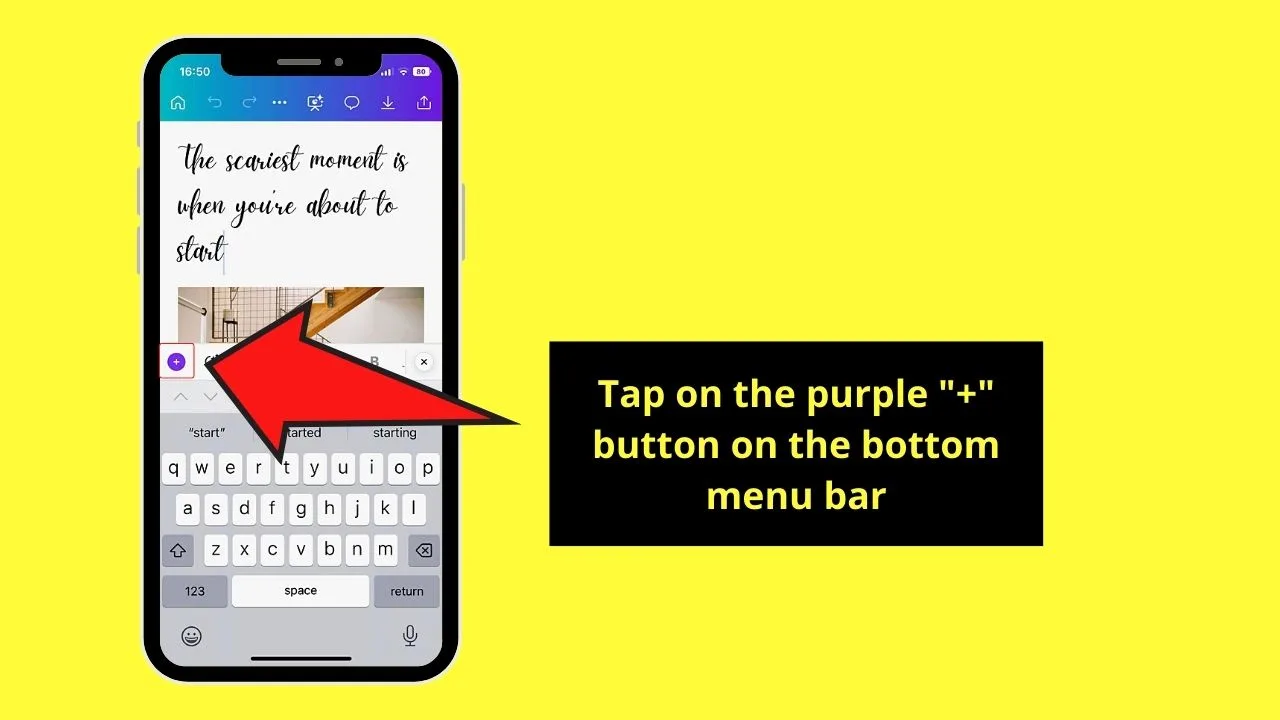
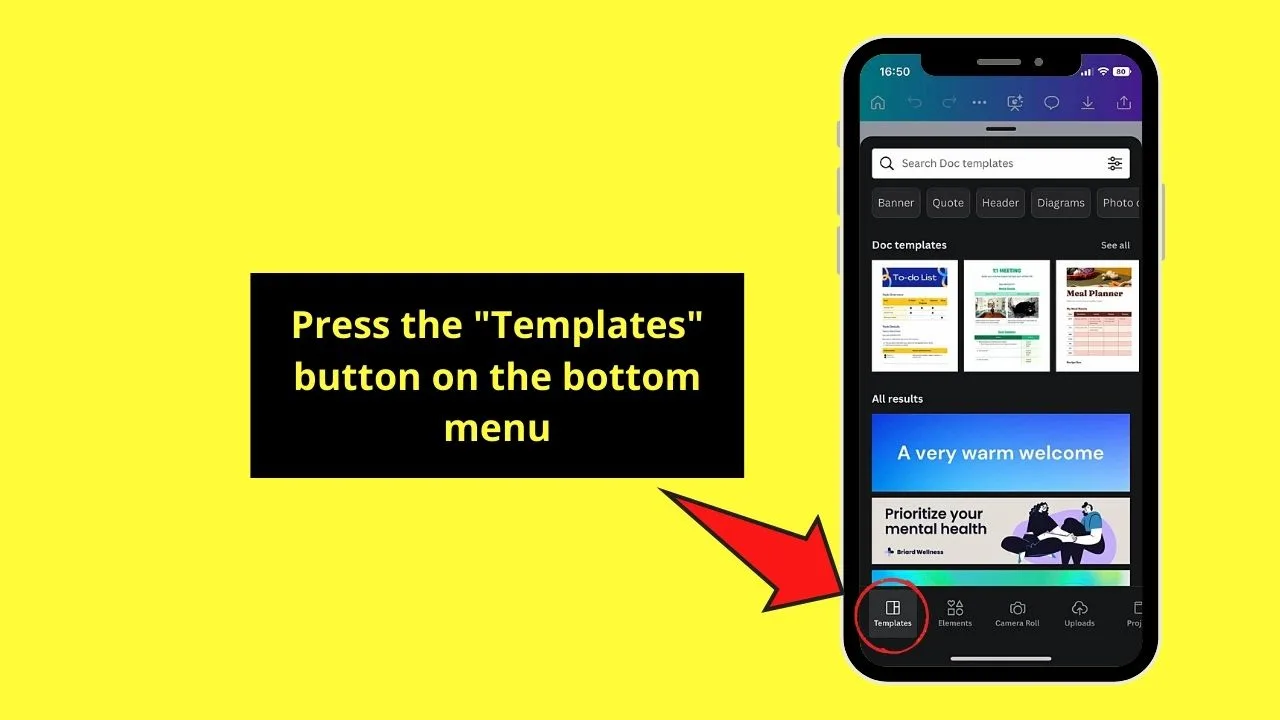
Step 2: Tap the “Templates” tab. A gallery of templates will then appear
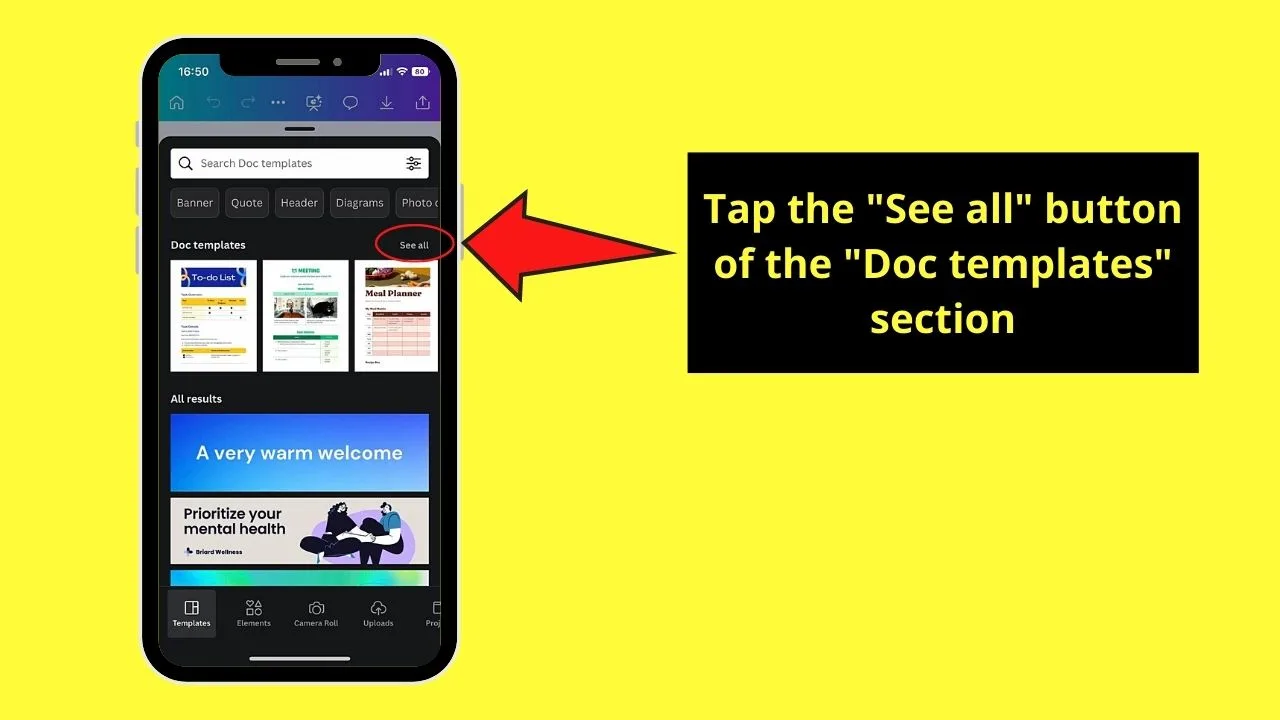
Step 3: Press the “See all” button beside the “Doc templates” section
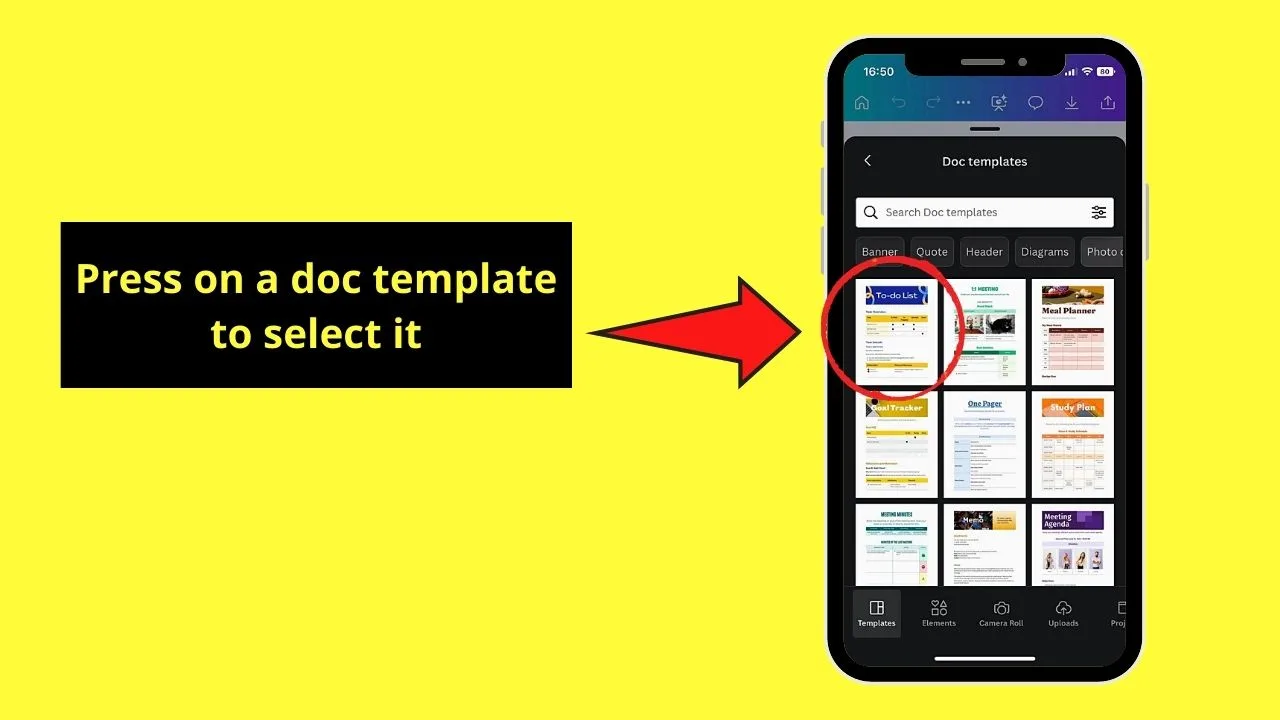
Step 4: Tap on a Doc template thumbnail to select it
Step 5: Choose the “Replace” button when asked if you’re sure about replacing the design with a new template
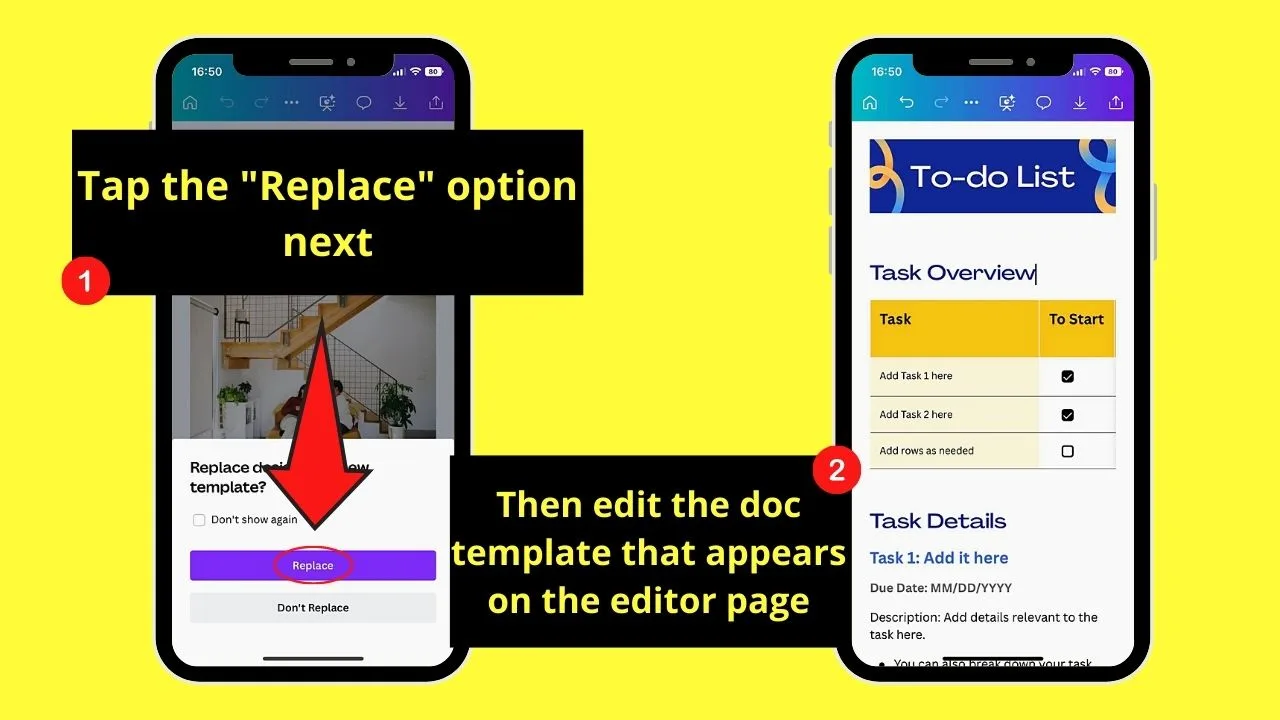
Automatically, the Doc template design you selected will appear on the document you’re working on.
Frequently Asked Questions about How to Use Canva Docs on Mobile Phone
Do I need to be on Canva Pro to use the Canva Docs feature on a mobile phone?
Just like in Canva Docs’ web version, you don’t need to be a Canva Pro user to use it only our mobile phone. You only have to sign up for the waitlist and wait for the team’s notification that can already use the said feature.
What file type can I save my Canva Docs to when I want to download it?
Currently, there’s only one file type available when you want to save your Canva Docs document — PDF Print Standard. We can only wait for the Canva team to add other file-type options in the meantime.
How can I access the “Magic Commands” menu on Canva Docs mobile?
You can access the “Magic Commands” menu on Canva Docs’ mobile version by tapping the magnifying icon beside the “+” button on the editor page. This is currently the only method of opening the said menu on Canva mobile.

Hey guys! It’s me, Marcel, aka Maschi. On MaschiTuts, it’s all about tutorials! No matter the topic of the article, the goal always remains the same: Providing you guys with the most in-depth and helpful tutorials!


