

Wow! I so love this image! I’m planning to use it as the background of the poem I created a while back.
But, how do I insert that image when I’m using Google Docs? Does it entail the same steps when I’m using Microsoft Word?
We’ll know in a bit how to do such a feat if you continue to read below.
How to Put an Image Behind Text in Google Docs
The easiest way to put an image behind text in Google Docs is to use the “Behind Text” text wrap option. But, you can also use Google Docs’ Drawings feature, use Microsoft Word for the text wrapping and upload it back to Google Docs, or use Google Slides to add the background.
Putting Images Behind Text in Google Docs: How to Do It
Inserting images behind text in Google Docs is not as complicated as it looks.
Technically, you only need to activate the text wrapping feature, which we’ll discuss a bit below.
But, there are a couple of workaround methods as well, which I’ll show you later in this text.
Basic Method: Use of the “Behind Text” Text Wrapping
Granting that you’ve already opened a blank file or an existing file, here’s what you’re supposed to do next:
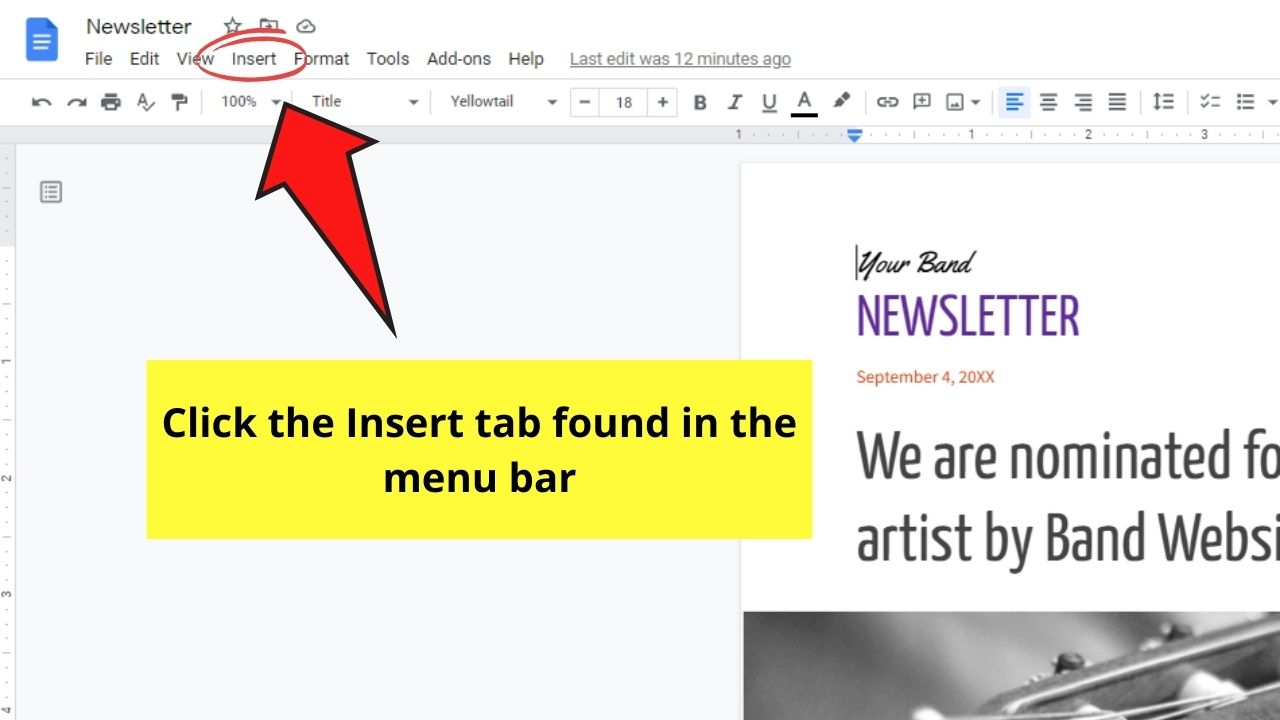
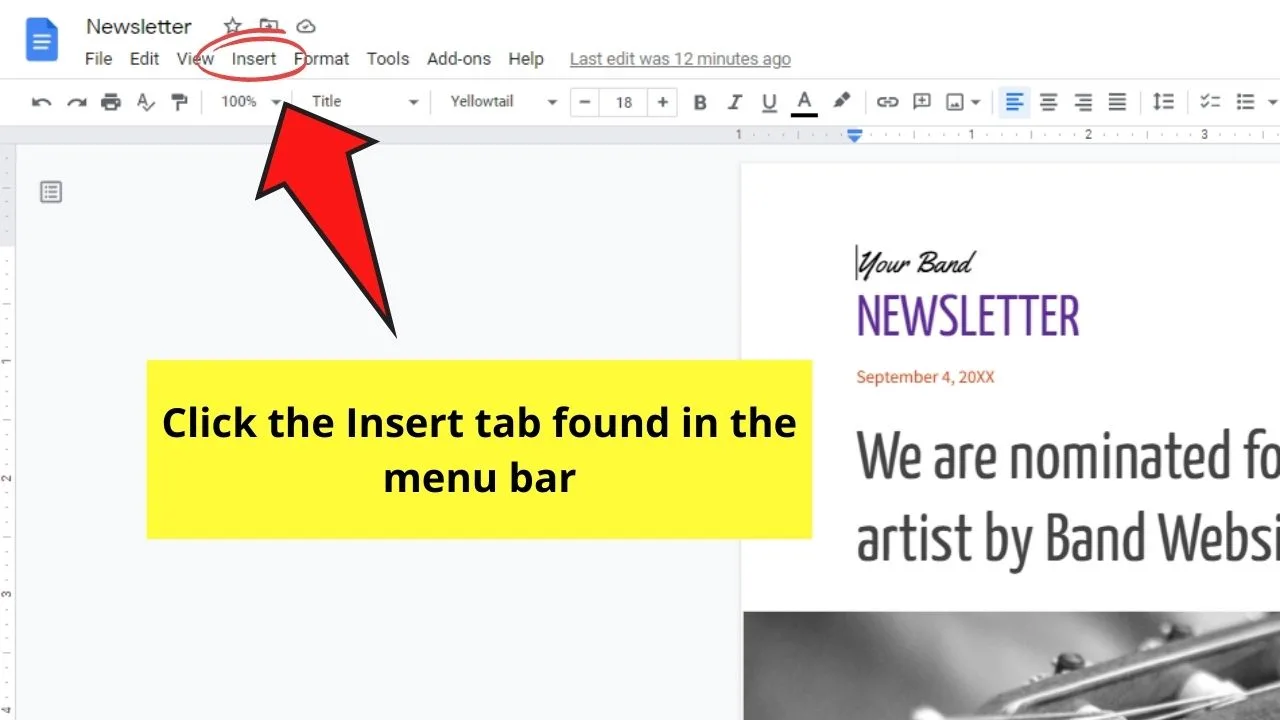
Step 1: On the menu bar, click the Insert button. A dropdown menu will then appear listing all the items that you can insert in Google Docs.
Step 2: In the Insert dropdown menu, select the Image option. This will then give you choices where you can source the photo.
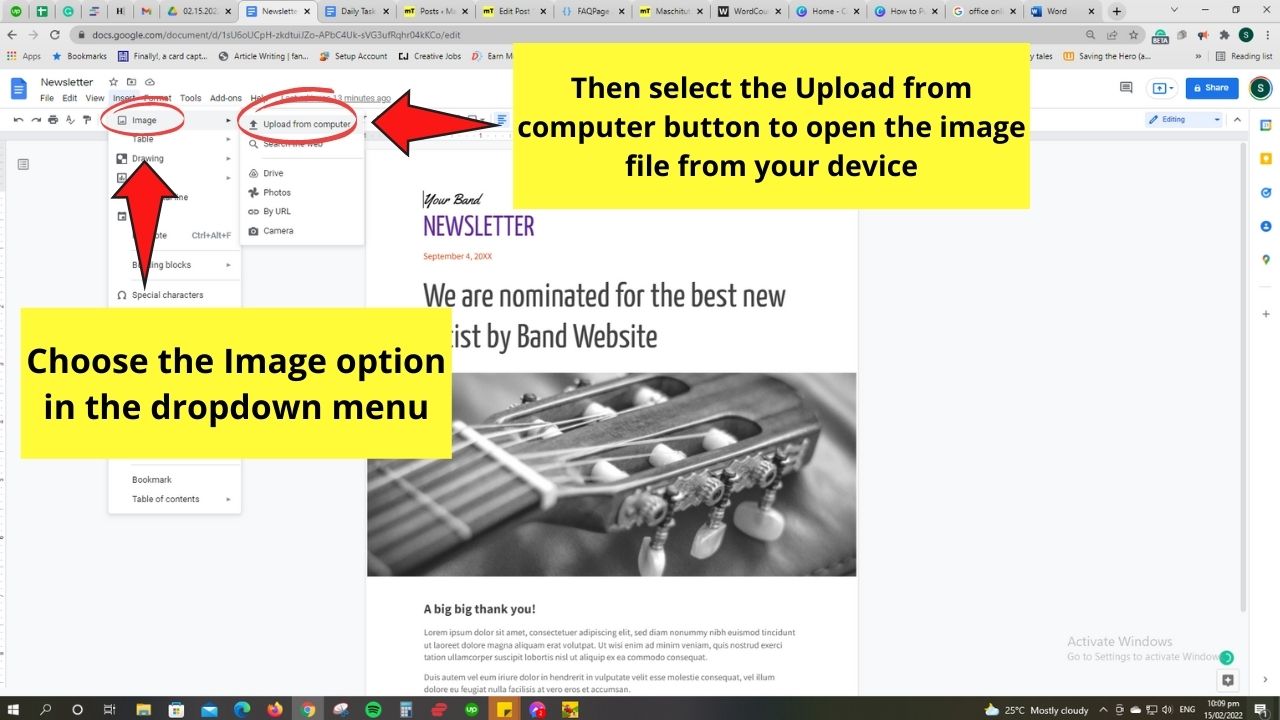
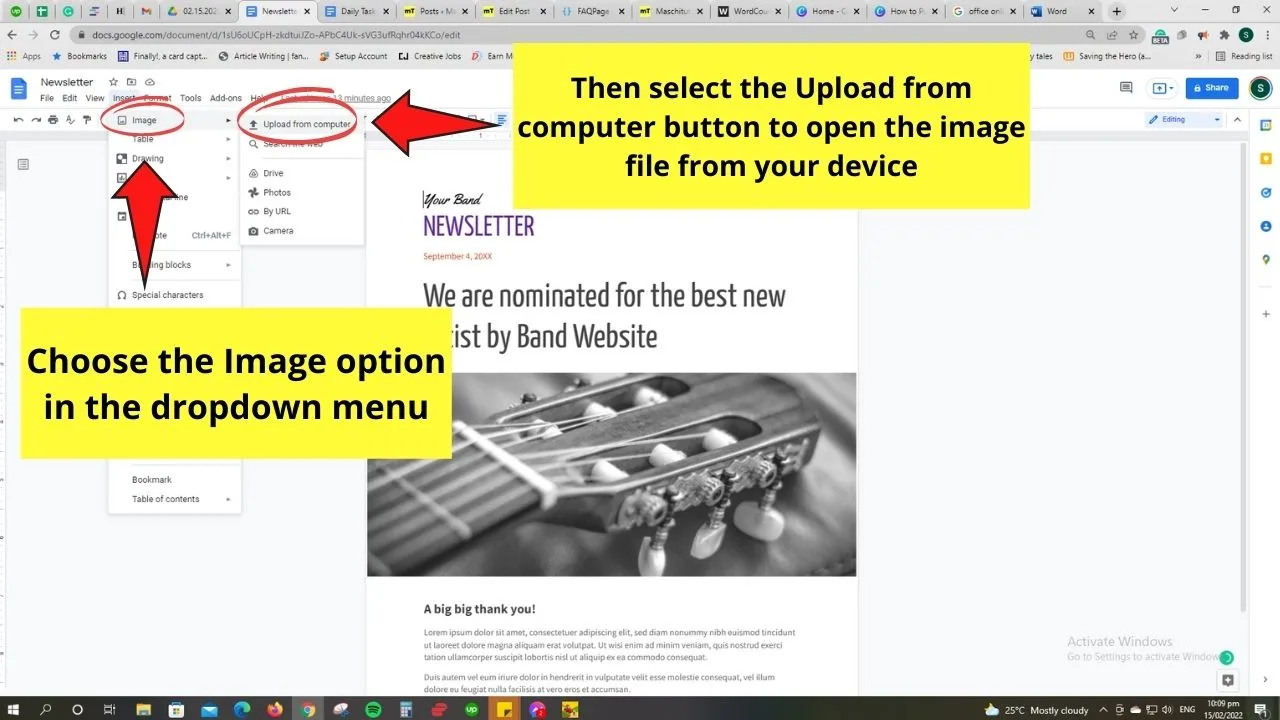
But, for sample purposes, we’ll go with the Upload from computer option. Locate the photo file on your device before you select the Open button.
Step 3: Once the photo’s uploaded, you’ll notice that it’s surrounded by a blue outline with squares at the corners.
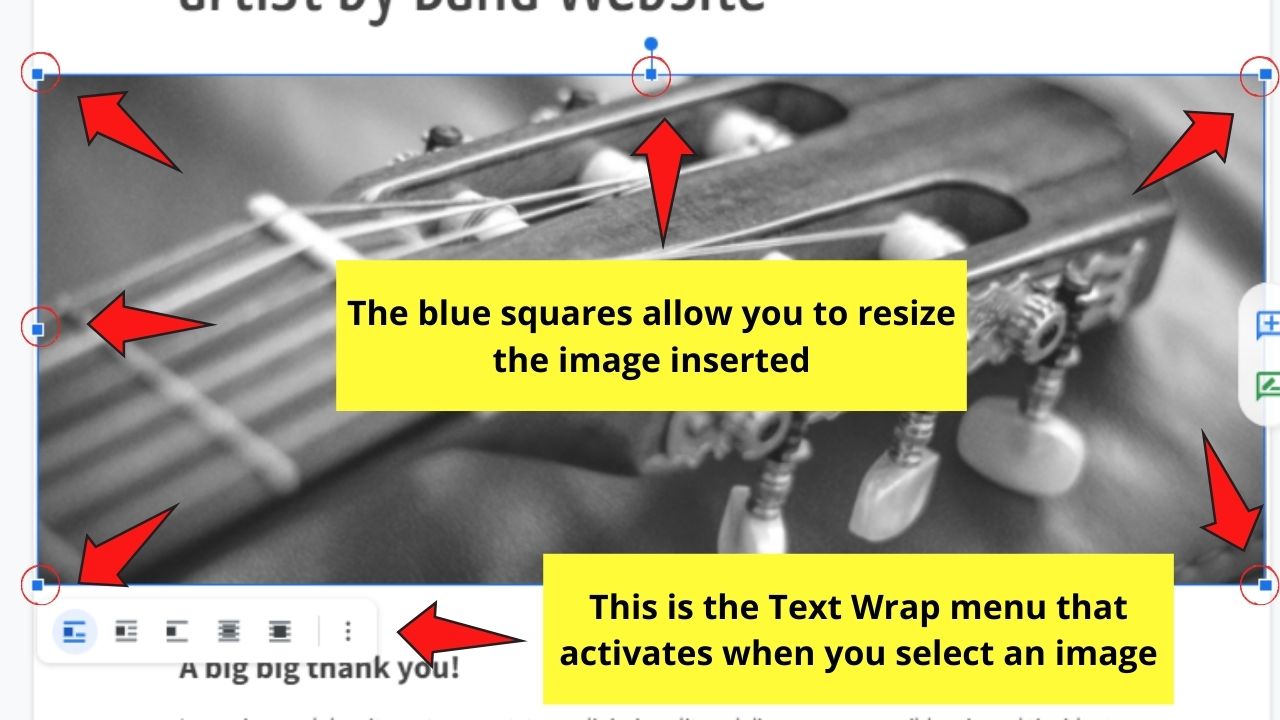

The blue squares allow you to resize the image you inserted by clicking and dragging them.
Also, if you look below the blue outline, you’ll see the Text Wrap menu. This allows us to tweak how the photo is laid out on the document with the text components.


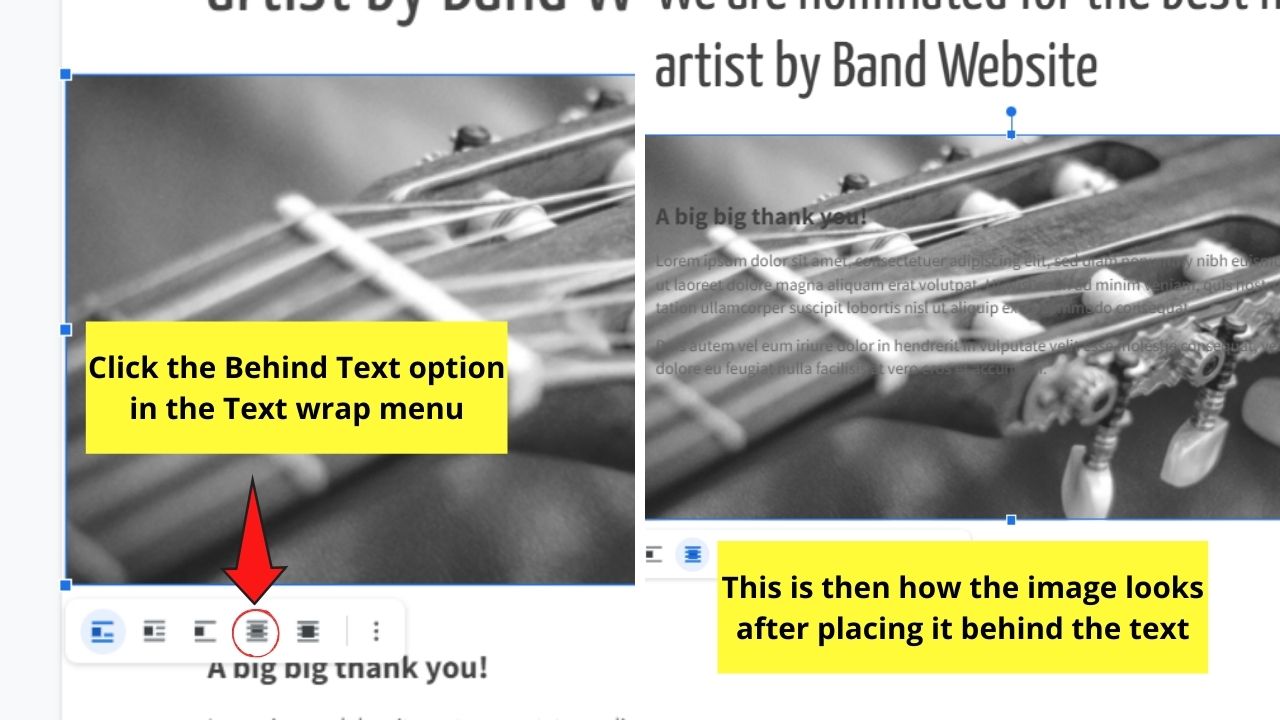

Select the Behind Text option. You’ll then see the photo behind the text.
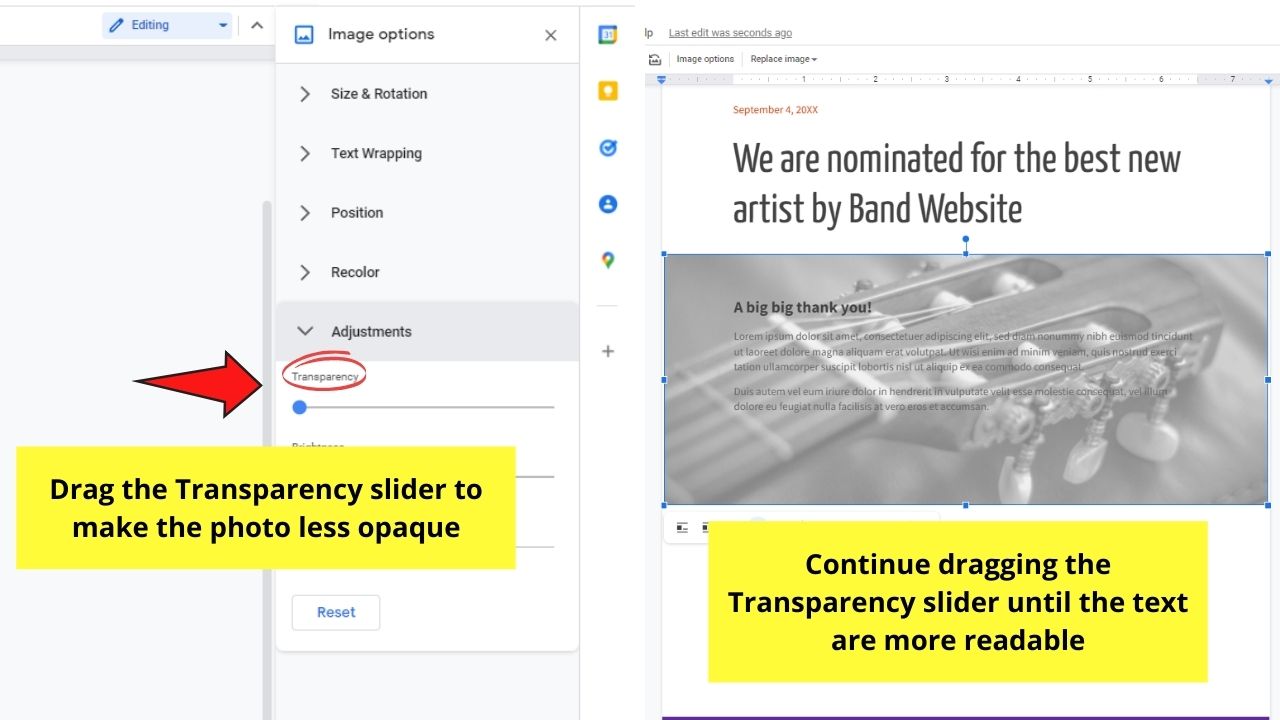
Step 4: If you notice that you can’t read the text properly because the image’s too dark, you can adjust its transparency.
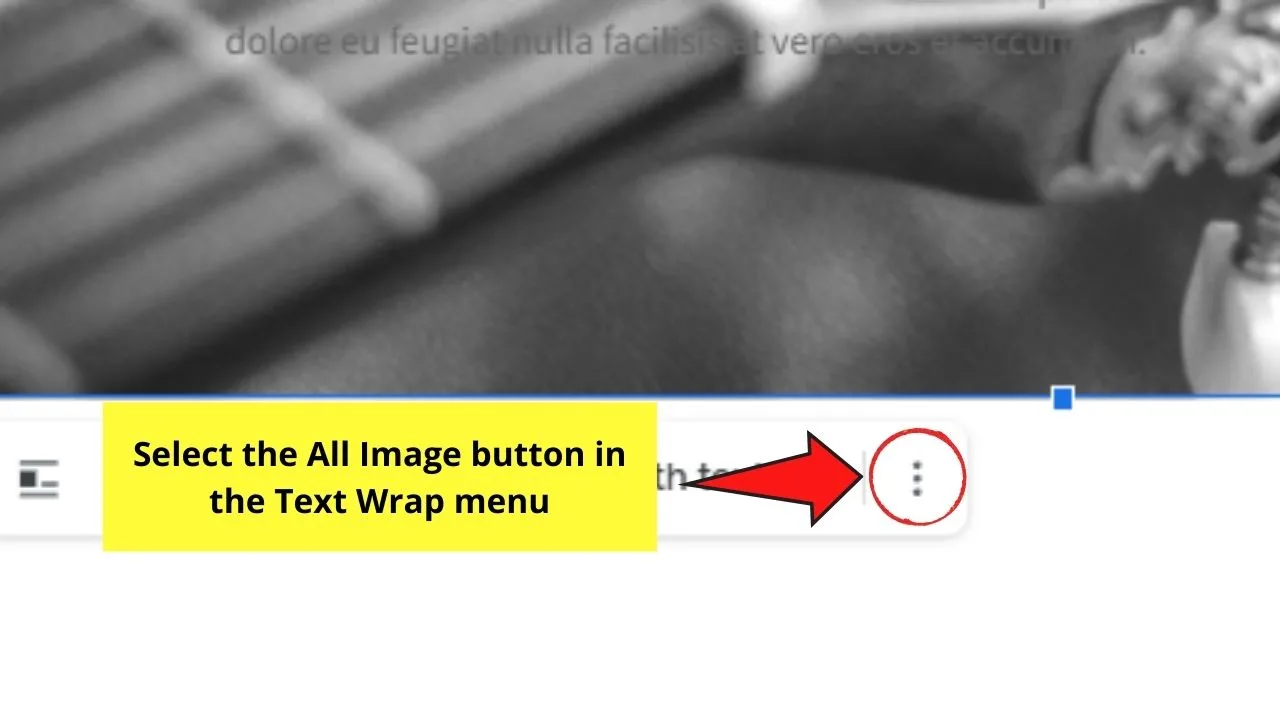
Click on the photo again to activate the Text Wrap menu. Then, head to the rightmost part of the menu bar and click on the three-dot icon, which is the All Image options button.

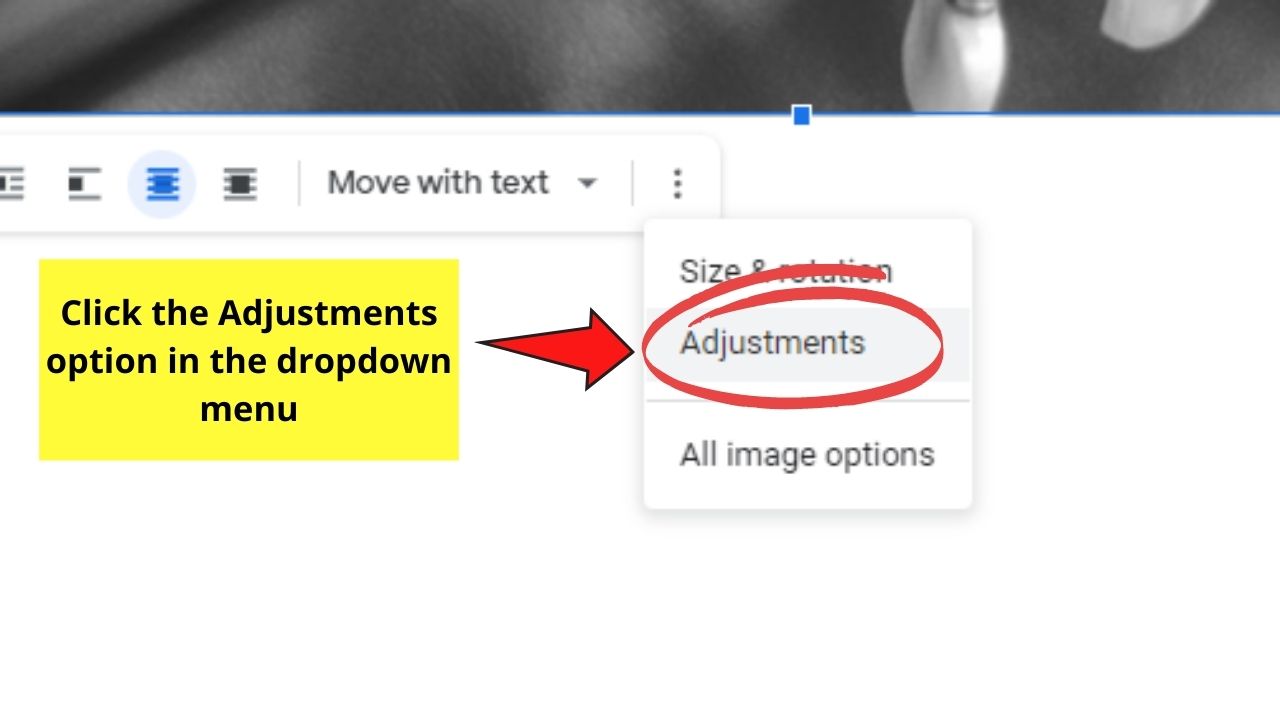
Step 5: In the All image options menu, head to the Adjustments section and click it. You’ll then see a bunch of sliders that you can tweak to change how the photo looks.
 Click and drag the Transparency slider to the left to decrease the image’s opacity. Once the texts are more readable, stop dragging the slider.

While the text wrapping feature in Google Docs should suffice, there are times that such a method’s not working.
Hence, take a look at 3 workaround methods you can use in case you’re experiencing a glitch with the first method.
Workaround #1: Inserting Google Docs Background with Microsoft Word
Note: For you to be able to use the entire feature list of Microsoft Word, make sure to have its licensed copy.
Or, if you’re not too keen on purchasing the license, then you can head to the web version of Microsoft Word known as Office Online.
So, granting that you’re finished creating your document in Google Docs, here’s what you should do next.
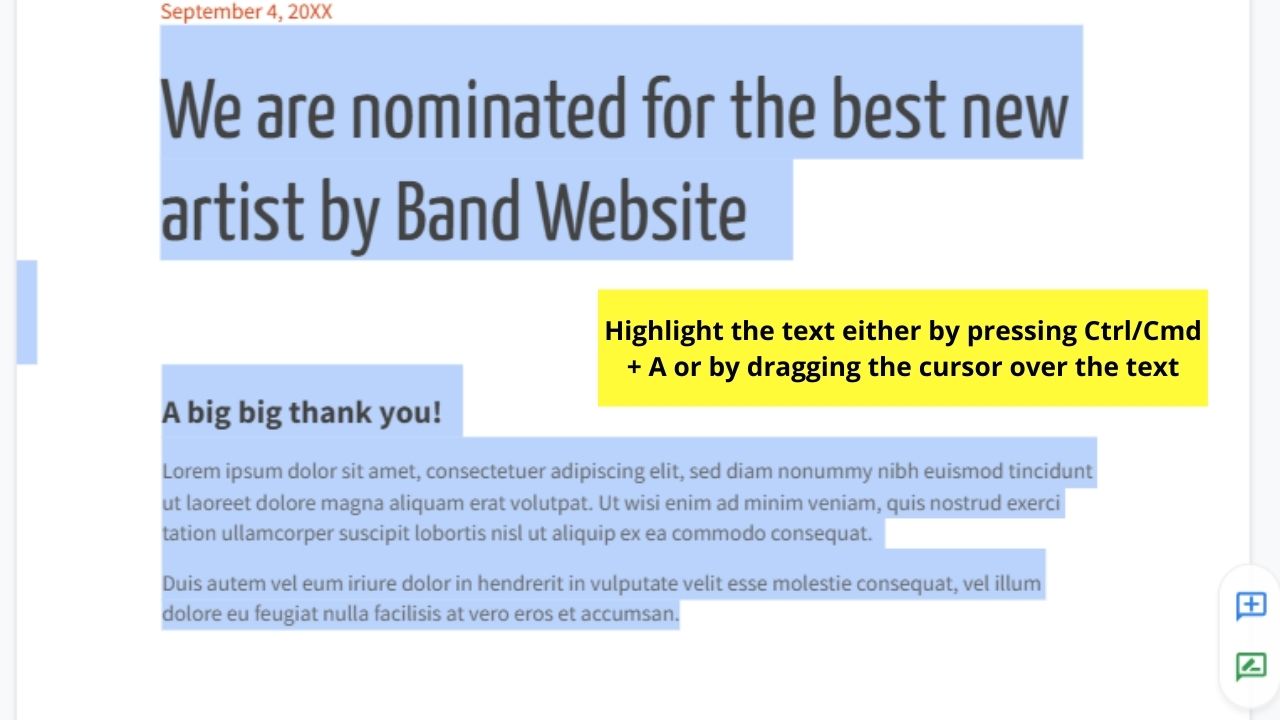
Step 1: First, select the entire text by dragging the cursor over. You can also just press Ctrl/Cmd + A to activate this command.

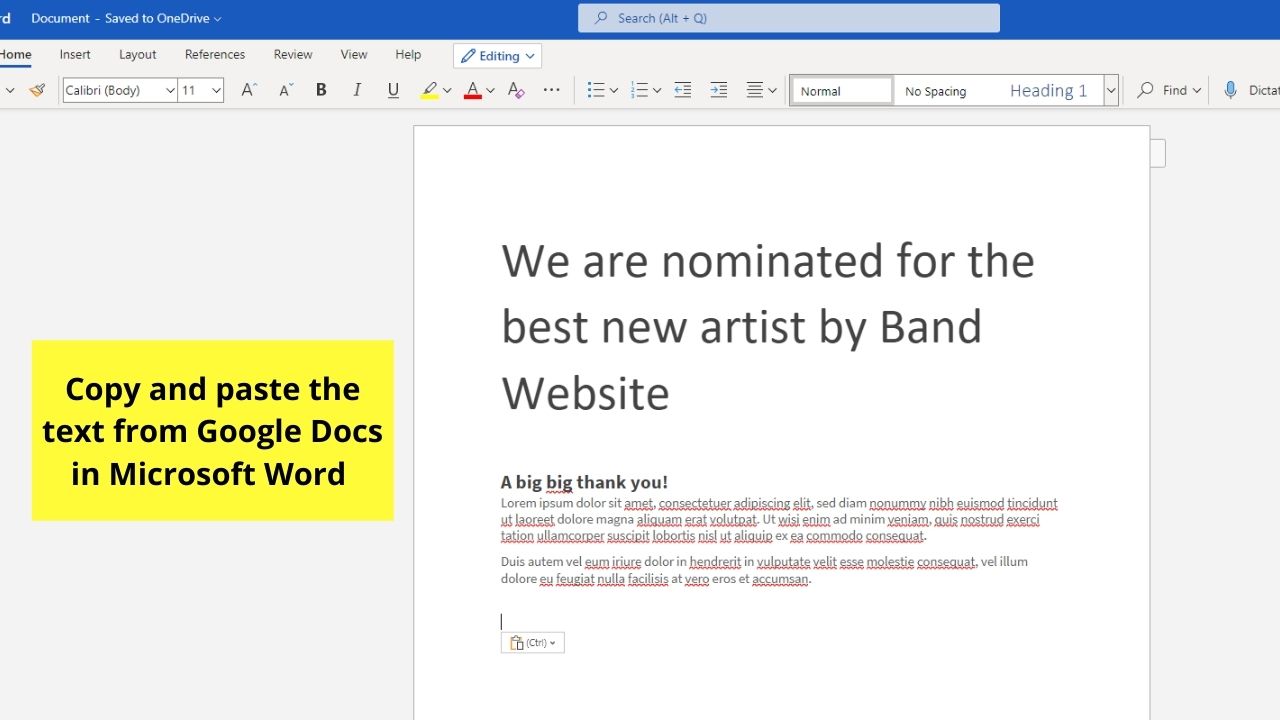
Step 2: After highlighting the entire text, press Ctrl/Cmd + C to activate the Copy feature.
Then paste the text with the Ctrl/Cmd + V keyboard shortcut in the Microsoft word document.

Step 3: Yet, if you don’t want to manually copy and paste the text from Google Docs to Microsoft Word, simply head to the File button on the menu bar first.

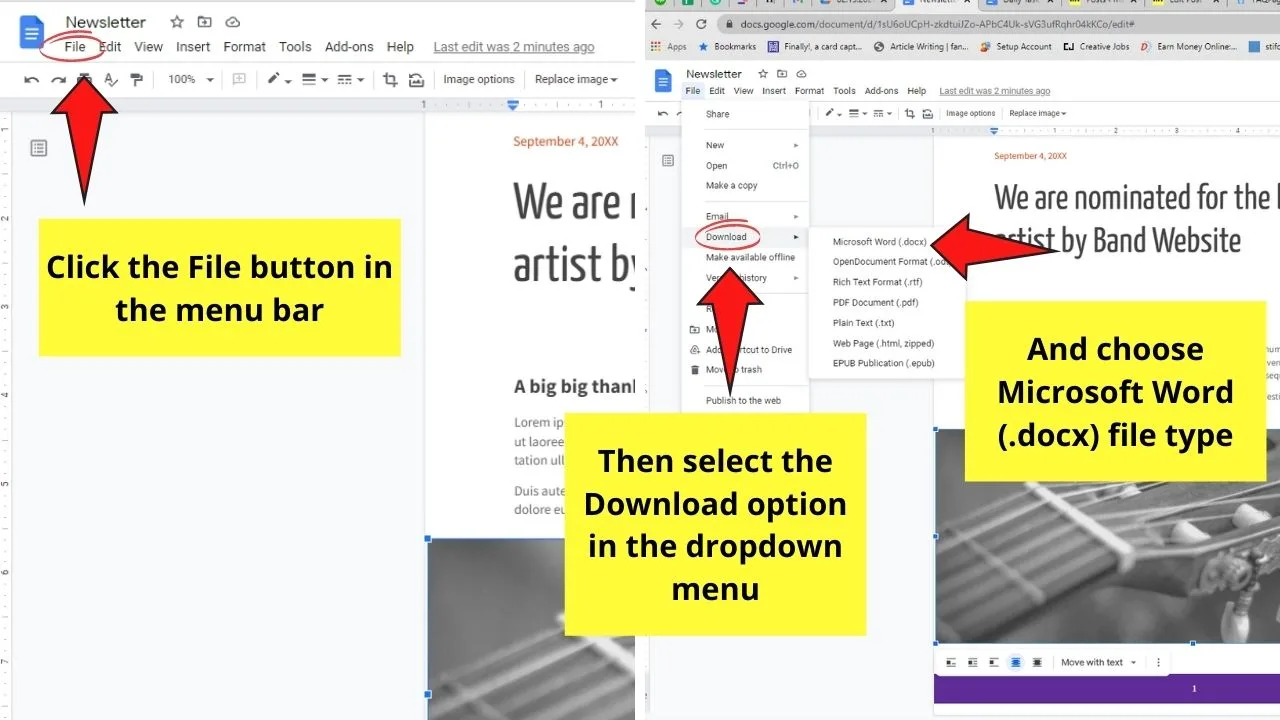
Then, choose the Download option. This will then make another dropdown menu open up.
Select the Microsoft Word (.docx) file option and open the newly-downloaded .docx file on your device.
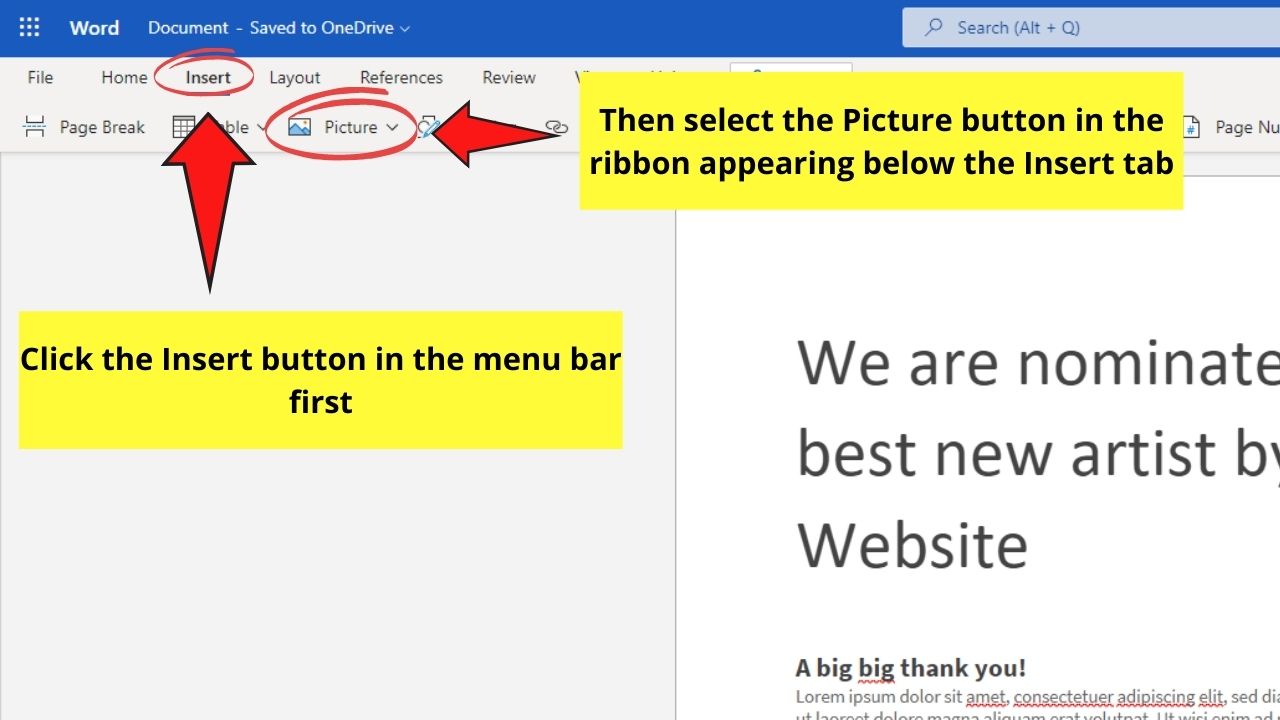
Step 4: Now, in Microsoft Word, head to the menu bar and click Insert. Then, click Pictures in the Insert ribbon that appears.

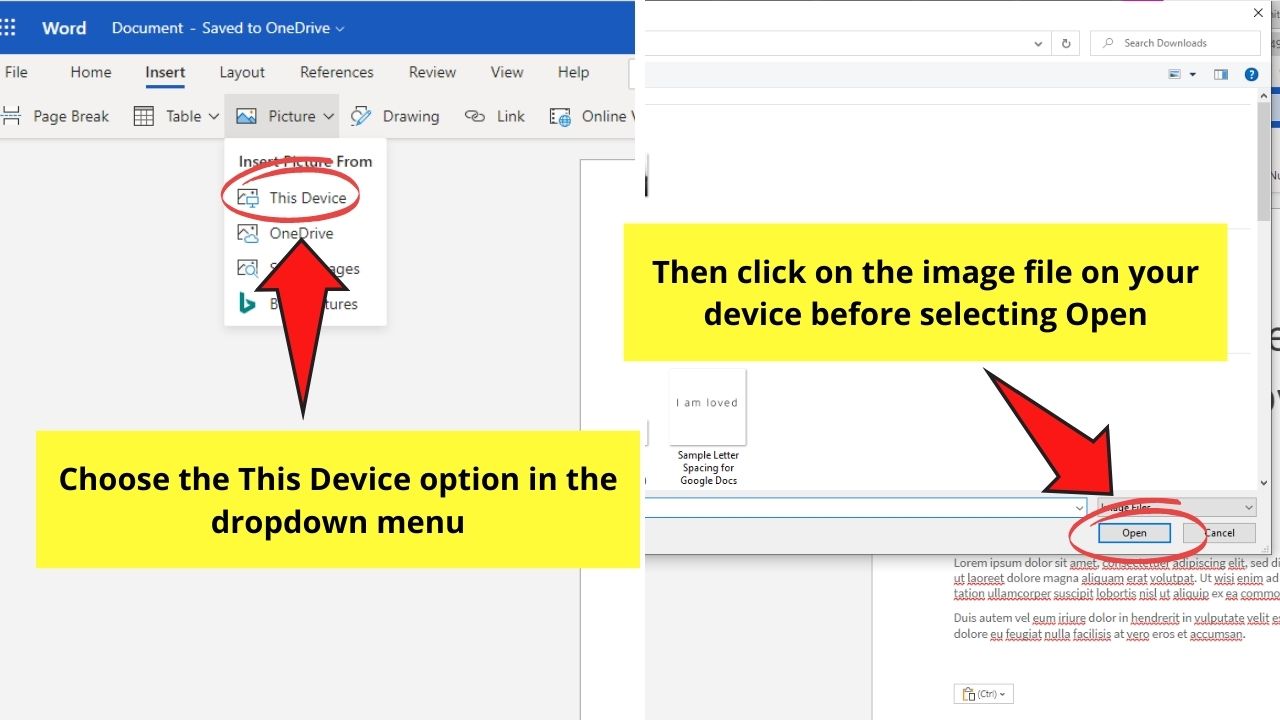
A pop-out window will then appear, allowing you to locate the image on your device. Once you find the picture, click it before selecting the Open button.

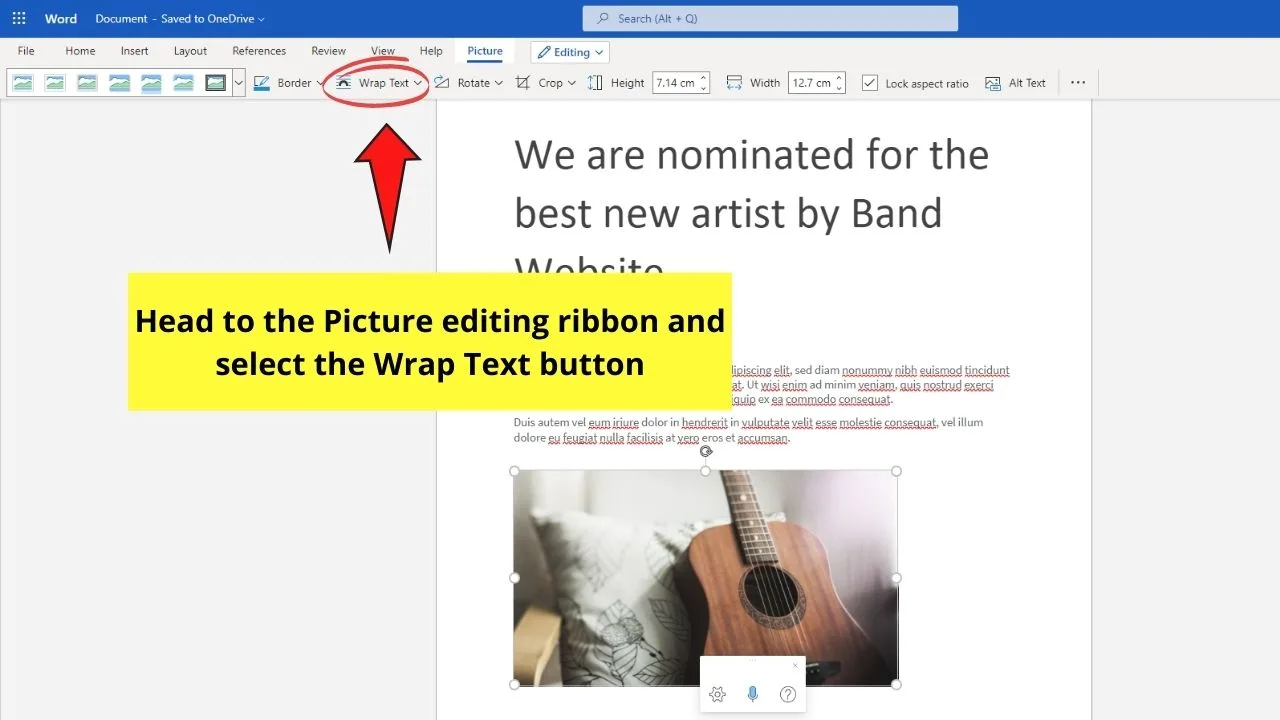
Step 5: Once the photo is inserted in Microsoft Word, a photo editing ribbon appears above the document. Click the Wrap Text button.

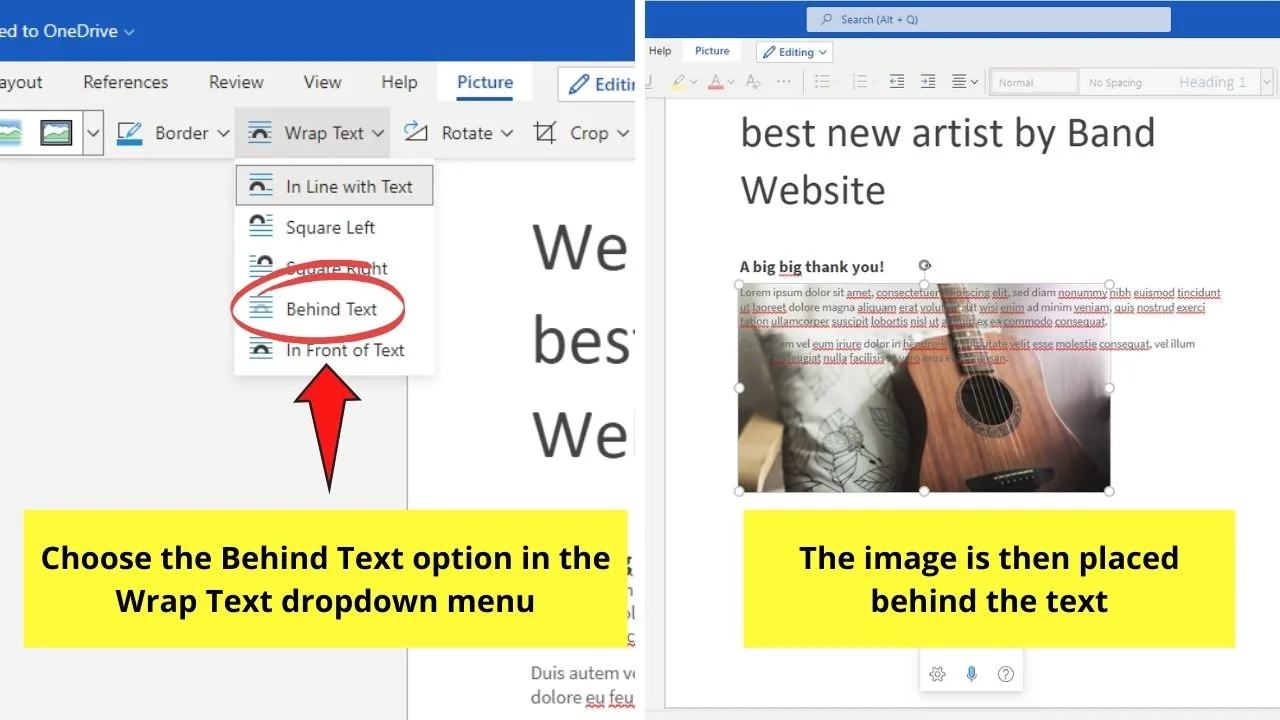
From the text wrapping options available, select the Behind Text button. This will then place the image behind your text components.

After which, resize and adjust the transparency of the photo to make the text more readable despite the image behind it.
Step 6: Now, save the document as a Word file. You can rename it if you want before clicking the Save button.
Step 7: Then, upload the Microsoft Word file into Google Docs.
First, select the File tab and click the Open option. Search the Microsoft Word file you created and click it.

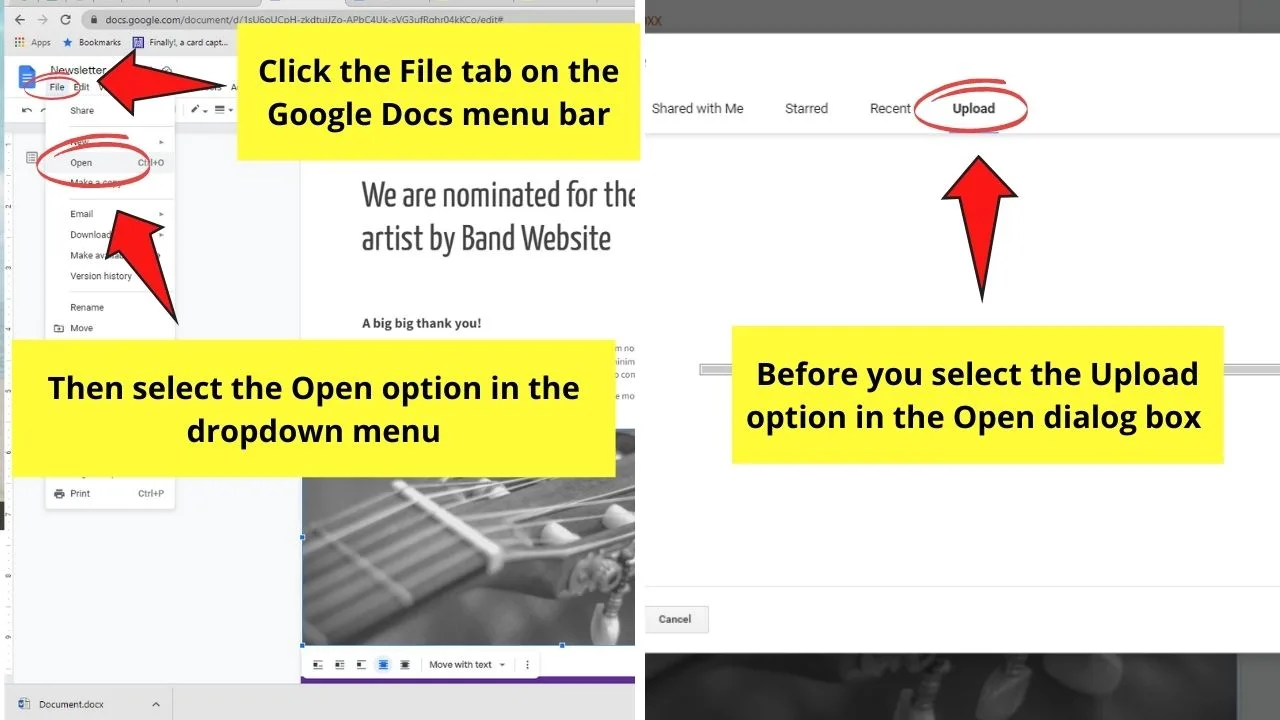
After which, select the Open button so that you can view the file in Google Docs.
But, wait, there’s more! Another way you can put an image behind text in Google Docs.
Workaround #2: Inserting Google Docs Background with Google Slides
Granting you’ve already opened a blank slide in Google Slides, here’s what you should do next:
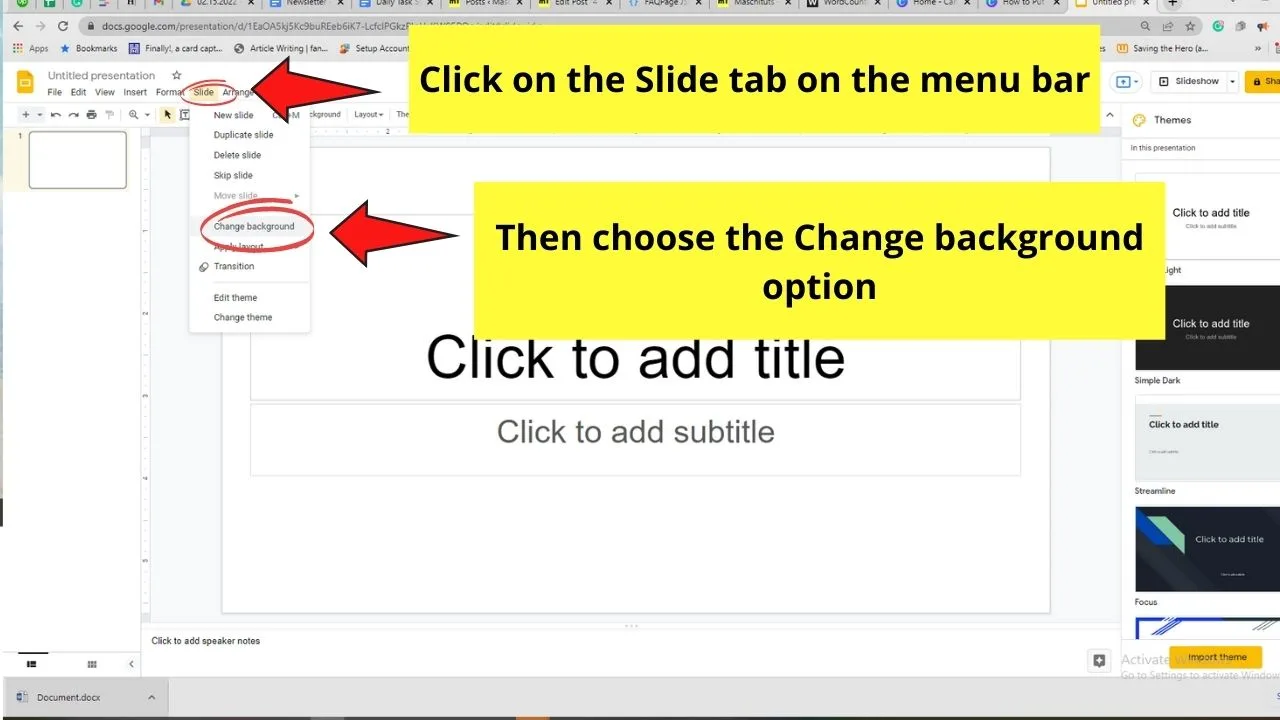
Step 1: Head to the menu bar and click the Slide button. Then, select the Change background option.

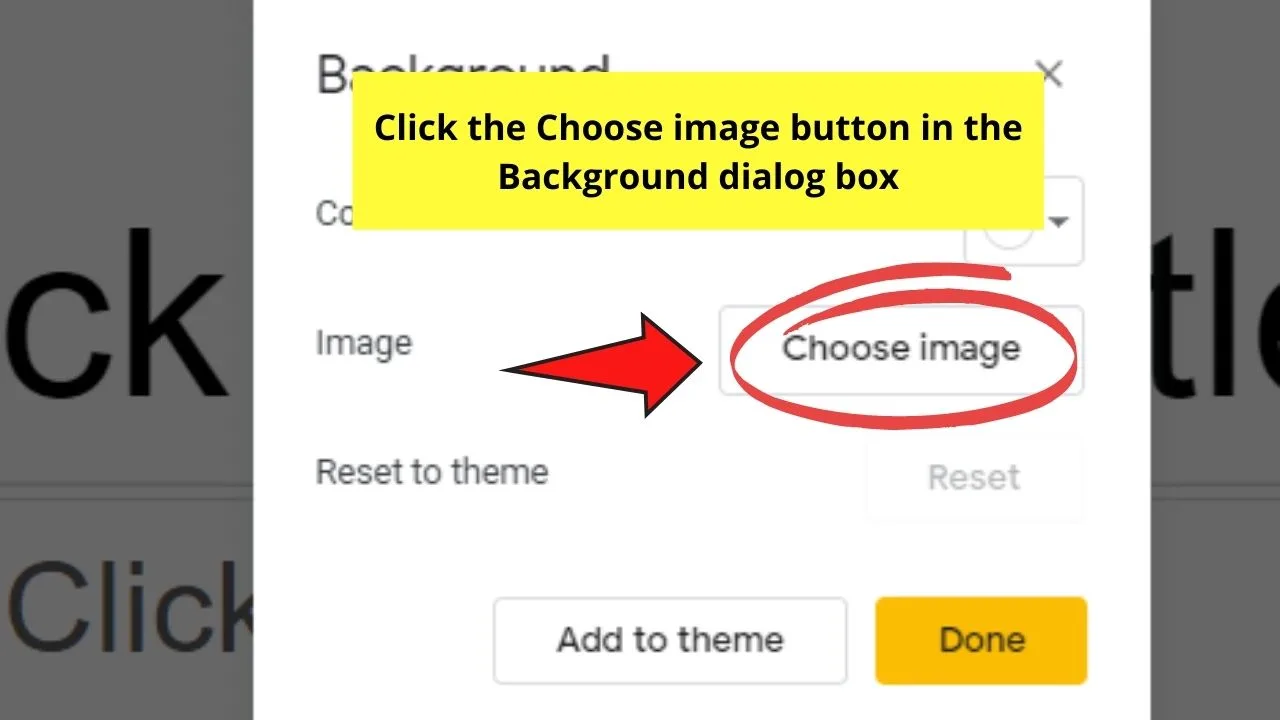
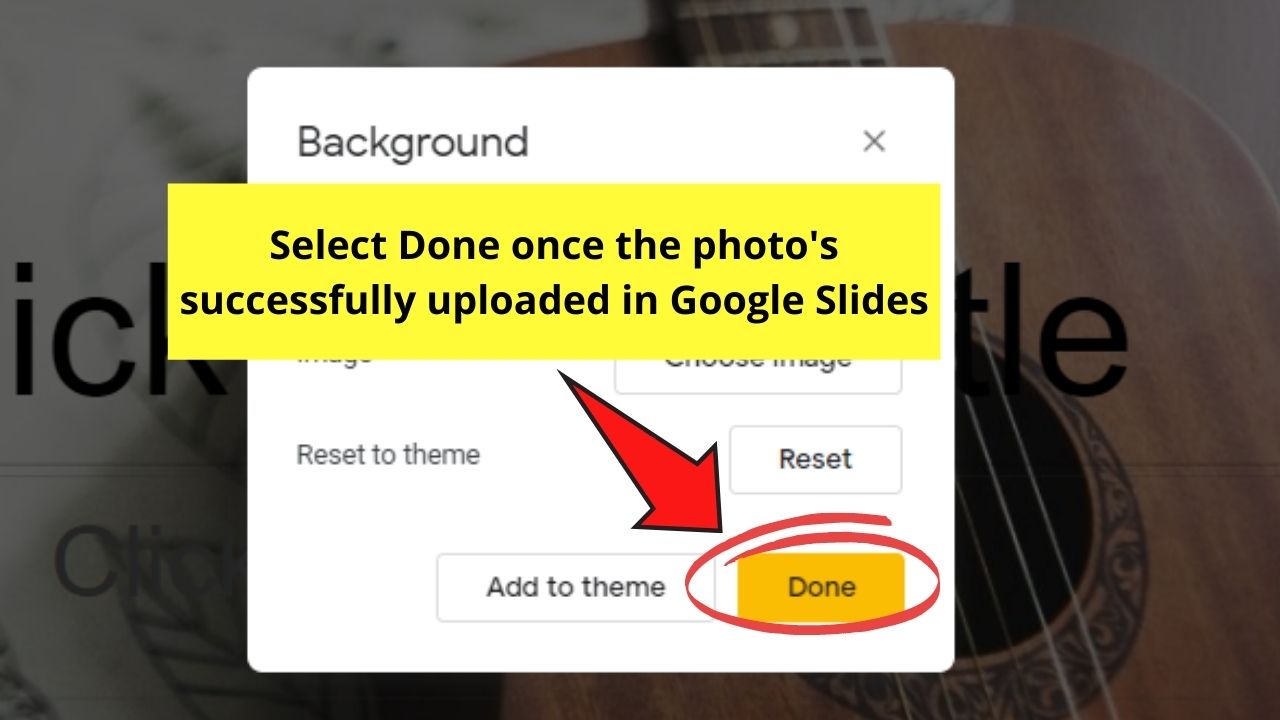
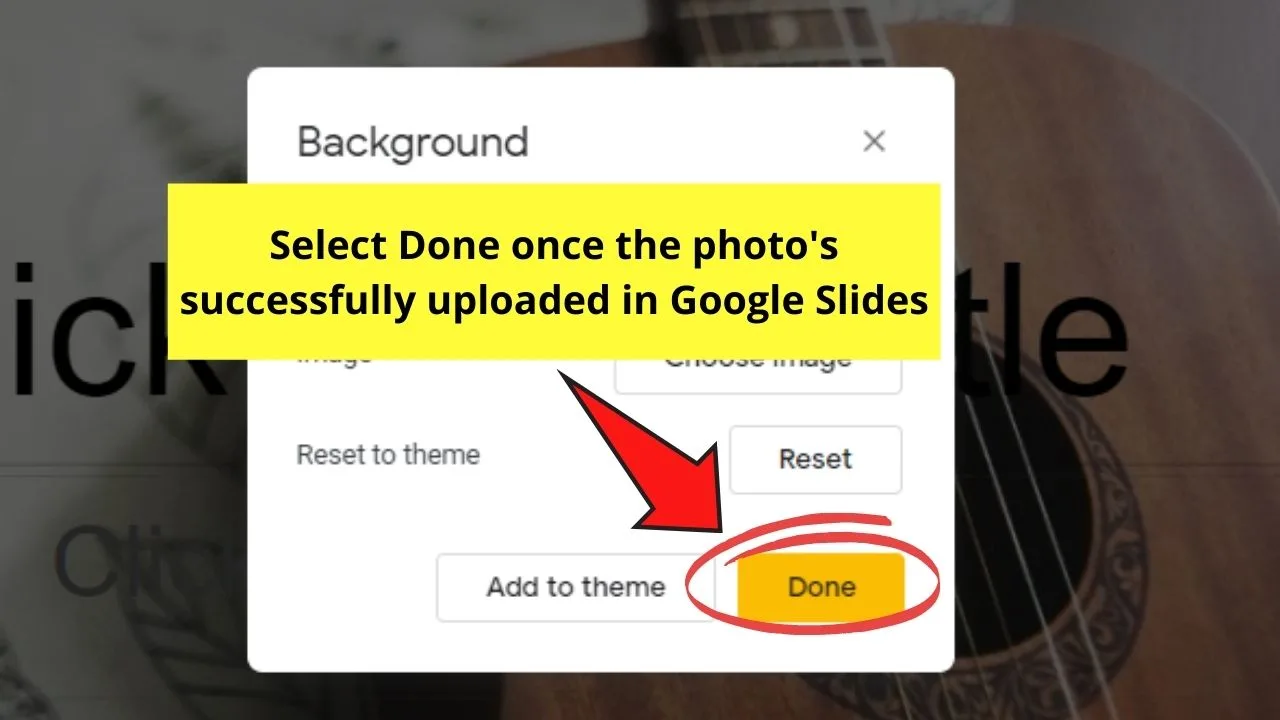
Step 2: In the Background dialog box that appears, select the Choose Image option to locate the photo on your device.

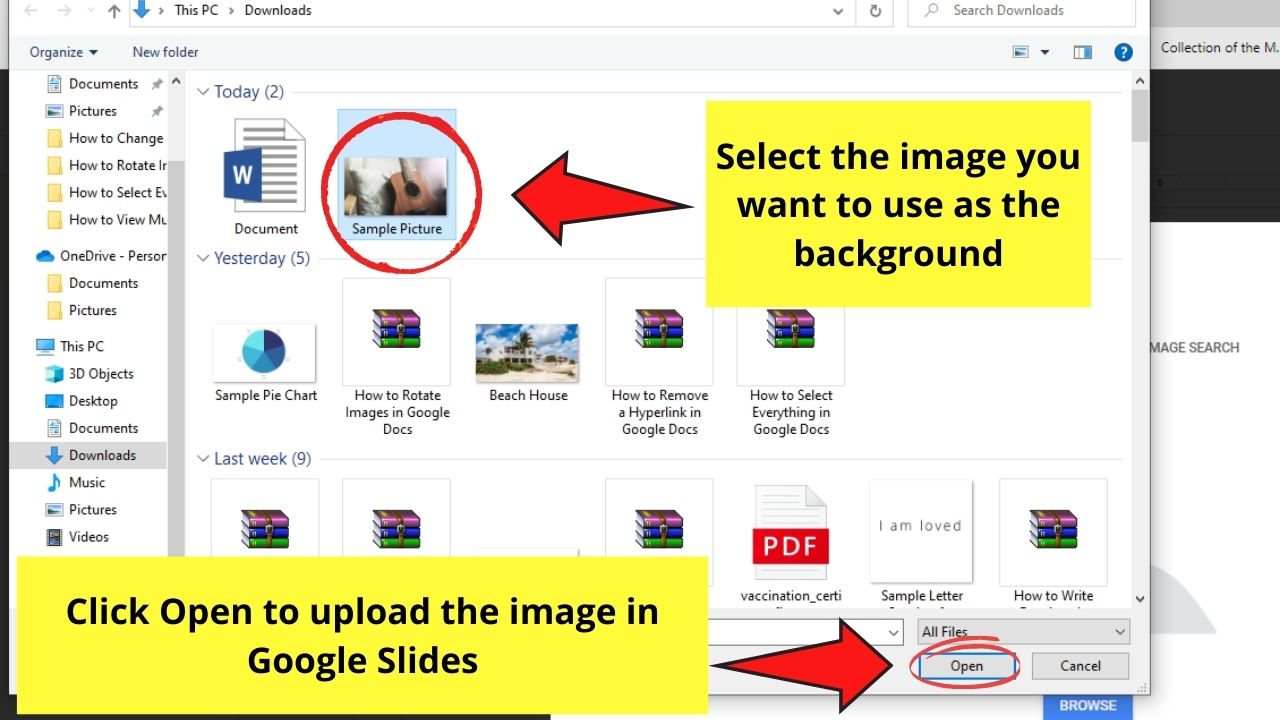
Click the said picture and choose the Open button.

Then, back in the Background dialog box, click Done.
Continue doing this step until all the slides have their backgrounds.
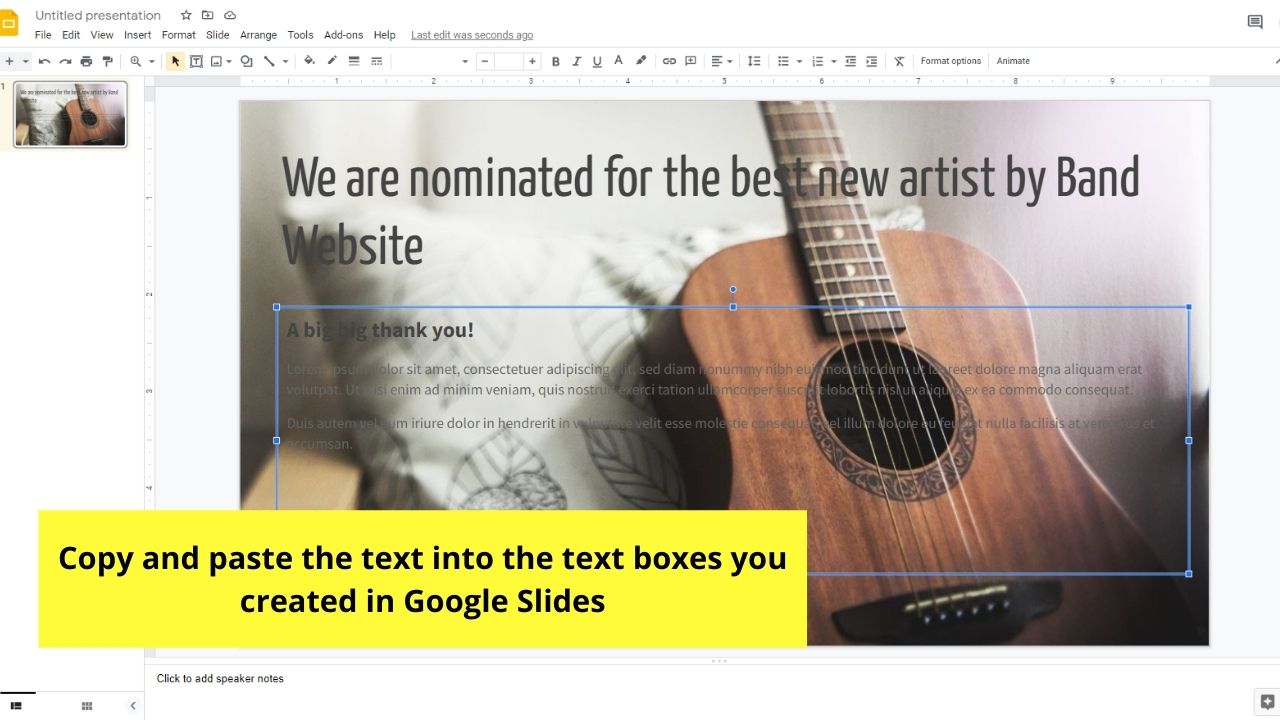
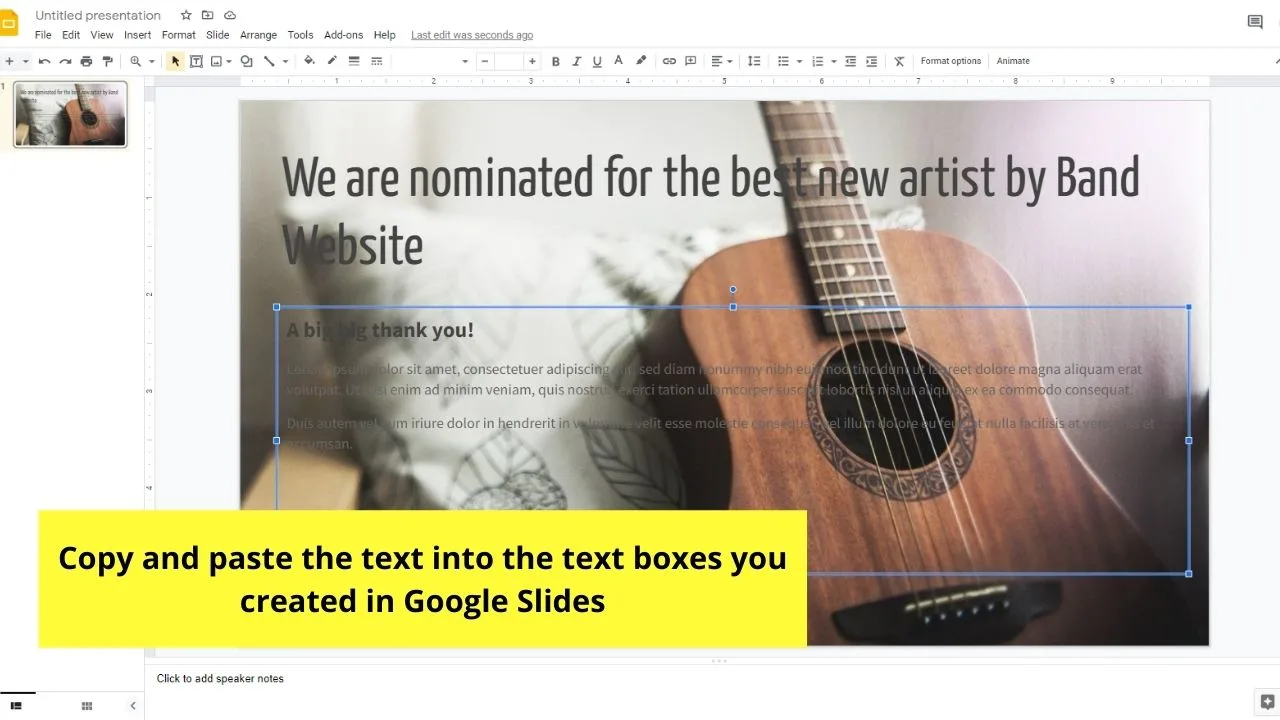
Step 3: After placing the backgrounds, add text boxes and paste the Google Docs content in them. Resize and edit those text boxes accordingly.
Step 4: Once you’re done with the editing, take a screenshot of the page.
Then, paste the said image directly on Google Docs through the Ctrl/Cmd + V keyboard shortcut.


Take note, though, that the photo you’ll insert into Google Docs isn’t editable. However, it’s already a good workaround just in case.
Just adjust the image accordingly to make it appear better in Google Docs.
But, if you don’t want to go out of Google Docs, there’s another way of placing images behind text.
Workaround #3: Using the Drawing Feature in Google Docs
Step 1: Head to the menu bar and click on the Insert tab. Then, select the Drawing option.

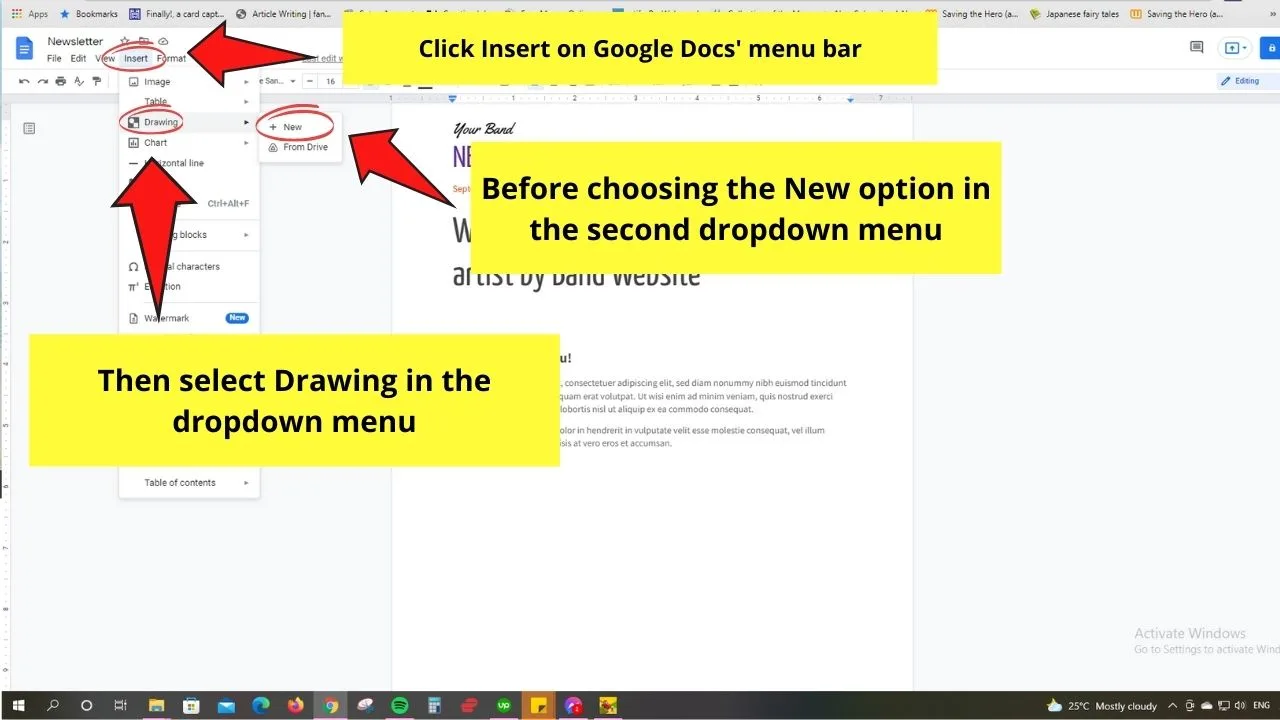
Choose the New button in the second dropdown menu that appears.
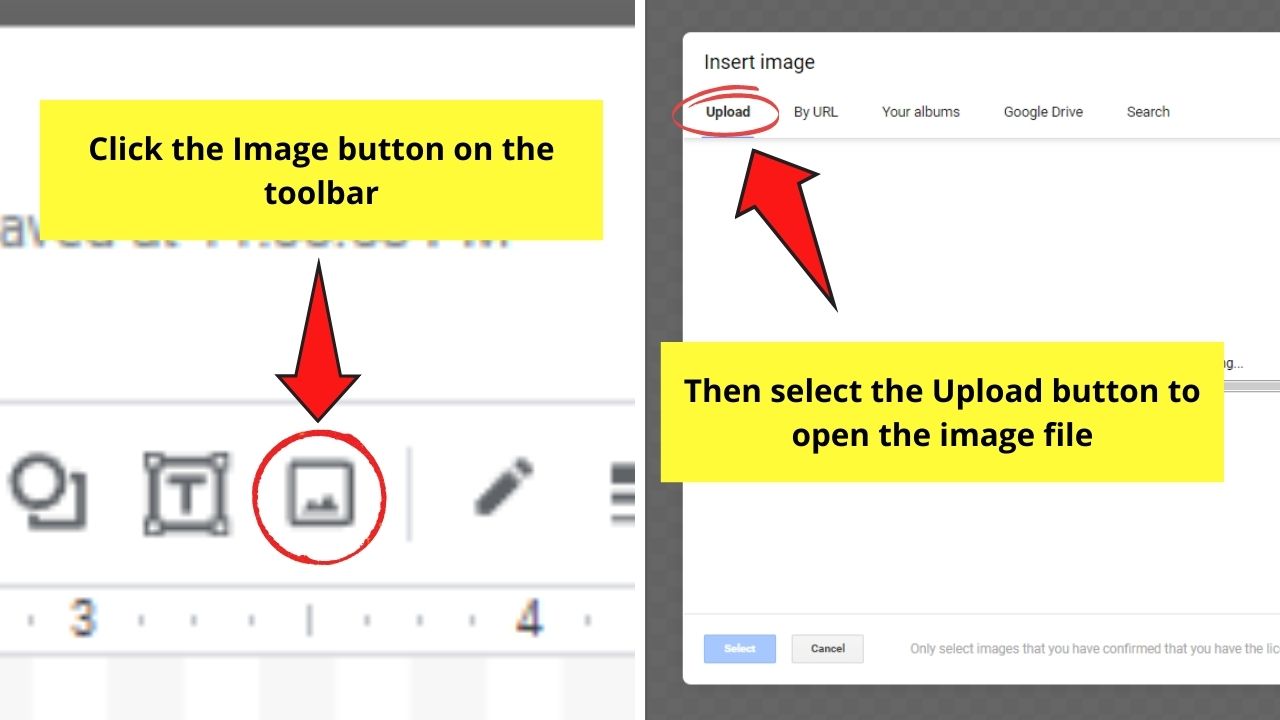
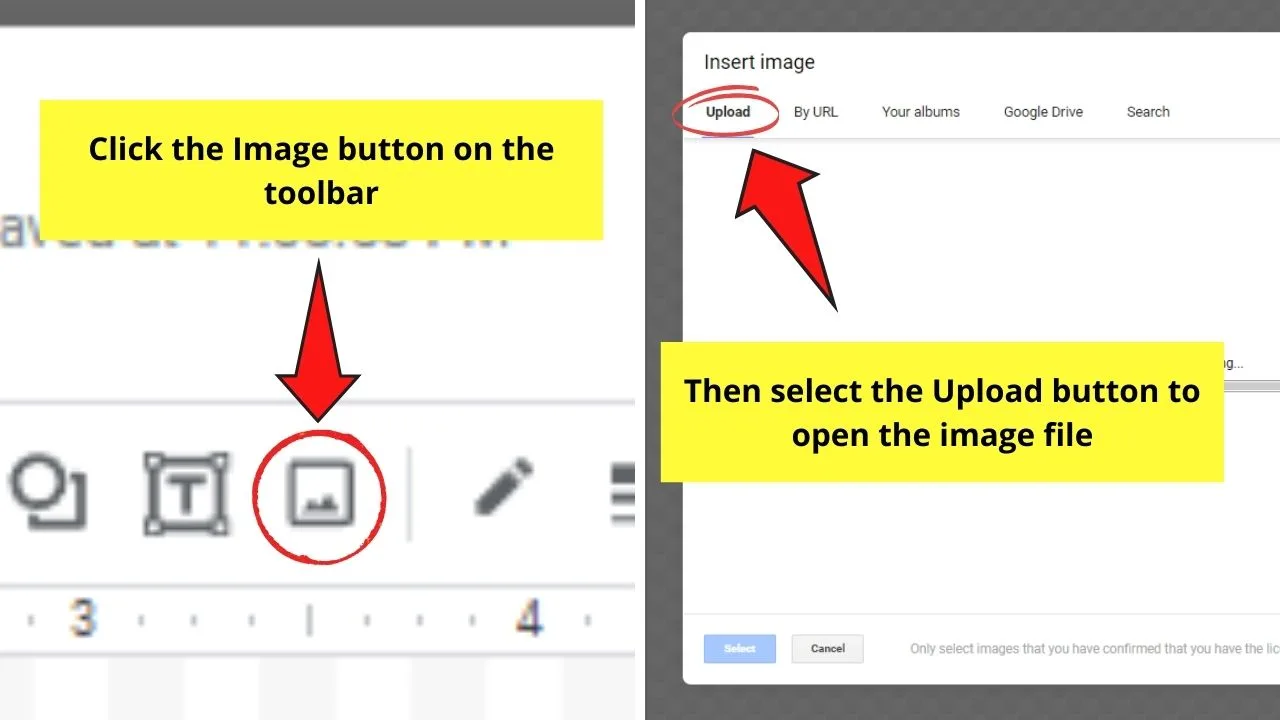
Step 2: In the Drawing pop-out window, click the Image button to upload the photo in the Drawing window.
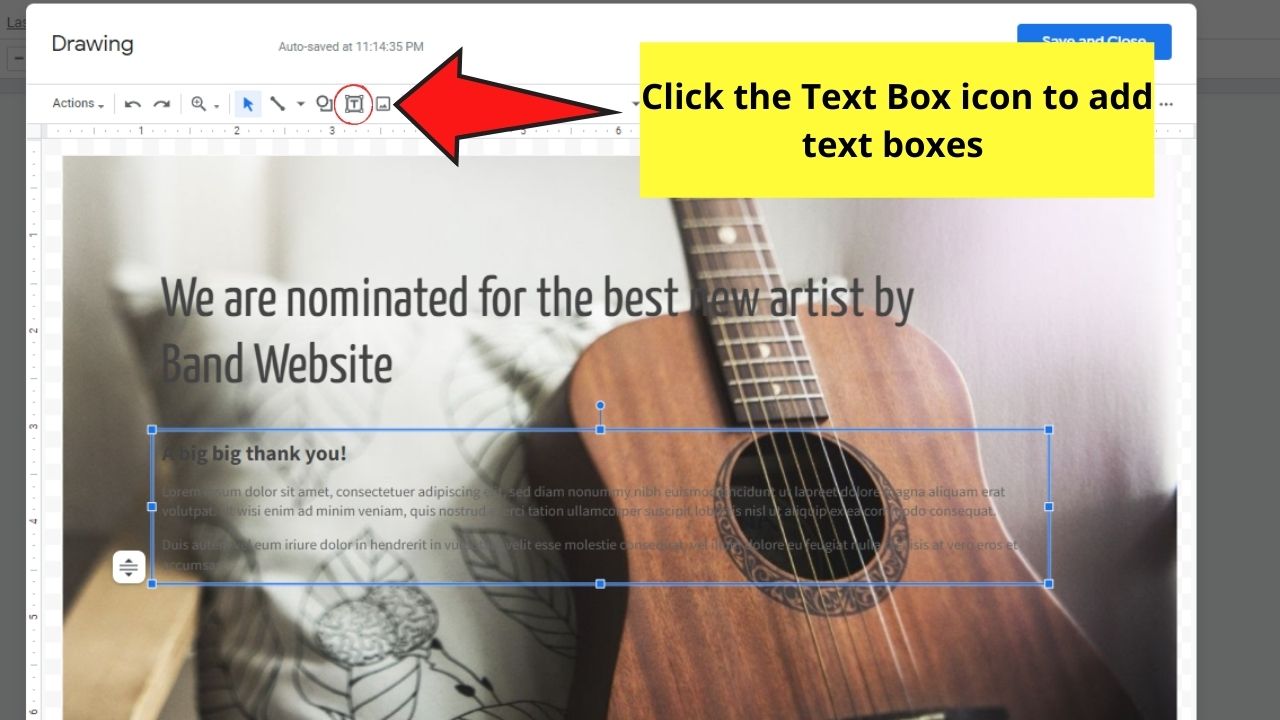
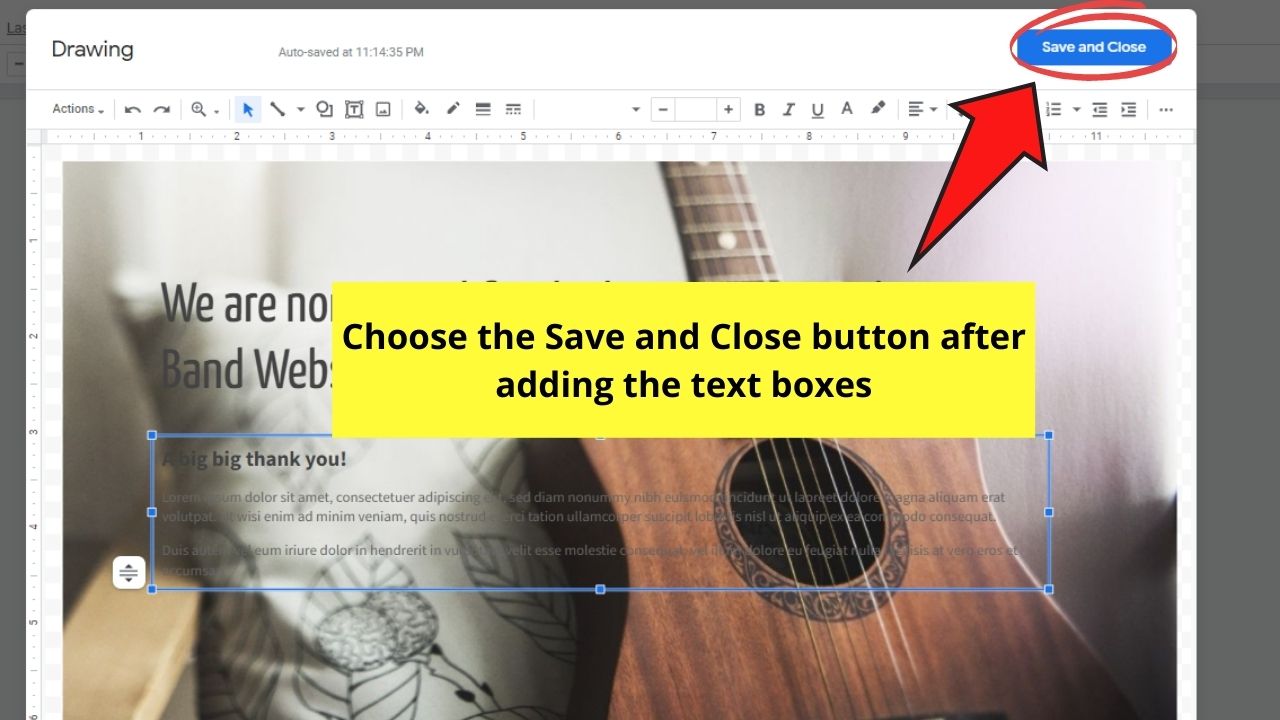
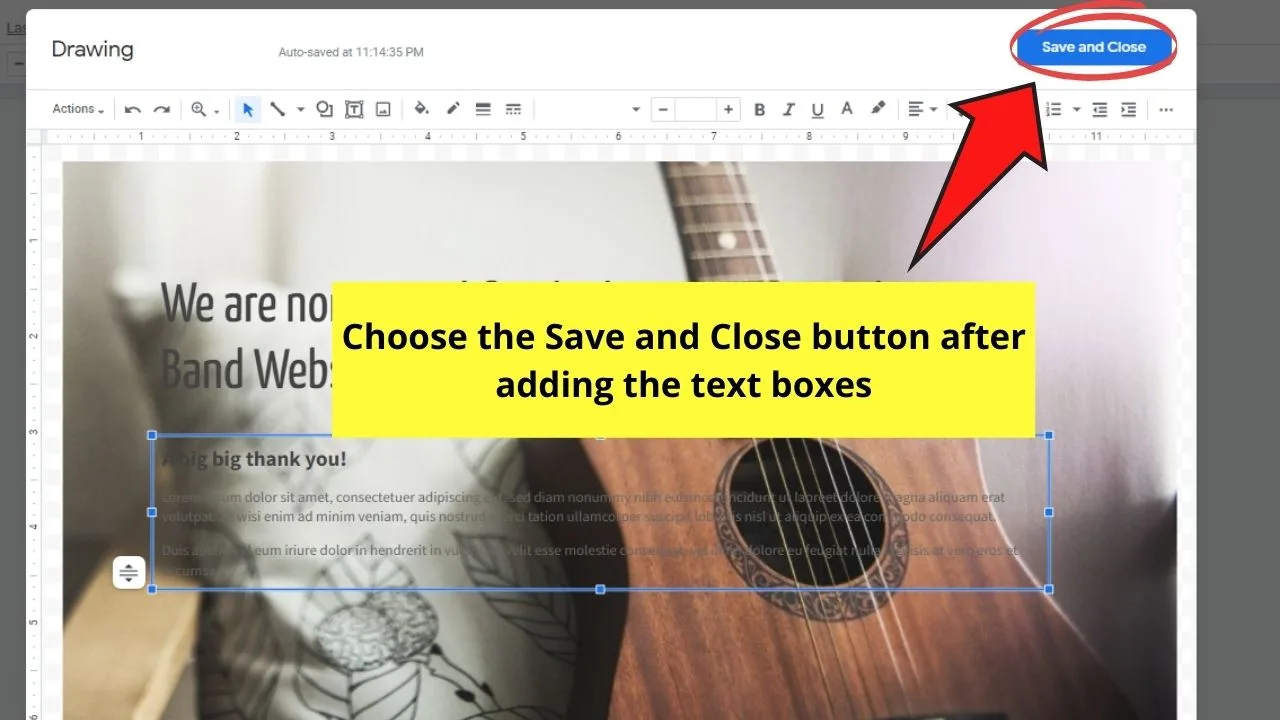
Step 3: Once the picture’s uploaded, add text boxes.
Click the Add Text Box button, position it accordingly to how you want it to appear, and adjust the text’s look.

Step 4: Once everything’s looking good, select the Save and Close button to insert it on your Google Docs document.
Whichever method you choose to use, the important thing is it’s efficient and comfortable for you.
Just remember the steps above, and you’ll never go astray with putting an image behind text in Google Docs.
Frequently Asked Questions about How to Put an Image Behind Text in Google Docs
What text wrapping options are available in Google Docs?
In previous versions, there are only 3 text wrapping options available: In lIne, Wrap text, and Break text. But, Google Docs recently added 2 new text wrapping options to the tool — Behind Text and In front of Text.
Can you still move the image you put behind the text?
You still can move the image you placed behind the text. Just make sure that the photo is still highlighted after you click the Behind Text wrapping option so you can still move it around the document.


Hey guys! It’s me, Marcel, aka Maschi. On MaschiTuts, it’s all about tutorials! No matter the topic of the article, the goal always remains the same: Providing you guys with the most in-depth and helpful tutorials!

