
Stretching text could seem to be a trivial topic, but it can become a real headache.
The problem usually comes up when we need to stretch a text in a specific way, and the tools we employ can’t get it done.
We eventually give up, and we end up editing the text manually, because we simply can’t find any tool to do exactly what we want.
Thankfully, Photoshop not only offers several ways to stretch and distort texts, but the company actually takes the upgrading of their software very seriously.
In the newer Photoshop versions we can find some great features that will definitely make our life easier.
Stick around to find out how to stretch a text exactly the way you need.
We’ll cover how to stretch texts in such different ways, that I can guarantee you’ll find your answer right here.
1. Stretch Text by Modifying Character Attributes in Photoshop
To stretch a text modifying “Character” attributes, we need an editable text.
If you are not sure how to type a text from scratch, you can check the F.A.Q. here in this article to find out how.
Method 1: Set the Tracking
![]()
![]()
Once you have your text typed in, go to the “Character” panel, usually located on the right side toolbar.
If you can’t find it, you may have to enable it first by going to “Window > Character” on the menu at the top of the screen.
Once in the “Character” panel, set the “Tracking” value.
This field modifies the spacing of the characters. The default value is “0”.
Set a number from “1” onwards to increase the character spacing. The higher the number you set, the larger the spacing between characters becomes.
Set the number to an inferior value (“ -1” or lower) to decrease the character spacing. The lower the number you set, the smaller the spacing between each character becomes.
Make sure to press the “Enter” key to confirm the edition of the spacing value.
I’ll set the “Tracking” field to 400 for this example.


Method 2: Set the Scaling

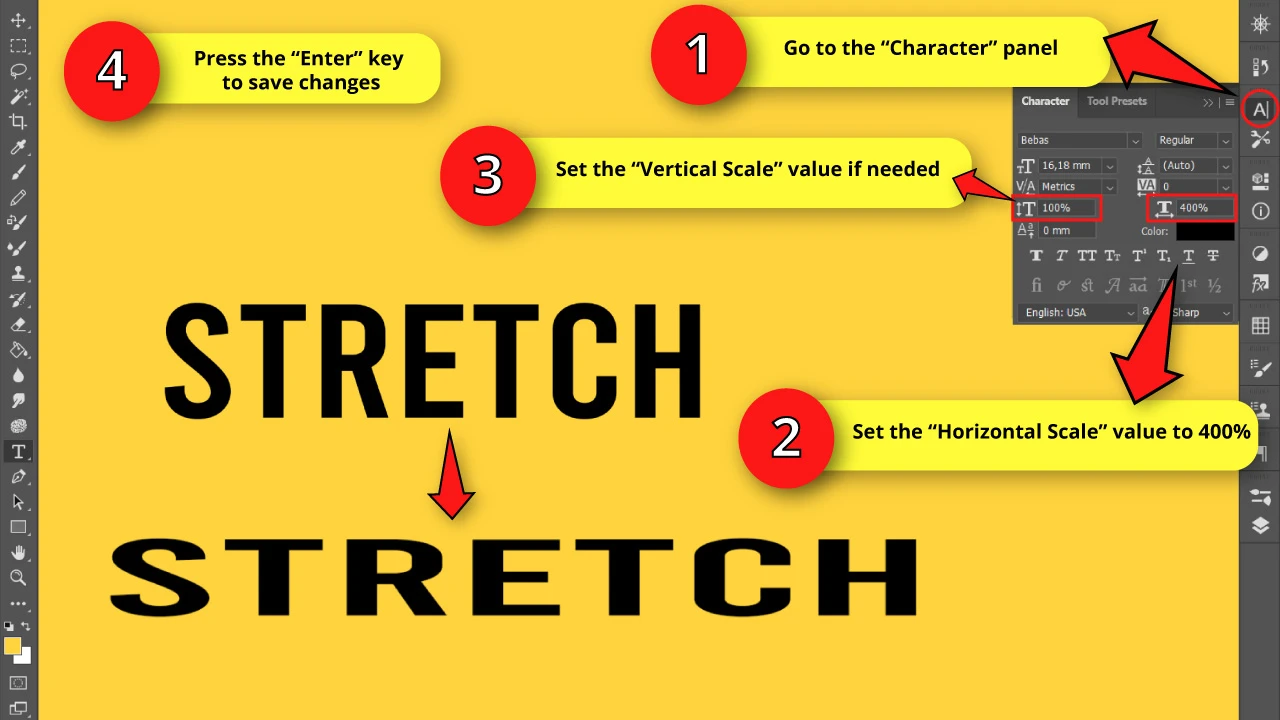
Go to the “Character” panel on the right side toolbar.
If you can’t find the “Character” panel, check “Method 1”.
On the “Character” panel there are 2 settings intended to scale and distort texts: “Horizontally Scale” and “Vertically Scale”.
Their value in this case, unlike the setting used in the previous method, is a percentage.
Set the value to:
1% – 99% to make the text narrower
101% or higher to make the text wider
100% is the default value.
For this example, I’ll set my text’s “Horizontally Scale” value to 400%.
2. Stretch Text by Using Anchor Points in Photoshop
To stretch a text using anchor points, we need an editable text converted to a shape.
If you don’t know how to type a text, check the F.A.Q.
Step 1: Convert Text to a Shape

To be able to use the text anchor points, we need to convert the text into a shape.
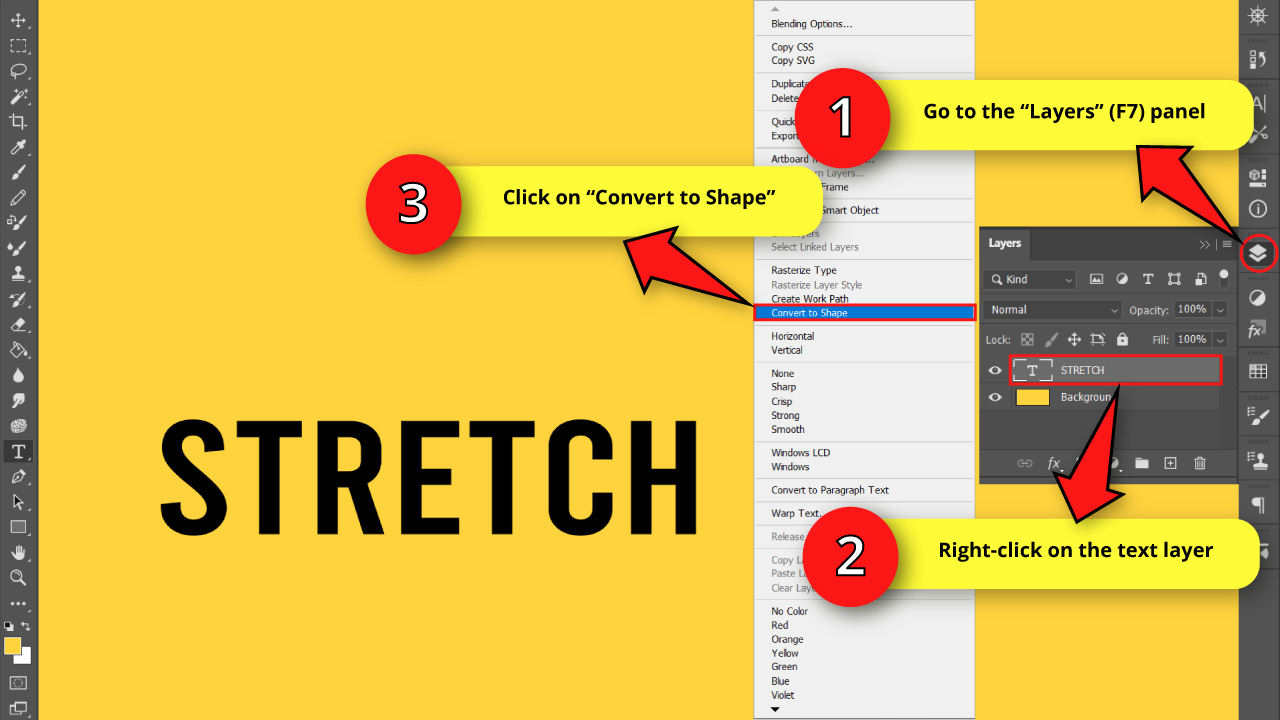
To convert an editable text into a shape, go to the “Layers” (F7) panel located on the right side toolbar. If you can’t find it, press the “F7” command to go to “Window > Layers” on the menu at the top of the screen.
Once you are on the “Layers” (F7) panel, right-click on the text layer to unfold the options menu.
On the options menu, select the “Convert to Shape” option.
If you feel you can work better that way, you can also rename layers in Photoshop.
Step 2: Stretch Your Text

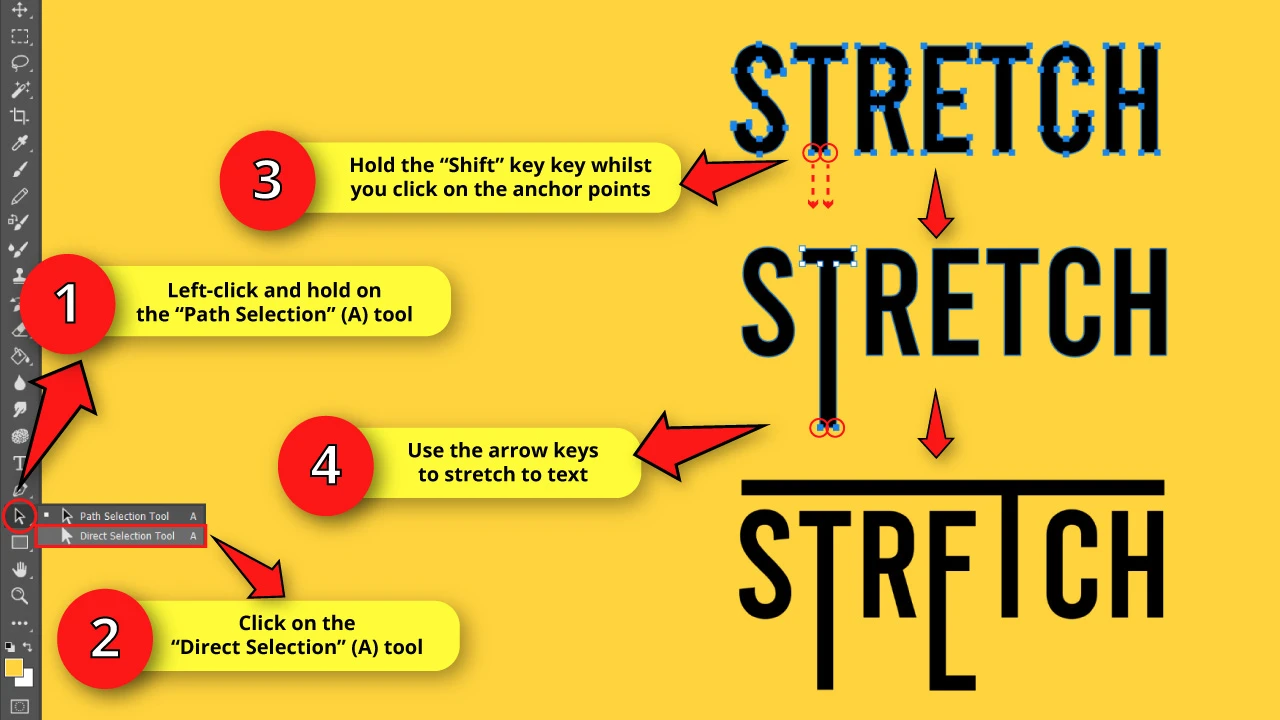
Now we need to use the “Direct Selection” (A) tool. Left-click and hold on the “Path Selection” (A) tool, located on the left side toolbar, to unfold the tools nest, and select the “Direct Selection” (A) tool.
You can now visualize and select the anchor points to stretch the text.
We’ll stretch the “T” character for this example.
It is necessary to select both bottom anchor points to keep the main shape of the character in this case. To select several anchor points at the same time, hold the “Shift” key as you click all desired anchor points.
Once you have the anchor points selected, use the arrow keys from your keyboard to move it in the direction you prefer.
I stretched some other characters as well for this example.
3. Stretch Text by Using the Free Transform Tool in Photoshop
This method doesn’t require to work with an editable text. You can use rasterized or shape converted images as well.
However, if you have the option to choose the type of text to work with, it’s highly recommended to use shape converted texts.
Whenever possible, avoid working with rasterized images, so it will not pixelate and lose quality when you distort and stretch it.
The problem with using editable texts for this method, is that the tool has some limitations. So your best option is to use shape converted texts whenever possible.
For this example I’ll use a fresh typed text converted into shape.
If you don’t know how to type a text, check the F.A.Q.
Now, to convert your text into a shape, go to the “Layers” (F7) panel, located on the right side toolbar, or press the “F7” key to shortcut it.
On the “Layers” (F7) panel, right-click on the text layer to unfold its options menu, and select the “Convert to Shape” option.
If you have any doubts, you can check the “Step 1” of the “How to Stretch Text Using Anchor Points in Photoshop” method, where you will find a screenshot of this same procedure.
Method 1: Make the Text Wider or Narrower
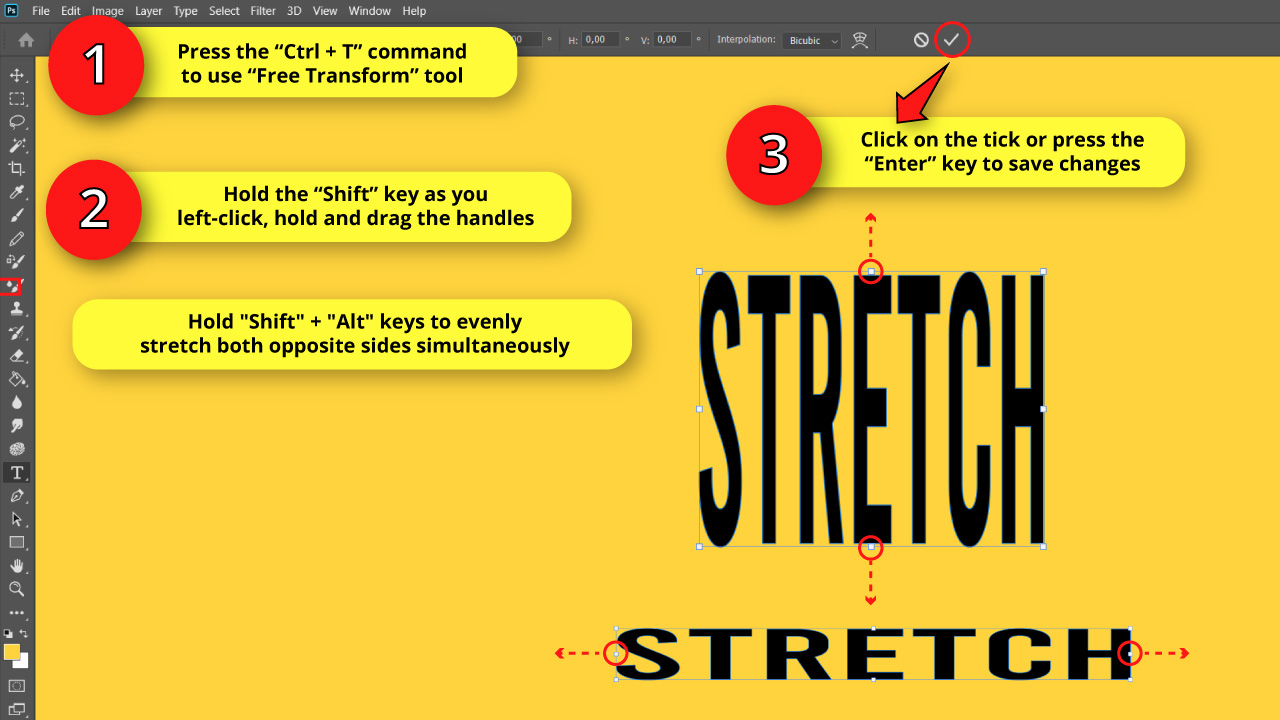
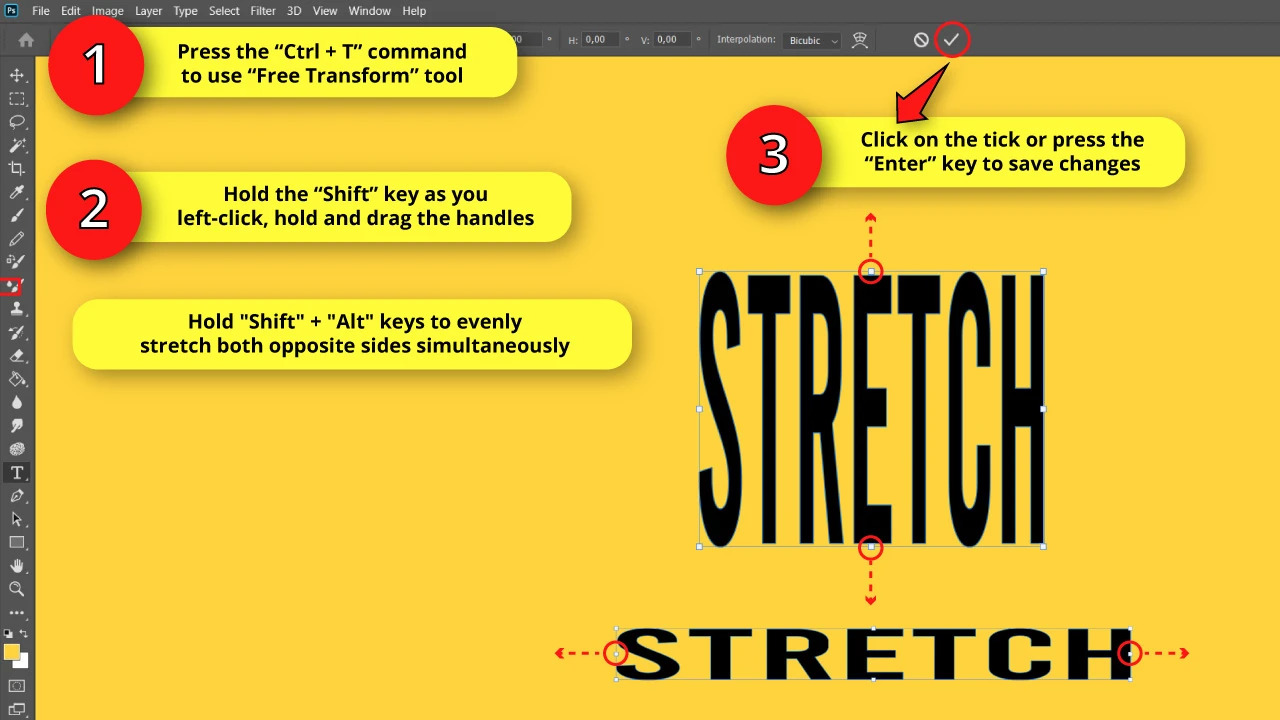
Once you have your text typed and converted into a shape, go to “Edit > Free Transform” on the menu at the top of the screen. Or press the “Ctrl + T” command to shortcut it.
Hold the “Shift” key while you left-click, hold and drag the bounding box handles to make the text wider or narrower.
The “holding the Shift key” procedure may differ according to your Photoshop version.
Newer versions require holding the “Shift” key to modify the proportions of the text, or image, so we can distort it.
Now, as you may have noticed, holding the “Shift” key in older versions keeps the proportions. So, depending on your Photoshop version, holding the “Shift” key may have the opposite effect.
If in doubt, simply try both, holding and not holding the “Shift” key until you get your desired result.
If you hold both “Shift” + “Alt” whilst you drag the bounding box handles, the text will evenly stretch from both opposite sides simultaneously.
When you feel satisfied with the transformation, press the “Enter” key, or click on the “Commit Transform” button, located on the toolbar at the top of the screen.
Method 2: Make a Skew Text

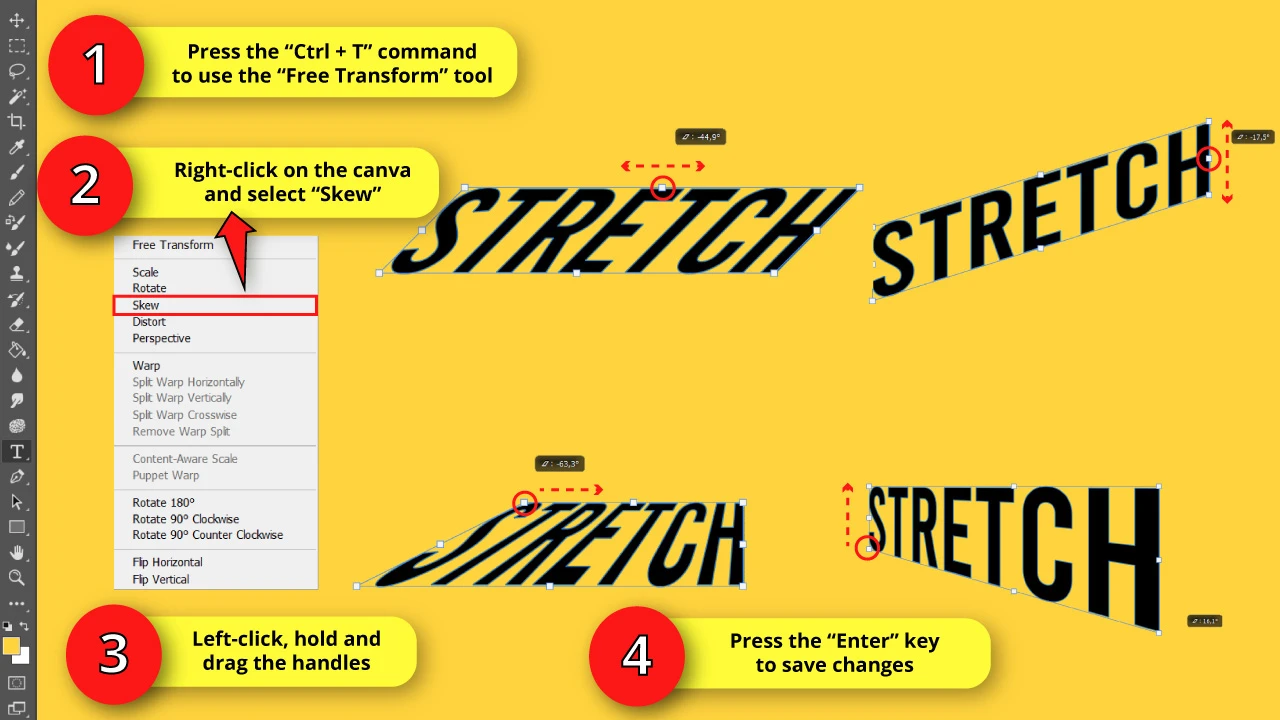
As we did in the previous method, go to “Edit > Free Transform” on the menu at the top of the screen. Or press the “Ctrl + T” command to shortcut it.
Right-click on the canva, or over the text to unfold the options menu. On the unfolded menu, select the “Skew” option.
Left-click, hold and drag the handle of the bounding box to evaluate different skew results.
Select the side anchor point, and drag it from side to side to skew the text in a horizontal way.
If you drag it from up to down, or vice versa, the text will be skewed in a vertical way.
Now, if you drag a corner handle you will get a perspective-like transformation.
When you’re done, press the “Enter” key to save changes.
Method 3: Make a Perspective Text
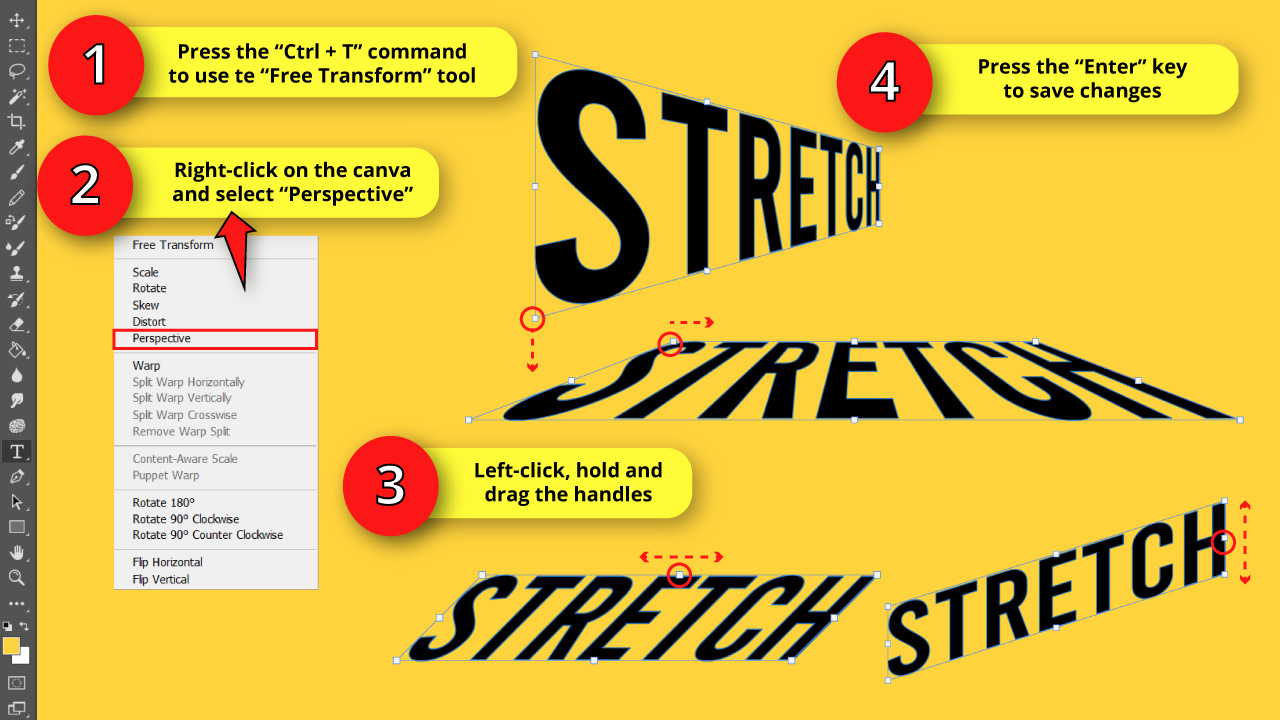

Go to “Edit > Free Transform” on the menu at the top of the screen. Or press the “Ctrl + T” command to shortcut it.
Once the free transform bounding box displays, right-click on it to open the options menu, and select the “Perspective” option.
Now you can transform your text in perspective.
Left-click, hold and drag the bounding box handles to stretch the text in perspective.
Then, press the “Enter” key to confirm the transformation.
Method 4: Make a Distort Text
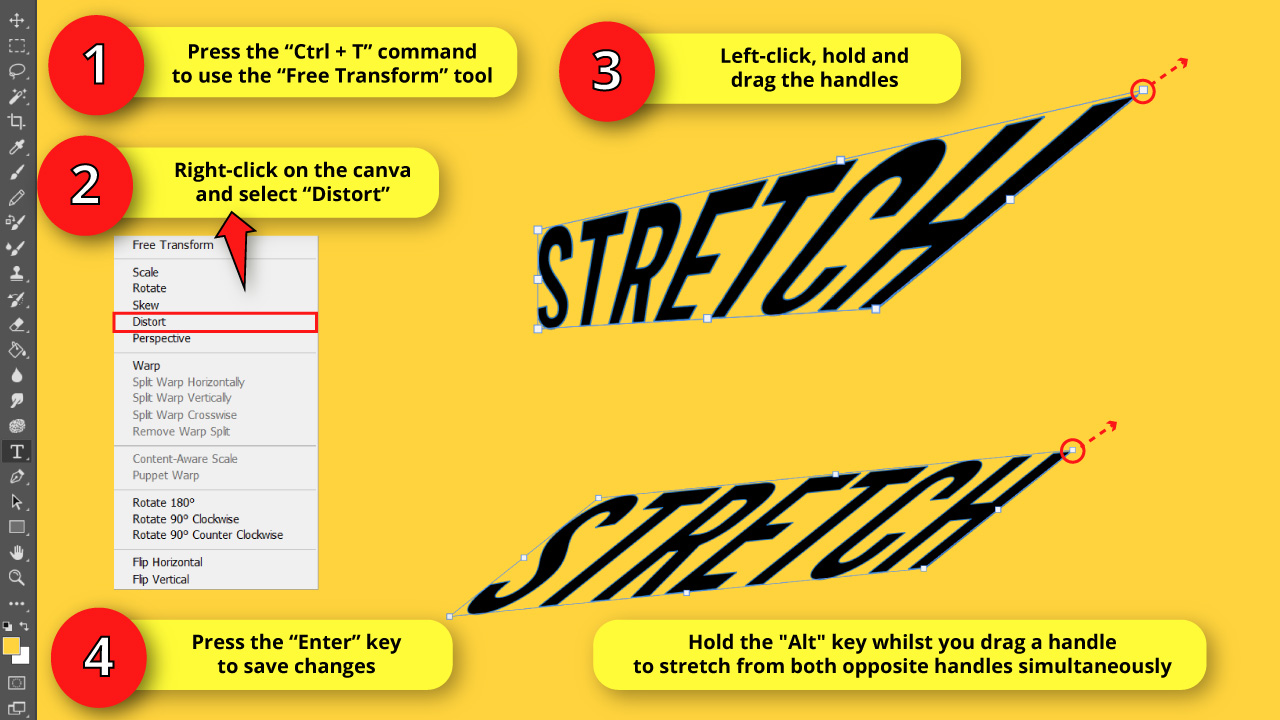

Again, go to “Edit > Free Transform” on the menu at the top of the screen. Or press the “Ctrl + T” command to shortcut it.
Once the free transform bounding box displays, right-click on it to open its options menu, and select “Distort”.
You can now freely move the bounding box handles.
Left-click, hold and drag the bounding box handles to distort them.
If you hold the “Alt ” key whilst dragging one of the bounding box handles, the text will distort from both opposite sides simultaneously.
Remember to press the “Enter” key when you are ready to save changes.
Method 5: Make a Preset Warp Text
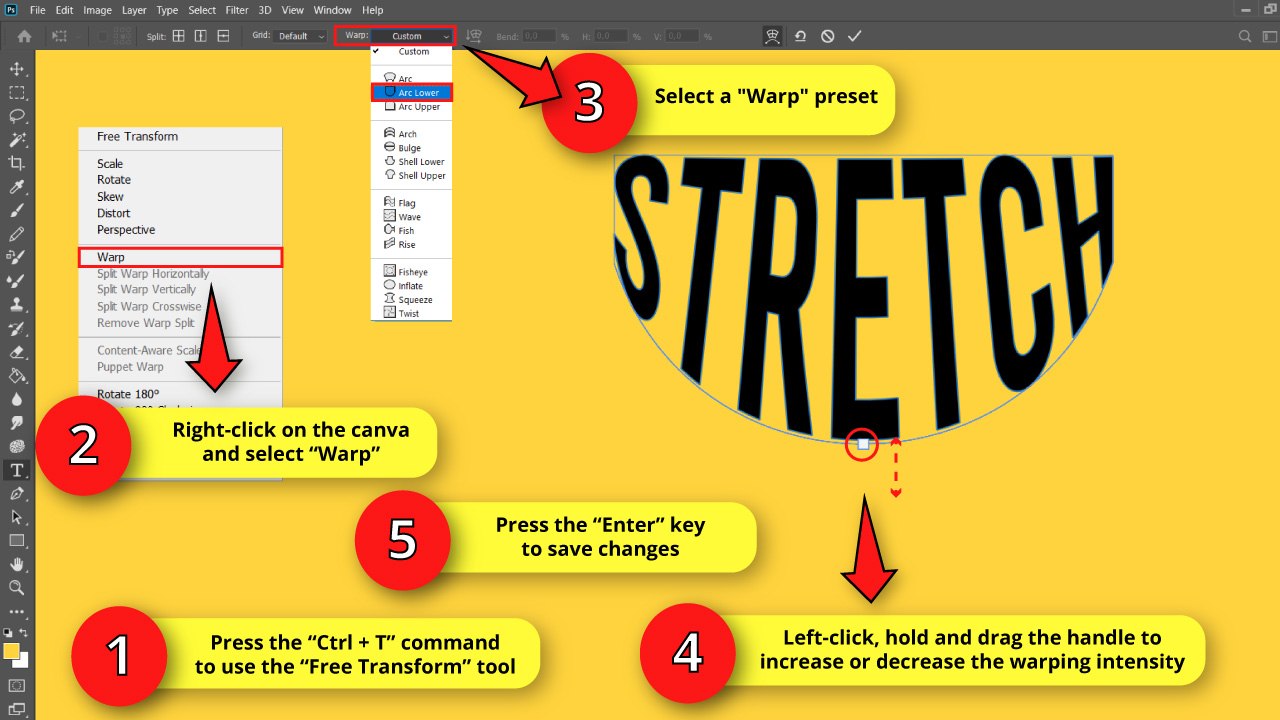
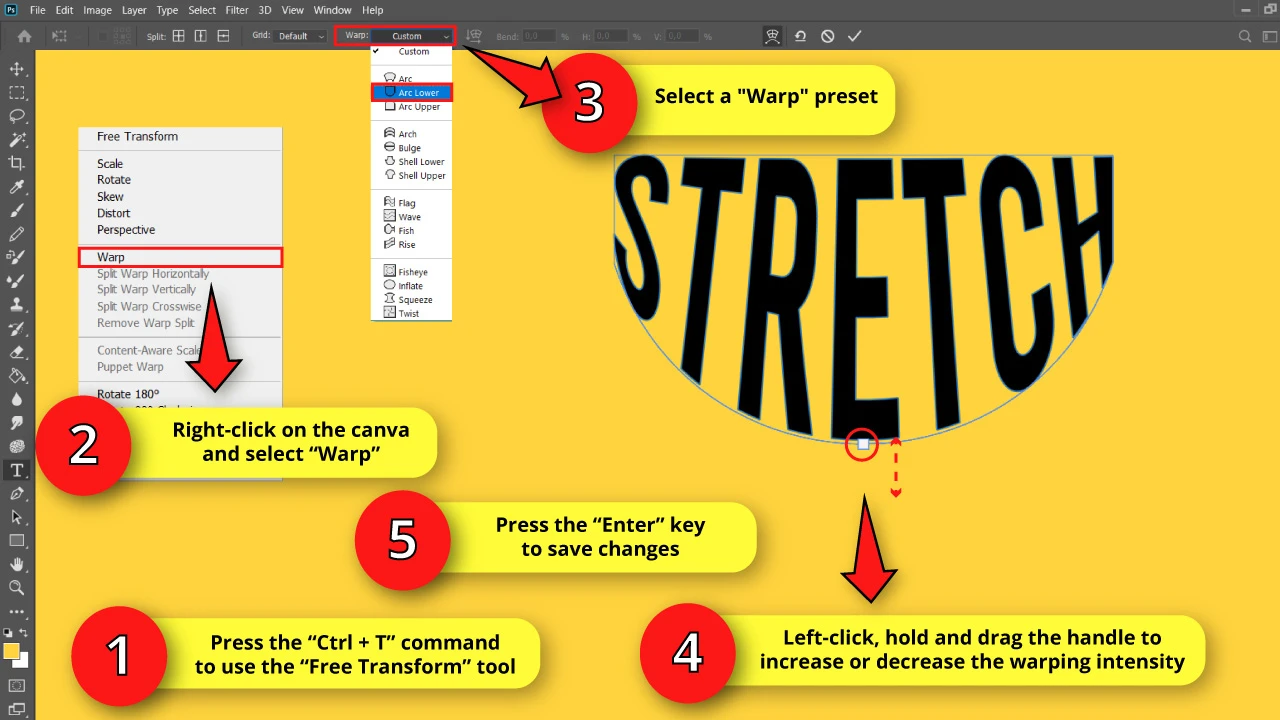
Go to “Edit > Free Transform” on the menu at the top of the screen. Or press the “Ctrl + T” command to shortcut it.
Once the free transform bounding box displays, right-click on it to open its options menu, and select “Warp”.
Now you can warp your text.
Go to the “Warp” presets on the toolbar at the top of the screen, and select your desired option.
For this example I’ll use the “Arc Lower” option.
As you can appreciate, once you select the “Warp” preset, you will have a handle to increase or decrease the warping intensity.
Left-click, hold and drag on the handle to manage it.
If you prefer, you can also add grids and splits to your selected preset to make a custom edition.
We’ll learn how to use these tools in the next method. Stay with me.
Press the “Enter” key to confirm the transformation when you’re done.
Method 6: Make a Custom Warp Text

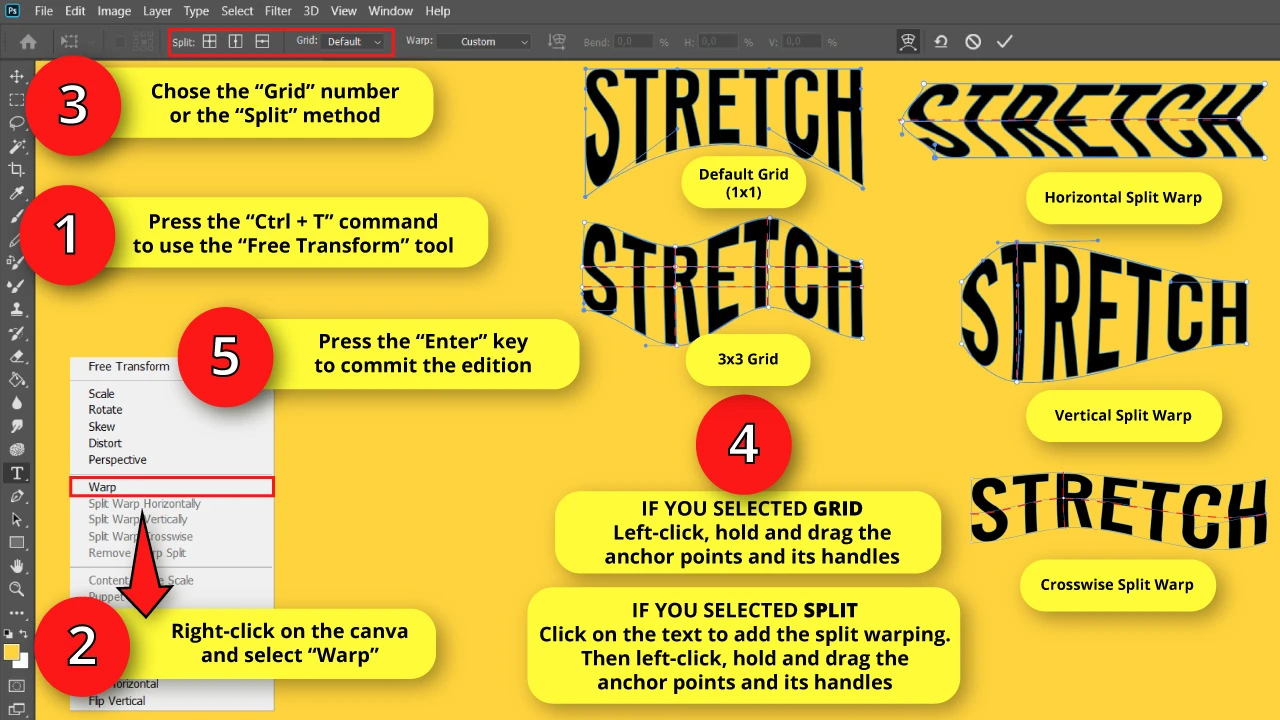
Many of the tools we’ll use for this method are only available on the newer Photoshop versions.
Go to “Edit > Free Transform” on the menu at the top of the screen. Or you can use the “Ctrl + T” command to shortcut it.
Once the free transform bounding box displays, right-click on it to open its options menu, and select “Warp”.
Set the “Grid” field:
Select “Default” to get a 1×1 grid
Select a preset grid (3×3, 4×4 or 5×5)
Or select “Custom” to get the exact grid format you need. Once you click on the “Custom” option, a window with “Column” and “Row” fields will pop up, so you can customize your grid from there.
The grid has anchor points and handles. These will allow us to stretch and distort our text as much as we need.
If split warping is what you’re looking for, the tools you need are “Split the Warp Vertically”, “Split the Warp Horizontally” or “Split the Warp Crosswise”.
Once you select one of these tools, click on the part of the text you want to split the warp in.
Then, you can left-click and drag the anchor point and use the handles to reach the desired effect.
Finally, press the “Enter” key to confirm the transformation.
4. Stretch Text Using the Puppet Warp Tool in Photoshop
This method is only available on newer Photoshop versions, and it only works with rasterized texts.
If you have an editable or shape converted text, you have to convert it to a rasterized image first in order for this method to work.
In the following steps, we’ll learn how to do this from scratch.
Step 1: Rasterize the Text
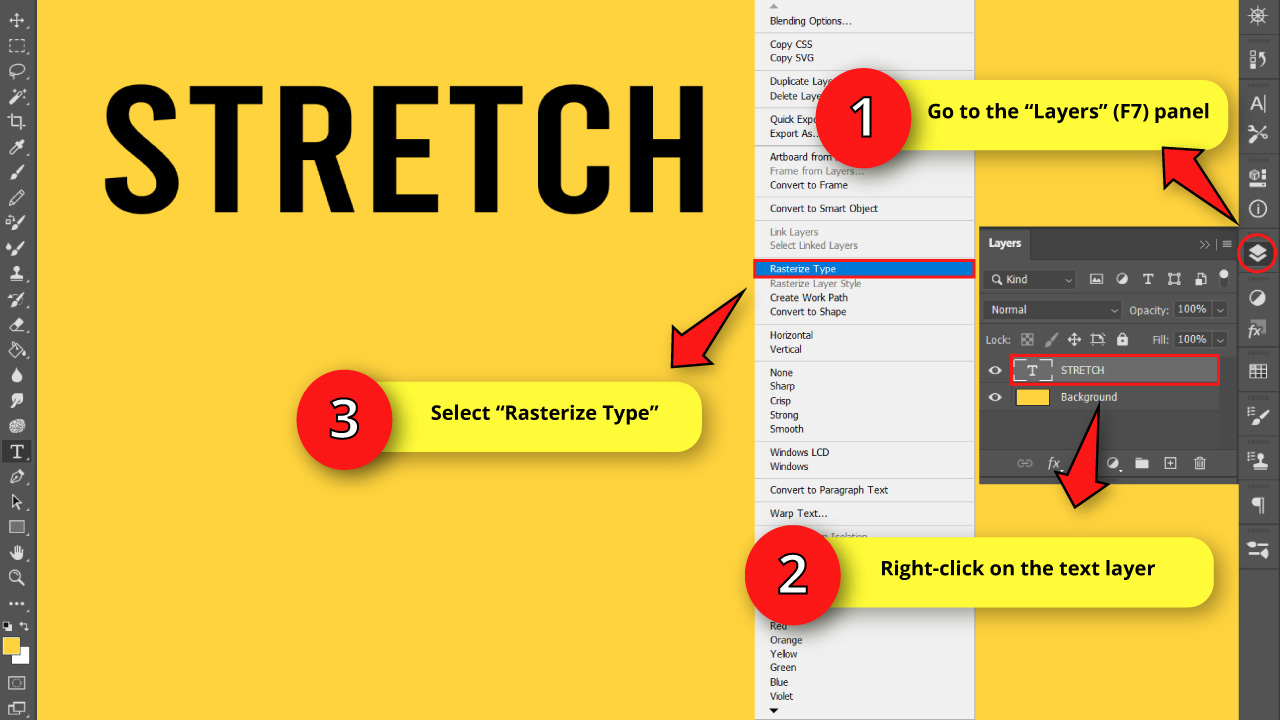

Once you have your text typed in (check the F.A.Q. if you have any doubts about how to type a text), go to the “Layers” (F7) panel, located on the right side toolbar.
If you can’t find it, press the “F7” command to go to “Window > Layers” on the menu at the top of the screen.
Once you are on the “Layers” (F7) panel, right-click on the text layer to unfold its options menu.
Locate the text layer and right-click on it to unfold the options menu, and select “Rasterize Type”.
Now our text has been rasterized.
Step 2: Use the “Puppet Warp” Tool

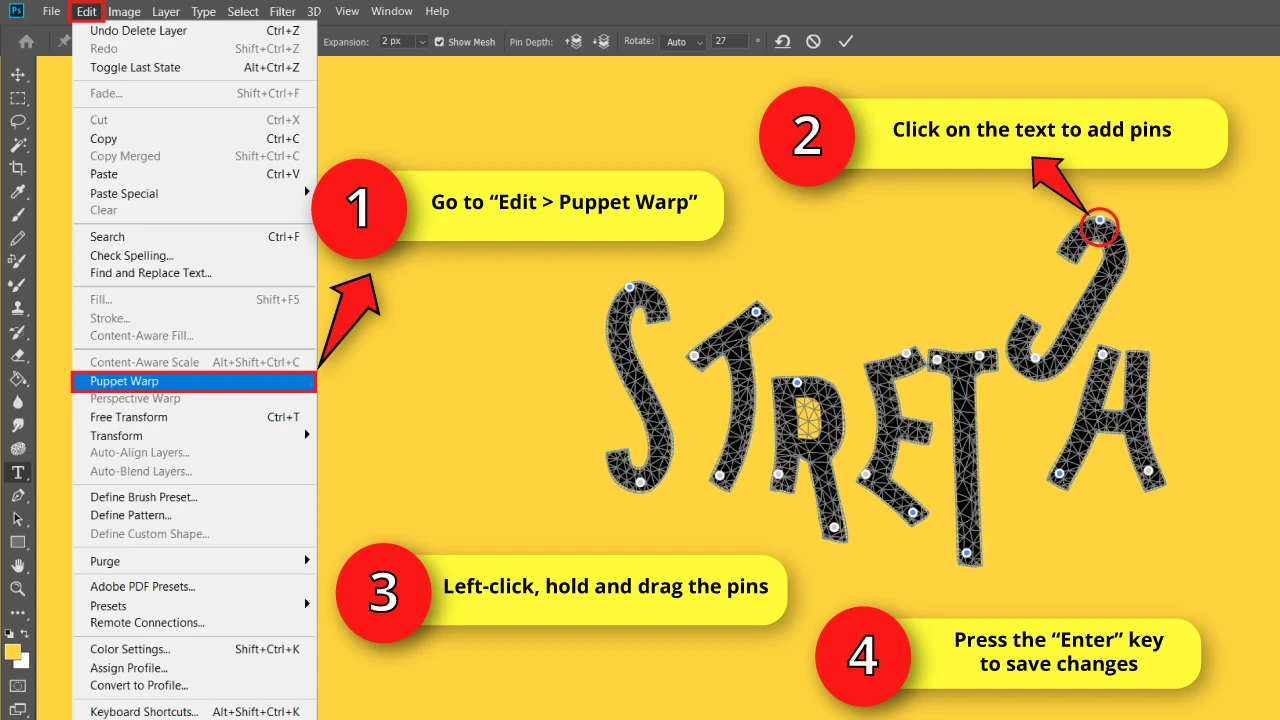
Go to “Edit > Puppet Warp” on the menu at the top of the screen.
Once you select this tool, a geometrical mesh will fill our text.
Now it’s time to add some pins to be able to stretch the text.
You can add as many pins as you want in each character, but make sure to add at least 2 pins for every character, so you have an anchor, and you avoid dragging the whole letter when you stretch it.
Each pin you add will work as a handle to stretch the character.
When you are stretching the character (dragging one of the pins), the other inactive pin (or pins) will work as anchors and axis points.
To stretch a character, just left-click, hold and drag on a pin to get your desired result.
Once you are satisfied with the result, press the “Enter” key to save changes.
Since we are working with a rasterized text, please be careful not to stretch the text too much to avoid pixelation. Use this tool cautiously.
Frequently Asked Questions on “How to Stretch Text in Photoshop”
How to type a text in Photoshop?
Select the “Horizontal Type” (T) tool located on the left side toolbar. Then click on the canva and type your text in. Next, pick the “Font”, “Type”, “Size” and “Color” for your text, all of them located at the top side toolbar.
How can I type a vertical text instead of a regular horizontal one in Photoshop?
Use the “Vertical Type” (T) tool, hidden in the “Horizontal Type” (T) tool nest, located on the left side toolbar.
To unfold the tool nest, just left-click and hold on the “Horizontal Type” (T) tool. Then, select the “Vertical Type” (T) tool by clicking on it.
What do you mean by editable text?
An editable text is a text which has the capability to be edited (typed text, font, size, color, spacing, paragraph, etc). An editable text could be a fresh new text typed from scratch, for example.
What is a rasterized text in Photoshop?
A rasterized text works like a bitmap image, just like a picture. It’s not possible to edit it using the “Character” panel, and can’t be modified using handles since it hasn’t any anchor points.
What is a shape converted text in Photoshop?
When you convert a text into a shape, the text will behave similar to a vector. When you select the “Direct Selection” (A) tool, it will be possible to modify the text by handling its anchor points.
I can’t find the “Puppet Warp” tool in Photoshop. Why?
The “Puppet Warp” tool is located on the “Edit” button, on the menu at the top of the screen. If you can’t find it, it’s likely that your Photoshop version is outdated. This is a new feature, only available on the newer Photoshop versions.
I can’t find the “Custom Grid” option in Photoshop. Why?
The “Custom Grid” option should be in the “Grid” field, on the toolbar at the top of the screen when you select the “Edit > Transform > Warp” tool. If you can’t find it, it’s likely that your Photoshop version is outdated. This is a new feature, only available on the newer Photoshop versions.
I can’t find the “Split the Warp” options in Photoshop. Why?
The “Split the Warp” option is available on the toolbar at the top of the screen when you select the “Edit > Transform > Warp” tool. If you can’t find it, it’s likely that your Photoshop version is outdated. This is a new feature, only available on the newer Photoshop versions.


Hey guys! It’s me, Marcel, aka Maschi. On MaschiTuts, it’s all about tutorials! No matter the topic of the article, the goal always remains the same: Providing you guys with the most in-depth and helpful tutorials!

