

The majority of voicemails are notoriously annoying. Sometimes though, there can be an emotionally stirring message left in your inbox that you want to save.
On most Android phones, saving voicemails is not made easy.
The voicemail is handled by carriers, not by the Operating System.
Should you listen to a voicemail that causes an emotional stir, you need to know where that message is stored so that you can create a copy as a backup.
Where are voicemails stored on Android?
On Android devices, voicemails are stored on external servers controlled by your Mobile Service Provider. Basic voicemails are only saved for 30-days maximum. To listen to your voicemails on Android, you will need to dial into your voicemail.
Visual Voicemail vs regular voicemail
Before continuing, it is important to note that devices and cell carriers differ in how they handle voicemails.
The majority of Android devices do not have Visual Voicemail enabled by default.
What is Visual Voicemail on Android?
Visual Voicemail is like an inbox view of all your voicemails. They are stored locally on your device and can include transcripts and audio recordings. These are the only types of voicemails you can find easily on Android devices.
Without this feature being supported by your device and service provider, it will not be available.
There are apps that you can configure in the device settings to move your voicemail management to a 3rd party service provider to enable Visual Voicemail. (More on that to follow).
Accessing regular/basic voicemail on Android
The regular/basic voicemail is what most Android devices have enabled.
The recordings are not stored locally but instead stored on servers that are managed by your Mobile Service Provider (MSP).
It is inconvenient for PAYG customers because without credit, you are tricked into believing you need to add credit to listen to your voicemail.
You do not!
You can ring your phone from another number, reach the voicemail, press the star key (*) on the phone keypad, then insert your pin.
Settings differ by device manufacturers. Some may use the # (hash or pound) key.
On a side note: Did you know that on Android, you can actually make a contact ring even if you have the “Silent” Mode on? This can be pretty useful at times!
How to dial into your voicemail on Android
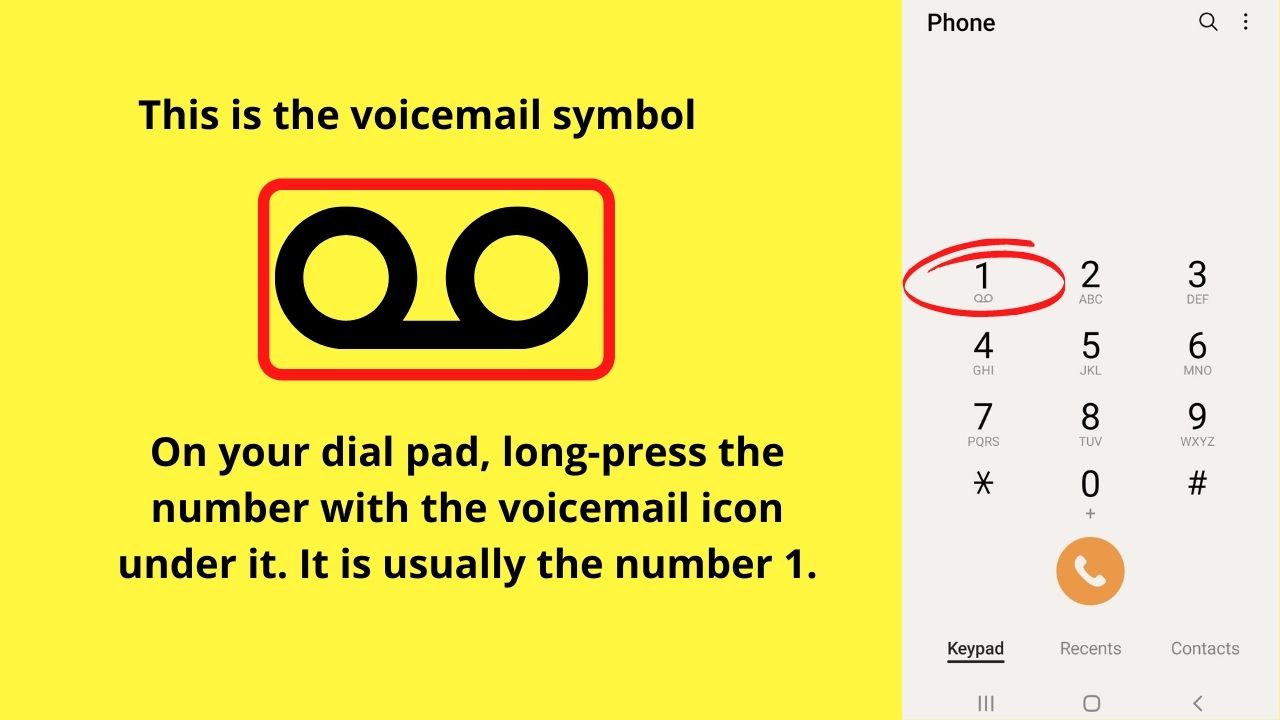
Most devices have a shortcut on the dial pad to access your voicemail.
- Tap the phone icon
- Look for the voicemail symbol (it is usually the number 1 on the keypad)
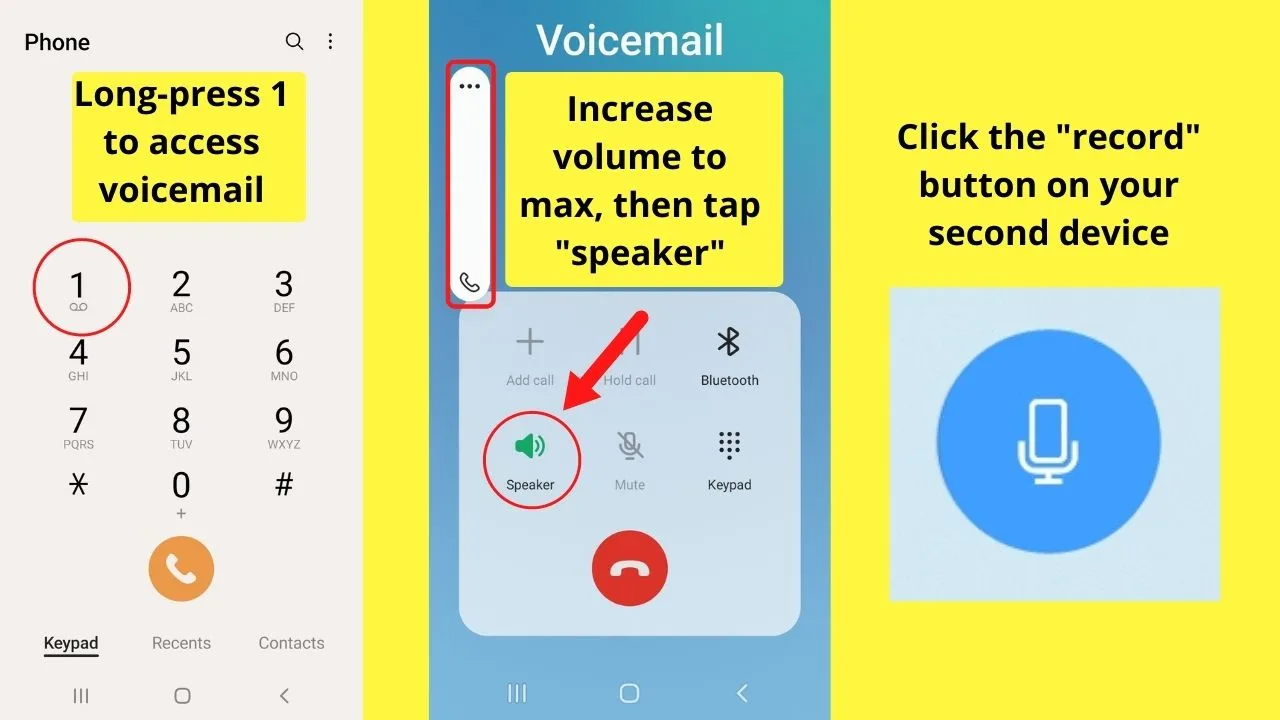
- Long-press to call your voicemail.

Should a message prompt show that “No voicemail number is stored on the card”, it will need setup first.


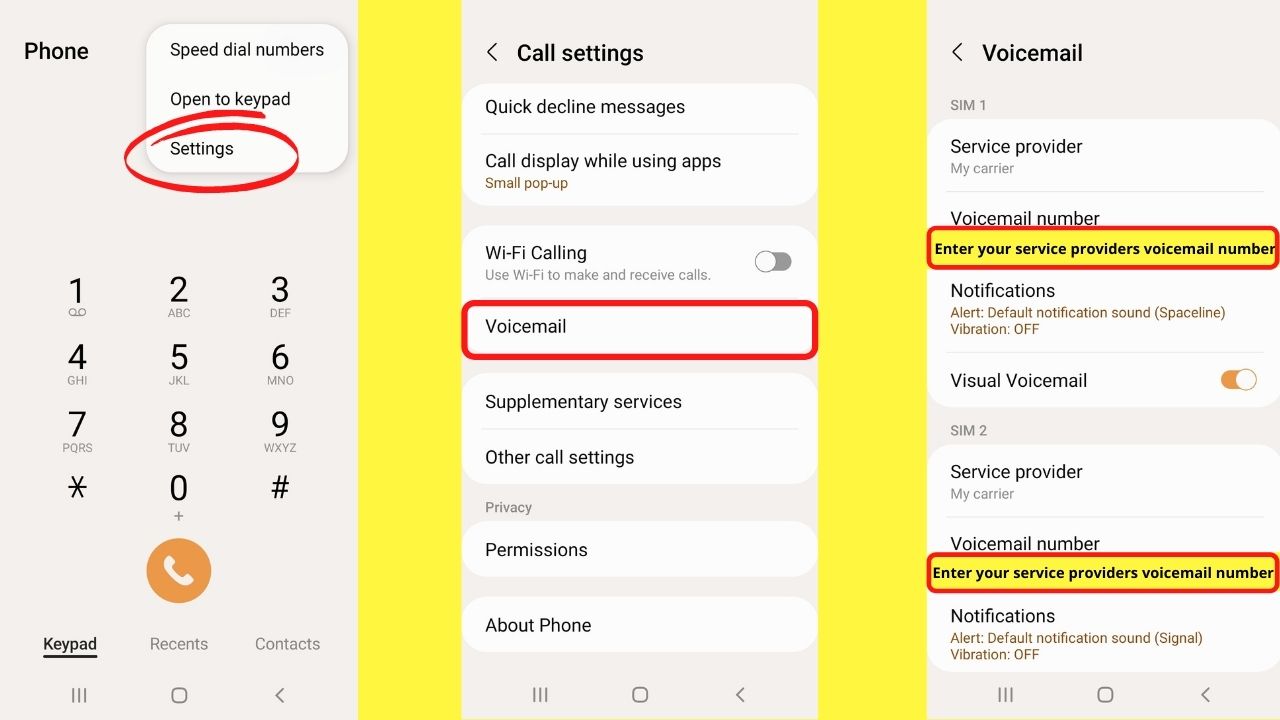
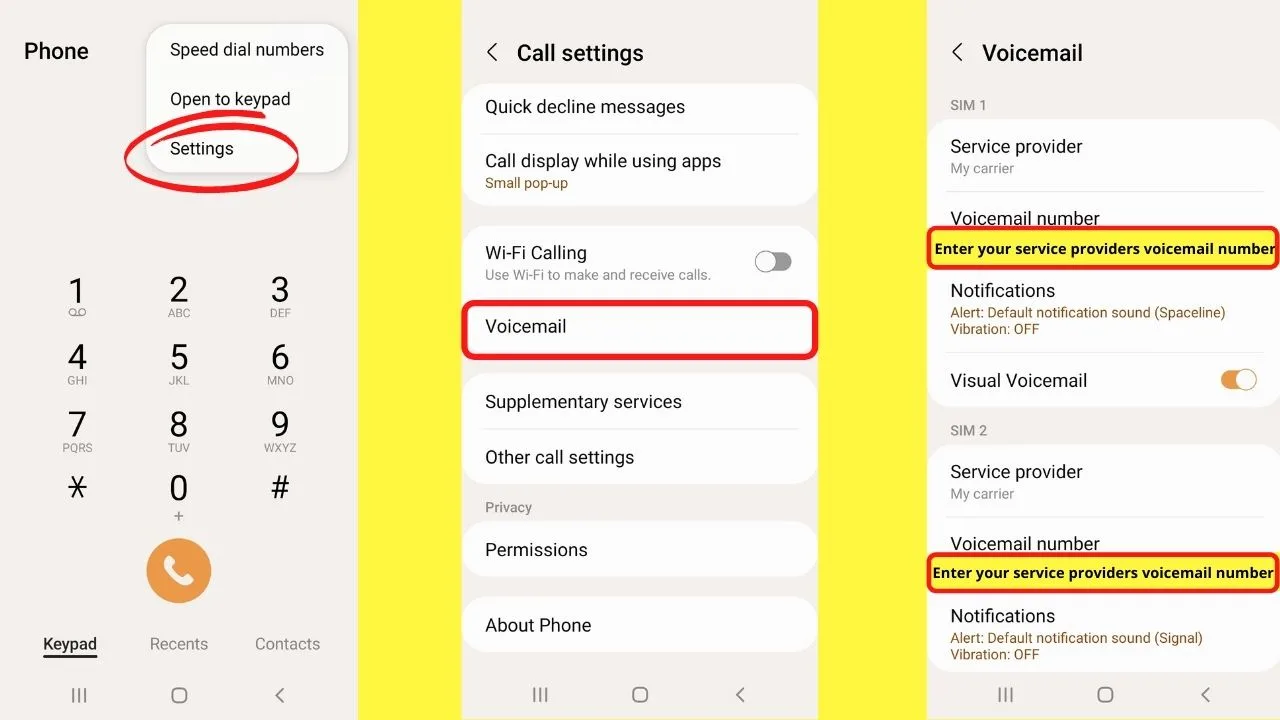
How to setup basic voicemail for the first time (new sim card) on Android
- On the top right of your phone keypad screen, tap the three vertical dots
- Tap on “settings”
- Tap on “Voicemail”
- Tap “voicemail number” then enter the number your Mobile Service Provider uses, or the shortcode
- Tap “OK” to apply the changes
- Tap the back button a couple of times to return to the keypad, then long-press on one to call voicemail.
Some operators use phone numbers to call voicemail, others have shortcodes. The codes are USSD codes that start with a hash (#) followed by a few digits, although they can run up to ten digits.
Generally, most voicemail servers are accessed from anywhere in the world using your unique pin.
If you forget your pin, you do need to contact the service operator to reset it. Depending on your service carrier, there may be a text option such as texting RESET to #222 (as an example).
A cause for concern among users who would like to save recordings is that all Mobile Service Provider’s auto deletes voicemails after a month, at most. Some providers only store voicemails for 14-days and then automatically delete them.
To avoid messages being purged from the server, customers need to continually re-save the voicemail, or download a recording.
How do I download a voicemail on Android?
Technically, Android only stores Visual Voicemails locally. Without a Visual Voicemail app, they cannot be ‘directly’ saved to the device. Without Visual Voicemails enabled, and supported by your carrier, you need to get creative.
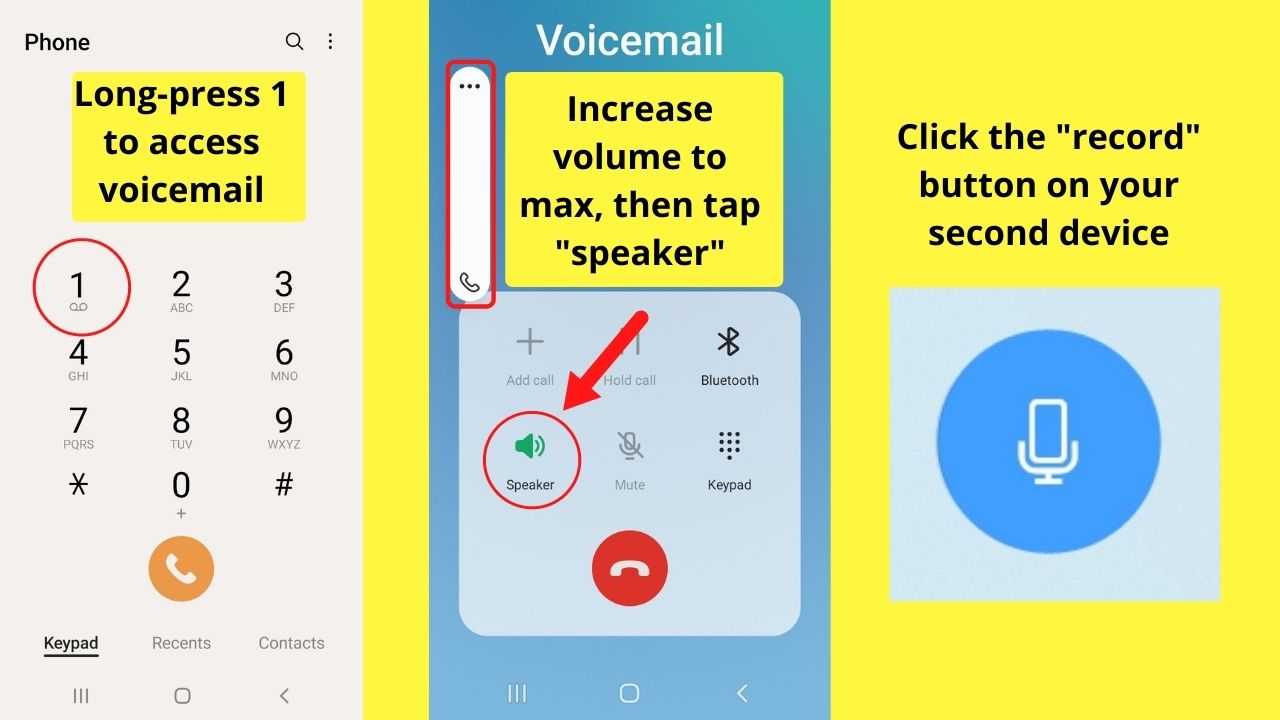
A workaround is to use a recorder to make an audio recording.
Unfortunately, that workaround requires a second device because the Android OS does not have a recording functionality that works when a call is in progress.
Since you have to call your voicemail, the voice recorder that comes as standard with the Android OS cannot record a call.
Instead, you can play the voicemail over the loudspeaker and use a second device to record the audio.
Other devices do not need to be Android. Most laptops and PC systems have audio recording functionality.
As an example, using a Windows machine,
- Type “recorder” in the search bar on the bottom left of the screen
- Click on Voice Recorder
- Allow access for the app to use your machines microphone
- Tap the record icon to begin recording then press play on speaker phone on your device.


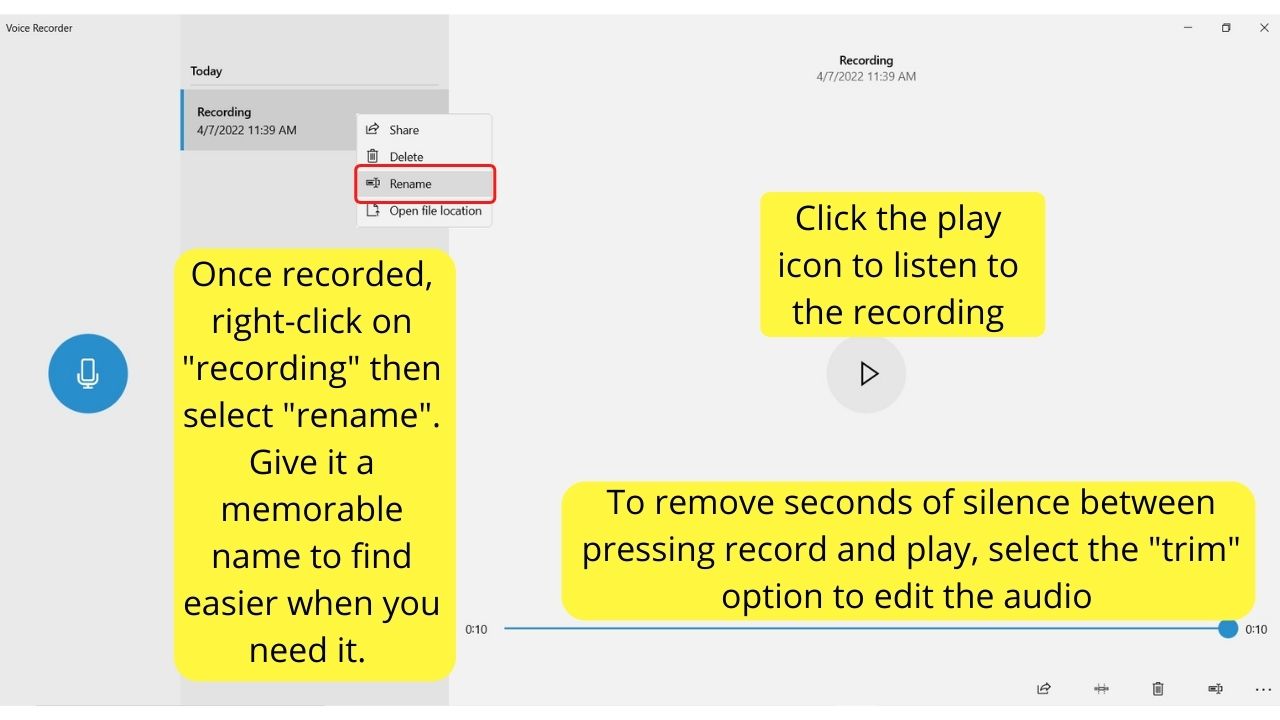
Do this at the same time, or as close as possible, to when you press play on the voicemail you want to record. There is a trim option available if there is a delay.
On the Android device, play the voicemail back on speaker with the volume up at max to get a clear recording on another device.
Once recorded, you can press the play button to listen to the playback, trim the audio (if required), and rename the audio file. If you don’t know how to do that, here’s a guide on “How to rename files on Android.”

Depending on the device and software you use for the recording, there may be an option to select a file type. On Windows, the defacto file type for “Sound Recording” are .m4a.
It is cross-platform compatible, so you can send it to Google Drive, Dropbox, or another device to save a copy.
Which file types are best for audio recordings?
M4a files are like MP3 files with more lossy compression done to reduce the file size, but the difference is minimal.
Lossless compression file types are .wav, and .flac. These offer slightly higher sound quality.
If you plan to do multiple edits to the recording, .aiff, and .pcm file types save the files with no compression, meaning you can edit multiple times without degrading the sound quality.
How to get Visual Voicemail on any Android Device
If you are switching to Android from an iPhone, Visual Voicemail will be missed.
It is a huge time saver, especially if you get a service with transcripts. It is much quicker than listening to multiple voicemails, pressing 1 to save, 3 to delete, and on, and on, and on. Tap, read, swipe, save, or delete is much easier.
Android devices that are either incompatible with Visual Voicemail or not supported by the Mobile Service Provider can get Visual Voicemail by using call forwarding to a 3rd party service.
Some are ad-supported, others are subscription-based. All are powered by Android Apps available in the Play Store.
The following steps are how to install the Hullomail Visual Voicemail Service. The setup for different services will be similar, with the bulk of the voicemail transfer handled automatically.
To change from basic voicemail to Visual Voicemail, follow the steps below (replacing Hullomail with any other service you would like to try).
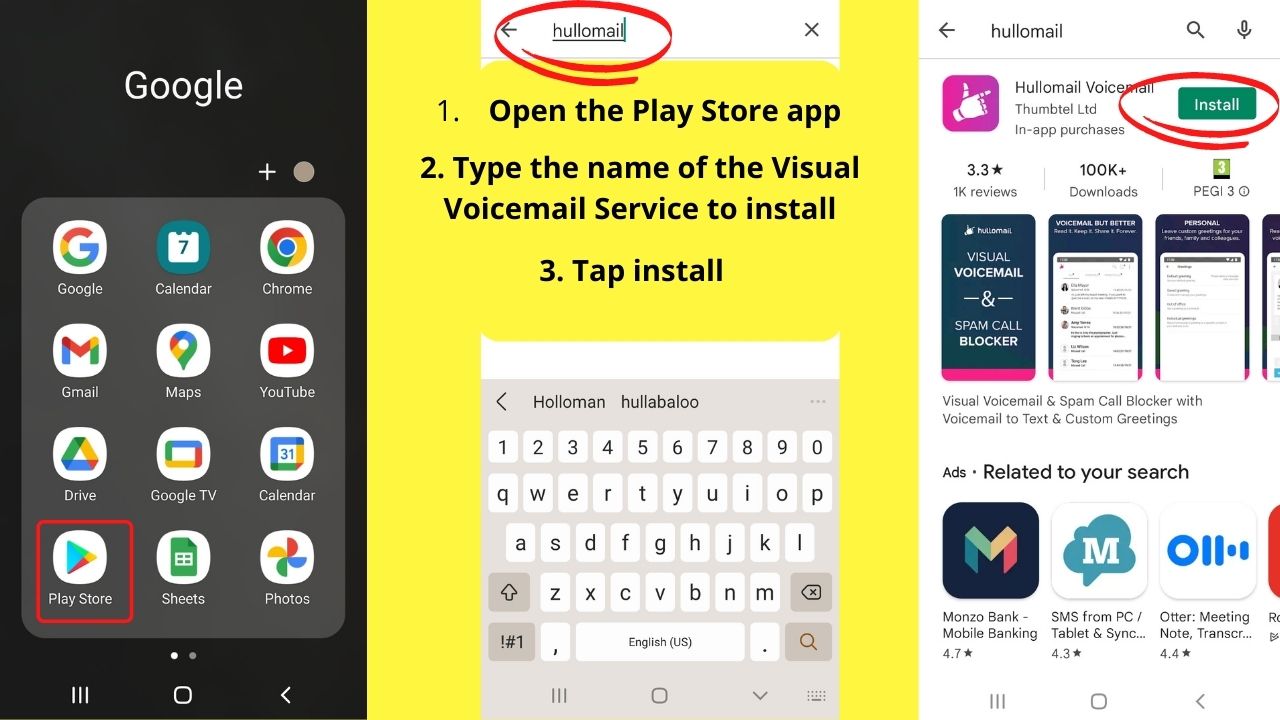
- Tap on the Play Store app
- Type in the Android Visual Voicemail service name (in this example setup, it is Hullomail).
- Tap install

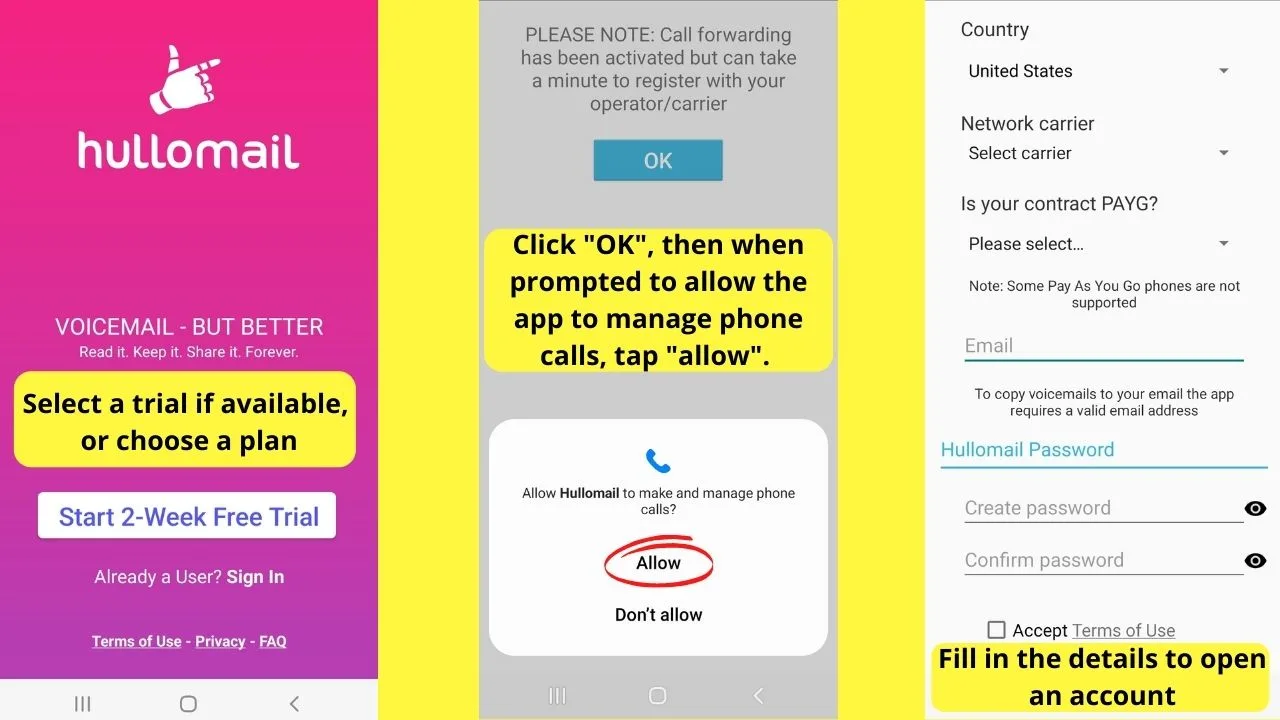
Once installed, you will be prompted to open an account.
4. Tap “2-week free trial” (or choose a plan if the offer has changed).
5. Tap “OK” then a prompt will appear asking you to allow the app to manage phone calls on your device. Select “allow” or the app will not be able to forward calls to another service.
6. Complete the details to set up your account.

Once your account is activated,
7. If prompted to allow the app to “access your contacts” select your preference. Allowing will let you see who left a voicemail. Without access to contacts, it can only show a number.
8. Tap the 3 vertical dots on the top right of the screen and tap on “settings”.
9. Tap “Activate voicemail”.
10. On your device, access the “Voicemail” settings and replace your carrier’s voicemail number with your new service mailbox number.
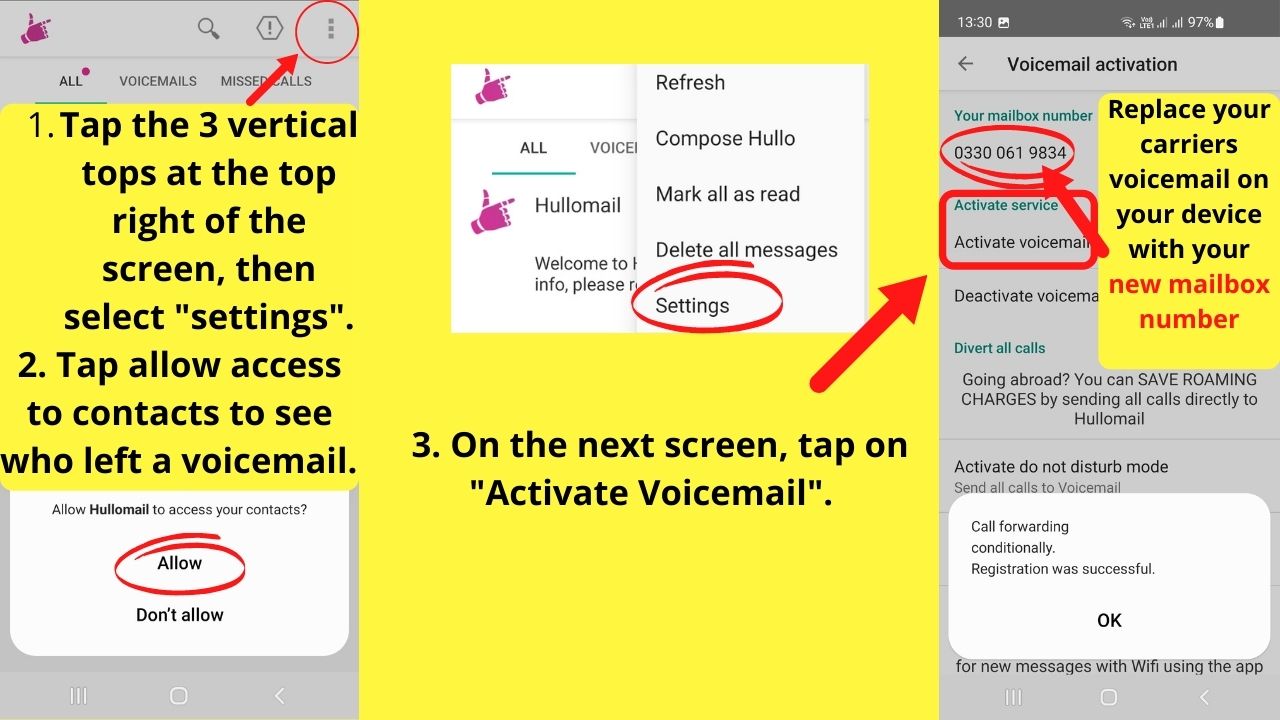

Call forwarding will be handled with the new provider with Visual Voicemails showing in the app.
Different services offer different features. The above is only one of many. Do your research on Visual Voicemail Apps for Android to find a service that meets your needs and within your budget.


Hey guys! It’s me, Marcel, aka Maschi. On MaschiTuts, it’s all about tutorials! No matter the topic of the article, the goal always remains the same: Providing you guys with the most in-depth and helpful tutorials!

