

While Canva does offer some useful features to edit audio, the overall audio editing capabilities of Canva remain very limited. While Basic features such as trimming audio and changing the audio volume are to be found in Canva, more advanced features such as audio effects and noise reduction for voiceovers (reverbs, delays, echos, etc.) are still missing.
Importing your own audio files & music into Canva
As trivial as this may sound, working with your own audio in Canva has not been a thing until pretty recently.
It used to be that way that you could only use audio from Canva’s very own audio library to enrich your (video) projects.
Luckily, this is, however, a thing of the past.
Uploading audio to Canva is now as simple as it should be and you can simply upload your mp3s to Canva by heading over to the Uploads tab in the left sidebar.
Then simply select “Upload media” and search for your audio file on your computer. Or, even better, simply drag & drop your mp3 into the uploads area and you are ready to go.
As you would hope with modern software, both mp3s and .wav files are supported by Canva.
How to Trim Audio in Canva

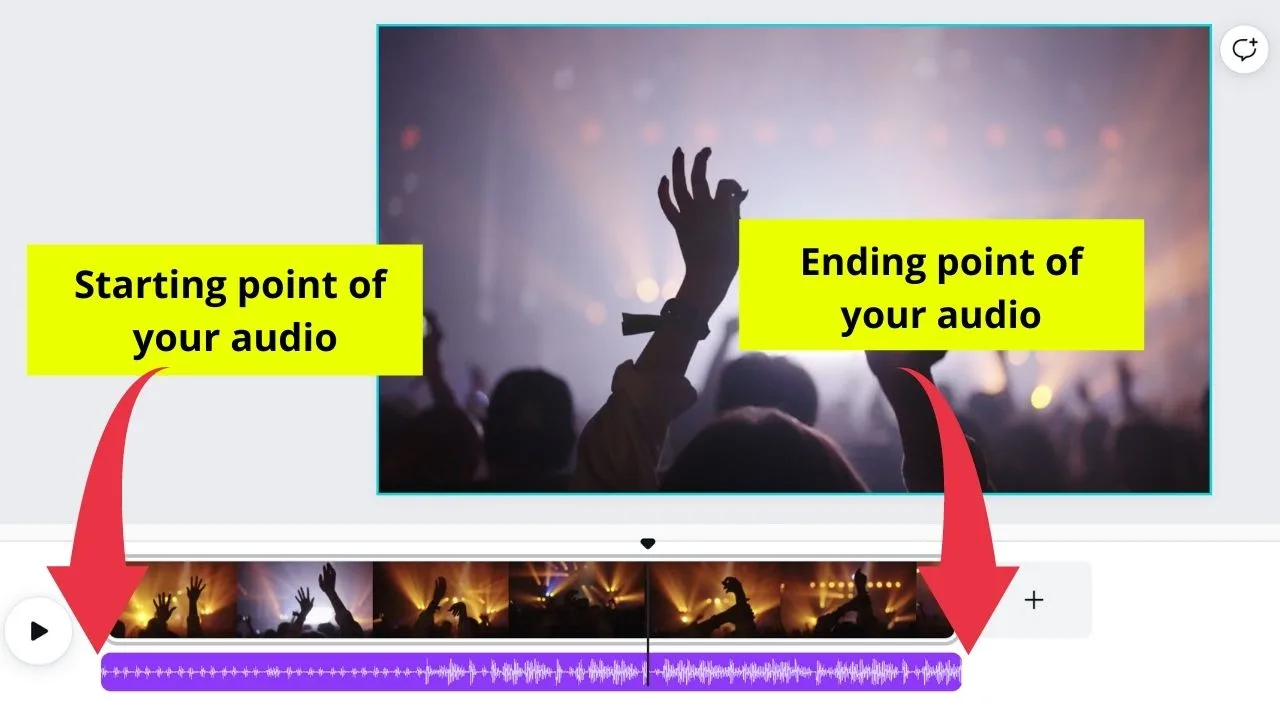
Trimming audio clips in Canva is as easy as it should be. Simply drag & drop an audio sequence into your project and then hover over either the starting or ending point of your audio clip and then drag to trim your audio clip.
This all works fine as long as you would just like to do very basic audio edits.
However, let’s imagine you would like to chop your audio track into several pieces and would just like to use parts in the middle of your audio sequence, then Canva won’t be your best friend, as trimming audio tracks, at least for the moment, only works by adjusting either the starting point or ending point (or both).
That said, you can’t simply chop out pieces from individual audio tracks.
In this case, to achieve the desired result, you would need to duplicate your audio track (Canva does have a button for that) and then trim each audio track accordingly.
Change the audio speed in Canva
Sometimes it can come in very handy to adjust the speed of an audio track. Your audio track might run at 120 BPM but it would sound/fit better at 100 BPM.
Unfortunately, Canva won’t be of any help in this scenario, as adjusting the audio speed is not a feature that Canva yet supports.
But my guess would be that this is something that Canva might implement in the (near) future.


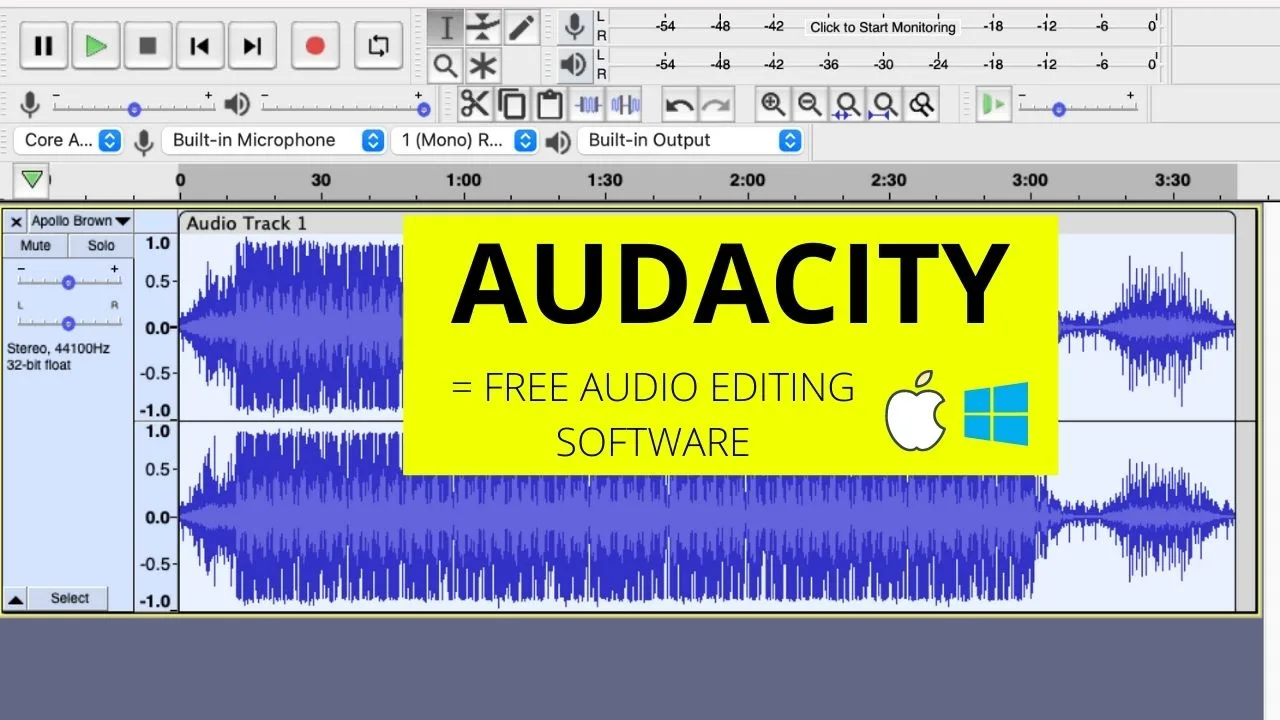
For now, to solve this problem, you would need to export your audio track, then speed up your audio in third-party audio software such as Adobe Audition (paid) or Audacity (free for both Mac and Windows) and then reimport your audio into Canva.
The same is also true when trying to slow down/speed up videos in Canva.
How to fade in & fade out audio in Canva
For a very long time, audio fades could not be performed properly within Canva.
However, this has now changed and it is now possible to set audio fade ins and audio fade outs in Canva manually.
All you need to do for that is to select the audio track, then click on “Audio effects” in toolbar above the project and then simply adjust the “Fade in” and the “Fade out” fader.
Noise reduction in Canva
Noise reduction is yet another crucial audio feature that you will search for in vain in Canva. I do understand that Canva is not an audio editing software, though, so I get it why this has not yet been implemented.
However, as Canva does indeed support Voice-over-recordings, it would be very nice to see such a feature in upcoming Canva updates.
Why is that so important, though?
Well, voice-over recordings are often accompanied by very annoying background noise, be it from your computer fan (my 8-year old Macbook Pro is noisy as hell, arghhh) or maybe just from people passing by or a crying baby in the background…
…and in these cases, having a noise reduction function can come in very handy.
As we don’t have that yet in Canva, some post-processing of your audio after exporting your audio/video from Canva will, in many cases, be inevitable.
What about Canva and audio effects?

Audio effects such as compression, delay, hall or maybe some distortion effects are, in fact, missing in Canva.
However, let’s be fair, this is not something that you could expect from software like Canva in the first place.
That said, if you would further like to process your audio, you would need to do that in dedicated audio software such as Adobe Audition or Audacity (free software).
Once you edited your audio, you can then obviously reimport it into Canva if need be (but generally speaking you would want to do it the other way around —> do the basics in Canva and then finalize your audio/video tracks in 3rd party software).
Working with audio in Canva image/slides projects v. Canva Video projects
Depending on the type of project you are working on in Canva, you will find different ways to edit audio.
In case you create a simple project based on images and photos only, then audio editing features are almost non-existent.
In these types of projects, you will find your audio track above the project page and you will only be able to add one audio track altogether.
So, this means, no matter how many pages your project might have, only one piece of music (= 1 audio track) can be played back.
And your audio track will simply follow along your pages and the playback time entirely depends on the duration of the slides.
In case you are working on a video project (select create a new project in the upper-right corner and then choose the video template), then after adding an audio track, you will find it below the actual video.
In this latter case, “the full palette” of Canva audio editing will be available such as adding more audio tracks (duplicate audio tracks) and setting the audio volume for each individual track.
How to separate audio from video in Canva
You can only separate audio from video in Canva if you added audio tracks from Canva’s audio library. In that case, to separate an audio track from any video, do the following:
- Left-click on the video
- In the timeline below the video, select your audio track
- Press “Delete” on your keyboard or hover over the end of the audio track and click on the three dots symbol and choose “Delete audio.”
In case you have uploaded a video to Canva that already contains an audio track, you won’t be able to separate this audio track from your video because Canva won’t display the audio track separately from your video.
This is a pity because this is not how things work in other software.
In professional video software for instance, whenever you import a video that comes with audio, the software will automatically split up your video into a video track and an audio track. This is not the case with Canva.
How to extract audio from video in Canva
There is no way to extract audio from video in Canva. For uploaded videos to Canva, there is not even an audio track visible. Canva stock videos do not come with audio in the first place.
With that said, if you do wish to extract audio from a video, you will need to use different software.
If you are on a Mac, you can simply use the built-in QuickTime video player to get the job done.
To extract audio from video in QuickTime, simply open up your video in QuickTime, then go to “File,” click on “Export as” and then choose “Audio only.”
Like this, QuickTime will only export the audio track of your video.
If you are on a Windows PC, you can use the website audio-extractor.com to extract audio from video. Don’t worry, it’s completely free!
On audio-extractor, click on “Open video” and then locate your video on your computer and upload it.
Then, choose the audio format that you would like to use for the output. If you want good quality, you should go with WAV. If you don’t care too much about the audio quality and care more about the file size not being too big, then you can choose .mp3.
Once chosen, click on “Extract audio” and you are good to go. Simple as that.
Enjoy.
Frequently asked questions about audio editing in Canva
How can you fade in audio in Canva?
Fade ins are done automatically by Canva. You won’t hear these fade ins in the audio preview, though. After you downloaded your project, however, you will find out that your audio track indeed contains a fade in at the beginning of the audio track.
How can you fade out audio in Canva?
Fade outs are automatically performed by Canva. You won’t hear these fade outs in the audio preview, though. After you downloaded your project, however, you will find out that your audio track indeed contains a fade out at the end of the audio track.
Does Canva offer audio pitch functionality?
Pitching audio is not supported by Canva.
Can you speed up audio files in Canva?
The audio speed can not be adjusted in Canva. To make this kind of audio edit, you would need to first download your audio track, then pitch it in some external software such as Audacity or Adobe Audition and then reimport your audio file to Canva.


Hey guys! It’s me, Marcel, aka Maschi. On MaschiTuts, it’s all about tutorials! No matter the topic of the article, the goal always remains the same: Providing you guys with the most in-depth and helpful tutorials!

