
Feeling stuck with your plans for a certain corporate event?
Or do you simply want your team to list all their ideas for a team project you’re submitting by the end of the week?
No matter the reason you have, you can always go back to using the traditional whiteboard in your meeting room to list those ideas.
But, while those traditional whiteboards are nifty, we’re now living in a techy world.
Hence, Canva launches its digital version of the whiteboard through its latest tool — the Whiteboard.
However, what can we expect from these whiteboards? How do we use them?
All these and more you’ll learn if you keep reading below.
How to Use Canva Whiteboard
To use Canva Whiteboard, type “Whiteboard” in the search bar. Choose either a blank template or a pre-made one. Then jot down your ideas using sticky notes and shapes connected by lines. For more interaction, add stickers, videos, images, and comments. Also, set a timer so your team’s in sync.
With Canva’s tagline, “Give your ideas space to grow,” let’s begin learning the basics of using this newest feature below.
Step 1: Click the search bar on Canva’s home page and type “Whiteboard” in it.


A dropdown menu listing all the relevant search results will then appear, including “Whiteboard.” Click to select it.


Or, you can select the “Whiteboard” option under the “You might want to try…” section to try it.


Step 2: On the “Whiteboard Template” page select the “Create a blank whiteboard” template.
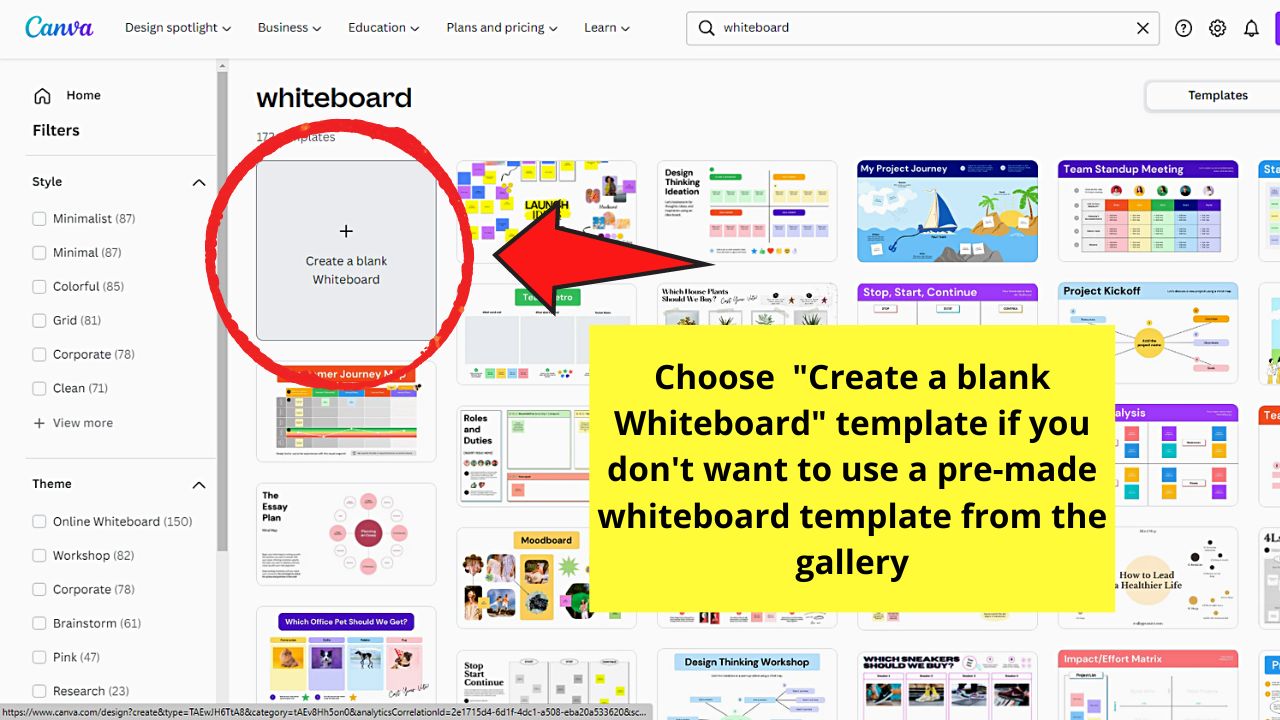
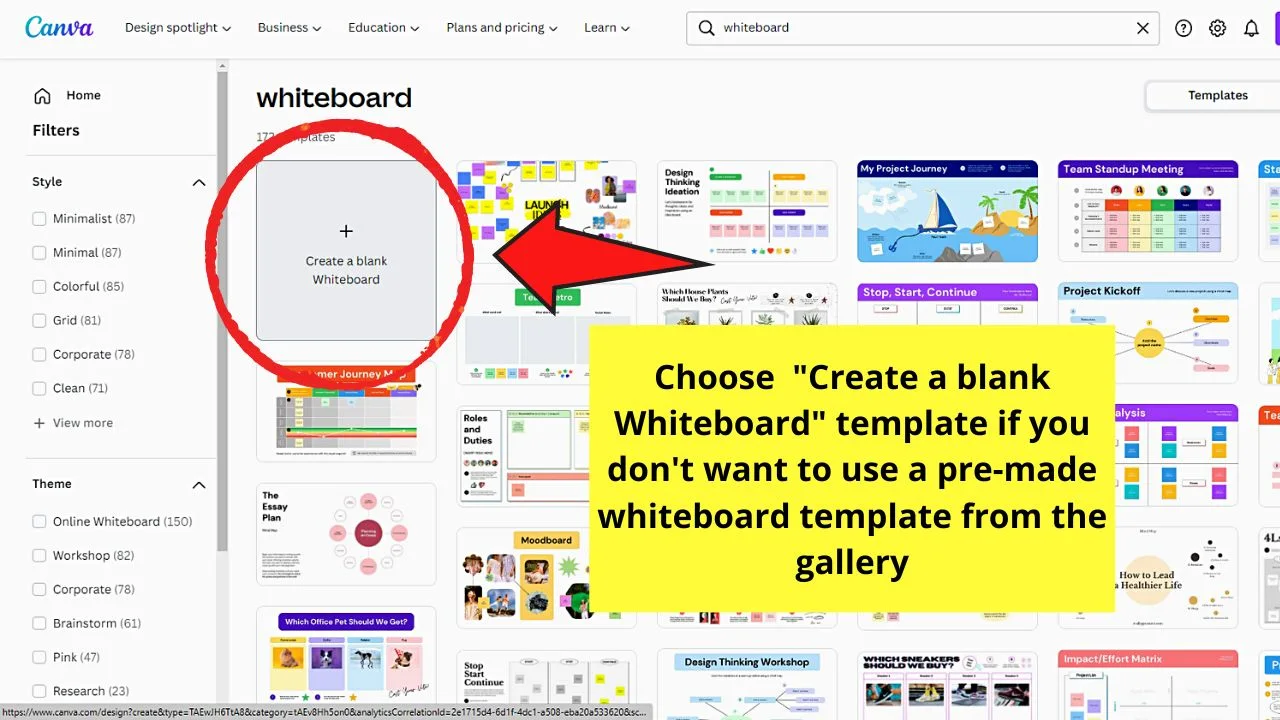
But, aside from the blank whiteboard template, there are also available pre-made or pre-designed whiteboard designs.
From mood boards, SWOT Analysis boards, mind maps, fish diagrams, and more, you have the freedom to choose what design to use.


You can always select one of them for your specific brainstorming and collaboration needs.
Step 3: Select the “Templates” tab on the left-side panel of the new whiteboard page that appears.
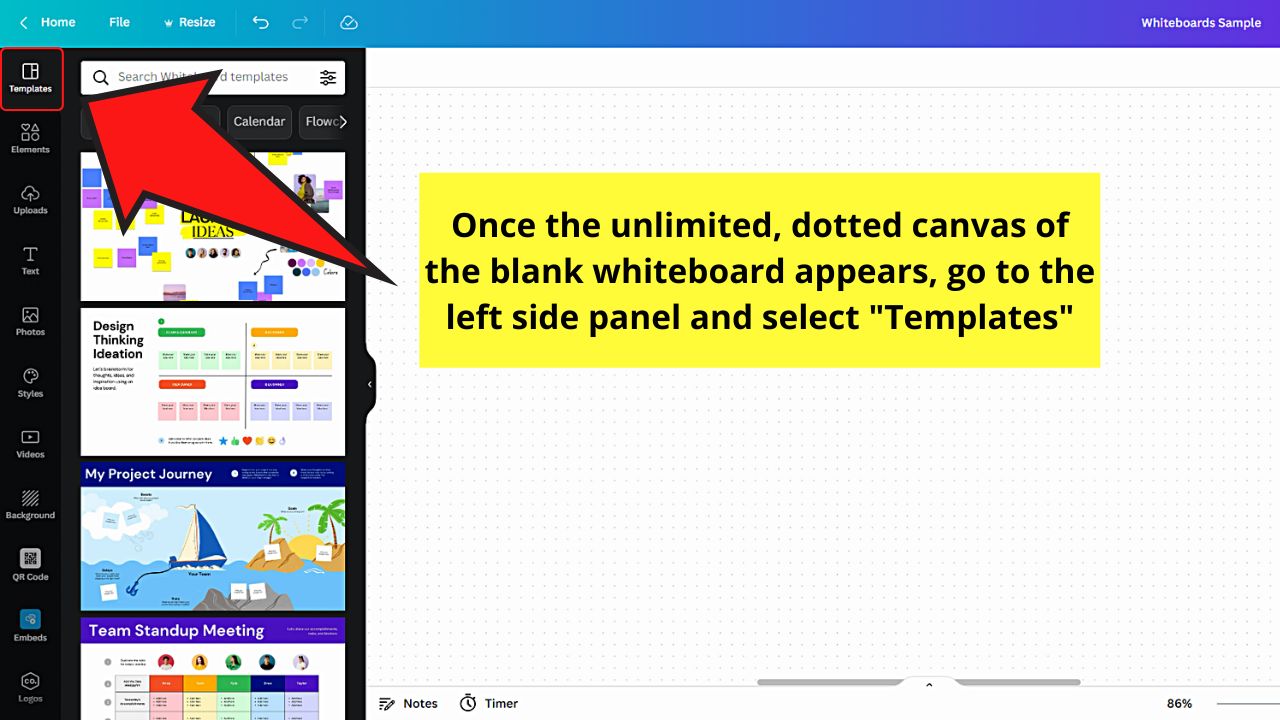
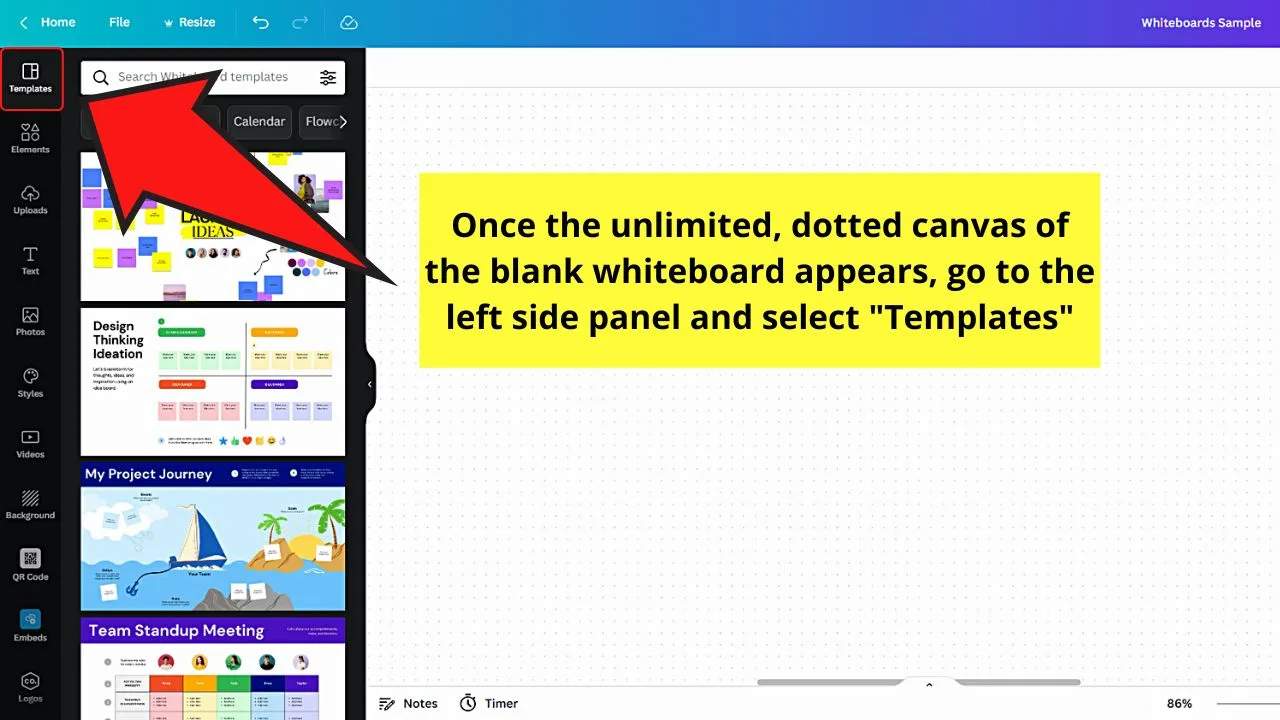
If you notice, there is no blank page on the editing space of the whiteboard. Just an unlimited, dotted canvas is present.
Don’t worry about that. Since Canva wants to give its users the space to grow their ideas, the app’s developers gave them the space they wanted.
Step 4: On “Templates,” type in the search bar the keywords of the specific whiteboard template you’ll use.
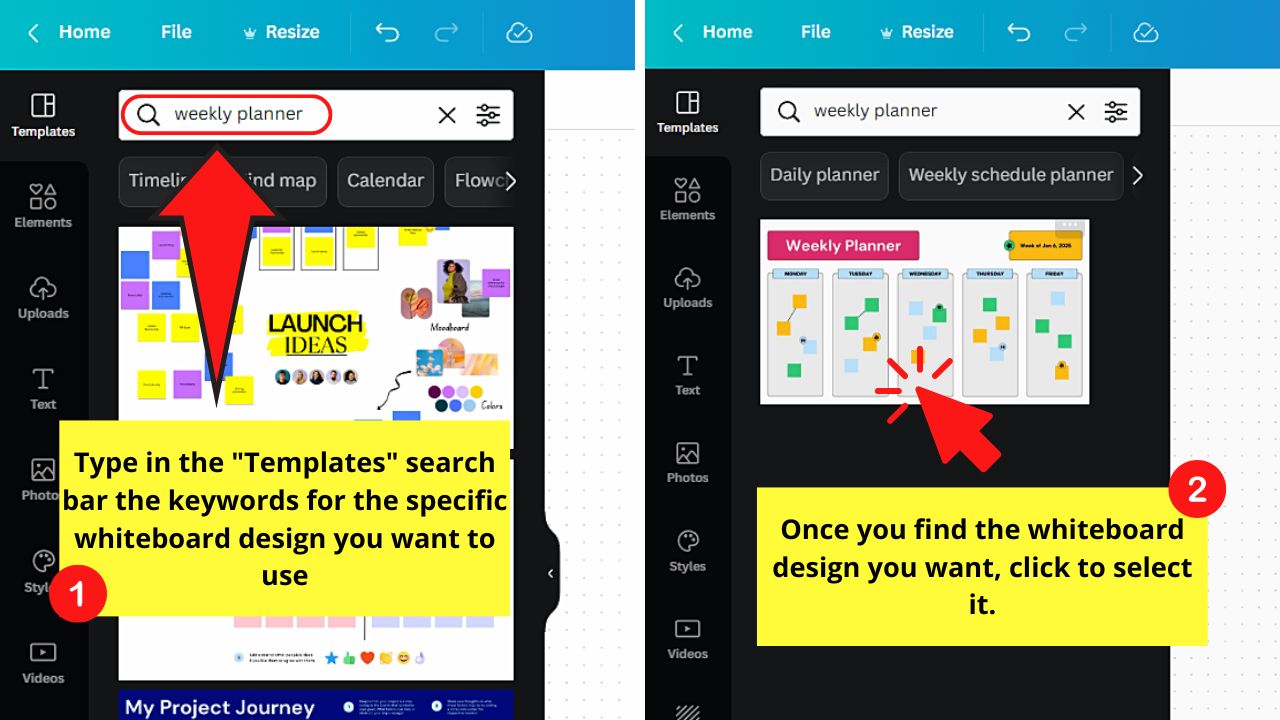

You can also browse through the whiteboard template list manually and click one to use. Then once the whiteboard design of your liking appears, click to select it.
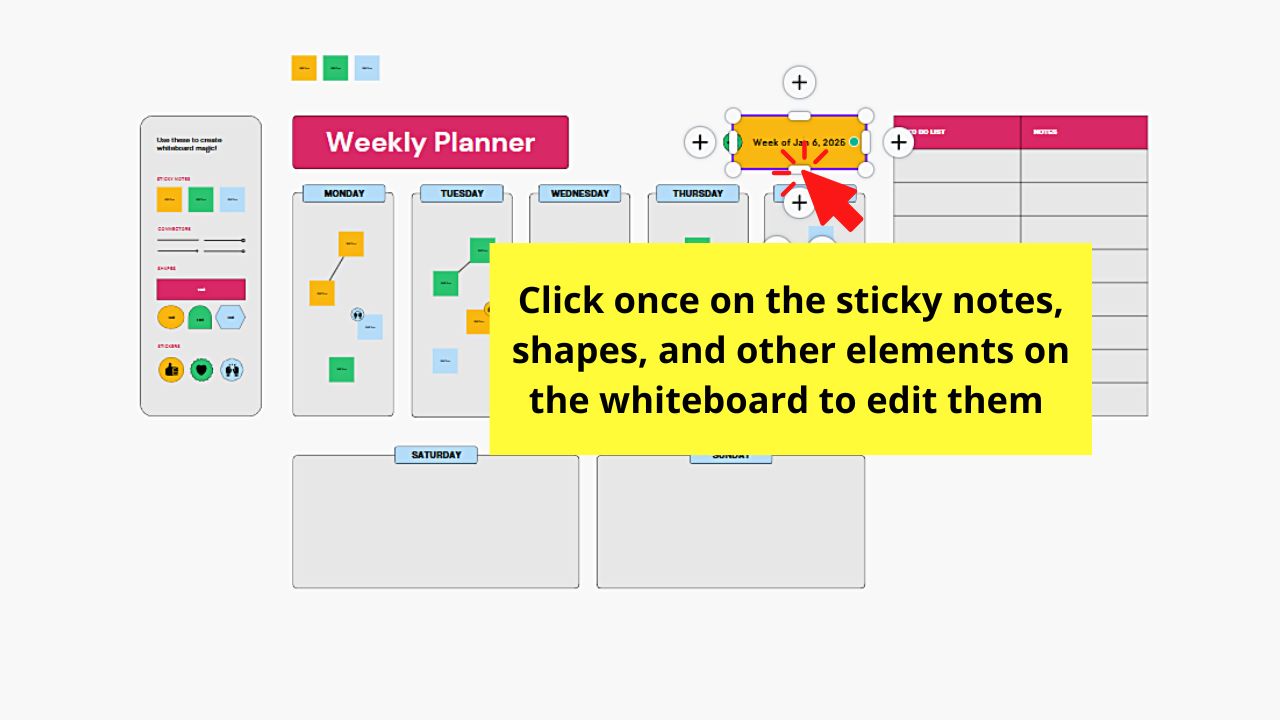
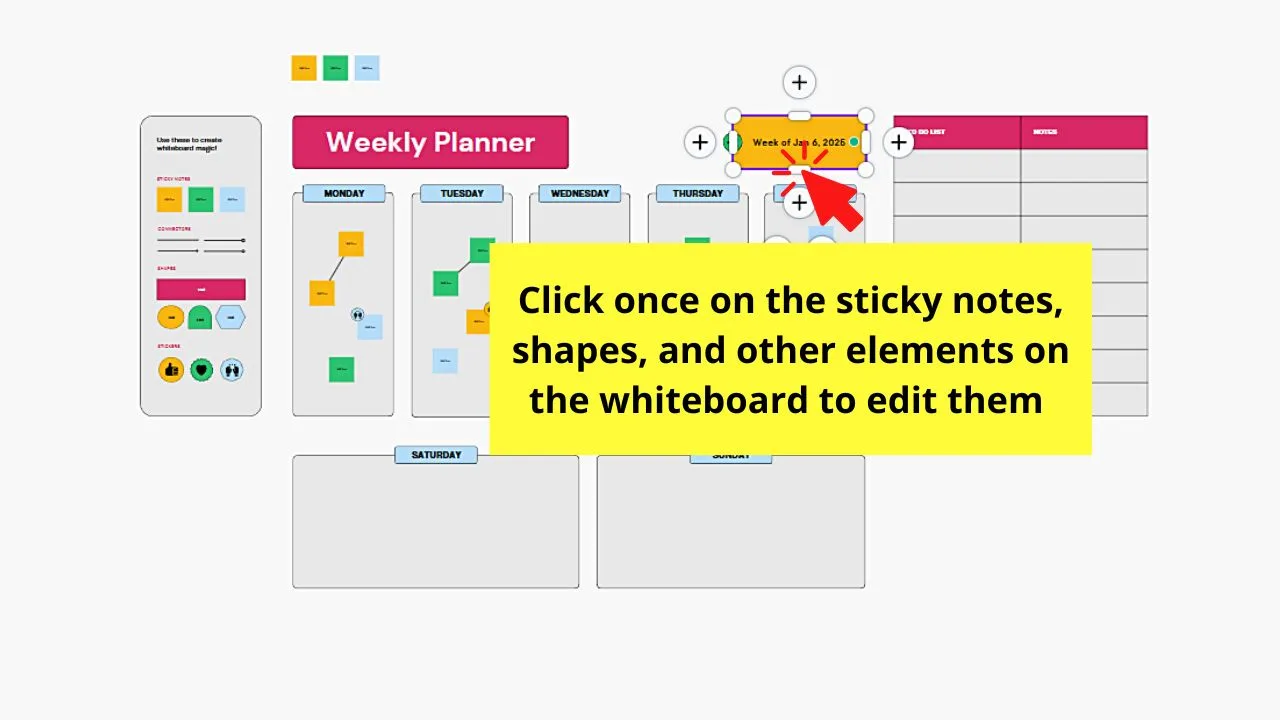
Step 5: Edit your whiteboard by clicking once on the text boxes, sticky notes, or shapes on the whiteboard to type out the new text in them.
Step 6: Go to the bottom toolbar of the Canva page and drag the “Zoom” slider to the right of the page.


This is if you’re having a hard time reading what’s inside the shapes, sticky notes, or text boxes on the whiteboard.
Drag the same slider to the left to zoom the whiteboard out.


Step 7: If you want to add more sticky notes, you can go back to the side panel menu and select “Elements.”


Then, click “Sticky Notes” and choose from the various sticky note colors available. After selecting one, click and drag the said sticky note to the whiteboard.
You can also directly add sticky notes without leaving the infinite canvas area by tapping “S” on your keyboard.


If you want to change the sticky note’s color, change its color using the same steps in editing an element in Canva.


After which, click on the said sticky note and type your entry in it. Think of it like filling a text box with color.


Step 8: Go back to the “Elements” tab and select “Lines & Shapes.”

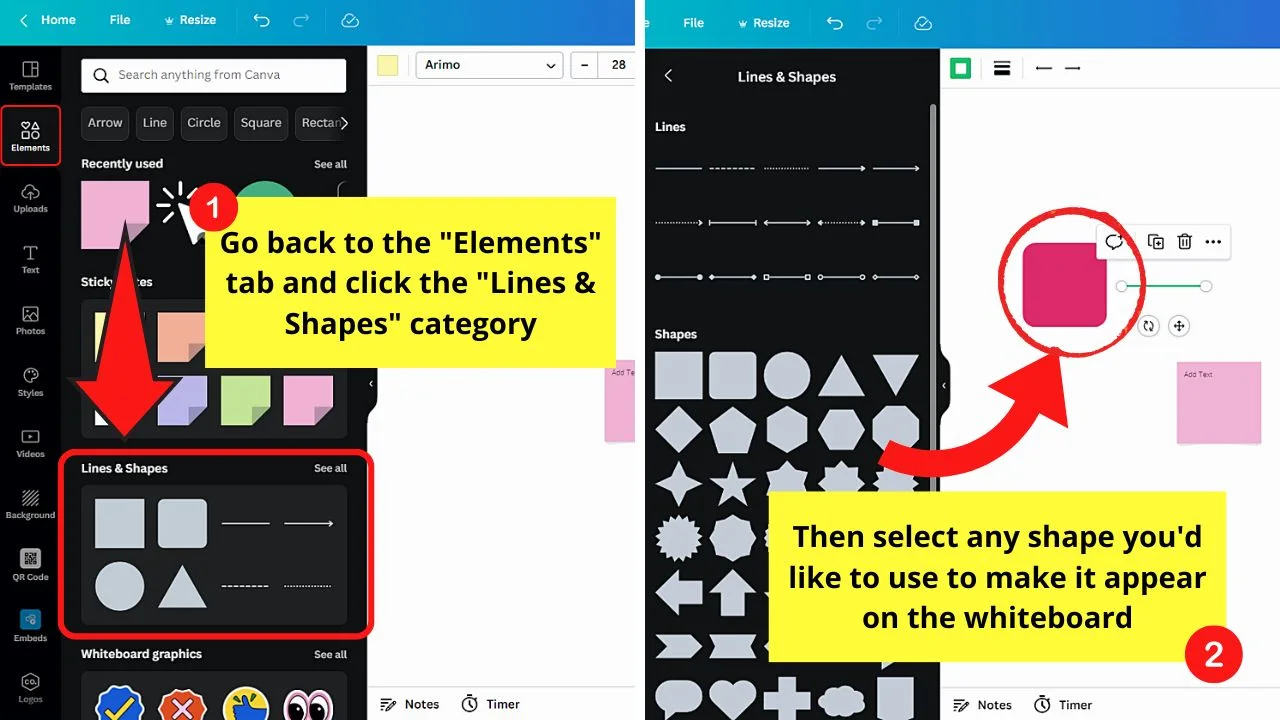
This will allow you to do some concept mapping as sticky notes won’t be enough to present your idea well.
From there, click on the shape you want to add and edit it the same way you can edit any element on Canva.
Step 9: Add lines by going back to the “Lines & Shapes” section of the “Elements” tab and choosing a line that suits your purpose.


This will allow you to connect certain ideas presented using the shapes you added to the whiteboard.
Or, you can simply press “L” to draw the said line on your whiteboard.


After adding lines, connect them to the shape by dragging one end of the said line toward the shape’s anchor points.


Once the line’s connected to the shape, you can now click and drag the shape across the canvas to where you want to place it.


Step 10: Duplicate the shape for your flow chart or concept map by clicking once on the said shape.


You will then see “+” symbols on each side of the shape.
Click one of them to make a duplicate appear beside it.


You’ll then notice that a line connects the two shapes. Then, drag the second shape across the canvas to where you want to position it.
Repeat the same steps until you add the needed shapes for your whiteboard.
This is what Canva calls the “Quick Flow” feature. The good news is, “Quick Flow” isn’t only exclusive to shapes. You can also apply it to sticky notes using the same steps.
If, however, you don’t want to use “Quick Flow,” then click once on the shape or sticky note. Then, select the “Disable Quick Flow” button on the menu that appears.


In case you want to bring the said feature back, click once on the shape or sticky note and select the meatballs menu. After which, choose “Enable Quick Flow” on the dropdown menu.


Step 11: Add borders to the shapes you added by clicking them and selecting the “Border” option on the toolbar.


Then, choose the border type and adjust the weight and corner rounding by dragging their respective sliders.


Step 12: Add whiteboard graphics by clicking “Elements” first on the left-side panel to make your whiteboard fun and interactive.


These whiteboard graphics can range from stickers, symbols, and the like, allowing your team members to voice their opinions, especially if you’re having a poll.
Under “Elements,” select “Whiteboard Graphics” and choose what you want to add by clicking on them.
Once those stickers appear, drag them across the canvas to position them accordingly.


Step 13: Head back to the “Elements” tab and select the “Photos” and “Videos” tabs accordingly.


This will allow you to add photos, videos, and even embed GIFs on the same whiteboard.
Drag the said photos and videos to where you want to position them on the canvas.
To embed GIFs on your whiteboard, click “More” on the left side panel. Then, scroll down the object panel that appears until you see “GIPHY.” Select it.


Then, use the search bar function to type the keyword of the GIF you want to add. Once you find one you’ll use, select it to make it appear on the whiteboard canvas.


Step 14: Invite your team members to the whiteboard by going to the menu bar and clicking the “+” icon beside your Canva profile picture.


After all, a whiteboard is intended to be an interactive feature in Canva, so you can invite your teammates to the said document.
Think of it like working on a Canva team where you can share certain files and interact with them as well through commenting and editing.
Then, type the name of your teammate in the search bar and select his or her name once it appears on the dropdown menu.


After which, type a message in the message field, saying that you’re inviting him or her to view and comment on the whiteboard. Then, click “Send.”


You can also select the “Copy link” button to copy the whiteboard link and share it with your team via email or the messaging app you’re using.


Step 15: Check the comments made by your teammates after they accept your invitation.


You’ll see their names appear on the canvas, represented in different colors.
And, right then and there, your teammates can add stickers, graphics, photos, and videos simultaneously. It’s almost like you’re all writing on your conference room’s giant whiteboard.
You and your teammates can even add a comment to a certain element. Just click that whiteboard element, choose the meatballs menu, and select “Comment” on the menu that appears.


Type your comment in the message field before clicking “Comment.” This comment will then remain attached to the element, making it easier for your teammates to reply to it.


Step 16: Select the “✔” button until a “Comment Resolved” message appears once your teammates have responded to the comment you made earlier.

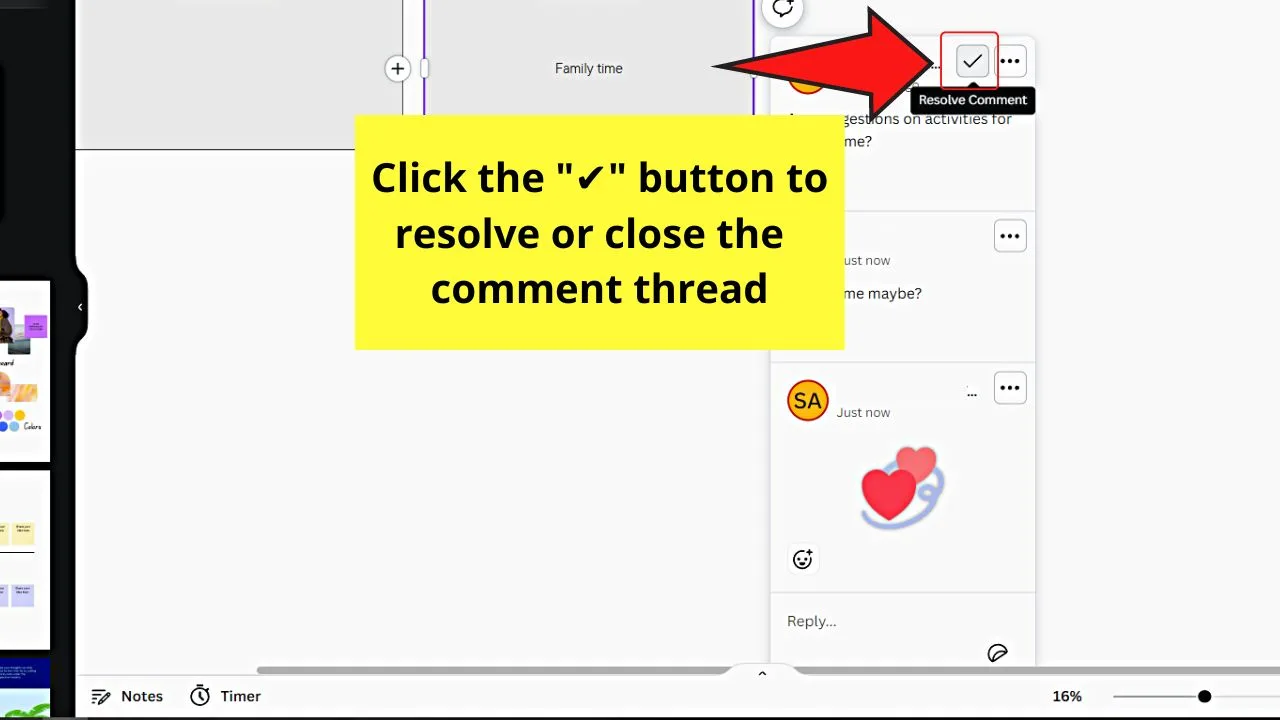
This move will effectively close the comment thread on your whiteboard.
If you cannot read your teammate’s comment, simply zoom in on the whiteboard using the “Zoom” slider.
You don’t have to worry about affecting your teammates’ view as zooming in won’t affect how the whiteboard looks on their end.
Step 17: Go to the bottom menu and select the “Timer” option beside the “Notes” button.


This will ensure that your team stays focused on your brainstorming.
A timer will then appear on the page’s left side. By default, the timer’s set to 5 minutes.


If you want to adjust this, click on the number and type the new duration in the minutes and seconds sections respectively.


Then, select “Start” to begin the countdown.


Once the countdown stops, an alarm-like sound will then be heard, signaling that the time has ended.


Step 18: Drag the cursor across the elements you wish to download to select them.


This will allow you to save a part of the whiteboard for your file if you’re done with your brainstorming.
Once the elements are selected, click the meatballs menu and choose the “Download Selection” option.


You will then be able to download those elements after tweaking with the image format you want to save the whiteboard as.


And, that’s it! You have already used the newest whiteboard feature on Canva!
The process might seem long, but with constant use and practice, you’ll be able to create various types of whiteboards in no time.
Frequently Asked Questions about How to Use Canva Whiteboards
How many people can I invite on a Canva whiteboard and collaborate with at the same time?
As Canva’s whiteboard feature is relatively new, you can invite and collaborate with up to 50 people at the same time on the whiteboard you’re working on.
When can you use Canva’s whiteboard feature?
As there are various template designs for Canva’s whiteboard feature, you can use this feature for different purposes. Generally, you can use a whiteboard for brainstorming and meetings. Other uses include research and design and strategy planning and mapping.
Is Canva whiteboard a Canva-Pro exclusive feature?
Canva’s whiteboard feature is not an exclusive feature for Pro account users. Everyone, including those on free accounts, can enjoy creating and collaborating with their friends using the whiteboard feature.
What tools are considered exclusive to Canva whiteboard?
Out of all the tools you can use and add to a Canva whiteboard, three of them are considered whiteboard-exclusive. “Quick Flow,” “Timer,” and “Whiteboard Stickers” are the three tools that you can only find on the Canva whiteboard object panel.
Is Canva whiteboard available on the app’s mobile version?
You can also access Canva whiteboard on the app’s mobile version. But, you might experience some issues while using the new feature. Hence, you need to duplicate the page and design file and activate the version history to be able to save more versions of the same file.


Hey guys! It’s me, Marcel, aka Maschi. On MaschiTuts, it’s all about tutorials! No matter the topic of the article, the goal always remains the same: Providing you guys with the most in-depth and helpful tutorials!

