

In the following tutorial, you will find 2 great methods to make the lines of a drawing thicker.
The first method makes use of the“Stroke” panel and the second one makes use of the “Minimum” panel. Both of these methods are very straightforward.
On top of that, we will also show you how to make simple lines thicker (for instance when drawing a line using the Line Segment tool).
How to Make Lines Thicker in Photoshop using the Stroke Option
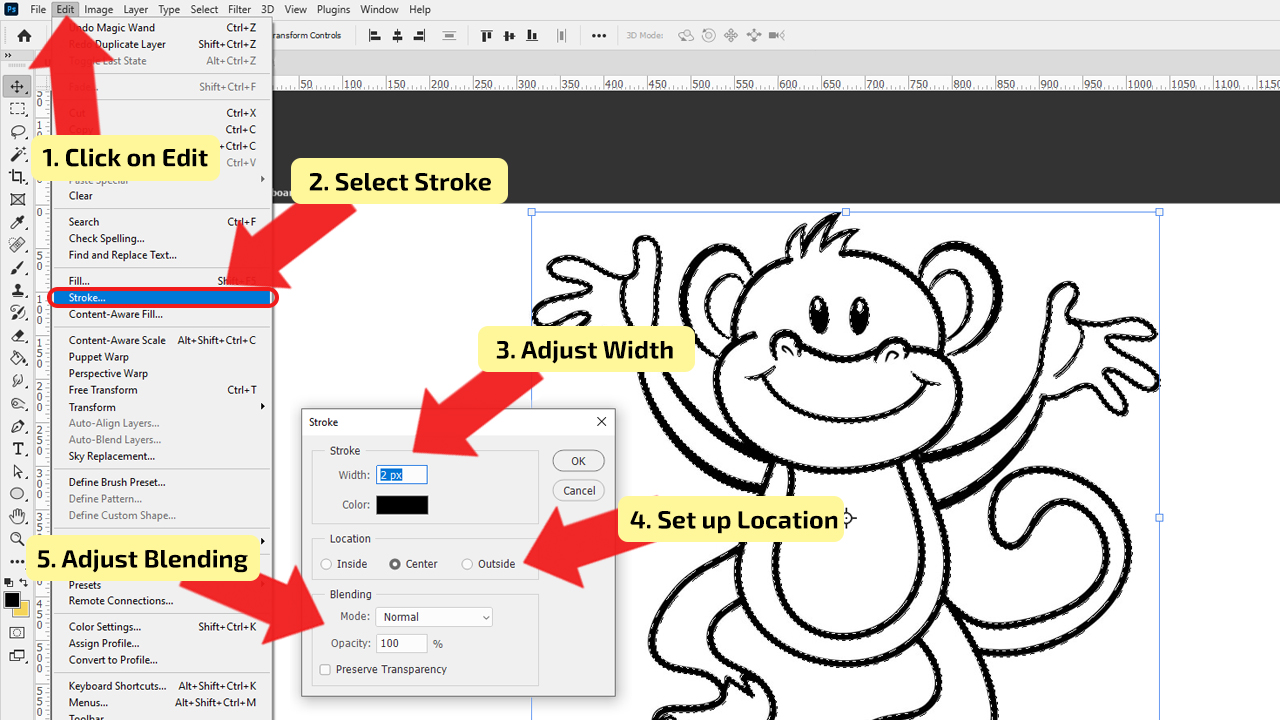
Select the lines using the “Magic Wand Tool”. In the main menu, click on “Edit” and a drop-down menu will appear. Select “Stroke”, then a new window will pop up. Adjust the lines settings and then press “OK” to apply the changes.
Step 1:
Select the line(s) in your drawing. After opening the scanned drawing, in the Tool menu, choose the tool for selecting drawing. For example, you can click on the “Magic Wand Tool”, and select the lines. If you prefer using shortcuts, to access the “Magic Wand Tool”, press the letter W on your keyboard.

Step 2:
Edit the line(s). To make lines ticker, you are going to use the “Stroke” panel. To access this settings window, go to the main menu, choose the “Edit”, in the drop-down menu, select the “Stroke” and the window will pop up. The first thing that you will set up in the new window is the “Width” of the line. Underneath is the option for changing the color of the line. Then select one of the following options, which will determine where the line will get thicker, either “Inside”, “Center” or “Outside”. Try all three options and then choose the one that you prefer. Also, you can adjust the “Mode” and “Opacity” of the lines. After adjusting the settings, press the “OK” button and your changes will be applied. Don’t forget, if you aren’t satisfied with the outcome, you can always adjust it again in the same way, just make sure to select the lines before opening the “Stroke” window.
How to Make Lines Thicker in Photoshop using the “Minimum” Option
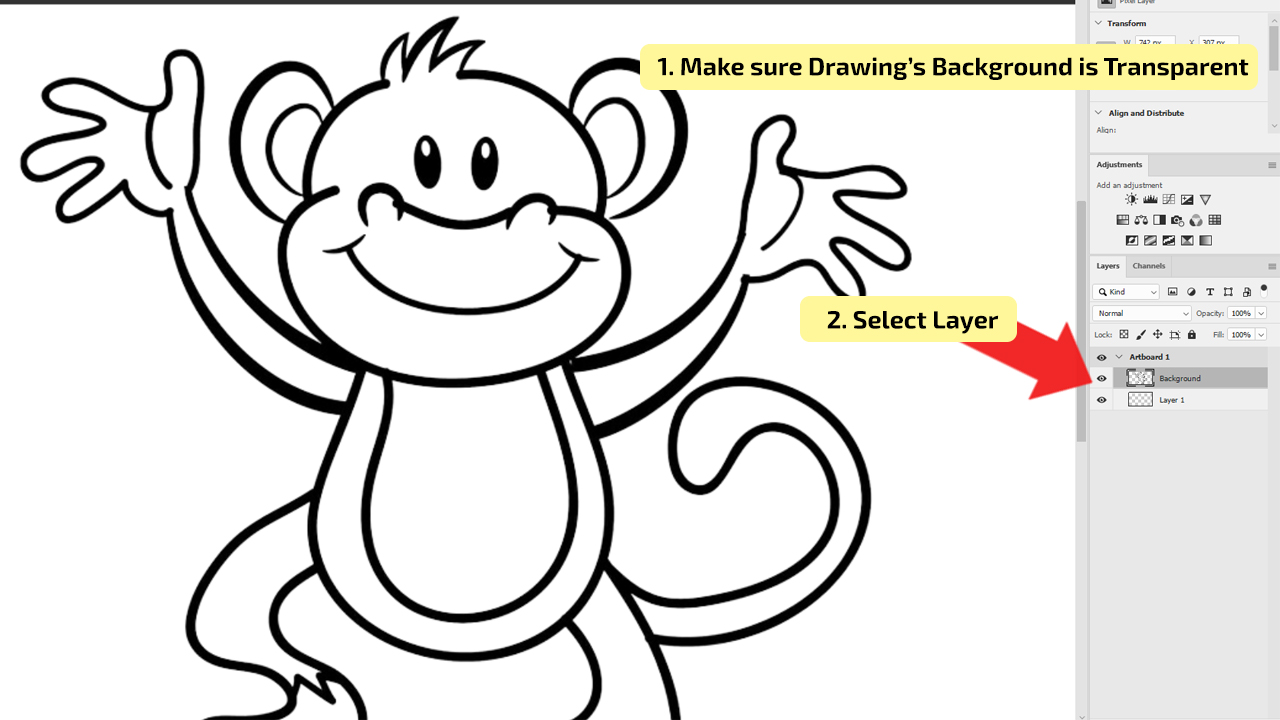
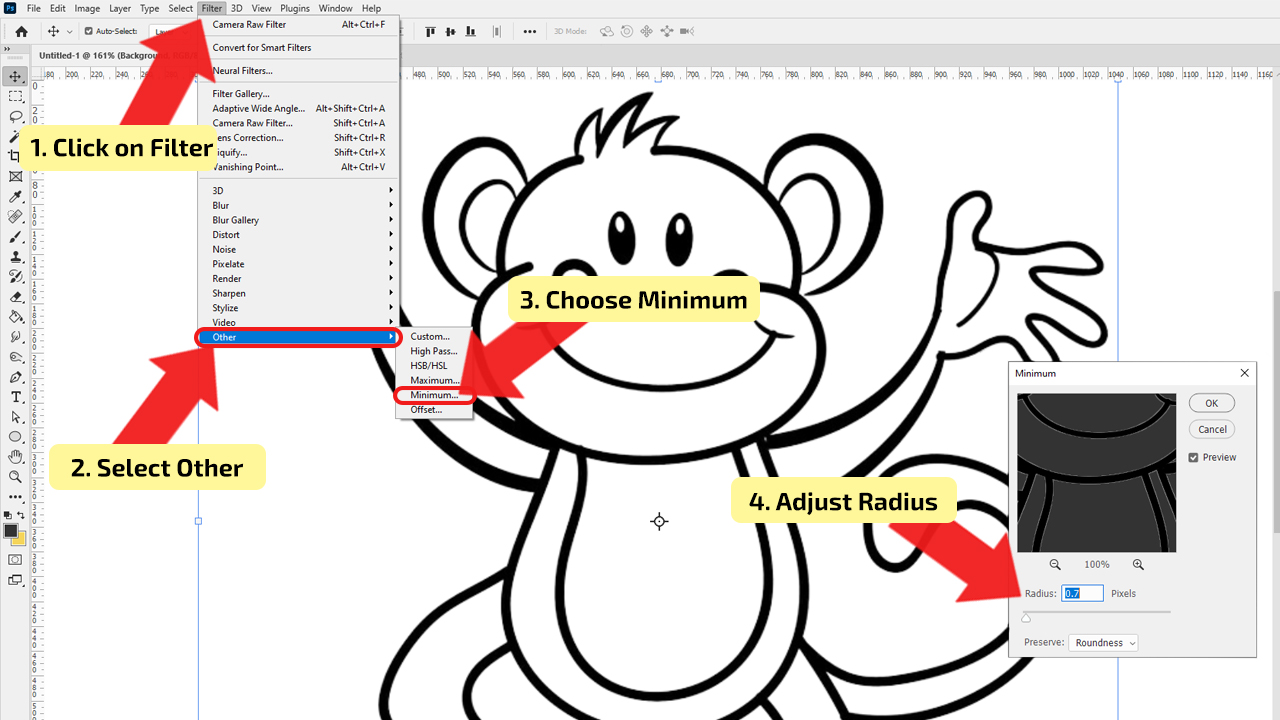
Select the line (layer) you wish to make thicker. Then click on “Filter” in the main menu and then choose “Other”. Now, in the fly-out menu choose “Minimum…”. Adjust the thickness of the lines in the settings and then press “OK.”
Step 1:
Select the line in your drawing. After opening the line drawing, select it by clicking on the drawing’s layer in the “Layers” section. Make sure that the drawing has a transparent background, in order to select only the lines.
Step 2:
Edit the line. The first thing you need to do is to open the “Minimum” settings dialog. In the main menu, click on the “Filter”, and the drop-down menu will be shown. Select “Other” and in the fly-out menu, choose “Minimum…” and the new window will pop up. Underneath the box, in which you can see the preview of the changes, there is the option “Radius” and with this option, you can adjust the thickness of the lines. Type in the value of line thickness in pixels or move the slider left and right until the size of the line is perfect. After adjusting the settings press the “OK” button and changes will be applied. If you are not satisfied with the outcome, in the same way, adjust it again.
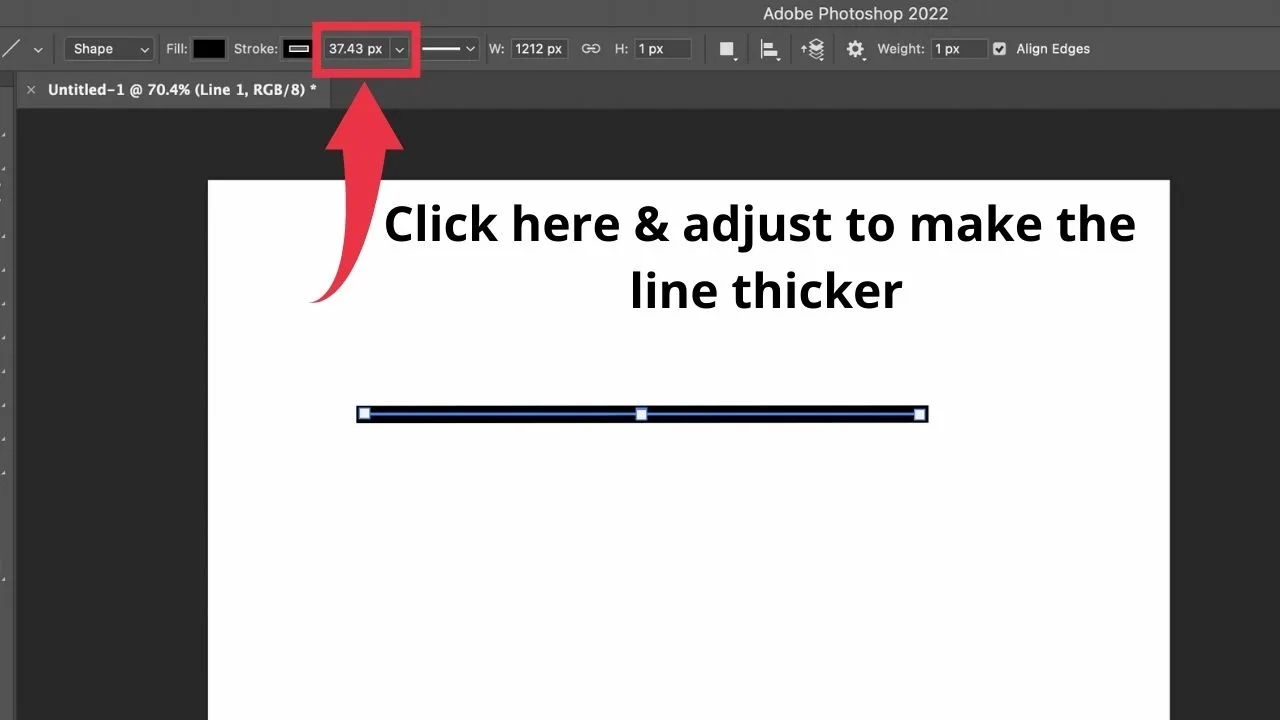
Make straight lines thicker (created with Photoshop’s Line Tool)
In case you would like to make lines thicker that you have created with Photoshop’s Line Tool (you find that tool in the left sidebar by right-clicking on the Rectangle Tool and then by selecting Line Tool), then you can easily do that by using the option “Set shape stroke width” in the top toolbar.


Make sure that the “Line Tool” is selected while searching for this option in the toolbar because the toolbar is a different one when the Line Tool is selected.

How to Make Lines Thicker in an Image in Photoshop

Before starting a drawing, it’s recommended to run several brush size tests so that you don’t have to fix line thickness later, as the result will never be as good as having drawn with the right brush size at the beginning.
Note that if you have made your drawing using the “Pen” (P) tool, it’s much easier to adjust the line thickness using the “Stroke” panel.
However, if you have already drawn either straight lines in Illustrator or a whole artwork and, after finishing, you notice that the line thickness isn’t as thick as you want, you can still fix it.
Fortunately, the line thickness can be fixed either in a transparent layer or with a filled background.
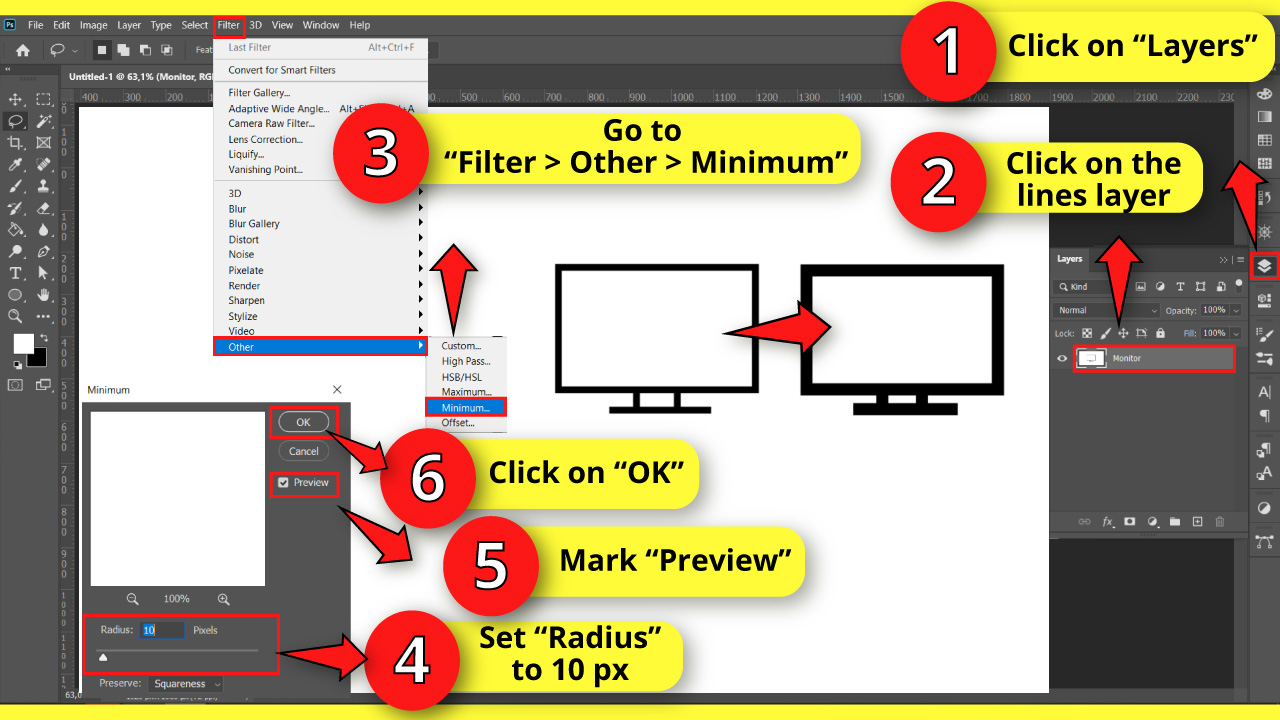
To make lines thicker in an image in Photoshop, first, click on the “Layers” (F7) panel, usually located on the right-side toolbar.
If you can’t find it, you may have to enable it first by going to “Window > Layers” in the menu at the top of the screen or by hitting the “F7” key on your keyboard.
Once you are on the “Layers” panel, select the layer that has the lines you want to make thicker.
Next, go to “Filter > Other > Minimum” in the menu at the top of the screen.
In the “Minimum” pop-up window, drag the slider to the right to increase the line radius. For example, I’ll go with 10 px, but you can enter the value that suits you better.
Make sure to enable the ‘Preview’ checkbox so that you can preview the changes.
Once you are happy with the edit, click on “OK” to save.
How to Change Line Thickness After Drawing Something
If you have drawn using the “Brush” (B) tool, you can change the thickness by adding a filter.
Fortunately, lines can be drawn either in a transparent layer or with a filled background.
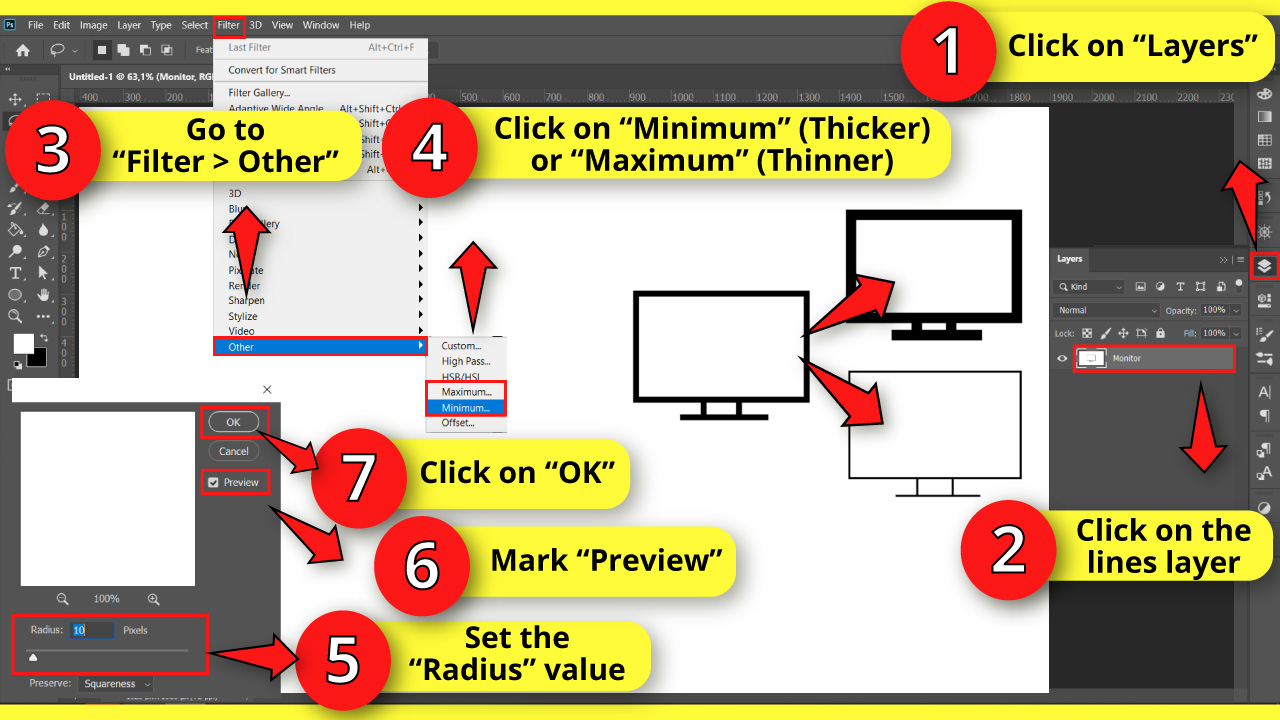
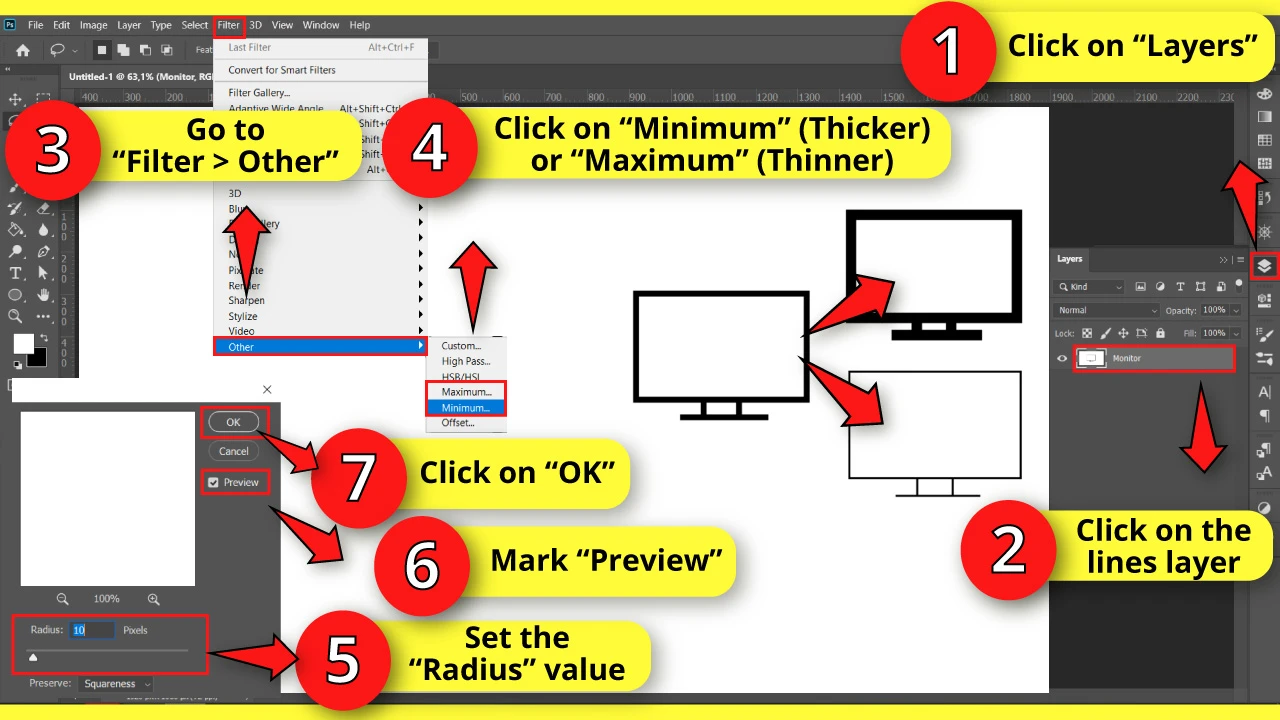
To change the line thickness, first, go to the “Layers” (F7) panel, usually located on the right-side toolbar, or you can hit the “F7” key on your keyboard to shortcut it.
On the “Layers” (F7) panel, click on the layer that has the lines to select it.
To work neatly, it’s recommended to rename layers in Illustrator, especially if you are working with tons of layers.
If you want to make the lines thicker, go to “Filter > Other > Minimum”.
If you want to make the lines thinner, go to “Filter > Other > Maximum”.
Both options are located in the menu at the top of the screen.
In their respective pop-up windows, drag the slider to the right to adjust the line thickness.
Check the “Preview” checkbox so that you can preview the changes.
Once you are happy with the edit, click on “OK” to save.
How to Thicken Pen Tool Lines in Photoshop

If you have drawn some lines using the “Pen” (P) tool, you can easily adjust their thickness by using the “Stroke” panel.
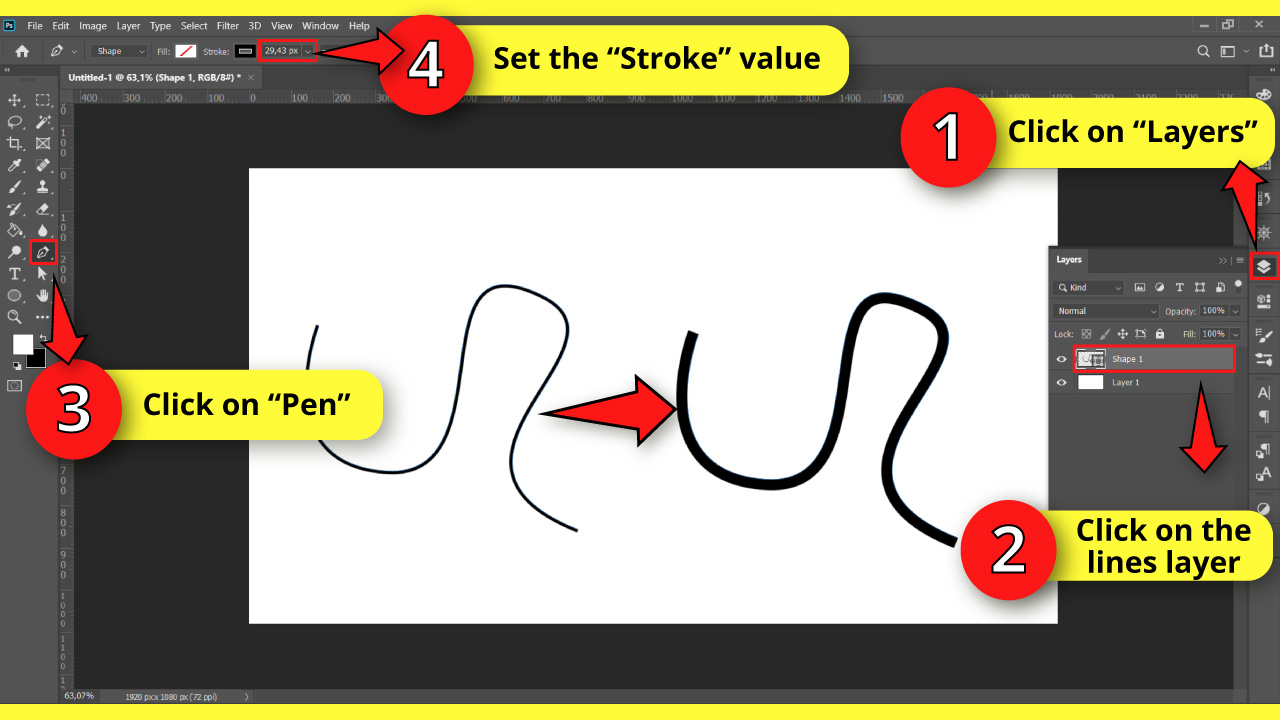
To do so, first, go to the “Layers” (F7) panel, usually located on the right-side toolbar. Alternatively, you can hit the “F7” key on your keyboard to shortcut it.
On the “Layers” (F7) panel, click on the layer that has the lines to select it.
Then, click on the “Pen” (P) tool located on the left-side toolbar, or press the “P” key to shortcut it.
Next, go to the “Stroke” panel located on the toolbar at the top of the screen and enter a new value on the field.
If the “Stroke” panel is not displaying, go to “Window > Options” on the menu at the top of the screen.


Hey guys! It’s me, Marcel, aka Maschi. On MaschiTuts, it’s all about tutorials! No matter the topic of the article, the goal always remains the same: Providing you guys with the most in-depth and helpful tutorials!

