There are three ways to make an image black and white in Illustrator. You can convert it to Grayscale, desaturate it, or adjust its color balance.
Each method is quick and easy, all you need to do is decide which one works best for you!
Here are three ways to make an image black and white in Adobe Illustrator.
How To Convert An Image to Grayscale In Illustrator
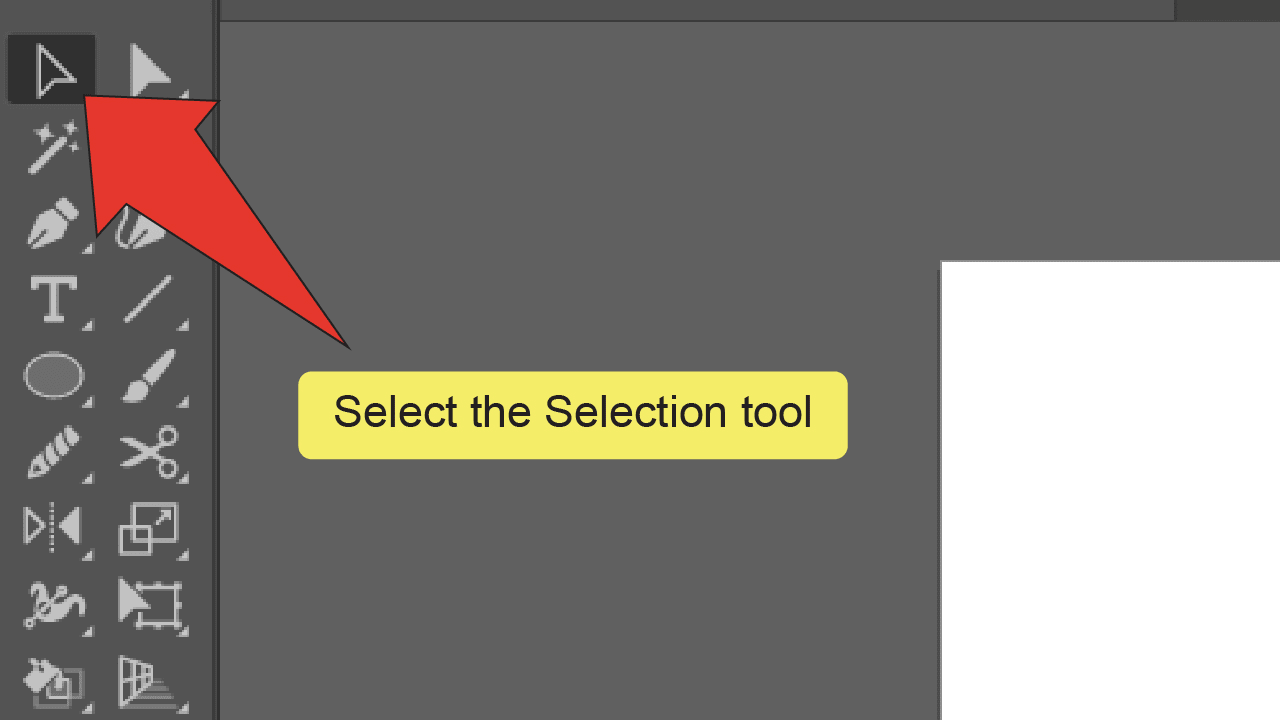
Press “V” to equip the Selection tool. Click on your image to select it and then click “Embed”. Finally, go to “Edit”, then “Edit Colors” and click on “Convert to Grayscale”.
Converting an image to Grayscale is the fastest way to make it black and white, but doesn’t grant much room for adjustment, compared to the other two methods.
In case you don’t see the “Embed” option in the menu, do this:
Click on “Window” in the main menu and then select “Links.” Now under the “Links” tab, make sure to open up the hamburger menu (located in the top right corner of the Links Windows).
Now, click on “Embed Image(s)” to embed the image. After that, when you click on “Edit” in the main menu, choose “Edit Colors” and then click on “Convert to Grayscale” to make your image black & white.
How To Convert An Image to Grayscale In Illustrator – Step-by-step Guide
Step 1:
Place your image. Click on “File” on the top menu, then “Place”, or use the shortcut “Shift+COMMAND+P” (MAC) “Shift+Ctrl+P” (Windows).. Next, select your image and click “Place”.

Step 2:
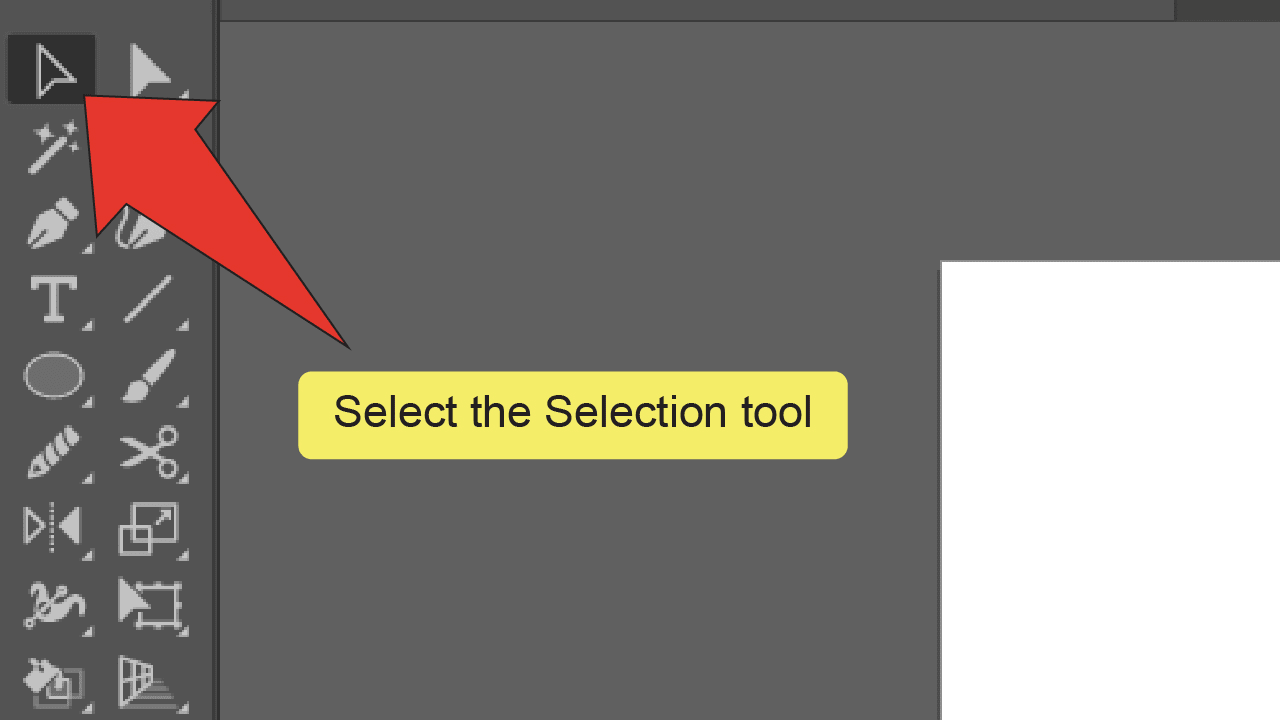
Find and equip the Selection tool. Look for and select the Selection tool, located on the toolbar on the left side of your screen. Alternatively, you can use the keyboard shortcut “V” to quick-select the tool.
Step 3:
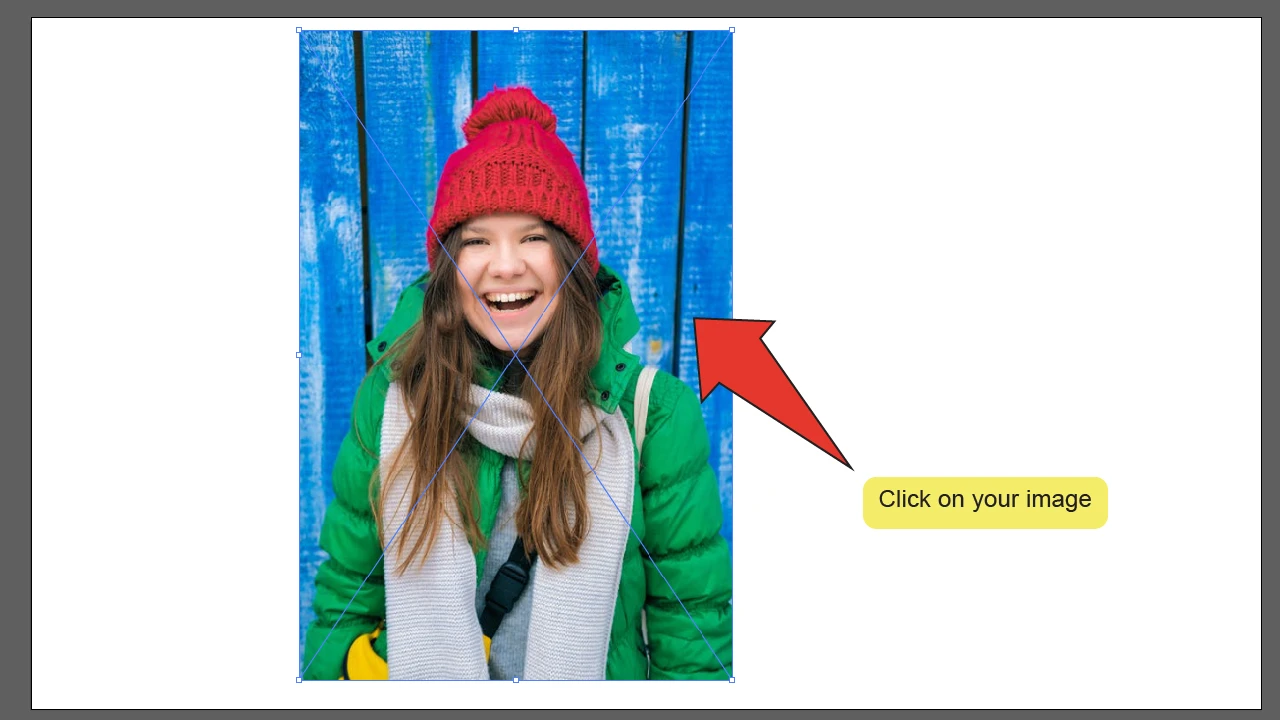
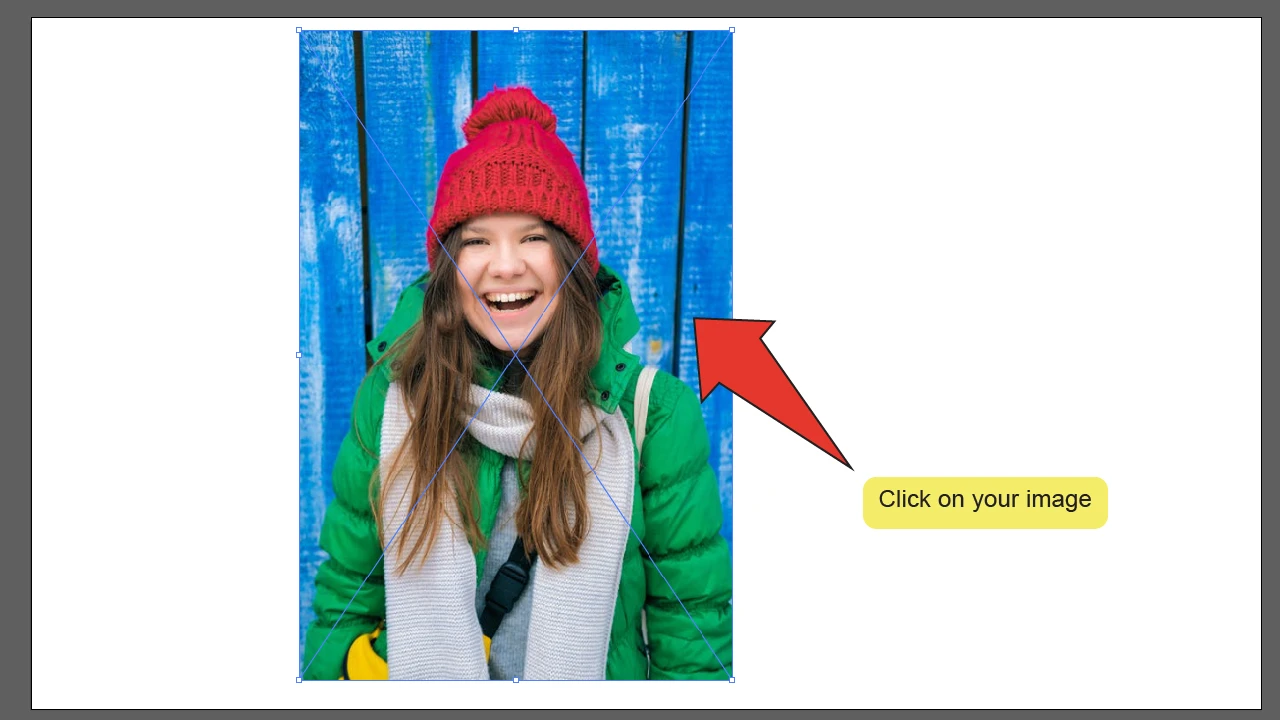
Select your image. Click on your image to select it. A highlighted border should appear around it, as well as in an ‘X’ shape across the image.
Step 4:
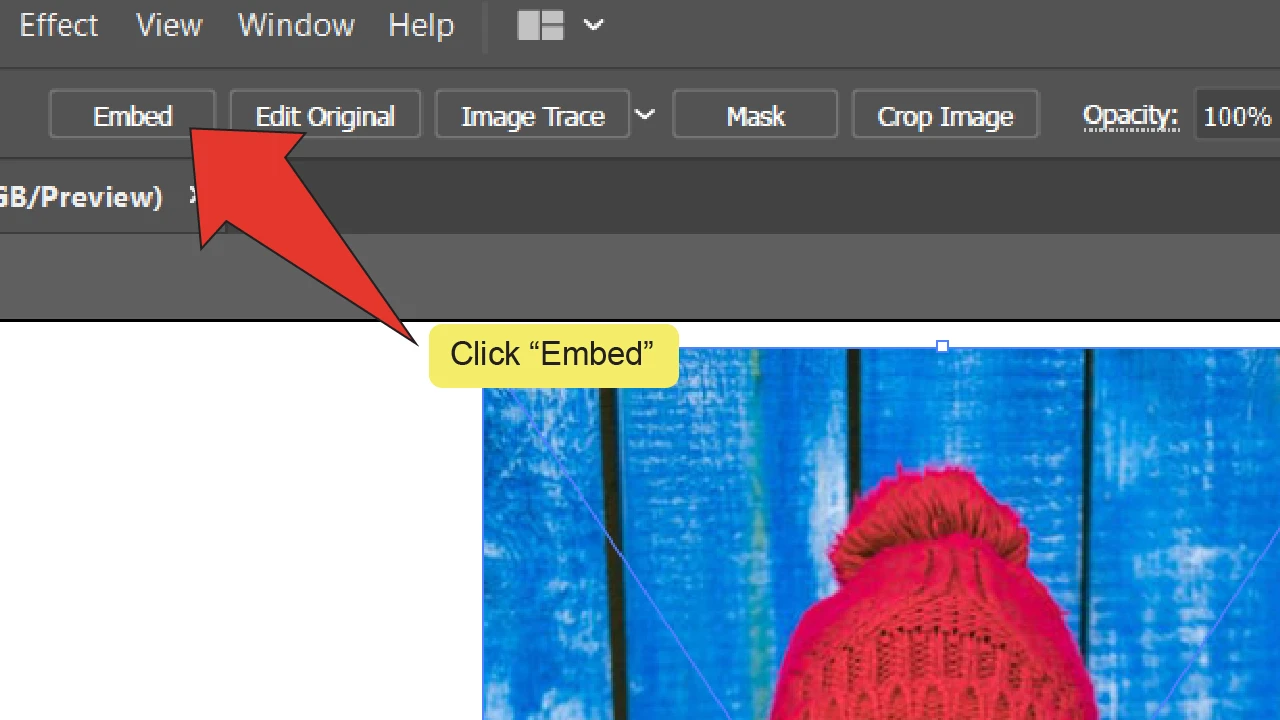
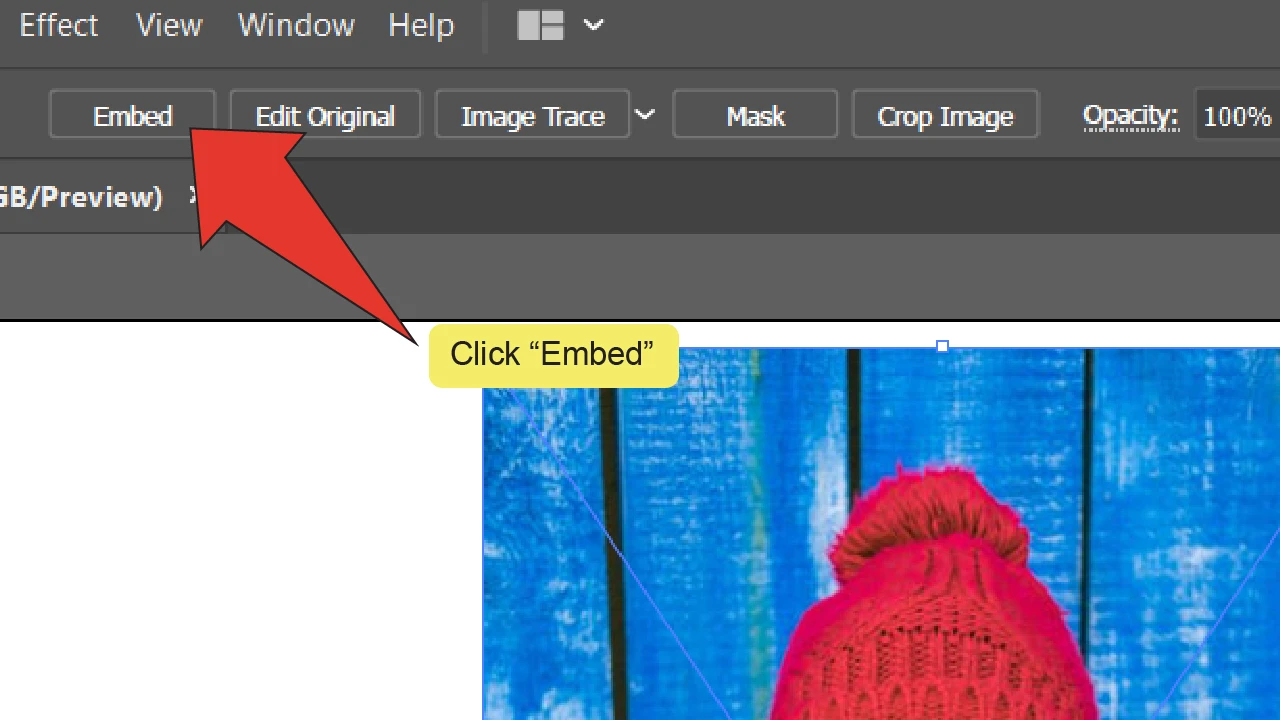
Embed your image. Click the “Embed” button located on the menu at the top of your screen. This will open the “Photoshop Import Options” window. If your image is already embedded, this button will read “Unembed” and no action needs to be taken. If you don’t have the embed button in your toolbar, you can do this buy clicking on “File” in the main menu, then select “Links”, then open op the hamburger menu in the top right corner of the “Links” window and then select “Embed Image(s) there.
Step 5:
Convert the image to Grayscale. On the taskbar at the top of the screen, go to “Edit”, then “Edit Colors” and click on “Convert to Grayscale”. This will convert all the colors in your image to shades of black and white.

How To Desaturate An Image In Illustrator
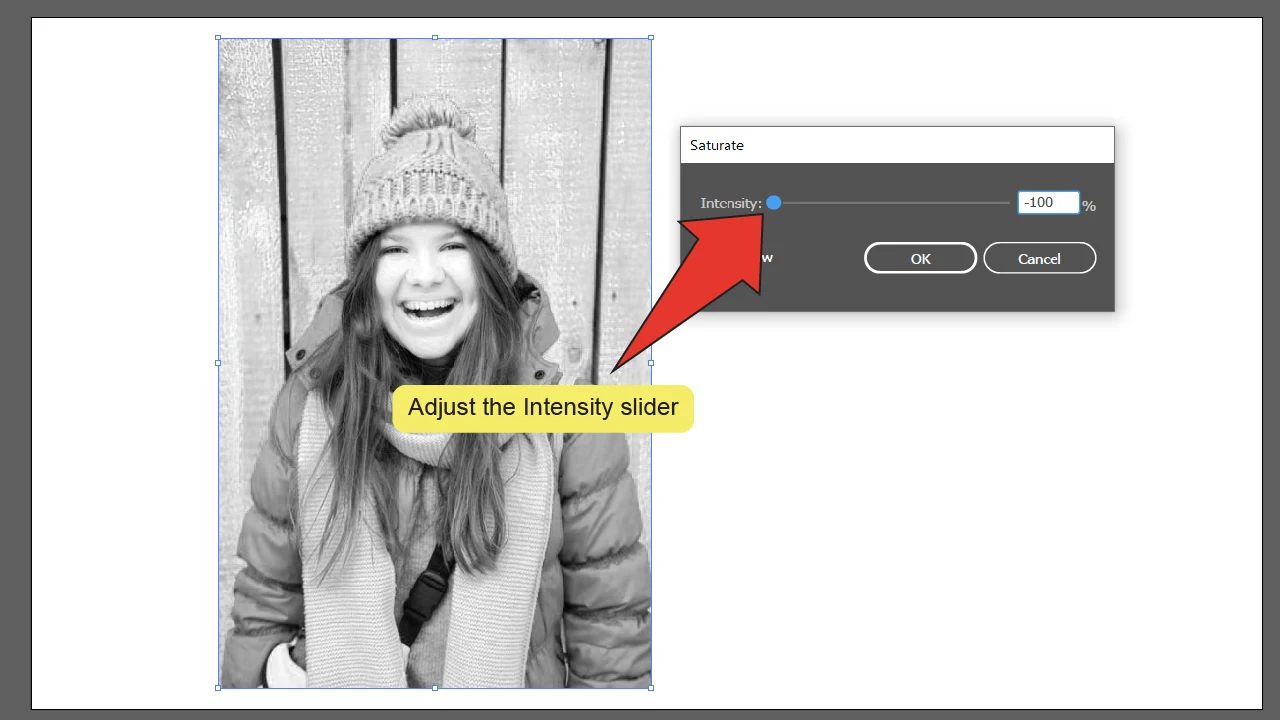
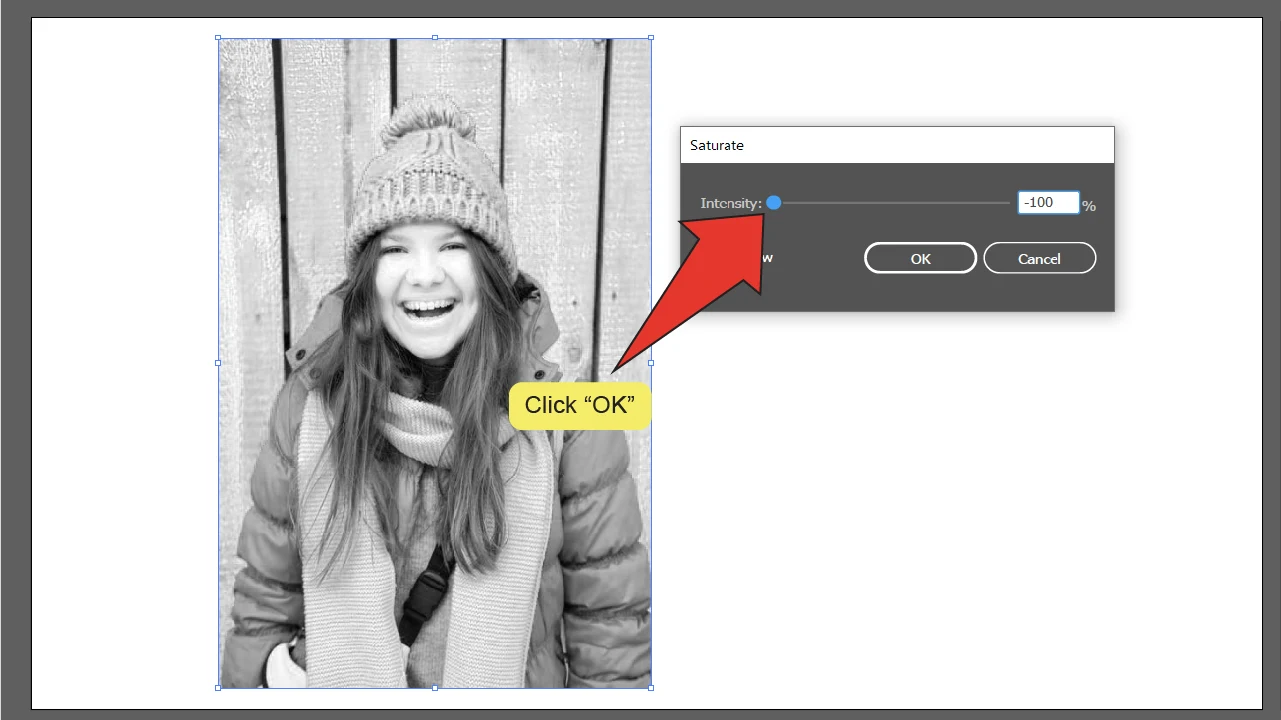
Press “V” to equip the Selection tool. Click on your image to select it then click “Embed”. Go to “Edit”, then “Edit Colors” and click on “Saturate…”. Select the preview box, then adjust the “Intensity” slider. Finally, click “OK”.
This method lets you control the intensity of the colors in your image via a simple slider and gives you more control over your colors than simply converting them to Grayscale.
How To Desaturate An Image In Illustrator – Step-by-step guide
Step 1:
Place your image. Click on “File” on the top menu, then “Place”, or use the shortcut “Shift+COMMAND+P” (MAC) “Shift+Ctrl+P” (Windows).. Next, select your image and click “Place”.

Step 2:
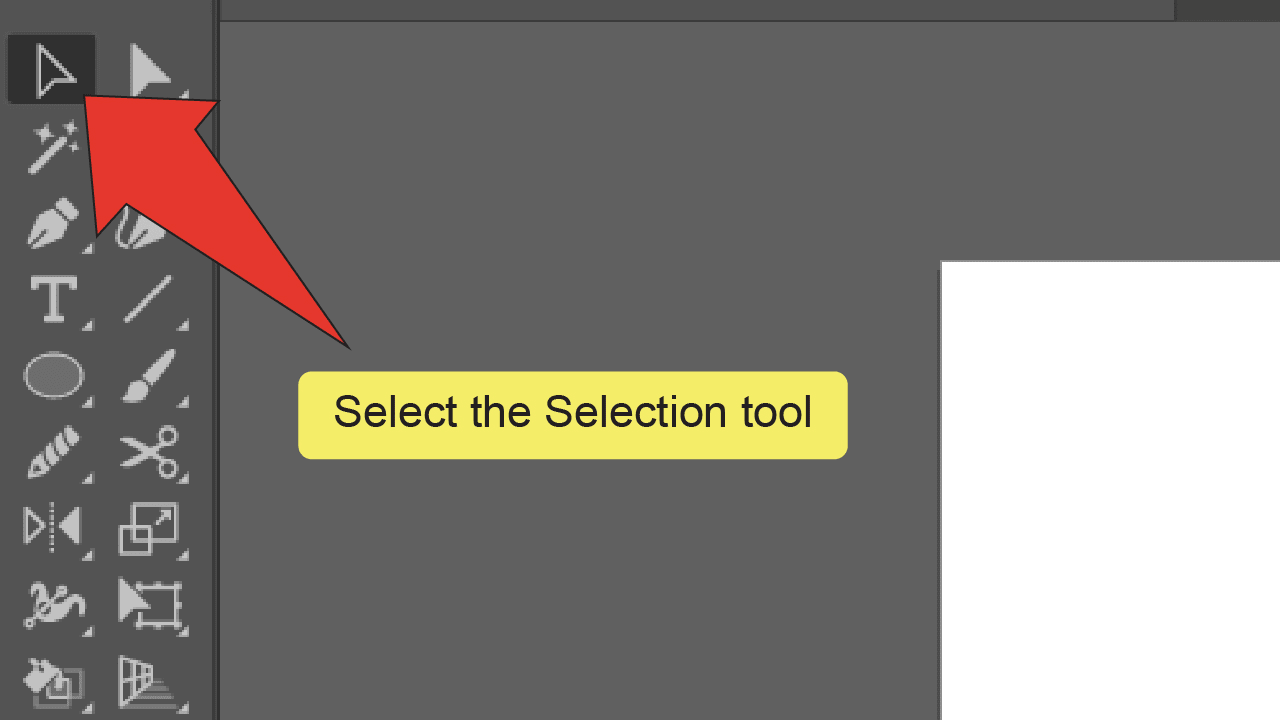
Find and equip the Selection tool. Look for and select the Selection tool, located on the toolbar on the left side of your screen. Alternatively, you can use the keyboard shortcut “V” to quick-select the tool.
Step 3:
Select your image. With the Selection tool equipped, click on your image to select it. A highlighted border should appear around as well as in an ‘X’ shape across the image.
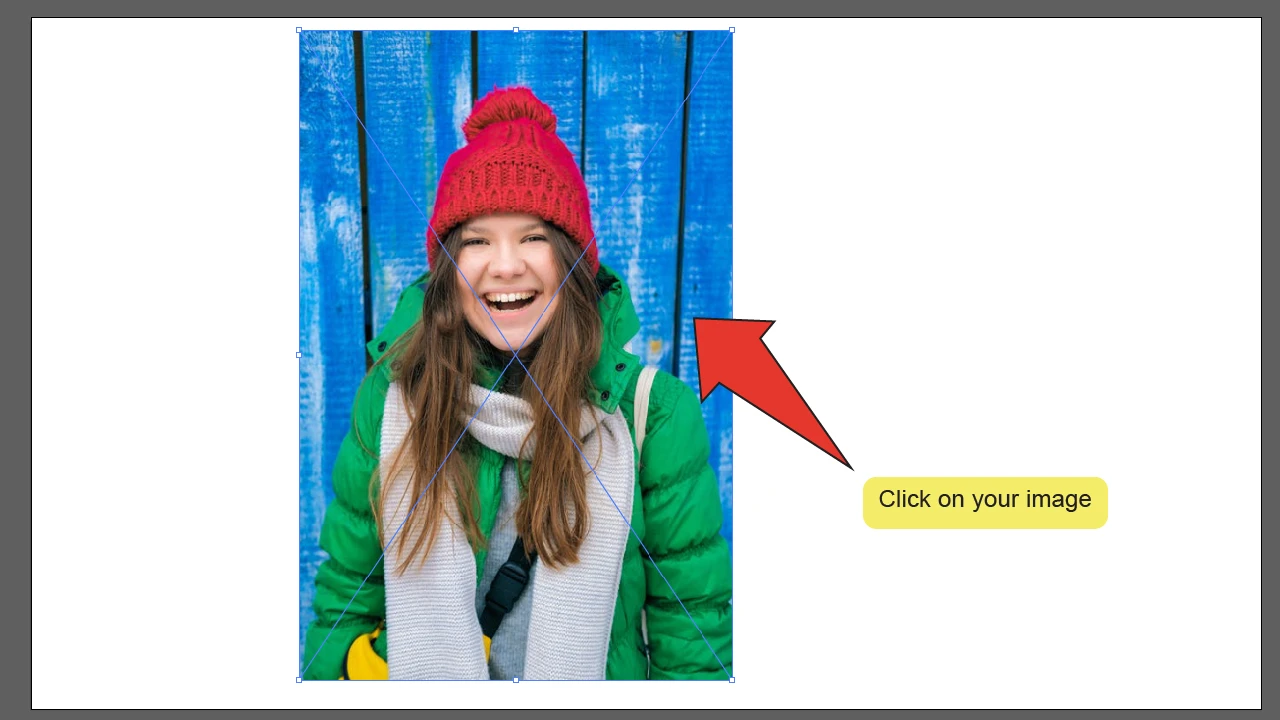
Step 4:
Embed your image. Click the “Embed” button located on the menu at the top of your screen. This will open the “Photoshop Import Options” window. If your image is already embedded, this button will read “Unembed” and no action needs to be taken.
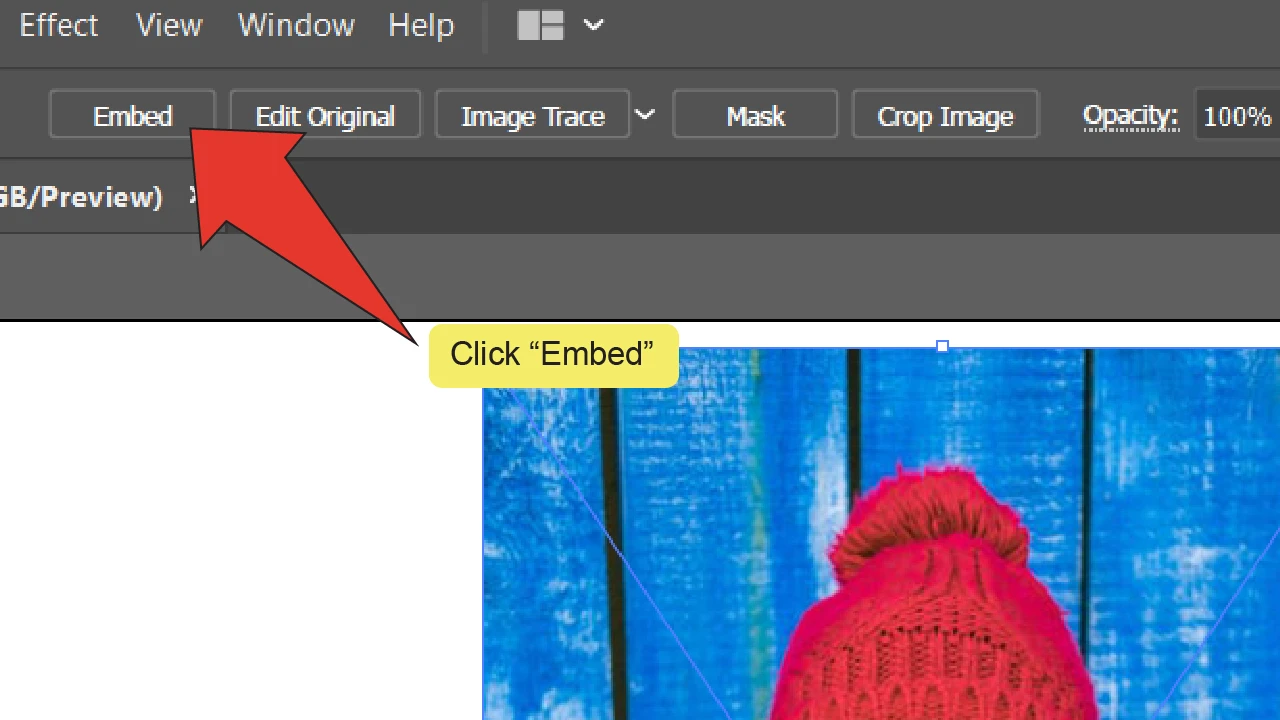
Step 5:
Open the saturation menu. On the taskbar at the top of the screen, go to “Edit”, then “Edit Colors” and click on “Saturate…”.
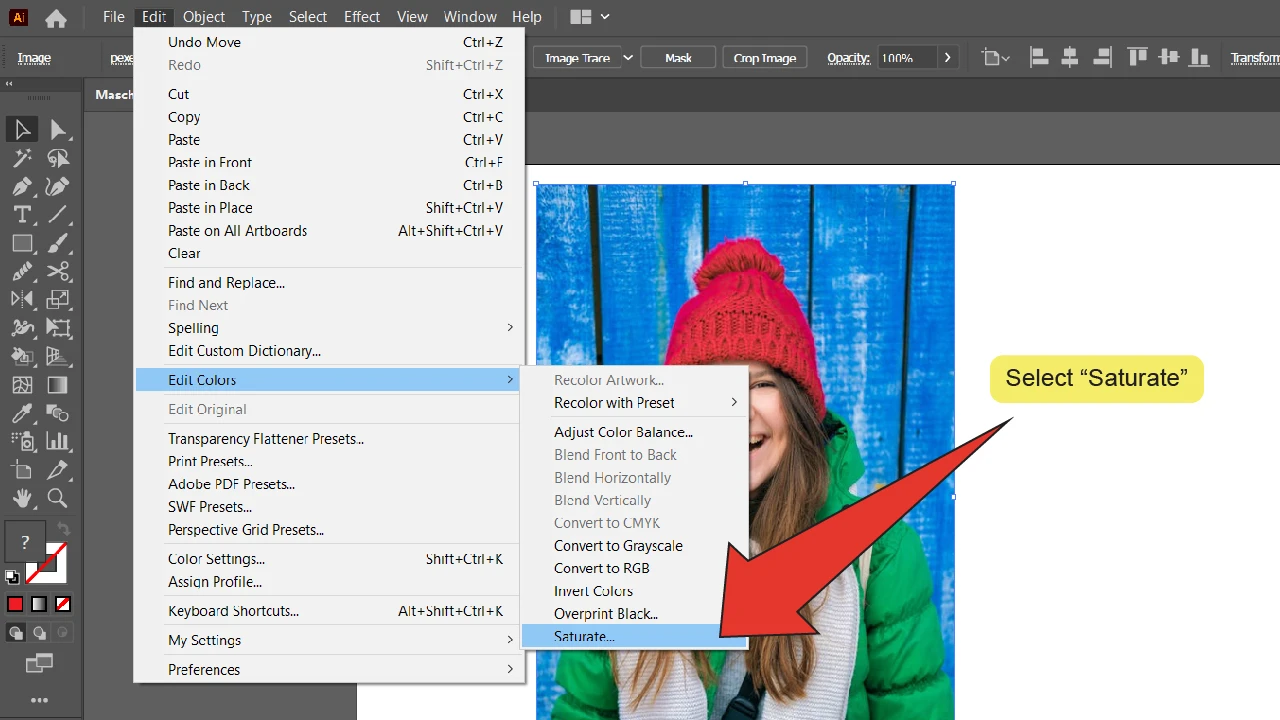
Step 6:
Select preview box. Make sure the Preview option is selected.
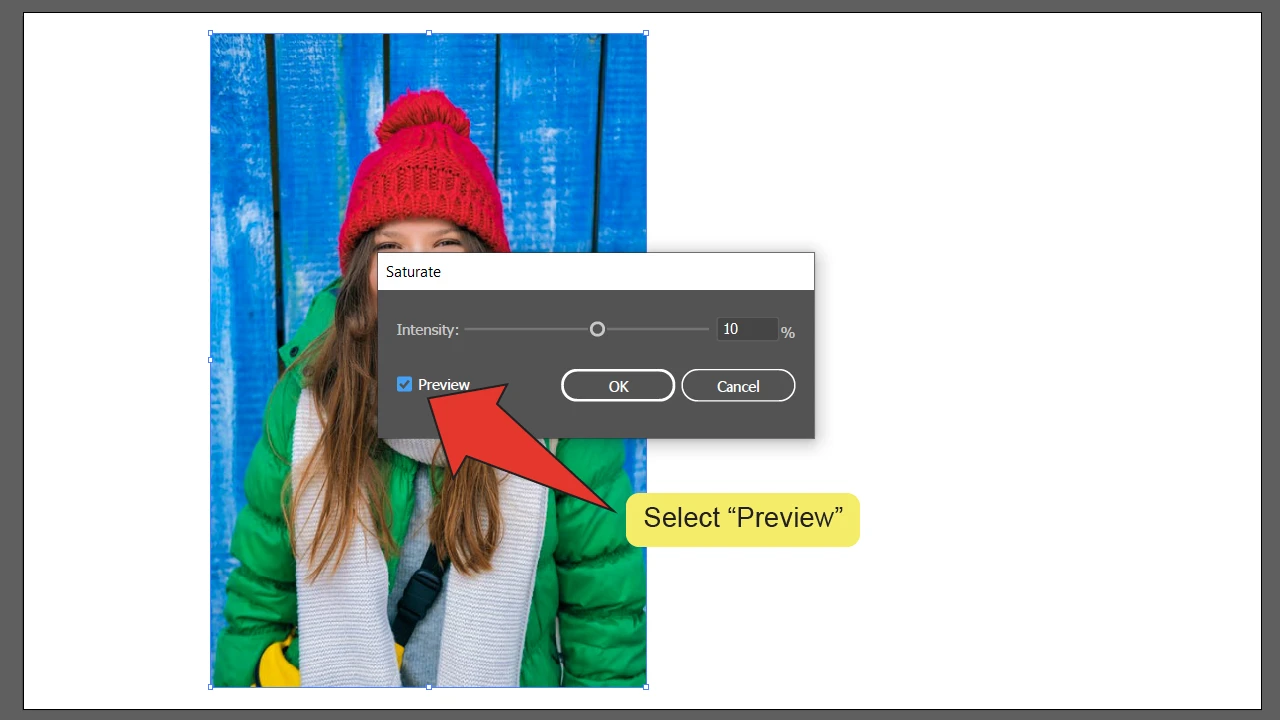
Step 7:
Adjust the intensity slider. Adjust the slider labeled “Intensity” to change the saturation of the colors in your image.
Step 8:
Click on “OK”. When you’re satisfied with the saturation of the colors in your image.
How To Make An Image Black And White In Illustrator By Adjusting Its Color Balance
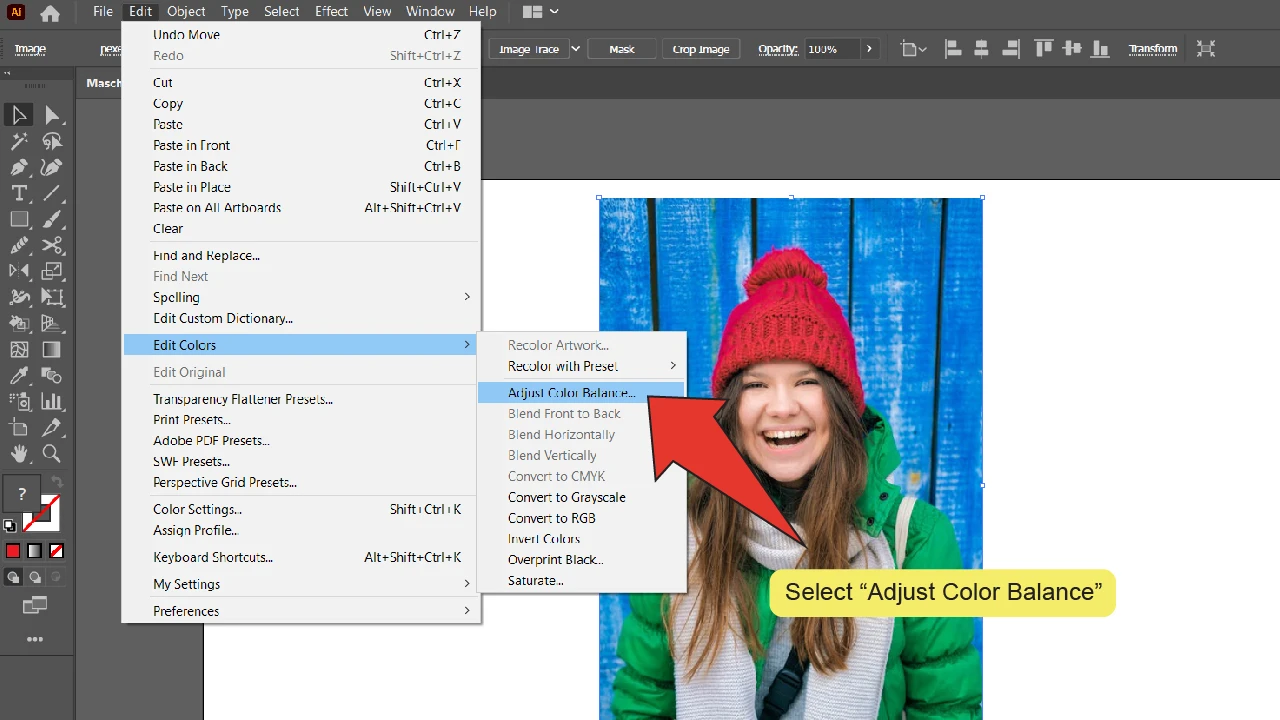
Press “V” to equip the Selection tool. Click on your image to select it then click “Embed”. Go to “Edit”, then “Edit Colors” and click on “Adjust Color Balance…”. Set “Grayscale” as your color mode. Select the preview box, then adjust the “Black” slider. Finally, click “OK”.
This method is very similar to Desaturation, except it involves the altering of the levels of black and white in your Grayscale image and not the saturation of your colors.
How To Make An Image Black And White In Illustrator By Adjusting Its Color Balance: Step-by-step Guide
Step 1:
Place your image. Click on “File” on the top menu, then “Place”, or use the shortcut “Shift+COMMAND+P” (MAC) “Shift+Ctrl+P” (Windows).. Next, select your image and click “Place”.
Step 2:
Find and equip the Selection tool. Look for and select the Selection tool, located on the toolbar on the left side of your screen. Alternatively, you can use the keyboard shortcut “V” to quick-select the tool.

Step 3:
Select your image. With the Selection tool equipped, click on your image to select it. A highlighted border should appear around as well as in an ‘X’ shape across the image.
Step 4:
Embed your image. Click the “Embed” button located on the menu at the top of your screen. This will open the “Photoshop Import Options” window. If your image is already embedded, this button will read “Unembed” and no action needs to be taken.
Step 5:
Open the Color Balance window. On the menu at the top of the screen, go to “Edit”, then “Edit Colors” and click on “Adjust Color Balance…”. A window labeled “Adjust Colors” should pop up on your screen.
Step 6:
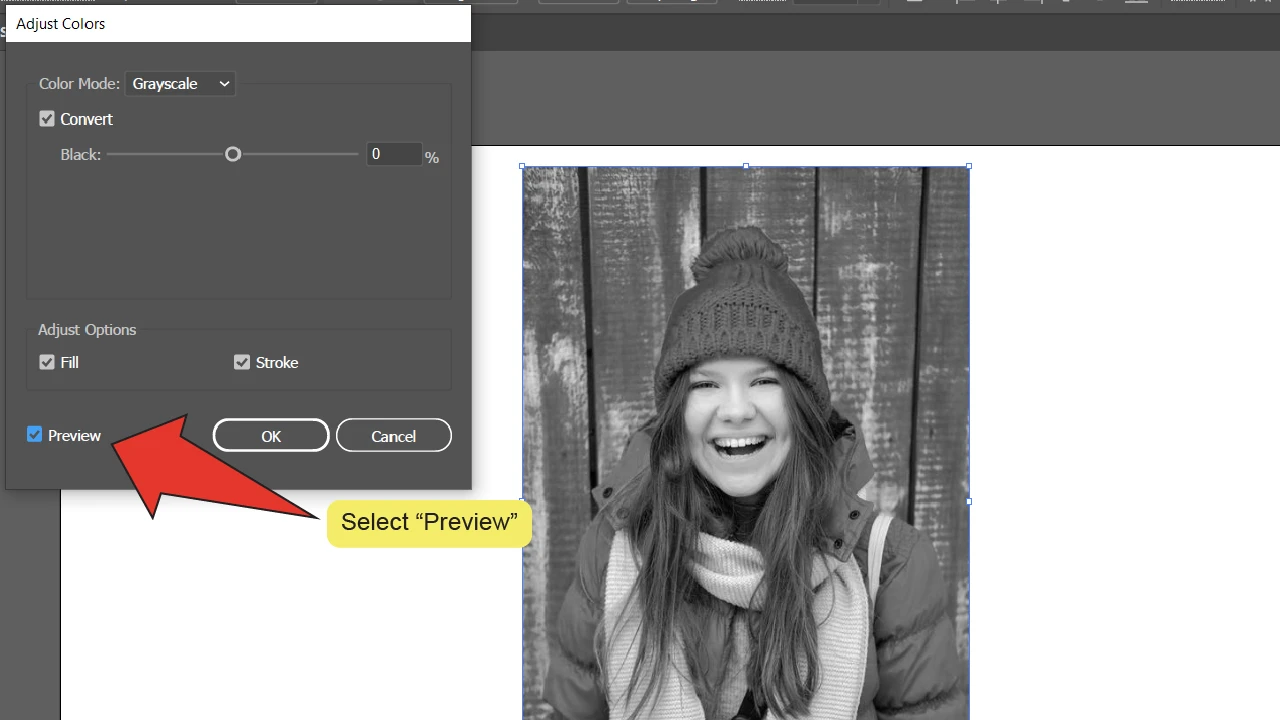
Convert your image to grayscale. Click on the dropdown menu labeled “Color Mode” and select “Grayscale”, then click the box labeled “Convert”.

Step 7:
Select the preview box. Click on the box labeled “Preview” so you can see the effect of your changes as you make them.
Step 8:
Adjust the slider. Move the slider labeled “Black” left or right to adjust the levels of black and white in your image.

Step 9:
Click OK. Once you’ve adjusted your image to the desired level, click the “OK” button at the bottom of the Color Balance panel to finalize your changes.


Hey guys! It’s me, Marcel, aka Maschi. On MaschiTuts, it’s all about tutorials! No matter the topic of the article, the goal always remains the same: Providing you guys with the most in-depth and helpful tutorials!


