
As a graphic design enthusiast or professional, spirals will most likely be among the first things to spark your interest.
Things like the Fibonacci sequence and golden ratio will inform you how the mathematics of the universe follows this unique pattern almost exactly.
It is only natural then that Adobe Illustrator offers us a plethora of tools that will enable you to create any kind of a spiral you can imagine.
We will list a couple of them here.
The first and most obvious way is to create the spiral using Adobe Illustrators spiral tool.
How to create a spiral using Illustrator’s Spiral Tool in 4 Simple Steps
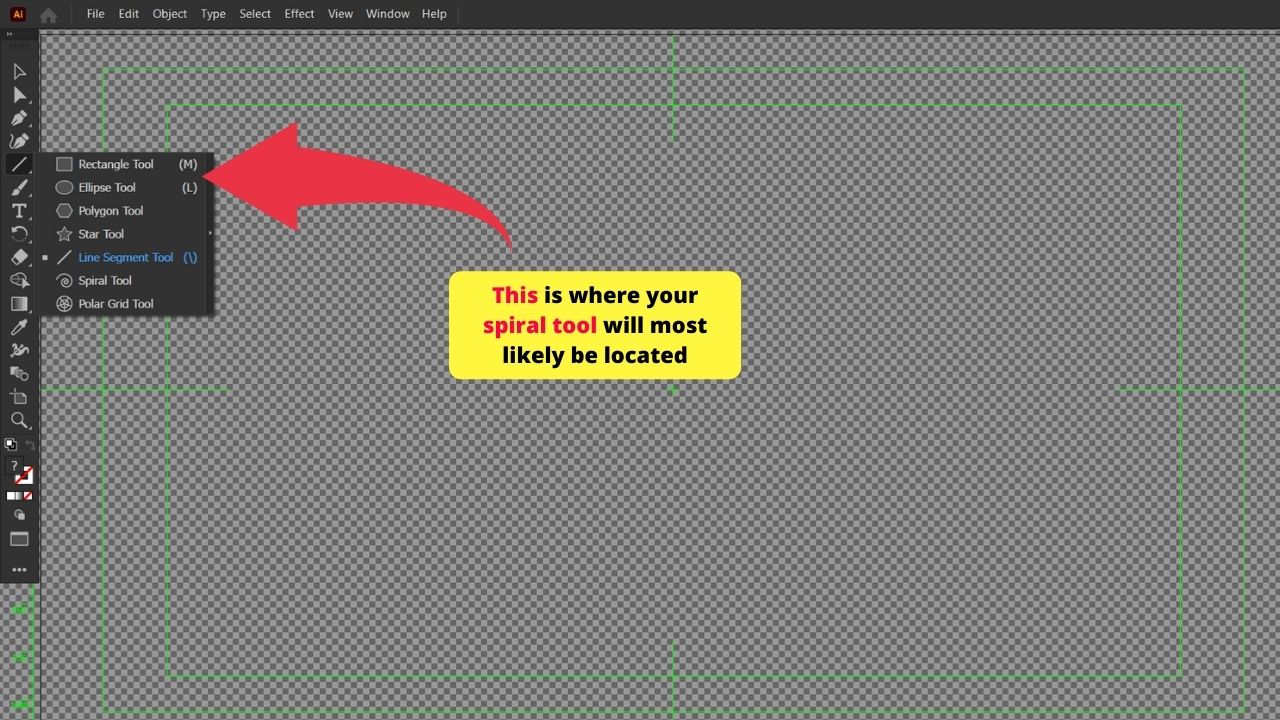
The spiral tool appears when you hold-click the line tool.
Step 1
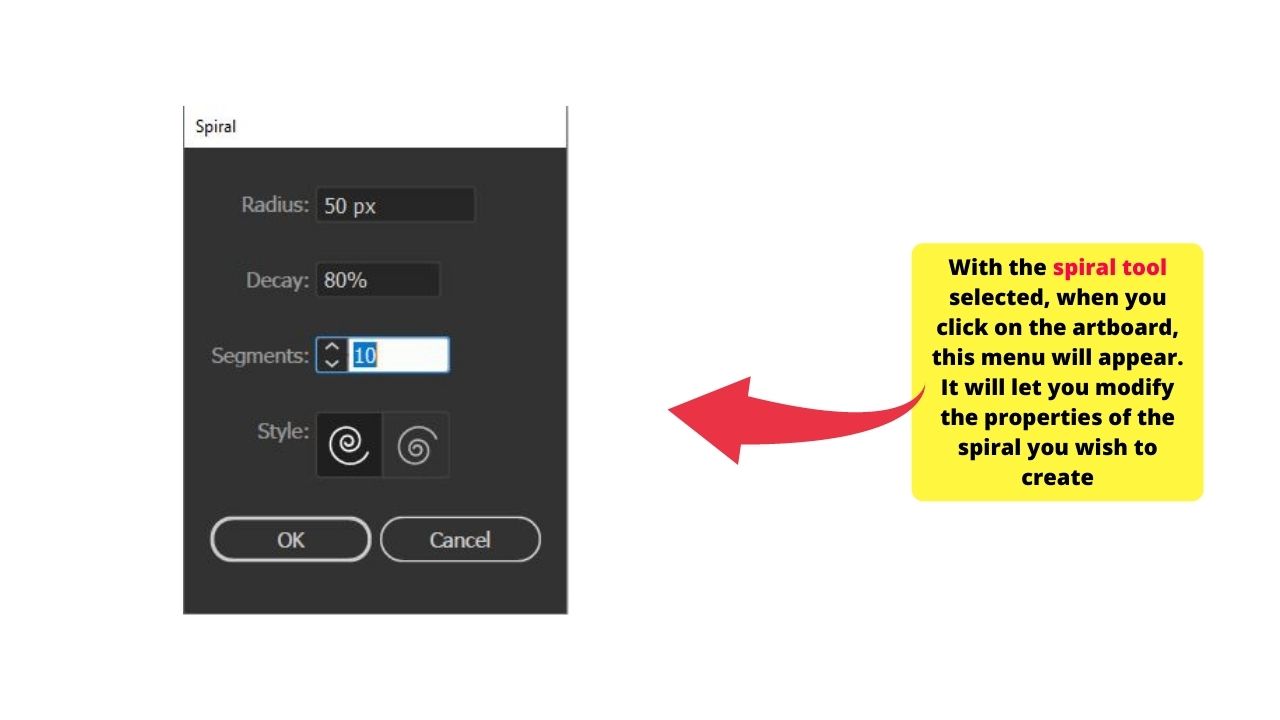
After you selected the Spiral tool, simply click anywhere on the artboard. This will prompt the spiral property box.
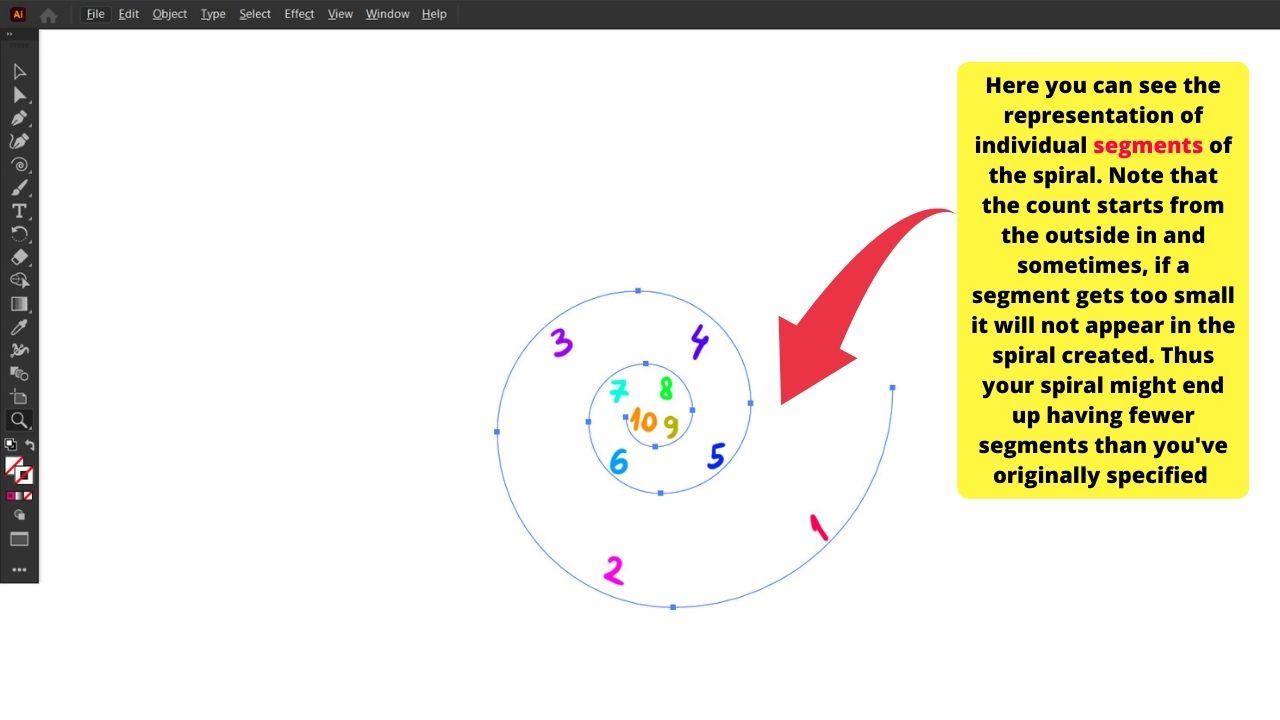
There are three parameters here that you can tweak to get the exact spiral that you’re looking for: Radius, Decay and Segments.
Step 2
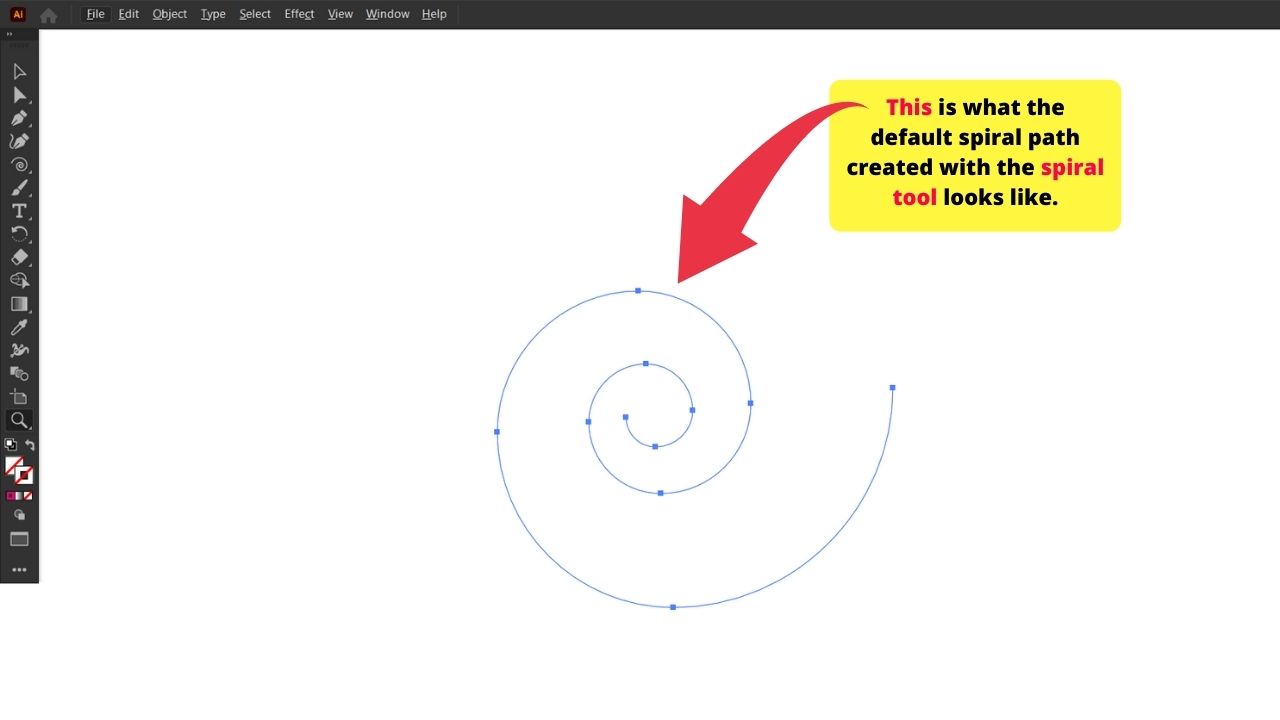
Set the number of segments: segments are constitutive units of a spiral, basically a single path.
Step 3
Select the radius: This parameter sets the distance between the outermost segment and the center of the bounding box of the whole spiral. Therefore, reducing it will make the spiral appear “denser” while increasing this value will make it more spread.
Step 4
Figure out the decay: This number responds to how long the second segment will be compared to the first one (and each subsequent segment compared to the former)
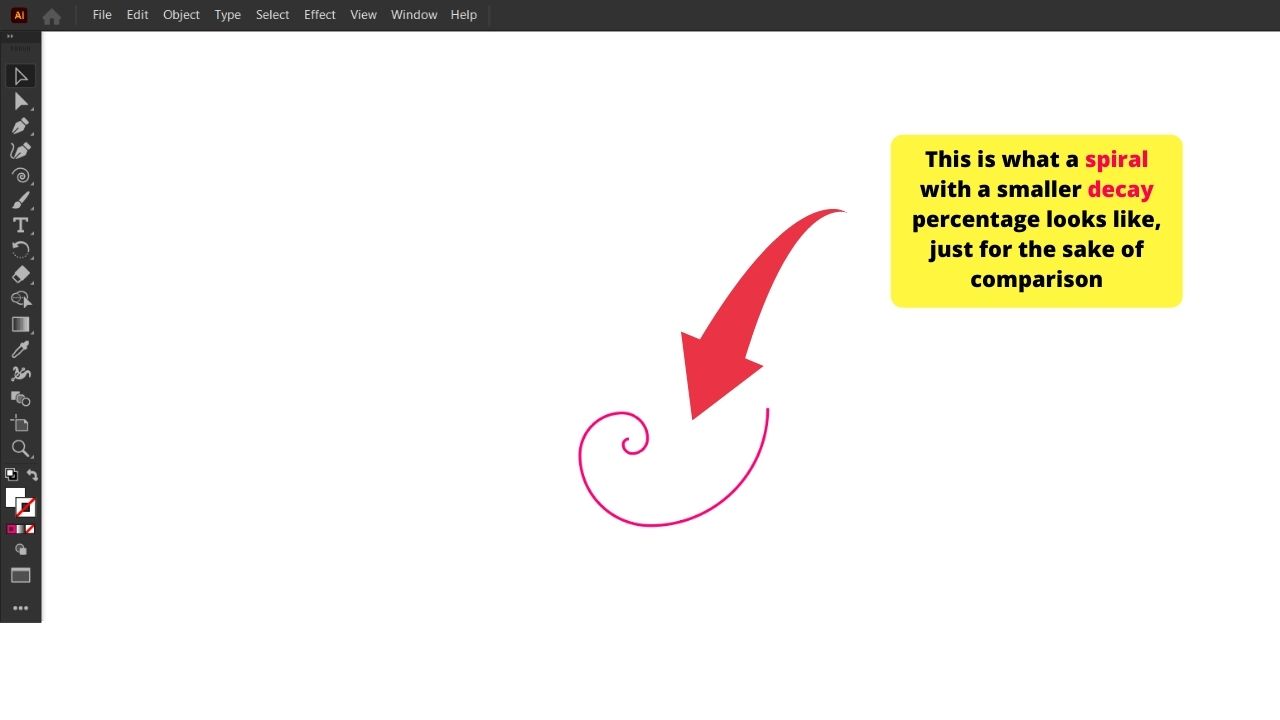
Therefore, decay of eighty percent (80%) will result in segment 2 being 80% of the length of segment 1.
Contrary to what you might expect, a larger number on the decay corresponds to a more gradual “shrinking” of the spiral.
How to Make a Spiral with the Polar Grid Tool
But perhaps this is not what you are looking for and you’d like your spiral to have equal spacing between the rows. In this case, we will use another method:
We will use another tool, located in the same toolbox. So hover your mouse over the line tool, and this time pick the polar grid tool.
Step 1
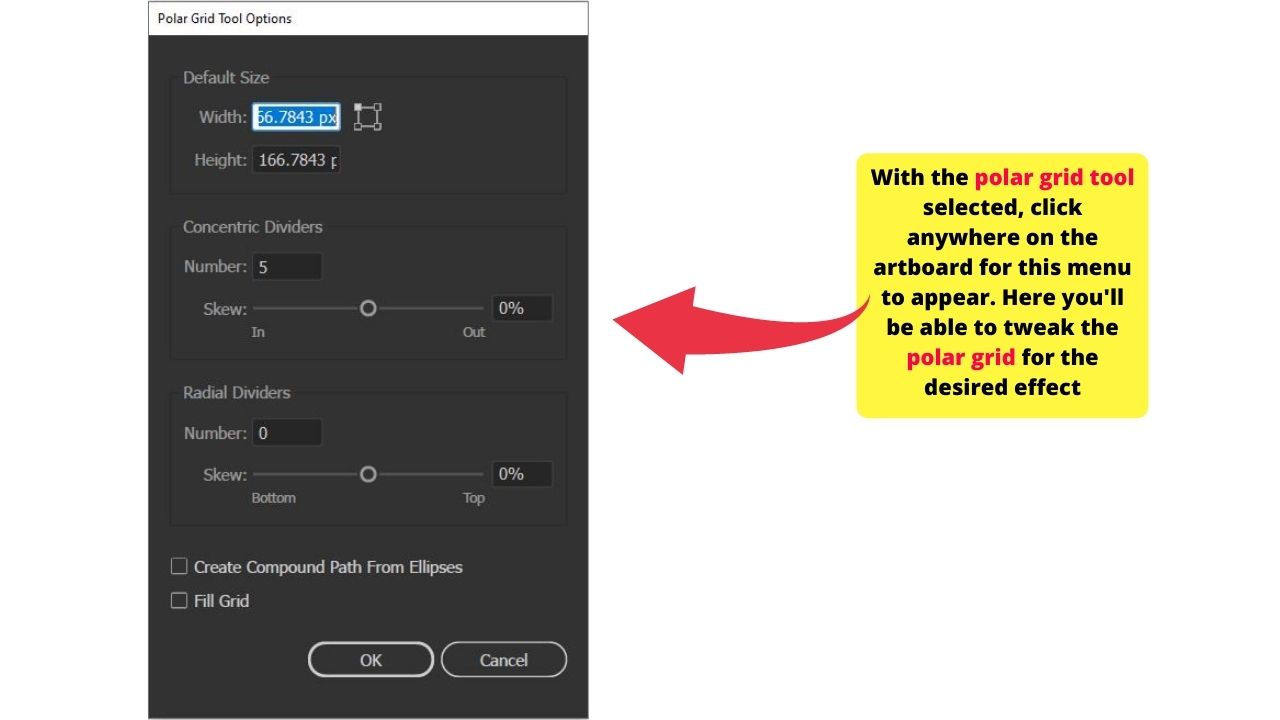
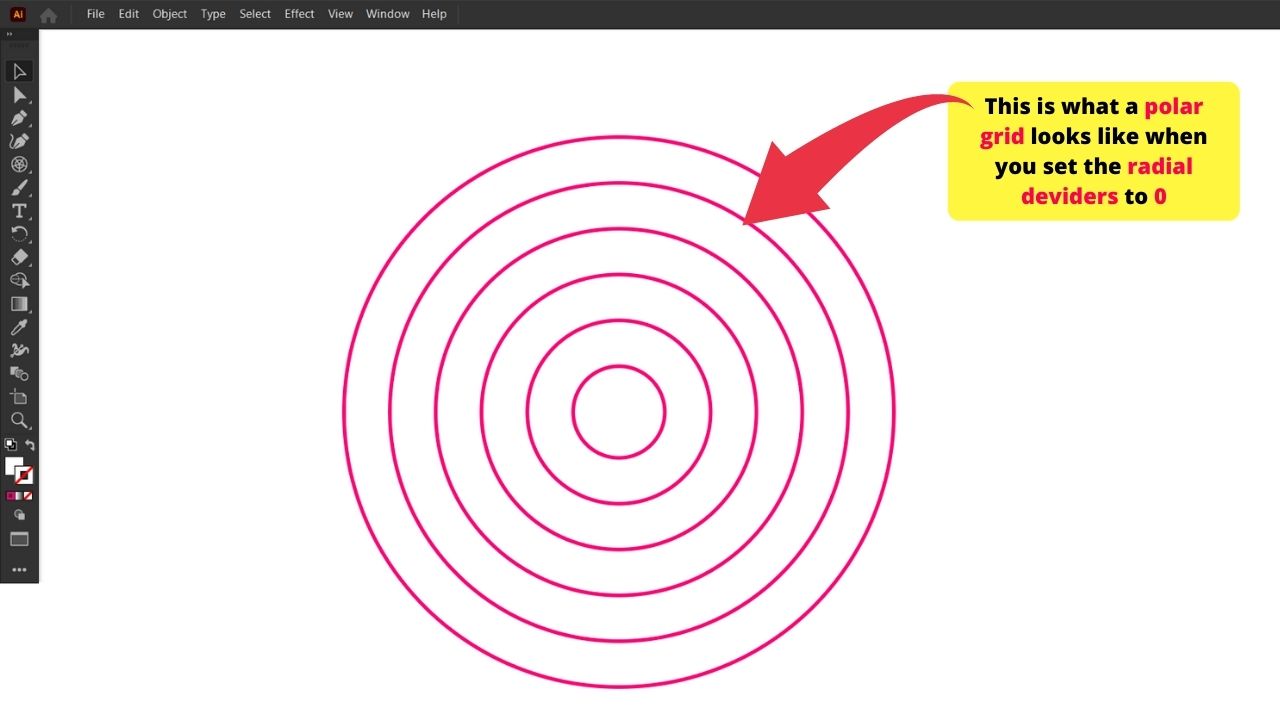
Click where you’d like to place your spiral. This will open the polar grid tool properties.
Step 2
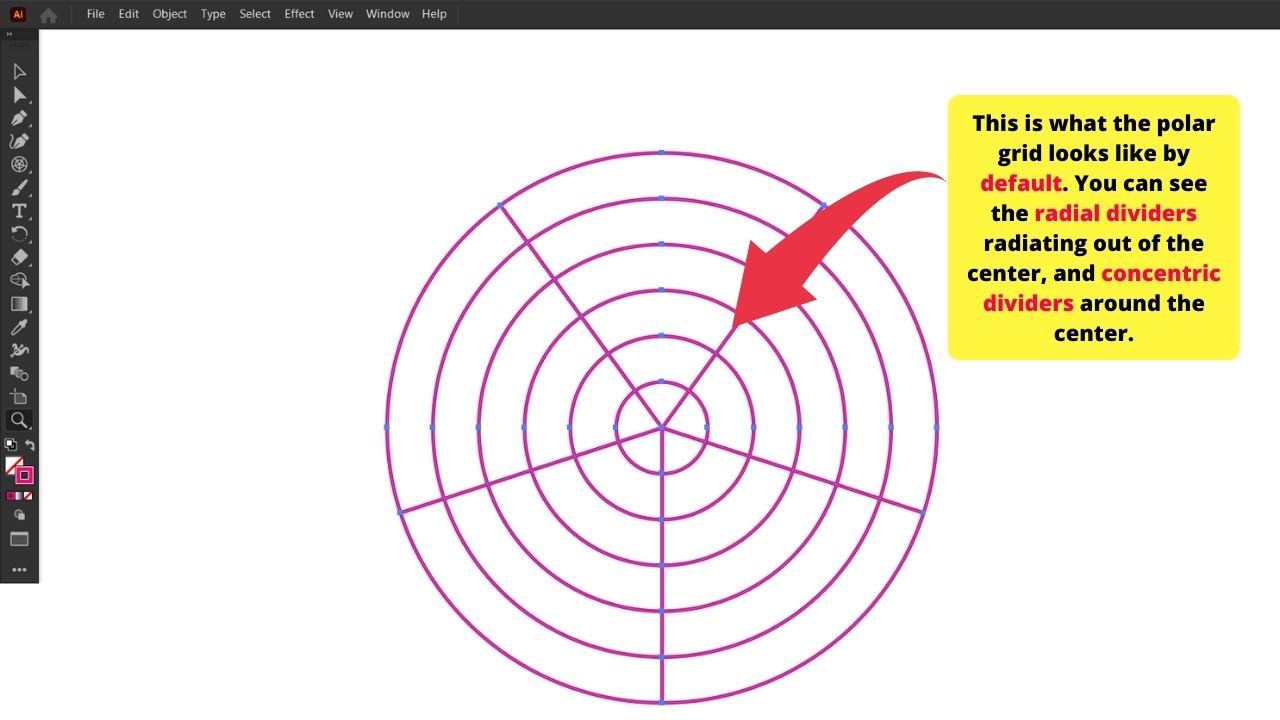
Pick the number of concentric dividers. This is your most important setting as it refers to the number of “rings” your spiral will have.
Step 3
Set the radial dividers number to 0. We don’t need these when creating a spiral.
Step 4
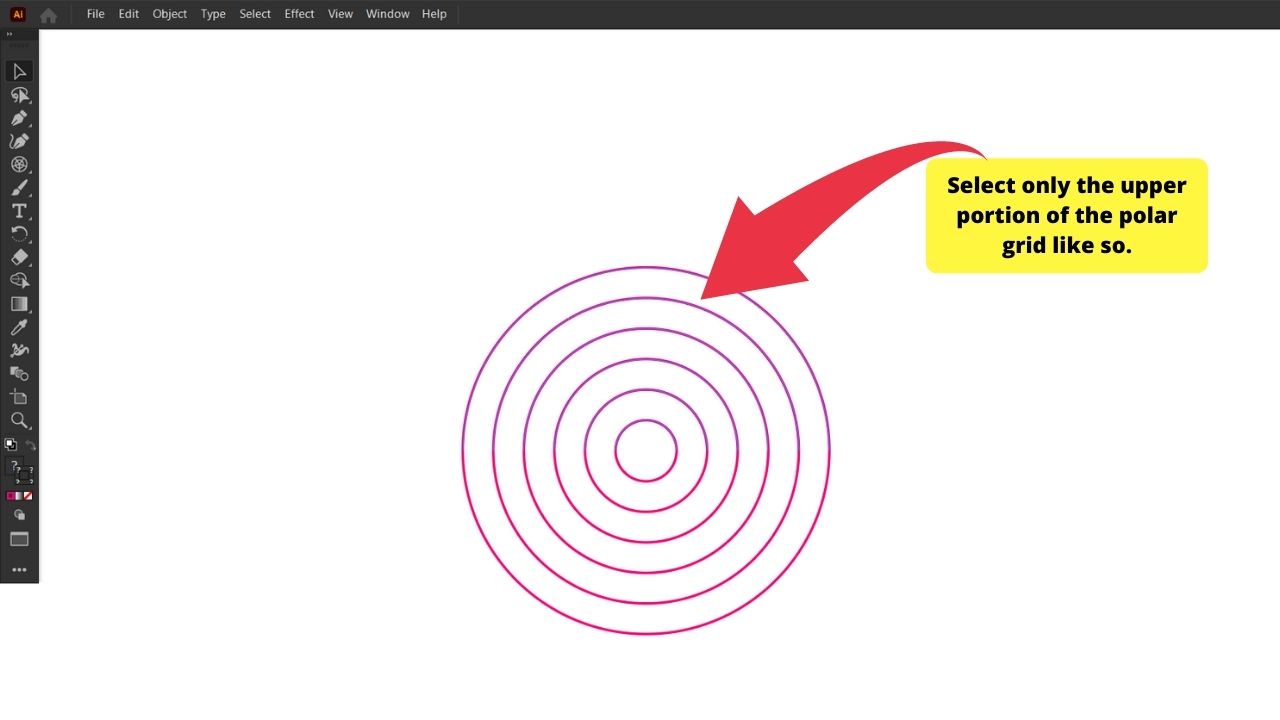
Select the upper half of the polar grid. Be careful not to select the anchor points dividing it in half. Go to the edit menu and select cut.
Step 5
Deselect everything. Go to the edit menu again and click paste to place. Then using the arrow keys, move the top half one row to the right.
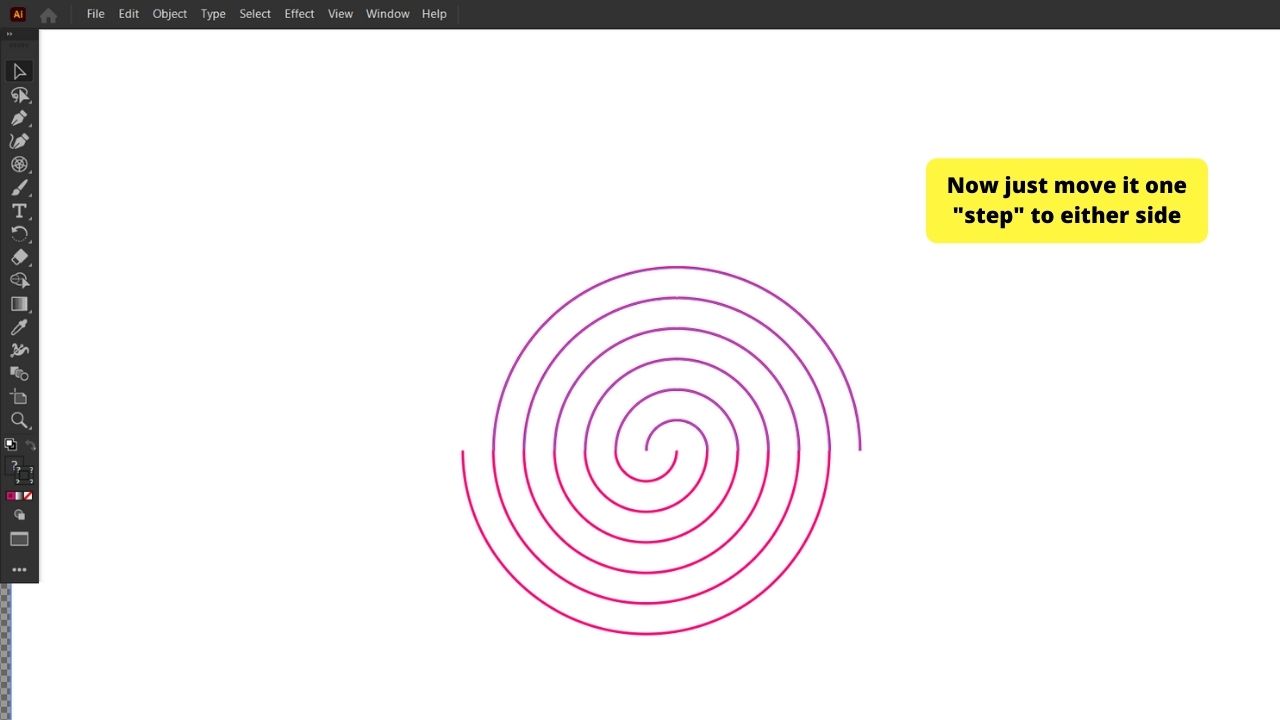
(Bonus Hint: snap to point )
Step 6
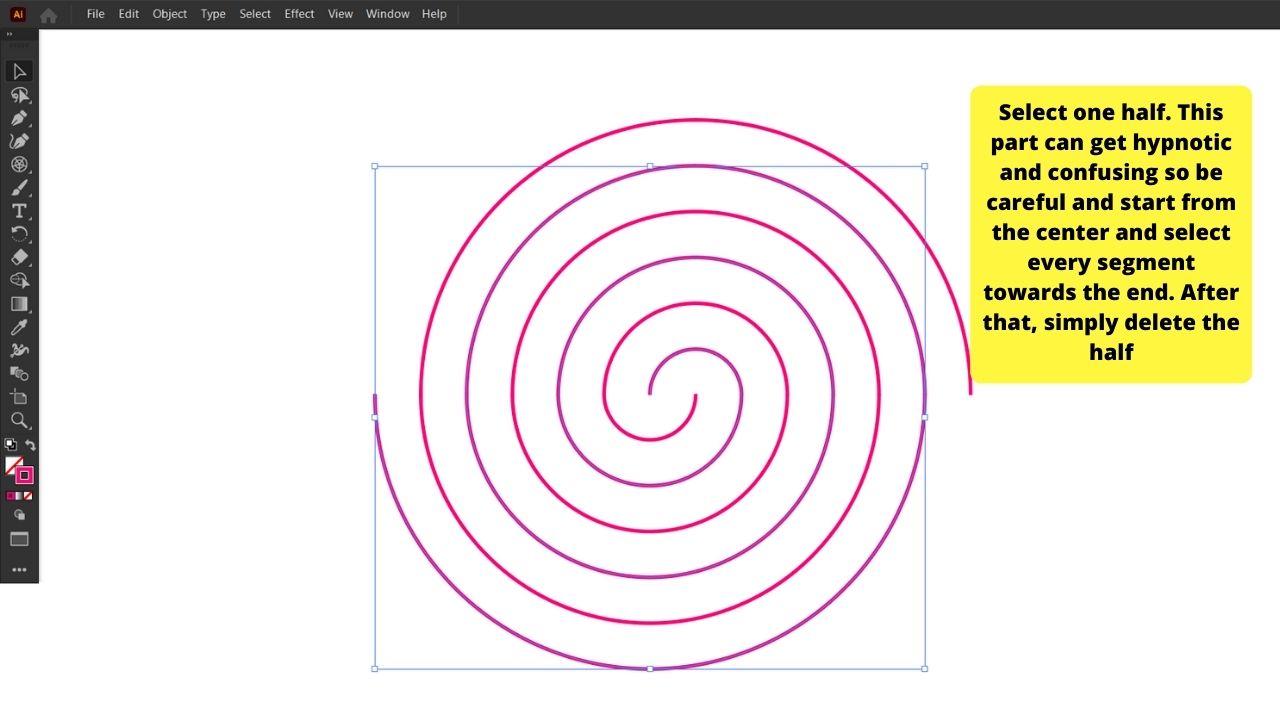
Select all paths ( all that originated from the initial polar grid ) and go to Edit > ungroup. Do it a couple of times until the option becomes unclickable.
Step 7
Go in and delete the surplus lines. Basically select half of the middle, and then every other concentric line to the end of the spiral. Now simply delete the selection.
Here’s how that looks.
Now you have a vector path for your spiral. Naturally, the final look will depend a lot on which kind of a stroke you pick.
In the case of the first spiral, where the distance between rings of the spiral gradually decreases as we approach the center, selecting a tapered stroke might be a necessity so as to not get overlapping lines.
The second kind of a spiral where the distance between rings is universal is much more forgiving in this regard. You mainly just have to consider the thickness of the line.
How to Make a Swirl in Illustrator
Swirls can be made using a specific tool available in Illustrator for this purpose: the “Spiral” tool. We are going to use this tool now to create our swirl in Illustrator. Simply follow the steps as outlined below to make a great-looking swirl!
Step 1: Select the “Spiral” Tool
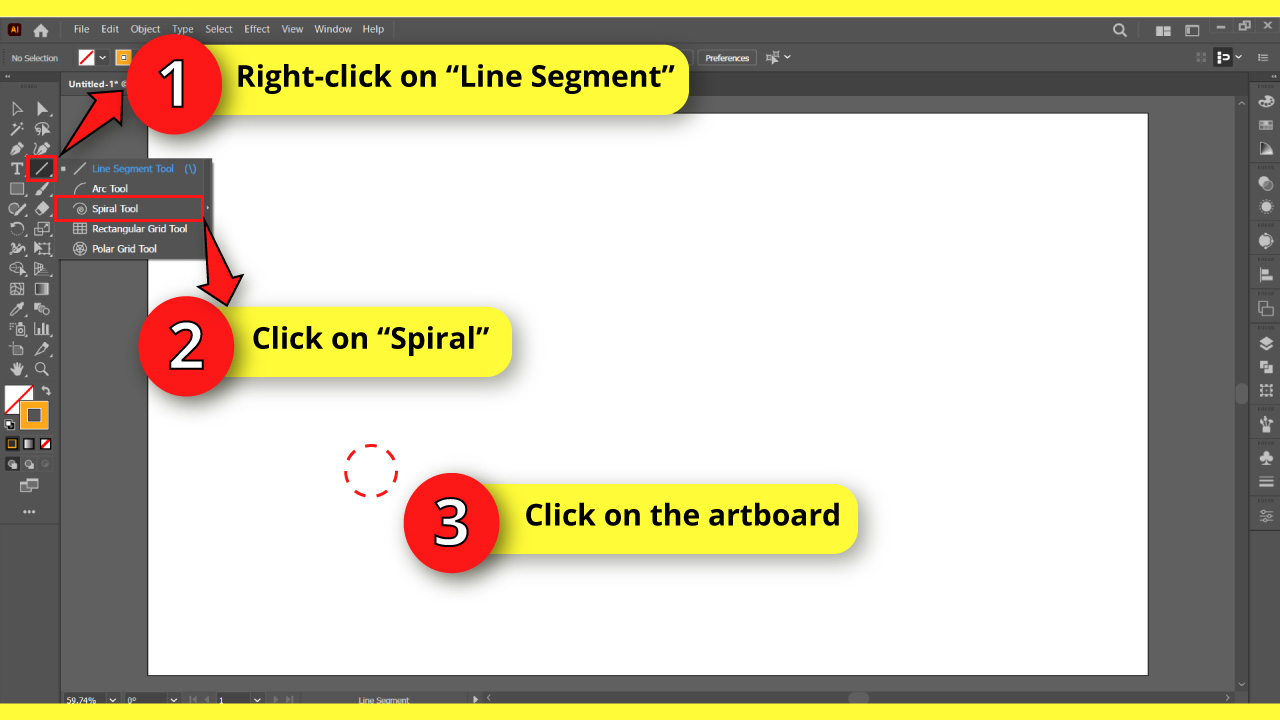
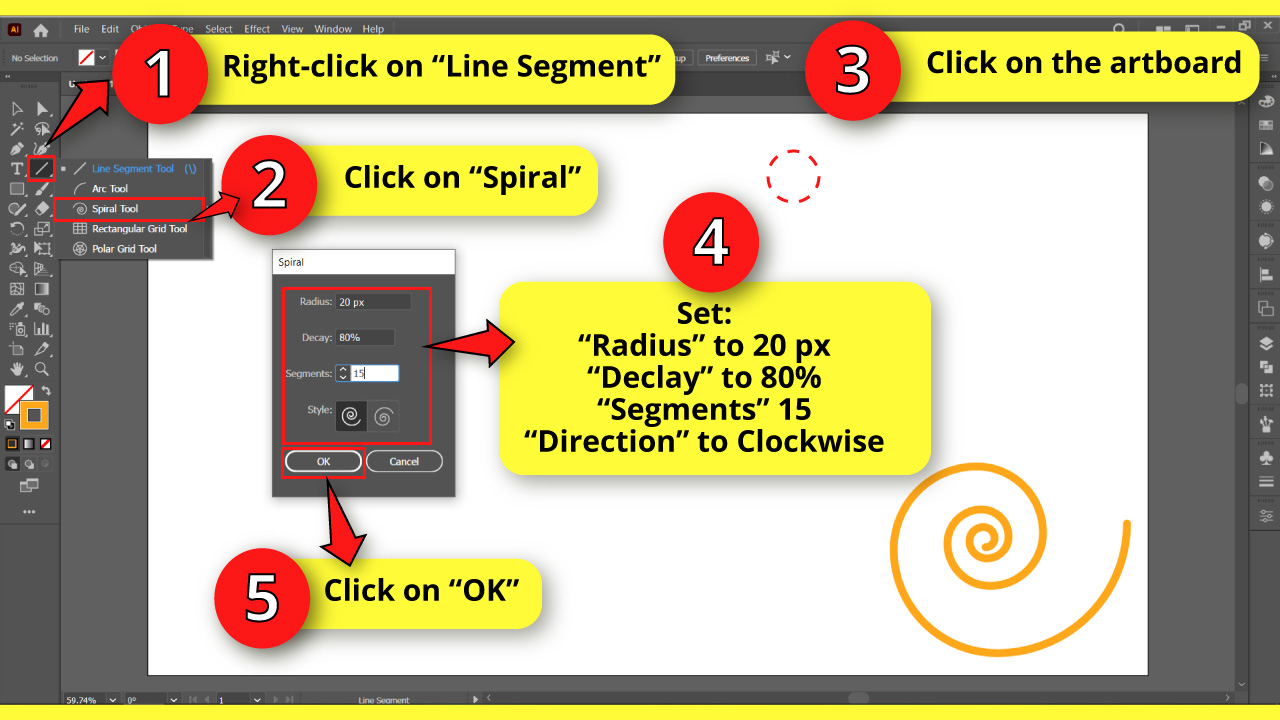
To use the “Spiral” tool, first right-click on the “Line Segment” () tool located on the right-side toolbar.
Once the hidden tools menu unfolds, click on the “Spiral” tool.
Next, click anywhere on the artboard to open the “Spiral” adjustments window.
Step 2 : Adjust the “Spiral” Settings
On the “Spiral” adjustments window, set the “Radius”, “Decay”, “Segments”, and “Direction”.
First, set the “Radius” value. The bigger the value, the bigger the size of the swirl. Keep in mind that even if you can adjust the swirl size later, a resized shape won’t look the same as a swirl created with the radius you need.
Next, set the “Decay” value that ranges from 5% to 100%. The higher the value, the closer the swirl lines will be.
If you set it to 100%, the swirl will turn into a perfect circle.
If you set it to 5%, it will look like a curve instead of a swirl.
However, if you want to curve a line in Illustrator, there are better tools to do it.
Then, set the “Segments” value. The higher the value, the more twists the swirl will have.
A segment is the part of the line that goes from anchor point to anchor point. Each twist has four segments.
Finally, select the direction of the swirl and click “OK” to save.
I’ll set it to:
“Radius” at 20 px
“Decay” at 80%
“Segments” at 15
“Direction” as clockwise
You can enter the values that suit you better.
How to Make a Spiral Text in Illustrator
To create spiral text in Illustrator, we need to first make a spiral and then add the text along the path. Keep reading to find out how to do it. This is actually not as difficult as it sound. You can easily get this done in Illustrator. Just follow along and you will have a great-looking spiral text along your spiral in minutes!
Step 1: Make a Spiral
To create spiral text, first make a spiral by right-clicking on the “Line Segment” () tool located on the right-side toolbar.
Once the hidden tools menu unfolds, click on the “Spiral” tool.
Next, click anywhere on the artboard to open the “Spiral” window and adjust the spiral settings. If you have any doubts about adjusting the “Spiral” settings, refer to the previous article sections.
Once you have finished adjusting your desired spiral, click on “OK” to save.
Step 2: Add Text
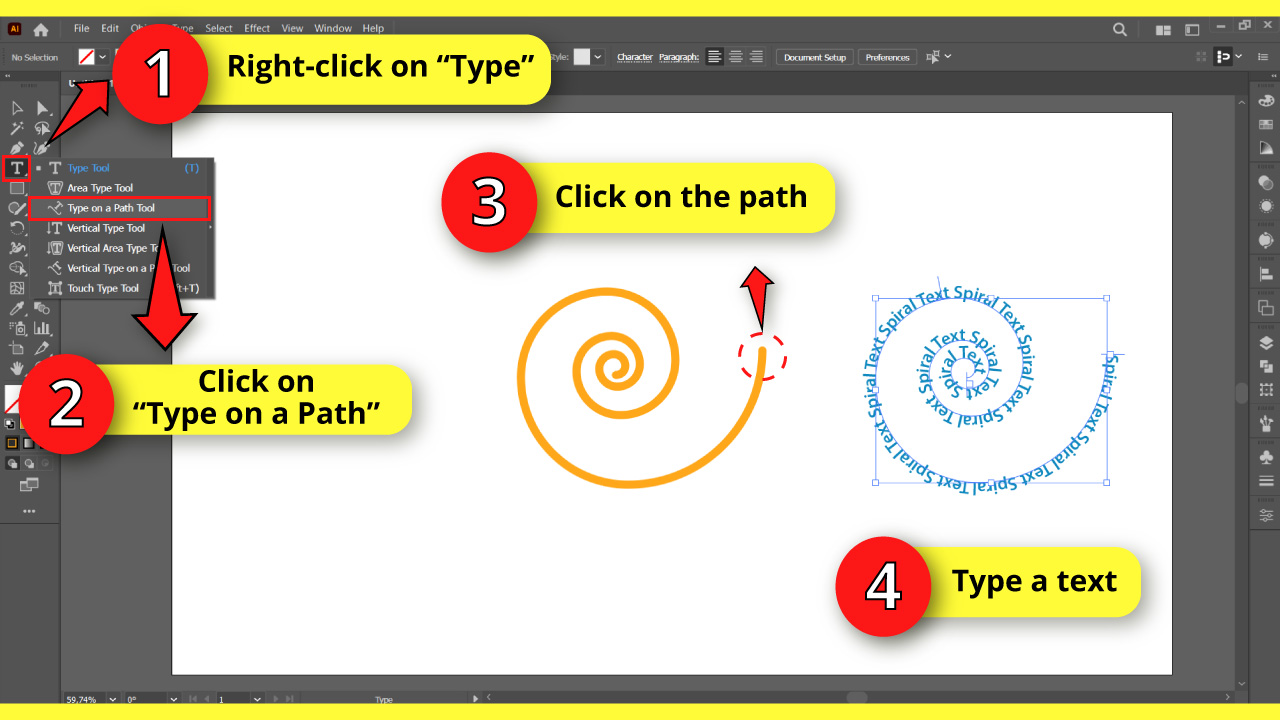
To add text to the spiral, right-click on the “Type” (T) tool located on the right-side toolbar. Then, click on the “Type on a Path” tool from the unfolded menu.
Next, click on the beginning of the spiral path and type the text you want to add.
After swirling the text, you can outline the text in Illustrator or gradient the text in Illustrator, but it’s recommended to expand the paths first.
You can outline the text in Illustrator or gradient the text in Illustrator after swirling it, but it’s recommended to first expand the paths.
If you only want to curve text in Illustrator without swirling it, there is a specific tool to do so.
Frequently asked questions on How to make a spiral in Illustrator
How to write text in a spiral in Illustrator?
Once you’ve created a spiral, select the “type on path ” tool. Select the spiral and start typing. Drag the lever in front of the text to adjust its position on the spiral.
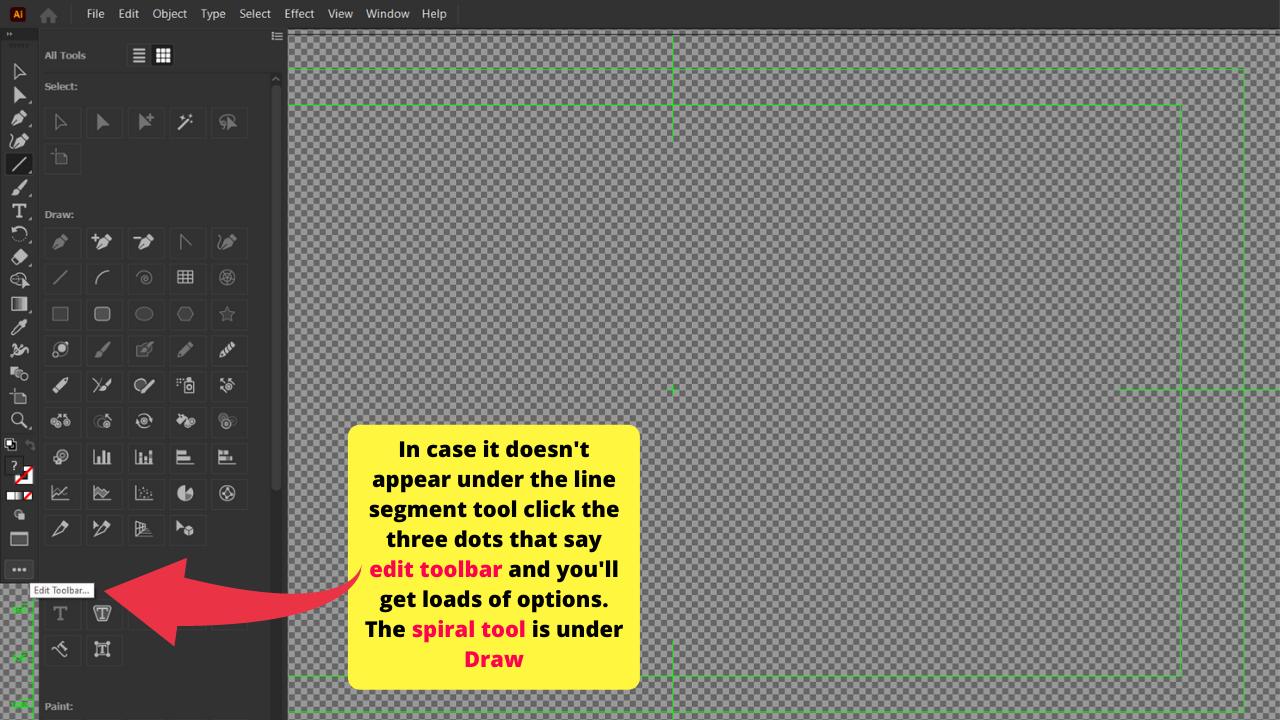
Where is the Spiral tool in Illustrator?
The Spiral tool is located under the Line Segment Tool. With that said, to equip the Spiral tool, right-click on the Line Segment Tool and then choose “Spiral Tool.”
How to edit the spiral created with the Spiral Tool in Illustrator?
Once you have a spiral path on your artboard, you edit it like you would any other path, using anchor points and handles. You can also ungroup a spiral to be able to individually affect single segments.