
Dark background is a very popular photo effect nowadays. Knowing how to get it equals having an ace up the sleeve that you can use anytime to turn any flat and dull photo into a dramatic, eye-catching image.
This effect will instantly make your photos look very professional, and the best part is that it’s very easy to do, and you don’t need any prior knowledge. All you need to know, you will find it here below.
In this tutorial we’ll cover two techniques of darkening. The first one will just darken the background, and the second one will be turning it to total black.
Continue reading to find out how to implement these techniques in your own photos!
How to Darken a Background in Photoshop
Go to the “Layers” (F7) panel and create a “Curves Mask” layer to darken the image. Make a black oval over the subjects. Blur the oval edges. Duplicate the “Curves Mask” layer and invert it. Go to the “Properties” panel and reset the adjustments. Finally, brighten up using the curve.
In this tutorial we’ll use a photo of a couple and darken the background. Of course, you can apply this technique to any photo.
Darkening the background is only half the process. The other half consists of making the subjects stand out.
Step 1: Import an Image

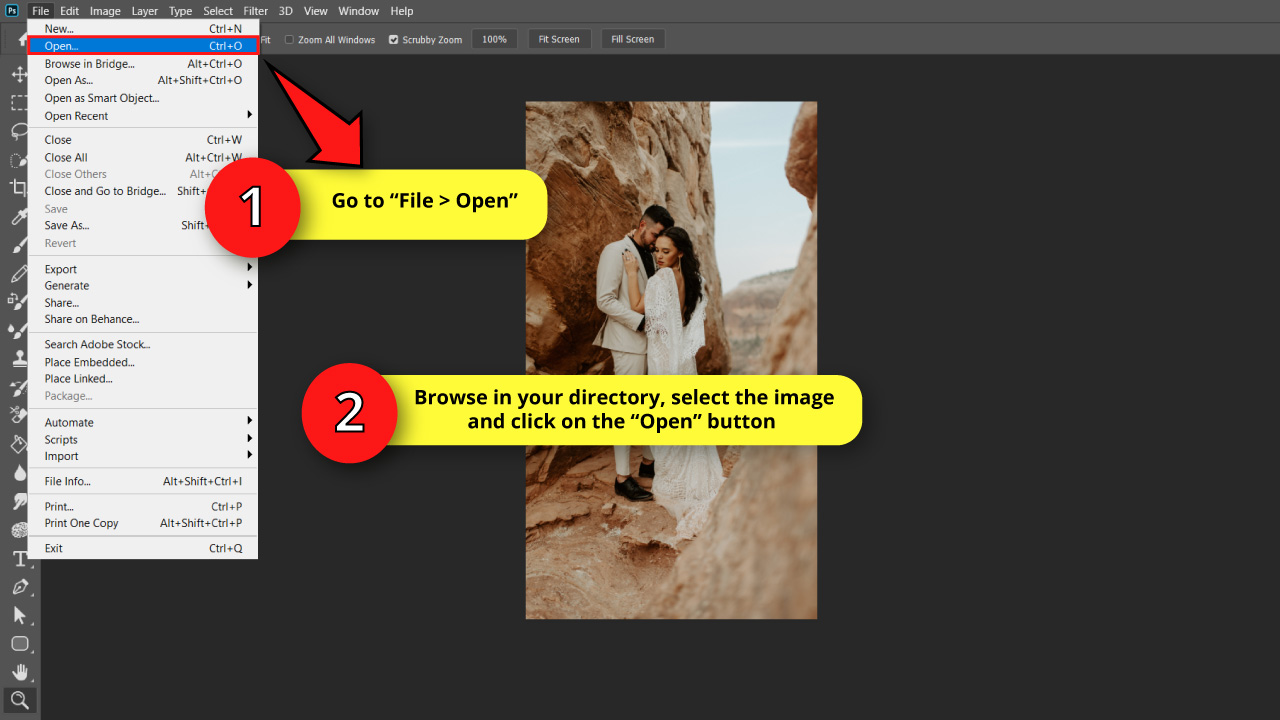
To import an image, go to “File > Open” on the menu at the top of the screen.
Or press the “Ctrl + O” command to shortcut it.
On the pop up window, browse in your directory and locate the photo you want to work on.
Select the image and then click on the “Open” button.
Step 2: Duplicate the Layer
Now we need to duplicate the layer so we can work on a copy, and keep the original layer as a backup, just in case.
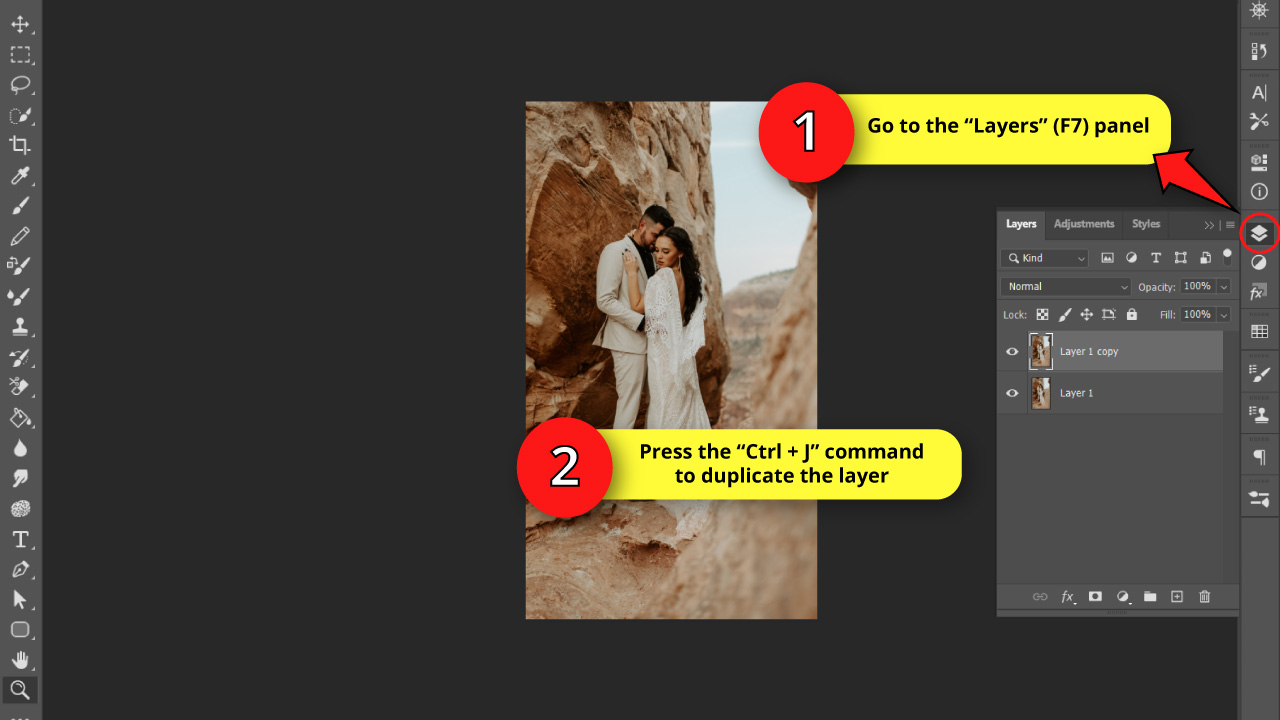
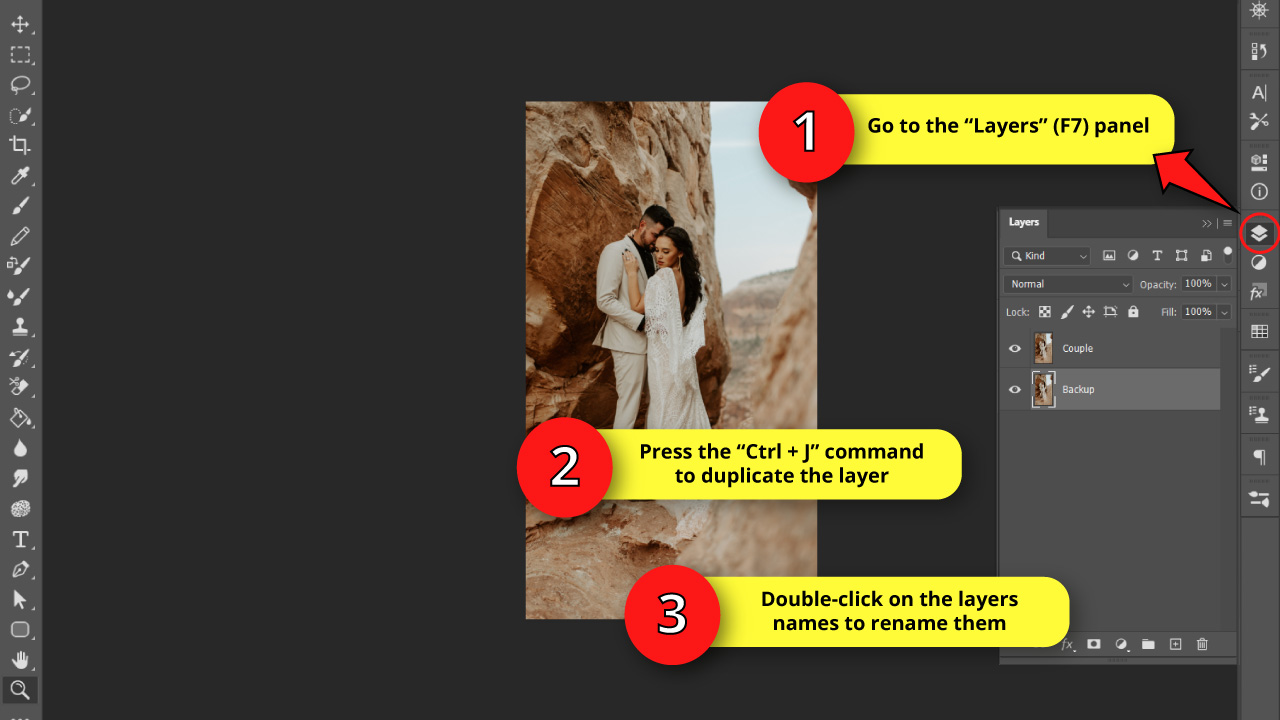
To duplicate a layer, go to the “Layers” (F7) panel, usually located on the right side toolbar.
If you can’t find it, you may have to enable it first by going to “Window > Layer” on the menu at the top of the screen.


Or press the “F7” key to shortcut it.
Once you are on the “Layers” (F7) panel, press the “Ctrl + J” command to duplicate the layer.
You can also do this by going to the “Settings” icon on the top right side of the panel. Once the settings menu unfolds, select the “Duplicate Layer…” option.
Step 3: Create a “Curves Mask” Layer
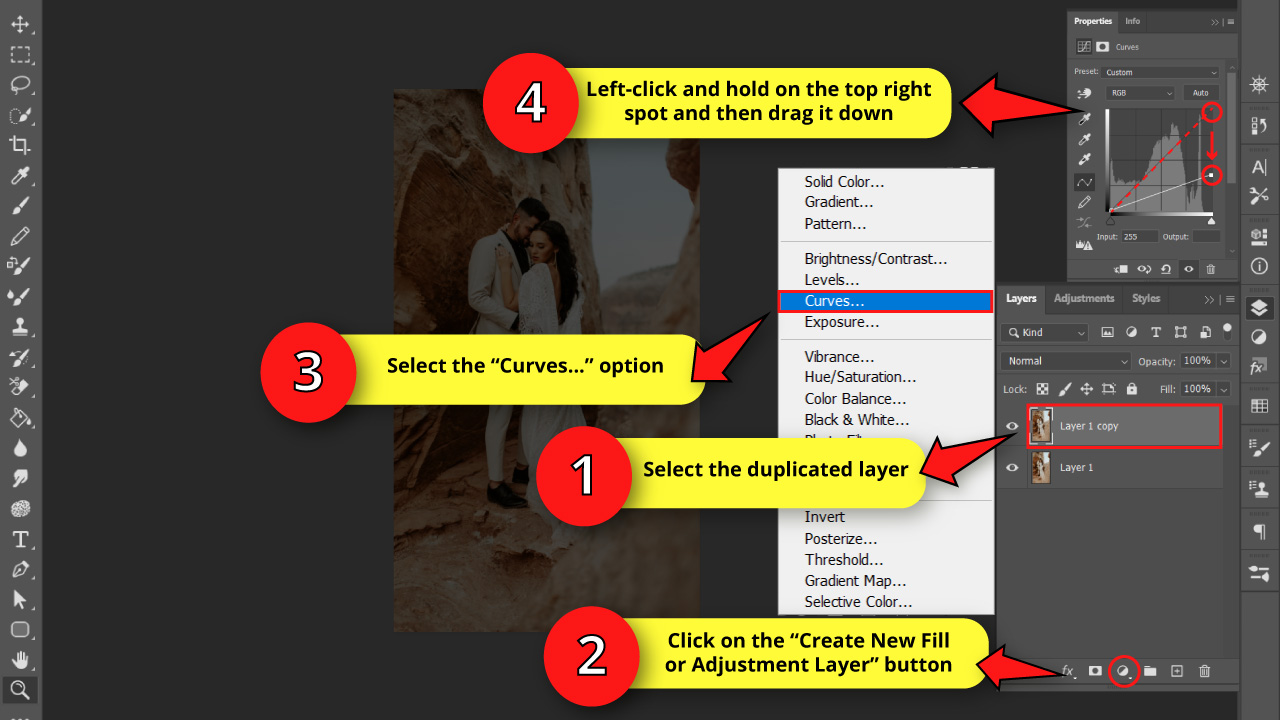
Make sure that the duplicated layer is selected, and then click on the “Create New Fill or Adjustment Layer” button at the bottom of the panel.
Once the menu unfolds, select the “Curves…” option to open the “Curves Properties” panel.
In this panel you will find a graphic with an adjustable curve.
We need to make the image darker, so left-click and hold on the top right spot of the linear curve, and then drag it down until you get your desired level of darkness. I’ll set it around 30% of its original position.
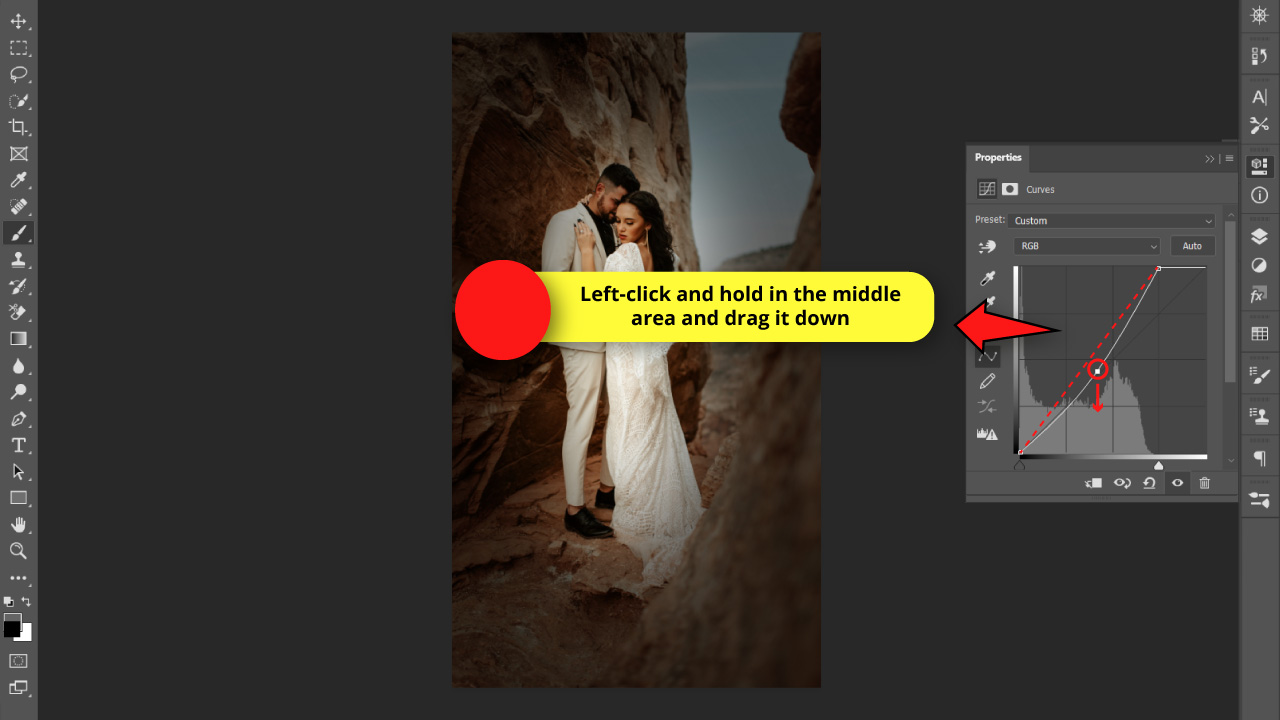
Step 4: Adjust the Contrast of the “Curves Mask” Layer
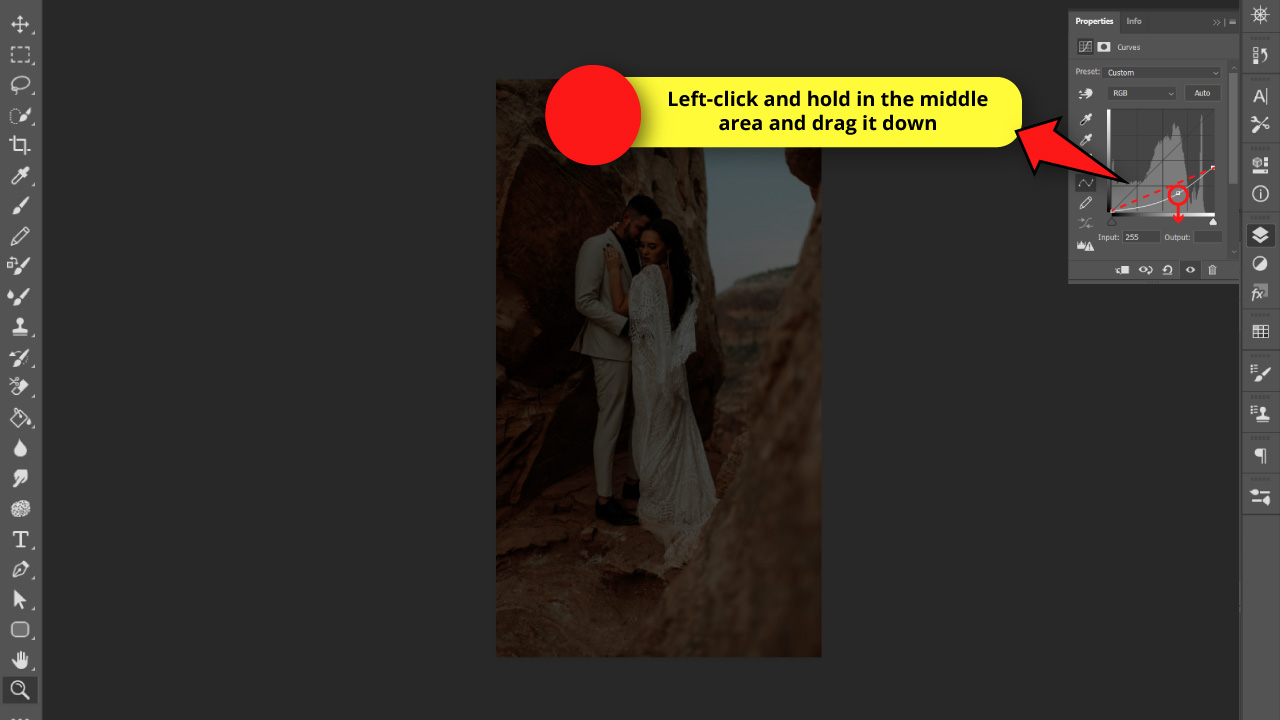
Then, left-click and hold in the middle area of the linear curve to drag it slightly down and get an “exponential” curve.
This will increase the contrast in your image.
Step 5: Use the “Brush” (B) Tool to Customize the Mask Layer
Now we need to highlight the couple. For this, we’ll use the “Brush” (B) tool.
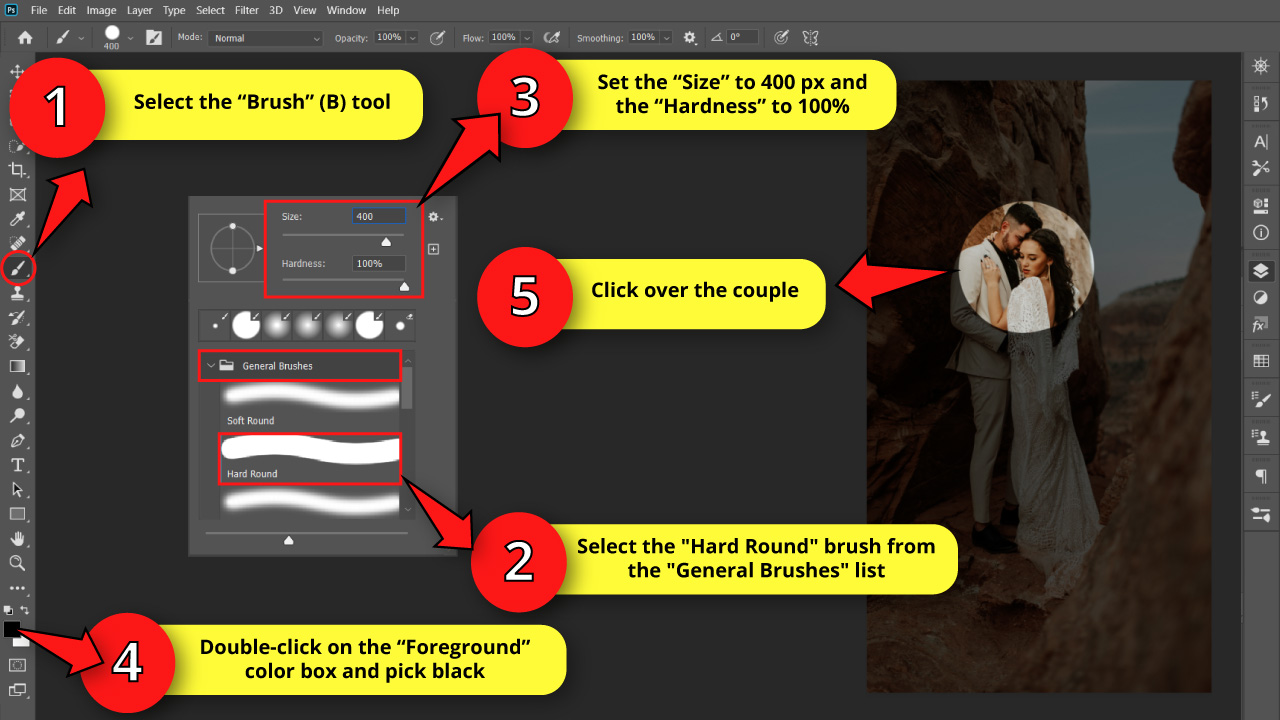
Select the “Brush” (B) tool on the left side toolbar, and then right-click on the canva to open the “Brush Settings” window.
You can also find this window on the toolbar at the top of the screen.
On the “Brush Settings” window, select the “Round Hard” brush that you can find in the folded “General Brushes” menu.
Make sure that the brush “Hardness” value is set to 100%. Then set the “Size” of your brush. This value may vary depending on your photo.
You need the brush to be large enough to cover the width or height (whichever is the smaller) of your subject.
For my photo, I need to set the “Size” to 400 px.
Once you’re done with the brush adjustments, double-click on the “Foreground” color box to pick black.
Finally, click over the couple and a spot of the size of your brush will be removed from the mask.
If you want to know more about how to customize a masked layer, check the F.A.Q. at the end of the tutorial.
Step 6: Convert the Circle to an Oval
Now we need an oval-shaped spot to cover the whole couple.
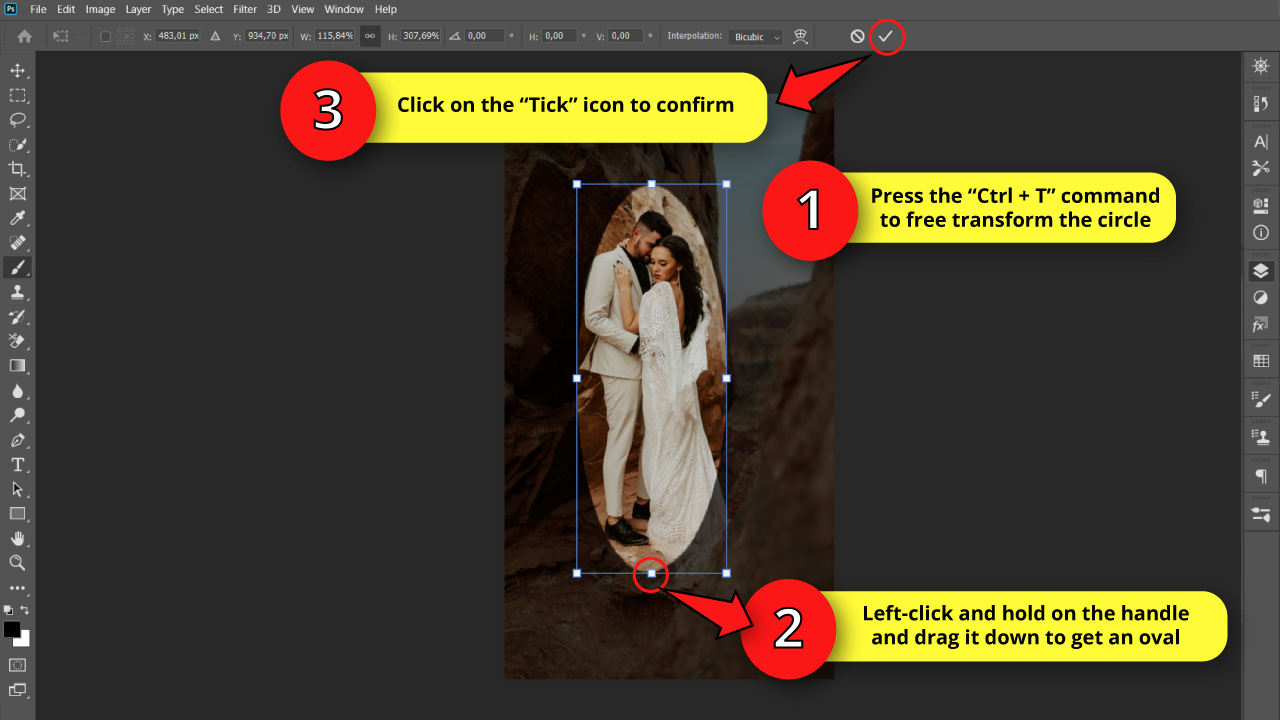
To distort the round spot, press the “Ctrl + T” command or go to “Edit > Free Transform” on the menu at the top of the screen.
Once the bounding box displays, hold the “Shift” key as you left-click and hold on the bottom handle, and drag it down to get an oval.
When you get the shape your photo requires, click on the “Tick” icon on the toolbar at the top of the screen to confirm the edition.
Step 7: Blur the Edges of the Oval
Now we need to blur the edges of the oval.
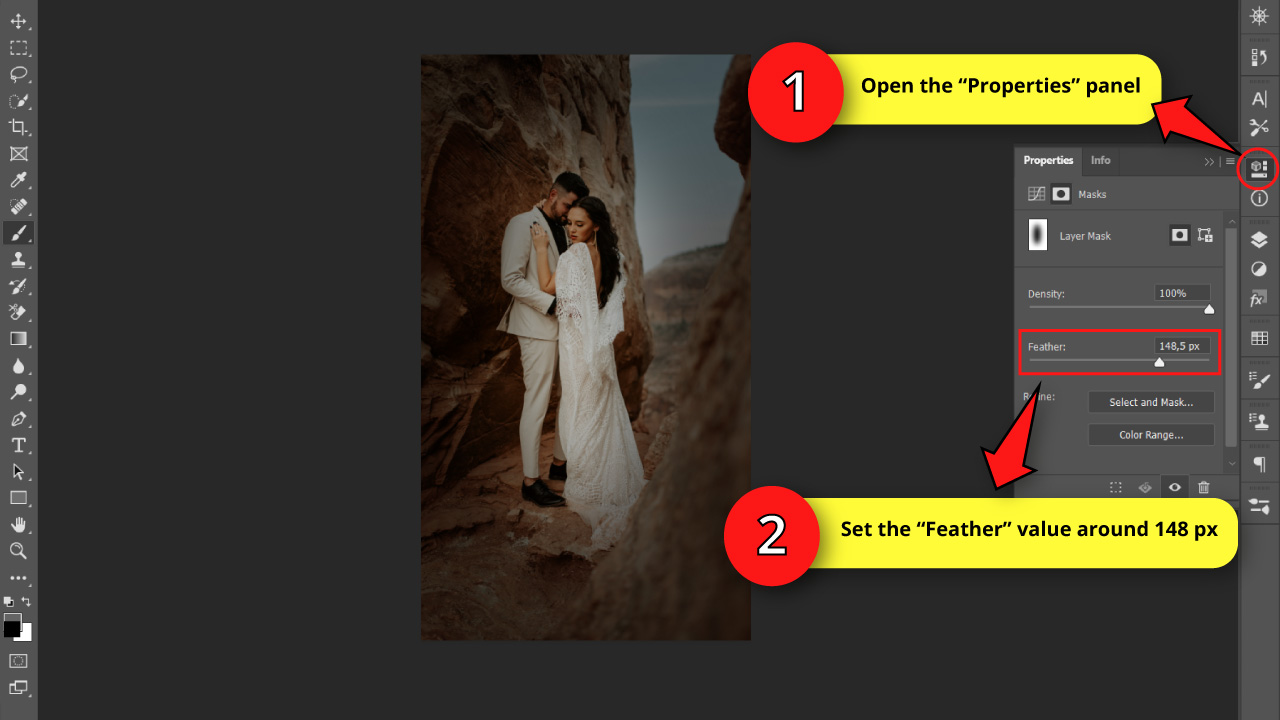
To blur the edges, go to “Properties”, usually located on the right side toolbar.
If you can’t find it, you may have to enable it first by going to “Window > Properties” on the menu at the top of the screen.
Once you are on the “Properties” panel, place the “Feather” slider at some point on the right area. The correct value may vary depending on your specific photo and the size of the oval.
Set the “Feather” slider value at some point that you consider the oval blurriness to fit the best.
I’ll set mine around 148 px.
Step 8: Duplicate and Invert the “Curves Mask” Layer

Go back to the “Layers” (F7) panel, and make sure the “Curves Mask” layer is selected.
Then press the “Ctrl + J” command to duplicate the masked layer.
Next, press the “Ctrl + I” command to invert the mask, so in the layers thumbnail the black area will become white, while the white area will turn black.
This step will darken your whole photo again, but don’t worry. We’ll fix this right away in the next step.
Step 9: Adjust the Brightness of the Duplicate “Curves Mask” Layer
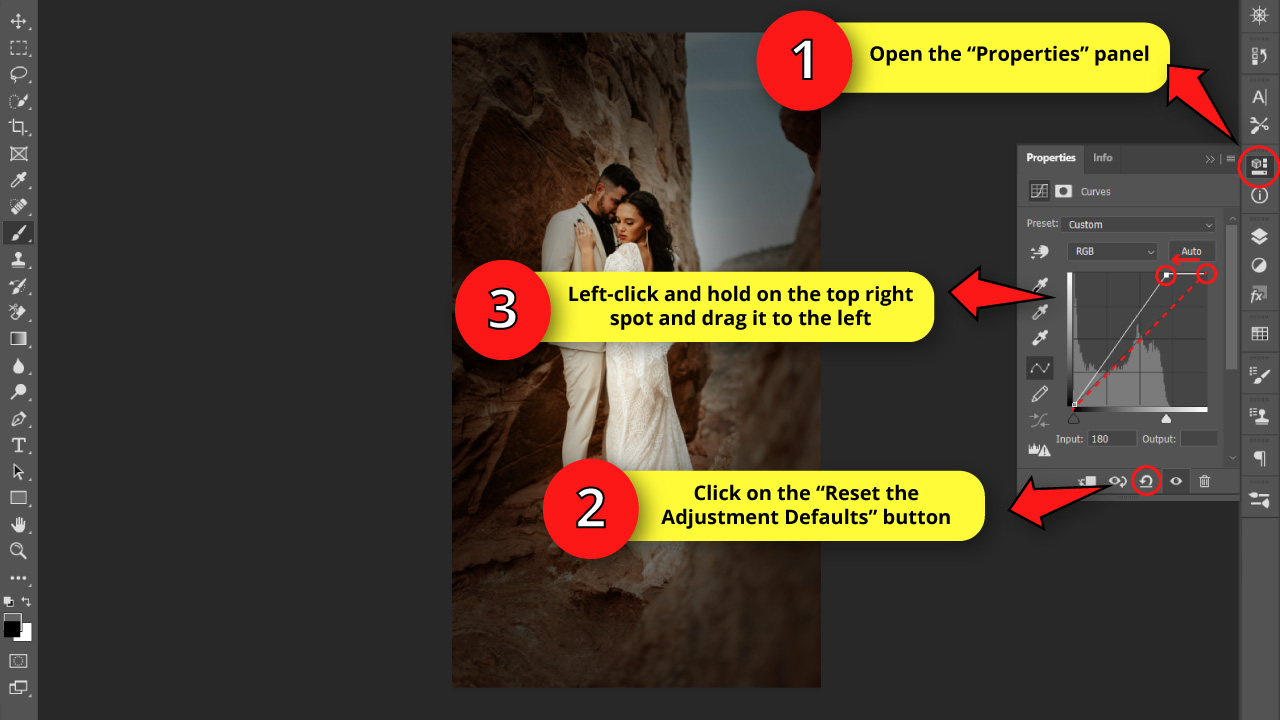
Now go to the “Properties” panel and click on the “Reset to Adjustment Defaults” button at the bottom of the panel.
Then, left-click and hold on the top right spot of the curve. Drag it to the left to increase the brightness.
Step 10: Adjust the Contrast of the Duplicate “Curves Mask” Layer
Now, just like in “Step 4”, left-click and hold in the middle area of the linear curve to drag it slightly down and get an “exponential” curve.
This will increase the contrast in your image.
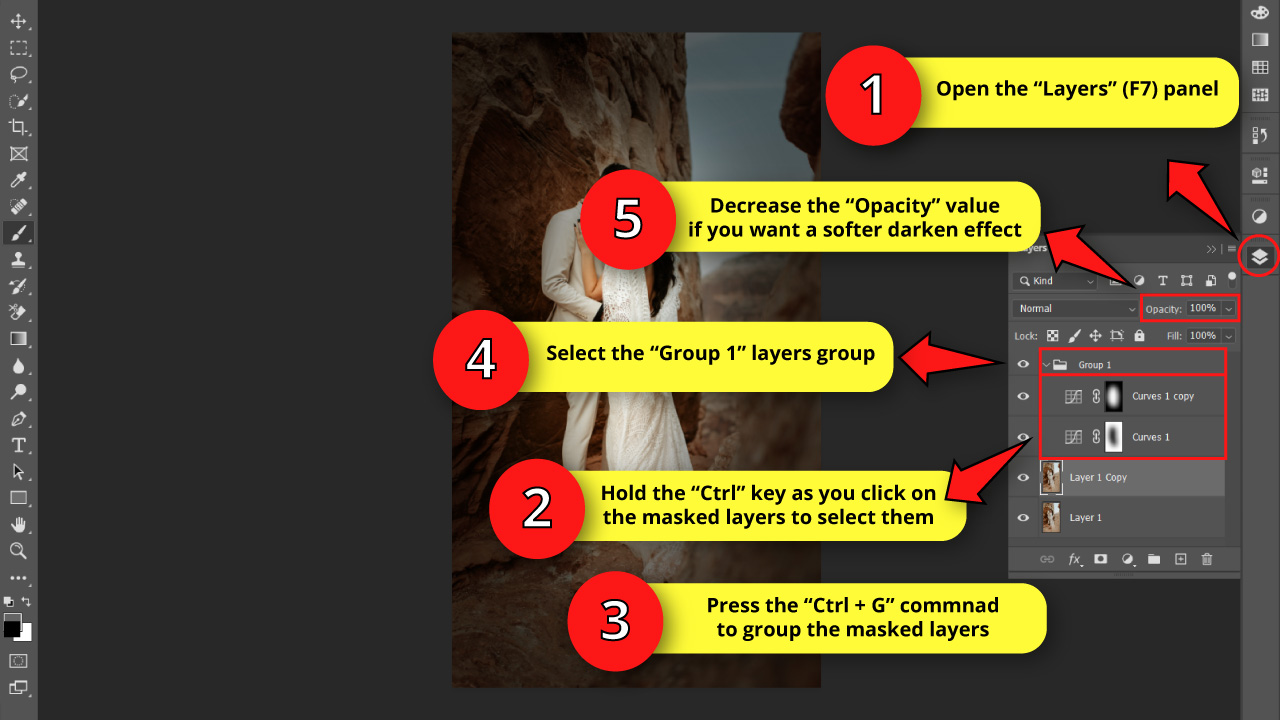
Step 11: Group the “Curves Mask” Layers
We are almost done. These last two steps are optional.
We’ll group the masked layers in order to adjust the intensity of the darken effect.
If you are already happy with the intensity of the darken effect, you can skip “Step 11” and “Step 12”. Otherwise, continue reading.
Go to the “Layers” (F7) panel one more time, and select both curves mask (“Curve 1” and “Curve 1 copy”) layers.
To select several layers at the same time, hold the “Ctrl” key as you click on the layers to select them simultaneously.
Now that we have the curves mask layers grouped, we can adjust the intensity of the effect all at once.
To make the darken effect softer, click on the “Group 1” layers group (which contains the curves mask layers) and lower the “Opacity” value.
I will not change the “Opacity” value for now.
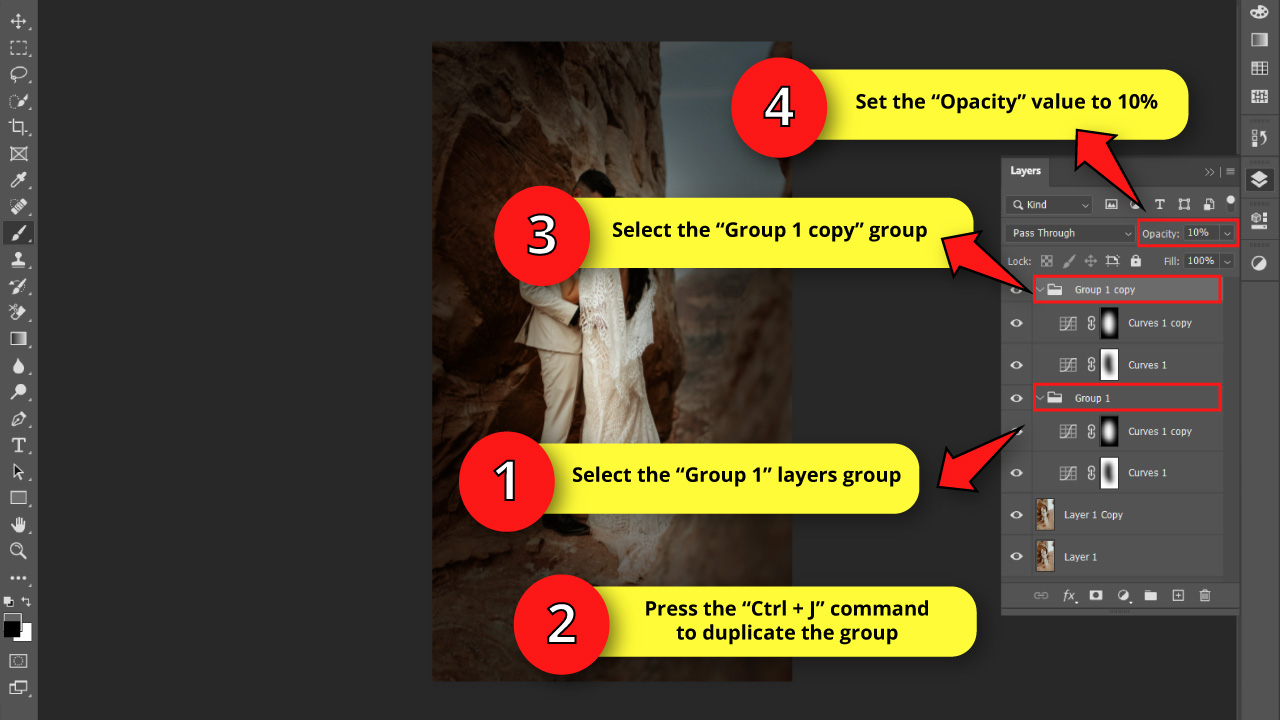
Step 12: Increase the Darken Effect
While in the previous step we learned how to decrease the effect intensity, in this step we will learn how to multiply it.
Go to the “Layers” (F7) panel yet again, and select “Group 1” layers group. Press the “Ctrl + J” command to duplicate it.
Duplicating the “Group 1” will multiply the darkening effect, but it will most likely be too much.
To adjust the intensity, select the “Group 1 copy” layer, and then lower the “Opacity” value.
I’ll set the “Opacity” to 10% for this example.
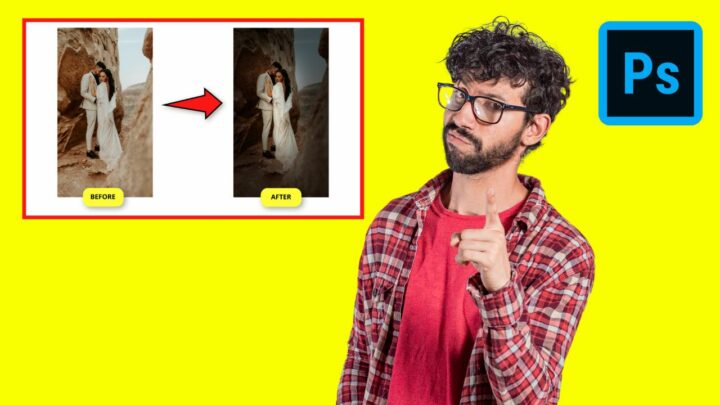
The Result
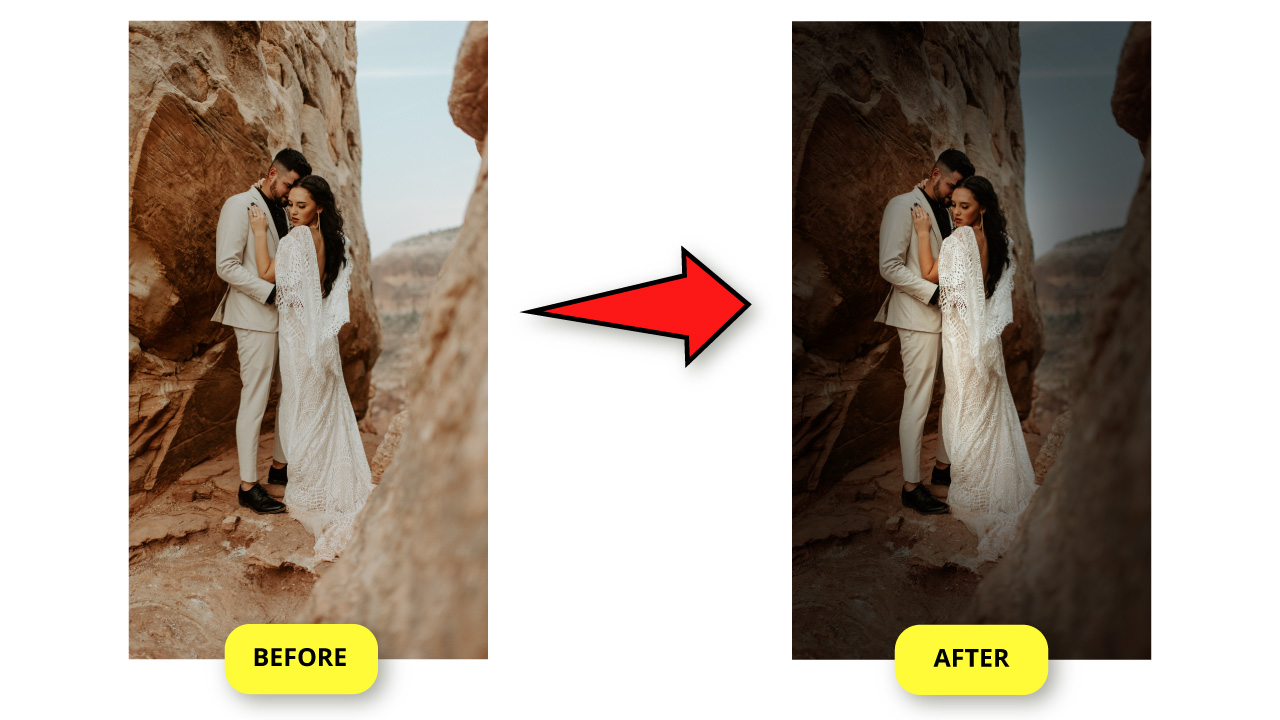
This is the before and after of darkening the photo background in Photoshop.
How to Turn the Background Black in Photoshop
Go to the “Layers” (F7) panel and add a solid black layer. Use the “Quick Selection” (W) tool to select the subject, and create a “Vector Mask”. Go to the “Properties” panel and decrease the “Density”. Use the “Brush” (B) tool to fix the masked edges. Reset the “Density” value.
For this tutorial we will also use the same image, but now we will turn the background to total black.
Turning the background black can be done in several ways, since newer versions of Photoshop introduced features such as the “Background Eraser” (E) tool, or the automatic “Select Subject” tool.
Unfortunately, the automatic “Select Subject” tool is not as accurate and reliable as we would like. But you can use it to make a rough selection, and then you can use the “Quick Selection” (W) tool to enhance the selection.
Regarding the “Background Eraser” (E) tool, although it has an exceptional accuracy (specially if you need to select problematic objects, like hair) its use could be a little tedious, and probably wouldn’t be worth the effort in most of the cases.
However, if you are working with complex shapes, or with images in very high resolution, you can totally try the “Background Eraser” (E) tool as well.
Step 1: Import an Image
We’ll use the same image we used for the first method to appreciate the differences between the results better.
So, as we did in the previous method, import an image going to “File > Open” on the menu at the top of the screen. Or press the “Ctrl + O” command to shortcut it.
On the pop up window, browse in your directory and locate the photo you want to work on.
Select the image and then click on the “Open” button.
Step 2: Duplicate the Layer
Go to the “Layers” (F7) panel, usually located on the right side toolbar.
If you can’t find it, you may have to enable it first by going to “Window > Layers” on the menu at the top of the screen.
Or use the “F7” key as a shortcut.On the “Layers” (F7) panel, press the “Ctrl + J” command to duplicate the layer. This will be our backup layer.
It is also a good idea to rename layers in Photoshop, so you can recognize them easier.
To rename a layer, just double-click on the layer name and type the new name in.
I’ll rename “Layer 1” to “Backup”, and “Layer 1 Copy” to “Couple”.
Step 3: Make a Solid Color Layer
Now we need to create a black color background. This layer needs to be placed in between the “Backup” and the “Couple” layers.
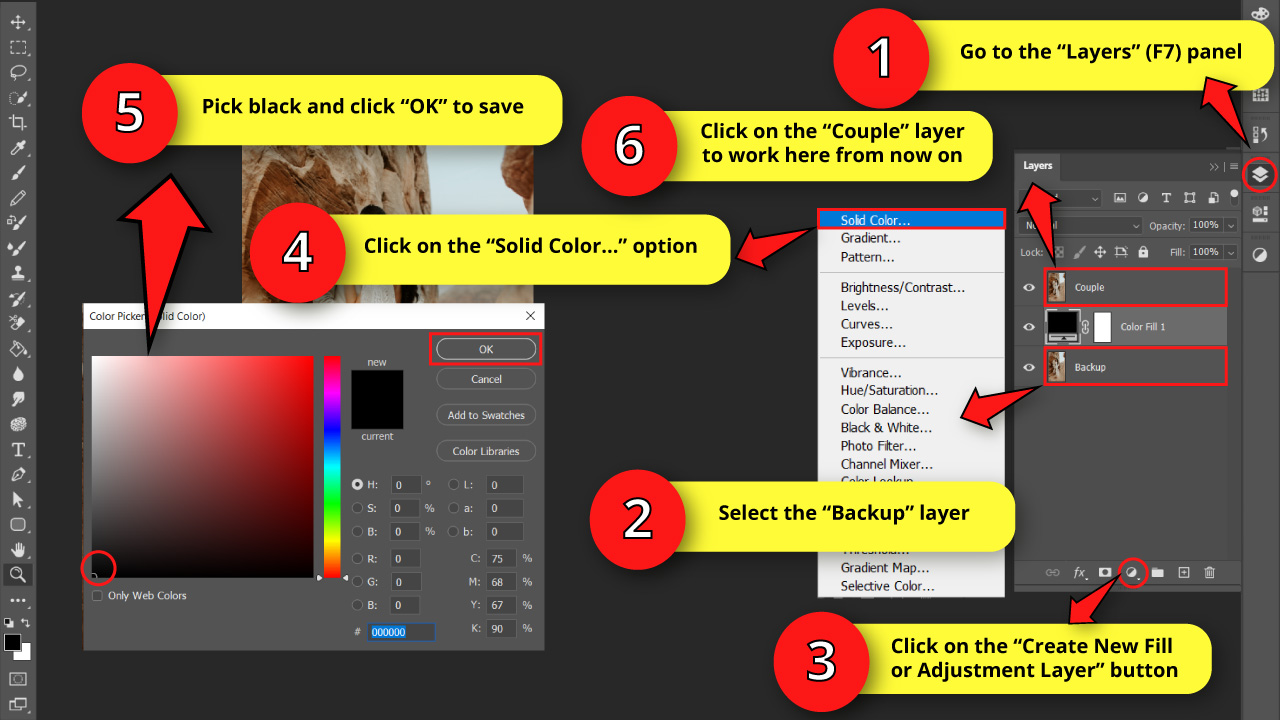
To get this black background, go to the “Layers” (F7) panel and select the “Backup” layer.
Then click on the “Create New Fill or Adjustment Layer” button placed at the bottom of the panel.
Once the options menu unfolds, select the “Solid Color…” option to open the “Color Picker” window.
On that window, select black and then click “OK” to save.
Finally, select the “Couple” layer to work here from now on.
Step 4: Select the Subjects
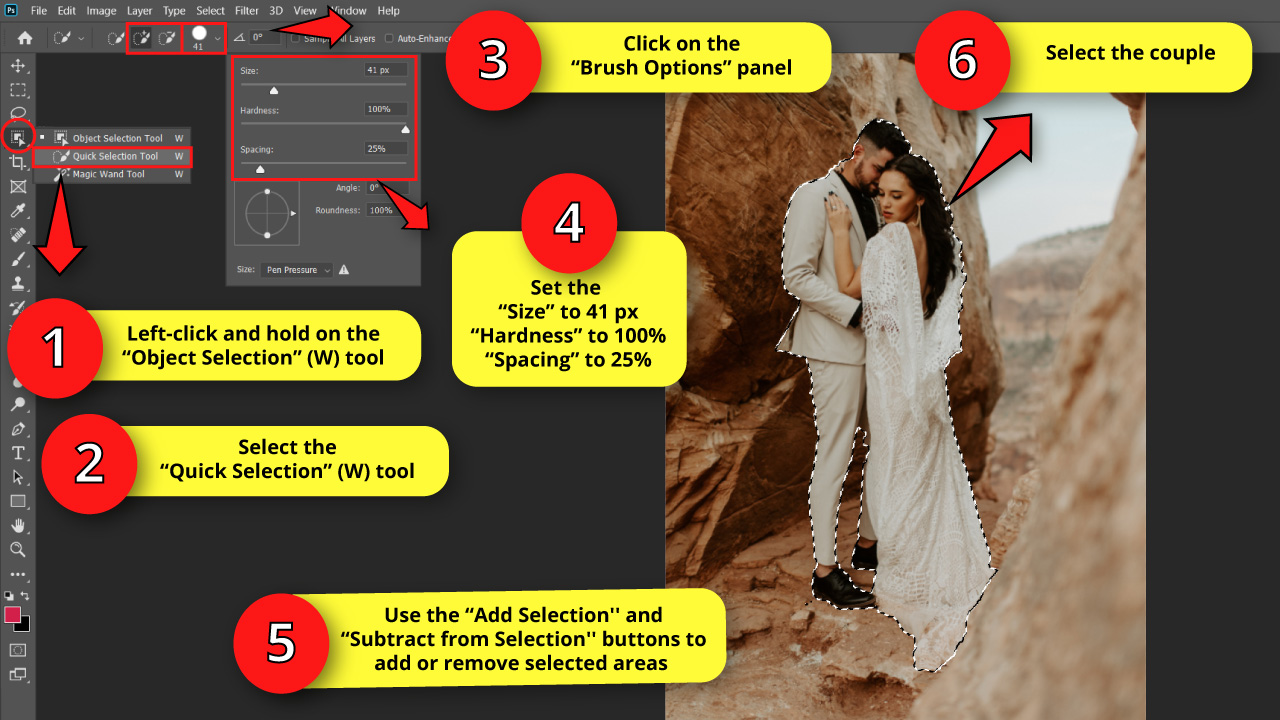
Left-click and hold on the “Object Selection” (W) tool nest, located on the left side toolbar, to unfold the hidden tools. Once the hidden tools menu unfolds, select the “Quick Selection” (W) tool.
Then, click on the “Brush Options” button on the menu at the top of the screen.
On the “Brush Options” panel, set the “Hardness” value to 100%. Chances are you will probably have to modify the “Size” value several times during the selection process.
Use a big size brush to make a rough selection, and then make the brush size smaller to select the smaller details.
I’ll start setting the “Size” of the brush to 41 px for the rough selection. Once again, this value may vary depending on your photo.
Finally, leave the “Spacing” value set to 25%, as by default.
You can also use the “Add Selection” and “Subtract from Selection” buttons, located on the toolbar at the top the screen, to add or subtract selected areas.
If you selected any areas by accident, use the “Subtract from Selection” tool to remove unwanted selected areas.
Follow this advice to make the best possible selection of the couple.
However, don’t worry if you still can’t manage to get a perfect selection. We’ll take care of that in the following steps.
Step 5: Add Vector Mask
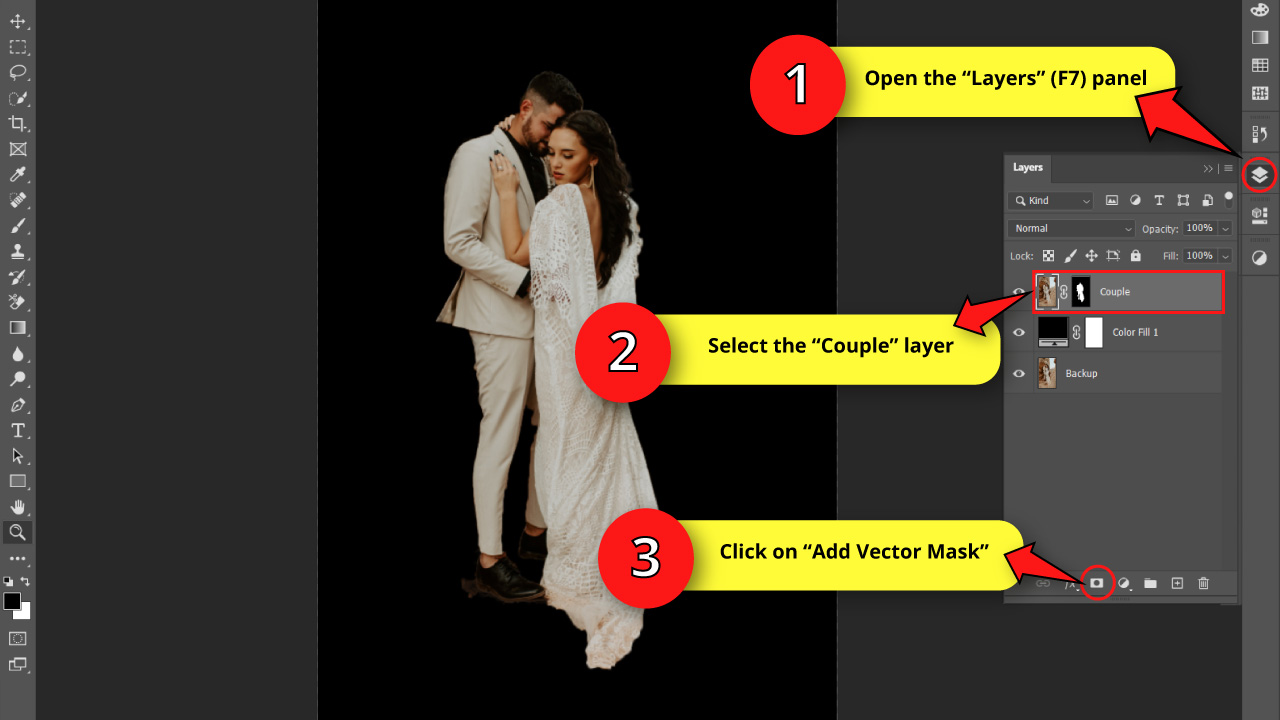
Once you have your subjects selected, go to the “Layers” (F7) panel one more time.
Make sure that the “Couple” layer is still selected, and then click on the “Add Vector Mask” button located at the bottom of the panel.
This will turn the background black.
Step 6: Fix the Vector Mask Edges
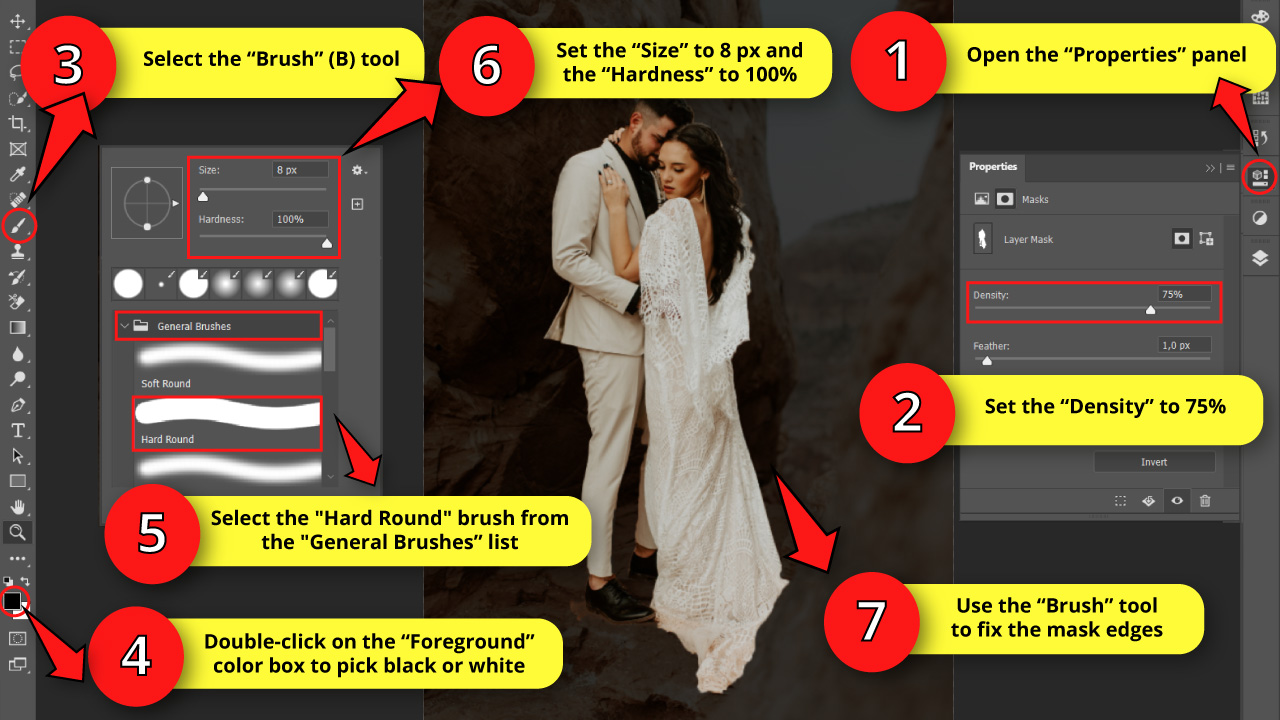
Now go to the “Properties” panel, located on the right side toolbar, and decrease the “Density” value a little bit. I’ll set it to 75%.
This will allow you to visualize the selection edges better, and we can now fix the masked edges to get a more accurate finish.
To reduce any selected (now masked) area, click on the “Brush” (B) tool, and then double-click on the “Foreground” color box to pick black.
Then, right-click on the canva to open the “Brush” options, and make sure that the “Hard Round” brush that you can find on the “General Brushes” list is selected.
To expand the masked area, repeat the previous paragraph, but picking white on the “Foreground” color box, instead of black.
Then, select your brush “Size” value. The “Size” value will vary depending on the photo and the specific area you are working on. I’ll set mine to 8 px.
The final setting you have to take care of is the “Hardness” value. Make sure that is set to 100%.
Finally, use the “Brush” tool to fix the mask edges.
Step 7: Adjust the “Vector Mask” Properties
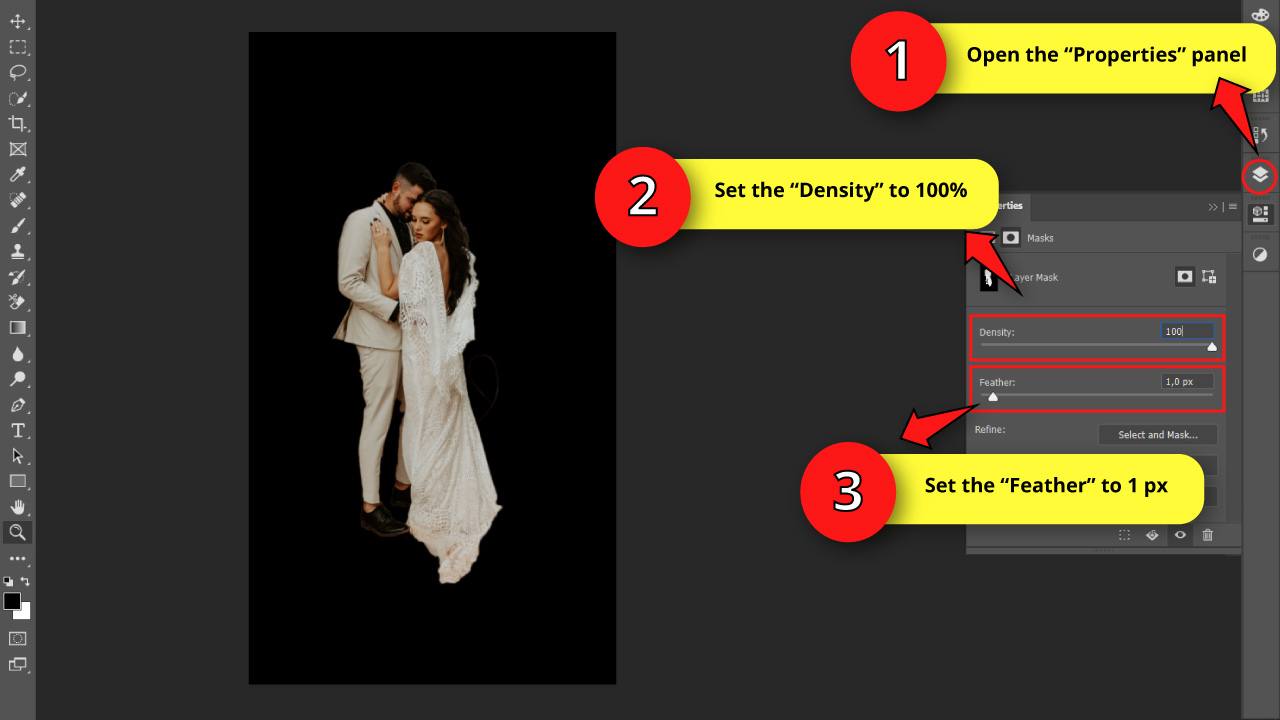
Once you are satisfied with the mask edges edition, set the “Density” value back to 100%.
Then, increase the “Feather” value just a tad bit. I’ll set it to 1 px. This step is optional.
In some photos it’s probably better to leave the “Feather” value by default (0 px).
But it’s highly recommendable to run different tests until you get the best possible result.
The Result
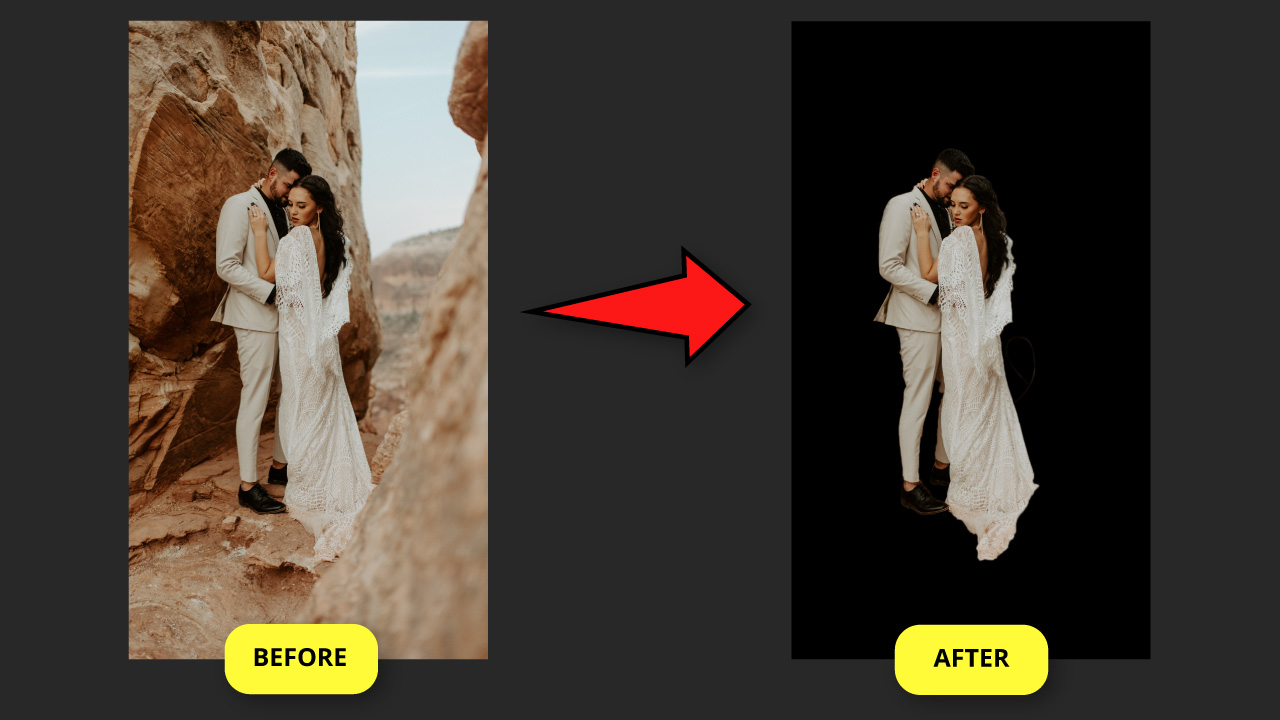
This is the before and after of turning the photo background to total black in Photoshop.
Frequently Asked Questions on “How to Darken the Background in Photoshop”
How does the masking layer work in Photoshop?
When you add a mask layer using the “Layer” (F7) panel, you can appreciate that the mask layer thumbnail is filled with white. This means that the whole canva is filled with the mask. Any black areas in the thumbnail are areas where the mask is not applying.
How can I customize the areas when applying a mask layer in Photoshop?
Go to the “Layers” (F7) panel and select the “Layer Mask Thumbnail” (the right thumbnail in the mask layer). Then use black and white brushes (or other paint tools) to paint over the canva. While the black brush will remove the mask area, the white brush will add the mask area.


Hey guys! It’s me, Marcel, aka Maschi. On MaschiTuts, it’s all about tutorials! No matter the topic of the article, the goal always remains the same: Providing you guys with the most in-depth and helpful tutorials!

