Contact sheets or contact prints origin lies in the need to visualize all the frames from a film roll before printing them.
Photographers used to place the negative stripes over a photographic paper, and then they used a magnifying glass to examine and select the photos that would make it to processing.
Of course, photographers still use this technique, but since film rolls have been losing popularity the past couple decades, the digital contact sheet has become the usual method.
Nowadays the contact sheet has mutated into some kind of digital positive photo gallery.
The purpose of contact sheets is essentially still the same, but they also work as a practical way to show and share photos, like when a photo artist needs to present a preview to a customer for them to make a selection of photos, for instance.
If you are planning to make a contact sheet, you can of course do it manually from scratch, but it may take a considerable amount of time and dedication if you have to process several photographs.
Luckily Photoshop has a tool that allows you to automatically create a contact sheet, very quickly and in just a few steps.
In this tutorial you will find how to use and customize the “Contact Sheet II” feature available in Photoshop.
Then we’ll learn how to customize the generated contact sheet to fit our needs better.
Let’s check it out now!
How to Create a Contact Sheet in Photoshop
Go to “File > Automate > Contact Sheet II”. Adjust the “Contact Sheet II” settings to fit your needs. Then click “OK” to generate the contact sheet. Next, distribute the rows evenly, change caption names if required. Finally change background and caption colors.
Creating a Contact Sheet Using the Automatic “Contact Sheet II” Function in Photoshop
Go to “File > Automate > Contact Sheet II” on the menu at the top of the screen. Set the “Source Images” and then the “Document” size and resolution properties. Next, set the “Color Mode” and “Thumbnail” properties. Finally set the “Caption” style and click “OK” to generate the contact sheet.
In this first section of the tutorial, we’ll learn how to create a contact sheet using the automatic “Contact Sheet II” function available in Photoshop.
This function allows you to adjust some features to fit your needs better.
However, if you need even more customized options, keep reading the next section “How to Customize the Generated “Contact Sheet II” in Photoshop” to find out how.
Step 1: Open the “Contact Sheet II” Settings Window
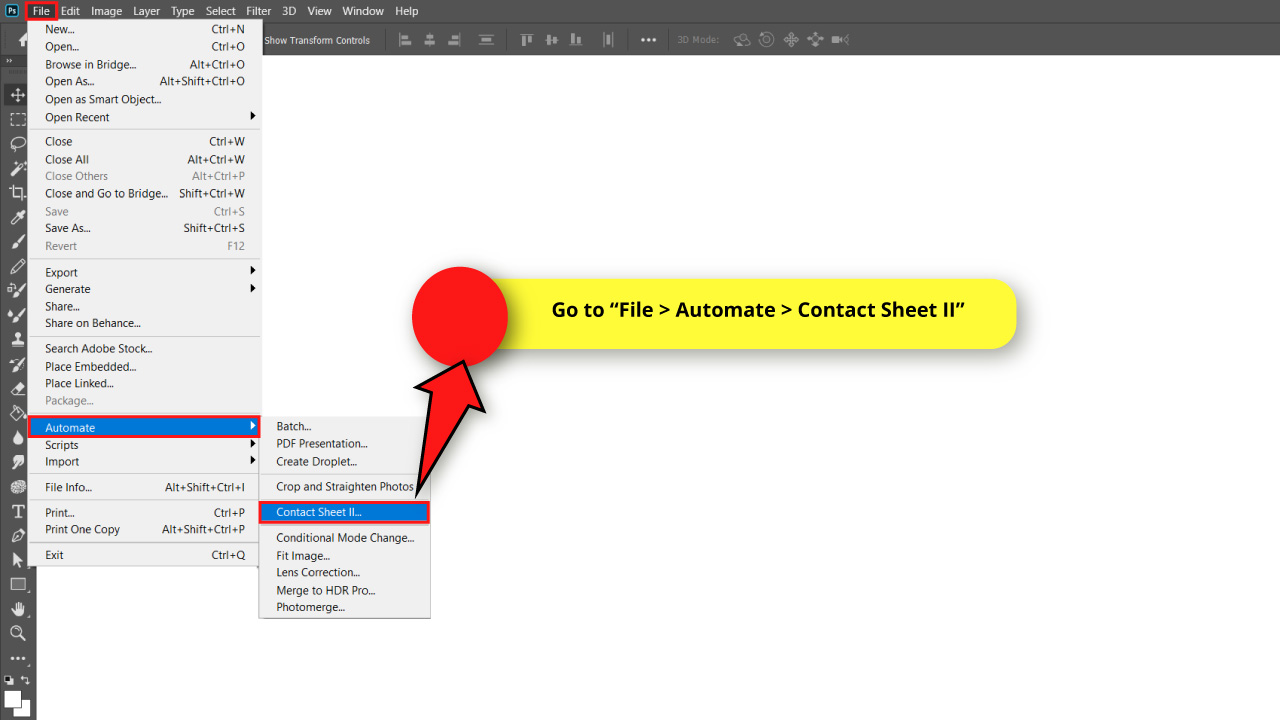
Go to “File > Automate > Contact Sheet II” on the menu at the top of the screen to open the “Contact Sheet II” settings window.
Continue reading the following steps to learn how to adjust the “Contact Sheet II” values.
Step 2: Set the “Source Images” Direction
First we need to locate our image source, so we’ll select an option for the “Source Images” field.
It can be: “Files”, “Folder” or “Open Documents”.
Select the “Files” option if you want to select the images one by one.
Select “Open Documents” to use all active document files you’re currently working on in Photoshop.
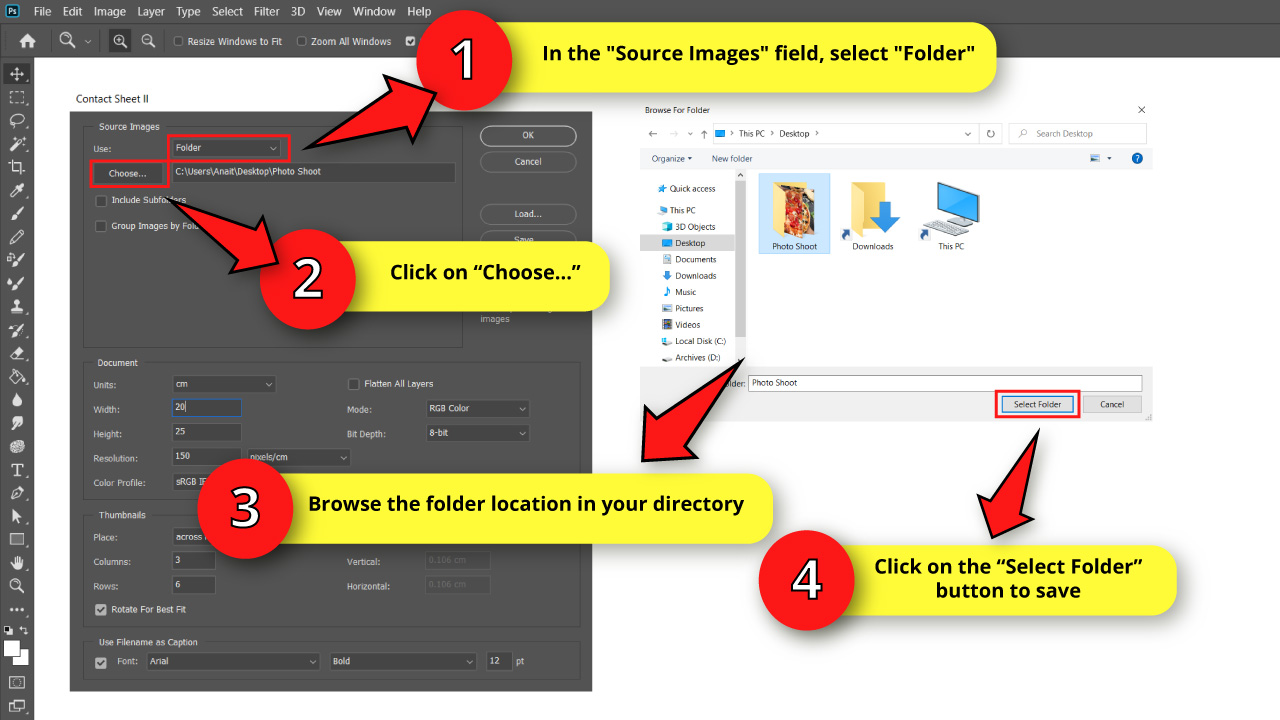
Select the “Folder” option if you have a folder that contains all the images that you’ll be using, just like we’re doing for this example.
If you selected the “Folder” option as I did, click on “Choose…” to browse in your directory and locate the folder containing the photos you’ll be using.
Once you locate the folder, click on it to select it, and then click on the “Select Folder” to save the selection.
If you have subfolders inside the folder you just assigned to import the images from, and you want to also use images inside that or those subfolder(s), make sure you check the “Include Subfolders” box.
I don’t have any subfolders, so I’ll leave the “Include Subfolders” box unmarked.
In case you have these subfolders, and you want to group them by folders on the contact sheet,make sure you also check the “Group Images by Folder” box. I won’t check this box, because I don’t have any subfolders as previously stated, therefore I don’t need any type of grouping.
Step 3: Set “Document” Size and Resolution Properties
Here is a key setting you must disable if you want to allow editing capabilities.
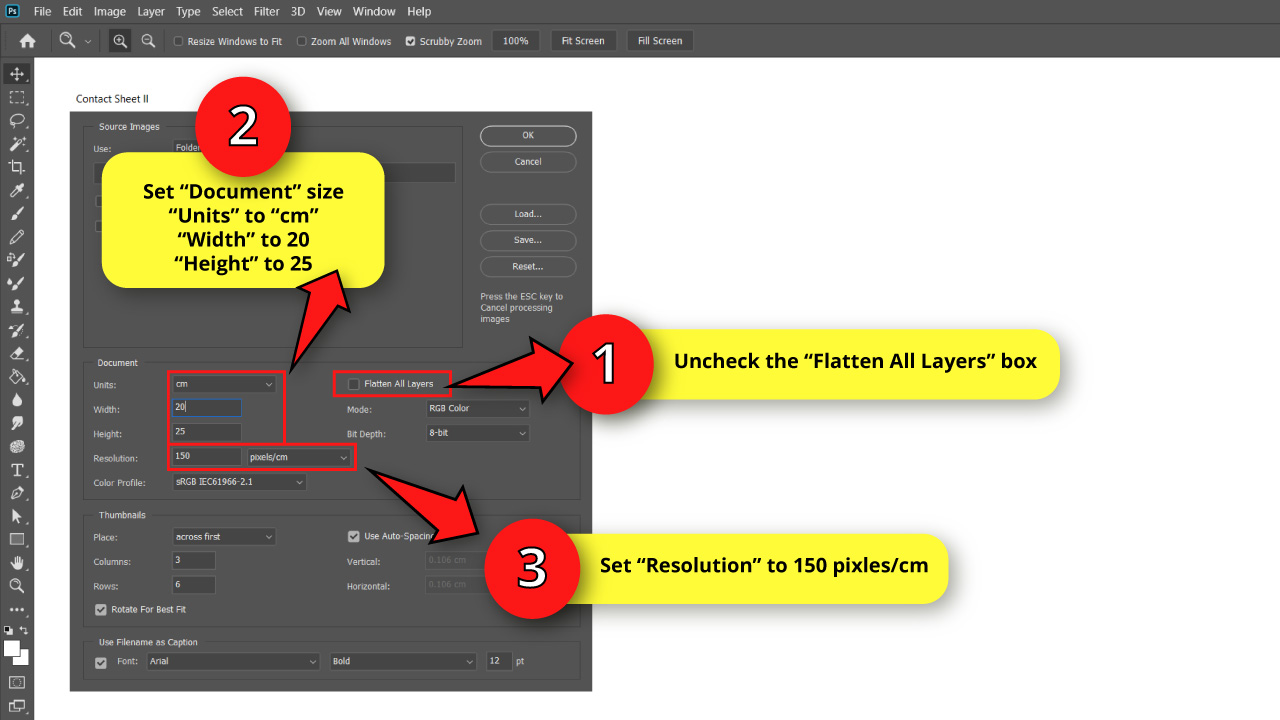
Make sure to uncheck the “Flatten All Layers” box to keep images and texts separated by layers, so you can edit them all you need later on.
If you check the “Flatten All Layers” option, you will get a single layer with all the images and text merged on it. You will lose editing capabilities but the image size will be smaller and the “Contact Sheet II” processing time will be shorter.
Now we’ll set the “Document” properties. For this example, I’ll go with the following values:
In the “Unit” field, I’ll select “cm”
In the “Width” field, I’ll select “20”
In the “Height” field, I’ll select “25”
In the “Resolution” field, I’ll select “150” and “pixels/cm”
If you are going to print the contact sheet, set the resolution to 300. But if you are going to use it just on digital screens, set it to 72, or to 150 if you want a better resolution quality.
Step 4: Set the “Document” Color Mode

To adjust the color mode, select your desired “Mode” between “RGB Color”, “CMYK Color”, “Grayscale” or “Lab Color”.
Make sure to set it to “CMYK” if you are planning to print the contact sheet.
I’ll set mine to “RGB” because I’m only going to use it on screens.
Then, you can set the “Color Profile” value. I’ll use the value that comes by default, set as “sRGB”.
Finally, set the “Bit Depth” value. I’ll set it as “8-bit”, but you can change it to “32-bit” if you want to get a higher quality.
Just keep in mind that the higher the quality, the larger the image size will end up being.
Step 5: Set the “Thumbnails” Properties
The “Contact Sheet II” feature also allows you to set the order when it comes to place the images.
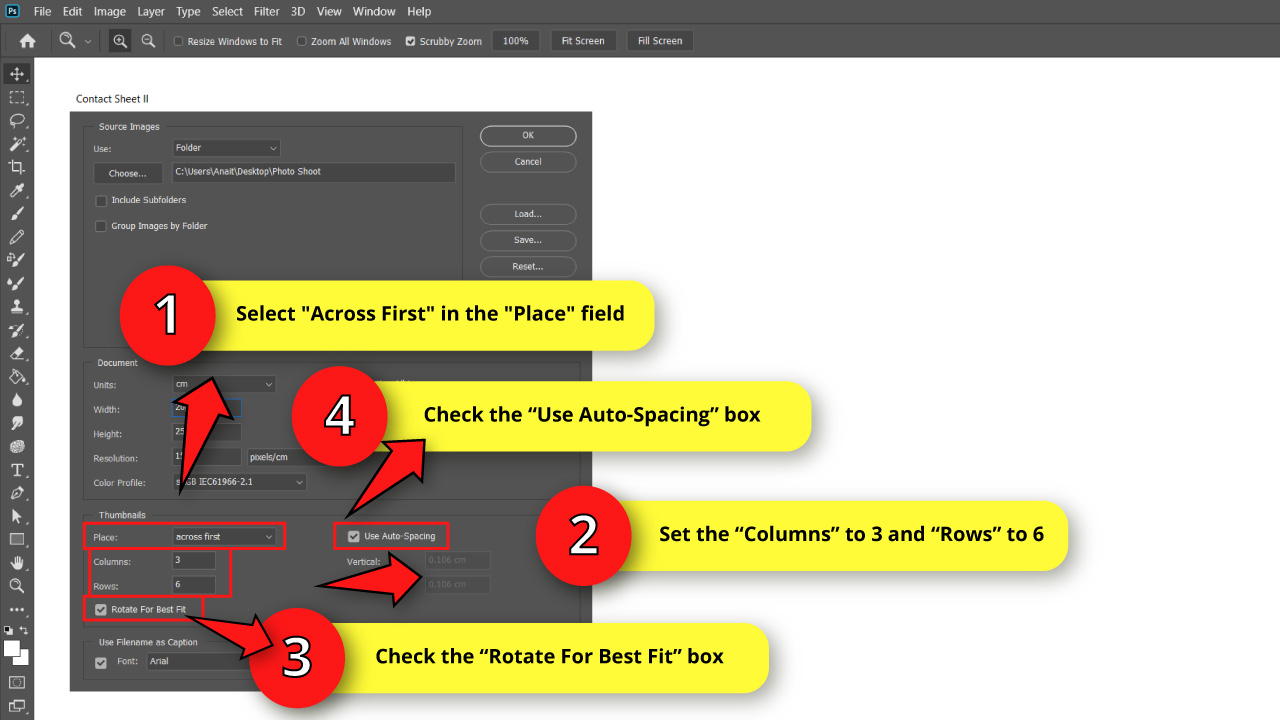
You can select either “Across First” or “Down First” in the “Place” field. I’ll select “Across First”.
Now, select the number of “Columns” and “Rows”.
I’ll set “Columns” to 3 and “Rows” to 6.
There is also an option to rotate the images to fit the sheet better, and to get a more uniform result.
If you check the “Rotate for Best Fit” box, all your images will be displayed vertically or horizontally, but not both. So chances are some images will be displayed in a rotated position.
Now, if you leave the “Rotate for Best Fit” box unchecked, your images will keep their original position, but it’s more likely that your contact sheet looks relatively messy.
I’ll check the “Rotate for Best Fit” box because I want to get a more uniform and tidier result on my contact sheet.
You can also adjust the distance between images manually by unchecking the “Use Auto-Spacing” box, and typing a custom value.
For this example, I’ll allow Photoshop to set the distance automatically. So I’ll check the “Use Auto-Spacing” box.
Step 6: Customize Images Caption
The automatic “Contact Sheet II” tool also allows you to use the image files names as the thumbnail caption.
Don’t worry if you don’t want your contact sheet to have the image files names. You can edit the captions later, as long as you have the “Flatten All Layers” box unchecked.
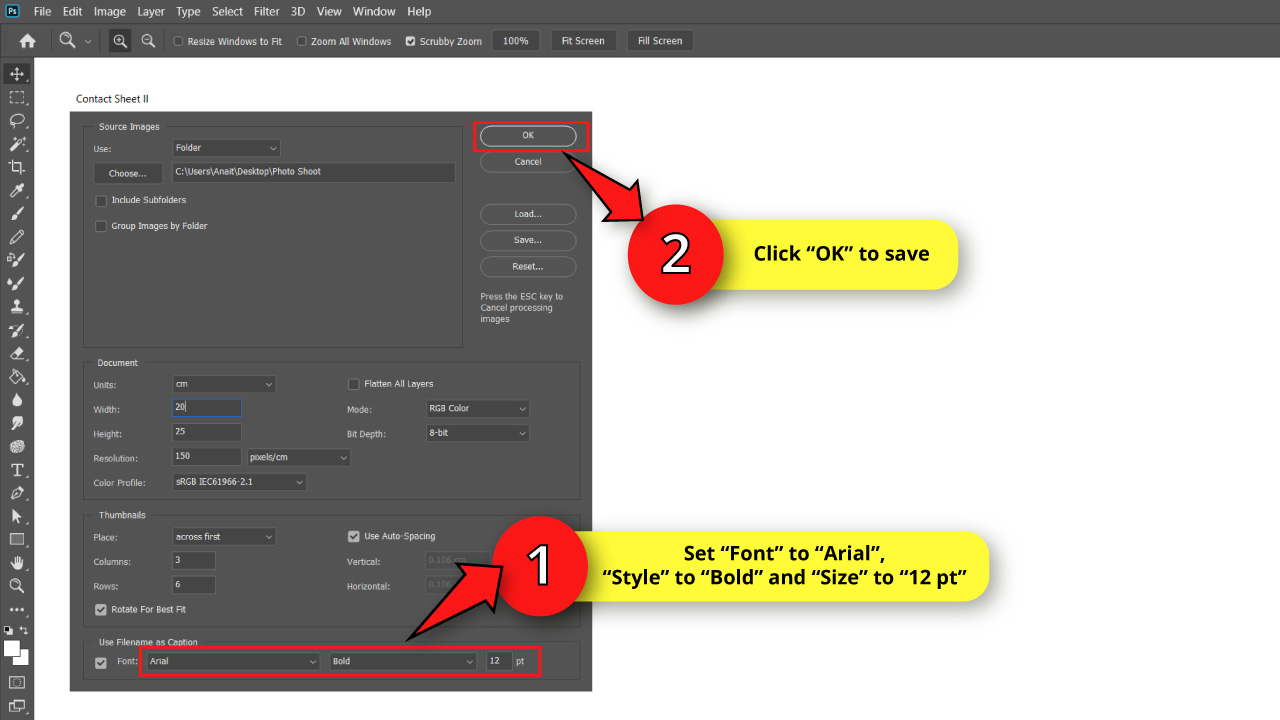
This tool also allows you to customize the “Font”, “Style” and “Size”.
I’ll set “Font” to “Arial”, “Style” to “Bold” and “Size” to “12 pt”.
You can change this later any time.
Now click on “OK” to save.
You’ll need to wait a few seconds while Photoshop applies the settings and generates the contact sheet.
The Result
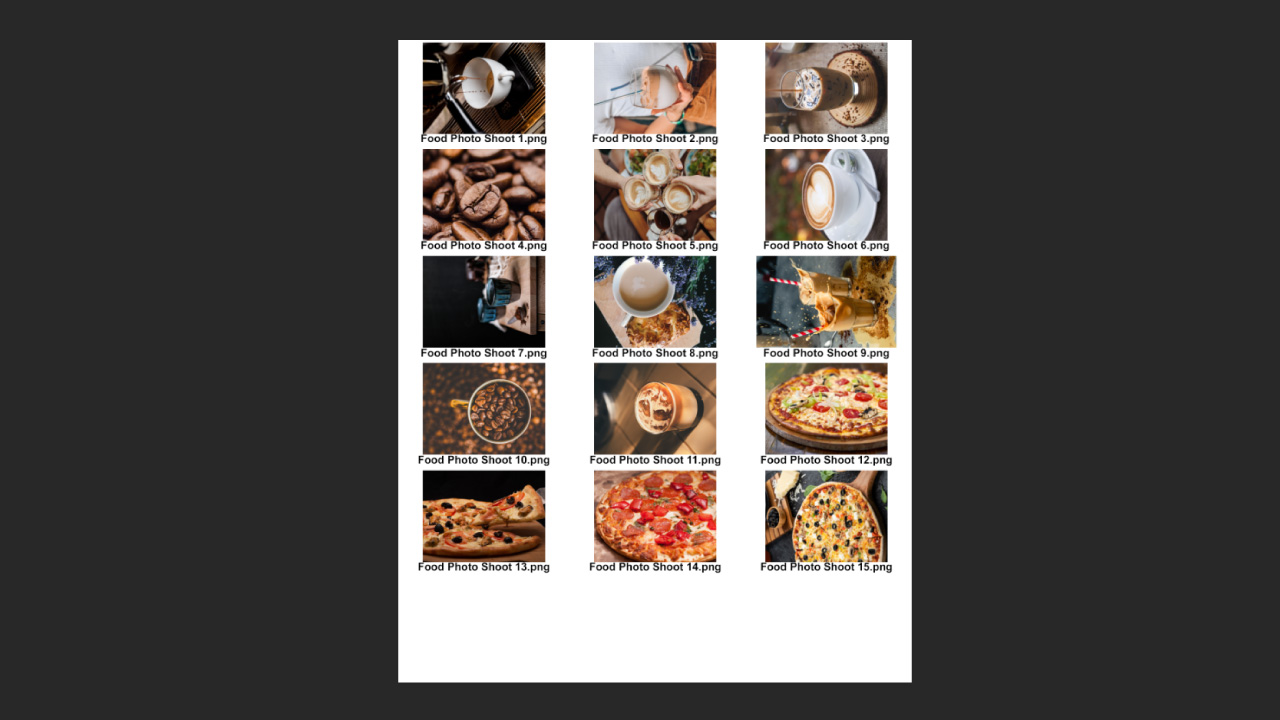
Here is the result of the automatic “Contact Sheet II” tool working process.
If the quantity of images you’re working with is too high, and these can’t fit on a single page, Photoshop will create multiple pages until all images are properly placed.
The process may take a while, depending on the quantity of images to be processed.
If you want to customize your contact sheet a little bit more in detail, continue with the following section.
Customizing the Generated “Contact Sheet II” in Photoshop
Use the “Move” (V) tool to evenly distribute the rows. Edit the texts. Next select the “Paint Bucket” (G) tool, pick a color and click on the background to fill with color. Finally go to the “Layers” (F7) panel, select all the texts, then go to the “Character” panel and change its colors.
In this last section of the tutorial, we’ll learn how to customize the generated “Contact Sheet II”.
Keep in mind that to be able to customize the generated “Contact Sheet II”, we first need to generate a contact sheet by using the “Contact Sheet II” function, and we also need to have the “Flatten All Layers” box unchecked, as explained in the previous section.
Step 1: Distribute the Thumbnails
The first thing that catches our attention is that there is a lot of empty space at the bottom of the sheet. To fix this poor distribution, we can improve the spacing.
There is a tool in the “Align” panel to evenly distribute the spacing between objects, but this tool doesn’t really work properly on a generated “Contact Sheet II”.
Our best option is to do this manually.
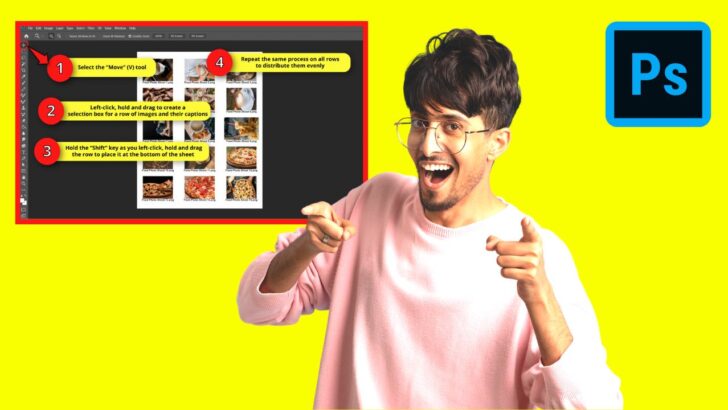
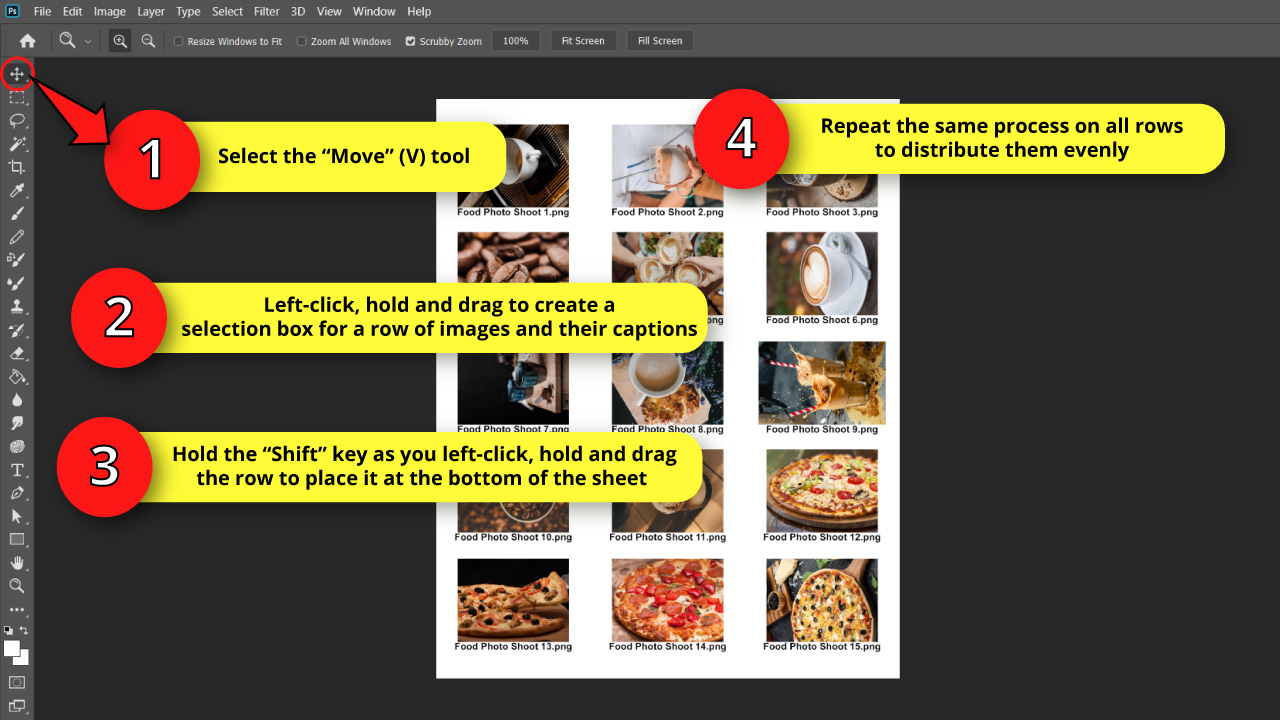
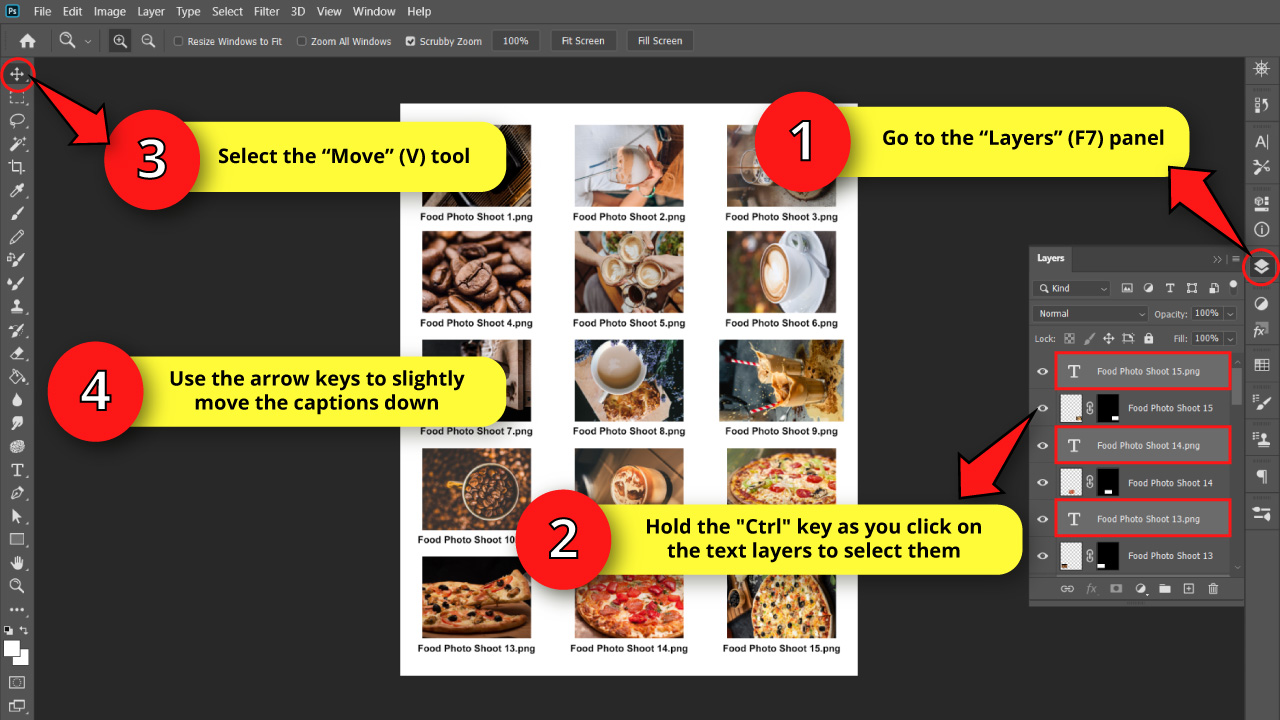
In order to do this, select the “Move” (V) tool on the left side toolbar.
Then left-click, hold and drag to create a selection box, so you can select several objects at the same time.
Using this method, select the thumbnails and their captions row by row. Once you have selected a row, hold the “Shift” key as you left-click, hold and drag the row to place it at the bottom of the sheet.
The “Shift” key will allow us to maintain the rows in line.
You can also move the selected rows using the arrow keys from your keyboard.
Repeat the same process on all rows to distribute them evenly.
Step 2: Distribute the Captions
As you can appreciate, the images and its captions have too little space between them. They would look much better if they had a little more space.
To fix this, go to the “Layers” (F7) panel, usually located on the right-side toolbar.
If you can’t find it, you might have to enable it first by going to “Window > Layer” on the menu at the top of the screen.
Once you are on the “Layers” (F7) panel, select the text layers, which are interleaved with the images.
To select several interleaved layers at the same time, hold the “Ctrl” key as you click on the different text layers.
Now that the layers texts have been selected, select the “Move” (V) tool, and then use the arrow keys from your keyboard to slightly move the captions down.
If you feel it can make your work any easier, you can also quickly rename layers in Photoshop to make things more organized.
Step 3: Change the Caption Names
If you don’t like the names that Photoshop gives to your captions by default, you can always change it.
For this example, I’d like to remove the .png extensions.
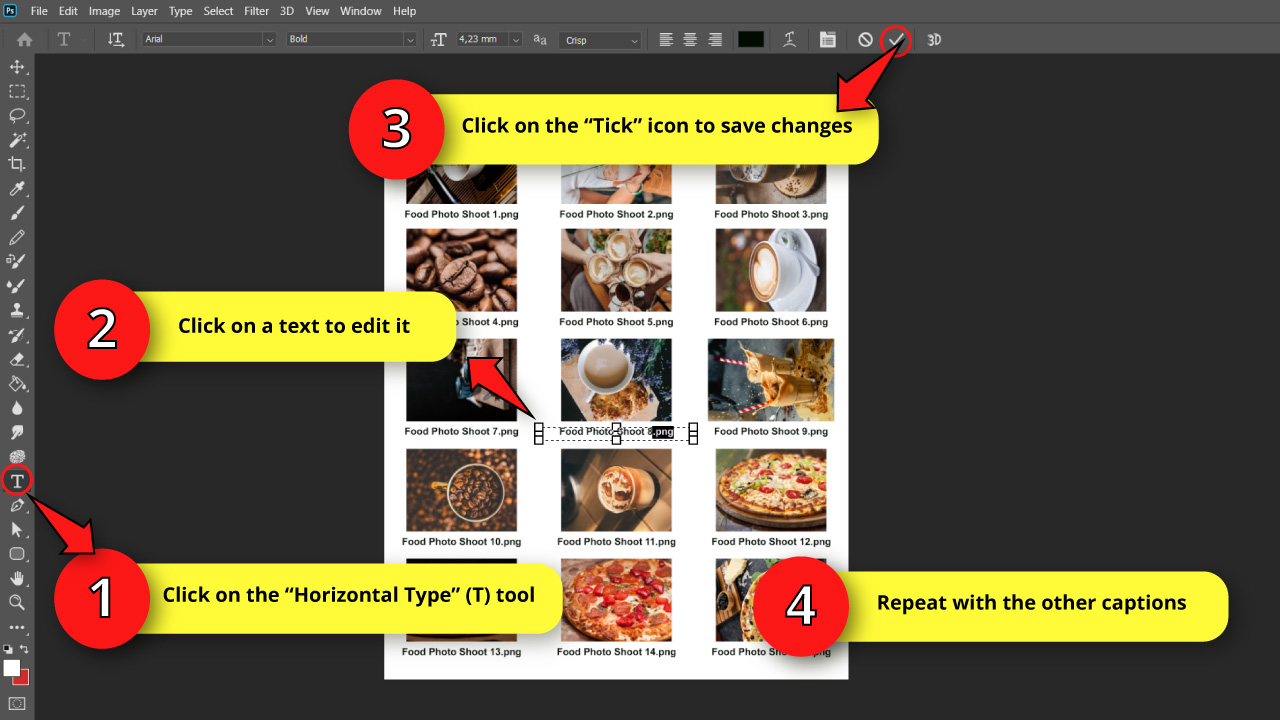
There are two different methods to edit texts.
The first method consists of selecting the “Horizontal Type” (T) tool on the left side toolbar, and then clicking on each text to edit it.
The other way would be using the “Layers” (F7) panel.
Open the “Layers” (F7) panel, and then double-click on the text layers “T” icon. Once you’ve done this, you will be able to edit each text.
When you’re done, click on the “Tick” icon located on the toolbar at the top of the screen to save changes.
Repeat the same process with all captions.
Step 4: Change the Background Color
If you want to customize your contact sheet to match with your specific project, changing the background color could be a gamechanger.
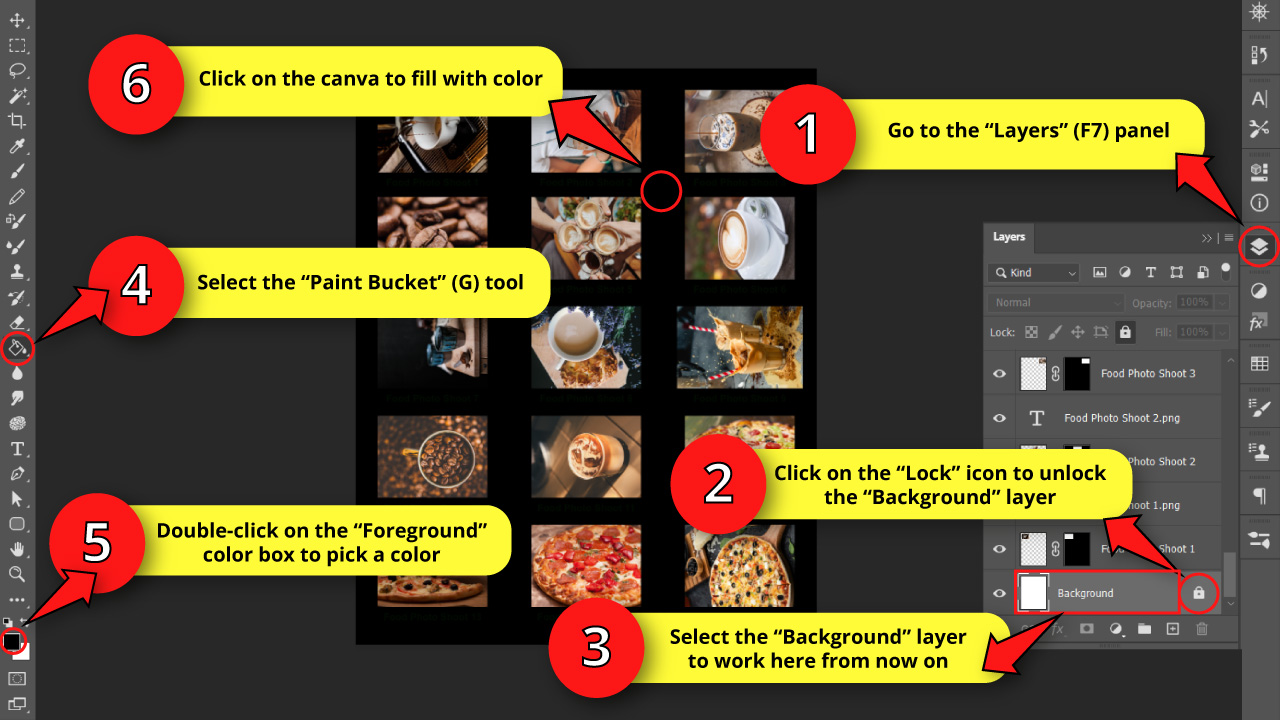
To change the background color, go to the “Layers” (F7) panel and scroll all the way down to the bottom to find the “Background” layers.
This layer will probably be locked, so you’ll need to unlock it first, in order to edit it. If it’s indeed locked, a lock icon will be displayed on the right side of the layer’s name.
To unlock the layer, just click on the lock and it will disappear, unlocking the layer.
If you want to lock it again, simply select the layer and click on the “Lock” icon located on the “Layers” (F7) panel toolbar.
Once you have your background layer unlocked, select it by clicking on it to work here from now on.
Now, select the “Paint Bucket” (G) tool located on the left side toolbar.
Then, double-click on the “Foreground” color box, also located on the left side toolbar, and pick a color.
I’ll pick black for this example.
Finally, click on the sheet to fill it with color.
Step 5: Change Captions Color
To complete the contact sheet customizing, we need to change the text color.
Since we now have black background, the black text is hidden and we can’t visualize it.
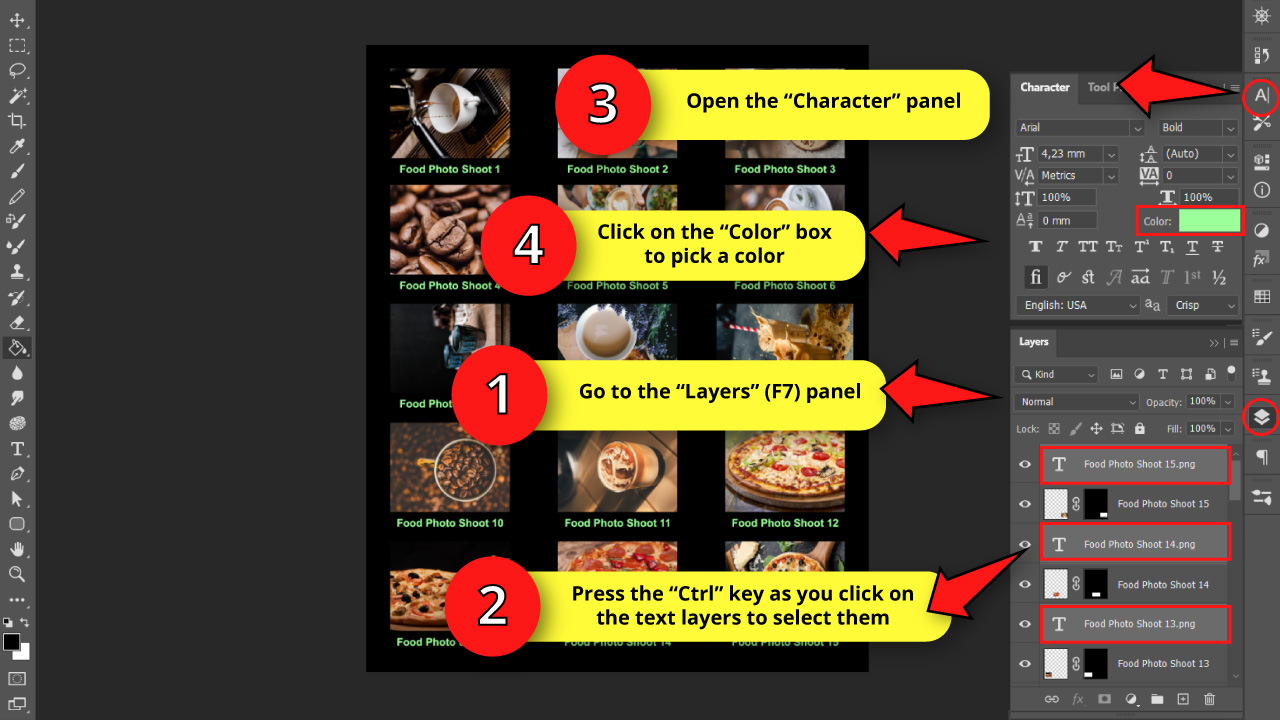
To change the text color, go to the “Layers” (F7) panel.
Select all text layers by holding the “Ctrl” key as you click on each text layer, selecting all of them.
Always remember that by holding the “Ctrl” key you can select several layers at the same time.
Once you have all text layers selected, go to the “Character” panel, usually located on the right side toolbar.
If you can’t find it, you might have to enable it first by going to “Window > Character” on the menu at the top of the screen.
On the “Character” panel, click on the “Color” box, and pick your desired color. I’ll use a light shade of green.
In this panel you can also customize the “Font”, “Style”, “Size”, “Spacing”, and other character properties.
The Result
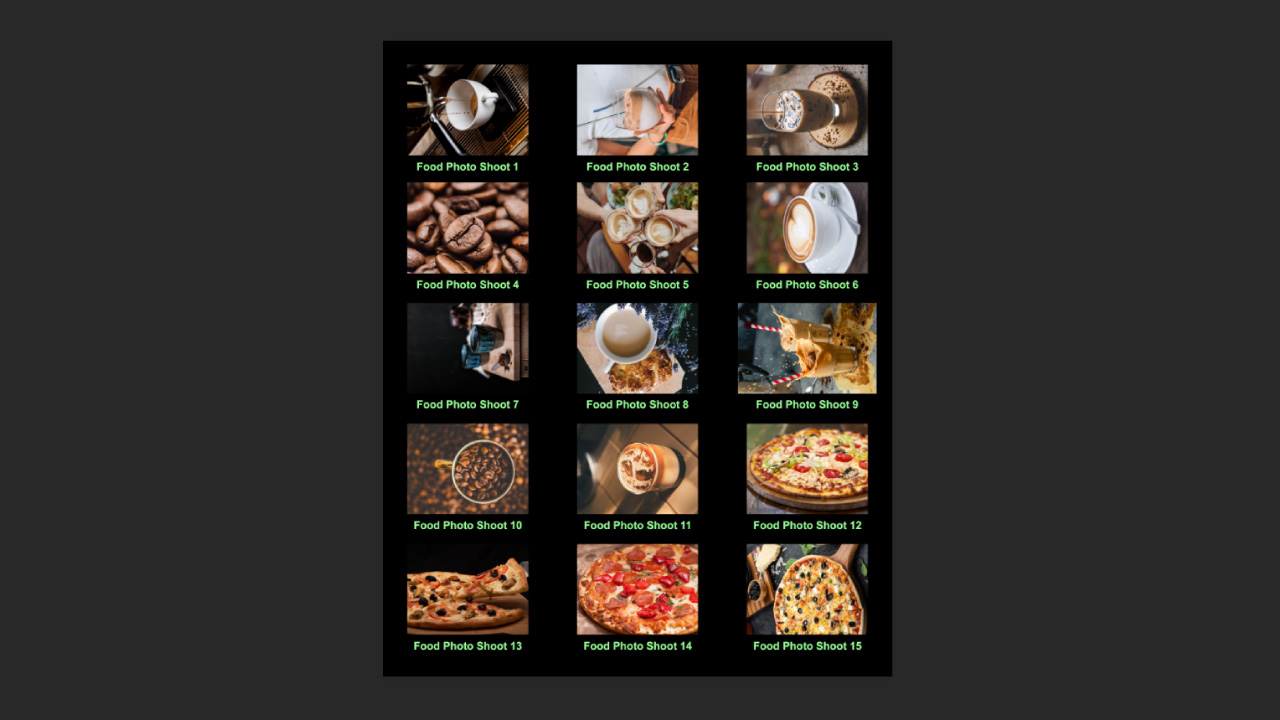
Here is the final result after customizing the generated “Contact Sheet II”.
Of course, this is just an example of what you can get by customizing the generated “Contact Sheet II”. It’s all up to you and your creativity.
Frequently Asked Questions on “How to Create a Contact Sheet in Photoshop”
How can I edit the generated “Contact Sheet II” in Photoshop?
To make the generated “Contact Sheet II” editable, you have to make sure to uncheck the “Flatten All Layers” box. You can find this checkbox on “File > Automate > Contact Sheet II”. Once the settings window opens, look for it in the right area of the “Document” section.
How can I disable the caption when I generate a contact sheet with “Contact Sheet II” in Photoshop ?
On the “Contact Sheet II” settings window (File > Automate > Contact Sheet II), go to the “Caption” section, and uncheck the “Font” box.
If you have already generated a contact sheet with captions, you can remove them all by selecting them with the “Move” (V) tool, and pressing the “Del” key.
I can’t find the “Contact Sheet II” in my Photoshop. Why?
The “Contact Sheet II” feature was introduced in Photoshop CS6. If you have an older version, this feature won’t be available. Even though, in some Photoshop versions, like CS5, you can download the plugin from Adobe’s website.