
Are you sick of the notifications coming through on your phone, or perhaps, you have been tagged in a embarrassing post that you want nothing to do with?
Read on to learn how to untag yourself on Instagram!
How to untag yourself on Instagram
When you remove yourself from a tag on Instagram will the person know?
How to restrict individual Instagram accounts from tagging you (without alerting them)
How to find all the photos that you have been tagged in on Instagram
How to stop people from tagging you on Instagram
How to Manually Approve Tags on Instagram
How to stop receiving tag notifications from the Instagram app
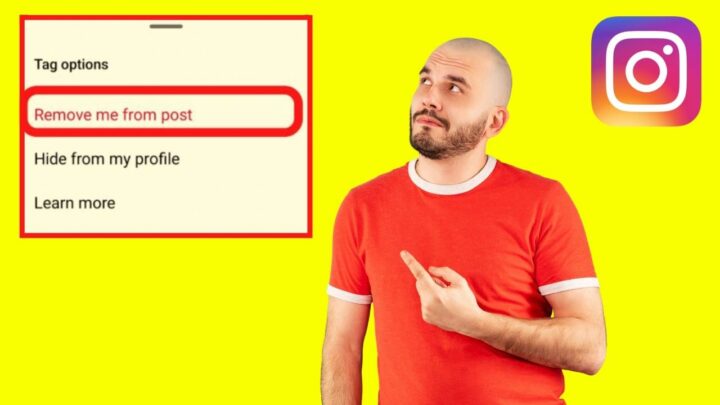
How to untag yourself on Instagram
To untag yourself on Instagram, follow these steps:
1. Load the post you are tagged in
2. Tap on your username
3. Select “Remove me from post”
Step 1: Load the post you are tagged in

Untagging is an in-app feature only. The process cannot be done on the desktop version of Instagram.
Step 2: Tap on your username

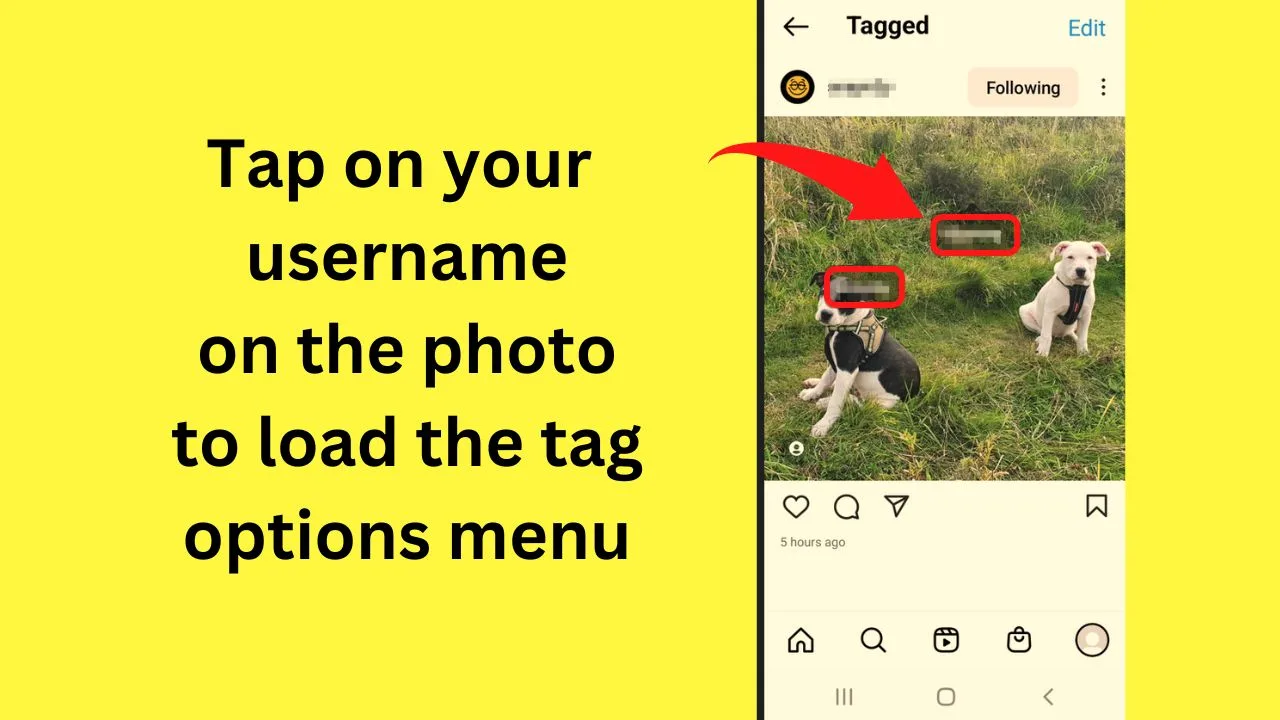
Tags show on top of photos. Tap on your username, and it will open a new menu.
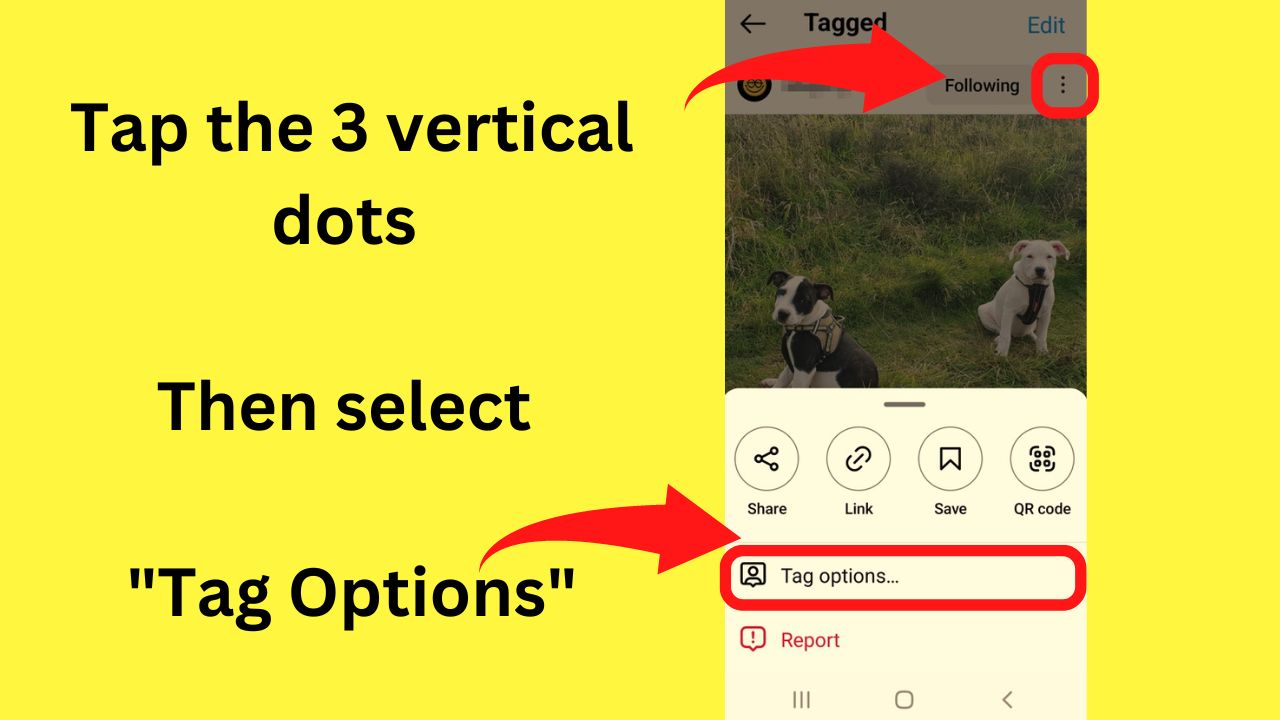
Tip: When there are multiple tags on a photo, select the three dots to the top right, then select “Tag options.” That will bring up the menu option of “Remove me from post.”
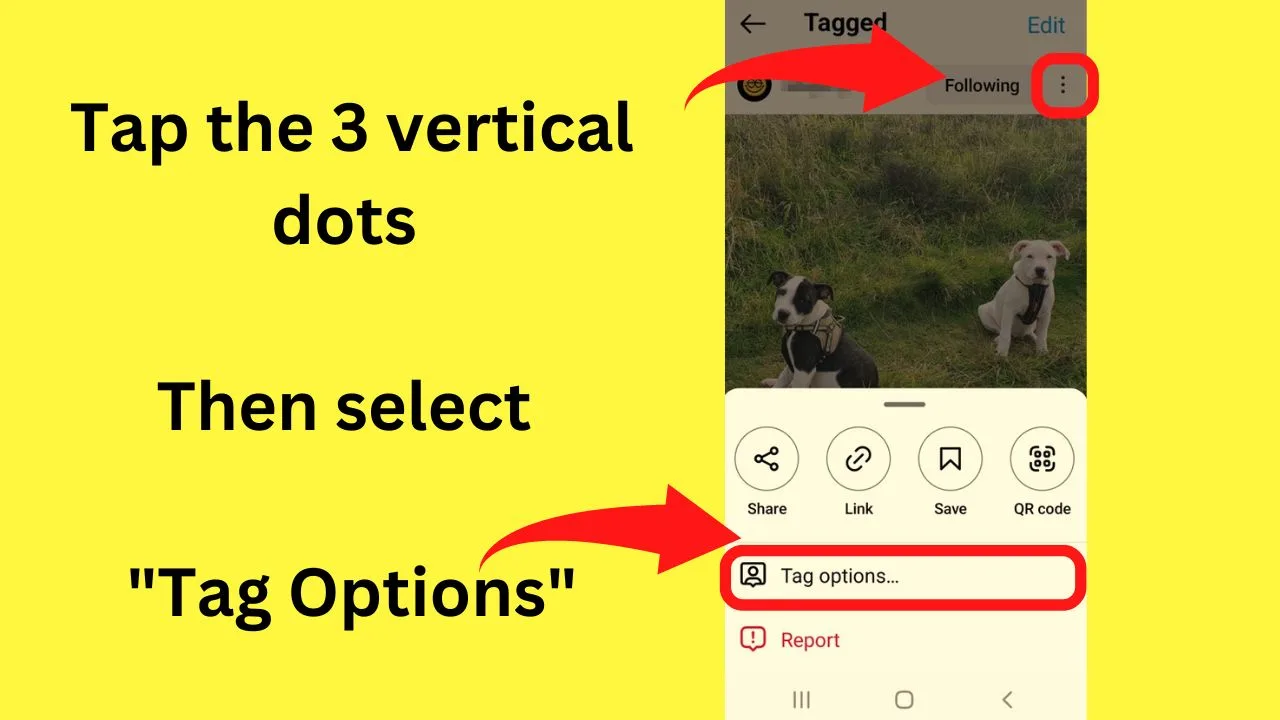
Step 3: Select “Remove me from post”
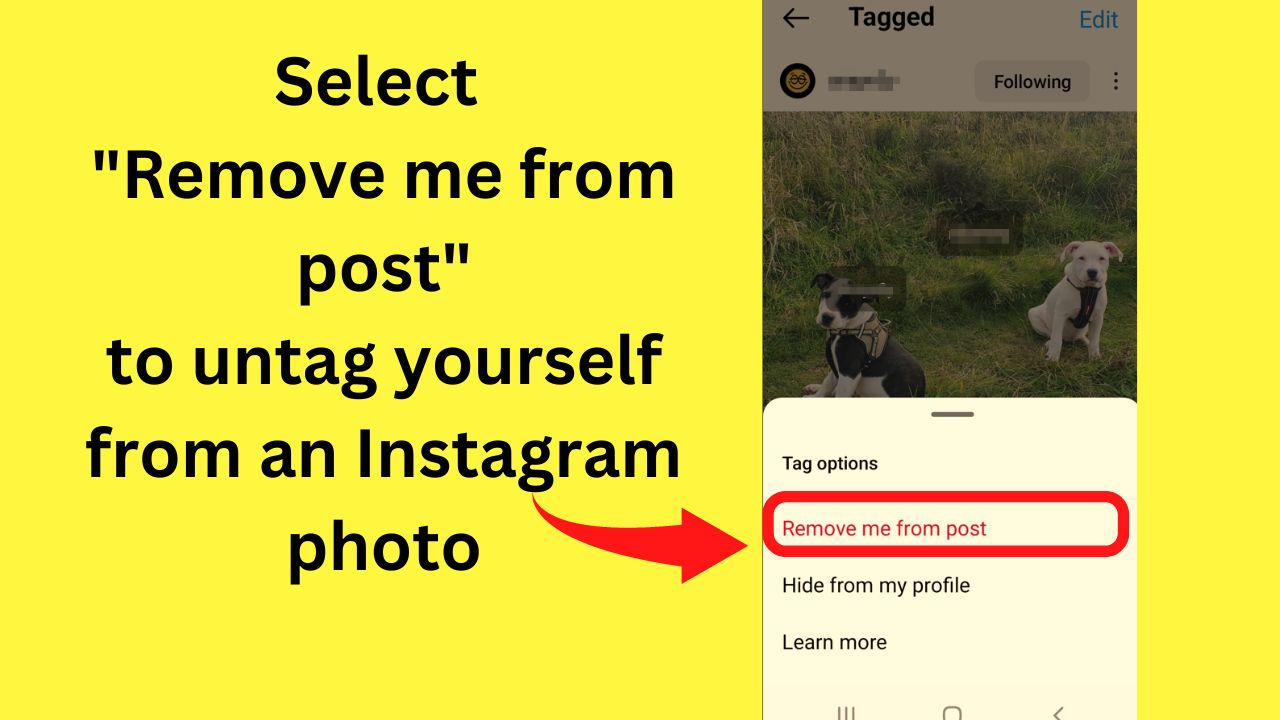

Once done, you will be untagged from the photo.
When you remove yourself from a tag on Instagram will the person know?
When you remove yourself from a tag on Instagram, the person will not know, as Instagram does not send a notification when you untag yourself from a post.
However, at some point. the person may notice that your tag has disappeared from the photo.
To add your tag back, they would need to create a new post and tag you again.
How to restrict individual Instagram accounts from tagging you (without alerting them)
For users who repeatedly tag you in photos you do not want, rather than continually untagging yourself or blocking them, there is a “restriction” setting in Instagram.
It works similarly to blocking an Instagram account, but without the tell-tale signs.
Restricted accounts remain on your follower’s list, and they will not be notified of their restrictions. You and their interactions remain visible, but nobody else will see the tags, comments, or any interactions.


On iOS, to restrict an Instagram account from tagging you, follow these steps:
- Go to “Settings and Privacy”
- Tap on “Restricted”
- Click on “Continue”
- Type the name of the Instagram user in the search bar
- Tap on “Restrict”
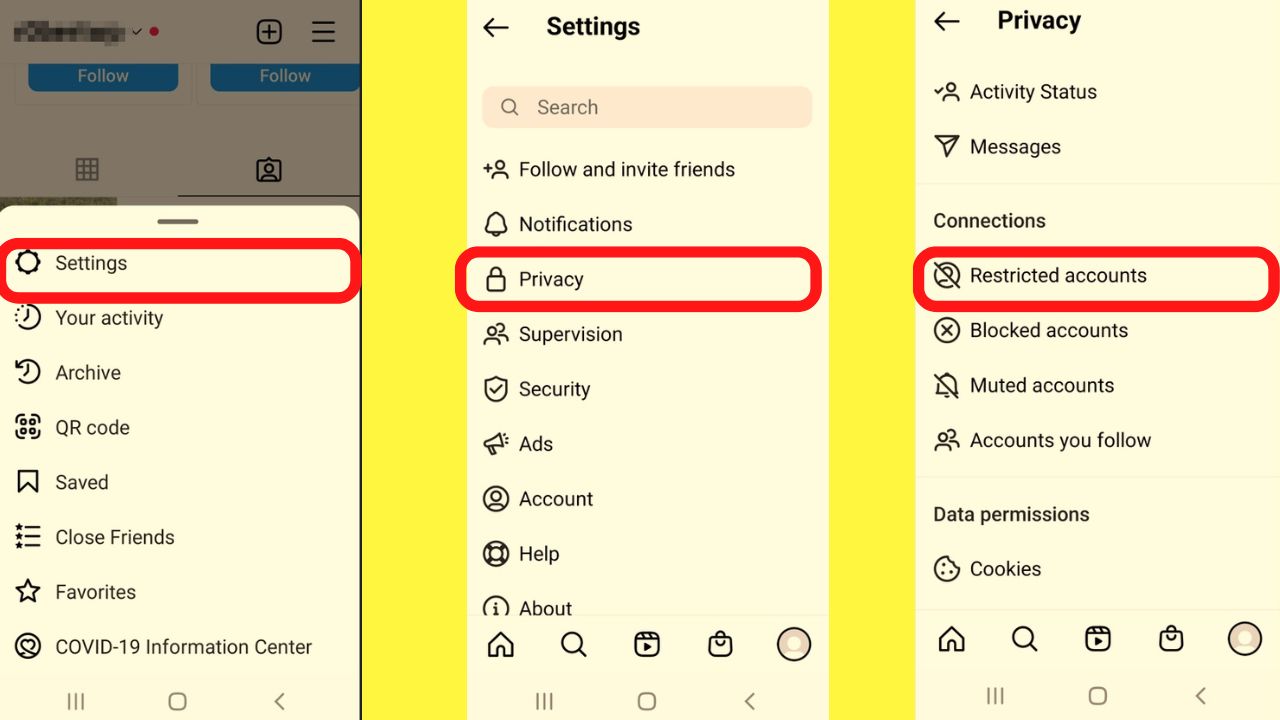
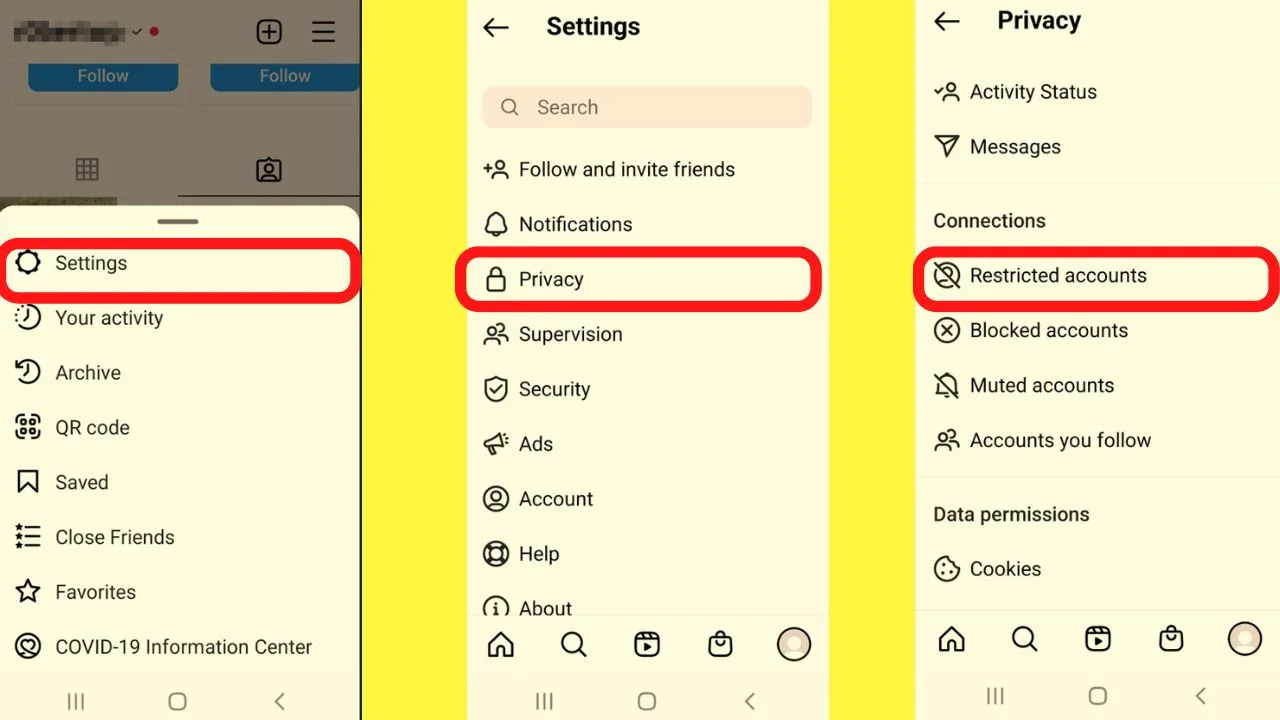
On Android, to restrict an Instagram account from tagging you, follow these steps:
- Go to Settings
- Tap on “Privacy”
- Tap on “Restricted accounts”
- Search for the account and then restrict it
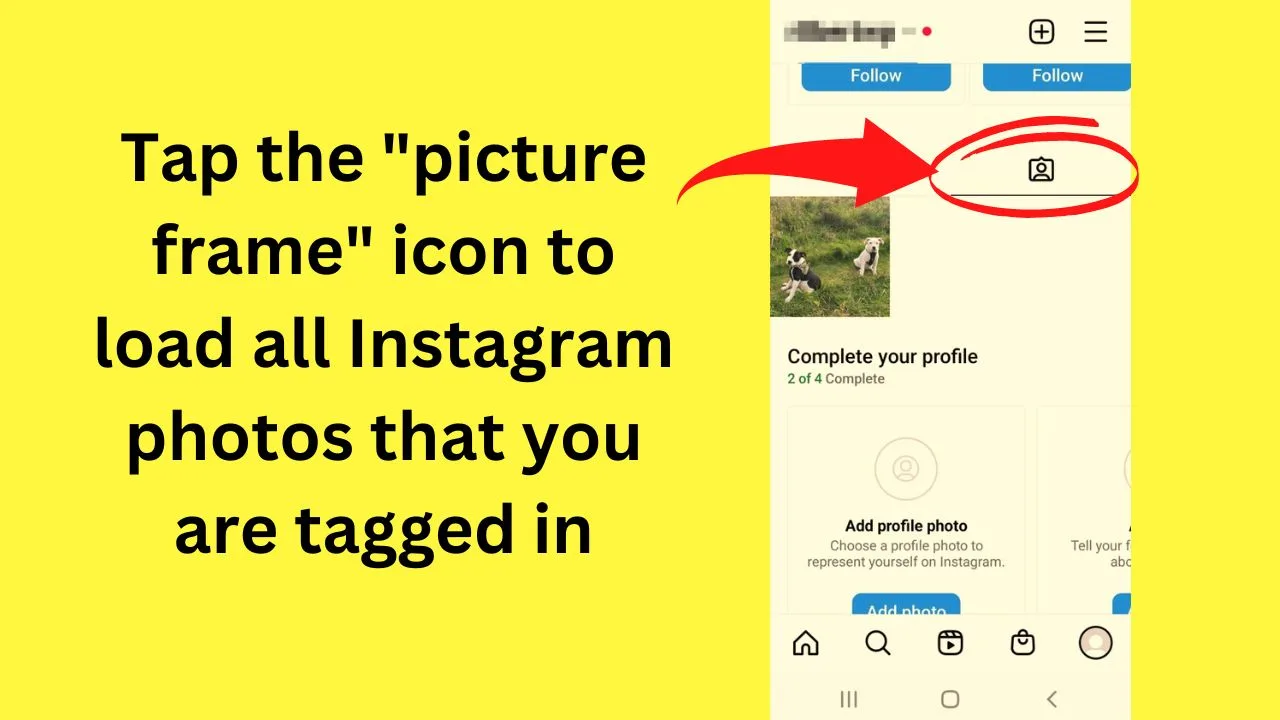
How to find all the photos that you have been tagged in on Instagram
Your Instagram profile has a wall that is dedicated to displaying every post and photo that you have been tagged in.
Within the Instagram app, you can view all posts that your account has been tagged in within your profile.
- Step 1: Open your profile in the Instagram App
- Step 2: Tap on the photo frame icon on the right column

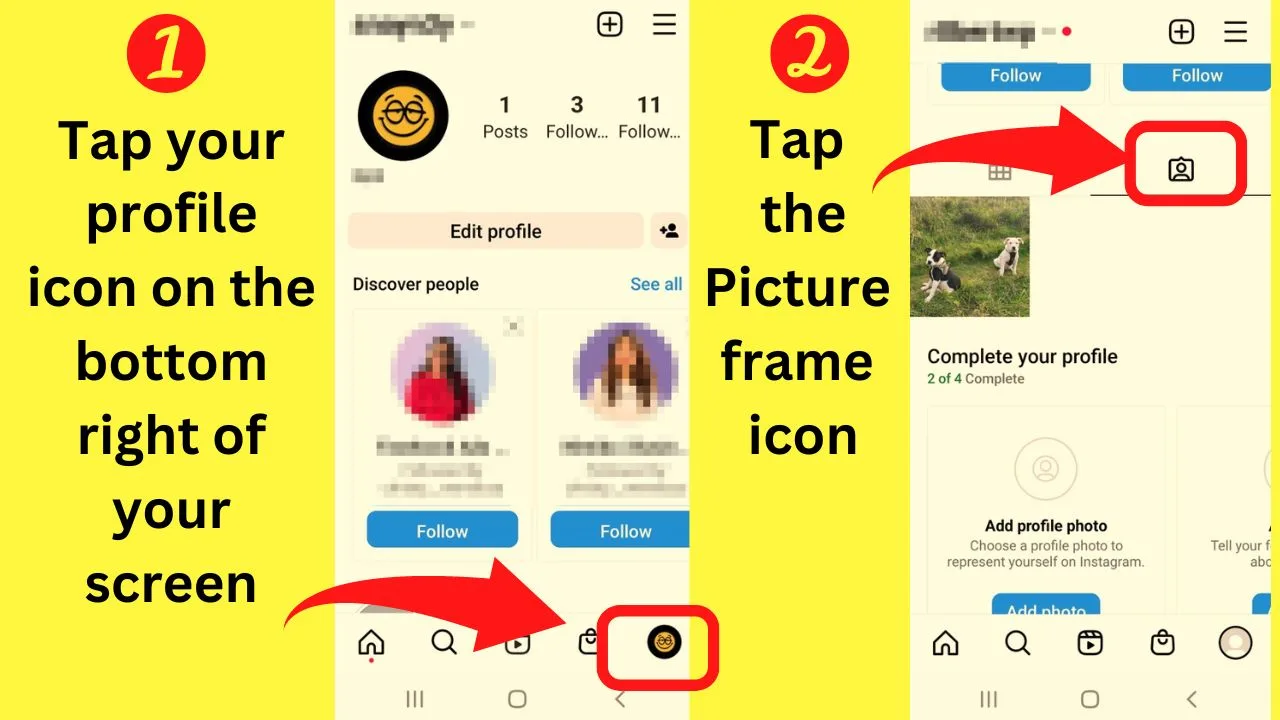
Every photo shown there will have your Instagram handle tagged. Untagging from them has to be done individually.
You can hide all tagged content to get rid of it from your profile, but you cannot mass untag yourself from multiple Instagram posts.
To avoid your profile becoming cluttered, there are handy features that you can use to control how and who can tag you in photos and posts on Instagram.
How to stop people from tagging you on Instagram
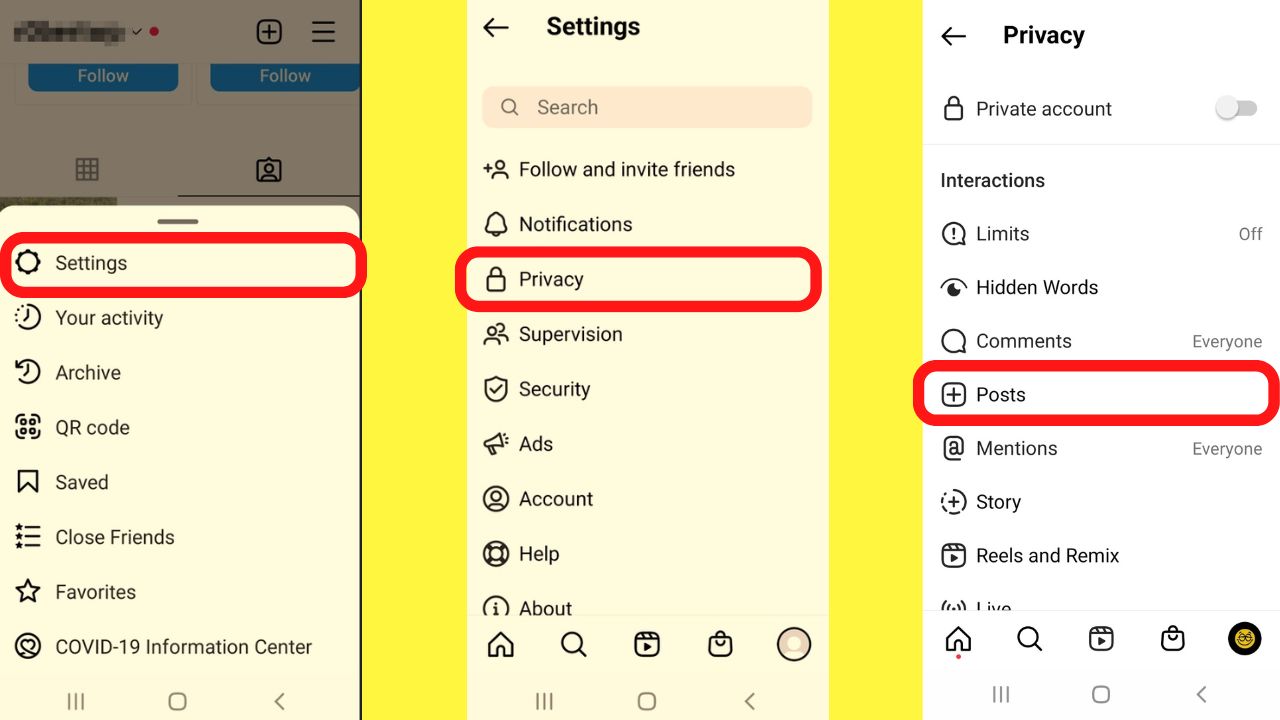
To stop people from tagging you on Instagram, follow these steps:
- Go to your Instagram profile
- Tap the three dots or lines to open the menu (top right corner)
- Select “Settings” (on iOS, it’s called Settings and Privacy)
- Tap on “Privacy”
- Then tap on “Posts”
- Under “Allow Tags from,” choose either “People you follow” or “No one”

From here, there are a couple of methods you can use to manage the tagging settings for your Instagram account.
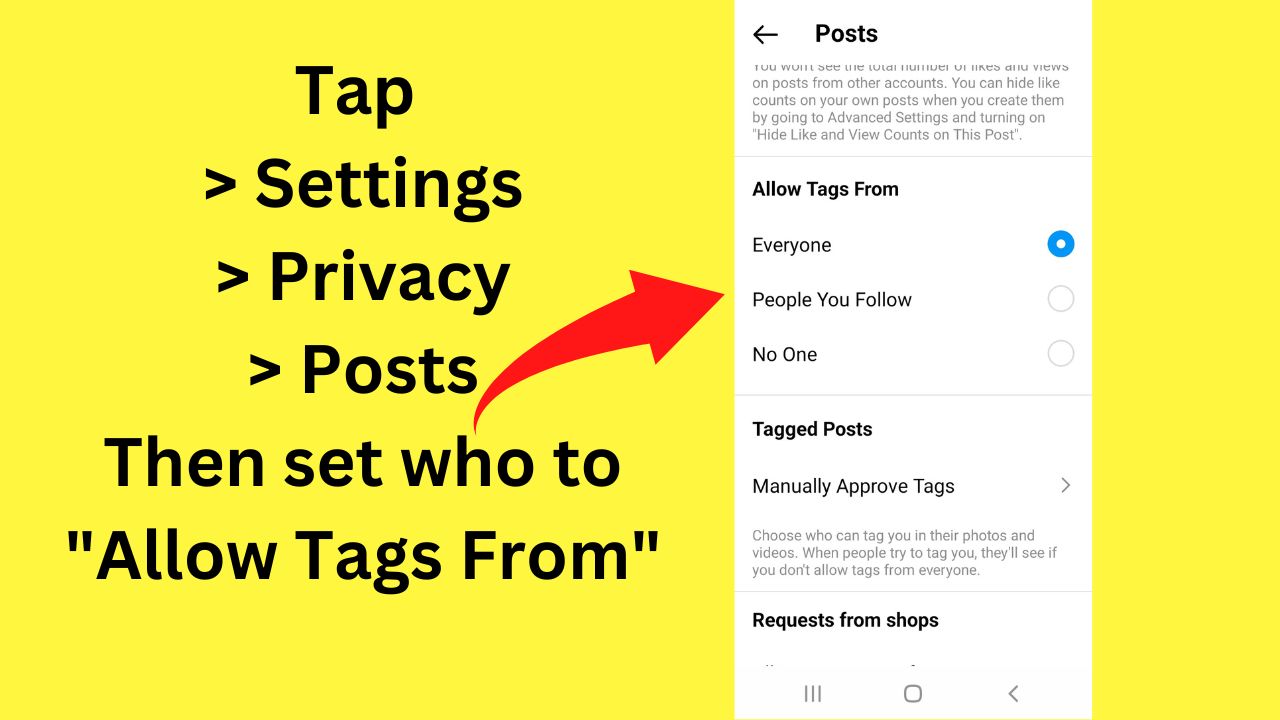
“Everyone” is the default option. Without changing this, you will quickly find yourself needing to untag yourself from numerous photos.
“People You Follow” is a safer alternative as it will only allow people you follow to be able to tag you in their photos. Not people who follow you.
“No One” can be considered as your nuclear option. It disables tags for everyone.
And, when someone does try to tag you, they will see that you have your account set not to allow tags from anyone.
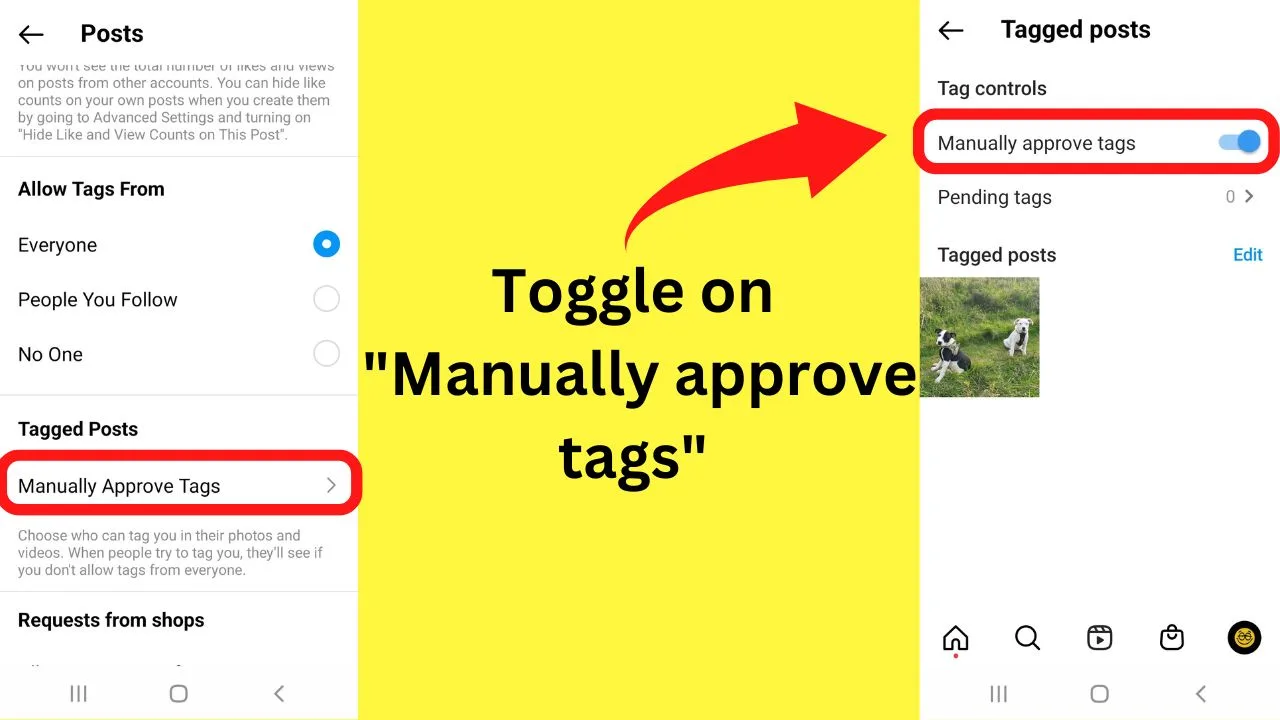
How to Manually Approve Tags on Instagram
Instead of changing “Allow tags from” to either only “People you follow” or “No one,” you can also decide to manually approve tags on Instagram.
This way, each time someone tags you in an Instagram post, you will get a notification and can then decide whether you would like to allow the tag or not.
To manually approve tags on Instagram on an iPhone (iOS), follow these steps:
- Tap on your profile icon in the lower-right corner
- Tap on the hamburger menu (3-horizontal lines menu) in the top-right corner
- Select “Settings and privacy”
- Scroll down and tap on “Tags and mentions”
- Select “Manually Approve Tags”
- Toggle “Manually approve tags” on
To manually approve tags on Instagram on Android, follow these steps:
- Tap on your profile icon in the lower-right corner
- Tap on the hamburger menu (3-horizontal lines menu) in the top-right corner
- Select “Settings”
- Tap on “Privacy
- Then tap on “Posts”
- Select “Manually approve tags”
- Toggle “Manually approve tags” on

This can work in tandem with the above settings without surrendering control. You can set your account to allow tags from everyone or people you follow without it automatically posting.
This prevents strangers from bombarding your profile with irrelevant content.
It lets you see who is trying to tag you, then requires you to view the post and approve, remove, or hide tagged photos on Instagram.
If you decide that manual approval would be wise, depending on the popularity of your Instagram account, the notifications can be a nuisance.
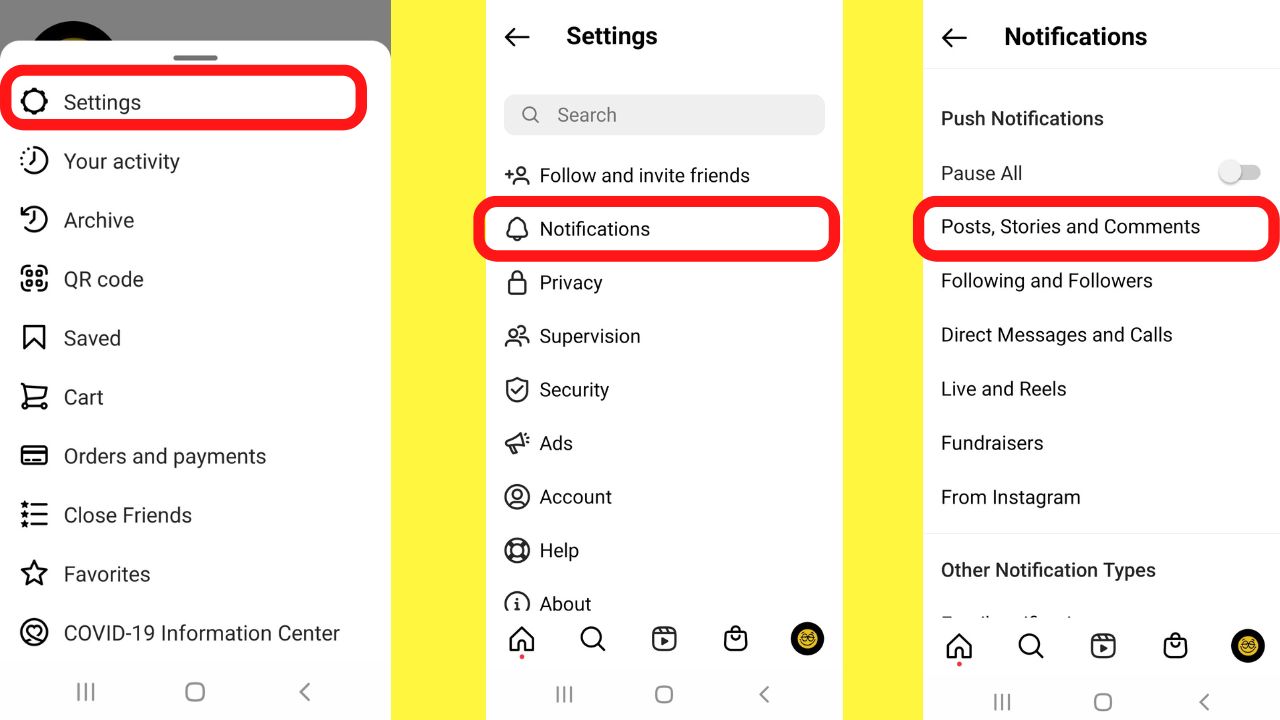
How to stop receiving tag notifications from the Instagram app
Push notifications for any app can be annoying.
With Instagram, provided you have your account set up to manually approve tags, you do not need to approve them right away so you do not need to be alerted every time someone tags you.
The settings to change for tag notifications are as follows:
Settings > Notifications > “Posts, Stories, and Comments” > “Photos of you” > Toggle off.

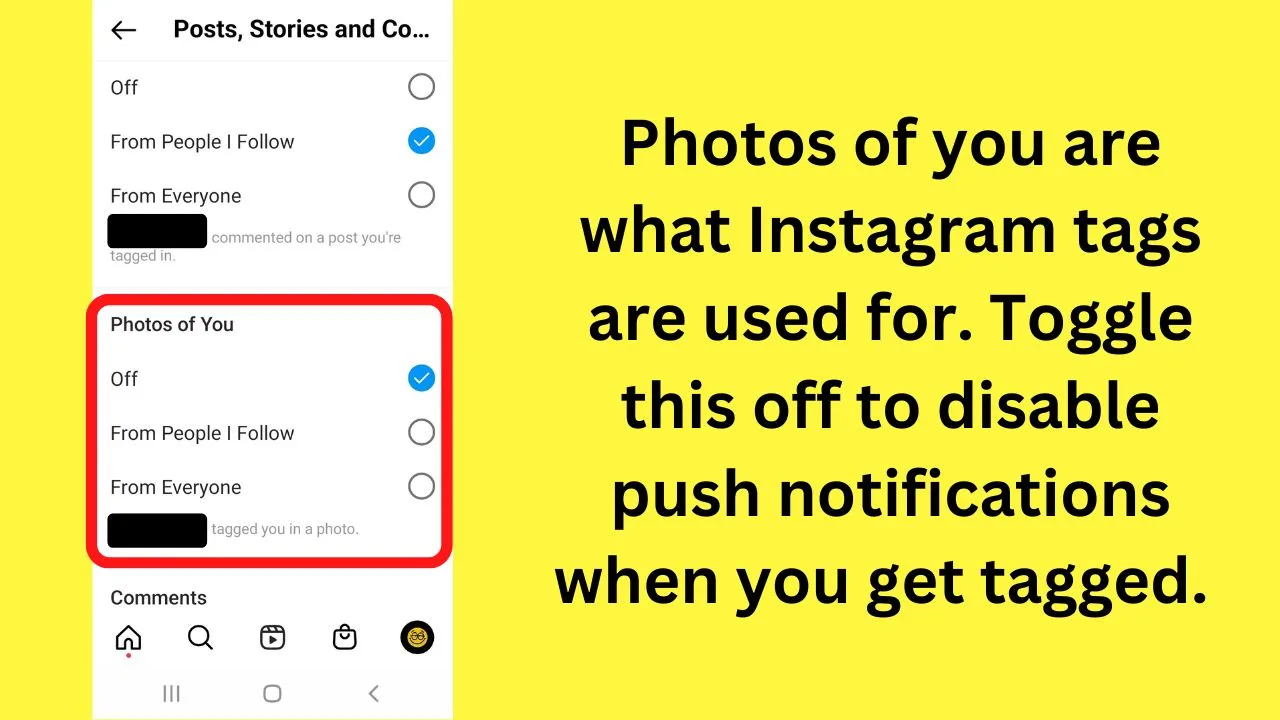
The reason is that tags are used to identify you in the photos on Instagram.
That’s why usernames are displayed on top of photos rather than in the captions or the comments. Those are mentions.
You can also toggle off likes, comments, and pins to minimize the number of push notifications being sent through the Instagram app.
If you would rather only deal with your Instagram account on your schedule, disabling notifications on your device will be easier than on Instagram’s granular options.
Most devices have settings for push notifications.
On Android devices, you can go to “Settings” > “Notifications,” then select the app you want to disable push notifications for and toggle it off.


Hey guys! It’s me, Marcel, aka Maschi. On MaschiTuts, it’s all about tutorials! No matter the topic of the article, the goal always remains the same: Providing you guys with the most in-depth and helpful tutorials!

