

The majority of WP themes follow the same bland styles for hyperlinks. Blue for hyperlinks on the page that turn purple once the link has been clicked.
Once you learn how to change the hyperlink color in WordPress, you can make your site stand apart.
Style-wise anyway. Styling your hyperlinks is a part of branding. And it is sooooo easy to do in WordPress that there are no graphic design tutorials required.
Depending on your WordPress theme, it may be click simple. If not, the tutorial below will make it copy-and-paste simple.
How to change the hyperlink color in WordPress
Using HTML, wrap your hyperlink within a <style> tag. The Advanced Editor Tools plugin adds a shortcut button to your toolbar. Page builder plugins have site settings for hyperlink colors. Some WP themes do too. Those that do not can have the color of hyperlinks changed using the CSS customizer.
Start by exploring your WP theme customization options
Before diving into any coding, see if your theme makes light work of style changes.
Head to the Appearance menu, under themes, click on customize. Look for anything to do with colors.
Most premium themes have more coding included, reducing the time-consuming part of editing with CSS.
If you have paid for a WordPress theme, it is more likely that the developers will have included more customization options.
Free themes are generally for DIY site builders who are content to do some coding.
As an example, the Socrates WordPress theme has a “colors” menu. Within that section are multiple labels to apply different colors to different elements without touching code.


For the purposes of only changing the hyperlink color, the “link color” tab changes those. Not all themes will have the same customization options.
The “Appearance > Customize” menu is where to find them. If your theme does not have a color picker, keep reading for alternative ways to change the hyperlink color in WordPress.
Clicking “select color” opens up the color picker. Left-click then drag the cursor around to select the color you want. Alternatively, use a HEX code.

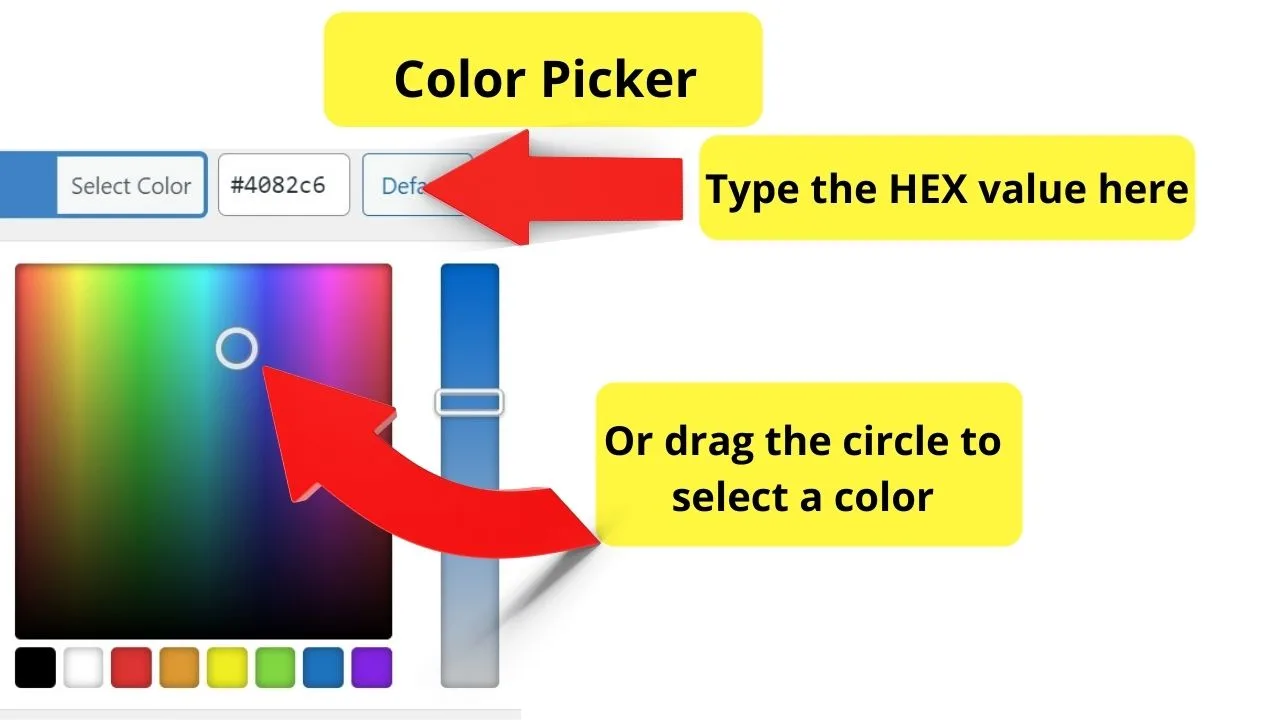
These are the easiest types of WordPress themes to customize. If you cannot find the exact shade you want, use the browser inspector tool to pick a color from your site.
Finding the HEX code for adding custom colors
To find the HEX value of a color, open a web page in your browser, right-click on the color you want to use, click “inspect”, then click on the color box within the inspector.
If your WordPress theme has a color picker option, this is all you need to change your hyperlink color.
If you do not have a color selector, you can either use a page builder plugin, edit the hyperlink color directly with HTML, or tweak your CSS.


Plugins are much easier. Start with those.
The Elementor page builder plugin
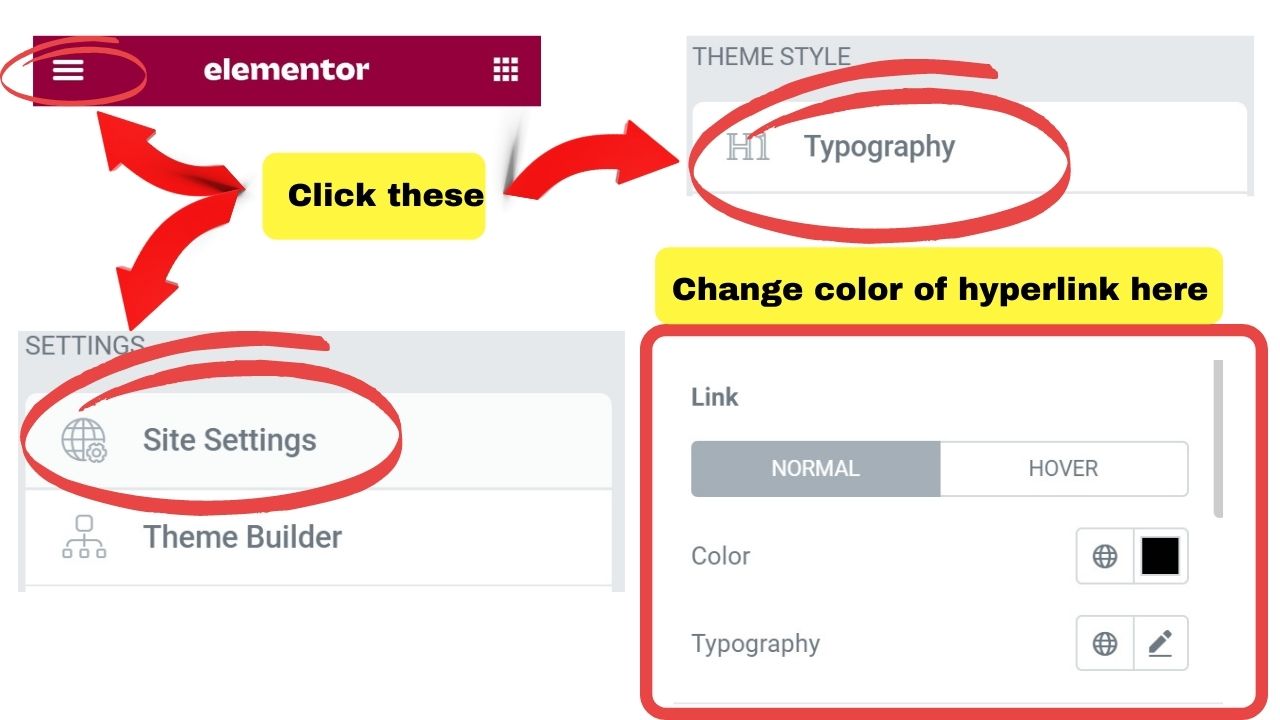
Using the Elementor page builder plugin, the link color is set from the “site settings” menu.
- On the left navigation menu, click the hamburger icon (three stacked horizontal lines) on the top left of your screen.
- Select “site settings”, then “typography”.
- The “link color” has two settings. One for the color of your normal hyperlinks, the other for when the link is being hovered.
- Click the colored box to open the color picker and select the color that best fits your site design.

The “Advanced Editor Tools” plugin…
This plugin has a button to add the HTML and the color code for you. Formerly, it was called “TinyMCE Advanced”.
To install it, go to your plugins page, select “Add New”, search by keyword for “advanced editor tools”. Click install, then activate it.
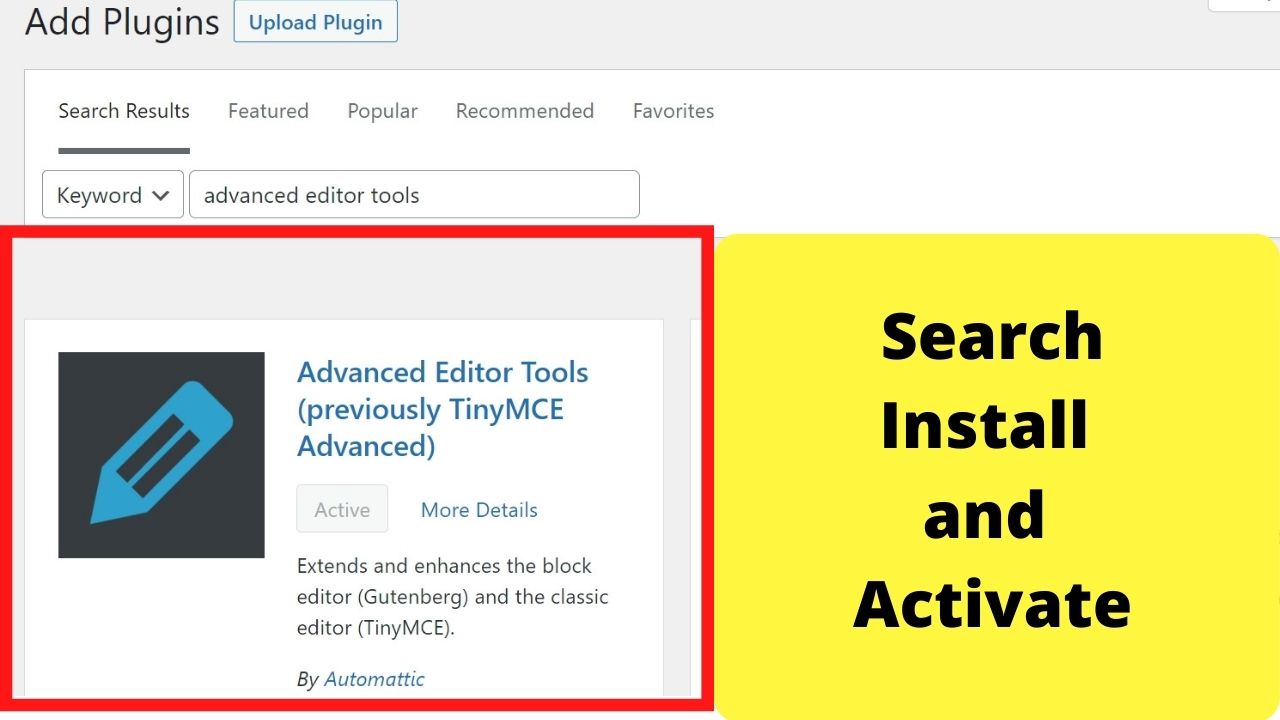

The text color shortcut button is added to the default toolbar.
Once installed and activated, highlight the hyperlinked text, then add a color style using the “text color” button. That will add the correct HTML to your content.
Change hyperlink color with HTML in WordPress
Using the classic editor, go into text mode to edit the HTML.
In the block editor, use a paragraph or classic block, click the three vertical dots in the toolbar, then select “Edit as HTML”.
Insert the following:
<a style="color: #ff6600;" href="http://www.your-link-here.com/">hyperlink</a>
Change the color to any HEX value you like, or use a color keyword like blue, red, green, purple, etc.
How to edit the CSS to change hyperlink colors in WordPress
So easily!
Two things are needed. The inspect tool in Chrome, or another browser developer tool, (discussed above to find the HEX color value to use) and the CSS customizer within your WordPress admin panel.
Do note that this applies to paid WordPress plans. Free WordPress.com plans require an upgrade to a premium plan to activate CSS customization.
For example purposes of this tutorial, the free Twenty Twenty-One theme is being used on a self-hosted WordPress installation. (WordPress.org). The same methods will work on any theme. Only the codes will be different.
Editing hyperlink colors with CSS in WordPress
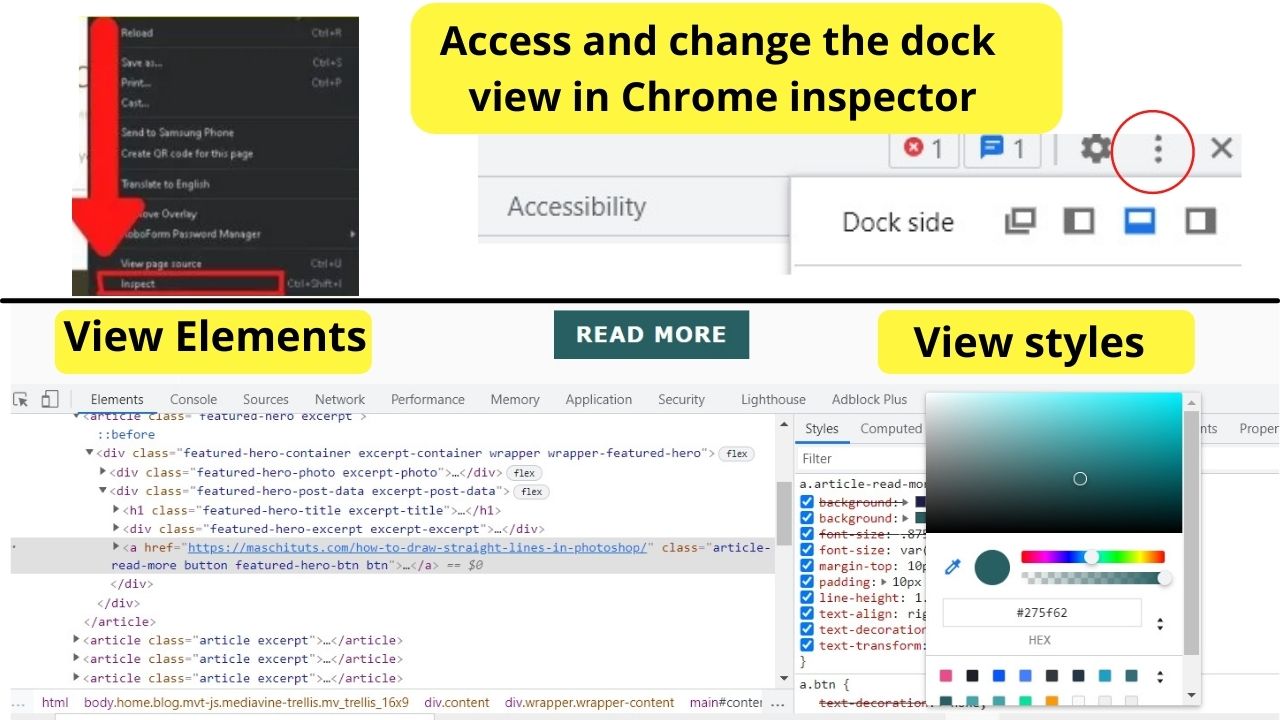
In Chrome, right-click on a hyperlink on your website, then select “inspect”.
By default, the dev tools in Chrome opens up in split view. You can change the “dock view” to make it easier to view the source code by clicking the three vertical dots and selecting a different dock view.
In the example screenshot below, the dock view is set to load at the bottom of the screen instead of the side view.
That is easier as we are inspecting the elements of the page on the left panel, plus the styles to the right.
Clicking on an element on the left side of the screen shows the element styles to the right.

The part you need is the code identified with “a”. The letter “a” in CSS and HTML stands for “anchor”. It is this element that represents hyperlinks.
The code below is how the hyperlinks are marked up in the stylesheet.css of the Twenty Twenty-One WP theme.
a {
cursor: pointer;
color: var(--wp--style--color--link, var(--global--color-primary));
text-underline-offset: 3px;
text-decoration-skip-ink: all;
}
The simplest method to override the original code is to use the integrated CSS customizer within WordPress.
There is no longer a need to edit theme stylesheets directly. The file can be overwritten from right within your WP admin panel. Neat!
Head to the Appearance menu, select customize, then click on the Additional CSS tab.
Copy the original CSS code shown in your browser inspector, then paste that into your additional CSS panel.
Wherever “color:” is, everything between the colon (:) and the semi-colon (;) can be deleted and replaced with a color of your choosing.
That will change the color of all your hyperlinks in WordPress.
How to change the color of hyperlinks when hovered
When you place the cursor over a hyperlink, it is beneficial to have it change color.
For the vision-impaired, it also helps to add a hover effect. That way, if the color change does not catch the user’s attention, the shape change will.
On the Twenty Twenty-One WP theme, the hover color stays the same, but the solid line that is set with the “text-decoration-offset” does change to a dotted line.
In addition, it changes the cursor to a pointer, which is beneficial for the colorblind as it is yet another shape change.
That is the purpose of the link hover effect.
For styling your own hover effects for hyperlinks, add the following code to your additional CSS panel.
a:hover {
color: #000000;
}
The color code above is adding the color black. If you have your hyperlink color set to black, make this a different color.
The purpose of changing the hover color is to make it easy for visitors to know when text is clickable so that they know they can click it to move to another website or page. No surprises.
An alternative is to add a different color background. You can do that by adding the following:
a:hover {
color: red;
Background-color:gold;
}
Again, colors can be any. Swap red and gold out for the colors you want.
To make it even clearer that text is clickable, you can also force the font size to change. Even in headings.
Add a font-size style to your CSS like this
a:hover {
color: red;
Background-color:gold;
Font-size:24px
}
Now you will see when you hover a hyperlink, all the changes show.
Note this though…
When you add a lot of styling in CSS at once, it can cause changes to appear too suddenly that it makes reading an eyesore. Your page bounce rates may very well go up. That is bad.
A high bounce rate means you have website visitors leaving your site after a single page view. Poor design is a contributing factor.
To smoothen the changes out, you can add a transition property.
Add a transition property in CSS for a smoother user experience
Use this code:
a:hover {
color: red;
Background-color:gold;
Font-size:24px
transition-property: all;
transition-duration: 2s
}
In the above example, the transition property is applied to each styling element using “all” and set to apply all the changes within 2 seconds.
This will cause the colors and the font size to gradually change over a time period of two seconds.
The transition duration can be anything you want.
The core thing to focus on is user experience.
The bigger or bolder the changes you are making happen on the site, be it to the font size or the color contrast, a slower duration will prevent sudden changes on your web page.
It can make for a more pleasant visitor experience. Nothing flashy!
How to change the hyperlink color of visited links
One last addition to your CSS is the color of your visited hyperlinks.
On most websites (and WP themes for that matter) the color of visited hyperlinks is purple. It can be anything you want.
The code to change the color of a visited hyperlink is:
a:visited {
color: ###;
}
Replace the ### with the color of your choice using either a color keyword like blue, green, red or add the HEX code value.
CSS checklist to ensure your hyperlink CSS changes are correct
When you edit the color of your hyperlinks in WordPress, your “additional CSS” should be targeting three elements. The “a” element, and two pseudo-classes.
- a
- a:hover
- a:visited
The “a” is the main element for standard hyperlinks.
Pseudo-classes are added with a colon after the “a”, followed by the name of the pseudo-class elements. In this case, it is the “hover” and the “visited” pseudo-classes.
Check your additional CSS panel has different colors for each hyperlink style.
a {
color: ######;
}
a:hover {
color: ######;
}
a:visited {
color: ######;
}
Once you are finished, you should have three CSS blocks for your hyperlinks. One for each element.


Hey guys! It’s me, Marcel, aka Maschi. On MaschiTuts, it’s all about tutorials! No matter the topic of the article, the goal always remains the same: Providing you guys with the most in-depth and helpful tutorials!

