
What would you do if your artboard was totally loaded with objects? If you’re a designer or aspiring to be one, you’re probably attempting to arrange them as tidily as possible.
What’s more annoying than the fact that the space between them isn’t distributed evenly? and how should you make that work?
It turns out to be extremely simple, and you can learn all you need to know with this tutorial! Don’t be afraid; all you have to do is follow the next steps.
How to Evenly Space Objects in Illustrator
There are three methods to evenly space objects in Illustrator. The first can be done with the “Align” panel, the second with the “Smart Guides” feature, and the third with the “Grid.” I mostly recommend the first method because it is the most accurate and simple to use.
How to Evenly Space Objects in Illustrator using the “Align” Panel
To distribute objects evenly in Illustrator, open the “Align” panel located on “Window”> “Align”. Double click to display the entire panel and show the hidden options. Distribute the objects vertically by clicking on “Vertical Distribute Space”, or horizontally by choosing the “Horizontal Distribute Space” option.
How to Evenly Space Objects in Illustrator: Step-by-step Guide
Step 1:
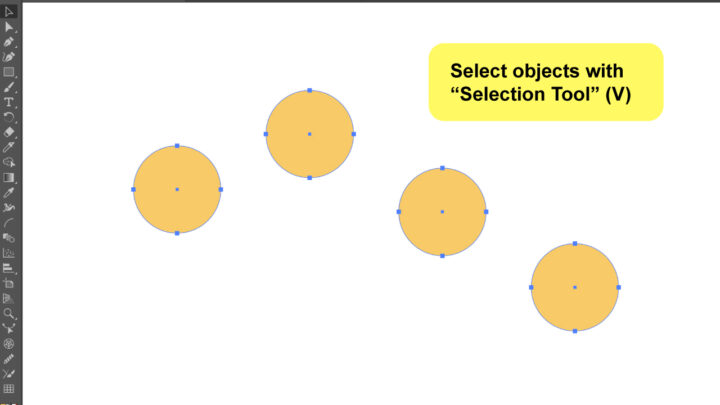
Select or create the objects to be organized.
First, you need the objects, so choose the “Rectangle Tool” to create some.
If you are already working with a file, just select the objects that you want to arrange.
To select the objects you can use the “Selection Tool” (V) from the toolbar on your left side.
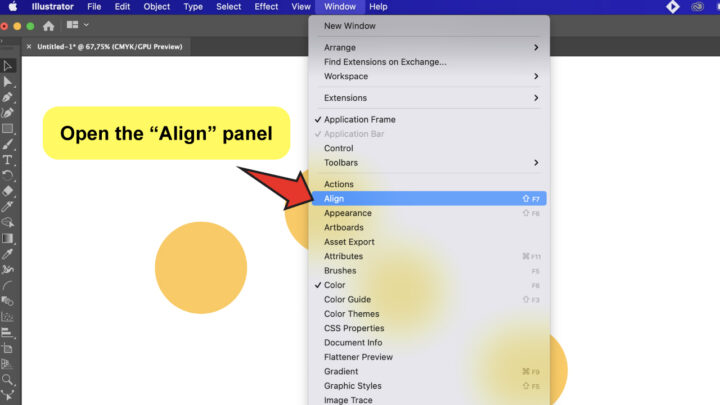
Step 2:
Open the “Align” panel.
To open the“Align” panel go to “Window” on the top-menu, and select “Align”. You can also use the “Shift + F7” keyboard shortcut.
This is what you will first see by default when you open the panel.
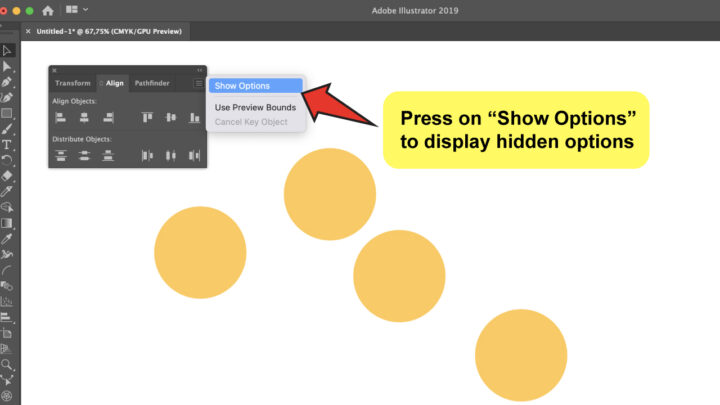
Step 3:
Display the hidden options on the “Align Panel”.
To open the tool required for this tutorial, you should first see the entire panel.
Normally, the “Align” panel does not display these settings by default, but you may easily access them by double-clicking on the panel name.
Another option to open them is by clicking on the hamburger icon on the top-right corner of the window. And then select “Show options”.
The hidden options will display automatically.
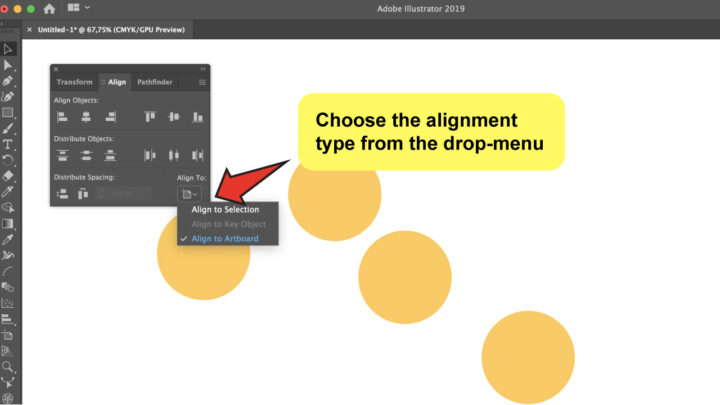
Step 4:
Set up the “Align to” option
It’s important to know this before we continue cause it could affect the rest of the process.
When using the “Align” panel in Adobe Illustrator, you must indicate what the alignment will be based on, and there’s a setting for it at the bottom-right corner of the panel. It can be based on the selection you have, the artboard you are working on, or a key object of your selection.
By default, Illustrator sets this option to “Align to Selection.” However, depending on the desired outcome, you may switch it to “Align to Key Object” or “Align to Artboard.”
Just make sure that you pay attention to this!
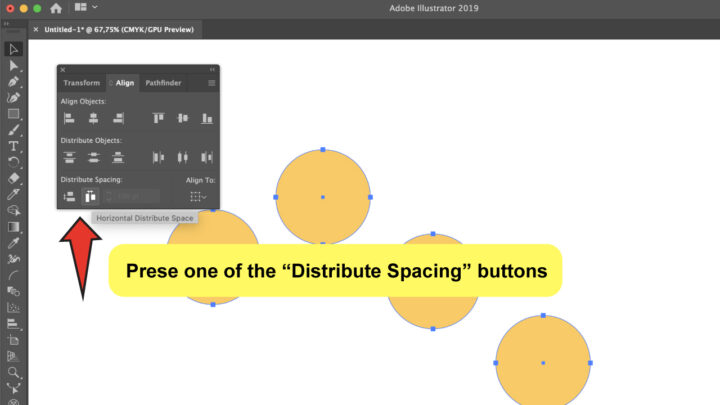
Step 5:
Apply “Distribute Spacing” tool to your objects.
Now that you’re all set up, let’s get started!
You will only see two buttons in this area, one for horizontal distribution and one for vertical. The one on the right is for horizontal distribution, whereas the left is for vertical.
While the objects are still selected, click on the option that meets your needs, and Voila!
Another option to evenly distribute objects in Illustrator is the “Distribute Objects” feature, but this won’t be as accurate as we need cause it will base on the object instead of the space between them.
This option takes the object’s center point as an axis, so unless the elements have the same proportions, the space between them won’t be the same when using this.
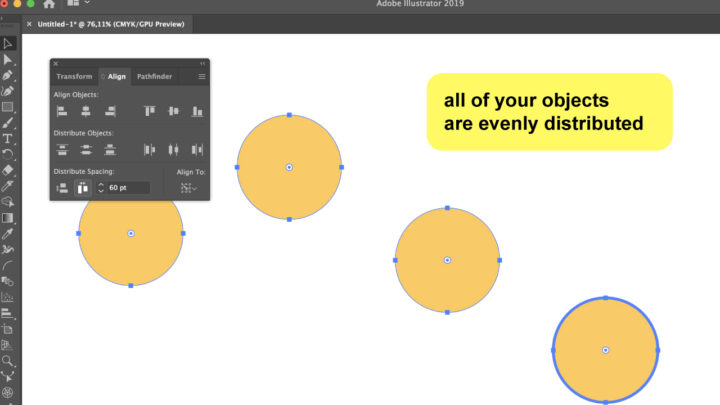
Step 6:
Set a pre-determined space between your objects by using the “Align to Key Object” option.
Now, let’s imagine that you require a specific amount of space between the objects when you apply this tool. There’s an option for that as well!
To define that value you will need to set the “Align to” setting on “Align to Key Object”.
You will notice that the field next to “Distribute Spacing” is now unlocked and you can type on it. So basically you can set the value there and select one of the two distribution options I described before.
As a result, you’ll see that all of your objects are evenly distributed in accordance with the expected value.
See? It was quite simple! You will grow familiar with this tool as you practice.
And, as always, it’s really important to be comfortable with using the tools that improve our work-flow on a daily basis so that we can work quicker and smarter.
Frequently Asked Questions About How to Evenly Space Objects in Illustrator
Can I apply more than two alignments on the same group of objects?
Absolutely, you can use any of the standard alignments tools from the panel, and then do the distribution for example.
Can I change the settings after I’m done?
You can apply new settings as much as you want. To do this you will need to select all the objects again, and press the new setting, that will re-organize the objects as you want.
Could I reach the same result by doing it manually?
Technically you can, but I wouldn’t recommend it at all because it would take longer. You could apply a specific distance from the transform panel, but it would require you to do each object separately.